

Page 1

Sun VirtualBox
User Manual
Version 3.0.0
c
2004-2009 Sun Microsystems, Inc.
http://www.virtualbox.org
R
Page 2

Contents
1 Introduction 9
1.1 Virtualization basics . . . . . . . . . . . . . . . . . . . . . . . . . . . . . 9
1.2 Software vs. hardware virtualization (VT-x and AMD-V) . . . . . . . . . 11
1.3 Features overview . . . . . . . . . . . . . . . . . . . . . . . . . . . . . . 13
1.4 Supported host operating systems . . . . . . . . . . . . . . . . . . . . . 16
1.5 Supported guest operating systems . . . . . . . . . . . . . . . . . . . . . 17
1.6 64-bit guests . . . . . . . . . . . . . . . . . . . . . . . . . . . . . . . . . 18
2 Installation 19
2.1 Installing on Windows hosts . . . . . . . . . . . . . . . . . . . . . . . . . 19
2.1.1 Prerequisites . . . . . . . . . . . . . . . . . . . . . . . . . . . . . 19
2.1.2 Performing the installation . . . . . . . . . . . . . . . . . . . . . 19
2.1.3 Uninstallation . . . . . . . . . . . . . . . . . . . . . . . . . . . . 20
2.1.4 Unattended installation . . . . . . . . . . . . . . . . . . . . . . . 20
2.2 Installing on Mac OS X hosts . . . . . . . . . . . . . . . . . . . . . . . . 20
2.2.1 Performing the installation . . . . . . . . . . . . . . . . . . . . . 20
2.2.2 Uninstallation . . . . . . . . . . . . . . . . . . . . . . . . . . . . 21
2.2.3 Unattended installation . . . . . . . . . . . . . . . . . . . . . . . 21
2.3 Installing on Linux hosts . . . . . . . . . . . . . . . . . . . . . . . . . . . 21
2.3.1 Prerequisites . . . . . . . . . . . . . . . . . . . . . . . . . . . . . 21
2.3.2 The VirtualBox kernel module . . . . . . . . . . . . . . . . . . . 21
2.3.3 USB and advanced networking support . . . . . . . . . . . . . . 23
2.3.4 Performing the installation . . . . . . . . . . . . . . . . . . . . . 23
2.3.5 Starting VirtualBox on Linux . . . . . . . . . . . . . . . . . . . . 28
2.4 Installing on Solaris hosts . . . . . . . . . . . . . . . . . . . . . . . . . . 28
2.4.1 Performing the installation . . . . . . . . . . . . . . . . . . . . . 28
2.4.2 Starting VirtualBox on Solaris . . . . . . . . . . . . . . . . . . . 29
2.4.3 Uninstallation . . . . . . . . . . . . . . . . . . . . . . . . . . . . 29
2.4.4 Unattended installation . . . . . . . . . . . . . . . . . . . . . . . 30
2.4.5 Configuring a zone for running VirtualBox . . . . . . . . . . . . 30
3 Starting out with VirtualBox 31
3.1 Starting the graphical user interface . . . . . . . . . . . . . . . . . . . . 31
3.2 Creating a virtual machine . . . . . . . . . . . . . . . . . . . . . . . . . 32
3.3 Basics of virtual machine configuration . . . . . . . . . . . . . . . . . . . 36
3.4 Running a virtual machine . . . . . . . . . . . . . . . . . . . . . . . . . 38
3.4.1 Keyboard and mouse support in virtual machines . . . . . . . . . 39
2
Page 3

Contents
3.4.2 Changing removable media . . . . . . . . . . . . . . . . . . . . . 41
3.4.3 Saving the state of the machine . . . . . . . . . . . . . . . . . . 41
3.4.4 Snapshots . . . . . . . . . . . . . . . . . . . . . . . . . . . . . . 42
3.5 The Virtual Disk Manager . . . . . . . . . . . . . . . . . . . . . . . . . . 43
3.6 Deleting virtual machines . . . . . . . . . . . . . . . . . . . . . . . . . . 45
3.7 Virtual machine settings . . . . . . . . . . . . . . . . . . . . . . . . . . . 45
3.7.1 General settings . . . . . . . . . . . . . . . . . . . . . . . . . . . 46
3.7.2 System settings . . . . . . . . . . . . . . . . . . . . . . . . . . . 47
3.7.3 Display settings . . . . . . . . . . . . . . . . . . . . . . . . . . . 49
3.7.4 Hard disk settings . . . . . . . . . . . . . . . . . . . . . . . . . . 50
3.7.5 CD/DVD-ROM and floppy settings . . . . . . . . . . . . . . . . . 51
3.7.6 Audio settings . . . . . . . . . . . . . . . . . . . . . . . . . . . . 52
3.7.7 Network settings . . . . . . . . . . . . . . . . . . . . . . . . . . . 52
3.7.8 Serial ports . . . . . . . . . . . . . . . . . . . . . . . . . . . . . . 53
3.7.9 USB support . . . . . . . . . . . . . . . . . . . . . . . . . . . . . 54
3.7.10 Shared folders . . . . . . . . . . . . . . . . . . . . . . . . . . . . 56
3.8 Importing and exporting virtual machines . . . . . . . . . . . . . . . . . 56
4 Guest Additions 60
4.1 Introduction . . . . . . . . . . . . . . . . . . . . . . . . . . . . . . . . . 60
4.2 Windows Guest Additions . . . . . . . . . . . . . . . . . . . . . . . . . . 61
4.2.1 Installing the Windows Guest Additions . . . . . . . . . . . . . . 62
4.2.2 Updating the Windows Guest Additions . . . . . . . . . . . . . . 63
4.2.3 Unattended Installation . . . . . . . . . . . . . . . . . . . . . . . 63
4.2.4 Manual file extraction . . . . . . . . . . . . . . . . . . . . . . . . 64
4.2.5 Windows Vista networking . . . . . . . . . . . . . . . . . . . . . 64
4.3 Linux Guest Additions . . . . . . . . . . . . . . . . . . . . . . . . . . . . 64
4.3.1 Installing the Linux Guest Additions . . . . . . . . . . . . . . . . 65
4.3.2 Video acceleration and high resolution graphics modes . . . . . 66
4.3.3 Updating the Linux Guest Additions . . . . . . . . . . . . . . . . 66
4.4 Solaris Guest Additions . . . . . . . . . . . . . . . . . . . . . . . . . . . 67
4.4.1 Installing the Solaris Guest Additions . . . . . . . . . . . . . . . 67
4.4.2 Uninstalling the Solaris Guest Additions . . . . . . . . . . . . . . 67
4.4.3 Updating the Solaris Guest Additions . . . . . . . . . . . . . . . 68
4.5 OS/2 Guest Additions . . . . . . . . . . . . . . . . . . . . . . . . . . . . 68
4.6 Folder sharing . . . . . . . . . . . . . . . . . . . . . . . . . . . . . . . . 68
4.7 Seamless windows . . . . . . . . . . . . . . . . . . . . . . . . . . . . . . 70
4.8 Hardware 3D acceleration (OpenGL and DirectX 8/9) . . . . . . . . . . 71
4.9 Guest properties . . . . . . . . . . . . . . . . . . . . . . . . . . . . . . . 72
5 Virtual storage 75
5.1 Hard disk controllers: IDE, SATA (AHCI), SCSI . . . . . . . . . . . . . . 75
5.2 Disk image files (VDI, VMDK, VHD) . . . . . . . . . . . . . . . . . . . . 77
5.3 Configuring image write operations . . . . . . . . . . . . . . . . . . . . 78
5.4 Cloning disk images . . . . . . . . . . . . . . . . . . . . . . . . . . . . . 80
3
Page 4

Contents
5.5 iSCSI servers . . . . . . . . . . . . . . . . . . . . . . . . . . . . . . . . . 80
5.5.1 Access iSCSI targets via Internal Networking . . . . . . . . . . . 80
6 Virtual networking 82
6.1 Virtual networking hardware . . . . . . . . . . . . . . . . . . . . . . . . 82
6.2 Introduction to networking modes . . . . . . . . . . . . . . . . . . . . . 83
6.3 “Not attached” mode . . . . . . . . . . . . . . . . . . . . . . . . . . . . . 84
6.4 Network Address Translation (NAT) . . . . . . . . . . . . . . . . . . . . 84
6.4.1 Configuring port forwarding with NAT . . . . . . . . . . . . . . . 84
6.4.2 PXE booting with NAT . . . . . . . . . . . . . . . . . . . . . . . . 85
6.4.3 NAT limitations . . . . . . . . . . . . . . . . . . . . . . . . . . . 85
6.5 Bridged networking . . . . . . . . . . . . . . . . . . . . . . . . . . . . . 86
6.6 Internal networking . . . . . . . . . . . . . . . . . . . . . . . . . . . . . 88
6.7 Host-only networking . . . . . . . . . . . . . . . . . . . . . . . . . . . . 89
7 Alternative front-ends; remote virtual machines 90
7.1 Introduction . . . . . . . . . . . . . . . . . . . . . . . . . . . . . . . . . 90
7.2 Using VBoxManage to control virtual machines . . . . . . . . . . . . . . 91
7.3 VBoxSDL, the simplified VM displayer . . . . . . . . . . . . . . . . . . . 92
7.4 Remote virtual machines (VRDP support) . . . . . . . . . . . . . . . . . 93
7.4.1 VBoxHeadless, the VRDP-only server . . . . . . . . . . . . . . . . 94
7.4.2 Step by step: creating a virtual machine on a headless server . . 95
7.4.3 Remote USB . . . . . . . . . . . . . . . . . . . . . . . . . . . . . 97
7.4.4 RDP authentication . . . . . . . . . . . . . . . . . . . . . . . . . 97
7.4.5 RDP encryption . . . . . . . . . . . . . . . . . . . . . . . . . . . 98
7.4.6 VRDP multiple connections . . . . . . . . . . . . . . . . . . . . . 99
8 VBoxManage reference 100
8.1 VBoxManage list . . . . . . . . . . . . . . . . . . . . . . . . . . . . . . . 105
8.2 VBoxManage showvminfo . . . . . . . . . . . . . . . . . . . . . . . . . . 105
8.3 VBoxManage registervm / unregistervm . . . . . . . . . . . . . . . . . . 106
8.4 VBoxManage createvm . . . . . . . . . . . . . . . . . . . . . . . . . . . . 107
8.5 VBoxManage modifyvm . . . . . . . . . . . . . . . . . . . . . . . . . . . 107
8.5.1 General settings . . . . . . . . . . . . . . . . . . . . . . . . . . . 107
8.5.2 Storage settings . . . . . . . . . . . . . . . . . . . . . . . . . . . 109
8.5.3 Networking settings . . . . . . . . . . . . . . . . . . . . . . . . . 110
8.5.4 Serial port, audio, clipboard, VRDP and USB settings . . . . . . 111
8.6 VBoxManage import . . . . . . . . . . . . . . . . . . . . . . . . . . . . . 112
8.7 VBoxManage export . . . . . . . . . . . . . . . . . . . . . . . . . . . . . 113
8.8 VBoxManage startvm . . . . . . . . . . . . . . . . . . . . . . . . . . . . 114
8.9 VBoxManage controlvm . . . . . . . . . . . . . . . . . . . . . . . . . . . 115
8.10 VBoxManage discardstate . . . . . . . . . . . . . . . . . . . . . . . . . . 116
8.11 VBoxManage snapshot . . . . . . . . . . . . . . . . . . . . . . . . . . . . 116
8.12 VBoxManage openmedium / closemedium . . . . . . . . . . . . . . . . . 116
8.13 VBoxManage showhdinfo . . . . . . . . . . . . . . . . . . . . . . . . . . 117
4
Page 5

Contents
8.14 VBoxManage createhd . . . . . . . . . . . . . . . . . . . . . . . . . . . . 117
8.15 VBoxManage modifyhd . . . . . . . . . . . . . . . . . . . . . . . . . . . 118
8.16 VBoxManage clonehd . . . . . . . . . . . . . . . . . . . . . . . . . . . . 118
8.17 VBoxManage convertfromraw . . . . . . . . . . . . . . . . . . . . . . . . 119
8.18 VBoxManage addiscsidisk . . . . . . . . . . . . . . . . . . . . . . . . . . 120
8.19 VBoxManage getextradata/setextradata . . . . . . . . . . . . . . . . . . 121
8.20 VBoxManage setproperty . . . . . . . . . . . . . . . . . . . . . . . . . . 121
8.21 VBoxManage usbfilter add/modify/remove . . . . . . . . . . . . . . . . 122
8.22 VBoxManage sharedfolder add/remove . . . . . . . . . . . . . . . . . . 122
8.23 VBoxManage metrics . . . . . . . . . . . . . . . . . . . . . . . . . . . . . 122
8.24 VBoxManage guestproperty . . . . . . . . . . . . . . . . . . . . . . . . . 124
8.25 VBoxManage dhcpserver . . . . . . . . . . . . . . . . . . . . . . . . . . . 125
9 Advanced topics 127
9.1 VirtualBox configuration data . . . . . . . . . . . . . . . . . . . . . . . . 127
9.2 Automated Windows guest logons (VBoxGINA) . . . . . . . . . . . . . . 128
9.3 Custom external VRDP authentication . . . . . . . . . . . . . . . . . . . 129
9.4 Secure labeling with VBoxSDL . . . . . . . . . . . . . . . . . . . . . . . 131
9.5 Custom VESA resolutions . . . . . . . . . . . . . . . . . . . . . . . . . . 132
9.6 Multiple monitors for the guest . . . . . . . . . . . . . . . . . . . . . . . 133
9.7 Releasing modifiers with VBoxSDL on Linux . . . . . . . . . . . . . . . . 133
9.8 Launching more than 120 VMs on Solaris hosts . . . . . . . . . . . . . . 134
9.9 Using serial ports . . . . . . . . . . . . . . . . . . . . . . . . . . . . . . . 134
9.10 Using a raw host hard disk from a guest . . . . . . . . . . . . . . . . . . 135
9.10.1 Access to entire physical hard disk . . . . . . . . . . . . . . . . . 135
9.10.2 Access to individual physical hard disk partitions . . . . . . . . . 136
9.11 Allowing a virtual machine to start even with unavailable CD/DVD/floppy
devices . . . . . . . . . . . . . . . . . . . . . . . . . . . . . . . . . . . . 138
9.12 Fine-tuning the VirtualBox NAT engine . . . . . . . . . . . . . . . . . . . 138
9.12.1 Configuring the address of a NAT network interface . . . . . . . 138
9.12.2 Configuring the boot server (next server) of a NAT network in-
terface . . . . . . . . . . . . . . . . . . . . . . . . . . . . . . . . 138
9.12.3 Tuning TCP/IP buffers for NAT . . . . . . . . . . . . . . . . . . . 139
9.12.4 Binding NAT sockets to a specific interface . . . . . . . . . . . . 139
9.12.5 Enabling DNS proxy in NAT mode . . . . . . . . . . . . . . . . . 140
9.13 Configuring the maximum resolution of guests when using the graphi-
cal frontend . . . . . . . . . . . . . . . . . . . . . . . . . . . . . . . . . . 140
9.14 Configuring the BIOS DMI information . . . . . . . . . . . . . . . . . . . 140
9.15 Configuring the guest time stamp counter (TSC) to reflect guest execution141
9.16 Configuring the hard disk vendor product data (VPD) . . . . . . . . . . 142
10 VirtualBox programming interfaces 143
5
Page 6

Contents
11 Troubleshooting 144
11.1 General . . . . . . . . . . . . . . . . . . . . . . . . . . . . . . . . . . . . 144
11.1.1 Collecting debugging information . . . . . . . . . . . . . . . . . 144
11.1.2 Guest shows IDE errors for VDI on slow host file system . . . . . 144
11.1.3 Responding to guest IDE flush requests . . . . . . . . . . . . . . 145
11.2 Windows guests . . . . . . . . . . . . . . . . . . . . . . . . . . . . . . . 146
11.2.1 Windows bluescreens after changing VM configuration . . . . . 146
11.2.2 Windows 0x101 bluescreens with SMP enabled (IPI timeout) . . 146
11.2.3 Windows 2000 installation failures . . . . . . . . . . . . . . . . 146
11.2.4 How to record bluescreen information from Windows guests . . 147
11.2.5 No networking in Windows Vista guests . . . . . . . . . . . . . . 147
11.2.6 Windows guests may cause a high CPU load . . . . . . . . . . . 147
11.3 Linux guests . . . . . . . . . . . . . . . . . . . . . . . . . . . . . . . . . 147
11.3.1 Linux guests may cause a high CPU load . . . . . . . . . . . . . 147
11.3.2 AMD Barcelona CPUs . . . . . . . . . . . . . . . . . . . . . . . . 148
11.3.3 Buggy Linux 2.6 kernel versions . . . . . . . . . . . . . . . . . . 148
11.4 Windows hosts . . . . . . . . . . . . . . . . . . . . . . . . . . . . . . . . 148
11.4.1 VBoxSVC out-of-process COM server issues . . . . . . . . . . . . 148
11.4.2 CD/DVD changes not recognized . . . . . . . . . . . . . . . . . . 149
11.4.3 Sluggish response when using Microsoft RDP client . . . . . . . 149
11.4.4 Running an iSCSI initiator and target on a single system . . . . . 150
11.5 Linux hosts . . . . . . . . . . . . . . . . . . . . . . . . . . . . . . . . . . 150
11.5.1 Linux kernel module refuses to load . . . . . . . . . . . . . . . . 150
11.5.2 Linux host CD/DVD drive not found . . . . . . . . . . . . . . . . 150
11.5.3 Linux host CD/DVD drive not found (older distributions) . . . . 151
11.5.4 Linux host floppy not found . . . . . . . . . . . . . . . . . . . . 151
11.5.5 Strange guest IDE error messages when writing to CD/DVD . . . 151
11.5.6 VBoxSVC IPC issues . . . . . . . . . . . . . . . . . . . . . . . . . 152
11.5.7 USB not working . . . . . . . . . . . . . . . . . . . . . . . . . . 152
11.5.8 PAX/grsec kernels . . . . . . . . . . . . . . . . . . . . . . . . . . 153
11.5.9 Linux kernel vmalloc pool exhausted . . . . . . . . . . . . . . . 153
11.6 Solaris hosts . . . . . . . . . . . . . . . . . . . . . . . . . . . . . . . . . 154
11.6.1 Cannot start VM, not enough contiguous memory . . . . . . . . 154
11.6.2 VM aborts with out of memory errors on Solaris 10 hosts . . . . 154
12 Change log 155
12.1 Version 3.0.0 (2009-06-30) . . . . . . . . . . . . . . . . . . . . . . . . . 155
12.2 Version 2.2.4 (2009-05-29) . . . . . . . . . . . . . . . . . . . . . . . . . 158
12.3 Version 2.2.2 (2009-04-27) . . . . . . . . . . . . . . . . . . . . . . . . . 160
12.4 Version 2.2.0 (2009-04-08) . . . . . . . . . . . . . . . . . . . . . . . . . 161
12.5 Version 2.1.4 (2009-02-16) . . . . . . . . . . . . . . . . . . . . . . . . . 165
12.6 Version 2.1.2 (2009-01-21) . . . . . . . . . . . . . . . . . . . . . . . . . 167
12.7 Version 2.1.0 (2008-12-17) . . . . . . . . . . . . . . . . . . . . . . . . . 170
12.8 Version 2.0.8 (2009-03-10) . . . . . . . . . . . . . . . . . . . . . . . . . 172
12.9 Version 2.0.6 (2008-11-21) . . . . . . . . . . . . . . . . . . . . . . . . . 173
6
Page 7

Contents
12.10Version 2.0.4 (2008-10-24) . . . . . . . . . . . . . . . . . . . . . . . . . 174
12.11Version 2.0.2 (2008-09-12) . . . . . . . . . . . . . . . . . . . . . . . . . 176
12.12Version 2.0.0 (2008-09-04) . . . . . . . . . . . . . . . . . . . . . . . . . 178
12.13Version 1.6.6 (2008-08-26) . . . . . . . . . . . . . . . . . . . . . . . . . 179
12.14Version 1.6.4 (2008-07-30) . . . . . . . . . . . . . . . . . . . . . . . . . 180
12.15Version 1.6.2 (2008-05-28) . . . . . . . . . . . . . . . . . . . . . . . . . 182
12.16Version 1.6.0 (2008-04-30) . . . . . . . . . . . . . . . . . . . . . . . . . 183
12.17Version 1.5.6 (2008-02-19) . . . . . . . . . . . . . . . . . . . . . . . . . 185
12.18Version 1.5.4 (2007-12-29) . . . . . . . . . . . . . . . . . . . . . . . . . 187
12.19Version 1.5.2 (2007-10-18) . . . . . . . . . . . . . . . . . . . . . . . . . 189
12.20Version 1.5.0 (2007-08-31) . . . . . . . . . . . . . . . . . . . . . . . . . 191
12.21Version 1.4.0 (2007-06-06) . . . . . . . . . . . . . . . . . . . . . . . . . 194
12.22Version 1.3.8 (2007-03-14) . . . . . . . . . . . . . . . . . . . . . . . . . 197
12.23Version 1.3.6 (2007-02-20) . . . . . . . . . . . . . . . . . . . . . . . . . 198
12.24Version 1.3.4 (2007-02-12) . . . . . . . . . . . . . . . . . . . . . . . . . 199
12.25Version 1.3.2 (2007-01-15) . . . . . . . . . . . . . . . . . . . . . . . . . 200
12.26Version 1.2.4 (2006-11-16) . . . . . . . . . . . . . . . . . . . . . . . . . 201
12.27Version 1.2.2 (2006-11-14) . . . . . . . . . . . . . . . . . . . . . . . . . 201
12.28Version 1.1.12 (2006-11-14) . . . . . . . . . . . . . . . . . . . . . . . . 202
12.29Version 1.1.10 (2006-07-28) . . . . . . . . . . . . . . . . . . . . . . . . 203
12.30Version 1.1.8 (2006-07-17) . . . . . . . . . . . . . . . . . . . . . . . . . 203
12.31Version 1.1.6 (2006-04-18) . . . . . . . . . . . . . . . . . . . . . . . . . 204
12.32Version 1.1.4 (2006-03-09) . . . . . . . . . . . . . . . . . . . . . . . . . 204
12.33Version 1.1.2 (2006-02-03) . . . . . . . . . . . . . . . . . . . . . . . . . 205
12.34Version 1.0.50 (2005-12-16) . . . . . . . . . . . . . . . . . . . . . . . . 207
12.35Version 1.0.48 (2005-11-23) . . . . . . . . . . . . . . . . . . . . . . . . 207
12.36Version 1.0.46 (2005-11-04) . . . . . . . . . . . . . . . . . . . . . . . . 208
12.37Version 1.0.44 (2005-10-25) . . . . . . . . . . . . . . . . . . . . . . . . 208
12.38Version 1.0.42 (2005-08-30) . . . . . . . . . . . . . . . . . . . . . . . . 209
12.39Version 1.0.40 (2005-06-17) . . . . . . . . . . . . . . . . . . . . . . . . 210
12.40Version 1.0.39 (2005-05-05) . . . . . . . . . . . . . . . . . . . . . . . . 211
12.41Version 1.0.38 (2005-04-27) . . . . . . . . . . . . . . . . . . . . . . . . 211
12.42Version 1.0.37 (2005-04-12) . . . . . . . . . . . . . . . . . . . . . . . . 212
13 Known limitations 213
14 Third-party licenses 216
14.1 Materials . . . . . . . . . . . . . . . . . . . . . . . . . . . . . . . . . . . 216
14.2 Licenses . . . . . . . . . . . . . . . . . . . . . . . . . . . . . . . . . . . . 218
14.2.1 GNU General Public License (GPL) . . . . . . . . . . . . . . . . . 218
14.2.2 GNU Lesser General Public License (LGPL) . . . . . . . . . . . . 223
14.2.3 Mozilla Public License (MPL) . . . . . . . . . . . . . . . . . . . . 230
14.2.4 X Consortium License (X11) . . . . . . . . . . . . . . . . . . . . 237
14.2.5 zlib license . . . . . . . . . . . . . . . . . . . . . . . . . . . . . . 237
14.2.6 OpenSSL license . . . . . . . . . . . . . . . . . . . . . . . . . . . 238
7
Page 8

Contents
14.2.7 Slirp license . . . . . . . . . . . . . . . . . . . . . . . . . . . . . 239
14.2.8 liblzf license . . . . . . . . . . . . . . . . . . . . . . . . . . . . . 239
14.2.9 libpng license . . . . . . . . . . . . . . . . . . . . . . . . . . . . 240
14.2.10lwIP license . . . . . . . . . . . . . . . . . . . . . . . . . . . . . 240
14.2.11libxml license . . . . . . . . . . . . . . . . . . . . . . . . . . . . 241
14.2.12libxslt licenses . . . . . . . . . . . . . . . . . . . . . . . . . . . . 241
14.2.13gSOAP Public License Version 1.3a . . . . . . . . . . . . . . . . . 242
14.2.14Chromium licenses . . . . . . . . . . . . . . . . . . . . . . . . . 249
14.2.15curl license . . . . . . . . . . . . . . . . . . . . . . . . . . . . . . 251
14.2.16dnsproxy license . . . . . . . . . . . . . . . . . . . . . . . . . . . 252
15 VirtualBox privacy policy 253
Glossary 255
8
Page 9
1 Introduction
Sun VirtualBox is a collection of powerful virtual machine tools, targeting desktop
computers, enterprise servers and embedded systems. With VirtualBox, you can virtualize 32-bit and 64-bit operating systems on machines with Intel and AMD processors,
either by using hardware virtualization features provided by these processors or even
entirely in software, at your option.
You can find a brief feature overview in chapter 1.3, Features overview, page 13; see
chapter 12, Change log, page 155 for a detailed list of version changes.
1.1 Virtualization basics
With VirtualBox, you can run unmodified operating systems – including all of the
software that is installed on them – directly on top of your existing operating system,
in a special environment called a “virtual machine”. Your physical computer is then
usually called the “host”, while the virtual machine is often called a “guest”.
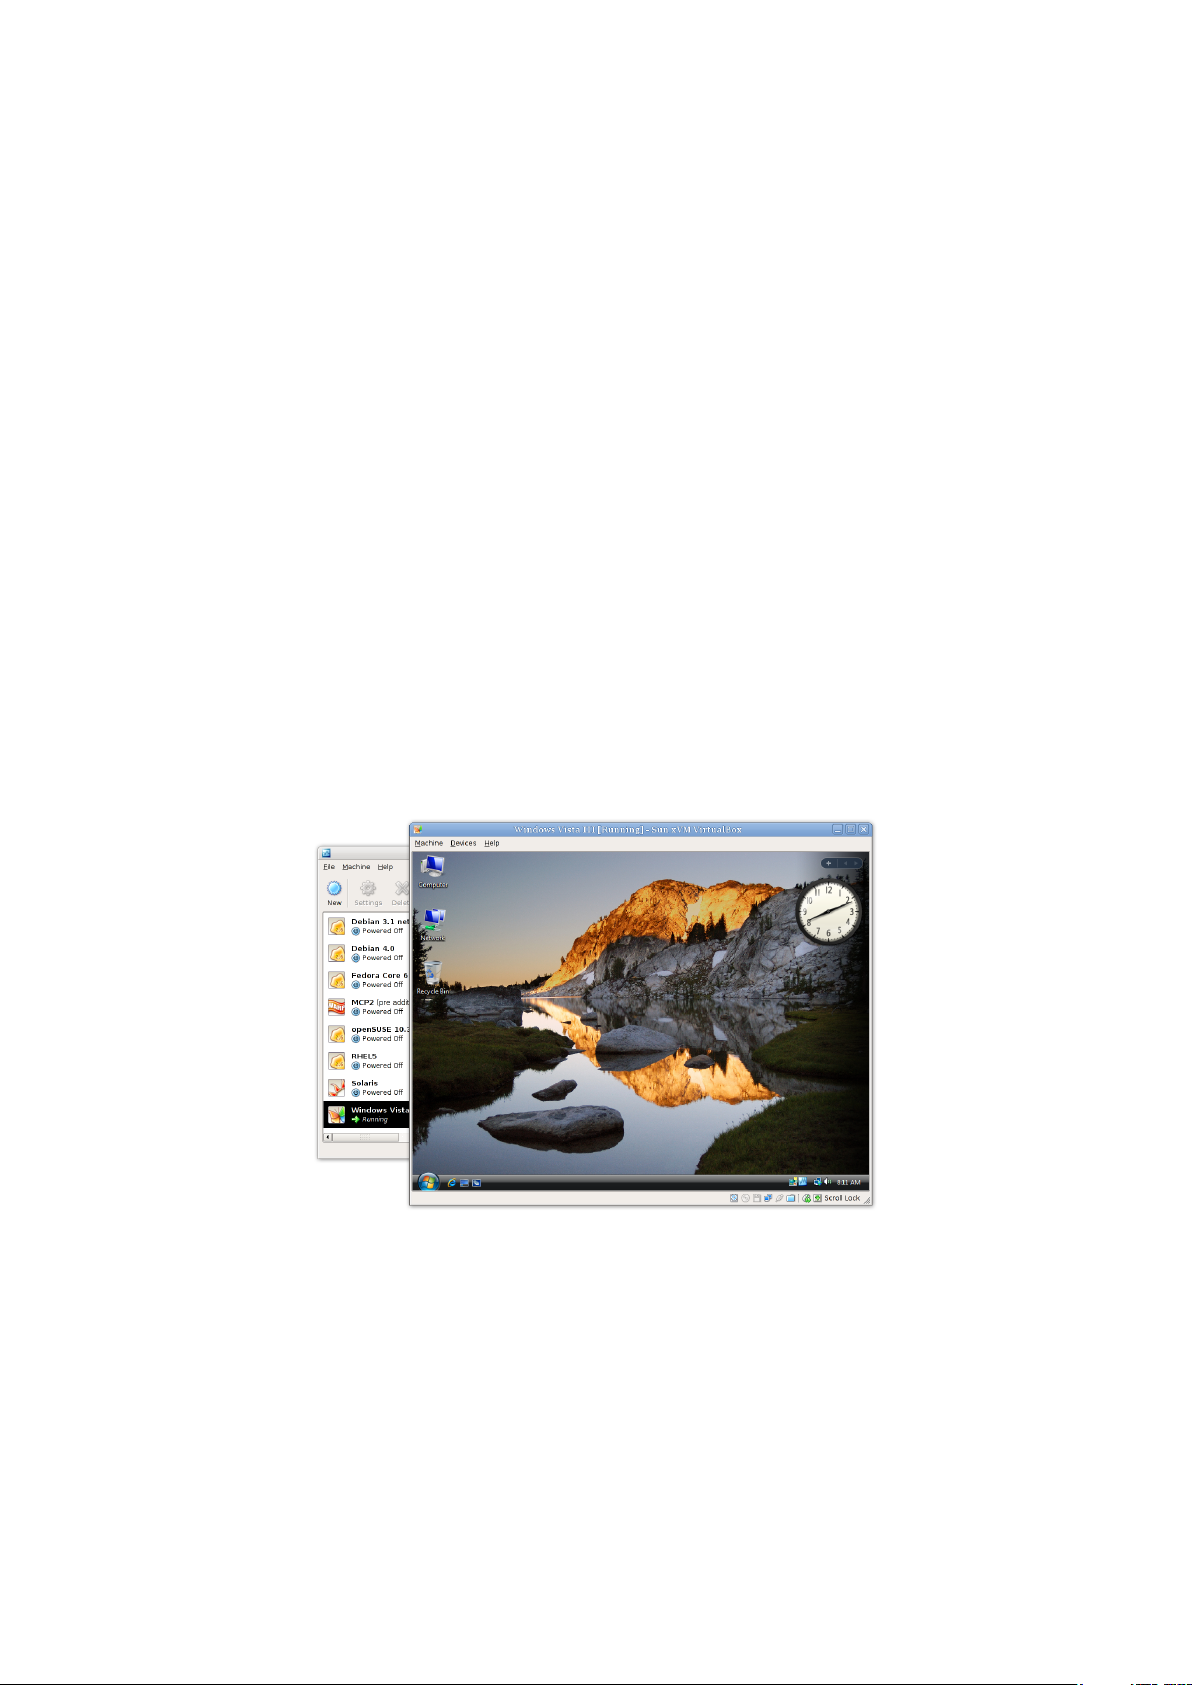
The following image shows you how VirtualBox, on a Linux host, is running Win-
dows Vista as guest operating system in a virtual machine window:
VirtualBox allows the guest code to run unmodified, directly on the host computer,
and the guest operating system “thinks” it’s running on a real machine. In the back-
9
Page 10

1 Introduction
ground, however, VirtualBox intercepts certain operations that the guest performs to
make sure that the guest does not interfere with other programs on the host.
The techniques and features that VirtualBox provides are useful for several scenar-
ios:
• Operating system support. With VirtualBox, one can run software written for
one operating system on another (for example, Windows software on Linux)
without having to reboot to use it. You can even install an old operating system
such as DOS or OS/2 in a virtual machine if your real computer’s hardware is
too advanced to be supported.
• Infrastructure consolidation. Virtualization can significantly reduce hardware
and electricity costs. The full performance provided by today’s powerful hardware is only rarely really needed, and typical servers have an average load of
only a fraction of their theoretical power. So, instead of running many such
physical computers that are only partially used, one can pack many virtual machines onto a few powerful hosts and balance the loads between them. With
VirtualBox, you can even run virtual machines as mere servers for the VirtualBox
Remote Desktop Protocol (VRDP), with full client USB support. This allows for
consolidating the desktop machines in an enterprise on just a few RDP servers,
while the actual clients only have to be capable of displaying VRDP data.
• Testing and disaster recovery. Once installed, a virtual box and its virtual hard
disk can be considered a “container” that can be arbitrarily frozen, woken up,
copied, backed up, and transported between hosts. On top of that, with the use
of another VirtualBox feature called “snapshots”, one can save a particular state
of a virtual machine and revert back to that state, if necessary. This way, one
can freely experiment with a computing environment. If something goes wrong
(e.g. after installing misbehaving software or infecting the guest with a virus),
one can easily switch back to a previous snapshot and avoid the need of frequent
backups and restores.
When dealing with virtualization (and also for understanding the following chapters
of this documentation), it helps to acquaint oneself with a bit of crucial terminology,
especially the following terms:
Host operating system (host OS): the operating system of the physical computer
where VirtualBox is running. There are versions of VirtualBox for several host
operating systems (see chapter 1.4, Supported host operating systems, page 16 for
further information). While the various VirtualBox versions are usually discussed
together in this document, there may be platform-specific differences which we
will point out where appropriate.
Guest operating system (guest OS): the operating system that is running inside
the virtual machine. Theoretically, VirtualBox can run any x86 operating system (DOS, Windows, OS/2, FreeBSD, OpenBSD), but to achieve near-native
10
Page 11

1 Introduction
performance of the guest code on your machine, we had to go through a lot
of optimizations that are specific to certain operating systems. So while your
favorite operating system may run as a guest, we officially support and optimize
for a select few (which, however, include the most common ones).
See chapter 1.5, Supported guest operating systems, page 17 for further information.
Virtual machine (VM). When running, a VM is the special environment that
VirtualBox creates for your guest operating system. So, in other words, you
run your guest operating system “in” a VM. Normally, a VM will be shown as
a window on your computer’s desktop, but depending on which of the various frontends of VirtualBox you use, it can be displayed in full-screen mode or
remotely by use of the Remote Desktop Protocol (RDP).
Sometimes we also use the term “virtual machine” in a more abstract way. Internally, VirtualBox thinks of a VM as a set of parameters that determine its
operation. These settings are mirrored in the VirtualBox graphical user interface
as well as the VBoxManage command line program; see chapter 8, VBoxManage
reference, page 100. They include hardware settings (how much memory the
VM should have, what hard disks VirtualBox should virtualize through which
container files, what CD-ROMs are mounted etc.) as well as state information
(whether the VM is currently running, saved, its snapshots etc.).
In other words, a VM is also what you can see in its settings dialog.
Guest Additions. With “Guest Additions”, we refer to special software packages that
are shipped with VirtualBox. Even though they are part of VirtualBox, they are
designed to be installed inside a VM to improve performance of the guest OS and
to add extra features. This is described in detail in chapter 4, Guest Additions,
page 60.
1.2 Software vs. hardware virtualization (VT-x and
AMD-V)
In a nutshell, virtualization means that the software in the virtual machine is allowed
to run directly on the processor of the host, while VirtualBox employs an array of
complex techniques to intercept operations that would interfere with your host.
Whenever the guest attempts to do something that could be harmful to your computer and its data, VirtualBox steps in and takes action. In particular, for lots of hardware that the guest believes to be accessing, VirtualBox simulates a certain “virtual”
environment according to how you have configured a virtual machine. For example, if
the guest attempts to access a hard disk, VirtualBox redirects these requests to whatever you have configured to be the virtual machine’s virtual hard disk – normally, an
image file on your host.
11
Page 12

1 Introduction
There are two ways in which VirtualBox can achieve virtualization: either entirely
in software or, with newer processors, using certain hardware features.
• For some years, Intel and AMD processors have had support for so-called “hard-
ware virtualization”. This means that these processors aid virtualization soft-
ware such as VirtualBox in intercepting potentially dangerous operations that a
guest operating system may be attempting and in presenting virtual hardware to
a virtual machine.
These hardware features differ between Intel and AMD processors. Intel named
its technology VT-x; AMD calls theirs AMD-V.
Note: On most systems, the hardware virtualization features first need to be
enabled in the BIOS before VirtualBox can use them.
• As opposed to other virtualization software, for many usage scenarios,
VirtualBox does not require hardware virtualization features to be present.
Through sophisticated techniques, VirtualBox virtualizes many guest operating
systems entirely in software. This means that you can run virtual machines even
on older processors which do not support hardware virtualization.
You can select for each virtual machine individually whether VirtualBox should use
software or hardware virtualization. Prior to version 2.2, software virtualization was
the default; starting with version 2.2, VirtualBox will enable hardware virtualization
by default for new virtual machines that you create. (Existing virtual machines are
not automatically changed for compatibility reasons, and the default can of course be
changed for each virtual machine.)
Even though VirtualBox does not always require hardware virtualization, enabling
it is required in the following three scenarios:
• Certain rare guest operating systems like OS/2 make use of very esoteric processor instructions that are not supported with our software virtualization. For
virtual machines that are configured to contain such an operating system, hardware virtualization is enabled automatically.
• VirtualBox’s 64-bit guest support (added with version 2.0) and multiprocessing
(SMP, added with version 3.0) both require hardware virtualization to be enabled. (This is not much of a limitation since the vast majority of today’s 64-bit
and multicore CPUs ship with hardware virtualization anyway; the exceptions to
this rule are e.g. older Intel Celeron and AMD Opteron CPUs.)
The reason for changing the default with version 2.2 is that the hardware has significantly improved with the latest Intel and AMD processors, and VirtualBox has also
fine-tuned its hardware virtualization support to a degree that it is now faster than
software virtualization in many situations.
12
Page 13

1 Introduction
Warning: Do not run other hypervisors (open-source or commercial virtualization products) together with VirtualBox! While several hypervisors can
normally be installed in parallel, do not attempt to run several virtual machines from competing hypervisors at the same time. VirtualBox cannot track
what another hypervisor is currently attempting to do on the same host, and
especially if several products attempt to use hardware virtualization features
such as VT-x, this can crash the entire host.
In addition to “plain” hardware virtualization, your processor may also support additional sophisticated techniques:
1
• A newer feature called “nested paging” implements some memory management
in hardware, which can greatly accelerate hardware virtualization since these
tasks no longer need to be performed by the virtualization software.
On AMD processors, nested paging has been available starting with the
Barcelona (K10) architecture; Intel added support for nested paging, which
they call “extended page tables” (EPT), with their Core i7 (Nehalem) processors.
Nested paging is still disabled by default even for new machines, but it can be
enabled for each virtual machine individually in the machine settings.
If your system supports nested paging (AMD-V) or EPT (VT-x), then you can
expect a significant performance increase by enabling hardware virtualization
and the nested paging feature
• Another hardware feature called “Virtual Processor Identifiers” (VPIDs) can
greatly accelerate context switching by reducing the need for expensive flushing
of the processor’s Translation Lookaside Buffers (TLBs). To enable this feature
for a VM, you need to use the command line; see chapter 8.5, VBoxManage
modifyvm, page 107.
1.3 Features overview
Here’s a brief outline of VirtualBox’s main features:
• Portability. VirtualBox runs on a large number of 32-bit and 64-bit host op-
erating systems (Windows, Linux, Mac OS X and Solaris; see chapter 1.4, Sup-
ported host operating systems, page 16 for details). Virtual machines can easily be
imported and exported using the industry-standard Open Virtualization Format
(OVF, see chapter 3.8, Importing and exporting virtual machines, page 56). Since
the file and image formats used are identical on all the platforms, this works
between all supported host operating systems.
1
VirtualBox 2.0 added support for AMD’s nested paging; support for Intel’s EPT and VPIDs was added with
version 2.1.
13
Page 14

1 Introduction
• Clean architecture; unprecedented modularity. VirtualBox has an extremely
modular design with well-defined internal programming interfaces and a clean
separation of client and server code. This makes it easy to control it from several
interfaces at once: for example, you can start a VM simply by clicking on a
button in the VirtualBox graphical user interface and then control that machine
from the command line, or even remotely. See chapter 7, Alternative front-ends;
remote virtual machines, page 90 for details.
Due to its modular architecture, VirtualBox can also expose its full functionality
and configurability through a comprehensive software development kit (SDK),
which allows for integrating every aspect of VirtualBox with other software systems. Please see chapter 10, VirtualBox programming interfaces, page 143 for
details.
• No hardware virtualization required. As explained in the previous chapter, in
most cases, VirtualBox does not require the processor features built into newer
hardware like Intel VT-x or AMD-V. As opposed to many other virtualization
solutions, you can therefore use VirtualBox even on older hardware where these
features are not present.
• Guest Additions: shared folders, seamless windows, 3D virtualization. The
VirtualBox Guest Additions are software packages which can be installed inside
of supported guest systems to improve their performance and to provide additional integration and communication with the host system. After installing the
Guest Additions, a virtual machine will support automatic adjustment of video
resolutions, seamless windows, accelerated 3D graphics and more. The Guest
Additions are described in detail in chapter 4, Guest Additions, page 60.
In particular, Guest Additions provide for “shared folders”, which let you access
files from the host system from within a guest machine. Shared folders are
described in chapter 4.6, Folder sharing, page 68.
• Great hardware support. Among others, VirtualBox supports:
– Guest multiprocessing (SMP). Starting with version 3.0, VirtualBox can
present up to 32 virtual CPUs to a virtual machine.
– Hardware compatibility. VirtualBox virtualizes a vast array of virtual de-
vices, among them many devices that are typically provided by other virtualization platforms – including an Input/Output Advanced Programmable
Interrupt Controller (I/O APIC) which is found in many modern PC systems. This eases cloning of PC images from real machines or 3rd party
virtual machines into VirtualBox.
– USB device support. VirtualBox implements a virtual USB controller and
allows you to connect arbitrary USB devices to your virtual machines without having to install device-specific drivers on the host. USB support is not
limited to certain device categories. For details, see chapter 3.7.9.1, USB
settings, page 54.
14
Page 15

1 Introduction
– Full ACPI support. The Advanced Configuration and Power Interface
(ACPI) is fully supported by VirtualBox. This eases cloning of PC images
from real machines or third-party virtual machines into VirtualBox. With its
unique ACPI power status support, VirtualBox can even report to ACPIaware guest operating systems the power status of the host. For mobile
systems running on battery, the guest can thus enable energy saving and
notify the user of the remaining power (e.g. in fullscreen modes).
– Multiscreen resolutions. VirtualBox virtual machines support screen res-
olutions many times that of a physical screen, allowing them to be spread
over a large number of screens attached to the host system.
– Built-in iSCSI support. This unique feature allows you to connect a vir-
tual machine directly to an iSCSI storage server without going through the
host system. The VM accesses the iSCSI target directly without the extra
overhead that is required for virtualizing hard disks in container files. For
details, see chapter 5.5, iSCSI servers, page 80.
– PXE Network boot. The integrated virtual network cards of VirtualBox
fully support remote booting via the Preboot Execution Environment (PXE).
• Multigeneration snapshots. VirtualBox can save successive snapshots of the
state of the virtual machine. You can revert the virtual machine to the state of
any of the snapshots. For details, see chapter 3.4.4, Snapshots, page 42.
• VRDP remote access. You can run any virtual machine in a special VirtualBox
program that acts as a server for the VirtualBox Remote Desktop Protocol
(VRDP). With this unique feature, VirtualBox provides high-performance remote
access to any virtual machine. A custom RDP server has been built directly into
the virtualization layer and offers unprecedented performance and feature richness.
VRDP support is described in detail in chapter 7.4, Remote virtual machines
(VRDP support), page 93.
On top of this special capacity, VirtualBox offers you more unique features:
– Extensible RDP authentication. VirtualBox already supports Winlogon
on Windows and PAM on Linux for RDP authentication. In addition, it
includes an easy-to-use SDK which allows you to create arbitrary interfaces
for other methods of authentication; see chapter 9.3, Custom external VRDP
authentication, page 129 for details.
– USB over RDP. Via RDP virtual channel support, VirtualBox also allows
you to connect arbitrary USB devices locally to a virtual machine which is
running remotely on a VirtualBox RDP server; see chapter 7.4.3, Remote
USB, page 97 for details.
15
Page 16

1 Introduction
1.4 Supported host operating systems
Currently, VirtualBox is available for the following host operating systems:
• Windows hosts:
– Windows XP, all service packs (32-bit)
– Windows Server 2003 (32-bit)
– Windows Vista (32-bit and 64-bit2).
– Windows Server 2008 (32-bit and 64-bit)
– Windows 7 beta (32-bit and 64-bit)
• Apple Mac OS X hosts: Intel hardware is required, all versions of Mac OS X
supported; please see chapter 13, Known limitations, page 213 also.
3
• Linux hosts (32-bit and 64-bit4). Among others, this includes:
– Debian GNU/Linux 3.1 (“sarge”), 4.0 (“etch”) and 5.0 (“lenny”)
– Fedora Core 4 to 11
– Gentoo Linux
– Redhat Enterprise Linux 4 and 5
– SUSE Linux 9 and 10, openSUSE 10.3, 11.0 and 11.1
– Ubuntu 6.06 (“Dapper Drake”), 6.10 (“Edgy Eft”), 7.04 (“Feisty Fawn”),
7.10 (“Gutsy Gibbon”), 8.04 (“Hardy Heron”), 8.10 (“Intrepid Ibex”), 9.04
(“Jaunty Jackalope”).
– Mandriva 2007.1, 2008.0 and 2009.1
It should be possible to use VirtualBox on most systems based on Linux kernel
2.6 using either the VirtualBox installer or by doing a manual installation; see
chapter 2.3, Installing on Linux hosts, page 21.
Note that starting with VirtualBox 2.1, Linux 2.4-based host operating systems
are no longer supported.
• Solaris hosts (32-bit and 64-bit5) are supported with the restrictions listed in
chapter 13, Known limitations, page 213:
– OpenSolaris (2008.05 and higher, “Nevada” build 86 and higher)
– Solaris 10 (u4 and higher)
2
Support for 64-bit Windows was added with VirtualBox 1.5.
3
Preliminary Mac support (beta stage) was added with VirtualBox 1.4, full support with 1.6.
4
Support for 64-bit Linux was added with VirtualBox 1.4.
5
Support for OpenSolaris was added with VirtualBox 1.6.
16
Page 17

1 Introduction
1.5 Supported guest operating systems
Since VirtualBox is designed to provide a generic virtualization environment for x86
systems, it may run operating systems of any kind, even those that are not officially
supported by Sun Microsystems. However, our focus is to optimize the product’s performance for a select list of guest systems:
Windows NT 4.0 All versions/editions and service packs are fully supported; how-
ever, there are some issues with older service packs. We recommend to install
service pack 6a. Guest Additions are available with a limited feature set.
Windows 2000 / XP / Server 2003 / Vista / Server 2008 / Windows 7 beta All ver-
sions/editions and service packs are fully supported (including 64-bit versions,
under the preconditions listed below). Guest Additions are available.
DOS / Windows 3.x / 95 / 98 / ME Limited testing has been performed. Use beyond
legacy installation mechanisms not recommended. No Guest Additions available.
Linux 2.4 Limited support.
Linux 2.6 All versions/editions are fully supported (32 bits and 64 bits). Guest Addi-
tions are available.
We strongly recommend using a Linux kernel version 2.6.13 or higher for better
performance.
Note: Certain Linux kernel releases have bugs that prevent them from executing in a virtual environment; please see chapter 11.3.3, Buggy Linux 2.6
kernel versions, page 148 for details.
Solaris 10, OpenSolaris Fully supported (32 bits and 64 bits). Guest Additions are
available.
FreeBSD Limited support. Guest Additions are not available yet.
OpenBSD Versions 3.7 and later are supported. Guest Additions are not available
yet.
OS/2 Warp 4.5 Requires hardware virtualization to be enabled. We officially support
MCP2 only; other OS/2 versions may or may not work. Guest Additions are
available with a limited feature set.
6
See chapter 13, Known limitations, page 213.
6
17
Page 18

1 Introduction
1.6 64-bit guests
Starting with Version 2.0, VirtualBox also supports 64-bit guest operating systems.
Starting with Version 2.1, you can even run 64-bit guests on a 32-bit host operating
system, so long as you have sufficient hardware.
In particular, 64-bit guests are supported under the following conditions:
1. You need a 64-bit processor with hardware virtualization support (see chapter
1.2, Software vs. hardware virtualization (VT-x and AMD-V), page 11).
2. You must enable hardware virtualization for the particular VM for which you
want 64-bit support; software virtualization is not supported for 64-bit VMs.
3. If you want to use 64-bit guest support on a 32-bit host operating system, you
must also select a 64-bit operating system for the particular VM. Since supporting
64 bits on 32-bit hosts incurs additional overhead, VirtualBox only enables this
support upon explicit request.
On 64-bit hosts, 64-bit guest support is always enabled, so you can simply install
a 64-bit operating system in the guest.
Warning: On any host, you should enable the I/O APIC for virtual machines
that you intend to use in 64-bit mode. This is especially true for 64-bit Windows VMs. See chapter 3.7.1.2, “Advanced” tab, page 46. In addition, for
64-bit Windows guests, you should make sure that the VM uses the Intel net-
working device, since there is no 64-bit driver support for the AMD PCNet
card; see chapter 6.1, Virtual networking hardware, page 82.
If you use the “Create VM” wizard of the VirtualBox graphical user interface (see
chapter 3.2, Creating a virtual machine, page 32), VirtualBox will automatically use
the correct settings for each selected 64-bit operating system type.
18
Page 19

2 Installation
As installation of VirtualBox varies depending on your host operating system, we provide installation instructions in four separate chapters for Windows, Mac OS X, Linux
and Solaris, respectively.
2.1 Installing on Windows hosts
2.1.1 Prerequisites
For the various versions of Windows that we support as host operating systems, please
refer to chapter 1.4, Supported host operating systems, page 16.
In addition, Windows Installer 1.1 or higher must be present on your system. This
should be the case if you have all recent Windows updates installed.
2.1.2 Performing the installation
The VirtualBox installation can be started
• either by double-clicking on its executable file (contains both 32- and 64-bit
architectures)
• or by entering
VirtualBox.exe -extract
on the command line. This will extract both installers into a temporary directory
in which you’ll then find the usual .MSI files. Then you can do a
msiexec /i VirtualBox-<version>-MultiArch_<x86|amd64>.msi
to perform the installation.
In either case, this will display the installation welcome dialog and allow you to
choose where to install VirtualBox to and which components to install. In addition to
the VirtualBox application, the following components are available:
USB support This package contains special drivers for your Windows host that
VirtualBox requires to fully support USB devices inside your virtual machines.
19
Page 20

2 Installation
Networking This package contains extra networking drivers for your Windows host
that VirtualBox needs to support Host Interface Networking (to make your VM’s
virtual network cards accessible from other machines on your physical network).
Depending on your Windows configuration, you may see warnings about “unsigned
drivers” or similar. Please select “Continue” on these warnings as otherwise VirtualBox
might not function correctly after installation.
The installer will create a “VirtualBox” group in the programs startup folder which
allows you to launch the application and access its documentation.
With standard settings, VirtualBox will be installed for all users on the local system.
In case this is not wanted, you have to invoke the installer by first extracting it by using
VirtualBox.exe -extract
and then do as follows:
VirtualBox.exe -msiparams ALLUSERS=2
or
msiexec /i VirtualBox-<version>-MultiArch_<x86|amd64>.msi ALLUSERS=2
on the extracted .MSI files. This will install VirtualBox only for the current user.
2.1.3 Uninstallation
As we use the Microsoft Installer, VirtualBox can be safely uninstalled at any time by
choosing the program entry in the “Add/Remove Programs” applet in the Windows
Control Panel.
2.1.4 Unattended installation
Unattended installations can be performed using the standard MSI support.
2.2 Installing on Mac OS X hosts
2.2.1 Performing the installation
For Mac OS X hosts, VirtualBox ships in a disk image (dmg) file. Perform the following
steps:
1. Double-click on that file to have its contents mounted.
2. A window will open telling you to double click on the VirtualBox.mpkg installer file displayed in that window.
3. This will start the installer, which will allow you to select where to install
VirtualBox to.
After installation, you can find a VirtualBox icon in the “Applications” folder in the
Finder.
20
Page 21

2 Installation
2.2.2 Uninstallation
To uninstall VirtualBox, open the disk image (dmg) file again and double-click on the
uninstall icon contained therein.
2.2.3 Unattended installation
To perform a non-interactive installation of VirtualBox you can use the command line
version of the installer application.
Mount the disk image (dmg) file as described in the normal installation. Then open
a terminal session and execute:
sudo installer -pkg /Volumes/VirtualBox/VirtualBox.mpkg \
-target /Volumes/Macintosh\ HD
2.3 Installing on Linux hosts
2.3.1 Prerequisites
For the various versions of Linux that we support as host operating systems, please
refer to chapter 1.4, Supported host operating systems, page 16.
You will need to install the following packages on your Linux system before starting
the installation (some systems will do this for you automatically when you install
VirtualBox):
• Qt 4.3.0 or higher;
• SDL 1.2.7 or higher (this graphics library is typically called libsdl or similar).
Note: To be precise, these packages are only required if you want to run the
VirtualBox graphical user interfaces. In particular, VirtualBox, our main
graphical user interface, requires both Qt and SDL; VBoxSDL, our simplified
GUI, requires only SDL. By contrast, if you only want to run the headless
VRDP server that comes with VirtualBox, neither Qt nor SDL are required.
2.3.2 The VirtualBox kernel module
VirtualBox uses a special kernel module to perform physical memory allocation and to
gain control of the processor for guest system execution. Without this kernel module,
you will still be able to work with virtual machines in the configuration interface, but
you will not be able to start any virtual machines.
21
Page 22

2 Installation
The VirtualBox kernel module is automatically installed on your system when you
install VirtualBox. To maintain it with future kernel updates, for recent Linux distributions – for example Fedora Core 5 and later, Ubuntu 7.10 (Gutsy) and later and Mandriva 2007.1 and later –, generally we recommend installing Dynamic Kernel Module
Support (DKMS)1. This framework helps to build kernel modules and to deal with
kernel upgrades.
If DKMS is not already installed, execute one of the following:
• On an Ubuntu system:
sudo apt-get install dkms
• On a Fedora system:
yum install dkms
• On a Mandriva system:
urpmi dkms
If DKMS is available and installed, the VirtualBox kernel module should always work
automatically, and it will be automatically rebuilt if your host kernel is updated.
Otherwise, there are only two situations in which you will need to worry about the
kernel module:
1. The original installation fails. This probably means that your Linux system is not
prepared for building external kernel modules.
Most Linux distributions can be set up simply by installing the right packages normally, these will be the GNU compiler (GCC), GNU Make (make) and packages containing header files for your kernel - and making sure that all system
updates are installed and that the system is running the most up-to-date kernel
included in the distribution. The version numbers of the header file packages must
be the same as that of the kernel you are using.
• With Debian and Ubuntu releases, you must install the right version of the
linux-headers and if it exists the linux-kbuild package. Current
Ubuntu releases should have the right packages installed by default.
• In even older Debian and Ubuntu releases, you must install the right version
of the kernel-headers package.
• On Fedora and Redhat systems, the package is kernel-devel.
• On SUSE and openSUSE Linux, you must install the right versions of the
kernel-source and kernel-syms packages.
• Alternatively, if you have built your own kernel, /usr/src/linux should
point to your kernel sources. If you have not removed the files created
during the build process, then your system will already be set up correctly.
1
See http://en.wikipedia.org/wiki/Dynamic_Kernel_Module_Support for an introduction.
22
Page 23

2 Installation
2. The kernel of your Linux host got updated. In that case, the kernel module will
need to be reinstalled by executing (as root):
/etc/init.d/vboxdrv setup
2.3.3 USB and advanced networking support
In order to use VirtualBox’s USB support, the user account under which you intend to
run VirtualBox must have read and write access to the USB filesystem (usbfs).
In addition, access to /dev/net/tun will be required if you want to use Host
Interface Networking, which is described in detail in chapter 6.5, Bridged networking,
page 86.
2.3.4 Performing the installation
VirtualBox is available in a number of package formats native to various common Linux
distributions (see chapter 1.4, Supported host operating systems, page 16 for details).
In addition, there is an alternative generic installer (.run) which should work on most
Linux distributions.
2.3.4.1 Installing VirtualBox from a Debian/Ubuntu package
First, download the appropriate package for your distribution. The following examples
assume that you are installing to an Ubuntu Edgy system. Use dpkg to install the
Debian package:
sudo dpkg -i VirtualBox_3.0.0_Ubuntu_edgy.deb
You will be asked to accept the VirtualBox Personal Use and Evaluation License.
Unless you answer “yes” here, the installation will be aborted.
The group vboxusers will be created during installation. Note that a user who is
going to run VirtualBox must be member of that group. A user can be made member of
the group vboxusers through the GUI user/group management or at the command
line with
sudo usermod -a -G vboxusers username
Also note that adding an active user to that group will require that user to log out
and back in again. This should be done manually after successful installation of the
package.
The installer will also search for a VirtualBox kernel module suitable for your
kernel. The package includes pre-compiled modules for the most common kernel configurations. If no suitable kernel module is found, the installation script
tries to build a module itself. If the build process is not successful you will be
shown a warning and the package will be left unconfigured. Please have a look at
/var/log/vbox-install.log to find out why the compilation failed. You may
have to install the appropriate Linux kernel headers (see chapter 2.3.2, The VirtualBox
kernel module, page 21). After correcting any problems, do
23
Page 24

2 Installation
sudo /etc/init.d/vboxdrv setup
This will start a second attempt to build the module.
If a suitable kernel module was found in the package or the module was successfully
built, the installation script will attempt to load that module. If this fails, please see
chapter 11.5.1, Linux kernel module refuses to load, page 150 for further information.
Once VirtualBox has been successfully installed and configured, you can start it by
selecting “VirtualBox” in your start menu or from the command line (see chapter 2.3.5,
Starting VirtualBox on Linux, page 28).
2.3.4.2 Using the alternative installer (VirtualBox.run)
The alternative installer performs the following steps:
• It unpacks the application files to a target directory of choice. By default,
/opt/VirtualBox/
will be used.
• It builds the VirtualBox kernel module (vboxdrv) and installs it.
• It creates /etc/init.d/vboxdrv, an init script to start the VirtualBox kernel
module.
• It creates a new system group called vboxusers.
• It creates symbolic links to VirtualBox, VBoxSDL, VBoxVRDP, VBoxHeadless
and VBoxManage in /usr/bin.
• It creates /etc/udev/60-vboxdrv.rules, a description file for udev, if
that is present, which makes the module accessible to anyone in the group
vboxusers.
• It writes the installation directory to /etc/vbox/vbox.cfg.
The installer must be executed as root with either install or uninstall as the
first parameter. If you do not want the installer to ask you whether you wish to accept
the license agreement (for example, for performing unattended installations), you can
add the parameter license_accepted_unconditionally. Finally, if you want
to use a directory other than the default installation directory, add the desired path as
an extra parameter.
sudo ./VirtualBox.run install /opt/VirtualBox
Or if you do not have the “sudo” command available, run the following as root
instead:
./VirtualBox.run install /opt/VirtualBox
24
Page 25

2 Installation
After that you need to put every user which should be able to use VirtualBox in the
group vboxusers, either through the GUI user management tools or by running the
following command as root:
sudo usermod -a -G vboxusers username
Note: The usermod command of some older Linux distributions does not
support the -a option (which adds the user to the given group without
affecting membership of other groups). In this case, find out the current
group memberships with the groups command and add all these groups in a
comma-separated list to the command line after the -G option, e.g. like this:
usermod -G group1,group2,vboxusers username.
If any users on your system should be able to access host USB devices from within
VirtualBox guests, you should also add them to the appropriate user group that your
distribution uses for USB access, e.g. usb or usbusers.
2.3.4.3 Performing a manual installation
If, for any reason, you cannot use the shell script installer described previously, you
can also perform a manual installation. Invoke the installer like this:
./VirtualBox.run --keep --noexec
This will unpack all the files needed for installation in the directory install
under the current directory. The VirtualBox application files are contained in
VirtualBox.tar.bz2 which you can unpack to any directory on your system. For
example:
sudo mkdir /opt/VirtualBox
sudo tar jxf ./install/VirtualBox.tar.bz2 -C /opt/VirtualBox
or as root:
mkdir /opt/VirtualBox
tar jxf ./install/VirtualBox.tar.bz2 -C /opt/VirtualBox
The sources for VirtualBox’s kernel module are provided in the src directory. To
build the module, change to the directory and issue
make
If everything builds correctly, issue the following command to install the module to
the appropriate module directory:
sudo make install
In case you do not have sudo, switch the user account to root and perform
25
Page 26

2 Installation
make install
The VirtualBox kernel module needs a device node to operate. The above make
command will tell you how to create the device node, depending on your Linux system.
The procedure is slightly different for a classical Linux setup with a /dev directory, a
system with the now deprecated devfs and a modern Linux system with udev.
On certain Linux distributions, you might experience difficulties building the module. You will have to analyze the error messages from the build system to diagnose the
cause of the problems. In general, make sure that the correct Linux kernel sources are
used for the build process.
Note that the user who is going to run VirtualBox needs read and write permission
on the VirtualBox kernel module device node /dev/vboxdrv. You can either define
a vboxusers group by entering
groupadd vboxusers
chgrp vboxusers /dev/vboxdrv
chmod 660 /dev/vboxdrv
or, alternatively, simply give all users access (insecure, not recommended!)
chmod 666 /dev/vboxdrv
You should also add any users who will be allowed to use host USB devices in
VirtualBox guests to the appropriate USB users group for your distribution. This group
is often called usb or usbusers.
Next, you will have to install the system initialization script for the kernel module:
cp /opt/VirtualBox/vboxdrv.sh /etc/init.d/vboxdrv
(assuming you installed VirtualBox to the /opt/VirtualBox directory) and activate
the initialization script using the right method for your distribution. You should create
VirtualBox’s configuration file:
mkdir /etc/vbox
echo INSTALL_DIR=/opt/VirtualBox > /etc/vbox/vbox.cfg
and, for convenience, create the following symbolic links:
ln -sf /opt/VirtualBox/VBox.sh /usr/bin/VirtualBox
ln -sf /opt/VirtualBox/VBox.sh /usr/bin/VBoxSVC
ln -sf /opt/VirtualBox/VBox.sh /usr/bin/VBoxManage
ln -sf /opt/VirtualBox/VBox.sh /usr/bin/VBoxHeadless
ln -sf /opt/VirtualBox/VBox.sh /usr/bin/VBoxSDL
2.3.4.4 Updating and uninstalling VirtualBox
Before updating or uninstalling VirtualBox, you must terminate any virtual machines
which are currently running and exit the VirtualBox or VBoxSVC applications. To
update VirtualBox, simply run the installer of the updated version. To uninstall
VirtualBox, invoke the installer like this:
26
Page 27

2 Installation
sudo ./VirtualBox.run uninstall
or as root
./VirtualBox.run uninstall
. Starting with version 2.2.2, you can uninstall the .run package by invoking
/opt/VirtualBox/uninstall.sh
To manually uninstall VirtualBox, simply undo the steps in the manual installation in
reverse order.
2.3.4.5 Automatic installation of Debian packages
The Debian packages will request some user feedback when installed for the first time.
The debconf system is used to perform this task. To prevent any user interaction during
installation, default values can be defined. A file vboxconf can contain the following
debconf settings:
virtualbox virtualbox/module-compilation-allowed boolean true
virtualbox virtualbox/delete-old-modules boolean true
The first line allows compilation of the vboxdrv kernel module if no module was found
for the current kernel. The second line allows the package to delete any old vboxdrv
kernel modules compiled by previous installations.
These default settings can be applied with
debconf-set-selections vboxconf
prior to the installation of the VirtualBox Debian package.
2.3.4.6 Automatic installation of .rpm packages
The .rpm format does not provide a configuration system comparable to the debconf system. To configure the installation process of our .rpm packages, a file
/etc/default/virtualbox is interpreted. The automatic generation of the udev
rule can be prevented by the following setting:
INSTALL_NO_UDEV=1
The creation of the group vboxusers can be prevented by
INSTALL_NO_GROUP=1
If the line
INSTALL_NO_VBOXDRV=1
is specified, the package installer will not try to build the vboxdrv kernel module if
no module according to the current kernel was found.
27
Page 28

2 Installation
2.3.5 Starting VirtualBox on Linux
The easiest way to start a VirtualBox program is by running the program of your choice
(VirtualBox, VBoxManage, VBoxSDL or VBoxHeadless) from a terminal. These
are symbolic links to VBox.sh that start the required program for you.
The following detailed instructions should only be of interest if you wish to execute VirtualBox without installing it first. You should start by compiling the vboxdrv
kernel module (see above) and inserting it into the Linux kernel. VirtualBox consists
of a service daemon (VBoxSVC) and several application programs. The daemon is
automatically started if necessary. All VirtualBox applications will communicate with
the daemon through Unix local domain sockets. There can be multiple daemon instances under different user accounts and applications can only communicate with
the daemon running under the user account as the application. The local domain
socket resides in a subdirectory of your system’s directory for temporary files called
.vbox-<username>-ipc. In case of communication problems or server startup
problems, you may try to remove this directory.
All VirtualBox applications (VirtualBox, VBoxSDL, VBoxManage and VBoxHeadless)
require the VirtualBox directory to be in the library path:
LD_LIBRARY_PATH=. ./VBoxManage showvminfo "Windows XP"
2.4 Installing on Solaris hosts
For the various versions of Solaris that we support as host operating systems, please
refer to chapter 1.4, Supported host operating systems, page 16.
If you have a previously installed instance of VirtualBox on your Solaris host, please
uninstall it first before installing a new instance. Refer to chapter 2.4.3, Uninstallation,
page 29 for uninstall instructions.
2.4.1 Performing the installation
VirtualBox is available as a standard Solaris package. Download the VirtualBox SunOS
package which includes both the 32-bit and 64-bit versions of VirtualBox. The installa-
tion must be performed as root and from the global zone as the VirtualBox installer loads
kernel drivers which cannot be done from non-global zones. To verify which zone you
are currently in, execute the zonename command. Execute the following commands:
gunzip -cd VirtualBox-3.0.0-SunOS-x86.tar.gz | tar xvf -
Starting with VirtualBox 1.6.2 we ship the VirtualBox kernel interface module (vbi).
The purpose of this module is to shield the VirtualBox kernel driver from changes to the
SunOS kernel. If you do not have vbi already installed (check for the existence of the
file /platform/i86pc/kernel/misc/vbi) install it by executing the command:
pkgadd -G -d VirtualBoxKern-3.0.0-SunOS.pkg
28
Page 29

2 Installation
Future versions of OpenSolaris may ship the VirtualBox kernel interface module, in
which case you can remove this one before upgrading OpenSolaris.
Next you should install the main VirtualBox package using:
pkgadd -d VirtualBox-3.0.0-SunOS-x86.pkg
Note: If you are using Solaris Zones, to install VirtualBox only into the current
zone and not into any other zone, use pkgadd -G. For more information
refer to the pkgadd manual; see also chapter 2.4.5, Configuring a zone for
running VirtualBox, page 30.
The installer will then prompt you to enter the package you wish to install. Choose
“1” or “all” and proceed. Next the installer will ask you if you want to allow the
postinstall script to be executed. Choose “y” and proceed as it is essential to execute
this script which installs the VirtualBox kernel module. Following this confirmation
the installer will install VirtualBox and execute the postinstall setup script.
Once the postinstall script has been executed your installation is now complete. You
may now safely delete the uncompressed package and autoresponse files from your
system. VirtualBox would be installed in /opt/VirtualBox.
2.4.2 Starting VirtualBox on Solaris
The easiest way to start a VirtualBox program is by running the program of your choice
(VirtualBox, VBoxManage, VBoxSDL or VBoxHeadless) from a terminal. These
are symbolic links to VBox.sh that start the required program for you.
Alternatively, you can directly invoke the required programs from /opt/VirtualBox.
Using the links provided is easier as you do not have to type the full path.
You can configure some elements of the VirtualBox Qt GUI such as fonts and
colours by executing VBoxQtconfig from the terminal.
2.4.3 Uninstallation
Uninstallation of VirtualBox on Solaris requires root permissions. To perform the uninstallation, start a root terminal session and execute:
pkgrm SUNWvbox
After confirmation, this will remove VirtualBox from your system.
To uninstall the VirtualBox kernel interface module, execute:
pkgrm SUNWvboxkern
29
Page 30

2 Installation
2.4.4 Unattended installation
To perform a non-interactive installation of VirtualBox we have provided a response
file named autoresponse that the installer will use for responses to inputs rather
than ask them from you.
Extract the tar.gz package as described in the normal installation. Then open a root
terminal session and execute:
pkgadd -d VirtualBox-3.0.0-SunOS-x86 -n -a autoresponse SUNWvbox
To perform a non-interactive uninstallation, open a root terminal session and execute:
pkgrm -n -a /opt/VirtualBox/autoresponse SUNWvbox
2.4.5 Configuring a zone for running VirtualBox
Starting with VirtualBox 1.6 it is possible to run VirtualBox from within Solaris
zones. For an introduction of Solaris zones, please refer to http://www.sun.com/
bigadmin/features/articles/solaris_zones.jsp.
Assuming that VirtualBox has already been installed into your zone, you need to give
the zone access to VirtualBox’s device node. This is done by performing the following
steps. Start a root terminal and execute:
zonecfg -z vboxzone
Inside the zonecfg prompt add the device resource and match properties to the
zone. Here’s how it can be done:
zonecfg:vboxzone>add device
zonecfg:vboxzone:device>set match=/dev/vboxdrv
zonecfg:vboxzone:device>end
zonecfg:vboxzone>verify
zonecfg:vboxzone>exit
If you are running VirtualBox 2.2.0 or above on OpenSolaris or Nevada hosts, you
should add a device for /dev/vboxusbmon too, similar to what was shown above.
This does not apply to Solaris 10 hosts due to lack of USB support.
Replace “vboxzone” with the name of the zone in which you intend to run
VirtualBox. Next reboot the zone using zoneadm and you should be able to run
VirtualBox from within the configured zone.
30
Page 31

3 Starting out with VirtualBox
As already mentioned in chapter 1.1, Virtualization basics, page 9, VirtualBox allows
you to run each of your guest operating systems on its own virtual computer system,
which is called a “virtual machine” (VM). The guest system will run in its VM as if it
were installed on a real computer, according to the VM settings you have specified. All
software running on the guest system does so as it would on a real machine.
You have considerable latitude in deciding what virtual hardware will be provided to
the guest. The virtual hardware can be used for communicating with the host system
or with other guests. For instance, if you provide VirtualBox with the image of a CDROM in an ISO file, VirtualBox can present this image to a guest system as if it were
a physical CD-ROM. Similarly, you can give a guest system access to the real network
via its virtual network card, and, if you choose, give the host system, other guests, or
computers on the Internet access to the guest system.
VirtualBox comes with many advanced interfaces, which will be described later in
this manual:
• chapter 7.3, VBoxSDL, the simplified VM displayer, page 92 explains how to run
a single VM at a time with a reduced graphical interface;
• chapter 7.4.1, VBoxHeadless, the VRDP-only server, page 94 shows how to run
virtual machines remotely;
• chapter 8, VBoxManage reference, page 100 explains how to create, configure,
and control virtual machines completely from the command line.
The following introductory sections, however, describe VirtualBox, the graphical
user interface, which is the simplest way to get started.
3.1 Starting the graphical user interface
Depending on your host operating system, you can start VirtualBox as follows:
• On a Windows host, in the standard “Programs” menu, click on the item in the
“VirtualBox” group.
• On a Mac OS X host, in the Finder, double-click on the “VirtualBox” item in the
“Applications” folder. (You may want to drag this item onto your Dock.)
• On a Linux or Solaris host, depending on your desktop environment, a
“VirtualBox” item may have been placed in either the “System” or “System Tools”
31
Page 32
3 Starting out with VirtualBox
group of your “Applications” menu. Alternatively, you can type VirtualBox in
a terminal.
A window like the following should come up:
On the left, you can see a pane that lists all the virtual machines you have created so
far (quite a few in the example above). A row of buttons above it allows you to create
new VMs and work on existing VMs. The pane on the right displays the properties of
the virtual machine currently selected, if any.
When you start VirtualBox for the first time, as there is no virtual machine yet,
everything will be empty.
3.2 Creating a virtual machine
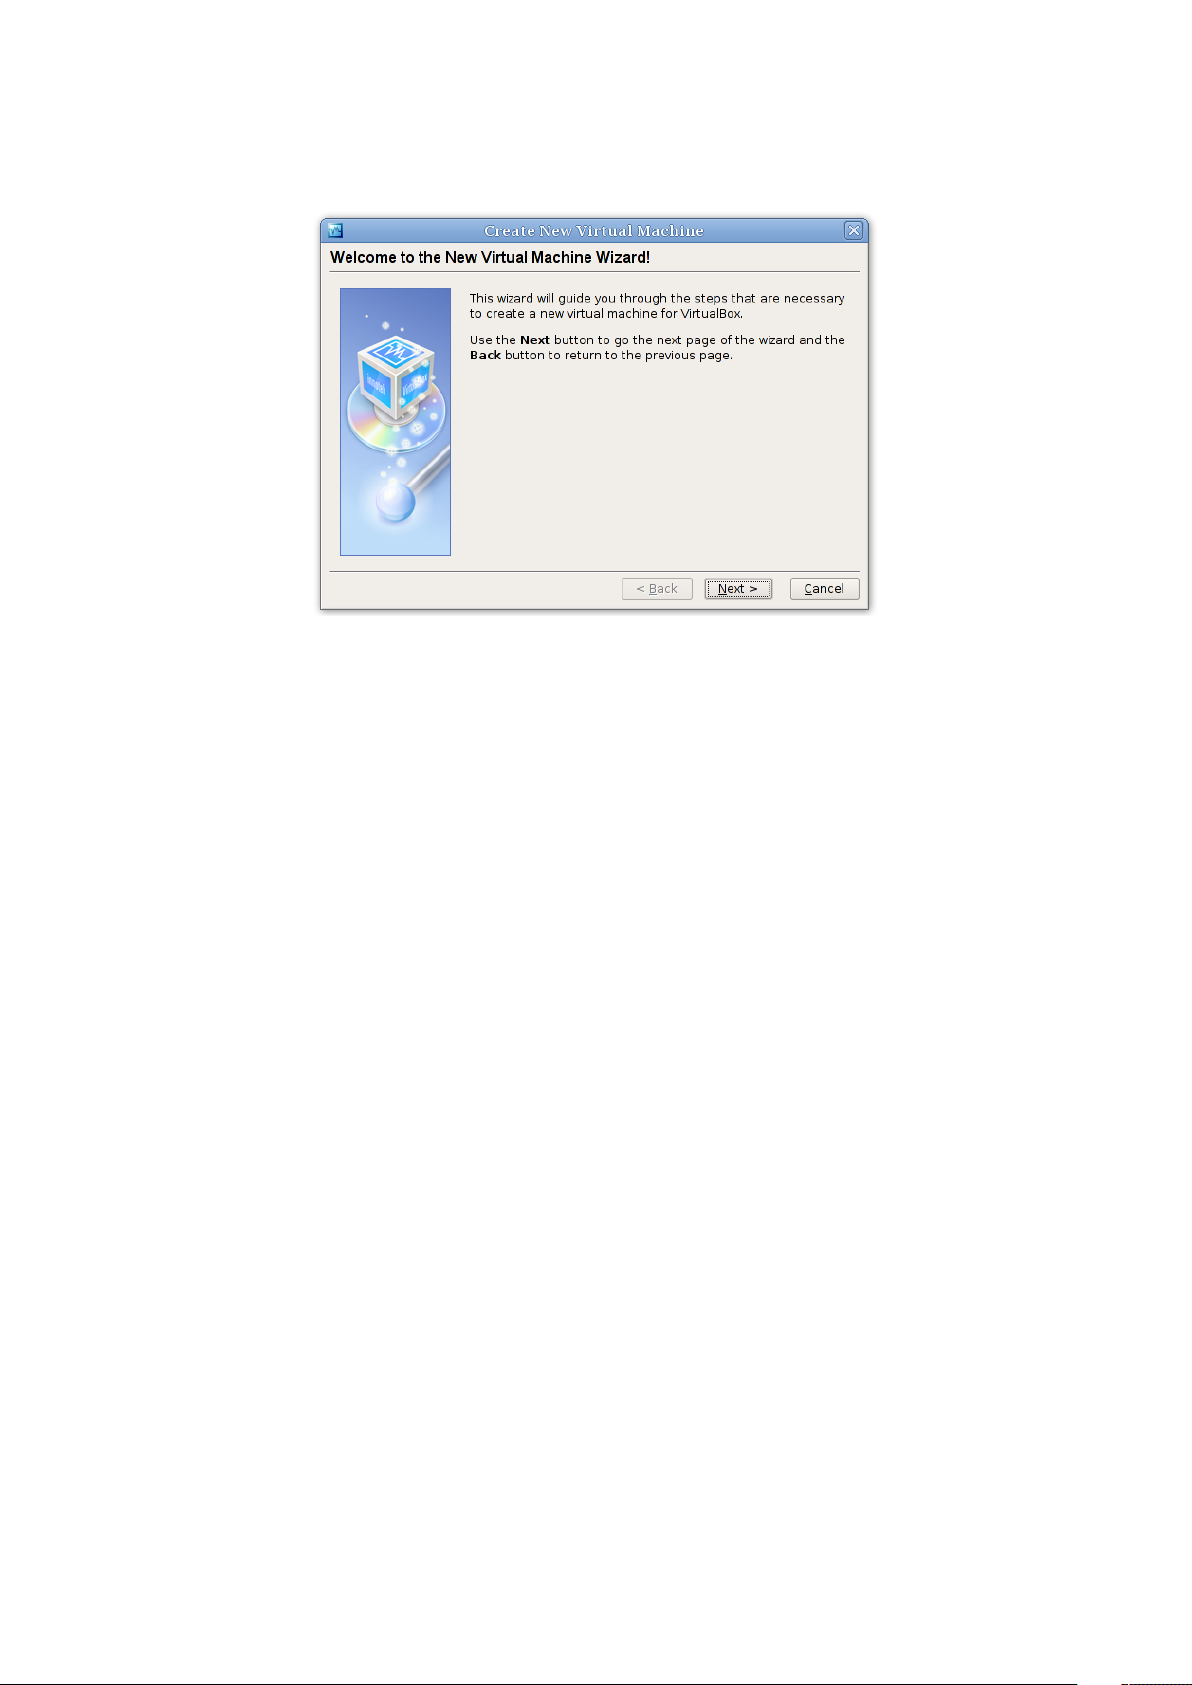
Clicking on the “New” button in the user interface will guide you through setting up a
new virtual machine (VM). A wizard will show up:
32
Page 33
3 Starting out with VirtualBox
On the following pages, the wizard will ask you for the bare minimum of information
that is needed to create a VM, in particular:
1. A name for your VM, and the type of operating system (OS) you want to install.
The name is what you will later see in the VirtualBox main window, and what
your settings will be stored under. It is purely informational, but once you have
created a few VMs, you will appreciate if you have given your VMs informative
names. “My VM” probably is therefore not as useful as “Windows XP SP2”.
For “Operating System Type”, select the operating system that you want to install
later. Depending on your selection, VirtualBox will enable or disable certain VM
settings that your guest operating system may require. This is particularly important for 64-bit guests (see chapter 1.6, 64-bit guests, page 18). It is therefore
recommended to always set it to the correct value.
2. The amount of memory (RAM) that the virtual machine should have for itself.
Every time a virtual machine is started, VirtualBox will allocate this much memory from your host machine and present it to the guest operating system, which
will report this size as the (virtual) computer’s installed RAM.
33
Page 34

3 Starting out with VirtualBox
Note: Choose this setting carefully! The memory you give to the VM will
not be available to your host OS while the VM is running, so do not specify
more than you can spare. For example, if your host machine has 1 GB of
RAM and you enter 512 MB as the amount of RAM for a particular virtual
machine, while that VM is running, you will only have 512 MB left for all the
other software on your host. If you run two VMs at the same time, even more
memory will be allocated for the second VM (which may not even be able to
start if that memory is not available). On the other hand, you should specify
as much as your guest OS (and your applications) will require to run properly.
A Windows XP guest will require at least a few hundred MB RAM to run properly,
and Windows Vista will even refuse to install with less than 512 MB. Of course,
if you want to run graphics-intensive applications in your VM, you may require
even more RAM.
So, as a rule of thumb, if you have 1 GB of RAM or more in your host computer,
it is usually safe to allocate 512 MB to each VM. But, in any case, make sure
you always have at least 256-512 MB of RAM left on your host operating system.
Otherwise you may cause your host OS to excessively swap out memory to your
hard disk, effectively bringing your host system to a standstill.
As with the other settings, you can change this setting later, after you have created the VM.
3. Next, you must specify a virtual hard disk for your VM.
There are many and potentially complicated ways in which VirtualBox can provide hard disk space to a VM (see chapter 5, Virtual storage, page 75 for details),
but the most common way is to use a large image file on your “real” hard disk,
whose contents VirtualBox presents to your VM as if it were a complete hard
disk.
The wizard presents to you the following window:
34
Page 35
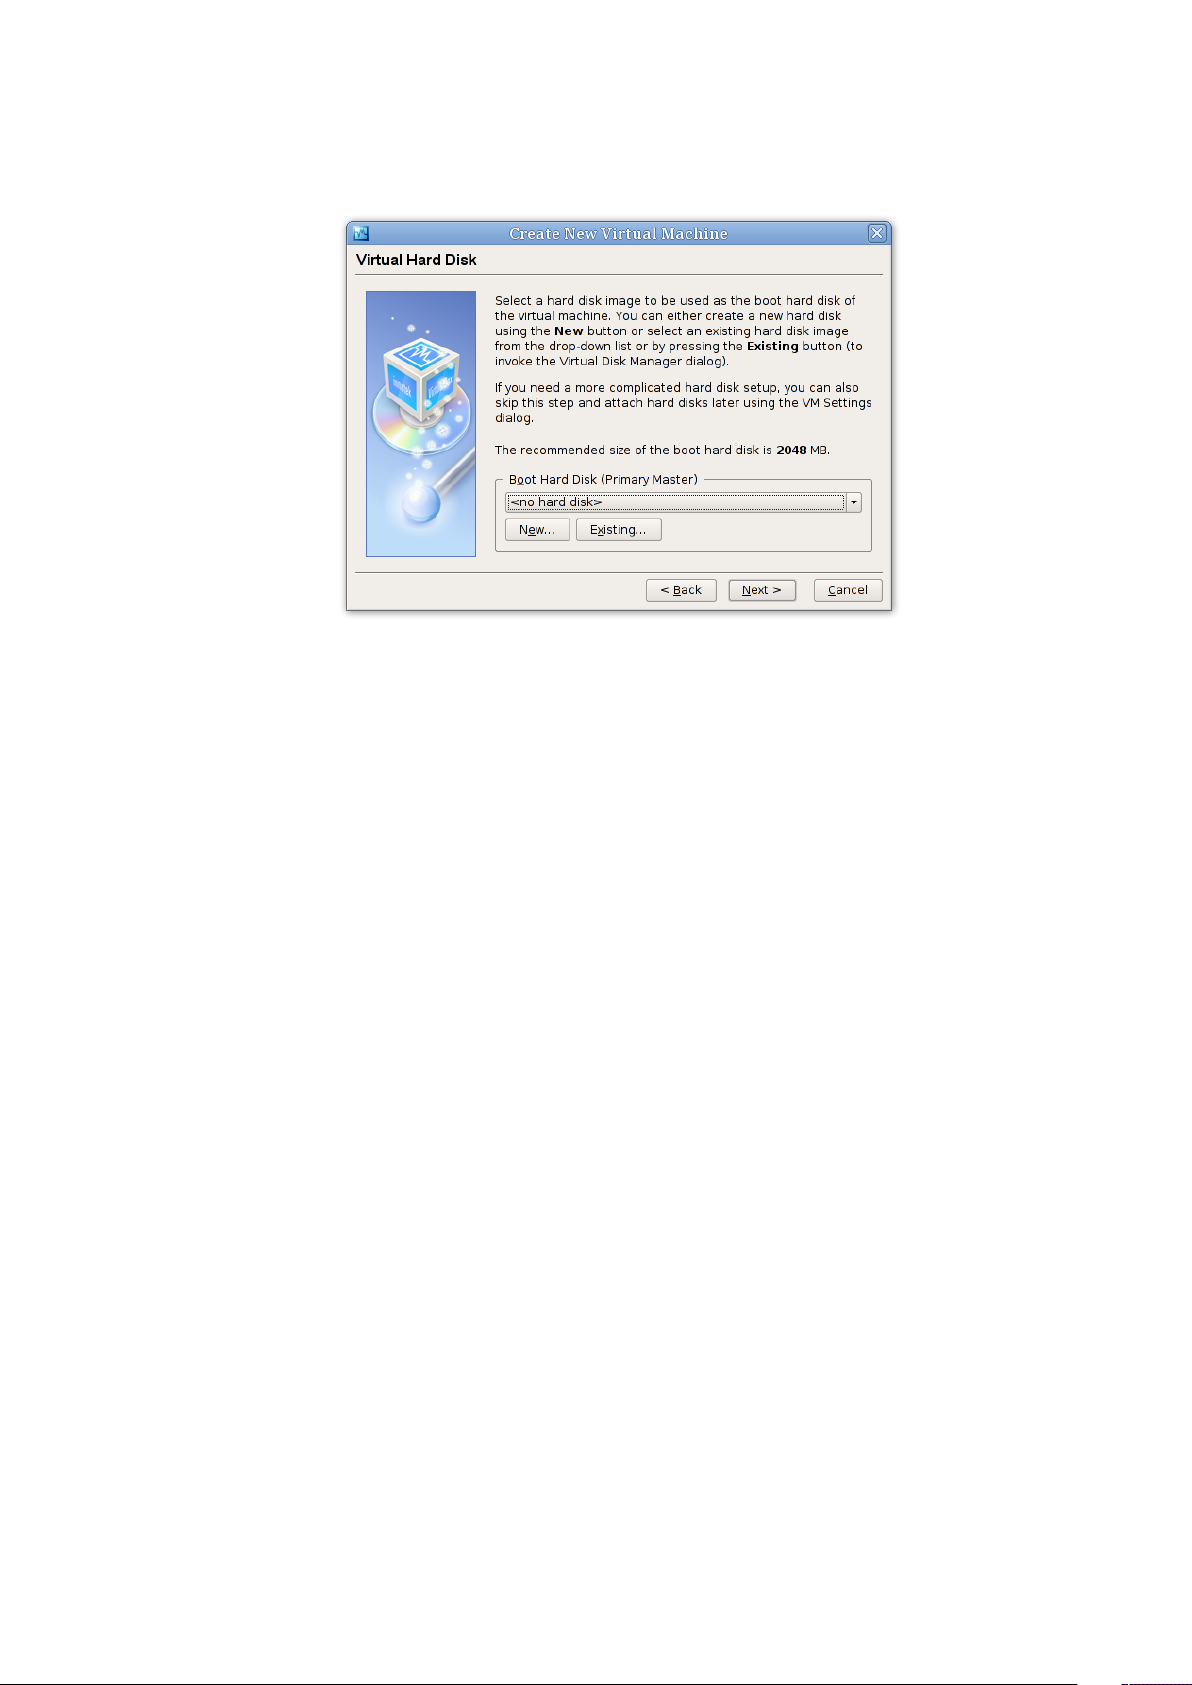
3 Starting out with VirtualBox
The wizard allows you to create an image file or use an existing one. Note also
that the disk images can be separated from a particular VM, so even if you delete
a VM, you can keep the image, or copy it to another host and create a new VM
for it there.
In the wizard, you have the following options:
• If you have previously created any virtual hard disks which have not been
attached to other virtual machines, you can select those from the dropdown list in the wizard window.
• Otherwise, to create a new virtual hard disk, press the “New” button.
• Finally, for more complicated operations with virtual disks, the “Existing...“
button will bring up the Virtual Disk Manager, which is described in more
detail in chapter 3.5, The Virtual Disk Manager, page 43.
Most probably, if you are using VirtualBox for the first time, you will want to
create a new disk image. Hence, press the “New” button.
This brings up another window, the “Create New Virtual Disk Wizard”.
VirtualBox supports two types of image files:
• A dynamically expanding file will only grow in size when the guest actu-
ally stores data on its virtual hard disk. It will therefore initially be small
on the host hard drive and only later grow to the size specified as it is filled
with data.
• A fixed-size file will immediately occupy the file specified, even if only a
fraction of the virtual hard disk space is actually in use. While occupying
35
Page 36

3 Starting out with VirtualBox
much more space, a fixed-size file incurs less overhead and is therefore
slightly faster than a dynamically expanding file.
For details about the differences, please refer to chapter
(VDI, VMDK, VHD), page 77.
To prevent your physical hard disk from running full, VirtualBox limits the size
of the image file. Still, it needs to be large enough to hold the contents of
your operating system and the applications you want to install – for a modern
Windows or Linux guest, you will probably need several gigabytes for any serious
use:
5.2, Disk image files
After having selected or created your image file, again press “Next” to go to the
next page.
4. After clicking on “Finish”, your new virtual machine will be created. You will
then see it in the list on the left side of the main window, with the name you
have entered.
3.3 Basics of virtual machine configuration
When you select a virtual machine from the list in the main VirtualBox window, you
will see a summary of that machine’s settings on the right of the window, under the
“Details” tab.
Clicking on the “Settings” button in the toolbar at the top of VirtualBox main window
brings up a detailed window where you can configure many of the properties of the
VM that is currently selected. But be careful: even though it is possible to change all
36
Page 37

3 Starting out with VirtualBox
VM settings after installing a guest operating system, certain changes might prevent a
guest operating system from functioning correctly if done after installation.
Note: The “Settings” button is disabled while a VM is either in the “running”
or “saved” state. This is simply because the settings dialog allows you to
change fundamental characteristics of the virtual computer that is created for
your guest operating system, and this operating system may not take it well
when, for example, half of its memory is taken away from under its feet. As a
result, if the “Settings” button is disabled, shut down the current VM first.
VirtualBox provides a plethora of parameters that can be changed for a virtual machine. The various settings that can be changed in the “Settings” window are described
in detail in chapter 3.7, Virtual machine settings, page 45. Even more parameters are
available with the command line interface; see chapter 8, VBoxManage reference, page
100.
For now, if you have just created an empty VM, you will probably be most interested
in the settings presented by the “CD/DVD-ROM” section if you want to make a CDROM or a DVD-ROM available the first time you start it, in order to install your guest
operating system.
For this, you have two options:
• If you have actual CD or DVD media from which you want to install your guest
operating system (e.g. in the case of a Windows installation CD or DVD), put the
media into your host’s CD or DVD drive.
Then, in the settings dialog, go to the “CD/DVD-ROM” section and select “Host
drive” with the correct drive letter (or, in the case of a Linux host, device file).
This will allow your VM to access the media in your host drive, and you can
proceed to install from there.
37
Page 38

3 Starting out with VirtualBox
• If you have downloaded installation media from the Internet in the form of an
ISO image file (most probably in the case of a Linux distribution), you would
normally burn this file to an empty CD or DVD and proceed as just described.
With VirtualBox however, you can skip this step and mount the ISO file directly.
VirtualBox will then present this file as a CD or DVD-ROM drive to the virtual
machine, much like it does with virtual hard disk images.
In this case, in the settings dialog, go to the “CD/DVD-ROM” section and select
“ISO image file”. This brings up the Virtual Disk Image Manager, where you
perform the following steps:
1. Press the “Add” button to add your ISO file to the list of registered images.
This will present an ordinary file dialog that allows you to find your ISO file
on your host machine.
2. Back to the manager window, select the ISO file that you just added and
press the “Select” button. This selects the ISO file for your VM.
The Virtual Disk Image Manager is described in detail in chapter 3.5, The Virtual
Disk Manager, page 43.
3.4 Running a virtual machine
The “Start” button in the main window starts the virtual machine that is currently
selected.
This opens up a new window, and the virtual machine which you selected will boot
up. Everything which would normally be seen on the virtual system’s monitor is shown
38
Page 39

3 Starting out with VirtualBox
in the window, as can be seen with the image in chapter 1.1, Virtualization basics, page
9.
In general, you can use the virtual machine much like you would use a real com-
puter. There are couple of points worth mentioning however.
3.4.1 Keyboard and mouse support in virtual machines
3.4.1.1 Capturing and releasing keyboard and mouse
Since the operating system in the virtual machine does not “know” that it is not running on a real computer, it expects to have exclusive control over your keyboard and
mouse. This is, however, not the case since, unless you are running the VM in fullscreen mode, your VM needs to share keyboard and mouse with other applications
and possibly other VMs on your host.
As a result, initially after installing a host operating system and before you install
the guest additions (we will explain this in a minute), only one of the two – your VM
or the rest of your computer – can “own” the keyboard and the mouse. You will see a
second mouse pointer which will always be confined to the limits of the VM window.
Basically, you activate the VM by clicking inside it.
To return ownership of keyboard and mouse to your host operating system,
VirtualBox reserves a special key on your keyboard for itself: the “host key”. By
default, this is the right Control key on your keyboard; on a Mac host, the default host
key is the left Command key. You can change this default in the VirtualBox Global
Settings. In any case, the current setting for the host key is always displayed at the
bottom right of your VM window, should you have forgotten about it:
In detail, all this translates into the following:
• Your keyboard is owned by the VM if the VM window on your host desktop
has the keyboard focus (and then, if you have many windows open in your guest
operating system as well, the window that has the focus in your VM). This means
that if you want to type within your VM, click on the title bar of your VM window
first.
39
Page 40

3 Starting out with VirtualBox
To release keyboard ownership, press the Host key (as explained above, typically
the right Control key).
Note that while the VM owns the keyboard, some key sequences (like Alt-Tab for
example) will no longer be seen by the host, but will go to the guest instead.
After you press the host key to re-enable the host keyboard, all key presses will
go through the host again, so that sequences like Alt-Tab will no longer reach the
guest.
• Your mouse is owned by the VM only after you have clicked in the VM window.
The host mouse pointer will disappear, and your mouse will drive the guest’s
pointer instead of your normal mouse pointer.
Note that mouse ownership is independent of that of the keyboard: even after
you have clicked on a titlebar to be able to type into the VM window, your mouse
is not necessarily owned by the VM yet.
To release ownership of your mouse by the VM, also press the Host key.
As this behavior can be inconvenient, VirtualBox provides a set of tools and device
drivers for guest systems called the “VirtualBox Guest Additions” which make VM keyboard and mouse operation a lot more seamless. Most importantly, the Additions will
get rid of the second “guest” mouse pointer and make your host mouse pointer work
directly in the guest.
This will be described later in chapter 4, Guest Additions, page 60.
3.4.1.2 Typing special characters
Operating systems expect certain key combinations to initiate certain procedures.
Some of these key combinations may be difficult to enter into a virtual machine, as
there are three candidates as to who receives keyboard input: the host operating system, VirtualBox, or the guest operating system. Who of these three receives keypresses
depends on a number of factors, including the key itself.
• Host operating systems reserve certain key combinations for themselves. For
example, it is impossible to enter the Ctrl+Alt+Delete combination if you want
to reboot the guest operating system in your virtual machine, because this key
combination is usually hard-wired into the host OS (both Windows and Linux
intercept this), and pressing this key combination will therefore reboot your host.
Also, on systems running the X Window System, the key combination
Ctrl+Alt+Backspace normally resets the X server (to restart the entire graphical
user interface in case it got stuck). As the X server intercepts this combination,
pressing it will usually restart your host graphical user interface (and kill all
running programs, including VirtualBox, in the process).
Third, on systems supporting virtual terminals, the key combination Ctrl+Alt+Fx
(where Fx is one of the function keys from F1 to F12) normally allows to switch
between virtual terminals. As with Ctrl+Alt+Delete, these combinations are
40
Page 41

3 Starting out with VirtualBox
intercepted by the host operating system and therefore always switch terminals
on the host.
If, instead, you want to send these key combinations to the guest operating system in the virtual machine, you will need to use one of the following methods:
– Use the items in the “Machine” menu of the virtual machine window. There
you will find “Insert Ctrl+Alt+Delete” and “Ctrl+Alt+Backspace”; the latter will only have an effect with Linux guests, however.
– Press special key combinations with the Host key (normally the right Con-
trol key), which VirtualBox will then translate for the virtual machine:
∗ Host key + Del to send Ctrl+Alt+Del (to reboot the guest);
∗ Host key + Backspace to send Ctrl+Alt+Backspace (to restart the
graphical user interface of a Linux guest);
∗ Host key + F1 (or other function keys) to simulate Ctrl+Alt+F1 (or
other function keys, i.e. to switch between virtual terminals in a Linux
guest).
• For some other keyboard combinations such as Alt-Tab (to switch between open
windows), VirtualBox allows you to configure whether these combinations will
affect the host or the guest, if a virtual machine currently has the focus. This is a
global setting for all virtual machines and can be found under “File” -> “Global
settings” -> “Input” -> “Auto-capture keyboard”.
3.4.2 Changing removable media
While a virtual machine is running, you can change removable media in the “Devices”
menu of the VM’s window. Here you can select in detail what VirtualBox presents to
your VM as a CD, DVD, or floppy.
The settings are the same as would be available for the VM in the “Settings” dialog
of the VirtualBox main window, but since that dialog is disabled while the VM is in the
“running” or “saved” state, this extra menu saves you from having to shut down and
restart the VM every time you want to change media.
Hence, in the “Devices” menu, VirtualBox allows you to attach the host drive to the
guest or select a floppy or DVD image using the Disk Image Manager, all as described
in chapter 3.3, Basics of virtual machine configuration, page 36.
3.4.3 Saving the state of the machine
When you click on the “Close” button of your virtual machine window (at the top right
of the window, just like you would close any other window on your system) (or press
the Host key together with “Q”), VirtualBox asks you whether you want to “save” or
“power off ” the VM.
41
Page 42

3 Starting out with VirtualBox
The difference between these three options is crucial. They mean:
• Save the machine state: With this option, VirtualBox “freezes” the virtual ma-
chine by completely saving its state to your local disk. When you later resume the
VM (by again clicking the “Start” button in the VirtualBox main window), you
will find that the VM continues exactly where it was left off. All your programs
will still be open, and your computer resumes operation.
Saving the state of a virtual machine is thus in some ways similar to suspending
a laptop computer (e.g. by closing its lid).
• Send the shutdown signal. This will send an ACPI shutdown signal to the vir-
tual machine, which has the same effect as if you had pressed the power button
on a real computer. So long as a fairly modern operating system is installed and
running in the VM, this should trigger a proper shutdown mechanism in the VM.
• Power off the machine: With this option, VirtualBox also stops running the
virtual machine, but without saving its state.
This is equivalent to pulling the power plug on a real computer without shutting
it down properly. If you start the machine again after powering it off, your
operating system will have to reboot completely and may begin a lengthy check
of its (virtual) system disks.
As a result, this should not normally be done, since it can potentially cause data
loss or an inconsistent state of the guest system on disk.
The “Discard” button in the main VirtualBox window discards a virtual machine’s
saved state. This has the same effect as powering it off, and the same warnings apply.
3.4.4 Snapshots
With VirtualBox’s snapshots, you can save a particular state of a virtual machine for
later use. At any later time, you can revert to that state, even though you may have
changed the VM considerably since then.
This is particularly useful for making sure that a guest installation is not damaged
by accidental changes, misbehaving software, or viruses.
42
Page 43

3 Starting out with VirtualBox
Once you have set up the machine the way you want it, simply take a snapshot, and
should anything happen to the installation, you can simply revert to its snapshot state.
To take a snapshot of your VM, perform the following steps:
1. If your VM is currently in either the “saved” or the “powered off” state (as displayed next to the VM in the VirtualBox main window), click on the “Snapshots”
tab on the top right of the main window, and then on the small camera icon (for
“Take snapshot”).
If your VM is currently running, select “Take snapshot” from the “Machine” pulldown menu of the VM window.
2. A window will pop up and ask you to name the snapshot. This name is purely for
reference purposes to help you remember the state of the snapshot. For example,
a useful name would be “Fresh installation from scratch, no external drivers”.
3. Your new snapshot will then appear in the list of snapshots under the “Snapshots”
tab. Underneath, you will see an item called “Current state”, signifying that the
current state of your VM is a variation based on the snapshot you took earlier.
(If you later take another snapshot, you will see that they will be displayed in
sequence, and each subsequent snapshot is a derivation of the earlier one.)
To revert to an earlier snapshot, you right-click on the “Current state” item and
select “Revert to current snapshot”. This will bring the VM back to the state of the
nearest (most recent) snapshot. Similarly, you can merge several earlier snapshots
into one by right-clicking on a snapshot and selecting “Discard snapshot”.
Note: The snapshot reverted to will affect the virtual hard drives that are
connected to your VM, as the entire state of the virtual hard drive will be
reverted as well. This means also that all files that have been created since
the snapshot and all other file changes will be lost. In order to prevent such
data loss while still making use of the snapshot feature, it is possible to add a
second hard drive in “write-through” mode using the VBoxManage interface
and use it to store your data. As write-through hard drives are not included
in snapshots, they remain unaltered when a machine is reverted. See chapter
5.3, Configuring image write operations, page 78 for details.
3.5 The Virtual Disk Manager
VirtualBox keeps an internal registry of all available hard disk, CD/DVD-ROM and
floppy disk images. This registry can be viewed and changed in the Virtual Disk
Manager, which you can access from the “File” menu in the VirtualBox main window:
43
Page 44

3 Starting out with VirtualBox
The Disk Image Manager shows you all images that are currently registered with
VirtualBox, conveniently grouped in three tabs for the three possible formats. These
formats are:
• Hard disk images, either in VirtualBox’s own Virtual Disk Image (VDI) format or
in the widely supported VMDK format1;
• CD/DVD images in standard ISO format;
• floppy images in standard RAW format.
As you can see in the screenshot above, for each image, the Virtual Disk Manager
shows you the full path of the image file and other information, such as the virtual
machine the image is currently attached to, if any. Also, as can be seen in the screenshot, if you have created snapshots for a virtual machine, additional “differencing”
hard disk images may automatically be created; see chapter 3.4.4, Snapshots, page 42
for details.
The Virtual Disk Manager allows you to
• create new hard disk images using the “New” button; this will bring up the
“Create Disk Image” wizard already described in chapter 3.2, Creating a virtual
machine, page 32;
• import existing VDI or VMDK files from your hard drive into VirtualBox using
the “Add” button;
1
With the VMDK support of VirtualBox, you can continue using VMDK images you may have created with
another virtualization product that uses the VMDK format. See chapter 5.2, Disk image files (VDI, VMDK,
VHD), page 77 for details.
44
Page 45

3 Starting out with VirtualBox
• remove an image from the registry (and optionally delete the image file when
doing so);
• “release” an image, that is, detach it from a virtual machine if it is currently
attached to one as a virtual hard disk.
We recommend that you maintain two special folders on your system for keeping
images: one for hard disk image files (which can, in the case of dynamically expanding images, grow to considerable sizes), and one for ISO files (which were probably
downloaded from the Internet).
Hard disk image files can be copied onto other host systems and imported into
virtual machines there, although certain guest systems (notably Windows 2000 and
XP) will require that the new virtual machine be set up in a similar way to the old one.
Note: Do not simply make copies of virtual disk images. If you import such
a second copy into a virtual machine, VirtualBox will complain with an error,
since VirtualBox assigns a unique identifier (UUID) to each disk image to
make sure it is only used once. See chapter 5.4, Cloning disk images, page 80
for instructions on this matter.
Details about the different container formats supported by VirtualBox are described
in chapter 5, Virtual storage, page 75.
3.6 Deleting virtual machines
The “Delete” button in the main VirtualBox window lets you remove a virtual machine
which you no longer need. All settings for that machine will be lost. However, any
hard disk images attached to the machine will be kept; you can delete those separately
using the Disk Image Manager (described just above).
You cannot delete a machine which has snapshots or is in a saved state, so you must
discard these first.
3.7 Virtual machine settings
Most of the settings described below are available in the settings window after selecting a virtual machine in the VirtualBox main window and clicking on the “Settings”
button. To keep the user interface simple, those of the following settings which are not
as commonly used are not shown in that settings window. They are, however, available through VBoxManage and will be described in chapter 8, VBoxManage reference,
page 100 later.
45
Page 46

3 Starting out with VirtualBox
3.7.1 General settings
In the Settings window, under “General”, you can configure the most fundamental
aspects of the virtual machine such as memory and essential hardware. There are four
tabs, “Basic”, “Advanced”, “Description” and “Other”.
3.7.1.1 “Basic” tab
Under the “Basic” tab of the “General” settings category, you can find these settings:
Name The name under which the VM is shown in the list of VMs in the main window.
Under this name, VirtualBox also saves the VM’s configuration files. By changing
the name, VirtualBox renames these files as well. As a result, you can only use
characters which are allowed in your host operating system’s file names.
Note that internally, VirtualBox uses unique identifiers (UUIDs) to identify virtual
machines. You can display these with VBoxManage.
Operating system / Version The type of the guest operating system that is (or will
be) installed in the VM. This is the same setting that was specified in the “New
Virtual Machine” wizard, as described with chapter 3.2, Creating a virtual ma-
chine, page 32 above.
3.7.1.2 “Advanced” tab
Snapshot folder By default, VirtualBox saves snapshot data together with your other
VirtualBox configuration data; see chapter 9.1, VirtualBox configuration data,
page 127. With this setting, you can specify any other folder for each VM.
Shared clipboard If the virtual machine has Guest Additions installed, you can select
here whether the clipboard of the guest operating system should be shared with
that of your host. If you select “Bidirectional”, then VirtualBox will always make
sure that both clipboards contain the same data. If you select “Host to guest”
or “Guest to host”, then VirtualBox will only ever copy clipboard data in one
direction.
Remember mounted media at runtime If this is checked, VirtualBox will save the
state of what media has been mounted between several runs of a virtual machine.
Mini toolbar In full screen or seamless mode, VirtualBox can display a small toolbar
that contains some of the items that are normally available from the virtual machine’s menu bar. This toolbar reduces itself to a small gray line unless you move
the mouse over it. With the toolbar, you can return from full screen or seamless
mode, control machine execution or enable certain devices. If you don’t want to
see the toolbar, disable this setting.
46
Page 47

3 Starting out with VirtualBox
3.7.1.3 “Description” tab
Here you can enter any description for your virtual machine, if you want. This has no
effect of the functionality of the machine, but you may find this space useful to note
down things like the configuration of a virtual machine and the software that has been
installed into it.
3.7.2 System settings
The “System” category groups various settings that are related to the basic hardware
that is presented to the virtual machine.
Note: As the activation mechanism of Microsoft Windows is sensitive to hardware changes, if you are changing hardware settings for a Windows guest,
some of these changes may trigger a request for another activation with Microsoft.
3.7.2.1 “Motherboard” tab
On the “Motherboard” tab, you can influence virtual hardware that would normally be
on the motherboard of a real computer.
Base memory This sets the amount of RAM that is allocated and given to the VM
when it is running. The specified amount of memory will be requested from the
host operating system, so it must be available or made available as free memory
on the host when attempting to start the VM and will not be available to the
host while the VM is running. This is the same setting that was specified in the
“New Virtual Machine” wizard, as described with guidelines under chapter 3.2,
Creating a virtual machine, page 32 above.
Generally, it is possible to change the memory size after installing the guest
operating system (provided you do not reduce the memory to an amount where
the operating system would no longer boot).
Boot order This setting determines the order in which the guest operating system
will attempt to boot from the various virtual boot devices. Analogous to a real
PC’s BIOS setting, VirtualBox can tell a guest OS to start from the virtual floppy,
the virtual CD/DVD drive, the virtual hard drive (each of these as defined by the
other VM settings), the network, or none of these.
If you select “Network”, the VM will attempt to boot from a network via the PXE
mechanism. This needs to be configured in detail on the command line; please
see chapter 8.5, VBoxManage modifyvm, page 107.
47
Page 48

3 Starting out with VirtualBox
Enable ACPI VirtualBox can present the Advanced Configuration and Power Interface
(ACPI) to the guest operating system for configuring the virtual hardware. In
addition, via ACPI, VirtualBox can present the host’s power status information to
the guest.
ACPI is the current industry standard to allow operating systems to recognize
hardware, configure motherboards and other devices and manage power. As all
modern PCs contain this feature and Windows and Linux have been supporting
it for years, it is also enabled by default in VirtualBox.
Warning: All Windows operating systems starting with Windows 2000 install
different kernels depending on whether ACPI is available, so ACPI must not
be turned off after installation of a Windows guest OS. Turning it on after
installation will have no effect however.
Enable I/O APIC Advanced Programmable Interrupt Controllers (APICs) are a newer
x86 hardware feature that have replaced old-style Programmable Interrupt Controllers (PICs) in recent years. With an I/O APIC, operating systems can use more
than 16 interrupt requests (IRQs) and therefore avoid IRQ sharing for improved
reliability.
Note: Enabling the I/O APIC is required for 64-bit guest operating systems,
especially Windows Vista; it is also required if you want to use more than one
virtual CPU in a virtual machine.
However, software support for I/O APICs has been unreliable with some operating systems other than Windows. Also, the use of an I/O APIC slightly increases
the overhead of virtualization and therefore slows down the guest OS a little.
Warning: All Windows operating systems starting with Windows 2000 install
different kernels depending on whether an I/O APIC is available. As with
ACPI, the I/O APIC therefore must not be turned off after installation of a
Windows guest OS. Turning it on after installation will have no effect however.
3.7.2.2 “Processor” tab
On the “Processor” tab, you can set how many virtual CPU cores the guest operating
systems should see. Starting with version 3.0, VirtualBox supports symmetrical multiprocessing (SMP) and can present up to 32 virtual CPU cores to each virtual machine.
You should not, however, configure virtual machines to use more CPU cores than
you have available physically.
48
Page 49

3 Starting out with VirtualBox
In addition, the “Enable PAE/NX” setting determines whether the PAE and NX capabilities of the host CPU will be exposed to the virtual machine. PAE stands for “Physical
Address Extension”. Normally, if enabled and supported by the operating system, then
even a 32-bit x86 CPU can access more than 4 GB of RAM. This is made possible by
adding another 4 bits to memory addresses, so that with 36 bits, up to 64 GB can be
addressed. Some operating systems (such as Ubuntu Server) require PAE support from
the CPU and cannot be run in a virtual machine without it.
3.7.2.3 “Acceleration” tab
On this page, you can determine whether VirtualBox should make use of hardware
virtualization; see chapter 1.2, Software vs. hardware virtualization (VT-x and AMD-V),
page 11 for an introduction.
The “Enable VT-x/AMD-V” setting determines whether the virtualization engine
will try to use the host CPU’s hardware virtualization extensions such as Intel VT-x
and AMD-V. For 64-bit guest operating systems, SMP and for some rather exotic guest
operating systems such as OS/2, this setting needs to be enabled.
Starting with VirtualBox 2.2, this setting is enabled by default for newly created
machines.
Nested paging is not enabled automatically when you enable hardware virtualization; you can enable it separately once you have enabled hardware virtualization.
Note: You can mix software and hardware virtualization when running multiple VMs. In certain cases a small performance penalty will be unavoidable
when mixing VT-x and software virtualization VMs. We recommend not mixing virtualization modes if maximum performance and low overhead are essential. This does not apply to AMD-V.
3.7.3 Display settings
Video memory size This sets the size of the memory provided by the virtual graph-
ics card available to the guest, in MB. As with the main memory, the specified
amount will be allocated from the host’s resident memory. Based on the amount
of video memory, higher resolutions and color depths may be available.
Enable 3D acceleration If the virtual machine has Guest Additions installed, you can
select here whether the guest should support accelerated 3D graphics. Please
refer to chapter 4.8, Hardware 3D acceleration (OpenGL and DirectX 8/9), page
71 for details.
Remote display Under the “Remote display” tab, you can enable the VRDP server
that is built into VirtualBox to allow you to connect to the virtual machine remotely. For this, you can use any standard RDP viewer, such as the one that
49
Page 50
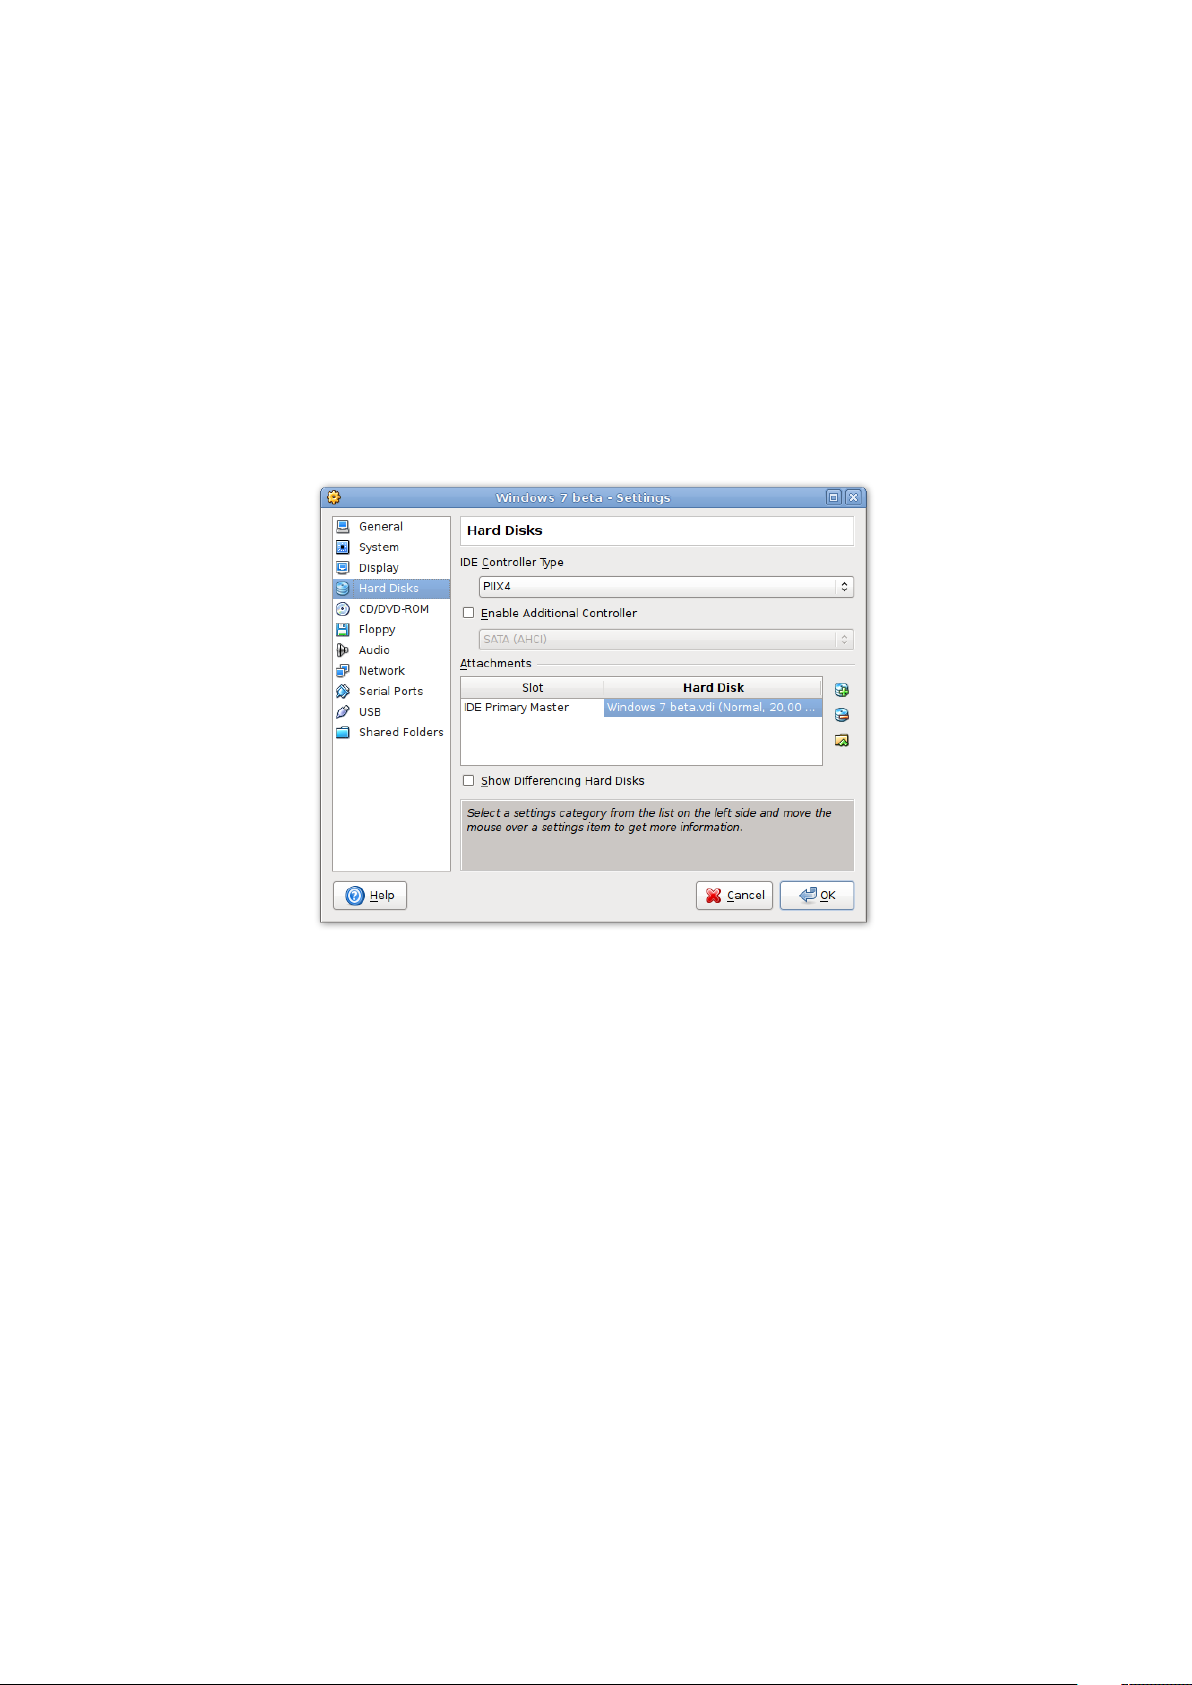
3 Starting out with VirtualBox
comes with Microsoft Windows (typically found under “Accessories” -> “Communication” -> “Remote Desktop Connection”) or, on Linux systems, the standard open-source rdesktop program.
These features are described in detail in chapter 7.4, Remote virtual machines
(VRDP support), page 93.
3.7.4 Hard disk settings
In the VM Settings window, the “Hard Disks” section allows you to connect virtual
hard disk images to your virtual machine:
As with a real PC, VirtualBox by default offers you two IDE controllers, each with
a “master” and a “slave” connection. With one of these four connectors being reserved
to the CD-ROM/DVD drive (see below), that leaves you with three possible hard disks,
each represented by one disk image file.
You can select which IDE controller type VirtualBox should present to the virtual
machine (PIIX3, PIIX4 or ICH6). This should not make much of a difference, but if you
import a virtual machine from another virtualization product, the operating system in
that machine may expect a particular controller and crash if it isn’t found.
In addition to the IDE controller, VirtualBox can also present either an SATA or
SCSI controller to the guest; however, this may require that you run a modern guest
operating system. See chapter 5.1, Hard disk controllers: IDE, SATA (AHCI), SCSI, page
75 for details.
The settings of the first IDE disk (the “primary master”) are initially set by the “Create VM” wizard. In many cases, you will stick with this default for the rest of a VM’s
50
Page 51

3 Starting out with VirtualBox
lifetime. You may, however, freely remove, add and exchange virtual hard drives after
the machine has been set up. For example, if you wish to copy some files from another
virtual disk that you created, you can connect that disk as a second hard disk.
To connect an additional disk, double-click on the empty space in the list of virtual
disks, or click on the respective icon to the right of that list. You can then select where
the virtual disk should be connected to (primary master or slave or secondary slave)
and which image to use. If you click on the “Select virtual disk” icon to the right,
this will bring up the Virtual Disk Image Manager (see chapter 3.5, The Virtual Disk
Manager, page 43 for details), where you can select a different image.
To remove a virtual disk, select it and click on the “remove” icon on the right.
We have dedicated an entire chapter of this User Manual to virtual storage: please
see chapter 5, Virtual storage, page 75.
3.7.5 CD/DVD-ROM and floppy settings
In the VM Settings window, the settings in these two categories determine what
VirtualBox provides as a floppy disk and as a CD/DVD-ROM drive to your VM’s guest
operating system.
For both the floppy and CD/DVD-ROM categories, if the “Mount” checkbox is
unchecked, VirtualBox will report to the guest that no media is in the drive. Otherwise, if the “Mount” checkbox is set, the following options are available:
• Host drive: The physical device of the host computer is connected to the VM, so
that the guest operating system can read from and write to your physical device.
This is, for instance, useful if you want to install Windows from a real installation
CD. In this case, select your host drive from the drop-down list presented.
• Image file: Quite similar to virtual hard disks, this presents a file on your host as
a device to the guest operating system. To use an image file, you must first import
it into the Virtual Disk Manager; see chapter 3.5, The Virtual Disk Manager, page
43. The image file format varies depending on the type of device:
– For floppies, the file must be in raw format.
– For CD- and DVD -ROMs, the file must be in ISO format. Most commonly,
you will select this option when installing an operating system from an ISO
file that you have obtained from the Internet. For example, most Linux
distributions are available in this way.
All these settings can be changed while the guest is running. Since the “Settings” dialog is not available at that time, you can also access these settings from the “Devices”
menu of your virtual machine window.
51
Page 52

3 Starting out with VirtualBox
Note: The identification string of the drive provided to the guest (which, in
the guest, would be displayed by configuration tools such as the Windows
Device Manager) is always “VBOX CD-ROM”, irrespective of the current configuration of the virtual drive. This is to prevent hardware detection from
being triggered in the guest operating system every time the configuration is
changed.
Using the host drive normally provides a read-only drive to the guest. As an experimental feature (which currently works for data only, audio is not supported), it is
possible to give the guest access to the CD/DVD writing features of the host drive (if
available):
VBoxManage modifyvm <vmname> --dvdpassthrough on
See also chapter 8.5, VBoxManage modifyvm, page 107.
This deliberately does not pass through really all commands. Unsafe commands
(such as updating the drive firmware) are blocked.
3.7.6 Audio settings
The “Audio” section in a virtual machine’s Settings window determines whether the
VM will see a sound card connected, and whether the audio output should be heard
on the host system.
If audio is enabled for a guest, you can choose between the emulation of an Intel
AC’97 controller or a SoundBlaster 16 card. In any case, you can select what audio
driver VirtualBox will use on the host.
On a Linux host, depending on your host configuration, you can also select between
the OSS, ALSA or the PulseAudio subsystem. On newer Linux distributions (Fedora 8
and above, Ubuntu 8.04 and above) the PulseAudio subsystem should be preferred.
3.7.7 Network settings
The “Network” section in a virtual machine’s Settings window allows you to configure
how VirtualBox presents virtual network cards to your VM, and how they operate.
When you first create a virtual machine, VirtualBox by default enables one virtual
network card and selects the “Network Address Translation” (NAT) mode for it. This
way the guest can connect to the outside world using the host’s networking and the
outside world can connect to services on the guest which you choose to make visible
outside of the virtual machine.
Note: If you are installing Windows Vista in a virtual machine, you will probably have no networking initially. See chapter 4.2.5, Windows Vista networking,
page 64 for instructions how to solve this problem.
52
Page 53

3 Starting out with VirtualBox
In most cases, this default setup will work fine for you.
However, VirtualBox is extremely flexible in how it can virtualize networking. It
supports up to eight virtual network cards per virtual machine, the first four of which
can be configured in detail in the graphical user interface. All eight network cards
can be configured on the command line with VBoxManage. Because of this, we have
dedicated an entire chapter of this manual to discussing networking configuration;
please see chapter 6, Virtual networking, page 82.
3.7.8 Serial ports
VirtualBox fully supports virtual serial ports in a virtual machine in an easy-to-use
manner.
2
Ever since the original IBM PC, personal computers have been equipped with one
or two serial ports (also called COM ports by DOS and Windows). While these are no
longer as important as they were until a few years ago (especially since mice are no
longer connected to serial ports these days), there are still some important uses left for
them. For example, serial ports can be used to set up a primitive network over a nullmodem cable, in case Ethernet is not available. Also, serial ports are indispensable for
system programmers needing to do kernel debugging, since kernel debugging software
usually interacts with developers over a serial port. In other words, with virtual serial
ports, system programmers can do kernel debugging on a virtual machine instead of
needing a real computer to connect to.
If a virtual serial port is enabled, the guest operating system sees it a standard
16450-type serial port. Both receiving and transmitting data is supported. How this
virtual serial port is then connected to the host is configurable, and details depend on
your host operating system.
You can use either the graphical user interface or the command-line VBoxManage
tool to set up virtual serial ports. For the latter, please refer to chapter 8.5, VBoxManage
modifyvm, page 107; in that section, look for the --uart and --uartmode options.
In either case, you can configure up to two virtual serial ports simultaneously. For
each such device, you will need to determine
1. what kind of serial port the virtual machine should see by selecting an I/O base
address and interrupt (IRQ). For these, we recommend to use the traditional
values3, which are:
a) COM1: I/O base 0x3F8, IRQ 4
b) COM2: I/O base 0x2F8, IRQ 3
c) COM3: I/O base 0x3E8, IRQ 4
d) COM4: I/O base 0x2E8, IRQ 3
2. Then, you will need to determine what this virtual port should be connected to.
For each virtual serial port, you have the following options:
2
Serial port support was added with VirtualBox 1.5.
3
See, for example, http://en.wikipedia.org/wiki/COM_(hardware_interface).
53
Page 54

3 Starting out with VirtualBox
• You can elect to have the virtual serial port “disconnected”, which means
that the guest will see it as hardware, but it will behave as if no cable had
been connected to it.
• You can connect the virtual serial port to a physical serial port on your
host. (On a Windows host, this will be a name like COM1; on Linux or
OpenSolaris hosts, it will be a device node like /dev/ttyS0). VirtualBox
will then simply redirect all data received from and sent to the virtual serial
port to the physical device.
• You can tell VirtualBox to connect the virtual serial port to a software pipe
on the host. This depends on your host operating system:
– On a Windows host, data will be sent and received through a named
pipe. You can use a helper program called VMware Serial Line Gateway, available for download at http://www.l4ka.org/tools/
vmwaregateway.php. This tool provides a fixed server mode named
pipe at \\.\pipe\vmwaredebug and connects incoming TCP connections on port 567 with the named pipe.
– On a Mac, Linux or OpenSolaris host, a local domain socket is used
instead. On Linux there are various tools which can connect to a local
domain socket or create one in server mode. The most flexible tool is
socat and is available as part of many distributions.
In this case, you can configure whether VirtualBox should create the named
pipe (or, on non-Windows hosts, the local domain socket) itself or whether
VirtualBox should assume that the pipe (or socket) exists already. With
the VBoxManage command-line options, this is referred to as “server” or
“client” mode, respectively.
Up to two serial ports can be configured simultaneously per virtual machine, but you
can pick any port numbers out of the above. For example, you can configure two serial
ports to be able to work with COM2 and COM4 in the guest.
3.7.9 USB support
3.7.9.1 USB settings
The “USB” section in a virtual machine’s Settings window allows you to configure
VirtualBox’s sophisticated USB support.
VirtualBox can allow virtual machines to access the USB devices on your host directly. To achieve this, VirtualBox presents the guest operating system with a virtual
USB controller. As soon as the guest system starts using a USB device, it will appear as
unavailable on the host.
54
Page 55

3 Starting out with VirtualBox
Note:
1. Be careful with USB devices that are currently in use on the host! For
example, if you allow your guest to connect to your USB hard disk that
is currently mounted on the host, when the guest is activated, it will be
disconnected from the host without a proper shutdown. This may cause
data loss.
2. Solaris hosts have a few known limitations regarding USB support;
please see chapter 13, Known limitations, page 213.
In addition to allowing a guest access to your local USB devices, VirtualBox even
allows your guests to connect to remote USB devices by use of the VRDP protocol. For
details about this, see chapter 7.4.3, Remote USB, page 97.
In the Settings dialog, you can first configure whether USB is available in the guest
at all, and in addition also optionally enable the USB 2.0 (EHCI) controller for the
guest. If so, you can determine in detail which devices are available. For this, you
must create so-called “filters” by specifying certain properties of the USB device.
Clicking on the “+“ button to the right of the “USB Device Filters” window creates a
new filter. You can give the filter a name (for referencing it later) and specify the filter
criteria. The more criteria you specify, the more precisely devices will be selected. For
instance, if you specify only a vendor ID of 046d, all devices produced by Logitech
will be available to the guest. If you fill in all fields, on the other hand, the filter will
only apply to a particular device model from a particular vendor, and not even to other
devices of the same type with a different revision and serial number.
In detail, the following criteria are available:
1. Vendor and product ID. With USB, each vendor of USB products carries an
identification number that is unique world-wide, the “vendor ID”. Similarly, each
line of products is assigned a “product ID” number. Both numbers are commonly
written in hexadecimal (that is, they are composed of the numbers 0-9 and the
letters A-F), and a colon separates the vendor from the product ID. For example,
046d:c016 stands for Logitech as a vendor, and the “M-UV69a Optical Wheel
Mouse” product.
Alternatively, you can also specify “Manufacturer” and “Product” by name.
To list all the USB devices that are connected to your host machine with their
respective vendor and product IDs, you can use the following command (see
chapter 8, VBoxManage reference, page 100):
VBoxManage list usbhost
On Windows, you can also see all USB devices that are attached to your system
in the Device Manager. On Linux, you can use the lsusb command.
2. Serial number. While vendor and product ID are already quite specific to iden-
tify USB devices, if you have two identical devices of the same brand and product
line, you will also need their serial numbers to filter them out correctly.
55
Page 56

3 Starting out with VirtualBox
3. Remote. This setting specifies whether the device will be local only, or remote
only (over VRDP), or either.
On a Windows host, you will need to unplug and reconnect a USB device to use it
after creating a filter for it.
As an example, you could create a new USB filter and specify a vendor ID of 046d
(Logitech, Inc), a manufacturer index of 1, and “not remote”. Then any USB devices
on the host system produced by Logitech, Inc with a manufacturer index of 1 will be
visible to the guest system.
Several filters can select a single device – for example, a filter which selects all
Logitech devices, and one which selects a particular webcam.
You can deactivate filters without deleting them by clicking in the checkbox next to
the filter name.
3.7.9.2 Implementation notes for Windows and Linux hosts
On Windows hosts, a kernel mode device driver provides USB proxy support. It implements both a USB monitor, which allows VirtualBox to capture devices when they are
plugged in, and a USB device driver to claim USB devices for a particular virtual machine. As opposed to VirtualBox versions before 1.4.0, system reboots are no longer
necessary after installing the driver. Also, you no longer need to replug devices for
VirtualBox to claim them.
On newer Linux hosts, VirtualBox accesses USB devices through special files in the
file system. When VirtualBox is installed, these are made available to all users in the
vboxusers system group. In order to be able to access USB from guest systems, make
sure that you are a member of this group.
On older Linux hosts, USB devices are accessed using the usbfs file system. Therefore, the user executing VirtualBox needs read and write permission to the USB file
system. Most distributions provide a group (e.g. usbusers) which the VirtualBox
user needs to be added to. Also, VirtualBox can only proxy to virtual machines
USB devices which are not claimed by a Linux host USB driver. The Driver= entry in /proc/bus/usb/devices will show you which devices are currently claimed.
Please refer to chapter 11.5.7, USB not working, page 152 also for details about usbfs.
3.7.10 Shared folders
Shared folders allow you to easily exchange data between a virtual machine and your
host. This feature requires that the VirtualBox Guest Additions be installed in a virtual
machine and is described in detail in chapter 4.6, Folder sharing, page 68.
3.8 Importing and exporting virtual machines
Starting with version 2.2, VirtualBox can import and export virtual machines in the
industry-standard Open Virtualization Format (OVF).
56
Page 57

3 Starting out with VirtualBox
OVF is a cross-platform standard supported by many virtualization products which
allows for creating ready-made virtual machines that can then be imported into a
virtualizer such as VirtualBox. As opposed to other virtualization products, VirtualBox
now supports OVF with an easy-to-use graphical user interface as well as using the
command line. This allows for packaging so-called virtual appliances: disk images
together with configuration settings that can be distributed easily. This way one can
offer complete ready-to-use software packages (operating systems with applications)
that need no configuration or installation except for importing into VirtualBox.
Note: The OVF standard is complex, and support in VirtualBox is an ongoing
process. In particular, no guarantee is made that VirtualBox supports all appliances created by other virtualization software. For a list of know limitations,
please see chapter 13, Known limitations, page 213.
An appliance in OVF format will typically consist of several files:
1. one or several disk images, typically in the widely-used VMDK format (see chapter 5.2, Disk image files (VDI, VMDK, VHD), page 77) and
2. a textual description file in an XML dialect with an .ovf extension.
These files must reside in the same directory for VirtualBox to be able to import
them.
A future version of VirtualBox will also support packages that include the OVF XML
file and the disk images packed together in a single archive.
To import an appliance in OVF format, select “File” -> “Import appliance” from the
main window of the VirtualBox graphical user interface. Then open the file dialog and
navigate to the OVF text file with the .ovf file extension.
If VirtualBox can handle the file, a dialog similar to the following will appear:
57
Page 58

3 Starting out with VirtualBox
This presents the virtual machines described in the OVF file and allows you to change
the virtual machine settings by double-clicking on the description items. Once you
click on “Import”, VirtualBox will copy the disk images and create local virtual machines with the settings described in the dialog. These will then show up in the list of
virtual machines.
Note that since disk images tend to be big, and VMDK images that come with virtual
appliances are typically shipped in a special compressed format that is unsuitable for
being used by virtual machines directly, the images will need to be unpacked and
copied first, which can take a few minutes.
For how to import an image at the command line, please see chapter 8.6, VBoxMan-
age import, page 112.
Conversely, to export virtual machines that you already have in VirtualBox, select
the machines and “File” -> “Export appliance”. A different dialog window shows up
that allows you to combine several virtual machines into an OVF appliance. Then, you
select the target location where the OVF and VMDK files should be stored, and the
conversion process begins. This can again take a while.
For how to export an image at the command line, please see chapter 8.7, VBoxMan-
age export, page 113.
58
Page 59

3 Starting out with VirtualBox
Note: OVF cannot describe every feature that VirtualBox provides for virtual
machines. For example, snapshot information gets lost on export; the disk
images will have a “flattened” state identical to the current state of the virtual
machine, but any snapshots that were defined for the machine will have been
merged.
59
Page 60

4 Guest Additions
The previous chapter covered getting started with VirtualBox and installing operating
systems in a virtual machine. For any serious and interactive use, the VirtualBox Guest
Additions will make your life much easier by providing closer integration between host
and guest and improving the interactive performance of guest systems. This chapter
describes the Guest Additions in detail.
4.1 Introduction
As said in chapter 1.1, Virtualization basics, page 9, the Guest Additions are designed
to be installed inside a virtual machine after the guest operating system has been
installed. They consist of device drivers and system applications that optimize the
guest operating system for better performance and usability. Please see chapter 1.5,
Supported guest operating systems, page 17 for details on what guest operating systems
are fully supported with Guest Additions by VirtualBox.
The VirtualBox Guest Additions for all supported guest operating systems are provided as a single CD-ROM image file which is called VBoxGuestAdditions.iso.
To install the Guest Additions for a particular VM, you mount this ISO file in your VM
as a virtual CD-ROM and install from there.
The Guest Additions offer the following features:
Mouse pointer integration To overcome the limitations for mouse support that were
described in chapter 3.4.1.1, Capturing and releasing keyboard and mouse, page
39, this provides you with seamless mouse support. You will only have one
mouse pointer and pressing the Host key is no longer required to “free” the
mouse from being captured by the guest OS. To make this work, a special mouse
driver is installed in the guest that communicates with the “real” mouse driver
on your host and moves the guest mouse pointer accordingly.
Better video support While the virtual graphics card which VirtualBox emulates for
any guest operating system provides all the basic features, the custom video
drivers that are installed with the Guest Additions provide you with extra high
and non-standard video modes as well as accelerated video performance.
In addition, with Windows and recent Linux, Solaris and OpenSolaris guests, if
the Guest Additions are installed, you can resize the virtual machine’s window,
and the video resolution in the guest will be automatically adjusted (as if you
had manually entered an arbitrary resolution in the guest’s display settings).
60
Page 61

4 Guest Additions
For Linux and Solaris guests, the Xorg server version 1.3 or later is required for
automatic resizing (the feature has been disabled on Fedora 9 guests due to a
bug in the X server they supply). The server version can be checked with Xorg
-version.
Finally, if the Guest Additions are installed, 3D graphics for guest applications
can be accelerated; see chapter 4.8, Hardware 3D acceleration (OpenGL and Di-
rectX 8/9), page 71.
Time synchronization With the Guest Additions installed, VirtualBox can ensure that
the guest’s system time is better synchronized. This fixes the problem that an
operating system normally expects to have 100% of a computer’s time for itself
without interference, which is no longer the case when your VM runs together
with your host operating system and possibly other applications on your host. As
a result, your guest operating system’s timing will soon be off significantly. The
Guest Additions will re-synchronize the time regularly.
Shared folders These provide an easy way to exchange files between the host and
the guest. Much like ordinary Windows network shares, you can tell VirtualBox
to treat a certain host directory as a shared folder, and VirtualBox will make it
available to the guest operating system as a network share. For details, please
refer to chapter 4.6, Folder sharing, page 68.
Seamless windows With this feature, the individual windows that are displayed on
the desktop of the virtual machine can be mapped on the host’s desktop, as if
the underlying application was actually running on the host. See chapter 4.7,
Seamless windows, page 70 for details.
Shared clipboard With the Guest Additions installed, the clipboard of the guest op-
erating system can optionally be shared with your host operating system; see
chapter 3.7.1, General settings, page 46.
Automated Windows logons (Credentials passing; Windows guests only) For de-
tails, please see chapter 9.2, Automated Windows guest logons (VBoxGINA), page
128.
4.2 Windows Guest Additions
The VirtualBox Windows Guest Additions are designed to be installed in a virtual
machine running a Windows operating system. The following versions of Windows
guests are supported:
• Microsoft Windows NT 4.0 (any service pack)
• Microsoft Windows 2000 (any service pack)
• Microsoft Windows XP (any service pack)
61
Page 62

4 Guest Additions
• Microsoft Windows Server 2003 (any service pack)
• Microsoft Windows Vista (all editions)
• Microsoft Windows 7 Beta
Generally, it is strongly recommend to install the Windows Guest Additions.
4.2.1 Installing the Windows Guest Additions
After mounting the Guest Additions ISO file, the Windows guest should automatically
start the Guest Additions installer, which installs the Guest Additions into your Windows guest.
Note: For Direct 3D acceleration to work in a Windows Guest, you must install
the Guest Additions in “Safe Mode”; see chapter 13, Known limitations, page
213 for details.
4.2.1.1 Mounting the Additions ISO file
In the “Devices” menu in the virtual machine’s menu bar, VirtualBox has a handy menu
item named “Install guest additions”, which will automatically bring up the Additions
in your VM window.
If you prefer to mount the additions manually, you can perform the following steps:
1. Start the virtual machine in which you have installed Windows.
2. Select “Mount CD/DVD-ROM” from the “Devices” menu in the virtual machine’s
menu bar and then “CD/DVD-ROM image”. This brings up the Virtual Disk Manager described in chapter 3.5, The Virtual Disk Manager, page 43.
3. In the Virtual Disk Manager, press the “Add” button and browse your host file
system for the VBoxGuestAdditions.iso file:
• On a Windows host, you can find this file in the VirtualBox installation
directory (usually under C:\Program files\Sun\xVM VirtualBox).
• On Mac OS X hosts, you can find this file in the application bundle of
VirtualBox. (Right click on the VirtualBox icon in Finder and choose Show
Package Contents. There it is located in the Contents/MacOS folder.)
• On a Linux host, you can find this file in the additions folder under where
you installed VirtualBox (normally /opt/VirtualBox/).
• On Solaris hosts, you can find this file in the additions folder under
where you installed VirtualBox (normally /opt/VirtualBox).
4. Back in the Virtual Disk Manager, select that ISO file and press the “Select” button. This will mount the ISO file and present it to your Windows guest as a
CD-ROM.
62
Page 63

4 Guest Additions
4.2.1.2 Running the installer
Unless you have the Autostart feature disabled in your Windows guest, Windows will now autostart the VirtualBox Guest Additions installation program
from the Additions ISO. If the Autostart feature has been turned off, choose
VBoxWindowsAdditions.exe from the CD/DVD drive inside the guest to start
the installer.
The installer will add several device drivers to the Windows driver database and
then invoke the hardware detection wizard.
Depending on your configuration, it might display warnings that the drivers are
not digitally signed. You must confirm these in order to continue the installation and
properly install the Additions.
After installation, reboot your guest operating system to activate the Additions.
4.2.2 Updating the Windows Guest Additions
Windows Guest Additions can be updated by running the installation program again,
as previously described. This will then replace the previous Additions drivers with
updated versions.
Alternatively, you may also open the Windows Device Manager and select “Update
driver...“ for two devices:
1. the VirtualBox Graphics Adapter and
2. the VirtualBox System Device.
For each, choose to provide your own driver and use “Have Disk” to point the wizard
to the CD-ROM drive with the Guest Additions.
4.2.3 Unattended Installation
In order to allow for completely unattended guest installations, you can specify a
command line parameter to the install launcher:
VBoxWindowsAdditions.exe /S
This automatically installs the right files and drivers for the corresponding platform
(32- or 64-bit).
Note: Because of the drivers are not yet WHQL certified, you still might get
some driver installation popups, depending on the Windows guest version.
For more options regarding unattended guest installations, consult the command
line help by using the command:
VBoxWindowsAdditions.exe /?
63
Page 64

4 Guest Additions
4.2.4 Manual file extraction
If you would like to install the files and drivers manually, you can extract the files from
the Windows Guest Additions setup by typing:
VBoxWindowsAdditions.exe /extract
To explicitly extract the Windows Guest Additions for another platform than
the current running one (e.g. 64-bit files on a 32-bit system), you have to execute the appropriate platform installer (VBoxWindowsAdditions-x86.exe or
VBoxWindowsAdditions-amd64.exe) with the /extract parameter.
4.2.5 Windows Vista networking
Earlier versions of VirtualBox provided a virtual AMD PCNet Ethernet card to guests by
default. Since Microsoft no longer ships a driver for that card with Windows (starting
with Windows Vista), if you select Windows Vista or newer as the guest operating
system for a virtual machine, VirtualBox will instead present a virtual Intel network
controller to the guest (see chapter 6.1, Virtual networking hardware, page 82).
However, if for any reason you have a 32-bit Windows Vista VM that is configured
to use an AMD PCNet card, you will have no networking in the guest initially.
As a convenience, VirtualBox ships with a 32-bit driver for the AMD PCNet card,
which comes with the Windows Guest Additions. If you install these in a 32-bit Vista
guest, the driver will automatically be installed as well. If, for some reason, you
would like to install the driver manually, you can extract the required files from the
Windows Guest Additions setup. Please consult chapter 4.2.4, Manual file extraction,
page 64 on how to achieve this. You will then find the AMD PCNet driver files in the
x86\Network\AMD\netamd.inf subdirectory of the default install directory.
Alternatively, change the Vista guest’s VM settings to use an Intel networking card
instead of the default AMD PCNet card; see chapter 3.7.7, Network settings, page 52
for details.
Unfortunately, there is no 64-bit driver available for the AMD PCNet card. So for
64-bit Windows VMs, you should always use the Intel networking devices.
4.3 Linux Guest Additions
Like the Windows Guest Additions, the VirtualBox Guest Additions for Linux take the
form of a set of device drivers and system applications which may be installed in the
guest operating system.
The following Linux distributions are officially supported:
• Fedora Core 4, 5, 6, 7, 8, 9 and 11;
• Redhat Enterprise Linux 3, 4 and 5;
• SUSE and openSUSE Linux 9, 10.0, 10.1, 10.2, 10.3, 11.0 and 11.1;
64
Page 65

4 Guest Additions
• Ubuntu 5.10, 6.06, 7.04, 7.10, 8.04, 8.10 and 9.04.
Other distributions may work if they are based on comparable software releases.
The version of the Linux kernel supplied by default in SUSE and openSUSE 10.2,
Ubuntu 6.10 (all versions) and Ubuntu 6.06 (server edition) contains a bug which
can cause it to crash during startup when it is run in a virtual machine. The Guest
Additions work in those distributions.
As with Windows guests, we recommend installation of the VirtualBox Guest Additions for Linux.
4.3.1 Installing the Linux Guest Additions
The VirtualBox Guest Additions for Linux are provided on the same ISO CD-ROM
as the Additions for Windows described above. They also come with an installation
program guiding you through the setup process, although, due to the significant differences between Linux distributions, installation may be slightly more complex.
Installation involves the following steps:
1. Before installing the Guest Additions, you will have to prepare your guest system
for building external kernel modules. This works similarly as described in chapter 2.3.2, The VirtualBox kernel module, page 21, except that this step must now
be performed in your Linux guest instead of on a Linux host system, as described
there.
Again, as with Linux hosts, we recommend using DKMS for Linux guests as well.
If it is not installed, use this command:
sudo apt-get install dkms
Install DKMS before installing the Linux Guest Additions.
2. Mount the VBoxGuestAdditions.iso file as your Linux guest’s virtual CDROM drive, exactly the same way as described for a Windows guest in chapter
4.2.1.1, Mounting the Additions ISO file, page 62.
3. Change to the directory where your CD-ROM drive is mounted and execute as
root:
sh ./VBoxLinuxAdditions-x86.run
In a 64-bit Linux guest, use VBoxLinuxAdditions-amd64.run instead.
The VirtualBox Guest Additions contain several different drivers. If for any reason
you do not wish to install them all, you can specify the ones which you wish on the
command line - for example
sh ./VBoxAdditions.run x11
to install the X Window graphic drivers. Type in the command
65
Page 66

4 Guest Additions
sh ./VBoxAdditions.run help
for more information.
To recompile the guest kernel modules, use this command:
/etc/init.d/vboxadd setup
After compilation you should reboot your guest to ensure that the new modules are
actually used.
4.3.2 Video acceleration and high resolution graphics modes
In Linux guests, VirtualBox video acceleration is available through the X Window System. Typically, in today’s Linux distributions, this will be the X.Org server. During the
installation process, X will be set up to use the VirtualBox video driver. On recent Linux
guests (that is, guests running X.Org server version 1.3 or later with the exception of
Fedora 9), graphics modes can be selected by resizing the VirtualBox window using
the mouse, or sending video mode hints using the VBoxManage tool.
If you are only using recent Linux guests systems, you can skip the rest of this
section. On older guest systems, whatever graphics modes were set up before the
installation will be used. If these modes do not suit your requirements, you can
change your setup by editing the configuration file of the X server, usually found in
/etc/X11/xorg.conf.
VirtualBox can use any default X graphics mode which fits into the virtual video
memory allocated to the virtual machine, as described in chapter 3.7.1, General set-
tings, page 46. You can also add your own modes to the X server configuration file. You
simply need to add them to the “Modes” list in the “Display” subsection of the “Screen”
section. For example, the section shown here has a custom 2048x800 resolution mode
added:
Section "Screen"
EndSection
Identifier "Default Screen"
Device "VirtualBox graphics card"
Monitor "Generic Monitor"
DefaultDepth 24
SubSection "Display"
Depth 24
Modes "2048x800" "800x600" "640x480"
EndSubSection
4.3.3 Updating the Linux Guest Additions
The Guest Additions can simply be updated by going through the installation procedure again with an updated CD-ROM image. This will replace the drivers with updated
versions. You should reboot after updating the Guest Additions.
66
Page 67

4 Guest Additions
4.4 Solaris Guest Additions
Like the Windows Guest Additions, the VirtualBox Guest Additions for Solaris take the
form of a set of device drivers and system applications which may be installed in the
guest operating system.
The following Solaris distributions are officially supported:
• OpenSolaris Nevada (Build 82 and higher; this includes OpenSolaris 2008.05,
2008.11 and 2009.06);
• OpenSolaris Indiana (Developer Preview 2 and higher);
• Solaris 10 (u5 and higher).
Other distributions may work if they are based on comparable software releases.
As with Windows and Linux guests, we recommend installation of the VirtualBox
Guest Additions for Solaris.
4.4.1 Installing the Solaris Guest Additions
The VirtualBox Guest Additions for Solaris are provided on the same ISO CD-ROM
as the Additions for Windows and Linux described above. They also come with an
installation program guiding you through the setup process.
Installation involves the following steps:
1. Mount the VBoxGuestAdditions.iso file as your Solaris guest’s virtual CDROM drive, exactly the same way as described for a Windows guest in chapter
4.2.1.1, Mounting the Additions ISO file, page 62.
If in case the CD-ROM drive on the guest doesn’t get mounted (observed on
some versions of Solaris 10), execute as root:
svcadm restart volfs
2. Change to the directory where your CD-ROM drive is mounted and execute as
root:
pkgadd -d ./VBoxSolarisAdditions.pkg
3. Choose “1” and confirm installation of the guest additions package. After the
installation is complete, re-login to X server on your guest to activate the X11
Guest Additions.
4.4.2 Uninstalling the Solaris Guest Additions
The Solaris Guest Additions can be safely removed by removing the package from the
guest. Open a root terminal session and execute:
pkgrm SUNWvboxguest
67
Page 68

4 Guest Additions
4.4.3 Updating the Solaris Guest Additions
The Guest Additions should be updated by first uninstalling the existing Guest Additions and then installing the new ones. Attempting to install new Guest Additions
without removing the existing ones is not possible.
4.5 OS/2 Guest Additions
VirtualBox also ships with a set of drivers that improve running OS/2 in a virtual
machine. Due to restrictions of OS/2 itself, this variant of the Guest Additions has a
limited feature set; see chapter 13, Known limitations, page 213 for details.
The OS/2 Guest Additions are provided on the same ISO CD-ROM as those for the
other platforms. As a result, mount the ISO in OS/2 as described previously. The OS/2
Guest Additions are located in the directory \32bit\OS2.
As we do not provide an automatic installer at this time, please refer to the
readme.txt file in that directory, which describes how to install the OS/2 Guest
Additions manually.
4.6 Folder sharing
Shared folders allow you to access files of your host system from within the guest
system, much like ordinary shares on Windows networks would – except that shared
folders do not need require networking. Shared folders must physically reside on
the host and are then shared with the guest; sharing is accomplished using a special
service on the host and a file system driver for the guest, both of which are provided
by VirtualBox.
In order to use this feature, the VirtualBox Guest Additions have to be installed.
Note however that Shared Folders are only supported with Windows (2000 or newer),
Linux and Solaris guests.
To share a host folder with a virtual machine in VirtualBox, you must specify the
path of that folder and choose for it a “share name” that the guest can use to access it.
Hence, first create the shared folder on the host; then, within the guest, connect to it.
There are several ways in which shared folders can be set up for a particular virtual
machine:
• In the graphical user interface of a running virtual machine, you can select
“Shared folders” from the “Devices” menu, or click on the folder icon on the
status bar in the bottom right corner of the virtual machine window.
• If a virtual machine is not currently running, you can configure shared folders in
each virtual machine’s “Settings” dialog.
• From the command line, you can create shared folders using the VBoxManage
command line interface; see chapter 8, VBoxManage reference, page 100. The
command is as follows:
68
Page 69

4 Guest Additions
VBoxManage sharedfolder add "VM name"
--name "sharename" --hostpath "C:\test"
There are two types of shares:
1. VM shares which are only available to the VM for which they have been defined;
2. transient VM shares, which can be added and removed at runtime and do not
persist after a VM has stopped; for these, add the --transient option to the
above command line.
Shared folders have read/write access to the files at the host path by default. To
restrict the guest to have read-only access, create a read-only shared folder. This can
either be achieved using the GUI or by appending the parameter --readonly when
creating the shared folder with VBoxManage.
Then, you can mount the shared folder from inside a VM the same way as you would
mount an ordinary network share:
• In a Windows guest, starting with VirtualBox 1.5.0, shared folders are
browseable and are therefore visible in Windows Explorer. So, to attach the
host’s shared folder to your Windows guest, open Windows Explorer and look
for it under “My Networking Places” -> “Entire Network” -> “VirtualBox Shared
Folders”. By right-clicking on a shared folder and selecting “Map network drive”
from the menu that pops up, you can assign a drive letter to that shared folder.
Alternatively, on the Windows command line, use the following:
net use x: \\vboxsvr\sharename
While vboxsvr is a fixed name (note that vboxsrv would also work), replace
“x:“ with the drive letter that you want to use for the share, and sharename
with the share name specified with VBoxManage.
• In a Linux guest, use the following command:
mount -t vboxsf [-o OPTIONS] sharename mountpoint
• In a Solaris guest, use the following command:
mount -F vboxfs [-o OPTIONS] sharename mountpoint
Replace sharename (use lowercase) with the share name specified with
VBoxManage or the GUI, and mountpoint with the path where you want the
share to be mounted on the guest (e.g. /mnt/share). The usual mount rules
apply, that is, create this directory first if it does not exist yet.
Here is an example of mounting the shared folder for the user “jack” on OpenSolaris:
69
Page 70

4 Guest Additions
$id
uid=5000(jack) gid=1(other)
$mkdir /export/home/jack/mount
$pfexec mount -F vboxfs -o uid=5000,gid=1 jackshare /export/home/jack/mount
$cd ~/mount
$ls
sharedfile1.mp3 sharedfile2.txt
$
Beyond the standard options supplied by the mount command, the following are
available:
iocharset CHARSET
to set the character set used for I/O operations (utf8 by default) and
convertcp CHARSET
to specify the character set used for the shared folder name (utf8 by default).
The generic mount options (documented in the mount manual page) apply also.
Especially useful are the options uid, gid and mode, as they allow access by
normal users (in read/write mode, depending on the settings) even if root has
mounted the filesystem.
4.7 Seamless windows
With the “seamless windows” feature of VirtualBox, you can have the windows that are
displayed within a virtual machine appear side by side next to the windows of your
host. This feature is supported for the following guest operating systems (provided
that the Guest Additions are installed):
• Windows guests (support added with VirtualBox 1.5);
• Linux or Solaris/OpenSolaris guests with an X.org server version 1.3 or higher
(support added with VirtualBox 1.6). The exception is Fedora 9, due to a bug in
its X server.
After seamless windows are enabled (see below), VirtualBox suppresses the display
of the Desktop background of your guest, allowing you to run the windows of your
guest operating system seamlessly next to the windows of your host:
1
The X server version is not the same as the version of the entire X.org suite. You can type X -version
in a terminal to find out about the X.org server version level that is currently installed.
70
1
Page 71

4 Guest Additions
To enable seamless mode, after starting the virtual machine, press the Host key (normally the right control key) together with “L”. This will enlarge the size of the VM’s
display to the size of your host screen and mask out the guest operating system’s background. To go back to the “normal” VM display (i.e. to disable seamless windows),
press the Host key and “L” again.
4.8 Hardware 3D acceleration (OpenGL and DirectX
8/9)
The VirtualBox Guest Additions contain experimental hardware 3D support for Windows, Linux and Solaris guests.
With this feature, if an application inside your virtual machine uses 3D features
through the OpenGL or DirectX 8/9 programming interfaces, instead of emulating
them in software (which would be slow), VirtualBox will attempt to use your host’s
3D hardware. This works for all supported host platforms (Windows, Mac, Linux,
Solaris), provided that your host operating system can make use of your accelerated
3D hardware in the first place.
The 3D acceleration currently has the following preconditions:
1. It is only available for certain Windows, Linux and Solaris guests. In particular:
• For Windows guests, support is restricted to 32-bit versions of XP and Vista.
Both OpenGL and DirectX 8/9 are supported (experimental).
2
OpenGL support for Windows guests was added with VirtualBox 2.1; support for Linux and Solaris fol-
lowed with version 2.2. With version 3, DirectX 8/9 support was added for Windows guests. OpenGL
2.0 is now supported as well.
2
71
Page 72

4 Guest Additions
• OpenGL on Linux requires kernel 2.6.27 and higher as well as X.org server
version 1.5 and higher. Ubuntu 8.10 and Fedora 10 have been tested and
confirmed as working.
• OpenGL on Solaris guests requires X.org server version 1.5 and higher.
2. The Guest Additions must be installed.
Note: For Direct 3D acceleration to work in a Windows Guest, VirtualBox
needs to replace Windows system files in the virtual machine. As a result, the
Guest Additions installation program offers Direct 3D acceleration as an option that must be explicitly enabled.Also, you must install the Guest Additions
in “Safe Mode”; see chapter 13, Known limitations, page 213 for details.
3. Because 3D support is still experimental at this time, it is disabled by default
and must be manually enabled in the VM settings (see chapter 3.7.1, General
settings, page 46).
Technically, VirtualBox implements this by installing an additional hardware 3D
driver inside your guest when the Guest Additions are installed. This driver acts as
a hardware 3D driver and reports to the guest operating system that the (virtual)
hardware is capable of 3D hardware acceleration. When an application in the guest
then requests hardware acceleration through the OpenGL or Direct3D programming
interfaces, these are sent to the host through a special communication tunnel implemented by VirtualBox, and then the host performs the requested 3D operation via the
host’s programming interfaces.
4.9 Guest properties
Starting with version 2.1, VirtualBox allows for requesting certain properties from a
running guest, provided that the VirtualBox Guest Additions are installed and the VM
is running. This is good for two things:
1. A number of predefined VM characteristics are automatically maintained by
VirtualBox and can be retrieved on the host, e.g. to monitor VM performance
and statistics.
2. In addition, arbitrary string data can be exchanged between guest and host, and
in both directions.
To accomplish this, VirtualBox establishes a private communication channel between the VirtualBox Guest Additions and the host, and software on both sides can
use this channel to exchange string data for arbitrary purposes. Guest properties are
simply string keys to which a value is attached. They can be set (written to) by either
the host and the guest, and they can also be read from both sides.
72
Page 73

4 Guest Additions
In addition to establishing the general mechanism of reading and writing values, a
set of predefined guest properties is automatically maintained by the VirtualBox Guest
Additions to allow for retrieving interesting guest data such as the guest’s exact operating system and service pack level, the installed version of the Guest Additions,
users that are currently logged into the guest OS, network statistics and more. These
predefined properties are all prefixed with /VirtualBox/ and organized into a hierarchical tree of keys.
Note: Currently this information is only available with Windows guests.
Some of this runtime information is shown when you select “Session Information
Dialog” from a virtual machine’s “Machine” menu.
A more flexible way to use this channel is via the VBoxManage guestproperty
command set; see chapter 8.24, VBoxManage guestproperty, page 124 for details. For
example, to have all the available guest properties for a given running VM listed with
their respective values, use this:
$ VBoxManage guestproperty enumerate "Windows Vista III"
VirtualBox Command Line Management Interface Version 3.0.0
(C) 2005-2008 Sun Microsystems, Inc.
All rights reserved.
Name: /VirtualBox/GuestInfo/OS/Product, value: Windows Vista Business Edition,
timestamp: 1229098278843087000, flags:
Name: /VirtualBox/GuestInfo/OS/Release, value: 6.0.6001,
timestamp: 1229098278950553000, flags:
Name: /VirtualBox/GuestInfo/OS/ServicePack, value: 1,
timestamp: 1229098279122627000, flags:
Name: /VirtualBox/GuestAdd/InstallDir,
value: C:/Program Files/Sun/xVM VirtualBox
Guest Additions, timestamp: 1229098279269739000, flags:
Name: /VirtualBox/GuestAdd/Revision, value: 40720,
timestamp: 1229098279345664000, flags:
Name: /VirtualBox/GuestAdd/Version, value: 3.0.0,
timestamp: 1229098279479515000, flags:
Name: /VirtualBox/GuestAdd/Components/VBoxControl.exe, value: 3.0.0r40720,
timestamp: 1229098279651731000, flags:
Name: /VirtualBox/GuestAdd/Components/VBoxHook.dll, value: 3.0.0r40720,
timestamp: 1229098279804835000, flags:
Name: /VirtualBox/GuestAdd/Components/VBoxDisp.dll, value: 3.0.0r40720,
timestamp: 1229098279880611000, flags:
Name: /VirtualBox/GuestAdd/Components/VBoxMRXNP.dll, value: 3.0.0r40720,
timestamp: 1229098279882618000, flags:
Name: /VirtualBox/GuestAdd/Components/VBoxService.exe, value: 3.0.0r40720,
timestamp: 1229098279883195000, flags:
Name: /VirtualBox/GuestAdd/Components/VBoxTray.exe, value: 3.0.0r40720,
timestamp: 1229098279885027000, flags:
Name: /VirtualBox/GuestAdd/Components/VBoxGuest.sys, value: 3.0.0r40720,
timestamp: 1229098279886838000, flags:
Name: /VirtualBox/GuestAdd/Components/VBoxMouse.sys, value: 3.0.0r40720,
timestamp: 1229098279890600000, flags:
73
Page 74

4 Guest Additions
Name: /VirtualBox/GuestAdd/Components/VBoxSF.sys, value: 3.0.0r40720,
timestamp: 1229098279893056000, flags:
Name: /VirtualBox/GuestAdd/Components/VBoxVideo.sys, value: 3.0.0r40720,
timestamp: 1229098279895767000, flags:
Name: /VirtualBox/GuestInfo/OS/LoggedInUsers, value: 1,
timestamp: 1229099826317660000, flags:
Name: /VirtualBox/GuestInfo/OS/NoLoggedInUsers, value: false,
timestamp: 1229098455580553000, flags:
Name: /VirtualBox/GuestInfo/Net/Count, value: 1,
timestamp: 1229099826299785000, flags:
Name: /VirtualBox/HostInfo/GUI/LanguageID, value: C,
timestamp: 1229098151272771000, flags:
Name: /VirtualBox/GuestInfo/Net/0/V4/IP, value: 192.168.2.102,
timestamp: 1229099826300088000, flags:
Name: /VirtualBox/GuestInfo/Net/0/V4/Broadcast, value: 255.255.255.255,
timestamp: 1229099826300220000, flags:
Name: /VirtualBox/GuestInfo/Net/0/V4/Netmask, value: 255.255.255.0,
timestamp: 1229099826300350000, flags:
Name: /VirtualBox/GuestInfo/Net/0/Status, value: Up,
timestamp: 1229099826300524000, flags:
Name: /VirtualBox/GuestInfo/OS/LoggedInUsersList, value: username,
timestamp: 1229099826317386000, flags:
To query the value of a single property, use the “get” subcommand like this:
$ VBoxManage guestproperty get "Windows Vista III"
VirtualBox Command Line Management Interface Version 3.0.0
(C) 2005-2008 Sun Microsystems, Inc.
All rights reserved.
Value: Windows Vista Business Edition
"/VirtualBox/GuestInfo/OS/Product"
For more complex needs, you can use the VirtualBox programming interfaces; see
chapter 10, VirtualBox programming interfaces, page 143.
74
Page 75

5 Virtual storage
As the virtual machine will most probably expect to see a hard disk built into its virtual
computer, VirtualBox must be able to present “real” storage to the guest as a virtual
hard disk. There are presently three methods in which to achieve this:
1. Most commonly, VirtualBox will use large image files on a real hard disk and
present them to a guest as a virtual hard disk. This is described in chapter 5.2,
Disk image files (VDI, VMDK, VHD), page 77.
2. Alternatively, if you have iSCSI storage servers, you can attach such a server to
VirtualBox as well; this is described in chapter 5.5, iSCSI servers, page 80.
3. Finally, as an experimental feature, you can allow a virtual machine to access
one of your host disks directly; this advanced feature is described in chapter
9.10, Using a raw host hard disk from a guest, page 135.
Each such virtual storage device (image file, iSCSI target or physical hard disk) will
need to be connected to the virtual hard disk controller that VirtualBox presents to a
virtual machine. This is explained in the next section.
5.1 Hard disk controllers: IDE, SATA (AHCI), SCSI
In a real PC, hard disks and CD-ROM/DVD drives are connected to a device called
hard disk controller which drives hard disk operation and data transfers. VirtualBox
can emulate the three most common types of hard disk controllers typically found in
today’s PCs: IDE, SCSI and SATA (AHCI).
1
• IDE (ATA) controllers have been in use since the 1980s. Initially, this type of
interface worked only with hard disks, but was later extended to also support
CD-ROM drives and other types of removable media. In physical PCs, this standard uses flat ribbon parallel cables with 40 or 80 wires. Each such cable can
connect two devices to a controller, which have traditionally been called “master”
and “slave”. Typical hard disk controllers have two connectors for such cables;
as a result, most PCs support up to four devices.
In VirtualBox, each virtual machine has one IDE controller enabled by default.
You can therefore connect up to four virtual storage devices to a virtual machine. Since one of these (the secondary master) is always configured to be a
1
SATA support was added with VirtualBox 1.6; experimental SCSI support was added with 2.1 and fully
implemented with 2.2.
75
Page 76

5 Virtual storage
CD-ROM/DVD drive, this leaves you with up to three virtual hard disks that you
can attach to a virtual machine’s IDE controller.
So even if your guest operating system has no support for SCSI or SATA devices,
it should always be able to see the default IDE controller that is enabled by
default. Of the four slots attached to it, one is normally used when you create
a virtual machine with the “New Virtual Machine” wizard of the graphical user
interface.
• SCSI is another established industry standard, standing for “Small Computer
System Interface”. This was established as early as 1986 as a generic interface for
data transfer between all kinds of devices, including storage devices. Today SCSI
is still used for connecting hard disks and tape devices, but it has mostly been
displaced in commodity hardware. It is still in common use in high-performance
workstations and servers.
Primarily for compatibility with other virtualization software, VirtualBox optionally supports LsiLogic and BusLogic SCSI controllers, to which up to 16 virtual
hard disks can be attached.
To enable the SCSI controller, on the “Hard Disks” page of a virtual machine’s
settings dialog, check the “Enable Additional Controller” box and select one of
the two SCSI modes from the list below. After this, the additional controller will
appear as a separate PCI device in the virtual machine.
Warning: There are limitations with the default SCSI drivers shipped with
some operating systems: the standard Windows XP driver for the LsiLogic
controller does not detect a hard disk attached to the controller’s first port,
and the BusLogic controller does not work with Windows NT4 guests.
• Finally, Serial ATA (SATA) is a newer standard introduced in 2003. Compared
to IDE, it supports both much higher speeds and more devices per hard disk controller. Also, with real hardware, devices can be added and removed while the
system is running. The standard interface for SATA controllers is called Advanced
Host Controller Interface (AHCI).
For compatibility reasons, AHCI controllers by default operate the disks attached
to it in a so-called IDE compatibility mode, unless SATA support is explicitly
requested. “IDE compatibility mode” means that the BIOS can operate these
drives. Disks assigned to those slots will operate in full-speed AHCI mode once
the guest operating system has loaded its AHCI device driver.
Like a real SATA controller, VirtualBox’s virtual SATA controller operates faster
and also consumes less CPU resources than the virtual IDE controller. Also, this
allows you to connect up to 30 virtual hard disks to one machine instead of just
three, as with IDE. Of these, the first four (numbered 0-3 in the graphical user
interface) are operated in IDE compatibility mode by default.
76
Page 77

5 Virtual storage
To enable the SATA controller, on the “Hard Disks” page of a virtual machine’s
settings dialog, check the “Enable Additional Controller” box and select “SATA
(AHCI)“ from the list below. After this, the additional controller will appear as a
separate PCI device in the virtual machine.
Warning: The entire SATA controller and the virtual disks attached to it (including those in IDE compatibility mode) will only seen by operating systems
that have device support for AHCI. In particular, there is no support for AHCI
in Windows before Windows Vista; Windows XP (even SP2) will not see such
disks unless you install additional drivers. We therefore do not recommend
installing operating systems on SATA disks at this time.
To change the IDE compatibility mode settings for the SATA controller, please see
chapter 8.5, VBoxManage modifyvm, page 107.
In summary, VirtualBox gives you the following categories of virtual hard disk slots:
1. three slots attached to the traditional IDE controller, which are always present
(plus one for the virtual CD-ROM device);
2. 16 slots attached to the SCSI controller or 30 slots attached to the SATA controller, provided that your guest operating system can see it. In the case of SATA,
these can either be
a) in IDE compatibility mode (by default, slots 0-3) or
b) in SATA mode.
5.2 Disk image files (VDI, VMDK, VHD)
Disk image files reside on the host system and are seen by the guest systems as hard
disks of a certain geometry. When creating an image, its size needs to be specified,
which determines this fixed geometry. It is therefore not possible to change the size of
the virtual hard disk later.
VirtualBox supports two variants of disk image files:
• Normally, VirtualBox uses its own container format for guest hard disks – Virtual
Disk Image (VDI) files. In particular, this format will be used when you create a
new virtual machine with a new disk.
• VirtualBox also fully supports the popular and open VMDK container format that
is used by many other virtualization products, in particular, by VMware.
2
Initial support for VMDK was added with VirtualBox 1.4; since version 2.1, VirtualBox supports VMDK
fully, meaning that you can create snapshots and use all the other advanced features described above for
VDI images with VMDK also.
77
2
Page 78

5 Virtual storage
• Finally, VirtualBox also fully supports the VHD format used by Microsoft.
Irrespective of the disk format, as briefly mentioned in chapter 3.2, Creating a virtual
machine, page 32, there are two options of how to create a disk image: fixed-size or
dynamically expanding.
• If you create a fixed-size image of e.g. 10 GB, an image file of roughly the same
size will be created on your host system. Note that the creation of a fixed-size
image can take a long time depending on the size of the image and the write
performance of your hard disk.
• For more flexible storage management, use a dynamically expanding image.
This will initially be very small and not occupy any space for unused virtual disk
sectors, but the image file will grow every time a disk sector is written to for the
first time. While this format takes less space initially, the fact that VirtualBox
needs to constantly expand the image file consumes additional computing resources, so until the disk has fully expanded, write operations are slower than
with fixed size disks. However, after a dynamic disk has fully expanded, the
performance penalty for read and write operations is negligible.
5.3 Configuring image write operations
For either of the above image formats (VDI, VMDK or VHD and irrespective of whether
an image is fixed-size or dynamically expanding), you can also specify how write operations from the VM should affect the image:
1. With normal images (the default setting), there are no restrictions on how
guests can read from and write to the disk.
When you take a snapshot of your virtual machine as described in chapter 3.4.4,
Snapshots, page 42, the state of such a “normal hard disk” will be recorded
together with the snapshot, and when reverting to the snapshot, its state will be
fully reset.
While you can attach the same “normal” image to more than one virtual machine, only one of these virtual machines attached to the same image file can
be executed simultaneously, as otherwise there would be conflicts if several machines write to the same image file.
3
2. By contrast, immutable images only remember write accesses temporarily while
the virtual machine is running; all changes are lost when the virtual machine is
closed.
Technically, VirtualBox never writes to an immutable image directly at all. All
write operations from the VM will be directed to a special differencing disk image
3
This restriction is more lenient now than it was before VirtualBox 2.2. Previously, each “normal” disk
image could only be attached to one single machine. Now it can be attached to more than one machine
so long as only one of these machines is running.
78
Page 79

5 Virtual storage
which VirtualBox creates automatically when the VM starts. The next time the
VM is started, the differencing image is reset so that every time the VM starts, its
immutable images have exactly the same content.
4
If the automatic discarding of the differencing image on VM startup does not fit
your needs, you can turn it off using the autoreset parameter of VBoxManage
modifyhd; see chapter 8.15, VBoxManage modifyhd, page 118 for details.
With respect to snapshots, the behavior of immutable images is identical to that
of “normal” images. When reverting to a snapshot taken of an immutable image,
its state will be fully reset to that of the snapshot.
As a result, as opposed to “normal” images, the same immutable image can be
used with several virtual machines without restrictions.
Normally, you would not create an immutable image, but instead create a
“normal” image first and then, when you deem its contents useful, later mark
it immutable using VBoxManage modifyhd; again, please see chapter 8.15,
VBoxManage modifyhd, page 118. Alternatively, open an existing image in “im-
mutable” mode using VBoxManage openmedium; see chapter 8.12, VBoxMan-
age openmedium / closemedium, page 116.
3. Finally, write-through hard disks are like normal hard disks in that they fully
support read and write operations. However, their state is not saved when a
snapshot is taken, and not restored when a VM’s state is reverted.
To create a disk image in VDI format as “write-through”, use the VBoxManage
createhd command; see chapter 8.14, VBoxManage createhd, page 117. To
mark an existing image as write-through, use VBoxManage modifyhd; see
chapter 8.15, VBoxManage modifyhd, page 118.
To illustrate the differences between the various types with respect to snapshots:
Assume you have installed your guest operating system in your VM, and you have
taken a snapshot. Imagine you have accidentally infected your VM with a virus and
would like to go back to the snapshot. With a normal hard disk image, you simply
revert the state of the VM, and the earlier state of your hard disk image will be restored
as well (and your virus infection will be undone). With an immutable hard disk,
irrespective of the snapshot, all it takes is to shut down and restart your VM, and the
virus infection will be discarded. With a write-through image however, you cannot
easily undo the virus infection by means of virtualization, but will have to disinfect
your virtual machine like a real computer.
Still, you might find write-though images useful if you want to preserve critical data
irrespective of snapshots, and since you can attach more than one image to a VM, you
may want to have one immutable for the operating system and one write-through for
your data files.
4
This behavior also changed with VirtualBox 2.2. Previously, the differencing images were discarded when
the VM session ended; now they are discarded every time the VM starts.
79
Page 80

5 Virtual storage
5.4 Cloning disk images
You can duplicate hard disk image files on the same host to quickly produce a second
virtual machine with the same operating system setup. However, you should only make
copies of virtual disk images using the utility supplied with VirtualBox; see chapter
8.16, VBoxManage clonehd, page 118. This is because VirtualBox assigns a unique
identity number (UUID) to each disk image, which is also stored inside the image, and
VirtualBox will refuse to work with two images that use the same number. If you do
accidentally try to reimport a disk image which you copied normally, you can make a
second copy using VirtualBox’s utility and import that instead.
Note that newer Linux distributions identify the boot hard disk from the ID
of the drive. The ID VirtualBox reports for a drive is determined from the
UUID of the virtual disk image. So if you clone a disk image and try to boot
the copied image the guest might not be able to determine its own boot disk
as the UUID changed. In this case you have to adapt the disk ID in your
boot loader script (for example /boot/grub/menu.lst). The disk ID looks like
scsi-SATA_VBOX_HARDDISK_VB5cfdb1e2-c251e503. The ID for the copied
image can be determined with
hdparm -i /dev/sda
5.5 iSCSI servers
iSCSI stands for “Internet SCSI” and is a standard that allows for using the SCSI protocol over Internet (TCP/IP) connections. Especially with the advent of Gigabit Ethernet,
it has become affordable to attach iSCSI storage servers simply as remote hard disks
to a computer network. In iSCSI terminology, the server providing storage resources
is called an “iSCSI target”, while the client connecting to the server and accessing its
resources is called “iSCSI initiator”.
VirtualBox can transparently present iSCSI remote storage to a virtual machine as
a virtual hard disk. The guest operating system will not see any difference between a
virtual disk image (VDI file) and an iSCSI target. To achieve this, VirtualBox has an
integrated iSCSI initiator.
VirtualBox’s iSCSI support has been developed according to the iSCSI standard and
should work with all standard-conforming iSC SI targets. To use an iSCSI target with
VirtualBox, you must first register it as a virtual hard disk with VBoxManage; see
chapter 8.18, VBoxManage addiscsidisk, page 120. The target will show up in the list
of disk images, as described in chapter 3.5, The Virtual Disk Manager, page 43, and
can thus be attached to one of the VM’s three hard disk slots the usual way.
5.5.1 Access iSCSI targets via Internal Networking
As an experimental feature, VirtualBox allows for accessing an iSCSI target running
in a virtual machine which is configured for using Internal Networking mode (as described in chapter 6.6, Internal networking, page 88). The setup of the virtual machine
80
Page 81

5 Virtual storage
which uses such an iSCSI target is done as described above. The only difference is that
the IP address of the target must be specified as a numeric IP address.
The IP stack accessing Internal Networking must be configured in the virtual machine which accesses the iSCSI target. A free static IP and a MAC address not used
by other virtual machines must be chosen. In the example below, adapt the name of
the virtual machine, the MAC address, the IP configuration and the Internal Networking name (’MyIntNet’) according to your needs. The following 7 commands must be
issued:
VBoxManage setextradata VMNAME
VBoxInternal/Devices/IntNetIP/0/Trusted 1
VBoxManage setextradata VMNAME
VBoxInternal/Devices/IntNetIP/0/Config/MAC 08:00:27:01:02:0f
VBoxManage setextradata VMNAME
VBoxInternal/Devices/IntNetIP/0/Config/IP 10.0.9.1
VBoxManage setextradata VMNAME
VBoxInternal/Devices/IntNetIP/0/Config/Netmask 255.255.255.0
VBoxManage setextradata VMNAME
VBoxInternal/Devices/IntNetIP/0/LUN#0/Driver IntNet
VBoxManage setextradata VMNAME
VBoxInternal/Devices/IntNetIP/0/LUN#0/Config/Network MyIntNet
VBoxManage setextradata VMNAME
VBoxInternal/Devices/IntNetIP/0/LUN#0/Config/IsService 1
Finally the iSCSI disk must be registered with the -intnet option to tell the iSCSI
initiator to use internal networking:
VBoxManage addiscsidisk --server 10.0.9.30
--target iqn.2008-12.com.sun:sampletarget --intnet
The target address must be specified as a numeric IP address, as there is no DNS
resolver for internal networking.
The virtual machine with the iSCSI target should be started before the VM using it
is powered on. If a virtual machine using an iSCSI disk is started without having the
iSCSI target powered up, it can take up to 200 seconds to detect this situation. The
VM will fail to power up.
81
Page 82

6 Virtual networking
As briefly mentioned in chapter 3.7.7, Network settings, page 52, VirtualBox provides
up to eight virtual PCI Ethernet cards for each virtual machine. For each such card,
you can individually select
1. the hardware that will be virtualized as well as
2. the virtualization mode that the virtual card will be operating in with respect to
your physical networking hardware on the host.
Four of the network cards can be configured in the “Network” section of the settings
dialog in the graphical user interface of VirtualBox. You can configure all eight network
cards on the command line via VBoxManage modifyvm; see chapter 8.5, VBoxManage
modifyvm, page 107.
This chapter explains the various networking settings in more detail.
6.1 Virtual networking hardware
For each card, you can individually select what kind of hardware will be presented to
the virtual machine. VirtualBox can virtualize the following five types of networking
hardware:
• AMD PCNet PCI II;
• AMD PCNet FAST III (the default);
• Intel PRO/1000 MT Desktop;
• Intel PRO/1000 T Server.
• Intel PRO/1000 MT Server.
The PCNet FAST III is the default because it is supported by nearly all operating
systems out of the box, as well as the GNU GRUB boot manager. As an exception,
the Intel PRO/1000 family adapters are chosen for some guest operating system types
that no longer ship with drivers for the PCNet card, such as Windows Vista; see chapter
4.2.5, Windows Vista networking, page 64 for details.
1
Support for the Intel PRO/1000 MT Desktop type was added with VirtualBox 1.6. The T Server variant
of the Intel PRO/1000 card was added with VirtualBox 1.6.2 because this one is recognized by Windows
XP guests without additional driver installation. The MT Server variant was added with VirtualBox 2.2
to facilitate OVF imports from other platforms.
82
1
Page 83

6 Virtual networking
VirtualBox has limited support for so-called jumbo frames, i.e. networking packets
with more than 1500 bytes of data, provided that you use the Intel card virtualization and bridged networking. In other words, jumbo frames are not supported in NAT
mode or with the AMD networking devices; in those cases, jumbo packets will silently
be dropped for both the transmit and the receive direction. Guest operating systems
trying to use this feature will observe this as a packet loss, which may lead to unexpected application behavior in the guest. This does not cause problems with guest
operating systems in their default configuration, as jumbo frames need to be explicitly
enabled.
6.2 Introduction to networking modes
Each of the eight networking adapters can be separately configured to operate in one
of the following five modes:
• Not attached
• Network Address Translation (NAT)
• Bridged networking
• Internal networking
• Host-only networking
By default, virtual network cards are set up to use network address translation, which
is well suited to standard networking needs (accessing the Internet from programs
running in the guest and providing network services for machines in a local intranet).
In particular, if all you want is to browse the Web, download files and view e-mail
inside the guest, then the default configuration of the NAT network should be sufficient
for you, and you can safely skip the rest of this section. Please note that the ping
utility does not work over NAT, and that there are certain limitations when using
Windows file sharing (see chapter 6.4.3, NAT limitations, page 85 for details).
For advanced networking needs such as network simulations, bridged networking
can be used to set up an additional, software based network interface on the host to
which the virtual machine is connected.
VirtualBox internal networking can be used to create a virtual network which is
visible to selected virtual machines, but not to applications running on the host or to
the outside world.
Finally, host-only networking can be used to create a network containing the host and
a set of virtual machines, without the need for the host’s physical network interface.
Instead, a virtual network interface (similar to a loopback interface) is created on the
host, providing connectivity among virtual machines and the host.
The following sections describe the available network modes in more detail.
83
Page 84

6 Virtual networking
6.3 “Not attached” mode
When a virtual network card’s mode is set to “Not attached”, VirtualBox reports to the
guest that a network card is present, but that there is no connection – as if no Ethernet
cable was plugged into the card. This way it is possible to “pull” the virtual Ethernet
cable and disrupt the connection, which can be useful to inform a guest operating
system that no network connection is available and enforce a reconfiguration.
6.4 Network Address Translation (NAT)
Network Address Translation (NAT) is the simplest way of accessing an external network from a virtual machine. Usually, it does not require any configuration on the
host network and guest system. For this reason, it is the default networking mode in
VirtualBox.
A virtual machine with NAT enabled acts much like a real computer that connects
to the Internet through a router. The “router”, in this case, is the VirtualBox networking engine, which maps traffic from and to the virtual machine transparently. The
disadvantage of NAT mode is that, much like a private network behind a router, the
virtual machine is invisible and unreachable from the outside internet; you cannot run
a server this way unless you set up port forwarding (described below).
The virtual machine receives its network address and configuration on the private
network from a DHCP server integrated into VirtualBox. The IP address thus assigned
to the virtual machine is usually on a completely different network than the host. As
more than one card of a virtual machine can be set up to use NAT, the first card is
connected to the private network 10.0.2.0, the second card to the network 10.0.3.0
and so on. If you need to change the guest-assigned IP range for some reason, please
refer to chapter 9.12, Fine-tuning the VirtualBox NAT engine, page 138.
The network frames sent out by the guest operating system are received by
VirtualBox’s NAT engine, which extracts the TCP/IP data and resends it using the host
operating system. To an application on the host, or to another computer on the same
network as the host, it looks like the data was sent by the VirtualBox application on
the host, using an IP address belonging to the host. VirtualBox listens for replies to
the packages sent, and repacks and resends them to the guest machine on its private
network.
6.4.1 Configuring port forwarding with NAT
As the virtual machine is connected to a private network internal to VirtualBox and
invisible to the host, network services on the guest are not accessible to the host machine or to other computers on the same network. However, VirtualBox can make
selected services available outside of the guest by using port forwarding. This means
that VirtualBox listens to certain ports on the host and resends all packets which arrive
on them to the guest on the ports used by the services being forwarded.
84
Page 85

6 Virtual networking
To an application on the host or other physical (or virtual) machines on the network,
it looks as though the service being proxied is actually running on the host (note that
this also means that you cannot run the same service on the same ports on the host).
However, you still gain the advantages of running the service in a virtual machine
– for example, services on the host machine or on other virtual machines cannot be
compromised or crashed by a vulnerability or a bug in the service, and the service can
run in a different operating system than the host system.
You can set up a guest service which you wish to proxy using the command line
tool VBoxManage. You will need to know which ports on the guest the service uses
and to decide which ports to use on the host (often but not always you will want to
use the same ports on the guest and on the host). You can use any ports on the host
which are not already in use by a service. An example of how to set up incoming NAT
connections to an ssh server on the guest requires the following three commands:
VBoxManage setextradata "Linux Guest"
"VBoxInternal/Devices/pcnet/0/LUN#0/Config/guestssh/Protocol" TCP
VBoxManage setextradata "Linux Guest"
"VBoxInternal/Devices/pcnet/0/LUN#0/Config/guestssh/GuestPort" 22
VBoxManage setextradata "Linux Guest"
"VBoxInternal/Devices/pcnet/0/LUN#0/Config/guestssh/HostPort" 2222
The above example assumes a PCNet virtual network card; if you have configured
the guest to use the Intel PRO/1000, replace “pcnet” with “e1000” in the above commands. Similarly, if you want to configure a different interface instance replace the
/0/ with the appropriate index. pcnet and e1000 are counted separately in this
respect, and counting starts at 0 for both types.
The name guestssh is an arbitrary one chosen for this particular forwarding configuration. With that configuration in place, all TCP connections to port 2222 on the
host will be forwarded to port 22 on the guest. Protocol can be either of TCP or UDP
(these are case insensitive). To remove a mapping again, use the same commands, but
leaving out the values (in this case TCP, 22 and 2222).
It is not possible to configure incoming NAT connections while the VM is running.
However you can change the settings for a VM which is currently saved (or powered
off at a snapshot).
6.4.2 PXE booting with NAT
PXE booting is now supported in NAT mode. The NAT DHCP server provides a boot
file name of the form vmname.pxe if the directory TFTP exists in the directory where
the user’s VirtualBox.xml file is kept. It is the responsibility of the user to provide
vmname.pxe.
6.4.3 NAT limitations
There are four limitations of NAT mode which users should be aware of:
85
Page 86

6 Virtual networking
ICMP protocol limitations: Some frequently used network debugging tools (e.g.
ping or tracerouting) rely on the ICMP protocol for sending/receiving messages.
While ICMP support has been improved with VirtualBox 2.1 (ping should now
work), some other tools may not work reliably.
Receiving of UDP broadcasts is not reliable: The guest does not reliably receive
broadcasts, since, in order to save resources, it only listens for a certain amount
of time after the guest has sent UDP data on a particular port. As a consequence,
NetBios name resolution based on broadcasts does not always work (but WINS
always works). As a workaround, you can use the numeric IP of the desired
server in the \\server\share notation.
Protocols such as GRE are unsupported: Protocols other than TCP and UDP are
not supported. This means some VPN products (e.g. PPTP from Microsoft) cannot be used. There are other VPN products which use simply TCP and UDP.
Forwarding host ports < 1024 impossible: On Unix-based hosts (e.g. Linux, So-
laris, Mac OS X) it is not possible to bind to ports below 1024 from applications
that are not run by root. As a result, if you try to configure such a port forwarding, the VM will refuse to start.
These limitations normally don’t affect standard network use. But the presence of
NAT has also subtle effects that may interfere with protocols that are normally working. One example is NFS, where the server is often configured to refuse connections
from non-privileged ports (i.e. ports not below 1024).
6.5 Bridged networking
With bridged networking, VirtualBox uses a device driver on your host system that
filters data from your physical network adapter. This driver is therefore called a “net
filter” driver. This allows VirtualBox to intercept data from the physical network and
inject data into it, effectively creating a new network interface in software. When a
guest is using such a new software interface, it looks to the host system as though the
guest were physically connected to the interface using a network cable: the host can
send data to the guest through that interface and receive data from it. This means that
you can set up routing or bridging between the guest and the rest of your network.
For this to work, VirtualBox needs a device driver on your host system. The way
bridged networking works has been completely rewritten with VirtualBox 2.0 and 2.1,
depending on the host operating system. From the user perspective, the main difference is that complex configuration is no longer necessary on any of the supported host
operating systems.
2
For Mac OS X and Solaris hosts, net filter drivers were already added in VirtualBox 2.0 (as initial support
for Host Interface Networking on these platforms). With VirtualBox 2.1, net filter drivers were also
added for the Windows and Linux hosts, replacing the mechanisms previously present in VirtualBox for
those platforms; especially on Linux, the earlier method required creating TAP interfaces and bridges,
2
86
Page 87

6 Virtual networking
Note: Even though TAP is no longer necessary on Linux with bridged networking, you can still use TAP interfaces for certain advanced setups, since you can
connect a VM to any host interface – which could also be a TAP interface.
To enable bridged networking, all you need to do is to open the Settings dialog of
a virtual machine, go to the “Network” page and select “Bridged network” in the drop
down list for the “Attached to” field. Finally, select desired host interface from the
list at the bottom of the page, which contains the physical network interfaces of your
systems. On a typical MacBook, for example, this will allow you to select between
“en1: AirPort” (which is the wireless interface) and “en0: Ethernet”, which represents
the interface with a network cable.
Depending on your host operating system, the following limitations should be kept
in mind:
• On Macintosh hosts, functionality is limited when using AirPort (the Mac’s wire-
less networking) for bridged networking. Currently, VirtualBox supports only
IPv4 over AirPort. For other protocols such as IPv6 and IPX, you must choose a
wired interface.
• On Linux hosts, functionality is limited when using wireless interfaces for
bridged networking. Currently, VirtualBox supports only IPv4 over wireless. For
other protocols such as IPv6 and IPX, you must choose a wired interface.
Also, setting the MTU to less than 1500 bytes on wired interfaces provided by
the sky2 driver on the Marvell Yukon II EC Ultra Ethernet NIC is known to cause
packet losses under certain conditions.
• On Solaris hosts, there is no support for using wireless interfaces. Filtering guest
traffic using IPFilter is also not completely supported due to technical restrictions
of the Solaris networking subsystem. These issues would be addressed in a future
release of OpenSolaris.
With VirtualBox 2.0.4 and above, it is possible to use Crossbow Virtual Network
Interfaces (VNICs) with bridged networking, but with the following caveats:
– A VNIC cannot be shared between multiple guest network interfaces, i.e.
each guest network interface must have its own, exclusive VNIC.
– The VNIC and the guest network interface that uses the VNIC must be as-
signed identical MAC addresses.
which was complex and varied from one distribution to the next. None of this is necessary anymore.
Bridged network was formerly called “Host Interface Networking” and has been renamed with version
2.2 without any change in functionality.
87
Page 88

6 Virtual networking
6.6 Internal networking
Internal Networking is similar to bridged networking in that the VM can directly communicate with the outside world. However, the “outside world” is limited to other VMs
which connect to the same internal network.
Even though technically, everything that can be done using internal networking can
also be done using bridged networking, there are two good reasons why this additional
mode was implemented:
1. Security. In bridged networking mode, all traffic goes through a physical inter-
face of the host system. It is therefore possible to attach a packet sniffer (such
as Ethereal) to the host interface and log all traffic that goes over it. If, for
any reason, you prefer two or more VMs on the same machine to communicate privately, hiding their data from both the host system and the user, bridged
networking therefore is not an option.
2. Speed. Internal networking is more efficient than bridged networking, as
VirtualBox can directly transmit the data without having to send it through the
host operating system’s networking stack.
Internal networks are created automatically as needed, i.e. there is no central configuration. Every internal network is identified simply by its name. Once there is more
than one active virtual network card with the same internal network ID, the VirtualBox
support driver will automatically “wire” the cards and act as a network switch. The
VirtualBox support driver implements a complete Ethernet switch and supports both
broadcast/multicast frames and promiscuous mode.
In order to attach a VM’s network card to an internal network, set its networking
mode to “internal networking”. There are two ways to accomplish this:
• You can use a VM’s “Settings” dialog in the VirtualBox graphical user interface.
In the “Networking” category of the settings dialog, select “Internal Networking”
from the drop-down list of networking modes. Now select the name of an existing internal network from the drop-down below or enter a new name into the
entry field.
• You can use VBoxManage modifyvm <VM name> --nic<x> intnet. Op-
tionally, you can specify a network name with the command VBoxManage
modifyvm <VM name> --intnet<x> <network name>. If you do not
specify a network name, the network card will be attached to the network
intnet by default.
Unless you configure the (virtual) network cards in the guest operating systems that
are participating in the internal network to use static IP addresses, you may want to use
the DHCP server that is built into VirtualBox to manage IP addresses for the internal
network. Please see chapter 8.25, VBoxManage dhcpserver, page 125 for details.
As a security measure, the Linux implementation of internal networking only allows
VMs running under the same user ID to establish an internal network.
88
Page 89

6 Virtual networking
6.7 Host-only networking
Host-only networking is another networking mode that was added with version 2.2
of VirtualBox. It can be thought of as a hybrid between the bridged and internal networking modes: as with bridged networking, the virtual machines can talk to each
other and the host as if they were connected through a physical ethernet switch. Similarly, as with internal networking however, a physical networking interface need not
be present, and the virtual machines cannot talk to the world outside the host since
they are not connected to a physical networking interface.
Instead, when host-only networking is used, VirtualBox creates a new software interface on the host which then appears next to your existing network interfaces. In
other words, whereas with bridged networking an existing physical interface is used
to attach virtual machines to, with host-only networking a new “loopback” interface
is created on the host. And whereas with internal networking, the traffic between the
virtual machines cannot be seen, the traffic on the “loopback” interface on the host
can be intercepted.
Host-only networking is particularly useful for preconfigured virtual appliances,
where multiple virtual machines are shipped together and designed to cooperate. For
example, one virtual machine may contain a web server and a second one a database,
and since they are intended to talk to each other, the appliance can instruct VirtualBox
to set up a host-only network for the two. A second (bridged) network would then
connect the web server to the outside world to serve data to, but the outside world
cannot connect to the database.
To change a virtual machine’s virtual network interface to “host only” mode:
• either go to the “Network” page in the virtual machine’s settings notebook in the
graphical user interface and select “Host-only networking”, or
• on the command line, type VBoxManage modifyvm <VM name> --nic<x>
hostonly; see chapter 8.5, VBoxManage modifyvm, page 107 for details.
For host-only networking, like with internal networking, you may find the DHCP
server useful that is built into VirtualBox. This can be enabled to then manage the IP
addresses in the host-only network since otherwise you would need to configure all IP
addresses statically.
• In the VirtualBox graphical user interface, you can configure all these items in
the global settings via “File” -> “Settings” -> “Network”, which lists all host-only
networks which are presently in use. Click on the network name and then on the
“Edit” button to the right, and you can modify the adapter and DHCP settings.
• Alternatively, you can use VBoxManage dhcpserver on the command line;
please see chapter 8.25, VBoxManage dhcpserver, page 125 for details.
89
Page 90

7 Alternative front-ends; remote
virtual machines
7.1 Introduction
As briefly mentioned in chapter 1.3, Features overview, page 13, VirtualBox has a very
flexible internal design that allows you to use different front-ends to control the same
virtual machines. To illustrate, you can, for example, start a virtual machine with
VirtualBox’s easy-to-use graphical user interface and then stop it from the command
line. With VirtualBox’s support for the Remote Desktop Protocol (VRDP), you can even
run virtual machines remotely on a headless server and have all the graphical output
redirected over the network.
In detail, the following front-ends are shipped in the standard VirtualBox package:
1. VirtualBox is our graphical user interface (GUI), which most of this User
Manual is dedicated to describing, especially in chapter 3, Starting out with
VirtualBox, page 31. While this is the easiest-to-use of our interfaces, it does
not (yet) cover all the features that VirtualBox provides. Still, this is the best
way to get to know VirtualBox initially.
2. VBoxManage is our command-line interface and is described in the next section.
3. VBoxSDL is an alternative, simple graphical front-end with an intentionally limited feature set, designed to only display virtual machines that are controlled in
detail with VBoxManage. This is interesting for business environments where
displaying all the bells and whistles of the full GUI is not feasible. VBoxSDL is
described in chapter 7.3, VBoxSDL, the simplified VM displayer, page 92.
4. Finally, VBoxHeadless is yet another front-end that produces no visible output
on the host at all, but merely acts as a VRDP server. Now, even though the other
graphical front-ends (VirtualBox and VBoxSDL) also have VRDP support builtin and can act as a VRDP server, this particular front-end requires no graphics
support. This is useful, for example, if you want to host your virtual machines
on a headless Linux server that has no X Window system installed. For details,
see chapter 7.4.1, VBoxHeadless, the VRDP-only server, page 94.
If the above front-ends still do not satisfy your particular needs, it is relatively painless
to create yet another front-end to the complex virtualization engine that is the core
of VirtualBox, as the VirtualBox core neatly exposes all of its features in a clean API;
please refer to chapter 10, VirtualBox programming interfaces, page 143.
90
Page 91

7 Alternative front-ends; remote virtual machines
7.2 Using VBoxManage to control virtual machines
This section will give you a brief introduction to VBoxManage and how you can use it
to create and operate virtual machines.
In essence, VBoxManage supports everything that our graphical user interface allows you to do with the click of a button. VBoxManage supports a lot more than that,
however. It exposes really all the features of the virtualization engine, even those that
cannot (yet) be accessed from the GUI.
You will need to use the command line if you want to
• use a different user interface than the main GUI (for example, VBoxSDL or the
VBoxHeadless server);
• control some of the more advanced and experimental configuration settings for
a VM.
There are two main things to keep in mind when using VBoxManage: First,
VBoxManage must always be used with a specific “subcommand”, such as “list” or
“createvm” or “startvm”. All the subcommands that VBoxManage supports are described in detail in chapter 8, VBoxManage reference, page 100.
Second, most of these subcommands require that you specify a particular virtual
machine after the subcommand. There are two ways you can do this:
• You can specify the VM name, as it is shown in the VirtualBox GUI. Note that
if that name contains spaces, then you must enclose the entire name in double quotes (as it is always required with command line arguments that contain
spaces).
For example:
VBoxManage startvm "Windows XP"
• You can specify the UUID, which is the internal unique identifier that VirtualBox
uses to refer to the virtual machine. Assuming that the aforementioned VM
called “Windows XP” has the UUID shown below, the following command has
the same effect as the previous:
VBoxManage startvm 670e746d-abea-4ba6-ad02-2a3b043810a5
You can type VBoxManage list vms to have all currently registered VMs listed
with all their settings, including their respective names and UUIDs.
Some typical examples of how to control VirtualBox from the command line are
listed below:
• To create a new virtual machine from the command line and immediately register it with VirtualBox, use VBoxManage createvm with the --register
option,1like this:
1
For details, see chapter 8.4, VBoxManage createvm, page 107.
91
Page 92

7 Alternative front-ends; remote virtual machines
$ VBoxManage createvm --name "SUSE 10.2" --register
VirtualBox Command Line Management Interface Version 3.0.0
(C) 2005-2008 Sun Microsystems, Inc.
All rights reserved.
Virtual machine ’SUSE 10.2’ is created.
UUID: c89fc351-8ec6-4f02-a048-57f4d25288e5
Settings file: ’/home/username/.VirtualBox/Machines/SUSE 10.2/SUSE 10.2.xml’
As can be seen from the above output, a new virtual machine has been created
with a new UUID and a new XML settings file.
• To show the configuration of a particular VM, use VBoxManage showvminfo;
see chapter 8.2, VBoxManage showvminfo, page 105 for details and an example.
• To change VM settings, use VBoxManage modifyvm, e.g. as follows:
VBoxManage modifyvm "Windows XP" --memory "512MB"
For details, see chapter 8.5, VBoxManage modifyvm, page 107.
• To control VM operation, use one of the following:
– To start a VM that is currently powered off, use VBoxManage startvm;
see chapter 8.8, VBoxManage startvm, page 114 for details.
– To pause or save a VM that is currently running, use VBoxManage
controlvm; see chapter 8.9, VBoxManage controlvm, page 115 for details.
7.3 VBoxSDL, the simplified VM displayer
VBoxSDL is a simple graphical user interface (GUI) that lacks the nice point-and-click
support which VirtualBox, our main GUI, provides. VBoxSDL is currently primarily
used internally for debugging VirtualBox and therefore not officially supported. Still,
you may find it useful for environments where the virtual machines are not necessarily
controlled by the same person that uses the virtual machine.
As you can see in the following screenshot, VBoxSDL does indeed only provide a
simple window that contains only the “pure” virtual machine, without menus or other
controls to click upon and no additional indicators of virtual machine activity:
92
Page 93

7 Alternative front-ends; remote virtual machines
To start a virtual machine with VBoxSDL instead of the VirtualBox GUI, enter the
following on a command line:
VBoxSDL --startvm <vm>
where <vm> is, as usual with VirtualBox command line parameters, the name or
UUID of an existing virtual machine.
7.4 Remote virtual machines (VRDP support)
VirtualBox, the graphical user interface, has a built-in server for the VirtualBox Remote
Desktop Protocol (VRDP). This allows you to see the output of a virtual machine’s
window remotely on any other computer and control the virtual machine from there,
as if it was running on the remote machine.
VRDP is a backwards-compatible extension to Microsoft’s Remote Desktop Protocol
(RDP). Typically graphics updates and audio are sent from the remote machine to the
client, while keyboard and mouse events are sent back.
You can use any standard RDP viewer, such as the one that comes with Microsoft
Windows (typically found under “Accessories” -> “Communication” -> “Remote Desktop Connection”) or, on Linux system, the standard open-source rdesktop program
to connect to the virtual machine remotely.
You should use the IP address of your host system as the server address. The VRDP
server uses the standard RDP TCP port 3389 by default. The port can be changed either in the GUI VM settings or with VBoxManage modifyvm command --vrdpport
option. Note that only one machine can use a given port at a time. Also on Windows
93
Page 94

7 Alternative front-ends; remote virtual machines
hosts the default RDP port (3389) could be already used by the Windows RDP server,
in this case you should choose another port for your VM(s).
You should specify -N command line option with rdesktop to be able to use
NumPad keys: rdesktop -N host_system_ip.
With VirtualBox, the graphical user interface, the VRDP server is disabled by
default, but can easily be enabled on a per-VM basis either with the VirtualBox GUI or
with VBoxManage:
VBoxManage modifyvm <vmname> --vrdp on
If you use VBoxHeadless (described below), VRDP support will be automatically
enabled.
Additional settings for modifyvm are --vrdpport and --vrdpauthtype; see
chapter 8.5, VBoxManage modifyvm, page 107 for details.
7.4.1 VBoxHeadless, the VRDP-only server
While the VRDP server that is built into the VirtualBox GUI is perfectly capable of
running virtual machines remotely, it is not convenient to have to run VirtualBox if
you never want to have VMs displayed locally in the first place. In particular, if you are
running servers whose only purpose is to host VMs, and all your VMs are supposed to
run remotely over VRDP, then it is pointless to have a graphical user interface on the
server at all – especially since, on a Linux or Solaris host, VirtualBox comes with
dependencies on the Qt and SDL libraries, which is inconvenient if you would rather
not have the X Window system on your server at all.
VirtualBox therefore comes with yet another front-end that produces no visible output on the host at all, but instead only delivers VRDP data. With VirtualBox 1.6, this
“headless server” is now aptly called VBoxHeadless. (In previous versions, it was
called VBoxVRDP. For the sake of backwards compatibility, the VirtualBox installation
still installs an executable with that name as well.)
To start a virtual machine with VBoxHeadless, you have two options:
• You can use VBoxManage startvm <vmname> --type vrdp. The extra
--type option causes the VirtualBox core to use VBoxHeadless as the front-
end to the internal virtualization engine.
• The recommended way, however, is to use VBoxHeadless directly, as follows:
VBoxHeadless --startvm <uuid|name>
This is the recommended way, because when starting the headless interface
through VBoxManage, you will not be able to view or log messages that
VBoxHeadless may have output on the console. Especially in case of startup
errors, such output might be desirable for problem diagnosis.
94
Page 95

7 Alternative front-ends; remote virtual machines
Note that when you use VBoxHeadless to start a VM, the built-in VRDP server will
always be enabled, regardless of whether you have enabled the VRDP server in the
VM’s settings. If this is undesirable (for example because you want to access the VM
via ssh only), start the VM like this:
VBoxHeadless --startvm <uuid|name> --vrdp=off
To have the VRDP server use the setting from the VM configuration, as the other frontends would, use this:
VBoxHeadless --startvm <uuid|name> --vrdp=config
7.4.2 Step by step: creating a virtual machine on a headless
server
The following instructions may give you an idea how to create a virtual machine on a
headless server over a network connection. We will create a virtual machine, establish
a VRDP connection and install a guest operating system – all without having to touch
the headless server. All you need is the following:
1. VirtualBox on a server machine with a supported host operating system; for the
following example, we will assume a Linux server;
2. an ISO file on the server, containing the installation data for the guest operating
system to install (we will assume Windows XP in the following example);
3. a terminal connection to that host over which you can access a command line
(e.g. via telnet or ssh);
4. an RDP viewer on the remote client; on a Linux client, you could use rdesktop
to connect; from a Windows machine, you could use the RDP viewer that comes
with Windows (usually found in “Accessories” -> “Communication” -> “Remote
Desktop Connection”).
Note again that on the server machine, since we will only use the headless server,
neither Qt nor SDL nor the X Window system will be needed.
1. On the headless server, create a new virtual machine:
VBoxManage createvm --name "Windows XP" --register
Note that if you do not specify --register, you will have to manually use the
registervm command later.
2. Make sure the settings for this VM are appropriate for the guest operating system
that we will install. For example:
VBoxManage modifyvm "Windows XP" --memory "256MB"
--acpi on --boot1 dvd --nic1 nat
95
Page 96

7 Alternative front-ends; remote virtual machines
3. Create a virtual hard disk for the VM (in this case, 10GB in size) and register it
with VirtualBox:
VBoxManage createhd --filename "WinXP.vdi" --size 10000 --remember
4. Set this newly created VDI file as the first virtual hard disk of the new VM:
VBoxManage modifyvm "Windows XP" --hda "WinXP.vdi"
5. Register the ISO file that contains the operating system installation that you want
to install later:
VBoxManage openmedium dvd /full/path/to/iso.iso
6. Attach this ISO to the virtual machine, so it can boot from it:
VBoxManage modifyvm "Windows XP" --dvd /full/path/to/iso.iso
(Alternatively, you can use VBoxManage controlvm dvdattach directly,
without having to register the image first; see chapter 8.9, VBoxManage con-
trolvm, page 115 for details.)
7. Start the virtual machine using VBoxHeadless:
VBoxHeadless --startvm "Windows XP"
If everything worked, you should see a copyright notice. If, instead, you are
returned to the command line, then something went wrong.
8. On the client machine, fire up the RDP viewer and try to connect to the server.
Assuming a Linux client, try the following:
rdesktop -a 16 -N my.host.address
(With rdesktop, the -a 16 option requests a color depth of 16 bits per pixel,
which we recommend. Also, after installation, you should set the color depth of
your guest operating system to the same value. The -N option requests the NumLock state synchronization, which is required for a correct handling of NumPad
keys.)
You should now be seeing the installation routine of your guest operating system.
96
Page 97

7 Alternative front-ends; remote virtual machines
7.4.3 Remote USB
As a special feature on top of the VRDP support, VirtualBox supports remote USB
devices over the wire as well. That is, the VirtualBox guest that runs on one computer
can access the USB devices of the remote computer on which the RDP data is being
displayed the same way as USB devices that are connected to the actual host. This
allows for running virtual machines on a VirtualBox host that acts as a server, where
a client can connect from elsewhere that needs only a network adapter and a display
capable of running an RDP viewer. When USB devices are plugged into the client, the
remote VirtualBox server can access them.
For these remote USB devices, the same filter rules apply as for other USB devices,
as described with chapter 3.7.9.1, USB settings, page 54. All you have to do is specify
“Remote” (or “Any”) when setting up these rules.
Accessing remote USB devices is only possible if the RDP client supports this extension. On Linux and Solaris hosts, the VirtualBox installation provides a suitable RDP
client called rdesktop-vrdp. RDP clients for other platforms will be provided in
future VirtualBox versions.
To make a remote USB device available to a VM, rdesktop-vrdp should be started as
follows:
rdesktop-vrdp -r usb -a 16 -N my.host.address
Note that rdesktop-vrdp can access USB devices only through /proc/bus/usb.
Please refer to chapter 11.5.7, USB not working, page 152 for further details on how
to properly set up the permissions. Furthermore it is advisable to disable automatic
loading of any host driver on the remote host which might work on USB devices to
ensure that the devices are accessible by the RDP client. If the setup was properly
done on the remote host, plug/unplug events are visible on the VBox.log file of the
VM.
7.4.4 RDP authentication
For each virtual machine that is remotely accessible via RDP, you can individually
determine if and how RDP connections are authenticated.
For this, use VBoxManage modifyvm command with the --vrdpauthtype option; see chapter 8.5, VBoxManage modifyvm, page 107 for a general introduction.
Three methods of authentication are available:
• The “null” method means that there is no authentication at all; any client can
connect to the VRDP server and thus the virtual machine. This is, of course, very
insecure and only to be recommended for private networks.
• The “external” method provides external authentication through a special authentication library.
VirtualBox comes with two default libraries for external authentication:
97
Page 98

7 Alternative front-ends; remote virtual machines
– On Linux hosts, VRDPAuth.so authenticates users against the host’s PAM
system.
– On Windows hosts, VRDPAuth.dll authenticates users against the host’s
WinLogon system.
In other words, the “external” method per default performs authentication with
the user accounts that exist on the host system. Any user with valid authentication credentials is accepted, i.e. the username does not have to correspond to
the user running the VM.
However, you can replace the default “external” authentication module with any
other module. For this, VirtualBox provides a well-defined interface that allows
you to write your own authentication module; see chapter 9.3, Custom external
VRDP authentication, page 129 for details.
• Finally, the “guest” authentication method performs authentication with a special
component that comes with the Guest Additions; as a result, authentication is
not performed with the host users, but with the guest user accounts. This method
is currently still in testing and not yet supported.
7.4.5 RDP encryption
RDP features data stream encryption, which is based on the RC4 symmetric cipher
(with keys up to 128bit). The RC4 keys are being replaced in regular intervals (every
4096 packets).
RDP provides three different authentication methods:
1. Historically, RDP4 authentication was used, with which the RDP client does not
perform any checks in order to verify the identity of the server it connects to.
Since user credentials can be obtained using a man in the middle (MITM) attack,
RDP4 authentication is insecure and should generally not be used.
2. RDP5.1 authentication employs a server certificate for which the client possesses
the public key. This way it is guaranteed that the server possess the corresponding private key. However, as this hard-coded private key became public some
years ago, RDP5.1 authentication is also insecure and cannot be recommended.
3. RDP5.2 authentication is based on TLS 1.0 with customer-supplied certificates.
The server supplies a certificate to the client which must be signed by a certificate
authority (CA) that the client trusts (for the Microsoft RDP Client 5.2, the CA
has to be added to the Windows Trusted Root Certificate Authorities database).
VirtualBox allows you to supply your own CA and server certificate and uses
OpenSSL for encryption.
While VirtualBox supports all of the above, only RDP5.2 authentication should be
used in environments where security is a concern. As the client that connects to the
server determines what type of encryption will be used, with rdesktop, the Linux RDP
viewer, use the -4 or -5 options.
98
Page 99

7 Alternative front-ends; remote virtual machines
7.4.6 VRDP multiple connections
The VirtualBox built-in RDP server supports simultaneous connections to the same
running VM from different clients. All connected clients see the same screen output
and share a mouse pointer and keyboard focus. This is similar to several people using
the same computer at the same time, taking turns at the keyboard.
The following command enables multiple connection mode:
VBoxManage modifyvm VMNAME --vrdpmulticon on
If the guest uses multiple monitors then multiple connection mode must be active
in order to use them at the same time (see chapter 9.6, Multiple monitors for the guest,
page 133).
99
Page 100

8 VBoxManage reference
When running VBoxManage without parameters or when supplying an invalid command line, the below syntax diagram will be shown. Note that the output will be
slightly different depending on the host platform; when in doubt, check the output of
VBoxManage for the commands available on your particular host.
Usage:
VBoxManage [-v|--version] print version number and exit
VBoxManage [-q|--nologo] ... suppress the logo
VBoxManage list [--long|-l] vms|runningvms|ostypes|hostdvds|hostfloppies|
VBoxManage showvminfo <uuid>|<name> [--details] [--statistics]
VBoxManage registervm <filename>
VBoxManage unregistervm <uuid>|<name> [--delete]
VBoxManage createvm --name <name>
VBoxManage modifyvm <uuid|name>
bridgedifs|hostinfo|dhcpservers|
hddbackends|hdds|dvds|floppies|
usbhost|usbfilters|systemproperties
[--machinereadable]
[--ostype <ostype>]
[--register]
[--basefolder <path> | --settingsfile <path>]
[--uuid <uuid>]
[--name <name>]
[--ostype <ostype>]
[--memory <memorysize in MB>]
[--vram <vramsize in MB>]
[--acpi on|off]
[--ioapic on|off]
[--pae on|off]
[--hwvirtex on|off|default]
[--nestedpaging on|off]
[--vtxvpid on|off]
[--cpus <number>]
[--monitorcount <number>]
[--accelerate3d <on|off>]
[--bioslogofadein on|off]
[--bioslogofadeout on|off]
[--bioslogodisplaytime <msec>]
[--bioslogoimagepath <imagepath>]
100
 Loading...