

Page 1

Ultra™Enterprise™10000
SSP 3.1 User’s Guide
Sun Microsystems Computer Company
A Sun Microsystems, Inc. Business
901 San Antonio Road
Palo Alto, CA 94303 USA
650 960-1300 fax 650 969-9131
Part No: 805-2955-10
Revision A, December 1997
Page 2

Copyright 1997 Sun Microsystems, Inc., 901 San Antonio Road, PaloAlto, California 94303 U.S.A.All rights reserved.
This product or document is protectedby copyright and distributed under licenses restricting its use, copying, distribution, and decompilation.
No part of this productor document may be reproducedinany form by any means without prior written authorization of Sun and itslicensors,
if any.Third-partysoftware,includingfonttechnology, is copyrighted and licensed from Sun suppliers.
Parts of the product may be derived from Berkeley BSD systems, licensed from the University of California. UNIX is a registeredtrademark in
the U.S. and other countries, exclusively licensed through X/Open Company, Ltd.
Sun,Sun Microsystems, the Sun logo, SunSoft, SunDocs,SunExpress,Solaris, Ultra Enterprise, and OpenBoot PROM aretrademarks, registered
trademarks, or service marks of Sun Microsystems, Inc. in the U.S. and other countries.All SPARCtrademarksareused under license and are
trademarks or registered trademarks of SPARCInternational, Inc. in theU.S. and other countries. Products bearingSPARCtrademarksare
based upon an architecture developed by Sun Microsystems, Inc.
The OPEN LOOK and Sun™ Graphical User Interface was developed by Sun Microsystems, Inc. for its users and licensees. Sun acknowledges
the pioneering efforts of Xerox in researchingand developing the concept ofvisual or graphical user interfaces for the computer industry. Sun
holds a non-exclusive license fromXeroxto the Xerox Graphical User Interface, which license also covers Sun’s licensees who implementOPEN
LOOK GUIs and otherwise complywith Sun’s written licenseagreements.
RESTRICTEDRIGHTS: Use, duplication, or disclosure by the U.S.Government is subject to restrictions of FAR52.227-14(g)(2)(6/87) and
FAR52.227-19(6/87),orDFAR252.227-7015(b)(6/95)andDFAR227.7202-3(a).
DOCUMENTATION IS PROVIDED “AS IS” AND ALL EXPRESS OR IMPLIED CONDITIONS, REPRESENTATIONS AND WARRANTIES,
INCLUDING ANY IMPLIED WARRANTY OF MERCHANTABILITY, FITNESS FOR A PARTICULARPURPOSEORNON-INFRINGEMENT,
ARE DISCLAIMED, EXCEPT TO THE EXTENT THAT SUCH DISCLAIMERS ARE HELD TO BE LEGALLY INVALID.
Copyright 1997 Sun Microsystems, Inc., 901 San Antonio Road, PaloAlto, Californie 94303 Etats-Unis.Tousdroitsréservés.
Ce produit ou document est protégé par un copyrightet distribué avec des licencesqui en restreignent l’utilisation, la copie, ladistribution, et la
décompilation. Aucune partie de ceproduit ou document ne peutêtre reproduitesous aucune forme, par quelque moyen que ce soit, sans
l’autorisation préalable et écrite deSun et de sesbailleurs de licence, s’il y en a. Le logiciel détenu par des tiers,et qui comprend la technologie
relativeaux polices de caractères, est protégépar un copyright et licencié par des fournisseurs de Sun.
Des parties de ce produitpourrontêtredérivées des systèmes Berkeley BSDlicenciés par l’Université de Californie. UNIX est une marque
déposée aux Etats-Unis et dans d’autrespays et licenciée exclusivement par X/Open Company, Ltd.
Sun, Sun Microsystems, le logo Sun, SunSoft, SunDocs, SunExpress, Solari, Ultra Enterprise, et OpenBoot PROMsont des marques de fabrique
ou des marques déposées, ou marquesde service, de Sun Microsystems,Inc. aux Etats-Unis et dans d’autres pays. Touteslesmarques SPARC
sont utilisées sous licence etsont des marques de fabriqueou des marques déposées de SPARC International, Inc. aux Etats-Unis et dans
d’autrespays. Les produits portant les marquesSPARCsontbaséssurune architecture développée par Sun Microsystems,Inc.
L’interfaced’utilisationgraphiqueOPEN LOOK et Sun™ a étédéveloppée par Sun Microsystems, Inc.pour ses utilisateurs et licenciés. Sun
reconnaîtles efforts de pionniers de Xeroxpour la recherche et le développementdu concept des interfacesd’utilisation visuelle ou graphique
pour l’industrie de l’informatique. Sundétient une licence nonexclusive de Xerox sur l’interfaced’utilisation graphique Xerox, cette licence
couvrant également les licenciés de Sun qui mettent en placel’interface d’utilisation graphique OPEN LOOK et qui en outrese conforment aux
licences écrites de Sun.
CETTE PUBLICATION EST FOURNIE "EN L’ETAT" ET AUCUNE GARANTIE, EXPRESSE OU IMPLICITE, N’EST ACCORDEE, Y COMPRIS
DES GARANTIES CONCERNANT LA VALEUR MARCHANDE, L’APTITUDE DE LA PUBLICATION A REPONDRE A UNE UTILISATION
PARTICULIERE, OU LE FAIT QU’ELLE NE SOIT PAS CONTREFAISANTE DE PRODUIT DE TIERS. CE DENI DE GARANTIE NE
S’APPLIQUERAIT PAS, DANS LA MESURE OU IL SERAIT TENU JURIDIQUEMENT NUL ET NON AVENU.
Page 3

Contents
Preface vii
1. Introduction 1-1
SSP Features 1-1
Enterprise 10000 System Architecture 1-3
SSP User Environment 1-4
SSP Window 1-4
SSP Console Window 1-5
Network Console Window 1-5
Hostview 1-6
Using a Spare SSP 1-6
Documentation 1-7
man Pages 1-8
2. Overview of the SSP Tools 2-1
Instances of Client Programs and Daemons 2-1
Only One Instance 2-2
One Instance per Platform 2-2
One Instance per Domain 2-3
Hostview 2-3
Contents i
Page 4

Hostview Main Window 2-5
▼ To Select Items in the Main Window 2-7
Main Window Menu Bar 2-7
Help Window 2-10
Main Window Buttons 2-11
Main Window Processor Symbols 2-12
Hostview Performance Considerations 2-13
The netcon(1M) Window 2-13
▼ To Display a netcon(1M) Window Using netcon(1M) 2-13
▼ To Display a netcon(1M) Window Using netcontool(1M) 2-13
Overview of netcontool(1M) 2-15
Overview of netcon(1M) 2-18
netcon(1M) Communications 2-18
3. System Administration Procedures 3-1
SSP Log Files 3-1
▼ To View a Messages File From Within Hostview 3-1
Administering Power 3-3
▼ To Power Components On or Off From Within Hostview 3-3
▼ To Power Components On or Off From the Command Line 3-4
▼ To Power Peripherals On or Off From the Command Line 3-5
▼ To Monitor Power Levels in Hostview 3-6
Administering Thermal Conditions and Fans 3-8
▼ To Monitor Thermal Conditions From Within Hostview 3-8
▼ To Monitor Fans From Within Hostview 3-10
▼ To Control Fans From Within Hostview 3-12
Domains 3-14
Domain Configuration Requirements 3-14
ii Ultra Enterprise 10000 SSP 3.1 User’s Guide • December 1997
Page 5

▼ To Create Domains From Within Hostview 3-15
▼ To Create Domains From the Command Line 3-16
▼ To Remove Domains From Within Hostview 3-17
▼ To Remove Domains From the Command Line 3-18
▼ To Rename Domains From Within Hostview 3-18
▼ To Rename Domains From the Command Line 3-19
▼ To Bring up a Domain From Within Hostview 3-20
▼ To Bring up a Domain From the Command Line 3-20
▼ To Obtain Domain Status From Within Hostview 3-21
▼ To Specify the Domain for an SSP Window 3-23
▼ To Create a netcon(1M) Window for a Domain 3-23
SSP Messages Files 3-23
Blacklisting Components 3-23
▼ To Blacklist Boards and Buses From Within Hostview 3-25
▼ To Blacklist Processors From Within Hostview 3-26
▼ To Clear the Blacklist File From Within Hostview 3-27
Dual Control Board Handling 3-27
Control Board Executive (cbe) 3-28
Booting 3-28
Primary Control Board 3-28
Control Board Server (cbs) 3-28
Connection 3-28
Control Board Executive Image and Port Specification Files 3-29
▼ To Switch the Primary Control Board 3-30
4. SSP Internals 4-1
Startup Flow 4-1
Enterprise 10000 Client/Server Architecture 4-4
Contents iii
Page 6

POST 4-6
Daemons 4-7
Event Detector Daemon (edd(1M)) 4-8
Control Board Server (cbs(1M)) 4-10
File Access Daemon (fad(1M)) 4-11
Network Time Protocol Daemon (xntpd(1M)/ ntpd(1M)) 4-11
obp_helper(1M) Daemon 4-13
Environment Variables 4-14
Executable Files Within a Domain 4-14
*.elf File 4-15
download_helper File 4-15
obp File 4-15
Glossary A-1
Index Index-1
iv Ultra Enterprise 10000 SSP 3.1 User’s Guide • December 1997
Page 7

Figures
FIGURE 1-1 Enterprise 10000 System and Control Boards 1-3
FIGURE 1-2 SSP Window 1-4
FIGURE 1-3 SSP Console Window 1-5
FIGURE 1-4 netcon(1M) Window 1-5
FIGURE 1-5 Hostview GUI Program 1-6
FIGURE 2-1 SSP clients and daemons: only one instance. 2-2
FIGURE 2-2 SSP clients and daemons: one instance per platform 2-2
FIGURE 2-3 SSP clients and daemons: one instance per domain. 2-3
FIGURE 2-4 Hostview Main Window 2-5
FIGURE 2-5 netcontool(1M) Main Window 2-15
FIGURE 2-6 netcontool(1M) Console Configuration Window 2-16
FIGURE 3-1 SSP Logs Window 3-2
FIGURE 3-2 Hostview — Power Control and Status Window 3-3
FIGURE 3-3 Hostview — Power Status Display 3-6
FIGURE 3-4 Hostview — System Board Power Detail Window 3-7
FIGURE 3-5 Hostview — Thermal Status Display 3-9
FIGURE 3-6 Hostview — System Board Thermal Detail 3-10
FIGURE 3-7 Hostview — Fan Status Display 3-11
FIGURE 3-8 Hostview — Fan Tray Display 3-12
Figures v
Page 8

FIGURE 3-9 Hostview — Fan Control and Status Window 3-13
FIGURE 3-10 Hostview — Remove Domain 3-17
FIGURE 3-11 Hostview — Rename Domain Window 3-19
FIGURE 3-12 Hostview — Domain Status Window 3-22
FIGURE 4-1 Startup Flow 4-3
FIGURE 4-2 Enterprise 10000 Client/Server Architecture 4-5
FIGURE 4-3 Uploading Event Detection Scripts 4-9
FIGURE 4-4 Event Recognition and Delivery 4-9
FIGURE 4-5 Response Action 4-10
FIGURE 4-6 SSP / Enterprise 10000 Communication Through cbs(1M) 4-11
vi Ultra Enterprise 10000 SSP 3.1 User’s Guide • September 1997
Page 9

Preface
The Ultra Enterprise 10000 SSP 3.1 User’s Guide describes the SSP (System Service
Processor), which enables you to monitor and control the Ultra Enterprise 10000
system.
How This Book Is Organized
This document contains the following chapters:
Chapter 1, “Introduction,” introduces the System Service Processor (SSP).
Chapter 2, “Overview of the SSP Tools,” introduces Hostview and the
netcontool(1M) command.
Chapter 3, “System Administration Procedures,” describes how to perform
common system administration procedures.
Chapter 4, “SSP Internals,” provides more detailed information for system
administrators interested in how the SSP works. Included are descriptions of the SSP
booting process and the edd(1M) daemon, which monitors the Ultra Enterprise
10000 system.
Preface vii
Page 10

Before You Read This Book
This manual is intended for the Ultra Enterprise 10000 system administrator, who
should have a working knowledge of UNIX
the Solaris
should first read the Solaris User and System Administrator AnswerBooks provided
with this system, and consider UNIX system administration training.
TM
operating environment. If you do not have such knowledge, you
®
systems, particularly those based on
Using UNIX Commands
This document does not contain information on basic UNIX®commands and
procedures such as shutting down the system, booting the system, and configuring
devices.
See one or more of the following for this information:
■ AnswerBook™ online documentation for the Solaris™ 2.x software environment,
particularly those dealing with Solaris system administration.
■ Other software documentation that you received with your system
viii Ultra Enterprise 10000 SSP 3.1 User’s Guide • December 1997
Page 11

Typographic Conventions
TABLEP-1 Typographic Conventions
Typeface or
Symbol Meaning Examples
AaBbCc123 The names of commands, files,
and directories; on-screen
computer output.
AaBbCc123
AaBbCc123 Book titles, new words or terms,
What you type, when
contrasted with on-screen
computer output.
words to be emphasized.
Command-line variable; replace
with a real name or value.
Edit your .login file.
Use ls -a to list all files.
% You have mail.
% su
Password:
Read Chapter 6 in the User’s Guide.
These are called class options.
You must be root to do this.
To delete a file, type rm filename.
Shell Prompts
TABLEP-2 Shell Prompts
Shell Prompt
C shell machine_name%
C shell superuser machine_name#
Bourne shell and Korn shell $
Bourne shell and Korn shell superuser #
ix
Page 12

Related Documentation
TABLEP-3 Related Documentation
Application Title
Installation Ultra Enterprise 10000 System Hardware and Software Installation
and De-Installation Guide
Reference (man pages) Ultra Enterprise 10000 SSP 3.1 Reference Manual
Release Notes SMCC Open Issues Supplement Release Notes (Solaris 2.6), or SSP
3.1 Release Notes (Solaris 2.5.1). The Open Issues Supplement
contains the information in the section, “Ultra Enterprise
10000 Servers”.
Other Dynamic Reconfiguration User’s Guide
Dynamic Reconfiguration Reference Manual
Alternate Pathing User ’s Guide
Alternate Pathing Reference Manual
Inter-Domain Network User ’s Guide
Ordering Sun Documents
SunDocsSMis a distribution program for Sun Microsystems technical documentation.
Contact SunExpress for easy ordering and quick delivery. You can find a listing of
available Sun documentation on the World Wide Web.
TABLEP-4 SunExpress Contact Information
Country Telephone Fax
Belgium 02-720-09-09 02-725-88-50
Canada 1-800-873-7869 1-800-944-0661
France 0800-90-61-57 0800-90-61-58
Germany 01-30-81-61-91 01-30-81-61-92
Holland 06-022-34-45 06-022-34-46
Japan 0120-33-9096 0120-33-9097
Luxembourg 32-2-720-09-09 32-2-725-88-50
x Ultra Enterprise 10000 SSP 3.1 User’s Guide • December 1997
Page 13

TABLEP-4 SunExpress Contact Information
Sweden 020-79-57-26 020-79-57-27
Switzerland 0800-55-19-26 0800-55-19-27
United Kingdom 0800-89-88-88 0800-89-88-87
United States 1-800-873-7869 1-800-944-0661
World Wide Web: http://www.sun.com/sunexpress/
Sun Documentation on the Web
The docs.sun.com web site enables you to access Sun technical documentation on
the World Wide Web. You can browse the docs.sun.com archive or search for a
specific book title or subject at http://docs.sun.com.
Sun Welcomes Your Comments
We are interested in improving our documentation and welcome your comments
and suggestions. You can email your comments to us at smcc-docs@sun.com.
Please include the part number of your document in the subject line of your email.
xi
Page 14

xii Ultra Enterprise 10000 SSP 3.1 User’s Guide • December 1997
Page 15

CHAPTER
1
Introduction
The System Service Processor (SSP) is a SPARC®workstation that enables you to
control and monitor the Ultra Enterprise 10000 system. The SSP software packages
must be installed on the SSP workstation. In addition, the SSP workstation must be
able to communicate with the Ultra Enterprise 10000 system over an Ethernet
connection. In this book, the SSP workstation is simply called the SSP.
The Ultra Enterprise 10000 system is often referred to as the platform. System boards
within the platform may be logically grouped together into separately bootable
systems called Dynamic System Domains, or simply domains . Up to eight domains
may exist simultaneously on a single platform. (Domains are introduced in this
chapter, and are described in more detail in “Domains” on page 3-14.) The SSP
enables you to control and monitor domains, as well as the platform itself.
Domains can communicate with each other at high speeds using the Inter-Domain
Networks (IDN) feature, which is only available with Solaris version 2.6 (and later)
on the Ultra Enterprise 10000. IDN exposes a normal network interface to the
domains that make up the network, but no cabling or other network hardware is
required. Instead, domains communicate using hardware features that are built into
the Ultra Enterprise 10000. IDN networks are described in the Inter-Domain Network
User’s Guide.
SSP Features
SSP 3.1 software can be loaded only on Sun workstations running Solaris 2.5.1 in an
OpenWindows
Solaris 2.6. However, the SSP does work well with Ultra Enterprise 10000 domains
running Solaris 2.5.1 or Solaris 2.6. The GUI programs that are provided with the
SSP 3.1 software can be used remotely, possibly on a workstation running the
Common Desktop Environment (CDE) rather than Open Look.
TM
or Open Look environment. The SSP software cannot be run on
1-1
Page 16

The SSP enables the system administrator to perform the following tasks:
■ Boot domains.
■ Perform emergency shutdown in an orderly fashion. For example, the SSP
software automatically shuts down a domain if the temperature of a processor
within that domain rises above a pre-set level.
■ Dynamically reconfigure a domain so that currently installed system boards can
be logically attached to or detached from the operating system while the domain
continues running in multiuser mode. This feature is known as Dynamic
Reconfiguration and is described in the Dynamic Reconfiguration User ’s Guide.(A
system board can easily be physically swapped in and out when it is not attached
to a domain, even while the system continues running in multiuser mode.)
■ Create domains by logically grouping system boards together. Domains are able
to run their own operating system and handle their own workload. See
“Domains” on page 3-14.
■ Assign paths to different controllers for I/O devices, which enables the system to
continue running in the event of certain types of failures. This feature is known as
Alternate Pathing and is described in the Alternate Pathing User’s Guide.
■ Monitor and display the temperatures, currents, and voltage levels of one or more
system boards or domains.
■ Control fan operations.
■ Monitor and control power to the components within a platform.
■ Execute diagnostic programs such as POST (power-on self test).
In addition, the SSP environment:
■ Warns you of impending problems, such as high temperatures or malfunctioning
power supplies.
■ Notifies you when a software error or failure has occurred.
■ Automatically reboots a domain after a system software failure (such as a panic).
■ Keeps logs of interactions between the SSP environment and the domains.
1-2 Ultra Enterprise 10000 SSP 3.1 User’s Guide • December 1997
Page 17
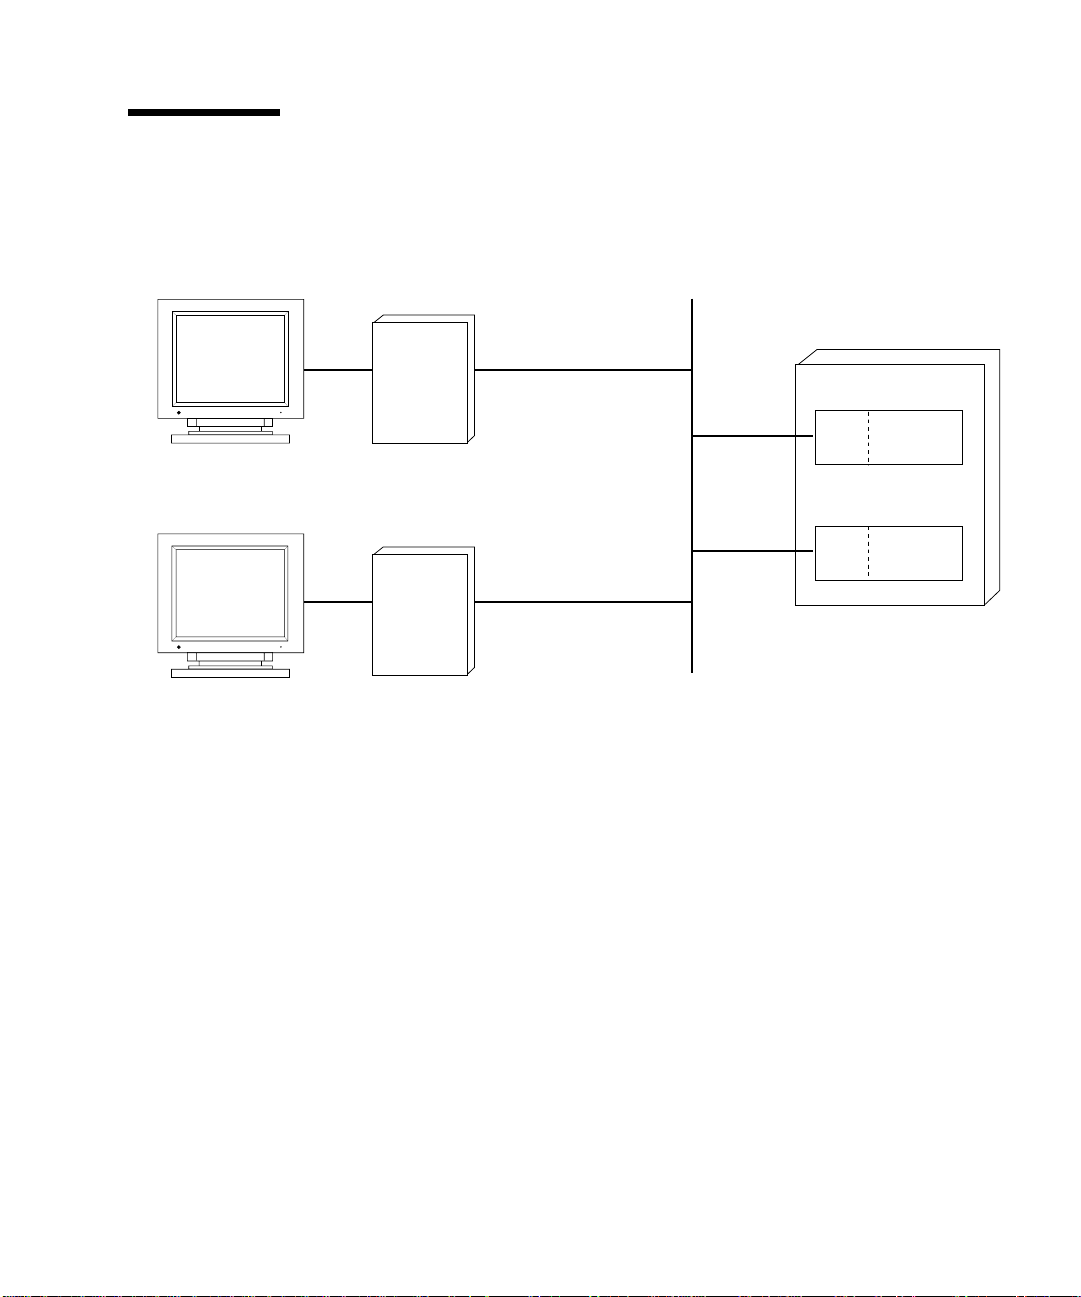
Enterprise 10000 System Architecture
The Enterprise 10000 platform, SSP, and other workstations communicate over
Ethernet as shown in
SSP
FIGURE 1-1.
Ethernet
Enterprise 10000
platform
CBE
CBE
WS
FIGURE 1-1 Enterprise 10000 System and Control Boards
Control
board 0
Control
board 1
Redundant control boards are supported within the Enterprise 10000 platform. Each
control board runs a Control Board Executive (CBE) that communicates with the SSP
over the network. One control board is designated as the primary control board, and
the other is designated as the alternate control board. If the primary control board
fails, you can manually switch to the alternate control board as described in “Dual
Control Board Handling” on page 3-27.
SSP operations can also be performed by remotely logging in to the SSP from
another workstation on the network. Whether you log in to the SSP remotely or
locally, you must log in as user ssp and provide the appropriate password if you
want to perform SSP operations (such as monitoring and controlling the platform).
Chapter 1 Introduction 1-3
Page 18
SSP User Environment
You can interact with the SSP and domains by using the Hostview GUI or other
window environments.
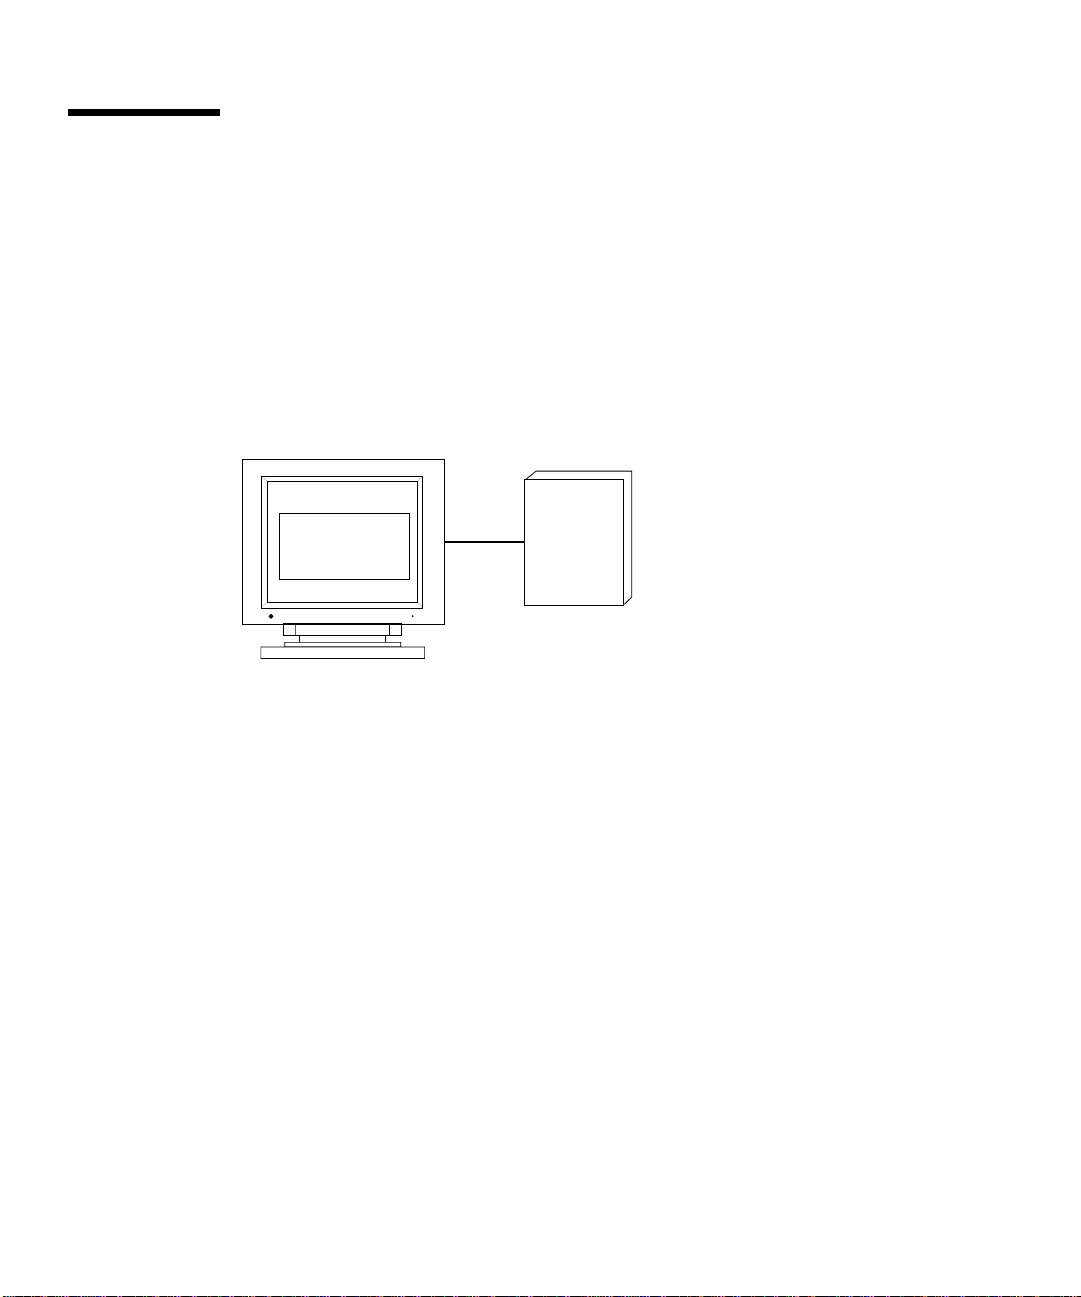
SSP Window
An SSP Window provides a command line interface to the Solaris and SSP
environments.
SSP or Other Workstation Display
SSP window
% rlogin ssp \
-1 ssp
FIGURE 1-2 SSP Window
To display an SSP Window, you must log in as user ssp and enter the ssp user
password. You are then prompted for the name of a domain. The SUNW_HOSTNAME
environment variable is set to that domain. (You can change the value of
SUNW_HOSTNAME at any time.) The effect of SUNW_HOSTNAME on client applications
and daemons is described in “Instances of Client Programs and Daemons” on
page 2-1.
You can also display an SSP Window on any workstation on the network by using
rlogin(1) to remotely log in to the SSP machine as user ssp. The DISPLAY
environment variable must be set to your display, and your xhost(1) settings must
enable the SSP software to display on your workstation.
Multiple SSP Windows can be used simultaneously.
SSP
1-4 Ultra Enterprise 10000 SSP 3.1 User’s Guide • December 1997
Page 19

SSP Console Window
The SSP Console Window is the console for the SSP machine.
SSP Display
SSP Console Window
% cmdtool —C
FIGURE 1-3 SSP Console Window
SSP
This window is normally created when OpenWindows starts but, if necessary, you
can display it using cmdtool(1) with its -C option. This window displays
messages from programs running in the SSP and its Solaris environment and kernel.
Network Console Window
A netcon(1M) window receives system console messages from a domain.
Logical Connection
Enterprise 10000
Domain 1
Domain 2
Chapter 1 Introduction 1-5
netcon (1M) Windows
% setenv SUNW_HOSTNAME domain1
% netcon
% setenv SUNW_HOSTNAME domain2
% netcon
FIGURE 1-4 netcon(1M) Window
Logical Connection
SSP
Network
Platform
Page 20
Multiple netcon(1M) windows can be open simultaneously, but only one at a time
can have write privileges to a specific domain. When a netcon(1M) window is in
read-only mode, you can view messages from the netcon(1M) window, but you
cannot enter any commands. For more information, see the netcon(1M) man page.
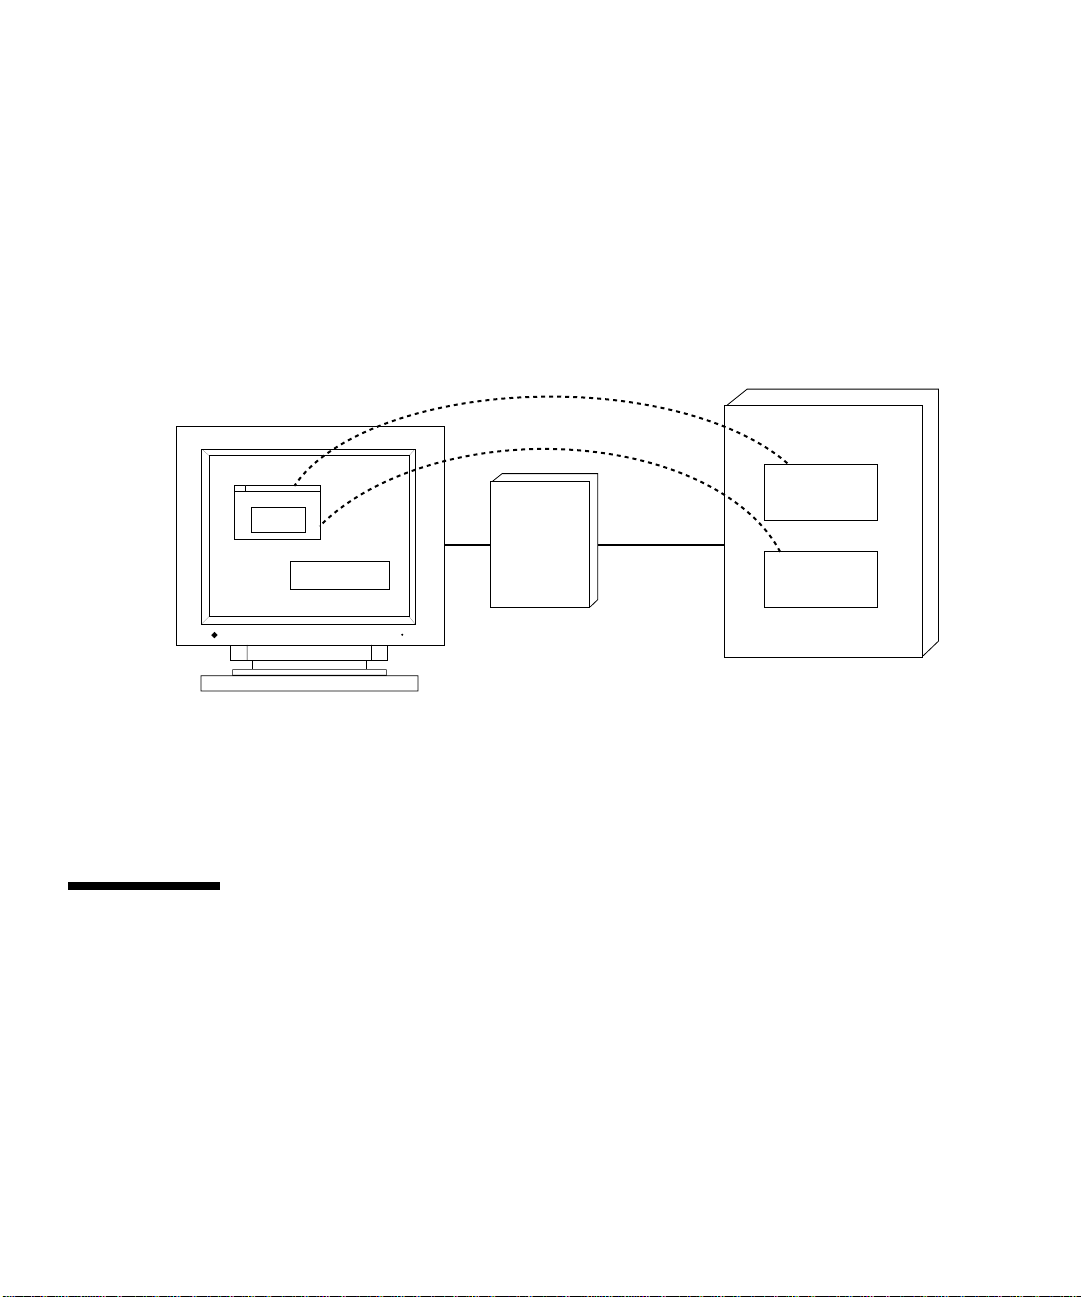
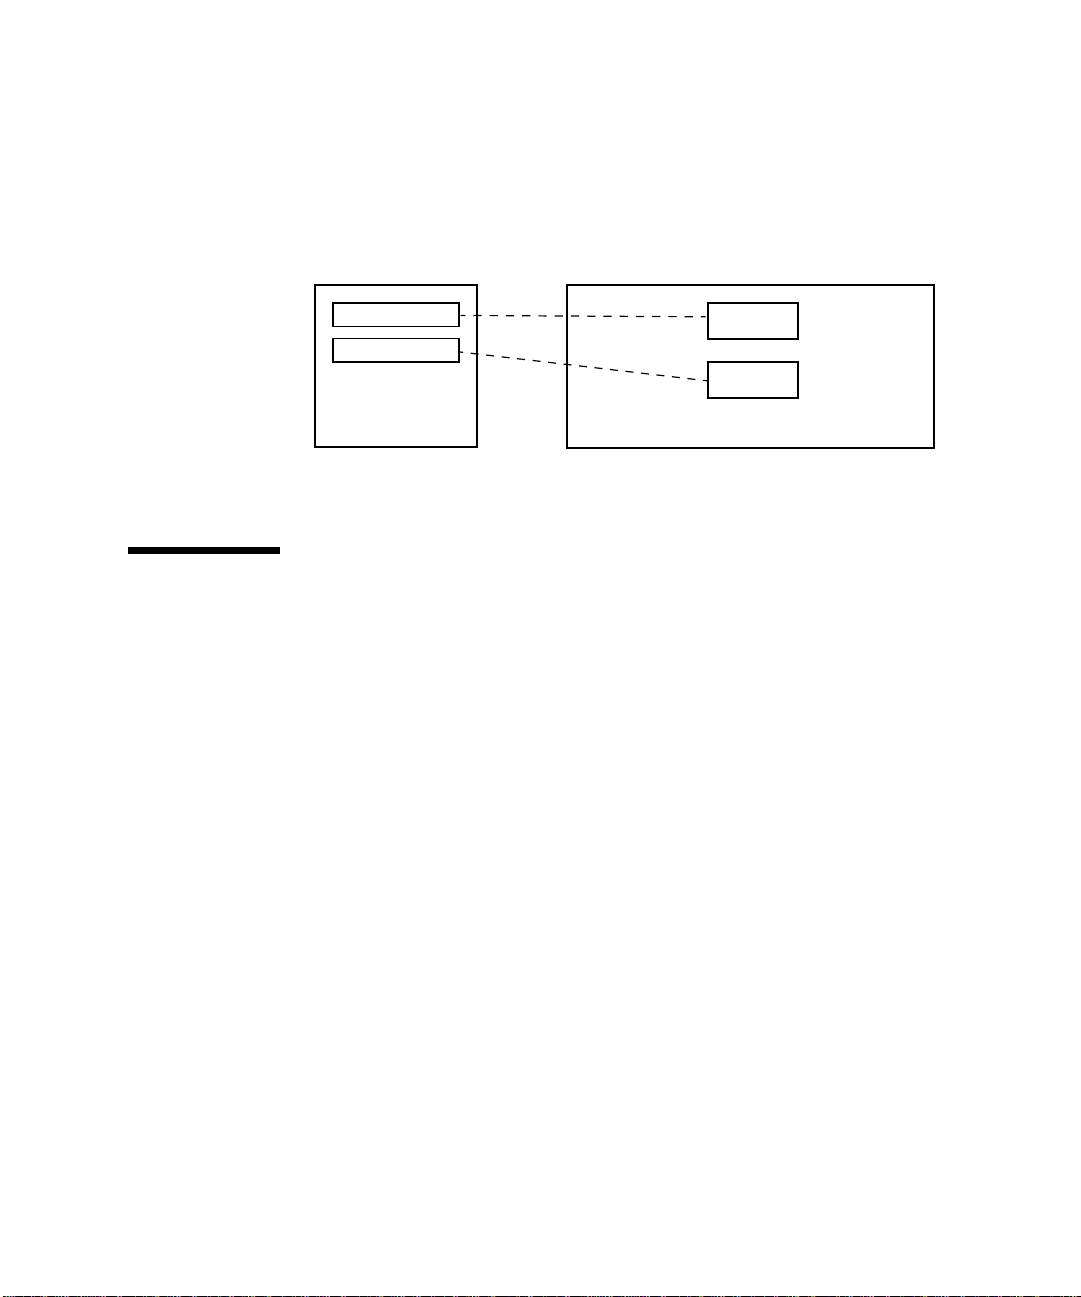
Hostview
The Hostview program provides a graphical user interface (GUI) with the same
functionality as many of the SSP commands:
Logical Connection
Logical Connection
Hostview
SSP Window
% hostview
FIGURE 1-5 Hostview GUI Program
Hostview is introduced in Chapter 2, “Overview of the SSP Tools” and is described
in more detail in Chapter 3, “System Administration Procedures”. It is also described
in hostview(1M) in the Ultra Enterprise 10000 SSP Reference.
SSP
Network
Enterprise 10000
Platform
Domain 1
Domain 2
Using a Spare SSP
The SSP unit is a Sun workstation with a defined hardware configuration. Any
identical Sun workstation can also serve as an SSP. You can optionally designate
such a Sun workstation as a spare SSP unit, to serve as a backup if your primary SSP
unit fails. You can also order your Ultra Enterprise 10000 server with a spare SSP
unit. The spare SSP can be a dedicated spare SSP or a non-dedicated spare SSP.
A dedicated spare SSP is a unit that you maintain in a ready state; if the primary SSP
fails, you can quickly switch to the spare SSP. The dedicated spare SSP is not used
for any other purpose. A non-dedicated spare SSP is one that you do not necessarily
1-6 Ultra Enterprise 10000 SSP 3.1 User’s Guide • December 1997
Page 21

maintain in a ready state, one that may require a re-install of the operating system
and SSP software before you can begin using it as the SSP, should the primary SSP
fail. However, you can use a non-dedicated SSP for other purposes in the meantime.
To maintain a spare SSP, you must adhere to the following requirements:
■ The hardware for the spare SSP must be identical to the hardware for the main
SSP. (A spare SSP purchased from Sun satisfies this requirement.)
■ The operating system and SSP software on the spare SSP must be identical to the
operating system and SSP software on the main SSP before you switch to the
spare SSP. If you are maintaining a dedicated spare SSP, you must install the same
operating system upgrades and patches on it as you do on the primary SSP.
■ If you are maintaining a dedicated spare SSP, you must not install or use any non-
SSP software on it.
■ The main SSP must be backed up regularly. You should perform weekly full
backups and daily incremental backups. After any system configuration
operation, you should immediately perform an incremental backup in case the
main SSP crashes prior to the next scheduled daily incremental backup. System
configuration operations include:
■ Changing the primary control board
■ Inserting or removing a board (using the Hot Swap procedure)
■ Attaching or detaching a board
■ Creating, removing, or renaming a domain
■ Performing a bringup(1M) operation on a domain
■ Rebooting a domain
■ Automatic domain recovery operations due to events such as system panics or
hardware failures
To switch over to the spare SSP, see the following sections in the Ultra Enterprise
10000 System Hardware and Software Installation and De-Installation Guide , a copy of
which is in both the SSP 3.1 Media Kit and the SMCC Server Media Kit:
■ Replacing the SSP With a Dedicated Spare SSP
■ Replacing the Main SSP With a Non-dedicated Spare SSP
Documentation
For general system administration information, such as adding users and mounting
file systems, refer to the Solaris 2.5 System Administrator AnswerBook. If you encounter
any information in these documents that conflicts with the Ultra Enterprise 10000
documents, the Ultra Enterprise 10000 documents take precedence, followed by
documents that describe Sun hardware, and then the Solaris documents.
Chapter 1 Introduction 1-7
Page 22

man Pages
The man pages for functions that run on the SSP are initially located on the SSP in
/opt/SUNWssp/man. When running Solaris 2.5.1 on the Ultra Enterprise 10000, the
man pages for Network Time Protocol (NTP) are initially loaded on the SSP (and on
domains) within /opt/SUNWxntp/man. When running Solaris 2.6 on the Ultra
Enterprise 10000, the man pages for NTP are bundled with operating system. Unless
noted otherwise, all man pages referenced in this document are SSP man pages.
They are included in the Ultra Enterprise 10000 SSP Reference, and you can view them
in an SSP Window by using the man(1) command.
1-8 Ultra Enterprise 10000 SSP 3.1 User’s Guide • December 1997
Page 23

CHAPTER
2
Overview of the SSP Tools
This chapter introduces:
■ Hostview —This is a graphical user interface (GUI) front-end to SSP commands.
■ netcontool(1M)—This is a GUI interface to the netcon(1M) command.
netcontool(1M) simplifies the process of configuring and bringing up
netcon(1M) Windows. You can also use the netcon(1M) command directly to
display a netcon(1M) Window. However, when using netcon(1M), you must
know escape sequences to perform operations that can be performed by clicking
on buttons under netcontool(1M).
Instances of Client Programs and Daemons
An Enterprise 10000 platform may host multiple domains, where each domain runs
its own copy of the operating system, independent of any other domains. The client
programs and daemons running on the SSP fall into three categories with respect to
how many instances are created relative to a platform and its domains:
■ Only one instance
■ One instance per platform
■ One instance per domain
2-1
Page 24
Only One Instance
For certain clients and daemons, exactly one instance is created on the SSP, without
regard to the platform or the number of domains that exist on the platform. For
these clients and daemons, the setting of the environment variable SUNW_HOSTNAME
is irrelevant. See
FIGURE 2-1.
SSP
Only one
instance
SUNW_HOSTNAME
is not relevant.
FIGURE 2-1 SSP clients and daemons: only one instance.
Platform
Domain
Domain
One Instance per Platform
For some clients and daemons, one instance is started for the platform. In the current
release, where the SSP can control only a single platform, there is little difference
between this type of client or daemon and the type previously described. However,
when a client or daemon is specific to a platform, the setting of the SUNW_HOSTNAME
environment variable is important; SUNW_HOSTNAME must identify the platform.
This can be accomplished by setting SUNW_HOSTNAME to the name of the platform or
to the name of a domain on the platform. See
SSP
Instance
SUNW_HOSTNAME
must identify the
platform.
FIGURE 2-2.
Platform
Domain
Domain
FIGURE 2-2 SSP clients and daemons: one instance per platform
2-2 Ultra Enterprise 10000 SSP 3.1 User’s Guide • December 1997
Page 25
One Instance per Domain
For certain other clients and daemons, one instance is created on the SSP for each
domain on the platform. Before you run a client application of this genre, set
SUNW_HOSTNAME to the relevant domain name. (hpost(1M) and bringup(1M) are
examples of this genre.) See
FIGURE 2-3.
SSP
Instance 1
Platform
Domain
Instance 2
SUNW_HOSTNAME
Domain
must be set to the
domain name.
FIGURE 2-3 SSP clients and daemons: one instance per domain.
Hostview
Hostview is a GUI program that enables you to perform the following actions:
■ Power a platform on and off.
■ Dynamically reconfigure the boards within a platform, logically attaching or
detaching them from the operating system. This feature is described in the
Dynamic Reconfiguration User’s Guide.
■ Dynamically group system boards into domains. Each domain runs its own
instance of Solaris and has its own log messages file.
■ Bring up domains.
■ Start an SSP Window for each domain.
■ Access the SSP log messages file for each platform or domain.
■ Remotely log in to each domain.
■ Edit the blacklist(4) file to enable or disable hardware components on a
domain.
■ Display a netcon(1M) Window.
If you want to run Hostview, you only need to run one instance for a given platform,
although it is possible to run more than one instance simultaneously (perhaps on
different SSPs) to work with the same platform. You can run Hostview from any SSP
Window (such as, a session where you have logged in as user ssp).
Chapter 2 Overview of the SSP Tools 2-3
Page 26

If you have logged into the SSP environment from a workstation, make sure your
DISPLAY environment variable is set to your current display and that your xhost
settings enable the SSP to display on your workstation (see xhost(1) in the Solaris
X Window System Reference Manual).
● To start up Hostview, run the hostview(1M) command in an SSP Window:
ssp% hostview &
2-4 Ultra Enterprise 10000 SSP 3.1 User’s Guide • December 1997
Page 27
Power
Temp.
Fans
Failure
Support
Board
Control
Board
System
Board
Selected
Board
Buses
Domain 1
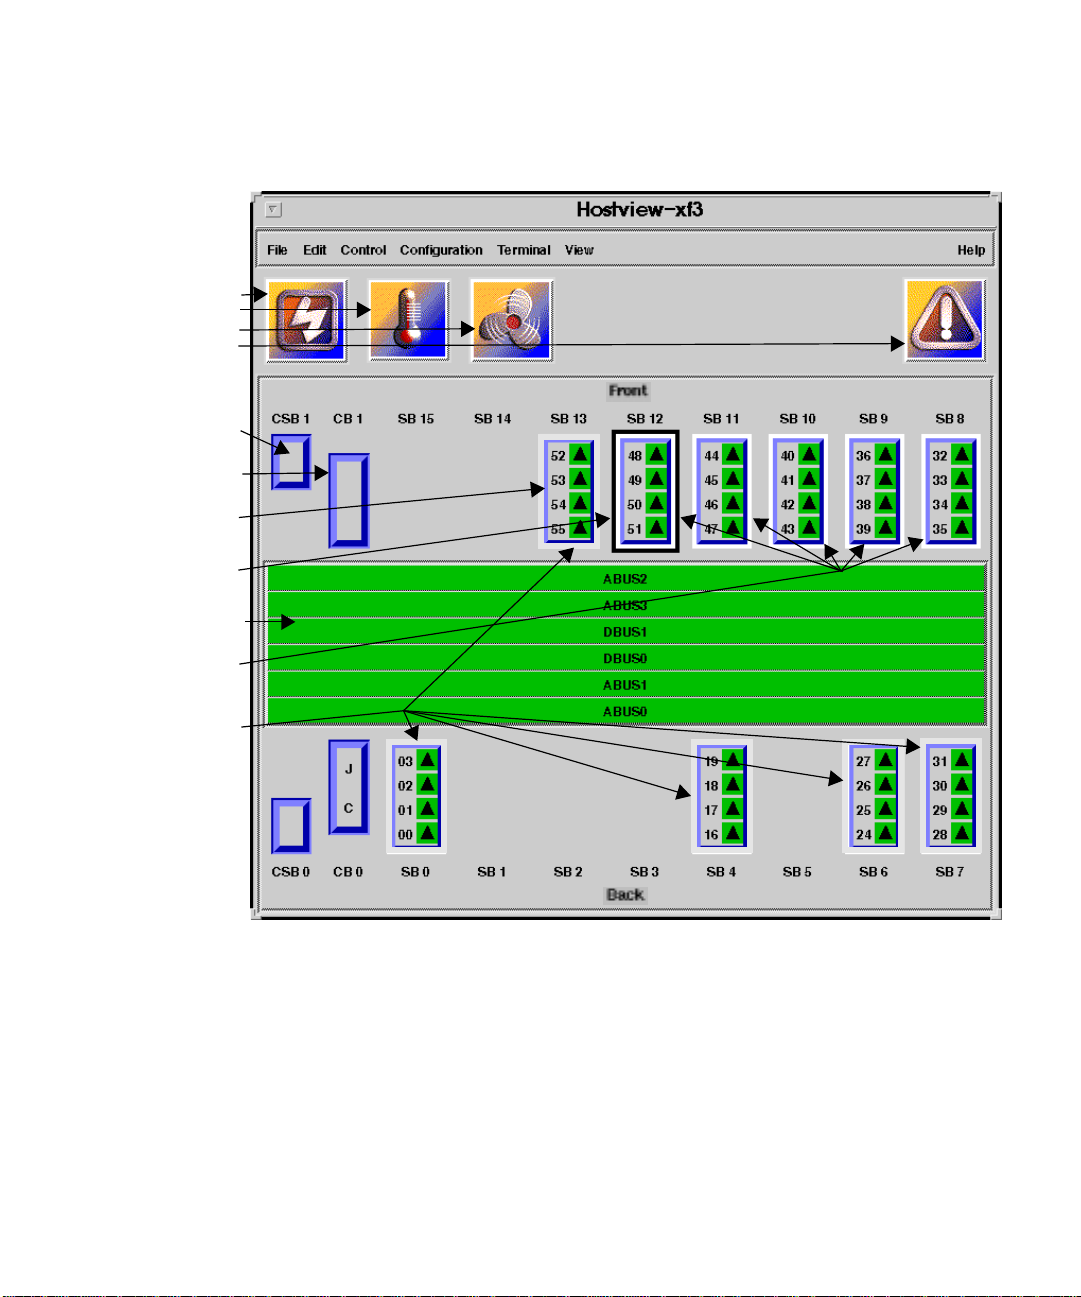
Hostview Main Window
When you start up Hostview, the main window is displayed:
Domain 2
FIGURE 2-4 Hostview Main Window
The menu bar on the main window provides the commands that you can use to
control the platform. See “Main Window Menu Bar” on page 2-7.
The buttons on the main window (power, temperature, and so forth) bring up status
details. The buttons are introduced in “Main Window Buttons” on page 2-11.
Chapter 2 Overview of the SSP Tools 2-5
Page 28
The rest of the main window provides a graphical view of the platform boards and
buses. The system boards are named SB0 through SB15, and their processor numbers
are shown. The control boards are named CB0 and CB1. The support boards are
named CSB0 and CSB1. The buses are named ABUS0 through ABUS3, and DBUS0
through DBUS3.
The system boards along the top of the display are arranged in the order they appear
on the front side of the physical platform. The system boards along the bottom of the
display are arranged in the order they appear on the back side of the physical
platform.
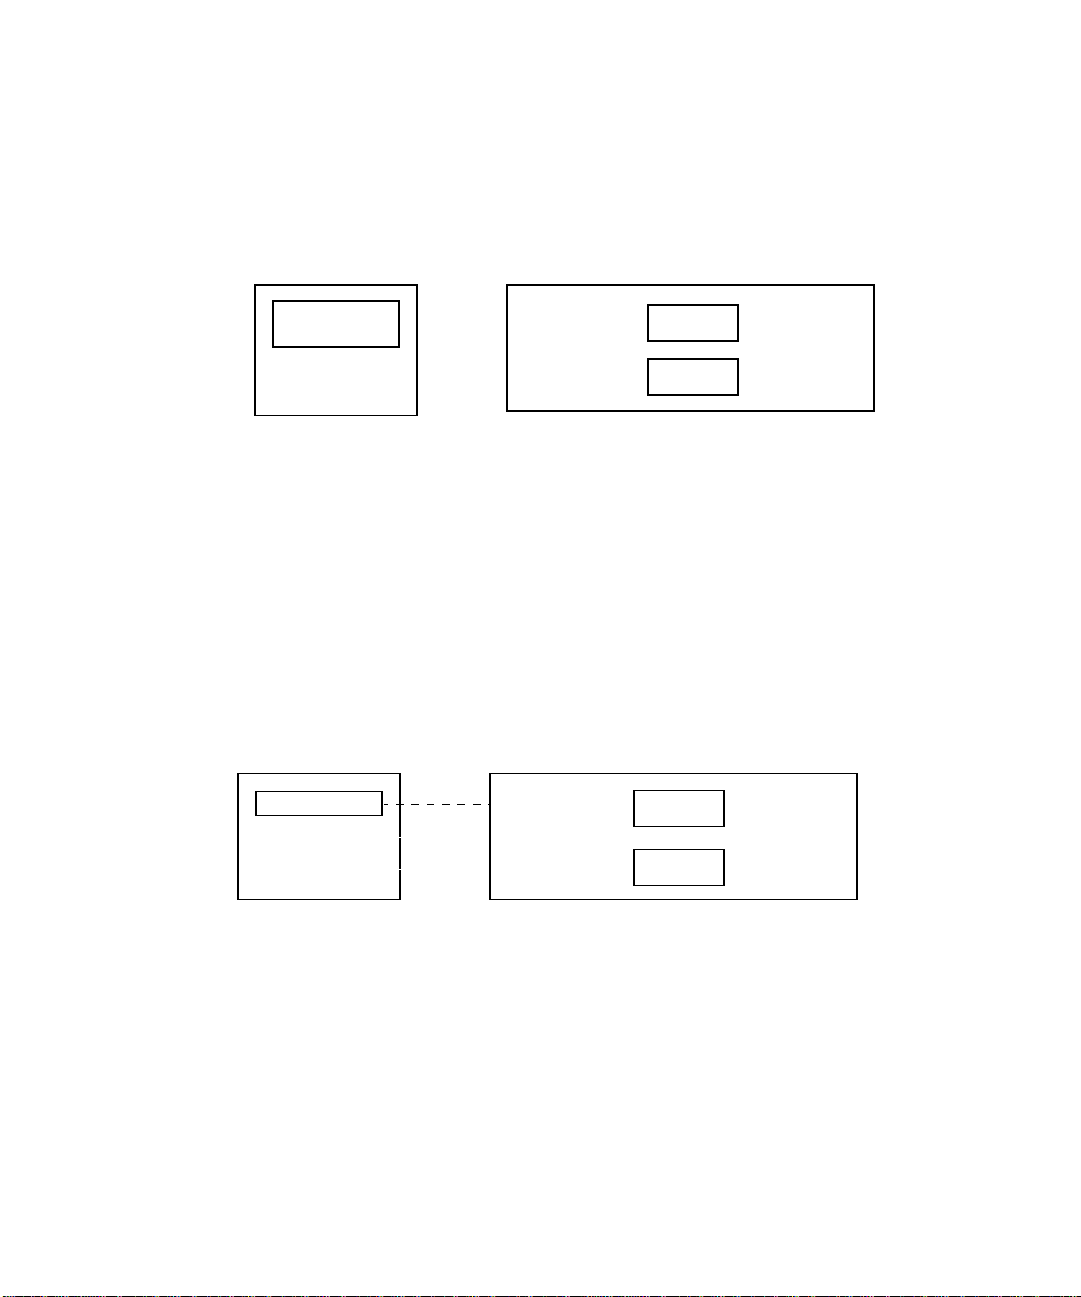
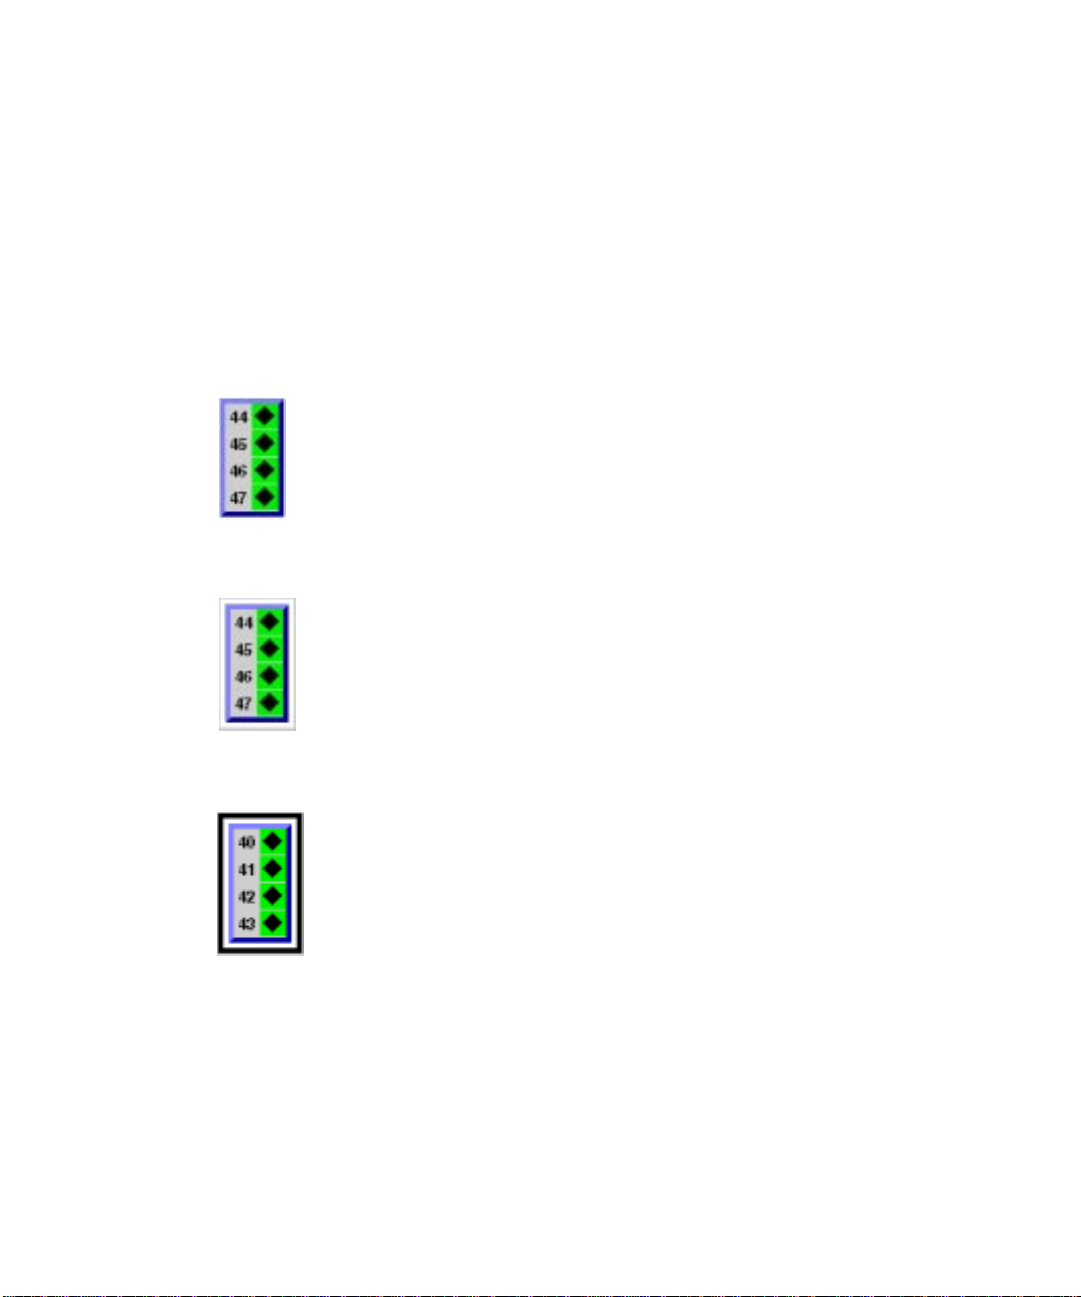
If a system board is shown with no outline, the board is not part of a domain and is
not currently selected. Here is an example:
If a system board is part of a domain, a colored outline surrounds it. The boards
within a given domain all have an outline of the same color. Here is an example:
A black outline (around the domain color outline) indicates that a board is selected.
Here is an example:
The processors within the boards are numbered 0 through 63. The processor symbols
(diamond, circle, and so forth) indicate the state of the processors, and are described
in “Main Window Processor Symbols” on page 2-12.
2-6 Ultra Enterprise 10000 SSP 3.1 User’s Guide • December 1997
Page 29

▼ To Select Items in the Main Window
You can select one or more boards in the Hostview main window. You can also select
one domain in the main window. You must select a set of boards prior to performing
certain operations, such as creating a domain.
■ To select a single board, click it with the left mouse button. The selected board is
indicated by a black outline, and all other boards are deselected.
■ To select additional boards, click them with the middle mouse button. You can
also deselect a currently selected board by clicking on it with the middle mouse
button. (The middle mouse button toggles the selection status of the board
without affecting the selection status of any other board.)
■ To select a domain, click a board within that domain with the left mouse button.
Note that it is possible to select boards from different domains (using the middle
mouse button), but the selected domain will correspond to the board that you
selected with the left mouse button.
Main Window Menu Bar
The items on the main Hostview menu are described in the following table.
TABLE2-1 Hostview Menu Items
Menu Selection Description
File SSP Logs Displays a window that shows the SSP
messages for a domain or for the platform.
For more information, see “SSP Log Files”
on page 3-1.
Quit Terminates Hostview.
Edit Blacklist File Lets you specify boards and CPUs to be
blacklisted.
Control Power Displays a window that enables you to turn
the power on and off for the selected board.
See “To Power Components On or Off From
Within Hostview” on page 3-3. You can also
set the JTAG claim and margin/trip
settings.
Bringup Displays a window that lets you run
bringup(1M) on a domain. See “To Bring
up a Domain From Within Hostview” on
page 3-20
.
Chapter 2 Overview of the SSP Tools 2-7
Page 30

TABLE2-1 Hostview Menu Items
Menu Selection Description
Fan Displays a window that lets you run the
fan(1M) command to control the fans
within the platform. See “To Control Fans
From Within Hostview” on page 3-12.
Configuration Board Enables you to attach and detach system
boards. This feature is described in the
Dynamic Reconfiguration User’s Guide.
Domain Provides a pull-right menu with several
choices. The menu choices enable you to
create domains, remove domains, rename
domains, obtain the status of domains, and
view the history of domains. A domain
consists of one or more system boards
running the same operating system kernel.
Domains function independently of each
other. Each domain can carry its own
workload and has its own log messages file.
For more information see “To Create
Domains From Within Hostview” on
page 3-15 and “To Remove Domains From
Within Hostview” on page 3-17.
Terminal netcontool Displays a window that provides a
graphical interface to the netcon(1M)
command, enabling you to open a network
console window for a domain. This menu
item is equivalent to executing the
netcontool(1M) command. See “The
netcon(1M) Window” on page 2-13.
SSP Provides pull-right menu choices that
enable you to display an SSP Window in
xterm, shelltool, or cmdtool format with a
platform or domain as its host. Choose a
domain (by selecting any system board
within that domain) before choosing this
option.
rlogin Provides pull-right menu choices that
enable you to remotely log on to the
selected platform or domain in an xterm,
shelltool, or cmdtool window. Choose a
domain (by selecting any system board
within that domain) before choosing this
option.
2-8 Ultra Enterprise 10000 SSP 3.1 User’s Guide • December 1997
Page 31

TABLE2-1 Hostview Menu Items
Menu Selection Description
View All Domains Displays the boards within all domains, as
well as any boards that are not part of a
domain. (A board can be present without
being part of a domain, although a board
cannot be used when it is not part of a
domain.)
Individual Domains When you select an individual domain,
only the boards within that domain are
displayed. Note that the color of the outline
used to designate a given domain is also
used as the background color for that
domain in the menu. The system board
numbers for the boards that belong to each
domain are shown in square brackets.
Help topic Provides online help information on several
topics.
Chapter 2 Overview of the SSP Tools 2-9
Page 32

Help Window
When you select a topic from the Help menu, the following window is displayed.
You can select the desired topic in the upper pane. The corresponding help
information is displayed in the lower pane.
2-10 Ultra Enterprise 10000 SSP 3.1 User’s Guide • December 1997
Page 33

Main Window Buttons
The main Hostview window contains the buttons described below. If an out-ofboundary condition exists or an error has occurred, one or more of these buttons
turn red.
The Power button (above) displays the Power Control and Status window which
enables you to view the power status for the platform. See “To Power Components
On or Off From Within Hostview” on page 3-3.
The Temperature button (above) displays the Thermal Status window which enables
you to view the temperature status for the boards and components within the
platform. See “To Monitor Thermal Conditions From Within Hostview” on page 3-8.
The Fan button (above) displays the Fan Status window which enables you to view
the status of the fans within the platform. See “To Monitor Fans From Within
Hostview” on page 3-10.
When certain error conditions occur, the Failure button (above) turns red. If you
click a red Failure button, a window is displayed showing the error condition(s) that
have occurred.
The following types of error conditions are trapped by this mechanism:
■ Host panic recovery in progress – The operating system on a domain
has failed and is recovering.
Chapter 2 Overview of the SSP Tools 2-11
Page 34

■ Heartbeat failure recovery in progress – The SSP was not receiving
updated platform or domain information as expected.
■ Arbitration stop recovery in progress – A parity error or other fatal
error has occurred, and the domain is recovering. See arbitration stop in the
Glossary.
■ Host reboot is in progress – The domain is being manually rebooted.
■ Power-on-bringup recovery in progress – The platform and domains
failed due to a power outage. Power has been restored, and the system is bringing
up the domains.
Main Window Processor Symbols
In the main window display, the shape and background color of a processor symbol
indicate the status of that processor. For example, a diamond on a green background
indicates the processor is running the operating system.
The shape indicates what the processor is running:
◆ Operating system
● hpost(1M)
■ download_helper
▲ OBP
? Unknown program
The color of a symbol indicates the state of a processor:
green Running.
maroon Exiting.
yellow Prerun. (The OS is currently being loaded.)
blue Unknown.
black Blacklisted. (The processor is unavailable to run
programs or diagnostics.)
red Redlisted. (The processor is unavailable to run
programs or diagnostics and its state may not be
changed.)
2-12 Ultra Enterprise 10000 SSP 3.1 User’s Guide • December 1997
Page 35

white Present but not configured. The processor is
unavailable, but not blacklisted or redlisted. One
example is a board that has been Hot Swapped in but
not yet attached to the operating system
Hostview Performance Considerations
Each copy of Hostview requires a significant amount—5 to 10 Mbytes—of the
available swap space in the SSP. Before running multiple copies of Hostview, make
sure the SSP has sufficient swap space available.
The netcon(1M) Window
▼ To Display a netcon(1M) Window Using
netcon(1M)
● Run the following commands in the SSP Window.
% setenv SUNW_HOSTNAME domain_name
% netcon
As shown, you must be sure that the SUNW_HOSTNAME environment variable is set to
the name of the domain for which you want to display a netcon(1M) Window. For
more information about the netcon(1M) command options, refer to netcon(1M)
man page.
▼ To Display a netcon(1M) Window Using
netcontool(1M)
1. Bring up netcontool(1M) in either of two following ways.
Chapter 2 Overview of the SSP Tools 2-13
Page 36

■ From an SSP Window, enter the following commands.
% setenv SUNW_HOSTNAME domain_name
% netcontool &
Note that the SUNW_HOSTNAME environment variable must be set to the domain
for which you want to display a netcontool(1M) Window before you run the
netcontool(1M) command.
■ Alternatively, from Hostview, select a board from the domain for which you
want to display a netcontool(1M) Window (by clicking on that board with
the left mouse button), and select Terminal ➤ netcontool.
The netcontool(1M) Window is displayed.
2. If you want to configure the netcon(1M) Window before you display it, choose
the Configure button. The Console Configuration window is displayed:
a. Select the session type in the left panel, and the window type in the right
panel.
b. Choose Done.
2-14 Ultra Enterprise 10000 SSP 3.1 User’s Guide • December 1997
Page 37

3. In the netcontool(1M) Window, choose the Connect button.
The netcon(1M) Window is displayed beneath the netcontool(1M) Window.
Overview of netcontool(1M)
The netcontool(1M) Window is shown below.
FIGURE 2-5 netcontool(1M) Main Window
Chapter 2 Overview of the SSP Tools 2-15
Page 38

If you choose the Configure button, the Console Configuration window is displayed:
FIGURE 2-6 netcontool(1M) Console Configuration Window
■ Read Only Session
Displays a console window where you can view output from a domain, but
cannot enter commands. This is the default session type.
■ Unlocked Write (-g)
Attempts to display a netcon(1M) Window with unlocked write permission. If
this attempt succeeds, you can enter commands into the console window, but
your write permission is taken away whenever another user requests Unlocked
Write, Locked Write, or Exclusive Session permission for the same domain.
■ If another user currently has Unlocked Write permission, it is changed to read
only permission, and you are granted Unlocked Write permission.
■ If another user currently has Locked Write permission, you are granted read
only permission.
■ If another user currently has Exclusive Session permission, you are not allowed
to display a netcon(1M) Window.
■ If you are granted Unlocked Write permission and another user requests
Unlocked Write or Locked Write permission, you are notified and your
permission is changed to read only. You can attempt to reestablish Unlocked
Write permission at any time, subject to the same constraints as your initial
attempt to gain Unlocked Write permission.
■ Locked Write (-l)
Attempts to display a console window with Locked Write permission.
■ If you are granted Locked Write permission, no other user can remove your
write permission unless they request Exclusive Session permission.
■ If another user currently has Locked Write permission, you are granted only
Read Only permission.
■ If another user currently has Exclusive Session permission, you are not allowed
to display a netcon(1M) Window.
■ Exclusive Session (-f)
Displays a console window with Locked Write permission, terminates all other
open console sessions for this domain, and prevents new console sessions for this
2-16 Ultra Enterprise 10000 SSP 3.1 User’s Guide • December 1997
Page 39

domain from being started. You can change back to multiple session mode by
choosing the Rel. Write button to release write access, or by choosing the
Disconnect button to terminate your console session for the domain. You can also
simply quit from the console window (using the Control menu of the window).
You are not granted Exclusive Session permission if any other user currently has
exclusive session permission.
■ Terminal Type
Use this part of the Console Configuration window to specify the window type as
xterm, shell tool (shelltool(1)), or command tool (cmdtool(1)). The
netcon(1M) Window is brought up in the specified type of window. The default
is xterm.
When you are satisfied with the contents of the window, you can choose Done to
accept the settings and dismiss the window, or Apply to accept the settings without
dismissing the window.
To display the netcon(1M) Window, choose the Connect button in the
netcontool(1M) Window. netcon(1M) attempts to connect to the domain that
you specified in the Console Configuration window, or to your default domain if
you did not specify a domain in that window. If an error occurs, you are notified
with a message box.
If no error occurs, the netcon(1M) Window is displayed directly beneath the
netcontool(1M) Window. Note that these are two separate windows, although
they can affect each other. You can view messages in the console window and, if you
have write permission, enter commands.
The Disconnect button in the netcontool(1M) Window disconnects the console
window from the domain and removes the console window. The netcontool(1M)
Window is still available so that you can reconfigure for another connect session.
The OBP/kadb button in the netcontool(1M) Window breaks to the OpenBoot
PROM (OBP) or kadb(1M) programs.
The Jtag button toggles the SSP-to-platform connection between a network
connection and a JTAG connection.
The Lock Write, Unlock Write, and Excl. Write buttons in the netcontool(1M)
Window request the corresponding mode for the console window.
The Rel. Write button in the netcontool(1M) Window releases write access and
places the console in read only mode.
The Status button in the netcontool(1M) Window displays information about all
open consoles that are connected to the same domain as the current session.
Chapter 2 Overview of the SSP Tools 2-17
Page 40

Overview of netcon(1M)
The netcon(1M) command is similar to netcontool(1M) except that no GUI
interface is provided, making it more functional for dial-in or other low-speed
network access. Typically, you log in to the SSP machine as user ssp, and enter the
netcon(1M) command in one of the following formats:
ssp% netcon
ssp% netcon -g
ssp% netcon -l
ssp% netcon -f
This action changes the window in which you run the netcon(1M) command into a
netcon(1M) Window for the domain specified by the SUNW_HOSTNAME
environment variable for the SSP Window. You can specify -g for Unlocked Write
permission, -l for Locked Write permission, and -f to force Exclusive Session
mode.
If you execute netcon(1M) with none of these options while all console sessions for
the domain are running in read only, unlocked write, or locked write mode, you are
granted read only permission. If you execute netcon(1M) with none of these
options when the domain has no other sessions running, you are granted Unlocked
Write permission. (If another user is running Exclusive Session for the domain, you
cannot bring up a console session.)
If you have write permission, you can enter Solaris commands. In addition, you can
enter special commands prefixed by tilde (~) to perform the functions offered by the
netcontool(1M) Window, described in the previous section.
netcon(1M) Communications
netcon(1M) uses two distinct paths for communicating console input/output
between the SSP and a domain: the standard network interface and the cbe
interface. Usually, when the domain is up and running, console traffic flows over the
network. If the local network becomes inoperable, all interactive access to the
domain is lost and, for example, telnet, rlogin, and netcon(1M) sessions hang. In
this case, you can switch to the cbe interface and access the host’s console window.
To perform this switch, use the ~= command in the netcon(1M) window.
2-18 Ultra Enterprise 10000 SSP 3.1 User’s Guide • December 1997
Page 41

CHAPTER
3
System Administration Procedures
This chapter describes the Ultra Enterprise 10000 system administration procedures.
Also see the man pages in the Ultra Enterprise 10000 SSP Reference and SunOS
Reference Manual. For information about standard Solaris system administration
functions, see the Solaris 2.5 System Administrator AnswerBook.
You can run many Enterprise 10000 system administration procedures on the SSP by
using Hostview and netcontool(1M).
SSP Log Files
When you perform procedures on an SSP, error messages for a particular domain are
logged in the file:
$SSPOPT/adm/domain_name/messages
where domain_name is the host name of the domain for which the error occurred.
Error messages for the platform (which are not specific to a domain) are logged in
the file:
$SSPOPT/adm/messages
▼ To View a Messages File From Within Hostview
1. Select the appropriate board.
3-1
Page 42

■ If you want to view the messages file for a particular domain, select that
domain in the main Hostview window (by clicking on a board from that
domain with the left mouse button).
■ If you want to view the messages file for the platform, make sure that no
domain is selected.
2. Choose File ➤ SSP Logs.
The following window is displayed.
FIGURE 3-1 SSP Logs Window
The Domain Name field shows the name of the domain that you selected. The
messages file is displayed in the main panel of the window.
3-2 Ultra Enterprise 10000 SSP 3.1 User’s Guide • December 1997
Page 43

Administering Power
▼ To Power Components On or Off From Within
Hostview
1. Click the left mouse button to select a board in the main Hostview window.
2. Choose Control ➤ Power. The following window is displayed.
FIGURE 3-2 Hostview — Power Control and Status Window
The default power(1M) command is displayed in the Command field.
3. Optionally, add options to the power(1M) command.
Chapter 3 System Administration Procedures 3-3
Page 44

4. Click the Execute button (or type Return) to run the command.
The results are shown in the main panel of the window.
5. For information about the power(1M) command, choose the Help button.
A help window is displayed. See “Help Window” on page 2-10.
Usually, after powering on the necessary components, you run the bring up
commands on the SSP for the domains you want to boot. See “To Bring up a Domain
From Within Hostview” on page 3-20.
If you try to power off the system while any domain is actively running the
operating system, the command fails and a message is displayed in the message
panel of the window. In this case, you have two choices. You can force a power off
by using the -f (force) option of the power(1M) command, and reissuing the
command. Or, you can issue a shutdown(1M) or similar command for the active
domain(s) to gracefully shut down the processors, and then reissue the power off
command. Using shutdown(1M) ensures that all resources are de-allocated and
users have time to log off before the power is turned off. To use shutdown(1M), you
must be logged on to the domain as root.
If the platform loses power due to a power outage, Hostview displays the last state
of each domain before power was lost.
▼ To Power Components On or Off From the
Command Line
■ To power on the Enterprise 10000 platform from the command line use:
ssp% power -on -all
■ To power on only selected power supplies, use the -s option. See power(1M).
Note – The Enterprise 10000 platform does not boot any domains when powered
on; individual domains must receive bring up instructions from the SSP. See “To
Bring up a Domain From Within Hostview” on page 3-20.
■ To power off the entire Enterprise 10000 system, use the following command:
ssp% power -off -all
3-4 Ultra Enterprise 10000 SSP 3.1 User’s Guide • December 1997
Page 45

This command fails and returns an appropriate error message if it finds that any
processors are still running the operating system. To force the power off without first
deallocating resources and warning the users, use the -f option.
Alternatively, to shut down a platform more gracefully before powering it off, follow
these steps.
1. Open a window for each domain.
2. Log in as root.
3. Run shutdown(1M) or a similar command.
4. After you have performed the above steps for each domain, reissue the power - off -all command.
Note – Running the power(1M) command with no options displays the status of
the power supplies and I/O cabinets.
See the power(1M) man page for more information.
▼ To Power Peripherals On or Off From the
Command Line
● Use the -p option the power(1M) command:
ssp% power -p 2 3 -on
This example powers on the peripherals attached to the power control units 2 and 3.
In place of -on, you can use -off to turn off the power to the specified peripherals,
or -v to determine the state of the power to the specified peripherals. For more
information, refer to power(1M).
Chapter 3 System Administration Procedures 3-5
Page 46

▼ To Monitor Power Levels in Hostview
1. Click the Power button:
The following window is displayed:
FIGURE 3-3 Hostview — Power Status Display
In this window, the bulk power supplies are named PS0 through PS7. The system
board power supplies are numbered 0 through 15. The support board power
supplies are named CSB0 and CSB1. The control board power supplies are named
CB0 and CB1.
Power supplies may be colored green, red, or grey. A green power supply is
functioning properly. A red power supply has failed. A grey power supply is not
present.
3-6 Ultra Enterprise 10000 SSP 3.1 User’s Guide • December 1997
Page 47
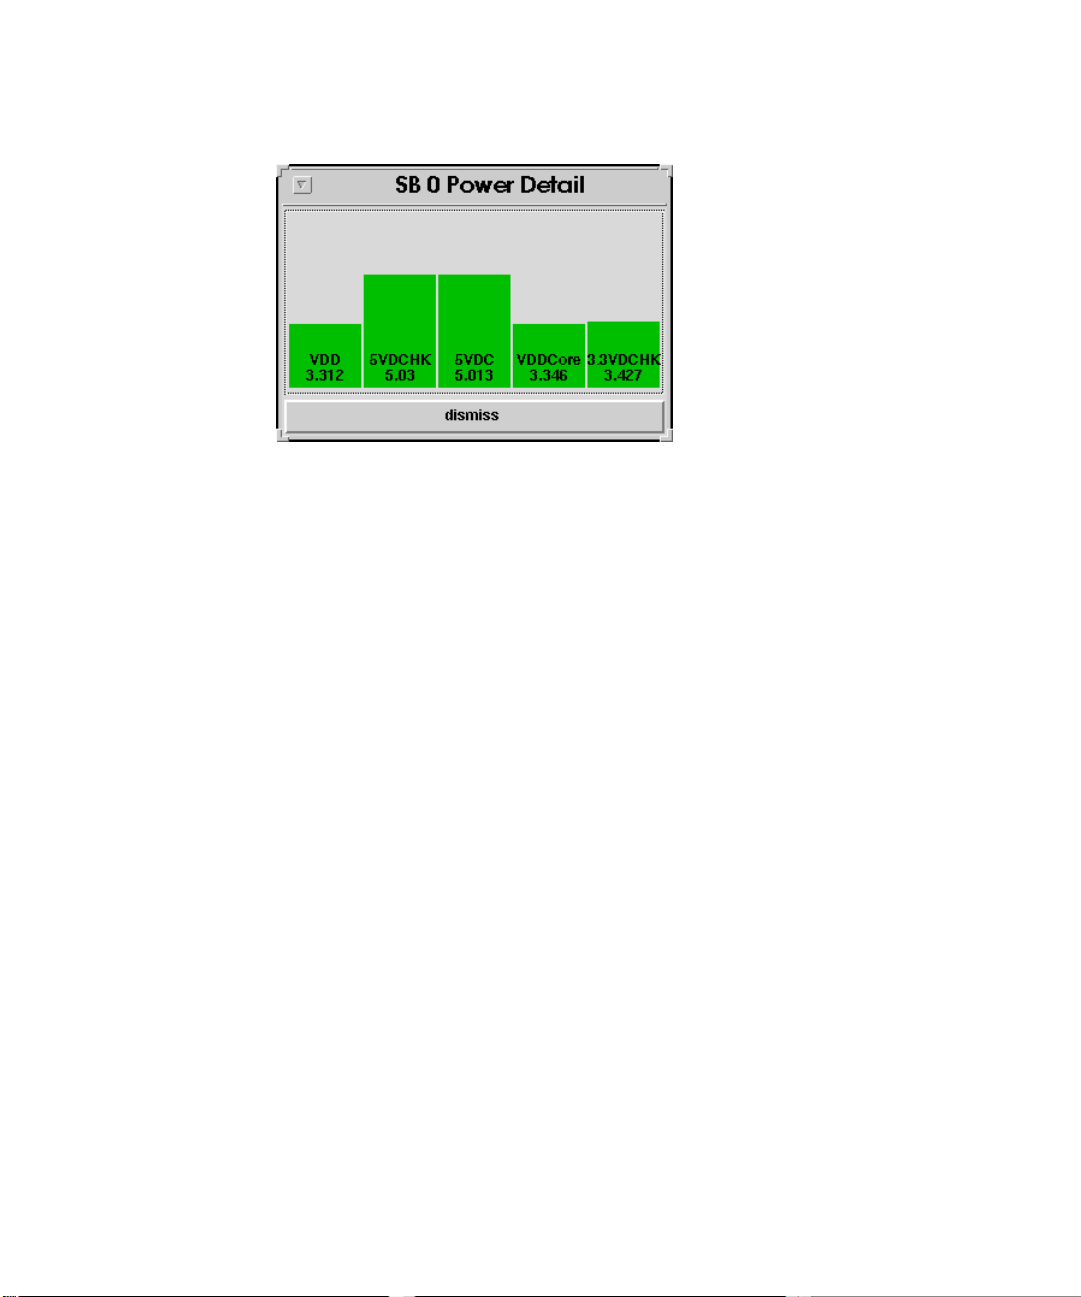
2. Click on a system board.
The Power Detail window for that board is displayed.
3.
FIGURE 3-4 Hostview — System Board Power Detail Window
The Power Detail window shows the voltage for each of the five power supplies on
the board. The power levels are indicated in volts. The bars give a visual
representation of the relative voltage levels so that you can monitor them more
easily. If a bar is green, the voltage level is within the acceptable range. If a bar is
red, the voltage level is either too low or too high. (Thus, a red bar could be short or
tall.) The bars never grow taller than the height of the window, so voltage levels that
exceed the maximum threshold are displayed as red maximum-height bars.
Similarly, bars never shrink below a minimum height, so voltage levels below the
minimum threshold are displayed as red minimum-height bars.
The control board and support board power details are similar to the system board
power detail, described above. The only difference between the detail for a system
board and the detail for a controller or support board, is the number of power
supplies.
Chapter 3 System Administration Procedures 3-7
Page 48

Administering Thermal Conditions and Fans
▼ To Monitor Thermal Conditions From Within
Hostview
You can use Hostview to monitor thermal conditions for power supplies, processors,
ASICs (application-specific integrated circuits), and other sensors located on system
boards, support boards, controller boards, and the centerplane.
3-8 Ultra Enterprise 10000 SSP 3.1 User’s Guide • December 1997
Page 49

1. Click the Temperature button.
The following window is displayed:
FIGURE 3-5 Hostview — Thermal Status Display
The centerplane, support boards, controller boards, and system boards are shown in
green if their temperatures are in the normal range, and in red otherwise.
Chapter 3 System Administration Procedures 3-9
Page 50

2. To see the Thermal Detail window for a component, click on it with the left
mouse button. A Thermal Detail window for a system board is shown below.
FIGURE 3-6 Hostview — System Board Thermal Detail
The left panel of the system board detail shows the temperatures for the five ASICs,
named A0 through A4. The middle panel shows the temperatures for the three
power supplies. The right panel shows the temperatures for the four processors,
named P0 through P3.
The temperatures are displayed in degrees Centigrade, and the values are shown
numerically and as vertical bars. The vertical bars are colored green if the
temperature is within the normal range, and red otherwise. The bars never grow
taller than the height of the window, so temperature levels above the maximum
threshold are displayed as red maximum-height bars. Similarly, bars never shrink
below a minimum height, so temperature levels below the minimum threshold are
displayed as red minimum-height bars.
The detail windows for control boards, support boards, and the center plane are
similar.
▼ To Monitor Fans From Within Hostview
You can use Hostview to monitor fan speeds and fan failures for the 32 fans located
throughout the Enterprise 10000 platform.
3-10 Ultra Enterprise 10000 SSP 3.1 User’s Guide • December 1997
Page 51

1. Click on the Fan button:
The following window is displayed:
FIGURE 3-7 Hostview — Fan Status Display
The fan trays are named FT0 through FT7 on the back, and FT8 through FT15 on the
front. Each fan tray contains two fans. The color of the fan tray symbol is green if
both fans in the tray are functioning at normal speed, amber if both fans are
functioning at high speed, and red if either fan within the fan tray has failed.
Chapter 3 System Administration Procedures 3-11
Page 52

2. To see a detail window that provides fan information, click on a fan tray symbol
with the left mouse button. A fan detail window is displayed.
FIGURE 3-8 Hostview — Fan Tray Display
The top circle indicates the inner fan when you open the fan tray, and the lower
circle indicates the outer fan. The color surrounding each circle in the fan detail
indicates the status of that fan. The colors are green for normal operation at normal
speed, amber for normal operation at high speed, and red for failure.
▼ To Control Fans From Within Hostview
You can control fan power and speed from within Hostview.
3-12 Ultra Enterprise 10000 SSP 3.1 User’s Guide • December 1997
Page 53

1. Choose Control ➤ Fan.
The following window is displayed:
FIGURE 3-9 Hostview — Fan Control and Status Window
The Domain Name field shows the selected domain from the platform to which
Hostview is connected. The fan(1M) command is shown in the Command field
without any options.
2. Add the desired set of options to the fan(1M) command, and click the execute
button (or press Return).
For information on the fan(1M) command itself, choose the Help button. A help
window is displayed. See “Help Window” on page 2-10.
Chapter 3 System Administration Procedures 3-13
Page 54

For example, if you want to set the fans on the front fan shelves to high speed, enter
the following command:
fan -s fast
For more information, see fan(1M).
Domains
The SSP supports commands that let you logically group system boards into
Dynamic System Domains, or simply domains, which are able to run their own
operating system and handle their own workload. Domains can be created and
deleted without interrupting the operation of other domains. You can use domains
for many purposes. For example, you can test a new operating system version or set
up a development and testing environment in a domain. In this way, if problems
occur, the rest of your system is not affected. You can also configure several domains
to support different departments, with one domain per department. In this situation,
you might reconfigure the system into one domain to run a large job over the
weekend.
Domain Configuration Requirements
You can create a domain out of any group of system boards, provided the following
conditions are met:
■ The boards are present and not in use in another domain.
■ At least one board has a network interface.
■ The boards have sufficient memory to support an autonomous domain.
■ The name given the new domain is unique and matches the hostname of the
domain to be booted.
The boards which will be grouped together into domains should have their own
disk from which they can be brought up, as well as a SCSI interface for that disk. If
the created domain does not have its own disk, you must always boot it from the
network.
3-14 Ultra Enterprise 10000 SSP 3.1 User’s Guide • December 1997
Page 55

▼ To Create Domains From Within Hostview
Note – Before proceeding, see “Domain Configuration Requirements” above. If the
system configuration must be changed to meet any of these requirements, call your
service provider.
1. Select the board(s) that the domain will contain. a. Click the left mouse button on the first board. b. Click the middle mouse button on any additional boards.
Note that the boards you select should not currently belong to any domain.
2. Choose Configuration ➤ Domain ➤ Create.
The Create Domain window is displayed.
Chapter 3 System Administration Procedures 3-15
Page 56

3. Enter the Domain Name.
The name of the domain must be preconfigured into your system by Sun
Microsystems.
4. If all other fields are acceptable, choose execute.
Note that the System Boards field indicates the boards that you selected in the main
Hostview window. The default OS version and the default platform type are shown.
If Hostview successfully executes the command, it displays the message Command
completed in the informational panel of the window.
Note – Hostview can run only one create or remove command at a time. If you
attempt to execute a second create or remove command before the first has
completed, your second attempt fails.
▼ To Create Domains From the Command Line
Many of the instructions that follow were copied from the SunInstall™ section of the
Sun document SPARC: Installing Solaris Software in the Solaris 2.5 System
Administrator AnswerBook. Several of these steps have been modified to reflect Ultra
Enterprise 10000 system-specific changes to the SunInstall procedures. For more
information, see the above mentioned document.
Before proceeding, see “Domain Configuration Requirements” on page 3-14. If the
system configuration must be changed to meet any of these requirements, call your
service provider.
1. Run domain_create(1M)in an SSP Window.
ssp% domain_create -d
-o
os_version
-p
domain_name -b system_board_list
platform_name
where
domain_name
is the name you want to give to the new domain. It should be
unique among all Enterprise 10000 systems controlled by the SSP.
system_board_list
specifies the boards that are to be part of this domain. The
specified system boards must be present and not in use. Each domain must have
a network interface, SCSI interface, and sufficient memory to support an
autonomous system. List the board numbers, separated by commas or spaces, for
all boards you want to include.
3-16 Ultra Enterprise 10000 SSP 3.1 User’s Guide • December 1997
\
Page 57

os_version
is the version of the operating system (possibly including the patch-
level) to be loaded into the domain, such as 2.5.1.
platform_name
is the name of the platform that contains the boards which will
make up the new domain (in case the SSP controls multiple platforms).
2. Optionally, create a new SSP Window.
Log in to the SSP machine as user ssp. When prompted for the SUNW_HOSTNAME
environment variable, enter the name of the new domain.
▼ To Remove Domains From Within Hostview
1. In the main Hostview window, click any board in the domain to be removed.
2. Choose Configuration ➤ Domain ➤ Remove.
A window similar to the following is displayed.
FIGURE 3-10 Hostview — Remove Domain
Chapter 3 System Administration Procedures 3-17
Page 58

3. If the default domain_remove(1M) command is satisfactory, choose the execute
button; otherwise, edit the command first.
For help on the domain_remove(1M) command, choose the help button. A help
window is displayed. See “Help Window” on page 2-10.
Note – If the system cannot remove your domain, see domain_remove(1M) for a
list of potential errors.
▼ To Remove Domains From the Command Line
1. Run domain_remove(1M).
You must execute this command in an SSP Window whose environment variable
SUNW_HOSTNAME is set to the name of the domain you want to remove. The domain
must be inactive.
ssp% domain_remove -d
2. Verify that the command was successful.
Upon successful completion, the SSP file system for this domain is removed.
domain_name
Note – If the system cannot remove your domain, an error message is displayed.
See domain_remove(1M) for a list of potential errors.
▼ To Rename Domains From Within Hostview
1. Shut down the domain.
2. In the main Hostview window, select a board from the domain that you want to
rename by clicking it with the left mouse button.
3-18 Ultra Enterprise 10000 SSP 3.1 User’s Guide • December 1997
Page 59

3. Choose Configuration ➤ Domain ➤ Rename.
A window similar to the following is displayed:
FIGURE 3-11 Hostview — Rename Domain Window
4. If the default domain_rename(1M) command is satisfactory, choose the execute
button. Otherwise, edit the command first.
For help on the domain_rename(1M) command, click the help button. A help
window is displayed. See “Help Window” on page 2-10.
▼ To Rename Domains From the Command Line
● Use the domain_rename(1M) command.
% domain_rename -d old_host_name -n new_host_name
Chapter 3 System Administration Procedures 3-19
Page 60

For more information, see the domain_rename(1M), domain_remove(1M), and
domain_create(1M) commands.
▼ To Bring up a Domain From Within Hostview
1. Select the domain you want to bring up.
Use the mouse to select any system board belonging to the domain you want to
bring up.
2. Choose Control ➤ Bringup.
A window is displayed that shows the name of the selected domain.
3. Choose Execute to perform the bringup.
4. After the bringup operation up has completed, choose Terminal ➤ netcontool. If
the OBP prompt appears (i.e., the OK prompt), boot the domain:
OK boot boot_device
The domain should boot and then display the login prompt. Note that you can use
the OBP command devalias to determine the alias for the disk you want to use as
boot_device.
▼ To Bring up a Domain From the Command Line
Before you can bringup a domain from the command line in an SSP Window, the
power supplies for the domain must be powered on.
1. Set the SSP to control the proper domain.
The SSP controls the domain specified by the SUNW_HOSTNAME environment
variable. To check its value, enter:
ssp% env
If SUNW_HOSTNAME is set to a domain other than the one you want to bringup,
change it by switching to the desired domain:
ssp% domain_switch
3-20 Ultra Enterprise 10000 SSP 3.1 User’s Guide • December 1997
domain_name
Page 61

2. Power on the power supplies for all boards in the domain (specified by SUNW_HOSTNAME).
ssp% power -on
3. Bringup the domain by running the following commands:
ssp% bringup -A [off/on] [disk]
ssp% netcon
ok boot
-A is the autoboot option. If -A is on, the domain will automatically boot. If -A is off,
you need to explicitly boot the domain as shown.
▼ To Obtain Domain Status From Within Hostview
1. In the main Hostview window, select a board from the domain for which you
want to obtain status information.
If the boards from the desired domain are not displayed, use the View menu to
display the desired domain (or all domains).
Chapter 3 System Administration Procedures 3-21
Page 62

2. Choose Configuration ➤ Domain ➤ Status.
A window similar to the following window is displayed.
DOMAIN TYPE PLATFORM OS SYSBDS
xf3-domain1 Ultra-Enterprise-1000 xf3 2.5.1 1 2 4 5
xf3-b8 Ultra-Enterprise-1000 xf3 2.5.1 8 9 13 14 15
FIGURE 3-12 Hostview — Domain Status Window
3. Choose the execute button. The status listing is displayed in the main panel of the window.
The status listing has five columns:
■ DOMAIN is the name of the domain.
■ TYPE is the platform type. It can only take the value UE10000 in the current
release.
■ PLATFORM is the name of the platform. (The platform name is set after the SSP
packages are installed.)
■ OS is the operating system identification number.
■ SYSBDS indicates the system boards that make up the domain.
3-22 Ultra Enterprise 10000 SSP 3.1 User’s Guide • December 1997
Page 63

▼ To Specify the Domain for an SSP Window
1. Open a new SSP Window.
2. When you are prompted to provide a value for the environment variable
SUNW_HOSTNAME, specify the name of the domain that you want to control and
monitor from within that SSP window.
▼ To Create a netcon(1M) Window for a Domain
● Run netcontool(1M) or netcon(1M) in an SSP Window that has its
SUNW_HOSTNAME set to the domain name.
SSP Messages Files
Each domain has its own SSP messages file, named ${SSPVAR}/adm/
{$SUNW_HOSTNAME}/messages, where $SUNW_HOSTNAME is the name of the
domain.
Blacklisting Components
The blacklisting feature enables you to configure the following components out of
the system:
■ System boards
■ Processors
■ Address buses
■ Data buses
■ Data Routers
■ I/O controllers
■ I/O adapter card
■ System board memory
■ Memory DIMM groups
■ Enterprise 10000 half-centerplane
■ Port controller ASICs
■ Data buffer ASICs
■ Coherent interface controller ASICs
■ 72-bit half of 144-bit local data router within system boards
Chapter 3 System Administration Procedures 3-23
Page 64

Generally, you may want to blacklist a component if you believe that component is
having intermittent problems, or if it is failing sometime after the system is booted.
If a component has a problem that shows up in the power-on self test (POST) run by
hpost(1M) (which is run by the bringup(1M) command), that component is
automatically configured out of the system by hpost(1M). However, that
component is not blacklisted. hpost(1M) is run on the components in the system
before a domain is booted, and on the components on a given board before that
board is attached with Dynamic Reconfiguration (DR). See the Dynamic
Reconfiguration User’s Guide.
To blacklist a component, you can edit the blacklist(4) file with a text editor, or
use Hostview. (Hostview does not allow you to blacklist all possible components, so
there may be times when you need to edit blacklist(4) directly.) When a domain
runs POST, hpost(1M) reads the blacklist(4) file and automatically configures
out the components specified in that file. Thus, changes that you make to the
blacklist(4) file do not take effect until the machine is rebooted.
The file is $SSPVAR/etc/platform_name/blacklist, where platform_name is the
name of the platform. See the blacklist(4) man page for information about the
contents of the blacklist(4) file.
3-24 Ultra Enterprise 10000 SSP 3.1 User’s Guide • December 1997
Page 65

▼ To Blacklist Boards and Buses From Within
Hostview
Note – Hostview only
1. In Hostview, select Edit ➤ Blacklist File.
The Blacklist Edit window is displayed.
2. Select the boards and/or buses that you want to blacklist.
To select a single component and de-select all other components of that type (e.g., to
select a single board and de-select all other boards), click that component with the
left mouse button. To toggle the selection status of a single component without
affecting the selection status of any other component, click that component with the
middle mouse button. The selected components are displayed in black.
Chapter 3 System Administration Procedures 3-25
Page 66

3. To save the changes, select File ➤ Save.
4. To exit the Blacklist Edit window, select File ➤ Close.
If you have unsaved changes and you close the Blacklist Edit window with
File ➤ Close, you are prompted to save the changes.
▼ To Blacklist Processors From Within Hostview
1. Select Edit ➤ Blacklist File.
The Blacklist Edit window is displayed.
2. From the Blacklist Edit window, select View ➤ Processors.
The Blacklist Edit window displays the processor view.
3-26 Ultra Enterprise 10000 SSP 3.1 User’s Guide • December 1997
Page 67

3. Select the processors that you want to blacklist.
To select a single processor on a board and de-select all other processors on that
board, click that processor with the left mouse button. To toggle the selection status
of a processor on a board without affecting the selection status of any other
processors on that board, click that processor with the middle mouse button. The
selected processors are displayed in black.
4. To save the changes, select File ➤ Save.
5. To exit the Blacklist Edit window, select File ➤ Close.
If you have unsaved changes and you close the Blacklist Edit window with
File ➤ Close, you are prompted to save the changes.
▼ To Clear the Blacklist File From Within
Hostview
1. In Hostview, select Edit ➤ Blacklist File.
The Blacklist Edit window is displayed.
2. From the Blacklist Edit window, select File ➤ New.
3. From the Blacklist Edit window, select File ➤ Close.
Dual Control Board Handling
A platform can be configured with dual control boards for redundancy purposes.
Although you can manually switch between the control boards, only one control
board at a time is used by the system. This section covers various issues concerning
dual control boards:
■ Configuring and switching between dual control boards
■ Control board executive
■ Control board server
One of the control boards is identified as the primary control board. The SSP
attempts to communicate only with the primary control board. If the system
administrator decides that it is necessary to switch the primary control board
because of a connection failure or for other reasons, the system administrator must
modify the control board configuration file and reboot the SSP to activate the new
primary control board. Note that this operation cannot be performed without
rebooting all running domains, because the control board provides the system clocks
for all boards.
Chapter 3 System Administration Procedures 3-27
Page 68

Control Board Executive (cbe)
The control board executive runs on the control board, and facilitates
communication between the SSP and the platform.
Booting
When power is applied, both control boards boot from the SSP serving as the boot
server. Once cbe is booted, it waits indefinitely for the control board server running
on the SSP to establish a connection.
Primary Control Board
When the control board server running on the SSP connects to the control board
executive running on a control board, the control board executive asserts the control
board as the primary control board. The primary control board is responsible for
providing the system clock and JTAG clock, and for controlling fan trays and bulk
power supplies.
Control Board Server (cbs)
After the SSP is booted, the control board server, cbs(1M), is started automatically.
The control board server is responsible for all communication between the SSP and
the primary control board.
Connection
The control board server attempts to connect only to the primary control board
identified in the control board configuration file. The format of the file is as follows:
platform_name:platform_type:cb0:status0:cb1:status1
where:
platform_name is the name assigned by the system administrator.
platform_type is defaulted to Ultra-Enterprise-1000.
cb0 is the hostname for control board 0, if available.
3-28 Ultra Enterprise 10000 SSP 3.1 User’s Guide • December 1997
Page 69

status0 indicates if control board 0 is the primary control board. P indicates primary,
and anything else indicates non-primary.
cb1 is the hostname for control board 1, if available
status1 indicates if control board 1 is the primary control board.
For example:
xf2:Ultra-Enterprise-10000:xf2-cb0:P:xf2-cb1:
This example indicates that there are two control boards in the xf2 platform. They
are xf2-cb0 and xf2-cb1. xf2-cb0 is specified as the primary. See the
cb_config(4) man page for more information.
The communication port that is used for communication between the control board
server and the control board executive is specified in /tftpboot/
XXXXXXXX.cb_port where XXXXXXXX is the control board IP address represented
in hexadecimal format.
Control Board Executive Image and Port Specification Files
The SSP is the boot server for the control board. Two files are downloaded by the
control board boot PROM during boot time: the image of cbe and the port number
specification file. These files are located in /tftpboot on the SSP and the naming
conventions are:
/tftpboot/XXXXXXXX
/tftpboot/XXXXXXXX.cb_port for the port number
for the cbe image
where XXXXXXXX is the control board IP address in hex format.
For example, the files for control board xf2-cb0 are:
/tftpboot/81973213
/tftpboot/81973213.cb_port
If you are using NIS, the IP address of xf2-cb0 can be determined as follows:
% ypcat hosts | grep xf2-cb0
The returning address is 129.153.49.147. This can be converted to 81993193.
Chapter 3 System Administration Procedures 3-29
Page 70

▼ To Switch the Primary Control Board
Caution – Do not edit the /var/opt/SUNWssp/.ssp_private/cb_config file
manually. Instead, use the ssp_config(1M) command as described below. If you
do not follow this recommendation, your domains may fail and arbitration stops
(arbstops) may occur.
1. If any domains are running, shutdown those domains using the standard Solaris shutdown command.
2. Log onto the main SSP as user ssp, and perform one of the following two steps: a. If the primary control board is currently functioning and the SSP can
communicate with the platform, power down all Ultra Enterprise 10000
components (except the control boards):
ssp% power -off -all
b. Alternatively, if the power(1M) command shown above will not execute
successfully (because the primary control board is not currently functioning),
remove all domains. Here is an example of removing one domain:
ssp% domain_remove -d domain_name
...
Keep directories (y/n)? y
ssp% domain_status
You should run domain_status(1M), as shown, to verify that you have
removed all domains. If necessary, run domain_remove(1M) again.
3. Log onto the main SSP as root.
4. Obtain the hostnames and IP addresses for the two control boards.
5. Verify that control board IP addresses are set up properly in the
/etc/inet/hosts file or in your local name service system.
3-30 Ultra Enterprise 10000 SSP 3.1 User’s Guide • December 1997
Page 71

6. As user root, execute the ssp_config(1M) command, as shown in the following sample session.
In this sample session, the primary control board is switched from snax-cb0 to
snax-cb1.
ssp# /opt/SUNWssp/bin/ssp_config cb
Configuring control boards.
Platform name = snax
Control Board 0 = snax-cb0 => 129.153.49.181
Control Board 1 = snax-cb1 => 129.153.49.182
Primary Control Board = snax-cb0
Is this correct? (y/n): n
Do you have a control board 0? (y/n): y
Please enter the host name of the control board 0 [snax-cb0]:
Do you have a control board 1? (y/n): y
Please enter the host name of the control board 1 [snax-cb0]:
Please identify the primary control board.
Is Control Board 0 [snax-cb0] the primary? (y/n) n
Is Control Board 1 [snax-cb1] the primary? (y/n) y
Platform name = snax
Control Board 0 = snax-cb0 => 129.153.49.181
Control Board 1 = snax-cb1 => 129.153.49.182
Primary Control Board = snax-cb1
Is this correct? (y/n): y
Note – The platform name identifies the entire host machine not a particular domain.
7. If you have a spare SSP, repeat Step 4 through Step 6 above, on the spare SSP.
8. Reboot the main and spare SSPs from their root windows:
ssp# init 6
9. After the main SSP reboots, login as user ssp, and start Hostview:
ssp% hostview &
Chapter 3 System Administration Procedures 3-31
Page 72

Note – Wait at least a minute after the SSP displays the console login prompt before
starting Hostview. This allows time for the SSP daemons to start.
Verify that the “J” and “C” symbols are shown on the symbol for Control Board 1 in
the main Hostview screen. This indicates that the JTAG connection and clock
distribution signals are coming from Control Board 1.
If Hostview fails to respond, verify that you can communicate with Control Board 1.
If you are unable to use ping(1M) to communicate with Control Board 1, visually
examine the LEDs to verify that the control board is operating correctly. For
example, verify that the link integrity LED is on. This indicates that the Ethernet
connection is good. If the LEDs are cycling through a pattern, the control board is
booted. If the LEDs are all off or all on continuously (without cycling through a
pattern), the control board is not booted. Also, try running snoop(1M) on the SSP to
verify that the control boards are communicating correctly.
10. Depending on what actions you took in Step 2, above, perform one of the
following steps:
a. If you turned off the power in Step 2, issue the following power(1M) command
on the main SSP to power on all Ultra Enterprise 10000 components:
ssp% power -on -all
b. If you removed all domains in Step 2, create those domains again. Here is an
example of creating one domain:
ssp% domain_create -d domain_name
11. Issue the bringup(1M) command for all domains.
3-32 Ultra Enterprise 10000 SSP 3.1 User’s Guide • December 1997
Page 73

CHAPTER
4
SSP Internals
SSP operations are generally performed by a set of daemons and commands. This
chapter provides an overview of how the SSP works, and describes the SSP
daemons, processes, commands, and system files. For more information about
daemons, commands, and system files, refer to the Ultra Enterprise 10000 SSP
Reference.
Caution – Changes made to files in /opt/SUNWssp can cause serious damage to
the system. Only very experienced system administrators should risk changing the
files described in this chapter.
Startup Flow
The sequence of events that take place when the SSP boots and starts the Enterprise
10000 system are illustrated in
FIGURE 4-1.
4-1
Page 74

1. Power on the SSP.
(Monitor, CPU/disk, and CD ROM)
The SSP boots automatically.
SSP Boot Process
/sbin/init
init loads /etc/inittab
inittab
includes a command to star t ssp_startup
Daemon Startup
ssp_startup star ts up the platform daemons: edd and
snmp. It then starts up the non-domain daemons in the
proper order (although the proper startup order is not
specified here):
and xntpd. ssp_startup also sets up environment
variables.
edd initiates event monitoring on the Enterprise 10000
control board, waits for an event to be generated by the
event detection task running on the control board, and
then responds to the event by running a response action
script on the SSP.
cbs, machine_server, fad, straps,
edd
4-2 Ultra Enterprise 10000 SSP 3.1 User’s Guide • December 1997
Page 75

2. Run domain_create.
Run domain_create. You only need to do this once
for each domain.
3. Apply power to platform or domain.
Set SUNW_HOSTNAME to the domain name.
4. Run bringup.
bringup verifies that the operating system is r unning,
runs POST, then runs
and star ts
netcon_server(1M).
obp_helper, which runs OBP,
The system loads the operating system and the boot
process is complete
FIGURE 4-1 Startup Flow
The SSP monitors the Enterprise 10000 system using the event detector daemon,
edd(1M). Each time the SSP boots, it runs init(1M) which in turn loads edd(1M)
via the startup script,
$SSPETC/ssp_startup.sh. The startup script checks the
environment for availability of certain files and the availability of the Enterprise
10000 system, sets environment variables, and then starts edd(1M). edd(1M)
obtains many of its initial control parameters from the following configuration files:
Chapter 4 SSP Internals 4-3
Page 76

■ $SSPVAR/etc/platform_name/edd.erc provides configuration information for
the Enterprise 10000 platform.
■ $SSPVAR/etc/platform_name/domain_name/edd.erc provides configuration
information for a particular domain. The event response configuration files
(edd.erc) specify how the event detector will respond to events.
■ $SSPVAR/etc/platform_name/edd.emc lists the events that edd(1M) will
monitor.
If a domain crashes, edd(1M) invokes the bringup(1M) script. The bringup(1M)
script runs the power-on self test (POST) program, which tests Enterprise 10000
components. It then uses the obp_helper(1M) daemon to download and begin
execution of OpenBoot PROM (OBP) in the domain specified by the
SUNW_HOSTNAME environment variable. This only happens if a domain fails (for
example, after a kernel panic) in which case it is rebooted automatically. After a
manual power on, or after a halt or shutdown, you must manually run
bringup(1M), which then causes OBP to be downloaded and run.
obp_helper(1M) is responsible for loading download_helper in all the
configured processors’ bootbus SRAM. All the processors are started, with one
processor designated the boot processor. With the assistance of download_helper,
obp_helper(1M) loads OBP into the memory of the Enterprise 10000 system and
starts OBP on the boot processor. See “obp_helper(1M) Daemon” on page 4-13 for
more information about obp_helper(1M) and OBP.
The primary task of OBP is to boot and configure the operating system from either a
mass storage device or from a network. OBP also provides extensive features for
testing hardware and software interactively. As part of the boot procedure, OBP
probes all the SBus slots on all the system boards and builds a device tree. This
device tree is passed on to the operating system.
Enterprise 10000 Client/Server Architecture
The Enterprise 10000 control board interface is accessed over an Ethernet connection
using the TCP/IP protocol. The control board executive, cbe, runs on the control
board and the control board server, cbs(1M), runs on the SSP and makes service
requests. The SSP control board server (the client to the real cbs(1M)) is a server to
other SSP clients.
4-4 Ultra Enterprise 10000 SSP 3.1 User’s Guide • December 1997
Page 77

FIGURE 4-2 illustrates the Ultra Enterprise 10000 system client/server architecture:
Enterprise 10000
Domain
SSP
netcon edd hostview post
SSP
netcon_server snmpd obp_helper
netconserver
netcon
Enterprise 10000
Domain
Control
Board
CBS
CBS
snmpd
edd
Control
Board
hostview
obp_helper
post
FIGURE 4-2 Enterprise 10000 Client/Server Architecture
Note – There is one instance of edd(1M) for each platform supported by the SSP.
Also, there is one instance of obp_helper(1M) and netcon_server(1M) per
domain.
Chapter 4 SSP Internals 4-5
Page 78

POST
POST (power-on self test) probes and tests the components of uninitialized
Enterprise 10000 system hardware, configures what it deems worthwhile into a
coherent initialized system, and hands it off to OpenBoot PROM (OBP). POST passes
to OBP a list of only those components that have been successfully tested; those in
the blacklist(4) file are excluded.
hpost(1M) is the SSP-resident executable program that controls and sequences the
operations of POST. hpost(1M) reads directives in the optional file . postrc (see
postrc(4)) before it begins operation with the host.
Warning – Running hpost(1M) outside of the bringup(1M)
!
POST looks at blacklist(4) which is on the SSP, before preparing the system for
booting. blacklist(4) specifies the Enterprise 10000 components that POST must
not configure.
POST stores the results of its tests in an internal data structure called a board
descriptor array. The board descriptor array contains status information for most of
the major components of the Enterprise 10000 system, including information about
the UltraSPARC modules.
POST attempts to connect and disconnect each system board, one at a time, to the
system centerplane. POST then connects all the system boards that passed to the
system centerplane.
command can cause the system to fail. hpost(1M), when run by itself,
does not check the state of the platform, and causes fatal resets.
4-6 Ultra Enterprise 10000 SSP 3.1 User’s Guide • December 1997
Page 79

Daemons
The SSP daemons play a central role on the SSP. Each daemon is fully described in
its corresponding man page. The daemons are:
cbs The control board server provides central
access to the Enterprise 10000 control board
for client programs running on the SSP.
edd The event detector daemon initiates event
monitoring on the control boards. When a
monitoring task detects an event,
edd(1M) runs a response action script.
fad The file access daemon provides distributed
file access services to SSP clients that need
to monitor, read, and write to the SSP
configuration files.
machine_server Provides machine services for
netcon(1M) and routes host messages
to proper messages file. See
machine_server(1M).
netcon_server The connection point for all
clients. netcon_server(1M)
communicates with OBP using a control
board protocol.
communicates with the OS using the TCP
protocol.
obp_helper Runs OpenBoot. obp_helper(1M)
terminates when OBP is terminated. During
execution, obp_helper(1M) provides
services to OBP, such as NVRAM
simulation, IDPROM simulation, and time
of day.
netcon_server(1M)
netcon(1M)
Chapter 4 SSP Internals 4-7
Page 80

snmpd The SNMP proxy agent listens to a UDP
port for incoming requests, and services the
group of objects specified in
Ultra-Enterprise-10000.mib.
straps The SNMP trap sink server listens to the
SNMP trap port for incoming trap
messages and forwards received messages
to all connected clients.
xntpd / ntpd The network time protocol (NTP) daemon
provides time synchronization services.
(xntpd is the daemon for Solaris 2.5.1, and
ntpd is the daemon for Solaris 2.6.) Clients
can connect to this service and have their
clocks automatically adjusted. This service
is used to synchronize SSP and domain
times. See
Time Protocol User’s Guide.
xntpd(1M) and the Network
Event Detector Daemon (edd(1M))
The event detector daemon, edd(1M), is a key component in providing the
reliability, availability, and serviceability (RAS) features of Enterprise 10000.
edd(1M) initiates event monitoring on the Enterprise 10000 control board, waits for
an event to be generated by the event detection monitoring task running on the
control board, and then responds to the event by executing a response action script
on the SSP. The conditions that generate events and the response taken to events are
fully configurable.
The edd(1M) provides the mechanism for event management, but doesn’t handle
the event detection monitoring directly. Event detection is handled by an event
monitoring task that runs on the control board. edd(1M) configures the event
monitoring task by downloading a vector that specifies the event types to be
monitored.
The edd(1M) provides the mechanism for event management, but it doesn’t handle
the events directly. Event handling is provided by response action scripts, which are
invoked by the edd(1M) when an event is received.
The RAS features are provided by several collaborative programs. The control board
within the platform runs a control board executive (cbe) program that communicates
via Ethernet with a control board server (cbs(1M)) program on the SSP. These two
components provide the data link between the platform and the SSP.
4-8 Ultra Enterprise 10000 SSP 3.1 User’s Guide • December 1997
Page 81

The SSP provides a set of interfaces for accessing the control board through the
Control Board Server and the simple network management protocol (SNMP) agent.
edd(1M) uses the Control Board Server interface to configure the event detection
monitoring task on the Control Board Executive. This is illustrated in
FIGURE 4-3:
Event Detector
FIGURE 4-3 Uploading Event Detection Scripts
SNMP
Agent
Control Board Server
Control Board
Executive
Once configured, the event detection monitoring task polls various conditions within
the platform, including environmental conditions, signature blocks, power supply
voltages, performance data, and so forth. If an event detection script detects a change
of state that warrants an event, an event message containing the pertinent
information is generated and delivered to the Control Board Server (cbs(1M))
running on the SSP. Upon receipt of the event message, the Control Board Server
delivers the event to the SNMP Agent, which in turn generates an SNMP trap, as
shown in
FIGURE 4-4:
Event Detector
SNMP-aware
Agent
Help! Board 7 is
over temperature!
Host view and other
SNMP aware
applications
FIGURE 4-4 Event Recognition and Delivery
Control Board
Control Board
Executive
Chapter 4 SSP Internals 4-9
Page 82

Upon receipt of an SNMP trap, edd(1M) determines whether to initiate a response
action. If a response action is required, the edd(1M) runs the appropriate response
action script as a subprocess. This is illustrated in
FIGURE 4-5:
Event Detector
Over temperature
response action
FIGURE 4-5 Response Action
SNMP
Agent
Control Board
Raising Board 7
fan speed.
Control Board
Executive
Event messages of the same type or related types may be generated while the
response action script is running. Some of these secondary event messages may be
meaningless or unnecessary if a responsive action script is already running for a
similar event.
For instance, in
FIGURE 4-5 edd(1M) is running a response action script for a high
temperature event. While the response action script is running, additional high
temperature events may be generated by the event monitoring scripts. edd(1M)
does not respond to those high temperature events (generated in response to the
same high temperature condition) until the first response script has finish. It is the
responsibility of applications (such as edd(1M)) to filter the events they will
respond to as necessary.
The cycle of event processing is completed at this point.
Control Board Server (cbs(1M))
The Control Board Server (cbs(1M)) is a server that runs on the SSP. Whenever a
client program running on the SSP needs to access the Enterprise 10000, the
communication is funneled through cbs(1M). cbs(1M), in turn, communicates
directly with a Control Board Executive (cbe) running on one of the control boards
4-10 Ultra Enterprise 10000 SSP 3.1 User’s Guide • December 1997
Page 83

in the Ultra Enterprise 10000 system. cbs(1M) converts client requests to the control
board management protocol (CBMP) that is understood by cbe. The following
diagram illustrates how this communication takes place:
TCP/IP Network
SSP
SSP
Client
Client
e.g. Hostview
e.g. Hostview
FIGURE 4-6 SSP / Enterprise 10000 Communication Through cbs(1M)
cbs(1M) relies on the cb_config(4) file to determine the platform it is to manage,
and the control board with which it is to interact. The cb_config(4) file specifies
the platforms managed by the SSP. You should not directly modify this file, however.
CBS
CBS
TCP/IP Network
Enterprise 10000
Platform
CBE
CBE
Enterprise 10000
Platform
CBE
Control
Board 0
CBE
Control
Board 1
Control
Board 0
Control
Board 1
File Access Daemon (fad(1M))
The file access daemon (fad(1M)) is used when ssp_to_domain_hosts(4) or any
other configuration file is updated. fad(1M) provides distributed file access
services, such as file locking, to all SSP clients that need to monitor, read, and write
changes to SSP configuration files. Once a file is locked by a client, other clients are
prevented from locking that file until the first client releases the lock.
Network Time Protocol Daemon (xntpd(1M)/ ntpd(1M))
The NTP daemon (which is xntpd(1M) for Solaris 2.5.1, and ntpd(1M) for Solaris
2.6) provides a mechanism for keeping the time settings synchronized between the
SSP and the domains. Each domain obtains the time from the SSP at boot time.
Chapter 4 SSP Internals 4-11
Page 84

Note – SSP 3.1 runs only on Solaris 2.5.1, so it supports only xntpd(1M). However,
xntpd(1M) on the SSP can communicate with either xntpd(1M) or ntpd(1M)
running in a domain.
The configuration is based on information provided by the system administrator. If
you are not currently running NTP at your site and you do not have access to the
Internet and you are not going to use a radio clock, you can set up the Enterprise
10000 system to use its own internal reference clock as the reference clock.
The Solaris 2.5 NTP packages are compiled with support for a local reference clock.
This means that your system can poll itself for the time instead of polling another
system or network clock. The poll is done through the network loopback interface.
The first three numbers in the IP address are 127.127.1. The last numbers in the IP
address are the NTP stratum to use for the clock.
When setting up an Ultra Enterprise 10000 system and its SSP, the SSP should
usually be set to stratum 4. The Enterprise 10000 system should be set up as a peer
to the SSP and its local clock should be set two stratums higher.
An example of server/peer lines in the /etc/opt/SUNWxntp/ntp.conf file on the
SSP is shown below.
server 127.127.1.4
An example of server/peer lines in the /etc/opt/SUNWxntp/ntp.conf file on the
platform is shown below.
peer my_ue10000-ssp
server 127.127.1.6
This tells the SSP to pretend its clock is stratum 4 so the SSP runs at stratum 5. The
Enterprise 10000 system considers its own time to be stratum 6. While the SSP is up,
the Enterprise 10000 system favors the SSP’s time at stratum 5, and so it runs at
stratum 6. If, for some reason, the SSP goes down, the Enterprise 10000 system uses
its own clock and runs at stratum 7.
For more information on the NTP daemon, refer to the Network Time Protocol User’s
Guide and the NTP Reference.
4-12 Ultra Enterprise 10000 SSP 3.1 User’s Guide • December 1997
Page 85

obp_helper(1M) Daemon
Note – OpenBoot PROM (OBP) is not a hardware PROM; it is actually loaded from
a file on the SSP. An SSP file also replaces the traditional OBP NVRAM and idprom
(hostid).
The OBP file is located in:
/opt/SUNWssp/release/Ultra-Enterprise-10000/2/5/1/hostobjs/obp
The “/2/5/1” portion of this path is specific to the version of the operating system
in your release, in this case Solaris 2.5.1. If your release contains a different version
of the operating system, that portion of the path will be different.
Note – The OBP file is required for successful system operation. You should back up
this file so you have an extra copy in case of a catastrophic SSP disk failure.
bringup(1M) starts obp_helper(1M) in the background, which kills the previous
obp_helper(1M), if one exists. obp_helper(1M) runs download_helper and
subsequently downloads and runs OBP.
obp_helper(1M) is essential in starting processors other than the boot processor. It
communicates with OBP through BootBus SRAM, responding to requests to supply
the time-of-day, get or put the contents of the pseudo-EEPROM, and release slave
processors when in multiprocessor mode. To release the slave processors,
obp_helper(1M) must load download_helper into the bootbus SRAM of all the
slave processors, place an indication in bootbus SRAM that it is a slave processor,
then start the processor by releasing the bootbus controller reset.
For more information, see the obp_helper(1M), and bringup(1M) man pages and
“download_helper File” on page 4-15.
Chapter 4 SSP Internals 4-13
Page 86

Environment Variables
Most of the necessary environment variables are set when $SSPETC/ssp_env.sh is
called. The following list describes the environment variables.
TABLE4-1 Environment Variables
SUNW_HOSTNAME The name of the domain controlled by the
SSP.
SSPETC The path to the directory containing
miscellaneous SSP-related files.
SSPLOGGER You should never change the value of this
environment variable. It specifies the
location of the configuration file for
message logging.
SSPOPT The path to the SSP package binaries,
libraries, and object files.
SSPVAR The path to the directory where modifiable
files reside.
Executable Files Within a Domain
These files reside in /opt/SUNWssp/release/Ultra-Enterprise-10000/
os_version and are run within a domain. The man pages for these programs reside
within the domain.
Some of the commands listed in this section should be used or modified only by
your service provider; they are normally called internally by other programs rather
than run on the command line.
Caution – Improper use of these commands may result in failure or damage to the
system. If you are not sure of the function of any command, contact your service
provider for assistance.
4-14 Ultra Enterprise 10000 SSP 3.1 User’s Guide • December 1997
Page 87

*.elf File
These are executable files that are downloaded by hpost(1M).
download_helper File
download_helper allows programs to be downloaded to the memory used by a
domain instead of BBSRAM. This provides an environment in which host programs
can run without having to know how to relocate themselves to memory. These
programs can be larger than BBSRAM.
download_helper works by running a protocol through a mailbox in BBSRAM.
The protocol has commands for allocating and mapping physical to virtual memory,
and for moving data from a buffer in BBSRAM to virtual memory, and vice-versa.
Once complete, the thread of execution is usually passed to the new program at an
entry point provided by the SSP. After this occurs, download_helper lives on in
BBSRAM so it can provide reset-handling services. Normally, a user would not be
concerned with the download helper; it should be used only by the
obp_helper(1M) daemon. See the obp_helper(1M) man page for more
information.
obp File
The file obp is named after OpenBoot PROM. obp is fundamental to the boot
process of a domain. OBP knows how to probe the SBUS to determine which devices
are connected where, and provides this information to the operating system in the
form of a device tree. The device tree is ultimately visible using the Solaris command
prtconf (for more information, see the SunOS prtconf(1M) man page).
obp also interprets and runs FCode on SBus cards, which provides loadable, simple
drivers for accomplishing boot. In addition, it provides a kernel debugger, which is
always loaded.
Chapter 4 SSP Internals 4-15
Page 88

4-16 Ultra Enterprise 10000 SSP 3.1 User’s Guide • December 1997
Page 89

Glossary
Application-specific
integrated circuit
(ASIC) Application-specific integrated circuit. Used in the Enterprise 10000 system
context to mean any of the large main chips in the design, including the
UltraSPARC
arbitration stop A condition that occurs when one of the Ultra Enterprise 10000 ASICs detects a
parity error or equivalent fatal system error. Bus arbitration is frozen, so all bus
activity stops. The system is down until the SSP detects the condition by
polling the CSRs of the Address Arbiter ASICs through JTAG, and clears the
error condition.
BBSRAM See bootbus SRAM.
blacklist A text file that hpost(1M) reads when it starts up. The blacklist file specifies
the Ultra Enterprise 10000 system components that are not to be used or
configured into the system. The default path name for this file can be
overridden in the .postrc file (see postrc(4)) and on the command line.
board descriptor
array The description of the single configuration that hpost(1M) chooses. It is part
of the structure handed off to OBP.
TM
processor and data buffer chips.
bootbus A slow-speed byte-wide bus controlled by the processor port controller ASICs,
used for running diagnostics and boot code. UltraSPARC starts running code
from BootBus when it exits reset. In Enterprise 10000 system, the only
component on the BootBus is the BBSRAM.
bootbus SRAM A 256-Kbyte static RAM attached to each processor PC ASIC. Through the PC,
it can be accessed for reading and writing from JTAG or the processor. Bootbus
SRAM is downloaded at various times with hpost(1M) and OBP startup code,
and provides shared data between the downloaded code and the SSP.
CSR Control and Status Register. A general term for any embedded register in any
of the ASICS in the Enterprise 10000 system.
Glossary A-1
Page 90

DIMM Dual in-line memory module, a small printed circuit card containing memory
chips and some support logic.
domain A set of one or more system boards that act as a separate system capable of
booting the OS and running independently of any other domains.
DRAM Dynamic RAM. Hardware memory chips that require periodic rewriting to
retain their contents. This process is called refresh. In Enterprise 10000 system,
DRAM is used only on main memory SIMMs, and on the control boards.
ECache External Cache. A 1/2-MByte to 4-MByte synchronous static RAM second-level
cache local to each processor module. Used for both code and data. This is a
direct-mapped cache.
JTAG A serial scan interface specified by IEEE standard 1149.1. The name comes from
Joint Test Action Group, which initially designed it. See JTAG+.
JTAG+ An extension of JTAG, developed by Sun Microsystems Inc., which adds a
control line to signal that board and ring addresses are being shifted on the
serial data line. Often referred to simply as JTAG.
OBP OpenBoot PROM. A layer of software that takes control of the configured
Enterprise 10000 system from hpost(1M), builds some data structures in
memory, and boots the operating system.
POST Power-on self test, performed by hpost(1M). This is the program that takes
uninitialized Enterprise 10000 system hardware and probes and tests its
components, configures what seems worthwhile into a coherent initialized
system, and hands it off to OBP.
.postrc A text file that controls options in hpost(1M). Some of the functions can also
be controlled from the command line. Arguments on the command line take
precedence over lines in the .postrc file, which takes precedence over built-in
defaults. hpost -?postrc gives a terse reminder of the .postrc options and
syntax. See postrc(4).
SBus A Sun Microsystems Inc. designed I/O bus, now an open standard.
SRAM Static RAM. These are memory chips that retain their contents as long as
power is maintained.
SSP System Service Processor, a workstation containing software for controlling
power sequencing, diagnostics, and booting of a Enterprise 10000 system.
UltraSPARC The UltraSPARC processor, which is the processor module used in the
Enterprise 10000 system.
A-2 Ultra Enterprise 10000 SSP 3.1 User’s Guide • December 1997
Page 91

Index
B
blacklist
blacklisting components, 3-23
bringup
manual, 3-20
bringup command, 4-13
bringup host, command line, 3-20
buttons
failure, 2-11
fans, 2-11
power, 2-11
temperature, 2-11
C
cbe (control board executive), 3-28
cbs (control board server), 3-28, 4-10
colors in Hostview, 2-12
command line, creating domains, 3-16
command line, removing domains, 3-18
commands
bringup, 4-13
download_helper, 4-15
obp, 4-15
configuration menu, 2-8
board, 2-8
domain, 2-8
configuration requirements, domain, 3-14
configuring control boards, 3-30
configuring NTP, 4-12
console configuration, netcontool(1M), 2-16
console menu, 2-8
control board configuration, 3-30
control board executive (cbe), 3-28
control board handling, 3-27
control board server (cbs), 3-28, 4-10
control menu, 2-7
bringup, 2-7
fan, 2-8
power, 2-7
controlling fans, Hostview, 3-12
creating domains, command line, 3-16
creating domains, Hostview, 3-15
D
daemons
edd, 4-8
obp_helper, 4-7, 4-13
SSP, 4-7
xntpd, 4-8
documentation, 1-7
man pages, 1-8
domain_create, 3-16
domain_remove, 3-18
domain_rename(1M), 3-19
domains
configuration requirements, 3-14
creating domains, Hostview, 3-15
netcon(1M) window, 3-23
removing domains, Hostview, 3-17
Index-1
Page 92

renaming domains, Hostview, 3-18
SSP Control, 3-23
status of domains, Hostview, 3-21
download_helper command, 4-15
dual control board handling, 3-27
E
edd daemon, 4-8
edit menu, 2-7
elf files, 4-15
environment variables, 4-14
SSPETC, 4-14
SSPLOGGER, 4-14
SSPOPT, 4-14
SSPVAR, 4-14
SUNW_HOSTNAME, 4-14
error message files, 3-1
event detector daemon (edd), 4-8
exclusive session (netcon), 2-17
F
failure button, 2-11
fan speed, 3-14
fan tray display, 3-12
fans button, 2-11
fans, controlling in Hostview, 3-12
fans, monitoring in Hostview, 3-10
features of SSP, 1-2
file menu, 2-7
files
error messages, 3-1
domains, status, 3-21
icons, meaning of, 2-12
main window, 2-5
menu
configuration, 2-8
board, 2-8
domain, 2-8
console, 2-8
control, 2-7
bringup, 2-7
fan, 2-8
power, 2-7
edit, 2-7
file, 2-7
help, 2-9
terminal
netcontool, 2-8
rlogin, 2-8
SSP, 2-8
view
all domains, 2-9
individual domains, 2-9
menu bar, 2-7
monitoring fans, 3-10
monitoring power, 3-6
monitoring temperature, 3-8
performance considerations, 2-13
starting Hostview, 2-3
symbols, meaning of, 2-12
I
icons, Hostview, 2-12
IDN (Inter-Domain Networks), 1-1
Inter-Domain Networks (IDN), 1-1
H
help menu, 2-9
Hostview, 2-3
bringup, manual, 3-20
colors, meaning of, 2-12
controlling fans, 3-12
domains, creating, 3-15
domains, removing, 3-17
domains, renaming, 3-18
Index-2 Ultra Enterprise 10000 SSP 3.1 User’s Guide • December 1997
L
locked write (netcon), 2-16
M
man pages, 1-8
Page 93

manual bringup, 3-20
menu
configuration, 2-8
board, 2-8
domain, 2-8
console, 2-8
control, 2-7
bringup, 2-7
fan, 2-8
power, 2-7
edit, 2-7
file, 2-7
help, 2-9
terminal
netcontool, 2-8
rlogin, 2-8
SSP, 2-8
view
all domains, 2-9
individual domains, 2-9
menu bar
Hostview, 2-7
messages files, 3-1
monitoring fans, Hostview, 3-10
monitoring power, Hostview, 3-6
monitoring temperature, Hostview, 3-8
N
netcon, 2-18
netcon(1M), 1-5
netcontool(1M), 2-15
Network Console Window, 1-5
NTP
configuring, 4-12
O
obp command, 4-15
OBP. See OpenBootProm
obp_helper daemon, 4-7, 4-13
OpenBootProm, 4-4, 4-13, 4-15
P
POST, 4-6
power
monitoring power, Hostview, 3-6
power command, 3-4
power button, 2-11
Power-On-Self-Test. See POST
R
read only session (netcon), 2-16
removing domains, command line, 3-18
removing domains, Hostview, 3-17
renaming domains, Hostview, 3-18
S
snmp agaent, 4-9
Solaris
version, 1-1
speed of fans, controlling, 3-14
SSP
Controlling a domain, 3-23
user environment, 1-4
SSP Console Window, 1-5
SSP daemons, 4-7
SSP features, 1-2
ssp log, 2-7
SSP log file, 3-1
SSP Window, 1-4
SSP window, 1-4
SSPETC, 4-14
SSPLOGGER, 4-14
SSPOPT, 4-14
SSPVAR, 4-14
startup flow, 4-1
status of domains, Hostview, 3-21
SUNW_HOSTNAME, 4-14
swapping control boards, 3-30
symbols in Hostview, 2-12
System Service Processor, 1-1
Index-3
Page 94

T
temperature
monitoring termperature, Hostview, 3-8
temperature button, 2-11
terminal menu
netcontool, 2-8
rlogin, 2-8
SSP, 2-8
terminal type (netcon), 2-17
U
unlocked write (netcon), 2-16
user environment, 1-4
V
view menu
all domains, 2-9
individual domains, 2-9
W
windows
Hostview main window, 2-5
netcon(1M), 1-5
Network Console Window, 1-5
SSP Console Window, 1-5
SSP Window, 1-4
X
xntpd daemon, 4-8
Index-4 Ultra Enterprise 10000 SSP 3.1 User’s Guide • December 1997
 Loading...