

Page 1

Sun Microsystems, Inc.
www.sun.com
Submit comments about this document at: http://www.sun.com/hwdocs/feedback
Sun Ultra
™
40 Workstation
Setup Guide
Part No. 819-3951-11
April 2007, Revision A
Page 2

Please
Recycle
Copyright 2006-2007Sun Microsystems, Inc.,4150 NetworkCircle, SantaClara, California95054, U.S.A.All rightsreserved.
Sun Microsystems, Inc.has intellectualproperty rightsrelating to technology that is described in this document. In particular, andwithout
limitation, theseintellectual property rightsmay includeone ormore ofthe U.S.patents listedat http://www.sun.com/patentsand oneor
more additional patents or pending patent applications in the U.S. and in other countries.
This documentand theproduct to which it pertains are distributedunder licensesrestricting theiruse, copying,distribution, and
decompilation. Nopart ofthe product orof thisdocument maybe reproduced inany formby anymeans withoutprior writtenauthorization of
Sun andits licensors,if any.
Third-party software, including font technology, is copyrighted and licensed fromSun suppliers.
Parts ofthe product maybe derivedfrom BerkeleyBSD systems,licensed from theUniversity ofCalifornia. UNIXis aregistered trademark in
the U.S.and inother countries,exclusively licensedthrough X/Open Company, Ltd.
Sun, Sun Microsystems, theSun logo,AnswerBook2, docs.sun.com, Sun Ultra, Java,and Solarisare trademarksor registered trademarksof Sun
Microsystems, Inc. in the U.S. and in other countries.
The OPENLOOK andSun™ GraphicalUser Interfacewas developedby SunMicrosystems, Inc. for its users and licensees. Sun acknowledges
the pioneeringefforts of Xerox in researchingand developingthe conceptof visualor graphicaluser interfacesfor thecomputer industry. Sun
holds anon-exclusive licensefrom Xerox tothe XeroxGraphical UserInterface, whichlicense alsocovers Sun’slicensees whoimplement OPEN
LOOK GUIsand otherwisecomply withSun’s writtenlicense agreements.
U.S. GovernmentRights—Commercial use. Government users are subject to the Sun Microsystems, Inc.standard licenseagreement and
applicable provisions ofthe FAR and itssupplements.
DOCUMENTATION IS PROVIDED "AS IS" AND ALL EXPRESS OR IMPLIED CONDITIONS, REPRESENTATIONS AND WARRANTIES,
INCLUDING ANYIMPLIED WARRANTY OF MERCHANTABILITY,FITNESS FORA PARTICULAR PURPOSE OR NON-INFRINGEMENT,
ARE DISCLAIMED, EXCEPT TO THE EXTENT THAT SUCH DISCLAIMERS ARE HELD TO BE LEGALLY INVALID.
Copyright 2006-2007Sun Microsystems, Inc.,4150 NetworkCircle, SantaClara, Californie95054, Etats-Unis.Tous droits réservés.
Sun Microsystems, Inc.a lesdroits depropriété intellectuels relatantsà latechnologie quiest décritdans cedocument. Enparticulier,et sansla
limitation, cesdroits de propriété intellectuels peuvent inclure unou plusdes brevetsaméricains énumérésà http://www.sun.com/patents et
un oules brevets plussupplémentaires oules applicationsde brevet enattente dansles Etats-Uniset dansles autrespays.
Ce produit oudocument estprotégé parun copyrightet distribuéavec deslicences quien restreignent l’utilisation,la copie,la distribution,et la
décompilation. Aucunepartie dece produit oudocument nepeut êtrereproduitesous aucuneforme, parquelque moyenque cesoit, sans
l’autorisation préalableet écritede Sunet deses bailleursde licence,s’il yena.
Le logicieldétenu pardes tiers,et quicomprend la technologie relative auxpolices decaractères, estprotégé parun copyright et licencié par des
fournisseurs deSun.
Des partiesde ceproduit pourront êtredérivées dessystèmes BerkeleyBSD licenciéspar l’Universitéde Californie.UNIX estune marque
déposée auxEtats-Unis etdans d’autres payset licenciéeexclusivement parX/Open Company, Ltd.
Sun, SunMicrosystems, le logo Sun, AnswerBook2, docs.sun.com, Sun Ultra, Java, et Solaris sont des marques defabrique oudes marques
déposées deSun Microsystems, Inc.aux Etats-Uniset dansd’autres pays.
L’interfaced’utilisation graphiqueOPEN LOOKet Sun™a étédéveloppée parSun Microsystems, Inc.pour sesutilisateurs etlicenciés. Sun
reconnaît les efforts de pionniers de Xeroxpour larecherche et le développement du concept des interfaces d’utilisation visuelle ou graphique
pour l’industriede l’informatique.Sun détientune licensenon exclusivede Xerox surl’interface d’utilisationgraphique Xerox,cette licence
couvrant égalementles licenciéesde Sunqui mettenten placel’interface d’utilisation graphiqueOPEN LOOKet quien outre seconforment
aux licencesécrites deSun.
LA DOCUMENTATION EST FOURNIE "EN L’ÉTAT" ET TOUTES AUTRES CONDITIONS, DECLARATIONS ET GARANTIES EXPRESSES
OU TACITES SONT FORMELLEMENT EXCLUES, DANS LA MESURE AUTORISEEPAR LALOI APPLICABLE,Y COMPRISNOTAMMENT
TOUTE GARANTIE IMPLICITE RELATIVE A LA QUALITE MARCHANDE, A L’APTITUDE A UNE UTILISATION PARTICULIERE OU A
L’ABSENCE DE CONTREFAÇON.
Page 3

iii
Contents
1. System Setup 1
Safety and Compliance Information 1
Planning the Installation Process 2
Package Contents Inventory 3
Front and Back Panel Overview 4
Cabling the Workstation 6
Powering On the Workstation 7
Setting Up the Software 8
Setting Up the Preinstalled Solaris 10 Operating System 8
Installing an Additional Operating System and Drivers 10
Additional System Software 12
Enabling the Secondary PCI-E Graphics Card 13
2. Setup Troubleshooting and Documentation 15
Troubleshooting the Sun Ultra 40 Workstation Setup 16
Technical Assistance 18
Sun Ultra 40 Workstation Documentation 20
Accessing the Documentation 20
Localization 20
Page 4

iv Sun Ultra 40 Workstation Setup Guide • February 2007
Page 5

1
CHAPTER
1
System Setup
This chapter includes information about the following topics:
■ “Safety and Compliance Information” on page 1
■ “Planning the Installation Process” on page 2
■ “Cabling the Workstation” on page 6
■ “Powering On the Workstation” on page 7
■ “Setting Up the Software” on page 8
■ “Enabling the Secondary PCI-E Graphics Card” on page 13
Safety and Compliance Information
Refer to the following documents for safety information regarding the Sun Ultra 40
Workstation:
■ Important Safety Information for Sun Hardware Systems, 816-7190 (included with the
workstation kit).
■ Sun Ultra 40 Workstation Safety and Compliance Guide, 819-3955 (available on the
Sun Ultra 40 Workstation documentation web site. See “Sun Ultra 40 Workstation
Documentation” on page 20).
Page 6

2 Sun Ultra 40 Workstation Setup Guide • February 2007
Planning the Installation Process
Use the following flowchart as a process tool to assist you with installation of the
Sun Ultra 40 Workstation.
FIGURE 1-1 Process for Setting Up the Sun Ultra 40 Workstation
Unpack the workstation and familiarize
yourself with the workstation features.
Connect the workstation and external device
cables.
Power on the workstation.
If necessary, install the supplemental drivers
from the Sun Ultra 40 Workstation
Supplemental CD.
READY TO WORK!
START
Configure the preinstalled operating system
or install another operating system.
Install optional
components?
Install
optional
components
.
Yes
No
See “Package Contents Inventory” on page 3 and
“Front and Back Panel Overview” on page 4.
To install DIMMs, graphic
accelerators, PCI cards, hard
drives, tape drives, or
CD or DVD drives, see the Sun
Ultra 40 Workstation Service,
Diagnostics, and Troubleshooting
Manual or the component
documentation.
See “Cabling the Workstation” on page 6.
See “Powering On the Workstation” on page 7.
See “Setting Up the Software” on page 8.
See “Installing an Additional Operating System
and Drivers” on page 10.
If necessary, enable the secondary
PCI-Express card.
See “Enabling the Secondary PCI-E Graphics
Card” on page 13.
Page 7

Chapter 1 System Setup 3
Package Contents Inventory
Carefully unpack all workstation components from the packing cartons. The
following items should be packaged with the Sun Ultra 40 Workstation:
Note – The Sun Ultra 40 Workstation is packaged with the stand in place, as shown
in the following figure. This stand must be positioned as shown when the system is
upright.
FIGURE 1-2 Sun Ultra 40 Workstation in Upright Position
Item Type Item
Hardware • DVI video adapter
• DMS59 cable (if an NVS285 graphics card is installed)
• SLI connector (if workstation has dual video cards with SLI support)
Documentation • Sun Ultra 40 Workstation Setup Guide
• Sun Ultra 40 Workstation Release Notes
• Where to Find Sun Ultra 40 Workstation Documentation
• Additional license and safety documentation
Media • Sun Ultra 40 Workstation Supplemental CD (drivers and diagnostics)
• DVD media kit containing the following software: Sun™ Studio 11,
Sun Java™ Studio Creator Update 8, Sun Java™ Studio Enterprise
Update 8
Additional
hardware
Type 7 keyboard, mouse and power cord (in separate country kits)
Stand position for
upright workstation
Page 8

4 Sun Ultra 40 Workstation Setup Guide • February 2007
Front and Back Panel Overview
FIGURE 1-3 and TABLE 1-1 show the front panel of the Sun Ultra 40 Workstation.
FIGURE 1-3 Front Panel of Sun Ultra 40 Workstation
TABLE 1-1 Front Panel
Label Button/LED/Port
1 DVD drive
2 Power button
3 Platform power LED
4 1394 ports (2)
5 USB ports (2)
6 Microphone-in jack
7 Headphone-out jack
2
3
4
6
7
1
5
Page 9

Chapter 1 System Setup 5
FIGURE 1-4 and TABLE 1-2 show the back panel of the Sun Ultra 40 Workstation.
FIGURE 1-4 Sun Ultra 40 Workstation Back Panel
TABLE 1-2 Back Panel
Label Connector/Slot Label Connector/Slot
1 Audio connectors (6) top left to bottom right:
Blue: line in; Pink: microphone-in; Orange:
center/LFE; Lime: line-out; Gray: side surround
out; Black: back surround out
8 PCI-Express x4 slot (PCI-E 2)
2 SPDIF optical (out top, in, bottom) 9 Primary PCI-Express x16 graphics slot
(PCI-E 1)
3 SPDIF coaxial (out top, in, bottom) 10 PCI 33 MHz/32-bit (PCI 1)
4 Secondary Ethernet connector (NIC1) 11 PCI 33 MHz/32-bit (fits 66 MHz/64-bit
card) (PCI 0)
5 Primary Ethernet connector (NIC0) 12 PCI-Express x4 slot (PCI-E 0)
6 USB connectors (6) 13 Power connector
7 Secondary PCI-Express x16 graphics slot (PCI-E 3)
1
2
3
5
10
4
7
6
8
9
11
12
13
Page 10
6 Sun Ultra 40 Workstation Setup Guide • February 2007
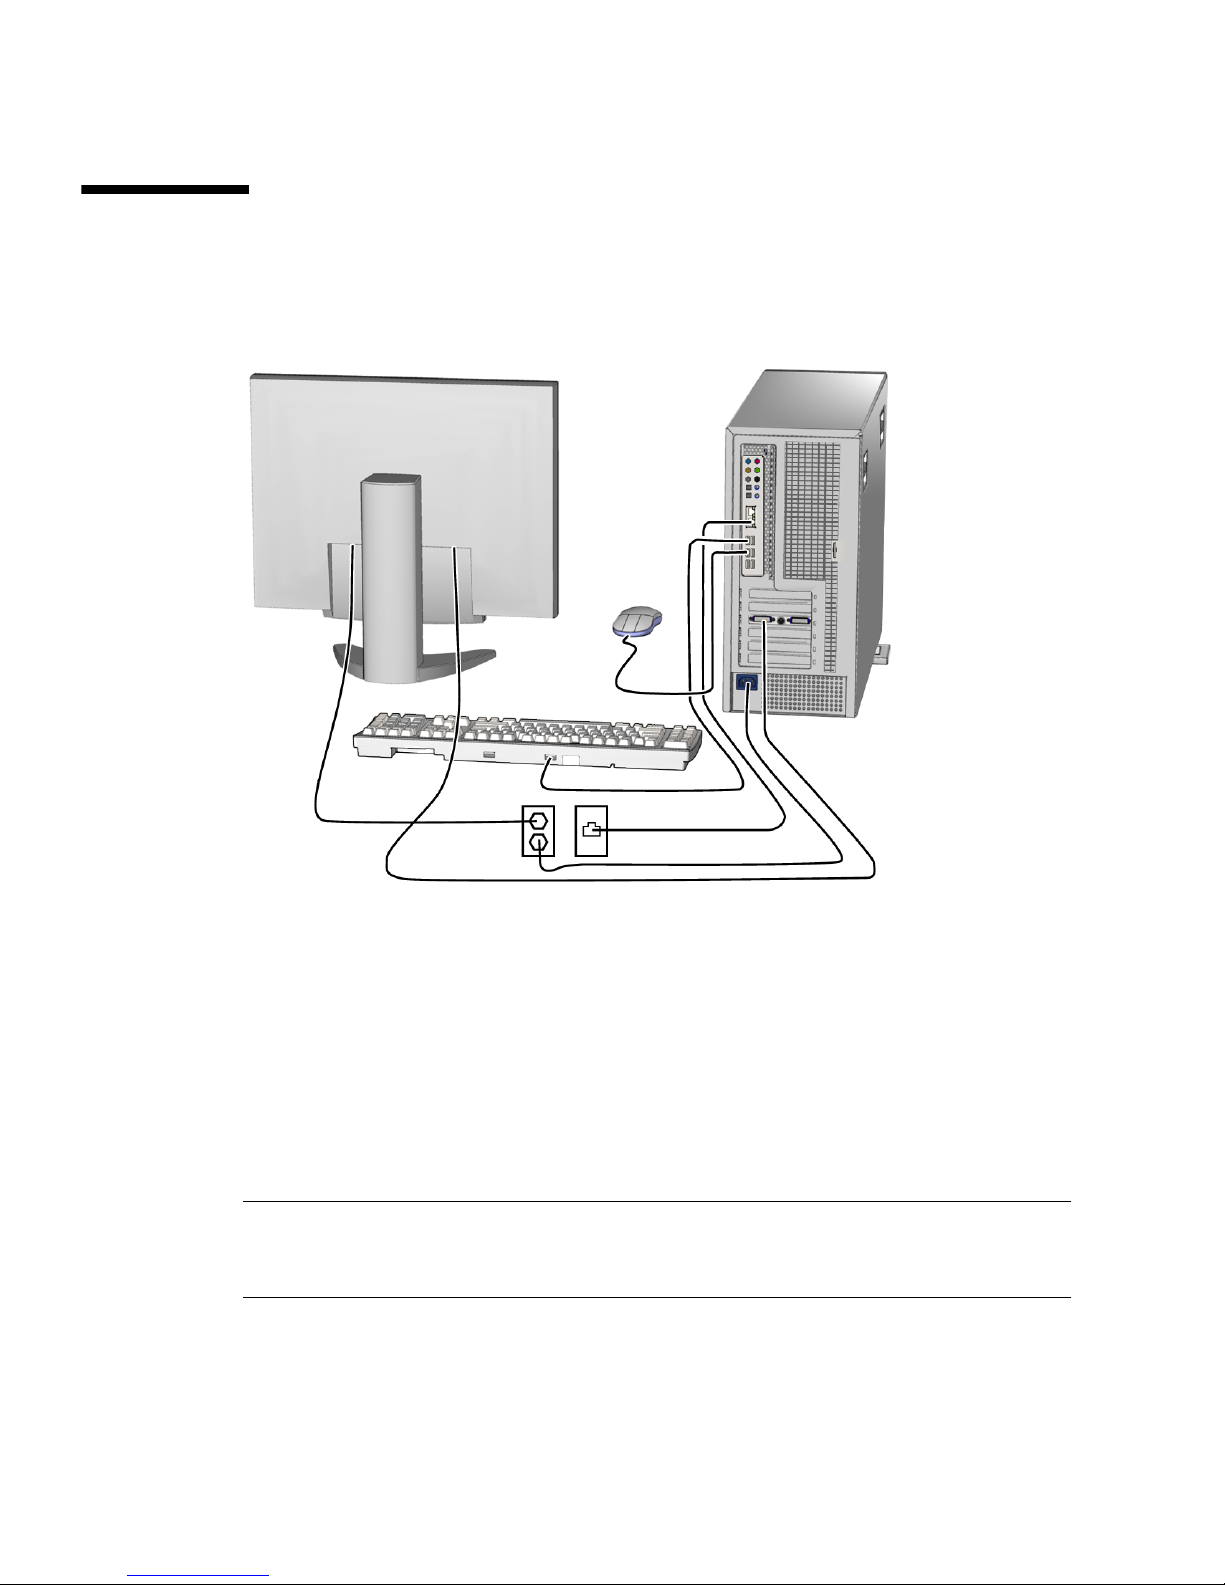
Cabling the Workstation
FIGURE 1-5 illustrates the cable connections for the workstation.
FIGURE 1-5 Cable Connections
Connect the workstation and external devices in this order (see FIGURE 1-5):
1. Connect the workstation power cord to a grounded electrical outlet.
2. Connect the keyboard and mouse to the USB connectors on the back panel.
3. Connect the monitor cable to a graphics card video connector installed in a PCIExpress graphics slot.
Note – You might need to use the DVI adapter included with the workstation to
connect the graphics card to the monitor. If your workstation has a NVS285 graphics
card installed, a DMS59 cable will be packaged with the workstation.
4. Connect the Ethernet cable to one of the Ethernet connector on the Sun Ultra 40
Workstation, and connect the other end of the cable to an Ethernet RJ-45 jack.
Page 11

Chapter 1 System Setup 7
Powering On the Workstation
Tip – If you are installing optional internal components, such as additional memory
DIMMs, PCI cards, optical drives, or hard drives, install those components before
you power on the workstation. If you are not installing optional components, you
are ready to power on the workstation.
1. Turn on power to the monitor and to all external devices.
2. Press and release the workstation Power button on the front panel.
See
FIGURE 1-6 (1).
3. After several seconds, verify that the platform power LED next to the Power
button lights.
The platform power LED lights after the workstation begins the internal booting
process. See
FIGURE 1-6 (2) for location of the platform power LED.
4. If you are powering on the workstation for the first time, configure the
preinstalled operating system or install another operating system after the
workstation has finished booting. See “Setting Up the Software” on page 8.
FIGURE 1-6 Power Button and LED on the Sun Ultra 40 Workstation
1
2
Page 12

8 Sun Ultra 40 Workstation Setup Guide • February 2007
Setting Up the Software
For information on setting up the operating system and software:
■ See “Setting Up the Preinstalled Solaris 10 Operating System” on page 8 if you
plan to use the installed operating system.
■ See “Installing an Additional Operating System and Drivers” on page 10 if you
plan to install an additional operating system.
■ See “Additional System Software” on page 12 for more information on additional
Sun Ultra 40 Workstation software.
Setting Up the Preinstalled Solaris 10 Operating
System
Further information on the preinstalled Solaris 10 Operating System can be found in
the Sun Ultra 40 Workstation Getting Started Guide, 819-3953.
Use
TABLE 1-3 to collect the information that you need, then follow the system
prompts to configure the operating system.
Page 13

Chapter 1 System Setup 9
TABLE 1-3 Information for Preinstalled Solaris 10 Setup
Setup Window Explanation and Notes Your Information
Select Language
and Locale
Native language and locale to use for the workstation.
Host Name A name for the workstation.
Network
Connectivity
(IP Address)
Network or stand-alone workstation protocols. A system
administrator might be required to complete this section.
Note: Depending on how you answer and what
information is provided by your network, you might also
be prompted for the workstation’s IP address.
Security Settings Security settings and protocols.
Name Service Name service to use: NIS+, NIS, DNS, LDAP, or None.
Note: This window is not displayed if the workstation is
not connected to a network.
Domain Name NIS or NIS+ domain for this workstation.
Note: This window is not displayed if the workstation is
not using the NIS or NIS+ service.
Name Server/
Subnet/
Subnet Mask
Name server (specify the server or have the workstation
find one on a local subnet).
Note: This window is not displayed if the workstation is
not connected to a network.
Note: Depending on how you answer and what
information is provided by your network, you might also
be prompted for:
• The subnet for the workstation
• The subnet mask for the workstation
Time Zone Local time zone (select by geographic region, GMT offset,
or a time zone file).
Date and Time Current date and time (accept the default or enter the
current date and time).
Root Password Root (superuser) password for the workstation.
Page 14

10 Sun Ultra 40 Workstation Setup Guide • February 2007
Installing an Additional Operating System and
Drivers
The Solaris 10 Operating System is preinstalled on your workstation. If you plan to
install an additional operating system, install it at this time. You might need to
remove the Solaris 10 Operating System in order to do this.
The following sources of information can help you with installing additional
operating systems on the Sun Ultra 40 Workstation:
■ Overview instructions for installing the drivers can be found in the following
section: “Overview Instructions for Additional Operating Systems and Drivers”
on page 10.
■ Detailed information on removing the existing operating system, installing
additional drivers, and installing another operating system is in the Sun Ultra 40
Workstation Getting Started Guide, 819-3953, available at:
http://www.sun.com/products-n-solutions/hardware/docs
/Workstation_Products/Workstations/ultra_40/index.html
■ Drivers for supported operating systems are available on the Sun Ultra 40
Workstation Supplemental CD included with your system and can also be
downloaded from the download link at:
http://sun.com/ultra40
■ The most recent list of operating systems supported for Sun Ultra 40 Workstation
can be found on the product web site at:
http://sun.com/ultra40
Overview Instructions for Additional Operating Systems and
Drivers
If you want detailed instructions on installing drivers, see the Sun Ultra 40
Workstation Getting Started Guide, 819-3953. If you want to install using overview
instructions only, refer to the following steps.
Page 15

Chapter 1 System Setup 11
Installing the Operating System
Follow these directions for installing a supported operating system (OS) on the
Sun Ultra 40 Workstation.
1. Power on the Sun Ultra 40 Workstation.
2. Do one of the following:
■ If you are installing a Linux OS or the Solaris 10 Operating System, and the BIOS
Installed O/S option has not been changed from the default, proceed to Step 3.
■ If you are installing Windows XP, make the following change to the BIOS settings:
a. Select the Advanced tab and change the Installed O/S option to Windows.
b. Press the F10 key to save your changes and exit the BIO Setup Utility.
3. Install the operating system, following the instructions that come with the
software.
Note – If you need to install RAID drivers for Windows XP, you will need to create
a new Windows CD before installing the Windows XP OS. See the Sun Ultra 40
Workstation Installation Guide for further information.
4. After installing the operating system, install the appropriate drivers from the Sun
Ultra 40 Workstation Supplemental CD, using one of the following procedures.
Installing the Drivers for a Linux OS
To install the drivers from the Supplemental CD for supported Red Hat and SUSE
operating systems:
a. If you have installed Red Hat Enterprise Linux, run the up2date utility.
b. If the CD does not automount, manually mount the CD.
c. Change to the following directory:
/mountpoint/drivers/linux/operating_system
Where mountpoint is the directory the CD is mounted to, and operating_system is
the operating system installed (red_hat or suse).
d. Run
./install.sh
Page 16

12 Sun Ultra 40 Workstation Setup Guide • February 2007
Installing the Drivers for a Windows XP OS
To install the drivers from the Supplemental CD for Windows XP 32-bit or 64-bit:
a. Change to the following directory:
D:\drivers\windows\OS\chipset
Where OS is XP32 or XP64.
b. Double-click on the executable file.
c. Follow the instructions in the installation software.
d. Repeat the above instructions for the video drivers in the following directory:
D:\drivers\windows\OS\video
Where OS is XP32 or XP64.
Installing the Drivers for the Solaris 10 OS
If you are using the preinstalled version of Solaris, the drivers are already installed.
To install the drivers from the Supplemental CD if you have reinstalled Solaris 10
Operating System:
a. Change to the
/cdrom/cdrom0/drivers/sx86 directory.
b. Run
./install.sh
Additional System Software
The following software is preinstalled on the Sun Ultra 40 Workstation: Sun Studio
11, Sun Java Studio Creator 2004Q2 Update 8, Sun Java Studio Enterprise Update 8,
and NetBeans IDE 4.1. Media kits for Sun Studio 11, Sun Java Studio Creator 2004Q2
Update 8, Sun Java Studio Enterprise Update 8 are also included with the
workstation.
In addition, two fully licensed RTU's for the Sun's N1 Grid Engine are also included
with the workstation. To purchase support, no additional licenses are required.
These RTU's can only be used with the Sun Ultra 40 workstation that it came with.
The RTU's are non-transferable and cannot be used on other hardware.
You can download Sun N1 Grid Engine by clicking on the “Get the Software” button
at the following URL:
http://www.sun.com/gridware
Page 17

Chapter 1 System Setup 13
See the Sun Ultra 40 Workstation Getting Started Guide , 819-3953, for more information
on the preinstalled software and CD media. The Sun Ultra 40 Workstation Getting
Started Guide and other Sun Ultra 40 Workstation documentation can be found at the
following web site:
http://www.sun.com/products-n-solutions/hardware/docs/
Workstation_Products/Workstations/ultra_40/index.html
Enabling the Secondary PCI-E Graphics
Card
The lower PCI-Express x16 slot (PCI-E 1) is the primary graphics slot. The BIOS is
set up for displaying video from a graphics card installed in this slot by default. This
card is powered by the 6-pin to 6-pin GFX1_PWR_OUT supplemental power
connector.
If you want to use the secondary PCI-Express x16 graphics slot (the top-most
PCI-E 3 slot), you must do the following to set it up:
■ Connect the GFX2 supplemental power connector to the card (if required by the
card).
See the Sun Ultra 40 Workstation Service, Diagnostics, and Troubleshooting Manual for
more information on connecting the power connector.
■ Set up the BIOS as shown in the following procedure.
Note – Attempting to use the wrong supplemental power cable for the wrong
graphics card may result in the machine not powering up.
To set up the secondary PCI-E x16 graphics card slot:
1. Boot the workstation with the video display connected to the primary graphics
card slot.
2. When you see the Sun logo screen displayed, press F2 to enter the BIOS Setup
Utility.
3. Select the Advanced menu.
The entry PCI-E X16 VGA CARD SELECT defines which slot is the primary graphics
slot. POST and BOOT information will be displayed to this card only.
4. Select PCI Express Slot 3 (i.e. PCI-E 3) to enable the PCI-E 3 graphics slot.
5. Press the F10 key to save your changes and exit the BIOS.
Page 18

14 Sun Ultra 40 Workstation Setup Guide • February 2007
Page 19

15
CHAPTER
2
Setup Troubleshooting and
Documentation
This chapter contains information to help you troubleshoot minor workstation
problems.
This chapter includes the following sections:
■ “Troubleshooting the Sun Ultra 40 Workstation Setup” on page 16
■ “Technical Assistance” on page 18
■ “Sun Ultra 40 Workstation Documentation” on page 20
Page 20

16 Sun Ultra 40 Workstation Setup Guide • April 2007
Troubleshooting the Sun Ultra 40
Workstation Setup
If you experience problems while setting up your workstation, refer to the
troubleshooting information in
TABLE 2-1. For additional troubleshooting
information, see the Sun Ultra 40 Workstation Service, Diagnostics and Troubleshooting
Guide, 819-3952.
TABLE 2-1 Troubleshooting Procedures
Problem Possible solution
Workstation powers
on, but the monitor
does not.
• Is the Power button for the monitor turned on?
• Is the monitor power cord connected to a wall outlet?
• Does the wall outlet have power? Test by plugging in another
device.
• Is the monitor connected to the onboard video connector or PCI
Express video connector?
CD or DVD does not
eject from the DVD
slot when you press
the Eject button.
• Move the mouse or press any key on the keyboard. The drive
might be in low-power mode.
• Use the utility software installed on your workstation to eject the
CD.
No video displays
on the monitor
screen.
• Is the monitor cable attached to the onboard video connector or
PCI Express video connector?
• Does the monitor work when connected to another system?
• If you have another monitor, does it work when connected to the
original system?
• Verify that the BIOS settings are correct.
Page 21

Chapter 2 Setup Troubleshooting and Documentation 17
Workstation does
not power on when
you press the front
panel Power button.
Keep notes on the following situations in case you need to call
service:
• Is the Power button LED illuminated on the front of the system?
(Ensure that the power cord is connected to the system and to a
grounded power receptacle.)
• Does the wall outlet have power? Test by plugging in another
device.
• Do you hear a beep when the system is powered on? (Ensure that
the keyboard is plugged in.)
• Test with another keyboard that you know is functional. Do you
hear a beep when you connect the keyboard and power on the
system?
• Does the monitor sync within 5 minutes after power on? (The
green LED on the monitor stops flashing and remains
illuminated.)
Keyboard or mouse
does not respond to
actions.
• Verify that the mouse and keyboard cables are connected to the
on-board USB 2.0 connectors on the workstation.
• Verify that the workstation is powered on and the front platform
power LED is illuminated.
Workstation appears
to be in low-power
mode, but the Power
button LED does not
blink.
The power-indicator LED blinks only when all workstation
components are in low-power mode. A tape drive might be
connected to your workstation. Because tape drives do not enter
low-power mode, the power-indicator LED does not blink.
Hung or frozen
workstation: No
response from
mouse, keyboard, or
any application.
Try to access your workstation from a another workstation on the
network.
1. From a terminal window, type: ping hostname
2. If there is no response, remotely log in from another system using
telnet or rlogin, and ping the system again.
3. Attempt to kill processes until the system responds.
If the above procedures do not work:
1. Press the Power button to power off the system.
2. Wait 20 to 30 seconds and power on the system.
TABLE 2-1 Troubleshooting Procedures (Continued)
Problem Possible solution
Page 22

18 Sun Ultra 40 Workstation Setup Guide • April 2007
Technical Assistance
If the troubleshooting procedures in this chapter fail to solve your problem, use
TABLE 2-2 to collect information that you might need to communicate to the support
personnel.
TABLE 2-3 lists the Sun web sites and telephone numbers for additional
technical support.
TABLE 2-2 System Information Required for Support
System Configuration Information Needed Your information
Sun service contract number
System model
Operating system, including service pack number or
update number
System serial number
Peripherals attached to the system
Hardware configuration information, including the
following:
• Graphics cards installed
• PCI or PCI Express cards installed
• Amount of memory
• Processor speed
• Optical disk type
Email address and phone number for you and a
secondary contact
Street address where the system is located
Superuser password
Summary of the problem and the work being done
when the problem occurred
Output of diagnostics test, if applicable
Other useful information
IP address
Workstation name (System host name)
Network or internet domain name
Proxy server configuration
Page 23

Chapter 2 Setup Troubleshooting and Documentation 19
TABLE 2-3 Sun Web Sites and Telephone Numbers
Workstation Documents and Support Resources URL or Telephone Number
HTML and PDF files for all the current Sun
Ultra 40 Workstation documentation.
http://www.sun.com/documentation/
Solaris™ and other software documents.
This web site has full search capabilities.
http://docs.sun.com/documentation/
Discussion and troubleshooting forums. http://supportforum.sun.com/
Support, diagnostic tools, and alerts for all
Sun products.
http://www.sun.com/bigadmin/
Links to software patches some system
specifications, troubleshooting and
maintenance information, and other tools.
http://www.sunsolve.sun.com/handbook_pub/
Service support phone numbers. 1-800-872-4786 (1-800-USA-4Sun) Select Option 1
International telephone numbers for
SunService Support.
http://www.sun.com/service/contacting/
Warranty and contract support contacts.
Links to other service tools.
http://www.sun.com/service/warrantiescontracts/
Warranties for every Sun product. http://www.sun.com/service/warranty
Page 24

20 Sun Ultra 40 Workstation Setup Guide • April 2007
Sun Ultra 40 Workstation
Documentation
Refer to the documentation described in the following sections for further
information on setting up the Sun Ultra 40 Workstation.
Accessing the Documentation
The documentation listed in the following table for the Sun Ultra 40 Workstation can
be found at:
http://www.sun.com/products-n-solutions/hardware/docs/
Workstation_Products/Workstations/ultra_40/index.html
Localization
If you want to read the contents of this document in one of the following languages:
French, Spanish, German, Italian, Swedish, Japanese, Traditional Chinese, Simplified
Chinese, Korean, or Russian, please refer to the Sun Ultra 40 Workstation Getting
Started Guide at:
http://www.sun.com/products-n-solutions/hardware/docs/
Workstation_Products/Workstations/ultra_40/index.html
The translated documents contain all of the information in this document as well as
additional information on the Sun Ultra 40 Workstation.
Application Title Part Number
Late-breaking information Sun Ultra 40 Workstation Release Notes 819-3954
System overview,
troubleshooting,
diagnostics, and service
information
Sun Ultra 40 Workstation Service, Diagnostics, and
Troubleshooting Manual
819-3952
Installation information Sun Ultra 40 Workstation Getting Started Guide 819-3953
System setup information Sun Ultra 40 Workstation Setup Guide 819-3951
Safety information Important Safety Information for Sun Systems
Sun Ultra 40 Workstation Safety and Compliance
Guide
816-7190
819-3955
Page 25

Chapter 2 Setup Troubleshooting and Documentation 21
Page 26

22 Sun Ultra 40 Workstation Setup Guide • April 2007
 Loading...