

Page 1

Sun Blade 1000 and Sun Blade 2000
UltraSPARC™ III Cu Module
Installation Guide
Sun Microsystems, Inc.
4150 Network Circle
Santa Clara, CA 95054 U.S.A.
650-960-1300
Part No. 816-3221-10
January 2002, Revision A
Send comments about this document to: [email protected]
Page 2

Copyright 2002Sun Microsystems, Inc.,4150 NetworkCircle, SantaClara, Ca.95054 U.S.A.All rightsreserved.
This product ordocument isdistributed underlicenses restrictingits use,copying, distribution,and decompilation.No partof thisproduct or
document may be reproduced inany formby anymeans withoutprior writtenauthorization ofSun andits licensors,if any. Third-party
software,including fonttechnology,is copyrighted and licensed from Sun suppliers.
Parts of the product maybe derivedfrom BerkeleyBSD systems,licensed fromthe University of California. UNIX is a registered trademarkin
the U.S. and other countries, exclusively licensed through X/OpenCompany,Ltd.
Sun, Sun Microsystems,the Sunlogo, docs.sun.com,OpenBoot, ShowMeHow,Sun Blade,Sun Fire,and Solaris aretrademarks, registered
trademarks, or service marks of Sun Microsystems,Inc. inthe U.S.and othercountries. AllSPARCtrademarks areused under license and are
trademarks or registeredtrademarks ofSPARCInternational, Inc. in the U.S. and other countries. Products bearing SPARC trademarksare
based upon an architecture developedby SunMicrosystems, Inc.
The OPEN LOOK and Sun™ Graphical User Interface was developed by Sun Microsystems,Inc. forits usersand licensees.Sun acknowledges
the pioneering effortsof Xeroxin researchingand developing the concept of visual or graphical user interfaces for the computer industry.Sun
holds a non-exclusive license fromXerox tothe XeroxGraphical User Interface, which license also covers Sun’s licensees who implement OPEN
LOOK GUIs and otherwise comply with Sun’s written license agreements.
Federal Acquisitions: CommercialSoftware—Government UsersSubject toStandard License Termsand Conditions.
DOCUMENTATION IS PROVIDED “AS IS” AND ALL EXPRESS OR IMPLIED CONDITIONS, REPRESENTATIONS AND WARRANTIES,
INCLUDING ANY IMPLIED WARRANTY OFMERCHANTABILITY, FITNESS FOR APARTICULAR PURPOSE OR NON-INFRINGEMENT,
ARE DISCLAIMED, EXCEPT TO THE EXTENT THAT SUCH DISCLAIMERS ARE HELD TO BE LEGALLY INVALID.
Copyright 2002 Sun Microsystems, Inc.,4150 NetworkCircle, SantaClara, Ca.95054 U.S.A.Etats-Unis. Tous droitsréservés.
Ce produit oudocument estdistribué avecdes licencesqui enrestreignent l’utilisation, la copie, la distribution, et la décompilation. Aucune
partie de ce produit oudocument nepeut êtrereproduite sous aucune forme, par quelque moyen que ce soit, sans l’autorisation préalable et
écrite de Sun et de ses bailleurs de licence, s’il y en a. Le logiciel détenu par des tiers, et qui comprend latechnologie relativeaux policesde
caractères,est protégépar uncopyright etlicencié pardes fournisseursde Sun.
Des parties de ce produitpourront êtredérivées des systèmes Berkeley BSD licenciés par l’Université de Californie. UNIX est une marque
déposée aux Etats-Unis et dans d’autres payset licenciéeexclusivement parX/Open Company, Ltd.
Sun, Sun Microsystems,le logoSun, docs.sun.com,OpenBoot, ShowMeHow,Sun Blade,Sun Fire,et Solaris sont des marquesde fabriqueou
des marques déposées,ou marquesde service,de SunMicrosystems, Inc. aux Etats-Unis et dans d’autres pays. Toutes lesmarques SPARC sont
utilisées sous licence et sont des marquesde fabriqueou desmarques déposéesde SPARC International,Inc. auxEtats-Unis etdans d’autres
pays. Les produitsportant lesmarques SPARC sontbasés surune architecturedéveloppéepar SunMicrosystems, Inc.
L’interfaced’utilisation graphique OPEN LOOK et Sun™ a été développée par Sun Microsystems, Inc.pour sesutilisateurs etlicenciés. Sun
reconnaîtles effortsde pionniersde Xeroxpour la rechercheet ledéveloppement duconcept desinterfaces d’utilisationvisuelle ougraphique
pour l’industrie de l’informatique. Sun détient une licence non exclusive de Xerox surl’interface d’utilisationgraphique Xerox,cette licence
couvrant également les licenciés de Sun qui mettent en place l’interface d’utilisation graphique OPEN LOOK et qui en outrese conformentaux
licences écrites de Sun.
Achats fédéraux : logiciel commercial- Lesutilisateurs gouvernementauxdoivent respecterles conditionsdu contratde licencestandard.
LA DOCUMENTATION EST FOURNIE “EN L’ETAT” ET TOUTES AUTRES CONDITIONS, DECLARATIONS ET GARANTIES EXPRESSES
OU TACITESSONT FORMELLEMENTEXCLUES, DANSLA MESUREAUTORISEE PAR LALOI APPLICABLE, Y COMPRIS NOTAMMENT
TOUTE GARANTIE IMPLICITE RELATIVE A LA QUALITE MARCHANDE, A L’APTITUDE A UNE UTILISATION PARTICULIERE OU A
L’ABSENCE DE CONTREFAÇON.
Please
Recycle
Page 3

Contents
Regulatory Compliance Statements v
Sun Blade 1000 and Sun Blade 2000 UltraSPARC III Cu CPU Module
Installation Guide 1
UltraSPARC III Cu CPU Module Installation Kit Contents 1
Firmware and Software Requirements for Installing an UltraSPARC III Cu CPU
Module 2
Sun Blade 1000 and Sun Blade 2000 UltraSPARC III Cu CPU Module Installation
Guide 4
Preparing for Installation 4
Powering Off the Workstation 4
Removing the Access Panel 8
Attaching the Disposable Antistatic Wrist Strap 10
About UltraSPARC III CPU Modules 11
CPU Module Positions in the Workstation 13
Removing a CPU Module 14
Installing a New CPU Module 19
Finishing the Installation 27
For More Information 28
iii
Page 4

iv Sun Blade 1000 and Sun Blade 2000 UltraSPARCTM III Cu Module Installation Guide • January 2002
Page 5

Regulatory Compliance Statements
Your Sun product is marked to indicate its compliance class:
• Federal Communications Commission (FCC) — USA
• Industry Canada Equipment Standard for Digital Equipment (ICES-003) - Canada
• Voluntary Control Council for Interference (VCCI) — Japan
• Bureau of Standards Metrology and Inspection (BSMI) — Taiwan
Please read the appropriate section that corresponds to the marking on your Sun product before attempting to install the
product.
FCC Class A Notice
This device complies with Part 15 of the FCC Rules. Operation is subject to the following two conditions:
1. This device may not cause harmful interference.
2. This device must accept any interference received, including interference that may cause undesired operation.
Note: This equipment has been tested andfound to comply with the limits for a Class A digital device, pursuant to Part 15of
the FCC Rules. These limits are designed to provide reasonable protection against harmful interference when the equipment
is operated in a commercial environment. This equipment generates, uses, and can radiate radio frequency energy, and if it is
not installed andused in accordance with theinstruction manual, it may causeharmful interference to radio communications.
Operation of thisequipment in a residentialarea is likely to causeharmful interference, in which casethe user will be required
to correct the interference at his own expense.
Shielded Cables: Connections between the workstation and peripherals must be made using shielded cables to comply
with FCC radio frequency emission limits. Networking connections can be made using unshielded twisted-pair (UTP) cables.
Modifications: Any modifications made to this device that are not approved by Sun Microsystems, Inc. may void the
authority granted to the user by the FCC to operate this equipment.
FCC Class B Notice
This device complies with Part 15 of the FCC Rules. Operation is subject to the following two conditions:
1. This device may not cause harmful interference.
2. This device must accept any interference received, including interference that may cause undesired operation.
Note: This equipment has been tested and found to comply with the limits for a Class B digital device, pursuant to Part 15 of
the FCC Rules. These limits are designed to provide reasonable protection against harmful interference in a residential
installation. This equipment generates, uses and can radiate radio frequency energy and, if not installed and used in
accordance with the instructions, may cause harmful interference to radio communications. However, there is no guarantee
that interference will not occur in a particular installation. If this equipment does cause harmful interference to radio or
television reception,which can be determined byturning the equipment offand on, the user isencouraged to try to correctthe
interference by one or more of the following measures:
• Reorient or relocate the receiving antenna.
• Increase the separation between the equipment and receiver.
• Connect the equipment into an outlet on a circuit different from that to which the receiver is connected.
• Consult the dealer or an experienced radio/television technician for help.
Shielded Cables: Connections between the workstation and peripherals must be made using shielded cables in order to
maintain compliance with FCC radio frequency emission limits. Networking connections can be made using unshielded
twisted pair (UTP) cables.
Modifications: Any modifications made to this device that are not approved by Sun Microsystems, Inc. may void the
authority granted to the user by the FCC to operate this equipment.
v
Page 6
ICES-003 Class A Notice- Avis NMB-003, Classe A
This Class A digital apparatus complies with Canadian ICES-003.
Cet appareil numérique de la classe A est conforme à la norme NMB-003 du Canada.
ICES-003 Class B Notice- Avis NMB-003, Classe B
This Class B digital apparatus complies with Canadian ICES-003.
Cet appareil numérique de la classe B est conforme à la norme NMB-003 du Canada.
vi Sun Blade 2000 UltraSPARCTM III Cu Module Installation Guide • January 2002
Page 7
BSMI Class A Notice
The following statement is applicable to products shipped to Taiwan and marked as Class A on the product compliance
label.
vii
Page 8

viii Sun Blade 2000 UltraSPARCTM III Cu Module Installation Guide • January 2002
Page 9

Sun Blade 1000 and Sun Blade 2000
UltraSPARC III Cu CPU Module
Installation Guide
This document describes how to remove or install an UltraSPARC III Cu CPU
module for the Sun Blade
topics are discussed:
■ “UltraSPARC III Cu CPU Module Installation Kit Contents” on page 1
■ “Firmware and Software Requirements for Installing an UltraSPARC III Cu CPU
Module” on page 2
■ “Sun Blade 1000 and Sun Blade 2000 UltraSPARC III Cu CPU Module Installation
Guide” on page 4
TM
1000 or Sun Blade 2000 workstation. The following
UltraSPARC III Cu CPU Module Installation Kit Contents
Your UltraSPARC III Cu CPU module installation kit contains:
■ The Sun Blade 1000 and Sun Blade 2000 UltraSPARC III Cu Module Installation Guide
(this manual)
■ Disposable antistatic wrist strap
■ Antistatic mat
■ One UltraSPARC III Cu CPU module
1
Page 10

Firmware and Software Requirements for Installing an UltraSPARC III Cu CPU Module
Note – The 900 MHz version of the UltraSPARC III Cu CPU module is only
available as an option for the Sun Blade 1000 workstation.
If you are installing UltraSPARC III Cu CPU module (501-6002), you may need to
upgrade your workstation’s OpenBoot PROM firmware and the Solaris operating
environment (software) that supports the workstation.
The OpenBoot PROM firmware upgrade patch can be obtained from the Sun web
site at:
http://www.sun.com/sunsolve/
Before installing an UltraSPARC III Cu CPU module, verify that:
■ OpenBoot PROM firmware v4.4.4 or later is installed on your workstation. The
firmware patch number for OpenBoot PROM v4.4.4 is 111292-05 or later.
OpenBoot PROM firmware v4.4.4 is the first version of firmware that supports the
UltraSPARC III Cu CPU module.
You can determine the PROM firmware version installed on your workstation by
typing the following command in a terminal window:
/usr/platform/sun4u/sbin/prtdiag -v
■ Solaris 8 10/01 or later is installed on your workstation. This is the first version of
software that supports the UltraSPARC III Cu CPU module.
To verify the current version of Solaris software type the following command in a
terminal window:
more /etc/release
If necessary, upgrade your workstation’s firmware and software to the versions
described above before beginning the installation procedure for the UltraSPARC III
Cu CPU module.
Note – Never mix UltraSPARC III 600, 750, or 900 MHz CPU modules with
UltraSPARC III Cu CPU modules. If the modules are mixed, the workstation will not
boot.
2 Sun Blade 1000 and Sun Blade 2000 UltraSPARCTMIII Cu Module Installation Guide • January 2002
Page 11
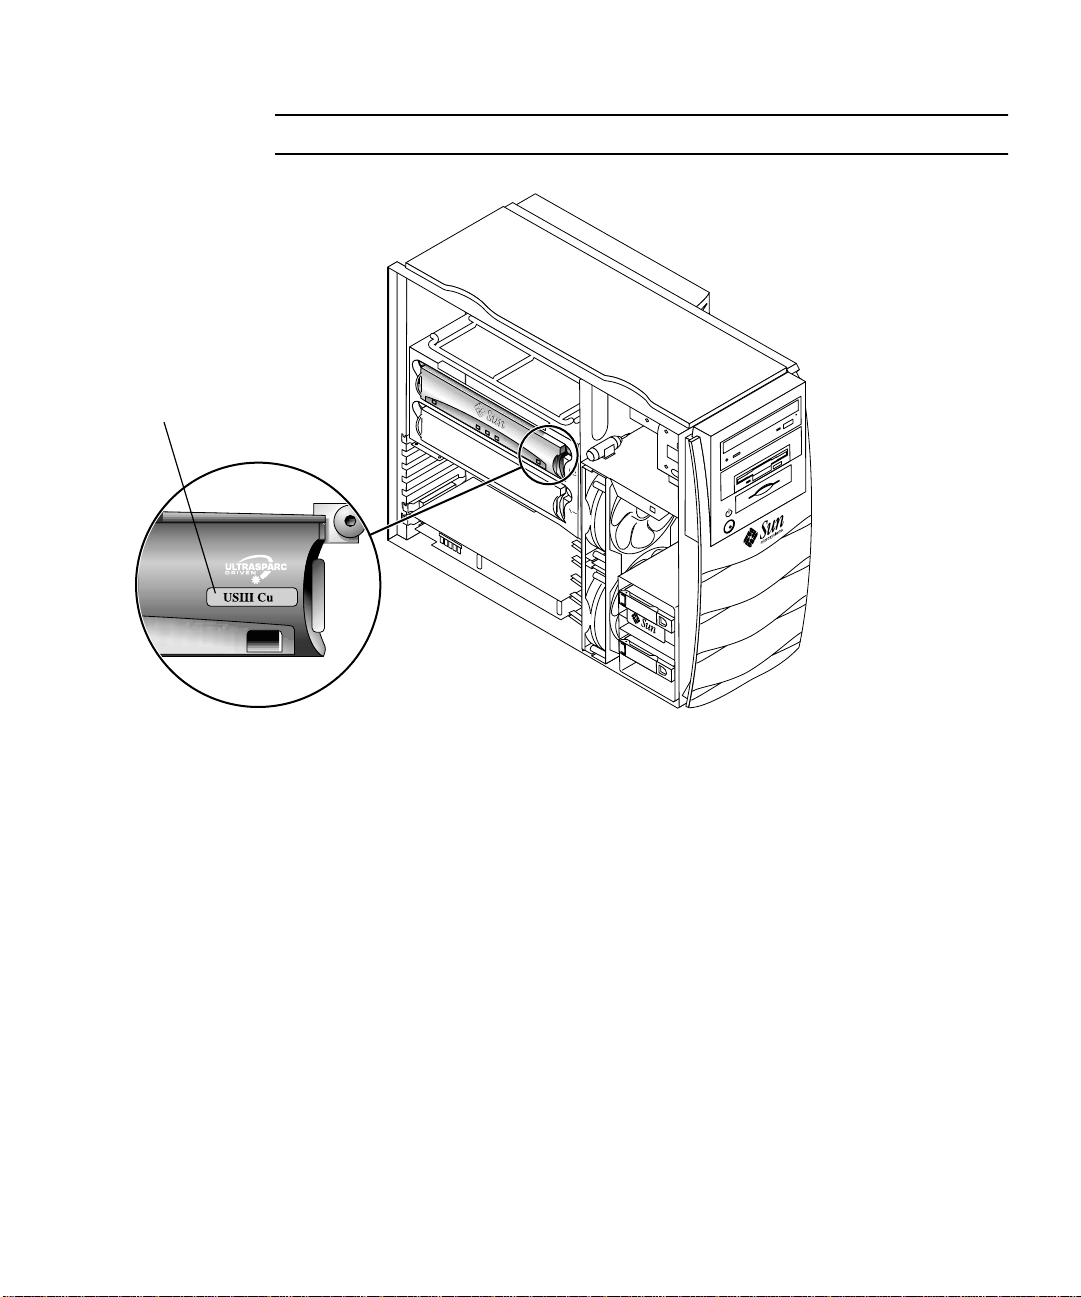
Note – UltraSPARC III Cu CPU modules are marked “USIII Cu” (see FIGURE 1).
UltraSPARC III Cu module
FIGURE 1 UltraSPARC III Cu CPU Module
Sun Blade 1000 and Sun Blade 2000 UltraSPARC III Cu CPU Module Installation Guide 3
Page 12

Sun Blade 1000 and Sun Blade 2000 UltraSPARC III Cu CPU Module Installation Guide
To install an UltraSPARC III Cu CPU module(s) in a Sun Blade 1000 or Sun Blade
2000 workstation, perform the following installation procedure.
Note – To install an UltraSPARC III 600, 750, or 900 MHz non Cu CPU module in a
Sun Blade 1000 workstation, see the “Sun Blade 1000 UltraSPARC III Module
Installation Instructions”, 816-0416-11.
Preparing for Installation
This section describes how to:
■ Power off the workstation
■ Remove the access panel
■ Attach an antistatic wrist strap
Note – If you are returning a used CPU module to Sun Microsystems, return the
used CPU module in the shipping box and packing materials that came with your
new or replacement CPU module.
Powering Off the Workstation
Caution – Prior to turning off power to the workstation, save, back up, and close
any open files. Notify any affected users that you are powering off your workstation.
1. To power off the workstation:
a. If the Solaris OS is running in a windowing environment:
i. Press and release the front panel power switch (see
automatically shut down all programs and the operating system, and to
power off the workstation.
4 Sun Blade 1000 and Sun Blade 2000 UltraSPARCTMIII Cu Module Installation Guide • January 2002
FIGURE 2) to
Page 13

ii. From the menu displayed on the system monitor, select “Shutdown”.
Sun Blade 1000 and Sun Blade 2000 UltraSPARC III Cu CPU Module Installation Guide 5
Page 14
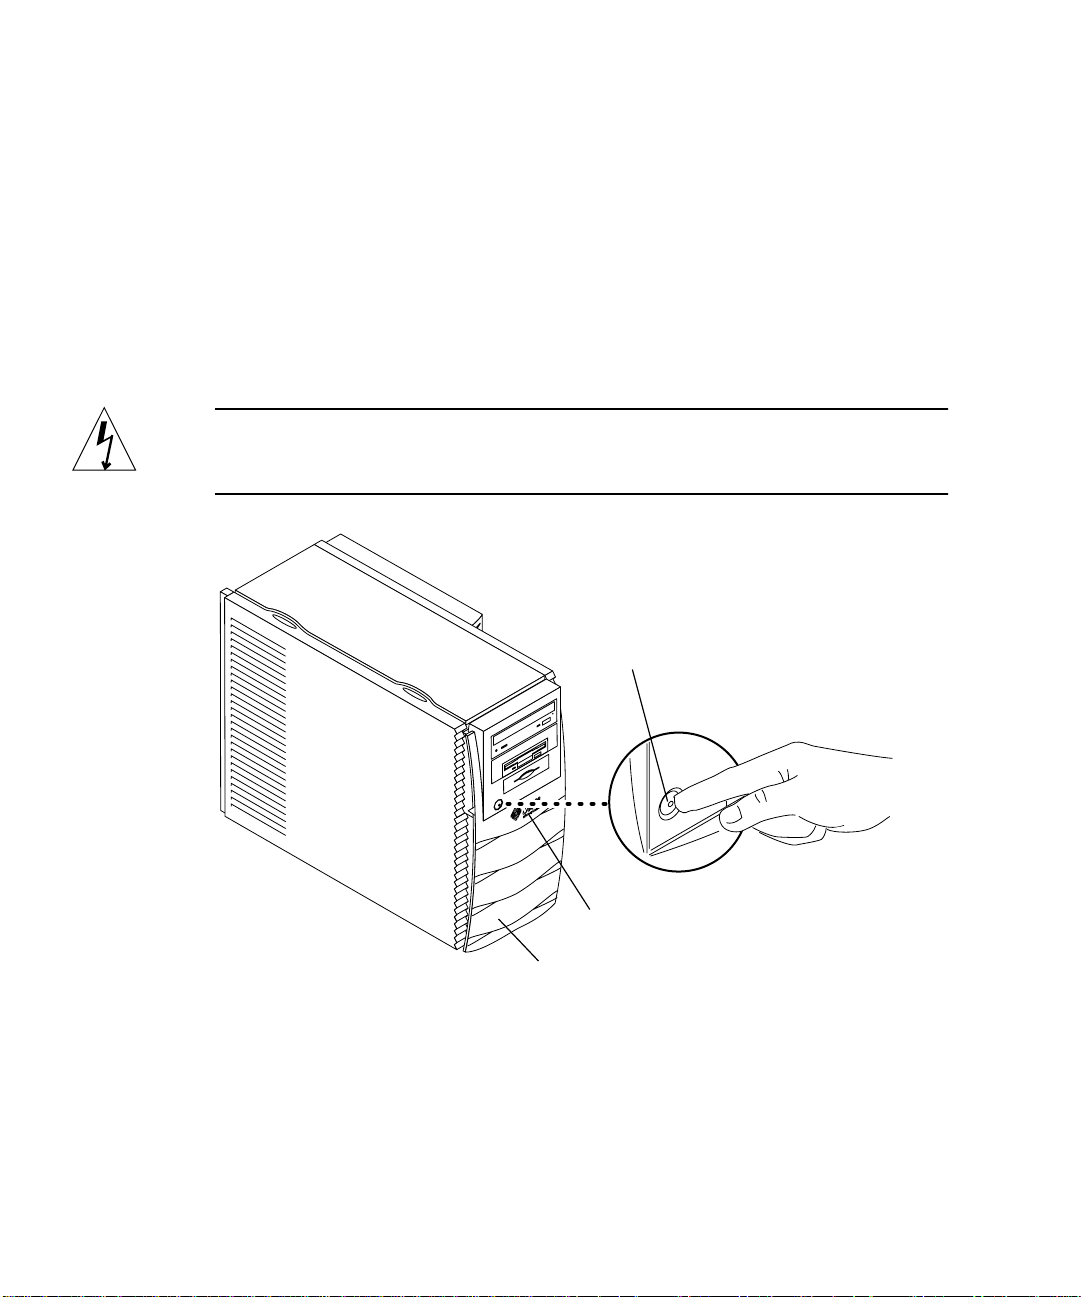
b. If the Solaris OS is not running in a windowing environment:
i. Press the front panel power switch (see
FIGURE 2) to power off the
workstation.
This action automatically shuts down the operating system, all software
programs, and it powers off the workstation.
c. If the system is at the ok prompt (OpenBoot interface), press and hold the front
panel power switch for four seconds (see
FIGURE 2) to power off the
workstation.
This action forces an immediate power off of the workstation. Any unsaved data
is lost.
Caution – Pressing the power switch does not remove all power from the
workstation. A trickle current remains in the power supply. To remove all power
from the workstation, disconnect the power cord.
Power switch
Sun logo
Front panel
FIGURE 2 Workstation Power Switch
2. Verify the following:
a. The backlit Sun logo on the front panel is off.
b. The workstation fans are not spinning.
6 Sun Blade 1000 and Sun Blade 2000 UltraSPARCTMIII Cu Module Installation Guide • January 2002
Page 15
3. Turn off power to the monitor and other external peripherals.
4. Disconnect the cables for any peripheral equipment.
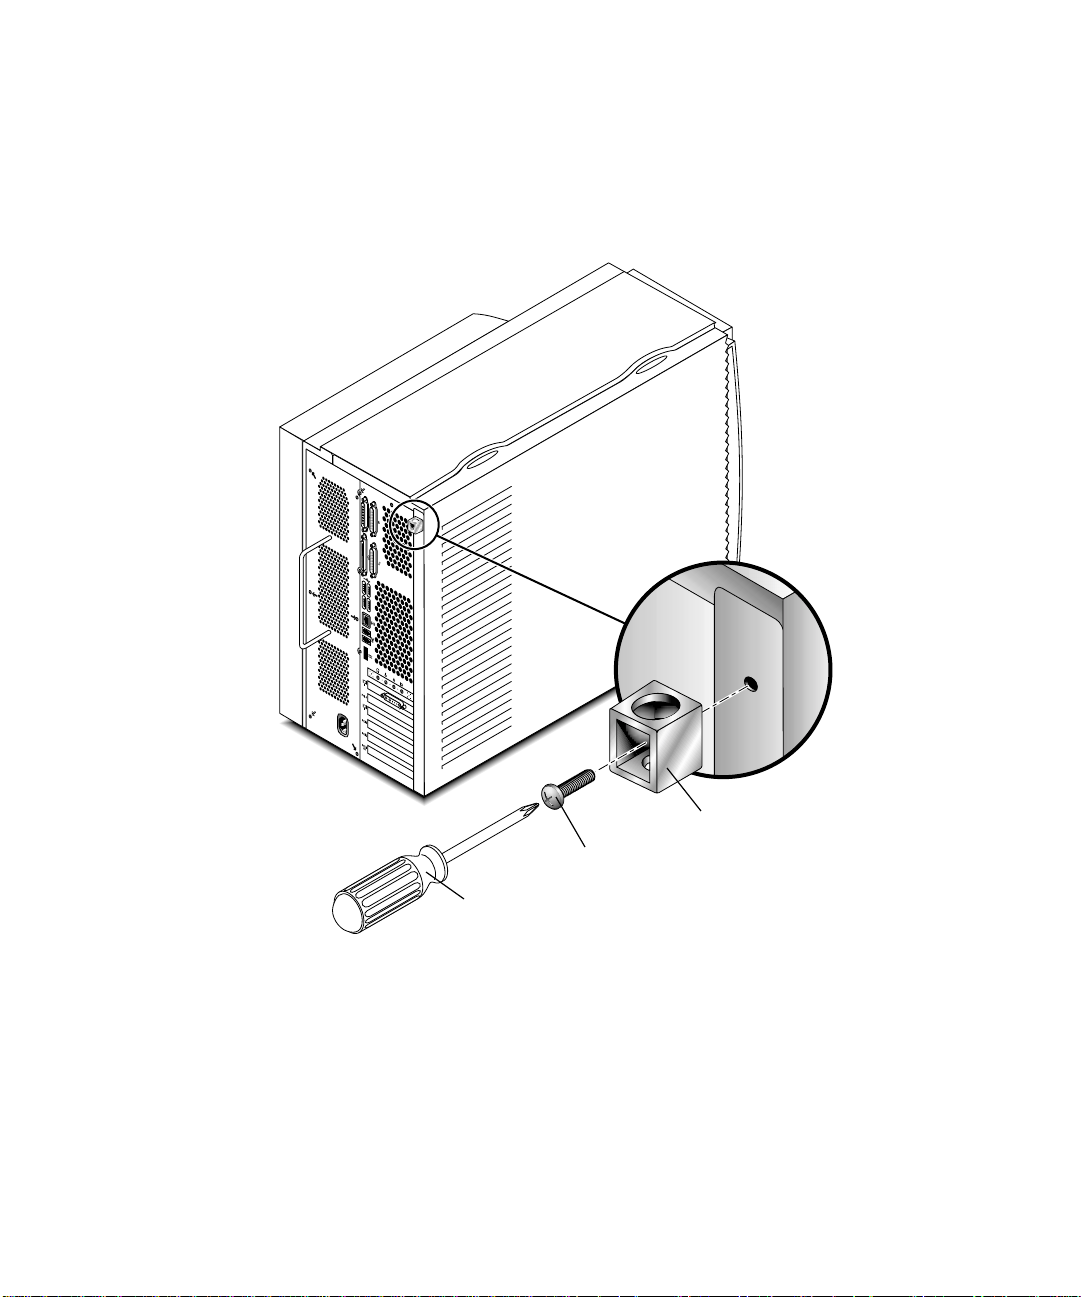
5. Remove the lock block, if one is installed (see
FIGURE 3).
If necessary, use a Phillips screwdriver to remove the screw and lock block.
Phillips
screwdriver
FIGURE 3 Removing the Lock Block
Sun Blade 1000 and Sun Blade 2000 UltraSPARC III Cu CPU Module Installation Guide 7
Lock block
Screw
Page 16

Removing the Access Panel
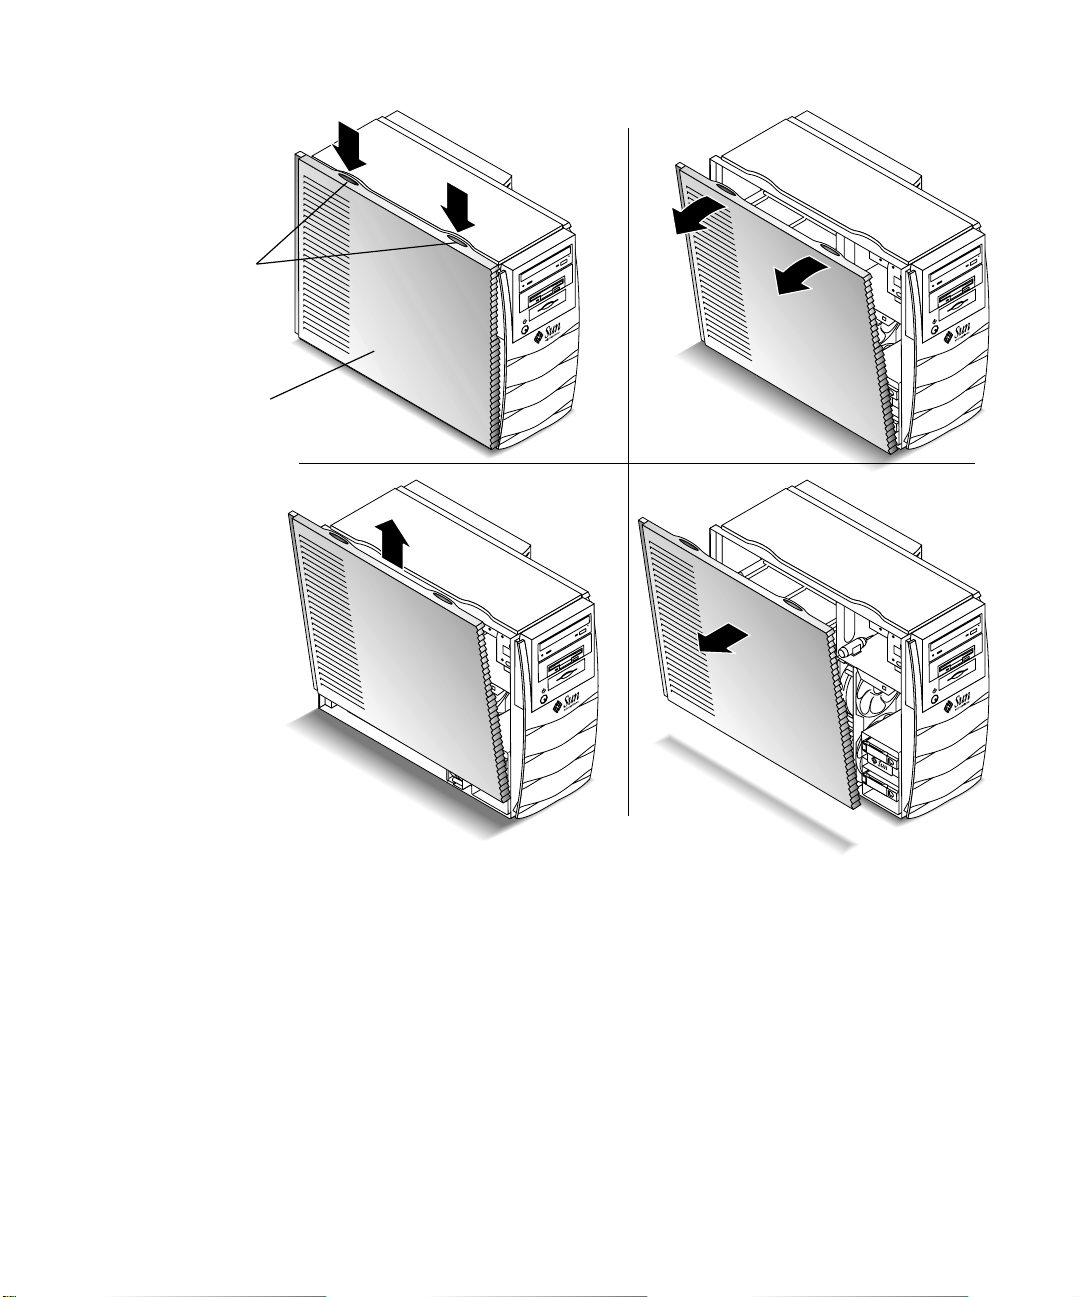
To remove the access panel (see FIGURE 4):
Note – If the power cord is connected, removal of the access panel will activate the
workstation power interlock circuit. This safety mechanism prevents all DC voltages
(except +5 VDC standby power) from reaching any internal components.
1. Press down on the two depressions at the top of the access panel (see
2. Tilt the top of the access panel about an inch away from the chassis.
3. Lift the access panel up.
4. Lift the access panel off.
FIGURE 4).
8 Sun Blade 1000 and Sun Blade 2000 UltraSPARCTMIII Cu Module Installation Guide • January 2002
Page 17
Depression(2)
Access panel
1
2
3
FIGURE 4 Removing the Access Panel
4
Sun Blade 1000 and Sun Blade 2000 UltraSPARC III Cu CPU Module Installation Guide 9
Page 18
Attaching the Disposable Antistatic Wrist Strap
Caution – Wear an antistatic wrist strap and use an antistatic mat when handling
Sun Blade 1000 and Sun Blade 2000 components. Before servicing or removing
workstation components, attach the strap to your wrist and then to a metal area on
the chassis. Then disconnect the power cord from the workstation and the wall
receptacle. Following this caution equalizes all electrical potentials within the
workstation.
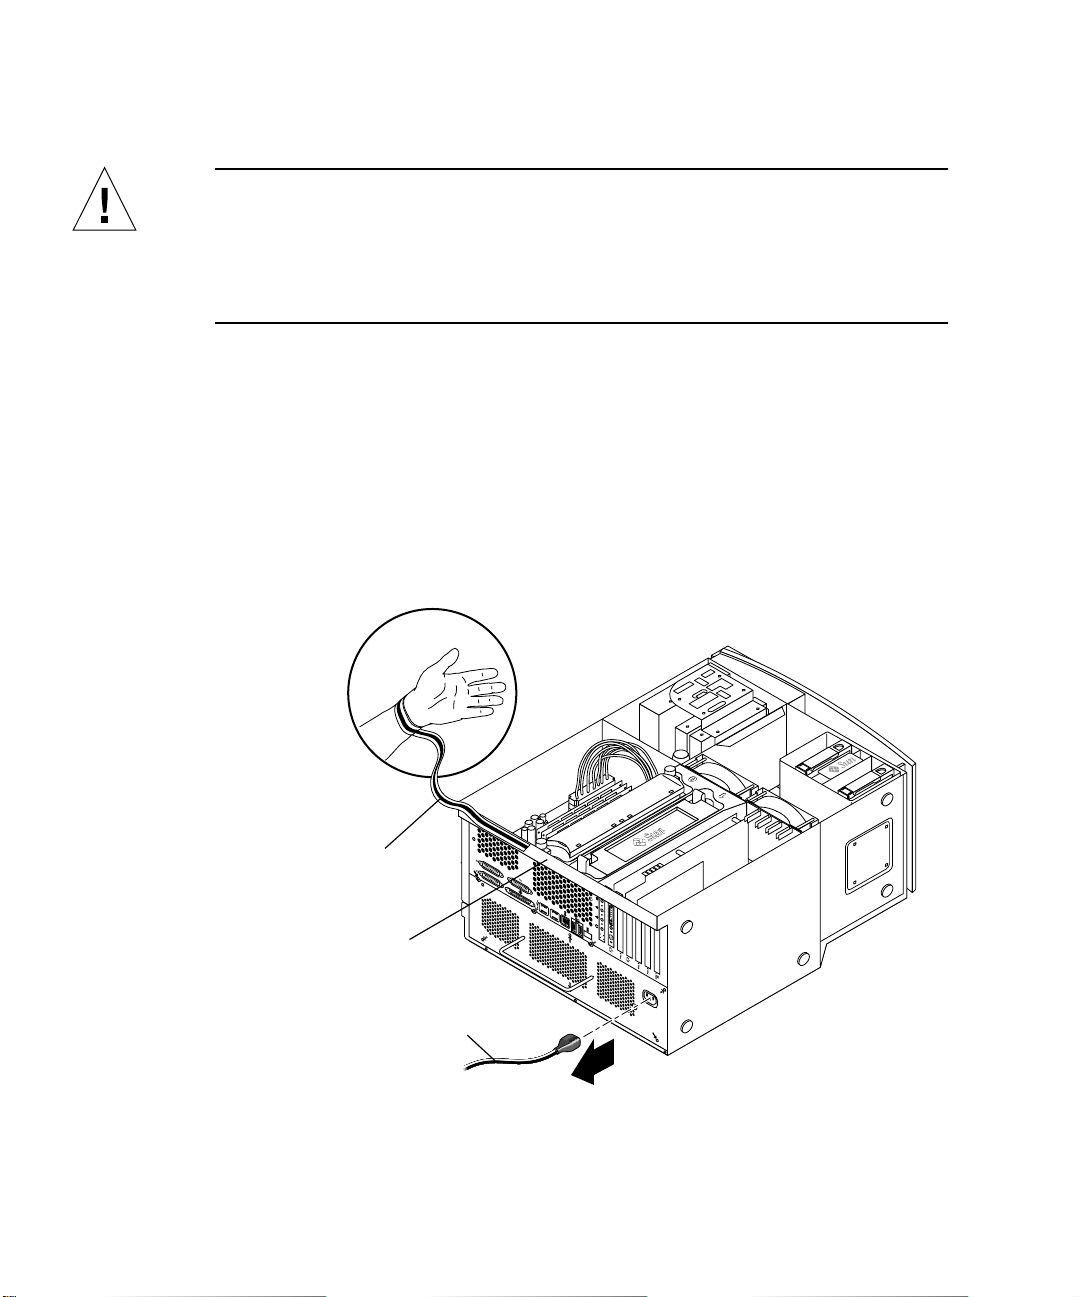
1. Place the workstation on its side on a work surface, open side facing up (see
FIGURE 5).
2. Unwrap the first two folds of the disposable antistatic wrist strap and wrap the
adhesive side firmly against your wrist.
3. Peel the liner from the copper foil at the opposite end of the wrist strap.
4. Attach the copper end of the wrist strap to the chassis (see
5. Disconnect the power cord.
Antistatic wrist strap
Chassis
Power cord
FIGURE 5).
FIGURE 5 Attaching the Antistatic Wrist Strap to the Chassis
10 Sun Blade 1000 and Sun Blade 2000 UltraSPARCTMIII Cu Module Installation Guide • January 2002
Page 19

About UltraSPARC III CPU Modules
The UltraSPARC III CPU module is a high-performance, highly-integrated
superscalar processor implementing SPARC-V9 64-bit reduced instruction set
computer (RISC) architecture. The CPU module has been updated and improved to
further advance reliability, availability, scalability, and serviceability features of the
UltraSPARC III Cu CPU module.
Note – There are now two types of UltraSPARC III CPU modules: the UltraSPARC
III 600, 750, or 900 MHz CPU modules and the UltraSPARC III Cu CPU modules.
Note – UltraSPARC III Cu CPU modules are marked “USIII Cu” (see FIGURE 1).
The workstation’s motherboard provides slots for two UltraSPARC III CPU modules.
Each processor module includes one CPU chip with an integrated memory cache for
data and instructions, as well as up to 8 Mbytes of external static random access
memory (SRAM) cache memory.
The CPU modules communicate with the workstation’s main memory and I/O
subsystem via the workstation’s high-speed data bus. The workstation CPU modules
are automatically synchronized with the system bus that runs at clock speeds up to
150 MHz.
Configuration Rules
The following configuration rules apply to both UltraSPARC III and UltraSPARC III
Cu CPU modules used in the Sun Blade 1000 and Sun Blade 2000 workstations:
■ You can install one or two UltraSPARC III CPU modules into the workstation
motherboard.
■ Always insert the first CPU module into CPU (processor) slot 0 (connectors J0501
and J0601).
■ If a second CPU module is to be installed, install the second CPU module into
CPU (processor) slot 1 (connectors J0701 and J0801).
■ If you wish to install more than one UltraSPARC III 600, 750, or 900 MHz CPU
module, you can. The speed of the modules does not need to be identical.
■ If you wish to install more than one UltraSPARC III Cu CPU module you can.
However, the speed of the modules must be identical.
Sun Blade 1000 and Sun Blade 2000 UltraSPARC III Cu CPU Module Installation Guide 11
Page 20

Note – Never mix an UltraSPARC III 600, 750, or 900 MHz CPU module with an
UltraSPARC III Cu CPU module. If the modules are mixed, the workstation will not
boot.
Note – UltraSPARC III Cu CPU modules are marked “USIII Cu” (see FIGURE 1).
12 Sun Blade 1000 and Sun Blade 2000 UltraSPARCTMIII Cu Module Installation Guide • January 2002
Page 21
CPU Module Positions in the Workstation
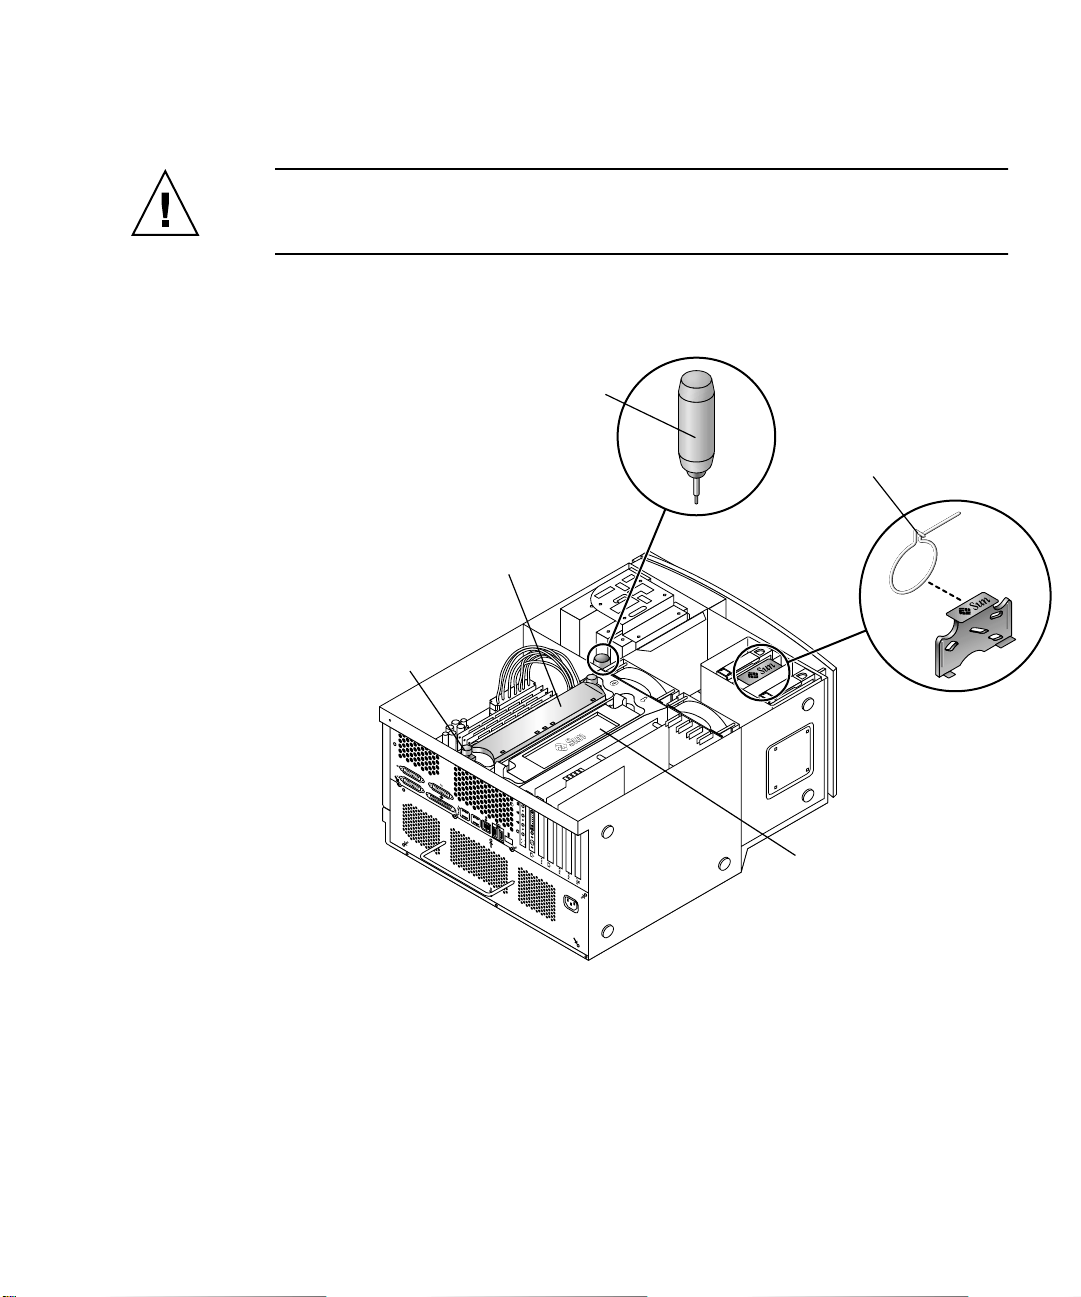
Caution – The slot positions of the two UltraSPARC III CPU modules are shown in
FIGURE 6. The position shown in figure 6 as “CPU processor slot 0” is the required
position for all workstations that contain only one CPU.
The CPU modules are enclosed in a cooling shroud and secured to the shroud with
captive screws that must be torqued to specific values.
Torque tool A
Torque tool B
CPU processor slot 0
Captive
FIGURE 6 Location of CPU Processor Slot 0, Captive Screws, and Torque Tools
screw(2)
CPU processor slot 1
Sun Blade 1000 and Sun Blade 2000 UltraSPARC III Cu CPU Module Installation Guide 13
Page 22
Removing a CPU Module
1. If necessary, place the workstation on its side on a work surface, open side facing
up (see
2. Remove torque tool A or torque tool B from its holder.
Note – Sun manufacturing installs torque tool A or torque tool B in Sun Blade 1000
and Sun Blade 2000 workstations. The torque tools are located in different locations
in the workstation (see FIGURE 6).
FIGURE 6).
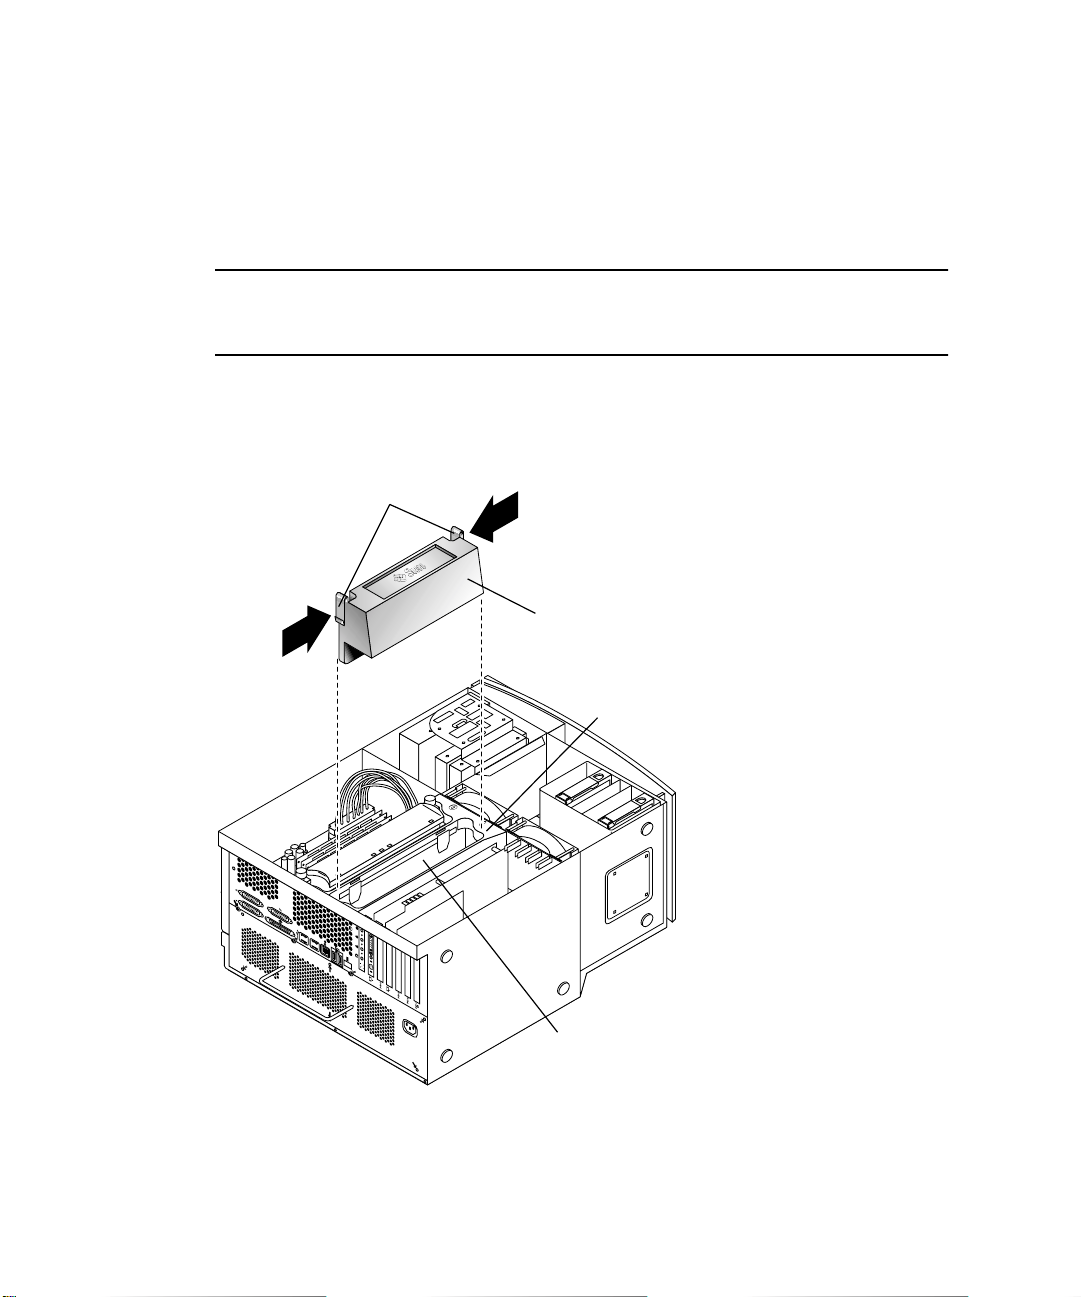
3. If necessary, remove the filler panel (see
FIGURE 7).
Squeeze the two tabs on the filler panel to release it from the cover for the CPU
shroud.
Tab (2)
Filler panel
Cover for the CPU
shroud
CPU Shroud
FIGURE 7 Removing the Filler Panel
14 Sun Blade 1000 and Sun Blade 2000 UltraSPARCTMIII Cu Module Installation Guide • January 2002
Page 23
4. Complete one of the following steps:
Your selection depends on whether you are replacing an existing UltraSPARC III Cu
CPU module or installing an additional UltraSPARC III Cu CPU module into an
unused CPU processor slot.
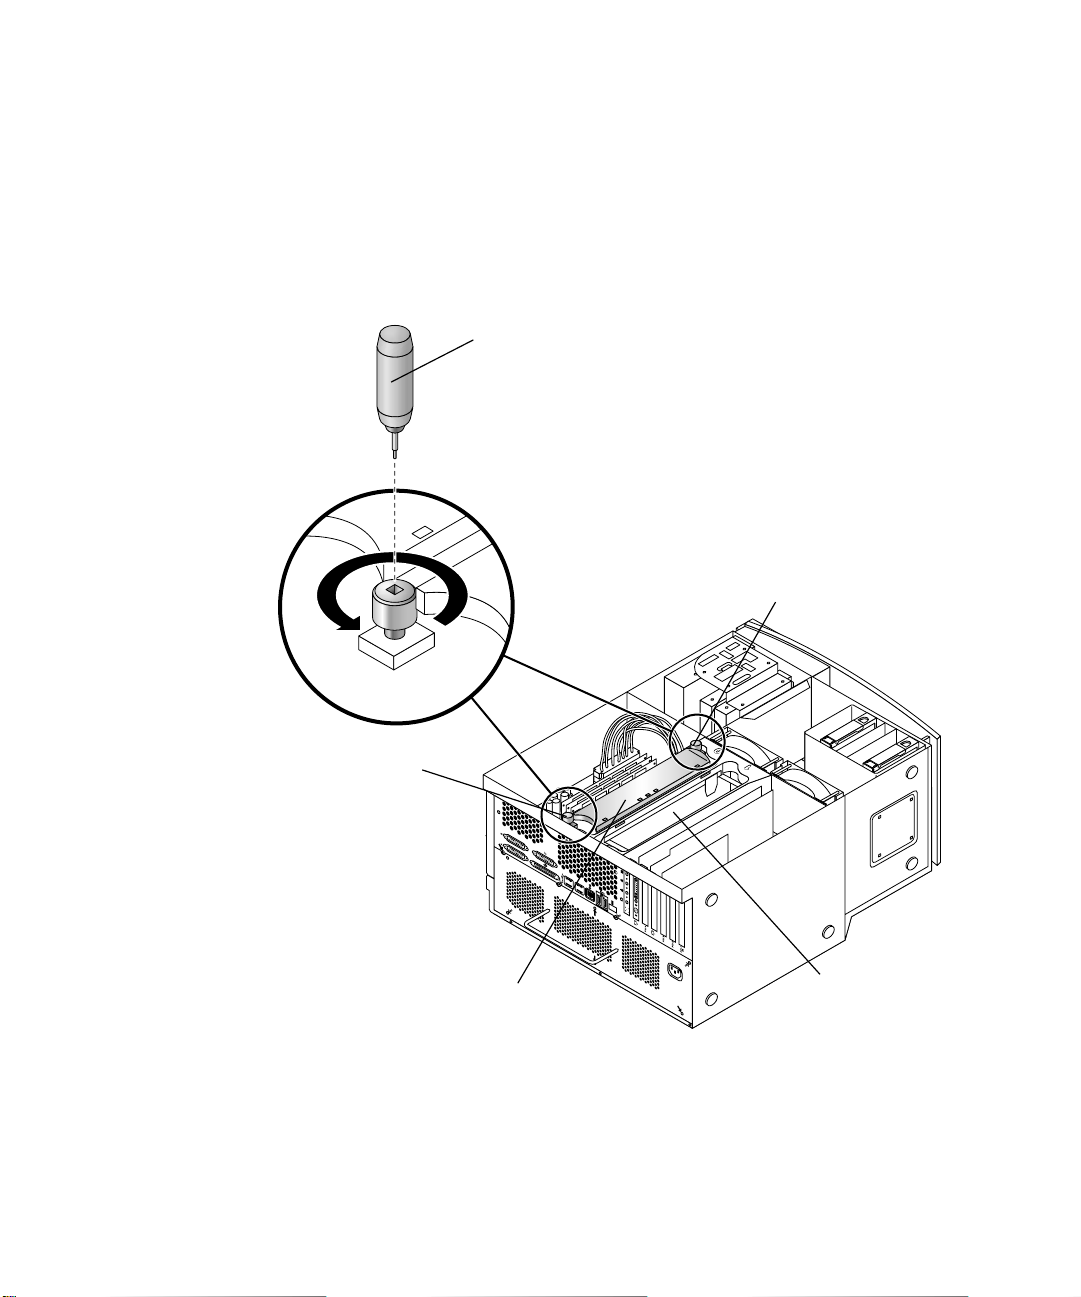
■ If you are replacing an existing module and have torque tool A, perform Step 5.
■ If you are replacing an existing module and have torque tool B, perform Step 6.
■ If you are installing an additional CPU module, perform Step 7.
Torque tool A
Right captive screw
Left captive
screw
CPU module
FIGURE 8 Using Torque Tool A to Remove the CPU Module
Shroud
5. To remove an existing CPU module using torque tool A:
a. Alternately rotate the left and right captive screws one turn counterclockwise
until the screws are free of the threaded inserts (see
Sun Blade 1000 and Sun Blade 2000 UltraSPARC III Cu CPU Module Installation Guide 15
FIGURE 8).
Page 24

Caution – Do not touch the board for the CPU module or its components. Touch
only the captive screws and plastic top cover of the module to avoid damaging
module components by electrostatic discharge (see FIGURE 11).
b. Use both hands to lift the CPU module out of the shroud.
c. Place the CPU module on an antistatic mat with the heat sink on the top facing
up. Proceed to “Installing a New CPU Module” on page 19.
16 Sun Blade 1000 and Sun Blade 2000 UltraSPARCTMIII Cu Module Installation Guide • January 2002
Page 25
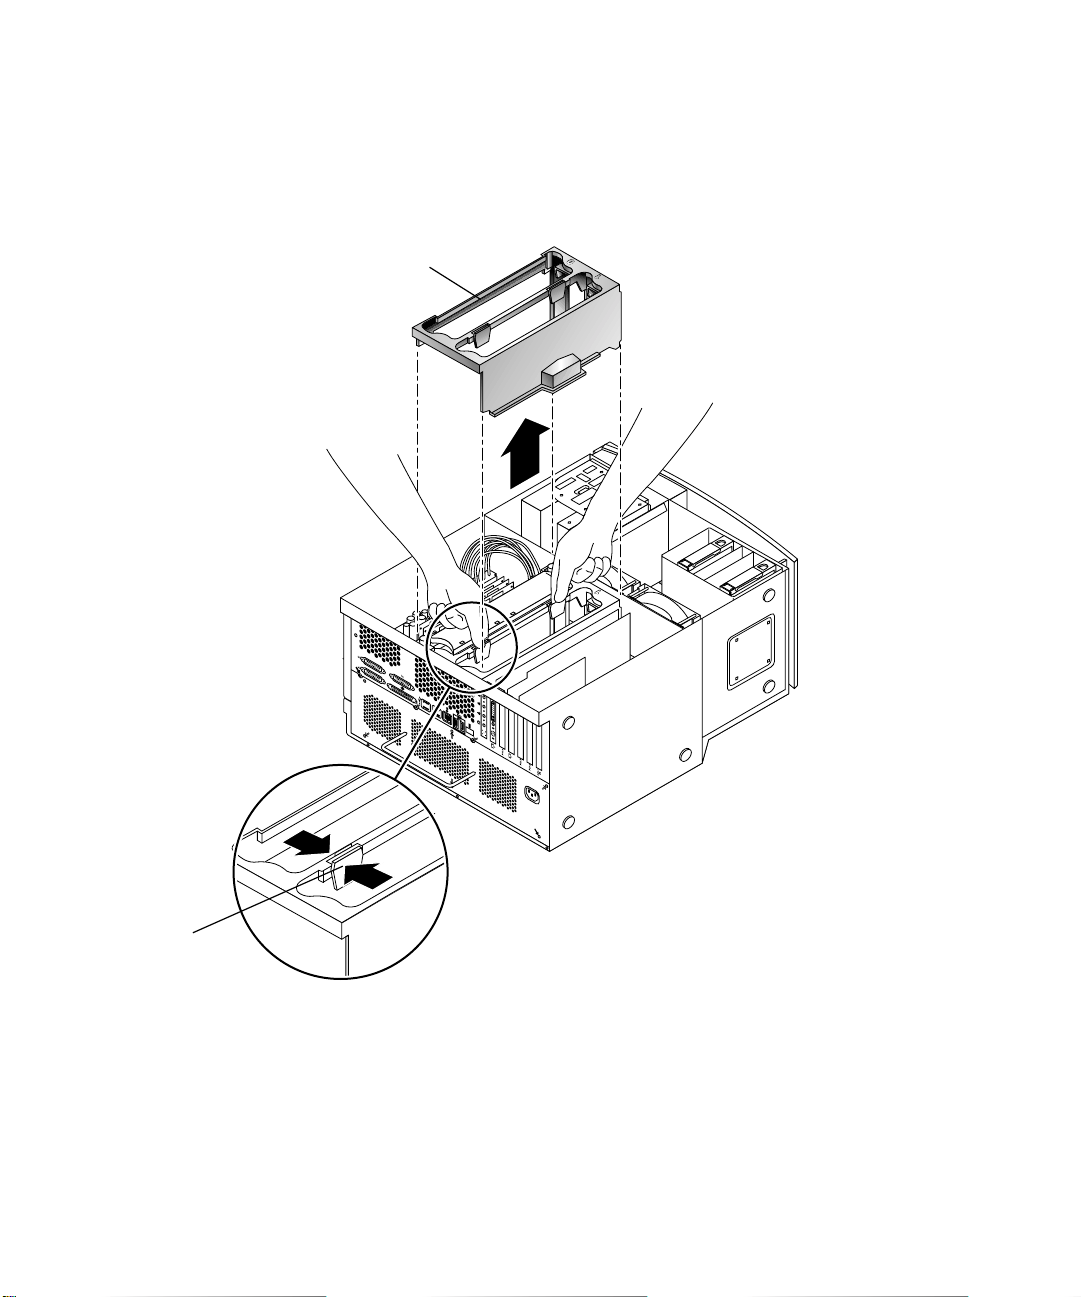
6. To remove an existing CPU module using torque tool B:
a. Remove the cover for the CPU shroud (see
Squeeze the two tabs to release the cover for the CPU shroud from the
motherboard.
Cover for the CPU shroud
FIGURE 10).
Tab(2)
FIGURE 9 Removing the CPU Shroud
b. Alternately rotate the left and right captive screws one turn counterclockwise
until the screws are free of the threaded inserts (see
Sun Blade 1000 and Sun Blade 2000 UltraSPARC III Cu CPU Module Installation Guide 17
FIGURE 10).
Page 26
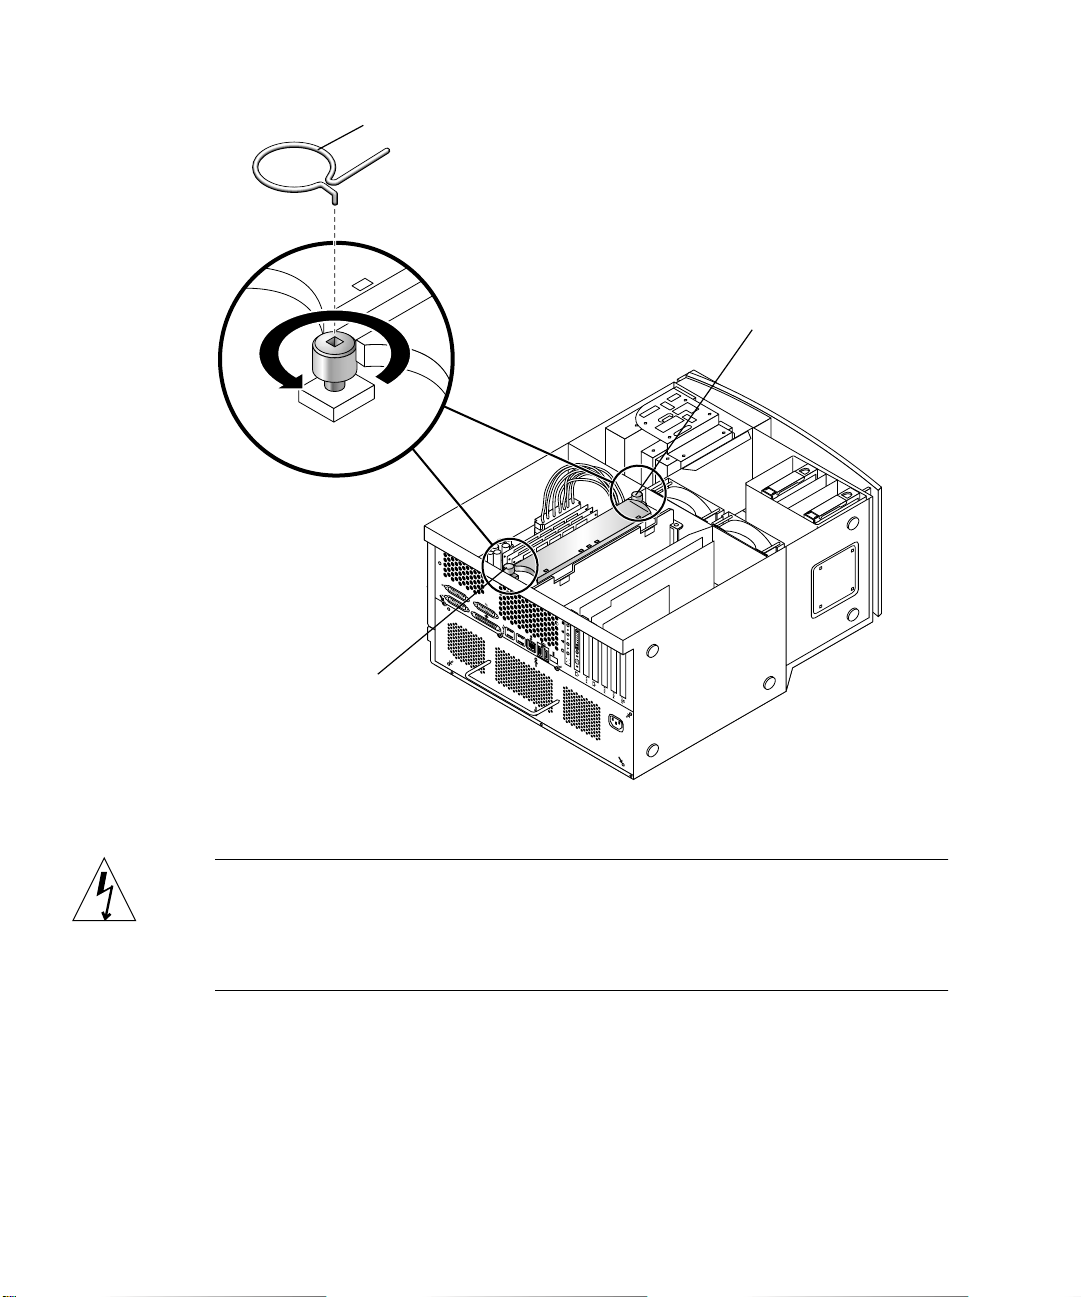
Left captive
screw
Torque tool B
Right captive screw
FIGURE 10 Using Torque Tool B to Remove the CPU Module
Caution – As you remove the module from the shroud, handle it only by its
captive screws. Do not touch the connectors on the bottom edge of the module or the
electrical components on the module. The connectors and the components for the
module are easily bent or damaged by improper handling and by electrostatic
discharge (see FIGURE 11).
c. Use both hands to lift the CPU module out of the shroud.
d. Place the CPU module on an antistatic mat with the heat sink on the top facing
up.
7. Proceed to “Installing a New CPU Module” on page 19.
18 Sun Blade 1000 and Sun Blade 2000 UltraSPARCTMIII Cu Module Installation Guide • January 2002
Page 27

Installing a New CPU Module
Caution – Perform the procedures described in Table 1 when unpacking a new CPU
module from its packing carton.
TABLE1 CPU Module Handling Procedures
Step Description
1 Use proper ESD grounding techniques when handling components.
Wear an antistatic wrist strap and use an antistatic mat. Store ESDsensitive components in antistatic bags before placing them on any
surface.
2 When you remove the CPU module from its packing carton, use
both hands to support the module along its sides.
3 As you remove the module from its antistatic bag, handle it only by
its captive screws. Do not touch the connectors on the bottom edge
of the module. The connectors for the module are easily bent or
damaged by improper handling.
4 Do not remove the plastic cover from the CPU module connectors
until you are ready to install the module into the workstation.
5 Do not grip the module by the heat sink.
Sun Blade 1000 and Sun Blade 2000 UltraSPARC III Cu CPU Module Installation Guide 19
Page 28
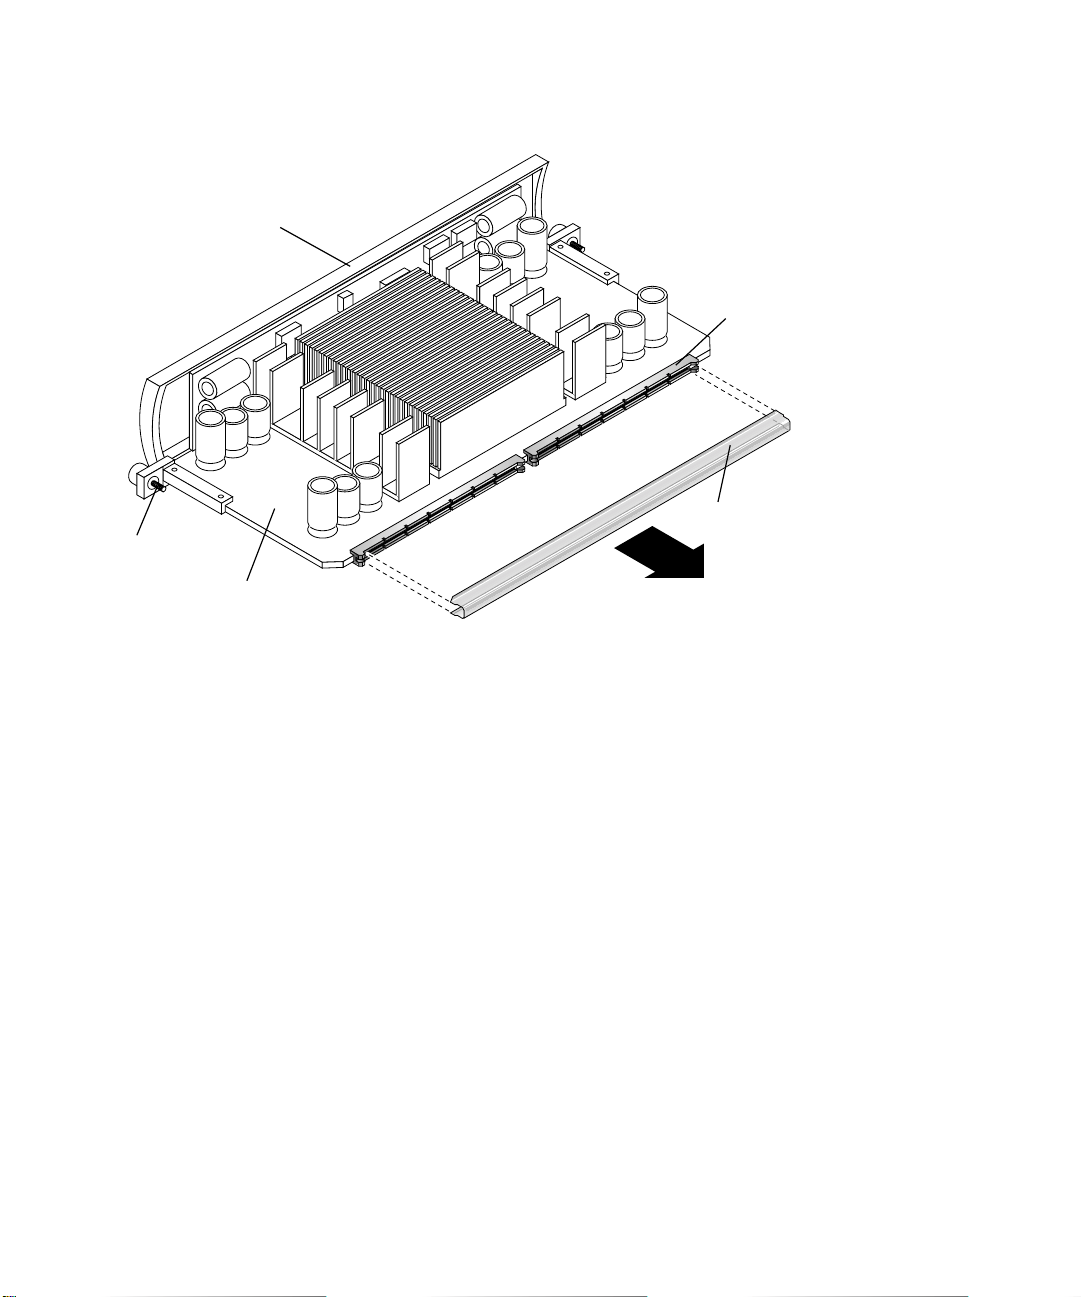
1. Remove the plastic cover from the CPU module connector (see FIGURE 11).
Plastic top cover
Captive screw(2)
CPU module
connector(2)
Plastic cover
CPU module
FIGURE 11 Removing the Plastic Cover From the CPU Module Connectors
20 Sun Blade 1000 and Sun Blade 2000 UltraSPARCTMIII Cu Module Installation Guide • January 2002
Page 29
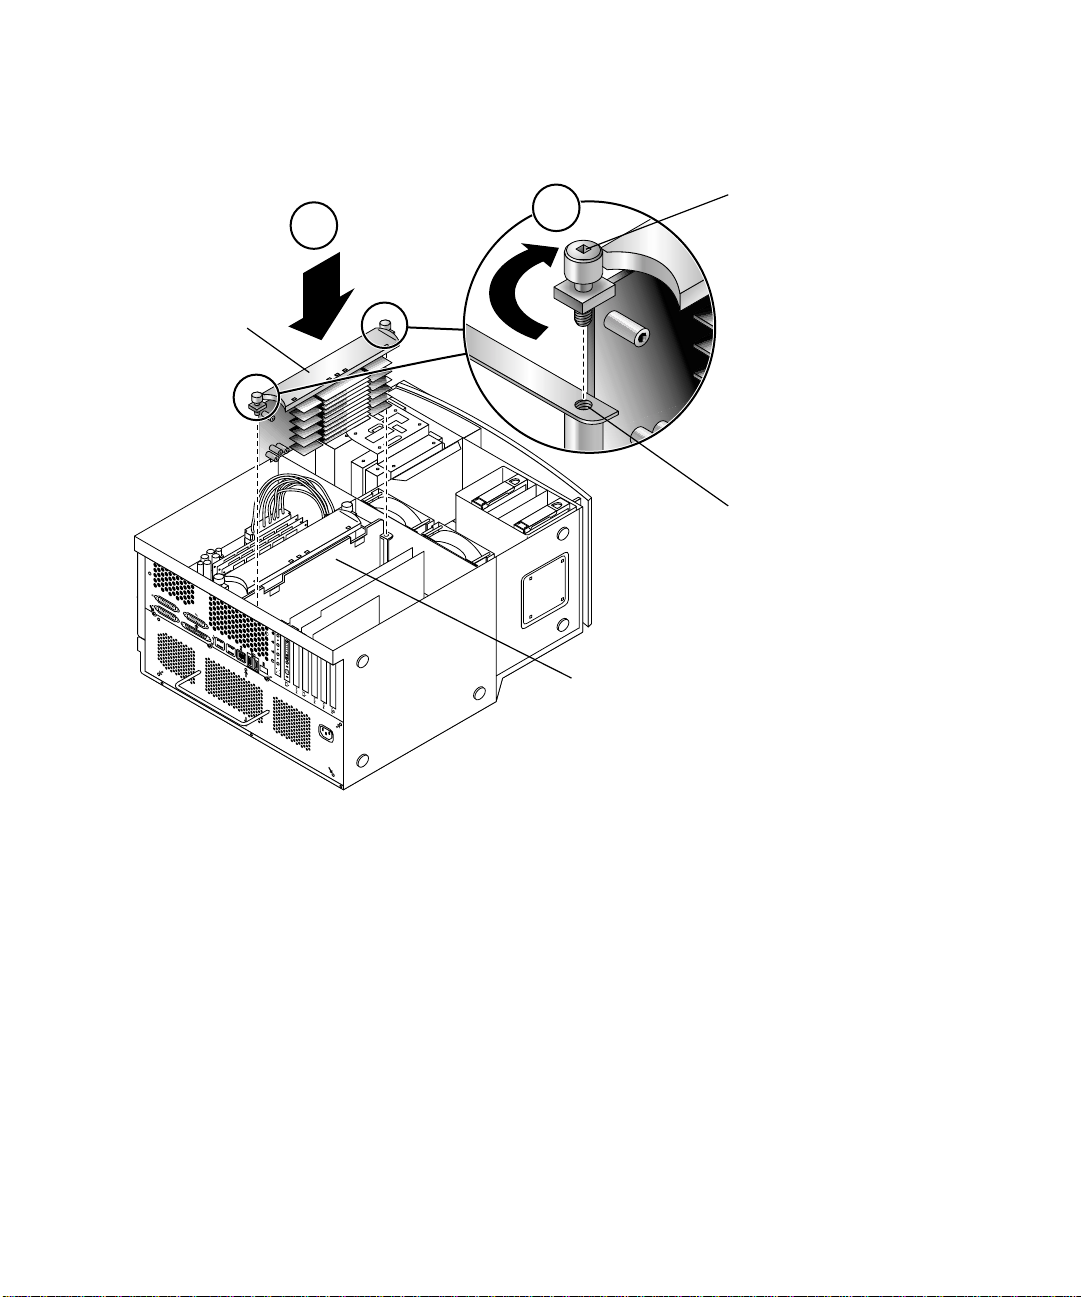
CPU module
2. Lower the CPU module into the CPU shroud until the captive screws are aligned
with the 2 threaded inserts (see
FIGURE 12).
2
Captive
screw(2)
1
Threaded
inserts(2)
CPU shroud
FIGURE 12 Lowering the CPU Module Into the Threaded Inserts
3. Tighten both captive screws by hand until the screws contact the threaded inserts
of the CPU shroud.
Once the CPU module is seated, surface contact between the captive screws and the
threaded inserts of the shroud typically occurs in less than one turn of both l eft and
right captive screws.
Sun Blade 1000 and Sun Blade 2000 UltraSPARC III Cu CPU Module Installation Guide 21
Page 30
4. Do one of the following:
a. If you have torque tool A, perform steps 10-16 (see
b. If you have torque tool B, perform steps 5-9 and 14-16 (see
FIGURE 6)
FIGURE 6).
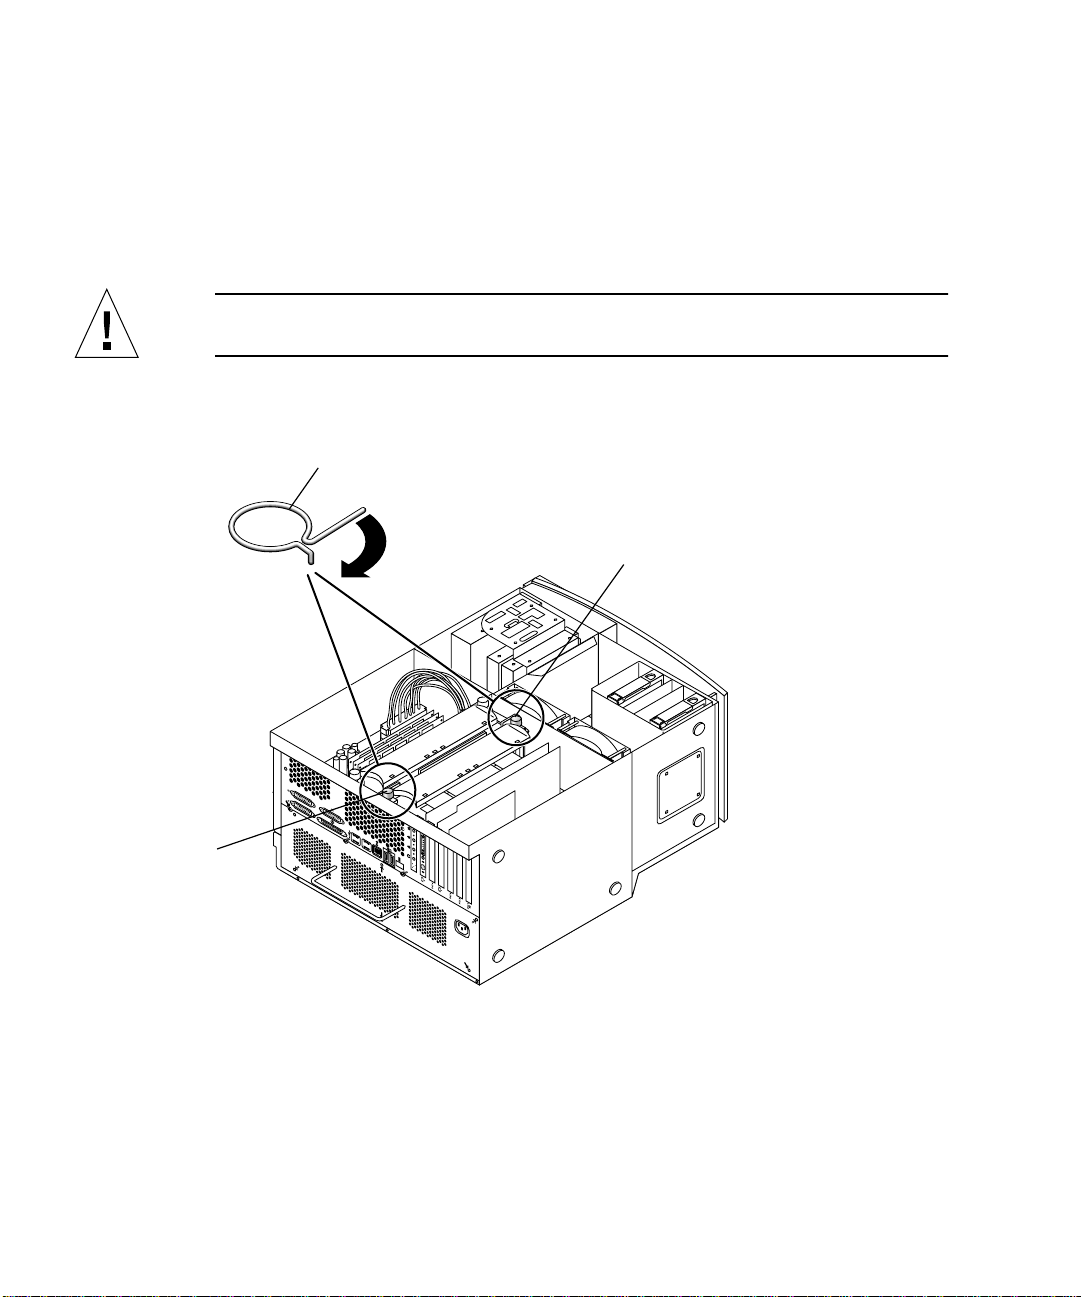
5. Use torque tool B to rotate the left captive screw one turn clockwise (see
FIGURE 13).
Caution – Do not use a torque tool from another Sun product. The Sun Blade 1000
and Sun Blade 2000 torque tools are specifically designed for your workstation.
6. Use torque tool B to rotate the right captive screw one turn clockwise (see
FIGURE 13).
Torque tool B
Right captive screw
Left captive screw
FIGURE 13 Alternately Rotating Left and Right Captive Screws One Turn Clockwise
22 Sun Blade 1000 and Sun Blade 2000 UltraSPARCTMIII Cu Module Installation Guide • January 2002
Page 31
Caution – Under-torquing the CPU module captive screws may cause a loss of
contact between the CPU module and the motherboard connector. This may cause
failure of the workstation to boot. Over-torquing the CPU module captive screws
may cause severe damage to the module and a potential workstation failure.
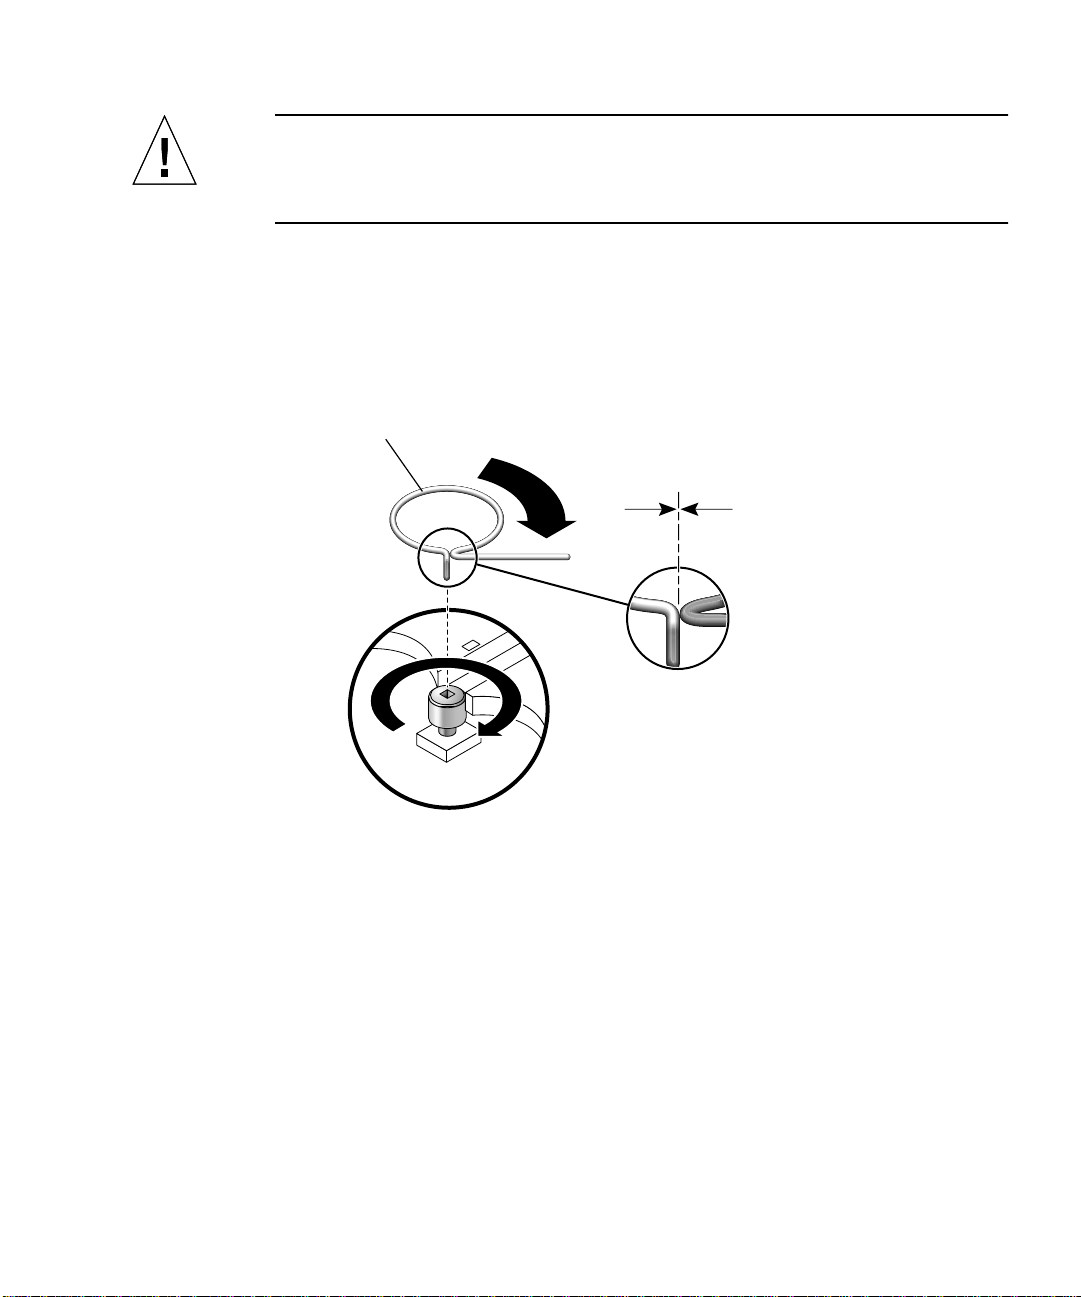
7. Repeat Step 5 and Step 6 until the gap for torque tool B is 0.0 inches (0.0 mm.) (see
FIGURE 14).
Use the torque tool to alternately tighten the left and right captive screws to the
correct torque. Always rotate the left captive screw one turn clockwise and then
rotate the right captive screw one turn clockwise. This assures that a uniform and
even torque is applied to the CPU module.
Torque tool B
0.0 inches
FIGURE 14 Adjusting Torque Tool B Until the Gap is 0.0 Inches (0.0 mm.)
0.0 mm
8. Return torque tool B to its green plastic holder, then return the holder to its
storage location in the hard drive bracket.
9. If necessary install the cover for the CPU shroud (see
FIGURE 15).
Sun Blade 1000 and Sun Blade 2000 UltraSPARC III Cu CPU Module Installation Guide 23
Page 32
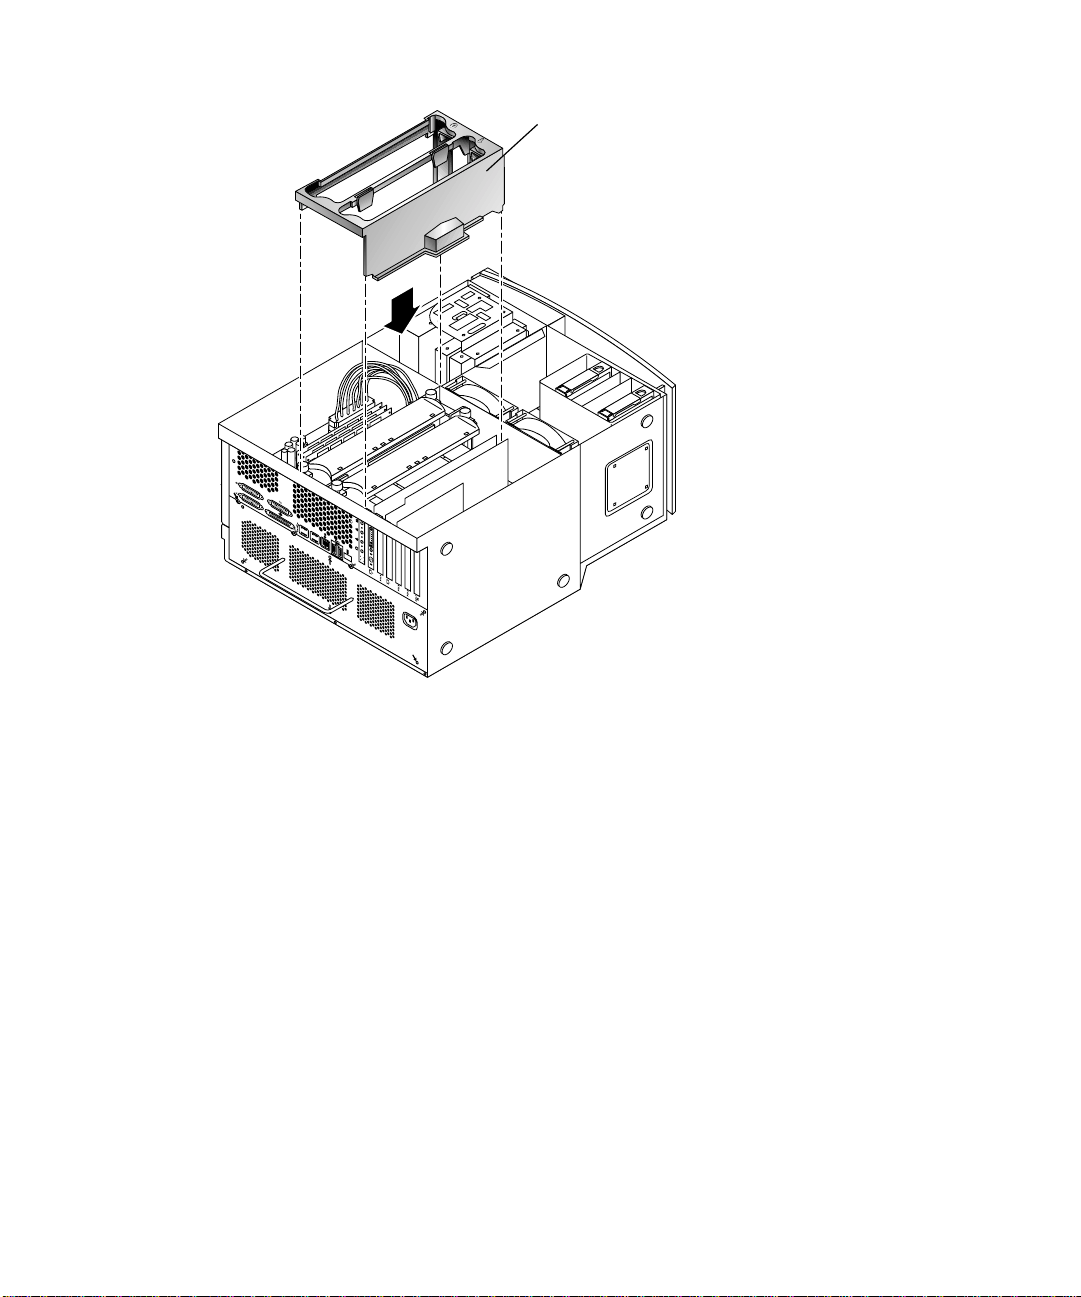
Cover for the
CPU shroud
FIGURE 15 Installing the Cover for the Shroud
24 Sun Blade 1000 and Sun Blade 2000 UltraSPARCTMIII Cu Module Installation Guide • January 2002
Page 33
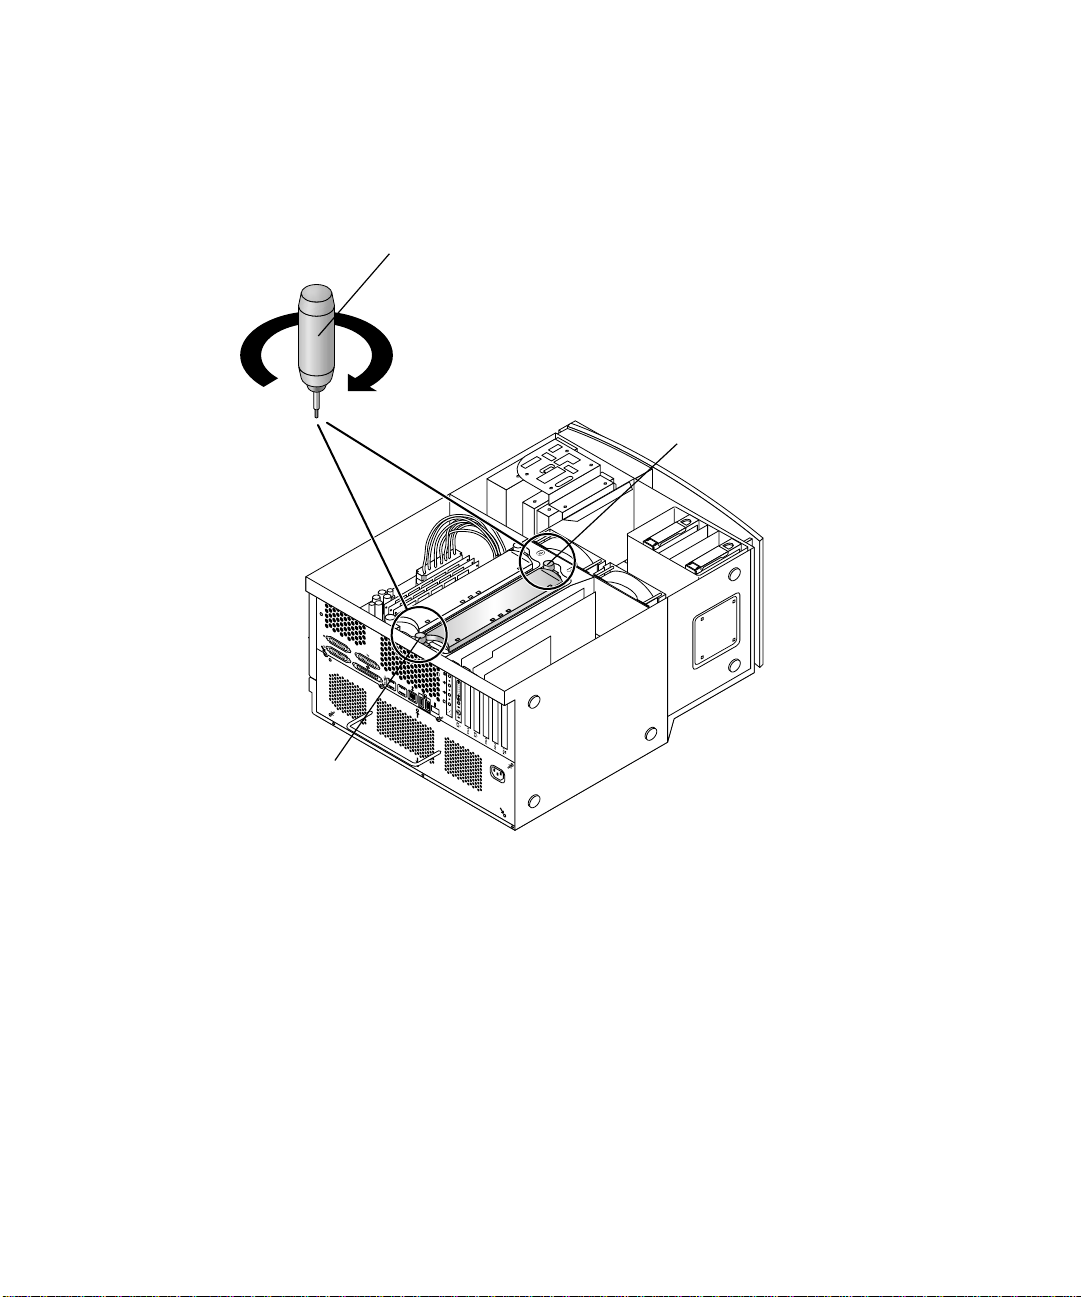
10. Use torque tool A to rotate the left captive screw one turn clockwise (see
FIGURE 16).
11. Use torque tool A to rotate the right captive screw one turn clockwise (see
FIGURE 16).
Torque tool A
Right captive screw
Left captive screw
FIGURE 16 Alternately Rotating Left and Right Captive Screws One Turn Clockwise
12. Repeat steps 10 and 11 until torque tool A clicks (see FIGURE 17).
Seating occurs when both captive screws are evenly torqued to 5 inch-lbs. (58 gramsmeter). Torque tool A will click when this adjustment specification is achieved.
Sun Blade 1000 and Sun Blade 2000 UltraSPARC III Cu CPU Module Installation Guide 25
Page 34
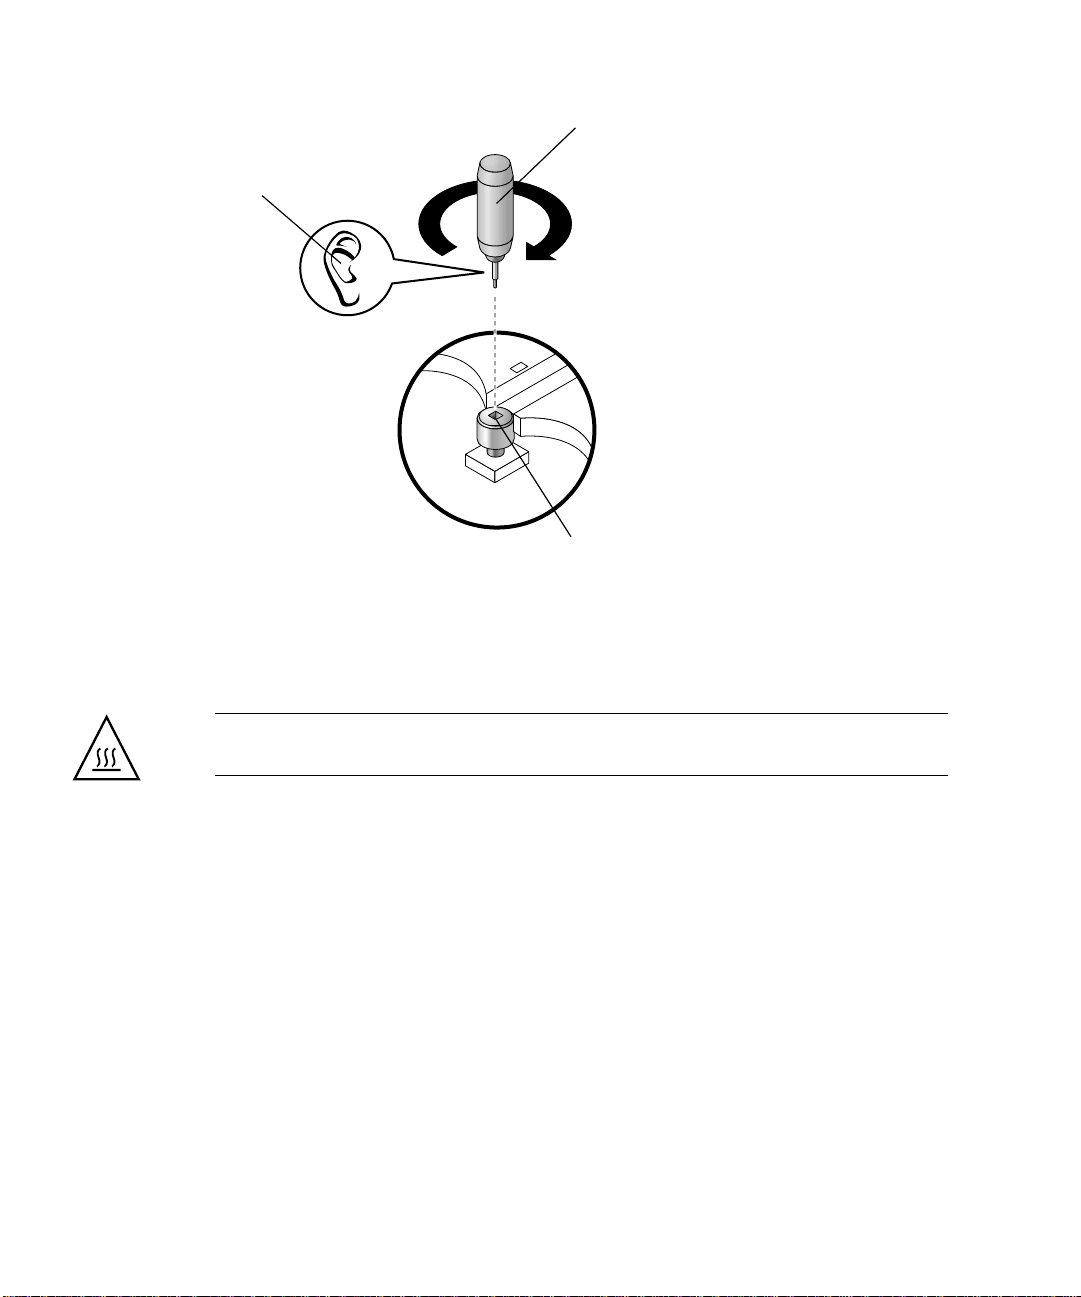
Torque tool A
Click
Captive screw(2)
FIGURE 17 Torque Tool A Clicks When the Captive Screws Are Correctly Torqued
13. Return torque tool A to its storage location in the workstation.
14. If necessary, reinstall the filler panel for the shroud.
Caution – To ensure proper workstation cooling, any unused CPU slot must contain
a filler panel for the shroud (see FIGURE 7).
15. Detach the antistatic wrist strap, replace the access panel, plug in the power cord,
and power on the workstation.
16. Proceed to “Finishing the Installation” on page 27.
26 Sun Blade 1000 and Sun Blade 2000 UltraSPARCTMIII Cu Module Installation Guide • January 2002
Page 35

Finishing the Installation
1. If necessary, remove the antistatic wrist strap from the chassis.
2. If necessary, replace the access panel.
3. If necessary, install a lock block on the back panel of the workstation.
4. Reconnect any cables from external devices to the workstation.
5. Reconnect the workstation power cord.
6. Power on the workstation:
a. Turn on power to the monitor and to all external devices.
b. Press the power switch on the front panel and release it.
c. After several seconds, verify that the power-indicator LED on the power switch
is energized and listen to verify that the workstation fans are operating
(spinning).
7. The workstation should automatically recognize installation of the new CPU
module(s).
Note – Perform a reconfiguration boot ( boot -r ). If the workstation correctly
boots, the CPU module has been correctly installed.
If problems are encountered, verify proper POST operation. See Section 3.4
“Maximum and Minimum Levels of POST” in the Sun Blade 1000 and Sun Blade 2000
Service Manual, 816-3217-10.
Sun Blade 1000 and Sun Blade 2000 UltraSPARC III Cu CPU Module Installation Guide 27
Page 36

For More Information
The Sun Blade 1000 and Sun Blade 2000 Service Manual is available from the following
sources:
■ The manual is shipped with new workstations in HTML and PDF formats on the
Sun Blade 1000 and Sun Blade 2000 Hardware Documentation CD (705-0073-10). The
HTML version of the manual on this CD also includes this CPU replacement
procedure as an animated ShowMe How™ multimedia procedure.
■ HTML and PDF versions of this manual are available for viewing and printing on
the following web site:
http://docs.sun.com
28 Sun Blade 1000 and Sun Blade 2000 UltraSPARCTMIII Cu Module Installation Guide • January 2002
 Loading...