

Page 1

Solaris™ Security Toolkit
4.2 Administration Guide
Sun Microsystems, Inc.
www.sun.com
Part No. 819-1402-10
July 2005, Revision A
Submit comments about this document at: http://www.sun.com/hwdocs/feedback
Page 2

Copyright 2005 Sun Microsystems, Inc. 4150 Network Circle, Santa Clara, California 95054 U.S.A. All rights reserved.
Sun Microsystems, Inc. has intellectual property rights relating to technology that is described in this document. In particular, and without
limitation, these intellectual property rights may include one or more of the U.S. patents listed at http://www.sun.com/patents and one or
more additional patents or pending patent applications in the U.S. and in other countries.
This document and the product to which it pertains are distributed under licenses restricting their use, copying, distribution, and
decompilation. No part of the product or this document may be reproduced in any form by any means without prior written authorization of
Sun and its licensors, if any.
Third-party software, including font technology, is copyrighted and licensed from Sun suppliers.
Parts of the product may be derived from Berkeley BSD systems, licensed from the University of California. UNIX is a registered trademark in
the U.S. and in other countries, exclusively licensed through X/Open Company, Ltd.
Sun, Sun Microsystems, the Sun logo, Sun BluePrints, Solaris, SunOS, Java, JumpStart, Sun4U, SunDocs, and Solstice DiskSuite are service
marks, trademarks, or registered trademarks of Sun Microsystems, Inc. in the United States and other countries.
All SPARC trademarks are used under license and are trademarks or registered trademarks of SPARC International, Inc. in the U.S. and in other
countries. Products bearing SPARC trademarks are based upon an architecture developed by Sun Microsystems, Inc. ORACLE is a registered
trademark of Oracle Corporation.
The OPEN LOOK and Sun™ Graphical User Interface was developed by Sun Microsystems, Inc. for its users and licensees. Sun acknowledges
the pioneering efforts of Xerox in researching and developing the concept of visual or graphical user interfaces for the computer industry. Sun
holds a non-exclusive license from Xerox to the Xerox Graphical User Interface, which license also covers Sun’s licensees who implement OPEN
LOOK GUIs and otherwise comply with Sun’s written license agreements.
U.S. Government Rights—Commercial use. Government users are subject to the Sun Microsystems, Inc. standard license agreement and
applicable provisions of the FAR and its supplements.
DOCUMENTATION IS PROVIDED "AS IS" AND ALL EXPRESS OR IMPLIED CONDITIONS, REPRESENTATIONS AND WARRANTIES,
INCLUDING ANY IMPLIED WARRANTY OF MERCHANTABILITY, FITNESS FOR A PARTICULAR PURPOSE OR NON-INFRINGEMENT,
ARE DISCLAIMED, EXCEPT TO THE EXTENT THAT SUCH DISCLAIMERS ARE HELD TO BE LEGALLY INVALID.
Copyright 2005 Sun Microsystems, Inc., 4150 Network Circle, Santa Clara, Californie 95054 Etats-Unis. Tous droits réservés.
Sun Microsystems, Inc. a les droits de propriété intellectuels relatants à la technologie qui est décrit dans ce document. En particulier, et sans la
limitation, ces droits de propriété intellectuels peuvent inclure un ou plus des brevets américains énumérés à http://www.sun.com/patents et
un ou les brevets plus supplémentaires ou les applications de brevet en attente dans les Etats-Unis et dans les autres pays.
Ce produit ou document est protégé par un copyright et distribué avec des licences qui en restreignent l’utilisation, la copie, la distribution, et la
décompilation. Aucune partie de ce produit ou document ne peut être reproduite sous aucune forme, par quelque moyen que ce soit, sans
l’autorisation préalable et écrite de Sun et de ses bailleurs de licence, s’il y en a.
Le logiciel détenu par des tiers, et qui comprend la technologie relative aux polices de caractères, est protégé par un copyright et licencié par des
fournisseurs de Sun.
Des parties de ce produit pourront être dérivées des systèmes Berkeley BSD licenciés par l’Université de Californie. UNIX est une marque
déposée aux Etats-Unis et dans d’autres pays et licenciée exclusivement par X/Open Company, Ltd.
Sun, Sun Microsystems, le logo Sun, Sun, Sun BluePrints, Solaris, SunOS, Java, JumpStart, Sun4U, SunDocs, , et Solstice DiskSuite sont des
marques de fabrique ou des marques déposées, ou marques de service, de Sun Microsystems, Inc. aux Etats-Unis et dans d’autres pays.
Toutes les marques SPARC sont utilisées sous licence et sont des marques de fabrique ou des marques déposées de SPARC International, Inc.
aux Etats-Unis et dans d’autres pays. Les produits portant les marques SPARC sont basés sur une architecture développée par Sun
Microsystems, Inc. ORACLE est une marque déposée registre de Oracle Corporation.
L’interface d’utilisation graphique OPEN LOOK et Sun™ a été développée par Sun Microsystems, Inc. pour ses utilisateurs et licenciés. Sun
reconnaît les efforts de pionniers de Xerox pour la recherche et le développement du concept des interfaces d’utilisation visuelle ou graphique
pour l’industrie de l’informatique. Sun détient une license non exclusive de Xerox sur l’interface d’utilisation graphique Xerox, cette licence
couvrant également les licenciées de Sun qui mettent en place l’interface d’utilisation graphique OPEN LOOK et qui en outre se conforment aux
licences écrites de Sun.
LA DOCUMENTATION EST FOURNIE "EN L’ÉTAT" ET TOUTES AUTRES CONDITIONS, DECLARATIONS ET GARANTIES EXPRESSES
OU TACITES SONT FORMELLEMENT EXCLUES, DANS LA MESURE AUTORISEE PAR LA LOI APPLICABLE, Y COMPRIS NOTAMMENT
TOUTE GARANTIE IMPLICITE RELATIVE A LA QUALITE MARCHANDE, A L’APTITUDE A UNE UTILISATION PARTICULIERE OU A
L’ABSENCE DE CONTREFAÇON.
Page 3

Contents
Preface xvii
1. Introduction 1
Securing Systems With the Solaris Security Toolkit Software 1
JumpStart Mode 2
Stand-alone Mode 3
Understanding the Software Components 3
Directories 5
Audit Directory 5
Documentation Directory 6
man Directory 6
Drivers Directory 6
Files Directory 9
Finish Directory 10
OS Directory 11
Packages Directory 12
Patches Directory 12
Profiles Directory 12
Sysidcfg Directory 13
Data Repository 13
iii
Page 4

Maintaining Version Control 13
Configuring and Customizing the Solaris Security Toolkit Software 14
Policies and Requirements 15
Guidelines 15
2. Securing Systems: Applying a Methodology 17
Planning and Preparing 17
Considering Risks and Benefits 18
Reviewing Security Policy, Standards, and Related Documentation 19
Example 1 20
Example 2 20
Determining Application and Service Requirements 20
Identifying Application and Operational Service Inventory 21
Determining Service Requirements 21
Developing and Implementing a Solaris Security Toolkit Profile 29
Installing the Software 30
Performing Preinstallation Tasks 30
Backing Up Data 31
Verifying System Stability 31
Performing the Post-installation Task 32
Verifying Application and Service Functionality 32
Verifying Security Profile Installation 32
Verifying Application and Service Functionality 33
Maintaining System Security 33
3. Upgrading, Installing, and Running Security Software 35
Performing Planning and Preinstallation Tasks 36
Software Dependencies 36
Determining Which Mode to Use 36
iv Solaris Security Toolkit 4.2 Administration Guide • July 2005
Page 5

Stand-alone Mode 37
JumpStart Mode 37
Upgrading Procedures 38
▼ To Upgrade Solaris Security Toolkit Software and the Solaris Operating
System 38
▼ To Upgrade Solaris Security Toolkit Software Only 39
Upgrading the Solaris OS Only 40
Downloading Security Software 40
Downloading Solaris Security Toolkit Software 40
▼ To Download the pkg Version 41
Downloading Recommended Patch Cluster Software 42
▼ To Download Recommended Patch Cluster Software 42
Downloading FixModes Software 43
▼ To Download FixModes Software 44
Downloading OpenSSH Software 44
▼ To Download OpenSSH Software 45
Downloading the MD5 Software 46
▼ To Download the MD5 Software 46
Customizing Security Profiles 47
Installing and Executing the Software 48
Executing the Software in Stand-alone Mode 48
▼ To Execute the Software in Stand-alone Mode 52
Audit Option 53
Clean Option 53
Display Help Option 54
Driver Option 55
Email Notification Option 56
Execute History Option 57
Most Recent Execute Option 57
Contents v
Page 6

Output File Option 58
Quiet Output Option 58
Root Directory Option 58
Undo Option 59
Executing the Software in JumpStart Mode 59
▼ To Execute the Software in JumpStart Mode 60
Validating the System Modifications 60
Performing QA Checks of Services 60
Performing Security Assessments of Configuration 61
Validating Security Profile 62
Performing the Post-installation Task 62
4. Reversing System Changes 63
Understanding How Changes Are Logged and Reversed 63
Requirements for Undoing System Changes 65
Customizing Scripts to Undo Changes 65
Checking for Files That Were Manually Changed 66
Using Options With the Undo Feature 67
Backup Option 68
Force Option 69
Keep Option 69
Output File Option 69
Quiet Output Option 70
Email Notification Option 70
Undoing System Changes 70
▼ To Undo a Solaris Security Toolkit Run 71
5. Configuring and Managing JumpStart Servers 79
Configuring JumpStart Servers and Environments 80
vi Solaris Security Toolkit 4.2 Administration Guide • July 2005
Page 7

▼ To Configure for JumpStart Mode 80
Using JumpStart Profile Templates 82
core.profile 83
end-user.profile 83
developer.profile 83
entire-distribution.profile 83
oem.profile 83
minimal-SunFire_Domain*.profile 83
Adding and Removing Clients 84
add-client Script 84
rm-client Script 86
6. Auditing System Security 87
Maintaining Security 87
Reviewing Security Prior to Hardening 88
Customizing Security Audits 89
Preparing to Audit Security 90
Using Options and Controlling Audit Output 90
Command-Line Options 91
Display Help Option 91
Email Notification Option 92
Output File Option 93
Quiet Option 93
Verbosity Option 93
Banners and Messages Output 94
Host Name, Script Name, and Timestamp Output 97
Performing a Security Audit 98
▼ To Perform a Security Audit 99
Contents vii
Page 8

7. Securing a System 103
Planning and Preparing 103
Assumptions and Limitations 104
System Environment 105
Security Requirements 105
Creating a Security Profile 105
Installing the Software 106
Downloading and Installing Security Software 106
▼ To Download and Install the Security Software 106
Installing Patches 107
▼ To Install Patches 107
Specifying and Installing the OS Cluster 108
▼ To Specify and Install the OS Cluster 108
Configuring the JumpStart Server and Client 109
Preparing the Infrastructure 110
▼ To Prepare the Infrastructure 110
Validating and Checking the Rules File 112
Customizing the Hardening Configuration 114
Enabling FTP Service 115
▼ To Enable FTP Service 115
Installing Secure Shell Software 116
▼ To Install Secure Shell 116
Enabling RPC Service 117
▼ To Enable RPC 118
Customizing the syslog.conf File 118
▼ To Customize the syslog.conf File 118
Installing the Client 119
▼ To Install the Client 120
viii Solaris Security Toolkit 4.2 Administration Guide • July 2005
Page 9

Testing for Quality Assurance 120
▼ To Verify Profile Installation 120
▼ To Verify Application and Service Functionality 121
Glossary 123
Index 131
Contents ix
Page 10

x Solaris Security Toolkit 4.2 Administration Guide • July 2005
Page 11

Figures
FIGURE 1-1 Software Component Structure 4
FIGURE 1-2 Driver Control Flow 8
xi
Page 12

xii Solaris Security Toolkit 4.2 Administration Guide • July 2005
Page 13

Tables
TABLE 1-1 Naming Standards for Custom Files 16
TABLE 2-1 Listing Services Recently in Use 28
TABLE 3-1 Using Command-Line Options With jass-execute 49
TABLE 4-1 Using Command-Line Options With Undo Command 68
TABLE 5-1 JumpStart add-client Command 85
TABLE 5-2 JumpStart rm-client Command 86
TABLE 6-1 Using Command-Line Options With the Audit Command 91
TABLE 6-2 Audit Verbosity Levels 94
TABLE 6-3 Displaying Banners and Messages in Audit Output 95
TABLE 6-4 Displaying Host Name, Script Name, and Timestamp Audit Output 97
xiii
Page 14

xiv Solaris Security Toolkit 4.2 Administration Guide • July 2005
Page 15

Code Samples
CODE EXAMPLE 1-1 Driver Control Flow Code 9
CODE EXAMPLE 2-1 Obtaining Information About File System Objects 22
CODE EXAMPLE 2-2 Collecting Information From a Running Process 22
CODE EXAMPLE 2-3 Identifying Dynamically Loaded Applications 23
CODE EXAMPLE 2-4 Determining if a Configuration File Is In Use 24
CODE EXAMPLE 2-5 Determining Which Applications Use RPC 25
CODE EXAMPLE 2-6 Validating rusers Service 26
CODE EXAMPLE 2-7 Alternative Method for Determining Applications That Use RPC 27
CODE EXAMPLE 2-8 Determining Which Ports Are Owned by Services or Applications 28
CODE EXAMPLE 2-9 Determining Which Processes Are Using Files and Ports 29
CODE EXAMPLE 3-1 Moving a Patch File to /opt/SUNWjass/Patches Directory 43
CODE EXAMPLE 3-2 Sample Command-Line Usage in Stand-alone Mode 48
CODE EXAMPLE 3-3 Executing the Software in Stand-alone Mode 52
CODE EXAMPLE 3-4 Sample -c Option Output 53
CODE EXAMPLE 3-5 Sample -h Option Output 54
CODE EXAMPLE 3-6 Sample -d driver Option Output 56
CODE EXAMPLE 3-7 Sample -H Option Output 57
CODE EXAMPLE 3-8 Sample -l Option Output 57
CODE EXAMPLE 3-9 Sample -o Option Output 58
CODE EXAMPLE 3-10 Sample -q Option Output 58
xv
Page 16

CODE EXAMPLE 4-1 Sample Output of Files That Were Manually Changed 67
CODE EXAMPLE 4-2 Sample Output of Runs Available to Undo 72
CODE EXAMPLE 4-3 Sample Output of an Undo Run Processing Multiple Manifest File Entries 73
CODE EXAMPLE 4-4 Sample Output of Undo Exception 74
CODE EXAMPLE 4-5 Sample Output from Choosing Backup Option During Undo 75
CODE EXAMPLE 4-6 Sample Output of Choosing Always Backup Option During Undo 76
CODE EXAMPLE 6-1 Sample -h Option Output 92
CODE EXAMPLE 6-2 Sample -o Option Output 93
CODE EXAMPLE 6-3 Sample -q Option Output 93
CODE EXAMPLE 6-4 Sample Output of Reporting Only Audit Failures 95
CODE EXAMPLE 6-5 Sample Output of Auditing Log Entries 97
CODE EXAMPLE 6-6 Sample Output of Audit Run 99
CODE EXAMPLE 7-1 Adding a Client to the JumpStart Server 110
CODE EXAMPLE 7-2 Creating a Profile 111
CODE EXAMPLE 7-3 Sample Output of Modified Script 111
CODE EXAMPLE 7-4 Checking the rules File for Correctness 112
CODE EXAMPLE 7-5 Sample Output for rules File 113
CODE EXAMPLE 7-6 Sample of Incorrect Script 113
CODE EXAMPLE 7-7 Sample of Correct Script 114
CODE EXAMPLE 7-8 Sample Output of Modified xsp-firewall-hardening.driver 119
CODE EXAMPLE 7-9 Assessing a Security Configuration 121
xvi Solaris Security Toolkit 4.2 Administration Guide • July 2005
Page 17

Preface
This manual contains reference information for understanding and using Solaris™
Security Toolkit software. This manual is primarily intended for persons who use the
Solaris Security Toolkit software to secure Solaris™ Operating System (OS) versions
8, 9, and 10, such as administrators, consultants, and others, who are deploying new
Sun systems or securing deployed systems. The instructions apply to using the
software in either its JumpStart™ mode or stand-alone mode.
Before You Read This Book
You should be a Sun Certified System Administrator for Solaris™ or Sun Certified
Network Administrator for Solaris™. You should also have an understanding of
standard network protocols and topologies.
Because this book is designed to be useful to people with varying degrees of
experience or knowledge of security, your experience and knowledge will determine
how you use this book.
How This Book Is Organized
This manual serves as a user guide. Its chapters contain information, instructions,
and guidelines for using the software to secure systems. This book is structured as
follows:
Chapter 1 describes the design and purpose of the Solaris Security Toolkit software.
It covers the key components, features, benefits, and supported platforms.
xvii
Page 18

Chapter 2 provides a methodology for securing systems. You can apply the Solaris
Security Toolkit process before securing your systems using the software.
Chapter 3 provides instructions for downloading, installing, and running the Solaris
Security Toolkit software and other security-related software.
Chapter 4 provides information and procedures for reversing (undoing) the changes
made by the Solaris Security Toolkit software during hardening runs.
Chapter 5 provides information for configuring and managing JumpStart servers to
use the Solaris Security Toolkit software.
Chapter 6 describes how to audit (validate) a system’s security using the Solaris
Security Toolkit software. Use the information and procedures in this chapter for
maintaining an established security profile after hardening.
Chapter 7 describes how to apply the information and expertise provided in earlier
chapters to a realistic scenario for installing and securing a new system.
Using UNIX Commands
This document might not contain information on basic UNIX® commands and
procedures such as shutting down the system, booting the system, and configuring
devices. Refer to the following for this information:
■ Software documentation that you received with your system
■ Solaris Operating System documentation, which is at
http://docs.sun.com
xviii Solaris Security Toolkit 4.2 Administration Guide • July 2005
Page 19

Shell Prompts
Shell Prompt
C shell machine-name%
C shell superuser machine-name#
Bourne shell and Korn shell $
Bourne shell and Korn shell superuser #
Typographic Conventions
Typeface
AaBbCc123 The names of commands, files,
AaBbCc123
AaBbCc123 Book titles, new words or terms,
* The settings on your browser might differ from these settings.
*
Meaning Examples
Edit your.login file.
and directories; on-screen
computer output
What you type, when contrasted
with on-screen computer output
words to be emphasized.
Replace command-line variables
with real names or values.
Use ls -a to list all files.
% You have mail.
% su
Password:
Read Chapter 6 in the User’s Guide.
These are called class options.
You must be superuser to do this.
To delete a file, type rm filename.
Using Generic Terms for Hardware
Models
Sun Fire™ high-end systems refers to these model numbers:
■ E25K
■ E20K
Preface xix
Page 20

■ 15K
■ 12K
Sun Fire midrange systems refers to these model numbers:
■ E6900
■ E4900
■ 6800
■ 4810
■ 4800
■ 3800
Sun Fire entry-level midrange systems refers to these model numbers:
■ E2900
■ Netra 1280
■ V1280
■ V890
■ V880
■ V490
■ V480
Supported Hardware Systems
Solaris Security Toolkit 4.2 software supports SPARC®, 64-bit only, and x86/x64
systems running the Solaris 10 OS. Solaris Security Toolkit 4.2 software does support
SPARC 32-bit systems running on Solaris 8 and 9; for example, the Ultra 2 Creator
3D.
Supported Solaris OS Versions
Sun support for Solaris Security Toolkit software is available only for its use in the
Solaris 8, Solaris 9, and Solaris 10 Operating Systems.
Note – For Solaris Security Toolkit 4.2 software, Solaris 10 can be used only on Sun
Fire high-end systems domains, not on the system controller (SC).
xx Solaris Security Toolkit 4.2 Administration Guide • July 2005
Page 21

While the software can be used in the Solaris 2.5.1, Solaris 2.6, and Solaris 7
Operating Systems, Sun support is not available for its use in those operating
systems.
The Solaris Security Toolkit software automatically detects which version of the
Solaris Operating System software is installed, then runs tasks appropriate for that
operating system version.
Note in examples provided throughout this document that when a script checks for
a version of the OS, it checks for 5.x, the SunOS™ versions, instead of 2.x, 7, 8, 9, or
10, the Solaris OS versions.
TABLE P-1 shows the correlation between SunOS and
Solaris OS versions.
TABLE P-1 Correlation Between SunOS and Solaris OS Versions
SunOS Version Solaris OS Version
5.5.1 2.5.1
5.6 2.6
5.7 7
5.8 8
5.9 9
5.10 10
Supported SMS Versions
If you are using System Management Services (SMS) to run the system controller
(SC) on your Sun Fire high-end systems, then Solaris Security Toolkit 4.2 software is
supported on all Solaris 8 and 9 OS versions when used with SMS versions 1.3, 1.4.1,
and 1.5. No version of SMS is supported on Solaris 10 OS with Solaris Security
Toolkit 4.2 software.
Note – For Solaris Security Toolkit 4.2 software, Solaris 10 can be used only on
domains, not on the system controller (SC).
Preface xxi
Page 22

Related Documentation
The documents listed as online are available at:
http://www.sun.com/products-n-solutions/hardware/docs/
Software/enterprise_computing/systems_management/sst/index.html
Application Title Part Number Format Location
Release
Notes
Reference Solaris Security Toolkit 4.2 Reference Manual 819-1503-10 PDF
Man Pages Solaris Security Toolkit 4.2 Man Page Guide 819-1505-10 PDF Online
Solaris Security Toolkit 4.2 Release Notes 819-1504-10 PDF
HTML
HTML
Online
Online
Documentation, Support, and Training
Sun Function URL Description
Documentation http://www.sun.com/documentation/ Download PDF and HTML documents,
and order printed documents
Support http://www.sun.com/support/ Obtain technical support and
download patches
Training http://www.sun.com/training/ Learn about Sun courses
Third-Party Web Sites
Sun is not responsible for the availability of third-party web sites mentioned in this
document. Sun does not endorse and is not responsible or liable for any content,
advertising, products, or other materials that are available on or through such sites
or resources. Sun will not be responsible or liable for any actual or alleged damage
or loss caused by or in connection with the use of or reliance on any such content,
goods, or services that are available on or through such sites or resources.
xxii Solaris Security Toolkit 4.2 Administration Guide • July 2005
Page 23

Sun Welcomes Your Comments
Sun is interested in improving its documentation and welcomes your comments and
suggestions. You can submit your comments by going to:
http://www.sun.com/hwdocs/feedback
Please include the title and part number of your document with your feedback:
Solaris Security Toolkit 4.2 Administration Guide, part number 819-1402-10
Preface xxiii
Page 24

xxiv Solaris Security Toolkit 4.2 Administration Guide • July 2005
Page 25

CHAPTER
1
Introduction
This chapter describes the design and purpose of the Solaris Security Toolkit
software. It covers the key components, features, benefits, and supported platforms.
This chapter provides guidelines for maintaining version control of modifications
and deployments, and it sets forth important guidelines for customizing the Solaris
Security Toolkit software.
This chapter contains the following topics:
■ “Securing Systems With the Solaris Security Toolkit Software” on page 1
■ “Understanding the Software Components” on page 3
■ “Maintaining Version Control” on page 13
■ “Configuring and Customizing the Solaris Security Toolkit Software” on page 14
Securing Systems With the Solaris Security Toolkit Software
The Solaris Security Toolkit software, informally known as the JumpStart
Architecture and Security Scripts (JASS) toolkit, provides an automated, extensible,
and scalable mechanism to build and maintain secure Solaris OS systems. Using the
Solaris Security Toolkit software, you can harden and audit the security of systems.
Following are terms used in this guide that are important to understand:
■ Hardening – Modifying Solaris OS configurations to improve a system’s security.
■ Auditing – Determining if a system’s configuration is in compliance with a
predefined security profile.
1
Page 26

Note – The term audit describes the Solaris Security Toolkit software’s automated
process of validating a security posture by comparing it with a predefined security
profile. The use of this term in this publication does not represent a guarantee that a
system is completely secure after using the audit option.
■ Scoring – Counting the number of failures uncovered during an audit run. If no
failures (of any kind) are found, then the resulting score is 0. The Solaris Security
Toolkit increments the score (also known as a vulnerability value) by 1 whenever
a failure is detected.
There are two modes of installing Solaris Security Toolkit software, which are
described briefly in the latter part of this section:
■ “JumpStart Mode” on page 2
■ “Stand-alone Mode” on page 3
Regardless of how a system is installed, you can use the Solaris Security Toolkit
software to harden and minimize your systems. Then periodically use the Solaris
Security Toolkit software to audit whether the security profile of secured systems
has been accidently or maliciously modified.
JumpStart Mode
System installation and configuration should be as automated as possible (ideally,
100 percent). This includes OS installation and configuration, network configuration,
user accounts, applications, and hardening. One technology available to automate
Solaris OS installations is JumpStart software. The JumpStart software provides a
mechanism to install systems over a network, with little or no human intervention
required. The Solaris Security Toolkit software provides a framework and scripts to
implement and automate most of the tasks associated with hardening Solaris OS
systems in JumpStart software-based installations. To obtain the JumpStart
Enterprise Toolkit (JET), which facilitates JumpStart-based installations and includes
modules to support hardening with the Solaris Security Toolkit, go to the Sun
Software Download site at:
http://www.sun.com/download/
For more information about JumpStart technology, refer to the Sun BluePrints™
book JumpStart Technology: Effective Use in the Solaris Operating Environment.
2 Solaris Security Toolkit 4.2 Administration Guide • July 2005
Page 27

Stand-alone Mode
In addition, the Solaris Security Toolkit software has a stand-alone mode. This mode
provides the ability to perform all the same hardening functionality as in JumpStart
mode, but on deployed systems. In either mode, the security modifications made
can, and should, be customized to match security requirements for your system.
Regardless of how a system is installed, you can use the Solaris Security Toolkit
software to harden your systems. Then periodically use the Solaris Security Toolkit
software to audit whether the configuration of secured systems have been accidently
or maliciously modified.
Understanding the Software Components
This section provides an overview of the structure of the Solaris Security Toolkit
software components. The Solaris Security Toolkit software is a collection of files and
directories.
FIGURE 1-1 shows an illustration of the structure.
Chapter 1 Introduction 3
Page 28
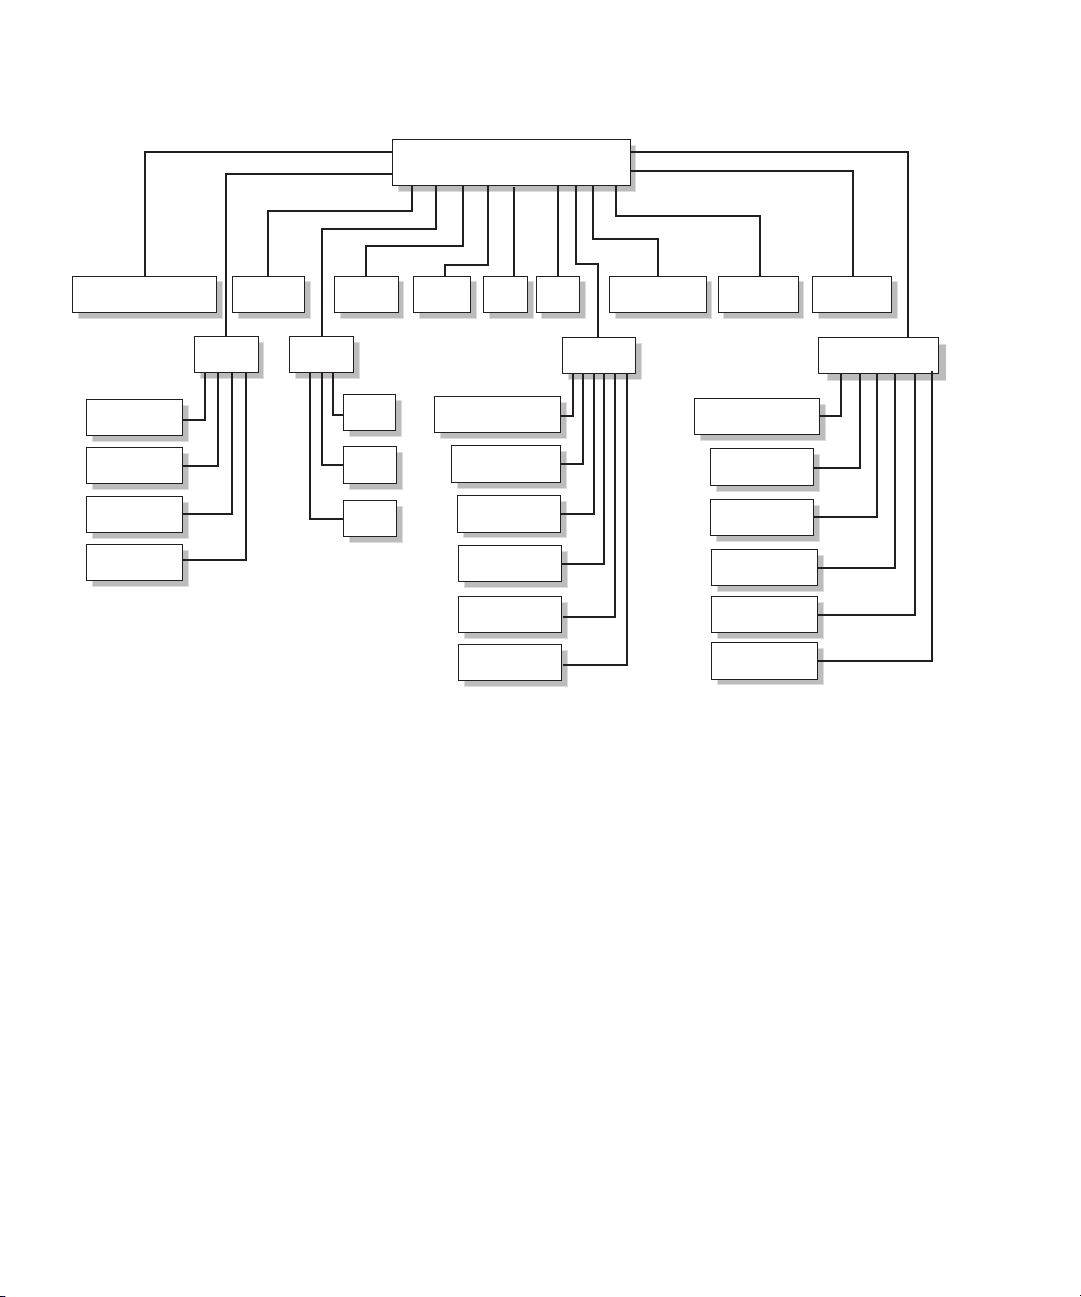
JASS_HOME_DIR
/Documentation
/sman1m
/sman4
/sman7
/Drivers
/man
/Finish
/Files
/etc
/root
/var
windex
FIGURE 1-1 Software Component Structure
The following program or command files are in the /bin directory:
■ add-client – JumpStart helper program for adding clients into a JumpStart
environment
■ rm-client – JumpStart helper program for removing clients from a JumpStart
environment
■ make-jass-pkg – Command that provides the ability to create a Solaris OS
package from the contents of the Solaris Security Toolkit directory, to simplify
internal distribution of a customized Solaris Security Toolkit configuration
■ jass-check-sum – Command that provides the ability to determine if any files
modified by the Solaris Security Toolkit software have been changed, based on a
checksum created during each Solaris Security Toolkit run
■ jass-execute – Command that executes most of the functionality of the Solaris
Security Toolkit software
/Solaris_2.5.1
/Solaris_2.6
/Solaris_7
/Solaris_8
/Solaris_9
/Solaris_10
/OS
/Packages/Audit /bin /lib
/Patches
/Profiles
/Sysidcfg
/Solaris_2.5.1
/Solaris_2.6
/Solaris_7
/Solaris_8
/Solaris_9
/Solaris_10
4 Solaris Security Toolkit 4.2 Administration Guide • July 2005
Page 29

Directories
The components of the Solaris Security Toolkit architecture are organized in the
following directories:
■ /Audit
■ /bin
■ /Documentation
■ /Drivers
■ /Files
■ /Finish
■ /lib
■ /man
■ /OS
■ /Packages
■ /Patches
■ /Profiles
■ /Sysidcfg
Each directory is described in this section. Where relevant, each script, configuration
file, or subdirectory is listed, and references to other chapters are provided for
detailed information.
The Solaris Security Toolkit directory structure is based on the structure in the Sun
BluePrints book JumpStart Technology: Effective Use in the Solaris Operating
Environment.
Audit Directory
This directory contains the audit scripts that evaluate a system’s compliance with a
defined security profile or set of audit scripts. The scripts in this directory are
organized into the following categories:
■ Disable
■ Enable
■ Install
■ Minimize
■ Print
■ Remove
■ Set
■ Update
For detailed listings of the scripts in each of these categories and descriptions of each
script, refer to the Solaris Security Toolkit 4.2 Reference Manual.
Chapter 1 Introduction 5
Page 30

Documentation Directory
This directory contains text files with information for the user, such as README,
EOL_NOTICE, and INSTALL files.
man Directory
This directory contains subdirectories for the sections of man pages for commands,
functions, and drivers. This directory also contains the windex file, which is an
index of the commands and is provided as a courtesy.
For more information about these man pages, refer to the actual man pages or to the
Solaris Security Toolkit 4.2 Man Page Guide.
Drivers Directory
This directory contains files of configuration information specifying which files are
executed and installed when you run the Solaris Security Toolkit software. This
directory contains drivers, scripts, and configuration files.
The following is an example of the drivers and scripts in the Drivers directory:
■ audit_{private|public}.funcs
■ common_{log|misc}.funcs
■ {config|hardening|secure}.driver
■ driver.{init|run}
■ driver_{private|public}.funcs
■ finish.init
■ server-{config|hardening|secure}.driver
■ suncluster3x-{config|hardening|secure}.driver
■ sunfire_15k_sc-{config|hardening|secure}.driver
■ undo.{funcs|init|run}
■ user.init.SAMPLE
■ user.run.SAMPLE
All drivers included with the Solaris Security Toolkit have three files for each driver:
■ name-{config|hardening|secure}.driver
These three files are indicated in brackets in the previous lists, for example,
sunfire_15k_sc-{config|hardening|secure}.driver. These files are listed
for completeness. Use only the secure.driver or name-secure.driver when
you want to execute a driver. That driver automatically calls the related drivers.
The Solaris Security Toolkit architecture includes configuration information to
enable driver, finish, and audit scripts to be used in different environments, while
not modifying the actual scripts themselves. All variables used in the finish and
6 Solaris Security Toolkit 4.2 Administration Guide • July 2005
Page 31

audit scripts are maintained in a set of configuration files. These configuration files
are imported by drivers, which make the variables available to the finish and audit
scripts as they are called by the drivers.
The Solaris Security Toolkit software has four main configuration files, all of which
are stored in the Drivers directory:
■ driver.init
■ finish.init
■ user.init
■ user.run
The user.run file provides a location for you to write replacement or enhanced
versions of Solaris Security Toolkit functions, which are automatically used if
present.
Caution – Only change variable definitions in the user.init configuration file,
and never in the driver.init and finish.init configuration files.
Finish scripts called by the drivers are located in the Finish directory. Audit scripts
called by the drivers are located in the Audit directory. Files installed by the drivers
are read from the Files directory. For more information about finish scripts, refer to
Chapter 4 in the Solaris Security Toolkit 4.2 Reference Manual. For more information
about audit scripts, refer to Chapter 5 in the Solaris Security Toolkit 4.2 Reference
Manual.
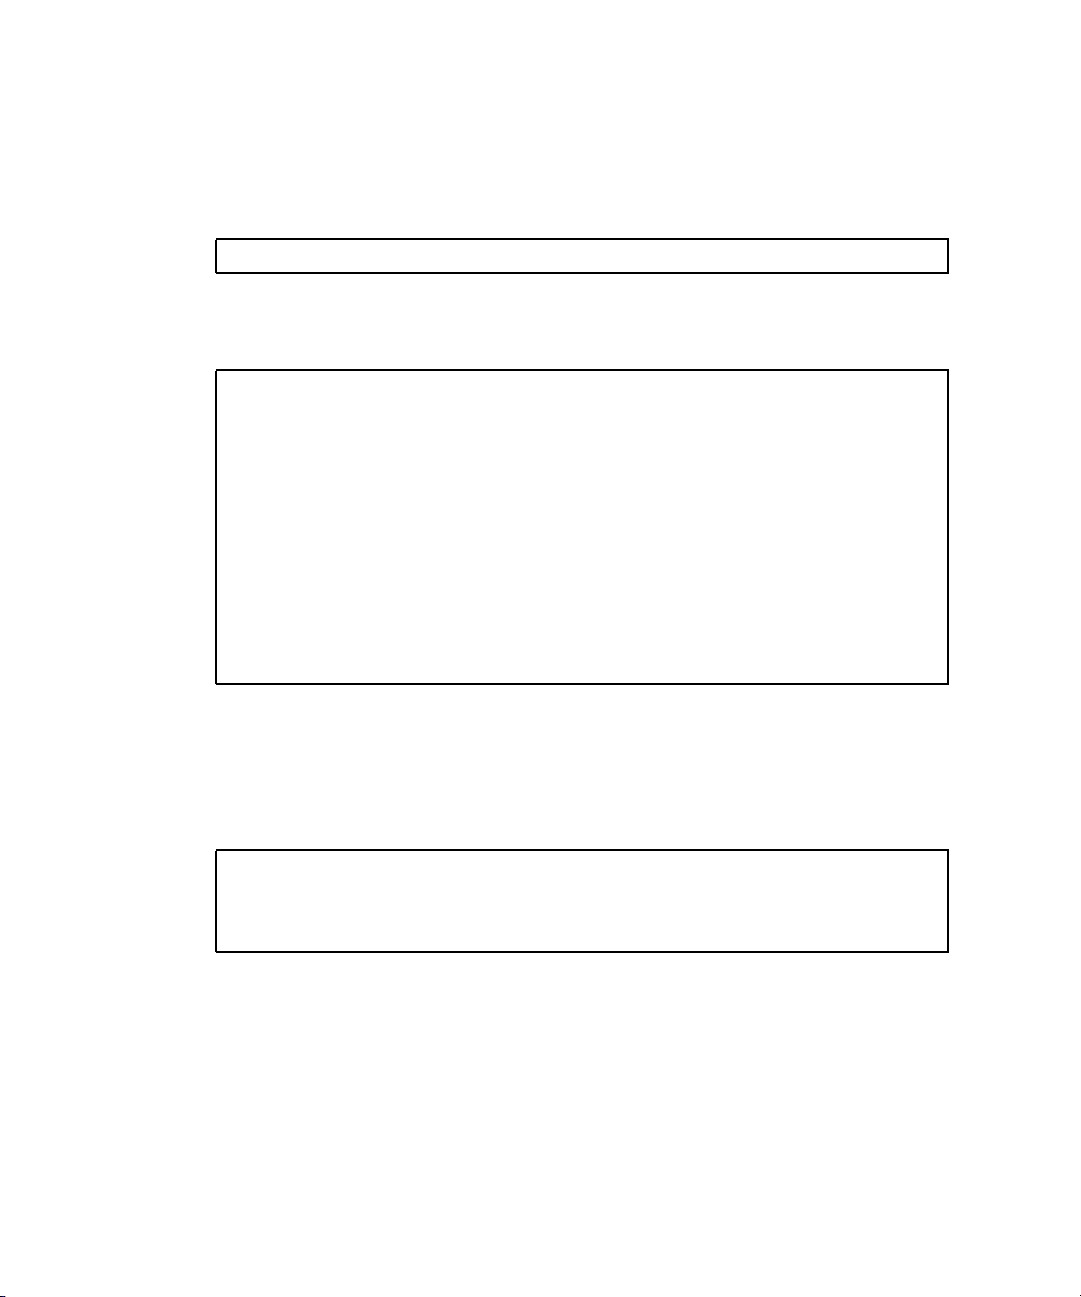
FIGURE 1-2 is a flow chart of the driver control flow.
Chapter 1 Introduction 7
Page 32

Only applies to
non-JumpStart runs
jass-execute
Driver
definition
Import variables (driver.init)
Import global user overrides
Import framework variables
Import finish script variables
Import variables (driver.init)
Import global user overrides
Import framework variables
Import finish script variables
Define JASS_FILES (optional)
Define JASS_SCRIPTS (optional)
Execute the driver
FIGURE 1-2 Driver Control Flow
1. For non-JumpStart runs only, the driver runs the jass-execute command.
JumpStart runs directly call the driver, instead of calling the jass-execute
command.
2. The driver might explicitly set variables.
3. The driver imports all of the environment variables from the various .init files.
4. The driver defines the JASS_FILES and JASS_SCRIPTS environment variables.
The definition of these are optional; either a single environment can be defined, or
both, or none.
Refer to the Solaris Security Toolkit 4.2 Reference Manual, Chapter 7, for more
information about defining the JASS_FILES and JASS_SCRIPTS environment
variables.
5. The driver calls driver.run to perform the tasks defined by the JASS_FILE and
JASS_SCRIPTS environment variables.
8 Solaris Security Toolkit 4.2 Administration Guide • July 2005
Page 33

6. (Optional) The driver defines specific driver behavior, which can be used to
override system defaults in finish.init or user.init. The driver in
CODE EXAMPLE 1-1 explicitly sets JASS_PASS_HISTORY to 4.
CODE EXAMPLE 1-1 illustrates the driver control flow code.
CODE EXAMPLE 1-1 Driver Control Flow Code
DIR="‘/bin/dirname $0‘"
JASS_PASS_HISTORY=”4”
export DIR
. ${DIR}/driver.init
JASS_FILES="
/etc/cron.d/cron.allow
/etc/default/ftpd
/etc/default/telnetd
"
JASS_SCRIPTS="
install-at-allow.fin
remove-unneeded-accounts.fin
"
. ${DIR}/driver.run
1. This code example sets and exports the DIR environment variable so that the
drivers recognize the starting directory.
2. The driver explicitly sets the JASS_PASS_HISTORY environment variable to 4.
3. The driver reads the various .init files (starting with driver.init).
4. The JASS_FILES environment variable is defined as containing those files that
are copied from the JASS_HOME_DIR/Files directory onto the client.
5. The JASS_SCRIPTS environment variable is defined with the finish scripts that
are run by the Solaris Security Toolkit software.
6. The execution of the hardening run is started by calling the driver.run driver.
The driver.run copies the files specified by JASS_FILES, and runs the scripts
specified by JASS_SCRIPTS.
Files Directory
This directory is used by the JASS_FILES environment variable and the
driver.run script to store files that are copied to the JumpStart client.
The following files are in this directory:
Chapter 1 Introduction 9
Page 34

■ /.cshrc
■ /.profile
■ /etc/default/sendmail
■ /etc/dt/config/Xaccess
■ /ftpd/banner.msg
■ /etc/hosts.allow
■ /etc/hosts.allow-15k_sc
■ /etc/hosts.allow-server
■ /etc/hosts.allow-suncluster
■ /etc/hosts.deny
■ /etc/init.d/klmmod
■ /etc/init.d/nddconfig
■ /etc/init.d/set-tmp-permissions
■ /etc/init.d/sms_arpconfig
■ /etc/init.d/swapadd
■ /etc/issue
■ /etc/motd
■ /etc/opt/ipf/ipf.conf
■ /etc/opt/ipf/ipf.conf-15k_sc
■ /etc/opt/ipf/ipf.conf-server
■ /etc/security/audit_class+5.10
■ /etc/security/audit_class+5.8
■ /etc/security/audit_class+5.9
■ /etc/security/audit_control
■ /etc/security/audit_event+5.10
■ /etc/security/audit_event+5.8
■ /etc/security/audit_event+5.9
■ /etc/sms_domain_arp
■ /etc/sms_sc_arp
■ /etc/syslog.conf
■ /root/.cshrc
■ /root/.profile
■ /var/opt/SUNWjass/BART/rules
■ /var/opt/SUNWjass/BART/rules-secure
Finish Directory
This directory contains the finish scripts that perform system modifications and
updates during execution. The scripts in this directory are organized into the
following categories:
■ Disable
■ Enable
■ Install
■ Minimize
■ Print
10 Solaris Security Toolkit 4.2 Administration Guide • July 2005
Page 35

■ Remove
■ Set
■ Update
For detailed listings of the scripts in each of these categories and descriptions of each
script, refer to the Solaris Security Toolkit 4.2 Reference Manual.
OS Directory
This directory contains only Solaris OS images. These are used by the JumpStart
software installation process as the Solaris OS source for client installations. The
add_client script accepts the Solaris OS versions contained in this directory as
arguments if the directory names follow the Solaris Security Toolkit OS naming
conventions that follow.
For more information about loading and modifying Solaris OS images, refer to the
Sun BluePrints book JumpStart Technology: Effective Use in the Solaris Operating
Environment.
The standard installation naming conventions follow.
Solaris OS
Use the following naming standard for Solaris OS:
Solaris_os version_4 digit year-2 digit month of CD release
For example, the Solaris 10 Operating Environment CD, dated March 2005, would
have a directory name of Solaris_10_2005-03. By separating updates and
releases of the Solaris OS, very fine control can be maintained for testing and
deployment purposes.
Solaris OS for x86/x64 Platforms
Use the following directory naming for Solaris OS for x86/x64 platforms:
Solaris_os version_4 digit year-2 digit month of CD release_ia
For example, if the Solaris OS for x86/x64 platforms release were dated March 2005,
the directory name would be: Solaris_10_2005-03_ia.
Chapter 1 Introduction 11
Page 36

Packages Directory
This directory contains software packages that can be installed with a finish script
and verified with an audit script. For example, the Open Secure Shell software
package could be stored in the Packages directory so that the correct finish script
installs the software as required.
Several finish and audit scripts included in the Solaris Security Toolkit software
perform software installation, basic configuration, and verification functions. The
scripts that install and verify software from the Packages directory include:
■ install-fix-modes.{fin|aud}
■ install-jass.{fin|aud}
■ install-md5.{fin|aud}
■ install-openssh.{fin|aud}
Patches Directory
This directory is for storing Recommended and Security Patch Clusters for the
Solaris OS. Download and extract required patches into this directory.
By placing and extracting the patches in this directory, you streamline installation.
When the patches are extracted into this directory, the Solaris Security Toolkit
software’s patch installation script automates installation so that you do not have to
manually extract the patch clusters for each system installation.
Create subdirectories for each of the Solaris OS versions used. For example, you
might have directories 9_Recommended and 10_Recommended within the Patches
directory.
Solaris Security Toolkit software supports Solaris OS for x86/x64 Platforms patch
clusters. The supported naming convention for these patch clusters is the same as
made available through SunSolve OnLine
The format is <release>_x86_Recommended. The Solaris OS for x86/x64
Platforms patch cluster for Solaris 10 OS would be in a directory named
10_x86_Recommended.
Profiles Directory
This directory contains all JumpStart profiles. These profiles contain configuration
information used by JumpStart software to determine Solaris OS clusters for
installation (for example, Core, End User, Developer, or Entire Distribution), disk
layout, and installation type (for example, stand-alone) to perform.
JumpStart profiles are listed and used in the rules file to define how specific
systems or groups of systems are built.
12 Solaris Security Toolkit 4.2 Administration Guide • July 2005
SM
service.
Page 37

Sysidcfg Directory
Similar to the Profiles directory, the Sysidcfg directory contains files that are
only used during JumpStart mode installations. These files automate Solaris OS
installations by providing the required installation information. A separate directory
tree stores OS-specific information.
Each Solaris OS has a separate directory. For each release, there is a directory named
Solaris_OS Version. The Solaris Security Toolkit software includes sample
sysidcfg files for Solaris OS versions 2.5.1 through 10.
The sample sysidcfg files can be extended to other types such as per network or
host. The Solaris Security Toolkit software supports arbitrary sysidcfg files.
For additional information on sysidcfg files, refer to the Sun BluePrints book
JumpStart Technology: Effective Use in the Solaris Operating Environment.
Data Repository
While not in the JASS_HOME_DIR directory structure, the data repository, or
JASS_REPOSITORY, directory supports Solaris Security Toolkit undo runs, saves
data on how each run is executed, maintains a manifest of files modified by the
software, and saves data for the execution log. This directory is located in
/var/opt/SUNWjass/runs/timestamp.
Maintaining Version Control
Maintaining version control for all files and scripts used by the Solaris Security
Toolkit software is critical for two reasons:
1. One of the goals of this environment is to be able to recreate a system installation.
This goal would be impossible without a snapshot of all file versions used during
an installation.
2. Because these scripts are performing security functions, which are critical
processes for many organizations, extreme caution must be exercised to ensure that
only necessary and tested changes are implemented.
A Source Code Control System (SCCS) version control package is provided in the
Solaris OS SUNWsprot package. You can use other version control software available
from freeware and commercial vendors to manage version information. Whichever
version control product you use, put a process in place to manage updates and
capture version information for future system re-creation.
Chapter 1 Introduction 13
Page 38

Use an integrity management solution in addition to version control to determine
whether the contents of files were modified. Although privileged users of a system
might be able to bypass the version control system, they would not be able to easily
bypass an integrity management system, which maintains its integrity database on a
remote system. Integrity management solutions work best when centralized, because
locally stored databases could be maliciously modified.
Configuring and Customizing the Solaris Security Toolkit Software
The Solaris Security Toolkit software contains default values for scripts, framework
functions, and variables that implement all security guidelines in the Sun BluePrints
book titled Enterprise Security: Solaris Operating Environment Security Journal, Solaris
Operating Environment Versions 2.5.1, 2.6, 7, and 8 and Sun BluePrints OnLine articles
about security. These settings are not appropriate for all systems, so you must
customize the Solaris Security Toolkit software to meet the security requirements for
your systems.
One of the most significant characteristics of the Solaris Security Toolkit software is
that you can easily customize it to fit your environment, systems, and security
requirements. To customize the Solaris Security Toolkit software, adjust its actions
through drivers, finish scripts, audit scripts, framework functions, environment
variables, and file templates.
Most users do not need to modify the Solaris Security Toolkit code. If code
modifications are absolutely necessary for using the Solaris Security Toolkit software
in your environment, copy the code to an unique function name in user.run, so
that you can easily track changes, as in
Throughout this guide, guidelines and instructions for customizing the Solaris
Security Toolkit software are provided. Refer to the Solaris Security Toolkit 4.2
Reference Manual to find helpful information about customizing the drivers.
Customizing includes modifying and creating files or variables.
This guide also provide examples for customizing the Solaris Security Toolkit
software throughout. The examples highlight some ways that you can customize the
Solaris Security Toolkit software; however, there are many possibilities.
The following sections present information that must be clearly understood before
attempting to customize the Solaris Security Toolkit software. The information is
based on shared experiences collected from many deployments, so that you can
avoid common pitfalls.
14 Solaris Security Toolkit 4.2 Administration Guide • July 2005
“Guidelines” on page 15.
Page 39

Policies and Requirements
When customizing and deploying the Solaris Security Toolkit software, proper
planning ensures that the resulting platform configuration is correct and in line with
your organization’s expectations.
In your planning phase, be sure to obtain input from a variety of sources, including
security policies and standards, industry regulations and guidelines, and vendorsupplied preferred practices.
In addition to this information, it is essential that you consider application and
operational requirements to ensure that the resulting configuration does not impact a
platform’s ability to serve its intended business function.
Guidelines
When customizing the Solaris Security Toolkit software, consider the following
guidelines. Understanding and observing these guidelines help make the process of
sustaining a deployment much simpler and more effective.
■ As a general rule, never alter any of the original files (drivers, scripts, files, and so
on) provided with the Solaris Security Toolkit software. Changing the original
files inhibits and restricts your organization’s ability to upgrade to newer versions
of the Solaris Security Toolkit software, because any changes to the original files
might be overwritten by new versions of the files. (All of your custom changes
would be lost, and your system’s configuration might change in undesirable
ways.)
To customize any of the files, first make a copy, then modify the copy, leaving the
original intact. Only one exception exist to this guideline:
■ sysidcfg files
■ A new feature in Solaris Security Toolkit 4.2 software allows you to use keyword
suffixes on templates in the Files directory. That way, the system administrator
does not have to modify any of the default templates included with the Solaris
Security Toolkit 4.2 software. Use suffixes wherever possible.
Chapter 1 Introduction 15
Page 40

■ Name your copy of a driver or script so that it can be distinguished from the
original. Use a prefix or keyword that is indicative of the purpose of the script.
For example, a prefix that contains the name or stock symbol of the company, a
department identifier, or even a platform or application type are all excellent
naming standards.
TABLE 1-1 Naming Standards for Custom Files
Custom File Naming Standard
abccorp-secure.driver Company prefix
abcc-nj-secure.driver Company stock symbol, location
abbcorp-nj-webserver.driver Company, location, application type
abc-nj-trading-webserver.driver Company, location, organization, application
■ Review the following Solaris Security Toolkit files for suitability to your system.
TABLE 1-1 lists a few examples of naming standards.
type
To customize these files, copy the original files, rename the copies to user.init
and user.run, then modify or add content to the copies.
Drivers/user.init.SAMPLE Used for customizing global parameters
Drivers/user.run.SAMPLE Used for customizing global functions
Note – Be aware that if SUNWjass is removed using the pkgrm command, the
user.init and user.run files, if created, are not removed. This behavior also
occurs for any customer files that are added to the Solaris Security Toolkit directory
structure and are not included in the original software distribution.
Note – The Solaris Security Toolkit 4.2 software provides a new enhancement to the
pkgrm command. With this release, the first step in the pkgrm command checks the
integrity of all files included in the distribution. If any files are different, the pkgrm
command exits with an error message that tells the system administrator either to
put the correct file in place or to remove the modified file.
16 Solaris Security Toolkit 4.2 Administration Guide • July 2005
Page 41

CHAPTER
2
Securing Systems: Applying a Methodology
This chapter provides a methodology for securing systems. You can apply the Solaris
Security Toolkit process before securing your systems using the software.
This chapter contains the following topics:
■ “Planning and Preparing” on page 17
■ “Developing and Implementing a Solaris Security Toolkit Profile” on page 29
■ “Installing the Software” on page 30
■ “Verifying Application and Service Functionality” on page 32
■ “Maintaining System Security” on page 33
Planning and Preparing
Proper planning is key to successfully using the Solaris Security Toolkit software to
secure systems. The planning phase constructs a Solaris Security Toolkit profile for
the system, based on an organization’s security policies and standards, as well as the
application and operation requirements of the system. This phase is divided into the
following tasks:
■ “Considering Risks and Benefits” on page 18
■ “Reviewing Security Policy, Standards, and Related Documentation” on page 19
■ “Determining Application and Service Requirements” on page 20
Although not covered in this book, other considerations for this phase might include
understanding risks and exposures; understanding infrastructure and its security
requirements; and considering accountability, logging, and usage auditing.
17
Page 42

Considering Risks and Benefits
When hardening systems, special precautions must be taken to help ensure that the
system is functional after the Solaris Security Toolkit software is implemented. It is
also important that the process be optimized to ensure any downtime is as brief as
possible.
Note – When securing a deployed system, it might be more effective in some cases
for an organization to rebuild the system, harden it during re-installation, then
reload all of the software necessary for operation.
This section presents considerations that must be clearly understood before you
attempt to secure a system. Carefully weigh the risks with the benefits to determine
which actions are appropriate for your organization.
1. Understand the requirements of the services and applications on the system.
You must identify the services and applications running on a system prior to
running the Solaris Security Toolkit software. Any dependencies associated with
the services and applications must be enumerated so that the configuration of the
Solaris Security Toolkit software can be sufficiently adjusted. Failure to do so
could disable services or prevent necessary services from starting. While the
changes made by the Solaris Security Toolkit software can in most cases be
undone, developing a correct profile before installation limits the potential
downtime associated with the Solaris Security Toolkit software implementation.
2. Take into account that the system must be taken offline and rebooted.
For the changes made by the Solaris Security Toolkit software to take effect, the
system must be rebooted. Depending on how vital the system is, the services that
it provides, and the availability of a maintenance window, an organization might
face difficulties implementing the software. A decision must be made after
carefully weighing the cost of downtime versus the risks of not enhancing
security.
3. A system might require multiple reboots to verify functionality.
Whenever possible, make all changes on nonproduction systems prior to
implementing the systems in a mission-critical setting. This is not always
possible; for example, due to lack of sufficient hardware or software that
effectively mirrors the target environment. Testing must be conducted both before
and after execution of the Solaris Security Toolkit software through hardening.
There could still be unidentified dependencies that require troubleshooting after a
system is hardened. In most cases, these issues can be resolved fairly quickly
using the techniques described in this chapter. If functionality problems are
discovered after the Solaris Security Toolkit software execution, additional
18 Solaris Security Toolkit 4.2 Administration Guide • July 2005
Page 43

platform reboots might be necessary to either undo the effects of the Solaris
Security Toolkit software or to make further changes to the security configuration
of the system to support and enable the missing functionality.
4. Platform security entails more than just hardening and auditing.
When considering retrofitting a system’s configuration to enhance its security
posture, it is critical to understand that platform hardening and auditing
represent only a fraction of what can and should be done to protect a system,
services, and data. A treatment of the additional measures and controls is outside
the scope of this document, but you are encouraged to consider issues related to
account management, privilege management, file system and data integrity, hostbased access control, intrusion detection, vulnerability scanning and analysis, and
application security.
5. The system might already have exploitable vulnerabilities or have been exploited.
The platform being hardened might have already been exploited by an attacker.
The Solaris Security Toolkit software is probably being implemented too late to
offer protection for an exploited vulnerability. In the case of an exploited
vulnerability:
a. Reinstall the system.
b. Install the Solaris Security Toolkit software.
c. Use the Solaris Security Toolkit software to enhance security.
Reviewing Security Policy, Standards, and Related Documentation
The first task in securing a system is to understand your organization’s relevant
security policies, standards, and guidelines with respect to platform security. Use
these documents as the foundation of your Solaris Security Toolkit’s profile, because
these documents communicate requirements and practices to be followed for all
systems in your organization. If your organization does not have documentation,
developing it increases your ability to customize the Solaris Security Toolkit
software.
Note – When looking for these documents, keep in mind that some material might
be listed in best practices or other documentation.
For more information on security policies, refer to the Sun BluePrints OnLine article
“Developing a Security Policy.” This document can be used to gain a greater
understanding of the role that security policies play in an organization’s security
plan.
Chapter 2 Securing Systems: Applying a Methodology 19
Page 44

The following two examples illustrate how policy statements can directly impact the
way that the Solaris Security Toolkit’s profile is configured.
Example 1
■ Policy – An organization must use management protocols that support strong
authentication of users and encryption of transmitted data.
■ Profile Impact – Clear-text protocols such as Telnet, File Transfer Protocol (FTP),
Simple Network Management Protocol version 1 (SNMPv1), and others should
not be used. The secure.driver in the Solaris Security Toolkit disables such
services, so no additional configuration is needed.
Note – Both Telnet and FTP services can be configured to support stronger
authentication and encryption using extensions such as Kerberos. However, their
default configurations do not support these added levels of security.
Example 2
Policy – All users are forced to change their passwords every 30 days.
Profile Impact – The Solaris Security Toolkit software can be configured to enable
password aging. The secure.driver in the Solaris Security Toolkit software sets a
password maximum age to 8 weeks (56 days). To comply with the policy, the Solaris
Security Toolkit software’s profile must be changed. Refer to the Solaris Security
Toolkit 4.2 Reference Manual.
Although the secure.driver in the Solaris Security Toolkit software enables password
aging when run on a system, this change does not affect existing users until they
change their password. To enable password aging for existing users, invoke the
passwd(1) command on each user account. To force existing users to change their
passwords, you can use the passwd -f command. For more information about the
passwd(1) command, refer to the Solaris 10 OS Reference Collection.
Determining Application and Service Requirements
This task ensures that services remain functional after a system is hardened. This
task is comprised of the following steps:
■ “Identifying Application and Operational Service Inventory” on page 21
■ “Determining Service Requirements” on page 21
20 Solaris Security Toolkit 4.2 Administration Guide • July 2005
Page 45

Identifying Application and Operational Service Inventory
Inventory the applications, services, and operational or management functions. This
inventory is necessary to determine the software that is actually being used on a
system. In many cases, systems are configured with more software than is used and
with software that does not support business functions.
Systems should be constructed minimally whenever possible. That is, software that
is not required to support a business function should not be installed. Unnecessary
software applications on a system increase the number of opportunities that an
attacker can use to exploit the system. Additionally, more software on a system
usually equates to more patches that must be applied. For information on
minimizing the Solaris OS, refer to the Sun BluePrints OnLine article “Minimizing
the Solaris Operating Environment for Security.” For information on minimizing Sun
Fire systems domains, refer to the Sun BluePrints Online articles “"Part I:
Minimizing Domains for Sun Fire V1280, 6800, 12K, and 15K Systems," and "Part II:
Minimizing Domains for Sun Fire V1280, 6800, 12K, and 15K Systems."
When building the inventory of software, be sure to include infrastructure
components such as management, monitoring, and backup software in addition to
applications residing on the system.
Determining Service Requirements
After you complete an application and service inventory, determine if any
components have dependencies that could be impacted by the hardening process.
Many third-party applications do not directly use services provided by the Solaris
OS. For those applications that do, the following sections provide helpful
information.
■ “Shared Libraries” on page 21
■ “Configuration Files” on page 24
■ “Service Frameworks” on page 25
Note – All of the examples in this section are from the Solaris 9 OS.
Shared Libraries
It is important to understand which libraries are needed to support an application.
This knowledge is most useful in debugging circumstances, but also is useful in
preparing a system to be hardened. When the state of a system is unknown, gather
as much information as possible so that issues such as software dependencies are
clearly understood.
Chapter 2 Securing Systems: Applying a Methodology 21
Page 46

You can use three methods to determine which libraries are used by an application,
depending upon the Solaris OS version you install. This section shows a code
example for each method.
■ Method 1 - Obtaining information about file system objects, for example,
application binaries or libraries (
■ Method 2 - Collecting information about a running process to analyze a running
application (
■ Method 3 - Identifying dynamically loaded applications to trace a program when
it is started (
CODE EXAMPLE 2-2).
CODE EXAMPLE 2-3).
CODE EXAMPLE 2-1).
Method 1
To obtain information about a file system object, use the /usr/bin/ldd command.
For example, determine the libraries that are needed to support the Domain Name
System (DNS) server software.
CODE EXAMPLE 2-1 Obtaining Information About File System Objects
# ldd /usr/sbin/in.named
libresolv.so.2 => /usr/lib/libresolv.so.2
libsocket.so.1 => /usr/lib/libsocket.so.1
libnsl.so.1 => /usr/lib/libnsl.so.1
libc.so.1 => /usr/lib/libc.so.1
libdl.so.1 => /usr/lib/libdl.so.1
libmp.so.2 => /usr/lib/libmp.so.2
/usr/platform/SUNW,Ultra-5_10/lib/libc_psr.so.1
Method 2
To collect the information from a running process, use the /usr/proc/bin/pldd
command (available on Solaris OS versions 8, 9, and 10).
CODE EXAMPLE 2-2 Collecting Information From a Running Process
# pldd 20307
20307: /usr/sbin/in.named
/usr/lib/libresolv.so.2
/usr/lib/libsocket.so.1
/usr/lib/libnsl.so.1
/usr/lib/libc.so.1
22 Solaris Security Toolkit 4.2 Administration Guide • July 2005
Page 47

CODE EXAMPLE 2-2 Collecting Information From a Running Process (Continued)
# pldd 20307
/usr/lib/libdl.so.1
/usr/lib/libmp.so.2
/usr/platform/sun4u/lib/libc_psr.so.1
/usr/lib/dns/dnssafe.so.1
/usr/lib/dns/cylink.so.1
Method 3
The pldd command shows the shared libraries that are loaded dynamically by the
application, in addition to those against which the application is linked. This
information can also be gathered using the following truss command.
Note – The following output is truncated for brevity.
CODE EXAMPLE 2-3 Identifying Dynamically Loaded Applications
# truss -f -topen,open64 /usr/sbin/in.named
20357: open("/usr/lib/libresolv.so.2", O_RDONLY) = 3
20357: open("/usr/lib/libsocket.so.1", O_RDONLY) = 3
20357: open("/usr/lib/libnsl.so.1", O_RDONLY) = 3
20357: open("/usr/lib/libc.so.1", O_RDONLY) = 3
20357: open("/usr/lib/libdl.so.1", O_RDONLY) = 3
20357: open("/usr/lib/libmp.so.2", O_RDONLY) = 3
20357: open("/usr/lib/nss_files.so.1", O_RDONLY) = 4
20357: open("/usr/lib/nss_files.so.1", O_RDONLY) = 4
20357: open("/usr/lib/dns/dnssafe.so.1", O_RDONLY) = 4
20357: open("/usr/lib/dns/cylink.so.1", O_RDONLY) = 4
20357: open("/usr/lib/dns/sparcv9/cylink.so.1", O_RDONLY) = 4
This version of the output contains the process identifier, the system call (in this
case, open) and its arguments, as well as the system call’s return value. Using the
return value, it is clear when the system call is successful in finding and opening the
shared library.
Chapter 2 Securing Systems: Applying a Methodology 23
Page 48

Once the list of shared libraries is known, use the following command to determine
the Solaris OS packages to which they belong.
# grep “/usr/lib/dns/cylink.so.1” /var/sadm/install/contents
/usr/lib/dns/cylink.so.1 f none 0755 root bin 63532 24346 \
1018126408 SUNWcsl
The resulting output, indicates that this shared library belongs to the SUNWcsl
(Core, Shared Libs) package. This process is especially useful when performing
platform minimization, because it helps to identify the packages that are required to
support an application or service.
Configuration Files
Another way to gather requirements is through configuration files. This process has
a more direct impact on how a system is hardened, because configuration files can
be renamed or removed to disable services. For more information, refer to the Solaris
Security Toolkit 4.2 Reference Manual.
To determine if a configuration file is in use, use the truss command.
Note – The following output is truncated for brevity.
CODE EXAMPLE 2-4 Determining if a Configuration File Is In Use
# truss -f -topen,open64 /usr/sbin/in.named 2>&1 | \
grep -v "/usr/lib/.*.so.*"
20384: open("/etc/resolv.conf", O_RDONLY) = 3
20384: open("/dev/conslog", O_WRONLY) = 3
20384: open("/usr/share/lib/zoneinfo/US/Eastern", O_RDONLY) = 4
20384: open("/var/run/syslog_door", O_RDONLY) = 4
20384: open("/etc/nsswitch.conf", O_RDONLY) = 4
20384: open("/etc/services", O_RDONLY) = 4
20384: open("/etc/protocols", O_RDONLY) = 4
20384: open("/etc/named.conf", O_RDONLY) = 4
20384: open("named.ca", O_RDONLY) = 5
24 Solaris Security Toolkit 4.2 Administration Guide • July 2005
Page 49

CODE EXAMPLE 2-4 Determining if a Configuration File Is In Use (Continued)
# truss -f -topen,open64 /usr/sbin/in.named 2>&1 | \
grep -v "/usr/lib/.*.so.*"
20384: open("named.local", O_RDONLY) = 5
20384: open("db.192.168.1", O_RDONLY) = 5
20384: open("db.internal.net", O_RDONLY) = 5
In this example, the DNS service uses configuration files such as
/etc/named.conf. As with the previous example, if the return value of a service
indicates an error, there might be a problem. Carefully documenting the results both
before and after hardening can help to speed the entire validation process.
Service Frameworks
This category includes frameworks or meta services on which larger, more complex
applications are built. The types of frameworks typically found in this category are:
■ Naming services, for example, Network Information Services (NIS), NIS+, and
Lightweight Directory Access Protocol (LDAP)
■ Authentication services, for example, Kerberos and LDAP
■ Utility services, such as port mapper used by the Remote Procedure Call (RPC)
facility
It is not always clear when an application depends on these types of services. When
special adjustments are needed to configure an application, such as when adding it
to a Kerberos realm, the dependency is known. However, application dependencies
do not always require any added tasks, and the actual dependency might not be
documented by the vendor.
One such example is the RPC port mapper. The secure.driver in the Solaris
Security Toolkit software disables the RPC port mapper. This action might cause
unexpected behavior in other services relying on this service. Based on past
experiences, services abort, hang, or fail depending on how well the application’s
code is written to handle exception cases. To determine if an application is using the
RPC port mapper, use the rpcinfo command. For example:
CODE EXAMPLE 2-5 Determining Which Applications Use RPC
# rpcinfo -p
100000 3 tcp 111 rpcbind
100000 4 udp 111 rpcbind
100000 2 udp 111 rpcbind
Chapter 2 Securing Systems: Applying a Methodology 25
Page 50

CODE EXAMPLE 2-5 Determining Which Applications Use RPC (Continued)
# rpcinfo -p
100024 1 udp 32777 status
100024 1 tcp 32772 status
100133 1 udp 32777
100133 1 tcp 32772
100021 1 udp 4045 nlockmgr
100021 2 udp 4045 nlockmgr
100021 3 udp 4045 nlockmgr
100021 4 udp 4045 nlockmgr
100021 1 tcp 4045 nlockmgr
The service column is populated with information from the /etc/rpc file or a
configured naming service, such as LDAP.
If this file does not have an entry for a service, as is often the case for third-party
products, the service field might be empty. This makes it more difficult to identify
applications registered by other applications.
For example, consider the rusers command. This command relies on the RPC port
mapping service. If the RPC port mapper is not running, the rusers command
appears to hang. The program eventually times out with the following error
message:
# rusers -a localhost
localhost: RPC: Rpcbind failure
This problem occurs because the program cannot communicate with the service.
After starting the RPC port mapping service from /etc/init.d/rpc, however, the
program immediately yields its result.
As another example, consider the case where the RPC port mapping service is
running, and the rusers service is not configured to run. In this case, a completely
different response is generated, and it is relatively straightforward to validate.
CODE EXAMPLE 2-6 Validating rusers Service
# rusers -a localhost
localhost: RPC: Program not registered
# grep rusers /etc/rpc
26 Solaris Security Toolkit 4.2 Administration Guide • July 2005
Page 51

CODE EXAMPLE 2-6 Validating rusers Service
rusersd 100002 rusers
# rpcinfo -p | grep rusers
<No output generated>
Given that the rpcinfo command does not have a registry for the rusers service,
it is safe to assume that the service is not configured to run. This assumption is
validated by looking at the service entry in the /etc/inet/inetd.conf.
# grep rusers /etc/inet/inetd.conf
# rusersd/2-3 tli rpc/datagram_v,circuit_v wait root
/usr/lib/netsvc/rusers/rpc.rusersd rpc.rusersd
The comment mark (#) at the beginning of the service line indicates that the rusers
service is disabled. To enable the service, uncomment the line and send a SIGHUP
signal to the /usr/sbin/inetd process as follows.
# pkill -HUP inetd
Note – The pkill command is only available in Solaris OS versions 7 through 10.
For other versions, use the ps and kill commands respectively to find and signal
the process.
Another way to determine if an application uses the RPC facility is to use the ldd
command described earlier.
CODE EXAMPLE 2-7 Alternative Method for Determining Applications That Use RPC
# ldd /usr/lib/netsvc/rusers/rpc.rusersd
libnsl.so.1 => /usr/lib/libnsl.so.1
librpcsvc.so.1 => /usr/lib/librpcsvc.so.1
libc.so.1 => /usr/lib/libc.so.1
libdl.so.1 => /usr/lib/libdl.so.1
libmp.so.2 => /usr/lib/libmp.so.2
/usr/platform/SUNW,Ultra-250/lib/libc_psr.so.1
The entry for librpcsvc.so.1 indicates, along with the file name, that this service
relies on the RPC port mapping service.
Chapter 2 Securing Systems: Applying a Methodology 27
Page 52
In addition to the RPC port mapper, applications might rely on other common OS
services such as FTP, SNMP, or Network File System (NFS). You can use similar
techniques to debug these services and to determine if they are actually needed to
support a business function. One method involves using the netstat command as
follows.
# netstat -a | egrep "ESTABLISHED|TIME_WAIT"
This command returns a list of services that are or were recently in use, for example:
TABLE 2-1 Listing Services Recently in Use
localhost.32827 localhost.32828 49152 0 49152 0
ESTABLISHED
localhost.35044 localhost.32784 49152 0 49152 0
ESTABLISHED
localhost.32784 localhost.35044 49152 0 49152 0
ESTABLISHED
localhost.35047 localhost.35046 49152 0 49152 0
ESTABLISHED
localhost.35046 localhost.35047 49152 0 49152 0
ESTABLISHED
filefly.ssh 192.168.0.3.2969 17615 1 50320 0 ESTABLISHED
In this example, many services are in use, but it is unclear which ports are owned by
which services or applications. This information can be collected by inspecting the
processes using the pfiles(1) command (available on Solaris OS versions 8, 9, and
10). The pfiles command reports information for all open files in each process.
CODE EXAMPLE 2-8 Determining Which Ports Are Owned by Services or Applications
# for pid in `ps -aeo pid | grep -v PID`; do
> pfiles ${pid} | egrep "^${pid}:|sockname:"
> done
A more effective and efficient way to determine these dependencies is by using the
list open files (lsof) command.
Download the lsof source code from:
ftp://lsof.itap.purdue.edu/pub/tools/unix/lsof/
Download the lsof binaries from:
http://www.sunfreeware.com
28 Solaris Security Toolkit 4.2 Administration Guide • July 2005
Page 53

The lsof command determines which processes are using which files and ports. For
example, to determine which processes are using port 35047 from the previous
example, use the following command.
CODE EXAMPLE 2-9 Determining Which Processes Are Using Files and Ports
# ./lsof -i | grep 35047
ttsession 600 root 9u IPv4 0x3000b4d47e8 0t1 TCP
localhost:35047->localhost:35046 (ESTABLISHED)
dtexec 5614 root 9u IPv4 0x3000b4d59e8 0t0 TCP
localhost:35046->localhost:35047 (ESTABLISHED)
The output of lsof indicates that port 35047 is in use for communication between
the dtexec and ttsession processes.
Using the lsof program, you might be able to more rapidly determine intersystem
or interapplication dependencies that require file system or network usage. Nearly
everything that is addressed in this section can be captured using various options of
the lsof program.
Note – The methods described for determining dependencies might not find rarely
used items. In addition to using these methods, review Sun documentation and
vendor documentation.
Developing and Implementing a Solaris Security Toolkit Profile
After you complete the planning and preparation phase, develop and implement a
security profile. A security profile consists of related configuration, hardening, and
secure drivers, for example, name-{config|hardening|secure}.driver,
scripts, and files to implement your site-specific security policies.
Customize one of the security profiles provided with the Solaris Security Toolkit
software, or develop your own. Each organization’s policies, standards, and
application requirements differ, even if only slightly.
To customize a security profile, adjust its actions through finish scripts, audit scripts,
environment variables, framework functions, and file templates.
See the following chapters for more information:
Chapter 2 Securing Systems: Applying a Methodology 29
Page 54

■ For important guidelines about customizing the software, see Chapter 1,
“Configuring and Customizing the Solaris Security Toolkit Software” on page 14.
■ For an example scenario where a security profile is created, see Chapter 7,
“Creating a Security Profile” on page 105.
■ For information about customizing drivers, refer to the Solaris Security Toolkit 4.2
Reference Manual.
As needed, see other chapters of the Solaris Security Toolkit 4.2 Reference Manual for
information about scripts, framework functions, environment variables, and files.
Two key environment variables you might want to customize are JASS_FILES
and JASS_SCRIPTS.
To enforce standards across a majority of platforms while still providing for
platform-specific differences, use a technique known as nested or hierarchical
security profiles. For more information, refer to the Solaris Security Toolkit 4.2
Reference Manual. Compare the resulting security profile with the policies, standards,
and requirements of your organization to ensure that changes are not inadvertently
or erroneously made.
Installing the Software
The installation of the Solaris Security Toolkit software is the same for both deployed
and new systems that are being installed. For detailed instructions, see
Chapter 3.
For deployed systems, a few special cases can make this process simpler and faster.
These cases are not focused on the hardening process, but are focused on
preinstallation and post-installation tasks.
Performing Preinstallation Tasks
Before hardening a deployed system, consider and plan two significant tasks:
■ Backup
■ Verification
These tasks help to determine the state of the deployed system and to work out any
potential configuration problems before the system is hardened.
30 Solaris Security Toolkit 4.2 Administration Guide • July 2005
Page 55

Backing Up Data
This task focuses on contingency planning. In the event of a problem, it is necessary
to ensure that the system’s configuration and data are archived in some form. You
must:
■ Back up the system
■ Ensure that the backup media can be read
■ Validate that the contents can be restored
Take these steps before making any significant change to a system’s configuration.
Verifying System Stability
The verification task is nearly as important as the backup task. Verification ensures
that the system is in a stable and working state prior to the implementation of any
configuration changes, such as those made by the hardening process. This
verification process involves:
■ Reboot
■ Successful testing of any applications or services
While having a well-defined test and acceptance plan is preferred, plans might not
always be available. If that is the case, test the system in a reasonable way based on
how it is used. The goal of this effort is to ensure that the running configuration, in
fact, matches the saved configuration.
Investigate any error messages or warnings that are displayed when the system
boots or an application starts. If you cannot correct the errors, log them so that
during the hardening process they are not included as potential causes of problems.
When looking at the log files, be sure to include system, service, and application logs
such as:
■ /var/adm/messages
■ /var/adm/sulog
■ /var/log/syslog
■ /var/cron/log
This task is complete when you can restart the system without encountering errors
or warning messages, or without encountering any unknown errors or warnings; all
known ones have been documented. The system should restart to a known and stable
state. If, during the course of verification, you discover that the running and stored
configurations of the system differ, reassess your organization’s change control
policies and processes to identify the gap that leads to that condition.
Chapter 2 Securing Systems: Applying a Methodology 31
Page 56

Performing the Post-installation Task
The post-installation task is an extension of the preinstallation tasks. The goal is to
ensure that the hardening process did not cause any new faults to the system or
applications. This task is primarily conducted by reviewing system and application
log files. The log files created after hardening and the subsequent reboot should be
similar to those collected before the system was hardened. In some cases, there
might be fewer messages, because fewer services are started. Most importantly, there
should be no new error or warning messages.
In addition to reviewing log files, test the functionality, because some applications
might fail without generating a log entry. See the following section for detailed
verification information.
Verifying Application and Service Functionality
The final task in the process of securing a system involves verifying that the
applications and services offered by the system are functioning correctly. This task
also verifies that the security profile successfully implemented the requirements of
the security policies. Perform this task thoroughly and soon after the reboot of the
hardened platform, to ensure that any anomalies or problems are detected and
corrected immediately. This task is divided into two subtasks: verifying security
profile installation and verifying application and service functionality.
Verifying Security Profile Installation
To verify that the Solaris Security Toolkit software installed the security profile
correctly and without error, review the installation log file jass-install-
log.txt. This file is installed in /var/opt/SUWWjass/runs under the directory
that is unique to each hardening or audit run (start time of the run).
Note – Refer to this log file to understand what the Solaris Security Toolkit software
did to a system. For each run on a system, there is a new log file stored in the
directory based on the start time of the run.
In addition to verifying that the profile is installed, assess the security configuration
of the system. Perform a manual inspection or use a tool to automate the process.
32 Solaris Security Toolkit 4.2 Administration Guide • July 2005
Page 57

Verifying Application and Service Functionality
To verify process applications and services, execute a well-defined test and
acceptance plan. This plan exercises the various components of a system or
application to determine that they are available and in working order. If such a plan
is not available, test the system in a reasonable way based on how it is used. The
goal of this effort is to ensure that the hardening process in no way affected the
ability of applications or services to perform their functions.
If you discover that an application or service malfunctions after a system was
hardened, determine the problem by reviewing the application log files. In many
cases, you can use the truss command to determine at what point an application is
having difficulty. Once this is known, you can target the problem and trace it back to
a change made by the Solaris Security Toolkit software.
Maintaining System Security
A common mistake that many organizations make is addressing security only
during installation, then rarely or never revisiting it. Maintaining security is an
ongoing process. System security must be reviewed and revisited periodically.
Maintaining a secure system requires vigilance, because the security configuration
for any system becomes increasingly open over time. For example, system
vulnerabilities become more known.
The following basic guidelines provide an overview of maintaining system security:
■ Review the security posture of a system before and after any patch is installed. It
is also important to keep your systems updated with the latest patches.
Solaris OS patches might install additional software packages as part of their
installation and could overwrite your system configuration files. The Solaris
Security Toolkit software can assist you with applying patches, because it
supports repetitive runs on a system, so that you can secure the system after
installing patches. Run the software after any patch installation, with the
applicable drivers, to ensure that your configuration remains consistent with your
defined security policies. In addition, perform a manual review of the system,
because the version of the Solaris Security Toolkit software being used might not
support the new features added by the installed patches.
■ Monitor the system on an ongoing basis to ensure that unauthorized behavior
does not occur. Review system accounts, passwords, and access patterns; they can
provide a great deal of information about what is happening to a system.
Chapter 2 Securing Systems: Applying a Methodology 33
Page 58

■ Deploy and maintain a centralized syslog repository to collect and parse
syslog messages. You can obtain valuable information by gathering and
reviewing these logs.
■ Institute a comprehensive vulnerability and audit strategy to monitor and
maintain system configurations. This requirement is particularly important in the
context of maintaining systems in secure configurations over time.
■ Update your systems periodically with the latest version of the Solaris Security
Toolkit software.
The Solaris Security Toolkit software includes default security profiles for use as a
starting point.
34 Solaris Security Toolkit 4.2 Administration Guide • July 2005
Page 59

CHAPTER
3
Upgrading, Installing, and Running Security Software
This chapter provides instructions for downloading, upgrading or installing, and
running the Solaris Security Toolkit software and other security-related software.
Included are instructions for configuring your environment for either stand-alone or
JumpStart mode, and for obtaining support.
Follow the instructions and process provided in this section to upgrade or install,
configure, and execute the software. These instructions include downloading
additional security software, helpful examples, and guidelines.
Although the Solaris Security Toolkit software is a stand-alone product, it is most
effective when used with the additional security software provided for
downloading. This software includes the latest Recommended and Security Patch
Cluster from SunSolve OnLine, Secure Shell software for Solaris OS releases that do
not include it, permission and ownership modification software to tighten Solaris OS
and third-party software permissions, and integrity validation binaries to validate
the integrity of Sun files and executables.
This chapter contains the following tasks:
■ “Performing Planning and Preinstallation Tasks” on page 36
■ “Software Dependencies” on page 36
■ “Determining Which Mode to Use” on page 36
■ “Upgrading Procedures” on page 38
■ “Downloading Security Software” on page 40
■ “Customizing Security Profiles” on page 47
■ “Installing and Executing the Software” on page 48
■ “Validating the System Modifications” on page 60
35
Page 60

Performing Planning and Preinstallation Tasks
Proper planning is key to successfully using the Solaris Security Toolkit software to
secure systems. See
install the software.
If you are installing the software on a deployed system, see “Performing
Preinstallation Tasks” on page 30 for information about performing preinstallation
tasks prior to installing the software on deployed systems.
Chapter 2 for detailed information about planning before you
Software Dependencies
The Solaris Security Toolkit 4.2 software depends upon the SUNWloc package. The
absence of this package causes the Solaris Security Toolkit to fail.
See “Supported Solaris OS Versions” on page xx for information about supported
versions of the Solaris Operating System.
See “Supported SMS Versions” on page xxi for information about supported
versions of the System Management Services (SMS) software.
Determining Which Mode to Use
Harden systems during or immediately after the OS installation, to limit the period a
system might be exposed to attack while in an unsecured state. Before using the
Solaris Security Toolkit software to secure a system, configure the Solaris Security
Toolkit software to run properly in your environment.
The Solaris Security Toolkit software has a modular framework. If you are not using
the JumpStart product, the flexibility of the Solaris Security Toolkit software’s
framework enables you to efficiently prepare for using JumpStart later. If you are
using JumpStart, you benefit from the Solaris Security Toolkit software’s ability to
integrate into existing JumpStart architectures.
The following sections describe the stand-alone and JumpStart modes.
36 Solaris Security Toolkit 4.2 Administration Guide • July 2005
Page 61

Stand-alone Mode
The Solaris Security Toolkit software runs directly from a Solaris OS shell prompt in
stand-alone mode. This mode enables you to use the Solaris Security Toolkit
software on those systems that require security modifications or updates, yet cannot
be taken out of service to reinstall the OS from scratch. However, whenever possible,
operating systems should be reinstalled from scratch prior to being secured.
Stand-alone mode is particularly useful when hardening a system after installing
patches or third-party software. You can run the Solaris Security Toolkit software
multiple times on a system with no ill effects. Patches might overwrite or modify
files the Solaris Security Toolkit software has modified; by rerunning the Solaris
Security Toolkit software, any security modifications negated by the patch
installation can be reimplemented.
Note – In production environments, stage patches in test and development
environments before installing the patches in live environments.
The stand-alone mode is one of the best options to harden a deployed system as
quickly as possible. No special steps are required to integrate the Solaris Security
Toolkit software into an architecture without JumpStart, other than those steps in the
downloading and installing instructions provided in
Software” on page 40.
“Downloading Security
JumpStart Mode
JumpStart technology, which is Sun’s network-based Solaris OS installation
mechanism, can run Solaris Security Toolkit scripts during the installation process.
This book assumes that the reader is familiar with JumpStart technology and has an
existing JumpStart environment available. For more information about JumpStart
technology, refer to the Sun BluePrints book JumpStart Technology: Effective Use in the
Solaris Operating Environment.
The Solaris Security Toolkit 4.2 package is relocatable, so that it can be installed to
whatever directory you want by using the correct options to the pkgadd command.
JASS_HOME_DIR becomes the base directory of the JumpStart server.
Only a few steps are required to integrate the Solaris Security Toolkit software into a
JumpStart architecture. See
JumpStart server.
Chapter 5 for instructions on how to configure a
Chapter 3 Upgrading, Installing, and Running Security Software 37
Page 62

Upgrading Procedures
This section contains information about how to upgrade your system from Solaris
Security Toolkit 4.0 and 4.1 software to Solaris Security Toolkit 4.2 software, with
and without upgrading your Solaris OS. The system is hardened by using the Solaris
Security Toolkit software on your Solaris operating system. The procedures are the
same whether upgrading from version 4.0 or 4.1. The procedures given here are very
important to use as prescribed, because they will prevent you from overwriting all
your prior customizing.
Caution – Only one version of the Solaris Security Toolkit can be installed at any
one time.
The Solaris Security Toolkit 4.2 software provides a new enhancement to the pkgrm
command. With this release, the first step in the pkgrm command checks the
integrity of all files included in the distribution. If any files are different, the pkgrm
command exits with an error message that tells the system administrator either to
put the correct file in place or to remove the modified file.
The drivers are in the Drivers subdirectory where Solaris Security Toolkit is
installed. User-written drivers are placed there, too. When removing SUNWjass with
the pkgrm command, it removes the Solaris Security Toolkit–provided drivers and
user-modified drivers, but leaves any custom drivers the user have added, assuming
the custom drivers have different names than Solaris Security Toolkit–provided
drivers.
Caution – If a driver was modified, it must be saved before upgrading. Never
modify the original files distributed with the Solaris Security Toolkit software.
Instead of modifying a driver file, copy the driver file to a new file, then modify the
new file.
▼ To Upgrade Solaris Security Toolkit Software
and the Solaris Operating System
1. Follow the best practice that is available for upgrading your system; that is,
backing it up or using Solaris upgrade.
2. Uninstall the previous version of Solaris Security Toolkit software.
3. Install Solaris Security Toolkit 4.2 software.
38 Solaris Security Toolkit 4.2 Administration Guide • July 2005
Page 63

4. Run Solaris Security Toolkit 4.2 software in audit mode against the upgraded
system using the previous Solaris Security Toolkit drivers and user-specified
drivers.
User-specified drivers must be in the Drivers directory. If they are, then they can
be specified for a jass-execute or hardening run.
5. Do one of the following:
a. If there are no errors, go to step 6.
b. If errors are generated during the run (for examples, a non-installed run control
script is modified, or a service should be controlled using an FMRI), fix those
errors, and repeat steps 4 and 5 until no more errors are generated.
6. Compare your customized driver against the secure.driver to determine if any
new finish or audit scripts should be added to your customized driver.
7. Do one of the following:
a. If no scripts are missing, go to step 8.
b. If any scripts are missing, add those missing scripts, and repeat steps 4, 5, 6,
and 7 until all necessary scripts are included.
8. Run Solaris Security Toolkit 4.2 in hardening mode.
9. Run Solaris Security Toolkit 4.2 in audit mode, and ensure there are no errors.
10. Review the security configuration and posture of the system to determine if it
complies with security requirements.
11. Do one of the following:
a. If the system is compliant, go to step 12.
b. If the system is not compliant, update the driver being used, and return to step
8.
12. Fully test the system to ensure that the system provides required network services
and all applications are fully functional.
13. If any errors are encountered, update the driver being used, and return to step 8.
This completes the upgrade.
▼ To Upgrade Solaris Security Toolkit Software
Only
1. Uninstall the previous version of Solaris Security Toolkit software.
Chapter 3 Upgrading, Installing, and Running Security Software 39
Page 64

2. Install Solaris Security Toolkit 4.2 software.
3. Go to step 4 of “To Upgrade Solaris Security Toolkit Software and the Solaris
Operating System” on page 38.
Upgrading the Solaris OS Only
If you are only upgrading the Solaris OS and already have Solaris Security Toolkit
4.2 software installed (for example, upgrading from Solaris 8 OS to Solaris 10 OS),
you do not need to uninstall the Solaris Security Toolkit 4.2 software. After you
finish the Solaris OS upgrade, run Solaris Security Toolkit 4.2 in audit mode, and
review the system security configuration to ensure there are no errors.
Downloading Security Software
The first stage in hardening a system requires downloading additional software
security packages onto the system you want to secure. This section covers the
following tasks:
■ “Downloading Solaris Security Toolkit Software” on page 40
■ “Downloading Recommended Patch Cluster Software” on page 42
■ “Downloading FixModes Software” on page 43
■ “Downloading OpenSSH Software” on page 44
■ “Downloading the MD5 Software” on page 46
Note – Of the software described in this section, the Solaris Security Toolkit
software, Recommended and Security Patch Cluster, FixModes, and
(MD5) algorithm software are essential. Instead of OpenSSH, you can substitute a
commercial version of Secure Shell, available from a variety of vendors. Install and
use a Secure Shell product on all systems. If using the Solaris 9 or 10 OS, use the
Secure Shell (SSH) version that is included. If using the Solaris 10 OS, use the
/usr/bin/digest command that is included for MD5 checksums.
Downloading Solaris Security Toolkit Software
The Solaris Security Toolkit software is distributed in Solaris OS package format.
First download the Solaris Security Toolkit software, then install it on the server on
which you are using the Solaris Security Toolkit software in stand-alone mode or on
a JumpStart server for JumpStart mode.
40 Solaris Security Toolkit 4.2 Administration Guide • July 2005
message-digest 5
Page 65

Note – The following instructions use file names that do not reference the version
number. Always download the latest version from the web site.
Throughout the rest of this guide, the JASS_HOME_DIR environment variable refers
to the root directory of the Solaris Security Toolkit software, which is by default
/opt/SUNWjass.
▼ To Download the pkg Version
1. Download the software distribution file (SUNWjass-n.n.pkg.tar.Z).
The source file is located at:
http://www.sun.com/security/jass
Note – If you encounter difficulty downloading the software, use your browser’s
Save As option.
2. Extract the software distribution file into a directory on the server by using the
uncompress command:
# uncompress SUNWjass-n.n.pkg.tar.Z
3. Untar the software distribution package by using the tar command:
# tar -xvf SUNWjass-n.n.pkg.tar
4. Install the software distribution file into a directory on the server using the
pkgadd command as shown:
# pkgadd -d SUNWjass-n.n.pkg SUNWjass
where n.n is the most current version that you are downloading.
Executing this command creates the SUNWjass directory in /opt. This subdirectory
contains all the Solaris Security Toolkit directories and associated files.
Chapter 3 Upgrading, Installing, and Running Security Software 41
Page 66

Downloading Recommended Patch Cluster Software
Patches are released by Sun to provide Solaris OS fixes for performance, stability,
functionality, and security. It is critical to the security of a system that the most
up-to-date patch cluster is installed. To ensure that the latest Solaris OS
Recommended and Security Patch Cluster is installed on your system, this section
describes how to download the latest patch cluster.
Note – Before installing any patches, evaluate and test them on nonproduction
systems or during scheduled maintenance windows.
▼ To Download Recommended Patch Cluster
Software
Before you install a patch cluster, review individual patch README files and other
information provided. The information often contains suggestions and information
helpful to know before installing a patch cluster.
1. Download the latest patch cluster from the SunSolve OnLine web site at:
http://sunsolve.sun.com
2. Click the Patches link on the right-hand navigation bar.
3. Click the Recommended Patch Clusters link.
4. Select the appropriate Solaris OS version in the Recommended Solaris Patch
Clusters box.
In our example, we select Solaris 10 OS.
5. Select the best download option, either HTTP or FTP, with the associated radio
button, then click Go.
A Save As dialog box is displayed in your browser window.
6. Save the file locally.
42 Solaris Security Toolkit 4.2 Administration Guide • July 2005
Page 67

7. Move the file securely to the system being hardened.
Use the secure copy command, scp(1), or another method that provides secure file
transfer.
Use the scp command as follows:
# scp 10_Recommended.zip target01:
8. Move the file to the /opt/SUNWjass/Patches directory and uncompress it.
For example:
CODE EXAMPLE 3-1 Moving a Patch File to /opt/SUNWjass/Patches Directory
# cd /opt/SUNWjass/Patches
# mv /directory in which file was saved/10_Recommended.zip .
# unzip 10_Recommended.zip
Archive: 10_Recommended.zip
creating: 10_Recommended/
inflating: 10_Recommended/CLUSTER_README
inflating: 10_Recommended/copyright
inflating: 10_Recommended/install_cluster
[. . .]
The patch cluster software is installed automatically after you download the other
security packages and execute the Solaris Security Toolkit software.
Note – If you do not place the Recommended and Security Patch Cluster software
into the /opt/SUNWjass/Patches directory, a warning message displays when
you execute the Solaris Security Toolkit software. You can safely ignore this message
if no patch clusters apply, as is often the case with new releases of the OS.
Downloading FixModes Software
FixModes is a software package that tightens the default Solaris OS directory and file
permissions. Tightening these permissions can significantly improve overall security.
More restrictive permissions make it even more difficult for malicious users to gain
privileges on a system.
Chapter 3 Upgrading, Installing, and Running Security Software 43
Page 68

Note – With the Solaris 10 OS release, significant changes were made to improve the
default permissions of objects previously altered by the FixModes software, so that
the software is no longer necessary. Therefore, install-fixmodes finish and audit
scripts cannot be used on systems running the Solaris 10 OS.
▼ To Download FixModes Software
1. Download the FixModes precompiled binaries from:
http://www.sun.com/security/jass
The FixModes software is distributed as a precompiled and compressed package
version file formatted for Solaris OS systems. The file name is SUNBEfixm.pkg.Z.
2. Move the file securely to the system being hardened by using the scp command,
or another method that provides secure file transfer.
Use the scp command as follows:
# scp SUNBEfixm.pkg.Z target01:
3. Uncompress and save the file, SUNBEfixm.pkg.Z, in the Solaris Security Toolkit
Packages directory in /opt/SUNWjass/Packages, with the following
commands:
# uncompress SUNBEfixm.pkg.Z
# mv SUNBEfixm.pkg /opt/SUNWjass/Packages/
Later, the FixModes software is installed automatically after downloading all the
other security packages and executing the Solaris Security Toolkit software.
Downloading OpenSSH Software
In any secured environment, the use of encryption in combination with strong
authentication is required to protect user-interactive sessions. At a minimum,
network access must be encrypted.
The tool most commonly used to implement encryption is Secure Shell software,
either a version bundled with the Solaris OS, a third-party commercial version, or a
freeware version. To implement all the security modifications performed by the
Solaris Security Toolkit software, you must include a Secure Shell software product.
44 Solaris Security Toolkit 4.2 Administration Guide • July 2005
Page 69

Note – If you are using the Solaris 9 or 10 OS, use the version of Secure Shell
provided with the operating system. This version of Secure Shell integrates with
other Solaris OS security features such as the Basic Security Module (BSM) and is
supported by Sun’s support organization.
Executing the Solaris Security Toolkit software disables all unencrypted
user-interactive services and daemons on the system, in particular daemons such as
in.telnetd, in.ftpd, in.rshd, and in.rlogind.
Secure Shell enables you to gain access to the system as you would using Telnet and
FTP.
▼ To Download OpenSSH Software
Note – If the server is running the Solaris 9 or 10 OS, you can use the bundled
Secure Shell software and skip the OpenSSH installation steps in this section. The
install-ssh finish and audit scripts cannot be used on system running the Solaris
10 OS.
● Obtain the following Sun BluePrints OnLine article or Sun BluePrints book, and
use the instructions for downloading the software:
■ A Sun BluePrints OnLine article about how to compile and deploy OpenSSH
titled “Building and Deploying OpenSSH on the Solaris Operating Environment”
is available at:
http://www.sun.com/blueprints
■ The Sun BluePrints publication Secure Shell in the Enterprise is available at book
stores.
After downloading all the other security packages and executing the Solaris Security
Toolkit software, the OpenSSH software is installed automatically.
Caution – Do not compile OpenSSH on the system being hardened, and do not
install the compilers on the system being hardened. Use a separate Solaris OS
system—running the same Solaris OS version, architecture, and mode (for example,
Solaris 8 OS, Sun4U™ (sun4u), and 64-bit)—to compile OpenSSH. If you implement
a commercial version of SSH, no compilation is required. The goal is to limit the
availability of compilers to potential intruders. However, refraining from installing
compilers locally on a system does not provide significant protection against
determined attackers, because they can still install precompiled tools.
Chapter 3 Upgrading, Installing, and Running Security Software 45
Page 70

Downloading the MD5 Software
The MD5 software generates MD5 digital fingerprints on the system being hardened.
Generate the digital fingerprints, then compare them with what Sun has published
as correct, to detect system binaries that are altered or hidden inside something that
appears safe (trojaned) by unauthorized users. By modifying system binaries,
attackers provide themselves with backdoor access onto a system; they hide their
presence and could cause systems to operate in unstable manners.
Note – If the server is running the Solaris 10 OS, you can use the bundled
/usr/bin/digest command and skip the MD5 installation steps that follow in this
section.
▼ To Download the MD5 Software
Note – The Solaris Security Toolkit does not install nor audit the installation of the
MD5 software as described in this procedure on Solaris 10 systems. The MD5
software is not needed for systems running the Solaris 10 OS, because the
digest(1M) command now includes MD5 functionality.
1. Download the MD5 binaries from the following web site:
http://www.sun.com/security/jass
The MD5 programs are distributed as a compressed package version file.
2. Move the file SUNBEmd5.pkg.Z securely to the system being hardened with the
scp command, or another method that provides secure file transfer.
Use the scp command as follows:
# scp SUNBEmd5.pkg.Z target01:
46 Solaris Security Toolkit 4.2 Administration Guide • July 2005
Page 71

3. Uncompress and move the file to the Solaris Security Toolkit Packages directory
in /opt/SUNWjass/Packages, using a command similar to the following:
# uncompress SUNBEmd5.pkg.Z
# mv SUNBEmd5.pkg /opt/SUNWjass/Packages/
After the MD5 software is saved to the /opt/SUNWjass/Packages directory, the
execution of the Solaris Security Toolkit software installs the software.
After the MD5 binaries are installed, you can use them to verify the integrity of
executables on the system through the Solaris fingerprint database. More
information on the Solaris fingerprint database is available in the Sun BluePrints
OnLine article titled “The Solaris Fingerprint Database — A Security Tool for Solaris
Software and Files.”
4. (Optional) Download and install Solaris Fingerprint Database Companion and
Solaris Fingerprint Database Sidekick software from the Sun BluePrint web site
at:
http://www.sun.com/blueprints/tools
Note – Even though step 4 is marked optional, it highly beneficial to use it on all
operating systems.
Install and use these optional tools with the MD5 software. These tools simplify the
process of validating system binaries against the database of MD5 checksums. Use
these tools frequently to validate the integrity of the Solaris OS binaries and files on
a secured system.
These tools and instructions for downloading them are in the Sun BluePrints OnLine
article titled “The Solaris Fingerprint Database — A Security Tool for Solaris
Software and Files.”
The integrity of the security tools downloaded should be verified. Before installing
and running the Solaris Security Toolkit software and additional security software,
validate integrity by using MD5 checksums. On the download page of the Solaris
Security Toolkit, MD5 checksums are available for this purpose.
Customizing Security Profiles
A variety of security profile templates are included with the Solaris Security Toolkit
software distribution as drivers. The security profiles implemented by these drivers
disable services that are not required and enable optional security features disabled
Chapter 3 Upgrading, Installing, and Running Security Software 47
Page 72

by the secure.driver. As mentioned in the previous chapter, the default security
profile and changes made by these drivers might not be appropriate for your
systems.
Before running the Solaris Security Toolkit software, review and customize the
default security profiles for your environment, or develop new ones. Techniques and
guidelines for customizing security profiles are provided in the Solaris Security
Toolkit 4.2 Reference Manual.
Installing and Executing the Software
It is important that the following preliminary tasks be completed prior to executing
the Solaris Security Toolkit software. Most of the hardening is done automatically
when you execute the Solaris Security Toolkit software.
■ Download the additional security software and the Solaris Security Toolkit
software on the system you want to harden or on the JumpStart server. See
“Downloading Security Software” on page 40.
■ Configure your system for stand-alone or JumpStart mode. See “Determining
Which Mode to Use” on page 36.
■ Customize the Solaris Security Toolkit software for your environment, if needed.
■ Before installing and running the Solaris Security Toolkit software and additional
security software, validate their integrity through the use of MD5 checksums.
You can execute the Solaris Security Toolkit software directly from the command line
or from a JumpStart server.
For command-line options and other information about executing the software, see
one of the following:
■ “Executing the Software in Stand-alone Mode” on page 48
■ “Executing the Software in JumpStart Mode” on page 59
Executing the Software in Stand-alone Mode
CODE EXAMPLE 3-2 shows a sample of command-line usage in stand-alone mode.
CODE EXAMPLE 3-2 Sample Command-Line Usage in Stand-alone Mode
# ./jass-execute -h
usage:
48 Solaris Security Toolkit 4.2 Administration Guide • July 2005
Page 73

CODE EXAMPLE 3-2 Sample Command-Line Usage in Stand-alone Mode (Continued)
To apply this Toolkit to a system, using the syntax:
jass-execute [-r root_directory -p os_version ]
[ -q | -o output_file ] [ -m e-mail_address ]
[ -V [3|4] ] [ -d ] driver
To undo a previous application of the Toolkit from a system:
jass-execute -u [ -b | -f | -k ] [ -q | -o output_file ]
[ -m e-mail_address ] [ -V [3|4] ]
To audit a system against a pre-defined profile:
jass-execute -a driver [ -V [0-4] ] [ -q | -o output_file ]
[ -m e-mail_address ]
To remove saved files from a previous run of the Toolkit:
jass-execute -c [ -q | -o output_file ]
[ -m e-mail_address ] [ -V [3|4] ]
To display the history of Toolkit applications on a system:
jass-execute -H
To display the last application of the Toolkit on a system:
jass-execute -l
To display this help message:
jass-execute -h
jass-execute -?
To display version information for this program:
jass-execute -v
#
TABLE 3-1 lists the command-line options available and describes each.
TABLE 3-1 Using Command-Line Options With jass-execute
Option Description
–a driver Determines if a system is in compliance with its security profile.
Do not use with the -b, -k, -f, -c, -d, -h, -H, -l, -p, -r, or -u
options.
–b Backs up any files that have manually changed since the last
hardening run, then restores the system to its original state.
Use only with the –u option.
-c Specifies the clean option. Removes saved files from a previous run
of Solaris Security Toolkit.
Chapter 3 Upgrading, Installing, and Running Security Software 49
Page 74

TABLE 3-1 Using Command-Line Options With jass-execute (Continued)
Option Description
–d driver Specifies the driver to be run in stand-alone mode.
Do not use with the -a, -b, -c, -f, -h, -H, -k, or -u options.
–f Reverses changes made during a hardening run without asking you
about exceptions, even if files were manually changed after a
hardening run.
Use only with the –u option.
–H Displays the history of the Solaris Security Toolkit software on the
system.
-h |-? Displays the jass-execute help message, which provides an
overview of the available options.
Use alone. Any option specified in addition to -h|-? is ignored.
–k Keeps any manual changes you made to files after a hardening run.
Use only with the –u option.
–l Displays the last application of the Solaris Security Toolkit installed
on the system.
-m e-mail_address Specifies an email address for in-house support.
-o output_file Specifies the complete path to the output file as well as the output
file itself.
-p os_version Specifies the Solaris OS version. The format is the same as that of
uname –r.
Must use with the –r root_directory option.
–q Specifies the quiet mode. Messages are not displayed while running
this command. Output is stored in JASS_REPOSITORY/.
-r root_directory Specifies the root directory used during jass-execute runs. The
root directory is / and is defined by the Solaris Security Toolkit
environment variable, JASS_ROOT_DIR. The Solaris OS being
secured is available through /. For example, if you wanted to secure
a separate OS directory, temporarily mounted under /mnt, then use
the -r option to specify /mnt.
Must use with the –p os_version option.
50 Solaris Security Toolkit 4.2 Administration Guide • July 2005
Page 75

TABLE 3-1 Using Command-Line Options With jass-execute (Continued)
Option Description
–u Runs the undo option with interactive prompts that ask you what
action you want to take when exceptions are encountered.
Do not use with the -a, -c, -d, -h, -l, -p, -r, or -H options.
-V verbosity_level Specifies the level of verbosity for an audit run. There are five levels
(0-4)
0 Single line indicating pass or fail.
1 For each script, a single line indicating pass
or fail, and one grand total score line below
all the script lines.
2 For each script, provides results of all checks.
3 Multiple lines providing full output,
including banner and header messages. This
is the default.
4 Multiple lines (all data provided from level 3)
plus all entries that are generated by the
logDebug logging function. This level is for
debugging.
–v Displays the version information for this program.
For detailed information about the options available with jass-execute command
in stand-alone mode, see the following sections:
■ “Audit Option” on page 53
■ “Clean Option” on page 53
■ “Display Help Option” on page 54
■ “Driver Option” on page 55
■ “Email Notification Option” on page 56
■ “Execute History Option” on page 57
■ “Most Recent Execute Option” on page 57
■ “Output File Option” on page 58
■ “Quiet Output Option” on page 58
■ “Root Directory Option” on page 58
■ “Undo Option” on page 59
For a complete listing of available drivers, see “Drivers Directory” on page 6.
Newer versions of the software might contain additional drivers.
Chapter 3 Upgrading, Installing, and Running Security Software 51
Page 76

▼ To Execute the Software in Stand-alone Mode
1. Execute the secure.driver (or a product-specific script such as
sunfire_15k_sc-secure.driver) as follows:
CODE EXAMPLE 3-3 Executing the Software in Stand-alone Mode
# ./jass-execute -d secure.driver
[NOTE] The following prompt can be disabled by setting
JASS_NOVICE_USER to 0.
[WARN] Depending on how the Solaris Security Toolkit is configured,
it is both possible and likely that by default all remote shell
and file transfer access to this system will be disabled upon
reboot effectively locking out any user without console access to
the system.
Are you sure that you want to continue? (YES/NO) [NO]
y
[NOTE] Executing driver, secure.driver
===============================================================
secure.driver: Driver started.
===============================================================
===============================================================
Solaris Security Toolkit Version: 4.2.0
Node name: ufudu
Zone name: global
Host ID: 8085816e
Host address: 10.8.31.115
MAC address: 8:0:20:85:81:6e
OS version: 5.10
Date: Tue Jul 5 16:28:24 EST 2005
===============================================================
[...]
For a complete listing of available drivers, see “Drivers Directory” on page 6.
Newer versions of the software might contain additional drivers.
2. After running the Solaris Security Toolkit software on a system, reboot the system
to implement the changes.
During hardening, a variety of modifications are made to the configuration of the
client. These modifications might include disabling startup scripts for services,
disabling options for services, and installing new binaries or libraries through
patches. Until the client is restarted, these modifications might not be enabled.
52 Solaris Security Toolkit 4.2 Administration Guide • July 2005
Page 77

3. After rebooting the system, verify the correctness and completeness of the
modifications.
See “Validating the System Modifications” on page 60.
4. If any errors are encountered, fix them and run the Solaris Security Toolkit
software again in stand-alone mode.
Audit Option
Through the -a option, the Solaris Security Toolkit software can perform an audit
run to determine if a system is in compliance with its security profile. This run
validates not only if system file modifications made are still active, but also if
previously disabled processes are running or removed software packages are
reinstalled. For more information on this function, see
Chapter 6.
Synopsis of command-line usage to audit a system against a security profile:
# jass-execute -a driver [ -V [0-4] ] [ -q | -o output-file ]
[ -m email-address ]
Clean Option
The -c option removes saved files from a previous run of the Solaris Security
Toolkit. You can use the quiet (-q), output (-o), mail (-m), and verbosity (-V)
options with the clean option.
CODE EXAMPLE 3-4 shows an example of using the -c option, which produces output
similar to the following:
CODE EXAMPLE 3-4 Sample -c Option Output
# bin/jass-execute -c
Executing driver, clean.driver
Please select Solaris Security Toolkit runs to clean:
1. July 15, 2005 at 11:41:02 (/var/opt/SUNWjass/run/20050715114102)
2. July 15, 2005 at 11:44:03 (/var/opt/SUNWjass/run/20050715114403)
Choice (’q’ to exit)? 2
[NOTE] Cleaning previous run from /var/opt/SUNWjass/run/20050715114403
==============================================================================
clean.driver: Driver started.
==============================================================================
Chapter 3 Upgrading, Installing, and Running Security Software 53
Page 78

CODE EXAMPLE 3-4 Sample -c Option Output (Continued)
==============================================================================
Toolkit Version: 4.2.0
Node name: sstzone
Zone name: sstzone
Host ID: 80cb346c
Host address: 10.8.28.45
MAC address: 8:0:20:cb:34:6c
OS version: 5.10
Date: Fri Jul 15 11:44:58 PDT 2005
==============================================================================
clean.driver: Performing CLEANUP of /var/opt/SUNWjass/run/20050715114403.
==============================================================================
==============================================================================
clean.driver: Driver finished.
==============================================================================
==============================================================================
[SUMMARY] Results Summary for CLEAN run of clean.driver
[SUMMARY] The run completed with a total of 1 script run.
[SUMMARY] There were Failures in 0 Scripts
[SUMMARY] There were Errors in 0 Scripts
[SUMMARY] There were Warnings in 0 Scripts
[SUMMARY] There was a Note in 1 Script
[SUMMARY] Notes Scripts listed in:
/var/opt/SUNWjass/run/20050715114403/jass-clean-script-notes.txt
==============================================================================
Display Help Option
The -h option displays the jass-execute help message, which provides an
overview of the available options.
The -h option produces output similar to the following:
CODE EXAMPLE 3-5 Sample -h Option Output
# ./jass-execute -h
To apply this Toolkit to a system, using the syntax:
jass-execute [–r root_directory –p os_version ]
[ –q | –o output_file ] [ –m e-mail_address ]
[ –V [3|4] ] [ –d ] driver
To undo a previous application of the Toolkit from a system:
jass-execute –u [ –b | –f | –k ] [ –q | –o output_file ]
54 Solaris Security Toolkit 4.2 Administration Guide • July 2005
Page 79

CODE EXAMPLE 3-5 Sample -h Option Output (Continued)
[ –m e-mail_address ] [ –V [3|4] ]
To audit a system against a pre-defined profile:
jass-execute –a driver [ –V [0–4] ] [ –q | –o output_file ]
[ –m e-mail_address ]
To remove saved files from a previous run of the Toolkit:
jass-execute -c [ -q | -o output_file ]
[ -m e-mail_address ] [ -V [3|4] ]
To display the history of Toolkit applications on a system:
jass-execute –H
To display the last application of the Toolkit on a system:
jass-execute –l
To display this help message:
jass-execute –h
jass-execute –?
To display version information for this program:
jass-execute –v
Note that just the driver name should be specified when using the
’–d’ or ’–a’ options. A path need not be specified as the script
is assumed to exist in the Drivers directory.
The ’–u’ undo option is mutually exclusive with the ’–d’ and ’–a’
options. The default undo behavior is to ask the user what to do if
a file to be restored has been modified as the checksum is
incorrect.
The –u option can be combined with the ’–k’, ’–b’, or ’–f’ to
override the default interactive behavior. The use of one of these
options is required when run in quiet mode (’–q’).
The ’–k’ option can be used to always keep the current file and
backup if checksum is incorrect. The ’b’ can be used to backup the
current file and restore original if the checksum is incorrect.
The ’f’ option will always overwrite the original if the checksum
is incorrect, without saving the modified original.
Driver Option
The –d driver option specifies the driver to be run in stand-alone mode.
Chapter 3 Upgrading, Installing, and Running Security Software 55
Page 80

You must specify a driver with the -d option. The Solaris Security Toolkit software
prepends Drivers/ to the name of the script added. You need to enter only the
script name on the command line.
Note – Do not use the -d option with the -a, -b, -c, -f, -H, -h, -k, or -u options.
A jass-execute hardening run using the -d driver option produces output similar
to the following:
CODE EXAMPLE 3-6 Sample -d driver Option Output
# ./jass-execute -d secure.driver
[...]
[NOTE] Executing driver, secure.driver
===============================================================
secure.driver: Driver started.
===============================================================
===============================================================
Solaris Security Toolkit Version: 4.2.0
Node name: ufudu
Zone name: global
Host ID: 8085816e
Host address: 10.8.31.115
MAC address: 8:0:20:85:81:6e
OS version: 5.10
Date: Tue Jul 5 16:28:24 EST 2005
===============================================================
[...]
Email Notification Option
The -m e-mail_address option provides a mechanism by which stand-alone audit,
clean, hardening, and undo output can be emailed automatically by the Solaris
Security Toolkit software when the run completes. The email report is in addition to
any logs generated on the system using other options and local logs created by the
Solaris Security Toolkit software.
A Solaris Security Toolkit run calling sunfire_15k_sc-config.driver using the
email option would be similar to the following:
# ./jass-execute -m root -d sunfire_15k_sc-config.driver
[...]
56 Solaris Security Toolkit 4.2 Administration Guide • July 2005
Page 81

Execute History Option
The -H option provides a simple mechanism to determine how many times the
Solaris Security Toolkit software has been run on a system. All runs are listed
regardless of whether they have been undone.
The -H option produces output similar to the following:
CODE EXAMPLE 3-7 Sample -H Option Output
# ./jass-execute -H
Note: This information is only applicable for applications of
the Solaris Security Toolkit starting with version 0.3.
The following is a listing of the applications of the Solaris
Security Toolkit on this system. This list is provided in
reverse chronological order:
1. June 31, 2004 at 12:20:19 (20040631122019) (UNDONE)
2. June 31, 2004 at 12:10:29 (20040631121029)
3. June 31, 2004 at 12:04:15 (20040631120415)
The output indicates that the Solaris Security Toolkit software was run on this
system three times and that the most recent run was undone.
Most Recent Execute Option
The -l option provides a mechanism to determine the most recent run. This is
always the most recent run listed by the -H option as well.
The -l option provide output similar to the following:
CODE EXAMPLE 3-8 Sample -l Option Output
# ./jass-execute -l
Note: This information is only applicable for applications of
the Solaris Security Toolkit starting with version 4.2.0.
The last application of the Solaris Security Toolkit was:
1. June 31, 2005 at 12:20:19 (20040631122019) (UNDONE)
Chapter 3 Upgrading, Installing, and Running Security Software 57
Page 82

Output File Option
The -o output_file option redirects the console output of jass-execute runs to a
separate output_file. You can specify a fully qualified path name for the output_file.
This option has no effect on the logs kept in the JASS_REPOSITORY directory. This
option is particularly helpful when performed over a slow terminal connection.
There can be a significant amount of output generated by a Solaris Security Toolkit
run depending on the verbosity_level specified.
You can use this option with the -a, -d, or -u options.
The -o option produces output similar to the following:
CODE EXAMPLE 3-9 Sample -o Option Output
# ./jass-execute -o /var/tmp/root/jass-output.txt -d secure.driver
[NOTE] Executing driver, secure.driver
[NOTE] Recording output to /var/tmp/root/jass-output.txt
Quiet Output Option
The -q option disables Solaris Security Toolkit output from going to the console
during a hardening run.
This option has no effect on the logs kept in the JASS_REPOSITORY directory.
Similar to the -o option, this option is particularly helpful when running the Solaris
Security Toolkit software through a cron job or over slow network connections.
You can use this option with the -a, -c, -d, or -u options.
The -q option produces output similar to the following:
CODE EXAMPLE 3-10 Sample -q Option Output
# ./jass-execute -q -d secure.driver
[NOTE] Executing driver, secure.driver
Root Directory Option
The -r root-directory option is for specifying the root directory used during
jass-execute runs. Using the -r option also requires using the -p option to
specify the platform (OS) version. The format of the -p option is equivalent to that
produced by uname -r.
58 Solaris Security Toolkit 4.2 Administration Guide • July 2005
Page 83

The root directory is / and is defined by the Solaris Security Toolkit environment
variable JASS_ROOT_DIR. The Solaris OS being secured is available through /. For
example, if you want to secure a separate OS directory, temporarily mounted under
/mnt, then use the -r option to specify /mnt. All the scripts are applied to that OS
image.
Undo Option
Through the -u option, the Solaris Security Toolkit software can undo system
modifications performed during hardening. Each finish script can be undone with
the -u option. In addition, the Solaris Security Toolkit’s undo ability is tightly
integrated with the checksums generated during each run. For more information on
this capability, see
There are three other options you can use with the -u option:
■ -b (backup) option, which backs up any files that have been changed manually
since the last hardening run, then restores the system to its original state.
■ -f (force) option, which reverses changes made during a hardening run without
asking you about exceptions, even if files were manually changed after a
hardening run.
■ -k (keep) option, which keeps any manual changes you made since the last
hardening run.
Synopsis of command-line usage of an undo command:
Chapter 4.
# jass-execute –u [ –b | –f | –k ] [ –q | –o output_file ]
[ –m e-mail_address ] [ –V [3|4] ]
Executing the Software in JumpStart Mode
The JumpStart mode is controlled by the Solaris Security Toolkit driver inserted in
the rules file on the JumpStart server.
If you have not configured your environment to use JumpStart mode, see Chapter 5.
For more information on the JumpStart technology, refer to the Sun BluePrints book
JumpStart Technology: Effective Use in the Solaris Operating Environment.
Chapter 3 Upgrading, Installing, and Running Security Software 59
Page 84

▼ To Execute the Software in JumpStart Mode
To execute the Solaris Security Toolkit software in JumpStart mode, it must be
integrated into your JumpStart environment and called as part of the finish scripts
associated with a JumpStart installation. For information about how to integrate the
Solaris Security Toolkit software into your environment, see
1. After making all of the required modifications to the drivers, install the client
using the JumpStart infrastructure.
This task is done using the following command from the client’s ok prompt.
ok> boot net - install
Once the installation is completed, the system is rebooted by the JumpStart software.
The system should be in its correct configuration. During hardening, a variety of
modifications are made to the configuration of the client. These modifications could
include disabling startup scripts for services, disabling options for services, and
installing new binaries or libraries through patches. Until the client is restarted,
these modifications might not be effective.
2. After the system is rebooted, verify the correctness and completeness of the
modifications.
See “Validating the System Modifications” on page 60.
3. If any errors are encountered, fix them and reinstall the client’s OS.
Chapter 5.
Validating the System Modifications
After rebooting the system, validate the correctness and completeness of the
modifications as described in the following sections.
Performing QA Checks of Services
One of the significant challenges involved in securing systems is determining what
OS services must be left enabled for the system to function properly. Solaris OS
services might be needed because they are used directly, such as Secure Shell to log
into a system. Or they could be used indirectly, such as using the RPC daemon for
the graphical user interface (GUI) of third-party software management tools.
60 Solaris Security Toolkit 4.2 Administration Guide • July 2005
Page 85

Most of these requirements should be determined before running the Solaris
Security Toolkit software. (See
“Determining Application and Service Requirements”
on page 20.) However, the only definitive mechanism is to install and secure the
system, then perform thorough testing of its required functionality through quality
assurance (QA) testing. A QA plan should be executed for any new system being
deployed after the system is hardened. Similarly, for deployed systems being
hardened, thorough testing must be performed to ensure that all required and
expected functionality is present.
If the QA process uncovers any discrepancies, perform the following:
1. Determine the problem area, based on the guidelines in Chapter 2.
2. Validate that the application runs in the modified configuration.
3. Undo the Solaris Security Toolkit run.
4. Modify the security profile (driver) based on the problem resolution.
5. Run the Solaris Security Toolkit software again.
The end result should be a security profile that can be run on the system without
adversely affecting any required functionality.
Performing Security Assessments of Configuration
While validating that the system performs all required functions, also evaluate the
security configuration to determine if the system is secured to the desired level.
Depending on what hardening or minimization was performed on the system, this
might involve different aspects.
At a minimum, the configuration of the system should be reviewed in the following
ways:
■ Ensure that all necessary Security and Recommended Patches are installed.
■ Verify that only required and relevant processes are running, and that they are
running with the correct arguments.
■ Ensure that only required daemons are running, and that they are running with
the correct arguments.
■ Verify that only required ports are open on the system by checking locally (for
example, netstat -a) and remotely by using a port scanner such as Nmap,
which can determine which ports are available on a network interface.
■ Make sure that only required Solaris OS packages were installed if the system was
minimized.
Chapter 3 Upgrading, Installing, and Running Security Software 61
Page 86

This review should be considered a minimum for newly built and secured systems.
When hardening legacy systems, the underlying OS should be verified to determine
if unauthorized modifications were made. Integrity checking of this nature is best
done by mounting the system’s file system in read-only mode and running integrity
checking software from a known OS instance. The tools described in the Sun
BluePrints OnLine article titled “The Solaris Fingerprint Database—A Security Tool
for Solaris Software and Files” are useful in these scenarios.
Validating Security Profile
After a system is secured and you validate its required services and capabilities, use
the audit function to make sure that the security profile was applied properly and
completely. This task is critical for two reasons. The first is to ensure that the system
is hardened as required. The second is to ensure that the security profile defined for
the system is properly reflected in the Solaris Security Toolkit configuration. This
check is critical because the configuration information is used to maintain the
security profile of the system over its entire deployed life cycle.
For more information about the audit function, see Chapter 6.
Performing the Post-installation Task
If you installed the software on a deployed system, see “Performing the
Post-installation Task” on page 32, for information about performing the
post-installation task on deployed systems.
62 Solaris Security Toolkit 4.2 Administration Guide • July 2005
Page 87

CHAPTER
4
Reversing System Changes
This chapter provides information and procedures for reversing (undoing) the
changes made by the Solaris Security Toolkit software during hardening runs. This
option provides an automated mechanism by which you can return a system to its
state prior to a Solaris Security Toolkit hardening run or sequence of runs.
This chapter contains the following topics:
■ “Understanding How Changes Are Logged and Reversed” on page 63
■ “Requirements for Undoing System Changes” on page 65
■ “Customizing Scripts to Undo Changes” on page 65
■ “Checking for Files That Were Manually Changed” on page 66
■ “Using Options With the Undo Feature” on page 67
■ “Undoing System Changes” on page 70
Understanding How Changes Are Logged and Reversed
Each Solaris Security Toolkit hardening run creates a run directory in
JASS_REPOSITORY. The names of these directories are based on the date and time
the run is initiated. In addition to displaying the output to a screen, the Solaris
Security Toolkit software creates a set of files in the directory to track the changes
and log the operations.
The files stored in the directory track modifications performed on the system and
enable the undo feature to work.
63
Page 88

Caution – An administrator should never modify the contents of the files in the
JASS_REPOSITORY directory. Modifying these files can corrupt their contents and
cause unexpected errors or system corruption when you use the undo feature.
When you use the Solaris Security Toolkit software to harden a system, either in
JumpStart or stand-alone mode, the software logs the changes in the
JASS_REPOSITORY/jass-manifest.txt file. This file lists operations that the
undo feature uses to reverse changes. The file contains information about the
hardening operations implemented by the Solaris Security Toolkit software,
including files created, copied, moved, or removed. In addition, this file might
contain both standard and custom entries that are required when reversing more
complex changes, such as software package installations. A separate jass-
manifest.txt file is created for each hardening run.
Note – The Solaris Security Toolkit software undo feature only reverses changes for
which there are entries in manifest files.
The undo run goes through the manifest files generated during a Solaris Security
Toolkit run and stored in the JASS_REPOSITORY. The run can restore the backed-up
files to their original locations, depending on whether you use the backup, force, or
keep option. See the following for more information on the backup, force, and keep
options:
■ “Backup Option” on page 68
■ “Force Option” on page 69
■ “Keep Option” on page 69
If files were not backed up during hardening, when the JASS_SAVE_BACKUP
variable is defined in the user.init file as 0 or when the -c option is used, then
the undo function is not available. See
on page 65 for more information.
When a Solaris Security Toolkit run is undone, the associated directory is not
removed. Instead, two files are created in the JASS_REPOSITORY directory: jass-
undo-log.txt and reverse-jass-manifest.txt. Afterward, the run that was
undone is not listed the next time jass-execute -u is executed. A hardening run
can be undone only once.
64 Solaris Security Toolkit 4.2 Administration Guide • July 2005
“Requirements for Undoing System Changes”
Page 89

Requirements for Undoing System Changes
Be aware of the following limitations and requirements for using the undo feature of
the Solaris Security Toolkit software.
■ In Solaris Security Toolkit versions 0.3 through 4.2, you can use the undo feature
for runs that were initiated in either stand-alone or JumpStart mode. However,
you can undo changes only in stand-alone mode. The undo feature cannot be used
during a JumpStart installation.
■ If you select the Solaris Security Toolkit option not to create backup files, either
through JumpStart or stand-alone modes, the undo feature is not available. The
creation of back-up file copies is disabled by setting the JASS_SAVE_BACKUP
parameter to 0.
■ A run can only be undone once.
■ If you develop a new finish script, be sure to use the Solaris Security Toolkit
framework functions. You must create a matching audit script and add entries to
the manifest file by using the add_to_manifest function. Otherwise, the Solaris
Security Toolkit has no way of knowing about your custom development.
■ Do not modify the contents of the JASS_REPOSITORY directories under any
circumstances. Modifying the files can corrupt the contents and cause unexpected
errors or system corruption when you use the undo feature.
Customizing Scripts to Undo Changes
The Solaris Security Toolkit framework provides flexibility for designing and
building finish scripts. The framework allows you to extend the capabilities of the
Solaris Security Toolkit software to better meet the needs of your organization while
also helping you to better manage the configuration of systems over their life cycles.
When customizing scripts, it is important to understand how the actions you take
can affect the undo feature. To simplify customizing scripts, helper functions make
the correct changes to the manifest files. (The undo feature relies on the contents of
manifest files to reverse hardening runs.) In most cases, these helper functions
provide what you need to customize scripts for your organization.
Chapter 4 Reversing System Changes 65
Page 90

For a list of helper functions and information about using them, refer to the Solaris
Security Toolkit 4.2 Reference Manual. Use these helper functions in place of their
system command counterparts, so that undo runs can reference the related entries in
manifest files.
In some cases, you might need to perform a function for which there is no helper
function. In these cases, use the special function called add_to_manifest. Using
this function, you can manually insert entries into manifest files without needing to
call one of the helper functions. Use this special function with care, so that you
protect the integrity of the system and the Solaris Security Toolkit repository. An
example of when you might use this special function is when you want to add
software packages that are not in Sun’s pkg format. In this example, you would need
to tell the undo feature how to remove the packages that were added in another
format during the hardening run.
With the helper functions and the special add_to_manifest function, the Solaris
Security Toolkit software provides a simple and flexible way to customize scripts
and have the changes extended to undo runs.
If you make changes to a finish script’s behavior without using these functions, there
is no way for the Solaris Security Toolkit software to know that a change was made.
Therefore, you would have to manually undo any changes that are not referenced in
manifest files.
In another example, before modifying a file on the system, the original version of the
file should be saved first. Outside the context of the Solaris Security Toolkit software,
typically, users accomplish this task by executing the /usr/bin/cp command.
However, within the context of the Solaris Security Toolkit software, if you use this
command directly, the Solaris Security Toolkit software has no way of knowing that
a manifest entry needs to be created. Instead of using the cp command, use the
backup_file helper function. This function saves a copy of the original file, with a
suffix of JASS_SUFFIX, and adds a manifest entry instructing the Solaris Security
Toolkit software that a copy of the file was made. This function also causes the file
checksums to be calculated. File checksums are used by the undo feature and the
jass-check-sum command.
Checking for Files That Were Manually Changed
Although the jass-execute -u command automatically checks for files that were
changed manually after a hardening run, sometimes you might find it helpful to use
the jass-check-sum command to list and review the files that have been changed.
66 Solaris Security Toolkit 4.2 Administration Guide • July 2005
Page 91

This command enables you to review the contents of the JASS_REPOSITORY
directory and perform checksums on all of the files listed in manifest files to
determine which files listed have changed since their checksums were recorded
during a hardening run. Performing this check before proceeding with a forced undo
run provides valuable information that might save many hours of needless
troubleshooting.
The following is an example output.
CODE EXAMPLE 4-1 Sample Output of Files That Were Manually Changed
# ./jass-check-sum
File Name Saved CkSum Current CkSum
- - - - - - - - - - - - - - - - - - - - - - - - - - - - - - /etc/inet/inetd.con 1643619259:6883 2801102257:6879
/etc/logadm.conf 2362963540:1042 640364414:1071
/etc/default/inetd 3677377803:719 2078997873:720
The output indicates that three files were changed after the hardening run was
completed.
Using Options With the Undo Feature
This section describes the jass-execute -u command and options that you can
use when executing an undo run.
Note – You cannot use the -c, -d, -a, -h, -l or -H options with the undo feature.
You must provide the –b, –k, or –f option when running undo in quiet mode.
The jass-execute -u command is the standard method for executing an undo
run. This command automatically discovers any files that were manually modified
since the last hardening run. If the Solaris Security Toolkit software discovers files
that were manually changed after a hardening run, it asks you to choose one of the
following responses:
1. Back up the most current file before restoring the original (the one that existed
before the hardening run).
2. Keep the most current file, and do not restore the original file.
3. Force an overwrite to any manually changed file, which might cause data loss,
and restore original file.
Chapter 4 Reversing System Changes 67
Page 92

4. Always back up the most current file before restoring the original (the one that
existed before the hardening run).
5. Always keep the most current file, and do not restore the original file.
6. Always force an overwrite to any manually changed file, which might cause data
loss, and restore original file.
If you want to define how the undo command should handle any files modified
since the hardening run, use the backup (-b), keep (-k), or force (-f) options when
executing the undo command.
TABLE 4-1 lists command-line options you can use with undo. For detailed
information about each option, see the sections that follow.
TABLE 4-1 Using Command-Line Options With Undo Command
Option Description
-b Backs up any files that have been manually changed since the last
hardening run, then restores the system to its original state.
-f Reverses changes made during a hardening run without asking you
about exceptions, even if files were manually changed after a
hardening run.
-k Keeps any manual changes you made to files after a hardening run.
-m Mails output to an email address.
-o Directs output to a file.
-q Prevents the display of output to the screen. Also known as the
quiet option. Output is stored in JASS_REPOSITORY/jass-undolog.txt.
-V Specifies the verbosity level for an undo run.
Backup Option
The -b option automatically backs up any files that have been manually changed
since the last hardening run, then restores the files to their original state prior to the
hardening run. To implement the manual changes, you must compare the restored
files with the backed-up files, and reconcile the differences manually. If a file is
backed up using this option, it appears similar to the following example.
/etc/motd.BACKUP.JASS_SUFFIX
68 Solaris Security Toolkit 4.2 Administration Guide • July 2005
Page 93

Force Option
The -f option reverses the changes made during a hardening run with no
exceptions, even if files were manually changed after a hardening run. The undo run
does not compare the saved file checksums to the current versions of the files. As a
result, if you manually changed files after a hardening run, the changes would be
overwritten and lost after the undo run.
It might be necessary to manually re-implement changes after the undo run
completes. Furthermore, it might be necessary to reconcile differences between
groups of files depending on the types of changes made.
Note – To help prevent these problems, use the jass-check-sum command or the
-b command-line option mentioned previously.
Keep Option
The -k option automatically keeps any manual changes you made to files after a
hardening run, instead of restoring the original files. The -k option discovers any
mismatches in files, causes a notice to be generated and logged, and does not
overwrite the file with the original. The only changes reversed are those for which
the saved checksums are valid.
This option is not without its drawbacks. For example, a system can be rendered into
an inconsistent state if a subset of files modified by a finish script is later modified.
Consider the remove-unneeded-accounts.fin finish script. This script modifies
both the /etc/passwd and /etc/shadow files on the system. If a user manually
changes a password after a hardening run is finished, then the checksum associated
with the /etc/shadow file does not match the value saved by the Solaris Security
Toolkit software. As a result, if the keep option is used, then only the /etc/passwd
file is copied back to its original state. The /etc/shadow file remains in its current
form. The two files are no longer consistent.
Output File Option
The -o /complete/path/to/output_file option redirects the console output of jass-
execute runs to a separate output_file.
Chapter 4 Reversing System Changes 69
Page 94

This option has no affect on the logs kept in the JASS_REPOSITORY directory. This
option is particularly helpful when performed over a slow terminal connection,
because there can be a significant amount of output generated by a Solaris Security
Toolkit undo run.
Quiet Output Option
Note – You must provide the –b, –k, or –f option when running undo in quiet
mode.
The -q option prevents the Solaris Security Toolkit software from displaying output
to the screen. This option has no affect on the logs kept in the JASS_REPOSITORY
directory. Similar to the -o option, this option is particularly helpful when running
the Solaris Security Toolkit through a cron job or over slow network connections.
Email Notification Option
The -m e-mail_address option instructs the Solaris Security Toolkit software to email a
copy of the completed run to a specified email address. The email report is in
addition to any logs generated on the system using other options.
Undoing System Changes
Sometimes it is necessary to reverse the changes made during one or multiple
Solaris Security Toolkit hardening runs. If you find that the changes made during a
hardening run have negatively impacted your system, undo the changes.
For example, if after a hardening run you discover that a required service such as
Solaris Volume Manager (SVM) was disabled, do the following:
1. Undo the hardening run.
2. Create a customized driver.
Refer to “Customizing Drivers” in Chapter 4 of the Solaris Security Toolkit 4.2
Reference Manual for instructions about customizing drivers.
70 Solaris Security Toolkit 4.2 Administration Guide • July 2005
Page 95

3. Enable the SVM services you want to use through the JASS_SVCS_ENABLE
environment variable.
Refer to “JASS_SVCS_ENABLE” in Chapter 7of the Solaris Security Toolkit 4.2
Reference Manual for instructions about using JASS_SVCS_ENABLE.
4. Repeat the hardening run.
This section provides instructions for reversing changes made during one or
multiple hardening runs. Note that there are limitations and requirements for
effectively reversing a hardening run. See
Changes” on page 65.
“Requirements for Undoing System
▼ To Undo a Solaris Security Toolkit Run
1. Back up and reboot your system.
Back up and reboot the system before each undo run to ensure that it returns to or
can be brought back to a known and working state.
2. Determine which options you want to use with the jass-execute -u command.
See “Using Options With the Undo Feature” on page 67.
The following instructions assume that you are using the jass-execute -u
command.
3. To undo one or more hardening runs using the standard -u option, enter the
following command from JASS_HOME_DIR/bin
:
# ./jass-execute -u
The Solaris Security Toolkit software collects information about each hardening run
by finding all of the manifest files located in JASS_REPOSITORY. If a manifest file is
empty or nonexistent, it is assumed that there are no changes to be undone and that
run is omitted. In addition, if a file called jass-undo-log.txt exists in the same
Chapter 4 Reversing System Changes 71
Page 96

directory as the manifest file, it is assumed that the run has already been reversed, so
that run is omitted. After the collection process is completed, the results are
displayed. The following is an example output.
CODE EXAMPLE 4-2 Sample Output of Runs Available to Undo
# ./jass-execute -u
[NOTE] Executing driver, undo.driver
Please select a JASS run to restore through:
1. January 24, 2003 at 13:57:27
(/var/opt/SUNWjass/run/20030124135727)
2. January 24, 2003 at 13:44:18
(/var/opt/SUNWjass/run/20030124134418)
3. January 24, 2003 at 13:42:45
(/var/opt/SUNWjass/run/20030124134245)
4. January 24, 2003 at 12:57:30
(/var/opt/SUNWjass/run/20030124125730)
Choice? (‘q’ to exit)?
In this example, four separate hardening runs are found. These runs made changes
to the system and have not been undone. The list of hardening runs is always
presented in reverse chronological order. The first entry in the list is the most recent
hardening run.
4. Review the output to determine which runs you want to undo, then enter the
corresponding number.
For any entry selected, the Solaris Security Toolkit software reverses each run with
an index number equal to or less than the value selected. That is, the undo run
undoes the changes in the reverse order that they were originally made, starting
with the most recent hardening run and continuing to the one you select. Using the
72 Solaris Security Toolkit 4.2 Administration Guide • July 2005
Page 97

previous example as a guide, if you select run 3, then the undo run first reverses
changes for run 1, then moves on to reverse changes for run 2, then finishes by
reversing changes to run 3.
CODE EXAMPLE 4-3 shows output generated when the undo run processes two
manifest file entries.
CODE EXAMPLE 4-3 Sample Output of an Undo Run Processing Multiple Manifest File
[...]
===============================================================
undo.driver: Performing UNDO of
//var/opt/SUNWjass/run/20050715145837.
================================================================
[...]
================================================================
undo.driver: Undoing Finish Script: update-cron-allow.fin
================================================================
[NOTE] Undoing operation COPY.
cp -p /etc/cron.d/cron.allow.JASS.20050715145906
/etc/cron.d/cron.allow
rm -f /etc/cron.d/cron.allow.JASS.20050715145906
[NOTE] Removing a Solaris Security Toolkit-created file.
rm -f /etc/cron.d/cron.allow
[...]
Entries
In this example, the Solaris Security Toolkit software undoes a copy operation and
removes a file that was added during the hardening run. The output of an undo run
documents the actual commands that are taken to restore the system, so that the
process can be clearly understood and referenced in case you need to troubleshoot a
system’s configuration.
If the Solaris Security Toolkit’s check for files modified since the last hardening run
is successful, the undo run continues until all runs and corresponding manifest files
are processed and the changes reversed.
In addition to the Solaris Security Toolkit software collecting information about each
hardening run by finding all of the manifest files located in JASS_REPOSITORY, the
Solaris Security Toolkit software does the following:
a. Compares the checksum of each modified file.
b. Generates and logs a notice for any mismatches in the checksum files.
Chapter 4 Reversing System Changes 73
Page 98

c. Asks you what action you want to take for these files.
5. If the undo run discovers an exception (a file that was changed after the hardening
run), enter one of the options.
Note – The Solaris Security Toolkit software remembers your backup, keep, and
force selections for a particular exception file, and you do not have to make the
selection for the file the next time that file is an exception in an undo run.
The following is an example output showing an exception and the choices for
handling the exception.
CODE EXAMPLE 4-4 Sample Output of Undo Exception
[...]
================================================================
undo.driver: Undoing Finish Script: enable-process-accounting.fin
================================================================
[NOTE] Undoing operation COPY.
[WARN] Checksum of current file does not match the saved value.
[WARN] filename = /var/spool/cron/crontabs/adm
[WARN] current = db27341e3e1f0f27d371d2e13e6f47ce
[WARN] saved = a7f95face84325cddc23ec66d59374b0
Select your course of action:
1. Backup - Save the current file, BEFORE restoring original.
2. Keep - Keep the current file, making NO changes.
3. Force - Ignore manual changes, and OVERWRITE current file.
NOTE: The following additional options are applied to this and ALL
subsequent files:
4. ALWAYS Backup.
5. ALWAYS Keep.
6. ALWAYS Force.
Enter 1, 2, 3, 4, 5, or 6:
74 Solaris Security Toolkit 4.2 Administration Guide • July 2005
Page 99

In this example, if you choose item 1, the following output is displayed.
CODE EXAMPLE 4-5 Sample Output from Choosing Backup Option During Undo
Enter 1, 2, 3, 4, 5, or 6: 1
[WARN] Creating backup copies of some files may cause unintended
effects.
[WARN] This is particularly true of /etc/hostname.[interface]
files as well as crontab files in /var/spool/cron/crontabs.
[NOTE] BACKUP specified, creating backup copy of
/var/spool/cron/crontabs/adm.
[NOTE] File to be backed up is from an undo operation.
[NOTE] Copying /var/spool/cron/crontabs/adm to
/var/spool/cron/crontabs/adm.BACKUP.JASS.20050715151817
cp -p /var/spool/cron/crontabs.JASS/adm.JASS.20050715151719
/var/spool/cron/crontabs/adm
rm -f /var/spool/cron/crontabs.JASS/adm.JASS.20050715151719
[NOTE] Undoing operation COPY.
cp -p /var/spool/cron/crontabs.JASS/root.JASS.20050715151717
/var/spool/cron/crontabs/root
rm -f /var/spool/cron/crontabs.JASS/root.JASS.20050715151717
[NOTE] Undoing operation MAKE DIRECTORY.
rmdir /var/spool/cron/crontabs.JASS
[NOTE] Undoing operation SYMBOLIC LINK.
rm -f /etc/rc3.d/S22acct
[NOTE] Undoing operation SYMBOLIC LINK.
rm -f /etc/rc0.d/K22acct
Chapter 4 Reversing System Changes 75
Page 100

If you choose item 4, the following output is displayed.
CODE EXAMPLE 4-6 Sample Output of Choosing Always Backup Option During Undo
Enter 1, 2, 3, 4, 5, or 6: 4
[NOTE] Always do BACKUP selected. Overriding JASS_UNDO_TYPE with
BACKUP.
[WARN] Creating backup copies of some files may cause unintended
effects.
[WARN] This is particularly true of /etc/hostname.[interface]
files as well as crontab files in /var/spool/cron/crontabs.
[NOTE] BACKUP specified, creating backup copy of
/var/spool/cron/crontabs/adm.
[NOTE] File to be backed up is from an undo operation.
[NOTE] Copying /var/spool/cron/crontabs/adm to
/var/spool/cron/crontabs/adm.BACKUP.JASS.20050715152126
cp -p /var/spool/cron/crontabs.JASS/adm.JASS.20050715151953
/var/spool/cron/crontabs/adm
rm -f /var/spool/cron/crontabs.JASS/adm.JASS.20050715151953
[NOTE] Undoing operation COPY.
[WARN] Checksum of current file does not match the saved value.
[WARN] filename = /var/spool/cron/crontabs/root
[WARN] current = 741af21a62ea7a9e7abe6ba04855aa76
[WARN] saved = bcf180f45c65ceff3bf61012cb2b4982
[WARN] Creating backup copies of some files may cause unintended
effects.
[WARN] This is particularly true of /etc/hostname.[interface]
files as well as crontab files in /var/spool/cron/crontabs.
[NOTE] BACKUP specified, creating backup copy of
/var/spool/cron/crontabs/root.
[NOTE] File to be backed up is from an undo operation.
[NOTE] Copying /var/spool/cron/crontabs/root to
/var/spool/cron/crontabs/root.BACKUP.JASS.20050715152127
cp -p /var/spool/cron/crontabs.JASS/root.JASS.20050715151951
/var/spool/cron/crontabs/root
rm -f /var/spool/cron/crontabs.JASS/root.JASS.20050715151951
[NOTE] Undoing operation MAKE DIRECTORY.
rmdir /var/spool/cron/crontabs.JASS
[NOTE] Undoing operation SYMBOLIC LINK.
rm -f /etc/rc3.d/S22acct
[NOTE] Undoing operation SYMBOLIC LINK.
rm -f /etc/rc0.d/K22acct
76 Solaris Security Toolkit 4.2 Administration Guide • July 2005
 Loading...