

Page 1

Sun Microsystems, Inc.
901 San Antonio Road
Palo Alto, CA 94303-4900
U.S.A
Solaris™ 7 11/99 Sun™ Hardware Platform Guide
Part No.: 806-2134-10
November 1999, Revision A
Send comments about this document to:
Page 2

Copyright 1999 Sun Microsystems, Inc.,901 San AntonioRoad, Palo Alto,California 94303-4900 U.S.A. All rights reserved.
This product or documentis protected by copyright and distributedunder licenses restrictingits use, copying,distribution, and decompilation.
No part of this product or document may be reproducedin any form by any meanswithout prior written authorization of Sun and its licensors,
if any.Third-party software, including font technology,is copyrighted and licensed fromSun suppliers.
Parts of the productmay be derived from Berkeley BSDsystems, licensed fromthe University of California. UNIX is a registered trademark in
the U.S. and other countries, exclusively licensed throughX/Open Company, Ltd. For Netscape Communicator, the following notice applies:
Copyright 1995 Netscape Communications Corporation. All rights reserved.
Sun, Sun Microsystems, theSun logo, AnswerBook, AnswerBook2, Solaris, Sun Enterprise, Sun StorEdge, SPARCstorage, SPARCserver,
SPARCclassic, SPARCstationSLC, SPARCstationELC, SPARCstationIPC, SPARCstationIPX, ShowMe TV,SunFDDI,SunForum, SunVTS, and
Ultra are trademarks, registeredtrademarks, or service marks of Sun Microsystems, Inc. in the U.S. and other countries. All SPARCtrademarks
areused under licenseand are trademarks or registeredtrademarks of SPARC International, Inc. in the U.S. and other countries. Products
bearing SPARCtrademarks are based upon an architecture developed by Sun Microsystems, Inc.
The OPEN LOOK and Sun™ Graphical User Interfacewas developed by Sun Microsystems, Inc.for its users and licensees. Sun acknowledges
the pioneering efforts ofXerox in researching and developing the concept of visual or graphical user interfaces for the computer industry.Sun
holds a non-exclusive license from Xerox to the Xerox Graphical User Interface, which license also coversSun’s licensees who implement OPEN
LOOK GUIs and otherwise comply with Sun’s written license agreements.
RESTRICTED RIGHTS: Use, duplication, or disclosure by the U.S. Government is subject to restrictionsof FAR52.227-14(g)(2)(6/87) and FAR
52.227-19(6/87), or DFAR252.227-7015(b)(6/95) and DFAR 227.7202-3(a).
DOCUMENTATIONIS PROVIDED “AS IS” AND ALL EXPRESS OR IMPLIED CONDITIONS, REPRESENTATIONSAND WARRANTIES,
INCLUDING ANY IMPLIED WARRANTYOFMERCHANTABILITY,FITNESS FOR A PARTICULARPURPOSE OR NON-INFRINGEMENT,
ARE DISCLAIMED, EXCEPT TOTHE EXTENT THATSUCH DISCLAIMERS ARE HELD TO BE LEGALLY INVALID.
Copyright 1999 Sun Microsystems,Inc., 901 San Antonio Road, Palo Alto, Californie 94303 Etats-Unis.Tousdroits réservés.
Ce produit ou documentest protégé par un copyright etdistribué avec des licences qui en restreignent l’utilisation, la copie, la distribution,et la
décompilation. Aucune partie de ce produit ou document ne peut être reproduitesous aucune forme, par quelque moyen que ce soit, sans
l’autorisation préalable et écrite de Sun et de ses bailleurs de licence, s’il y en a. Le logiciel détenu par des tiers, et qui comprend la technologie
relativeaux polices decaractères, est protégé par un copyright et licencié par des fournisseurs deSun.
Des parties de ce produit pourront être dérivées des systèmes Berkeley BSD licenciés par l’Université deCalifornie. UNIX est une marque
déposée aux Etats-Unis et dans d’autres pays et licenciée exclusivement par X/Open Company, Ltd. La notice suivante est applicable à
Netscape Communicator : Copyright 1995 Netscape Communications Corporation. All rights reserved.
Sun, Sun Microsystems, lelogo Sun, AnswerBook, AnswerBook2, Solaris, Sun Enterprise, Sun StorEdge, SPARCstorage, SPARCserver,
SPARCclassic, SPARCstationSLC, SPARCstationELC, SPARCstationIPC, SPARCstationIPX, ShowMe TV,SunFDDI,SunForum, SunVTS, et
Ultra sont des marquesde fabrique ou des marques déposées,ou marques de service, de SunMicrosystems, Inc. aux Etats-Unis et dansd’autres
pays. Toutesles marques SPARCsont utilisées sous licence et sontdes marques de fabrique ou desmarques déposées de SPARCInternational,
Inc. aux Etats-Unis et dans d’autres pays. Les produits portantles marques SPARCsont basés sur une architecture développée par Sun
Microsystems,Inc.
L’interfaced’utilisation graphique OPEN LOOK et Sun™ a été développée par SunMicrosystems, Inc. pour ses utilisateurs et licenciés. Sun
reconnaîtles efforts de pionniers de Xerox pour la recherche et le développement du concept des interfaces d’utilisation visuelle ou graphique
pour l’industrie de l’informatique. Sun détient une licencenon exclusive de Xerox sur l’interface d’utilisation graphique Xerox,cette licence
couvrant également les licenciés de Sun qui mettenten place l’interface d’utilisation graphique OPEN LOOK et qui en outre se conforment aux
licences écrites de Sun.
CETTE PUBLICATION EST FOURNIE "EN L’ETAT"ET AUCUNE GARANTIE, EXPRESSE OU IMPLICITE, N’EST ACCORDEE, Y COMPRIS
DES GARANTIES CONCERNANT LA VALEURMARCHANDE, L’APTITUDEDE LA PUBLICATIONA REPONDRE A UNE UTILISATION
PARTICULIERE,OU LE FAIT QU’ELLE NE SOIT PAS CONTREFAISANTE DE PRODUIT DE TIERS. CE DENI DEGARANTIE NE
S’APPLIQUERAIT PAS,DANS LA MESURE OU IL SERAIT TENU JURIDIQUEMENT NUL ET NON AVENU.
Please
Recycle
Page 3

Contents
Preface vii
1. Installing Software From the
Solaris CD 1
Automatic Installation of Solaris Software 1
Manual Installation of Solaris Software 1
Custom JumpStart Profiles 9
32-bit Kernel the Default on 200MHz or Lower UltraSPARC Systems 10
2. Supported Sun Hardware 13
Supported Platforms 13
Supported Storage Peripherals 14
Controllers 18
Graphics Accelerators 19
PCMCIA 20
TTY Graphics Input Devices 20
Networking and Communications 20
Keyboard and Mouse Options 21
3. Installing Software from the Sun Computer Systems Supplement CD 23
Installing Sun Computer Systems Supplement CD Software 23
iii
Page 4

Validation Test Suite Software
(SunVTS Software) 29
OpenGL Software 32
PC Launcher 37
PC File Viewer 44
ShowMe TV 1.3 Software 48
Solaris 7 11/99 AnswerBook Set 51
Sun Computer Systems Manual Page Clusters and Packages 54
Sun Remote System Control for Sun Servers 55
SunForum 55
Network Adapter Drivers Included on the Supplement CD 56
Java 3D 1.1.1 API 57
Sun Enterprise 10000 SSP 57
4. Updating the Flash PROM on the Ultra 1, Ultra 2, Ultra 450, and Sun Enterprise
450 Systems 59
Related Material 59
Determining If the Flash PROM Needs Updating 60
Updating the Flash PROM 61
Recovering From a Power Failure During the Flash PROM Update 71
Restoring NVRAM Configuration Variables 74
Error Messages 76
Location of Flash PROM Jumpers in Sun Enterprise 450 System and the Ultra 450
Workstation 77
Flash PROM Update Multimedia Collection 79
5. Updating the Flash PROM on the Sun Enterprise 3x00, 4x00, 5x00, and 6x00
Systems 83
Determining If the Flash PROM Needs Updating 83
Updating the Flash PROM 85
Location of Flash PROM Jumpers in Sun Enterprise Server Systems 97
iv Solaris 7 11/99 Sun Hardware Platform Guide • November 1999
Page 5

Recovering From a Power Failure During the Flash PROM Update 100
6. Installing the Solaris Operating Environment With the SPARCstorage Array
105
Disk Management Software 105
SPARCstorage Array Firmware 106
Installation and Upgrade Scenarios 106
Scenario 1: New Installation of Solaris 7 11/99 Software on Systems Booting From
the SPARCstorage Array Disk 107
Scenario 2: New Installation of Solaris 7 11/99 Software on Systems Not Booting
From the SPARCstorage Array Disk 112
Scenario 3: Upgrading to the
Solaris 7 11/99 Operating Environment 113
7. Power Management on Sun Hardware 117
Supported Platforms 117
Supported Peripherals 119
SPARCstation 4 Issues 120
8. Alternate Pathing 2.2 on the Sun Enterprise 3x00, 4x00, 5x00, and 6x00
Servers 121
Performing a Fresh Install of AP 121
Performing an Upgrade of AP 128
9. Alternate Pathing 2.2 on the Sun Enterprise 10000 Server 139
Performing a Fresh Install of AP 139
Performing an Upgrade of AP 146
10. The Solaris 7 11/99 Operating Environment on the Sun Enterprise 10000
Server 161
Knowing Where to Start 161
Creating a Domain 162
Performing a Fresh Install 165
Contents v
Page 6

Performing an Upgrade to Solaris 7 11/99 183
A. Localized Packages on the Supplement CD 201
Japanese Localized Packages 201
German Localized Packages 203
Italian Localized Packages 203
French Localized Packages 204
Spanish Localized Packages 204
Swedish Localized Packages 205
Traditional Chinese Localized Packages 205
Simplified Chinese Localized Packages 206
Korean Localized Packages 207
vi Solaris 7 11/99 Sun Hardware Platform Guide • November 1999
Page 7

Preface
The Solaris 7 11/99 Sun Hardware Platform Guide contains important information
about the Sun™ hardware supported by the Solaris™ 7 11/99 operating
environment.
This manual:
■ Provides platform-specific installation instructions for the Solaris 7 11/99
software
■ Describes software provided on the Sun Computer Systems Supplement CD and
explains how to install product software
■ Describes flash PROM update procedures necessary for some systems to run in
64-bit mode
■ Describes installation issues affecting the Sun Enterprise 10000 system
■ Identifies installation issues affecting the SPARCstorage™ Array
■ Describes hardware and software requirements affecting Power
Management™ software
Note – For general Solaris 7 11/99 operating environment installation instructions,
refer to Chapter 1 “Installing Software From the Solaris CD”.For information about
how to install software contained on the Sun Computer Systems Supplement CD
and information about supported hardware, refer to Chapter 3, “Installing Software
from the Sun Computer Systems Supplement CD”.
vii
Page 8

Where to Find Installation Information
The Solaris 7 11/99 software is delivered on two CDs:
■ Solaris 7 11/99 SPARC Platform Edition CD (called the Solaris CD throughout this
manual)
■ Supplement for Solaris 7 11/99 Operating Environment for Sun Computer
Systems CD (called the Supplement CD throughout this manual).
Before installing the Solaris 7 11/99 software, check
with information that may apply to your situation and
TABLE P-1 for listings of manuals
TABLE P-2 for specific
installation information.
Note – All Solaris and SPARC documentation can be found on the Documentation
CD. All Sun hardware-specific documentation can be found on the Supplement CD.
Some co-packaged products contain documentation on their respective CDs.
TABLEP-1 Related Documentation
Title Description
Solaris 7 SPARC Installation
Instructions
Solaris 7 (SPARC Platform Edition)
Installation Library
Solaris Advanced Installation Guide Contains additional information about how to
TABLEP-2 Specific Installation Information
Primary installation manual for this release of the
Solaris operating environment from the
Documentation CD
Supplements the Solaris Start Here card by
providing detailed installation information
install the Solaris operating environment on server
systems
If you want to Go to
Know more about new products
and peripherals
Know about late-breaking news 1. Solaris 7 11/99 Release Notes Supplement for Sun
Begin the installation process from
the Solaris CD
viii Solaris 7 11/99 Sun Hardware Platform Guide • November 1999
Chapter 3 in this manual
Hardware
2. Solaris 7 Release Notes
1. Solaris 7 11/99 Sun Hardware Platform Guide
2. Solaris 7 SPARC Installation Instructions
Page 9

TABLEP-2 Specific Installation Information (Continued)
If you want to Go to
Install software for your
platform/peripheral from the
Supplement CD
Update your flash PROM for
64-bit operation
Install Solaris software on a Sun
Enterprise 10000 system
Install Solaris software on a
SPARCstorage Array
Install an AnswerBook from the
Supplement CD
Chapter 3 in this manual
Chapter 4 and Chapter 5 of this manual
Chapter 10 in this manual
Chapter 6 in this manual
Chapter 3 in this manual
How This Book Is Organized
This book is organized as follows:
Chapter 1 supports the Solaris 7 11/99 Start Here card by providing additional
installation instructions on how to install or upgrade to the Solaris 7 11/99 software
on specific Sun platforms and hardware options.
Chapter 2 lists supported Sun hardware.
Chapter 3 describes how to install the software for Sun platforms and hardware
options and describes value-added software provided to users of Sun hardware.
Chapter 4 describes the procedure for updating the flash PROMs for 64-bit operation
on Ultra 1, Ultra 2, Ultra 450, and Sun Enterprise 450 systems.
Chapter 5 describes the procedure for updating the flash PROMs for 64-bit operation
on Sun Enterprise 3x00, 4x00, 5x00, and 6x00 systems.
Chapter 6 describes how to install the Solaris 7 11/99 software either as a new
installation or as an upgrade on systems where the SPARCstorage Array™ may be
used as the boot device.
Chapter 7 describes the hardware and software requirements for running the Power
Management software on Sun hardware.
Chapter 8 describes installing Alternate Pathing 2.2 on Sun Enterprise 6x00, 5x00,
4x00, and 3x00 servers.
Preface ix
Page 10

Chapter 9 describes installing Alternate Pathing 2.2 on Sun Enterprise 10000 servers.
Chapter 10 describes how to install Solaris 7 11/99 software on a Sun Enterprise
10000 Domain. It also describes how to upgrade the Solaris software on a host
domain.
Typographic Conventions
TABLEP-3 Typographic Conventions
Typeface or
Symbol Meaning Example
AaBbCc123 The names of commands, files,
and directories; on-screen
computer output
AaBbCc123 What you type, contrasted with
on-screen computer output
AaBbCc123 Command-line placeholder:
replace with a real name or
value
AaBbCc123 Book titles, new words or
terms, or words to be
emphasized
Edit your .login file.
Use ls -a to list all files.
machine_name% You have mail.
machine_name% su
Password:
To delete a file, type rm filename.
Read Chapter 6 in User’s Guide. These
are called class options.
You must be root to do this.
Sun Documentation on the Web
The docs.sun.com web site enables you to access Sun technical documentation on
the Web. You can browse the docs.sun.com archive or search for a specific book
title or subject at:
http://docs.sun.com
x Solaris 7 11/99 Sun Hardware Platform Guide • November 1999
Page 11

Sun Welcomes Your Comments
We are interested in improving our documentation and welcome your comments
and suggestions. You can email your comments to us at:
Please include the part number of your document in the subject line of your email.
Preface xi
Page 12

xii Solaris 7 11/99 Sun Hardware Platform Guide • November 1999
Page 13

CHAPTER
1
Installing Software From the Solaris CD
Automatic Installation of Solaris Software
For the Sun™ hardware listed in TABLE 1-1, the Solaris™ 7 11/99 release requires no
special installation or upgrade instructions. If you plan to perform an automatic
installation of the Solaris 7 11/99 operating environment on your Sun hardware,
refer to the Solaris 7 11/99 (SPARC Platform Edition) Installation Library or the Solaris
Advanced Installation Guide for all your installation needs.
Manual Installation of Solaris Software
If you are installing the Solaris 7 11/99 operating environment using the manual (or
interactive) method, you may need to add some software packages and clusters. This
section identifies platform-specific installation needs and lists the required software
packages and clusters. The manual installation method is described in the “Planning
Your Installation” module of the Solaris 7 11/99 (SPARC Platform Edition) Installation
Library.
1
Page 14

Platform Names and Groups
You need to know your system architecture (platform group), if you are performing
one of the following tasks:
■ Setting up a boot server on a subnet
■ Adding clients for network installation (standalone, servers, dataless, diskless)
If you are writing a custom JumpStart™ installation rules file, you need to know the
platform name.
TABLE 1-1 shows the platform names and platform groups of various Sun hardware
systems.
TABLE1-1 Platform Names for Sun Systems
System Platform Name Platform Group
SPARCstation SLC SUNW,Sun_4_20 sun4c
SPARCstation ELC SUNW,Sun_4_25 sun4c
SPARCstation IPC SUNW,Sun_4_40 sun4c
SPARCstation IPX SUNW,Sun_4_50 sun4c
SPARCstation 1 SUNW,Sun_4_60 sun4c
SPARCstation 1+ SUNW,Sun_4_65 sun4c
SPARCstation 2 SUNW,Sun_4_75 sun4c
SPARCclassic SUNW,SPARCclassic sun4m
SPARCstation LX SUNW,SPARCstation-LX sun4m
SPARCstation LX+ SUNW,SPARCstation-LX+ sun4m
SPARCstation 4 SUNW,SPARCstation-4 sun4m
SPARCstation 5 SUNW,SPARCstation-5 sun4m
SPARCstation 5Model 170 SUNW,SPARCstation-5 sun4m
SPARCstation 10 SUNW,SPARCstation-10 sun4m
SPARCstation 10SX SUNW,SPARCstation-10,SX sun4m
SPARCstation 20 SUNW,SPARCstation-20 sun4m
SPARCstation Voyager SUNW,S240 sun4m
Ultra 1 Model 140 SUNW,Ultra-1 sun4u
Ultra 1 Model 170 SUNW,Ultra-1 sun4u
Ultra 1 Creator Model 140E SUNW,Ultra-1 sun4u
Ultra 1 Creator3D Model 140E SUNW,Ultra-1 sun4u
2 Solaris 7 11/99 Sun Hardware Platform Guide • November 1999
Page 15

TABLE1-1 Platform Names for Sun Systems (Continued)
System Platform Name Platform Group
Ultra 1 Creator Model 170E SUNW,Ultra-1 sun4u
Ultra 1 Creator 3D Model 170E SUNW,Ultra-1 sun4u
Ultra 1 Creator Model 200E SUNW,Ultra-1 sun4u
Ultra 1 Creator3D Model 200E SUNW,Ultra-1 sun4u
Sun Enterprise 1 Model 140 SUNW,Ultra-1 sun4u
Sun Enterprise 1 Model 170 SUNW,Ultra-1 sun4u
Sun Enterprise 1 Model 170E SUNW,Ultra-1 sun4u
Ultra 2 Creator Model 1170 SUNW,Ultra-2 sun4u
Ultra 2 Creator3D Model 1170 SUNW,Ultra-2 sun4u
Ultra 2 Creator Model 2170 SUNW,Ultra-2 sun4u
Ultra 2 Creator3D Model 2170 SUNW,Ultra-2 sun4u
Ultra 2 Creator Model 1200 SUNW,Ultra-2 sun4u
Ultra 2 Creator3D Model 1200 SUNW,Ultra-2 sun4u
Ultra 2 Creator Model 2200 SUNW,Ultra-2 sun4u
Ultra 2 Creator 3D Model 2200 SUNW,Ultra-2 sun4u
Ultra 2 Creator Model 1300 SUNW,Ultra-2 sun4u
Ultra 2 Creator Model 2300 SUNW,Ultra-2 sun4u
Ultra 5 SUNW,Ultra-5_10 sun4u
Ultra 10 SUNW,Ultra-5_10 sun4u
Ultra 30 SUNW,Ultra-30 sun4u
Ultra 60 SUNW,Ultra-60 sun4u
Ultra 80 SUNW,Ultra-80 sun4u
Ultra 450 SUNW,Ultra-4 sun4u
Sun Enterprise 2 Model 1170 SUNW,Ultra-2 sun4u
Sun Enterprise 2 Model 2170 SUNW,Ultra-2 sun4u
Sun Enterprise 2 Model 1200 SUNW,Ultra-2 sun4u
Sun Enterprise 2 Model 2200 SUNW,Ultra-2 sun4u
Sun Enterprise 2 Model 1300 SUNW,Ultra-2 sun4u
Sun Enterprise 2 Model 2300 SUNW,Ultra-2 sun4u
Sun Enterprise 150 SUNW,Ultra-1 sun4u
Chapter 1 Installing Software From the Solaris CD 3
Page 16

TABLE1-1 Platform Names for Sun Systems (Continued)
System Platform Name Platform Group
Sun Enterprise 250 SUNW,Ultra-250 sun4u
Sun Enterprise 450 SUNW,Ultra-4 sun4u
Sun Enterprise 3000 SUNW,Ultra-Enterprise sun4u
Sun Enterprise 4000 SUNW,Ultra-Enterprise sun4u
Sun Enterprise 5000 SUNW,Ultra-Enterprise sun4u
Sun Enterprise 6000 SUNW,Ultra-Enterprise sun4u
Sun Enterprise 3500 SUNW,Ultra-Enterprise sun4u
Sun Enterprise 4500 SUNW,Ultra-Enterprise sun4u
Sun Enterprise 5500 SUNW,Ultra-Enterprise sun4u
Sun Enterprise 6500 SUNW,Ultra-Enterprise sun4u
Sun Enterprise 10000 SUNW,Ultra-Enterprise sun4u
SPARCserver 1000 SUNW,SPARCserver-1000 sun4d
SPARCcenter 2000 SUNW,SPARCcenter-2000 sun4d
Refer to the Solaris 7 11/99 SPARC (SPARC Platform Edition) Installation Instructions
manual for further information on platform groups for all other systems.
Setting Up Diskless Clients Using Solstice AdminSuite
If you are setting up a diskless client on a platform other than a sun4c, sun4d, or
sun4m, select Entire Distribution Plus OEM as the client OS service.
Caution – If you do not select this metacluster, you will not be able to boot your
!
4 Solaris 7 11/99 Sun Hardware Platform Guide • November 1999
sun4u system as a diskless client.
Page 17

Interactive Installation of Solaris Software
When you install the Solaris 7 11/99 operating environment from the Solaris CD, all
of the required software clusters and packages for your Sun hardware are
automatically loaded. If you choose to customize your Solaris 7 11/99 software
configuration using the interactive installation method, refer to
TABLE 1-3 to identify which software packages and clusters are needed.
TABLE 1-2 and
Chapter 1 Installing Software From the Solaris CD 5
Page 18

TABLE1-2 Required Software Clusters and Packages for Sun Hardware
Product Name Cluster or Package Name Description
S24 frame buffer SUNWCtcx TCX API Support
SX frame buffer SUNWCsx SX Support
Creator and Creator3D SUNWxilvl
SUNWCffb
Creator Graphics Device Drivers and
Pipelines
SUNWffbx 64-bit Support
Creator and Creator3D
(Series 2)
SUNWxilvl Creator Graphics Device Drivers and
SUNWCffb
Pipelines
SUNWffbx 64-bit Support
Elite3D SUNWCafb Elite3D Device Drivers and Pipelines
SUNWafbmn Elite3D Online Manual Pages
SUNWxfb.u Elite3D/FFB (Creator) Common Driver
Routines
SUNWafbx 64-bit Support
PGX Graphics Frame Buffer SUNWCm64 M64 Graphics Support
SUNWm64x 64-bit Support
PGX32 Graphics Frame Buffer TSIpgx.u Device driver for PGX32 (Raptor GFX)
graphics accelerator
TSIpgxmn PGX32 (Raptor GFX) graphics accelerator
manual pages
TSIpgxw X Server loadable module for PGX32
(Raptor GFX) graphics accelerator
TSIpgxx.u Device driver for PGX32 (Raptor GFX)
graphics accelerator (64-bit)
SPARCstorage Array
(Models 100 or 200)
SUNWssad
SUNWssaop
SPARCstorage Array Support Software
SUNWssdx 64-bit Support
Sun StorEdge A5000 SUNWClux
Sun StorEdge A5000 Support Software
SUNWses
SUNWluxdx.u
64-bit Support
SUNWluxlx
SunSwift SBus Adapter SUNWChmd SunSwift SBus Adapter Drivers
SUNWhmdx 64-bit Support
6 Solaris 7 11/99 Sun Hardware Platform Guide • November 1999
Page 19

TABLE1-2 Required Software Clusters and Packages for Sun Hardware (Continued)
Product Name Cluster or Package Name Description
SunSwift PCI Adapter SUNWChmd SunSwift PCI Adapter Drivers
SUNWhmdx 64-bit Support
SPARCstation 4 SUNWCtcx TCX API Support
SPARCstation 5 SUNWCtcx TCX API Support
SPARCstation 10SX SUNWCsx SX End User
SPARCstation 20 SUNWCsx SX End User
Ultra 1 Series SUNWxilvl VIS/XIL Support
Ultra 1 Creator Series, Ultra 2
Creator Series, and Sun
Enterprise X000 Series
SUNWxilvl
SUNWCffb
VIS/XIL Support
Creator Graphics Device Drivers and
Pipelines
SUNWChmd SunSwift SBus Adapter Drivers
SUNWffbx
64-bit Support
SUNWhmdx
Ultra 5, Ultra 10, and Ultra 30 SUNWxilvl VIS/XIL Support
SUNWCffb Creator Graphics Device Drivers and
Pipelines
SUNWCm64 M64 Graphics Support
SUNWChmd SunSwift SBus Adapter Drivers
SUNWffbx
64-bit Support
SUNWhmdx
SUNWm64x
Ultra 60 SUNWxilvl VIS/XIL Support
SUNWCffb Creator Graphics Device Drivers and
Pipelines
SUNWCm64 M64 Graphics Support
SUNWChmd SunSwift SBus Adapter Drivers
SUNWffbx
64-bit Support
SUNWm64x
Ultra 450 and
Sun Enterprise 450
SUNWCpd Drivers for SPARC platforms with PCI bus
SUNWpdx 64-bit Support
Sun Enterprise 10000 SUNWC4u1 Sun Enterprise 10000 Support
SUNWcvcx 64-bit Support
Chapter 1 Installing Software From the Solaris CD 7
Page 20

Manual Installation of Packages
If you are installing at the package level, refer to TABLE 1-3 for the software packages
required for specific hardware.
TABLE1-3 Required Packages for Hardware Platforms and Options
Product Name Package Name
SX frame buffer SUNWsxr.m
SUNWsx
SUNWsxow
SUNWxilcg
SUNWsxxgl
S24 or FSV frame buffer SUNWtcx.m
SUNWtcxu
SUNWtcxow
Creator and Creator3D (including Series 2) SUNWffb.u
SUNWffbcf
SUNWffbw
SUNWffbxg
SUNWxilvl
Elite3D SUNWafb.u
SUNWafbcf
SUNWafbmn
SUNWafbr
SUNWafbw
SUNWafbxg
SUNWxfb.u
PGX Graphics Frame Buffer SUNWm64.u
SUNWm64w
SUNWm64cf
PGX32 Graphics Frame Buffer TSICpgx.u
TSIpgxmn
TSIpgxw
TSIpgxx.u
SunSwift SBus Adapter SUNWhmd
SUNWhmdu
SunSwift PCI Adapter SUNWhmd
SUNWhmdu
SPARCstorage Array, model 100/200 SUNWssad
SUNWssaop
8 Solaris 7 11/99 Sun Hardware Platform Guide • November 1999
Page 21

TABLE1-3 Required Packages for Hardware Platforms and Options (Continued)
Product Name Package Name
Sun StorEdge A5000 SUNWluxal
SUNWluxdv.d
SUNWluxdv.u
SUNWluxdv.u1
SUNWluxmn
SUNWluxop
SUNWses
Ultra 1 Series SUNWxilvl
Ultra 1 Creator Series, Ultra 2 Creator Series,
Ultra 5, Ultra 10, Ultra 60, or Sun Enterprise
X000 Series
Ultra 5, Ultra 10, Ultra 60, Ultra 250, Ultra
450, and Sun Enterprise 450
Sun Enterprise 10000 SUNWcvcr.u
SUNWffb.u
SUNWffbcf
SUNWffbw
SUNWffbxg
SUNWxilvl
SUNWhmd
SUNWhmdu
SUNWpd
SUNWpdu
Custom JumpStart Profiles
For information on the availability of the custom JumpStart™ method at your site,
consult your system administrator.
software options that may require additional entries in custom profiles. These
clusters might not be installed with the core distribution software group. Refer to the
Solaris 7 11/99 SPARC Installation Instructions manual for more information.
When writing Custom JumpStart profiles, be sure to allow sufficient space in the
root partition for software from the Supplement CD, such as software for SunVTS
diagnostics.
TABLE 1-4 lists platforms and hardware and
Chapter 1 Installing Software From the Solaris CD 9
Page 22

Note – For more information about automating Solaris installations, refer to
Automating Solaris Installations: A Custom JumpStart Guide (Kasper/McClellan), a
SunSoft Press/Prentice Hall publication.
TABLE1-4 Additional Entries for Custom JumpStart Installations
Product Name Package Name
SX Frame Buffer cluster SUNWCsx
S24 or FSV Frame Buffer cluster SUNWCtcx
Creator and Creator3D Graphics
(including Series 2)
Elite3D cluster SUNWCafb
PGX Graphics Frame Buffer cluster SUNWCm64
PGX32 Graphics Frame Buffer TSIpgx
SunSwift SBus Adapter cluster SUNWChmd
SunSwift PCI Adapter cluster SUNWChmd
SPARCstation 10SX cluster SUNWCsx
SPARCstation 20 cluster SUNWCsx
Ultra 5, Ultra 10, Ultra 60, Ultra 250,
Ultra 450 and Sun Enterprise 450
Sun Enterprise 10000 cluster SUNWC4u1
cluster SUNWCffb
package SUNWxilvl
package SUNWafbmn
package SUNWxfb.u
TSIpgxmn
TSIpgxx.u
cluster SUNWCpd
32-bit Kernel the Default on 200MHz or Lower UltraSPARC Systems
On UltraSPARC systems with 200MHz or lower processors, it is possible for a user
to run a 64-bit program designed to exploit a problem that could cause a processor
to stall. Since 64-bit programs cannot run on the Solaris 32-bit kernel, the Solaris
32-bit kernel is booted by default on these systems.
10 Solaris 7 11/99 Sun Hardware Platform Guide • November 1999
Page 23

The code sequence that exploits the problem is very unusual, and is not likely to be
generated by a compiler. Assembler code had to be specifically written to
demonstrate the problem. It is highly unlikely that a legitimate handwritten
assembler routine would use this code sequence.
Users willing to assume the risk that a user might accidentally or deliberately run a
program that was designed to cause a processor to stall may choose to run the
Solaris 64-bit kernel on these systems.
You can determine the speed of your processor(s) by typing:
# /usr/sbin/psrinfo -v
You can change the default kernel from 32-bit on a system by modifying the boot
policy file. Edit the /platform/platform-name/boot.conf file so that it contains an
uncommented line with the variable named
ALLOW_64BIT_KERNEL_ON_UltraSPARC_1_CPU set to the value true as shown
in the example that follows:
ALLOW_64BIT_KERNEL_ON_UltraSPARC_1_CPU=true
See boot(1M) for more information about changing the default kernel.
You may also purchase an upgrade to your system, contact your Sun representative
for details.
Chapter 1 Installing Software From the Solaris CD 11
Page 24

12 Solaris 7 11/99 Sun Hardware Platform Guide • November 1999
Page 25

CHAPTER
2
Supported Sun Hardware
Supported Platforms
Note – Not all platforms and peripheral devices listed in this chapter are
compatible. Contact your authorized Sun support provider for support information.
■ SPARCclassic™
■ SPARCstation SLC™
■ SPARCstation ELC™
■ SPARCstation LX
■ SPARCstation IPC™
■ SPARCstation IPX™
■ SPARCstation 1
■ SPARCstation 1+
■ SPARCstation 2
■ SPARCstation 4
■ SPARCstation 5
■ SPARCstation 5 Model 170
■ SPARCstation 10
■ SPARCstation 10SX
■ SPARCstation 20
■ SPARCstation 20 Model HS11, HS12, HS14, HS21, HS22, 151, and 152
■ SPARCstation Voyager™
■ Ultra™ 1 Model 140, 170
■ Ultra 1 Creator Model 140E, 170E, 200E
■ Ultra 1 Creator3D Model 140E, 170E, 200E
■ Sun Enterprise™ 1 Model 140, 170, 170E
■ Ultra 2 Creator Model 1170, 2170, 1200, 2200, 1300, 2300
■ Ultra 2 Creator3D Model 1170, 2170, 1200, 2200
13
Page 26

■ Ultra 5
■ Ultra 10
■ Ultra 30
■ Ultra 60
■ Ultra 80
■ Ultra 450
■ Sun Enterprise 2 Model 1170, 2170, 1200, 2200, 1300, 2300
■ Sun Enterprise 150
■ Sun Enterprise 250
■ Sun Enterprise 450
■ Sun Enterprise 3000
■ Sun Enterprise 4000
■ Sun Enterprise 5000
■ Sun Enterprise 6000
■ Sun Enterprise 3500
■ Sun Enterprise 4500
■ Sun Enterprise 5500
■ Sun Enterprise 6500
■ Sun Enterprise 10000
■ SPARCserver™ 1000 and 1000E
■ SPARCcenter 2000 and 2000E
Supported Storage Peripherals
The following peripherals are supported:
■ SPARCstorage™ Array
■ Sun StorEdge™ A5000
■ Sun StorEdge D1000/A1000
SCSI Disks
Sun StorEdge UniPack
■ 1.05-Gbyte
■ 1.05-Gbyte Fast/Wide
■ 2.1-Gbyte
■ 2.1-Gbyte Fast/Wide
■ 4.2-Gbyte Fast/Wide
■ 9-Gbyte Ultra
■ 18-Gbyte Ultra
14 Solaris 7 11/99 Sun Hardware Platform Guide • November 1999
Page 27

Sun StorEdge MultiPack
■ 2.1-Gbyte (2 x 1.05-Gbyte)
■ 4.2-Gbyte (2 x 2.1-Gbyte Fast SCSI-2)
■ 4.2-Gbyte (4 x 1.05-Gbyte)
■ 4.2-Gbyte (2 x 2.1-Gbyte 7200 rpm)
■ 8.4-Gbyte (4 x 2.1-Gbyte Fast SCSI-2)
■ 8.4-Gbyte (2 x 4.2-Gbyte 5400 rpm)
■ 8.4-Gbyte (4 x 2.1-Gbyte 7200 rpm)
■ 8.4-Gbyte (2 x 4.2-Gbyte)
■ 9-Gbyte (2 x 9-Gbyte 7200 rpm Ultra)
■ 9-Gbyte (4 x 9-Gbyte 7200 rpm Ultra)
■ 9-Gbyte (6 x 9-Gbyte Ultra)
■ 16.8-Gbyte (4 x 4.2-Gbyte)
■ 16.8-Gbyte (4 x 4.2-Gbyte 5400 rpm)
■ 18-Gbyte (2 x 9-Gbyte)
■ 36-Gbyte (2 x 18-Gbyte)
■ 36-Gbyte (4 x 9-Gbyte)
■ 54-Gbyte (6 x 9-Gbyte)
■ 72-Gbyte (4 x 18-Gbyte)
■ 108-Gbyte (6 x 18-Gbyte)
Desktop Storage Pack (3.5-inch)
■ 104-Mbyte
■ 207-Mbyte
■ 207-Mbyte Low profile (LP)
■ 424-Mbyte
■ 535-Mbyte (LP)
■ 1.05-Gbyte
■ 1.05-Gbyte (LP)
■ 2.1-Gbyte
■ 4.2-Gbyte
External Storage Module/External Expansion Module (5.25inch)
■ 327-Mbyte
■ 669-Mbyte
Multi-Disk Pack (3.5-inch)
■ 4.2-Gbyte (4 x 1.05-Gbyte)
■ 4.2-Gbyte (2 x 2.1-Gbyte)
Chapter 2 Supported Sun Hardware 15
Page 28

■ 8.4-Gbyte (4 x 2.1-Gbyte)
■ 8.4-Gbyte (2 x 4.2-Gbyte)
■ 16.8-Gbyte (4 x 4.2-Gbyte)
Desktop Storage Module
■ 16.8-Gbyte (4 x 4.2-Gbyte 5.25-inch)
■ 1.3-Gbyte (5.25-inch)
Differential SCSI Disk Tray (5.25-inch)
■ 2.1-Gbyte
■ 2.9-Gbyte
■ 9.0-Gbyte
Differential SCSI Expansion Pedestal (5.25-inch)
■ 2.1-Gbyte
SCSI Disk Cards (3.5-inch)
■ 2.1-Gbyte (4 x 535-Mbyte, narrow)
■ 4.2-Gbyte (4 x 1.05-Gbyte, wide)
■ 8.4-Gbyte (4 x 2.1-Gbyte, wide)
Enterprise Disk Cards
■ 4.2-Gbyte (2 x 2.1-Gbyte)
■ 8.4-Gbyte (2 x 4.2-Gbyte)
CD Drives
■ SunCD™ drive
■ SunCD Plus™ drive
■ SunCD 2Plus™ drive
■ SunCD 4 drive
■ Sun StorEdge CD12 drive
■ SunCD 16 drive
■ SunCD 24 drive
■ SunCD 32 drive
16 Solaris 7 11/99 Sun Hardware Platform Guide • November 1999
Page 29

SCSI Tape Drives
■ 60-Mbyte 1/4 inch QIC Sun3 Mass Storage subsystem
■ 150-Mbyte 1/4 inch QIC Desktop Backup Pack and External Storage Module
■ 2.5-Gbyte 1/4-inch QIC Sun StorEdge UniPack
■ 1/2-inch Front Load (800/1600/6250 bpi) Tape
■ 5-Gbyte 4mm Tape Desktop Backup Pack and Sun StorEdge UniPack
■ 20-Gbyte 4mm Tape Auto-Loader Desktop Backup Module
■ 2.3-Gbyte 8mm Desktop Backup Pack and External Storage Module
■ 5.0-Gbyte 8mm Desktop Backup Pack
■ 10-Gbyte 8mm Desktop Backup Pack
■ 14-Gbyte 8mm Desktop Backup Pack and Sun StorEdge UniPack
■ Multi-Tape Tray and Dragon Media Tray
■ 20-Gbyte 4mm tape autoloader
■ 5.0-Gbyte 8mm
■ 10-Gbyte 8mm
■ 14-Gbyte 8mm
■ Internal
■ 4-Gbyte 4mm DDS2 tape drive
■ 4-Gbyte 4mm DDS2CR tape drive
■ 4-Gbyte DDS3 tape drive
■ 7-Gbyte 8mm 8505XL tape drive
■ 7-Gbyte 8mm 8705DX tape drive
■ SPARCstorage Library (up to two 14-Gbyte tape drives with 10 magazine
cartridges and a robotic mechanism to select cartridges) (SCSI)
Diskette Drives
■ 3.5-inch dual-density diskette drive
■ 3.5-inch tri-density diskette drive
■ 3.5-inch tri-density manual eject diskette drive
Expansion Subsystems
■ SBus Expansion Subsystem/Chassis (SES/C)
■ SBus Expansion Subsystem/Board (SES/B)
Chapter 2 Supported Sun Hardware 17
Page 30

Controllers
Sun StorEdge SCSI Host Adapters
■ Sun SCSI Host Adapter (SSHA)
■ SBus SCSI Buffered Ethernet (SBE/S)
■ SBus Fast SCSI Buffered Ethernet (FSBE/S)
■ SBus Single-Ended Fast/Wide Intelligent SCSI-2 (SWIS/S)
■ SBus Single-Ended Fast/Wide SCSI-2 (SunSwift)
■ SBus Differential Fast/Wide Intelligent SCSI-2 (DWIS/S)
■ SBus Differential SCSI Buffered Ethernet (DSBE/S)
PCI Host Adapters
■ PCI Single-ended Fast/Wide SCSI-2 (SunSwift/PCI)
■ Dual Differential UltraSCSI (UD2S)
■ Dual Single-ended UltraSCSI (US2S)
Fibre Channel Host Adapters
■ FC/S
■ FC-OM (FC/S only)
■ FC100/S
■ GBIC (FC100/S only)
18 Solaris 7 11/99 Sun Hardware Platform Guide • November 1999
Page 31

Graphics Accelerators
The following frame buffers are supported:
Frame Buffer Support Matrix
TABLE2-1 Supported Frame Buffers
Product
Name Common Name Device Driver X Bus Architecture
n/a CG3 /dev/fbs/cgthreeX SBus
GX CG6 /dev/fbs/cgsixX SBus
GXplus CG6 /dev/fbs/cgsixX SBus
TGX TurboGX /dev/fbs/cgsixX SBus
TGX4 TurboGX+ /dev/fbs/cgsixX SBus
SX CG14 /dev/fbs/cgfourteenX embedded
SPARCstation 10SX
SPARCstation 20
S24 tcx /dev/fbs/tcxX AFX Bus
FSV tcx /dev/fbs/tcxX AFX Bus (embedded)
SunVideo rtvc /dev/rtvcX SBus
Creator ffb /dev/fbs/ffbX UPA Bus
Creator3D ffb /dev/fbs/ffbX UPA Bus
Creator Series 2 ffb2 /dev/fbs/ffbX UPA Bus
Creator3D
Series 2
Elite3D afb /dev/fbs/afbx UPA Bus
PGX M64 /dev/fbs/m64X PCI Bus
ffb2 /dev/fbs/ffbX UPA Bus
Note – X denotes the device number for the device driver and FSV (tcx)is
integrated on the SPARCstation 4 system motherboard.
Chapter 2 Supported Sun Hardware 19
Page 32

PCMCIA
The PCMCIA interfaces are provided with the following products:
■ SPARCstation Voyager (uses STP4020 PCMCIA controller chip)
■ PCMCIA Interface/SBus (uses STP4020 PCMCIA controller chip)
The supported PC cards are:
■ Serial RS-232 communication cards
■ Data and fax modem cards
■ SRAM, DRAM, MROM memory cards
TTY Graphics Input Devices
■ SunDials™
■ SunButtons™
Note – The SunDials and SunButtons products are not supported on all hardware.
Contact your authorized Sun Support provider for more information.
Networking and Communications
The following network and communications devices are supported:
■ SBus Second Ethernet
■ SBus SCSI/Buffered Ethernet Card (SBE/S)
■ SBus Fast SCSI Buffered Ethernet Card (FSBE/S)
■ SBus Differential SCSI Buffered Ethernet Card (DSBE/S)
■ SBus Quad Ethernet Controller (SQEC)
■ SunSwift SBus Adapter
■ SunFastEthernet-2 SBus Adapter
■ SunSwift PCI Adapter
20 Solaris 7 11/99 Sun Hardware Platform Guide • November 1999
Page 33

Unbundled Options
■ SBus Fiber Distributed Data Interface (FDDI/S)
■ SBus High-Speed Interface (HSI/S)
■ SBus Token Ring Interface (TRI/S)
■ SBus Prestoserve™
■ SBus SunATM™ 155
■ SBus SunATM 622
■ SBus Fibre Channel Card (FC/S)
■ NVSIMM
■ Integrated Services Digital Network (ISDN)
■ Serial Parallel Controller/SBus (SPC/S)
■ SunPC™ Accelerator
■ SunFDDI Single-Attach PCI Adapter
■ SunFDDI Dual-Attach PCI Adapter
■ SUNTRI Token Ring Interface PCI Adapter
■ SUNHSI High-Speed Serial Interface PCI Adapter
■ Sun Serial Asynchronous Interface PCI Adapter
Keyboard and Mouse Options
The following keyboard and mouse options are supported:
Keyboard Options
■ Type 3 keyboard
■ Type 4 keyboard
■ Type 5 keyboard
■ Compact 1 keyboard
Mouse Options
■ M3 mouse
■ M4 mouse
■ Type 5 mouse
■ Compact 1 mouse
Chapter 2 Supported Sun Hardware 21
Page 34

22 Solaris 7 11/99 Sun Hardware Platform Guide • November 1999
Page 35

CHAPTER
3
Installing Software from the Sun Computer Systems Supplement CD
This chapter describes the contents and the installation of the Sun Computer
Systems Supplement CD, which contains software for these Sun products:
■ SunVTS™ 3.4
■ OpenGL 1.2 software
■ PC launcher/PC file viewer 1.0.1/1.0.1 software
■ ShowMe TV™ 1.3 Software
■ Sun Hardware Manual Pages
■ Solaris 7 11/99 AnswerBook™ Set
■ SunFDDI™ 6.0 drivers
■ SunHSI (PCI: 2.0) and SunHSI (SBus: 3.0) drivers
■ Sun GigabitEthernet 2.0 driver
■ SunATM 4.0 Update 1
■ SunForum™ 2.0 software
■ Remote System Control (RSC) 1.0 for Sun Enterprise Servers
■ Alternate Pathing 2.2 software
■ Java 3D 1.1.1
■ Sun Enterprise 10000 SSP 3.2
Installing Sun Computer Systems Supplement CD Software
There are at least four ways to install software from the supplement CD:
■ Solaris Web Start 1.0
■ Solaris Web Start 2.0
■ AdminTool/SWMtool
■ pkgadd
23
Page 36

Before Installing Supplement CD Software
If you have installed any of the Supplement CD software from a previous release,
you should remove the packages associated with that software before installing the
new software.
Installing Supplement CD Software Using Solaris Web Start 1.0
You can use the Solaris Web Start 1.0 method to install some of the software from the
Supplement CD at the same time you are installing from the Solaris CD. For more
information on the Solaris Web Start 1.0 method of installation, see the “ Using Solaris
Web Start” module in the Information Library.
See
TABLE 3-1 for a list of which software on the Supplement CD is installed by
default or not installed by Solaris Web Start 1.0. software
Installing Supplement CD Software Using Solaris Web Start 2.0
You can use Solaris Web Start 2.0 to install Supplement CD software after you have
installed the Solaris operating environment.
▼ To Install Supplement CD Software Using Solaris
Web Start 2.0
1. Insert the Supplement CD into your CDROM drive.
2. In a shell, type:
# cd /cdrom/cdrom0
# ./installer
3. When the Solaris Web Start GUI is displayed, select Next.
4. See
24 Solaris 7 11/99 Sun Hardware Platform Guide • November 1999
TABLE 3-1. In the Solaris Web Start 2.0 column, software is labeled “Installed
by default” or “Optional”.
a. If you want to install all of the default installed software, click Default Install,
then click Next.
Page 37

b. If you only want to install some of the software products, click Custom Install,
then click Next. Select the software you want to install, then click Next.
TABLE3-1 Supplement Software Installation
Software
Solaris Web Start
1.0 (Desktop)
Solaris Web Start
1.0 (Server)
SunVTS Optional Installed by
default
OpenGL software Installed by
default
PC launcher and PC file viewer Installed by
default
ShowMe TV 1.3 software Installed by
default
Installed by
default
Installed by
default
Installed by
default
Solaris on Sun Hardware AnswerBook Set Optional Installed by
default
SunFDDI drivers Cannot be
installed
SunHSI drivers Cannot be
installed
Sun GigabitEthernet driver Cannot be
installed
SunATM driver Cannot be
installed
SunForum software Installed by
Cannot be
installed
Cannot be
installed
Cannot be
installed
Cannot be
installed
Optional Installed by
default
Remote System Control (RSC) for Sun
Enterprise Servers
Alternate Pathing 2.2 software Cannot be
Cannot be
installed
Cannot be
installed
Optional Optional
installed
Sun Enterprise 10000 SSP Cannot be
installed
Java 3D 1.1.1 Cannot be
installed
Cannot be
installed
Cannot be
installed
Solaris Web Start
2.0
Installed by
default
Installed by
default
Installed by
default
Installed by
default
Installed by
default
Optional
Optional
Optional
Optional
default
Optional
Optional
Installed by
default
Chapter 3 Installing Software from the Sun Computer Systems Supplement CD 25
Page 38

Installing Supplement CD Software Using
swmtool
With swmtool, you can install packages for more than one software product during
the same installation session.
▼ To Install Clusters and Packages Using swmtool
1. Insert the Supplement CD into your CD-ROM drive.
2. In a shell, become superuser using the su command and the superuser password.
3. Start swmtool:
# swmtool
4. Select Add from the swmtool Edit Menu.
5. Enter the path to the Supplement CD:
/cdrom/cdrom0
or:
/cdrom/cdrom0/Product
From /cdrom/cdrom0 you can add clusters; from /cdrom/cdrom0/Product you
can customize and add individual packages.
6. In the swmtool GUI, select the clusters or packages you want to install.
7. Select Add.
Some products may require a customized installation. For example, packages may
need to be installed in a directory other than the default directory, /opt. Specific
directions for any customized installations are included in the individual software
product sections in this chapter.
26 Solaris 7 11/99 Sun Hardware Platform Guide • November 1999
Page 39

Installing Supplement CD Software on a Standalone System Using pkgadd
▼ To install packages for supported products from the
Supplement CD using pkgadd
1. Insert the Supplement CD into your CD-ROM drive.
The File Manager window is displayed.
2. In a shell, become superuser using the su command and the superuser password.
3. Type:
# /usr/sbin/pkgadd -d /cdrom/cdrom0/Product package_names
or:
# cd /cdrom/cdrom0/Product
# pkdadd -d . package_names
The argument to the -d option must be a full path name to a device or directory. If
you do not specify the device on which the package resides, pkgadd checks the
default spool directory (/var/spool/pkg). If the package is not there, installation
fails.
To install a particular product, choose the appropriate packages:
TABLE3-2 Software, Clusters, and Packages
Software Version Cluster Packages
Alternate Pathing Core Software 2.2 SUNWCap SUNWapdoc
SUNWapdv
SUNWapr
SUNWapu
Validation Test Suite Software (SunVTS) 3.4 SUNWCvts SUNWsycfd
SUNWvts
SUNWvtsmn
SUNWeswsa
64-Bit Validation Test Suite Software (SunVTS) 3.4 SUNWCvtsx SUNWCvts
SUNWvtsx
SunVTS Online Diagnostics Utilities 3.4 SUNWCondg SUNWodu
Chapter 3 Installing Software from the Sun Computer Systems Supplement CD 27
Page 40

TABLE3-2 Software, Clusters, and Packages (Continued)
Software Version Cluster Packages
OpenGL Runtime Libraries Software 1.2 SUNWCogl SUNWafbgl
SUNWffbgl
SUNWglrt
SUNWglrtu
SUNWglh
64 Bit OpenGL Runtime Libraries Software 1.2 SUNWCoglx SUNWCogl
SUNWafbgx
SUNWffbgx
SUNWglrtx
PClauncher/PC file viewer 1.0.1/
1.0.1
SUNWCpcfv SUNWdtpcv
SUNWdtpcz
SUNWdtpcp
Remote System Control Server Software 1.0 SUNWCrscs SUNWrsc
Remote System Control Client Software 1.0 SUNWCrscc SUNWrscj
ShowMe TV 1.3 SUNWCsmtv SUNWsmtvh
SUNWsmtvr
SUNWsmtvt
SUNWsmtvu
Sun Computer Systems Manual Page Cluster 1.0 SUNWCman SUNWapdoc
SUNWgedm
SUNWhsipm
SUNWhsism
SUNWnfm
SUNWpfm
SUNWvtsmn
SUNWsspmn
SunForum 2.0 SUNWCdat SUNWdat
SUNWdatr
SUNWdatu
SunFDDI PCI Driver Software 2.0 SUNWCfdip SUNWpfd
SUNWpfh
SUNWpfm
SUNWpfu
SunFDDI SBus Driver Software 6.0 SUNWCfdis SUNWnfd
SUNWnfh
SUNWnfm
SUNWnfu
Sun GigabitEthernet Software 2.0 SUNWCgem SUNWged
SUNWgedm
SUNWgedu
28 Solaris 7 11/99 Sun Hardware Platform Guide • November 1999
Page 41

TABLE3-2 Software, Clusters, and Packages (Continued)
Software Version Cluster Packages
SunHSI PCI Driver Software 2.0 SUNWChsip SUNWhsip
SUNWhsipm
SUNWhsipu
SunHSI SBbus Driver Software 3.0 SUNWChsis SUNWhsis
SUNWhsism
SUNWhsisu
Sun Hardware AnswerBook 2 Cluster 1.0 SUNWCabk SUNWabhdw
Java 3D 1.1.1 SUNWCj3d SUNWj3doc
SUNWj3dem
SUNWj3drt
SUNWj3dut
SunATM 4.0 Update 1 4.0 SUNWCatm SUNWatm
SUNWatma
SUNWatmu
Note – For information on installing Sun Enterprise 10000 SSP, see the document,
Sun Enterprise 10000 SSP Installation and Release Notes, a printed copy of which is
included in your server media kit.
Note – Some pakcages have been localized. For a list of localized package names,
see Appendix A.
If a problem occurs during package installation, information about the problem is
displayed, followed by this prompt:
Do you want to continue with this installation?
Respond with either yes, no,orquit.
Validation Test Suite Software (SunVTS Software)
The SunVTS validation test suite is a diagnostic tool designed to test Sun hardware.
By running multiple diagnostic hardware tests, the SunVTS software verifies the
connectivity and functionality of most hardware controllers and devices in a 32-bit
or 64-bit environment.
Chapter 3 Installing Software from the Sun Computer Systems Supplement CD 29
Page 42

Within this environment, you can run individual tests designed to validate most
currently supported hardware that Sun sells. The SunVTS environment also allows
programmers to develop their own tests and run them on SunVTS interfaces.
You can find the software for the SunVTS application on the Supplement CD. To use
the SunVTS software, refer to the SunVTS 3.4 User’s Guide, SunVTS 3.4 Test Reference
Manual, and the SunVTS Quick Reference Card.
TABLE 3-3 describes the main features of the SunVTS environment.
TABLE3-3 SunVTS Diagnostic Tools
Features Description
SunVTS kernel (vtsk) The SunVTS kernel controls all aspects of the testing. It is
a daemon designed to stay in the background, and to be
used when needed. Upon starting, the SunVTS kernel
probes the hardware configuration of the system under
test and waits for instructions from a user interface.
During testing, the SunVTS kernel coordinates the
running of individual tests, and manages all the messages
(informational and error messages) sent by these tests.
SunVTS CDE user interface
(vtsui)
SunVTS OPEN LOOK user
interface (vtsui.o1)
This interface is designed to run on top of the Common
Desktop Environment (CDE). It will also run on top of
OpenWindows if the CDE package SUNWdtbas is
installed. This interface provides a user-friendly GUI for
accessing SunVTS test session configuration, execution,
and log files.
This interface is designed to be run on top of
OpenWindows. The SunVTS OPEN LOOK User Interface
may not support the latest SunVTS features. For full
feature support, use the SunVTS CDE or TTY interface.
The SunVTS OPEN LOOK User Interface will be
sustainedm but not enhanced, as long as OPEN LOOK is
supported in the Solaris environment.
30 Solaris 7 11/99 Sun Hardware Platform Guide • November 1999
Page 43

TABLE3-3 SunVTS Diagnostic Tools (Continued)
Features Description
SunVTS TTY user interface
(vtstty)
Because not every system has a monitor, SunVTS has a
TTY interface. This ASCII menu-based interface accepts
various key sequences to control the test options and the
test sessions. It can be used from a terminal, a shelltool,
or a modem.
Running an individual test
from the command line
Besides being run from a SunVTS user interface, each
individual hardware test can be run from a UNIX®
command line. Running a test alone can be helpful to
validate only one piece of hardware.
Custom test support A SunVTS user can run third-party executable test
binaries under the SunVTS environment in the way that
the test, rather than the SunVTS kernel, fully controls its
input argument list and output log files. A user can
simply modify the .customtest file provided by
SunVTS to make it loosely coupled to the environment.
SunVTS Clusters and Packages
TABLE 3-4 provides a list of SunVTS clusters and packages needed to run the SunVTS
diagnostic tool.
TABLE3-4 SunVTS Clusters and Packages on the Supplement CD
Cluster
Includes
Packages Name Description
SUNWCvts SUNWvts Validation Test Suite SunVTS kernel, User Interface
(UI), tests and tools
SUNWvtsmn Validation Test Suite
Manual Pages
Manual pages for SunVTS
utilities/binaries
SUNWsycfd Standalone configuration reader
for Enterprise server platforms
SUNWeswsa Standalone configuration reader
for desktop platforms
SUNWCvtsx SUNWvtsx
SUNWCvts
SUNWCondg SUNWodu Online Validation Test
Validation Test Suite 64-Bit Validation Test Suite
software
Online diagnostics tool software
Suite Diagnostics
Note: SUNWodu is not installed
via Web Start. You must install
it using pkgadd.
Chapter 3 Installing Software from the Sun Computer Systems Supplement CD 31
Page 44

Installing SunVTS
See “Installing Sun Computer Systems Supplement CD Software” on page 23.
Using SunVTS Software
To use SunVTS software, refer to the SunVTS 3.4 User’s Guide in the Solaris 7 11/99
on Sun Hardware AnswerBook set. For SunVTS test and quick reference
information, refer to the SunVTS 3.4 Test Reference Manual and SunVTS Quick
Reference Card.
OpenGL Software
The Sun OpenGL software for Solaris is Sun’s native implementation of the OpenGL
application programming interface (API). The OpenGL API is an industry-standard,
vendor-neutral graphics library. It provides a small set of low-level geometric
primitives and many basic and advanced 3D rendering features, such as modeling
transformations, shading, lighting, anti-aliasing, texture mapping, fog, and alpha
blending.
Supported Platforms
The Sun OpenGL 1.2 software for Solaris supports the following devices:
■ Creator Graphics, Creator3D Graphics, and Elite3D Graphics—OpenGL
functionality is accelerated in hardware.
■ SX, GX, GX+, TGX, TGX+, S24—OpenGL functionality is performed in software.
■ All Sun SPARC
supported on the OpenGL 1.2 software: the TCX, SX, GX, Creator, and Elite3D
families of frame buffers. This includes Ultra desktop, Sun Enterprise and all the
legacy SPARCstation family.
TM
systems equipped with the following frame buffers are
Removing Old Packages
If you have older versions of the Sun OpenGL software for Solaris packages, you
must use the pkgrm command to remove them.
32 Solaris 7 11/99 Sun Hardware Platform Guide • November 1999
Page 45

▼ To Remove Old Packages
1. Check to see whether any older versions of the OpenGL packages are installed
using the pkginfo command.
The pkginfo | egrep -i “OpenGL” command lists any existing OpenGL
packages that you have installed.
% pkginfo | egrep -i “OpenGL”
application SUNWffbgl Creator Graphics (FFB) OpenGL Support
application SUNWglrt OpenGL Runtime Libraries
application SUNWglrtu OpenGL Platform Specific Runtime Libraries
application SUNWglwrt OpenGL Widget Library
application SUNWafbgl Loadable pipeline for UPA Bus Elite3D graphics
application SUNWgldoc Solaris OpenGL Documentation and Man Pages
application SUNWglh Solaris OpenGL Header Files
application SUNWglut Solaris OpenGL Utilities and Example Programs
application SUNWglwh Solaris OpenGL Widget Header Files
2. To remove the packages, become superuser:
% su
Password: superuser password
3. Run pkgrm to remove all existing Sun OpenGL software for Solaris packages.
# pkgrm SUNWglrt SUNWglh...
Chapter 3 Installing Software from the Sun Computer Systems Supplement CD 33
Page 46

OpenGL Clusters and Packages
TABLE 3-5 lists the clusters and packages that are provided with the Sun OpenGL
software for Solaris.
TABLE3-5 OpenGL Clusters and Packages
Cluster Name
SUNWCogl SUNWglrt OpenGL client-side runtime
SUNWCoglx SUNWglrtx Sun OpenGL 64-bit Runtime
Package
Name Description Default Install Location
libraries
SUNWglrtu UltraSPARC-specific OpenGL
libraries
SUNWffbgl Device pipeline for Creator
and Creator3D Graphics
frame buffers
SUNWafbgl Loadable pipeline for UPA
Bus Elite3D graphics
Libraries
SUNWafbgx Sun OpenGL 64-bit loadable
pipeline for the UPA Bus
Elite3D graphics accelerator
SUNWffbgx Sun OpenGL 64-bit loadable
pipeline for the UPA Bus
Creator graphics accelerator
SUNWCogl Core OpenGL software, see
SUNWCogl in the left column,
above.
/usr/openwin/lib
/usr/openwin/
platform/sun4u/lib/GL
/usr/openwin/lib/GL/
devhandlers
/usr/openwin
/usr/openwin
/usr/openwin
/usr/openwin
Installing OpenGL
See “Installing Sun Computer Systems Supplement CD Software” on page 23.
After Installing the Packages
After installing the packages, do the following:
34 Solaris 7 11/99 Sun Hardware Platform Guide • November 1999
Page 47

▼ To Verify Package Installation
1. Exit the window system and restart it so that the window system loads the newly
installed GLX server extension.
2. To verify that the OpenGL libraries are installed correctly, run ogl_install_check.
The ogl_install_check test program prints the version of the OpenGL library
and renderer used, and renders a rotating wheel. The program returns the following
output when it is run on an UltraSPARC Creator3D:
OpenGL Vendor: Sun Microsystems, Inc.
OpenGL Version: 1.2 Sun OpenGL 1.2 for Solaris
For diagnostic purposes, the following values should be noted if Solaris OpenGL
software problems are seen:
OpenGL Renderer: Creator 3D, VIS
OpenGL Extension Support: GL_EXT_texture3D
GL_SGI_color_table
GL_SUN_geometry_compression
GL_EXT_abgr
GL_EXT_rescale_normal
OpenGL GLX Server: Detail Status Report
GLX: Context is direct.
GLX: OpenGL Rendering in use
GLX: Double Buffering in use
GLX: Color Buffer (GLX_BUFFER_SIZE) = 24 bits
GLX: Depth Buffer (GLX_DEPTH_SIZE) = 28 bits
GLX: Stencil Buffer (GLX_STENCIL_SIZE) = 4 bits
GLX: RGBA (True Color/Direct Color) Visual in use
OpenGL Library: Detail Status Report
Number of color bits (R/G/B/A): 8/8/8/0
Frame Buffer Depth (GL_DEPTH_BITS):28
Unexpected Slow Local Rendering
Whenever possible, Sun OpenGL software for Solaris renders directly to the frame
buffer, bypassing the X server. This is enabled by Sun’s DGA mechanism for locking
portions of the screen. However, a Solaris security feature only allows the user who
originally logged in to the window system to use DGA to lock portions of the screen.
Only owners of the window system have access to DGA.
Chapter 3 Installing Software from the Sun Computer Systems Supplement CD 35
Page 48

If you notice poor performance when rendering locally, the cause may be this Solaris
security feature. For example, if you start the window system, and another user at
the workstation changes to that user’s own environment using su, the application
will not run via DGA even though the second user is running the application locally.
If you notice slow local rendering, run the ogl_install_check diagnostic
program (found in /usr/openwin/demo/GL) to determine whether the application
is running via DGA. If the OpenGL GLX server status report from the
ogl_install_check program says that the GLX context is indirect, edit the login
permissions to enable DGA access for all users.
To give all local users access to DGA, follow these steps:
▼ To Give All Local Users Access to DGA
1. Become superuser:
% su
Password: superuser password
2. Edit permissions to allow world read/write access to the following devices:
% chmod 666 /dev/mouse /dev/kbd /dev/sound/* /dev/fbs/*
This will enable DGA access for all users for the duration of the current window
system session (subject to X authorization, see xhost(1)).
3. Edit the /etc/logindevperm file and change the default permissions of all
devices listed in the file to 0666 to allow world read/write access.
For example, in the following lines in logindevperm, change 0600 to 0666 so that
the next time you log in and restart your window system, it will still be accessible by
all users.
/dev/console 0600 /dev/mouse:/dev/kbd
/dev/console 0600 /dev/sound/* # audio devices
/dev/console 0600 /dev/fbs/* #frame buffers
Note that your system is no longer secure.
36 Solaris 7 11/99 Sun Hardware Platform Guide • November 1999
Page 49

PC Launcher
Audience
PC launcher is designed for Solaris users who have access to Windows ‘95 or ‘98
based PC environments
What is PC Launcher?
PC launcher provides you with the capability to view and edit PC files and
attachments by launching the associated Windows applications and files in the PC
environment. PC launcher enables you to launch attachments and files created in the
Windows environment.
PC Launcher Installation Requirements
■ Software Supplement for the Solaris 7 11/99 Operating Environment for Sun
Computer Systems CD
If you don’t have the Supplement CD, contact your Sun service representative.
System Requirements
Sun Workstation
■ Solaris 7 operating environment
■ CDE 1.3
■ 32 MB RAM
Network PC Environment with one of the following:
■ SunPCi card
■ Software Environment
■ PC Hardware with Win 9x (PC -NFS/Solstice Network Client)
Chapter 3 Installing Software from the Sun Computer Systems Supplement CD 37
Page 50

PC Launcher Installation
SunPCi Requirements
In order for PC launcher to work, SunPCi and its host workstation must be able to
ping each other by ‘name’. To do this, you must have:
■ IP connectivity between the two.
■ Name services (whatever you happen to be using) set up on each so that you can
look up the other’s name and get its IP address.
Because of the network architecture of SunPCi and the way it shares Ethernet access
with its host, the SunPCI and host cannot see each other on the network.
To work around this, use an IP routing system (a "real" router, another Sun system,
an NT system, etc.) on the same subnet to act as a proxy router.
Note – You must have account access to the IP router you have selected, since you
must add two routes to it.
For example, based on following setup:
■ SunPCi IP = 10.0.0.1
■ Host workstation IP = 10.0.0.2
■ Router IP = 10.0.0.3
you need to do the following:
1. On the host workstation:
route add 10.0.0.1 10.0.0.3 1
Note – You can add an /etc/rc script to make this happen at every reboot.
2. On the routing proxy:
route add 10.0.0.2 10.0.0.3 0
route add 10.0.0.1 10.0.0.3 0 (or the equivalent)
Caution – You must add routes to all three systems in this fashion in order for this
to work. Do NOT assume that "standard network default routers" or anything else
will provide similar functionality; they will not.
38 Solaris 7 11/99 Sun Hardware Platform Guide • November 1999
Page 51

After doing this, verify that the SunPCi can ping its host by IP, and vice versa. Once
that works, make sure that they can ping each other by name; add entries to the
appropriate naming services if they cannot. On UNIX, examples of naming services
are DNS or /etc/hosts. Windows can use DNS or the hosts file as well. Consult
your System Administrator to add these entries, based on your setup. Once the
systems can ping each other by name, PC launcher will install.
For further assistance with installation of SunPCi, refer to the following publications:
■ SunPCi Installation Guide
■ SunPCi Release Notes
■ SunPCi 1.1 Windows NT Installation Guide
Installing PC Launcher Packages
See “Installing Sun Computer Systems Supplement CD Software” on page 23.
Configuring PC Launcher
You configure PC launcher by specifying your setup in the three steps on the PC
launcher Configuration window.
Before configuring, you must have the following:
■ A network host name and network connectivity between your Solaris and
Windows environments.
■ Your UNIX home directory mapped in your Windows environment.
▼ To Configure PC Launcher for PCi
1. From the CDE Toolbar, start the Application Manager.
2. Click Configure PC launcher under the Desktop controls. The PC launcher
Configuration window is displayed. Answer the questions in the following three
steps.
a. On-Board PC Emulator and SunPCI (default)
b. Enter your Sun PCi’s hostname (default)
c. Let PC Emulator handle the file
3. Click OK.
Chapter 3 Installing Software from the Sun Computer Systems Supplement CD 39
Page 52

Note – PC-type documents can be opened for viewing and editing through the Sun
PCi card whenever you double-click a document. If you want to do “quick” viewing,
select “Let Solaris handle the file” and PC file viewer is invoked. For editing, use the
right-mouse button and select “Open In Emulator”.
4. From SunPCi run h: \.dt\bin\win9x\intel\sdtpcactiond.exe (assuming
h: is mapped to your UNIX home directory).
▼ To Configure PC Launcher for the Software
Environment
1. From the CDE Toolbar, start the Application Manager.
2. Click Configure PC launcher under the Desktop controls then select or enter the following:
a. On-Board PC Emulator and SoftWindows. b. <Hostname> c. Let Solaris handle the file
Note – PC-type documents can be opened for viewing and editing with a right-
mouse double-click. If you selected “Let Solaris handle the file” when you
configured PC launcher, then double-clicking on a file will launch PC file viewer.
3. Click OK.
4. From Software Environment run:
h: \.dt\bin\win9x\intel\sdtpcactiond.exe
(assuming h: is mapped to your UNIX home directory).
▼ To Configure PC Launcher for a Deskside PC
1. From the CDE Toolbar, start the Application Manager.
2. Click Configure PC launcher under the Desktop Applications then select or enter the following:
40 Solaris 7 11/99 Sun Hardware Platform Guide • November 1999
Page 53

a. Standalone PC
b. <Hostname>
c. Let the Standalone PC handle the file
Note – PC-type documents can be opened for viewing and editing with a right-
mouse double-click. If you selected “Let Solaris handle the file” when you
configured PC launcher, then double-clicking on a file will launch PC file viewer.
3. Click OK.
4. From Deskside PC run:
h: \.dt\bin\win9x\intel\sdtpcactiond.exe
(assuming h: is mapped to your UNIX home directory).
Using PC Launcher
The CDE front panel and CDE workspace can be populated with an icon
representing the PC environment, such as SunPCi. To do this, drag and drop
OpenInSunPCi from the Desktop Applications in Application Manager, onto the
Front Panel.
If you did not configure PC launcher, then the first time you open PC launcher, the
PC launcher Configuration window will display. This is where you will configure PC
launcher. You only need to configure PC launcher once.
Working With Windows Files
Windows Files
Identification of many popular PC file formats in CDE allows you to select and
launch them in your preferred PC environment, such as SunPCI. A right mouse click
on these files gives you the three following choices in the menu:
■ Open—the double-click action.
■ OpenInEmulator—launches the file in your preferred hardware, such as SunPCi
(or any software emulator).
Chapter 3 Installing Software from the Sun Computer Systems Supplement CD 41
Page 54

■ OpenInRemotePC—launches the file in a standalone networked PC.
You can drag and drop Windows shortcuts onto the Front Panel. You can also put
shortcuts on the CDE workspace by creating a windows short cut in your UNIX
home directory and using dtfile to drag and drop. Refer to Windows help on
creating shortcuts, and CDE help to get more information on drag and drop.
▼ To Open an Application or Datafile
● Double-click on the shortcut from the Solaris desktop.
The associated applications must be available to you. This procedure makes the
Solaris desktop act like a Windows desktop. You can keep all your relevant
applications inside the Solaris CDE front panel and CDE workspace and run them
by double-clicking on them.
▼ To Run Windows Binary Files
● Double-click on the file (exe) and run inside the PC environment (for example,
SunPCi).
▼ To Copy and Paste Text
1. Highlight the text you want to copy and select Copy from the Edit menu.
2. Click the place you want to paste the text, and select Paste from the Edit menu.
▼ To View a File
● Click on the file and select View.
▼ To Search for a File
1. Select Find/Change from the Edit menu.
2. Enter the filename into the Find field and click Find.
▼ To Print Files
● Select Print from the File menu
The file will print out on the PC printer.
42 Solaris 7 11/99 Sun Hardware Platform Guide • November 1999
Page 55

Other Features
▼ To Display the Windows Start Menu in CDE
Using manual steps, you can get to all of the Windows Start Menu choices in the
CDE Application Manager.
1. Start Windows Explorer.
2. Copy C: \Window\StartMenu\ to H: \.dt\appmanager.
3. Start Application Manager.
4. Go to the Desktop controls.
5. Click Reload Application.
▼ To Log On to a Different Machine
● Reconfigure PC launcher on the Configuration window.
▼ To Reconfigure PC Launcher
● Remove the PC’s hostname in Step 2 on the PC launcher Configuration window.
▼ Switch Between Targets
● Change your selection in Step 1 on the PC launcher Configuration window.
Getting Help for PC Launcher
Help for PC launcher is available through the Help menu at the bottom of the PC
launcher Configuration window.
Chapter 3 Installing Software from the Sun Computer Systems Supplement CD 43
Page 56

PC File Viewer
PC File Viewer
The PC file viewer software provides you with an application to view popular PC
file formats such as Microsoft Word, PowerPoint, Excel, Lotus 1-2-3, and AutoCAD.
The viewer allows you to choose a file and to copy and paste information from the
viewer to another application, such as a text editor. CDE applications will be able to
identify these filetypes and launch this application by double-clicking on the icon in
your mail attachment or from File Manager (dtfile).
File Formats Supported
PC file viewer supports 17 different file types:
Word Processing Formats
■ Microsoft Word for Windows versions through 7.0 and Word 97
■ Microsoft Windows Works versions through 4.0
■ Word Perfect for Windows versions through 7.0
■ AMI/AMI Professional versions through 3.1
Spreadsheet Formats
■ Microsoft Excel Windows versions 2.2 through 7.0 and Excel 97
■ Microsoft Excel Chart versions 2.x through 7.0
■ Microsoft Windows Works versions through 4.0
■ Lotus 1-2-3 Windows versions through 6.x
■ Lotus 1-2-3 Chart Windows versions through 5.0
■ QuattroPro for Windows versions through 7.0
Presentation Formats
■ Microsoft PowerPoint versions through 7.0 and PowerPoint 97
■ Corel Presentation versions through 7.0
■ Freelance versions 1.0 and 2.0
Graphics Formats
■ BMP—Windows
■ DXF—versions through 13
■ GEM—Bitmap and vector
■ PIC—Lotus
44 Solaris 7 11/99 Sun Hardware Platform Guide • November 1999
Page 57

PC File Viewer Limitations
PC file viewer is limited to the following products and configurations for this Solaris
release:
■ SPARC architecture ONLY
■ Printing is not supported
The following limitations are related to displaying items in a supported file:
■ Charts are not supported in QuattroPro.
■ Text that is designed to be shown vertically is shown horizontally in the viewer.
This vertical text may overlap adjacent cells making reading what is in them
difficult.
■ Figures and footers are aligned with the anchors in the text. If font sizes on the
viewing system are not identical to those on the authoring system, then anchored
objects will not be at the appropriate place in the text.
■ There is limited support for incremental shading in presentation file formats
■ There is no support for drawing objects in Microsoft Word and Lotus.
■ Borders in Word Perfect and AmiPro files are not supported
■ Copy & Paste does not work for Japanese text in Microsoft Office applications.
Note – All of the above limitations also exist in the Microsoft Windows version of
the product from Inso Corporation.
■ There is no support for OLE objects.
■ If a font that is used in a document is not on the system, the default system font
will be used and the viewed text may look different than what was seen in the
authoring application.
■ If a special character is used in a document that is not in the available character
set, it will be replaced by an asterisk in the document as shown by the file viewer.
Chapter 3 Installing Software from the Sun Computer Systems Supplement CD 45
Page 58

PC File Viewer Packages
TABLE 3-6 lists the packages that are provided with PC file viewer.
TABLE3-6 PC file viewer Packages
Locale Package Name Description
English SUNWdtpcv US base package
SUNWdtpcz US base actions and messages
Japanese SUNWjdpcv Japanese EUC/PCK/UTF-8 common messages
SUNWjepcv Japanese EUC messages
SUNWjppcv Japanese PCK messages
SUNWjupcv Japanese UTF-8 messages
SUNWjepcz Japanese EUC action files
SUNWjppcz Japanese PCK action files
SUNWjupcz Japanese UTF-8 action files
Korean SUNWkcpcv Korean EUC/UTF-8 common messages
SUNWkupcv Korean UTF-8 messages
SUNWkdpcv Korean EUC messages
SUNWkupcz Korean UTF-8 action files
SUNWkdpcz Korean EUC action files
Traditional
Chinese
Simplified
Chinese
German SUNWdepcv German messages
SUNWhcpcv Traditional Chinese EUC/BIG5 common files
SUNW5pcv Traditional Chinese BIG5 messages
SUNWhdpcv Traditional Chinese EUC messages
SUNW5pcz Traditional Chinese BIG5 action files
SUNWhdpcz Traditional Chinese EUC action files
SUNWccpcv Simplified Chinese EUC/GBK common messages
SUNWcdpcv Simplified Chinese EUC messages
SUNWgpcv Simplified Chinese GBK messages
SUNWcdpcz Simplified Chinese EUC action files
SUNWgpcz Simplified Chinese GBK action files
SUNWdepcz German action files
46 Solaris 7 11/99 Sun Hardware Platform Guide • November 1999
Page 59

TABLE3-6 PC file viewer Packages (Continued)
Locale Package Name Description
French SUNWfrpcv French messages
SUNWfrpcz French action files
Spanish SUNWespcv Spanish messages
SUNWespcz Spanish action files
Italian SUNWitpcv Italian messages
SUNWitpcz Italian action files
Swedish SUNWsvpcv Swedish messages
SUNWsvpcz Swedish action files
Installing PC File Viewer
See “Installing Sun Computer Systems Supplement CD Software” on page 23.
Adding PC File Viewer to the CDE Front Panel
To Add PC File Viewer to the CDE Front Panel
1. Open File Manager (dtfile).
2. Go to the /opt/SUNWdtpcv/bin directory.
You will see the PC file viewer icon there.
3. Open the CDE front panel where you want the icon.
For example, the Application or File sub-folder.
4. Drag and drop the PC file viewer icon from File Manager to InstallIcon in the selected subfolder.
Now the PC file viewer can be launched by just clicking on the icon in the CDE front
panel. You can also promote the icon to appear on the front panel by default.
Chapter 3 Installing Software from the Sun Computer Systems Supplement CD 47
Page 60

ShowMe TV 1.3 Software
ShowMe TV is a television system for local- and wide-area networks. You can use it
to view and broadcast live or prerecorded video programs on your network. Here
are some examples of how you can use ShowMe TV:
■ Broadcast and view training courses
■ Lectures
■ Corporate messages
■ Monitor important news events
ShowMe TV contains the following components:
■ ShowMe TV Receiver
■ ShowMe TV Transmitter
■ ShowMe TV Address Book
ShowMe TV Packages
TABLE 3-7 lists the packages that are provided with ShowMe TV.
TABLE3-7 ShowMe TV Packages
Package Name Description Default Install Location
SUNWsmtvh Online help binaries and
documentation
SUNWsmtvr ShowMe TV receiver application
and support files
SUNWsmtvt ShowMe TV transmitter application
and support files
SUNWsmtvu Support utilities /opt/SUNWsmtv 842
Removing Old Packages
If you have ShowMe TV 1.1, 1.2, or 1.2.1 installed, you need to remove it before
installing ShowMe TV 1.3.
48 Solaris 7 11/99 Sun Hardware Platform Guide • November 1999
Disk Space
(Kbytes)
/opt/SUNWsmtv 319
/opt/SUNWsmtv 12320
/opt/SUNWsmtv 9329
Page 61

● To remove ShowMe TV 1.1, type:
# pkgrm SUNWsmUt1 SUNWstv SUNWstvs
If you have an earlier release of ShowMe TV 1.2 installed, you need to remove it
before installing any new software packages.
● To remove ShowMe TV 1.2 or 1.2.1, type:
# pkgrm SUNWsmtvt SUNWsmtvu SUNWsmtvr SUNWsmtvh
Installing ShowMe TV
See “Installing Sun Computer Systems Supplement CD Software” on page 23.
Translated Documentation
The Supplement CD contains the ShowMe TV User’s Guide in the following
languages:
■ French
■ German
■ Spanish
■ Italian
■ Swedish
■ Japanese
■ Korean
■ Simplified Chinese
■ Traditional Chinese
Chapter 3 Installing Software from the Sun Computer Systems Supplement CD 49
Page 62

▼ Accessing the ShowMe TV User ’s Guide
The /cdrom/cdrom0/Docs/ShowMeTV1.3/UserGuide directory on the
Supplement CD contains the following files:
TABLE3-8 ShowMe TV Translated Documents
File Name Description
UG_en.ps English PostScript™ file
UG_de.ps German PostScript file
UG_fr.ps French PostScript file
UG_es.ps Spanish PostScript file
UG_it.ps Italian PostScript file
UG_sv.ps Swedish PostScript file
UG_ja.ps Japanese PostScript file
UG_ko_dir/ Korean HTML files
UG_zh_dir/ Simplified Chinese HTML files
UG_zh_TW_dir/ Traditional Chinese HTML files
● To view the desired PostScript manual, type the following at the command line:
# imagetool filename
● To print the manual, either use the File menu in Image Tool or type the following
at the command line:
# lp filename
● To view the manuals in HTML format, use a Web browser and type the following
in the address field:
file:/cdrom/cdrom0/Docs/ShowMeTV1.3/UserGuide/directory
If you have copied the HTML files to a different directory, type in the path to that
directory. Open the table of contents to determine which file to open.
50 Solaris 7 11/99 Sun Hardware Platform Guide • November 1999
Page 63

Solaris 7 11/99 AnswerBook Set
For customers using Sun hardware, a set of online manuals in AnswerBook format is
provided on the Supplement CD. The Solaris 7 11/99 on Sun Hardware Collection is
contained in the package named SUNWabhdw.
Refer to the SPARC: Solaris 7 11/99 SPARC Installation Instructions for information
about installing the Solaris 7 11/99 on Sun Hardware AnswerBook set.
Refer to the “Accessing Online Documentation” module in the Solaris 7 11/99
Installation Library for information about how to install document collections on an
AnswerBook2 server.
The AnswerBook set includes general manuals as well as Platform Notes, which are
manuals that cover use of Solaris 7 11/99 software with specific Sun hardware
products.
TABLE 3-9 lists the online manuals in this AnswerBook collection.
TABLE3-9 Solaris 7 11/99 on Sun Hardware AnswerBook Manuals
Title Contents
Solaris 7 11/99 on Sun Hardware
Documentation Guide
Solaris on Sun Hardware Reference
Manual Supplement
Solaris Handbook for Sun Peripherals Information about installing drives and other peripherals for use
Solaris Handbook for Sun Frame Buffers Information on how to use features of the TurboGXPlus, SX, PGX
NFS Server Performance and Tuning
Guide
SunVTS 3.3 User’s Guide Basic instructions on using the SunVTS diagnostic software.
SunVTS 3.3 Test Reference Manual Information about each test provided with the SunVTS diagnostic
SunVTS Quick Reference Card A quick reference card for the SunVTS diagnostic software.
PCI: SBus Comparison Feature differences between SBus and PCI.
Information about other manuals in this set. Helps you determine
which manuals are useful for the work you do with your hardware.
Information to help you find a compilation of manual pages
provided in packages on the Supplement CD. Includes man pages
that cover SunVTS software.
with the Solaris 7 11/99 software environment. Covers issues such
as configuring SCSI addresses.
(m64) and Creator Graphics Accelerator frame buffers. Also
explains how to configure multiple monitors on a system. (In some
past Solaris releases, this manual was titled Platform Notes: SMCC
Frame Buffers.)
Information about the performance and tuning of an NFS server.
software.
Chapter 3 Installing Software from the Sun Computer Systems Supplement CD 51
Page 64

TABLE3-9 Solaris 7 11/99 on Sun Hardware AnswerBook Manuals (Continued)
Title Contents
Platform Notes: The hme FastEthernet
Device Driver
Information on how to configure the hme device driver for use with
the Ultra Workstation series platform, Sun Enterprise servers,
SunSwift SBus adapter, SunSwift PCI adapter, and PCI
SunFastEthernet card.
Platform Notes: SPARCstation 10SX and
20 System Configuration Guide
Platform Notes: SPARCstation Voyager
Software Guide
Information about how to take advantage of graphics memory and
acceleration features of these systems.
Information about Supplement CD software used with the
SPARCstation Voyager system. Also contains information for
system administrators supporting users with these systems.
Platform Notes: Sun Enterprise 6000,
5000, 4000, and 3000 Systems
Sun Enterprise X000-specific OpenBoot commands, including those
for board hot-plug operations. Also contains board hot-plug
procedures, and miscellaneous related information.
Platform Notes: Sun Enterprise 250
Server
New OpenBoot commands, configuration variables, and disk drive
hot-plug procedures. Also provides procedures for mapping
between logical and physical device names for internal storage
devices.
Platform Notes: Sun Ultra 450
Workstation and Sun Enterprise 450
Server
New OpenBoot commands, configuration variables, and disk drive
hot-plug procedures. Also provides procedures for mapping
between logical and physical device names for internal storage
devices.
Platform Notes: Using luxadm Software Instructions on using the luxadm administrative program with the
Sun StorEdge A5000 and the SPARCstorage Array.
Platform Notes: Sun FDDI Adapters Information about how to configure the SunFDDI driver software
and use the SunFDDI network utilities.
Platform Notes: Sun GigabitEthernet
Device Driver
Platform Notes: The SunHSI/S Device
Information on how to configure the Sun GigabitEthernet driver
software.
Describes how to configure the SunHSI SBus driver software.
Driver
Platform Notes: The SunHSI/P Device
Describes how to configure the SunHSI PCI driver software.
Driver
Platform Notes: The SunATM Driver
Describes how to configure the SunATM driver software.
Software
Dynamic Reconfiguration User’s Guide
for Sun Enterprise 6x00,5x00,4x00, 3x00
Information about how to use Dynamic Reconfiguration software
features on these Sun Enterprise servers.
Systems
Remote System Control (RSC) User’s
Guide
Remote System Control (RSC) Installation
Guide
Information about how to use Remote System Control for the
Enterprise 250 Server.
Installation and configuration information for Remote System
Control for the Enterprise 250 Server.
52 Solaris 7 11/99 Sun Hardware Platform Guide • November 1999
Page 65

TABLE3-9 Solaris 7 11/99 on Sun Hardware AnswerBook Manuals (Continued)
Title Contents
Sun Enterprise Server Alternate Pathing
User’s Guide
Sun Enterprise Server Alternate Pathing
Reference Manual
Sun Enterprise 10000 Dynamic
Reconfiguration User’s Guide
Sun Enterprise 10000 Dynamic
Reconfiguration Reference Manual
Information about how to use Alternate Pathing software features
on Sun Enterprise servers.
Man pages for Sun Enterprise Server Alternate Pathing
Information about how to use Dynamic Reconfiguration software
features on the Sun Enterprise 10000 server.
Man pages for Sun Enterprise 10000 Dynamic Reconfiguration.
Additional documentation can be found on the Supplement CD in the /cdrom/
cdrom0/Docs directory.
Solaris 7 11/99 AnswerBook Clusters and Packages
The following table lists the clusters and packages that are provided for the Solaris 7
11/99 AnswerBook collection.
TABLE3-10 Solaris 7 11/99 AnswerBook Clusters and Packages on the Supplement CD
Cluster Name
SUNWCabk SUNWabhdw Sun Hardware AnswerBook
Includes
Package Description
Installing Solaris 7 11/99 AnswerBook Set
See “Installing Sun Computer Systems Supplement CD Software” on page 23.
Using the Solaris 7 11/99 AnswerBook Set
To determine which of the manuals in this AnswerBook set are of interest to you, see
the Solaris 7 11/99 on Sun Hardware Documentation Guide in this set.
To view any AnswerBook set, see the Solaris User’s Guide in the Solaris 7 11/99 User
AnswerBook on the Solaris CD.
Chapter 3 Installing Software from the Sun Computer Systems Supplement CD 53
Page 66

Sun Computer Systems Manual Page Clusters and Packages
The SUNWCman cluster will install all the manual (man) pages for software on the
Supplement CD. This provides a way to install the man pages on a system without
installing the software they describe on that system.
TABLE3-11 Sun Computer Systems Manual Page Clusters and Packages on the
Cluster
Name
SUNWCman SUNWvtsmn Online Validation Test
Supplement CD
Includes
Package Name Description
Manual pages for SunVTS
Suite Manual Pages
SUNWnfm SunFDDI SBus Manual
Pages
SUNWpfm SunFDDI PCI Manual
Pages
SUNWgedm Sun GigabitEthernet
Manual Pages
SUNWapdoc Sun Alternate Pathing
Manual Pages
SUNWhsism SunHSI/S Manual Pages Manual pages for SunHSI SBus
SUNWhsipm SunHSI/P Manual Pages Manual pages for SunHSI PCI
drivers/binaries
Manual pages for SunFDDI SBus
Manual pages for SunFDDI PCI
Manual pages for Sun Gigabit
Manual pages for Sun Alternate
Pathing
Installing Sun Computer Systems Manual Pages
See “Installing Sun Computer Systems Supplement CD Software” on page 23.
Using Sun Computer Systems Manual Pages
To view the man pages you have installed, use the man command as you would for
the man pages installed as part of the Solaris operating environment installation.
These additional man pages are also available in the Solaris on Sun Hardware
Reference Manual Supplement in the Solaris 7 11/99 on Sun Hardware AnswerBook
set.
54 Solaris 7 11/99 Sun Hardware Platform Guide • November 1999
Page 67

Sun Remote System Control for Sun Servers
Sun Remote System Control (RSC) is a secure server management tool that lets you
monitor and control a Sun Enterprise 250 server over modem lines and over a
network, using Solaris operating environment or Microsoft Windows clients. RSC
can also notify you when server problems occur. RSC provides remote system
administration for geographically distributed or physically inaccessible systems. All
hardware functionality required to support RSC is already included with your Sun
Enterprise 250 server.
The Sun Remote System Control for Sun Servers software is provided on the
Supplement CD. For installation information, see “Installing Sun Computer Systems
Supplement CD Software” on page 23. For configuration information for Remote
System Control, see Remote System Control (RSC) Installation Guide
.
SunForum
SunForum is a data conferencing product for Sun workstations. It is based on the
T.120 standard, which enables your Sun system to conference over intranets and the
Internet with other T.120 products, such as Microsoft NetMeeting and PictureTel
LiveShare Plus, version 4.0.
SunForum includes the features
■ View and control applications shared from other UNIX or PC machines that are
based on the T.120 protocol.
■ Share local Solaris applications, which can be viewed and controlled by any
conference participant.
■ Exchange ideas and data using the whiteboard, clipboard, chat, and file transfers.
Installing SunForum
See “Installing Sun Computer Systems Supplement CD Software” on page 23.
Chapter 3 Installing Software from the Sun Computer Systems Supplement CD 55
Page 68

Online Help
You can read information about SunForum online. You can access help from the
Help menu located on any SunForum menu bar.
Network Adapter Drivers Included on the Supplement CD
The following drivers are provided on the Supplement CD contained in your Solaris
7 11/99 Media Kit:
■ Sun GigabitEthernet Driver software
■ SunFDDI PCI Driver software
■ SunFDDI SBus Driver software
■ SunHSI PCI Driver software
■ SunHSI SBus Driver software
■ SunATM 4.0 Update 1
Note – SunFDDI supports booting from the 32-bit kernel or the 64-bit kernel.
SunFDDI will attach to whichever you choose to boot from with no special user
interaction.
Installing the Drivers
Note – Before installing driver software from the supplement CD make sure that
you have already installed the adapter hardware. Refer to the appropriate Platform
Notes for more information.
See “Installing Sun Computer Systems Supplement CD Software” on page 23.
Platform Notes for Network Adapter Drivers
Refer to the following platform notes for more information:
■ Platform Notes: Sun FDDI Adapters
■ Platform Notes: The Sun GigabitEthernet Device Driver
56 Solaris 7 11/99 Sun Hardware Platform Guide • November 1999
Page 69

■ Platform Notes: The SunHSI/P Device Driver
■ Platform Notes: The SunHSI/S Device Driver
■ Platform Notes: SunATM Driver Software
Java 3D 1.1.1 API
The Java 3D™ 1.1.1 API is a set of classes for writing three-dimensional graphics
applications and 3D applets. It gives developers high level constructs for creating
and manipulating 3D geometry and for constructing the structures used in rendering
that geometry. Application developers can describe very large virtual worlds using
these constructs, which provides Java 3D with enough information to render these
worlds efficiently.
Installation Dependencies
■ OpenGL 1.1 or later
■ JDK 1.2 or later
Installing Java 3D 1.1.1 API
See “Installing Sun Computer Systems Supplement CD Software” on page 23.
Sun Enterprise 10000 SSP
For SSP installation and update procedures, as well as SSP release notes, see the
document, Sun Enterprise 10000 SSP Installation and Release Notes, a printed copy of
which is included in your server media kit.
Chapter 3 Installing Software from the Sun Computer Systems Supplement CD 57
Page 70

58 Solaris 7 11/99 Sun Hardware Platform Guide • November 1999
Page 71

CHAPTER
4
Updating the Flash PROM on the Ultra 1, Ultra 2, Ultra 450, and Sun Enterprise 450 Systems
This chapter describes how to update the flash PROM on the Ultra™ 1, Ultra 2, Ultra
450, and the Sun™ Enterprise™ 450 systems.
Some systems require a higher level of OpenBoot™ firmware in the flash PROM to
run the 64-bit mode of the Solaris™ 7 operating environment. The OpenBoot
firmware is contained within a single flash PROM for the Ultra 1, Ultra 2, Ultra 450,
and the Sun Enterprise 450 systems.
Note – Only those systems identified in this chapter and the following chapter need
the flash PROM upgrade.
The flash PROM devices, which contain OpenBoot, are electrically erasable and
writable devices. This means that the firmware can be updated without removing
the flash PROM from the system board.
Related Material
You can also use the Flash PROM Update Multimedia Collection containing videos
of how to upgrade the flash PROM in the Ultra 1, Ultra 2, Ultra 450, and Sun
Enterprise 450 systems. This collection is located on the Flash PROM Update
Multimedia AnswerBook CD. For more information, see “Flash PROM Update
Multimedia Collection” on page 79.
59
Page 72

Determining If the Flash PROM Needs Updating
Only sun4u systems that can run the 64-bit mode of the Solaris 7 operating
environment might need the flash PROM update. Systems that can only run the 32bit mode (such as those in the sun4c, sun4d, and sun4m platform groups) do not
require updated firmware to run Solaris 7 software.
Note – If the Solaris 7 operating environment notified you that the flash PROM in
your system needs updating, skip the steps in the procedure “To Determine If Your
System Requires a Flash PROM Update” on page 60 and go directly to “Updating
the Flash PROM” on page 61.
▼ To Determine If Your System Requires a Flash
PROM Update
1. Determine the architecture type of your system.
% uname -m
TABLE4-1 Determining the System Architecture
If your system architecture type is . . . Then . . .
• sun4u Go to Step 2.
• sun4c, sun4d, sun4m You do not need a flash PROM update. Do not proceed
further.
2. Determine the system type of your system.
% uname -i
60 Solaris 7 11/99 Sun Hardware Platform Guide • November 1999
Page 73

TABLE4-2 Determining the System Type
If your system type is one of the
following systems. . . Then . . .
SUNW, Ultra-1
Go to Step 3 for each system type.
SUNW, Ultra-2
SUNW, Ultra-4
SUNW, Ultra-Enterprise
Not in the above list You do not need a flash PROM update. Do not proceed
further.
3. Determine the version level of the firmware in your system. Type:
% prtconf -V
TABLE4-3 Determining the Firmware Version Level
If your system type is . . .
And you see a number
lower than . . . Then . . . Otherwise . . .
SUNW, Ultra-1 3.11.1 Proceed to “Updating the
Flash PROM” on page 61.
SUNW, Ultra-2 3.11.2 Proceed to “Updating the
Flash PROM” on page 61.
SUNW, Ultra-4 3.7.107 Proceed to “Updating the
Flash PROM” on page 61.
SUNW, Ultra-Enterprise 3.2.16 Proceed to “Updating the
Flash PROM” on page 61.
You do not need a flash
PROM update. Do not
proceed further.
You do not need a flash
PROM update. Do not
proceed further.
You do not need a flash
PROM update. Do not
proceed further.
You do not need a flash
PROM update. Do not
proceed further.
Updating the Flash PROM
This section describes the following:
■ Capturing configuration variable settings
■ Installing the Solaris 7 operating environment
■ Making the flash PROM write-enabled
■ Steps to perform before updating the flash PROM
■ Updating the flash PROM
Chapter 4 Updating the Flash PROM on the Ultra 1, Ultra 2, Ultra 450, and Sun Enterprise 450 Systems 61
Page 74

Note – For step-by-step instructions, follow the procedures beginning with “To
Capture the Configuration Variable Settings” on page 62.
After installing the Solaris 7 operating environment on your hardware, set the
write-protect/enable flash PROM jumper to the write-enable position (Sun Ultra 1
and Ultra 2 systems) before you attempt to update the firmware in the flash PROM.
To change the write protection state of the Sun Enterprise 450 system, turn the
external front panel keyswitch.
Refer to the recovery procedure covered later in this chapter if there is a power
interruption during the update process.
Return the write-protect/enable jumper (Sun Ultra 1 and Ultra 2 systems) to the
write-protect position after updating the firmware in the flash PROM.
When your system has been updated to the proper firmware revision, you can run
the Solaris 7 software in 64-bit mode.
Capturing Configuration Variable Settings
While the Solaris operating environment is still running, capture the NVRAM
configuration variable settings before you install the Solaris 7 operating environment
or begin the flash PROM update process. This will enable you to restore customized
settings if there is a problem during the flash PROM upgrade.
▼ To Capture the Configuration Variable Settings
1. Using the eeprom utility, capture the system’s configuration variable settings in a
file. The filename is any file name you choose.
% eeprom > filename
Note – If you have custom values installed in oem-logo or keymap, those values
cannot be displayed or printed properly by the eeprom utility because the contents
contain binary information. If it is necessary to restore these values after a power
loss, you should determine the original method by which these values were placed
into NVRAM and use that method to restore the values.
62 Solaris 7 11/99 Sun Hardware Platform Guide • November 1999
Page 75

2. Print out the values captured by the eeprom command. Type the following:
lp filename
You must have a printed copy of the configuration values before you install the
Solaris 7 operating environment and begin to update the flash PROM.
▼ To Install the Solaris 7 Operating Environment
● Install the Solaris 7 operating environment on your system.
Refer to the Installation Library shipped in your Solaris 7 media kit. As the Solaris 7
operating environment is installed, you will be notified whether the flash PROM in
your system needs updating. Installing this Solaris release will provide the software
that can upgrade your system’s flash PROM to the required level.
Making the Flash PROM Write-Enabled
Before you update the OpenBoot firmware contained in the flash PROM, you must
set a jumper to the write-enable position (Sun Ultra 1 and Ultra 2 systems) or set the
front panel keyswitch to the proper position (Sun Enterprise 450 system and the Sun
Ultra 450 workstation).
The Sun Ultra 1 and Ultra 2 systems, which do not have a front panel keyswitch, are
equipped with jumpers on their motherboards that allow the flash PROM to be
either write-protected or write-enabled. The default position is for the flash PROM
to be write-protected. To update the flash PROM, you must change the jumper to the
write-enable position.
▼ Sun Ultra 1 and Ultra 2 Systems: To Change the
Jumper to the Write-Enable Position
1. Shut down the system. Type the following:
% su
Type your superuser password
# init 0
System shutdown messages
Chapter 4 Updating the Flash PROM on the Ultra 1, Ultra 2, Ultra 450, and Sun Enterprise 450 Systems 63
Page 76
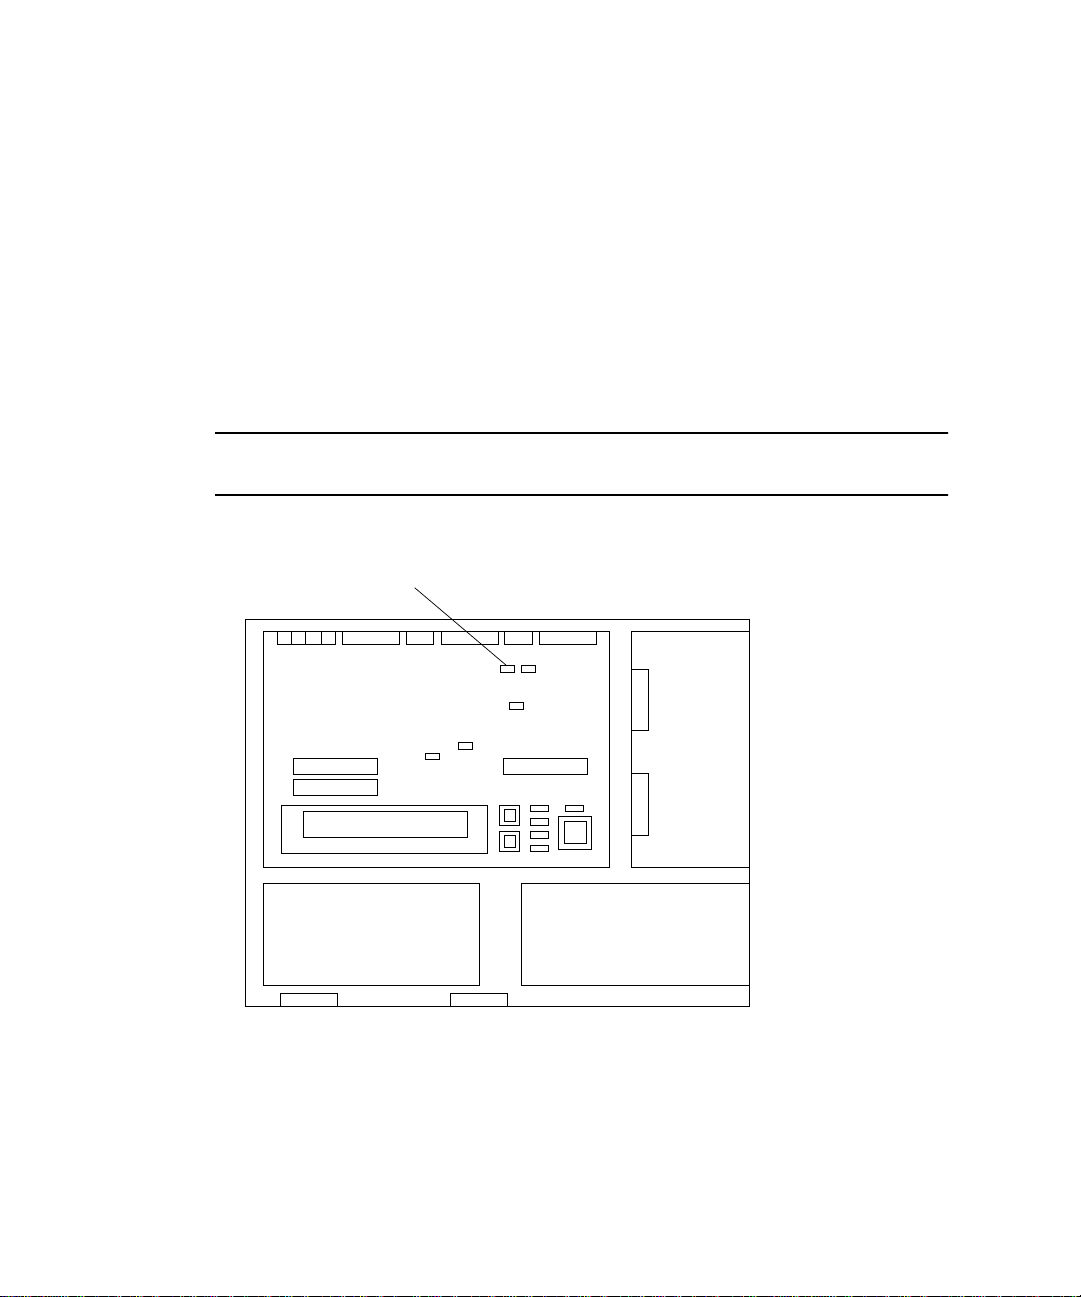
2. Power off the system unit.
Refer to the installation guide or service manual for your system.
3. Remove the system access cover.
Refer to the installation guide or service manual for your system for this procedure.
4. Use proper grounding procedures such as wearing a wrist strap to avoid
electrostatically damaging system components.
5. Locate the flash PROM J2003 write-protect/enable jumper on the motherboard in your system:
■ See FIGURE 4-1 if you have a Sun Ultra 1 system.
■ See FIGURE 4-2 if you have a Sun Ultra 2 system.
Note – You may have to remove a plug-in card if the card is covering the flash
PROM jumper. Refer to the service manual for your system to remove the card.
J2003 write
protect/enable jumper
Back panel
FIGURE 4-1 Sun Ultra 1 Series Write-Protect/Enable Jumper Location on Motherboard
64 Solaris 7 11/99 Sun Hardware Platform Guide • November 1999
Front panel
Page 77
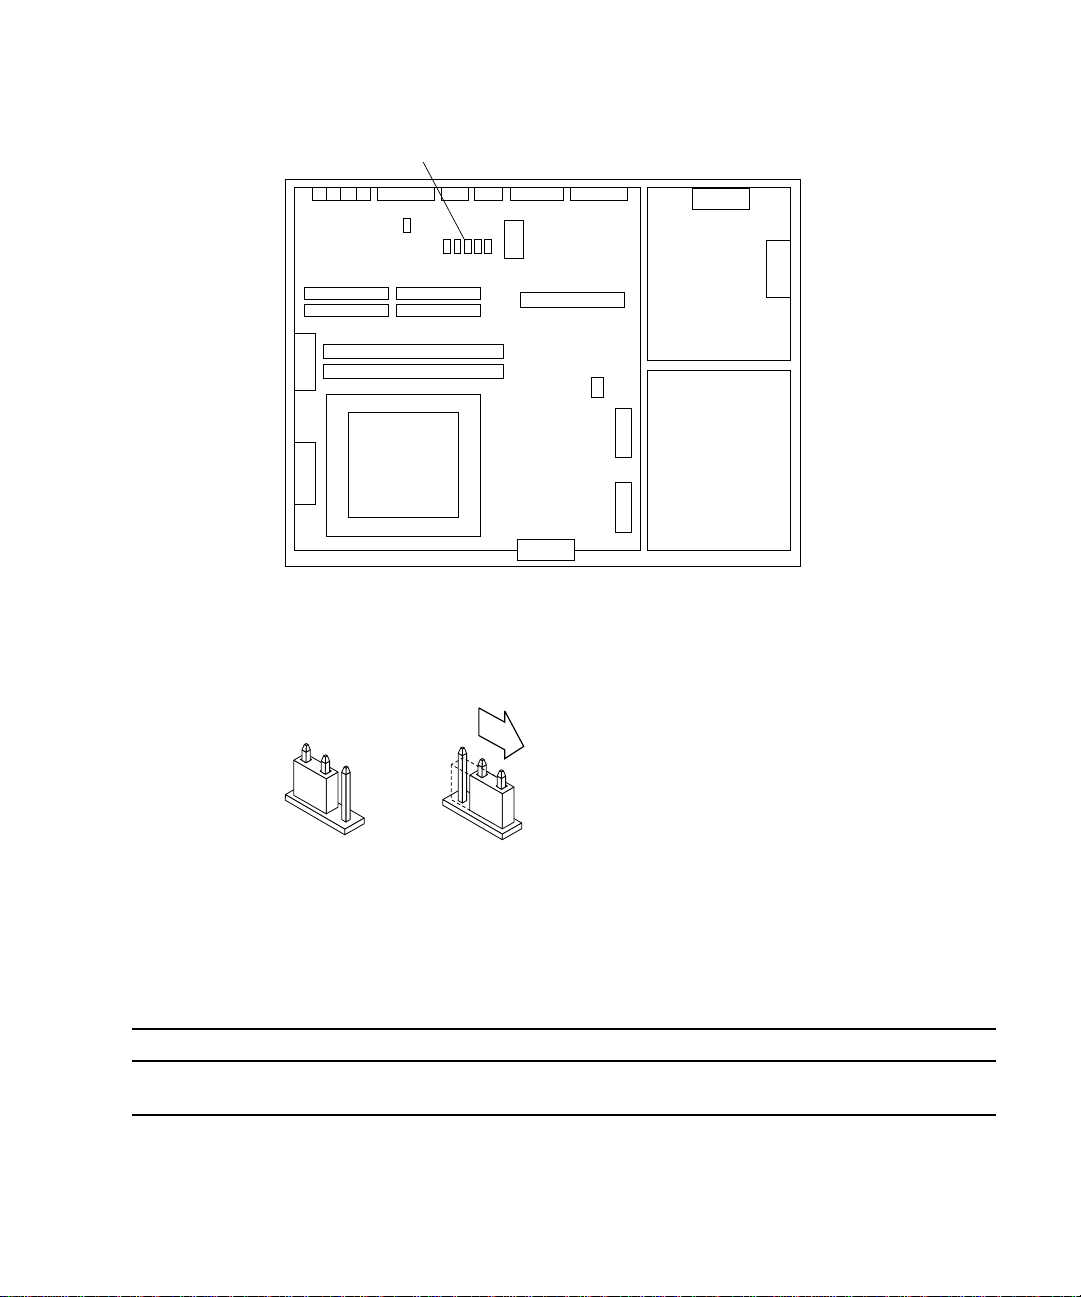
J2003 write
protect/enable jumper
FIGURE 4-2 Sun Ultra 2 System Write-Protect/Enable Jumper Location on Motherboard
Back panel
6. Set the J2003 write-protect/enable jumper to pins 2 and 3 (write enabled) using
needlenose pliers (see
FIGURE 4-3). Pin 1 is noted by an asterisk (*).
**
123
Write
protected
FIGURE 4-3 Setting the Write-Protect/Enable Jumper to the Write-Enable Position
TABLE4-4 Jumper Setting
Jumper Pins 1 + 2 Jumpered Pins 2 + 3 Jumpered Default Jumper on Pins Name
J2003 Write-protect Write-enable 1 + 2 Write-protect/
1
2
Write
enabled
3
enable
7. If you removed a plug-in card from the system before changing the jumper, replace the card now.
Chapter 4 Updating the Flash PROM on the Ultra 1, Ultra 2, Ultra 450, and Sun Enterprise 450 Systems 65
Page 78

8. Remove your wrist strap and replace the system access cover.
9. Go to “Before Updating the Flash PROM” on page 67.
Sun Enterprise 450 System and the Sun Ultra 450 Workstation: Disabling Write Protection
For the Sun Enterprise 450 system and the Sun Ultra 450 workstation you do not
have to change jumper pins. Instead, you move the keyswitch to allow the flash
PROM to be write-enabled.
When the switch is set to the Locked position (
protected. When the switch is set to the On or Diagnostics position, the flash PROM
is write-enabled.
FIGURE 4-4), the flash PROM is write-
▼ To Write Enable the Flash PROM on the Sun
Enterprise 450 System and the Sun Ultra 450
Workstation
● Turn the keyswitch to the On or Diagnostics position (FIGURE 4-4) before updating
the flash PROM.
Note – Disabling write-protection the Sun Enterprise 450 system or the Ultra 450
workstation assumes that the write-protect/enable jumper was set in the default
position (enabled). If you previously changed the write-protect/enable jumper to be
write protected, perform the steps to make the flash PROM write enabled in
“Location of Flash PROM Jumpers in Sun Enterprise 450 System and the Ultra 450
Workstation” on page 77. You must change the jumper to be write enabled before
continuing with the flash PROM update procedure.
66 Solaris 7 11/99 Sun Hardware Platform Guide • November 1999
Page 79
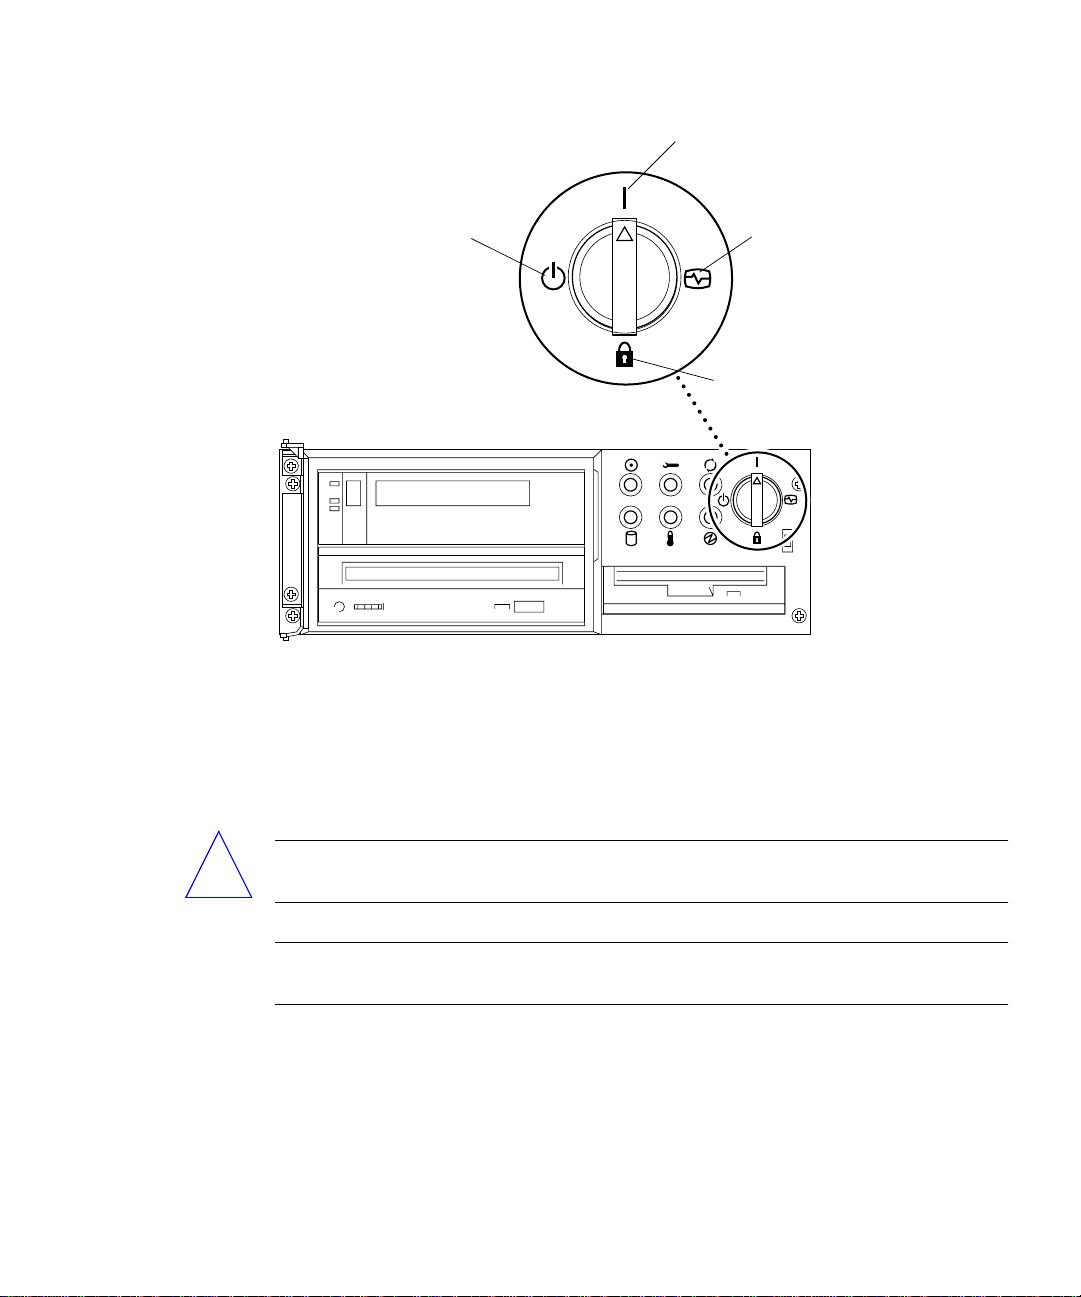
On
Standby
FIGURE 4-4 Sun Enterprise 450 and Sun Ultra 450 Keyswitch Location
Diagnostics
Locked
Before Updating the Flash PROM
Before you begin updating the flash PROM, please note the following.
Caution – Do not interrupt power during flash PROM updating. When you are
!
using the update routine, do not remove or insert system boards.
Note – If power is interrupted during flash PROM updating, follow the power
interruption recovery procedures covered later in this chapter.
▼ To Update the Flash PROM
1. If you shut down your system to set the write-enable jumper (Ultra 1, Ultra 2
systems), turn the system on so it can boot.
Chapter 4 Updating the Flash PROM on the Ultra 1, Ultra 2, Ultra 450, and Sun Enterprise 450 Systems 67
Page 80

2. Bring the system down to single user mode. Type the following:
% su
Type your superuser password
# init S
3. Execute the flash PROM update script by typing the following:
/bin/sh /usr/platform/sun4u/lib/prom/‘/usr/bin/uname -i‘
When the flash update process begins, it displays the current, available OpenBoot
firmware revisions.
4. Type yes to the question about updating the firmware in the system flash PROM.
Note – If the NVRAM configuration variable use-nvramrc? is set to true, the
update script resets use-nvramrc? to false. You will only see the message about the
use-nvramrc? variable if use-nvramrc? is set to true. This is rarely the case.
Current System Flash PROM Revision:
----------------------------------OBP 3.5.2 1997/01/06 17:40
Available System Flash PROM Revision:
------------------------------------OBP 3.11.1 1997/12/03 15:44
NOTE: The system will be rebooted (reset) after the firmware has
been updated.
Do you wish to update the firmware in the system Flash PROM? yes/
no :yes
The NVRAM variable ’use-nvramrc?’ was ’true’. This program will
reset it to the default value ’false’. This is being done because
the contents of the NVRAM variable ’nvramrc’ may or may not be
appropriate for use with the new firmware. Do not change the value
of ’use-nvramrc?’ until you evaluate the contents of ’nvramrc’.
68 Solaris 7 11/99 Sun Hardware Platform Guide • November 1999
Page 81

5. Next, the update script asks you if you want to continue. Type yes.
Are you sure that you wish to continue? yes/no :yes
**IMPORTANT** If the power fails during the firmware update that
is about to take place, it is possible that the customized values
in the NVRAM configuration variables will revert back to their
*default values* once the system power is restored. *If* this event
occurs then it could have a significant effect on the behavior of
the system after power is restored. Following is a list of the
system’s NVRAM configuration variables which have default values
and have been customized. You may wish to write this information
down so that the values may be restored after recovery from a power
loss.
Name: sbus-probe-list
Default: 01
Current: 10
Name: nvramrc
Default: <null>
Current: ." This is a sample message which indicates that nvramrc
has been modified." cr
If any of the NVRAM configuration variables have been customized, the update
displays both the default value and the current value.
Chapter 4 Updating the Flash PROM on the Ultra 1, Ultra 2, Ultra 450, and Sun Enterprise 450 Systems 69
Page 82

Note – After the update, you may want to evaluate if the customized values
displayed on the previous screen need to be modified.
The script automatically boots the machine and displays the following message:
Erasing the top half of the Flash PROM.
Programming OBP into the top half of the Flash PROM.
Verifying OBP in the top half of the Flash PROM.
Erasing the bottom half of the Flash PROM.
Programming OBP into the bottom half of Flash PROM.
Verifying OBP in the bottom half of the Flash PROM.
Erasing the top half of the Flash PROM.
Programming POST into the top half of Flash PROM.
Verifying POST in the top half of the Flash PROM.
The system's Flash PROM firmware has been updated.
Please wait while the system is rebooted . . .
The system’s reboot messages are displayed.
........................................................
NOTICE: 64-bit OS installed, but the 32-bit OS is the default for
the processor on this system.
See boot(1M) for more information.
Booting the 32-bit OS/
6. Become root and change the default kernel from 32-bit to 64-bit by editing the
/platform/platform-name/boot.conf file.
# cd /platform/sun4u/
# ls
boot.conf cprboot cprbooter kadb kernel ufsboot
# vi boot.conf
7. Uncomment the line ALLOW_64BIT_KERNEL_ON_UltraSPARC_1_CPU=true.
8. If you have a Sun Ultra 1 or Ultra 2 system, change the jumper back to the writeprotect position.
a. Allow the system to boot so you can become superuser.
b. Halt the system by typing init 0 at the superuser prompt.
70 Solaris 7 11/99 Sun Hardware Platform Guide • November 1999
Page 83
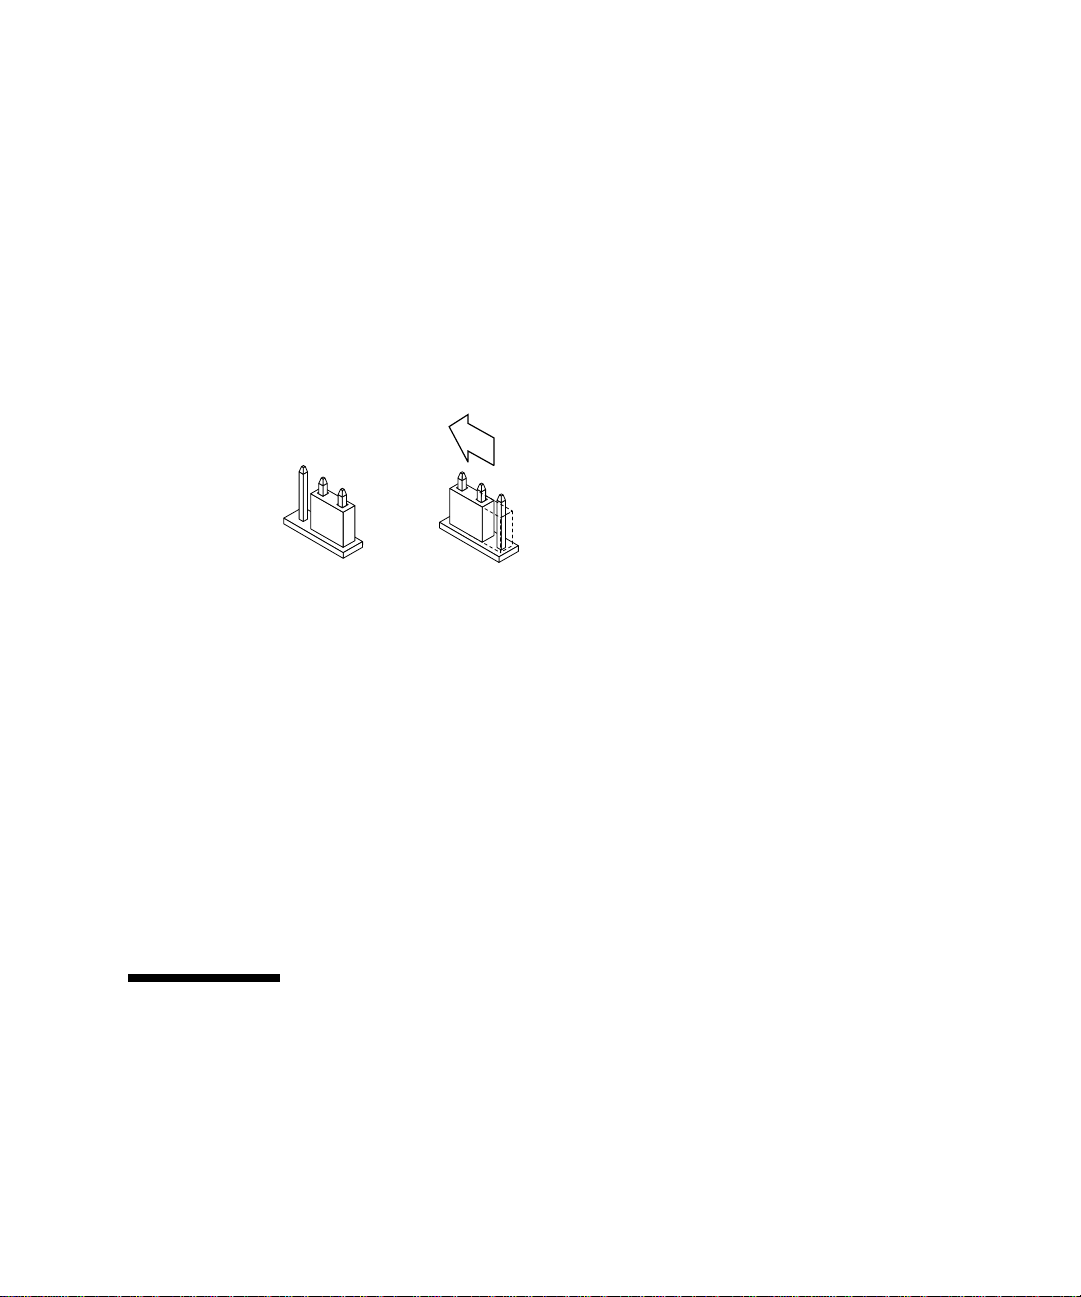
c. Power off the system.
d. Open the system unit (refer to the installation or service manual for your
system).
e. Attach a wrist strap properly (refer to the installation or service manual for
your system).
f. Reset the J2003 write-enable/protect jumper to the write-protect position. In the
write-protect position pins 1 and 2 are jumpered (see
FIGURE 4-5, and TABLE 4-4). You may need to remove a plug-in card from the
system before resetting the jumper if the card is covering the jumper. Pin 1 is
noted by an asterisk (*).
FIGURE 4-1, FIGURE 4-2,
*
123123
Write
enabled
FIGURE 4-5 Moving the Write-Protect/Enable Jumper Back to the Write-Protect Position
g. If you removed a plug-in card from the system before changing the jumper,
replace the card now.
h. Remove your wrist strap and replace the system access cover.
i. Turn the power on to the system.
9. If you have a Sun Enterprise 450 system or a Sun Ultra 450 workstation, turn the
keyswitch to the Standby position, wait a few seconds, and then power on again.
This power-cycling flushes any old firmware code out of system memory.
*
Write
protected
Recovering From a Power Failure During the Flash PROM Update
If the power was lost during the flash PROM update, complete the power
interruption recovery procedure for your system.
Chapter 4 Updating the Flash PROM on the Ultra 1, Ultra 2, Ultra 450, and Sun Enterprise 450 Systems 71
Page 84

Sun Ultra 1 and Ultra 2 Systems, Sun Enterprise 450 System, Sun Ultra 450 Workstation
If power to your system was interrupted during updating of the flash PROM,
complete the following steps:
1. Turn the power switch to the Standby position to prevent power surge to the
system when power is restored.
2. After power is restored to the system location, return the power switch to the On position.
After power is restored, one of the following two recovery scenarios should happen
on your system. Follow the instructions described for the appropriate scenario.
Scenario 1—System Recovers After Power Restoration
If your system attempts to autoboot after power is restored, you must complete the
flash PROM updating process.
Scenario 2—System Does Not Recover After Power Restoration
If your system does not boot, run diagnostics, or return to the PROM monitor’s ok
prompt after power is restored, complete the following steps:
1. If the update was being run via a serial port and the system also has a frame
buffer and keyboard installed, or if the system has a keyboard and more than one
frame buffer installed:
a. Connect a monitor to each frame buffer.
b. Confirm that output has been redirected to one of the frame buffers.
■ The NVRAM configuration variables might have been modified because of the
firmware update just before power was lost. If this happened, then the system
output was possibly redirected to a device other than the one originally used to
display it. This could only have happened if a keyboard was connected to the
system.
■ If there is no keyboard connected to the system and the NVRAM configuration
variables are set to their default values, then system input and output are directed
to serial port A.
72 Solaris 7 11/99 Sun Hardware Platform Guide • November 1999
Page 85

2. If output cannot be found on any of the installed frame buffers or serial port A,
set the boot control jumper to boot from the half of the PROM that is not
currently selected. See
FIGURE 4-1, FIGURE 4-2, FIGURE 4-6, and FIGURE 4-7. An asterisk
(*) on the main logic board notes the location of pin 1.
■ If the jumper is set for high-half booting, move it to low-half booting (pins 2 and
3 jumpered). See
■ If the jumper is set for low-half booting, move it to high-half booting (pins 1 and
2 jumpered). See
TABLE4-5 Boot Control Jumper
FIGURE 4-6.
FIGURE 4-6.
System Jumper Pins 1 + 2 Jumpered Pins 2 + 3 Jumpered
Default Jumper on
Pins Name
Ultra 1, 2 J2204 High-half booting Low-half booting 2 + 3 Boot control
Sun Enterprise
J5501 High-half booting Low-half booting 2 + 3 Boot control
450 or Sun Ultra
450 workstation
*
123
High-half
booting
FIGURE 4-6 Setting the Boot Control Jumper to Low-Half Booting or High-Half Booting
*
123
Low-half
booting
3. Power on the system unit.
■ If the system recovers, complete the programming process by rebooting.
■ If the system does not recover, repeat Step 1 and Step 2 a second time.
4. If the system still does not recover, contact your Sun service provider or local Sun
service Authorized Service Provider.
Chapter 4 Updating the Flash PROM on the Ultra 1, Ultra 2, Ultra 450, and Sun Enterprise 450 Systems 73
Page 86

Restoring NVRAM Configuration Variables
If for any reason, the flash PROM update process did not complete successfully, for
example if you lost power, you may have to restore diag-switch? to its default
value of false and restore any customized values to the other NVRAM configuration
variables.
Note – Use the steps in this section only if for any reason your NVRAM
configuration variables were not reset to their customized values or if diagswitch? was not set to its proper value.
1. Reboot the system by typing reboot at the prompt.
If diag-switch? was set to true and the system is power cycled, diagnostics will be
run. Running diagnostics could take several minutes. Also, the system will attempt
to boot from the network once the diagnostics have completed running.
Note – Other NVRAM variables may be reset to their default values, which could
affect the system in other ways. For example, if you ran the flash PROM update
through the serial port and the system still has its keyboard plugged in, you will no
longer get any response from the serial port connection. The firmware will be
waiting for input from the keyboard.
2. As the system boots, go to the ok prompt by one of the following methods.
■ Press Stop-a from the keyboard.
■ If you are running on a terminal and connected to serial port A of the system,
press the Break key.
■ If you are connected to serial port A via telnet connection send a Break
sequence by pressing the Control and ] keys simultaneously. This returns you
to the telnet command line. Type send brk at the telnet command line.
■ If you are connected to serial port A via a tip connection, send a Break
sequence by typing the characters ~# in quick succession.
74 Solaris 7 11/99 Sun Hardware Platform Guide • November 1999
Page 87

3. Reset the configuration variables default value to the current value (see the values
you captured with the eeprom command in “To Capture the Configuration
Variable Settings” on page 62 and the values you wrote down earlier in this
procedure in Step 1). At the ok prompt, type the following for each configuration
variable:
ok setenv variablename currentvalue
For example:
ok setenv auto-boot? false
The setenv command resets each configuration variable you entered to the current
value.
4. If the OpenBoot diag-switch? variable was set to true (false is the default).
and the system is power cycled, diagnostics will run. Also, when you boot the
system, the system will attempt to boot from the network. Unless you had diag-
switch? set to true before the flash PROM update, set diag-switch? to false,
the default value:
ok setenv diag-switch? false
5. If the use-nvramrc? configuration variable was set to true before the flash
PROM update, as part of the update the use-nvramrc? variable was set to false
because the contents of the NVRAM configuration variable nvramrc may or may
not be appropriate for use with the new firmware. If you want to change the use-
nvramrc? variable back to true, evaluate the contents of nvramrc first with
printenv nvramrc then change the use-nvramrc? configuration variable back
to true with the setenv use-nvramrc? true command.
6. Make sure that other configuration variables are set properly. a. Use the printenv OpenBoot command to display the NVRAM configuration
variables and their settings.
b. At the PROM monitor’s ok prompt, you can use OpenBoot commands to restore
the values of the configuration variables. Refer to the OpenBoot 3.x Command
Reference Manual. You can also use the eeprom utility as superuser in the
Solaris operating environment. See the eeprom man page description for more
information.
Chapter 4 Updating the Flash PROM on the Ultra 1, Ultra 2, Ultra 450, and Sun Enterprise 450 Systems 75
Page 88

7. If you have a Sun Enterprise 450 or an Ultra 450, turn the keyswitch to the
Standby position, wait a few seconds, and then power on again. If you have an
Ultra 1 or Ultra 2 system, type reset-all.
If you set the auto-boot? NVRAM configuration variable to true, and the bootdevice variable contains the device or device alias where the Solaris 7 operating
environment was installed, then the system will boot the Solaris 7 operating
environment.
Error Messages
Most of the error messages were documented within the flash PROM update
procedure. This section contains error messages that were not part of the flash
PROM update procedure.
Retained Page/mmap Failure
If you see an error message similar to the following, just after the flash update
program logs on Flash Update 2.0: Program and system
initialization in progress... eeprom:(attach) No retained page
found in device tree then the update will fail with the following message if
the Flash PROM Update is attempted:
Do you wish to update the firmware in the system Flash PROM? yes/
no : yes
eeprom:(mmap) on retained page failed: no retained page found
Flash Update: MMAP call failed.
: No such device or address
If this error occurs, issue a reboot command at the superuser prompt and allow the
system to return to the Flash PROM Update inquiry WITHOUT INTERRUPTION.
Attempt the flash PROM Update once again by completing the steps in the section
“To Update the Flash PROM” on page 67. If the reboot was uninterrupted and the
flash PROM Update fails a second time for the same reason, contact your
Authorized Service Provider.
76 Solaris 7 11/99 Sun Hardware Platform Guide • November 1999
Page 89

Location of Flash PROM Jumpers in Sun Enterprise 450 System and the Ultra 450 Workstation
The flash PROM update procedure for the Sun Enterprise 450 and the Ultra 450
systems assumes that the write-protect/enable jumper was set in the default
position (enabled). In order to update the flash PROM, you must move the writeprotect/enable jumper to the write-enable position.
Three jumpers on the main logic board affect flash PROM operation.
shows the jumper locations, and TABLE 4-6 describes their functions.
FIGURE 4-7
Chapter 4 Updating the Flash PROM on the Ultra 1, Ultra 2, Ultra 450, and Sun Enterprise 450 Systems 77
Page 90
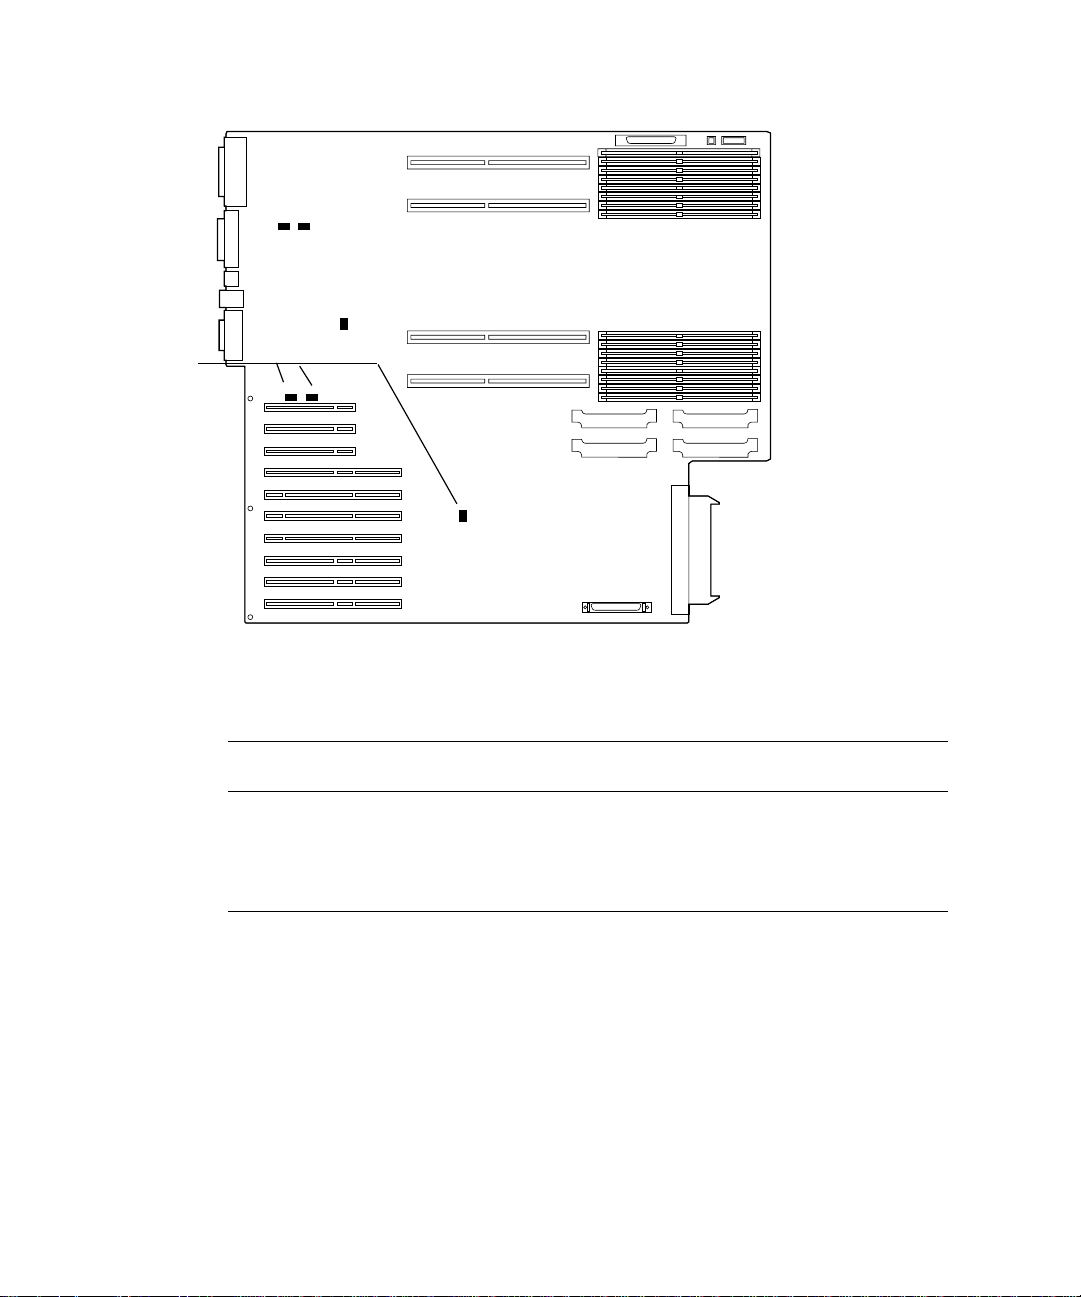
Flash PROM
jumpers
J3304
J3103
J3303
J2701
J3102
J5501
FIGURE 4-7 Flash PROM Jumpers on the Sun Enterprise 450 System and the Sun Ultra 450
Workstation
TABLE4-6 Sun Enterprose 450 and Ultra 450 Flash PROM Jumper Settings
Jumper Pins 1 + 2 Jumpered Pins 2 + 3 Jumpered
J3102 Flash PROM Not to be used 1 + 2 FLASH PROM SEL
J3103 Write-protect Write-enable 2 + 3 FLASH PROM PROG
J5501 High-half booting Low-half booting 2 + 3 XOR LOGIC SET
Make sure that the write-protect/write-enable jumper is set to the write-enable
position, pins 2 and 3 jumpered (see
78 Solaris 7 11/99 Sun Hardware Platform Guide • November 1999
FIGURE 4-8). Pin 1 is noted by an asterisk (*).
Default on
Pins Signal Controlled
ENABLE
Page 91

*
1
23 123
Write
protected
*
Write
enabled
FIGURE 4-8 Setting the J3103 Write Protect/Enable Jumper on the Sun Enterprise 450 or
Ultra 450
Flash PROM Update Multimedia Collection
The video content of the AnswerBook2 collection is very large. You may want to
view it directly from the CD rather than installing this software package on a system
already running an AnswerBook2 server. You also can view the video clips directly
without using AnswerBook software or a browser.
▼ Running the Video Clips from the CD
To run the video clips contained in this AnswerBook collection directly from the CD,
perform the following steps:
1. Insert the Flash PROM Update Multimedia AnswerBook CD into your CD-ROM drive.
2. Change directory to, or bring up file manager, and go to the top level of the CDROM volume. This should look similar to:
% cd /cdrom/flash_answerbook
where cdrom is the mount-point for the CD-ROM device and flash_answerbook is the
name of the CD-ROM volume.
Chapter 4 Updating the Flash PROM on the Ultra 1, Ultra 2, Ultra 450, and Sun Enterprise 450 Systems 79
Page 92

3. To run the viewing script, type:
% ./watch-videos
4. Select the first video clip you want to see.
5. Before you view another video clip, dismiss the viewer that displayed the previous video clip.
▼ Running an AnswerBook2 Server from the CD
To run the AnswerBook2 server directly from the CD, perform the following steps:
1. Insert the Flash PROM Update Multimedia AnswerBook CD into your CD-ROM drive.
2. Open a command window and become superuser using the su command and superuser password.
3. Change directory to the top level of the CD-ROM volume.
This should look similar to:
# cd /cdrom/flash_answerbook
where cdrom is the mount-point for the CD-ROM device and flash_answerbook is the
name of the CD-ROM volume.
Among other things, this directory contains the executable script ab2cd.
4. Run the following command:
# ./ab2cd
5. If you have existing AnswerBook2 documentation collections installed on your
server machine and you want the CD-driven server software to recognize those
collections, use the following command:
# ./ab2cd -s
This causes the CD-driver server software to scan for other collections installed on
this system and add them to its database.
80 Solaris 7 11/99 Sun Hardware Platform Guide • November 1999
Page 93

6. You can now access the document server using the following URL:
http://server:8888/
Where server is the name of the machine to which the CD is attached.
7. To view video clips that are contained in an AnswerBook document, edit your
browser's preferences to specify an MPEG Video application.
For example, to make use of the ShowMe™ TV™ software provided on this CD in a
Netscape Communicator browser, perform these steps:
a. In the top bar menu of the browser, select Edit --> Preferences.
b. In the Preferences window, select the category Navigator and the subcategory
Applications.
c. In the list of Applications, specify that MPEG Video is handled by the
following: showmetv -nowrap %s.
d. Click OK to apply this change to the Preferences.
8. In the document, click the video clip icon to launch the viewer.
9. Before you view another video clip, dismiss the viewer that displayed the previous video clip.
10. To stop running the AnswerBook server from the CD, run the following command:
# /cdrom/flash_answerbook/ab2cd stop
Notes on Running AnswerBook2 from a CD
The following paragraphs provide important information about running the
AnswerBook2 server from the CD.
Default AnswerBook2 Port
The AnswerBook2 server run from the CD always runs on port 8888. If you already
have an AnswerBook2 server running on your system using the default port (8888),
the ab2cd script will display the following message:
A document server is already running on this system as server:8888.
Chapter 4 Updating the Flash PROM on the Ultra 1, Ultra 2, Ultra 450, and Sun Enterprise 450 Systems 81
Page 94

Shut down the current server before running the ab2cd command. Use the
following command to shut down the existing server:
# /usr/lib/ab2/bin/ab2admin -o stop
Stopping the AnswerBook2 Server Process
Always use ab2cd stop to stop the server running from the CD. Do not use
/etc/init.d/ab2mgr stop to stop the CD-based server.
The ab2cd stop command stops the AnswerBook2 server process and cleans up all
files in the /tmp/.ab2/ and /tmp/ab2cd_config/ directories. The
/etc/init.d/ab2mgr stop command stops all server processes, but does not
clean up the files in the /tmp/.ab2/ and /tmp/ab2cd_config/ directories.
Running Two AnswerBooks
To run two AnswerBook2 servers (one on your system, one from the CD), keep these
rules in mind:
Startup
■ The /etc/init.d/ab2mgr start command always starts the server on your
system.
■ The ab2cd command always starts the server from the CD.
Shutdown
■ Always use the ab2cd stop command to stop the server running from the CD.
■ To stop both servers, first use the ab2cd stop command to stop the server
running from the CD, then use either /etc/init.d/ab2mgr stop or
/usr/lib/ab2/bin/ab2admin -o stop to stop the server running on your
system.
82 Solaris 7 11/99 Sun Hardware Platform Guide • November 1999
Page 95

CHAPTER
5
Updating the Flash PROM on the Sun Enterprise 3x00, 4x00, 5x00, and 6x00 Systems
The steps in this chapter describe how to update the flash PROMs in your Sun
Enterprise 3x00, 4x00, 5x00, or 6x00 system.
Some systems require higher level of OpenBoot™ firmware in the flash PROM to
run the 64-bit mode of the Solaris™ 7 operating environment. The OpenBoot
firmware is contained in several PROMs that are located on several different boards.
The flash PROM devices, which contain OpenBoot, are electrically erasable and
writable devices. This means that the firmware can be updated without removing
the flash PROM from the system board. This Solaris 7 kit includes the routines and
instructions you need to update the flash PROM in your system.
Determining If the Flash PROM Needs Updating
Note – If your system is an Ultra™ Enterprise™ 10000, you do not need to do this
update because the Ultra Enterprise 10000 does not have a flash PROM.
Only sun4u systems that can run the 64-bit mode of the Solaris 7 operating
environment might need the flash PROM update. Systems that can only run the 32bit mode (such as those in the sun4c, sun4d, and sun4m platform groups) do not
require updated firmware to run Solaris 7 software.
83
Page 96

Note – If the Solaris 7 operating environment notified you that the flash PROM in
your system needs updating, skip the steps in the procedure “To Determine If Your
System Requires a Flash PROM Update” on page 84 and go directly to “Updating
the Flash PROM” on page 85.
▼ To Determine If Your System Requires a Flash
PROM Update
1. Determine the architecture type of your system.
% uname -m
TABLE5-1 Determining the System Architecture
If your system architecture type is . . . Then . . .
• sun4u Go to Step 2.
• sun4c, sun4d, sun4m You do not need a flash PROM update. Do not proceed
further.
2. Determine the system type of your system.
% uname -i
TABLE5-2 Determining the System Type
If your system type is one of the
following systems. . . Then . . .
SUNW, Ultra-1
SUNW, Ultra-2
SUNW, Ultra-4
SUNW, Ultra-Enterprise Go to Step 3.
Not in the above list You do not need a flash PROM update. Do not proceed
84 Solaris 7 11/99 Sun Hardware Platform Guide • November 1999
Go to Chapter 4
further.
Page 97

3. Determine the version level of the firmware in your system. Type prtconf -V (upper case V).
% prtconf -V
TABLE5-3
If your system type is . . .
SUNW, Ultra-Enterprise 3.2.16 Proceed to “Updating the
SUNW, Ultra-1 3.11.1 Proceed to Chapter 4. You do not need a flash
SUNW, Ultra-2 3.11.2 Proceed to Chapter 4. You do not need a flash
SUNW, Ultra-4 3.7.107 Proceed to Chapter 4. You do not need a flash
And you see a number
lower than . . . Then . . . Otherwise . . .
You do not need a flash
Flash PROM” on page 85.
PROM update. Do not
proceed further.
PROM update. Do not
proceed further.
PROM update. Do not
proceed further.
PROM update. Do not
proceed further.
Updating the Flash PROM
This section describes the following:
■ Flash PROM update process
■ Capturing NVRAM configuration variable settings
■ Making the flash PROM write-enabled
■ Steps to perform before updating the flash PROM
■ Updating the flash PROM
Flash PROM Update Process
Note – For step-by-step instructions, follow the procedures beginning with
“Capturing Configuration Variable Settings” on page 86.
Chapter 5 Updating the Flash PROM on the Sun Enterprise 3x00, 4x00, 5x00, and 6x00 Systems 85
Page 98

After installing the Solaris 7 operating environment, make sure that the external
front panel keyswitch is set to the On or Diagnostics position.
Take note of screen messages, during the flash PROM update, that report
configuration variables that may be reset to their default values. When the update is
complete and after you either reset the system or power cycle the system, revise the
configuration variables as needed to restore your preferences.
Refer to the recovery procedure covered later in this chapter if there is a power
interruption during the update process.
When your system has been updated to the proper firmware revision, you can run
Solaris 7 software in 64-bit mode.
Capturing Configuration Variable Settings
While the Solaris operating environment is still running, capture the NVRAM
configuration variable settings before you install the Solaris 7 operating environment
or begin the flash PROM update process.
As part of the flash PROM update, your NVRAM configuration variables might
change to the default values. To ensure that you can change the default values back
to the values you customized, you need to save the current state of the NVRAM
configuration variables using the eeprom command.
▼ To Capture the Configuration Variable Settings
1. Using the eeprom utility, capture the system’s configuration variable settings in a
file. Type eeprom > filename. The filename is any file name you choose.
% eeprom > filename
Note – If you have custom values installed in oem-logo or keymap, those values
cannot be displayed or printed properly by the eeprom utility because the contents
contain binary information. If it is necessary to restore these values after a power
loss, you should determine the original method by which these values were placed
into NVRAM and use that method to restore the values.
86 Solaris 7 11/99 Sun Hardware Platform Guide • November 1999
Page 99

2. Print out the values captured by the eeprom command. You must have a printed
copy of the configuration values before you install the Solaris 7 operating
environment and begin to update the flash PROM. Type the following:
lp filename
▼ To Install the Solaris 7 Operating Environment
● Install the Solaris 7 operating environment on your system.
Refer to the Installation Library which is in your Solaris 7 media kit. As the Solaris 7
operating environment is installed, you will be notified whether the flash PROM in
your system needs updating. Installing this Solaris release will provide the software
that can upgrade your system’s flash PROM to the required level.
Making the Flash PROM Write-Enabled
Before you update the OpenBoot firmware, which is contained in the flash PROM,
you must set the front panel keyswitch to the proper position to allow the flash
PROM to be write-enabled.
When the switch is set to the Locked position (
protected. When the switch is set to the On position or to the Diagnostics position,
the flash PROM is write-enabled.
FIGURE 5-1 shows the keyswitch positions on a 16-slot Sun Enterprise 6000 system.
The server systems described in this section have the same keyswitch positions.
FIGURE 5-1), the flash PROM is write-
▼ To Write Enable the Flash PROM
● Turn the keyswitch to the On or Diagnostics position (FIGURE 5-1) before updating
the flash PROM.
Note – Disabling write-protection on servers assumes that the system’s write-
protect/enable jumpers were set in the default position (enabled). If you previously
removed the write-protect/enable jumper, perform the steps to make the flash
PROM write enabled in “Location of Flash PROM Jumpers in Sun Enterprise Server
Systems” on page 97.
Chapter 5 Updating the Flash PROM on the Sun Enterprise 3x00, 4x00, 5x00, and 6x00 Systems 87
Page 100
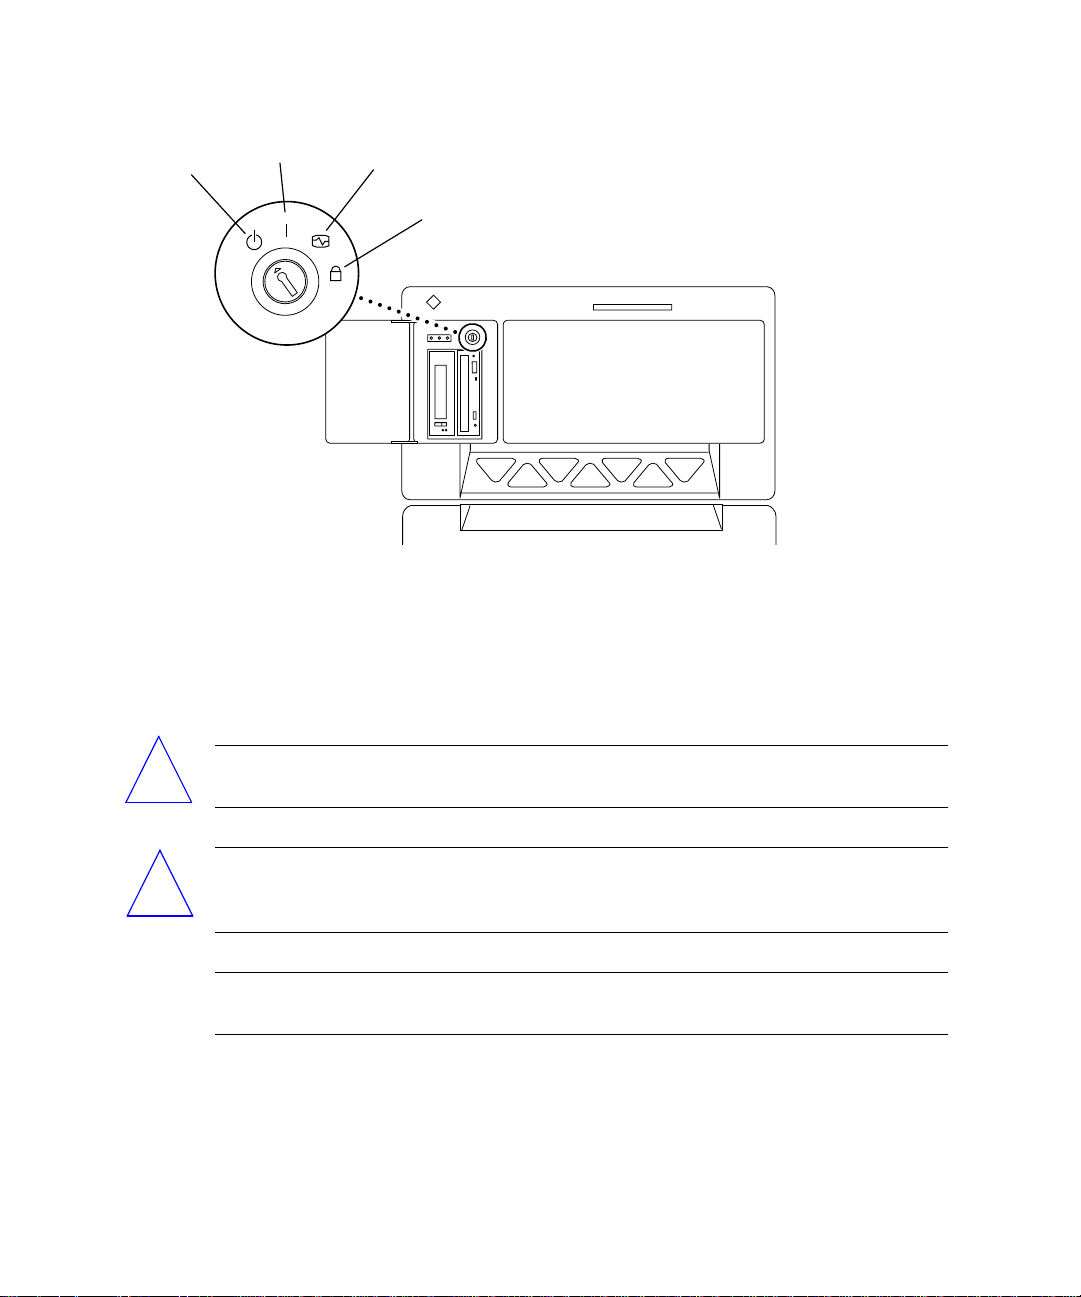
Standby
On
Diagnostics
Locked
Front view
FIGURE 5-1 Sun Enterprise 6x00, 5x00, 4x00, 3x00 Keyswitch Locations
Before Updating the Flash PROM
Before you begin updating the flash PROM, please note the following cautions.
Caution – Do not interrupt power during flash PROM updating. When you are
!
!
88 Solaris 7 11/99 Sun Hardware Platform Guide • November 1999
using the update routine, do not remove or insert system boards.
Caution – The flash update may cause default NVRAM values to overwrite
customized NVRAM variables. Be sure to record the custom and default values
displayed so that you can restore them after you perform the flash PROM update.
Note – If power is interrupted during flash PROM updating, follow the power
interruption recovery procedures covered later in this chapter.
 Loading...