

Page 1

Netra™ Internet Server
3.1 User’s Manual
The Network Is the Computer
Sun Microsystems Computer Company
2550 Garcia Avenue
Mountain View, CA 94043 USA
415 960-1300 fax 415 969-9131
Part No.: 802-7157-10
Revision A, September 1996
™
Page 2

Copyright 1996 Sun Microsystems, Inc. 2550 Garcia A venue, Mountain V iew, California 94043-1100 U.S.A.
All rights reserved. This product or document is protected by copyright and distributed under licenses restricting its use, copying, distribution,
and decompilation. No part of this product or document may be reproduced in any form by any means without prior written authorization of
Sun and its licensors, if any .
®
Portions of this product may be derived from the UNIX
system and from the Berkeley 4.3 BSD system, licensed from the University of
California. UNIX is a registered trademark in the United States and in other countries and is exclusively licensed by X/Open Company Ltd.
Third-party software, including font technology in this product, is protected by copyright and licensed fr om Sun’s suppliers.
RESTRICTED RIGHTS LEGEND: Use, duplication, or disclosure by the government is subject to restrictions as set forth in subparagraph (c)(1)(ii)
of the Rights in T echnical Data and Computer Software clause at DF ARS 252.227-7013 and F AR 52.227-19.
Sun, Sun Microsystems, the Sun logo, Solaris, Solstice, and Netra are trademarks or registered trademarks of Sun Micr osystems, Inc. in the
United States and in other countries. The Netscape Communications Corporation logo, Netscape, Netsite, Mozilla, and Netscape Navigator are
trademarks in the United States and/or other countries of Netscape Communications Corporation. FireW all-First! is a trademark of CheckPoint
Software T echnologies, Ltd., used under license by SunSoft, Inc. All SP ARC trademarks ar e used under license and are trademarks or registered
trademarks of SP ARC International, Inc. in the United States and in other countries. Products bearing SP ARC trademarks ar e based upon an
architecture developed by Sun Microsystems, Inc.
The OPEN LOOK® and Sun™ Graphical User Interfaces were developed by Sun Microsystems, Inc. for its users and licensees. Sun
acknowledges the pioneering efforts of Xerox Corporation in researching and developing the concept of visual or graphical user interfaces for the
computer industry . Sun holds a nonexclusive license from Xerox to the Xer ox Graphical User Interface, which license also covers Sun’s licensees
who implement OPEN LOOK GUIs and otherwise comply with Sun’s written license agreements.
X Window System is a trademark of X Consortium, Inc.
THIS PUBLICATION IS PROVIDED “AS IS” WITHOUT WARRANTY OF ANY KIND, EITHER EXPRESS OR IMPLIED, INCLUDING,
BUT NOT LIMITED TO, THE IMPLIED WARRANTIES OF MERCHANTABILITY, FITNESS FOR A PARTICULAR PURPOSE, OR
NON-INFRINGEMENT.
Copyright 1996 Sun Microsystems, Inc., 2550 Garcia A venue, Mountain V iew, Californie 94043-1100 U.S.A.
T ous droits réservés. Ce produit ou document est protégé par un copyright et distribué avec des licences qui en r estreignent l’utilisation, la copie
et la décompilation. Aucune partie de ce produit ou de sa documentation associée ne peut être reproduite sous aucune forme, par quelque moyen
que ce soit, sans l’autorisation préalable et écrite de Sun et de ses bailleurs de licence, s’il y en a.
®
Des parties de ce produit pourront être derivées du système UNIX
et du système Berkeley 4.3 BSD licencié par l’Université de Californie. UNIX
est une marque enregistrée aux Etats-Unis et dans d’autres pays, et licenciée exclusivement par X/Open Company Ltd. Le logiciel détenu par des
tiers, et qui comprend la technologie relative aux polices de caractères, est protégé par un copyright et licencié par des fournisseurs de Sun.
Sun, Sun Microsystems, le logo Sun, Solaris, Solstice, et Netra sont des marques déposées ou enregistrées de Sun Microsystems, Inc. aux EtatsUnis et dans d’autres pays. Le logo de Netscape Communications Corporation, Netscape, Netsite, Mozilla, et Netscape Navigator sont des
marques de Netscape Communications Corporation aux Etats-Unis et dans d'autres pays. Firewall-First! est une marque de Checkpoint Softwar e
T echnologies, Ltd., utilisée sous licence par SunSoft, Inc.T outes les marques SPARC, utilisées sous licence, sont des marques déposées ou
enregistrées de SP ARC International, Inc. aux Etats-Unis et dans d’autres pays. Les produits portant les mar ques SP ARC sont basés sur une
architecture développée par Sun Microsystems, Inc.
Les utilisateurs d’interfaces graphiques OPEN LOOK® et Sun™ ont été développés de Sun Microsystems, Inc. pour ses utilisateurs et licenciés.
Sun reconnaît les efforts de pionniers de Xerox Corporation pour la recher che et le développement du concept des interfaces d’utilisation visuelle
ou graphique pour l’industrie de l’informatique. Sun détient une licence non exclusive de Xerox sur l’interface d’utilisation graphique, cette
licence couvrant aussi les licenciés de Sun qui mettent en place les utilisateurs d’interfaces graphiques OPEN LOOK et qui en outre se
conforment aux licences écrites de Sun.
Le système X Window est un produit du X Consortium, Inc.
CETTE PUBLICATION EST FOURNIE "EN L’ETAT" SANS GARANTIE D’AUCUNE SORTE, NI EXPRESSE NI IMPLICITE, Y COMPRIS, ET
SANS QUE CETTE LISTE NE SOIT LIMITATIVE, DES GARANTIES CONCERNANT LA VALEUR MARCHANDE, L’APTITUDE DES
PRODUITS A REPONDRE A UNE UTILISATION PARTICULIERE OU LE FAIT QU’ILS NE SOIENT P AS CONTREFAISANTS DE PRODUITS
DE TIERS.
Please
Recycle
Page 3

Contents
Preface. . . . . . . . . . . . . . . . . . . . . . . . . . . . . . . . . . . . . . . . . . . . . . . . . . . . xv
Part 1 —Setting Up the Netra Server
1. Overview . . . . . . . . . . . . . . . . . . . . . . . . . . . . . . . . . . . . . . . . . . . . 1-1
The Internet Service Provider . . . . . . . . . . . . . . . . . . . . . . . . . . . . 1-2
The Netra Server Administrator . . . . . . . . . . . . . . . . . . . . . . . . . 1-2
Using the Netra Server In a Network Topology. . . . . . . . . . . . . 1-3
2. Client System Requirements . . . . . . . . . . . . . . . . . . . . . . . . . . . 2-1
Basic Software Requirements . . . . . . . . . . . . . . . . . . . . . . . . . . . . 2-1
Installing the IPX Gateway on a Client System . . . . . . . . . . . . . 2-2
3. Understanding the Netra User Interface. . . . . . . . . . . . . . . . . . 3-1
Netra Administration Modules . . . . . . . . . . . . . . . . . . . . . . . . . . 3-1
Types of Pages . . . . . . . . . . . . . . . . . . . . . . . . . . . . . . . . . . . . . 3-2
Navigation Icons . . . . . . . . . . . . . . . . . . . . . . . . . . . . . . . . . . . 3-9
Information Icons. . . . . . . . . . . . . . . . . . . . . . . . . . . . . . . . . . . 3-10
Accessing the Netra Administration Framework . . . . . . . . . . . 3-11
iii
Page 4

4. Performing the Initial Configuration . . . . . . . . . . . . . . . . . . . . 4-1
Options for Initial Configuration. . . . . . . . . . . . . . . . . . . . . . . . . 4-1
Using a Monitor for Initial Configuration . . . . . . . . . . . . . . . . . 4-2
Using a PC for Initial Configuration . . . . . . . . . . . . . . . . . . . . . . 4-6
Part 2 — Network Services Administration
5. Anonymous FTP Administration. . . . . . . . . . . . . . . . . . . . . . . . 5-1
6. Mail Administration. . . . . . . . . . . . . . . . . . . . . . . . . . . . . . . . . . . 6-1
Mail Return Address . . . . . . . . . . . . . . . . . . . . . . . . . . . . . . . . . . . 6-1
Mail Aliases . . . . . . . . . . . . . . . . . . . . . . . . . . . . . . . . . . . . . . . . . . 6-2
Mail Procedures . . . . . . . . . . . . . . . . . . . . . . . . . . . . . . . . . . . . . . . 6-3
Return Address . . . . . . . . . . . . . . . . . . . . . . . . . . . . . . . . . . . . 6-3
Aliases. . . . . . . . . . . . . . . . . . . . . . . . . . . . . . . . . . . . . . . . . . . . 6-3
7. Name Service Administration . . . . . . . . . . . . . . . . . . . . . . . . . . 7-1
Name Services on the Netra Server . . . . . . . . . . . . . . . . . . . . . . . 7-1
iv Netra Internet Server 3.1 User’s Manual—September 1996
Local Name Service . . . . . . . . . . . . . . . . . . . . . . . . . . . . . . . . . 7-2
Network Information Service . . . . . . . . . . . . . . . . . . . . . . . . . 7-2
Domain Name Service. . . . . . . . . . . . . . . . . . . . . . . . . . . . . . . 7-2
Configuration Options . . . . . . . . . . . . . . . . . . . . . . . . . . . . . . . . . 7-4
How to Set Up Name Services . . . . . . . . . . . . . . . . . . . . . . . . . . . 7-5
Name Service Procedures . . . . . . . . . . . . . . . . . . . . . . . . . . . . . . . 7-6
NIS Client Administration . . . . . . . . . . . . . . . . . . . . . . . . . . . 7-6
Local Name Server Administration. . . . . . . . . . . . . . . . . . . . 7-7
DNS Client Administration . . . . . . . . . . . . . . . . . . . . . . . . . . 7-7
DNS Server Administration . . . . . . . . . . . . . . . . . . . . . . . . . . 7-8
Page 5

8. Netscape Enterprise Server Administration . . . . . . . . . . . . . . . 8-1
Configuring Web Servers . . . . . . . . . . . . . . . . . . . . . . . . . . . . . . . 8-2
Part 3 —Network Connection Administration
9. ATM Administration . . . . . . . . . . . . . . . . . . . . . . . . . . . . . . . . . . 9-1
Classical Internet Protocol Interface . . . . . . . . . . . . . . . . . . . . . . 9-2
LAN Emulation Interface . . . . . . . . . . . . . . . . . . . . . . . . . . . . . . . 9-2
Configuring ATM Interfaces. . . . . . . . . . . . . . . . . . . . . . . . . . . . . 9-3
ATM Procedures. . . . . . . . . . . . . . . . . . . . . . . . . . . . . . . . . . . . . . . 9-4
Framing Interface. . . . . . . . . . . . . . . . . . . . . . . . . . . . . . . . . . . 9-4
User Network Interface . . . . . . . . . . . . . . . . . . . . . . . . . . . . . . 9-4
Classical IP Interface . . . . . . . . . . . . . . . . . . . . . . . . . . . . . . . . 9-5
LAN Emulation Interface . . . . . . . . . . . . . . . . . . . . . . . . . . . . 9-6
10. High-Speed Serial Interface Administration. . . . . . . . . . . . . . 10-1
11. ISDN Administration. . . . . . . . . . . . . . . . . . . . . . . . . . . . . . . . . . 11-1
12. Local Area Network Administration. . . . . . . . . . . . . . . . . . . . . 12-1
13. Modem Administration . . . . . . . . . . . . . . . . . . . . . . . . . . . . . . . . 13-1
Contents v
Connecting to a Remote Host Using ISDN. . . . . . . . . . . . . . . . . 11-2
ISDN Procedures . . . . . . . . . . . . . . . . . . . . . . . . . . . . . . . . . . . . . . 11-3
Remote Host Connections . . . . . . . . . . . . . . . . . . . . . . . . . . . 11-3
Local Port Assignments . . . . . . . . . . . . . . . . . . . . . . . . . . . . . 11-5
Remote Host Connection Log . . . . . . . . . . . . . . . . . . . . . . . . 11-7
What is a Network Interface. . . . . . . . . . . . . . . . . . . . . . . . . . . . . 12-1
LAN Procedures. . . . . . . . . . . . . . . . . . . . . . . . . . . . . . . . . . . . . . . 12-2
Connecting to a Remote Host Using a Modem . . . . . . . . . . . . . 13-1
Page 6

Modem Procedures . . . . . . . . . . . . . . . . . . . . . . . . . . . . . . . . . . . . 13-2
Remote Host Connections . . . . . . . . . . . . . . . . . . . . . . . . . . . 13-2
Modem Definitions . . . . . . . . . . . . . . . . . . . . . . . . . . . . . . . . . 13-4
Modem Port Assignments . . . . . . . . . . . . . . . . . . . . . . . . . . . 13-5
Modem Log Files . . . . . . . . . . . . . . . . . . . . . . . . . . . . . . . . . . . 13-6
14. Routing Administration. . . . . . . . . . . . . . . . . . . . . . . . . . . . . . . . 14-1
Netra System Routers . . . . . . . . . . . . . . . . . . . . . . . . . . . . . . . . . . 14-1
Dynamic Router. . . . . . . . . . . . . . . . . . . . . . . . . . . . . . . . . . . . 14-1
Static Router . . . . . . . . . . . . . . . . . . . . . . . . . . . . . . . . . . . . . . . 14-2
Setting a Default Route Over a PPP Link . . . . . . . . . . . . . . . 14-2
Not a Router. . . . . . . . . . . . . . . . . . . . . . . . . . . . . . . . . . . . . . . 14-2
Routing Procedures . . . . . . . . . . . . . . . . . . . . . . . . . . . . . . . . . . . . 14-3
Static Router . . . . . . . . . . . . . . . . . . . . . . . . . . . . . . . . . . . . . . . 14-3
Dynamic Router. . . . . . . . . . . . . . . . . . . . . . . . . . . . . . . . . . . . 14-4
Part 4 —Security Administration
15. Administration Web Server . . . . . . . . . . . . . . . . . . . . . . . . . . . . . 15-1
16. Solstice FireWall-First! Administration . . . . . . . . . . . . . . . . . . 16-1
17. Network Service Access Administration . . . . . . . . . . . . . . . . . 17-1
vi Netra Internet Server 3.1 User’s Manual—September 1996
Not a Router. . . . . . . . . . . . . . . . . . . . . . . . . . . . . . . . . . . . . . . 14-5
Host Access Control . . . . . . . . . . . . . . . . . . . . . . . . . . . . . . . . . . . 15-2
Configuring the Initial Security Policy . . . . . . . . . . . . . . . . . . . . 16-2
Solstice FireWall-First! Licensing. . . . . . . . . . . . . . . . . . . . . . . . . 16-2
Installing Solstice FireWall-First! on a New Network Interface 16-2
Using the Solstice FireWall-First! Software. . . . . . . . . . . . . . . . . 16-3
Page 7

18. Root Password Administration . . . . . . . . . . . . . . . . . . . . . . . . . 18-1
Part 5 —System Administration
19. Netra System Administration. . . . . . . . . . . . . . . . . . . . . . . . . . . 19-1
Audio Volume . . . . . . . . . . . . . . . . . . . . . . . . . . . . . . . . . . . . . . . . 19-2
External Disks. . . . . . . . . . . . . . . . . . . . . . . . . . . . . . . . . . . . . . . . . 19-3
File System Backup and Restore . . . . . . . . . . . . . . . . . . . . . . . . . 19-4
Backup Options . . . . . . . . . . . . . . . . . . . . . . . . . . . . . . . . . . . . 19-4
Restore Options . . . . . . . . . . . . . . . . . . . . . . . . . . . . . . . . . . . . 19-5
Backup and Restore Procedures. . . . . . . . . . . . . . . . . . . . . . . 19-5
Host Name . . . . . . . . . . . . . . . . . . . . . . . . . . . . . . . . . . . . . . . . . . . 19-8
Log Files . . . . . . . . . . . . . . . . . . . . . . . . . . . . . . . . . . . . . . . . . . . . . 19-9
Restart and Shutdown. . . . . . . . . . . . . . . . . . . . . . . . . . . . . . . . . . 19-10
Save and Restore Configuration. . . . . . . . . . . . . . . . . . . . . . . . . . 19-11
Save and Restore Options. . . . . . . . . . . . . . . . . . . . . . . . . . . . 19-11
Contents vii
Save and Restore Procedures . . . . . . . . . . . . . . . . . . . . . . . . . 19-12
Software Management. . . . . . . . . . . . . . . . . . . . . . . . . . . . . . . . . . 19-13
Install and Remove Options. . . . . . . . . . . . . . . . . . . . . . . . . . 19-13
Install/Remove Procedures . . . . . . . . . . . . . . . . . . . . . . . . . . 19-14
System Administrator Alias . . . . . . . . . . . . . . . . . . . . . . . . . . . . . 19-16
System Defaults . . . . . . . . . . . . . . . . . . . . . . . . . . . . . . . . . . . . . . . 19-17
Unconfigure . . . . . . . . . . . . . . . . . . . . . . . . . . . . . . . . . . . . . . . . . . 19-18
User Accounts . . . . . . . . . . . . . . . . . . . . . . . . . . . . . . . . . . . . . . . . 19-19
User Account Procedures . . . . . . . . . . . . . . . . . . . . . . . . . . . . 19-19
Page 8

Part 6 —Crash Recovery
20. Netra System Recovery . . . . . . . . . . . . . . . . . . . . . . . . . . . . . . . . 20-1
Reconfiguration, Repair, and Reinstallation. . . . . . . . . . . . . . . . 20-2
Recovery Options. . . . . . . . . . . . . . . . . . . . . . . . . . . . . . . . . . . . . . 20-2
A. Administering Localized Software . . . . . . . . . . . . . . . . . . . . . . A-1
B. Installing Solstice Backup 4.2.2 and Solstice DiskSuite 4.0
Software . . . . . . . . . . . . . . . . . . . . . . . . . . . . . . . . . . . . . . . . . . . . . B-1
C. Initial Configuration
Using TTY . . . . . . . . . . . . . . . . . . . . . . . . . . . . . . . . . . . . . . . . . . . C-1
Configuring the Netra Server Using TTY . . . . . . . . . . . . . . . . . . C-1
Glossary . . . . . . . . . . . . . . . . . . . . . . . . . . . . . . . . . . . . . . . . . . . . . Glossary-1
viii Netra Internet Server 3.1 User’s Manual—September 1996
Page 9

Figures
Figure 1-1 LAN that Uses the Netra Server as a Router. . . . . . . . . . . . . . . 1-4
Figure 1-2 Intranet Configuration for Netra Servers. . . . . . . . . . . . . . . . . . 1-5
Figure 2-1 Sample IPX Gateway Setup . . . . . . . . . . . . . . . . . . . . . . . . . . . . . 2-2
Figure 3-1 Navigation Page. . . . . . . . . . . . . . . . . . . . . . . . . . . . . . . . . . . . . . . 3-2
Figure 3-2 Task Page (form) . . . . . . . . . . . . . . . . . . . . . . . . . . . . . . . . . . . . . . 3-4
Figure 3-3 Error Form . . . . . . . . . . . . . . . . . . . . . . . . . . . . . . . . . . . . . . . . . . . 3-5
Figure 3-4 Verify Form . . . . . . . . . . . . . . . . . . . . . . . . . . . . . . . . . . . . . . . . . . 3-6
Figure 3-5 Help Page . . . . . . . . . . . . . . . . . . . . . . . . . . . . . . . . . . . . . . . . . . . . 3-7
Figure 3-6 Success Page. . . . . . . . . . . . . . . . . . . . . . . . . . . . . . . . . . . . . . . . . . 3-8
Figure 7-1 Example of DNS Domains . . . . . . . . . . . . . . . . . . . . . . . . . . . . . . 7-3
ix
Page 10

x Netra Internet Server 3.1 User’s Manual—September 1996
Page 11

Tables
Table 3-1 User Input Elements . . . . . . . . . . . . . . . . . . . . . . . . . . . . . . . . . . . 3-3
Table 3-2 Netra Navigation Icons. . . . . . . . . . . . . . . . . . . . . . . . . . . . . . . . . 3-9
Table 3-3 Netra Information Icons . . . . . . . . . . . . . . . . . . . . . . . . . . . . . . . . 3-10
Table 5-1 Information for Anonymous FTP . . . . . . . . . . . . . . . . . . . . . . . . 5-2
Table 6-1 Information for Mail Administration . . . . . . . . . . . . . . . . . . . . . 6-3
Table 6-2 Information for Mail Alias Administration. . . . . . . . . . . . . . . . 6-4
Table 7-1 NIS Client Administration Information. . . . . . . . . . . . . . . . . . . 7-6
Table 7-2 Local Server Information . . . . . . . . . . . . . . . . . . . . . . . . . . . . . . . 7-7
Table 7-3 DNS Client Administration Information . . . . . . . . . . . . . . . . . . 7-7
Table 7-4 DNS Server Information. . . . . . . . . . . . . . . . . . . . . . . . . . . . . . . . 7-8
Table 7-5 DNS Primary Server Information . . . . . . . . . . . . . . . . . . . . . . . . 7-9
Table 7-6 DNS Secondary Server Information . . . . . . . . . . . . . . . . . . . . . . 7-11
Table 9-1 Information for ATM Framing Interface . . . . . . . . . . . . . . . . . . 9-4
Table 9-2 Information for ATM User Network Interface . . . . . . . . . . . . . 9-4
Table 9-3 Information for ATM Classical IP Interface. . . . . . . . . . . . . . . . 9-5
Table 9-4 Information for ATM LAN Emulation Interface . . . . . . . . . . . 9-6
xi
Page 12

Table 10-1 Information for High-Speed Serial Interface . . . . . . . . . . . . . . . 10-2
Table 11-1 Information for ISDN Remote Host Connection . . . . . . . . . . . 11-3
Table 11-2 Information for Configuring a Port (ISDN). . . . . . . . . . . . . . . . 11-5
Table 12-1 Network Interface Administration: TCP/IP. . . . . . . . . . . . . . . 12-3
Table 12-2 Network Interface Administration: SPX/IPX . . . . . . . . . . . . . . 12-3
Table 13-1 Information for Modem Remote Host Connection . . . . . . . . . 13-2
Table 13-2 Information for Adding/Modifying a Modem Definition . . . 13-4
Table 13-3 Modem Assignments . . . . . . . . . . . . . . . . . . . . . . . . . . . . . . . . . . 13-5
Table 13-4 Modem Log File Detail Levels. . . . . . . . . . . . . . . . . . . . . . . . . . . 13-6
Table 14-1 Information for Static Router. . . . . . . . . . . . . . . . . . . . . . . . . . . . 14-3
Table 14-2 Information for Dynamic Router. . . . . . . . . . . . . . . . . . . . . . . . . 14-4
Table 15-1 Administration Web Server Password Information. . . . . . . . . 15-2
Table 17-1 Security Levels for Network Services. . . . . . . . . . . . . . . . . . . . . 17-3
Table 18-1 Information for Root Password Administration. . . . . . . . . . . . 18-2
Table 19-1 Information for Audio Administration . . . . . . . . . . . . . . . . . . . 19-2
Table 19-2 Information for Backup Options . . . . . . . . . . . . . . . . . . . . . . . . . 19-5
Table 19-3 Information for Restore Device . . . . . . . . . . . . . . . . . . . . . . . . . . 19-7
Table 19-4 Information for Easy Restore . . . . . . . . . . . . . . . . . . . . . . . . . . . . 19-7
Table 19-5 Information for Selective Restore . . . . . . . . . . . . . . . . . . . . . . . . 19-8
Table 19-6 Information for Host Name . . . . . . . . . . . . . . . . . . . . . . . . . . . . . 19-8
Table 19-7 Information for System Restart/Shutdown. . . . . . . . . . . . . . . . 19-10
Table 19-8 Information for Save/Restore Configuration . . . . . . . . . . . . . . 19-12
Table 19-9 Information for Installing Packages/Patches . . . . . . . . . . . . . . 19-14
Table 19-10 Information for Removing Packages/Patches . . . . . . . . . . . . . 19-15
Table 19-11 Information for System Administrator Alias . . . . . . . . . . . . . . 19-16
xii Netra Internet Server 3.1 User’s Manual—September 1996
Page 13

Table 19-12 Information for System Defaults . . . . . . . . . . . . . . . . . . . . . . . . . 19-17
Table 19-13 Information for Unconfiguring Modules. . . . . . . . . . . . . . . . . . 19-18
Table 19-14 Information for User Accounts . . . . . . . . . . . . . . . . . . . . . . . . . . 19-19
Table B-1 Solstice Backup Required Installation Packages. . . . . . . . . . . . B-2
Table B-2 Solstice Backup Required Installation Patch . . . . . . . . . . . . . . . B-2
Table B-3 Solstice DiskSuite Required Installation Packages. . . . . . . . . . B-2
Table B-4 Solstice Backup Required Installation Patch . . . . . . . . . . . . . . . B-2
Tables xiii
Page 14

xiv Netra Internet Server 3.1 User’s Manual—September 1996
Page 15

Preface
This manual, the Netra Internet Server 3.1 User’s Manual, is written for the
Netra™ system administrator.
Some knowledge of networking concepts and terminology is assumed.
Using the Netra Internet Server Manuals
The Netra Internet server comes with two types of manuals: a Netra hardware
manual (or manual set) and the Netra Internet Server 3.1 User’s Manual.
The Netra hardware manual contains the following information:
• How to add hardware to the Netra Internet server
• How to connect the Netra Internet server to the network
• System specifications for the Netra Internet server
This manual, the Netra Internet Server 3.1 User’s Manual, contains the following
information:
• How the Netra Internet server fits in to a network topology
• What software is required for client systems
• How to configure the Netra server
• How to use the HTML-based user interface and administration modules
• How to perform a system recovery in case of a disk failure
xv
Page 16

How This Book Is Organized
The information in this manual is organized in six parts:
Part 1 —Setting Up the Netra Server—introduces the Netra server and its user
interface and describes how to configure it.
Part 2 —Network Services Administration—describes the Netra server’s
Network Services Administration modules.
Part 3 —Network Connection Administration—describes the Netra server’s
Network Connection Administration modules.
Part 4 —Security Administration—describes the Netra server’s Security
Administration modules.
Part 5 —System Administration—describes the Netra server’s System
Administration modules.
Part 6 —Crash Recovery—describes how to recover the Netra server in case of
a system disk failure.
Related Books
A number of helpful books describe how to access and use the Internet:
• Albitz and Liu, DNS and BIND, O’Reilly & Associates, Inc. 1992
• Gilsten, Paul, Finding It on the Internet, John Wiley & Sons, Inc., 1994
• Krol, Ed, The Whole Internet User’s Guide and Catalog, O’Reilly & Associates,
• Morris, Mary E.S., HTML for Fun and Profit, Prentice Hall, 1995
• Wiggins, Richard W., The Internet for Everyone, McGraw Hill, Inc., 1995
xvi Netra Internet Server 3.1 User’s Manual—September 1996
Inc., 1992, 1994
Page 17

T ypographic Conventions
The following table describes the typographic conventions used in this book.
Table P-1 Typographic Conventions
Typeface or
Symbol Meaning Example
AaBbCc123 The names of commands,
files, and directories;
on-screen computer output
AaBbCc123 What you type, contrasted
with on-screen computer
output
AaBbCc123 Command-line placeholder:
replace with a real name or
value
AaBbCc123 Book titles, new words or
terms, or words to be
emphasized
Edit your .login file.
Use ls -a to list all files.
machine_name% You have mail.
machine_name% su
Password:
To delete a file, type rm filename.
Read Chapter 6 in User’s Guide.
These are called class options.
You must be root to do this.
Preface xvii
Page 18

Ordering Sun Documents
The SunDocs Order Desk is a distribution center for Sun Microsystems
technical documents. You can use major credit cards and company purchase
orders. You can order documents in the following ways:
Country Telephone Fax
United States 1-800-873-7869 1-800-944-0661
United Kingdom 0-800-89-88-88 0-800-89-88-87
France 05-90-61-57 05-90-61-58
Belgium 02-720-09-09 02-725-88-50
Luxembourg 32-2-720-09-09 32-2-725-88-50
Germany 01-30-81-61-91 01-30-81-61-92
The Netherlands 06-022-34-45 06-022-34-46
Sweden 020-79-57-26 020-79-57-27
Switzerland 155-19-26 155-19-27
Japan 0120-33-9096 0120-33-9097
World Wide Web: http://www.sun.com/sunexpress/
Sun Welcomes Your Comments
Please use the Reader Comment Card that accompanies this document. We are
interested in improving our documentation and welcome your comments and
suggestions.
If a card is not available, you can email or fax your comments to us. Please
include the part number of your document in the subject line of your email or
fax message.
• Email: smcc-docs@sun.com
• Fax: SMCC Document Feedback
xviii Netra Internet Server 3.1 User’s Manual—September 1996
1-415-786-6443
Page 19

Part 1 — Setting Up the Netra Server
The four chapters in Part 1 introduce the Netra server and its user interface
and describe how to configure it.
• Chapter 1, “Overview,” describes the Netra server’s capabilities.
• Chapter 2, “Client System Requirements,” describes the software
requirements for client systems. It also describes how to install the
Solstice™ IPX Gateway software.
• Chapter 3, “Understanding the Netra User Interface,” introduces you to the
design conventions of the HTML-based user interface. It describes how to
navigate through the various types of “pages” and “forms”.
• Chapter 4, “Performing the Initial Configuration,” describes options for
configuring your Netra server for the first time.
Page 20

Page 21

Overview
The Sun™ Netra Internet Server is an Internet and gateway server that
connects small or large organizations of heterogeneous clients directly to the
Internet.
PC, Macintosh, and UNIX® workstation clients on TCP/IP or Novell
NetWare®-based local area networks (LANs) can use the Netra Internet Server
to send and receive global electronic mail, access the World Wide Web (WWW),
and use other services available over the Internet. The Netra server can also be
used in an intranet configuration to provide services for a local LAN. The
Netra server ’s graphical user interface-based tools make installation,
configuration, and administration simple, even for a user who does not have
UNIX expertise.
Connecting the Netra server to the Internet requires three hardware
components:
1
• A communications line
• An interface from the communications line to the Netra server
• The Netra server
All the necessary software components are included in the Netra server.
1-1
Page 22

1
The Internet Service Provider
An Internet Service Provider (ISP) is the organization that provides your
connection to the Internet. The Netra Internet server is the gateway from your
local network to the Internet via the ISP’s communications server. The Netra
server on your LAN provides one end of a data communications link, such as
a direct line or modem connection. The other end of the communications link
is at the ISP’s server. (The ISP may also have other connections to other large
regional networks that make up the Internet.)
The ISP may also be responsible for providing:
• A registered network number, if your site does not have one
• An host addressing scheme
• A domain name
• Name server support
• Security for your Internet connection
• Route management to and from your network
• Names of news servers and mail servers
The Netra Server Administrator
The Netra server administrator ’s responsibility is to configure and administer
the Netra server and the local network. After the server is configured, the
server administrator can set up the Internet services provided by the Netra
server. Examples of such tasks are: configuring local routing, assigning host
addresses, and selecting the appropriate services and security for your site.
1-2 Netra Internet Server 3.1 User’s Manual—September 1996
Page 23

Using the Netra Server In a Network Topology
The Netra server supports the two basic network scenarios described below.
Figure 1-1 shows a typical Internet scenario. Note that there are two Netra
servers in this scenario. The server stimpy acts as an Internet gateway server
for all the systems in the domain called tv.net. The server ren serves the
domain called comedy.tv.net and uses stimpy for Internet access.
Clients on the LAN use the Netra server to access the Internet. The Netra
server is the router, and this enables it to pass information from the Internet to
the clients on the LAN. If only one network port exists on the Netra server, the
scenario in Figure 1-1 is supported by adding virtual network interfaces.
1
Overview 1-3
Page 24

1
elmo
129.144.79.1
Internet service provider
access.isp.net
INTERNET
129.144.102.6
tv.net
• Modem
• ISDN
• HSI
• Router
129.144.102.27
grover
129.144.79.2
Netra server (stimpy)
Customer LAN
129.144.79.0
PC and
MAC clients
bert
129.144.79.3
1-4 Netra Internet Server 3.1 User’s Manual—September 1996
ernie
129.144.79.4
comedy.tv.net
larry
129.144.78.1
Figure 1-1 LAN that Uses the Netra Server as a Router
129.144.79.6
129.144.78.4
129.144.79.5
curly
129.144.78.2
Netra server (ren)
moe
129.144.78.3
Page 25

1
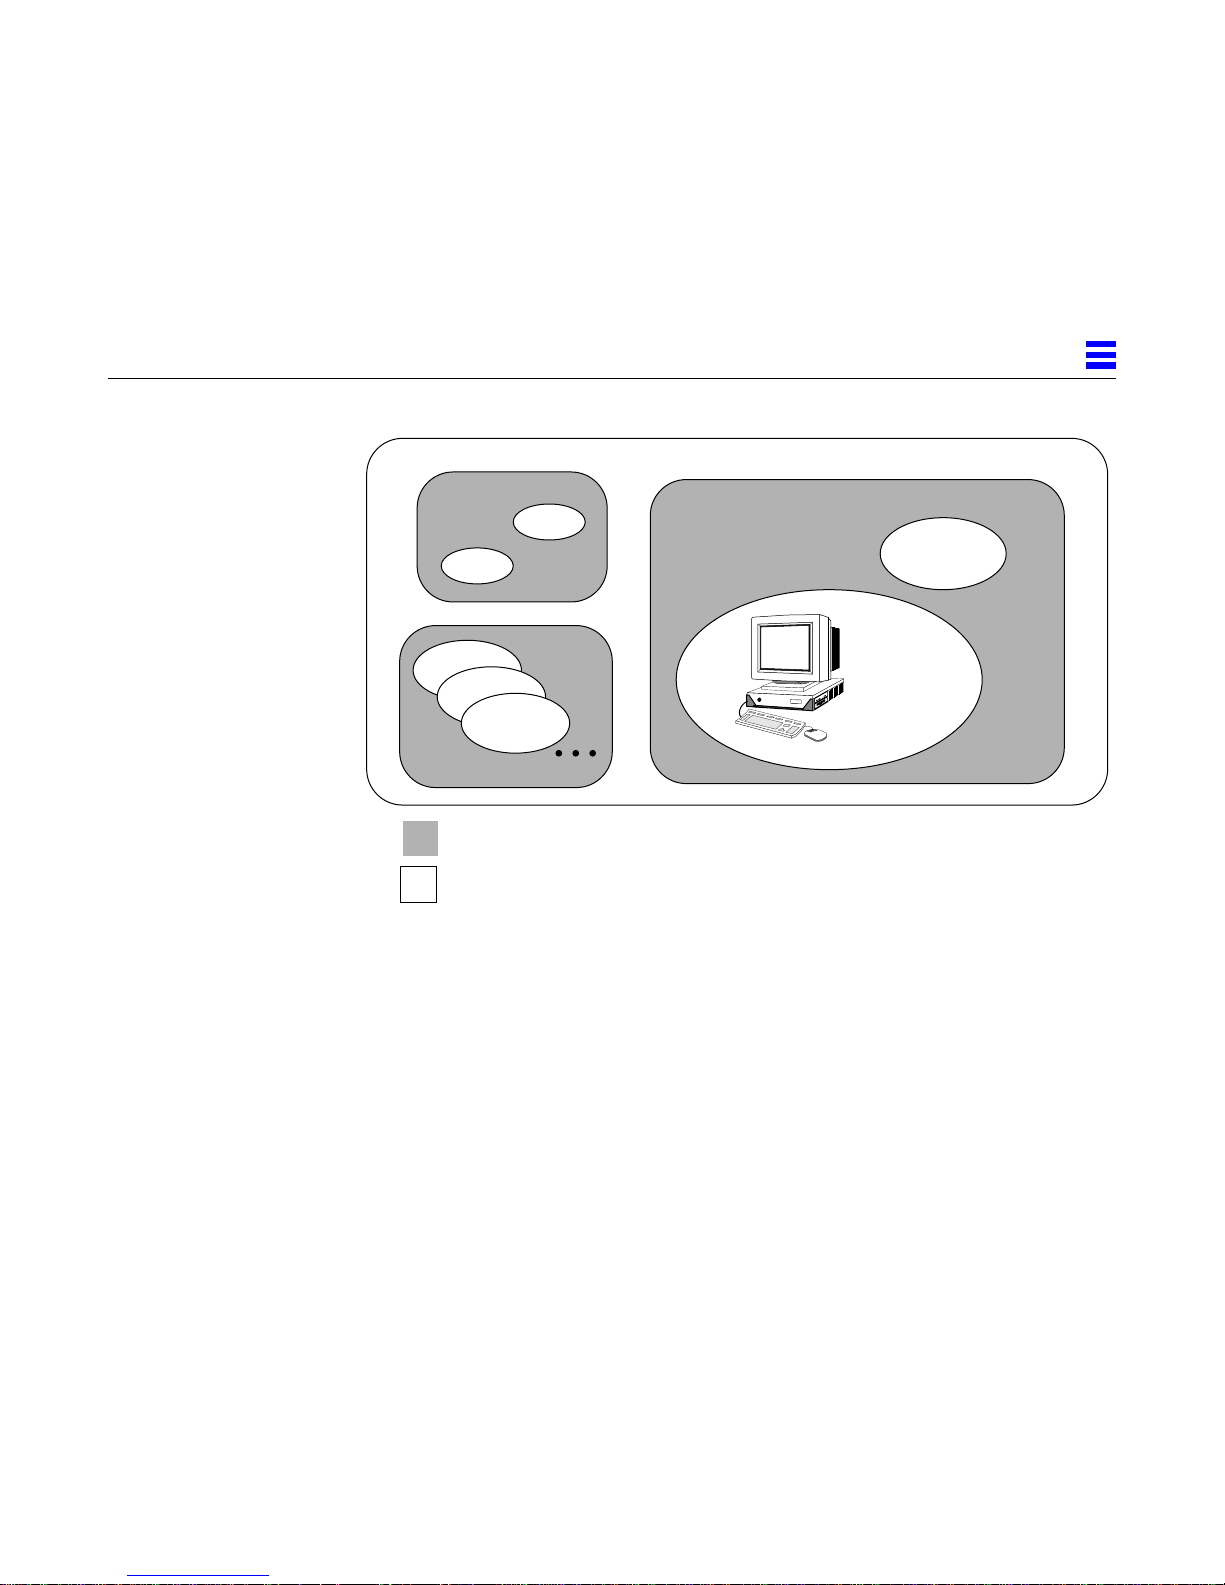
Figure 1-2 shows an example intranet configuration. Here, two departmental
Netra servers share global information provided by a third Netra server.
Netra server
Netra server
PC and
Mac clients
Netra server
PC and
Mac clients
Figure 1-2 Intranet Configuration for Netra Servers
Overview 1-5
Page 26

1
1-6 Netra Internet Server 3.1 User’s Manual—September 1996
Page 27

Client System Requirements
This chapter discusses the requirements for client systems on your LAN. Make
sure these systems are set up before you configure and use the Netra server.
Basic Software Requirements
Each client system (PC, Macintosh, or other) must have the following types of
software to communicate with the Internet through the Netra server.
• Network protocol stack: A network protocol stack is the basic network-to-
network communications software package. If you have already set up your
LAN, then you have a network protocol stack.
If your LAN is running the Transmission Control Protocol/Internet Protocol
(TCP/IP) network protocol, it is ready to communicate with the Internet
because Internet applications such as Web browsers, electronic mail, and
File Transfer Protocol (FTP) use TCP/IP.
If your LAN is running the Sequenced Packet Exchange/Internetwork
Packet Exchange (SPX/IPX) network protocol, you must use the IPX
Gateway software to translate SPX/IPX to TCP/IP. The IPX Gateway
software is shipped with your Netra server; you must install it on client
systems on your LAN.
2
• Web browsers: Mosaic and Netscape™ are two popular examples.
• Utilities: FTP client software, telnet, and mail packages.
2-1
Page 28

2
Before configuring the Netra server, configure your LAN with a network
protocol and the IPX Gateway software. Then configure the Netra server. Next,
install and configure a mail package (it must support the SMTP, POP2, POP3,
or IMAP protocol); set up a Name Service; and add the browser software and
utilities.
Note – If your browser supports caching, make sure this feature is either
disabled or configured to verify documents every time. In addition, do not use
proxy servers to access the Netra administration modules.
Installing the IPX Gateway on a Client System
The IPX Gateway is a client-server application that provides transparent
TCP/IP connectivity to SPX/IPX clients. The IPX Gateway enables any
NetWare® client to access Internet services such as Web browsers, mail, news
groups, and file transfer capabilities through the built-in IPX-to-IP gateway.
The IPX network number that is used on the existing NetWare server must also
be used in the IPX Gateway’s configuration in the Netra server on that LAN.
For example, assume you have the setup shown in Figure 2-1.
Figure 2-1 Sample IPX Gateway Setup
2-2 Netra Internet Server 3.1 User’s Manual—September 1996
Netra server
Internet
NetWare
server
LAN
NetWare
client
Page 29

If the NetWare server has the following SPX/IPX configuration:
• Frame type: Ethernet_802.3
• IPX network number: 12345678
then the network interface for the Netra server on that LAN should also have
the same SPX/IPX configuration: a frame type of Ethernet_802.3 and an IPX
network number of 12345678.
If you have two frame types on the NetWare server, you can choose either one
or both frame types (you must use at least one of them). If you choose both
frame types, the same rule applies: the IPX network numbers that are used on
the NetWare server must also be used on the Netra server.
Use the IPX Gateway diskette that was shipped with your Netra server to
install the IPX Gateway software on each client system. The program used to
install the software is called setup.exe. It should be run on each client PC or
installed on a file server.
▼ To Install IPX Gateway on the Client PC
1. Insert the IPX Gateway diskette into drive A on the client PC.
2
2. Start File Manager on the client PC and access drive A.
3. Double click on the setup.exe file name (or icon) to start the installation
program.
An “Initializing Setup” screen is displayed, followed by a client setup
screen.
4. Select Express Setup.
A setup window is displayed, showing the status of the installation.
Once the IPX Gateway is installed, a screen showing that the installation is
complete is displayed. Then icons labeled Internet Junction Client
and Release Notes are displayed on the client system.
Client System Requirements 2-3
Page 30

2
2-4 Netra Internet Server 3.1 User’s Manual—September 1996
Page 31

Understanding the Netra User
Interface
The Netra server uses an HTML-based user interface for its administration.
Each screen is a hypertext document. A browser running on a client or on the
Netra system accesses these documents from an administration Web server
running on the Netra system.
Netra Administration Modules
An administration function in the Netra user interface is called a module and is
made up of a set of related tasks. For example, the User Accounts module
contains tasks to add user accounts as well as to modify or delete them. These
modules are grouped into four categories:
• Network Services Administration
• Network Connection Administration
• Security Administration
• System Administration
The modules are displayed as hypertext links on the main administration page
of the user interface. Selecting a link takes you to the module associated with
the task.
3
3-1
Page 32
3
T ypes of Pages
The Netra user interface has five types of pages, as described below.
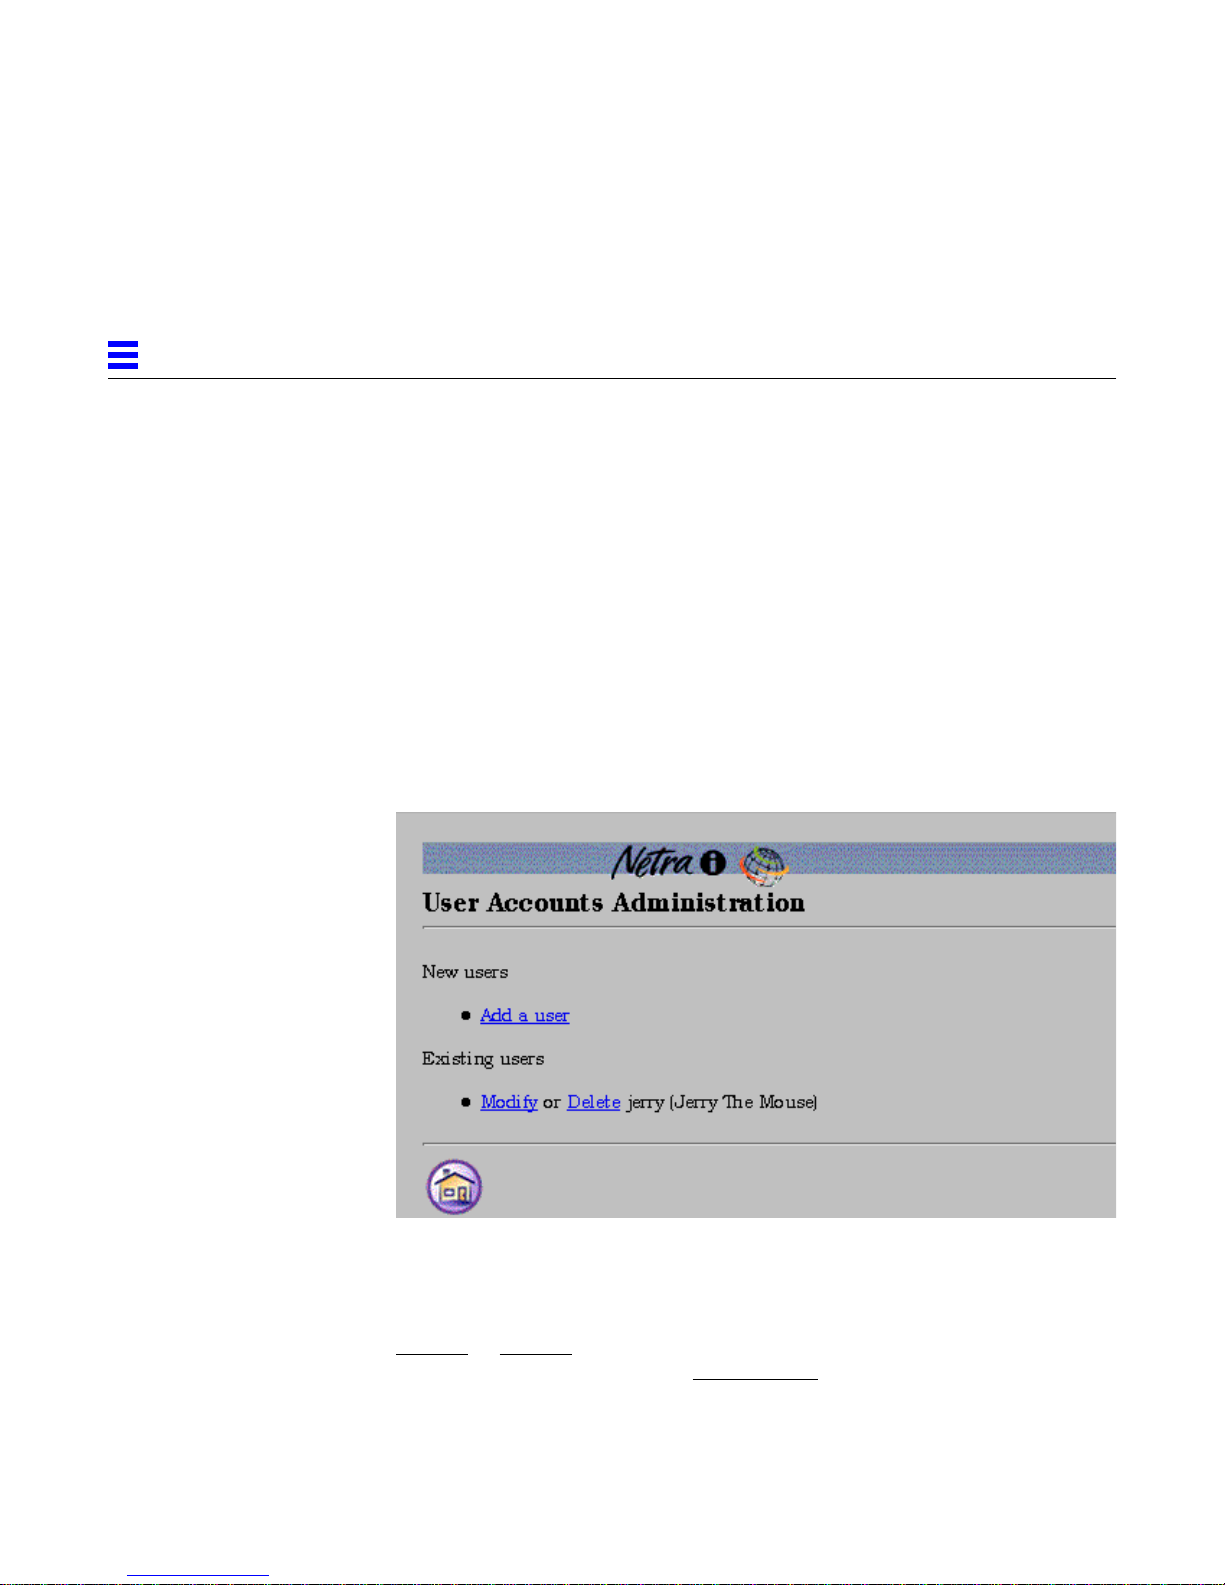
Navigation Page
A navigation page is used to select tasks. You select a task by clicking on the
link (displayed as an underlined word or term). When you follow a link, you
never change the state of the system.
Some navigation pages are dynamic: they display only the options that are
available on your particular Netra system. If you enter information that
changes the available options, these navigation pages will reflect the changes.
Figure 3-1 shows a navigation page for the User Accounts module.
Figure 3-1 Navigation Page
The example in Figure 3-1 shows that there is one account on the Netra server:
Jerry The Mouse. You can change or remove this account by selecting the
Modify or Delete links, or you can add a new account. Note that if no
accounts were defined, only the Add a user link would be displayed.
3-2 Netra Internet Server 3.1 User’s Manual—September 1996
Page 33

3
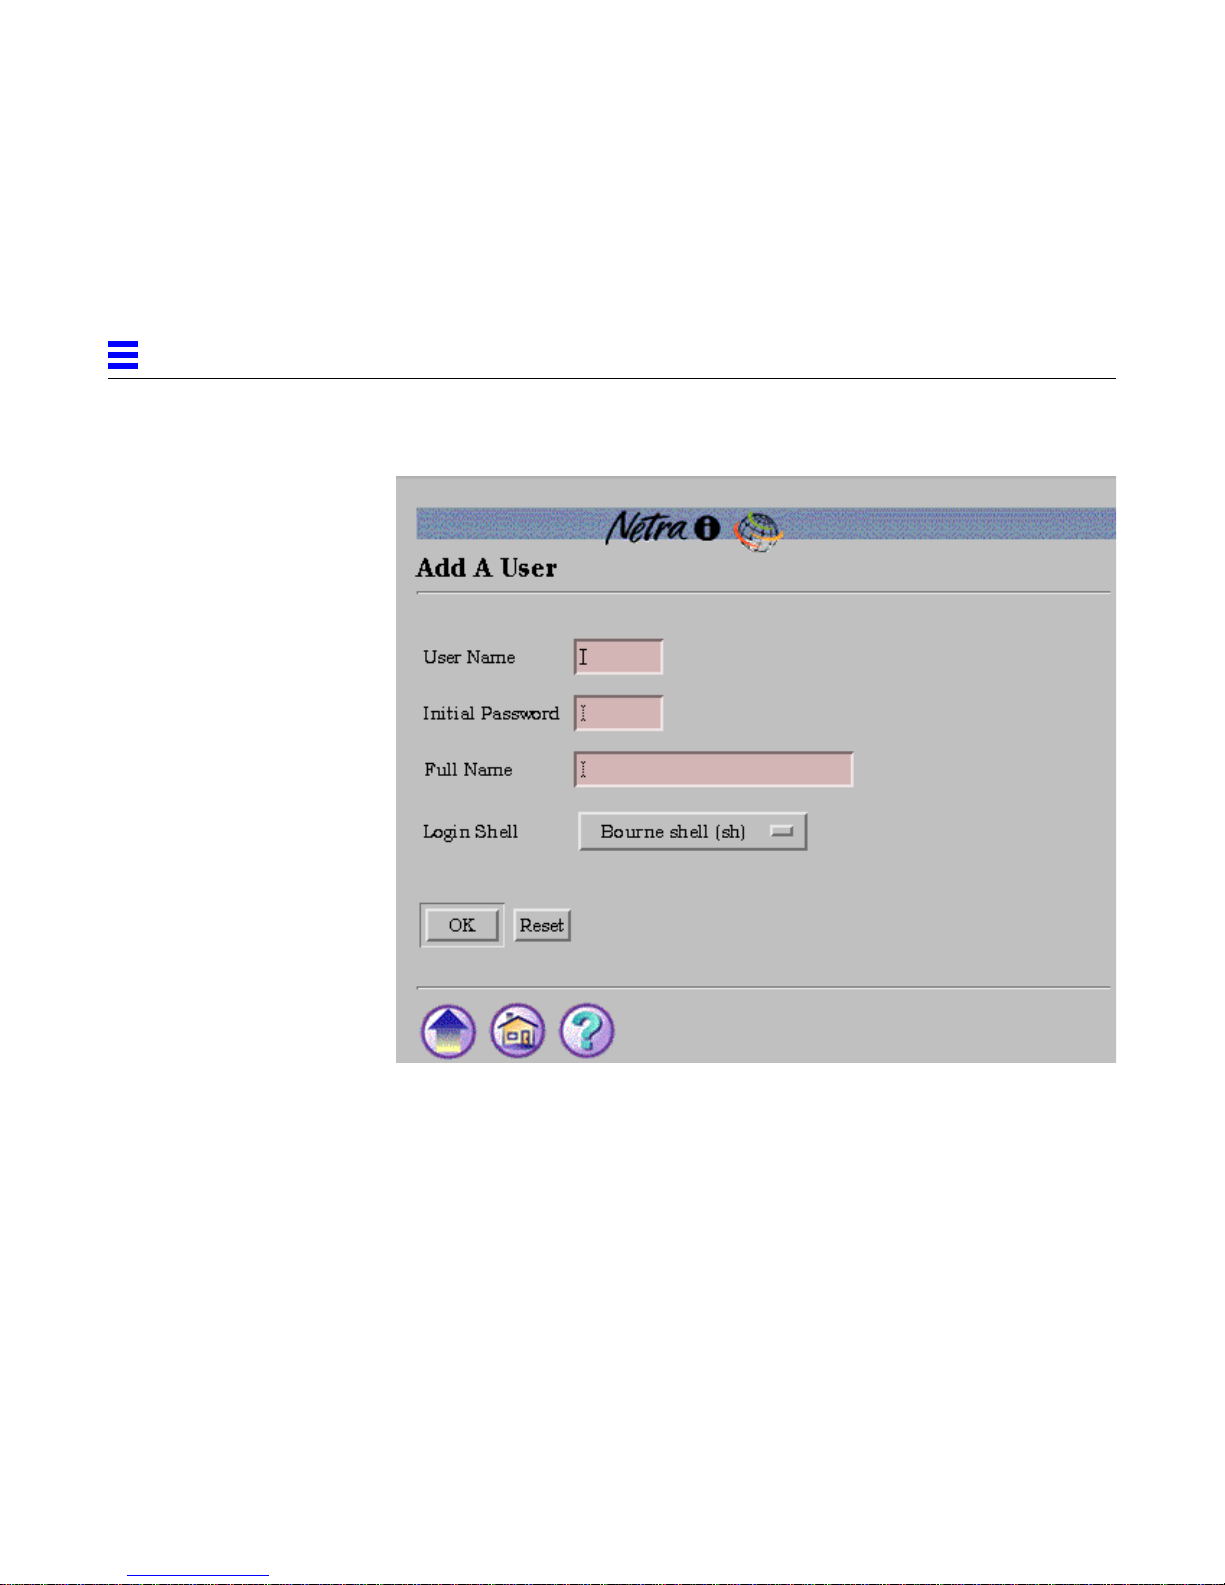
Task Page
A task page is also called a form. There are two types of forms: regular and
special.
Regular forms provide the only way to change the system state. When a form
is displayed, the values in the fields are either current or default values. You
can enter information in a regular form by typing it into the text boxes or by
choosing the radio button options.
Regular forms have an OK button. If you enter or change information in such a
form, you must click the OK button to activate the changes and change the
system state.
Some forms also have a Reset button. If you want to discard your changes, use
the Reset button to return fields to their previous values.
The user-input elements in a form are described in Table 3-1.
Table 3-1 User Input Elements
Element Description
Text Box Accepts one line of text input.
Text Area Accepts multiple lines of text input.
Radio Buttons A group of one or more buttons, only one of which can be selected.
Click on a radio button to select it. This will de-select any other
selected radio button in its group. The only way to de-select a radio
button is to select another one.
Check Box Selects an option. Click on the button to change its state.
Pop-up Menu A list of options displayed in a menu. Only one option can be
selected. The selected item is shown. Click and hold on the menu to
display the list of options. Release over a new option to select it.
Scrolling List A list of options displayed in a window. Click on an option to select
it. Scrolling lists can allow multiple selections.
Understanding the Netra User Interface 3-3
Page 34
3
Figure 3-2 shows a form for the User Accounts module.
Figure 3-2 Task Page (form)
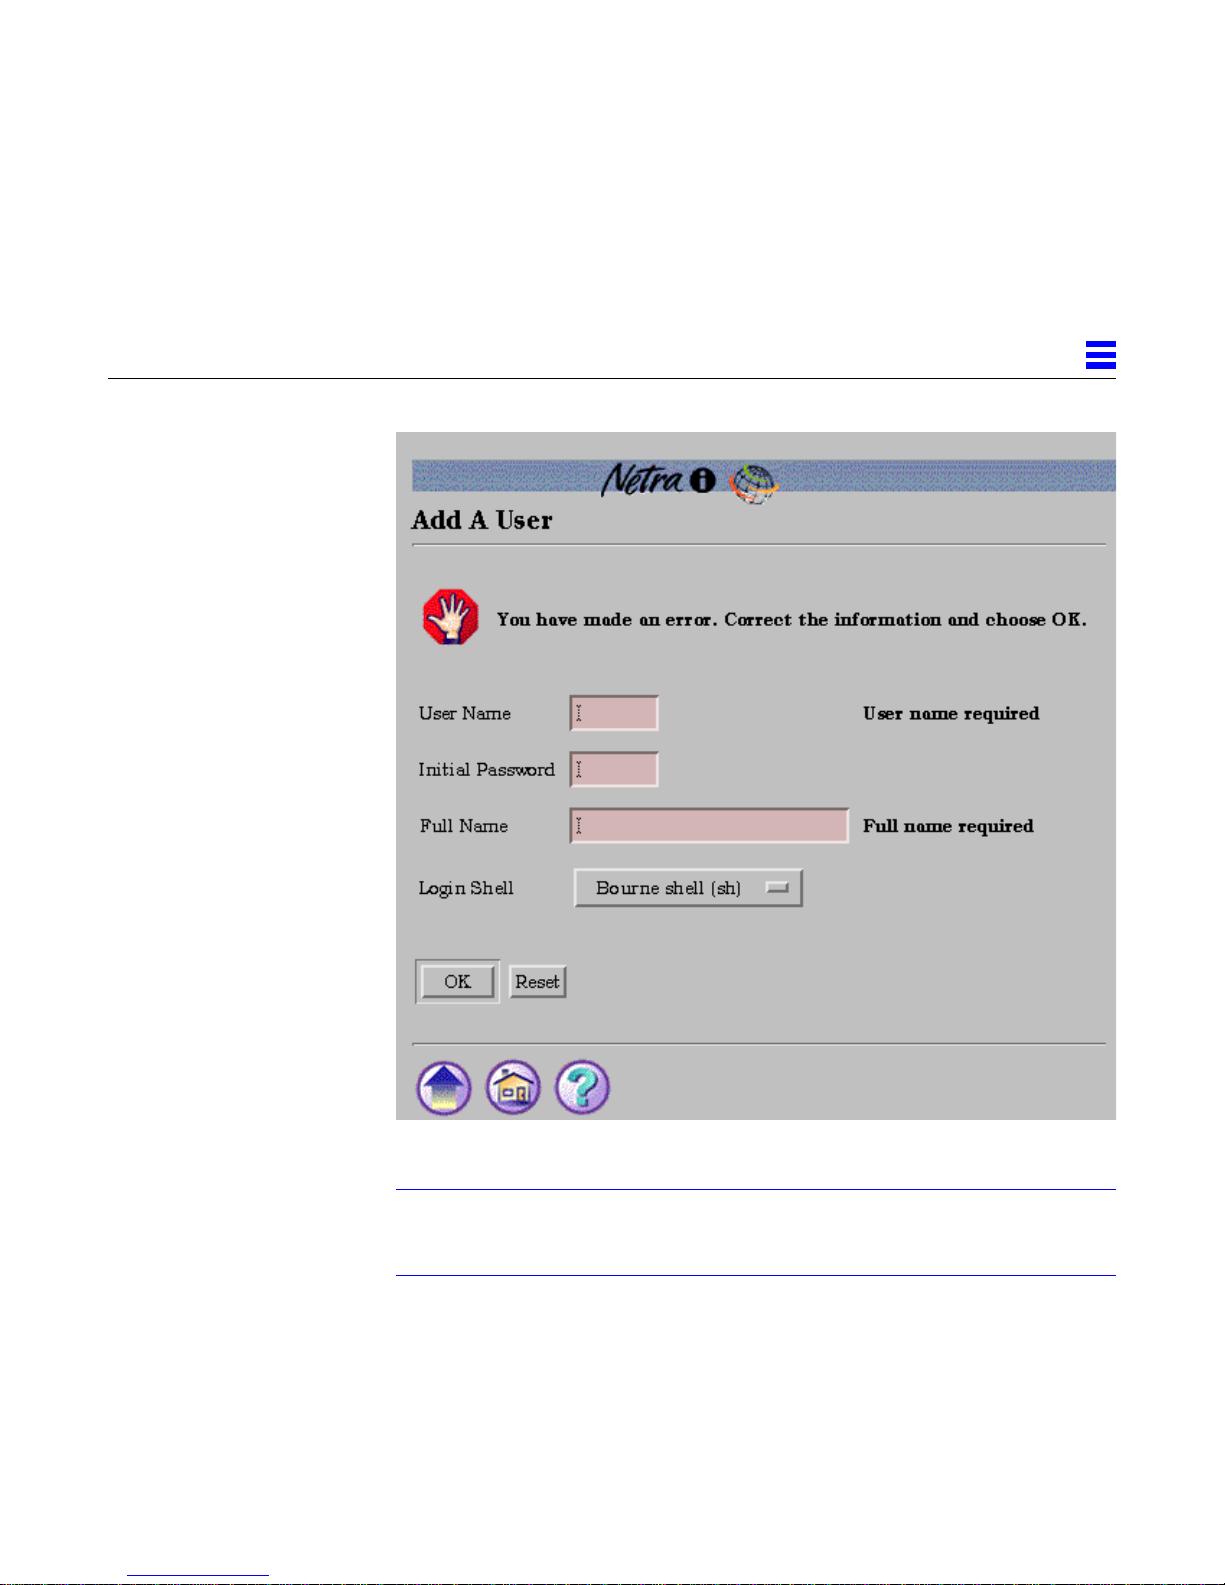
Special forms are based on regular forms. There are two types of special forms:
an Error form and a Verify form.
• An error form does not change the system state. It displays an error icon,
3-4 Netra Internet Server 3.1 User’s Manual—September 1996
and allows you to correct the error and re-enter information in a form.
Errors are marked on the form, alongside the relevant field.
Figure 3-3 shows an Error form for the User Accounts module.
Page 35
3
Figure 3-3 Error Form
Note – If the information you enter in a form produces an error, the system
state is not changed. The form is re-displayed with the erroneous data. You
must correct the data.
Understanding the Netra User Interface 3-5
Page 36
3
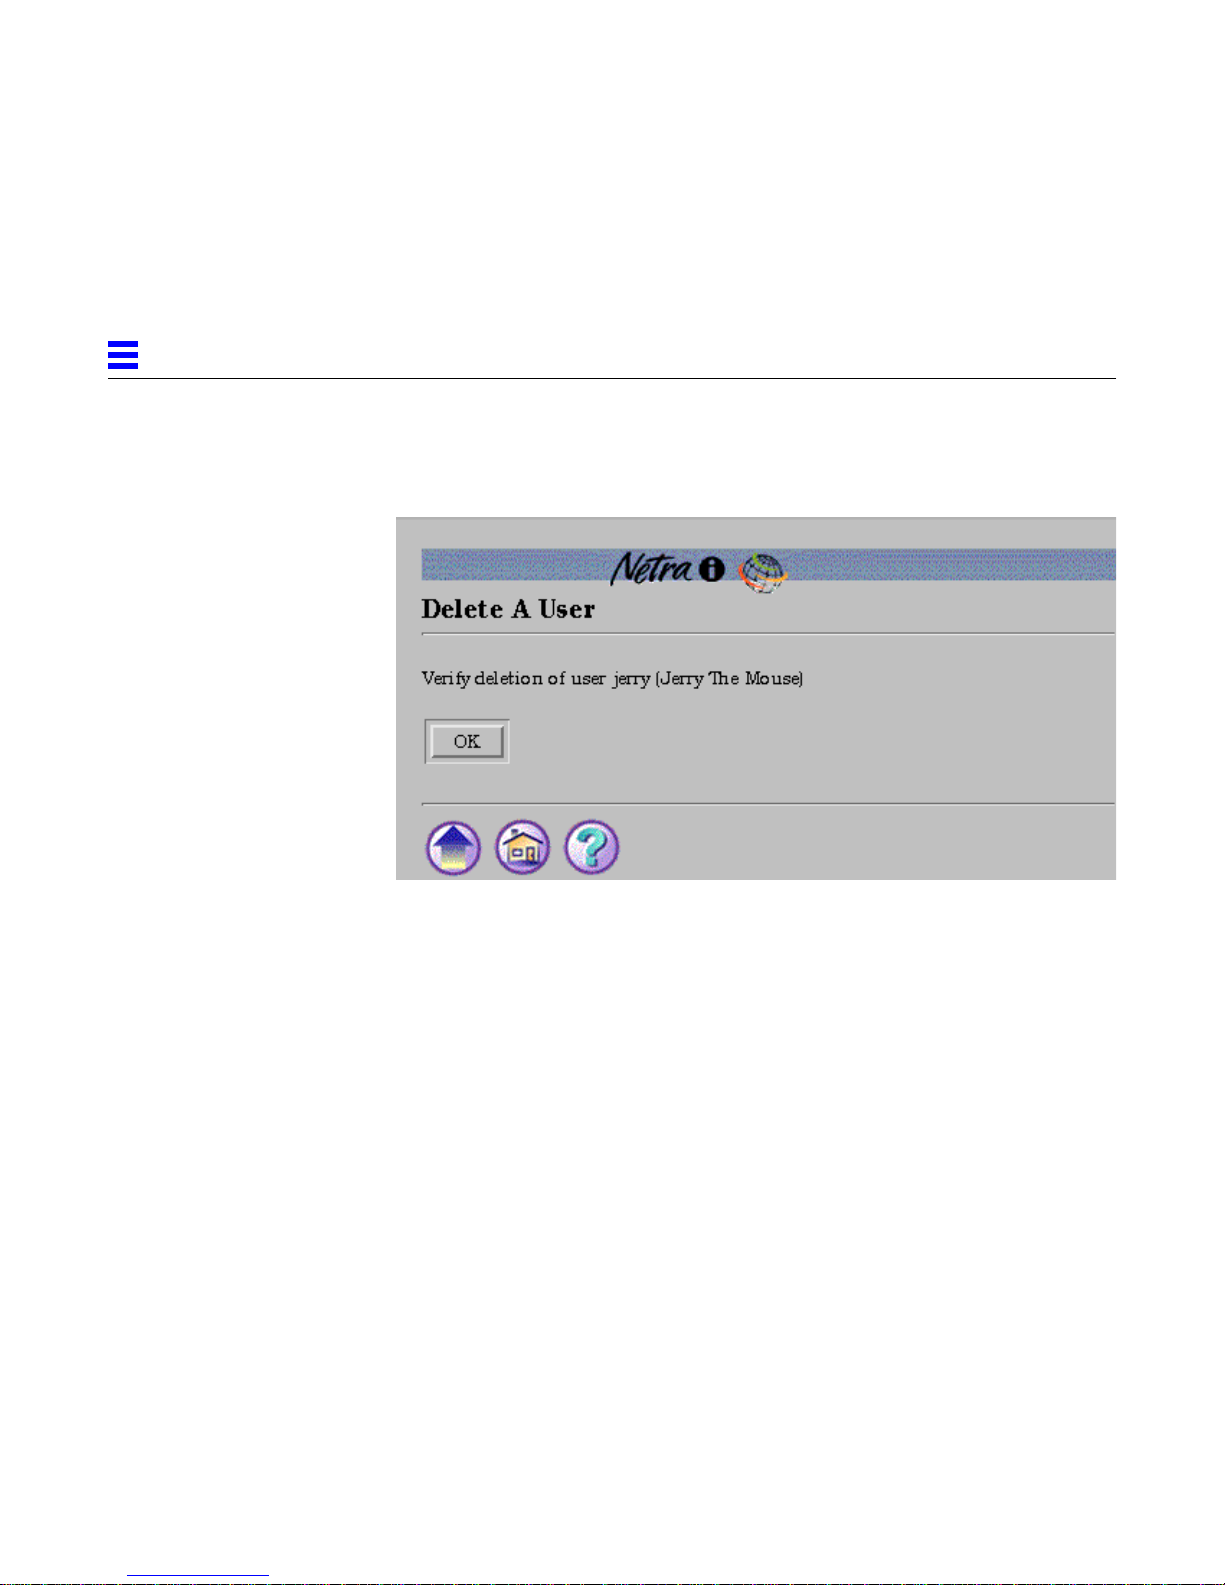
• In a Verify form, you only confirm a previous choice.
Figure 3-4 shows a Verify form for the User Accounts module.
Figure 3-4 Verify Form
Help Page
The Netra user interface also provides Help pages that contain the information
you need to fill out a form. All forms have a help icon. Some Help pages use
terms that are linked to the glossary. To return to the related form from a Help
page, use the back arrow icon described in Table 3-2.
Figure 3-5 shows a Help page for the User Accounts module.
3-6 Netra Internet Server 3.1 User’s Manual—September 1996
Page 37

3
Figure 3-5 Help Page
Note – If you enter information in a form and go to the corresponding Help
page before submitting the form, you will lose all the information you entered.
The form will display current or default values. If your browser supports it,
use a second browser window to view Help pages.
Glossary Page
The Glossary page is accessed using links in the Help pages of a module. When
you select a term that is a link, the term and its explanation are displayed at
the top of the Glossary page. The Glossary page is displayed in a scrolling
window. To return to the Help page, use the back arrow icon.
Understanding the Netra User Interface 3-7
Page 38
3
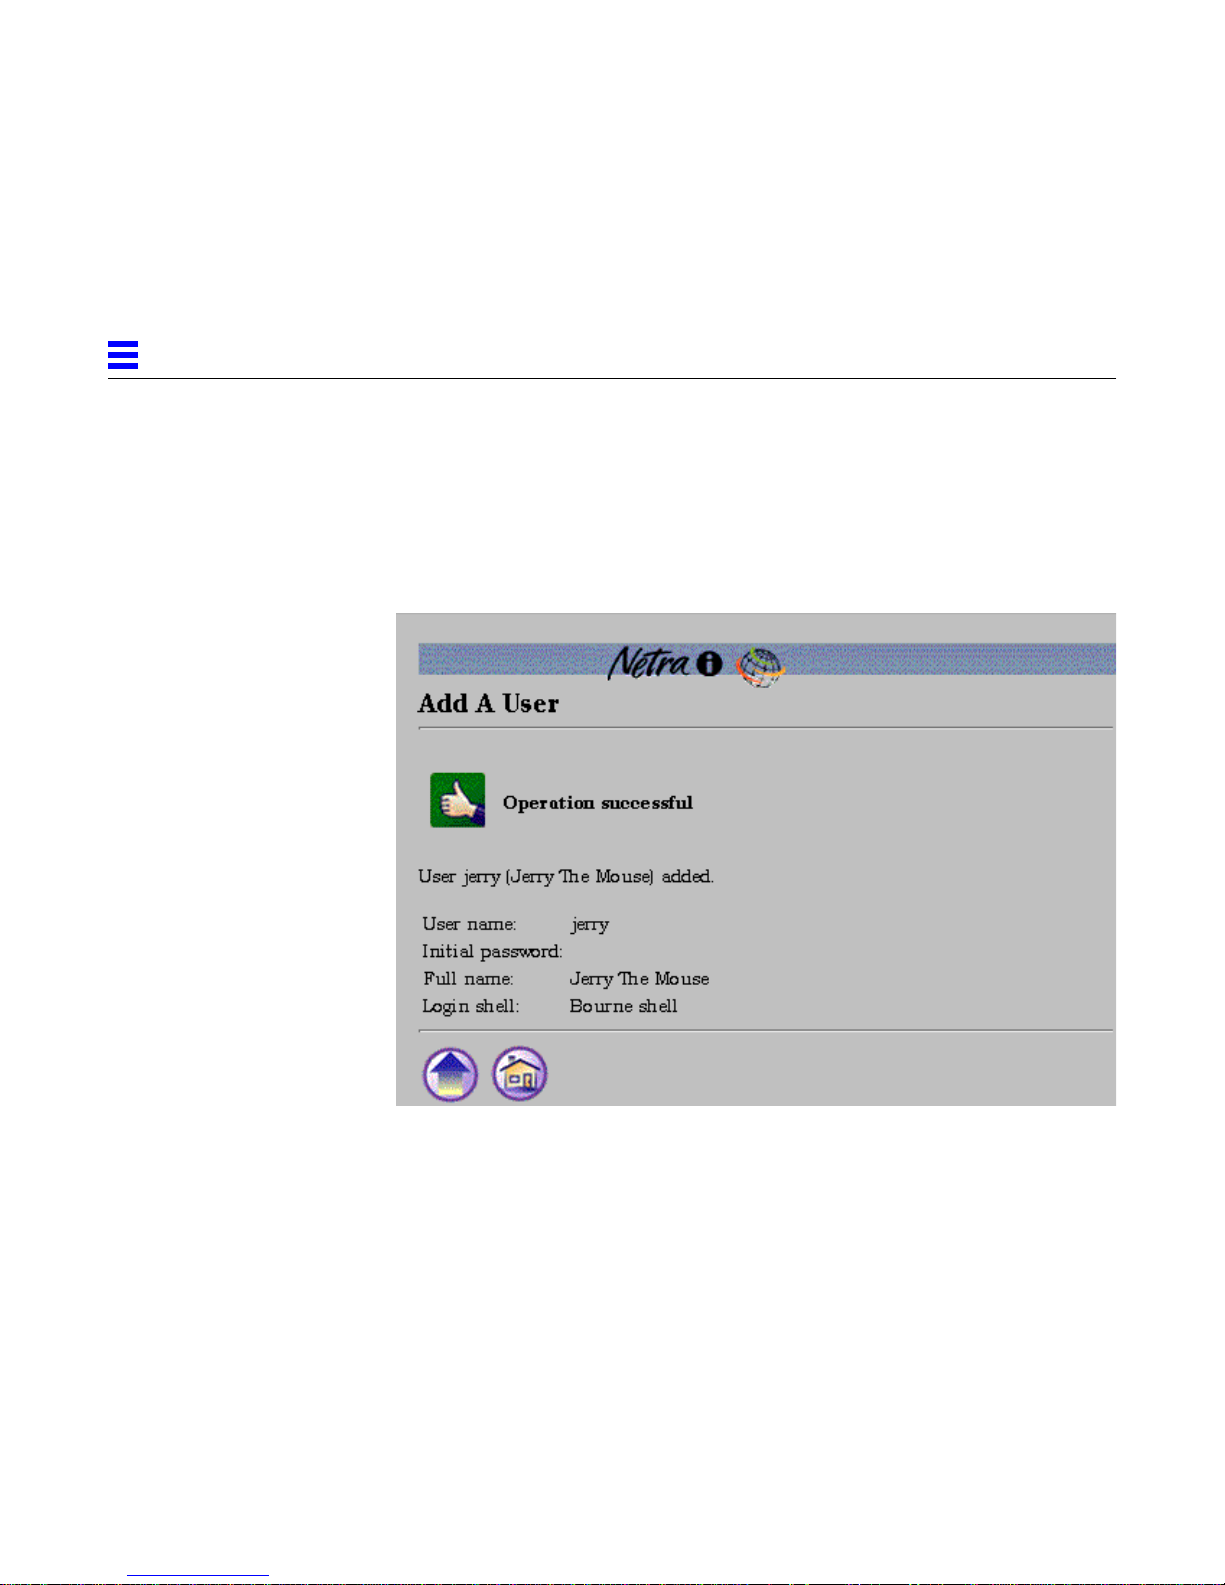
Status Page
A Status page is displayed once you have filled out all the forms for a task. It
can contain either a success icon or an information icon. A Status page
confirms that the system state has changed.
Figure 3-6 shows a Success page for the User Accounts module.
Figure 3-6 Success Page
3-8 Netra Internet Server 3.1 User’s Manual—September 1996
Page 39
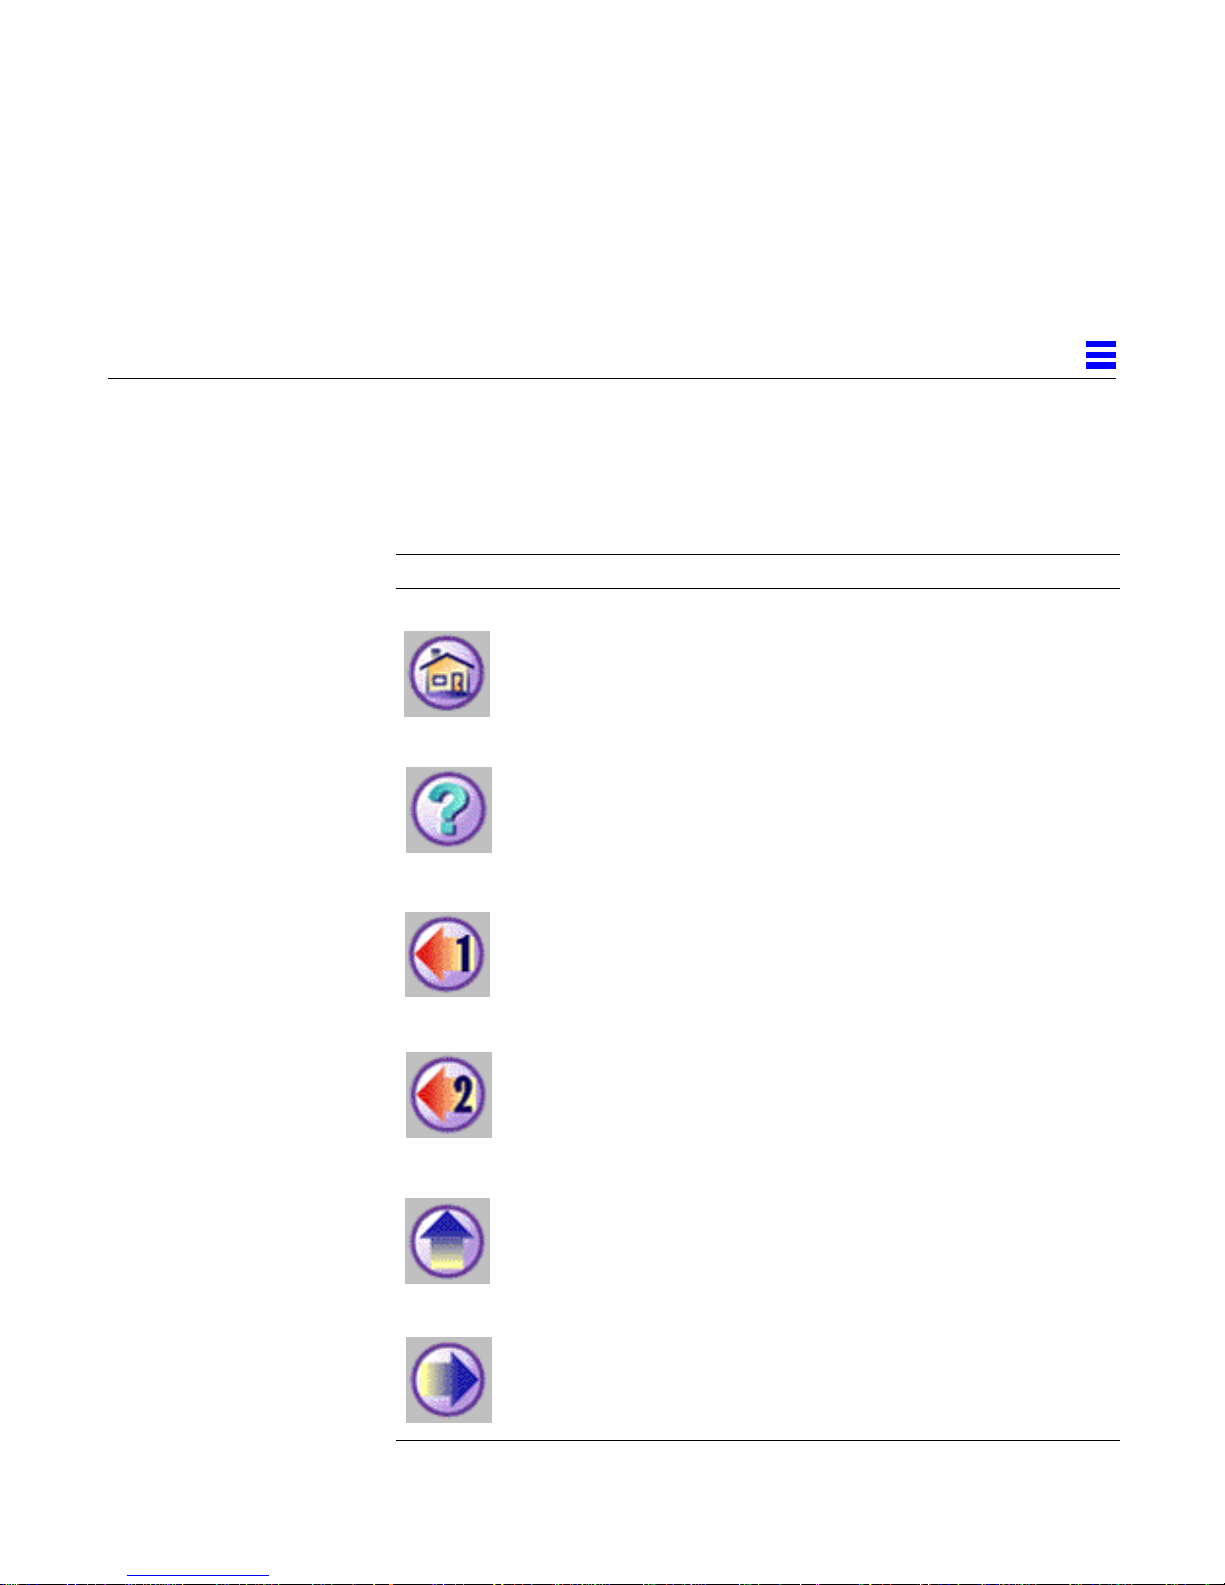
Navigation Icons
Every administration page has some or all of the following icons:
Table 3-2 Netra Navigation Icons
Icon Description
3
Home icon. Returns to the Netra Main Administration page.
(Selecting the banner will also do this.)
The Help icon. Contains explanations of fields in the related form.
Back Arrow icon. Goes back 1 navigation page. (Forms are skipped.)
Understanding the Netra User Interface 3-9
Back Arrow icon. Goes back 2 navigation pages. (Forms are skipped.)
Top of Module icon. Returns to a module’s top-level page.
Forward Arrow icon. Continues to the next configuration task.
Page 40

3
Information Icons
The following icons may be displayed while a task is being completed.
Table 3-3 Netra Information Icons
Icon Description
Information icon. Calls attention to important messages in response to
submitting a form. The message indicates the status of the operation.
Error icon. Calls attention to errors in form entries.
Success icon. Shows that a task has been completed successfully.
3-10 Netra Internet Server 3.1 User’s Manual—September 1996
Page 41

Accessing the Netra Administration Framework
The HTML-based Netra administration framework is accessed through a
dedicated administration Web server. To access this framework, you must use a
Web browser and provide a user name and password. Two methods are
described below.
▼ Using a Netra Server with a Monitor
1. Power on the Netra server.
2. At the console prompt, log in as the user setup.
3. Enter setup for the password.
A window system and a browser are started. The browser is configured to
access the Netra administration framework.
You are now required to authenticate the browser connection.
4. Enter setup for the User ID and setup for the Password.
The Netra Welcome page is displayed.
3
5. In the Netra Welcome page, select Administration.
The Main Administration page is displayed.
Understanding the Netra User Interface 3-11
Page 42

3
▼ Using a Client on the Network
1. Start a browser on the client system.
2. Open the following URL:
http://netra:81
where netra is the host name or host address for your Netra server. The
Netra password screen is displayed.
3. Enter setup for the User ID and setup for the Password.
The Netra Welcome page is displayed.
4. In the Netra Welcome page, select Administration.
The Main Administration page is displayed.
3-12 Netra Internet Server 3.1 User’s Manual—September 1996
Page 43

Performing the Initial
Configuration
Before you can use the Netra server for any administration tasks, you must
configure it with information that is specific to your site. This chapter describes
the options for performing the initial configuration.
Options for Initial Configuration
You have two choices when performing the initial configuration:
• If you have a monitor for the Netra server, you can perform the initial
configuration using the monitor. (See page 4-2.)
• If you do not have a monitor, you must perform the initial configuration
using a PC on the LAN. (See page 4-6.)
Note – Another, less-used configuration option is described in Appendix C,
“Initial Configuration Using TTY.” If you do not have a monitor for the Netra
server, you can also connect a TTY terminal to it and complete the initial
configuration using a browser on a client system.
4
4-1
Page 44

4
Using a Monitor for Initial Configuration
▼ To Prepare for Configuration
1. Physically connect the Netra server to the LAN, and attach the monitor
and keyboard. (Refer to your Netra hardware installation manual for
instructions.)
2. Obtain the following configuration information for your site:
• System Defaults (See Chapter 19, “Netra System Administration.”)
• Host name for your Netra server (See Chapter 19, “Netra System
Administration.”)
• System administrator alias members (See Chapter 19, “Netra System
Administration.”)
• Root password (See Chapter 18, “Root Password Administration.”)
• Administration Web Server password (See Chapter 15, “Administration Web
Server.”)
• LAN interface information: host address and netmask for a TCP/IP
network, or network number and frame type for an SPX/IPX network.
(See Chapter 12, “Local Area Network Administration.”)
▼ To Log In to the Netra Server
1. Power on the Netra server.
2. At the NewNetra console login prompt, enter setup.
3. At the Password prompt, enter setup again.
4. Enter setup for the User ID; then enter setup for the Password.
4-2 Netra Internet Server 3.1 User’s Manual—September 1996
Note that an unconfigured Netra server uses the name NewNetra.
The Netscape browser is automatically started on your system, and a
Netscape Password window is displayed.
The Netra Welcome page is displayed.
Page 45

▼ To Perform the Initial Configuration
1. Select the Administration option.
The Initial Configuration page is displayed. The required administration
modules are displayed in the order in which they should be configured. Two
optional tasks are also displayed.
2. If you want to install a localized version of your Netra software, perform
the following tasks; if not, proceed to Step 3.
a. Select the Install localized Netra software option.
The Software Management Administration page is displayed.
b. Insert the localization CD-ROM in the Netra CD-ROM drive.
c. Select the Select new installation medium option.
d. Select CD-ROM as the installation medium.
e. Select Install: Clusters.
The Installing Clusters page is displayed with a pair of clusters (required
and optional) for each locale. For example, the localized software for
Japan is contained in the Required Japanese Netra Software and
Optional Japanese Netra Software clusters.
4
f. Select the two clusters for your locale.
You must install the Required cluster. The Optional cluster is
necessary only if you want to install additional Solaris software.
g. Once you install the locale-specific clusters, return to the Initial
Configuration page.
3. Select the highlighted System Defaults option.
The System Defaults Administration page is displayed with the current
time, date, time zone, and default locale.
4. If necessary, enter a new time and date using the displayed format.
5. If necessary, select a new default system time zone from the scrolling list.
6. If you have installed localized Netra software, select a new default system
locale from the scrolling list; if not, proceed to Step 7.
7. Use the Forward Arrow icon to go directly to the next configuration task.
Performing the Initial Configuration 4-3
Page 46

4
8. Select the highlighted Host Name option.
The Host Name Administration page is displayed.
9. Enter the name for the Netra server.
A message saying the Netra server needs to be restarted is displayed. You
can restart the Netra server once you finish configuring it.
Note – If you choose to restart the Netra server immediately, you must repeat
the initial login sequence (notice that the new host name is used) to bring you
to the Initial Configuration page. At this point, the Host Name option will not
be shown as one of the remaining configuration tasks. Proceed to the next
administration module.
10. Use the Forward Arrow icon to go to the next configuration task.
11. Complete the System Administrator Alias, Root Password,
Administration Web Server, and Local Area Network configuration tasks.
Note – If you change the Administration Web Server password, you must
reauthenticate the browser connection.
12. Use the Forward Arrow icon to go to the Main Administration page.
The Main Administration page is displayed.
▼ To Complete the Configuration
1. Use the displayed modules to perform any further system configuration
tasks (such as setting up mail aliases, configuring a name service, or
setting routing options).
Refer to the relevant chapters in this manual for more information on each
administration module.
2. Once the Netra server is completely configured, save the configuration
information as follows:
a. Insert a blank diskette into the Netra disk drive.
If you do not have a diskette drive on your Netra server, proceed to
Step b.
b. Select System Administration: Save and Restore Configuration.
4-4 Netra Internet Server 3.1 User’s Manual—September 1996
Page 47

4
c. If you are saving your configuration to diskette, select Save
configuration to diskette; if not, select Save configuration to file
system.
3. If you did not restart the Netra server after entering the host name, do the
following:
a. Select System Administration: Restart and Shutdown.
The Restart snd Shutdown Administration page is displayed:
b. Select the Restart option.
Your Netra server will be restarted with the new configuration.
Performing the Initial Configuration 4-5
Page 48

4
Using a PC for Initial Configuration
Using a PC on the LAN for the initial configuration requires the following
general tasks:
• Creating a partial configuration diskette using the Utilities diskette that was
shipped with your Netra system.
• Connecting the Netra server to the LAN, insert the partial configuration
diskette, and power on the Netra server.
• Using a client on the LAN to complete the initial configuration.
These processes are described in detail in the following sections.
▼ To Prepare for Configuration
1. If you have a Novell network, install the IPX Gateway software on each
PC on the LAN (see Chapter 2, “Client System Requirements”).
2. Obtain the following configuration information for your site:
• System Defaults (see Chapter 19, “Netra System Administration.”)
• Host name for your Netra server (See Chapter 19, “Netra System
Administration.”)
• Type of network interface card, Ethernet port, and network protocol
• LAN interface information: host address and netmask for a TCP/IP
network, or network number and frame type for an SPX/IPX network
(See Chapter 12, “Local Area Network Administration.”)
• System administrator alias members (See Chapter 19, “Netra System
Administration.”)
• Root password (See Chapter 18, “Root Password Administration.”)
• Administration Web Server password (See Chapter 15, “Administration Web
Server.”)
4-6 Netra Internet Server 3.1 User’s Manual—September 1996
Page 49
▼ To Create a Partial Configuration Diskette
1. Insert the Utilities diskette into the PC diskette drive.
2. Access drive A:
c:\ a:
3. Run the following program:
a:\ config
The following is displayed:
This program generates a configuration file
for the local area network interface.
Values shown in square brackets are the default values.
4. Enter the name of the Netra server.
4
Enter the Host Name for the Netra Server:
5. Enter the number that corresponds to the network interface in your server:
The following interfaces may be available on your Netra server:
1) Lance Ethernet
2) Quad Ethernet
3) Fast Ethernet
4) Token Ring
5) Fast Ethernet 100baseT
Enter the number corresponding to the interface
to be configured [1]:
Performing the Initial Configuration 4-7
Page 50
4
6. Enter the Ethernet port that you are using to connect the Netra server to
the local area network:
Which port are you using on the Netra to connect to the local area
network? [0]:
7. Enter the number corresponding to the type of network you have:
The following types of networks are available:
1) TCP/IP
2) Novell (SPX/IPX)
Enter the number corresponding to the network type [1]:
8. Now enter information for your network type as follows:
• If you typed 1 for a TCP/IP network:
a. Enter the Netra server ’s local area network host address:
Enter the local area network host address for the
Netra server:
Enter the local area network netmask for the
Netra server [255.255.255.0]:
• If you typed 2, for a Novell (SPX/IPX) network:
Enter the IPX network number in hexadecimal format:
4-8 Netra Internet Server 3.1 User’s Manual—September 1996
b. Enter the netmask:
The information you entered is saved on the diskette. This diskette now
contains partial configuration information for your Netra server.
c. Go to Step 9.
a. Enter the IPX network number:
See Chapter 11 for more information on SPX/IPX network numbers and
frame types.
Page 51
4
b. Enter the number for the frame type you are using:
The following frame types are available:
1) Ethernet_802.2
2) Ethernet_802.3
3) Ethernet_II
4) Ethernet_snap
Enter the number corresponding to the frame type being used [1]:
The information you entered is saved on the diskette. This diskette now
contains partial configuration information for your Netra server.
9. Eject the diskette from the drive.
10. Make sure your Netra server is connected to the LAN.
Refer to your Netra hardware installation manual for this procedure.
11. Insert the diskette with partial configuration information in the Netra
diskette drive.
12. Power on the Netra server.
▼ To Complete the Initial Configuration
1. Start a browser on a client PC on the LAN.
2. Open the following URL in the browser:
• If you have a TCP/IP network, open:
http://netra_host_address:81
• If you have an SPX/IPX network, open:
http://hostname:81
A password window is displayed.
Performing the Initial Configuration 4-9
Page 52

4
3. Enter setup for the User ID; then enter setup for the Password.
The Netra Welcome page is displayed.
4. Select the Administration option.
The Initial Configuration page is displayed with the remaining
configuration tasks.
5. If you want to install a localized version of your Netra software, perform
the following tasks; if not, proceed to Step 6.
a. Select the Install localized Netra software option.
The Software Management Administration page is displayed.
b. Insert the localization CD-ROM in the Netra CD-ROM drive.
c. Select the Select new installation medium option.
d. Select CD-ROM as the installation medium.
e. Select Install: Clusters.
The Installing Clusters page is displayed with a pair of clusters (required
and optional) for each locale. For example, the localized software for
Japan is contained in the Required Japanese Netra Software and
Optional Japanese Netra Software clusters.
f. Select the two clusters for your locale.
You must install the Required cluster. The Optional cluster is
necessary only if you want to install additional Solaris software.
g. Once you install the locale-specific clusters, return to the Initial
Configuration page.
6. Select the highlighted System Defaults option.
The System Defaults Administration page is displayed with the current
time, date, time zone, and default locale.
7. If necessary, enter a new time and date using the displayed format.
8. If necessary, select a new default system time zone from the scrolling list.
9. If you have installed localized Netra software, select a new default system
locale from the scrolling list; if not, proceed to Step 10.
10. Use the Forward Arrow icon to go directly to the next configuration task.
4-10 Netra Internet Server 3.1 User’s Manual—September 1996
Page 53

11. Select the System Administrator Alias option.
12. Enter the mail addresses of the alias members.
13. Complete the Root Password and Administration Web Server
configuration tasks.
Note – If you change the Administration Web Server password, you must
reauthenticate the browser connection.
14. Use the Forward Arrow icon to go to the Main Administration page.
The Main Administration page is displayed.
▼ To Complete Other Configuration Tasks
1. Use the displayed modules to perform any further system configuration
tasks (such as setting up mail aliases, configuring a name service, or
setting routing options).
Refer to the relevant chapters in this manual for more information on each
administration module.
4
2. Once the Netra server is completely configured, save the configuration
information as follows:
a. Insert a blank diskette into the Netra disk drive.
If you do not have a diskette drive on your Netra server, proceed to
Step b.
b. Select System Administration: Save and Restore Configuration.
c. If you are saving your configuration to diskette, select Save
configuration to diskette.
If not, select Save configuration to file system.
Performing the Initial Configuration 4-11
Page 54

4
4-12 Netra Internet Server 3.1 User’s Manual—September 1996
Page 55

Part 2 — Network Services
Administration
The chapters in Part 2 describe the Netra server ’s Network Services
Administration modules.
• Chapter 5, “Anonymous FTP Administration,” describes how to configure
the Netra server as an anonymous FTP server.
• Chapter 6, “Mail Administration,” describes how to set up mail aliases and
return addresses.
• Chapter 7, “Name Service Administration,” describes how to use the Local
name service, Network Information Service, and Domain Name Service for
name resolution.
• Chapter 8, “Netscape Enterprise Server Administration,” describes how to
configure a Netscape Web Server.
Page 56

Page 57

Anonymous FTP Administration
File Transfer Protocol (FTP) enables a user to copy files from one computer to
another over a network. The user runs an FTP client program on one computer
and connects to the FTP server running on the other computer. To use FTP, a
user must have a valid login account on the server.
Anonymous FTP allows users who do not have accounts on a server to access
files on that server. The server can be configured to allow either read-only
access or read and write access.
Use the Anonymous FTP module to configure your Netra server as an
anonymous FTP server. This module allocates disk space for files that can be
accessed by anonymous users. The anonymous FTP server can be in one of
three configuration states:
5
• Enable anonymous FTP with upload and download capability:
Anonymous users can connect to the Netra server and copy files both to and
from the server.
• Enable anonymous FTP with upload capability only: Anonymous users
can connect to the Netra server and copy files from the server but not to the
server.
• Disable anonymous FTP: Anonymous users cannot connect to the Netra
server.
5-1
Page 58

5
Place all files that can be accessed from the server in the /export/ftp/pub
directory. Anonymous FTP users will see this directory as /pub. If the server is
configured with upload capability, anonymous users will be able to copy files
to the /export/ftp/incoming directory. FTP users will see this directory as
/incoming.
The Anonymous FTP administration module displays the current
configuration state of your Netra server. If you want to change this state, use
the radio buttons to select one of the other two configuration options.
▼ To Configure Anonymous FTP
1. Select Network Services Administration: Anonymous FTP.
The Anonymous FTP Administration page, with the current state of the
server, is displayed.
2. Enter the information in the form using Table 5-1.
Table 5-1 Information for Anonymous FTP
Enable anonymous FTP
with upload and
download capability
Enable anonymous FTP
with upload capability
only
Disable anonymous FTP Only users with valid user accounts on the Netra server
Anyone can connect to the Netra server using FTP.
A user can copy files from the /export/ftp/pub
directory on the Netra server to the user machine and
from the user machine to the /export/ftp/incoming
directory on the Netra server.
•Files for download should be placed in the
/export/ftp/pub directory by the root user.
Anyone can connect to the Netra server using FTP.
A user can only copy files from the /export/ftp/pub
directory on the Netra server to the user machine.
•Files for download should be placed in the
/export/ftp/pub directory by the root user.
can connect to it using FTP.
5-2 Netra Internet Server 3.1 User’s Manual—September 1996
Page 59

Mail Return Address
Mail Administration
The Netra server is configured to be a mail gateway between clients on your
LAN and the Internet. The Mail module is used to set the return address on
outgoing mail and to administer mail aliases.
Note – For mail services to work correctly, your name service must have an
entry for each network interface on the Netra server.
The mail return address is set for all mail originating on the Netra server. You
have the option of including the Netra server host name in the return address.
For example, suppose your Netra server ’s host name is stimpy, and your
domain (set by the Name Service module) is tv.net (see Figure 1-1 in
Chapter 1, “Overview”). The possible return addresses for mail sent by the
user setup on stimpy.tv.net are:
6
• setup@stimpy.tv.net
• setup@tv.net
If the second return address (stimpy@tv.net) is used, then the DNS database
must have a mail address record. If the Netra server is acting as your primary
DNS server, this record can be added in the Mail Servers field, as follows:
Mail Address: tv.net; Preference: 1; Mail Servers: stimpy. (See Chapter
7, Name Service Administration, for more information on DNS databases and
servers.)
6-1
Page 60

6
Mail Aliases
Mail aliases are used to redirect mail that is sent to one or more mail addresses.
Aliases are used for any mail that is sent to the Netra server, including mail
sent from local clients and mail sent from the Internet. Two useful ways to use
aliases are: (i) to send mail to a group of users (group aliases) and (ii) to
redirect mail for single users (personal aliases).
Group Aliases
Group aliases generally have more than one member. For example, suppose the
members of a volleyball team are on an alias called vball. If mail is sent to the
vball alias, each member of the team will receive a copy of that mail. The
sender does not have to know each team member ’s mail address or even who
is on the team.
Personal Aliases
Personal aliases usually have only a single member. Such aliases redirect mail
to either a different user or to the same user on a different machine. For
example, if user Tom wants his mail sent to his personal machine, grover, add
a personal alias for Tom (with the user name tom) to the Netra server. The alias
will contain one member: tom@grover. The name of the alias will be the same
as Tom’s user name (that is, tom).
To send mail to an alias, address the mail as if it were going to any user on the
Netra server. Thus, if you send mail to vball@stimpy.tv.net, it will reach
the members of the volleyball team. If you send mail to tom@stimpy.tv.net,
it will go to tom@grover.tv.net.
Alias members must be valid mail addresses on the Netra server. If a user
receives mail on the Netra server, then only the user name is required. If this
user receives mail on another host, then the user name and the host name
(username@hostname) must be used when specifying this user as an alias
member. You can also use a fully qualified host name.
An alias member list can also contain other aliases as members. This is helpful
if you want to circumvent the 1000-character limit on the alias member list.
6-2 Netra Internet Server 3.1 User’s Manual—September 1996
Page 61

Mail Procedures
Return Address
6
▼ To Modify the Mail Return Address
1. Select Network Services Administration: Mail ➤ Modify mail return
address.
The Mail Return Address Administration page, showing the return address
on mail sent from the Netra server, is displayed.
2. Make the changes in the form using Table 6-1.
Table 6-1 Information for Mail Administration
user@domain The return address on mail does not include the host name of the
Netra server.
user@host.domain The return address on mail includes the host name of the Netra
server.
Aliases
Note – If no aliases are defined, you will only see the Add a mail alias option.
The Modify or Delete options are only displayed after you add at least one
mail alias.
▼ To Create a Mail Alias
1. Select Network Services Administration: Mail ➤ Add a mail alias.
The Add A Mail Alias page is displayed.
2. Enter the information in the form using Table 6-2.
Mail Administration 6-3
Page 62

6
Table 6-2 Information for Mail Alias Administration
Alias Name The name of a mail alias. A copy of all mail sent to the alias is sent
to each member of the alias. Alias names:
•Must be at least one character and no more than 20 characters in
length
•Must begin with a letter, and may include letters, digits, hyphens,
underscores, and periods
•Are case insensitive
•Must be unique
Alias Members A list of users, one per line, who will receive mail sent to the alias.
•Each listed user must be a valid mail address. Valid alias members
who cannot be reached at configuration time are added to the alias,
but mail sent to that alias is returned to the sender.
•The maximum length of the alias member list is 1000 characters,
including implicit commas that are added between successive alias
members.
▼ To Modify or Delete a Mail Alias
1. Select Network Services Administration: Mail.
The Mail Administration page is displayed with a list of aliases.
2. Select one of the following options:
• To modify an existing alias, select Modify for the required alias, and make
the changes in the form using Table 6-2.
• To delete an alias, select Delete for the alias you want to remove; then
confirm your operation.
6-4 Netra Internet Server 3.1 User’s Manual—September 1996
Page 63

Name Service Administration
Every machine on a network must have a unique identifier to distinguish itself
from other machines on the network. This is also true for all machines on the
Internet. Thus, every machine is given a host address. A host address has the
form 129.144.79.5, where each of the four numbers separated by periods can be
in the range of 0 to 255. Such addresses are hard to memorize, so each machine
is also given a host name that is associated with its host address. Users
generally use a host name, such as stimpy@tv.net, to access a specific
machine on a given network.
The process by which a host name is associated with or translated to its host
address is called name resolution. It is usually performed by a name service.
Name Services on the Netra Server
The Netra server provides three types of name services:
• Local name service: Translation is done locally (by looking up the name in a
file)
• Network Information Service (NIS): Translation is done by an NIS server
(running on another host)
7
• Domain Name Service (DNS): Translation is provided by a DNS server
(running either on the Netra server or on another host)
7-1
Page 64

7
The Netra server can use any or all of the name services at the same time. If
you decide to use more than one name service, they are tried in the following
order: local name service, NIS, DNS. For example, suppose your Netra server
is configured to use the local name service and DNS. When a name service
query is made, the server attempts name resolution by looking up the host
name in the local database first. If the host name is found, the server returns
the host address. If not, the query is passed to the DNS server. If the DNS
server resolves the query, it returns the information, otherwise it returns “not
found”.
Local Name Service
The local name service provides a local database that associates the names of
hosts with their host addresses. This name service is only available to
programs running on the Netra server.
Network Information Service
The NIS name service provides information about the local network. This
information can include more than host names and addresses (such as users
and passwords). However, the Netra server can only use NIS for host names,
host aliases, and host addresses.
Domain Name Service
DNS gives different groups responsibility for subsets of names. Each subset or
level is called a domain. At the top level of the DNS hierarchy are a small
number of large domains, such as com (for commercial organizations).
Individual organizations set up their own domains within these domains
(sun.com, oracle.com, stanford.edu). Domains, in turn, can have
subdomains. Domain names are requested from and registered by the Network
Information Center (NIC) for an annual fee.
The host name of a system, together with its full domain specification, makes
up a complete DNS name. For example, Figure 7-1 shows such a DNS name:
ren.comedy.tv.net. The machine ren is a node residing in the subdomain
comedy within in the domain tv, which is the domain net.
7-2 Netra Internet Server 3.1 User’s Manual—September 1996
Page 65
net
7
myworld
tv
soap
local
green
isp
ren
comedy
access
— A sub-domain of the domain net
— A sub-domain of tv.net, isp.net, or myworld.net
Figure 7-1 Example of DNS Domains
Every domain has two or more systems that keep a database of DNS names for
that domain. These systems also contain the DNS names of the subdomains,
unless this responsibility is delegated to systems in the subdomain. Thus, there
are several systems that contain the database for the domain net. In that
database, there is a delegation entry pointing to a system that keeps the
database for tv. The DNS database for tv contains entries for delegating the
domains soap and comedy. The database for comedy contains the host address
for ren.
The DNS system of resolving names is strictly hierarchical. Using the previous
example, the system that acts as the DNS server for the domain tv translates a
host name to a host address only if that host name exists directly within the
domain. All other host names are forwarded to the appropriate sub-domain for
resolution. (Thus, the name ren.comedy.tv.net is forwarded from tv’s
DNS server to the DNS server for the subdomain tv for resolution.
Name Service Administration 7-3
Page 66

7
Configuration Options
When configuring each name service, you must take into account both the
client side and the server side.
Local Name Service
For the Local name service, the Netra server is both client and server. As a local
name server, your Netra server will contain a list of host-name-to-host-address
mappings for its own use. These mappings are only available to applications
running on the Netra server. Information entered in the local database is
automatically available to programs running locally.
NIS
For the NIS name service, you can only configure the client side. You cannot
configure an NIS server to run on the Netra server. This means that an NIS
server should already be running on another host.
DNS
For the DNS name service, you can configure a client and a server.
• When a Netra server functions as a DNS client, it does not perform any
name service functions. If you want the Netra server to be a DNS client, you
should already have name servers for your DNS domain. You can choose a
DNS server that is running either on another machine or on the Netra
server. You can also configure alternate servers that will be used when the
first server is unavailable.
• The Netra server can be configured as a DNS server. All DNS servers cache
the results of name service queries. This means that repeat queries are
answered by the local name server rather than the original name server
(until the information is out of date). When a DNS server is not configured
with any primary or secondary domains, it is called a cache-only server.
As a primary domain server, the Netra server maintains a master database for
its own domain. (You must make all updates to the DNS database.) The
primary name server regularly propagates information to the other name
servers in its domain. It should have a secondary name server to back it up,
either on your LAN or at your ISP.
7-4 Netra Internet Server 3.1 User’s Manual—September 1996
Page 67

As a secondary domain server, the Netra server is subordinate to another DNS
server maintained by your ISP or in your network. It periodically compares
its database to the current database on the master name server. When it
detects a difference, it requests a zone transfer (in which the master name
server sends the latest copy of the database to the secondary name server).
• For intranet configurations (configurations without connections to the
Internet), you can configure the Netra server as a root name server. In this
case, the Netra server is responsible for all domain information although it
may delegate domains to other DNS name servers.
How to Set Up Name Services
The three name service options (Local, NIS, and DNS) work independently of
each other.
• Local name service enables you to add or delete hosts and their respective
addresses.
• NIS enables you to add or delete the Netra server as an NIS client.
• DNS requires you to configure two independent pieces: a client and a server.
If you configure the Netra server as a DNS server, it is usually best to also
be a client of this DNS server. (Note that you must configure the DNS server
first and then configure it as a client.)
7
Configuring the DNS server is a two-step process:
1. Start a name server. Unless you are running a root name server, you must
2. Once the DNS server is running, add primary and secondary domains as
Name Service Administration 7-5
specify a list of other name servers that will be queried when the local DNS
server cannot resolve a query. The default list of name servers should be
sufficient for all sites connected directly to the Internet. For sites that do not
have direct access (for example, because they are behind a firewall), list
other DNS servers that can be contacted.
needed.
When you add a primary domain, you are specifying a domain of hosts for
which this DNS server contains authoritative data. Other DNS servers
contact this server to resolve queries about hosts in this domain. Host
Page 68

7
Name Service Procedures
NIS Client Administration
▼ To Configure the Netra Server as an NIS Client
names, host addresses, host aliases (CNAME records), mail servers (MX
records), and other name servers can all be entered as information that is
part of a primary domain.
When you add a secondary domain, you specify that this DNS server
should cache all the information about that domain from another name
server. Standard caching only stores the results from previous queries: a
secondary domain actively retrieves all the domain information in
anticipation of future requests. A secondary domain reduces the load on the
primary server and serves as a backup in case other servers cannot be
contacted by clients.
1. Select Network Services Administration: Name Service ➤ Administer
NIS.
The NIS Client Administration page is displayed.
2. Enter the information in the form using Table 7-1.
Table 7-1 NIS Client Administration Information
NIS Client Domain Name The NIS domain in which the Netra server resides.
▼ To Modify or Unconfigure an NIS Client Domain
Note – The Modify and Unconfigure options are only displayed when the
Netra server is configured as an NIS client.
• To modify an NIS client domain, select Network Service Administration:
• To unconfigure an NIS client domain, select Network Service
7-6 Netra Internet Server 3.1 User’s Manual—September 1996
Name Service ➤ Administer NIS ➤ Modify.
Administration: Name Service ➤ Administer NIS ➤ Unconfigure.
The Netra server will no longer use NIS to resolve host names, and the NIS
client domain name is ignored.
Page 69

Local Name Server Administration
▼ To Configure the Netra Server as a Local Server
1. Select Network Services Administration: Name Service ➤ Administer
Local.
The Local Name Server Administration page is displayed.
2. Enter the information in the form using Table 7-2.
Table 7-2 Local Server Information
7
Host Names/
Host Addresses
DNS Client Administration
▼ To Configure the Netra Server as a DNS Client
1. Select Network Services Administration: Name Service ➤ Administer
DNS ➤ Configure DNS Client.
The DNS Client Administration page is displayed.
2. Enter the information in the form using Table 7-3.
Table 7-3 DNS Client Administration Information
DNS Domain Name The DNS domain that will be used to resolve partially-
Name Server 1 The host address of the DNS server that will be tried first for
Name Server 2 The host address of the DNS server to use, if the first name
The host names and corresponding host addresses. The host
names may be partially or fully qualified to be compatible with
other name services. However, this database only resolves host
names that have an exact match in the database.
qualified host names. Usually, this is the local domain name.
Example: comedy.tv.net
all DNS queries. Example: 129.144.79.5
server is unreachable. Example: 129.144.79.6
Name Server 3 The host address of the DNS server to use, if the first two
Name Service Administration 7-7
name servers are unreachable. Example: 129.144.102.6
Page 70

7
▼ To Modify DNS Client Setup
1. Select Network Services Administration: Name Service ➤ Administer
DNS ➤ Modify DNS client.
The DNS Client Administration page is displayed.
2. Make the changes in the form using Table 7-3.
DNS Server Administration
▼ To Configure the Netra Server as a DNS Server
1. Select Network Services Administration: Name Service ➤ Administer
DNS ➤ Configure DNS Server.
The DNS Server Administration page is displayed.
2. Enter the information in the form using Table 7-4.
Table 7-4 DNS Server Information
DNS Domain Name The DNS domain in which the Netra server resides. The
domain name is assumed to be fully-qualified (do not use a
trailing period). Example: comedy.tv.net
Root Name Servers/
Host Addresses
7-8 Netra Internet Server 3.1 User’s Manual—September 1996
The fully-qualified host names and host addresses of DNS
name servers to contact to resolve name service queries. If
the Netra server is behind a firewall, use the names and
addresses of name servers on the firewall. If the Netra server
is a root name server, this field can remain empty.
Example: access.isp.net 129.144.102.6
Page 71

▼ To Configure the Netra Server as a DNS Primary Server
1. Select Network Services Administration: Name Service ➤ Administer
DNS ➤ Add a primary domain.
The Add DNS Primary Domain page is displayed.
2. Enter the information in the form using Table 7-5.
Table 7-5 DNS Primary Server Information
Primary Domain Name The name of the primary domain. If the Netra server is a
root name server, use the domain name root. The domain
name is assumed to be fully qualified (do not use a trailing
period). Example: elmo 129.144.79.1
Host Names The host names and corresponding host addresses of the
hosts within the specified domain.
Host Aliases The host aliases within this domain and their
corresponding host names. A host name must be within
the domain, unless it is a fully-qualified host name.
Mail Servers The mail address, the corresponding mail server, and its
preference value.
•The mail address is a host name or an alias and must be
within the domain.
•The mail server is the machine that will accept mail for
this address. If there is more than one mail server, the
preference value determines which mail server is used.
•The preference value is an integer: the lower the value,
the higher the priority of that mail server.
7
DNS Servers The domains served by the corresponding DNS name
Name Service Administration 7-9
servers. The domain must be a subdomain of the primary
domain, unless it is a fully-qualified domain name. The
host name of the name server must be within this domain,
unless it is a fully qualified host name. All DNS servers
will be treated as authoritative for the listed domain. If a
subdomain is entered, authority for that domain is
delegated to the listed server. Do not enter the Netra server
or primary domain.
Page 72
7
The Internet community uses some standard aliases and mail addresses that
you may also want to use. For example you can add the following entries to
the Host Aliases and Mail Servers fields:
• The host aliases: www, ftp, ns. For example:
www stimpy
ftp stimpy
ns stimpy
• The mail server corresponding to your domain. For example:
tv.net. 10 stimpy
▼ To Modify or Delete a DNS Primary Domain
1. Select Network Services Administration: Name Service ➤ Administer
DNS.
2. Select one of the following:
• To modify a DNS primary domain, select Modify, and make the changes in
the form using Table 7-5.
• To delete a DNS primary domain, select Delete; then confirm the
operation.
7-10 Netra Internet Server 3.1 User’s Manual—September 1996
Page 73

▼ To Configure the Netra Server as a DNS Secondary Server
1. Select Network Services Administration: Name Service ➤ Administer
DNS ➤ Add a secondary domain.
The Add DNS Secondary Domain page is displayed.
2. Enter the necessary information in the form using Table 7-6.
Table 7-6 DNS Secondary Server Information
7
Secondary Domain
Name
Master DNS Servers’
Host Addresses
The name of the secondary domain. Use the domain name
root if the Netra system is a secondary server for the root
domain. The domain name is assumed to be fully-qualified
(do not use a trailing period). Example: tv.net
The host addresses of the master DNS name servers in the
order in which they should be queried. A master DNS
server can be either an existing primary or secondary DNS
server. Example: 129.144.102.6
▼ To Modify or Delete a DNS Secondary Domain
1. Select Network Services Administration: Name Service ➤ Administer
DNS.
2. Select one of the following:
• To modify a DNS secondary domain, select Modify, and make the changes
in the form using Table 7-6.
• To delete a DNS secondary domain, select Delete; then confirm the
operation.
Name Service Administration 7-11
Page 74

7
7-12 Netra Internet Server 3.1 User’s Manual—September 1996
Page 75

Netscape Enterprise Server
Administration
The Netscape Enterprise Server is a Hypertext Transfer Protocol (HTTP) server.
It is also known as a Web server. Anyone connected to your network can access
the information provided by such a server. It can be accessed using the URL
http://hostname.domainname.
You can administer the Netscape Enterprise Server using the Netscape
Administration Server. You can initially access the Netscape Administration
Server using the Netscape Enterprise Server option on the Netra Main
Administration page. Thereafter, you can access this administration server
using the URL http://hostname:82.
To access the Netscape Administration Server you must provide a user name
(setup) and password. The password is the same as the current Netra
administration password. It can only be changed using the Netscape
Administration Server. Changing the password enables people other than the
Netra server administrator to administer the Web servers.
8
8-1
Page 76

8
Configuring Web Servers
You can use the Netscape Administration Server to set up and administer one
or more Web servers. For further details refer to the Netscape documentation
that was shipped with your Netra system.
Note – If you are setting up multiple Web servers on your Netra server, each
host address must be unique.
The default document root directory for a Web server must be
/export/htdocs. The Netra File System Backup and Restore module and
future Netra upgrades assume that all HTML documents are stored in this
directory. If you have multiple Web servers and want to provide different
content on each server, you must create different document root directories.
Add multiple document root directories within the /export/htdocs
directory (for example, /export/htdocs/server1/,
/export/htdocs/server2/, and so on).
8-2 Netra Internet Server 3.1 User’s Manual—September 1996
Page 77

Part 3 — Network Connection
Administration
The chapters in Part 3 describe the Netra server ’s Network Connection
Administration modules.
• Chapter 9, “ATM Administration,” describes how to set up a connection to
an Asynchronous Transfer Mode (ATM) network.
• Chapter 10, “High-Speed Serial Interface Administration,” describes how to
connect the Netra server to a remote host using an HSI interface and PPP.
• Chapter 11, “ISDN Administration,” describes how to connect the Netra
server to a remote host using ISDN and PPP.
• Chapter 12, “Local Area Network Administration,” describes how to
configure the LAN interfaces on a Netra server.
• Chapter 13, “Modem Administration,” describes how to connect the Netra
server to a remote host using a modem and PPP.
• Chapter 14, “Routing Administration,” describes how to configure the Netra
server as a router.
Note – The Netra software does not display information on high-speed serial,
ISDN or Token Ring interfaces if the necessary interface hardware and
software are not installed in the Netra server. (Refer to your Netra hardware
installation manual for instructions on adding network interface hardware.
Refer to the Software Management module for software installation
instructions. Then configure the interface using the following chapters.)
Page 78

Page 79

ATM Administration
This chapter describes how to set up a connection to an Asynchronous Transfer
Mode (ATM) network.
ATM is a connection-oriented network protocol. To use this protocol, two
communicating entities must establish a connection before data transfer can
begin. TCP/IP, on the other hand, is inherently connectionless.
The SunATM™ 2.0 software supports two protocols which reconcile the
differences between the ATM and TCP/IP paradigms:
9
• Classical Internet Protocol (IP) interface
• LAN Emulation interface
Both these protocols allow TCP/IP to run transparently over an ATM interface
by resolving an IP address to an ATM address and establishing the connection
to the host to which a message is addressed.
The Netra ATM administration module supports SunATM version 2.0 software
and SunATM-155 version 2.0 hardware. (The SunATM-155/Mfiber SBus
Adapter 2.0 and SunATM-155/UTP5 SBus Adapter 2.0 are single-wide SBus
adapters that conform to the specifications of the ATM Forum.)
9-1
Page 80

9
Classical Internet Protocol Interface
Classical IP supports the TCP/IP and UDP/IP protocols in an ATM
environment. An ATM address resolution protocol (ATM ARP) server replaces
the traditional ARP protocol by resolving IP addresses to ATM addresses. It is
accessible to all hosts on a subnet. Each host must register with the ARP server
when the ATM interface is brought up.
Classical IP has the following limitations because it does not support broadcast
and multicast messaging.
• Running NIS or NIS+ over Classical IP requires configuration beyond the
scope of the ATM module and is not supported.
• The Routing Information Protocol (RIP) and the router discovery protocol
are not supported. Thus, to route over an ATM network using a Classical IP
interface, the Netra server must be configured as a static router. Routes to
the routers in the ATM subnet must be explicitly added.
Each ATM port (SBus card) on the Netra server supports only one Classical IP
interface.
LAN Emulation Interface
LAN Emulation, which provides mechanisms to send broadcast messages, is
another way of supporting the TCP/IP and UDP/IP protocols over an ATM
network. A series of LAN Emulation services (such as the LAN Emulation
Configuration Server (LECS), the LAN Emulation Server (LES), and the
Broadcast and Unknown Server (BUS)) provide address resolution information.
When a LAN Emulation interface is brought up, it joins the LAN by registering
with these services. The LAN Emulation protocol provides a broadcast service
to the upper layer protocols. Therefore, a LAN Emulation interface is not
affected by the multicast and RIP limitations of Classical IP.
Each ATM port on the Netra server currently supports only one LAN
Emulation interface.
9-2 Netra Internet Server 3.1 User’s Manual—September 1996
Page 81

Configuring A TM Interfaces
To configure ATM interfaces on the Netra server, you must perform the
following general tasks:
1. Set the type of framing interface.
ATM switches use either the SDH or the SONET framing interface.
(The framing interface used by your ATM switch should be in the switch
product information.) Set the framing interface type using the Change
Framing Interface option, as described on page 9-4.
2. Set the User Network Interface (UNI) version for each ATM port.
Each ATM port must be configured with a User Network Interface version.
This version will apply to all Classical IP and LAN Emulation interfaces
configured on that port. Each port can be configured with a different
version. Set the UNI version using the Change User Network Interface
Version option, as described on page 9-4.
3. Configure a Classical IP and/or a LAN Emulation interface for each ATM
port.
Use the Configure a Classical IP Interface and Configure a LAN
Emulation Interface options described on page 9-5 and page 9-6.
9
ATM Administration 9-3
Page 82

9
A TM Procedures
Framing Interface
▼ To Change the Framing Interface
1. Select Network Connection Administration: ATM.
The ATM Administration page is displayed with the current switch and port
configuration information.
2. Select Change Framing Interface.
3. Select the type of framing interface (see Table 9-1).
Table 9-1 Information for ATM Framing Interface
Framing Interface The supported ATM switch framing interface. The Netra
default framing interface type is SONET.
Choices: SONET, SDH
4. Restart the Netra server using System Administration: Restart and
Shutdown.
User Network Interface
▼ To Change the User Network Interface Version
1. Select Network Connection Administration: ATM.
2. Select Change User Network Interface for the required ATM port.
3. Select the version number (see Table 9-2).
Table 9-2 Information for ATM User Network Interface
User Network Interface
(UNI)
4. Restart the Netra server using System Administration: Restart and
9-4 Netra Internet Server 3.1 User’s Manual—September 1996
The ATM Administration page is displayed with configuration information
for each port.
The version of the UNI specification used for signalling.
The default version is 3.0.
Choices: 3.0, 3.1
Shutdown.
Page 83

Classical IP Interface
▼ To Configure a Classical IP Interface
1. Select Network Connection Administration: ATM.
The ATM Administration page is displayed with configuration information
for each port.
2. Select Configure a Classical IP interface for the required ATM port.
An administration page for the selected interface is displayed.
3. Enter the information in the form using Table 9-3.
Table 9-3 Information for ATM Classical IP Interface
ARP Configuration The server or client ARP configuration. Standalone allows
ARP Server Prefix The 13-byte prefix of the ARP server switch. If the ARP
ARP Server Address The 7-byte local portion of the ATM address of the ARP
Remote Host Address The remote host address for the machine to which the Netra
Host Address The host address for the network interface. This address
Netmask The netmask address that determines the network with
9
a back-to-back configuration.
Choices: Server, Client, Standalone
server is on the same switch as the Netra server, no entry is
required. If there is no entry in this field, the local switch
prefix is used.
•This field is required only when the ARP Configuration
field is set to Client.
server. If there is no entry in this field, the default local
server is assumed. (There are also 256 addresses reserved by
Sun: SUNMACSEL0-255.)
•This field must remain blank if the ARP Configuration
field is set to Standalone.
server is connected. The remote host address and the host
address must be on the same subnet.
•This field is required only when the ARP Configuration
field is set to Standalone.
should be unique on the system.
which the host address is associated.
Example: 255.255.255.0
4. Restart the Netra server using System Administration: Restart and
ATM Administration 9-5
Shutdown.
Page 84

9
▼ To Modify or Unconfigure a Classical IP Interface
1. Select Network Connection Administration: ATM.
The ATM Administration page is displayed with configuration information
for each port.
2. Select one of the following.
• To modify a Classical IP interface, select Modify for the required interface,
and make the changes in the form using Table 9-3.
• To unconfigure a Classical IP interface, select Unconfigure for the interface
you want to remove; then confirm the operation.
3. Restart the Netra server using System Administration: Restart and
Shutdown.
LAN Emulation Interface
▼ To Configure a LAN Emulation Interface
1. Select Network Connection Administration: ATM.
The ATM Administration page is displayed with configuration information
for each port.
2. Select Configure a LAN Emulation interface
3. Enter the information in the form using Table 9-4.
Table 9-4 Information for ATM LAN Emulation Interface
LAN Name The name of an emulation LAN to join.
Host Address The host address for the network interface. This address
Netmask The netmask address that determines the network with
4. Restart the Netra server using System Administration: Restart and
9-6 Netra Internet Server 3.1 User’s Manual—September 1996
An administration page for the selected interface is displayed.
should be unique on the system.
which the host address is associated.
Example: 255.255.255.0
Shutdown.
Page 85

▼ To Modify or Unconfigure a LAN Emulation Interface
1. Select Network Connection Administration: ATM.
The ATM Administration page, with configuration information for each port
is displayed.
2. Select one of the following.
• To modify a LAN emulation interface, select Modify for the required
interface, and make the changes in the form using Table 9-4.
• To unconfigure a LAN emulation interface, select Unconfigure for the
interface you want to remove; then confirm the operation.
3. Restart the Netra server using System Administration: Restart and
Shutdown.
9
ATM Administration 9-7
Page 86

9
9-8 Netra Internet Server 3.1 User’s Manual—September 1996
Page 87

High-Speed Serial Interface
Administration
This chapter describes how to set up a connection to a remote host over a highspeed serial interface (HSI) using point-to-point protocol (PPP).
The SunLink™ High-speed Serial Interface (HSI) controller card is a four-port
serial communications SBus card. When used with Data Service Unit or
Channel Service Unit (DSU/CSU) equipment (available from third parties) the
HSI controller card can be used to communicate over 1.544 Mbps T1 or 2.148
Mbps E1 telephone lines. While DSU and CSU are two separate entities, they
are often combined in one physical unit
T1 line, and provides termination and signal regeneration for the T1 line. The
DSU converts signals from the router into the bipolar digital signals used by
the digital line.
Note – The Netra software only displays information about network interface
hardware that is currently attached to the Netra server. (Refer to your Netra
hardware installation manual for instructions on adding network interface
hardware. See the “Software Management” module in Chapter 19 for software
installation instructions.)
The High-Speed Serial Interface module only supports the SunLink PPP 2.0
software. SunLink PPP 3.0 and SunLink PPP 3.0.1 are not supported.
. The CSU is the point of contact for the
10
10-1
Page 88

10
▼ To Configure an HSI Interface
1. Select Network Connection Administration: High-Speed Serial Interface
The High-Speed Serial Interface Administration page is displayed with the
status for each port.
2. Select the Configure for PPP option for the port you want to configure.
3. Enter the information in the form using Table 10-1.
Table 10-1 Information for High-Speed Serial Interface
Local Host Address The host address of the HSI interface (that is, the Netra end
of the HSI connection). It is provided by the ISP.
Example: 129.144.102.27
Local Netmask The netmask of the local area network.
Example: 255.255.255.0
Remote Host Address The host address of the system at the other end of the HSI
connection (for example, your ISP). Example: 129.144.102.6
Line Speed The line speed of the serial link (modem or CSU/DSU). This
value must match the speed of the modem or CSU/DSU.
Clocking The origin of the clocking for transmitted data.
•External means that the incoming transmit clock is used.
•Internal means that the Netra server’s internal clock is
used.
4. Restart the Netra server so that the new values take effect.
▼ To Modify or Delete an HSI Interface
1. Select Network Connection Administration: High-Speed Serial Interface
The High-Speed Serial Interface Administration page is displayed.
2. Select one of the following options:
• To modify an interface, select Modify for the appropriate interface, and
make the changes in the form using Table 10-1.
• To remove an interface, select Delete for the interface you want to remove;
then confirm the operation.
10-2 Netra Internet Server 3.1 User’s Manual—September 1996
Page 89

ISDN Administration
This chapter describes how to set up a connection to a remote host over
Integrated Services Digital Network (ISDN) using PPP.
ISDN is a set of services provided by telephone companies over public
telecommunication lines. Voice and data services are supported at speeds
greater than normal telephone line speeds, using multi-channel digital
telephone lines through specially-configured switches. The channel used for
voice and data is referred to as the B channel.
As a data service, ISDN can be used as the medium for a Wide Area Network
(WAN) or for a dedicated connection to the ISP. In either case, PPP should be
used to provide connectivity between systems.
The ISDN module supports only the SunISDN™ version 1.0.3 software, which
is available with the SunISDN hardware. Most of the configurations that are
possible using ISDN and PPP are supported. The compression and multi-point
links configurations are not supported. (If you need advanced configurations
for your site, you can unconfigure the Netra ISDN module and use the tools
provided by the SunISDN software instead.)
11
11-1
Page 90

11
Connecting to a Remote Host Using ISDN
To connect to a remote host over ISDN using PPP requires the following tasks:
1. Configuring all ISDN ports.
All ports must be configured correctly before connections can be made to
remote hosts. Configure each port using the appropriate Configure Port x
option, as described on page 11-5.
2. Adding a remote host connection.
After configuring all the ports, set up a connection to a remote host using
the Add a remote host connection option, as described on page 11-3. Most
of the information you need should be available from the ISP or the WAN
administrator.
If you are connecting to Ascend, Cisco, or Network Express routers,
configure your connection with the following information:
• Ascend: Use CHAP as the security protocol and MP-Ascend as the
encapsulation protocol.
• Cisco: Use CHAP as the security protocol and MP-Other as the
encapsulation protocol for Multilink.
• Network Express: Use MP-Other as the encapsulation protocol for
Multilink.
11-2 Netra Internet Server 3.1 User’s Manual—September 1996
Page 91

ISDN Procedures
Remote Host Connections
11
▼ To Add a Remote Host Connection
1. Select Network Connection Administration: ISDN Administration ➤ Add
a remote host connection.
The ISDN Remote Host Connection page is displayed.
2. Enter the information in the form using Table 11-1.
Table 11-1 Information for ISDN Remote Host Connection
Connection
Remote Host Address The host address of the peer side of the ISDN point-to-point
link (for example, the ISP’s ISDN server). Example:
129.144.102.6
Local Host Address The host address of the local side of the ISDN point-to-
point link. Example: 129.144.102.27
Netmask The number that masks the host component of a host
address and thus shows how to divide the network
component of the host address into sub-networks.
Inactivity Timeout The number of minutes an ISDN connection is allowed to
idle before it is disconnected.
Host Setup Timeout The number of minutes allowed before a connection request
ceases its attempt to connect to the remote system.
Default Route The route entry that allows connections to unspecified hosts
to go through this connection. The default route is created
when the connection is made with the remote system; it is
deleted when that connection is terminated or timed out.
Choices: On, Off
Bandwidth Controller The side of the connection that is controlling the number of
ISDN links used on the connection. Only one side can be
“on” at a time. Choices: On, Off
ISDN Administration 11-3
Page 92

11
Table 11-1 Information for ISDN Remote Host Connection (Continued)
Encapsulation The encapsulation protocol used in data transfers. For
multilink PPP (MP), the control protocol may or may not be
encapsulated. Ascend boxes require control encapsulation;
others typically do not. Choices: PPP, MP-Ascend,
MP-Other.
Security
Local Authentication The authentication process (if any) that will be used to
validate incoming calls.
•CHallenge Authentication Protocol (CHAP) uses
encryption-based password control.
•Password Authentication Protocol (PAP) is similar to
CHAP.
Choices: chap, pap, off
ID String (Local) The login string used by the authentication protocol.
Password (Local) The password string used by the authentication protocol.
Remote Authentication The authentication protocol that will be used with remote
systems. Choices: chap, pap, both
ID String (Remote) The login string used by the authentication protocol.
Password (Remote) The password string used by the authentication protocol.
Phone
Caller ID Choices: On, Off
Channel Baud Rate The B-channel baud rate. Choices: data56, data64
Phone Number 1 The phone number to dial to reach the system at the other
end of the ISDN connection. Example: 17005554141
Phone Number 2 (Optional) The phone number to dial to reach the system at
the other end of the ISDN connection. This number need
only be entered if it is supplied by the remote system.
Example: 17005554141
11-4 Netra Internet Server 3.1 User’s Manual—September 1996
Page 93

▼ To Modify or Delete Remote Host Connections
1. Select Network Connection Administration: ISDN Administration.
The ISDN Administration page is displayed.
2. Select one of the following:
• To modify an existing interface, select Modify, and make the changes in the
form using Table 11-1.
• To delete the existing interface, select Delete; then confirm the operation.
Local Port Assignments
Note – Profile B and SPID numbers should only be used in the U.S.A.
▼ To Configure a Port
1. Select Network Connection Administration: ISDN Administration ➤
Configure Port x.
11
2. Enter the information in the form using Table 11-2.
Table 11-2 Information for Configuring a Port (ISDN)
Switch Type Specifies the type of switch to which your ISDN line is
connected. This information is available from your phone
company or ISP. Choices: au1 (Australia); vn3, vn6 (France);
1tr6 (Germany); ntt (Japan); bt2 (United Kingdom); dms, 5ess,
ni2 (North America); etsi (Europe); swd-etsi (Sweden);
hkt (Hong Kong)
Profile A
Force 56Kb Forces the ISDN line to a 56Kb transfer rate, regardless of
how the incoming call identifies itself. This is mainly used to
solve incompatibility problems between switches.
Choices: On, Off
Calling Line Identify Enables or disables exchange service (if available) where the
exchange verifies that the local calling number is the phone
number of the calling system.
ISDN Administration 11-5
Page 94

11
Table 11-2 Information for Configuring a Port (ISDN) (Continued)
ISDN Number Your ISDN phone number. This information is used for
outgoing calls and specifies the calling number to the remote
host.
ISDN Subaddress (Optional) If more than one ISDN device is using the same
ISDN line, sub-addressing can be used to address each
device. This is an advanced feature; consult the ISDN
documentation for details.
SPID (Optional) The service profile identifier. It is used in North
America as an additional identifier and in conjunction with
the calling number, to identify the local number to the local
switch.
Local Number (Optional) Used to “filter” incoming calls. If the calling
number of an incoming call does not match this number, the
call will be rejected. When used, this number should be your
ISDN number.
Local Subaddress (Optional) This is an advanced feature and is normally not
needed. Consult the ISDN documentation for details.
Profile B
Force 56Kb Forces the ISDN line to a 56Kb transfer rate, regardless of
how the incoming call identifies itself. This is mainly used to
solve incompatibility problems between switches.
Choices: On, Off
Calling Line Identify Enables or disables exchange service (if available) where the
exchange verifies that the local calling number is the phone
number of the calling system.
ISDN Number If more than two phone numbers were provided by your
phone company, this field represents the second number.
ISDN Subaddress (Optional) If more than one ISDN device is using the same
ISDN line, sub-addressing can be used to address each
device. This is an advanced feature; consult the ISDN
documentation for details.
11-6 Netra Internet Server 3.1 User’s Manual—September 1996
Page 95

Table 11-2 Information for Configuring a Port (ISDN) (Continued)
SPID (Optional) The service profile identifier. It is used in North
Local Number (Optional) Used to “filter” incoming calls. If the calling
Local Subaddress (Optional) This is an advanced feature and is normally not
Remote Host Connection Log
▼ To View or Clear Log Files
1. Select Network Connection Administration: ISDN Administration.
The ISDN Administration page is displayed.
11
America as an additional identifier and in conjunction with
the calling number, to identify the local number to the local
switch.
number of an incoming call does not match the number you
specify, the call will be rejected. When used, this number
should be your ISDN number.
needed. Consult the ISDN documentation for details.
2. Select one of the following options:
• To look at the log file, select View log file.
• To clear the log file, select Clear log file; then confirm the operation.
ISDN Administration 11-7
Page 96

11
11-8 Netra Internet Server 3.1 User’s Manual—September 1996
Page 97

Local Area Network Administration
This chapter describes how to configure the local area network (LAN)
interfaces on your Netra server using the Local Area Network module.
Note – The Netra software will only display information about network
interface hardware that is currently attached to the Netra server. (Refer to your
Netra hardware installation manual for instructions on adding network
interface hardware. See the “Software Management” module in Chapter 19 for
any software installation instructions.)
What is a Network Interface
A network interface consists of three elements:
• Network Port
The network port provides the physical link between machines that
comprise a network. Ports can be built into the Netra server, or they can be
provided by SBus cards in the server. The Netra server supports the
following types of network hardware:
12
• Lance Ethernet
• Fast Ethernet
• Fast Ethernet 100 Base-T
• Quad Ethernet
• Token Ring
12-1
Page 98

12
LAN Procedures
• Network Protocol
The network protocol defines the communication that travels over the
network. The Netra server supports the following network protocols:
• TCP/IP: This protocol supports the definition of multiple interfaces for a
network hardware port and network protocol.
• SPX/IPX: This protocol is used for communicating with NetWare clients.
It does not support multiple interfaces per port.
Note – Both network protocols can be associated with the same port.
• Interface Definition
The interface definition is the configuration information that is specific to
the Netra server. For example, the Netra server requires host addresses for
TCP/IP interfaces, and network numbers and frame types for SPX/IPX
interfaces. (See “Installing the IPX Gateway on a Client System” on page 22” for information about SPX/IPX network numbers and frame types.)
Note – You cannot administer the Netra server from a remote client without
defining the network interface.
▼ To Configure a Network Interface
1. Select Network Connection Administration: Local Area Network.
The Local Area Network Administration page is displayed with a list of
network interface hardware to configure.
2. Select either Add a TCP/IP Interface or Add an SPX/IPX Interface for the
required network interface.
An administration page for the selected interface and protocol is displayed.
12-2 Netra Internet Server 3.1 User’s Manual—September 1996
Page 99

12
3. Enter the information in the form using one of the following tables.
• If you selected TCP/IP, use Table 12-1:
T able 12-1 Network Interface Administration: TCP/IP
Host Address The host address for the network interface. This address should
not be on the same network as any other configured interface.
Example: 129.144.79.5
Netmask The netmask address that determines the network with which the
host address is associated. Example: 255.255.255.0
• If you selected SPX/IPX, use Table 12-2:
Table 12-2 Network Interface Administration: SPX/IPX
Ethernet II The network number*, if your SPX/IPX LAN uses Ethernet II frame
types.
Ethernet 802.2 The network number*, if your SPX/IPX LAN uses Ethernet 802.2
frame types.
Ethernet 802.3 The network number*, if your SPX/IPX LAN uses Ethernet 802.3
frame types.
Ethernet Snap The network number*, if your SPX/IPX LAN uses Ethernet Snap
frame types.
*The number must be the same as the one used in the Novell network.
Local Area Network Administration 12-3
Page 100

12
▼ To Modify a Network Interface
1. Select Network Connection Administration: Local Area Network.
The Local Area Network Administration page is displayed with a list of
network interfaces to configure.
2. Select either Modify a TCP/IP Interface or Modify an SPX/IPX Interface
for the required network interface.
An administration page is displayed with existing configuration information
for the selected interface and protocol.
3. Make the changes in the form using Table 12-1 or Table 12-2.
▼ To Delete a Network Interface
1. Select Network Connection Administration: Local Area Network.
The Local Area Network Administration page is displayed with a list of
network interfaces to delete.
2. Select Delete for the interface you want to remove; then confirm the
operation.
12-4 Netra Internet Server 3.1 User’s Manual—September 1996
 Loading...