


 Loading...
User’s Guide
J2ME Wireless Toolkit
2.2
Sun Microsystems, Inc. 4150 Network Circle
Santa Clara, California 95054 U.S.A.
1-800-555-9SUN or 1-650-960-1300
October 2004

Copyright © 2004 Sun Microsystems, Inc., 4150 Network Circle, Santa Clara, California 95054, U.S.A. All rights reserved.
U.S. Government Rights - Commercial software. Government users are subject to the Sun Microsystems, Inc. standard license agreement and applicable provisions of the FAR and its supplements.
This distribution may include materials developed by third parties.
Sun, Sun Microsystems, the Sun logo, Java, J2ME and the Java Coffee Cup logo are trademarks or registered trademarks of Sun Microsystems, Inc. in the U.S. and other countries. The Adobe logo and the PostScript logo are trademarks or registered trademarks of Adobe Systems, Incorporated.
Products covered by and information contained in this service manual are controlled by U.S. Export Control laws and may be subject to the export or import laws in other countries. Nuclear, missile, chemical biological weapons or nuclear maritime end uses or end users, whether direct or indirect, are strictly prohibited. Export or reexport to countries subject to U.S. embargo or to entities identified on U.S. export exclusion lists, including, but not limited to, the denied persons and specially designated nationals lists is strictly prohibited.
DOCUMENTATION IS PROVIDED "AS IS" AND ALL EXPRESS OR IMPLIED CONDITIONS, REPRESENTATIONS AND WARRANTIES, INCLUDING ANY IMPLIED WARRANTY OF MERCHANTABILITY, FITNESS FOR A PARTICULAR PURPOSE OR NON-INFRINGEMENT, ARE DISCLAIMED, EXCEPT TO THE EXTENT THAT SUCH DISCLAIMERS ARE HELD TO BE LEGALLY INVALID.
Copyright © 2004 Sun Microsystems, Inc., 4150 Network Circle, Santa Clara, California 95054, Etats-Unis. Tous droits réservés.
Cette distribution peut comprendre des composants développés par des tierces parties.
Sun, Sun Microsystems, le logoSun, Java, J2ME et le logo Java Coffee Cup sont des marques de fabrique ou des marques déposées de Sun Microsystems, Inc. aux Etats-Unis et dans d'autres pays.Le logo Adobe. et le logo PostScript sont des marques de fabrique ou des marques déposées de Adobe Systems, Incorporated.
Les produits qui font l'objet de ce manuel d'entretien et les informations qu'il contient sont regis par la legislation americaine en matiere de controle des exportations et peuvent etre soumis au droit d'autres pays dans le domaine des exportations et importations. Les utilisations finales, ou utilisateurs finaux, pour des armes nucleaires, des missiles, des armes biologiques et chimiques ou du nucleaire maritime, directement ou indirectement, sont strictement interdites. Les exportations ou reexportations vers des pays sous embargo des Etats-Unis, ou vers des entites figurant sur les listes d'exclusion d'exportation americaines, y compris, mais de maniere non exclusive, la liste de personnes qui font objet d'un ordre de ne pas participer, d'une facon directe ou indirecte, aux exportations des produits ou des services qui sont regi par la legislation americaine en matiere de controle des exportations et la liste de ressortissants specifiquement designes, sont rigoureusement interdites.
LA DOCUMENTATION EST FOURNIE "EN L'ETAT" ET TOUTES AUTRES CONDITIONS, DECLARATIONS ET GARANTIES EXPRESSES OU TACITES SONT FORMELLEMENT EXCLUES, DANS LA MESURE AUTORISEE PAR LA LOI APPLICABLE, Y COMPRIS NOTAMMENT TOUTE GARANTIE IMPLICITE RELATIVE A LA QUALITE MARCHANDE, A L'APTITUDE A UNE UTILISATION PARTICULIERE OU A L'ABSENCE DE CONTREFACON.
Please
Recycle

Contents
Preface ix
1. Introduction 1
1.1Quick Start 1
1.2 The Tools in the Toolkit 2
1.3Toolkit Features 3
1.4Supported Technology 3
2. Developing MIDlet Suites 5
2.1About Projects 5
2.2 The Simple Development Cycle 7
2.2.1 Edit Source Code 7
2.2.2Build 8
2.2.3Run 9
2.3 The Full Development Cycle 11
2.3.1 |
Package 11 |
|
2.3.2 |
Install |
12 |
2.3.3 |
Run |
14 |
2.4 |
Using an Obfuscator 15 |
|
2.5 |
Using a Debugger |
17 |
2.6 |
Deploying Applications on a Web Server 17 |
|
3. Working With Projects |
19 |
|
Contents iii
3.1Selecting APIs 19
3.2 Changing MIDlet Suite Attributes 21
3.3Manipulating MIDlets 23
3.4 |
Using the Push Registry 24 |
|
|
|
3.5 |
Project Directory Structure |
25 |
|
|
3.6 |
Using Third-Party Libraries |
25 |
|
|
|
3.6.1 |
Third-Party Libraries for One Project |
26 |
|
|
3.6.2 |
Third-Party Libraries for All Projects |
26 |
|
3.7Configuring KToolbar 26
3.7.1 |
Setting the Application Directory 27 |
3.7.2 |
Setting the javac Encoding Property 27 |
3.7.3 |
Working with Revision Control Systems 27 |
4. Using the Emulator 29
4.1Emulator Skins 29
4.2 |
Using the Emulator |
30 |
|
|
4.3 |
Setting Emulator Preferences |
32 |
||
|
4.3.1 |
Network Proxies 32 |
|
|
|
4.3.2 |
Heap Size |
33 |
|
|
4.3.3 |
Storage and Cleaning |
33 |
|
|
4.3.4 |
Adjusting Emulator Performance 34 |
||
4.4 |
Pausing and Resuming |
35 |
|
|
4.5 |
Running the Emulator Solo |
36 |
||
4.6 |
Using Third Party Emulators |
36 |
||
5. Monitoring Applications 39 |
|
|
||
5.1 |
Using the Profiler 39 |
|
|
|
|
5.1.1 |
The Call Graph |
41 |
|
|
5.1.2 |
Execution Time and Number of Calls 41 |
||
|
5.1.3 |
Saving and Loading Profiler Information 41 |
||
5.2 |
Using the Memory Monitor |
42 |
||
|
5.2.1 |
Saving and Loading Memory Monitor Information 44 |
||
5.3 |
Using the Network Monitor |
44 |
||
iv J2ME Wireless Toolkit User’s Guide • October 2004
5.3.1Filtering Messages 45
5.3.2Sorting Messages 46
5.3.3 |
Saving and Loading Network Monitor Information 46 |
5.3.4 |
Clearing the Message Tree 47 |
6. Security and MIDlet Signing 49
6.1Permissions 49
6.2Protection Domains 50
6.3 Signing a MIDlet Suite 51
6.4Managing Keys 52
6.4.1 |
Creating a New Key Pair 52 |
6.4.2 |
Getting Real Keys 53 |
6.4.3 |
Importing an Existing Key Pair 54 |
6.4.4 |
Removing a Key Pair 54 |
6.5Managing Certificates 54
6.5.1Importing Certificates 55
6.5.2Removing Certificates 56
7. Using the Wireless Messaging API 57 |
|||
7.1 |
Setting Emulator Phone Numbers |
57 |
|
7.2 |
Simulating an Unreliable Network |
58 |
|
7.3 |
Sending Messages With the WMA Console 59 |
||
|
7.3.1 |
Sending a Text SMS Message 59 |
|
|
7.3.2 |
Sending a Binary SMS Message 60 |
|
|
7.3.3 |
Sending Text or Binary CBS Messages 61 |
|
|
7.3.4 |
Sending MMS Messages |
62 |
7.4 |
Receiving Messages in the WMA Console |
63 |
7.5 |
Using the Network Monitor with WMA |
64 |
8. Using the Mobile Media API 65 |
|
|
8.1 |
Supported Formats and Protocols 65 |
|
8.2Using MediaControlSkin 66
8.3Media Capture 66
Contents v
8.4Well-Behaved MIDlets 66
9. Working With Mobile 3D Graphics 67
9.1 JSR 184 Overview 67
9.2Immediate Mode 67
9.3Retained Mode 68
9.4 |
Trading Quality for Speed 68 |
|
|
9.5 |
Creating Mobile 3D Graphics Content |
69 |
|
10. Using the PIM and FileConnection APIs |
71 |
||
10.1 |
The FileConnection API |
71 |
|
10.2 |
The PIM API 72 |
|
|
11. Using the Bluetooth and OBEX APIs 73 |
|
||
11.1 |
Bluetooth Simulation Environment |
73 |
|
11.2 |
OBEX Over Infrared 73 |
|
|
11.3 |
Setting OBEX and Bluetooth Preferences 74 |
||
|
11.3.1 OBEX Preferences |
74 |
|
11.3.2 Bluetooth Discovery Timeout 75
11.3.3 Bluetooth System Properties 75
11.3.4 Bluetooth BCC Properties 75
12. Using Web Services 77
A.Application Demonstrations 79
A.1 Overview 79
A.2 General Instructions 81
A.3 BluetoothDemo 82
A.4 Demo3D 83 A.4.1 Life3D 83
A.4.2 PogoRoo 84 A.4.3 retainedmode 85
A.5 JSR172Demo 86
A.6 mmademo 86
vi J2ME Wireless Toolkit User’s Guide • October 2004
|
A.6.1 |
Simple Tones |
87 |
|
|
A.6.2 |
Simple Player |
87 |
|
|
A.6.3 |
PausingAudioTest 89 |
||
|
A.6.4 |
Video |
89 |
|
|
A.6.5 |
Attributes for mmademo 90 |
||
A.7 |
ObexDemo 90 |
|
||
A.8 |
PDAPDemo |
92 |
|
|
|
A.8.1 |
Browsing Files |
92 |
|
|
A.8.2 |
The PIM API |
94 |
|
A.9 |
WMADemo |
97 |
|
|
B. Command Line Reference |
103 |
|||
B.1 |
Prerequisites |
103 |
|
|
B.2 |
The Development Cycle 103 |
|||
|
B.2.1 |
Build |
103 |
|
|
B.2.2 |
Package 104 |
|
|
|
B.2.3 |
Run |
106 |
|
|
B.2.4 |
Debugging 107 |
||
B.3 |
Launching Toolkit GUI Components 108 |
||||
B.4 |
Setting Emulator Preferences |
108 |
|||
B.5 |
Using Security Features 110 |
|
|||
|
B.5.1 |
Changing the Emulator’s Default Protection Domain 110 |
|||
|
B.5.2 |
Signing MIDlet Suites |
111 |
||
|
B.5.3 |
Managing Certificates |
112 |
||
B.6 |
Using the Stub Generator |
113 |
|
||
|
B.6.1 |
Options |
113 |
|
|
|
|
B.6.1.1 |
Example |
114 |
|
C.Internationalization 115
C.1 Locale Setting 115
C.2 Emulated Locale 116
C.3 Character Encodings 116
C.3.1 Java Compiler Encoding Setting 117
Contents vii
C.4 Font Support in the Default Emulator 117
Index 119
viii J2ME Wireless Toolkit User’s Guide • October 2004

Preface
This document describes how to work with the J2ME Wireless Toolkit.
Who Should Use This Book
This guide is intended for developers creating Mobile Information Device Profile (MIDP) applications with the J2ME Wireless Toolkit. You should already understand how to use, the Mobile Information Device Profile (MIDP), and the Connected Limited Device Configuration (CLDC).
If you need help getting started with Java programming, try the New to Java Center:
http://java.sun.com/learning/new2java/
For a quick start with MIDP programming, read Learning Path: Getting Started with MIDP 2.0:
http://developers.sun.com/techtopics/mobility/learn/midp/
midp20/
Related Documentation
This book is not a tutorial in MIDP programming, nor is it a tutorial in programming any of the additional APIs that are supported by the toolkit. This section lists related specifications. Although specifications are definitive, they are not always the most accessible kind of information. For a variety of developercentered articles, try Sun’s mobility web site:
Preface ix

http://developers.sun.com/techtopics/mobility/
Topic |
Title |
|
|
Customizing the J2ME Wireless Toolkit
Release Notes
MIDP 1.0 - JSR 37
MIDP 2.0 - JSR 118
CLDC 1.0 - JSR 30
CLDC 1.1 - JSR 139
WMA 2.0 - JSR 205
MMAPI - JSR 135
JTWI - JSR 185
J2ME Web Services JSR 172
PDAP Optional Packages - JSR 75
Bluetooth and OBEX - JSR 82
Mobile 3D Graphics - JSR 184
J2ME Wireless Toolkit Basic Customization Guide J2ME Wireless Toolkit Release Notes
Mobile Information Device Profile for the J2ME™ Platform
Mobile Information Device Profile 2.0
J2ME Connected Limited Device Configuration
J2ME Connected Limited Device Configuration
Wireless Messaging API (WMA)
Mobile Media API
Java Technology for the Wireless Industry J2ME Web Services Specification
PDA Optional Packages for the J2ME Platform Java APIs for Bluetooth
Mobile 3D Graphics API for J2ME
How This Book Is Organized
This guide contains the following chapters and appendixes:
Chapter 1 introduces the J2ME Wireless Toolkit and the development features it provides.
Chapter 2 describes the development processes for creating and running MIDlets.
Chapter 3 explains how to work with projects in KToolbar. You’ll learn how to adjust project properties, manipulate MIDlets, work with the push registry, and understand the project directory structure.
Chapter 4 describes the emulator and explains how to adjust its options and take advantage of its many features.
Chapter 5 shows how you can examine the performance of your application using the method profiler, memory monitor, and network monitor.
Chapter 6 describes how to sign MIDlet suites and manage keys and certificates.
x J2ME Wireless Toolkit User’s Guide • October 2004
Chapter 7 details support for running and testing wireless messaging applications.
Chapter 8 explains how the J2ME Wireless Toolkit supports the Mobile Media API.
Chapter 9 contains information about developing 3D graphics content.
Chapter 10 describes how the toolkit implements access to local files and personal information like contacts and calendar appointments.
Chapter 11 covers the toolkit’s Bluetooth and OBEX simulation environment.
Chapter 12 shows how to use the web services stub generator.
Chapter 12 shows how to use the web services stub generator.
Appendix A describes the application demonstrations that are included in the J2ME Wireless Toolkit.
Appendix B explains how to use the functionality of the J2ME Wireless Toolkit from the command line.
Appendix C describes internationalization features in the J2ME Wireless Toolkit.
Preface xi

Typographic Conventions
Typeface |
Meaning |
Examples |
|
|
|
AaBbCc123 The names of commands, files, and directories; on-screen computer output
AaBbCc123 What you type, when contrasted with on-screen computer output
AaBbCc123 Book titles, new words or terms, words to be emphasized
Command-line variable; replace with a real name or value
{AaBbCc.dir} Variable file names and directories.
Edit your .login file.
Use ls -a to list all files.
%You have mail.
%su
Password:
Read Chapter 6 in the User’s Guide. These are called class options.
You must be superuser to do this.
To delete a file, type rm filename.
In the book, {toolkit} always refers to the installation directory of the J2ME Wireless Toolkit.
Accessing Documentation Online
The following sites provide technical documentation related to Java technology.
http://developer.sun.com/
http://java.sun.com/docs/
We Welcome Your Comments
We are interested in improving our documentation and welcome your comments and suggestions. You can email your comments to us at:
wtk-comments@sun.com
xii J2ME Wireless Toolkit User’s Guide • October 2004

CHAPTER 1
Introduction
This book describes how to use the J2ME Wireless Toolkit.
The J2ME Wireless Toolkit is a set of tools that makes it possible to create applications for mobile phones and other wireless devices. Although it is based on the Mobile Information Device Profile (MIDP) 2.0, the J2ME Wireless Toolkit also supports a handful of optional packages, making it a widely capable development toolkit.
1.1Quick Start
If you’d like to get started right away, try the demonstration applications that are included with the J2ME Wireless Toolkit.
To run the demonstrations, start KToolbar. On Windows you’ll do this by choosing
Start > Programs > J2ME Wireless Toolkit 2.2 > KToolbar.1 You’ll see a window like this:
1.Depending on how Windows is configured, you might need to choose Start > All Programs instead of Start > Programs.
1
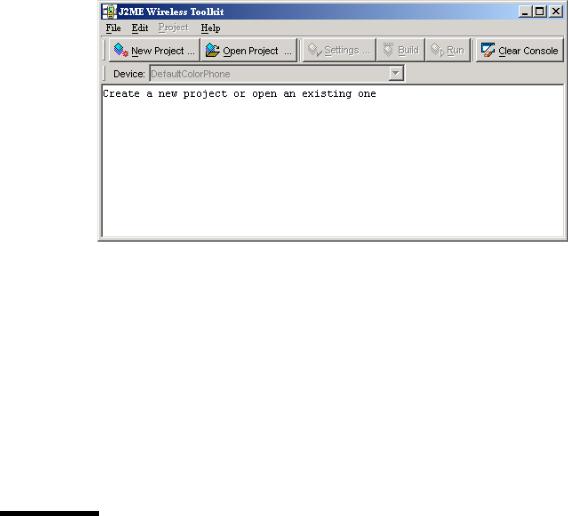
FIGURE 1 The KToolbar window
Next, click on the Open Project... button to open a demonstration application. You'll see a list of all the available applications. Pick one of them and click on the Open Project button in the dialog.
Once the application is open, all you need to do is press the Run button. The emulator will pop up running the example application.
Most demonstrations are self-explanatory, but some have additional instructions. See Appendix A, “Application Demonstrations,” for additional details.
All the source code for the demonstration applications is available in the {toolkit}\apps directory. Each demonstration has its own project directory. Inside the project directory, the source files are in the src directory. For example, the source code for the games demonstration is in {toolkit}\apps\games\src directory.
1.2The Tools in the Toolkit
The J2ME Wireless Toolkit has three main components:
■KToolbar automates many of the tasks involved in creating MIDP applications.
■The emulator is a simulated mobile phone. It is useful for testing MIDP applications.
■A collection of utilities provides other useful functionality, including a text messaging console and cryptographic utilities.
2 J2ME Wireless Toolkit User’s Guide • October 2004

KToolbar is the center of the toolkit. You can use it to build applications, launch the emulator, and start the utilities. Alternately, the emulator and utilities can be run by themselves, which is useful in many situations. If you want to demonstrate MIDP applications, for example, it’s useful to run the emulator by itself.
The only additional tool you need is a text editor for editing source code.
1.3Toolkit Features
The J2ME Wireless Toolkit supports the creation of MIDP applications with the following main features:
■Building and packaging: You write the source code and the toolkit takes care of the rest. With the push of a button, the toolkit compiles the source code, preverifies the class files, and packages a MIDlet suite.
■Running and monitoring: You can run a MIDlet suite directly in the emulator or install it using a process that resembles application installation on a real device. A memory monitor, network monitor, and method profiler are provided to analyze the operation of your MIDlets.
■MIDlet suite signing: The toolkit contains tools for cryptographically signing MIDlet suites. This is useful for testing the operation of MIDlets in different protection domains.
1.4Supported Technology
The J2ME Wireless Toolkit supports many standard Application Programming Interfaces (APIs) defined through the Java Community Process (JCP). TABLE 1 shows the APIs and includes links to the specifications.
TABLE 1 Supported JCP APIs in the J2ME Wireless Toolkit
JSR |
Name |
API |
URL |
|
|
JSR 139 |
Connected Limited Device Configuration |
CLDC 1.1 |
http://jcp.org/en/jsr/detail?id=139 |
JSR 118 |
Mobile Information Device Profile |
MIDP 2.0 |
http://jcp.org/en/jsr/detail?id=118 |
JSR 185 |
Java Technology for the Wireless Industry |
JTWI 1.0 |
http://jcp.org/en/jsr/detail?id=185 |
JSR 205 |
Wireless Messaging API |
WMA 2.0 |
http://jcp.org/en/jsr/detail?id=205 |
|
|
Chapter 1 Introduction 3

TABLE 1 Supported JCP APIs in the J2ME Wireless Toolkit
JSR |
Name |
API |
URL |
|
|
JSR 135 |
Mobile Media API |
MMAPI 1.1 |
http://jcp.org/en/jsr/detail?id=135 |
JSR 75 |
PDA Optional Packages for the J2ME Platform |
PIM and File |
http://jcp.org/en/jsr/detail?id=75 |
JSR 82 |
Java APIs for Bluetooth |
Bluetooth and OBEX |
http://jcp.org/en/jsr/detail?id=82 |
JSR 172 |
J2ME Web Services Specification |
|
http://jcp.org/en/jsr/detail?id=172 |
JSR 184 |
Mobile 3D Graphics API for J2ME |
3D Graphics |
http://jcp.org/en/jsr/detail?id=184 |
|
|
4 J2ME Wireless Toolkit User’s Guide • October 2004

CHAPTER 2
Developing MIDlet Suites
This chapter describes how you can use the J2ME Wireless Toolkit to create applications. It begins with a description of toolkit projects, then works through the development process.
There are two basic development cycles you are likely to follow in creating MIDlet suite applications. The first is quicker and simpler; you will probably use it in your initial development. The second cycle is longer but allows for more comprehensive and realistic testing.
Toward the end of the chapter you’ll read about how to use the J2ME Wireless Toolkit with advanced development tools like an obfuscator and a debugger. A final section briefly describes how to configure a web server to serve MIDP applications.
2.1About Projects
In the J2ME Wireless Toolkit, MIDlet suites are organized into projects, where the end result of one project is one MIDlet suite. A project contains all of the files that will be used to build a MIDlet suite, including Java source files, resource files, and the MIDlet descriptor.
The J2ME Wireless Toolkit works on one project at a time. You can create a new project or open an existing project.
In this chapter you will work with a very simple example project. As you read about each step in the development cycles, you can work along in the toolkit.
To create a new project, first start KToolbar. On Windows, choose Start > Programs > J2ME Wireless Toolkit 2.2 > KToolbar.2 You’ll see the KToolbar window.
2.Depending on how Windows is configured, you might need to choose Start > All Programs instead of Start > Programs.
5

FIGURE 2 The KToolbar window
Click on New Project... The toolkit will ask you for the name of the project and the name of the MIDlet class you will write. Fill in the names and click Create Project.
FIGURE 3 Creating a new project
The project options automatically pop up, allowing you to set up the build environment for the project. The default options are fine for this example; just click on OK to dismiss the window. In the KToolbar console, you’ll see some messages telling you exactly where to store the source code and resource files for this project.
6 J2ME Wireless Toolkit User’s Guide • October 2004

FIGURE 4 File locations in the console
2.2The Simple Development Cycle
The simple development cycle looks like this:
Edit source code → Build → Run
1.Edit source code. In this step, you create Java source files and resource files that will be used by your application.
2.Build. The J2ME Wireless Toolkit compiles and preverifies your Java source files.
3.Run. The compiled Java class files are run on the emulator.
If an error occurs when the toolkit attempts to compile your source files, go back and edit them again. If you find a bug when you are testing your application in the emulator, edit the source files to fix the bug.
Now that you understand the simple development cycle at a high level, the rest of this section illustrates how you can accomplish each step using the J2ME Wireless Toolkit.
2.2.1Edit Source Code
Editing source code is the only step in which the J2ME Wireless Toolkit is no help at all. You will need to use the text editor of your choice to create and edit source code files.
Chapter 2 Developing MIDlet Suites 7
If you are following along with the example project, create a new Java source file TinyMIDlet.java. It should be saved in the source directory of your project, which will be {toolkit}\apps\Tiny\src\TinyMIDlet.java where {toolkit} is the installation directory of the toolkit. The contents of the file are a very simple MIDlet:
import javax.microedition.lcdui.*; import javax.microedition.midlet.MIDlet;
public class TinyMIDlet extends MIDlet
implements CommandListener { public void startApp() {
Display display = Display.getDisplay(this);
Form mainForm = new Form("TinyMIDlet"); mainForm.append("Welcome to the world of MIDlets!");
Command exitCommand = new Command("Exit", Command.EXIT, 0); mainForm.addCommand(exitCommand); mainForm.setCommandListener(this);
display.setCurrent(mainForm);
}
public void pauseApp () {}
public void destroyApp(boolean unconditional) {}
public void commandAction(Command c, Displayable s) { if (c.getCommandType() == Command.EXIT)
notifyDestroyed();
}
}
Save the file when you’re finished.
2.2.2Build
The next step is to build your source code. The toolkit makes this part very easy.
In the KToolbar window, click on the Build button. Assuming you saved your source file in the right place, the toolkit will find it and compile it. Compilation errors are displayed in the KToolbar console. If you have errors, go back and edit the source code to fix them. Once you’ve eliminated your errors, the KToolbar console tells you the project was successfully built.
8 J2ME Wireless Toolkit User’s Guide • October 2004
FIGURE 5 Messages about building
Behind the scenes, the J2ME Wireless Toolkit also preverifies the compiled class files. MIDlet class files must be preverified before they can be run on a MIDP device or emulator. The toolkit quietly handles this detail for you; you probably won’t ever realize it’s happening. See the CLDC specification for more information on preverification.
2.2.3Run
Once the project builds successfully, you are ready to try it out in the emulator. Click on the Run button. The emulator pops up and shows a list of all the MIDlets in your project.
Chapter 2 Developing MIDlet Suites 9
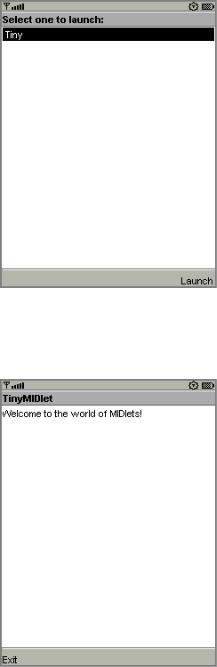
FIGURE 6 List of project MIDlets
Choose the MIDlet you want and select Launch. If you’re following along with the TinyMIDlet example, you’ll see the fruit of your labors:
FIGURE 7 TinyMIDlet in action
10 J2ME Wireless Toolkit User’s Guide • October 2004

2.3The Full Development Cycle
The second development cycle is slightly more complicated:
Edit source code → Package → Install → Run
1.Edit source code. This is the same as in the simple cycle.
2.Package. In this step, the J2ME Wireless Toolkit compiles and preverifies the source files (essentially the same as the Build step from before). Then it bundles the Java class files and resource files into a MIDlet suite JAR file and a MIDlet suite descriptor.
3.Install. MIDlet suites need to be installed before they can be run. You can install the MIDlet suite into the J2ME Wireless Toolkit emulator or a real device.
4.Run. As in the simple development cycle, run your application and test for bugs.
In the full development cycle, the first step is identical to the simple development cycle. Editing source code is the same as always. The Build step is now incorporated in packaging.
The full development cycle includes two new steps, packaging and installing. Finally, running an installed application is different in important ways from running an application in the simple development cycle.
2.3.1Package
The J2ME Wireless Toolkit automates the task of packaging a MIDlet suite. The end result of packaging is two files, a MIDlet descriptor and a MIDlet suite JAR. The descriptor is a small text file that contains information about the MIDlet suite. The JAR contains the class files and resources that make up the MIDlet suite. Devices can use the descriptor to learn about the application before downloading the entire JAR, an important consideration in a memory-lean, bandwidth-starved wireless world.
To ask the toolkit to package your MIDlet suite, choose Project > Package > Create Package from the KToolbar menu. The MIDlet suite descriptor and JAR are generated and placed in the bin directory of your project.
Packaging might involve additional steps. You can use a code obfuscator to shrink the size of the MIDlet suite JAR, a technique that is described later in this chapter. In addition, the J2ME Wireless Toolkit provides tools to allow you to cryptographically sign MIDlet suites. See Chapter 6, “Security and MIDlet Signing,” for more information.
Chapter 2 Developing MIDlet Suites 11

2.3.2Install
To properly test a MIDlet suite, you should install it into the toolkit’s emulator or a real device. When you press the Run button in KToolbar, the MIDlet suite is not installed into the emulator. Instead, the emulator runs the MIDlet classes directly.
The emulator also has the capability of installing applications into its memory in a process that resembles how applications are transmitted and installed on real devices. To install applications in the J2ME Wireless Toolkit emulator, choose
Project > Run via OTA.
The emulator window pops open, but instead of running your MIDlet classes directly, this time the emulator shows the welcome screen of its Application Management Software (AMS). The emulator’s AMS is an example of the type of software that real devices must have to manage MIDlet suites.
FIGURE 8 Emulator AMS welcome screen
Choose Apps to go to the main list of installed applications. Select Install Application and press the select button on the emulator. The emulator prompts you for the URL location of the application you want to install. The URL is already filled in for you.
12 J2ME Wireless Toolkit User’s Guide • October 2004
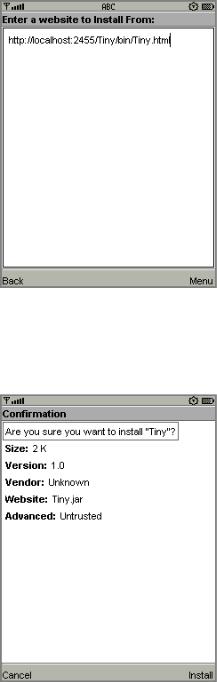
FIGURE 9 URL prompt
Choose Go from the menu to begin the installation. The emulator shows a list of the applications it finds at the URL. Choose the only one and select Install from the menu. The emulator gives you one last chance to confirm your intentions.
FIGURE 10 Confirming the installation
Choose Install again to finish the installation. You’ll be returned to the emulator’s installed list of applications, which now includes the application you just installed.
Chapter 2 Developing MIDlet Suites 13
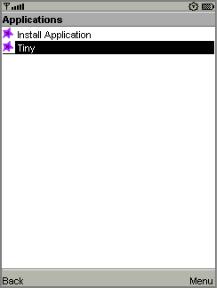
FIGURE 11 The application menu, again
Run via OTA is an extremely useful mechanism that makes it easy to install your MIDlet suite on the toolkit emulator. Some features must be tested using this technique, including the push registry and the installation of signed MIDlet suites.
If you want to test your MIDlet suite on a real device, you’ll need to install it first. How this happens depends heavily on the device you are using. There are two likely possibilities:
■You can deploy the application on a web server, then transmit the application from server to device using the Over the Air (OTA) protocol described in the MIDP 2.0 specification. This is most likely the same mechanism that users will encounter when they go to purchase or install your application.
■You might be able to transfer the MIDlet suite to the device using a Bluetooth, infrared, or serial connection. This is quite a bit simpler than running a web server, and although it won’t give you any insights into the process of installing your application on the device via OTA, it allows you to see how your application performs on the device.
2.3.3Run
Once the application is installed, running it is simple. Just choose the application from the list and choose Launch from the menu.
14 J2ME Wireless Toolkit User’s Guide • October 2004

FIGURE 12 Launching the installed application
Running an application on a real device depends heavily on the device itself. Consult your device documentation for information.
2.4Using an Obfuscator
An obfuscator is a tool that reduces the size of class files. MIDlet suites need to be compact, both to minimize download times and to comply with sometimes stringent limits on JAR size imposed by manufacturers or carriers. Using an obfuscator is one way (not the only way) that you can keep your MIDlet suite JAR small.
You can use an obfuscator in the packaging step of the development cycle. Although the J2ME Wireless Toolkit doesn’t come with an obfuscator, it is already configured to use the ProGuard obfuscator. All you need to do is download ProGuard and put it in a place where the toolkit can find it.
ProGuard is published under the terms of the GNU General Public License (GPL). If you are comfortable with the terms of the license, you can download and use ProGuard free of charge.
Installing ProGuard in the J2ME Wireless Toolkit is straightforward:
1.Go to the ProGuard web site, http://proguard.sourceforge.net/.
2.Download the latest version.
Chapter 2 Developing MIDlet Suites 15
3.Uncompress the proguard.jar file from the lib directory of the ProGuard installation to the bin directory of your J2ME Wireless Toolkit installation.
Once ProGuard is installed, you can use it by choosing Project > Package > Create Obfuscated Package.
In some cases you will need to provide a script file that controls how the obfuscator works. If you are loading classes using Class.forName(), for example, you need to tell ProGuard to leave the class names unchanged.
Create a script file using a text editor, then save it under the project’s main directory. Consult the ProGuard documentation for information on script files. Next you need to tell the toolkit how to find this file. To do this, edit
{toolkit}\wtklib\{platform}\ktools.properties, where {platform} is the name of your underlying platform (most likely Windows or Linux). Add a line as follows:
obfuscate.script.name: scriptfile
Replace “scriptfile” with the name you used for the script file. You will need to quit and restart KToolbar for the change to take effect.
The J2ME Wireless Toolkit also includes support for RetroGuard. If you want to use RetroGuard, you’ll need to download it separately and change the toolkit’s configuration.
1.Go to the RetroGuard web site, http://www.retrologic.com/retroguardmain.html.
2.Download the latest version.
3.Extract the retroguard.jar file from downloaded zip file to the bin directory of your J2ME Wireless Toolkit installation.
4.Edit {toolkit}\wtklib\{platform}\ktools.properties so that it uses the RetroGuard obfuscator plug-in:
obfuscator.runner.class.name: com.sun.kvem.ktools.RunRetro obfuscator.runner.classpath: wtklib\\ktools.zip
Retroguard will be used when you create an obfuscated package.
To switch back to ProGuard, edit the obfuscator lines in the ktools.properties file as follows:
obfuscator.runner.class.name: com.sun.kvem.ktools.RunPro obfuscator.runner.classpath: wtklib\\ktools.zip
If you want to use a different obfuscator, you’ll have to implement an obfusctor plug-in yourself. See the J2ME Wireless Toolkit Basic Customization Guide for an example of how to implement an obfuscator plug-in.
16 J2ME Wireless Toolkit User’s Guide • October 2004

2.5Using a Debugger
A variation on running your application is running it with a debugger. A debugger allows you to monitor the running application more closely, set breakpoints, and examine variables.
You will need to supply your own debugger. You can use the jdb debugger from J2SE™ or another debugger of your choice.
Begin by choosing Project > Debug from the KToolbar menu. Enter the TCP/IP port number that the debugger will use to connect to the emulator. Click on Debug. The emulator begins running and waits for a connection from a debugger.
Start up your debugger and attach it to the port you specified. Make sure to set the remote debugger to run in remote mode and to use TCP/IP. For more information, consult the debugger’s documentation.
Information about using jdb with the J2ME Wireless Toolkit is here:
Debugging MIDlets
http://developers.sun.com/techtopics/mobility/midp/questions/
jdb/
2.6Deploying Applications on a Web Server
The MIDP 2.0 specification includes the Over The Air User Initiated Provisioning Specification, which describes how MIDlet suites can be transferred over-the-air (OTA) to a device. You can test this type of scenario using the J2ME Wireless Toolkit emulator.
To deploy a packaged MIDP application remotely on a Web server:
1.Change the JAD file’s MIDlet-Jar-URL property to the URL of the JAR file. The URL should be an absolute path. For example:
MIDlet-Jar-URL: http://your.server.com/midlets/example.jar
2.Ensure that the Web server uses the correct MIME types for JAD and JAR files:
a.For MIDlet suite descriptors, map the .jad extension to the text/ vnd.sun.j2me.app-descriptor MIME type.
b.For MIDlet suite JARs, map the .jar extension to the application/javaarchive MIME type.
Chapter 2 Developing MIDlet Suites 17
The details of how to configure a Web server depend on the specific software used.
The emulator implements the device behavior during OTA provisioning. You can use the emulator to test and demonstrate the full provisioning process of MIDlet suites from a server to the device. All you need to do is launch the emulator’s AMS. (You may already be familiar with the AMS if you have used KToolbar’s Run via OTA option.
To launch the emulator’s AMS, you have two options:
■In the Windows start menu, choose Start > Programs > J2ME Wireless Toolkit 2.2 > OTA Provisioning.
■From the command line, run:
{toolkit}\bin\emulator -Xjam
Now follow the AMS prompts to install your application. This process is very similar to the Run via OTA option described earlier in this chapter, except you will need to enter the URL of your own server to install your application.
18 J2ME Wireless Toolkit User’s Guide • October 2004
Loading...