


Sun Fire™ X4100/X4100 M2
and X4200/X4200 M2
Servers Diagnostics Guide
Sun Microsystems, Inc.
www.sun.com
Part No. 819-3284-17
May 2007, Revision A
Submit comments about this document at: http://www.sun.com/hwdocs/feedback

Copyright 2007Sun Microsystems,Inc., 4150 NetworkCircle, SantaClara, California95054, U.S.A. Allrights reserved.
Sun Microsystems,Inc. hasintellectual propertyrights relating to technology thatis described in this document.In particular, andwithout
limitation, theseintellectual propertyrights may includeone ormore ofthe U.S. patentslisted athttp://www.sun.com/patentsand one or
more additionalpatents orpending patent applicationsin theU.S. and inother countries.
This documentand the product to whichit pertainsare distributedunder licenses restricting theiruse, copying, distribution,and
decompilation. Nopart of the product orof thisdocument may bereproduced in any formby any means without priorwritten authorizationof
Sun andits licensors, if any.
Third-party software, includingfont technology, iscopyrighted andlicensed fromSun suppliers.
Parts ofthe productmay be derivedfrom BerkeleyBSD systems,licensed from the University ofCalifornia. UNIX is a registered trademarkin
the U.S.and in other countries, exclusivelylicensed throughX/Open Company, Ltd.
Sun, Sun Microsystems,the Sunlogo, Java, AnswerBook2,docs.sun.com, SunFire, SunVTS,and Solaris are trademarksor registered
trademarks ofSun Microsystems,Inc. in theU.S. andin other countries.
All SPARCtrademarks are used under licenseand aretrademarks or registered trademarksof SPARC International, Inc. inthe U.S. and in other
countries. Productsbearing SPARC trademarks are basedupon anarchitecture developedby Sun Microsystems, Inc.
The OPENLOOK and Sun™ Graphical UserInterface was developed by SunMicrosystems, Inc.for its users and licensees. Sun acknowledges
the pioneeringefforts ofXerox inresearching anddeveloping the conceptof visualor graphical userinterfaces forthe computer industry.Sun
holds anon-exclusive license from Xeroxto the Xerox GraphicalUser Interface, whichlicense alsocovers Sun’s licenseeswho implementOPEN
LOOK GUIsand otherwise comply with Sun’swritten license agreements.
U.S. GovernmentRights—Commercial use.Government users are subjectto the SunMicrosystems, Inc.standard licenseagreement and
applicable provisionsof theFAR and its supplements.
DOCUMENTATION IS PROVIDED "AS IS" AND ALL EXPRESS OR IMPLIED CONDITIONS, REPRESENTATIONS AND WARRANTIES,
INCLUDING ANYIMPLIED WARRANTY OF MERCHANTABILITY, FITNESSFOR A PARTICULAR PURPOSE OR NON-INFRINGEMENT,
ARE DISCLAIMED, EXCEPT TO THE EXTENT THAT SUCH DISCLAIMERS ARE HELD TO BE LEGALLY INVALID.
Copyright 2007Sun Microsystems,Inc., 4150 NetworkCircle, SantaClara, Californie95054, Etats-Unis. Tousdroits réservés.
Sun Microsystems,Inc. ales droitsde propriété intellectuels relatants àla technologiequi est décritdans cedocument. En particulier,et sans la
limitation, cesdroits depropriété intellectuelspeuvent inclure un ou plusdes brevetsaméricains énumérés àhttp://www.sun.com/patentset
un oules brevetsplus supplémentairesou les applicationsde breveten attente dans les Etats-Uniset dans les autres pays.
Ce produitou documentest protégépar un copyrightet distribuéavec des licencesqui enrestreignent l’utilisation,la copie, ladistribution, etla
décompilation. Aucunepartie de ce produit oudocument nepeut êtrereproduite sousaucune forme, parquelque moyenque ce soit,sans
l’autorisation préalableet écrite de Sun etde ses bailleurs de licence,s’il yen a.
Le logicieldétenu par des tiers, etqui comprendla technologie relative auxpolices de caractères, est protégé parun copyright etlicencié pardes
fournisseurs deSun.
Des partiesde ce produit pourrontêtre dérivées des systèmes BerkeleyBSD licenciés par l’Université deCalifornie. UNIX est une marque
déposée auxEtats-Unis et dans d’autres payset licenciéeexclusivement par X/OpenCompany, Ltd.
Sun, SunMicrosystems, lelogo Sun, Java,AnswerBook2, docs.sun.com,Sun Fire,SunVTS, et Solarissont desmarques de fabrique ou des
marques déposéesde SunMicrosystems, Inc.aux Etats-Unis etdans d’autrespays.
Toutes lesmarques SPARC sontutilisées souslicence et sontdes marquesde fabriqueou des marques déposéesde SPARC International,Inc.
aux Etats-Uniset dans d’autres pays. Lesproduits portantles marquesSPARCsont basés sur une architecture développéepar Sun
Microsystems, Inc.
L’interfaced’utilisation graphiqueOPEN LOOK etSun™ aété développée parSun Microsystems,Inc. pourses utilisateurs etlicenciés. Sun
reconnaît lesefforts depionniers deXerox pour la recherche et le développementdu conceptdes interfaces d’utilisationvisuelle ougraphique
pour l’industriede l’informatique. Sun détient unelicense non exclusive de Xeroxsur l’interfaced’utilisation graphique Xerox, cette licence
couvrant égalementles licenciéesde Sunqui mettenten placel’interface d ’utilisation graphique OPEN LOOK etqui enoutre seconforment aux
licences écritesde Sun.
LA DOCUMENTATION EST FOURNIE "EN L’ÉTAT" ET TOUTES AUTRES CONDITIONS, DECLARATIONS ET GARANTIES EXPRESSES
OU TACITES SONT FORMELLEMENT EXCLUES,DANS LAMESURE AUTORISEE PAR LA LOI APPLICABLE,Y COMPRISNOTAMMENT
TOUTE GARANTIE IMPLICITE RELATIVE A LA QUALITE MARCHANDE, A L’APTITUDE A UNE UTILISATION PARTICULIERE OU A
L’ABSENCE DE CONTREFAÇON.

Contents
Preface vii
1. Initial Inspection of the Server 1
Service Visit Troubleshooting Flowchart 1
Gathering Service Visit Information 3
Serial Number Locations 3
System Inspection 4
Troubleshooting Power Problems 4
Externally Inspecting the Server 4
Internally Inspecting the Server 5
Troubleshooting DIMM Problems 8
How DIMM Errors Are Handled By the System 8
Uncorrectable DIMM Errors 8
Correctable DIMM Errors 9
BIOS DIMM Error Messages 9
DIMM Fault LEDs 11
DIMM Population Rules 14
Sun Fire X4100/X4200 Rules 14
Sun Fire X4100 M2/X4200 M2 Rules 15
Isolating and Correcting DIMM ECC Errors 16
Contents iii

2. Diagnostic Testing Software 19
SunVTS Diagnostic Tests 19
SunVTS Documentation 20
Diagnosing Server Problems With the Bootable Diagnostics CD 20
Requirements 20
Using the Bootable Diagnostics CD 21
A. BIOS Event Logs and POST Codes 23
Viewing BIOS Event Logs 23
Power-On Self-Test (POST) 25
How BIOS POST Memory Testing Works 25
Redirecting Console Output 26
Changing POST Options 27
POST Codes 28
POST Code Checkpoints 30
B. Status Indicator LEDs 35
External Status Indicator LEDs 35
Internal Status Indicator LEDs 39
C. Using the ILOM SP GUI to View System Information 43
Making a Serial Connection to the SP 44
Viewing ILOM SP Event Logs 45
Interpreting Event Log Time Stamps 47
Viewing Replaceable Component Information 48
Viewing Temperature, Voltage, and Fan Sensor Readings 50
D. Using IPMItool to View System Information 55
About IPMI 56
About IPMItool 56
iv Sun Fire X4100/X4100 M2 and X4200/X4200 M2 Servers Diagnostics Guide • May 2007

IPMItool Man Page 56
Connecting to the Server With IPMItool 57
Enabling the Anonymous User 57
Changing the Default Password 58
Configuring an SSH Key 58
Using IPMItool to Read Sensors 59
Reading Sensor Status 59
Reading All Sensors 59
Reading Specific Sensors 60
Using IPMItool to View the ILOM SP System Event Log 62
Viewing the SEL With IPMItool 62
Clearing the SEL With IPMItool 63
Using the Sensor Data Repository (SDR) Cache 64
Sensor Numbers and Sensor Names in SEL Events 64
Viewing Component Information With IPMItool 65
Viewing and Setting Status LEDs 66
LED Sensor IDs 66
LED Modes 68
LED Sensor Groups 68
Using IPMItool Scripts For Testing 69
E. Error Handling 71
Handling of Uncorrectable Errors 71
Handling of Correctable Errors 74
Handling of Parity Errors (PERR) 76
Handling of System Errors (SERR) 79
Handling Mismatching Processors 81
Hardware Error Handling Summary 82
Contents v

vi Sun Fire X4100/X4100 M2 and X4200/X4200 M2 Servers Diagnostics Guide • May 2007

Preface
This Guide contains information and procedures for troubleshooting problems with
the servers.
Before You Read This Document
It is important that you review the safety guidelines in the Sun Fire X4100/X4100 M2
and X4200/X4200 M2 Servers Safety and Compliance Guide (819-1161).
Using UNIX Commands
This document might not contain information about basic UNIX®commands and
procedures such as shutting down the system, booting the system, and configuring
devices. Refer to the following for this information:
■ Software documentation that you received with your system
■ Solaris™ Operating System documentation, which is at:
http://docs.sun.com
vii

Related Documentation
For a description of the document set for these servers, see the Where To Find
Documentation sheet that is packed with your system and also posted at the
product's documentation site. See the following URL, then navigate to your product.
http://www.sun.com/documentation
Translated versions of some of these documents are available at the web site
described above in French, Simplified Chinese, Traditional Chinese, Korean, and
Japanese. English documentation is revised more frequently and might be more upto-date than the translated documentation.
For all Sun hardware documentation, see the following URL:
http://www.sun.com/documentation
For Solaris and other software documentation, see the following URL:
http://docs.sun.com
viii Sun Fire X4100/X4100 M2 and X4200/X4200 M2 Servers Diagnostics Guide • May 2007

Typographic ConventionsThird-Party
Typeface
AaBbCc123 The names of commands, files,
AaBbCc123 What you type, when contrasted
AaBbCc123 Book titles, new words or terms,
* The settings on your browser might differ from these settings.
*
Meaning Examples
Edit your.login file.
and directories; on-screen
computer output
with on-screen computer output
words to be emphasized.
Replace command-line variables
with real names or values.
Use ls -a to list all files.
% You have mail.
su
%
Password:
Read Chapter 6 in the User’s Guide.
These are called class options.
Yo u must be superuser to do this.
To delete a file, type rm filename.
Web Sites
Sun is not responsible for the availability of third-party web sites mentioned in this
document. Sun does not endorse and is not responsible or liable for any content,
advertising, products, or other materials that are available on or through such sites
or resources. Sun will not be responsible or liable for any actual or alleged damage
or loss caused by or in connection with the use of or reliance on any such content,
goods, or services that are available on or through such sites or resources.
Preface ix

Sun Welcomes Your Comments
Sun is interested in improving its documentation and welcomes your comments and
suggestions. You can submit your comments by going to:
http://www.sun.com/hwdocs/feedback
Please include the title and part number of your document with your feedback:
Sun Fire X4100/X4100 M2 and X4200/X4200 M2 Servers Diagnostics Guide, part
number 819-3284-17
x Sun Fire X4100/X4100 M2 and X4200/X4200 M2 Servers Diagnostics Guide • May 2007

CHAPTER
1
Initial Inspection of the Server
Note – This chapter applies to all Sun Fire X4100/X4100 M2 and X4200/X4200 M2
servers, unless otherwise noted.
Service Visit Troubleshooting Flowchart
Use the following flowchart as a guideline for using the subjects in this book to
troubleshoot the server.
1

To perform this task: Refer to these sections:
Gather initial service visit information.
“Gathering Service Visit Information” on page 3
Investigate any powering-on problems.
Perform external visual inspection and
internal visual inspection.
View BIOS event logs and POST messages.
View service processor logs and sensor
information.
View service processor logs and sensor
information.
“Troubleshooting Power Problems” on page 4
“Externally Inspecting the Server” on page 4
“Internally Inspecting the Server” on page 5
“Troubleshooting DIMM Problems” on page 8
“Viewing BIOS Event Logs” on page 23,
“Power-On Self-Test (POST)” on page 25
“Using the ILOM SP GUI to View System Information” on page 43
“Using IPMItool to View System Information” on
page 55
Run SunVTS diagnostics
FIGURE 1-1 Troubleshooting Flowchart
2 Sun Fire X4100/X4100 M2 and X4200/X4200 M2 Servers Diagnostics Guide • May 2007
“Diagnosing Server Problems With the Bootable Diagnostics CD” on page 20

Gathering Service Visit Information
The first step in determining the cause of the problem with the server is to gather
whatever information you can from the service call paperwork or the on-site
personnel. Use the following general guideline steps when you begin
troubleshooting.
1. Collect information about the following items:
■ Events that occurred prior to the failure
■ Whether any hardware or software was modified or installed
■ Whether the server was recently installed or moved
■ How long the server exhibited symptoms
■ The duration or frequency of the problem
2. Document the server settings before you make any changes.
If possible, make one change at a time, in order to isolate potential problems. In this
way, you can maintain a controlled environment and reduce the scope of
troubleshooting.
3. Take note of the results of any change you make. Include any errors or
informational messages.
4. Check for potential device conflicts before you add a new device.
5. Check for version dependencies, especially with third-party software.
Serial Number Locations
The system serial number is located on a sticker that is attached to the front bezel
(see
FIGURE 1-2 or FIGURE 1-3 for the location).
If the bezel is missing, a second serial number label is affixed to the system:
■ For Sun Fire X4100/X4100 M2 servers, the second sticker is attached to the top of
■ For Sun Fire X4200/X4200 M2 servers, the second sticker is attached to the side of
the chassis. If you are facing the chassis front, the sticker is on the left side near
the front.
Chapter 1 Initial Inspection of the Server 3

System Inspection
Improperly set controls and loose or improperly connected cables are common
causes of problems with hardware components.
Troubleshooting Power Problems
■ If the server will power on, skip this section and go to “Externally Inspecting the
Server” on page 4.
■ If the server will not power on, check this list of items:
1. Check that AC power cords are attached firmly to the server’s power supplies and
to the AC source.
2. Check that both the main cover and rear cover are firmly in place.
There is an intrusion switch on the front I/O board that automatically shuts down
the server power to standby mode when the covers are removed.
Externally Inspecting the Server
To perform a visual inspection of the external system:
1. Inspect the external status indicator LEDs, which can indicate component
malfunction.
For the LED locations and descriptions of their behavior, see “External Status
Indicator LEDs” on page 35.
2. Verify that nothing in the server environment is blocking air flow or making a
contact that could short out power.
3. If the problem is not evident, continue with “Internally Inspecting the Server” on
page 5.
4 Sun Fire X4100/X4100 M2 and X4200/X4200 M2 Servers Diagnostics Guide • May 2007

Internally Inspecting the Server
Perform a visual inspection of the internal system by following these steps. Stop
when you identify the problem.
1. Choose a method for shutting down the server from main power mode to standby
power mode.
■ Graceful shutdown: Use a ballpoint pen or other stylus to press and release the
Power button on the front panel. This causes Advanced Configuration and Power
Interface (ACPI) enabled operating systems to perform an orderly shutdown of
the operating system. Servers not running ACPI-enabled operating systems will
shut down to standby power mode immediately.
■ Emergency shutdown: Use a ballpoint pen or other stylus to press and hold the
Power button for four seconds to force main power off and enter standby power
mode.
When main power is off, the Power/OK LED on the front panel will begin flashing,
indicating that the server is in standby power mode.
Caution – When you use the Power button to enter standby power mode, power is
still directed to the graphics-redirect and service processor (GRASP) board and
power supply fans, indicated when the Power/OK LED is flashing. To completely
power off the server, you must disconnect the AC power cords from the back panel
of the server.
Power buttonPower/OK LED
Serial number sticker on bezel
FIGURE 1-2 Sun Fire X4100/X4100 M2 Server Front Panel
Chapter 1 Initial Inspection of the Server 5

Power buttonPower/OK LED
Serial number sticker on bezel
FIGURE 1-3 Sun Fire X4200/X4200 M2 Server Front Panel
2. Remove the server covers, as required.
For instructions on removing system covers, refer to the Sun Fire X4100/X4100 M2
and Sun Fire X4200/X4200 M2 Servers Service Manual, 819-1157.
3. Inspect the internal status indicator LEDs, which can indicate component
malfunction.
For the LED locations and descriptions of their behavior, see “Internal Status
Indicator LEDs” on page 39.
Note – You can hold down the Locate button on the server back panel or front panel
for 5 seconds to initiate a “push-to-test” mode that illuminates all other LEDs both
inside and outside of the chassis for 15 seconds.
4. Verify that there are no loose or improperly seated components.
5. Verify that all cable connectors inside the system are firmly and correctly attached
to their appropriate connectors.
6. Verify that any after-factory components are qualified and supported.
For a list of supported PCI cards and DIMMs, refer to the Sun Fire X4100/X4100 M2
and Sun Fire X4200/X4200 M2 Servers Service Manual, 819-1157.
7. Check that the installed DIMMs comply with the supported DIMM population
rules and configurations, as described in “Troubleshooting DIMM Problems” on
page 8.
8. Replace the server covers.
6 Sun Fire X4100/X4100 M2 and X4200/X4200 M2 Servers Diagnostics Guide • May 2007

9. To restore main power mode to the server (all components powered on), use a
ballpoint pen or other pointed object to press and release the Power button on the
server front panel. See
FIGURE 1-2 or FIGURE 1-3.
When main power is applied to the full server, the Power/OK LED next to the
Power button lights and remains lit.
10. If the problem with the server is not evident, you can try viewing the power-on
self test (POST) messages and BIOS event logs during system startup. Continue
with “Viewing BIOS Event Logs” on page 23.
Chapter 1 Initial Inspection of the Server 7

Troubleshooting DIMM Problems
Use this section to troubleshoot problems with memory modules, or DIMMs.
Note – For information on Sun’s DIMM replacement policy for x64 servers, contact
your Sun Service representative.
How DIMM Errors Are Handled By the System
Uncorrectable DIMM Errors
For all operating systems (OS), the behavior is the same:
■ When UC error happens, the memory controller causes an immediate reboot of
the system.
■ During reboot, BIOS checks NorthBridge memory controller’s “Machine Check”
registers and finds out previous reboot was due to Uncorrectable ECC Error
(PERR/SERR also), then reports this in POST after the memtest stage:
A Hypertransport Sync Flood occurred on last boot.
■ Memory reports this event in Service Processor’s System Event Log (SEL) as
follows:
# ipmitool -H 10.6.77.249 -U root -P changeme -I lanplus sel list
f000 | 02/16/2006 | 03:32:38 | OEM #0x12 |
f100 | OEM record e0 | 00000000040f0c0200200000a2
f200 | OEM record e0 | 01000000040000000000000000
f300 | 02/16/2006 | 03:32:50 | Memory | Uncorrectable ECC | CPU 1 DIMM 0
f400 | 02/16/2006 | 03:32:50 | Memory | Memory Device Disabled | CPU 1
DIMM 0
f500 | 02/16/2006 | 03:32:55 | System Firmware Progress | Motherboard
initialization
f600 | 02/16/2006 | 03:32:55 | System Firmware Progress | Video
initialization
f700 | 02/16/2006 | 03:33:01 | System Firmware Progress | USB resource
configuration
8 Sun Fire X4100/X4100 M2 and X4200/X4200 M2 Servers Diagnostics Guide • May 2007

Correctable DIMM Errors
At this time, correctable errors are not logged in the server’s system event logs. They
are reported or handled in the supported operating systems as follows:
Windows server:
■ A Machine Check error message bubble pops up on task bar.
■ User must manually go into Event Viewer to view errors as follows:
Start-->Administration Tools-->Event Viewer
■ View individual errors (by time) to see details of error
Solaris:
■ There is no reporting of correctable errors in Solaris x86 at this time.
Linux:
■ There is no reporting of correctable errors in the Linux distributions that we
support at this time.
BIOS DIMM Error Messages
BIOS will display and log three types of error messages:
NODE-n Memory Configuration Mismatch
The following conditions will cause this error message:
■ DIMMs are not paired (Running in 64-bit mode instead of 128-bit mode)
■ DIMMs speed not same
■ DIMMs do not support ECC
■ DIMMs are not registered
■ MCT stopped due to errors in DIMM
■ DIMM module type (buffer) mismatch
■ DIMM generation (I/II) mismatch
■ DIMM CL/T mismatch
■ Banks on two sided DIMM mismatch
■ DIMM organization mismatch (128-bit)
■ SPD missing Trc or Trfc info
Chapter 1 Initial Inspection of the Server 9

NODE-n Paired DIMMs Mismatch
The following conditions will cause this error message:
■ Paired DIMMs are not same, Checksum mismatch
NODE-n DIMMs Manufacturer Mismatch
The following conditions will cause this error message:
■ DIMMs Manufacturer not supported
■ Only Samsung, Micron, Infineon and SMART DIMMs are supported
This will be displayed when you add Hitachi DIMMs
10 Sun Fire X4100/X4100 M2 and X4200/X4200 M2 Servers Diagnostics Guide • May 2007

DIMM Fault LEDs
The ejectors on the DIMM slots on the motherboard contain DIMM fault LEDs.
Note the following differences between the Sun Fire X4100/X4200 and the X4100
M2/X4200 M2 servers regarding the power requirements for viewing the DIMM
fault LEDs:
■ Sun Fire X4100/X4200 servers only: To see the DIMM fault LEDs, you must put
the server in standby power mode, with the AC power cords attached. See
“Internally Inspecting the Server” on page 5.
■ Sun Fire X4100 M2/X4200 M2 servers only: You can view the DIMM fault LEDs
without the power cords attached. These LEDs can be lit by a capacitor on the
motherboard for up to one minute. To light the DIMM fault LEDs from the
capacitor, push the small button on the motherboard labeled “DIMM SW2.” See
FIGURE 1-5.
Note – The DIMM fault LEDs always indicate a failed DIMM pair, with the LEDs lit
on both slots of the pair that contains the failed DIMM. See “Isolating and Correcting
DIMM ECC Errors” on page 16 for a procedure to determine which DIMM of the pair
is faulty.
FIGURE 1-4 shows the numbering of the Sun Fire X4100/X4200 DIMM slots.
FIGURE 1-5 shows the numbering of the Sun Fire X4100 M2/X4200 M2 DIMM slots.
Chapter 1 Initial Inspection of the Server 11

Back panel of server
DIMM 3
DIMM 1
DIMM 2
DIMM 0
Pair 0 = DIMM 0 + DIMM 1
Pair 1 = DIMM 2 + DIMM 3
FIGURE 1-4 Sun Fire X4100/X4200 DIMM Slot Locations
CPU1 CPU0
FT1
FM0
FT0
FM0
FT1
FM1
FT1
FM1
DIMM 3
DIMM 1
DIMM 2
DIMM 0
DIMM fault LEDs
in DIMM ejector levers
FT1
FM2
FT1
FM2
12 Sun Fire X4100/X4100 M2 and X4200/X4200 M2 Servers Diagnostics Guide • May 2007

DIMM SW2
Back panel of server
DIMM A0
DIMM B0
DIMM A1
DIMM B1
Pair 0 = DIMM B1 + DIMM A1
Pair 1 = DIMM B0 + DIMM A0
FIGURE 1-5 Sun Fire X4100 M2/X4200 M2 DIMM Slot Locations
CPU1 CPU0
FT1
FM0
FT0
FM0
FT1
FM1
FT1
FM1
DIMM A0
DIMM B0
DIMM A1
DIMM B1
DIMM fault LEDs
in DIMM ejector levers
FT1
FM2
FT1
FM2
Chapter 1 Initial Inspection of the Server 13

DIMM Population Rules
Note – The Sun Fire X4100/X4200 servers use only DDR1 DIMM. The Sun Fire
X4100 M2/X4200 M2 servers use only DDR2 DIMMs.
Sun Fire X4100/X4200 Rules
The DIMM population rules for the Sun Fire X4100/X4200 servers are listed here:
■ Each CPU can support a maximum of four DDR1 DIMMs.
■ Each pair of DIMMs must be identical (same manufacturer, size, and speed).
■ The DIMM slots are paired and the DIMMs must be installed in pairs (0 and 1,
2 and 3). The memory sockets are colored black or white to indicate which slots
are paired by matching colors.
■ CPUs with only a single pair of DIMMs must have those DIMMs installed in that
CPU’s white DIMM slots (0 and 1).
■ See TABLE 1-1 for supported DIMM configurations.
TABLE 1-1 Sun Fire X4100/X4200 Supported DIMM Configurations (DDR1 Only)
Slot 3 Slot 1 Slot 2 Slot 0 Total Memory Per CPU
0 512 MB 0 512 MB 1GB
512 MB 512 MB 512 MB 512 MB 2GB
512 MB 1 GB 512 MB 1GB 3GB
512 MB 2 GB 512 MB 2GB 5GB
512 MB 4 GB 512 GB 4GB 9GB
01GB0 1GB 2GB
1 GB 512 MB 1GB 512 MB 3GB
1GB 1GB 1GB 1GB 4GB
1GB 2GB 1GB 2GB 6GB
1GB 4GB 1GB 4GB 10 GB
02GB0 2GB 4GB
2 GB 512 MB 2GB 512 MB 5GB
2GB 1GB 2GB 1GB 6GB
2GB 2GB 2GB 2GB 8GB
14 Sun Fire X4100/X4100 M2 and X4200/X4200 M2 Servers Diagnostics Guide • May 2007

TABLE 1-1 Sun Fire X4100/X4200 Supported DIMM Configurations (DDR1 Only)
Slot 3 Slot 1 Slot 2 Slot 0 Total Memory Per CPU
2GB 4GB 2GB 4GB 12 GB
04GB0 4GB 8GB
4GB 4GB 4GB 4GB 16 GB
Sun Fire X4100 M2/X4200 M2 Rules
The DIMM population rules for the Sun Fire X4100 M2/X4200 M2 servers are listed
here:
■ Each CPU can support a maximum of four DDR2 DIMMs.
■ Each pair of DIMMs must be identical (same manufacturer, size, and speed).
■ The DIMM slots are paired and the DIMMs must be installed in pairs (A1 and B1,
A0 and B0). The memory sockets are colored black or white to indicate which
slots are paired by matching colors.
■ CPUs with only a single pair of DIMMs must have those DIMMs installed in that
CPU’s white DIMM slots (A1 and B1).
■ See TABLE 1-2 for supported DIMM configurations.
TABLE 1-2 Sun Fire X4100/X4200 M2 Supported DIMM Configurations (DDR2 Only)
Slot A1 Slot B1 Slot A0 Slot B0 Total Memory Per CPU
1GB 1GB 0 0 2GB
1GB 1GB 1GB 1GB 4GB
2GB 2GB 1GB 1GB 6GB
4GB 4GB 1GB 1GB 10 GB
2GB 2GB 0 0 4GB
2GB 2GB 2GB 2GB 8GB
4GB 4GB 2GB 2GB 12 GB
4GB 4GB 0 0 8GB
4GB 4GB 4GB 4GB 16 GB
Chapter 1 Initial Inspection of the Server 15

Isolating and Correcting DIMM ECC Errors
If your log files report an ECC error or a problem with a DIMM, complete the steps
below until you can isolate the fault.
Note – The slot numbers given in the following example use the slot numbering
from Sun Fire X4100/X4200 servers. The pair 0+1 is equivalent to pair A1+B1, and
pair 2+3 is equivalent to pair A0+B0, in the Sun Fire X4100 M2/X4200 M2 servers.
In this example, the log file reports an error with the DIMM in CPU0, slot 1. The
fault LEDs on CPU0, slots 0+1 are lit.
1. If you have not already done so, shut down your server to standby power mode
and remove the main cover.
Refer to the Sun Fire X4100 and Sun Fire X4200 Servers Service Manual, 819-1157.
2. Inspect the installed DIMMs to ensure that they comply with the “DIMM
Population Rules” on page 14.
3. Inspect the fault LEDs on the DIMM slot ejectors and the CPU LEDs on the
motherboard. See
If any of these LEDs are lit, they can indicate the component with the fault.
4. Disconnect the AC power cords from the server.
FIGURE 1-4.
Caution – Before handling components, attach an ESD wrist strap to a chassis
ground (any unpainted metal surface). The system’s printed circuit boards and hard
disk drives contain components that are extremely sensitive to static electricity.
5. Remove the DIMMs.
6. Visually inspect the DIMMs for physical damage, dust, or any other
contamination on the connector or circuits.
7. Visually inspect the DIMM slot for physical damage. Look for cracked or broken
plastic on the slot.
8. Dust off the DIMMs, clean the contacts, and reseat them.
9. If there is no obvious damage, exchange the individual DIMMs between the two
slots of a given pair. Ensure that they are inserted correctly with ejector latches
secured.
Using the example, remove the DIMMs from CPU0, slots 0+1 then reinstall the
DIMM from slot 1 into slot 0; reinstall the DIMM from slot 0 into slot 1.
10. Reconnect AC power cords to the server.
16 Sun Fire X4100/X4100 M2 and X4200/X4200 M2 Servers Diagnostics Guide • May 2007

11. Power on the server and run the diagnostics test again.
12. Review the log file.
■ If the error now appears in CPU0, slot 0 (opposite to the original error in slot 1),
the problem is related to the individual DIMM. In this case, return both DIMMs
(the pair) to the Support Center for replacement.
■ If the error still appears in CPU0, slot 1 (as the original error did), the problem is
not related to an individual DIMM. Instead, it might be caused by CPU0 or by the
DIMM slot. Continue with the next step.
13. Shut down the server again and disconnect the AC power cords.
14. Remove both DIMMs of the pair and install them into paired slots on the
opposite CPU.
Using the example, install the two DIMMs from CPU0, slots 0+1 into CPU1, slots 0+1
or CPU1, slots 2+3.
15. Reconnect AC power cords to the server.
16. Power on the server and run the diagnostics test again.
17. Review the log file.
■ If the error now appears under the CPU that manages the DIMM slots you just
installed, the problem is with the DIMMs. Return both DIMMs (the pair) to the
Support Center for replacement.
■ If the error remains with the original CPU, there is a problem with that CPU.
Chapter 1 Initial Inspection of the Server 17

18 Sun Fire X4100/X4100 M2 and X4200/X4200 M2 Servers Diagnostics Guide • May 2007

CHAPTER
2
Diagnostic Testing Software
This chapter contains information about a diagnostic software tools that you can use.
Note – This chapter applies to all Sun Fire X4100/X4100 M2 and X4200/X4200 M2
servers, unless otherwise noted.
SunVTS Diagnostic Tests
The servers are shipped with a Bootable Diagnostics CD (705-1439) that contains
SunVTS™ software.
SunVTS is the Sun Validation Test Suite, which provides a comprehensive diagnostic
tool that tests and validates Sun hardware by verifying the connectivity and
functionality of most hardware controllers and devices on Sun platforms. SunVTS
software can be tailored with modifiable test instances and processor affinity
features.
Only the following tests are supported on x86 platforms. The current x86 support is
for the 32-bit operating system only.
■ CD DVD Test (cddvdtest)
■ CPU Test (cputest)
■ Disk and Floppy Drives Test (disktest)
■ Data Translation Look-aside Buffer (dtlbtest)
■ Floating Point Unit Test (fputest)
■ Network Hardware Test (nettest)
■ Ethernet Loopback Test (netlbtest)
■ Physical Memory Test (pmemtest)
■ Serial Port Test (serialtest)
■ System Test (systest)
19

■ Universal Serial Bus Test (usbtest)
■ Virtual Memory Test (vmemtest)
SunVTS software has a sophisticated graphical user interface (GUI) that provides
test configuration and status monitoring. The user interface can be run on one
system to display the SunVTS testing of another system on the network. SunVTS
software also provides a TTY-mode interface for situations in which running a GUI
is not possible.
SunVTS Documentation
For the most up-to-date information on SunVTS software, go to this site:
http://docs.sun.com/app/docs/coll/1140.2
Diagnosing Server Problems With the Bootable Diagnostics CD
SunVTS software is preinstalled on these servers. The server is also shipped with the
Bootable Diagnostics CD (705-1439). This CD is designed so that the server will boot
from the CD. This CD will boot the Solaris™ Operating System and start SunVTS
software. Diagnostic tests will run and write output to log files that the service
technician can use to determine the problem with the server.
Requirements
■ To use the Bootable Diagnostics CD, you must have a keyboard, mouse, and
monitor attached to the server on which you are performing diagnostics.
20 Sun Fire X4100/X4100 M2 and X4200/X4200 M2 Servers Diagnostics Guide • May 2007

Using the Bootable Diagnostics CD
To use the Bootable Diagnostics CD to perform diagnostics:
1. With the server powered on, insert the Bootable Diagnostics CD into the DVDROM drive.
2. Reboot the server, but press F2 during the start of reboot so that you can change
the BIOS setting for boot-device priority.
3. When the BIOS Main menu appears, navigate to the BIOS Boot menu.
Instructions for navigating within the BIOS screens are printed on the BIOS screens.
4. On the BIOS Boot menu screen, select Boot Device Priority.
The Boot Device Priority screen appears.
5. Select the DVD-ROM drive to be the primary boot device.
6. Save and exit the BIOS screens.
7. Reboot the server.
When the server reboots from the CD in the DVD-ROM drive, the Solaris Operating
System boots and SunVTS software starts and opens its first GUI window.
8. In the SunVTS GUI, press Enter or click the Start button when you are prompted
to start the tests.
The test suite will run until it encounters an error or the test is completed.
Note – The CD will take approximately nine minutes to boot.
9. When SunVTS software completes the test, review the log files generated during
the test.
SunVTS provides access to four different log files:
■ SunVTS test error log contains time-stamped SunVTS test error messages. The log
file path name is /var/opt/SUNWvts/logs/sunvts.err. This file is not
created until a SunVTS test failure occurs.
■ SunVTS kernel error log contains time-stamped SunVTS kernel and SunVTS
probe errors. SunVTS kernel errors are errors that relate to running SunVTS, and
not to testing of devices. The log file path name is
/var/opt/SUNWvts/logs/vtsk.err. This file is not created until SunVTS
reports a SunVTS kernel error.
■ SunVTS information log contains informative messages that are generated when
you start and stop the SunVTS test sessions. The log file path name is
/var/opt/SUNWvts/logs/sunvts.info. This file is not created until a
SunVTS test session runs.
Chapter 2 Diagnostic Testing Software 21

■ Solaris system message log is a log of all the general Solaris events logged by
syslogd. The path name of this log file is /var/adm/messages.
a. Click the Log button.
The Log file window is displayed.
b. Specify the log file that you want to view by selecting it from the Log file
window.
The content of the selected log file is displayed in the window.
c. With the three lower buttons you can do the following actions:
■ Print the log file: A dialog box appears for you to specify your printer options
and printer name.
■ Delete the log file: The file remains displayed, but will be gone the next time
you try to display it.
■ Close the Log file window: The window is dismissed.
Note – If you want to save the log files: You must save the log files to another
networked system or a removable media device. When you use the Bootable
Diagnostics CD, the server boots from the CD. Therefore, the test log files are not on
the server’s hard disk drive and they will be deleted when you power cycle the
server.
22 Sun Fire X4100/X4100 M2 and X4200/X4200 M2 Servers Diagnostics Guide • May 2007

APPENDIX
A
BIOS Event Logs and POST Codes
This appendix contains information about BIOS event logs, power-on self test
(POST), and console redirection.
Note – This chapter applies to all Sun Fire X4100/X4100 M2 and X4200/X4200 M2
servers, unless otherwise noted.
Viewing BIOS Event Logs
Use this procedure to view the BIOS event log and the BMC system event log:
1. To turn on main power mode (all components powered on), use a ball-point pen
or other stylus to press and release the Power button on the server front panel. See
FIGURE 1-1 or FIGURE 1-2.
When main power is applied to the full server, the Power/OK LED next to the
Power button lights and remains lit.
2. Enter the BIOS Setup utility by pressing the F2 key while the system is
performing the power-on self-test (POST).
The BIOS Main menu screen is displayed.
3. View the BIOS event log:
a. From the BIOS Main Menu screen, select Advanced.
The Advanced Settings screen is displayed.
b. From the Advanced Settings screen, select Event Log Configuration.
The
Advanced Menu Event Logging screen is displayed.
23

c. From the Event Logging Details screen, select View Event Log.
All unread events are displayed.
4. View the BMC system event log:
a. From the BIOS Main Menu screen, select Advanced.
The Advanced Settings screen is displayed.
b. From the Advanced Settings screen, select IPMI 2.0 Configuration.
The
Advanced Menu IPMI 2.0 Configuration screen is displayed:
c. From the IPMI 2.0 Configuration screen, select View BMC System Event Log.
The log takes about 60 seconds to generate, then it is displayed on the screen.
5. If the problem with the server is not evident, continue with “Using the ILOM SP
GUI to View System Information” on page 43,or“Using IPMItool to View System
Information” on page 55.
24 Sun Fire X4100/X4100 M2 and X4200/X4200 M2 Servers Diagnostics Guide • May 2007

Power-On Self-Test (POST)
The system BIOS provides a rudimentary power-on self-test. The basic devices
required for the server to operate are checked, memory is tested, the LSI 1064 disk
controller and attached disks are probed and enumerated, and the two Intel dualgigabit Ethernet controllers are initialized.
The progress of the self-test is indicated by a series of POST codes. These codes are
displayed at the bottom right corner of the system’s VGA screen (once the self-test
has progressed far enough to initialize the system video). However, the codes are
displayed as the self-test runs and scroll off of the screen too quickly to be read. An
alternate method of displaying the POST codes is to redirect the output of the
console to a serial port (see “Redirecting Console Output” on page 26).
How BIOS POST Memory Testing Works
The BIOS POST memory testing is performed as follows:
1. The first megabyte of DRAM is tested by the BIOS before the BIOS code is
shadowed (that is, copied from ROM to DRAM).
2. Once executing out of DRAM, the BIOS performs a simple memory test (a
write/read of every location with the pattern 55aa55aa).
Note – This memory test is performed only if Quick Boot is not enabled from the
Boot Settings Configuration screen. Enabling Quick Boot causes the BIOS to skip the
memory test. See “Changing POST Options” on page 27 for more information.
3. The BIOS polls the memory controllers for both correctable and uncorrectable
memory errors and logs those errors into the service processor.
Appendix A BIOS Event Logs and POST Codes 25

Redirecting Console Output
Use these instructions to access the service processor and redirect the console output
so that the BIOS POST codes can be read.
1. Initialize the BIOS Setup utility by pressing the F2 key while the system is
performing the power-on self-test (POST).
The BIOS Main menu screen is displayed.
2. When the BIOS Main menu screen is displayed, select Advanced.
3. When the Advanced Settings screen is displayed, select IPMI 2.0 Configuration.
4. When the IPMI 2.0 Configuration screen is displayed, select the LAN
Configuration menu item.
5. Select the IP Address menu item.
The service processor’s IP address is displayed using the following format:
Current IP address in BMC : xxx.xxx.xxx.xxx
6. Start a web browser and type the service processor’s IP address in the browser’s
URL field.
7. When you are prompted, for a user name and password, type the following:
■ User Name: root
■ Password: changeme
8. When the ILOM Service Processor web GUI screen is displayed, click the Remote
Control tab.
9. Click the Redirection tab.
10. Set the color depth for the redirection console at either 6 or 8 bits.
11. Click the Start Redirection button.
12. When you are prompted for a user name and password, type the following:
■ User Name: root
■ Password: changeme
The current POST screen is displayed.
26 Sun Fire X4100/X4100 M2 and X4200/X4200 M2 Servers Diagnostics Guide • May 2007

Changing POST Options
These instructions are optional, but you can use them to change the operations that
the server performs during POST testing.
1. Initialize the BIOS Setup utility by pressing the F2 key while the system is
performing the power-on self-test (POST).
The BIOS Main menu screen is displayed.
2. When the BIOS Main menu screen is displayed, select Boot.
The Boot Settings screen is displayed.
3. When the Boot Settings screen is displayed, select Boot Settings Configuration.
The Boot Settings Configuration screen is displayed.
4. On the Boot Settings Configuration screen, there are several options that you can
enable or disable:
■ Quick Boot: This option is disabled by default. If you enable this, the BIOS skips
certain tests while booting, such as the extensive memory test. This decreases the
time it takes for the system to boot.
■ System Configuration Display: This option is disabled by default. If you enable
this, the System Configuration screen is displayed before booting begins.
■ Quiet Boot: This option is disabled by default. If you enable this, the Sun
Microsystems logo is displayed instead of POST codes.
■ Language: This option is reserved for future use. Do not change.
■ Add On ROM Display Mode: This option is set to Force BIOS by default. This
option has effect only if you have also enabled the Quiet Boot option, but it
controls whether output from the Option ROM is displayed. The two settings for
this option are as follows:
■ Force BIOS: Remove the Sun logo and display Option ROM output.
■ Keep Current: Do not remove the Sun logo. The Option ROM output is not
displayed.
■ Boot Num-Lock: This option is On by default (keyboard Num-Lock is turned on
during boot). If you set this to off, the keyboard Num-Lock is not turned on
during boot.
■ Wait for F1 if Error: This option is disabled by default. If you enable this, the
system will pause if an error is found during POST and will only resume when
you press the F1 key.
■ Interrupt 19 Capture: This option is reserved for future use. Do not change.
Appendix A BIOS Event Logs and POST Codes 27

POST Codes
TABLE A-1 contains descriptions of each of the POST codes, listed in the same order
in which they are generated. These POST codes appear as a four-digit string that is a
combination of two-digit output from primary I/O port 80 and two-digit output
from secondary I/O port 81. In the POST codes listed in
digits are from port 81 and the last two digits are from port 80.
TABLE A-1 POST Codes
Post Code Description
00d0 Coming out of POR, PCI configuration space initialization, Enabling the AMD
controller’s SMBus.
00d1 Keyboard controller BAT, Waking up from PM, Saving power-on CPUID in scratch
CMOS.
00d2 Disable cache, full memory sizing, and verify that flat mode is enabled.
00d3 Memory detections and sizing in boot block, cache disabled, IO APIC enabled.
01d4 Test base 512KB memory. Adjust policies and cache first 8MB.
01d5 Bootblock code is copied from ROM to lower RAM. BIOS is now executing out of RAM.
01d6 Key sequence and OEM specific method is checked to determine if BIOS recovery is
forced. If next code is E0, BIOS recovery is being executed. Main BIOS checksum is tested.
01d7 Restoring CPUID; moving bootblock-runtime interface module to RAM; determine
whether to execute serial flash.
01d8 Uncompressing runtime module into RAM. Storing CPUID information in memory.
01d9 Copying main BIOS into memory.
01da Giving control to BIOS POST.
0004 Check CMOS diagnostic byte to determine if battery power is OK and CMOS checksum
is OK. If the CMOS checksum is bad, update CMOS with power-on default values.
00c2 Set up boot strap processor for POST. This includes frequency calculation, loading BSP
microcode, and applying user requested value for GART Error Reporting setup question.
00c3 Errata workarounds applied to the BSP (#78 & #110).
00c6 Re-enable cache for boot strap processor, and apply workarounds in the BSP for errata
#106, #107, #69, and #63 if appropriate.
00c7 HT sets link frequencies and widths to their final values.
000a Initializing the 8042 compatible Keyboard Controller.
000c Detecting the presence of Keyboard in KBC port.
000e Testing and initialization of different Input Devices. Traps the INT09h vector, so that the
POST INT09h handler gets control for IRQ1.
TABLE A-1, the first two
28 Sun Fire X4100/X4100 M2 and X4200/X4200 M2 Servers Diagnostics Guide • May 2007

TABLE A-1 POST Codes (Continued)
Post Code Description
8600 Preparing CPU for booting to OS by copying all of the context of the BSP to all
application processors present. NOTE: APs are left in the CLI HLT state.
de00 Preparing CPU for booting to OS by copying all of the context of the BSP to all
application processors present. NOTE: APs are left in the CLI HLT state.
8613 Initialize PM regs and PM PCI regs at Early-POST. Initialize multi host bridge, if system
supports it. Setup ECC options before memory clearing. Enable PCI-X clock lines in the
AMD controller.
0024 Uncompress and initialize any platform specific BIOS modules.
862a BBS ROM initialization.
002a Generic Device Initialization Manager (DIM) - Disable all devices.
042a ISA PnP devices - Disable all devices.
052a PCI devices - Disable all devices.
122a ISA devices - Static device initialization.
152a PCI devices - Static device initialization.
252a PCI devices - Output device initialization.
202c Initializing different devices. Detecting and initializing the video adapter installed in the
system that have optional ROMs.
002e Initializing all the output devices.
0033 Initializing the silent boot module. Set the window for displaying text information.
0037 Displaying sign-on message, CPU information, setup key message, and any OEM specific
information.
4538 PCI devices - IPL device initialization.
5538 PCI devices - General device initialization.
8600 Preparing CPU for booting to OS by copying all of the context of the BSP to all
application processors present. NOTE: APs are left in the CLI HLT state.
Appendix A BIOS Event Logs and POST Codes 29

POST Code Checkpoints
The POST code checkpoints are the largest set of checkpoints during the BIOS preboot process.
the POST portion of the BIOS. These two-digit checkpoints are the output from
primary I/O port 80.
TABLE A-2 POST Code Checkpoints
Post Code Description
03 Disable NMI, Parity, video for EGA, and DMA controllers. At this point, only ROM
accesses are to the GPNV. If BB size is 64K, require to turn on ROM Decode below
FFFF0000h. It should allow USB to run in E000 segment. The HT must program the NB
specific initialization and OEM specific initialization can program if it need at beginning
of BIOS POST, like overriding the default values of Kernel Variables.
04 Check CMOS diagnostic byte to determine if battery power is OK and CMOS checksum
is OK. Verify CMOS checksum manually by reading storage area. If the CMOS checksum
is bad, update CMOS with power-on default values and clear passwords. Initialize status
register A. Initializes data variables that are based on CMOS setup questions. Initializes
both the 8259 compatible PICs in the system.
05 Initializes the interrupt controlling hardware (generally PIC) and interrupt vector table.
06 Do R/W test to CH-2 count reg. Initialize CH-0 as system timer. Install the POSTINT1Ch
handler. Enable IRQ-0 in PIC for system timer interrupt. Traps INT1Ch vector to
"POSTINT1ChHandlerBlock."
C0 Early CPU Init Start--Disable Cache--Init Local APIC.
C1 Set up boot strap processor information.
C2 Set up boot strap processor for POST. This includes frequency calculation, loading BSP
microcode, and applying user requested value for GART Error Reporting setup question.
C3 Errata workarounds applied to the BSP (#78 & #110).
C5 Enumerate and set up application processors. This includes microcode loading, and
workarounds for errata (#78, #110, #106, #107, #69, #63).
C6 Re-enable cache for boot strap processor, and apply workarounds in the BSP for errata
#106, #107, #69, and #63 if appropriate. In case of mixed CPU steppings, errors are sought
and logged, and an appropriate frequency for all CPUs is found and applied. NOTE: APs
are left in the CLI HLT state.
C7 The HT sets link frequencies and widths to their final values. This routine gets called
after CPU frequency has been calculated to prevent bad programming.
0A Initializes the 8042 compatible Keyboard Controller.
0B Detects the presence of PS/2 mouse.
0C Detects the presence of Keyboard in KBC port.
TABLE A-2 describes the type of checkpoints that might occur during
30 Sun Fire X4100/X4100 M2 and X4200/X4200 M2 Servers Diagnostics Guide • May 2007

TABLE A-2 POST Code Checkpoints (Continued)
Post Code Description
0E Testing and initialization of different Input Devices. Also, update the Kernel Variables.
Traps the INT09h vector, so that the POST INT09h handler gets control for IRQ1.
Uncompress all available language, BIOS logo, and Silent logo modules.
13 Initialize PM regs and PM PCI regs at Early-POST, Initialize multi host bridge, if system
support it. Setup ECC options before memory clearing. REDIRECTION causes corrected
data to written to RAM immediately. CHIPKILL provides 4 bit error det/corr of x4 type
memory. Enable PCI-X clock lines in the AMD controller.
20 Relocate all the CPUs to a unique SMBASE address. The BSP will be set to have its entry
point at A000:0. If less than 5 CPU sockets are present on a board, subsequent CPUs entry
points will be separated by 8000h bytes. If more than 4 CPU sockets are present, entry
points are separated by 200h bytes. CPU module will be responsible for the relocation of
the CPU to correct address. NOTE: APs are left in the INIT state.
24 Uncompress and initialize any platform specific BIOS modules.
30 Initialize System Management Interrupt.
2A Initializes different devices through DIM.
2C Initializes different devices. Detects and initializes the video adapter installed in the
system that have optional ROMs.
2E Initializes all the output devices.
31 Allocate memory for ADM module and uncompress it. Give control to ADM module for
initialization. Initialize language and font modules for ADM. Activate ADM module.
33 Initializes the silent boot module. Set the window for displaying text information.
37 Displaying sign-on message, CPU information, setup key message, and any OEM specific
information.
38 Initializes different devices through DIM.
39 Initializes DMAC-1 and DMAC-2.
3A Initialize RTC date/time.
3B Test for total memory installed in the system. Also, Check for DEL or ESC keys to limit
memory test. Display total memory in the system.
3C By this point, RAM read/write test is completed, program memory holes or handle any
adjustments needed in RAM size with respect to NB. Test if HT Module found an error in
BootBlock and CPU compatibility for MP environment.
40 Detect different devices (Parallel ports, serial ports, and coprocessor in CPU,... etc.)
successfully installed in the system and update the BDA, EBDA,... etc.
50 Programming the memory hole or any kind of implementation that needs an adjustment
in system RAM size if needed.
52 Updates CMOS memory size from memory found in memory test. Allocates memory for
Extended BIOS Data Area from base memory.
Appendix A BIOS Event Logs and POST Codes 31

TABLE A-2 POST Code Checkpoints (Continued)
Post Code Description
60 Initializes NUM-LOCK status and programs the KBD typematic rate.
75 Initialize Int-13 and prepare for IPL detection.
78 Initializes IPL devices controlled by BIOS and option ROMs.
7A Initializes remaining option ROMs.
7C Generate and write contents of ESCD in NVRam.
84 Log errors encountered during POST.
85 Display errors to the user and gets the user response for error.
87 Execute BIOS setup if needed/requested.
8C After all device initialization is done, programmed any user selectable parameters
relating to NB/SB, such as timing parameters, non-cacheable regions and the shadow
RAM cacheability, and do any other NB/SB/PCIX/OEM specific programming needed
during Late-POST. Background scrubbing for DRAM, and L1 and L2 caches are set up
based on setup questions. Get the DRAM scrub limits from each node.
8D Build ACPI tables (if ACPI is supported).
8E Program the peripheral parameters. Enable/Disable NMI as selected.
90 Late POST initialization of system management interrupt.
A0 Check boot password if installed.
A1 Clean-up work needed before booting to OS.
A2 Takes care of runtime image preparation for different BIOS modules. Fill the free area in
F000h segment with 0FFh. Initializes the Microsoft IRQ Routing Table. Prepares the
runtime language module. Disables the system configuration display if needed.
A4 Initialize runtime language module.
A7 Displays the system configuration screen if enabled. Initialize the CPUs before boot,
which includes the programming of the MTRRs.
A8 Prepare CPU for OS boot including final MTRR values.
A9 Wait for user input at config display if needed.
AA Uninstall POST INT1Ch vector and INT09h vector. Deinitializes the ADM module.
AB Prepare BBS for Int 19 boot.
AC Any kind of Chipsets (NB/SB) specific programming needed during End- POST, just
before giving control to runtime code booting to OS. Programmed the system BIOS
(0F0000h shadow RAM) cacheability. Ported to handle any OEM specific programming
needed during End-POST. Copy OEM specific data from POST_DSEG to RUN_CSEG.
32 Sun Fire X4100/X4100 M2 and X4200/X4200 M2 Servers Diagnostics Guide • May 2007

TABLE A-2 POST Code Checkpoints (Continued)
Post Code Description
B1 Save system context for ACPI.
00 Prepares CPU for booting to OS by copying all of the context of the BSP to all application
processors present. NOTE: APs are left in the CLIHLT state.
61-70 OEM POST Error. This range is reserved for chipset vendors and system manufacturers.
The error associated with this value may be different from one platform to the next.
Appendix A BIOS Event Logs and POST Codes 33

34 Sun Fire X4100/X4100 M2 and X4200/X4200 M2 Servers Diagnostics Guide • May 2007

APPENDIX
B
Status Indicator LEDs
This appendix describes the locations and definitions of the system LEDs.
Note – This chapter applies to all Sun Fire X4100/X4100 M2 and X4200/X4200 M2
servers, unless otherwise noted.
External Status Indicator LEDs
FIGURE B-1 and FIGURE B-2 show the locations of the external status indicator LEDs. A
Sun Fire X4200/X4200 M2 server is shown, but the LED locations are the same for
the Sun Fire X4100/X4100 M2 servers.
Refer to
slightly between Sun Fire X4100/X4100 M2 and X4200/X4200 M2 servers.
TABLE B-1 and TABLE B-2 for descriptions of the LED behavior, which differs
35

Locate button/LED
Service action required LED
Power/OK LED
Power button
Front fan fault LED
Power supply/rear fan tray fault LED
System overheat fault LED
Hard disk drive status LEDs
FIGURE B-1 Sun Fire X4200/X4200 M2 Servers Front Panel LEDs
TABLE B-1 Front Panel LED Functions
LED Name Description
Locate button/LED This LED helps you to identify which system in the rack
you are working on in a rack full of servers.
• Push and release this button to make the Locate LED
blink for 30 minutes.
• Hold down the button for 5 seconds to initiate a “pushto-test” mode that illuminates all other LEDs both inside
and outside of the chassis for 15 seconds.
Service Action Required LED This LED has two states:
• Off: Normal operation.
• Slow Blinking: An event that requires a service action
has been detected.
Power/OK LED This LED has three states:
• Off: Server main power and standby power are off.
• Blinking: Server is in standby power mode, with AC
power applied to only the GRASP board and the power
supply fans.
• On: Server is in main power mode with AC power
supplied to all components.
36 Sun Fire X4100/X4100 M2 and X4200/X4200 M2 Servers Diagnostics Guide • May 2007

TABLE B-1 (Continued)Front Panel LED Functions
LED Name Description
Front Fan Fault LED This LED lights when there is a failed front cooling fan
module. LEDs on the individual fan modules indicate
which fan module has failed.
Power Supply/Rear Fan Tray
Fault LED
This LED lights when:
• Two power supplies are present in the system but only
one has AC power connected. To clear this condition
either plug in the second power supply or remove it
from the chassis.
• Any voltage related event occurs in the system. For CPUrelated voltage errors the associated CPU Fault LED will
also be illuminated.
• (For Sun Fire X4200/X4200 M2 only) When the rear fan
tray has failed or is removed.
System Overheat Fault LED This LED lights when an upper temperature limit is
detected.
Hard Disk Drive Status LEDs The hard disk drives have three LEDs:
• Top LED (blue): Reserved for future use.
• Middle LED (amber): Hard disk drive failed.
• Bottom LED (green): Hard disk drive is OK.
Rear fan tray fault LED (Sun Fire X4200 only)
Power supply LEDs on each power supply
Service action required LED
Locate button/LED
FIGURE B-2 Sun Fire X4200/X4200 M2 Servers Back Panel LEDs
NET MGT
Power/OK LED
Appendix B Status Indicator LEDs 37

TABLE B-2 Back Panel LED Functions
LED Name Description
Rear Fan Tray Fault LED
(The rear fan tray and the
LED are present only in Sun
This LED has two states:
• Off: Fan module is OK.
Lit (amber): Fan tray has failed.
Fire X4200/X4200 M2
servers.)
Power Supply LEDs The power supplies have three LEDs:
• Top LED (green): Power supply is OK.
• Middle LED (amber): Power supply failed.
• Bottom LED (green): AC power to power supply is OK.
Locate button/LED
(Same function as on front
panel.)
This LED helps you to identify which system in the rack
you are working on in a rack full of servers.
• Push and release this button to make the Locate LED
blink for 30 minutes.
• Hold down the button for 5 seconds to initiate a “pushto-test” mode that illuminates all other LEDs both inside
and outside of the chassis for 15 seconds.
Service Action Required LED
(Same function as on front
panel.)
This LED has two states:
• Off: Normal operation.
• Slow Blinking: An event that requires a service action
has been detected.
Power/OK LED
(Same function as on front
panel.)
This LED has three states:
• Off: Server main power and standby power are off.
• Blinking: Server is in standby power mode, with AC
power applied to only the GRASP board and the power
supply fans.
• On: Server is in main power mode with AC power
supplied to all components.
38 Sun Fire X4100/X4100 M2 and X4200/X4200 M2 Servers Diagnostics Guide • May 2007

Internal Status Indicator LEDs
The servers have internal fault indicator LEDs for the fan modules, the DIMM slots,
and the CPUs.
FIGURE B-3 shows the locations of the internal LEDs. See TABLE B-3 for descriptions of
the LED behavior.
Note – To see the CPU LEDs or the GRASP board LED, you must put the server in
standby power mode (shut down with the front panel Power button, but do not
disconnect the AC power cords).
Note the following differences between the original Sun Fire X4100/X4200 and the
Sun Fire X4100/X4200 M2 servers regarding the power requirements for viewing the
DIMM fault LEDs:
■ For the original Sun Fire X4100/X4200 servers, to see the DIMM fault LEDs, you
must put the server in standby power mode, with the AC power cords attached.
See “Internally Inspecting the Server” on page 5.
■ For the Sun Fire X4100/X4200 M2 servers, you can view the DIMM fault LEDs
without the power cords attached. These LEDs can be lit by a capacitor on the
motherboard for up to one minute. To light the DIMM fault LEDs from the
capacitor, push the small button on the motherboard labeled “DIMM SW2.” See
FIGURE B-4.
FIGURE B-3 shows the internal LEDs in the Sun Fire X4100/X4200 servers.
FIGURE B-4 shows the internal LEDs in the Sun Fire X4100/X4200 M2 servers.
Appendix B Status Indicator LEDs 39

Back panel of server
GRASP board
power status LED
(on the GRASP board)
DIMM 3
DIMM 1
DIMM 2
DIMM 0
CPU1 CPU0
CPU fault
LEDs on the
motherboard
FT1
FM0
FT1
FM1
FT1
FM2
Fan module fault LEDs
on fan modules
FT0
FM0
FT1
FM1
FT1
FM2
Front panel of server
FIGURE B-3 Sun Fire X4100/X4200 Internal LED Locations
DIMM 3
DIMM 1
DIMM 2
DIMM 0
DIMM fault LEDs
in DIMM ejector levers
40 Sun Fire X4100/X4100 M2 and X4200/X4200 M2 Servers Diagnostics Guide • May 2007

DIMM SW2
Back panel of server
GRASP board
power status LED
(on the GRASP board)
DIMM A0
DIMM B0
DIMM A1
DIMM B1
CPU fault
LEDs on the
motherboard
Fan module fault LEDs
on fan modules
FIGURE B-4 Sun Fire X4100 M2/X4200 M2 Internal LED Locations
CPU1 CPU0
FT1
FM0
FT0
FM0
FT1
FM1
FT1
FM1
DIMM A0
DIMM B0
DIMM A1
DIMM B1
DIMM fault LEDs
in DIMM ejector levers
FT1
FM2
FT1
FM2
Appendix B Status Indicator LEDs 41

TABLE B-3 Internal LED Functions
LED Name Description
DIMM Fault LED
(The ejector levers on the
DIMM slots hold the LEDs.)
CPU Fault LED
(on motherboard)
This LED has two states:
• Off: DIMM is OK.
• Lit (amber): DIMM has failed.
This LED has two states:
• Off: CPU is OK.
• Lit (amber): CPU has encountered a voltage or heat error
condition.
Fan Module Fault LED This LED has two states:
• Off: Fan module is OK.
• Lit (amber): Fan module has failed.
GRASP Board Power Status
LED
This LED has two states:
• Off: standby power is not reaching the GRASP board.
• Lit (green): 3.3V standby power is reaching the GRASP
board.
42 Sun Fire X4100/X4100 M2 and X4200/X4200 M2 Servers Diagnostics Guide • May 2007

APPENDIX
C
Using the ILOM SP GUI to View System Information
Note – This chapter applies to all Sun Fire X4100/X4100 M2 and X4200/X4200 M2
servers, unless otherwise noted.
This appendix contains information about using the Integrated Lights-Out Manager
(ILOM) Service processor (SP) GUI to view monitoring and maintenance information
for your server.
■ “Making a Serial Connection to the SP” on page 44
■ “Viewing ILOM SP Event Logs” on page 45
■ “Viewing Replaceable Component Information” on page 48
■ “Viewing Temperature, Voltage, and Fan Sensor Readings” on page 50
For more information on using the ILOM SP GUI to maintain the server (for
example, configuring alerts), refer to the Integrated Lights-Out Manager (ILOM)
Administration Guide, 819-1160.
If any of the logs or information screens indicate a DIMM error, see “Troubleshooting
DIMM Problems” on page 8 and “Isolating and Correcting DIMM ECC Errors” on
page 16.
If the problem with the server is not evident after viewing ILOM SP logs and
information, continue with “SunVTS Diagnostic Tests” on page 19.
43

Making a Serial Connection to the SP
1. Connect a serial cable from the RJ-45 Serial Management (SER MGT) port on your
ILOM SP to a terminal device.
2. Press ENTER on the terminal device to establish a connection between that
terminal device and the ILOM SP.
Note – If you are connecting to the serial port on the SP before it has been powered
up or during its power-up sequence, you will see bootup messages displayed.
The service processor eventually displays a login prompt. For example:
SUNSP0003BA84D777 login:
The first string in the prompt is the default host name for the ILOM SP. It consists of
the prefix SUNSP and the MAC address of the ILOM SP. The MAC address for each
ILOM SP is unique.
3. Log in to the SP and type the default user name, root, with the default password,
changeme.
Once you have successfully logged in to the SP, it displays its default command
prompt.
->
4. To start the serial console, type the following commands:
cd /SP/console
start
5. Determine whether you could successfully connect to the SP:
■ If you could not connect to the SP, there is likely a problem with the graphics-
redirect and service processor (GRASP) board. Replace this board and then repeat
this procedure.
■ If you could connect to the SP, continue with the following procedures:
■ “Viewing ILOM SP Event Logs” on page 45
■ “Viewing Replaceable Component Information” on page 48
■ “Viewing Temperature, Voltage, and Fan Sensor Readings” on page 50
44 Sun Fire X4100/X4100 M2 and X4200/X4200 M2 Servers Diagnostics Guide • May 2007

Viewing ILOM SP Event Logs
The IPMI system event log (SEL) provides status information about the server’s
hardware and software to the ILOM software, which displays the events in the
ILOM web GUI. Events are notifications that occur in response to some actions.
1. Log in to the SP as Administrator or Operator to reach the ILOM web GUI:
a. Type the IP address of the server’s SP into your web browser.
The Sun Integrated Lights Out Manager Login screen is displayed.
b. Type your user name and password.
When you first try to access the ILOM Service Processor, you are prompted to
type the default user name and password. The default user name and password
are:
Default user name: root
Default password: changeme
2. From the System Monitoring tab, choose Event Logs.
The System Event Logs page is displayed. See
FIGURE C-1.
FIGURE C-1 Sample System Event Logs Screen
3. Select a category of event that you want to view in the log from the drop-down list
box.
Appendix C Using the ILOM SP GUI to View System Information 45

You can select from the following types of events:
■ Sensor-specific events. These events relate to a specific sensor for a component,
for example, a fan sensor or a power supply sensor.
■ BIOS-generated events. These events relate to error messages generated in the
BIOS.
■ System management software events. These events relate to events that occur
within the ILOM software.
After you have selected a category of event, the Event Log table is updated with the
specified events. The fields in the Event Log are described in
TABLE C-1 Event Log Fields
Field Description
Event ID The number of the event, in sequence from number 1.
Time Stamp The day and time the event occurred. If the Network Time Protocol
(NTP) server is enabled to set the SP time, the SP clock will use
Universal Coordinated Time (UTC). For more information about
time stamps, see “Interpreting Event Log Time Stamps” on page 47.
Sensor Name The name of a component for which an event was recorded. The
sensor name abbreviations correspond to these components:
sys: System or chassis
• p0: Processor 0
• p1: Processor 1
• io: I/O board
• ps: Power supply
• fp: Front panel
• ft: Fan tray
• mb: Motherboard
Sensor Type The type of sensor for the specified event.
Description A description of the event.
TABLE C-1.
4. To clear the event log, click the Clear Event Log button.
A confirmation dialog box is displayed.
5. Click OK to clear all entries in the log.
6. If the problem with the server is not evident after viewing ILOM SP logs and
information, continue with “SunVTS Diagnostic Tests” on page 19.
46 Sun Fire X4100/X4100 M2 and X4200/X4200 M2 Servers Diagnostics Guide • May 2007

Interpreting Event Log Time Stamps
The system event log time stamps are related to the service processor clock settings.
If the clock settings change, the change is reflected in the time stamps.
When the service processor reboots, the SP clock is set to Thu Jan 1 00:00:00 UTC
1970. The SP reboots as a result of the following:
■ A complete system unplug/replug power cycle
■ An IPMI command; for example, mc reset cold
■ A command-line interface (CLI) command; for example, reset /SP
■ ILOM web GUI operation; for example, from the Maintenance tab, selecting Reset
SP
■ An SP firmware upgrade
After an SP reboot, the SP clock is changed by the following:
■ When the host is booted. The host’s BIOS unconditionally sets the SP time to that
indicated by the host’s RTC. The host’s RTC is set by the following operations:
■ When the host’s CMOS is cleared as a result of changing the host’s RTC battery
or inserting the CMOS-clear jumper on the motherboard. The host’s RTC starts
at Jan 1 00:01:00 2002.
■ When the host’s operating system sets the host’s RTC. The BIOS does not
consider time zones. Solaris and Linux software respect time zones and will set
the system clock to UTC. Therefore, after the OS adjusts the RTC, the time set
by the BIOS will be UTC.
■ When the users sets the RTC using the host BIOS Setup screen.
■ Continuously via NTP. If NTP is enabled on the SP, NTP jumping is enabled to
recover quickly from an erroneous update from the BIOS or user. NTP servers
provide UTC time. Therefore, if NTP is enabled on the SP, the SP clock will be in
UTC.
■ Via the CLI, ILOM web GUI and IPMI
Appendix C Using the ILOM SP GUI to View System Information 47

Viewing Replaceable Component Information
Depending on the component you select, information about the manufacturer,
component name, serial number, and part number can be displayed.
1. Log in to the SP as Administrator or Operator to reach the ILOM web GUI:
a. Type the IP address of the server’s SP into your web browser.
The Sun Integrated Lights Out Manager Login screen is displayed.
b. Type your user name and password.
When you first try to access the ILOM Service Processor, you are prompted to
type the default user name and password. The default user name and password
are:
Default user name: root
Default password: changeme
2. From the System Information tab, choose Components.
The Replaceable Component Information page is displayed. See
FIGURE C-2.
48 Sun Fire X4100/X4100 M2 and X4200/X4200 M2 Servers Diagnostics Guide • May 2007

FIGURE C-2 Sample Replaceable Component Information Screen
3. Select a component from the drop-down list box.
Information about the selected component is displayed.
4. If the problem with the server is not evident after viewing ILOM SP logs and
information, continue with “SunVTS Diagnostic Tests” on page 19.
Appendix C Using the ILOM SP GUI to View System Information 49

Viewing Temperature, Voltage, and Fan Sensor Readings
This section explains how to view the server temperature, voltage, and fan sensor
readings.
There are a total of six temperature sensors that are monitored. They all generate
IPMI events that will be logged in to the system event log (SEL) when an upper
threshold is exceeded. Three of these sensor readings are used to adjust the fan
speeds and perform other actions, such as illuminating LEDs and powering off the
chassis. These sensors and their respective thresholds are as follows:
■ Front panel ambient temperature (fp.t_amb)
■ Upper non-critical: 30 degrees C
■ Upper critical: 35 degrees C
■ Upper non-recoverable: 40 degrees C
■ CPU 0 (p0.t_core) and CPU 1 (p1.t_core) die temperatures
■ Upper non-critical: 55 degrees C
■ Upper critical: 65 degrees C
■ Upper non-recoverable: 75 degrees C
There are three other temperature sensors:
■ I/O board ambient temperature (io.t_amb)
■ Motherboard ambient temperature (mb.t_amb)
■ Power distribution board ambient temperature (pdb.t_amb)
1. Log in to the SP as Administrator or Operator to reach the ILOM web GUI:
a. Type the IP address of the server’s SP into your web browser.
The Sun Integrated Lights Out Manager Login screen is displayed.
b. Type your user name and password.
When you first try to access the ILOM Service Processor, you are prompted to
type the default user name and password. The default user name and password
are:
Default user name: root
Default password: changeme
2. From the System Monitoring tab, choose Sensor Readings.
The Sensor Readings page is displayed. See
50 Sun Fire X4100/X4100 M2 and X4200/X4200 M2 Servers Diagnostics Guide • May 2007
FIGURE C-3.
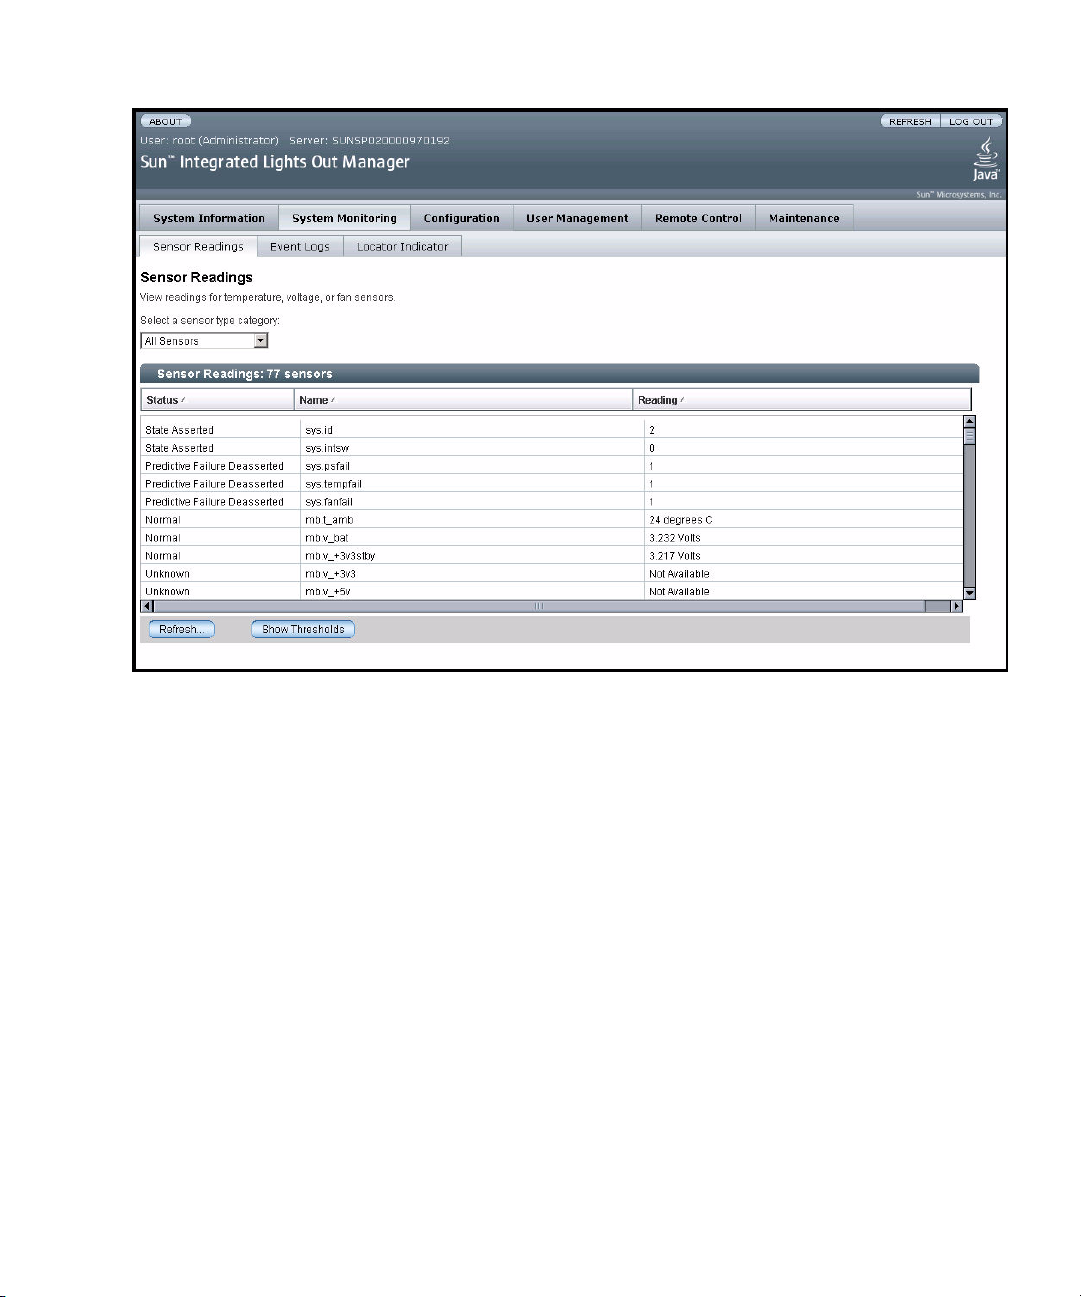
FIGURE C-3 Sample Sensor Readings Screen
3. Select the type of sensor readings that you want to view from the drop-down list
box.
You can select All Sensors, Temperature Sensors, Voltage Sensors, or Fan Sensors.
Appendix C Using the ILOM SP GUI to View System Information 51

The sensor readings are displayed. The Sensor Readings fields are described in
TABLE C-2.
TABLE C-2 Event Log Fields
Field Description
Status Reports the status of the sensor, including State Asserted, State
Deasserted, Predictive Failure, Device Inserted/Device Present,
Device Removed/Device Absent, Unknown, and Normal.
Name Reports the name of the sensor. The names correspond to these
components:
• sys: System or chassis
• bp: Back panel
• fp: Front panel
• mb: Motherboard
• io: I/O board
• p0: Processor 0
• p1: Processor 1
• ft0: Fan tray 0
• ft1: Fan tray 1
• pdb: Power distribution board
• ps0: Power supply 0
• ps1: Power supply 1
Reading Reports the rpm, temperature, and voltage measurements.
4. Click the Refresh button to update the sensor readings to their current status.
5. Click the Show Thresholds button to display the settings that trigger alerts.
The Sensor Readings table is updated. See the example in
FIGURE C-4.
For example, if system temperature reaches 30 C, the service processor will send an
alert. Sensor thresholds include the following:
■ Low/High NR: Low or high non-recoverable
■ Low/High CR: Low or high critical
■ Low/High NC: Low or high non-critical
52 Sun Fire X4100/X4100 M2 and X4200/X4200 M2 Servers Diagnostics Guide • May 2007
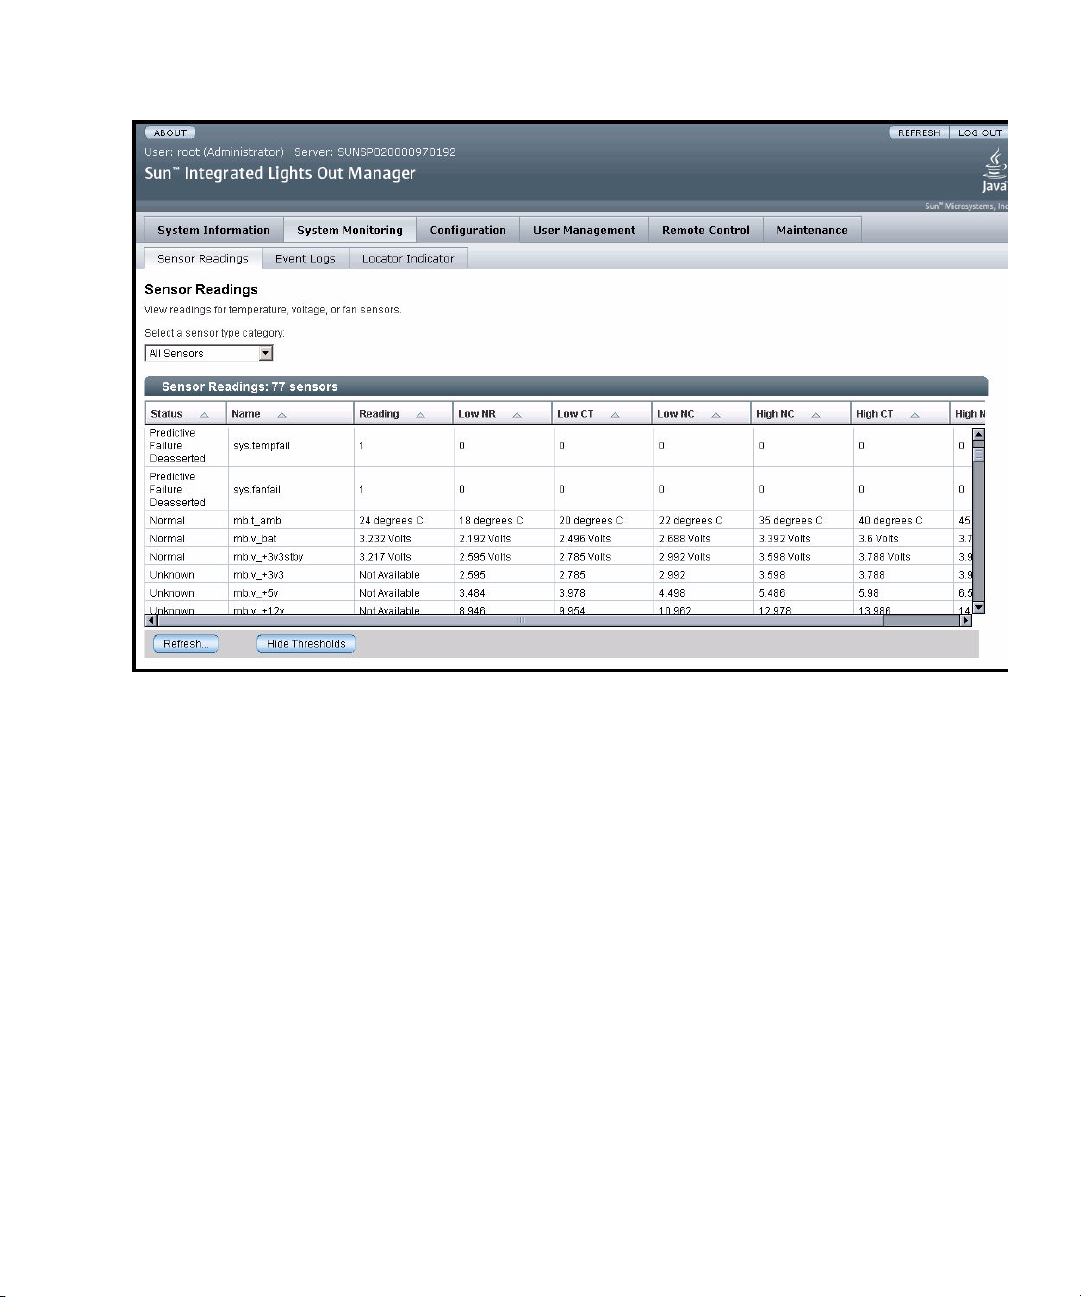
FIGURE C-4 Sample Sensor Readings Screen, With Thresholds Shown
6. Click the Hide Thresholds button to revert to the sensor readings.
The sensor readings are redisplayed, without the thresholds.
7. If the problem with the server is not evident after viewing ILOM SP logs and
information, continue with “SunVTS Diagnostic Tests” on page 19.
Appendix C Using the ILOM SP GUI to View System Information 53

54 Sun Fire X4100/X4100 M2 and X4200/X4200 M2 Servers Diagnostics Guide • May 2007

APPENDIX
D
Using IPMItool to View System Information
Note – This chapter applies to all Sun Fire X4100/X4100 M2 and X4200/X4200 M2
servers, unless otherwise noted.
Caution – Although you can use IPMItool to view sensor and LED information, do
not use any interface other than the ILOM CLI or Web GUI to alter the state or
configuration of any sensor or LED. Doing so could void your warranty.
This appendix contains information about using the Intelligent Platform
Management Interface (IPMI) to view monitoring and maintenance information for
your server. This appendix contains the following sections:
■ “About IPMI” on page 56
■ “About IPMItool” on page 56
■ “Connecting to the Server With IPMItool” on page 57
■ “Using IPMItool to Read Sensors” on page 59
■ “Using IPMItool to View the ILOM SP System Event Log” on page 62
■ “Viewing Component Information With IPMItool” on page 65
■ “Viewing and Setting Status LEDs” on page 66
55

About IPMI
IPMI is an open-standard hardware management interface specification that defines
a specific way for embedded management subsystems to communicate. IPMI
information is exchanged though baseboard management controllers (BMCs), which
are located on IPMI-compliant hardware components. Using low-level hardware
intelligence instead of the operating system has two main benefits: first, this
configuration allows for out-of-band server management, and second, the operating
system is not burdened with transporting system status data.
Your ILOM Service Processor (SP) is IPMI v2.0 compliant. You can access IPMI
functionality through the command line with the IPMItool utility either in-band or
out-of-band. Additionally, you can generate an IPMI-specific trap from the web
interface, or manage the server's IPMI functions from any external management
solution that is IPMI v1.5 or v2.0 compliant. For more information about the IPMI
v2.0 specification, go to
http://www.intel.com/design/servers/ipmi/spec.htm#spec2.
About IPMItool
IPMItool is included on the Resource CD, also titled Tools and Drivers CD in later
servers (705-1438). IPMItool is a simple command-line interface that is useful for
managing IPMI-enabled devices. You can use this utility to perform IPMI functions
with a kernel device driver or over a LAN interface. IPMItool enables you to manage
system hardware components, monitor system health, and monitor and manage
system environmentals, independent of the operating system.
Locate IMPItool and its related documentation on your Resource CD (705-1438), or
download this tool from the following URL:
http://ipmitool.sourceforge.net/
IPMItool Man Page
After you install the IPMItool package, you can access detailed information about
command usage and syntax from the man page that is installed. From a command
line, type this command:
man ipmitool
56 Sun Fire X4100/X4100 M2 and X4200/X4200 M2 Servers Diagnostics Guide • May 2007

Connecting to the Server With IPMItool
To connect over a remote interface you must supply a user name and password. The
default user with admin-level access is
you must use the
command line, as shown in the following example:
ipmitool -I lanplus -H <IPADDR> -U root -P changeme chassis status
-U and -P parameters to pass both user name and password on the
Note – If you encounter command-syntax problems with your particular operating
system, you can use the
parameters can be passed with the
Also refer to the ipmitool man page by typing man ipmitool.
ipmitool -h command and parameter to determine which
Note – In the example commands shown in this appendix, the default user name,
root, and default password, changeme are shown. You should type the user name
and password that has been set for the server.
Enabling the Anonymous User
In order to enable the Anonymous/NULL user you must alter the privilege level on
that account. This will let you connect without supplying a
command line. The default password for this user is
ipmitool -I lanplus -H <IPADDR> -U root -P changeme channel setaccess 1 1
privilege=4
ipmitool -I lanplus -H <IPADDR> -P anonymous user list
root with password changeme. This means
ipmitool command on your operating system.
-U user option on the
anonymous.
Appendix D Using IPMItool to View System Information 57

Changing the Default Password
You can also change the default passwords for a particular user ID. First get a list of
users and find the ID for the user you wish to change, then supply it with a new
password, as shown in the following command sequence:
ipmitool -I lanplus -H <IPADDR> -U root -P changeme user list
ID Name Callin Link Auth IPMI Msg Channel Priv Limit
1 false false true NO ACCESS
2 root false false true ADMINISTRATOR
ipmitool -I lanplus -H <IPADDR> -U root -P changeme user set password 2
newpass
ipmitool -I lanplus -H <IPADDR> -U root -P newpass chassis status
Configuring an SSH Key
You can use IPMItool to configure an SSH key for a remote shell user. To do this, first
determine the user ID for the desired remote SP user with the user list command:
ipmitool -I lanplus -H <IPADDR> -U root -P changeme user list
Then supply the user ID and the location of the RSA or DSA public key to use with
the
ipmitool sunoem sshkey command. For example:
ipmitool -I lanplus -H <IPADDR> -U root -P changeme sunoem sshkey set 2
id_rsa.pub
Setting SSH key for user id 2.......done
You can also clear the key for a particular user, for example:
ipmitool -I lanplus -H <IPADDR> -U root -P changeme sunoem sshkey del 2
Deleted SSH key for user id 2
58 Sun Fire X4100/X4100 M2 and X4200/X4200 M2 Servers Diagnostics Guide • May 2007

Using IPMItool to Read Sensors
For more information about supported IPMI 2.0 commands and the sensor naming
for this server, also refer to the Integrated Lights-Out Manager (ILOM)
Administration Guide, 819-1160 and the Integrated Lights-Out Manager Supplement
for Sun Fire X4100 and Sun Fire X4200 Servers, 819-5464.
Reading Sensor Status
There are a number of ways to read sensor status, from a broad overview that lists
all sensors, to querying individual sensors and returning detailed information on
them. See the following sections:
■ “Reading All Sensors” on page 59
■ “Reading Specific Sensors” on page 60
Reading All Sensors
To get a list of all sensors in these servers and their status, use the sdr list
command with no arguments. This returns a large table with every sensor in the
system and its status.
The five fields of the output lines, as read from left to right are:
1. IPMI sensor ID (16-character maximum)
2. IPMI sensor number
3. Sensor status, indicating which thresholds have been exceeded
4. Entity ID and instance
5. Sensor reading
For example:
fp.t_amb | 0Ah | ok | 12.0 | 22 degrees C
Appendix D Using IPMItool to View System Information 59

Reading Specific Sensors
Although the default output is a long list of sensors, it is possible to refine the
output to see only specific sensors. The
argument to limit the output to sensors of a specific type.
available sensor arguments.
TABLE D-1 IPMItool Sensor Arguments
Argument Description Sensors
all All sensor records All sensors
full Full sensor records Temperature, voltage, and fan sensors
compact Compact sensor records Digital Discrete: failure and presence sensors
event Event-only records Sensors used only for matching with SEL
mcloc MC locator records Management Controller sensors
generic Generic locator records Generic devices: LEDs
fru FRU locator records FRU devices
For example, to see only the temperature, voltage, and fan sensors, you would use
the following command, with the
ipmitool -I lanplus -H <IPADDR> -U root -P changeme sdr elist full
fp.t_amb | 0Ah | ok | 12.0 | 22 degrees C
ps.t_amb | 11h | ok | 10.0 | 21 degrees C
ps0.f0.speed | 15h | ok | 10.0 | 11000 RPM
ps1.f0.speed | 19h | ok | 10.1|0RPM
mb.t_amb | 1Ah | ok | 7.0 | 25 degrees C
mb.v_bat | 1Bh | ok | 7.0 | 3.18 Volts
mb.v_+3v3stby | 1Ch | ok | 7.0 | 3.17 Volts
mb.v_+3v3 | 1Dh | ok | 7.0 | 3.34 Volts
mb.v_+5v | 1Eh | ok | 7.0 | 5.04 Volts
mb.v_+12v | 1Fh | ok | 7.0 | 12.22 Volts
mb.v_-12v | 20h | ok | 7.0 | -12.20 Volts
mb.v_+2v5core | 21h | ok | 7.0 | 2.54 Volts
mb.v_+1v8core | 22h | ok | 7.0 | 1.83 Volts
mb.v_+1v2core | 23h | ok | 7.0 | 1.21 Volts
io.t_amb | 24h | ok | 15.0 | 21 degrees C
p0.t_core | 2Bh | ok | 3.0 | 44 degrees C
p0.v_+1v5 | 2Ch | ok | 3.0 | 1.56 Volts
p0.v_+2v5core | 2Dh | ok | 3.0 | 2.64 Volts
p0.v_+1v25core | 2Eh | ok | 3.0 | 1.32 Volts
p1.t_core | 34h | ok | 3.1 | 40 degrees C
p1.v_+1v5 | 35h | ok | 3.1 | 1.55 Volts
p1.v_+2v5core | 36h | ok | 3.1 | 2.64 Volts
p1.v_+1v25core | 37h | ok | 3.1 | 1.32 Volts
ft0.fm0.f0.speed | 43h | ok | 29.0 | 6000 RPM
sdr list command can use an optional
TABLE D-1 describes the
records
full argument.
60 Sun Fire X4100/X4100 M2 and X4200/X4200 M2 Servers Diagnostics Guide • May 2007

ft0.fm1.f0.speed | 44h | ok | 29.1 | 6000 RPM
ft0.fm2.f0.speed | 45h | ok | 29.2 | 6000 RPM
ft1.fm0.f0.speed | 46h | ok | 29.3 | 6000 RPM
ft1.fm1.f0.speed | 47h | ok | 29.4 | 6000 RPM
ft1.fm2.f0.speed | 48h | ok | 29.5 | 6000 RPM
You can also generate a list of all sensors for a specific Entity. Use the list output to
determine which entity you are interested in seeing, then use the
sdr entity
command to get a list of all sensors for that entity. This command accepts an entity
ID and an optional entity instance argument. If an entity instance is not specified, it
will display all instances of that entity.
The entity ID is given in the 4th field of the output, as read from left to right. For
example, in the output shown in the previous example, all the fans are entity 29. The
last fan listed (29.5) is entity 29, with instance 5:
ft1.fm2.f0.speed | 48h | ok | 29.5 | 6000 RPM
For example, to see all fan-related sensors, you would use the following command
that uses the entity 29 argument.
ipmitool -I lanplus -H <IPADDR> -U root -P changeme sdr entity 29
ft0.fm0.fail | 3Dh | ok | 29.0 | Predictive Failure Deasserted
ft0.fm0.led | 00h | ns | 29.0 | Generic Device @20h:19h.0
ft0.fm1.fail | 3Eh | ok | 29.1 | Predictive Failure Deasserted
ft0.fm1.led | 00h | ns | 29.1 | Generic Device @20h:19h.1
ft0.fm2.fail | 3Fh | ok | 29.2 | Predictive Failure Deasserted
ft0.fm2.led | 00h | ns | 29.2 | Generic Device @20h:19h.2
ft1.fm0.fail | 40h | ok | 29.3 | Predictive Failure Deasserted
ft1.fm0.led | 00h | ns | 29.3 | Generic Device @20h:19h.3
ft1.fm1.fail | 41h | ok | 29.4 | Predictive Failure Deasserted
ft1.fm1.led | 00h | ns | 29.4 | Generic Device @20h:19h.4
ft1.fm2.fail | 42h | ok | 29.5 | Predictive Failure Deasserted
ft1.fm2.led | 00h | ns | 29.5 | Generic Device @20h:19h.5
ft0.fm0.f0.speed | 43h | ok | 29.0 | 6000 RPM
ft0.fm1.f0.speed | 44h | ok | 29.1 | 6000 RPM
ft0.fm2.f0.speed | 45h | ok | 29.2 | 6000 RPM
ft1.fm0.f0.speed | 46h | ok | 29.3 | 6000 RPM
ft1.fm1.f0.speed | 47h | ok | 29.4 | 6000 RPM
ft1.fm2.f0.speed | 48h | ok | 29.5 | 6000 RPM
Other queries can include a particular type of sensor. The command in the following
example would return a list of all Temperature type sensors in the SDR.
ipmitool -I lanplus -H <IPADDR> -U root -P changeme sdr type temperature
sys.tempfail | 03h | ok | 23.0 | Predictive Failure Deasserted
mb.t_amb | 05h | ok | 7.0 | 25 degrees C
fp.t_amb | 14h | ok | 12.0 | 25 degrees C
ps.t_amb | 1Bh | ok | 10.0 | 24 degrees C
io.t_amb | 22h | ok | 15.0 | 23 degrees C
p0.t_core | 2Ch | ok | 3.0 | 35 degrees C
p1.t_core | 35h | ok | 3.1 | 36 degrees C
Appendix D Using IPMItool to View System Information 61

Using IPMItool to View the ILOM SP System Event Log
The ILOM SP System Event Log (SEL) provides storage of all system events. You can
view the SEL with IPMItool. See the following sections.
■ “Viewing the SEL With IPMItool” on page 62
■ “Clearing the SEL With IPMItool” on page 63
■ “Using the Sensor Data Repository (SDR) Cache” on page 64
■ “Sensor Numbers and Sensor Names in SEL Events” on page 64
Viewing the SEL With IPMItool
There are two different IPMI commands that you can use to see different levels of
detail.
■ View the ILOM SP SEL with a minimal level of detail by using the sel list
command:
ipmitool -I lanplus -H <IPADDR> -U root -P changeme sel list
100 | Pre-Init Time-stamp | Entity Presence #0x16 | Device Absent
200 | Pre-Init Time-stamp | Entity Presence #0x26 | Device Present
300 | Pre-Init Time-stamp | Entity Presence #0x25 | Device Absent
400 | Pre-Init Time-stamp | Phys Security #0x01 | Gen Chassis intrusion
500 | Pre-Init Time-stamp | Entity Presence #0x12 | Device Present
Note – When you use this command, an event record gives a sensor number, but
does not display the name of the sensor for the event. For example, in line 100 in the
sample output above, the sensor number
0x16 is displayed. For information about
how to map sensor names to the different sensor number formats that might be
displayed, see “Sensor Numbers and Sensor Names in SEL Events” on page 64.
■ View the ILOM SP SEL with a detailed event output by using the sel elist
command instead of sel list. The sel elist command cross-references event
records with sensor data records to produce descriptive event output. It takes
longer to execute because it has to read from both the SEL and the Static Data
Repository (SDR). For increased speed, generate an SDR cache before using the
sel elist command. See “Using the Sensor Data Repository (SDR) Cache” on
page 64. For example:
62 Sun Fire X4100/X4100 M2 and X4200/X4200 M2 Servers Diagnostics Guide • May 2007

ipmitool -I lanplus -H <IPADDR> -U root -P changeme sel elist first 3
100 | Pre-Init Time-stamp | Temperature fp.t_amb | Upper Non-critical going
high | Reading 31 > Threshold 30 degrees C
200 | Pre-Init Time-stamp | Power Supply ps1.pwrok | State Deasserted
300 | Pre-Init Time-stamp | Entity Presence ps1.prsnt | Device Present
Certain qualifiers are available to refine and limit the SEL output. If you want to see
only the first NUM records, add that as a qualifier to the command. If you want to
see the last NUM records, use that qualifier. For example, to see the last three records
in the SEL, use this command:
ipmitool -I lanplus -H <IPADDR> -U root -P changeme sel elist last 3
800 | Pre-Init Time-stamp | Entity Presence ps1.prsnt | Device Absent
900 | Pre-Init Time-stamp | Phys Security sys.intsw | Gen Chassis intrusion
a00 | Pre-Init Time-stamp | Entity Presence ps0.prsnt | Device Present
If you want to get more detailed information on a particular event, you can use the
sel get ID command, in which you specify an SEL record ID. For example:
ipmitool -I lanplus -H <IPADDR> -U root -P changeme sel get 0x0a00
SEL Record ID : 0a00
Record Type : 02
Timestamp : 07/06/1970 01:53:58
Generator ID : 0020
EvM Revision : 04
Sensor Type : Entity Presence
Sensor Number : 12
Event Type : Generic Discrete
Event Direction : Assertion Event
Event Data (RAW) : 01ffff
Description : Device Present
Sensor ID : ps0.prsnt (0x12)
Entity ID : 10.0
Sensor Type (Discrete): Entity Presence
States Asserted : Availability State
[Device Present]
In the example above, this particular event describes that the Power Supply #0 is
detected and present.
Clearing the SEL With IPMItool
To clear the SEL, use the sel clear command:
ipmitool -I lanplus -H <IPADDR> -U root -P changeme sel clear
Clearing SEL. Please allow a few seconds to erase.
Appendix D Using IPMItool to View System Information 63

Using the Sensor Data Repository (SDR) Cache
When working with the ILOM SP, certain operations can be expensive in terms of
execution time and the amount of data transferred. Typically, issuing the
sdr elist
command requires the entire SDR to be read from the SP. Similarly, the sel elist
command needs to read both the SDR and the SEL from the SP in order to crossreference events and display useful information.
To speed up these operations, it is possible to pre-cache the static data in the SDR
and feed it back into IPMItool. This can have a dramatic effect in the processing time
for some commands. In order to generate an SDR cache for later ruse, use the
dump command. For example:
ipmitool -I lanplus -H <IPADDR> -U root -P changeme sdr dump galaxy.sdr
Dumping Sensor Data Repository to 'galaxy.sdr'
sdr
After you have generated a cache file, it can be supplied to future invocations of
IPMItool with the
ipmitool -I lanplus -H <IPADDR> -U root -P changeme -S galaxy.sdr sel elist
100 | Pre-Init Time-stamp | Entity Presence ps1.prsnt | Device Absent
200 | Pre-Init Time-stamp | Entity Presence io.f0.prsnt | Device Absent
300 | Pre-Init Time-stamp | Power Supply ps0.vinok | State Asserted
...
-S option. For example:
Sensor Numbers and Sensor Names in SEL Events
Depending on which IPMI command you use, the sensor number that is displayed
for an event might appear in slightly different formats. See the following examples:
■ The sensor number for the sensor ps1.prsnt (power supply 1 present) can be
displayed as either
■ 38h is equivalent to 0x38.
■ 4Bh is equivalent to 0x4B.
1Fh or 0x1F.
The output from certain commands might not display the sensor name along with
the corresponding sensor number. To see all sensor names in your server mapped to
the corresponding sensor numbers, you can use the following command:
ipmitool -H 129.144.82.21 -U root -P changeme sdr elist
sys.id | 00h | ok | 23.0 | State Asserted
sys.intsw | 01h | ok | 23.0 |
sys.psfail | 02h | ok | 23.0 | Predictive Failure Asserted
...
In the sample output above, the sensor name is in the first column and the
corresponding sensor number is in the second column.
For a detailed explanation of each sensor, listed by name, refer to the Integrated
Lights Out Manager Supplement For Sun Fire X4100 and Sun Fire X4200 Servers,
819-5464.
64 Sun Fire X4100/X4100 M2 and X4200/X4200 M2 Servers Diagnostics Guide • May 2007

Viewing Component Information With IPMItool
You can view information about system hardware components. The software refers
to these components as field-replaceable unit (FRU) devices.
To read the FRU inventory information on these servers, you must first have the
FRU ROMs programmed. After that is done, you can see a full list of the available
FRU data by using the
(only two FRU devices are shown in the example, but all devices would be shown).
ipmitool -I lanplus -H <IPADDR> -U root -P changeme fru print
FRU Device Description : Builtin FRU Device (ID 0)
Board Mfg : BENCHMARK ELECTRONICS
Board Product : ASSY,SERV PROCESSOR,X4X00
Board Serial : 0060HSV-0523000195
Board Part Number : 501-6979-02
Board Extra : 000-000-00
Board Extra : HUNTSVILLE,AL,USA
Board Extra : b302
Board Extra : 06
Board Extra : GRASP
Product Manufacturer : SUN MICROSYSTEMS
Product Name : ILOM
FRU Device Description : sp.net0.fru (ID 2)
Product Manufacturer : MOTOROLA
Product Name : FAST ETHERNET CONTROLLER
Product Part Number : MPC8248 FCC
Product Serial : 00:03:BA:D8:73:AC
Product Extra : 01
Product Extra : 00:03:BA:D8:73:AC
...
fru print command, as shown in the following example
Appendix D Using IPMItool to View System Information 65

Viewing and Setting Status LEDs
In these servers, all LEDS are active-driven; that is, the SP is responsible for the I2C
commands that assert and deassert each GPIO pin for each flash cycle.
The IPMItool command for reading LED status is:
ipmitool -I lanplus -H <IPADDR> sunoem led get <sensor ID>
The IPMItool command for setting LED status is:
ipmitool -I lanplus -H <IPADDR> sunoem led set <sensor ID> <LED mode>
It is possible for both of these commands to operate on all sensors at once by
substituting
their status with one command.
See “LED Sensor IDs” on page 66 and “LED Modes” on page 68 for information about
the variables in these commands.
LED Sensor IDs
All LEDs in these servers are represented by two sensors:
■ A Generic Device Locator record describes the location of the sensor in the
system. It has an
get commands. You can get a list of all of these sensors by issuing the sdr list
generic command.
■ A Digital Discrete fault sensor monitors the status of the LED pin and is asserted
when the LED is active. These sensors have a
events to the SEL.
all for the sensor ID. That way, you can easily get a list of all LEDs and
.led suffix and is the name that is fed into the led set and led
.fail suffix and are used to report
Each LED has both a descriptor and a status reading sensor, and the two are linked;
that is, if you use the
is represented in the associated
.led sensor to turn on a particular LED, then the status change
.fail sensor. Also for some of these, an event is
generated in the SEL. For LEDs that blink on failure instead of steady-on, there
events are not generated (this is because display an event every time it flashed in the
blink cycle).
TABLE D-2 lists the LED sensor IDs in these servers. See “Status Indicator LEDs” on
page 35 for diagrams of the LED locations.
66 Sun Fire X4100/X4100 M2 and X4200/X4200 M2 Servers Diagnostics Guide • May 2007

TABLE D-2 LED Sensor IDs
LED Sensor ID Description
sys.power.led System Power (front+back)
sys.locate.led System Locate (front+back)
sys.alert.led System Alert (front+back)
sys.psfail.led System Power Supply Failed
sys.tempfail.led System Over Temperature
sys.fanfail.led System Fan Failed
bp.power.led Back Panel Power
bp.locate.led Back Panel Locate
bp.alert.led Back Panel Alert
fp.power.led Front Panel Power
fp.locate.led Front Panel Locate
fp.alert.led Front Panel Alert
io.hdd0.led Hard Disk 0 Failed
io.hdd1.led Hard Disk 1 Failed
io.hdd2.led Hard Disk 2 Failed
io.hdd3.led Hard Disk 3 Failed
io.f0.led I/O Fan Failed
p0.led CPU 0 Failed
p0.d0.led CPU 0 DIMM 0 Failed
p0.d1.led CPU 0 DIMM 1 Failed
p0.d2.led CPU 0 DIMM 2 Failed
p0.d3.led CPU 0 DIMM 3 Failed
p1.led CPU 1 Failed
p1.d0.led CPU 1 DIMM 0 Failed
p1.d1.led CPU 1 DIMM 1 Failed
p1.d2.led CPU 1 DIMM 2 Failed
p1.d3.led CPU 1 DIMM 3 Failed
ft0.fm0.led Fan Tray 0 Module 0 Failed
ft0.fm1.led Fan Tray 0 Module 1 Failed
Appendix D Using IPMItool to View System Information 67

TABLE D-2 LED Sensor IDs
LED Sensor ID Description
ft0.fm2.led Fan Tray 0 Module 2 Failed
ft1.fm0.led Fan Tray 1 Module 0 Failed
ft1.fm1.led Fan Tray 1 Module 1 Failed
ft1.fm2.led Fan Tray 1 Module 2 Failed
LED Modes
You supply the modes in TABLE D-3 to the led set commands to specify in which
mode you want the LED to be placed.
TABLE D-3 LED Modes
Mode Description
OFF LED off
ON LED steady-on
STANDBY 100 ms on, 2900 ms off
SLOW 1 Hz blink rate
FAST 4 Hz blink rate
LED Sensor Groups
Because each LED has its own sensor and can be controlled independently, there is
some overlap in sensors. In particular there are separate LEDs defined for the power,
locate, and alert LEDs on the front and back panels.
It is desirable to have these sensors “linked” so that both the front and back panel
LEDs can be controlled at the same time. This is handled through the use of Entity
Association Records. These are records in the SDR that contain a list of entities that
are considered part of a group.
For each Entity Association Record we also define another Generic Device Locator as
a logical entity to indicate to system software that it refers to a group of LEDS rather
than a single physical LED.
68 Sun Fire X4100/X4100 M2 and X4200/X4200 M2 Servers Diagnostics Guide • May 2007
TABLE D-4 describes the LED sensor groups.

TABLE D-4 LED Sensor Groups
Group Name Sensors in Group
sys.power.led bp.power.led
fp.power.led
sys.locate.led bp.locate.led
fp.locate.led
sys.alert.led bp.alert.led
fp.alert.led
For example, to set both the front and back panel Power/OK leds to a standby blink
rate, you could use this command:
ipmitool -I lanplus -H <IPADDR> -U root -P changeme sunoem led set
sys.power.led standby
Set LED fp.power.led to STANDBY
Set LED bp.power.led to STANDBY
Then you could turn off the back panel Power/OK LED but leave the front panel
Power/OK LED blinking by using this command:
ipmitool -I lanplus -H <IPADDR> -U root -P changeme sunoem led set
bp.power.led off
Set LED bp.power.led to OFF
Using IPMItool Scripts For Testing
For testing purposes, it is often useful to change the status of all (or at least several)
LEDs at once. You can do this by constructing an IPMItool script and executing it
with the
For example, a script to turn on all Fan module LEDS would look like:
sunoem led set ft0.fm0.led on
sunoem led set ft0.fm1.led on
sunoem led set ft0.fm2.led on
sunoem led set ft1.fm0.led on
sunoem led set ft1.fm1.led on
sunoem led set ft1.fm2.led on
If this script file were then named, leds_fan_on.isc, you would use it in a
command as shown here:
ipmitool -I lanplus -H <IPADDR> -U root -P changeme exec leds_fan_on.isc
exec command.
Appendix D Using IPMItool to View System Information 69

70 Sun Fire X4100/X4100 M2 and X4200/X4200 M2 Servers Diagnostics Guide • May 2007

APPENDIX
E
Error Handling
Note – This chapter applies to all Sun Fire X4100/X4100 M2 and X4200/X4200 M2
servers, unless otherwise noted.
This appendix contains information about how the servers process and log errors.
See the following sections:
■ “Handling of Uncorrectable Errors” on page 71
■ “Handling of Correctable Errors” on page 74
■ “Handling of Parity Errors (PERR)” on page 76
■ “Handling of System Errors (SERR)” on page 79
■ “Handling Mismatching Processors” on page 81
■ “Hardware Error Handling Summary” on page 82
Handling of Uncorrectable Errors
This section lists facts and considerations about how the server handles
uncorrectable errors.
Note – The BIOS ChipKill feature must be disabled if you are testing for failures of
multiple bits within a DRAM (ChipKill corrects for the failure of a four-bit wide
DRAM).
■ The BIOS logs the error to the SP system event log (SEL), through the board
management controller (BMC).
■ The SP's SEL is updated with the failing DIMM pair's particular bank address.
■ The system reboots.
■ The BIOS logs the error in DMI.
71

Note – If the error is on low 1MB, the BIOS freezes after rebooting. Therefore, no
DMI log is recorded.
■ An example of the error is reported by the SEL through IPMI 2.0 is as follows:
■ When low memory is erroneous, the BIOS is frozen on pre-boot low memory
test because the BIOS cannot decompress itself into faulty DRAM and execute
the following items:
ipmitool> sel list
100 | 08/26/2005 | 11:36:09 | OEM #0xfb |
200 | 08/26/2005 | 11:36:12 | System Firmware Error | No
usable system memory
300 | 08/26/2005 | 11:36:12 | Memory | Memory Device
Disabled | CPU 0 DIMM 0
■ When the faulty DIMM is beyond the BIOS's low 1MB extraction space, proper
boot happens:
ipmitool> sel list
100 | 08/26/2005 | 05:04:04 | OEM #0xfb |
200 | 08/26/2005 | 05:04:09 | Memory | Memory Device
Disabled | CPU 0 DIMM 0
■ Note the following considerations for this revision:
■ Uncorrectable ECC Memory Error is not reported.
■ Multi-bit ECC errors are reported as Memory Device Disabled.
■ On first reboot, BIOS logs a HyperTransport Error in the DMI log.
■ The BIOS disables the DIMM.
■ The BIOS sends the SEL records to the BMC.
■ The BIOS reboots again.
■ The BIOS skips the faulty DIMM on the next POST memory test.
■ The BIOS reports available memory, excluding the faulty DIMM pair.
FIGURE E-1 shows an example of a DMI log screen from BIOS Setup Page.
72 Sun Fire X4100/X4100 M2 and X4200/X4200 M2 Servers Diagnostics Guide • May 2007

FIGURE E-1 Sample DMI Log Screen, Uncorrectable Error
Appendix E Error Handling 73

Handling of Correctable Errors
This section lists facts and considerations about how the server handles correctable
errors.
■ During BIOS POST:
■ The BIOS polls the MCK registers.
■ The BIOS logs to DMI.
■ The BIOS logs to the SP SEL through the BMC.
■ The feature is turned off at OS boot time by default.
■ The following Linux versions report correctable ecc syndrome and memory fill
errors in /var/log, if kernel flag mce is indicated at boot time, or if mce is
enabled through kernel compile or installation:
■ RH3 Update5 single core
■ RH4 Update1+
■ SLES9 SP1+
■ The Linux kernel (x86_64/kernel/mce.c) repeats a report every 30 seconds
until another error is encountered and a flag is reset.
■ Solaris support provides full self-healing and automated diagnosis for the CPU
and Memory subsystems.
■ FIGURE E-2 shows an example of a DMI log screen from BIOS Setup Page:
FIGURE E-2 Sample DMI Log Screen, Correctable Error
74 Sun Fire X4100/X4100 M2 and X4200/X4200 M2 Servers Diagnostics Guide • May 2007

■ If during any stage of memory testing the BIOS finds itself incapable of
reading/writing to the DIMM, it takes the following actions:
■ The BIOS disables the DIMM as indicated by the Memory Decreased message
in the example in
■ The BIOS logs an SEL record.
■ The BIOS logs an event in DMI.
FIGURE E-3.
FIGURE E-3 Sample DMI Log Screen, Correctable Error, Memory Decreased
Appendix E Error Handling 75

Handling of Parity Errors (PERR)
This section lists facts and considerations about how the server handles parity errors
(PERR).
■ The handling of parity errors works through NMIs.
■ During BIOS POST the NMI is logged in the DMI and the SP SEL. See the
following example command and output:
[root@d-mpk12-53-238 root]# ipmitool -H 129.146.53.95 -U root
-P changeme -I lan sel list -v
SEL Record ID : 0100
Record Type : 00
Timestamp : 01/10/2002 20:16:16
Generator ID : 0001
EvM Revision : 04
Sensor Type : Critical Interrupt
Sensor Number : 00
Event Type : Sensor-specific Discrete
Event Direction : Assertion Event
Event Data : 04ff00
Description : PCI PERR
■ FIGURE E-4 shows an example of a DMI log screen from BIOS Setup Page, with a
parity error.
76 Sun Fire X4100/X4100 M2 and X4200/X4200 M2 Servers Diagnostics Guide • May 2007

FIGURE E-4 Sample DMI Log Screen, PCI Parity Error
■ The BIOS displays the following messages and freezes (during POST or DOS):
■ NMI EVENT!!
■ System Halted due to Fatal NMI!
■ The Linux NMI trap catches the interrupt and reports the following NMI
“confusion report“ sequence:
Aug 5 05:15:00 d-mpk12-53-159 kernel: Uhhuh. NMI received
for unknown reason 2d on CPU 0.
Aug 5 05:15:00 d-mpk12-53-159 kernel: Uhhuh. NMI received
for unknown reason 2d on CPU 1.
Aug 5 05:15:00 d-mpk12-53-159 kernel: Dazed and confused,
but trying to continue
Aug 5 05:15:00 d-mpk12-53-159 kernel: Do you have a strange
power saving mode enabled?
Aug 5 05:15:00 d-mpk12-53-159 kernel: Uhhuh. NMI received
for unknown reason 3d on CPU 1.
Aug 5 05:15:00 d-mpk12-53-159 kernel: Dazed and confused,
but trying to continue
Aug 5 05:15:00 d-mpk12-53-159 kernel: Do you have a strange
power saving mode enabled?
Aug 5 05:15:00 d-mpk12-53-159 kernel: Uhhuh. NMI received
for unknown reason 3d on CPU 0.
Appendix E Error Handling 77

Aug 5 05:15:00 d-mpk12-53-159 kernel: Dazed and confused,
but trying to continue
Aug 5 05:15:00 d-mpk12-53-159 kernel: Do you have a strange
power saving mode enabled?
Aug 5 05:15:00 d-mpk12-53-159 kernel: Dazed and confused,
but trying to continue
Aug 5 05:15:00 d-mpk12-53-159 kernel: Do you have a strange
power saving mode enabled?
Note – The Linux system reboots, but does not inform the BIOS of this incident.
78 Sun Fire X4100/X4100 M2 and X4200/X4200 M2 Servers Diagnostics Guide • May 2007

Handling of System Errors (SERR)
This section lists facts and considerations about how the server handles system
errors (SERR).
■ System error handling works through the HyperTransport Synch Flood Error
mechanism in the AMD controller.
■ The following events happen during BIOS POST:
■ POST reports of any previous system errors at the bottom of screen. See
FIGURE E-5 for an example.
FIGURE E-5 Sample POST Screen, Previous System Error Listed
■ SERR and HyperTransport Synch Flood Error are logged in DMI and the SP
SEL. See the following sample output:
SEL Record ID : 0a00
Record Type : 00
Timestamp : 08/10/2005 06:05:32
Generator ID : 0001
EvM Revision : 04
Sensor Type : Critical Interrupt
Sensor Number : 00
Event Type : Sensor-specific Discrete
Appendix E Error Handling 79

Event Direction : Assertion Event
Event Data : 05ffff
Description : PCI SERR
■ FIGURE E-6 shows an example DMI log screen from the BIOS Setup Page with a
system error.
FIGURE E-6 Sample DMI Log Screen, System Error Listed
80 Sun Fire X4100/X4100 M2 and X4200/X4200 M2 Servers Diagnostics Guide • May 2007

Handling Mismatching Processors
This section lists facts and considerations about how the server handles mismatching
processors.
■ The BIOS performs a complete POST.
■ The BIOS displays a report of any mismatching CPUs, as shown in the following
example.
Note – The following example report, the names of the AMD controllers in the
original Sun Fire X4100/X4200 are used.
AMIBIOS(C)2003 American Megatrends, Inc.
BIOS Date: 08/10/05 14:51:11 Ver: 08.00.10
CPU : AMD Opteron(tm) Processor 254, Speed : 2.4 GHz
Count : 3, CPU Revision, CPU0 : E4, CPU1 : E6
Microcode Revision, CPU0 : 0, CPU1 : 0
DRAM Clocking CPU0 = 400 MHz, CPU1 Core0/1 = 400 MHz
Sun Fire X4100 Server, 1 AMD North Bridge, Rev E4
1 AMD North Bridge, Rev E6
1 AMD 8111 I/O Hub, Rev C2
2 AMD 8131 PCI-X Controllers, Rev B2
System Serial Number : 0505AMF028
BMC Firmware Revision : 1.00
Checking NVRAM..
Initializing USB Controllers .. Done.
Press F2 to run Setup (CTRL+E on Remote Keyboard)
Press F12 to boot from the network (CTRL+N on Remote
Keyboard)
Press F8 for BBS POPUP (CTRL+P on Remote Keyboard)
■ No SEL or DMI event is recorded.
■ The system enters Halt mode and the following message is displayed.
******** Warning: Bad Mix of Processors *********
Multiple core processors cannot be installed with single core
processors.
Fatal Error... System Halted.
Appendix E Error Handling 81

Hardware Error Handling Summary
This section contains a table that summarizes the most-common hardware errors
that you might encounter with these servers.
TABLE E-1 Hardware Error Handling Summary
Error Description Handling
SP failure The SP fails to boot
upon application
of system power.
SP failure SP boots but fails
POST.
BIOS POST
failure
Server BIOS does
not pass POST.
The SP controls the system reset so the system may power on but will not come out of
reset.
• During power up, the SP's boot loader
turns on the power LED.
• During SP boot, Linux startup, and SP
sanity check The power LED blinks.
• The LED is turned off when SP
management code (the IPMI stack) is
started.
• At exit of BIOS POST the LED goes to
STEADY ON state.
The SP controls the system RESET so the
system will not come out of reset.
There are fatal and non-fatal errors in POST.
The BIOS does detect some errors that are
announced during POST as POST codes on
the bottom right corner of the display on the
serial console and on the video display.
Some POST codes are forwarded to the SP
for logging.
The POST codes described above do not
come out in sequential order and some are
repeated, because some POST codes are issued by code in add-in card BIOS expansion
ROMs.
In the case of early POST failures (for example, the BSP fails to operate correctly) BIOS
just halts without logging.
For some other POST failures subsequent to
memory and SP initialization, the BIOS logs
a message to the SP’s SEL.
Logged (DMI
Log or SP
SEL) Fatal?
Not logged Fatal
Not logged Fatal
82 Sun Fire X4100/X4100 M2 and X4200/X4200 M2 Servers Diagnostics Guide • May 2007

TABLE E-1 Hardware Error Handling Summary
Error Description Handling
Single-bit
DRAM ECC
error
With ECC enabled
in the BIOS Setup,
the CPU detects
and corrects a single-bit error on the
DIMM interface.
The CPU corrects the error in hardware. No
interrupt or machine check is generated by
the hardware. The polling is triggered every
half-second by SMI timer interrupts, and is
done by the BIOS SMI handler.
The BIOS SMI handler starts logging each
detected error, and stops logging when the
limit for the same error is reached. The
BIOS's polling is disablable through a software interface.
Single four-bit
DRAM error
With CKIP-KILL
enabled in the
BIOS Setup, the
CPU detects and
corrects for the
failure of a fourbit-wide DRAMon
the DIMM interface.
The CPU corrects the error in hardware. No
interrupt or machine check is generated by
the hardware. The polling is triggered every
half-second by SMI timer interrupts, and is
done by the BIOS SMI handler.
The BIOS SMI handler starts logging each
detected error, and stops logging when the
limit for the same error is reached. The
BIOS's polling is disablable via a software
interface.
Uncorrectable DRAM
ECC error
The CPU detects
an uncorrectable
multiple-bit DIMM
error.
The "sync flood" method of handling this is
used to prevent the erroneous data from being propogated across the HyperTransport
links. The system reboots, the BIOS recovers
the machine check register information,
maps this information to the failing DIMM
(when CHIPKILL is disabled) or DIMM pair
(when CHIPKILL is enabled), and logs that
information to the SP.
The BIOS will halt the CPU.
Unsupported
DIMM configuration
Unsupported
DIMMs are used,
or supported
The BIOS displays an error message, logs an
error, and halts the system.
DIMMs are loaded improperly.
HyperTransport link failure
CRC or link error
on one of the HyperTransport Links
Sync floods on HyperTransport links, the
machine resets itself, and error information
gets retained through reset.
The BIOS reports, A Hyper Transport
sync flood error occurred on last
boot, press F1 to continue.
Logged (DMI
Log or SP
SEL) Fatal?
SP SEL Normal
operation
SP SEL Normal
operation
SP SEL Fatal
DMI Log
Fatal
SP SEL
DMI Log
Fatal
SP SEL
Appendix E Error Handling 83

TABLE E-1 Hardware Error Handling Summary
Error Description Handling
PCI SERR,
PERR
System or parity
error on a PCI bus
Sync floods on HyperTransport links, the
machine resets itself, and error information
gets retained through reset.
The BIOS reports, A Hyper Transport
sync flood error occurred on last
boot, press F1 to continue.
BIOS POST
Microcode Error
The BIOS could
not find or load
the CPU Micro-
The BIOS displays an error message, logs
the error to DMI, and boots.
code Update to the
CPU. The message
most likely appears when a new
CPU is installed in
a motherboard
with an outdated
BIOS. In this case,
the BIOS must be
updated.
BIOS POST
CMOS Checksum Bad
Unsupported
CPU configuration
CMOS contents
failed the Checksum check.
The BIOS supports mismatched
frequency and
The BIOS displays an error message, logs
the error to DMI, and boots.
The BIOS displays an error message, logs
the error, and halts the system.
steppings in CPU
configuration, but
some CPUs might
not be supported.
Correctable
error
The CPU detects a
variety of correctable errors in the
MCi_STATUS registers.
The CPUcorrects the error in hardware. No
interrupt or machine check is generated by
the hardware. The polling is triggered every
half-second by SMI timer interrupts, and is
done by the BIOS SMI handler.
The SMI handler logs a message to the SP
SEL if the SEL is available, otherwise SMI
logs a message to DMI. The BIOS's polling is
disablable through software SMI.
Single fan failure
Fan failure is detected by reading
tach signals.
The Front Fan Fault, Service Action Required, and individual fan module LEDs are
lit.
Logged (DMI
Log or SP
SEL) Fatal?
DMI Log
Fatal
SP SEL
DMI Log Non-fatal
DMI Log Non-fatal
DMI Log Fatal
DMI Log
SP SEL
Normal
operation
SP SEL Non-fatal
84 Sun Fire X4100/X4100 M2 and X4200/X4200 M2 Servers Diagnostics Guide • May 2007

TABLE E-1 Hardware Error Handling Summary
Error Description Handling
Multiple fan
failure
Single power
supply failure
Fan failure is detected by reading
tach signals.
When any of the
AC/DC
The Front Fan Fault, Service Action Required, and individual fan module LEDs are
lit.
Service Action Required, and Power Sup-
ply/Rear Fan Tray Fault LEDs are lit.
PS_VIN_GOOD or
PS_PWR_OK signals are deasserted.
DC/DC power converter
failure
Any
POWER_GOOD
signal is deasserted from the
The Service Action Required LED is lit, the
system is powered down to standby power
mode, and the Power LED enters standby
blink state.
DC/DC converters.
Voltage
above/below
Threshold
The SP monitors
system voltages
and detects voltage
The Service Action Required LED and Pow-
er Supply/Rear Fan Tray Fault LED blink.
above or below a
given threshold.
High temperature
the SP monitors
CPU and system
temperatures, and
detects tempera-
The Service Action Required LED and Sys-
tem Overheat Fault LED blink. The mother-
board is shut down above the specified
critical level.
ture above a given
threshold.
Processor
thermal trip
The CPU drives
the
THERMTRIP_L
CPLD shuts down power to the CPU. The
Service Action Required LED and System
Overheat Fault LED blink.
signal upon detecting an overtemp
condition.
Boot device
Failure
The BIOS is not
able to boot from a
device in the boot
device list.
The BIOS goes to the next boot device in the
list. If all devices inthe list fail, an error mes-
sage is displayed, retry from beginning of
list. SP can control/change boot order
Logged (DMI
Log or SP
SEL) Fatal?
SP SEL Fatal
SP SEL Non-fatal
SP SEL Fatal
SP SEL Fatal
SP SEL Fatal
SP SEL Fatal
DMI Log Non-fatal
Appendix E Error Handling 85

86 Sun Fire X4100/X4100 M2 and X4200/X4200 M2 Servers Diagnostics Guide • May 2007

Index
A
anonymous user, IPMItool 57
B
back panel LEDs
definitions 38
locations 37
BIOS
event logs 23
POST code checkpoints 30
POST codes 28
POST options 27
POST overview 25
redirecting console output for POST 26
Bootable Diagnostics CD 20
C
comments and suggestions x
component inventory
viewing with ILOM SP GUI 48
viewing with IPMItool 65
console output, redirecting 26
correctable errors, handling 74
CPU fault LED 42
D
diagnostic software
Bootable Diagnostics CD 20
SunVTS 19
DIMM fault LEDs, definition 42
DIMMs
fault LEDs 11
isolating errors 16
population rules 14
E
emergency shutdown 5
error handling
correctable 74
hardware errors 82
mismatching processors 81
parity errors 76
system errors 79
uncorrectable errors 71
event logs, BIOS 23
external inspection 4
external LEDs 35
F
fan fault LED, front panel 37
fan module fault LEDs 42
faults, DIMM 11
finding sensor names 64
Front Fan Fault LED 37
front panel LEDs
definitions 36
locations 36
front panel Power button 5
FRU inventory
viewing with ILOM SP GUI 48
viewing with IPMItool 65
87

G
general troubleshooting guidelines 3
graceful shutdown 5
GRASP board power status LED 42
guidelines for troubleshooting 3
H
hard disk drive status LEDs 37
hardware errors, handling 82
I
ILOM SP GUI
general information 43
serial connection 44
time stamps 47
viewing component inventory 48
viewing sensors 50
viewing SP SEL 45
inspection
external 4
internal 5
Integrated Lights-Out Manager Service Processor,
See ILOM SP
Intelligent PlatformManagement Interface, SeeIPMI
internal inspection 5
internal LEDs 39
IPMI, general information 56
IPMItool
changing password 58
clearing SP SEL 63
configuring SSH key 58
connecting to server 57
enabling anonymous user 57
general information 56
LED modes 68
LED sensor groups 68
LED sensor IDs 66
location of package 56
man page 56
setting LED status 66
using scripts for testing 69
using SDR 64
viewing component inventory 65
viewing LED status 66
viewing sensor status 59
viewing SP SEL 62
isolating DIMM ECC errors 16
L
LEDs
back panel definitions 38
back panel locations 37
CPU fault 42
DIMM fault 42
external 35
fan module fault 42
Front Fan Fault 37
front panel definitions 36
front panel locations 36
GRASP Board Power Status 42
hard disk drive status 37
internal 39
Locate 36
modes 68
power supply status 38
Power Supply/Rear Fan Tray Fault 37
Power/OK 36
rear fan tray fault 38
sensor groups 68
sensor IDs 66
Service Action Required 36
setting status with IPMItool 66
System Overheat Fault 37
viewing status with IPMItool 66
Locate LED and button 36
M
mapping sensor numbers to sensor names 64
mismatching processors, error handling 81
O
overview, SunVTS diagnostics 19
P
parity errors, handling 76
password, changing with IPMItool 58
PERR 76
population rules for DIMMs 14
POST
changing options 27
code checkpoints 30
codes table 28
overview 25
88 Sun Fire X4100/X4100 M2 and X4200/X4200 M2 Servers Diagnostics Guide • May 2007

redirecting console output 26
Power button, front panel 5
power off procedure 5
power supply status LEDs 38
Power Supply/Rear Fan Tray Fault LED 37
Power/OK LED 36
power-on self test, see POST
processors mismatched, error 81
R
rear fan tray fault LED 38
redirecting console output 26
related documentation viii
Resource CD 56
S
safety guidelines vii
scripts, IPMItool 69
SDR, using with IPMItool 64
sensor data repository, See SDR
sensor IDs for LEDs 66
sensor number formats 64
sensors
viewing with ILOM SP GUI 50
viewing with IPMItool 59
serial connection to ILOM SP 44
serial number locations 3
SERR 79
Service Action Required LED 36
Service Processor system event log, See SP SEL
shutdown procedure 5
SP SEL
clearing with IMPItool 63
sensor numbers and names 64
time stamps 47
using SDR 64
viewing with ILOM SP GUI 45
viewing with IPMItool 62
SSH key, configuring with IPMItool 58
sticker, serial number 3
SunVTS
Bootable Diagnostics CD 20
documentation 20
logs 21
overview 19
system errors, handling 79
System Overheat Fault LED 37
T
time stamps in ILOM SP SEL 47
troubleshooting guidelines 3
U
uncorrectable errors, handling 71
V
visual inspection of system 4
Index 89

90 Sun Fire X4100/X4100 M2 and X4200/X4200 M2 Servers Diagnostics Guide • May 2007
 Loading...