

Page 1

Owner’s Manual
Page 2

Table of Contents
Important Hot Tub Owner Information.....................................................1
Important Safety Instructions.........................................................................2
Locating Your Sundance Hot Tub .................................................................8
General Electrical Safety Instructions........................................................9
Electrical Installation Instructions (240V)..............................................11
Power Supply Options and Requirements.............................................12
Start Up Instructions..........................................................................................13
Operating Instructions.......................................................................................15
View.......................................................................................................................15
Light.......................................................................................................................15
Air Injection........................................................................................................15
Jets.........................................................................................................................17
Selecting the Desired Massage Action..................................................18
Adjusting the Intelli-Jets................................................................................18
Air Controls.........................................................................................................18
Fragrance Dispenser.......................................................................................18
Automatic Filtration Cycles ............................................................................19
Filtration Cycles.................................................................................................19
Preset Filter Cycles...........................................................................................19
Clean Up Cycles...............................................................................................19
Programming Instructions...............................................................................20
Adjusting the Time of Day...........................................................................20
Changing the Filter Cycles...........................................................................20
Programmable Operation Time for Circulation Pump....................21
Locking the Filter Cycles...............................................................................21
Choosing the “Standard” or “Economy” Mode...................................22
Panel Lock...........................................................................................................22
Temperature Setting Lock............................................................................22
Hot Tub Maintenance........................................................................................23
Cleaning the Filter...........................................................................................23
Draining and Refilling.....................................................................................24
Cleaning the Interior of the Hot tub........................................................25
Pillow Care..........................................................................................................25
Intelli-Jet Cleaning Procedure......................................................................26
Maintaining the Wood Cabinet..................................................................27
Maintaining the Cover....................................................................................27
Winterizing..........................................................................................................27
Restarting your Hot Tub in Cold Weather............................................28
Page 3

Water Quality Maintenance...........................................................................28
pH Control...........................................................................................................29
Sanitizing.............................................................................................................29
Other Additives.................................................................................................29
Optional SunZone™ Water Maintenance System..............................29
Troubleshooting.....................................................................................................30
Display Messages............................................................................................30
Troubleshooting Procedures..........................................................................32
Electrical Wiring Diagram ...............................................................................34
Typical Spa Wiring Diagrams A-B ..............................................................35
Page 4

Important Hot Tub Owner Information
Your Sundance hot tub is constructed to the highest standards and is capable of providing many years of trouble-free
use. However, because heat retentive materials are utilized
to insulate the hot tub for efficient operation, an uncovered
hot tub surface directly exposed to sunlight and high temperatures for an extended period is subject to permanent
damage. Damage caused by exposing the hot tub to this
abuse is not covered by warranty. We recommend that you
always keep the hot tub full of water when it is exposed to
direct sunlight and that you keep the Sundance insulating
cover in place at all times when the hot tub is not in use.
Read and carefully follow the requirements for your hot tub’s
support base (found in the section titled, “Locating Your
Sundance Hot Tub”).
Sundance Spas constantly strives to offer the finest hot
tubs available, therefore modifications and enhancements
may be made which affect the specifications , illustrations
and/or instructions contained herein.
FCC Notice
This equipment has been tested and found to comply with the limits for
a Class B Digital Device, pursuant to Part 15 of the FCC Rules. These limits are designed to provide reasonable protection against harmful interference in a residential installation. This equipment generates, uses and can
radiate radio frequency energy and, if not installed and used in accordance with the instructions, may cause harmful interference to radio communications. However, there is no guarantee that interference will not
occur in a particular installation. If this equipment does cause harmful
interference to radio or television reception, which can be determined by
turning the equipment off and on, the user is encouraged to try to correct
the interference by one or more of the following measures: l) Rearrange
or relocate the receiving antenna. 2) Increase the separation between the
equipment and receiver. 3) Connect the equipment into an outlet on a circuit different from the circuit connected. 4) Consult the dealer or an experienced radio/TV technician for help. (Changes or modifications not
expressly approved by the party responsible for FCC compliance could
void the user’s authority to operate this equipment.)
Page 1
Page 5

IMPORTANT SAFETY INSTRUCTIONS:
READ AND FOLLOW ALL INSTRUCTIONS CAREFULLY
When installing and using this electrical equipment, basic safety precautions
should always be followed, including:
1) WARNING: To r educe the risk of injury, do not permit children to use this
product unless they are closely supervised at all times.
2) WARNING: A grounding wire connector is provided on this unit to con-
nect a minimum No. 8AWG (8.4mm2) solid copper conductor between
this unit and any metal equipment, metal enclosures of electrical equipment, metal water pipe, or conduit within 5 feet (1.5m) of the unit.
3) DANGER: Risk of Accidental Drowning. Extreme caution must be exer-
cised to prevent unauthorized access by children. To avoid accidents,
ensure that children cannot use this hot tub unless they are supervised
at all times.
4) DANGER: Risk of Injury. The suction fittings in this hot tub are sized to
match the specific water flow created by the pump. Should the need
arise to replace the suction fittings or the pump, be sure that the flow
rates are compatible. Never operate the hot tub if the suction fittings are
broken or missing. Never replace a suction fitting with one rated less than
the flow rate marked on the original suction fitting.
5) DANGER: Risk of Electric Shock. Install at least 5 feet (1.5m), from all
metal surfaces. As an alternative, a hot tub may be installed within 5 feet
of metal surfaces if each metal surface is permanently connected by a
minimum No. 8 AWG (8.4 mm2) solid copper conductor attached to the
wire connector on the grounding lug, inside the equipment compartment
on the equipment box.
6) DANGER: Risk of Electric Shock. Do not permit any electrical appliance,
such as a light, telephone, radio, television, etc. within 5 feet of a hot tub.
7) ELECTRICAL SUPPLY: The electrical supply for this product must
include a suitably rated switch or circuit breaker to open all ungrounded
supply conductors to comply with section 422-20 of the National
Electrical Code, ANSI/NFPA 70. The disconnect must be readily accessible and visible to the hot tub occupant but installed at least 5 feet (1.5m),
from the hot tub water.
Page 2
Page 6

8) WARNING: To Reduce the Risk of Injury:
a) The water in a hot tub should never exceed 104˚F (40˚C). Water tem-
peratures between 100˚F (38˚C) and 104˚F (40˚C) are considered
safe for a healthy adult. Lower water temperatures are recommended
for young children and when hot tub use exceeds 10 minutes.
b) Since excessive water temperatures have a high potential for causing
fetal damage during the early months of pregnancy, pregnant or possibly pregnant women should limit hot tub water temperatures to100˚F
(38˚C). If pregnant, please consult your physician before using a hot
tub.
c) Before entering the hot tub, the user should measure the water tem-
perature with an accurate thermometer since the tolerance of water
temperature-regulating devices may vary as much as +/- 5˚F (2˚C).
d) The use of alcohol, drugs, or medication before or during hot tub use
may lead to unconsciousness with the possibility of drowning.
e) Persons suffering from obesity or a medical history of heart disease, low
or high blood pressure, circulatory system problems, or diabetes should
consult a physician before using a hot tub.
f) Persons using medication should consult a physician before using a hot
tub since some medication may induce drowsiness, while other medication may affect heart rate, blood pressure, and circulation.
IMPORTANT SAFETY INSTRUCTIONS
(CSA SAFETY INFORMATION)
When using this electrical equipment, basic safety precautions should
always be followed, including the following:
a) READ AND FOLLOW ALL INSTRUCTIONS.
b) A green colored terminal or a terminal marked G, Gr, Ground, Grounding
or the symbol*is located inside the supply terminal box or compartment. To reduce the risk of electric shock, this terminal must be connected to the grounding means provided in the electric supply service
panel with a continuous copper wire equivalent in size to the circuit
conductors that supply this equipment.
*IEC Publication 417, Symbol 5019.
Page 3
Page 7

c) At least two lugs marked “Bonding Lugs” are provided on the external
surface or on the inside of the supply terminal box/compartment. To
reduce the risk of electric shock, connect the local common bonding
grid in the area of the hot tub to these terminals with an insulated or
bare copper conductor not smaller than No. 6 AWG.
d) All field-installed metal components such as rails, ladders, drains or
other similar hardware within 10 feet (3m) of the hot tub shall be
bonded to the equipment grounding buss with copper conductors not
smaller than No. 6 AWG.
e)
SAVE THESE INSTRUCTIONS.
WARNING: Children should not use hot tubs without adult supervision.
AVERTISSEMENT: NE PAS LAISSER LES ENFANTS UTILISER LA CUVE DE
RELAXATION SANS SURVEILLANCE.
WARNING: Do not use hot tubs unless all suction guards are installed to
prevent body and hair entrapment.
AVERTISSEMENT: NE PAS UTILISER LA CUVE DE RELAXATION SI LES
GRILLES DE PRISE D’ASPIRATION NE SONT PAS TOUTES EN PLACE,.POUR
EVITER QUE LES CHEVEUX OU UNE PARTIE DU CORPS SOIENT ASPIRES
WARNING:People with infectious diseases should not use a hot tub.
AVERTISSEMENT: LES PERSONNES ATTEINTES DE MALADIES INFECTIEUSES NE DEVRAIENT PAS UTILISER LA CUVE DE RELAXATION .
WARNING: To avoid injury, exercise care when entering or exiting the hot
tub.
AVERTISSEMENT: POUR EVITER DES BLESSURES, SOYEZ PRUDENT EN
ENTRANT ET SORTANT DE LA CUVE DE RELAXATION .
WARNING: Do not use drugs or alcohol before or during the use of a hot
tub to avoid unconsciousness and possible drowning.
Page 4
Page 8

AVERTISSEMENT: POUR EVITER L’EVANOUISSEMENT ET LA NOYADE
EVENTUELLE, NE PRENDRE NI DROGUE NI ALCOOL AVANT D’UTILISER LA
CUVE DE RELAXATION NI QUAND ON S’Y TROUVE.
WARNING: Pregnant or possibly pregnant women should consult a physician before using a hot tub.
AVERTISSEMENT: LES FEMMES ENCEINTES, QUE LEUR GROSSESSE
SOIT CONFIRMEE OU NON, DEVRAIENT CONSULTER UN MEDECIN AVANT
D’UTILISER LA CUVE DE RELAXATION.
WARNING: Water temperature in excess of 38˚C (104˚F) may be injurious
to your health.
AVERTISSEMENT: IL PEUT ETRE DANGEREUX POUR LA SANTE DE SE
PLONGER DANS DE L’EAU A PLUS DE 38˚C.
WARNING: Before entering the hot tub, measure the water temperature
with an accurate thermometer.
AVERTISSEMENT: AVANT D’UTILISER UNE CUVE DE RELAXATION
MESURER LA TEMPERATURE DE L’EAU A L’AIDE D’UN THERMOMETRE
PRECIS.
WARNING: Do not use a hot tub immediately following strenuous exercise.
AVERTISSEMENT: NE PAS UTILISER LA CUVE DE RELAXATION IMMEDIATEMENT APRES UN EXERCICE FATIGANT.
WARNING: Prolonged immersion in a hot tub may be injurious to your
health.
AVERTISSEMENT: RESTER TROP LONGTEMPS DANS LA CUVE DE RELAXATION PEUT ETRE DANGEREUX POUR LA SANTE.
WARNING: Do not permit electric appliances (such as light, telephone,
radio, television, etc.) within 5 feet (1.5m) of this hot tub.
AVERTISSEMENT: NE PAS PLACER D’APPAREIL ELECTRIQUE (LUMINAIR,
TELEPHONE, RADIO, TELEVISEUR, ETC.) A MOINS DE 1.5M DE LA CUVE
DE RELAXATION.
Page 5
Page 9

CAUTION: Maintain water chemistry in accordance with manufacturer’s
instructions.
AT TENTION: LA TENEUR DE L’EAU EN MATIERES DISSOUTES DOIT ETRE
CONFORME AUX DIRECTIVES DU FABRICANT.
WARNING: The use of alcohol or drugs can greatly increase the risk of fatal
hyperthermia in hot tubs.
AVERTISSEMENT: LA CONSOMMATION D’ALCOOL OU DE DROGUE AUGMENTE CONSIDERABLEMENT LES RISQUES D’HYPERTHERMIE MORTELLE
DANS UNE CUVE DE RELAXATION .
SAVE THESE INSTRUCTIONS
HYPERTHERMIA
Prolonged immersion in hot water may induce hyperthermia. A description of
the causes, symptoms, and effects of hyperthermia are as follows:
Hyperthermia occurs when the internal temperature of the body reaches a
level several degrees above the normal body temperature of 98.6˚F, or 37˚C.
The symptoms of hyperthermia include drowsiness, lethargy, and an increase
in the internal temperature of the body. The effects of hyperthermia include:
a) Unawareness of impending hazard:
b) Failure to perceive heat;
c) Failure to recognize the need to exit hot tub;
d) Physical inability to exit hot tub;
e) Fetal damage in pregnant women; and
f) Unconsciousness and danger of drowning.
Page 6
Page 10

Cautions
1. Persons suffering from heart disease, diabetes, high or low blood pressure, and any condition requiring medical treatment, pregnant women,
the elderly, or infants should consult with a physician before using a hot
tub.
2. The Consumer Products Safety Commission has stated that the water
temperature in a hot tub should not exceed 104˚F (40˚C). Immersion in
water in excess of 104˚F (40˚C) can be hazardous to your health.
3. Observe a reasonable time limit when using the hot tub. Long exposures
at higher temperatures can cause high body temperature. Symptoms may
include dizziness, nausea, fainting, drowsiness, and reduced awareness.
These effects could possibly result in drowning.
4. Do not use the hot tub under the influence of alcohol, narcotics, or other
drugs. Use of the hot tub under these conditions may lead to serious consequences.
5. Always test the hot tub water temperature before entering the hot tub.
Enter and exit the hot tub slowly. Wet surfaces can be very slippery.
6. Never bring any electrical appliances into or near the hot tub. Never operate any electrical appliances from inside the hot tub or when you are
wet.
7. Proper chemical maintenance of hot tub water is necessary to maintain
safe water and prevent possible damage to hot tub components.
8. Use the straps and clip tie downs to secure the cover when not in use.
This will help to discourage unsupervised children from entering the hot
tub and keep the hot tub cover secure in high-wind conditions. There is
no representation that the cover, clip tie-downs, or actual locks will prevent access to the hot tub.
Page 7
Page 11

Locating Your Sundance Hot tub
IMPORTANT: Because of the combined weight of the hot tub, water and
users, it is extremely important that the base upon which the hot tub rests be
smooth, flat, level and capable of uniformly supporting this weight, without
shifting or settling, for the entire time the hot tub is in place. If the hot tub is
placed on a surface which does not meet these requirements, damage to the
skirt and/or the hot tub shell may result. Damage caused by improper support is not covered under warranty. It is the responsibility of the hot tub owner
to assure the integrity of the support over time.
We recommend a poured, reinforced concrete slab (minimum of 4 inches
thick). Wood decking is also acceptable provided it is constructed so that it
meets the requirements outlined above.
The hot tub must be installed in such a manner as to provide drainage away
from the hot tub. Placing the hot tub in a depression without provisions for
proper drainage could allow rain, overflow and other casual water to flood the
equipment and create a wet condition in which it would sit.
For hot tubs which will be recessed into a floor or deck, install so as to permit access to the equipment, either from above or below, for servicing. Make
certain that there are no obstructions which would prevent removal of the
cabinet side panels, especially on the side with the equipment bay doors.
In selecting the ideal outdoor location for your hot tub, we suggest that you
take into consideration 1) the proximity to change area and shelter (especially in colder weather); 2) the pathway to and from your hot tub (this should be
free of debris so that dirt and leaves are not easily tracked into the hot tub);
3) the closeness to trees and shrubbery (remember that leaves and birds
could create extra work in keeping the hot tub clean); 4) a sheltered environment (less wind and weather exposure can result in lowered operation and
maintenance costs); and 5) the overall enhancement of your environment. It
is preferable not to place the hot tub under an unguttered roof overhang since
run-off water will shorten the life expectancy of the hot tub cover.
For indoor installations, be certain to make provisions for proper ventilation.
When the hot tub is in use, considerable amounts of moisture will escape.
This can damage certain surfaces over time.
If you have any questions regarding the placement or installation of your hot
tub consult your authorized Sundance Dealer.
Page 8
Page 12

General Electrical Safety Instructions
Your new Sundance hot tub is equipped with the "state-of-the-art" SentryTM
equipment system. It contains the most advanced safety and self-protective
equipment in the industry. Nonetheless, this hot tub must be installed properly to insure dependable usage. Please contact your dealer or local building
department should you have any questions regarding your installation.
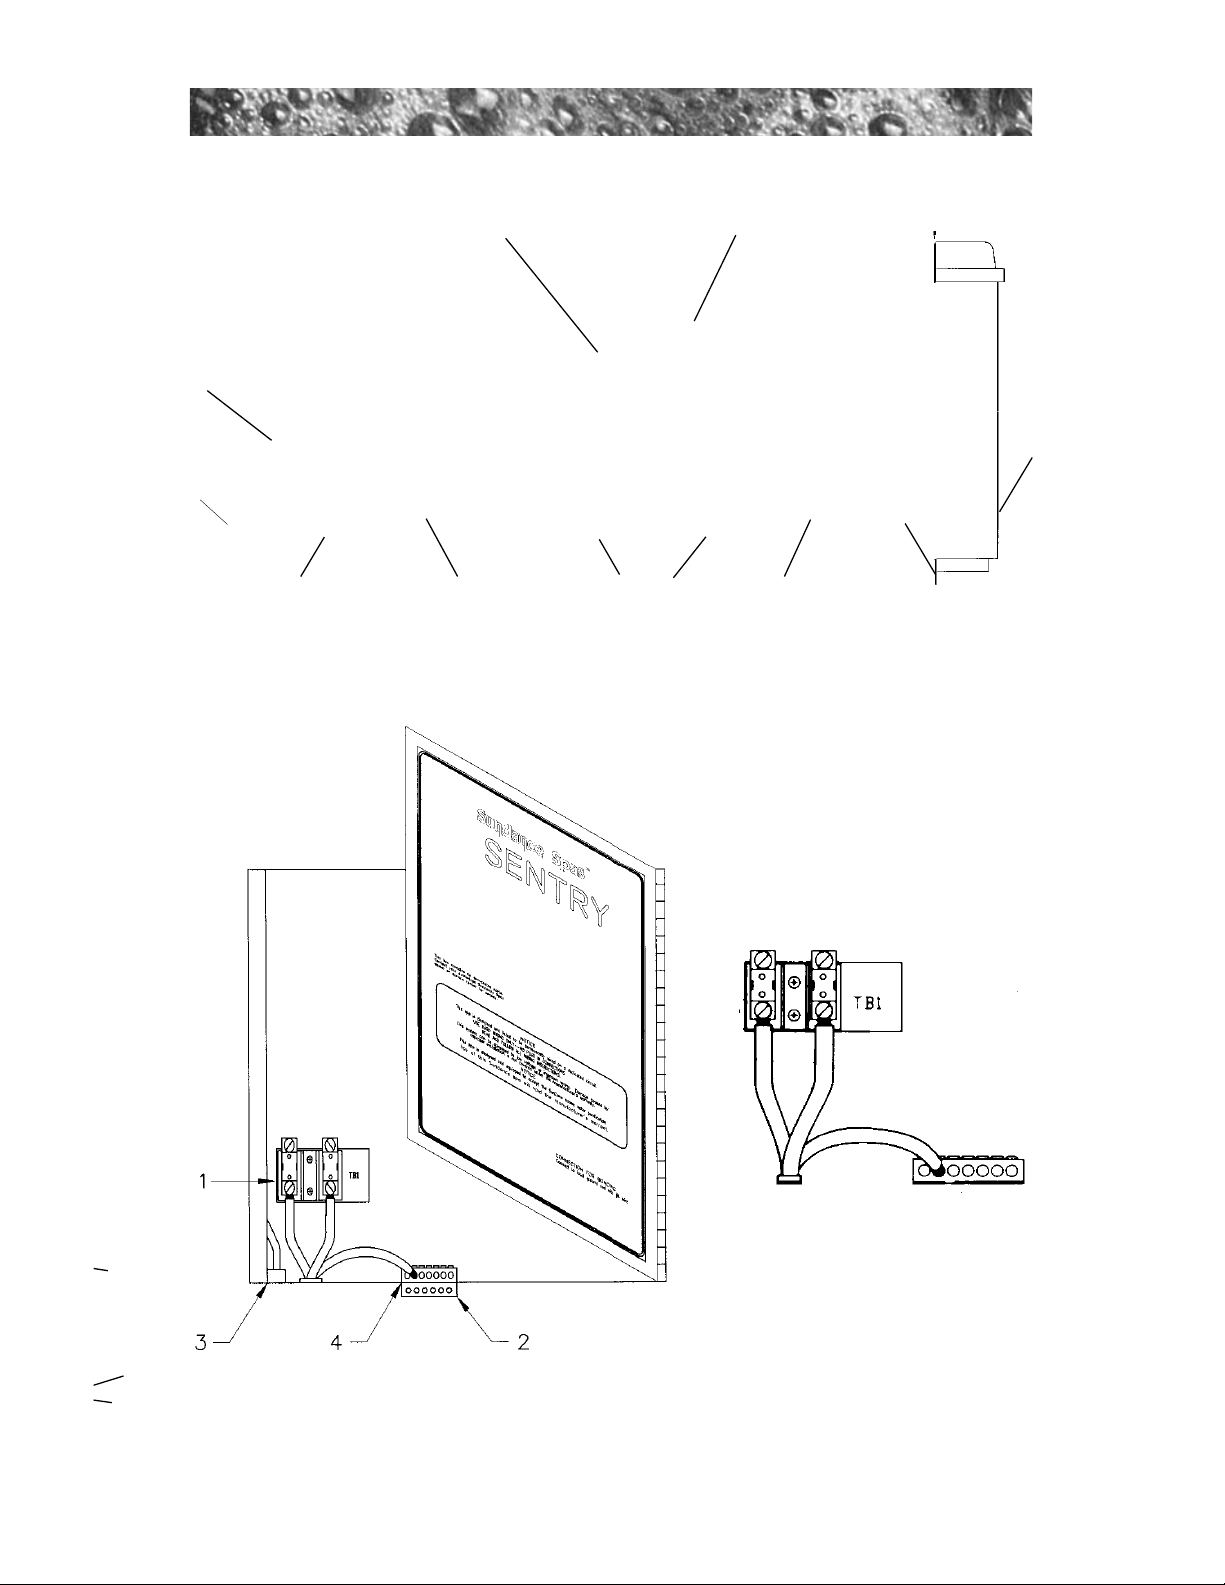
Proper grounding is extremely important. Sundance hot tubs are equipped
with a current collector system. A pressure wire connector is provided on the
surface of the control box, located inside the equipment door (See Ill. 2, item
2) to permit connection of a bonding wire between this point and any ground
metal equipment, metal water pipe or conduit within 5 feet (1.5m) of the hot
tub, or copper clad grounding rod buried within 5 feet (1.5m) of the hot tub.
Bonding wire must be at least No. 8 AWG (8.4 mm2) solid copper wire. This
is a most important safety assurance feature.
Before installing this hot tub, check with the local building department to
insure installation conforms to local building codes.
Page 9
Page 13
Page 10
Ill. No. 1.2
Terminal Block
240V Wire Connection
Ill. No. 1
Equipment Area
1. Terminal Block
2. Bonding Lug
RED
BLACK
GREEN
2
3
6
2
4
77
9
58
1
TB 3
1.
Page 14

Electrical Installation Instructions
For Connection to 240V Service
IMPORTANT
NOTICE: The electrical wiring of this hot tub must meet the
requirements of the National Electrical Code (NEC) and any applicable state
or local codes. The electrical circuit must be installed by a qualified electrician and approved by a local building/electrical inspection authority.
1. This hot tub must be permanently connected (hard-wired) to the power
supply. No plug-in connections or extension cords are to be used in
conjunction with the operation of this hot tub. Supplying power to
the hot tub which is not in accordance with these instructions will void
both the independent testing agency listing and the manufacturer’s warranty.
2. The power supplied to this hot tub must be a dedicated circuit with no
other appliances or lights sharing the power provided by the circuit.
3. To determine the current, voltage and wire size required, refer to the
power supply table on page 12.
– Wire size must be appropriate per NEC and/or local codes.
– We recommend type THHN wire.
– All wiring must be copper to ensure proper connections. Do not use
aluminum wire.
– When using wire larger than #6, add a junction box near the hot tub
and reduce to short lengths of #6 wire to connect to the hot tub.
4. The electrical supply for this product must include a suitably rated switch
or circuit breaker to open all ungrounded supply conductors to comply
with Section 422-20 of the National Electrical Code, ANSI/NFPA 70. The
disconnecting means must be readily accessible to the hot tub’s occupant
but installed at least 5 feet (1.5m) from hot tub water.
5. The electrical circuit supplied for the hot tub must include a suitable
ground fault circuit interruptor (GFCI) as required by NEC Article 680-42.
6. To gain access to the hot tub’s power terminal block, remove the four
screws securing the center cabinet panel on the side of the hot tub under
the controls. Then open the door to the control box. (Ill. No. 1, item 1).
7. Select the power supply inlet you want to use (Ill. No. 1, item 2) and
remove the short cabinet panel from the front of the hot tub to allow you
to feed the cable through to the control box. Install the cable with connector through the large opening provided in the bottom of the control
box.
8. Connect wires, color to color, on terminal blocks TB1 and TB3 (Ill. 1.2).
TIGHTEN SECURELY! All wires must be hooked up or damage could
result.
9. Close the control box door and reinstall the cabinet side panels.
Page 11
Page 15

Table No. 1
POWER SUPPLY OPTIONS AND REQUIREMENTS
Sundance hot tubs are designed to provide optimum performance and flexibility of use when connected to the maximum electrical service as listed
below. However, they are shipped configured for the most commonly preferred electrical connection -- 50A, 240V*
If you prefer, your Sundance dealer can perform a minor circuit board modification to allow the hot tub to accept different electrical service. The operational considerations of these modifications are listed in the footnotes below.
CAMEO, OPTIMA, MARIN and ALTAMAR MODELS
240V/30A** 240V/50A* 240V/60A***
Voltage 240 volts 240 volts 240 volts
Current Draw 24 amps 40 amps 48 amps
Number of Wires Three Three Three
Circuit Breaker 30A dual pole 50A dual pole 60A dual pole
CAPRI
240V/30A** 240V/50A* 240V/60A***
Voltage 240 volts 240 volts N/A
Current Draw 24 amps 40 amps
Number of Wires Three Three
Circuit Breaker 30A dual pole 50A dual pole
* In 50A configuration, the heater will not operate while both pumps are
operating at high speed. Note: pump 2 runs only in high speed.
** In 30A configuration, the heater will not operate while either pump is
running in high speed or if the air blower is running. Note: pump 2 runs
only in high speed.
*** In 60A configuration, the heater will operate at the same time as the
high speed of both pumps and the air blower. Note: Not applicable for
1-pump Capri models.
Page 12
Page 16

Start Up Instructions
CAMEO, OPTIMA, ALTAMAR, MARIN and CAPRI
FOR BEST RESULTS, READ EACH STEP IN ITS ENTIRETY BEFORE
PROCEEDING WITH THAT STEP.
1. PREPARE THE HOT TUB FOR FILLING
• Clear all debris from the hot tub. (Although the hot tub shell has been
polished at the factory, you may want to treat it with a specially formulated hot tub cleaner and wax available from your dealer prior to filling
the first time.)
• Remove the filter lid (Ill. 3, item 3), then remove the filter cartridge by
loosening the retainer nut on the pipe at one end of the filter and sliding the filter toward the nut until the other end is free. Lift the filter out
as you pull it away from the filter pipe.
2. FILL THE HOT TUB
• Place the end of your garden hose into the pipe exposed when you
removed the filter cartridge.
NOTE: Never fill with water from a water softener. If your water is extremely “hard”, it is preferable to fill half-way with hard water and the rest of the
way with softened water. Or, you may fill entirely with hard water if you
use a special water additive available from your Sundance dealer.
• Fill the hot tub until the water level is midway in the skimmer opening
and above all jets. Do not over fill.
Important: Always fill your hot tub through the filter pipe after draining.
Failure to do so may cause air to be trapped in the pump, preventing the
pump from circulating water.
• Remove the hose and replace the filter cartridge by sliding it back onto the pipe
then securing one of the protruding tabs on the other end under the retainer
bracket. Tighten the retainer nut only until it is snug, do not over tighten.
3. TURN ON THE POWER
Turn on the power to the hot tub at the home’s circuit breaker. The heater
and the pump’s low speed automatically activate and the LED display on
the control panel flashes the water temperature and “COOL” (Pg. 30).
4. ACTIVATE JETS
Depress the JETS sensor pad on the control panel twice to activate the
pump’s high speed and initiate maximum water flow to certain jets.
Page 13
Page 17

5 ADD START-UP CHEMICALS
Add the hot tub water chemicals as recommended by your Sundance
Dealer. (See the section titled WATER QUALITY MAINTENANCE (page 28) for
general guidance.)
6. SET HOT TUB TO HEAT
To warm the hot tub water up to a comfortable temperature, follow these
steps:
• The LCD display on the control panel displays the actual temperature of
the hot tub water. Press either the COOLER (Down) or WARMER (Up)
sensor pad to display the “set” temperature for 5 seconds. If you want
the water to heat to a different temperature, simply press COOLER or
WARMER within 5 seconds. The set temperature advances or decreases by one degree each time one of these sensor pads is pressed.
• The heater will turn off when the temperature corresponding to the thermostat setting is achieved.
NOTE:
• The maximum temperature for which the hot tub can be set is 104˚F (40˚C) and
the minimum is 80˚ F. (27˚C)
• Setting the thermostat at maximum will not accelerate the heating process.
This will only result in a higher ultimate temperature.
• If hot tub is hooked up to 30 amps - turn off high speed pump and blower
to operate heater.
7. PLACE COVER ON HOT TUB
• Keeping the insulating cover in place anytime the hot tub is not in use
will reduce the time required for heating, thereby minimizing operating
costs.
• The time required for initial heat-up will vary depending on the starting
water temperature and the capacity of your hot tub. Smaller hot tubs
heat at a rate of approximately 8 to 10 degrees per hour; larger hot tubs
heat at about 4 to 6 degrees per hour.
DANGER. RISK OF INJURY. Always check water temperature carefully
before entering hot tub.
Page 14
Page 18

Operating Instructions
Your Sundance hot tub has a touch-sensitive control panel, Massage Selector
valves and air control knobs located on the top rim of the hot tub (See Ill. 3,
items 1, 2, 4, 7). These controls let you operate many of the special functions
of your Sundance hot tub. By familiarizing yourself with the following information, you will be able to gain the full benefit afforded by the various functions of your hot tub.
VIEW
Pressing the sensor pad labeled VIEW inverts the main four-digit display on
the Command Center’s LCD screen to allow easy reading from either inside
or outside the hot tub.
LIGHT
The LIGHT sensor pad activates both the underwater light and the light symbol on the LCD screen when touched. To reduce the brightness of the light,
touch the sensor pad again. A third touch will result in an even lower level of
illumination. A fourth touch turns the light off. If left on, the light will automatically turn off after one hour.
There are two colored lenses included with your hot tub which may be placed
over the light lens inside the hot tub. To remove a lens, pull straight out. To
install a lens, align tabs and push straight in. Your hot tub comes with clear
lens installed.
AIR INJECTION
When the AIR sensor pad is pressed, the air blower forces air through the
injectors located in the seats and footwell. The bubbles symbol above the sensor pad appears whenever the air blower is on. An electronic timer automatically turns the air blower off 20 minutes after it was turned on.
The air blower automatically activates for 1 minute at the start of Clean Up
cycle. This clears the lines of the air injector system to help ensure that all
water is exposed to sanitizer.
Page 15
Page 19
Page 16
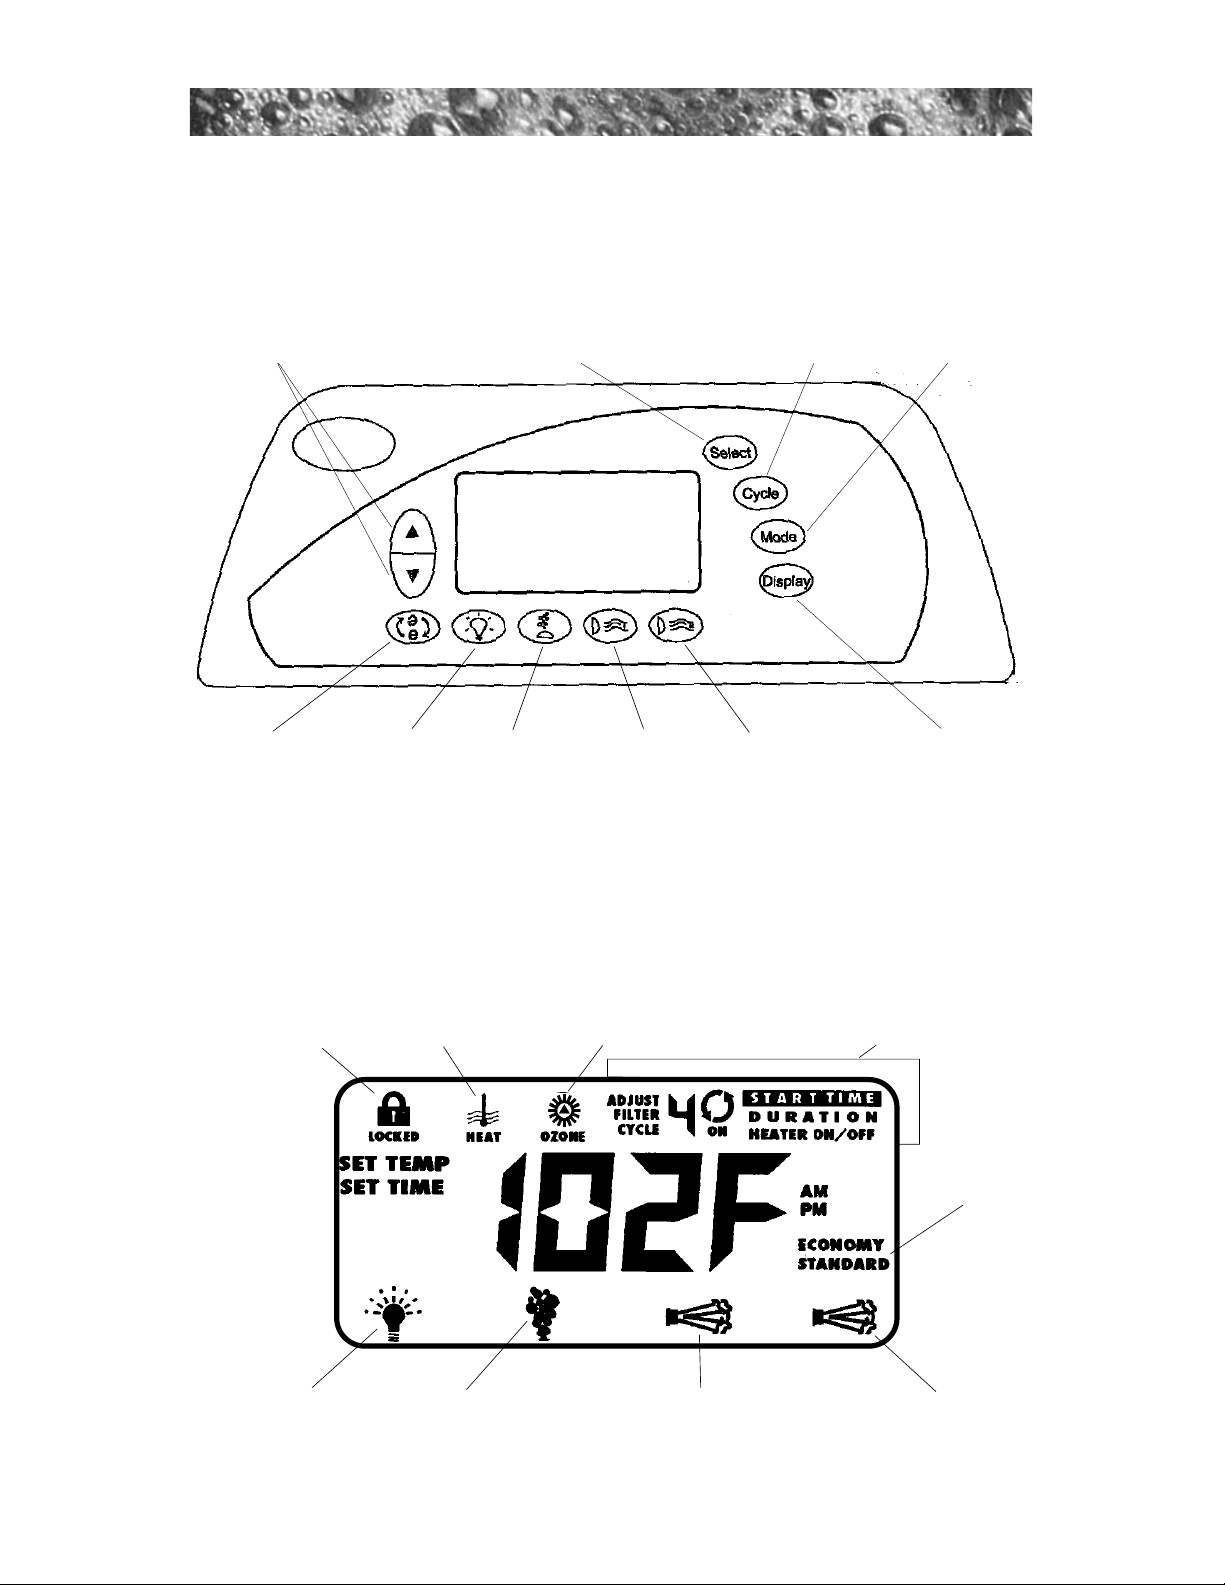
Indicates panel, set
temperature or filter
cycle programming locked.
Indicates heater on.
(page 14).
Indicates ozone generator
on (page 28).
Indicates filter cycle in progress
(page 19) or displays cycle
programming features (page 20).
Indicates high-speed pump 2 is on
(Cameo, Optima and Altamar only).
Indicates 2-speed pump 1
is on (changes according
to speed selected, flashes
during auto operation).
Indicates air injector system is on.Indicates hot tub light
is on (changes according to
brightness selected).
These characters
identify what is
being shown on
the main 4-digit
display
Ill. No. 2.2
LCD SCREEN
Ill. No. 2.1
COMMAND CENTER
Indicates operating
mode selected (page
22).
{
(LCD Screen not shown)
These display temperature
setting and increase or decrease
temperature setting and other
programmable features.
Inverts the
main 4-digit
display.
Controls the hot tub
light (bright, dim,
dimmer, off).
Controls the air
blower.
Controls 2-speed
pump 1 (Lo, Hi,
Off).
Controls high-speed
pump 2 (N/A Marin
and Capri).
Switches between
standard and economy
modes. (page 22).
Accesses filter cycle program mode and
advances display to next cycle.
Scrolls menu through filter
cycle programming features.
Displays time of day and
initiates time setting and
locking functions.
Page 20
JETS
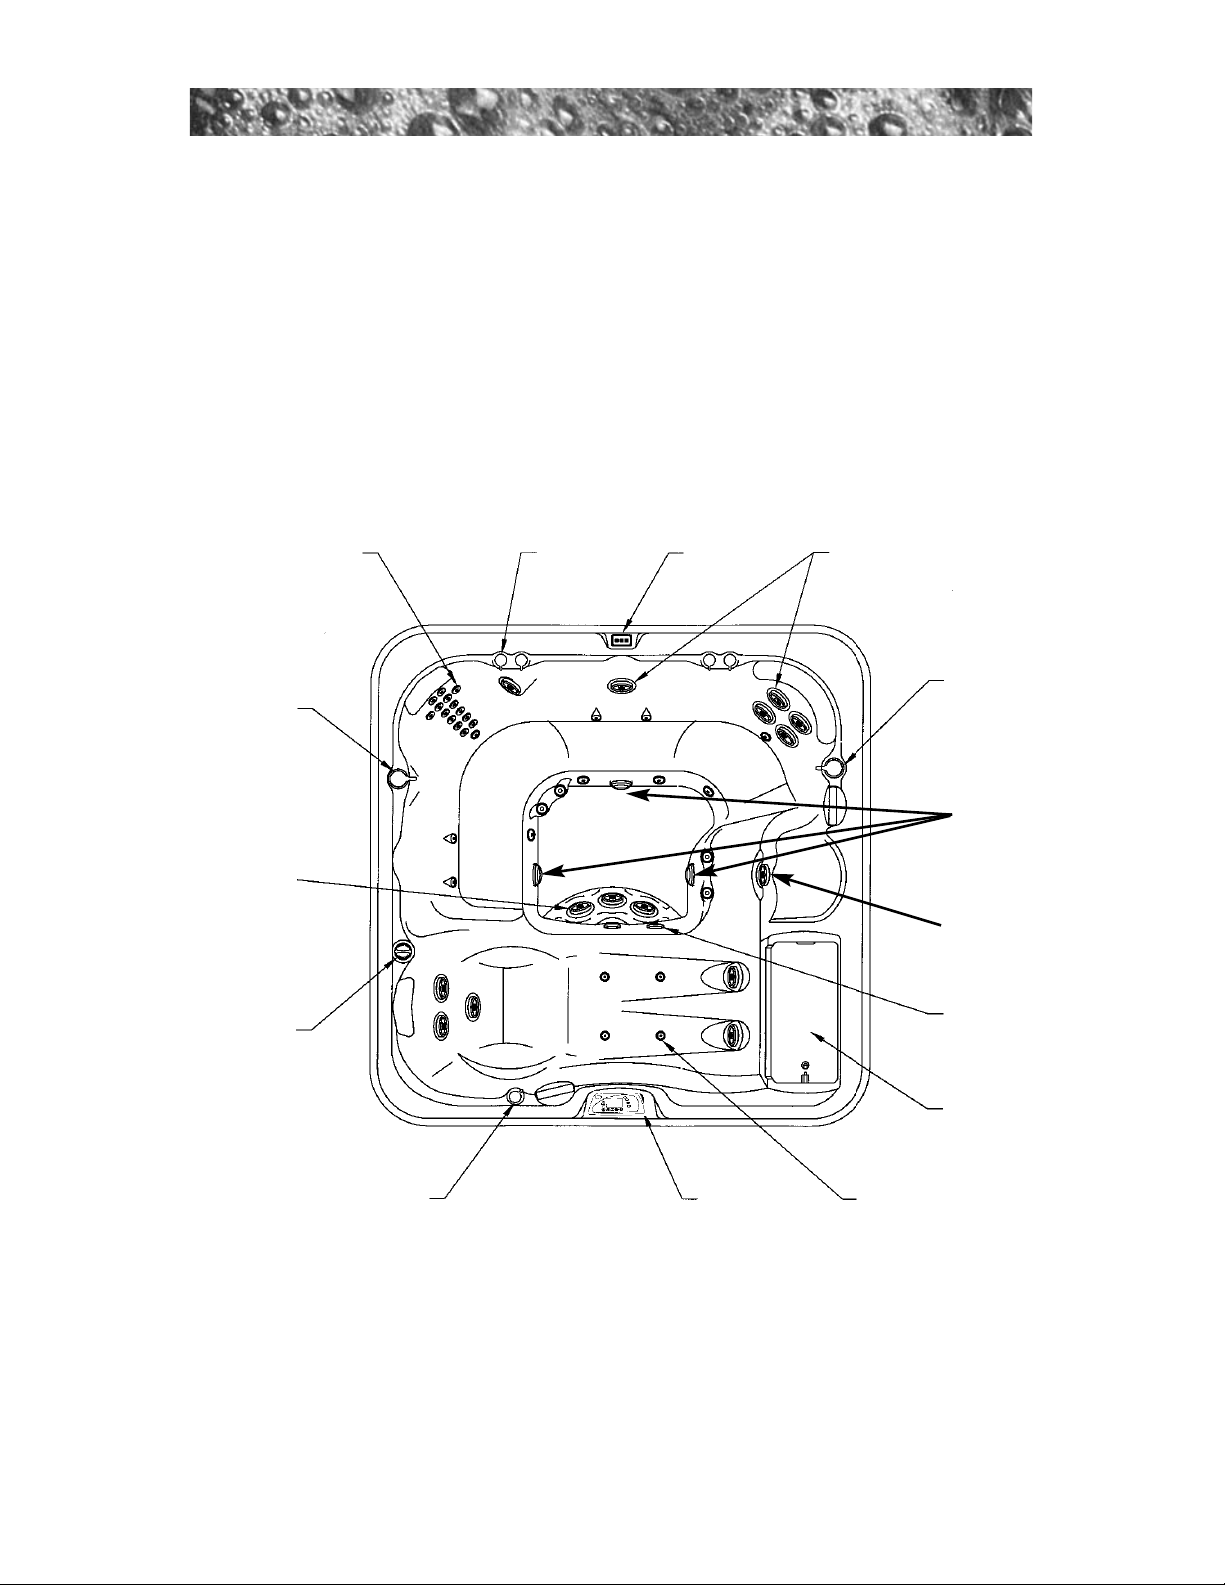
The sensor pad labeled JETS controls the 2-speed pump 1. Pressing this sensor cycles pump 1 from off, to low speed, to high speed, and back to off.
JETS 2 — On models with two jet pumps, JETS 2 controls the high-speed pump 2.
Auto Turn Off — Anytime a pump has been manually turned on, it will automatically turn off after approximately 20 minutes. If at this time you desire more jet operation you may simply turn the pump(s) back on.
Page 17
5
11
3
10
12
12
13
4
9
7
6
8
2
1. Control Panel
2. Air Controls
3. Filter
4. Massage Selector Valve #1
5. Whirlpool Jets
(N/A Capri)
6. Therapy Jets (Intelli-Jets)
7. Massage Selector Valve #2 (N/A Capri)
(Location of features varies by model)
Ill. No. 3 Top View Hot tub
8. Auxiliary Control Panel
(Cameo, Optima and Altamar Only)
9. Therapy Seat
10. Air Injectors
11. Hot tub Light
12. Fragrance Dispenser
13. Vertical Jets
14. Footwell suction fittings and filters
14
Page 21
SELECTING THE DESIRED MASSAGE ACTION
Your Sundance hot tub is equipped to allow you to customize the massage action you
desire.
Customizing the Massage
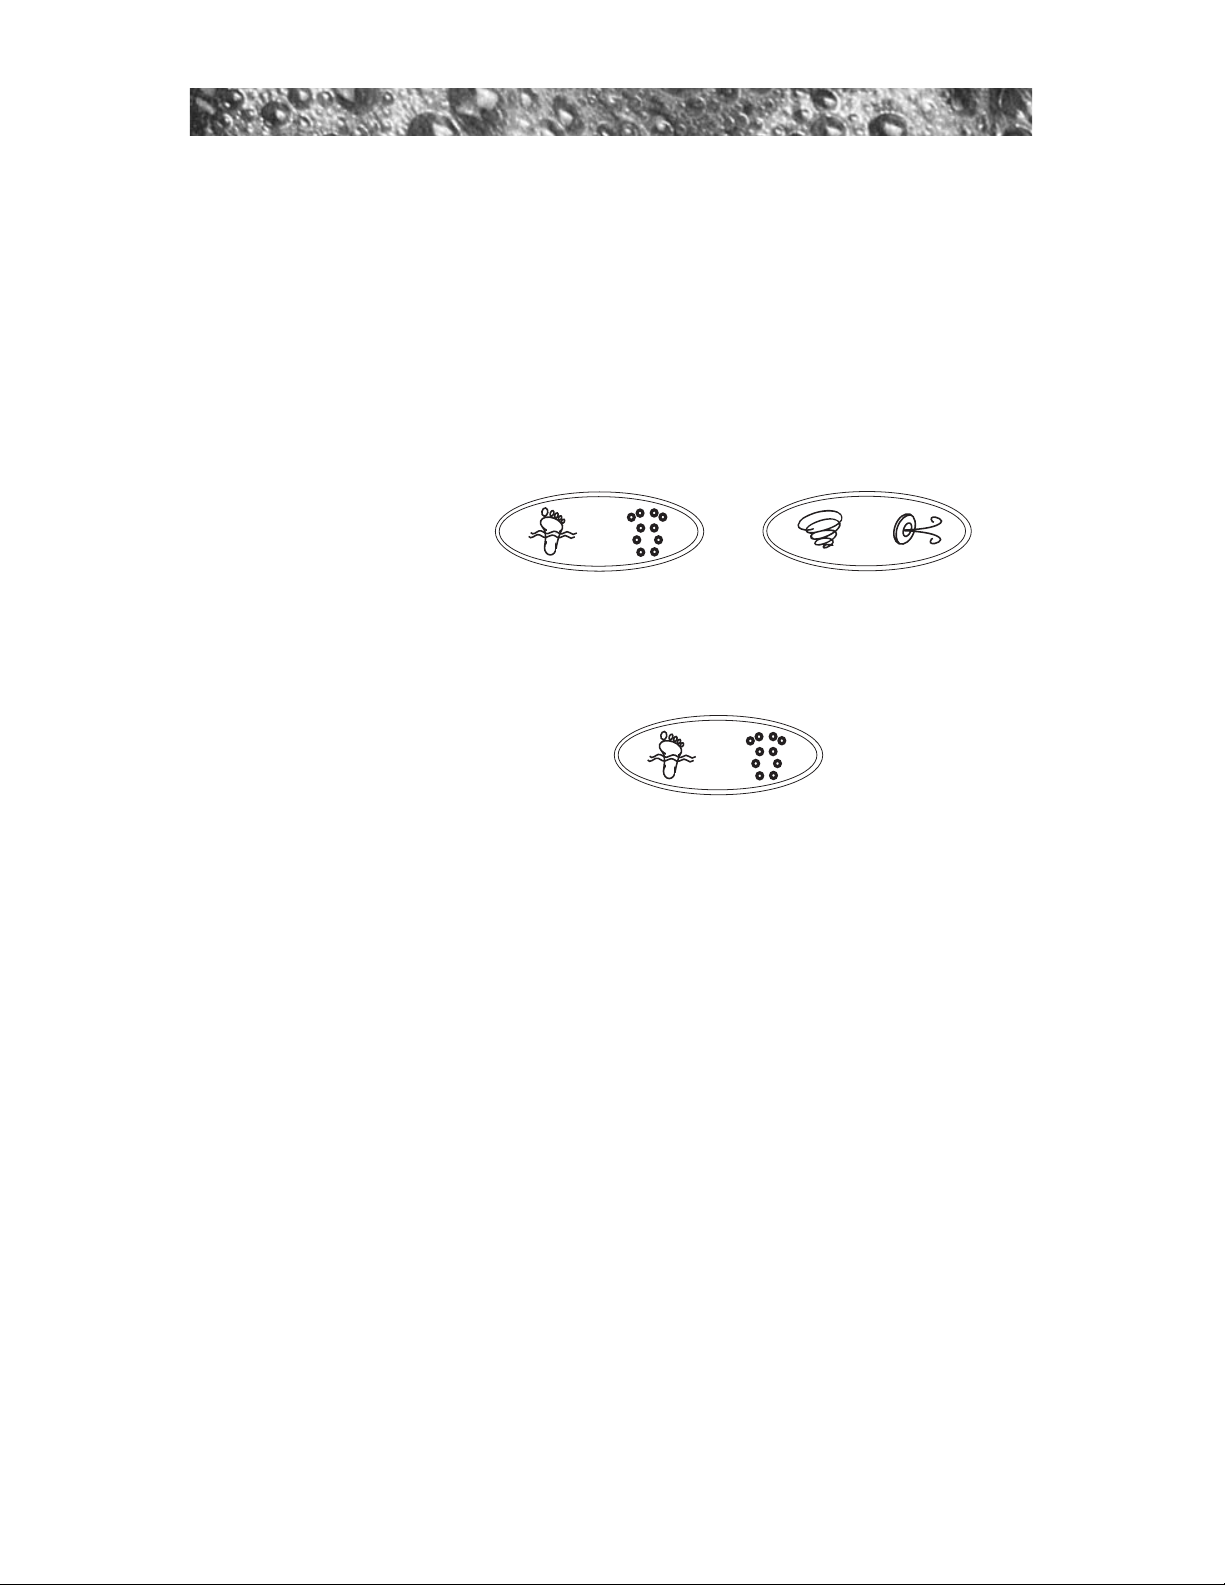
Most Sundance Models incorporate Massage Selectors which allow you to
customize the massage and performance by diverting water between various
jet systems.
In the Optima, Cameo and Marin, one Massage Selector controls the therapy
jets and whirlpool jets. The other Massage Selector controls the therapy seat
jets and vertical jets.
In the Altamar, the Massage Selector on the high-speed pump 2 system
diverts between the therapy seat and the whirlpool jets (in the footwell and
on the side wall). The 2-speed pump 1 system powers the therapy jets in the
lounge and seats of the hot tub.
.
Adjusting Individual Jet Flow
The water flow to the individual jets in your hot tub can be increased or
decreased by rotating the outside face of the jet. Note: Always keep at
least 6 adjustable jets open at all times.
ADJUSTING THE INTELLI-JETS
With the nozzles of the Intelli-Jets positioned straight ahead, the jet stream will
be stationary. Pushing the nozzle to one side causes the jet nozzle to rotate,
moving the jet stream in a circular pattern. The speed of the rotation can be
adjusted by grasping the base of the nozzle and rotating the tip.
AIR CONTROLS
Each jet system has its own air control. These controls allow you to regulate
the amount of air which is mixed with the water entering through the jets.
Clockwise rotation adds more air and counterclockwise rotation reduces air
flow. To minimize heat loss, these controls should be closed when the hot tub
is not in use.
FRAGRANCE DISPENSER
On the rim of your hot tub is a screw-off cap labeled “SunScents Fragrance
Dispenser” (Ill. 3, item 12). It is designed to contain packages of a specially made
fragrance available from your Sundance dealer. The fragrance is carried into the
hot tub water by the air coming through the injector system when the air
blower is on.
Page 18
Page 22

CAUTION: Use Only Sundance SunScentsTMFragrances in your new hot
tub. Never remove the SunScentsTMbeads from their webbed bag for any
reason. Install webbed bead bag directly into SunScentsTMdispensor.
Never use this dispenser for any other type of fragrance. Always make
certain that the dispenser cap is securely in place before operating the
hot tub’s air blower.
Automatic Filtration Cycles
FILTRATION CYCLES
Your hot tub’s control system activates automatic filter cycles, during which
pump 1 turns on in low speed to move water through the filter. This water
movement also provides important skimming action to remove debris and
suspensions from the water’s surface, minimizing the “bathtub ring” effect.
These filter cycles are only active when the hot tub is in the ‘Standard Mode’.
When an automatic filter cycle activates, the LCD screen displays the following message:
FILTER
CYCLE ON
NOTE: After a long filter cycle, you may notice that the water temperature
is greater than the temperature setting. This can happen in such a well
insulated hot tub because, even though the heater turns off as intended,
the transference of heat from the pump continues to add warmth to the
water. If the water temperature is above 95°F (35°C) and two degrees
above your set temperature, the circulation pump (and ozone generator, if
equipped) will shut off until the water temperature cools to the set temperature. In warm weather, it may be necessary to reduce filter cycle run
time to prevent this type of heat overrange from occuring.
Preset Filter Cycles
Your hot tub comes with four 30-minute filter cycles already programmed in, beginning at 6:00 a.m., noon, 6:00 p.m. and midnight. You can easily change the start time, or the cycle length for
any of these cycles to suit your individual needs by following the
steps in the next section.
Clean Up Cycle:
Clean up cycle is once per day in both Standard and Economy mode at 12:00
PM for two minutes. This is not user programmable. Pump 2 and Blower activate
for one minute to circulate any water in the plumbing. After 1 minute they both
go off and Pump 1 runs for 1 minute. If the filter cycle is also set at 12:00 PM
pump 1 will continue to run for the duration of the filter cycle.
Page 19
Page 23

Programming Instructions
ADJUSTING THE TIME OF DAY
The Sentry control system remembers the time of day even in the event of a
prolonged power outage. However, it may occasionally be necessary to reset
the time of day. For example: if you are not in the Pacific Time Zone you will
want to reset the time for your own time zone. (The system will automatically adjust to and from daylight savings time.)
To accomplish this, press DISPLAY, MODE and DISPLAY within five seconds
each. A number representing the hour will be displayed, followed by AM or
PM. The hour will advance or decrease each time UP or DOWN is pressed
within five seconds. Then, press DISPLAY again to display the minutes.
Adjust the minutes as necessary by pressing UP or DOWN. After 5 seconds,
the display will return to normal.
CHANGING THE FILTER CYCLES
The Sentry Control System allows you to easily adjust two separate aspects
of each of the filtration cycles (1) the time of day at which each cycle begins,
(2) the duration of each cycle.
To make adjustments, first press CYCLE to enter the filter cycle programming
mode. The LCD screen will display the following in the upper right corner:
ADJUST START TIME
FILTER
CYCLE
This means the system is ready to accept your changes to the start time for
filter cycle number one. Simultaneously, the large four-digit display in the center of the screen displays the currently programmed start time for that filtration cycle.
At this point, you have four options. You may:
(1) Press UP or DOWN to adjust the start time in increments of 30 minutes.
(2) Press CYCLE to progress to adjusting each subsequent filter cycle. With
each press, the currently programmed status will be shown in the large four
digit display. To adjust any of the programming, simply press UP or DOWN .
(3) Press SELECT to move down the menu from Start Time to Duration. With
each press, the currently programmed status will be shown in the large fourdigit display. Press UP or DOWN to adjust the duration in increments of 15
minutes.
Page 20
START TIME
Page 24

(4) Press DISPLAY to make the filter cycle programming characters disap-
pear from the screen and the main display return to showing the water temperature. If no sensor is pressed within 30 seconds, the screen automatically
returns to normal display.
At any time, you may check the programming of any aspect of any filter cycle
by first pressing CYCLE then moving through the menu by pressing either
CYCLE or SELECT. The programming is changed only by pressing UP or
DOWN during this process.
Programmable Operation Time for Circulation Pump
The Sentry control system allows you to easily adjust two separate aspects
of Circulation Pump operation.
1. The time of day at which the Circulation Pump begins operating.
2. The duration of the Circulation Pump operation time.
The factory default start time is 12:00AM. The default duration is 24 hours.
To make adjustments, press the sensor labeled CYCLE five times to enter
the Circulation Pump programming mode. The LCD screen will display
ADJUST Circ. At this time the system is ready to accept your changes.
•Press the SELECT sensor once. The previously programmed start time
appears on the LCD display.
•Press UP or DOWN sensors to adjust the start time in 30-minute increments.
•Press the SELECT sensor to program duration.
•Press UP or DOWN sensors to program the duration time in 2 hour
increments.
•Press DISPLAY to make the Circulation pump programming characters
disappear from the screen and the main display return to showing the
water temperature. If no sensor is pressed within 30 seconds, the
screen will automatically return to normal display
Please No
te: The Circulation pump automatically activates if the spa
requires heat regardless of the programmed time.
LOCKING THE FILTER CYCLES
You may keep the filter cycle programs from being inadvertently altered by
electronically “locking” them. To accomplish this, simply press CYCLE then,
within 30 seconds, press DISPLAY, MODE and UP, within five seconds each.
A padlock symbol will appear on the screen. In this state, the status of the
cycle programming may be checked, but may not be altered.
Page 21
Page 25

To unlock the filter cycle programming to make changes, simply press
DISPLAY, MODE and DOWN within five seconds each.
CHOOSING THE “STANDARD” OR “ECONOMY” MODE
Pressing MODE switches your hot tub between the “standard” and “economy” operating modes. The mode currently selected is displayed on the right
side of the LCD screen. By selecting the appropriate operating mode, you can
ensure that your hot tub will be ready to use when you want it with the lowest possible energy consumption.
Standard/Economy Mode
In these standard/economy modes, the hot tub water temperature will always
be held at the set temperature. The heater will turn on as needed to maintain
the hot tub water temperature you have set with the temperature control.
When the desired temperature has been achieved, the heater will turn off. In
addition, when in the “standard” mode, the filter cycles will operate the low
speed pump as programmed to provide skimming action and additional filtration. In the economy mode: filter cycles are turned off.
PANEL LOCK
To help prevent unauthorized use of your hot tub, the Sentry controls incorporate a unique panel locking system which disables the controls on the
panel.
To Lock The Panel:
Press the DISPLAY, MODE, and UP sensor pads, in order, within five sec-
onds. A padlock symbol will appear on the LCD screen.
With the panel locked, none of the components can be turned on and the
only settings that can be adjusted are the standard/economy operating mode
and changing the time of day.
All automatic hot tub functions will operate normally.
To Unlock The Panel:
Press DISPLAY, MODE, and DOWN, in order, within five seconds. The “lock”
symbol will disappear. All sensor pads are now active.
TEMPERATURE SETTING LOCK
To electronically lock the temperature setting, first enter the “temperature setting” mode by pressing UP or DOWN. Then, within five seconds, press the
three sensors described under “Panel Lock” above. This will prevent the temperature setting from being changed by unauthorized persons but all other
sensors will remain active.
Page 22
Page 26
To unlock the temperature setting so that it can be adjusted, simply follow the
instructions above under “To Unlock the Panel.”
Hot tub Maintenance
Proper and regular maintenance of your hot tub will help it retain its beauty
and performance. Your authorized Sundance Dealer can supply you with all
the information, supplies and accessory products you will need to accomplish
this.
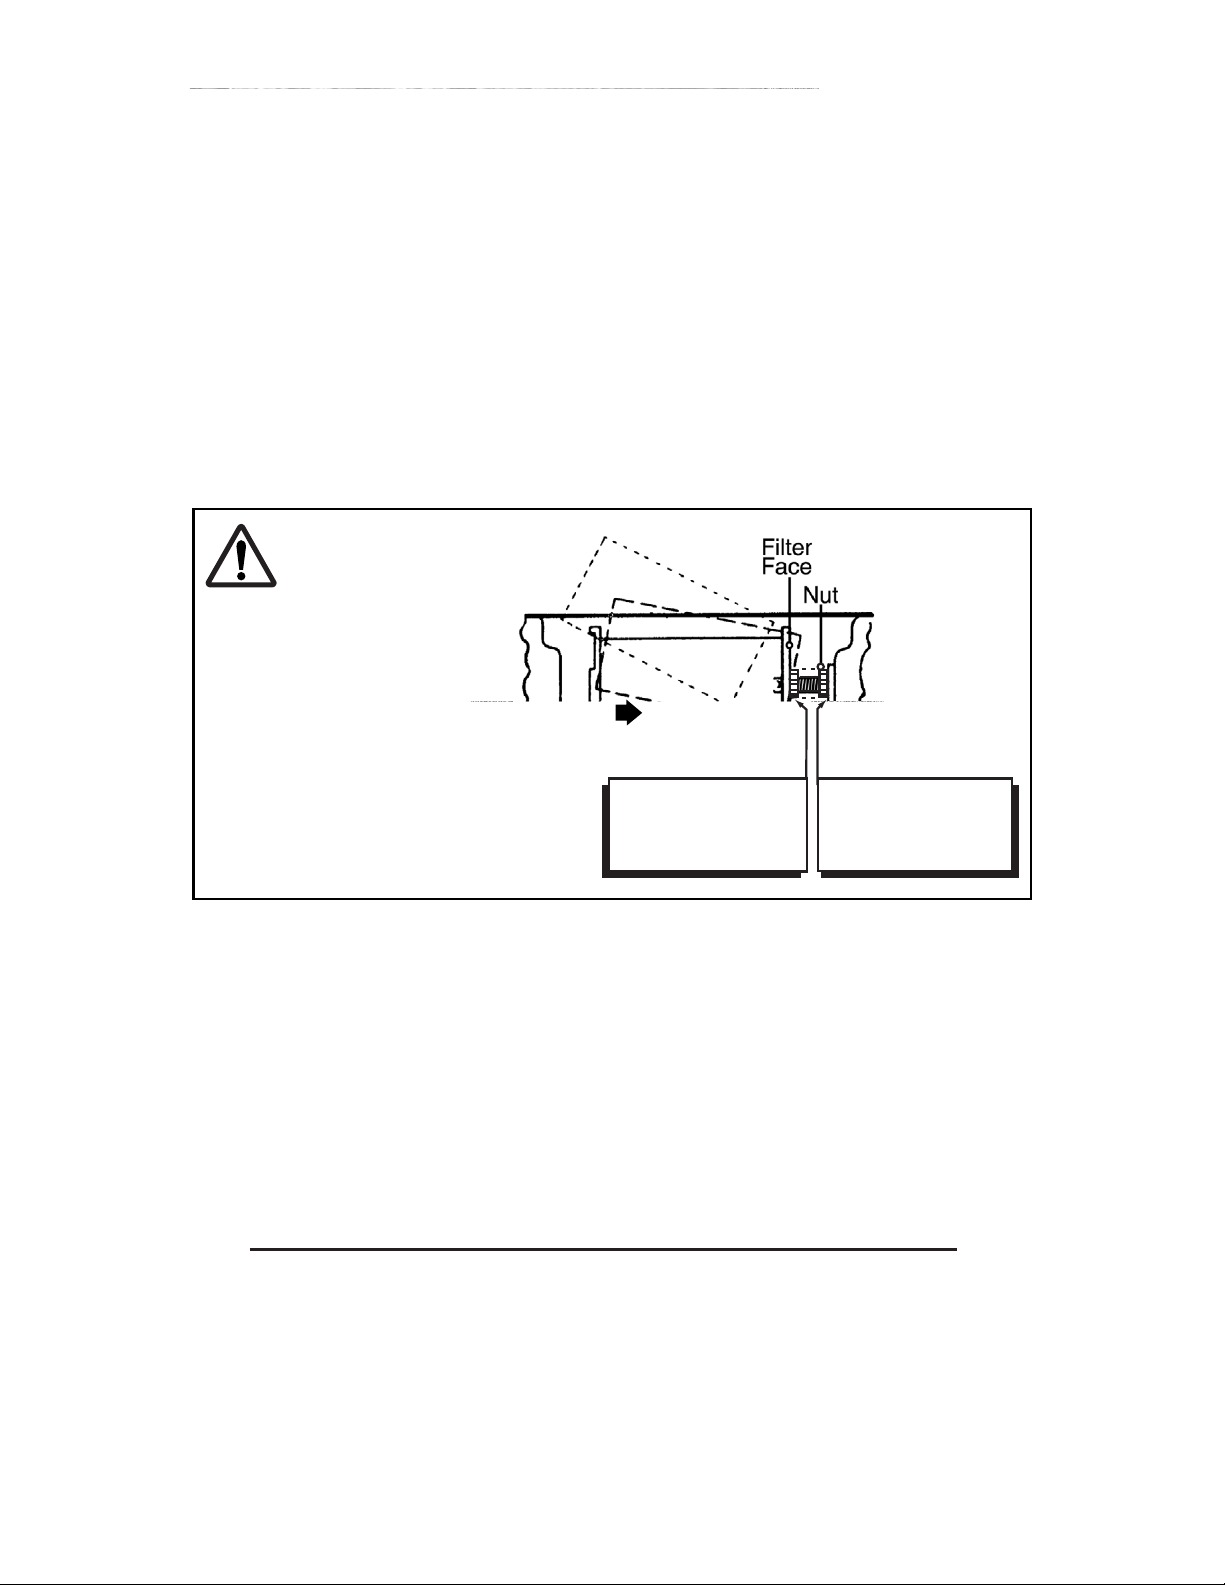
Ill. No. 4
Cartridge Filter Removal
CLEANING THE FILTER
Your Sundance hot tub is equipped with a cartridge filter located in the
skimmer/filter well (Ill. No. 3, item 3). Filtering is accomplished when the
2-speed pump 1, on either high or low speed, causes water to flow through
the polyester mesh of the filter. As this happens, suspended particles become
trapped on the filter’s surface (Ill. No. 4).
To ensure optimum performance, it is necessary to remove and clean the filter cartridge, usually once a week, depending on usage and water quality. To
accomplish this, follow these steps:
1. T
urn off power to the hot tub at the home’s breaker panel.
2. Remove the filter lid (Ill. No. 3, item 3).
3. Remove the filter cartridge by loosening the retainer nut on the pipe at
one end of the filter and sliding the filter toward the nut until the other
end is free of the retainer bracket. Lift the filter out as you pull it away
from the filter pipe.
4. Using a garden hose with a high-pressure nozzle, rinse debris from the
filter pleats beginning at the top and working your way downward.
Continue, one section at a time, until you have rinsed all of the filter’s pleats.
To install filter:
Adjust nut to lightly
touch filter face
as shown.
To install filter:
To remove filter:
Loosen nut to
provide clearance,
then remove filter.
To remove filter:
CAUTION!
NEVER remove
filter cartridge
while a pump is
running.
ALWAYS
turn-off power
to hot tub
BEFORE
removing
filter cartridge
for cleaning or
replacement.
Page 23
Page 27

Periodically, the filter cartridge will need a more thorough cleaning to remove
imbedded oils and minerals. For this, we suggest cleaning as above and then
soaking the cartridge overnight in a plastic container filled with a solution of
water and a specially formulated filter cleanser available from your Sundance
dealer.
Replace the filter cartridge by sliding it back onto the pipe then securing one
of the protruding tabs on the other end under the filter hook. Tighten the
filter retainer nut only until it just barely touches the filter face -- DO NOT over
tighten or filter will be damaged and/or filter hook will dislodge from
wall (see Ill No. 4, page 23).
The average life expectancy of a Sundance filter cartridge is approximately
two years with proper care and water quality maintenance. A replacement cartridge may be purchased from your Sundance Dealer.
DRAINING and REFILLING
About every 3 to 6 months, you will want to replace the hot tub’s water. The
frequency depends on a number of variables including the amount of use,
attention paid to water quality maintenance, etc. You will know it is time for a
change when you cannot control sudsing and/or you can no longer get the
normal feel or sparkle to the water even though the key water balance measurements are all within the proper parameters.
WARNING! READ THIS BEFORE DRAINING: To prevent damage to
the hot tub’s components, turn off power to the hot tub at the cir-
cuit breaker before draining it. Do not turn the power back on
until your hot tub has been refilled.
CAUTION: There are certain precautions to keep in mind when draining your hot tub. If it is extremely cold, and the hot tub is outdoors,
freezing could occur in the lines or the equipment (see “WINTERIZING”, page 27). On the other hand, if it is hot outdoors, do not leave
the hot tub’s surface exposed to direct sunlight for long periods.
To drain your hot tub using the drain port provided, first turn off the power
to the hot tub at the circuit breaker. Then remove the center panel from
the side of the cabinet under the control panel. The drain port is secured to
the base inside the door and features a white “T” handle (Ill. No. 1, item 5).
To attach a garden hose, replace the fitting screwed into the end of the drain
port with the fitting provided with your hot tub (in the plastic bag with your
colored lenses). For faster draining, a special, large-diameter drain hose is
available from your Sundance dealer.
Page 24
Page 28

Once the hose is connected and the end placed where you want the water
to drain, open the valve by pulling the “T” handle outward from the pipe.
After draining, always remember to close the "T" handle valve and reinstall the
threaded plug (to prevent water from seeping past the valve) prior to refilling.
After refilling, turn on power to the hot tub and follow the steps listed under
"Start Up Instructions".
CLEANING THE INTERIOR OF THE HOT TUB
To preserve the sheen of your hot tub's surface, it is crucial that you avoid
using abrasive cleaners or cleaners which have adverse chemical effect on
Page 29
INTELLI-JET CLEANING PROCEDURE
If you experience a sticky rotational jet, perform the following
cleaning procedure. In most of these cases debris is present in the
jet bearings and must be cleared to achieve proper operation. Note:
This procedure is considered normal maintenance for this type of jet.
Procedure
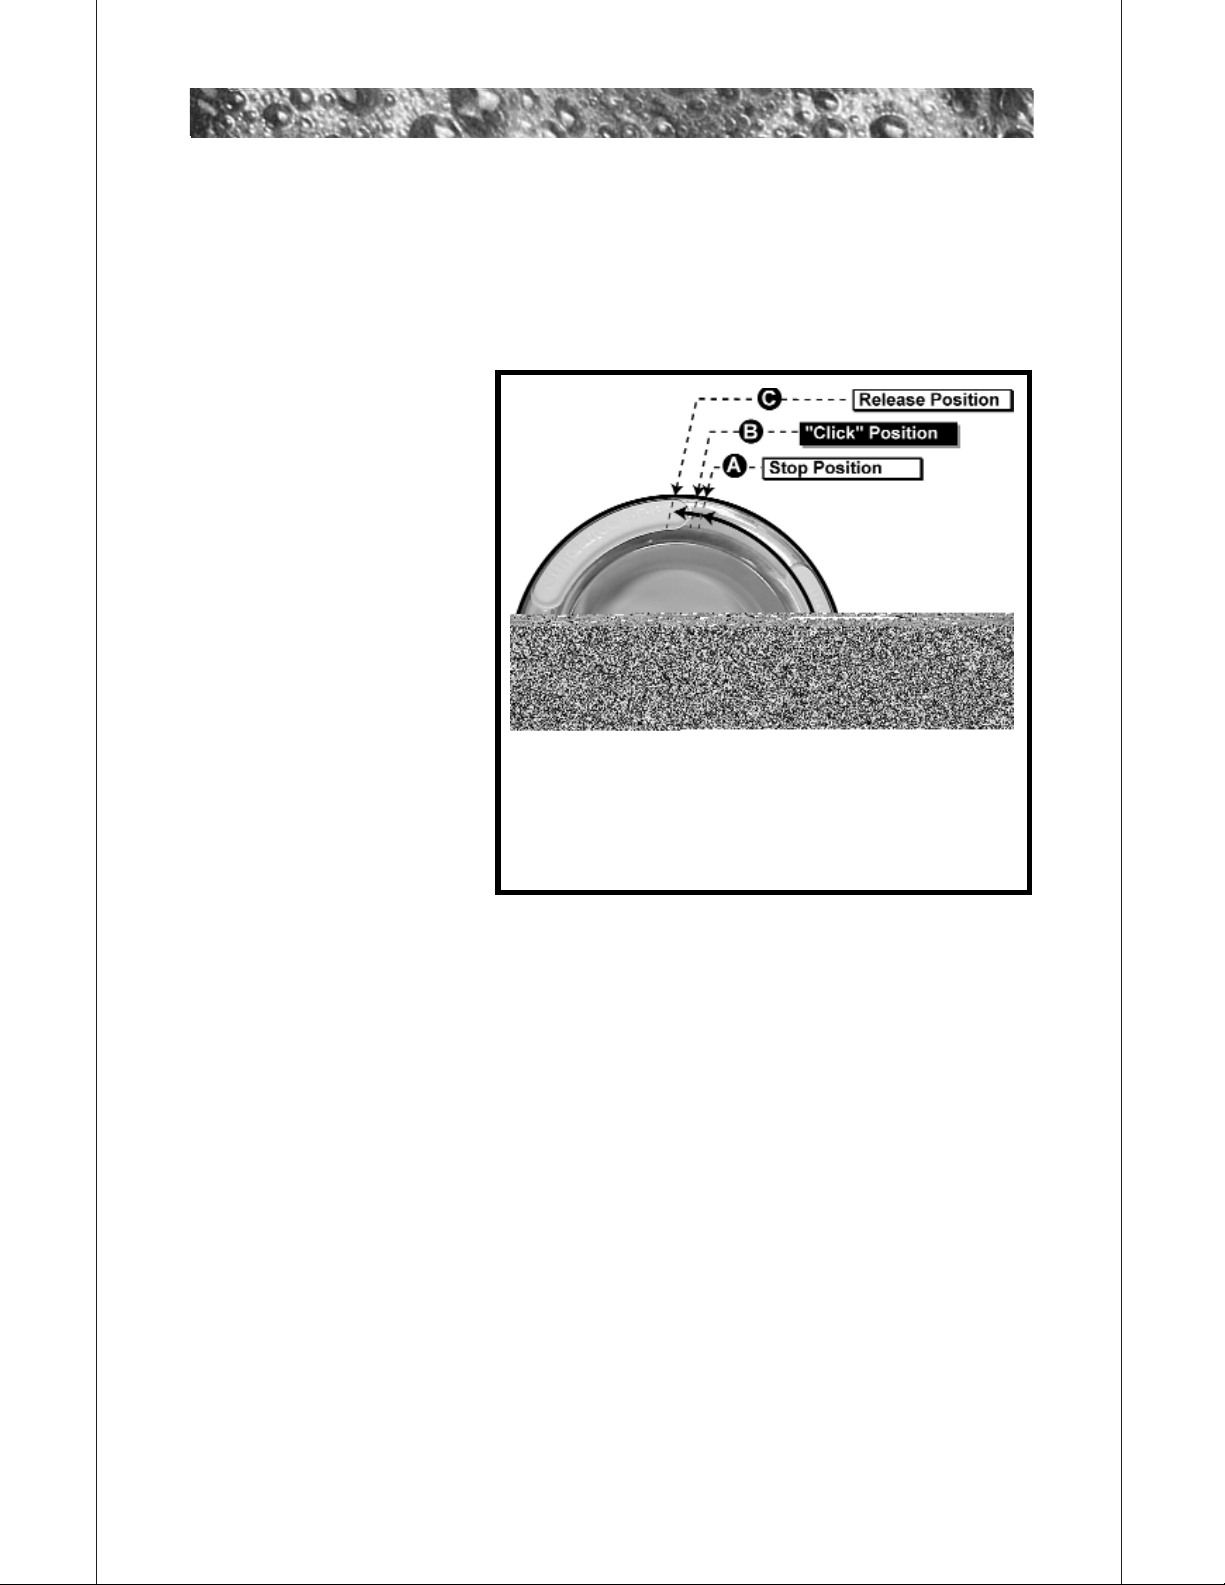
1. Remove jet internal
from hot tub wall
fitting by placing your
hand around the
outer jet adjustment
ring and rotating it
counterclockwise
(fig. 1). Rotate jet
adjustment ring until
it stops at position
(A). Use additional
force at position (A)
to continue rotation
until you feel a “click”
at position (B); then
feel the internal
release at position
(C). It may seem like
your are overtorquing
the jet internal between positions (A-B), however, additional force
is necessary at position (A) to unlatch its retaining mechanism
from the wall fitting.
2. Fill a clean bucket with tap water and immerse jet internal. Rotate
submersed jet internal’s nozzle in a circular motion while moving
it back and forth allowing water to flow through both ends of the
jet. This motion allows slow moving water to wash back through
the jet bearing and dislodge any debris that might be lodged in
the bearing. Clean each jet internal for approximately 1 to 2
minutes twice a year, or when a particular jets rotation appears
sluggish, jerky, or obstructed.
3. Reinstall jet internal by inserting it in any jet opening of the same
jet type. Rotate the jet internal clockwise with light pressure until
your feel the retaining mechanism “snap” in place. The jet’s
nozzle should rotate freely to the left or right using only fingertip
pressure. If jet rotation appears sluggish or obstructed at this
time, repeat steps 2-3 until condition clears. If condition persists,
contact dealer for technical support.
Page 26
Page 30

Page 27
MAINTAINING THE WOOD CABINET
With time and exposure to the elements, the wood on your hot tub will tend to lose
its new appearance. Protecting or reviving the wood surfaces is a fairly simple
process. Light sanding with fine-grit sandpaper will help smooth any roughness and
regular applications of a penetrating wood preservative will enhance and protect the
richness of the wood. A specially formulated wood stain available from your
Sundance dealer is ideal for this.
NOTE: Do not apply varnish, shellac or other surface sealants to the
wood. These tend to react with the chemicals in the wood and the
UV rays of the sun, causing yellowing, flaking and peeling.
MAINTAINING THE COVER
Using the Sundance insulating hot tub cover anytime the hot tub is not in use will significantly reduce your operating costs, heat-up time and maintenance requirements. To
prolong the life of the cover, handle it with care and clean it regularly using mild soap and
water. Periodic treatments with a special conditioner developed for Sundance hot tub covers will help protect against deterioration caused by U.V. rays from the sun. Never allow
anyone to stand or sit on the cover, and avoid dragging it across rough surfaces.
WINTERIZING
Your Sundance hot tub is designed to automatically protect itself against freezing when operating properly. During periods of severe freezing temperatures,
you should check periodically to be certain that the electrical supply to the hot
tub has not been interrupted. In extreme, bitter cold weather (less than -20°F)
reset the filter cycles for 24-hour operation to protect the hot tub (i.e. four 6hour cycles).
If you do not intend to use your hot tub, or if there is a prolonged power outage during periods of severe freezing temperatures, it is important that all
water be removed from the hot tub and equipment to protect against damage from freezing.
For expert winterization of your hot tub, contact your authorized
Sundance Dealer. In emergency situations, damage can be minimized by
taking the following steps:
1. Follow the directions on page 24 for draining the hot tub.
2. As the water level drops below the seats, use whatever means necessary to get the water out of the recessed seating areas and into the
footwell.
3. When the water level ceases to drop, use whatever means available to
remove any remaining water from the footwell
Page 31

Page 28
4. Turn the power to the hot tub back on briefly and press the AIR button
to activate the air blower. This will evacuate the water from the air injector lines. (Note: Stand back to avoid the misty spray.)
5. Turn off power to the hot tub.
6. Remove the equipment-side cabinet panels and locate the drain plugs
in the front of the pump(s) (see Ill. No.1, item 7). Remove these plugs
to allow the water to drain out of the pumps and heater. (Note:
Approximately one to two gallons will be released during this procedure. Use a wet/dry vacuum or other means to keep this from flooding
the equipment compartment.) Replace the drain plugs.
7. Loosen the hose clamp at the bottom of the heater (Ill. No.1, item 4)
and pull this hose off of the heater fitting (twist the hose back and forth
while pulling downward). Tip the hose down and allow to drain.
8. Re-install the cabinet side panels and cover the hot tub so that no casual moisture can enter the hot tub.
Consult your Authorized Sundance Dealer if you have any questions regarding
winter use or winterizing.
RE-STARTING YOUR HOT TUB IN COLD WEATHER
If you want to start up your hot tub after it has sat empty for a time in freezing temperatures, be aware that the water remaining in certain sections of the
piping may still be frozen. This situation will block water flow preventing the
hot tub from operating properly and possibly damaging the equipment. We
recommend you consult your dealer for guidance before attempting to re-start
your hot tub under these conditions.
Water Quality Maintenance
Maintaining the quality of the water within specified limits will serve to
enhance your enjoyment and prolong the life of the hot tub's equipment. It is
a fairly simple task, but it requires regular attention because the water chemistry involved is a balance of several factors. There is no simple formula, and
there is no avoiding it. A careless attitude in regard to water maintenance will
result in poor and potentially unhealthful conditions for soaking and even
damage to your hot tub investment. For specific guidance on maintaining
water quality, consult your Authorized Sundance Dealer who can recommend
appropriate chemical products for sanitizing and maintaining your hot tub.
CAUTION: Never store hot tub chemicals inside the hot tub's equipment bay.
Page 32

Page 33

Page 30
Troubleshooting
DISPLAY MESSAGES
There are a number of unique functions designed into your Sundance hot tub
to protect it from damage and/or to aid in troubleshooting. Following is a listing of all the possible messages along with their meanings:
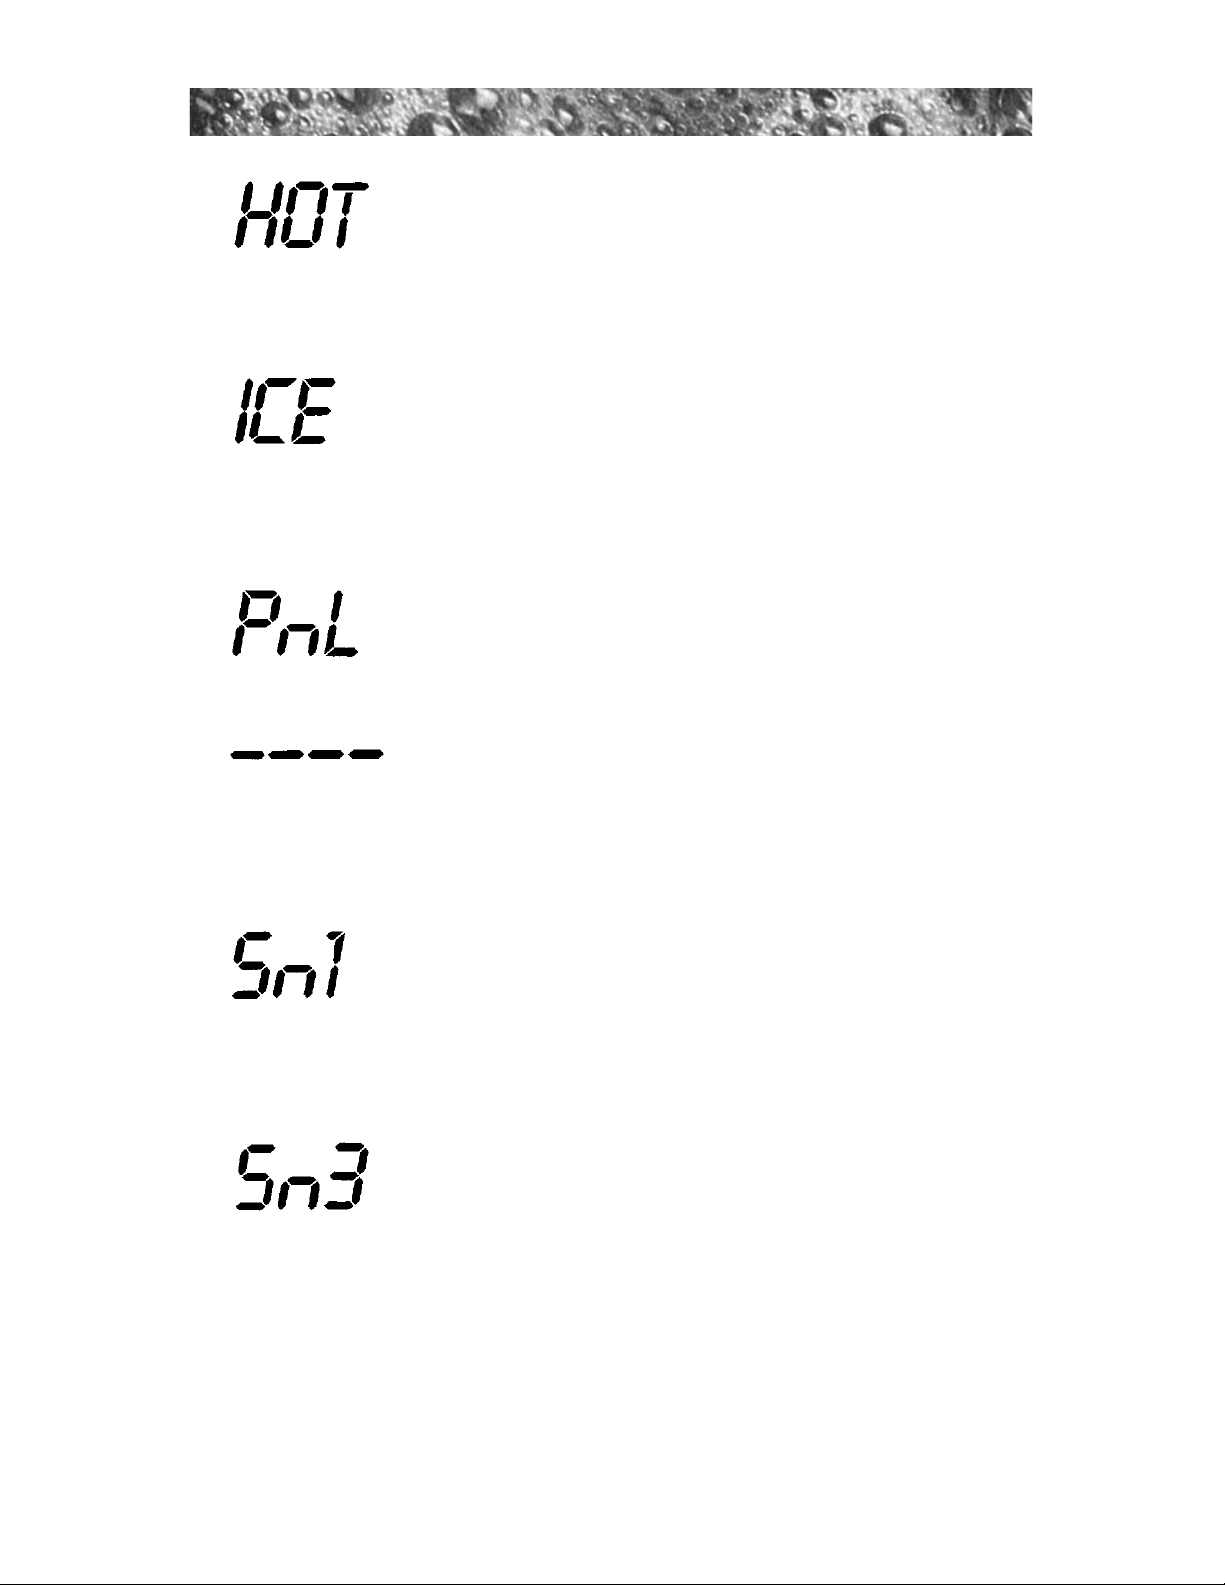
MESSAGE MEANING
Overheat Protection (Heater is deactivated, pump’s
low speed is activated). Water temperature is above
acceptable limits. Do not enter the water! Remove
hot tub cover to speed cooling. See “WATER IS TOO
HOT” on page 33. If condition persists, contact your
dealer or authorized service center.
If the hot tub water is more than 20 degrees F
cooler than the temperature set point, the low
speed pump 1 and heater will automatically activate to provide freeze protection. The hot tub will
stay in this mode until the water temperature
reaches 15 degrees below the set temperature. No
corrective action is necessary.
FLOW SWITCH (Heater is deactivated. Pump may also
be deactivated). Proper flow of water is inhibited or a
flow switch has malfunctioned. Check for proper
water level. Check for clogged filter. Contact your dealer or service organization.
*NOTE: THIS MESSAGE CAN ALSO APPEAR IF THE PUMP HAS NOT
REGAINED PRIME AFTER THE HOT TUB HAS BEEN DRAINED AND REFILLED.
IF YOU SUSPECT THAT THIS IS THE CASE, SEE THE INSTRUCTIONS ON PAGE
32 UNDER “PUMP DOES NOT OPERATE...”
Panel sensors have been pressed too many times in a
short period of time. Because this could cause excessive wear on equipment components, panel sensors
are temporarily deactivated. Panel sensors will automatically re-activate if no sensor is pressed for 30 seconds.
*
Page 34
Page 31
Circuit board temperature has exceeded acceptable
limit. This message will disappear when the circuit
board temperature drops below acceptable limit. If
condition persists, provide shade for the equipment
side of the hot tub.
FREEZE PROTECTION
A potential freeze condition has been detected. No
action is required. Pump(s) operate until the hot tub is
out of danger.
Communication between the control panel and the
circuit board is faulty. Contact your dealer or service
organization.
"WATCHDOG" (Hot tub is deactivated.)
A problem has been detected which could cause
damage to the hot tub or its components. Contact
your dealer or service organization.
OPEN SENSOR (heater disabled) OR
SHORTED SENSOR (hot tub is deactivated)
The high-limit temperature sensor is non-functional. This
must be repaired only by a dealer or qualified service
organization.
OPEN OR SHORTED SENSOR (heater disabled)
The main sensor is non-functional. This must be
repaired only by a dealer or qualified service organization.
Page 35

Troubleshooting Procedures
In the unlikely event your hot tub is not working the way you believe it should,
please first review all the installation and operating instructions in this manual and check the message on the panel display; second, if you are still not satisfied it is working properly, please follow the appropriate troubleshooting
instructions.
PROBLEM PROCEDURE
NONE OF THE Check the control panel lights.
COMPONENTS 1. If there are letters or symbols displayed on the
OPERATE (i.e. screen, refer to the previous section to
pump, blower, light) determine meaning and action required.
2. If nothing appears on the screen:
a. Check the household circuit breaker.
b. Contact you dealer or authorized service center.
PUMP DOES Depress "Jets" sensor.
NOT OPERATE 1. If no sound is detected or if a "buzzing" sound is
BUT BLOWER detected, turn off power to the hot tub and contact
AND LIGHT DO your dealer or service center.
OPERATE 2. If motor operates but no water flows to jets:
a. Pump may not be properly primed. See instruc-
tions below.
b. Contact dealer or authorized service center.
Pump Priming Instructions: Turn Hot Tub Off!
Remove filter and insert end of garden hose into filter pipe. Seal-off pipe
opening around hose using a large, clean rag and turn on maximum water
flow through the hose. After about 30 seconds, turn off water, remove
hose and rag, reinstall filter and activate pump’s high speed.
Another method of priming the hot tub’s pump(s) is as follows:
1. Turn off the power to the hot tub.
2. Remove the handle from the Massage Selector supplied by the pump
you are priming.
3. Loosen the Massage Selector’s cap slightly (counterclockwise),
listening for the air to seep out.
4. Tighten the cap finger-tight, replace the handle and turn the hot tub’s
power back on.
(Note: This method must be used for the single speed pump (pump 2) of
all altamar, cameo, marin, and optima models because pump 2 is not connected to the filter.)
Page 32
Page 36

Page 33
IMPORTANT: If freezing conditions exist and pump is not operational, take measures to protect the system from freeze damage. See
“Winterizing” (page 27).
POOR JET ACTION 1. Make certain the pump is on high speed.
(see III. 3 page 17) 2. Check position of massage selectors
3. Open air control for the jet system selected.
4. Check for adequate water level.
5. Check for dirty filter.
6. Check for dirty filters on all three pump 2
footwell suction covers.
WATER IS TOO HOT. 1. Reduce thermostat setting.
2. Reduce filtration cycle length. (Even without
heater on, water temperature can increase from
prolonged pump operation.)
NO HEAT 1. Check thermostat setting.
2. Keep the cover in place while heating.
3. If “heater on” indicator is lit (see Ill. 2.1), but no
temperature rise is experienced after a reasonable period of time, contact your dealer or
authorized service center.
Your Authorized Sundance Dealer is a trained service repair center. Should
checking the above steps fail to correct the problem, please call your dealer
so that he may arrange service.
Your Sundance Dealer’s phone number:
Sundance builds the best hot tubs in the industry. Nonetheless, we are always
striving to improve the quality and features of our products. Your input as a
Sundance hot tub owner is a cherished part of this process. If you have any
comments or suggestions, or if you wish to be informed on any new products
for your hot tub, please write to us.
CONGRATULATIONS on your good taste and welcome to the happiest and
most relaxed family in the world!
Page 37
Page 34
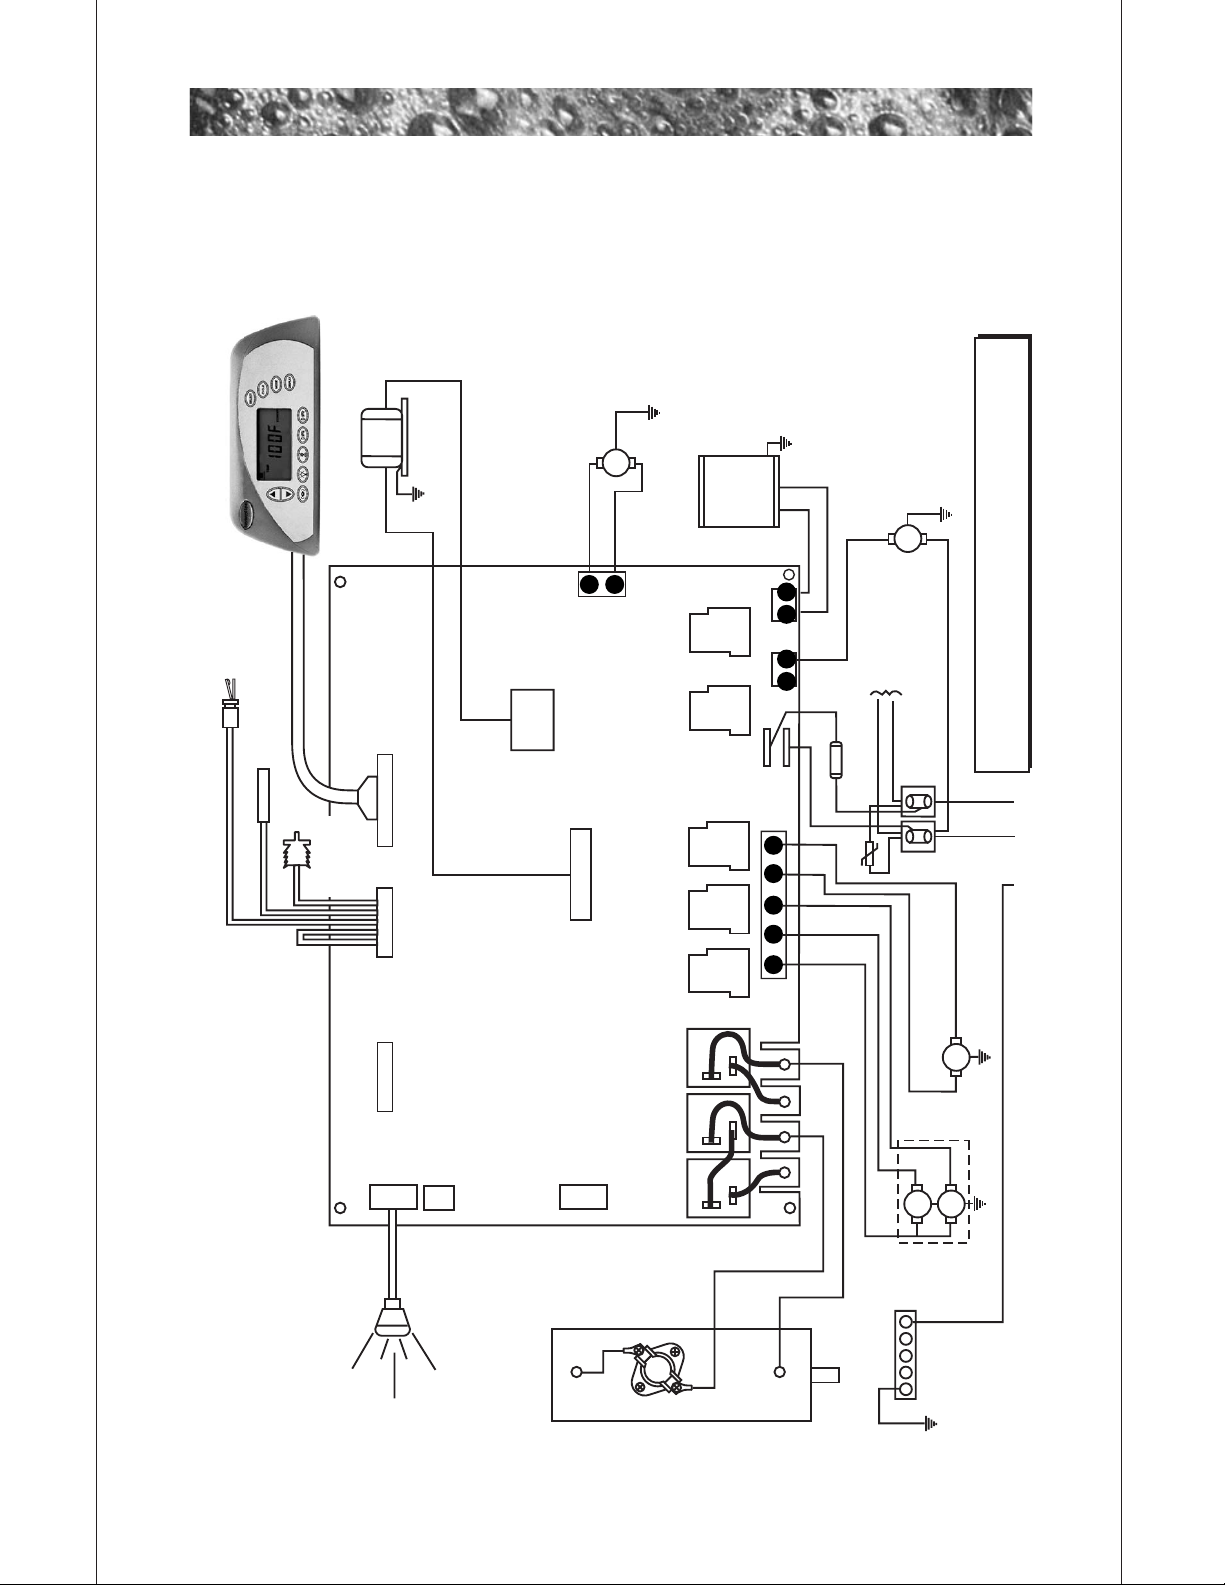
Electrical Wiring Diagram
Cameo, Optima, Altamar, Marin and Capri
SYSTEM CONTROL
PANEL
SENSORS 800 LCD PANEL
TB1
TB3
TB1
240 VAC, 24A/40A/48A,, 1-Phase 60 Hz
USE COPPER CONDUCTORS ONLY
Wire size must be appropriate per NEC and/or Local Codes
TB4
J4
J8
J2
K8
K6K5K4
K1 K2 K3
K7
TB6
TB2
J1
Z1
J6 J7
J3
OPTIONS
FLOW SWITCH
HI - LIMIT / FREEZE SENSOR
TRANSFORMER
T1
BLOWER
CIRCULATION
PUMP
Blk
Wht
RED
Wht
Wht
Wht
Blk
Red
BLK
Blk
30A, 250V
SC-30
F1
PUMP 2
PUMP 1
HI
HI
LO
GRN
2
1
SPA LIGHT
TB5
TB3
K13
20
21
1
1 2 1 2
3 5
8 10
BB
18
TEMPERATURE
SENSOR
To Heater
Relays
HEATER
5.5 kW, 240 VAC
Wht
Blk
UV or CD
Ozonator
(Optional)
Page 38

Page 35
Page 39

14525 Monte Vista Ave. • Chino, CA 91710
Part #6530-316 • Rev. B • © 2001 Sundance Spas, Inc.
 Loading...