


FCC ID: 2AI5B-SO64
With a water proof casing, allowing you to film 30 meters under water scene.
HD screen display for convenient videos and image playback.
Detachable battery for easy replacement and help extend
product lifespan
Record videos while charging
HD 16 Megapixel wide angle lens
HDMI Output
WebCamera
Supports SD card memory expandable up to 64GB(Maximum)
Supports multiple video recording formats:4K/2K/1080P/720P/ WVGA
Supports MOV recording format
Supports multiple photo shooting modes: Single shot &Snapper
Video encryption enabled
Super lightweight, small in size and available in 8 colors
1,Keep it safe from falling and dropping
2,Keep it distance from any strong magnetic interference objects
like electrical machine to avoid strong radio waves that might be
damaging the product and affect the sound or image quality.
3,Don’t expose the product directly to high temperatures and strong
sunlight
4,We recommend using high quality Micro SD Card for the best
results.
5,Don’t place your Micro SD card near strong magnetic objects to
avoid data error.
Warning
6,In case of overheating, unwanted smoke or unpleasant smell from
the device, unplug it immediately from the power outlet to prevent
hazardous fire.
7,Keep it safety from children while on charging.
8,Stored the device in a cool, dry and dust free location.
Product features
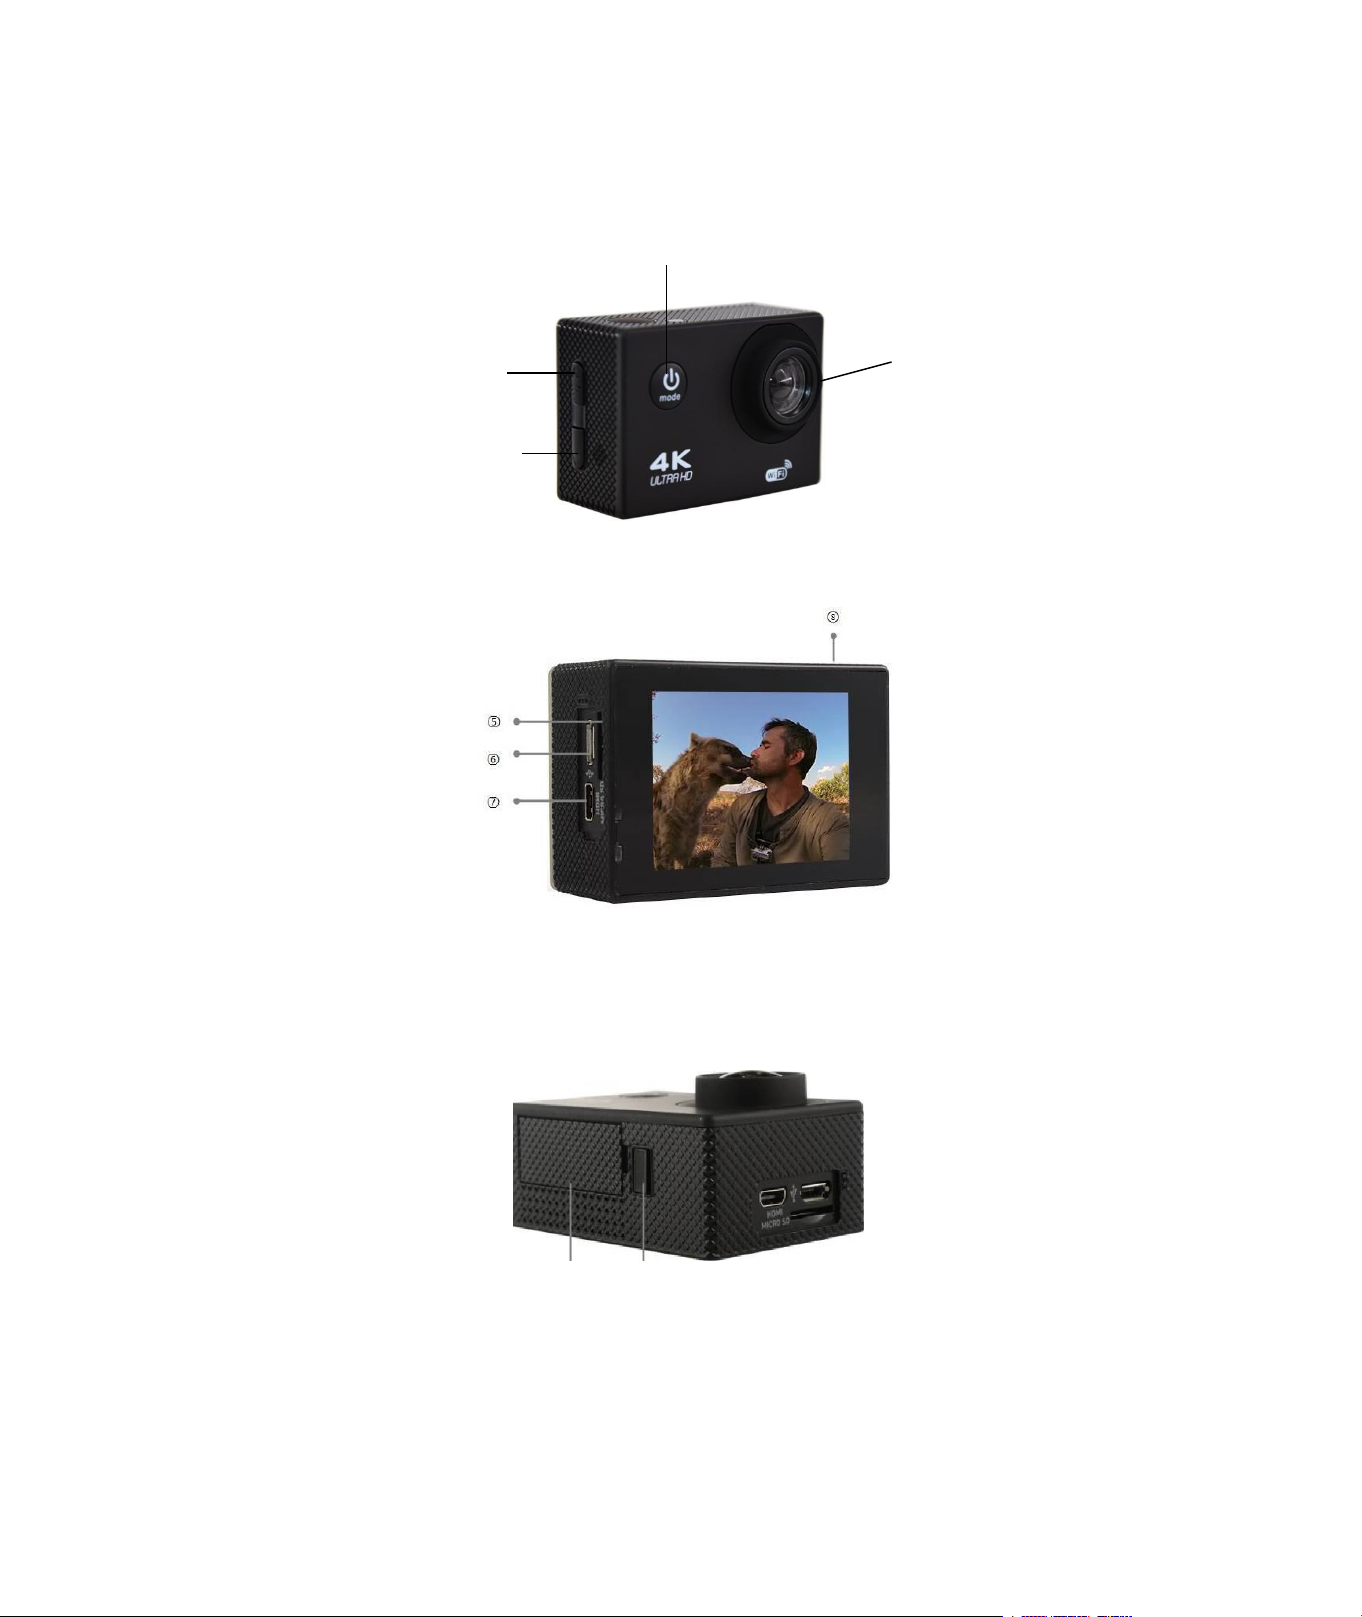
Product structure
①
②
③
④
1.Power/Mode 2.UP/WI-FI 3.DOWN 4.LENS
5.TF card slot 6.USB slot 7.HDMI 8.OK
9 10
9.Battery Door 10.Battery Door Latch

GETTING STARTED
To power ON:
Press the Power/Mode Button.
To power OFF:
Press and hold the Power/Mode Button.
OVERVIEW
Turn camera ON and repeatedly press the Power/Mode Button to
cycle through camera modes and settings.The modes will appear in
following order:
SETTINGS
Press the OK Button to enter the settings menu. Repeatedly press the Power/Mode Button to cycle
Model
SO64
Video Resolution
4K@30FPS/2.7K@30FPS/1080P@60F
PS/1080P@30FPS/720P@120FPS
Video sound
ON/OFF
Time-lapse
OFF/0.5S/1S/2S/5S/10S/30S/60S
Loop Recording
OFF/2min/3 min /5 min
Slow motion
1080P@60FPS/720P@120FPS
Pixel set
16M/12M/8M /5M/2M
Timed
3S/5S/10S/20S/OFF
Auto
3S/10S/15S/20S/30S/OFF
Drama shot
3P/S、 5P/S、 10P/S、 20P/S、 OFF
Exposure
-2---+2
White balance
Auto/Sunny/Cloudy/Incandescent
light/Fluorescent light
Image
Rotation
ON/OFF
WIFI
ON/OFF
Light source
frequency
Auto/50HZ/60HZ
through options and press the OK Button to select desired option.
Video setting
Photo
SETTINGS
LED
indicator
light
ON/OFF
Auto
Screen saver
10S/20S/30S/OFF
Auto shutdown
1min/3min/5min/OFF
Time
watermark
ON/OFF
Language
English/German/French/Spanish/Italian/Portuguese/traditi
onal/Chinese simplified/Chinese/Japanese/Russian
Date-time
2015/01/01 12:00:00
Format
Confirmation/cancel
Reset
Confirmation/cancel
Micro
SD
4K@30FPS/108
0P@60FPS
1080P@30
FPS
720P@60
FPS
32GB
120min
240min
320min
16GB
60min
120min
160min

Video mode
1,To record video,Verify the camera is in Video mode
2,If the Video icon” ” on screen is showing, press the OK key to start video, at the same time also has“a
red icon” flashing.
3,Click the OK button again to stop the video, also the red icon disappear.
Picture mode
1,To take picture,Verify the camera is in picture mode.
2, If the picture icon ” ” on screen is showing, press the OK key to take pictures.
Slow motion
1,To record slow motion video,Verify the camera is in slow motionmode.
2, If the slow motion Video icon” ” on screen is showing, press the OK key to start video, at the same
time also has “a red icon” flashing
Time-lapse
1,Enter the setting menu, open this function, return to video mode.
2, If the slow motion Video icon” ” on screen is showing, press the OK key to start video, at the same
time also has “a red icon”.
Playback
Playing back video and photos
1,verify the camera is in playback menu
2,press up or down button to select file,press OK button to playback
video
Battery
1, install and remove the battery
a. down upon battery cover can be open it.
b. according to the battery label plus or minus sign and the direction
of the arrow, right put the battery into the camera, until the
installation in position.
c. take out battery, push away the battery cover can take out the

battery
a. Select the "WIFI" menu, press "OK" button to enter, select "open",the screen will show the WIFI icon,
LCD
2.0LTPS
LENS
170 degree A + high resolution wide Angle
lens
Language
English/German/French/Spanish/Italian/Po
Chinese,simplified Chinese/Japanese/Russia
n language
video
4K 30FPS 2K 30FPS
1080P (1920*1080) 60FPS
video format
MOV
2, charge
a. connect the computer or the power adapter can be recharged.
b. directly to the car charger can be recharged in the car.
c. can charge while video function.(inside the function table Settings
required to open the car mode)
d. power off can be charged.
CAMERA WIFI APP
1,Download the APP client and install it to the smart phone, which displays the “XDV” application icon after
installation. Apple WLAN,direct search “XDV”, click install. After the installation of the mobile phone interface
will appear a APP application icon. Click to enter the APP "XDV" interface .
2,The open WIFI function
SSID:********,
PWA2:********
b. click the UP button to return. At this time to open the phone to set the WIFI function, to find a new set of
WIFI name of the network,
c. The connection after entering the new WIFI password and confirm the connection, the connection after
the success of the LCD on the Connected/ display MAC:************.
d. At this time to open the phone has been installed “XDV” APP client, and search to add the camera ID code,
after the completion of the camera and video operations can be performed.
Parameter

compression
format
H.264
Photo
16M/14M/12M/8M/5M
Memory
Micro SD UPTO 64GB
Picture mode
Single/timer / (2S/5S/10S) / Continuous
shot
Light source frequency
50Hz/60Hz
USB
USB2.0
Power
5V 1A
Battery
900MAH
Video time
1080P/ 90min
Charge time
About 3 hours
System
Windows XP/Vistaor Above/Win7/Mac os

操作注意事項
1本產品是高精密產品,請勿摔落或撞擊
2.請勿將攝像機靠近具有強磁的物體,如磁鐵和電機,另外也要避免將產品靠近發出較強的無線電波的物體,強磁
場可能會引起產品故障,或者破壞圖像及聲音.
3.請勿將攝像機放置在溫度較高或陽光直射的地方
4.
請選擇品牌Micro SD卡,普通卡不能保證能正常使用,
5.
請勿將Micro SD卡存放在或靠近強磁的地方。避免丟失M現過熱,冒煙,或者發出異味,請立即拔出電源,
停止充電,避免發生火災。6.充電時,請將產品置於兒童無法接觸到的地方,電源線可能會導致兒童意外窒息
或受到電擊
7.請將產品置於陰涼,乾燥且絕塵的地方
產品特性
>提供防水功能的防水外殼,方便您拍攝精彩的水上運動,防水外殼可以在深度30米处拍攝
>超高清顯示幕,顯示和重播拍攝的精彩視頻
>電池可拆卸,方便更換電池,延長使用壽命
>邊充電邊錄影功能
>插電錄影功能
> 1600萬高清廣角鏡頭
> H D MI高清輸出功能
>網路攝像頭功能
>支援最高64G儲存卡
>多種視頻錄製格式
4K@30fps/2K@30fps/1080P60fps/720P@120fps/WVGA > MOV格式視頻錄製
>多種拍攝模式單拍自動連拍
>超小迷你外觀,多種顏色可

产品结构
1.开关键 2上翻键/WI-FI 3.下翻键 4.镜头
5.TF卡槽 6.USB接口 7.HDMI接口 8.确认键
9 10
9.电池盖 10.电池扣

使用操作
開機:
点按开关机/模式键,攝像機开机
關機:
長按开关机/模式键,攝像機關機
概述
打開攝像機,重複點按开关机/模式键,機器會循環攝像機拍攝模式
和設置,見下圖

開機狀態下,點按开关机/模式键,攝像機开机,重複點按开关机/
拍照設置
型号
SO64
錄像分辨率
4K@30FPS/2.7K@30FPS/1080P@60FPS
/1080P@30FPS/720P@120FPS
錄像聲音
選擇開啟或者關閉
縮時錄影
/0.5S/1S/2S/5S/10S/30S/60S/关闭
循環錄影
關閉/2分鐘/3分鐘/5分鐘
慢攝影
1080P@60FPS/720P@120FPS
像素設置
16M/12M/8M/5M/2M
定時拍照
3S/5S/10S/20S/關閉
自動拍照
3S/10S/15S/20S/30S
運動軌跡拍照
3P/S、5P/S、10P/S、20P/S
模式键進行狀態切換進入設置。
錄像設置

設置
曝光設置
-2---+2
白平衡
自動/晴天/陰天/白熾光/熒光
影像旋轉
開啟/關閉
WIFI開關
開啟/關閉
光源頻率
自動/50HZ/60HZ
LED指示燈
開啟/關閉
自動熄屏
10秒/20秒/30秒/關閉
自動關機
1分鐘/3分鐘/5分鐘/關閉
時間水印
開啟/關閉
系統設置
語言
繁體中文/簡體中文/英文/日本語/韓語/
語/德語/法語/意大利語/西班牙語/波蘭
日期
2015/01/01 12:00:00
格式化
確認/取消
恢復出廠設
置
確認/取消
固件版本
*******

錄像時長參考
Micro
SD
4K@30FPS/1080P@
60FPS
1080P@30F
PS
720P@60F
PS
32GB
120min
240min
320min
16GB
60min
120min
160min
录像模式
攝像機進入到攝像模式,螢幕的左上角有 標誌時,按確認鍵開始錄影,錄影的同時螢幕正下方有紅點
標誌閃動,再次點按確認鍵
停止錄影,同時正下方紅點標誌也消失。
注:攝像機會一直錄像直到機器沒有電,機器關機前,視頻會自動保存到內存卡裡面。
拍照模式
打開電源,攝像默認進入錄像模式,點按模式鍵切換進入拍照模式,螢幕上左上角有 標誌時,此時進
入拍照模式。點按確認鍵進行拍照。
慢攝像
打開電源,攝像默認進入錄像模式,點按模式鍵切換進入拍照模式,
再次點按進入慢攝像模式,
此模式下,點按確認鍵,機器錄製高幀率視頻,
註明:慢动作是因为普通电脑显卡还做不到1秒播放120张, 並且播放器本身的解码能力也达不到这么高的要
求,所以,播放器会将视频按照30帧的速率来播放。例如:120帧的视频,按照30帧来播放, 那就相当于放
慢了4倍,故可以慢動作播放。

縮時錄像
通過打開菜單裡面的縮時錄像功能,設置相應的拍摄时间间隔,設置完成后,進入攝影模式,按下確認鍵,左
下角會有相應的縮時錄像圖標顯示,表明已經在進行縮時錄像。
回放
1. 打開電源,攝像默認進入錄像模式,點按模式鍵切換進入拍照模式,點按兩次進入慢攝像模式
2. 按上翻鍵和下翻鍵進行文件選擇
3. 按確認鍵進行視頻播放和暫停
電池
1,安裝和取出電池
A.向下撥動電池蓋可將它打開。
B.按照電池上標示的正負符號和箭頭指示方向,正確的把電池裝入攝像機內,直到安裝到位。
C.取出電池,將電池蓋推開即可取出電池
2,電池充電
A.連接電腦和電源適配器均能進行充電。
B.直接將車充也能在汽車上進行充電。
C.可邊充電邊錄影功能。(需在功能表裡面設置把車載模式打開)
D.關機狀態也可以充電。
WI-FI APP連接
1.本機可跟安卓或蘋果系統的手機或者平板電腦通過 WIFI連接:
A.在手機或平板電腦上安裝“XDV” APP,(安卓系統可在Google Play上搜索下載,蘋果系統的可在 APP
Store上搜索下載)。
B.開啟攝像機後,按攝像機上的 WIFI標示,攝像機的螢幕會顯示WIFI標誌,然後出現 ACTION CAM型號,
C.在手機或者平板電腦上開啟WIFI功能,打開手機 WIFI鏈接,搜索攝像機的 WIFI SSID號,帳號是ACTION
CAM......然後連接.初始密碼會顯示在主機螢幕上。初始密碼:12345678
D.待成功連接上 WIFI後,攝像機的螢幕上顯示:WIFI Connection Ready!
E.在手機或平板電腦上運行軟體“ XDV ”進入後,攝像機拍攝的畫面即時顯示在手機或平板電腦上。並且
可以通過軟體中的相關圖示操作或者設置攝像機功能參數.

產品參數表
液晶顯示幕
2.0LTPS
鏡頭
170度 A+級高解析度廣角鏡頭
選擇語言
英文/德文/法文/西班牙文/義大利文/葡
萄牙文/繁體中文/簡體中文/日文/俄文
錄影視頻
4K 30FPS 2k 30FPS
1080P (1920*1080) 60FPS
錄影視頻格式
MOV
視訊壓縮格式
H.264
相片解析度
16M/14M/12M/8M/5M
存儲卡
Micro SD UP TO64GB
拍照模式
單拍/定時自拍/(2秒/5秒/10秒)/連拍
光源頻率
50Hz/60Hz
USB
USB2.0
電源
5V1A
電池容量
900MAH
功耗
400mA@4.2V
錄影時間
1080P/ 90分鐘左右
充電時間
約3小時
作業系統
Windows XP/Vistaor Above/Win7/Mac
os
WIFI
支持

1.當產品操作不當引起死機現象 可拆卸電池重新安裝,本機可以恢復正常
2.本機最大支持64G Micro SD卡,請選擇品牌的 Micro SD卡,在電腦上格式化後再使用通中性卡不能保證
能正常使用工作。
3.什麼是縮時錄像?
即通过设置一定的拍摄时间间隔,对同一场景或同一物体以一定拍摄频率自动进行长时间连续拍摄,形成一帧
帧由成千上万张照片组合而成的连续画面,并自动将其加工为动画视频从而将一些需要长时间才能完成的过程
浓缩为几分钟的影像呈现出来。免去长时间摄影的不便。
FCC STATEMENT :
This device complies with Part 15 of the FCC Rules. Operation is subject
to the following two conditions:
(1) This device may not cause harmful interference, and
(2) This device must accept any interference received, including
interference that may cause undesired operation.
Warning: Changes or modifications not expressly approved by the party
responsible for compliance could void the user's authority to operate the
equipment.
NOTE: This equipment has been tested and found to comply with the
limits for a Class B digital device, pursuant to Part 15 of the FCC Rules.
These limits are designed to provide reasonable protection against
harmful interference in a residential installation. This equipment
generates uses and can radiate radio frequency energy and, if not
installed and used in accordance with the instructions, may cause harmful
interference to radio communications. However, there is no guarantee
that interference will not occur in a particular installation. If this equipment
does cause harmful interference to radio or television reception, which
can be determined by turning the equipment off and on, the user is
encouraged to try to correct the interference by one or more of the
following measures:
Reorient or relocate the receiving antenna.
Increase the separation between the equipment and receiver.
Connect the equipment into an outlet on a circuit different from that to
which the receiver is connected.
Consult the dealer or an experienced radio/TV technician for help.
RF warning statement:
The device has been evaluated to meet general RF exposure
requirement. The device can be used in portable exposure condition
without restriction.

- English: "
This device complies with Industry Canada licence-exempt RSS standard(
s). Operation is subject to the following two conditions:
(1) this device may not cause interference, and
(2) this device must accept any interference, including interference that
may cause undesired operation of the device."
- French:"
Le présent appareil est conforme aux CNR d'Industrie Canada applicables
aux appareils radio exempts de licence. L'exploitation est autorisée
aux deux conditions suivantes :
(1) l'appareil nedoit pas produire de brouillage, et
(2) l'utilisateur de l'appareil doit accepter tout brouillage radioélectrique
subi, même si le brouillage est susceptible d'en compromettre le
fonctionnement."
 Loading...