

Page 1
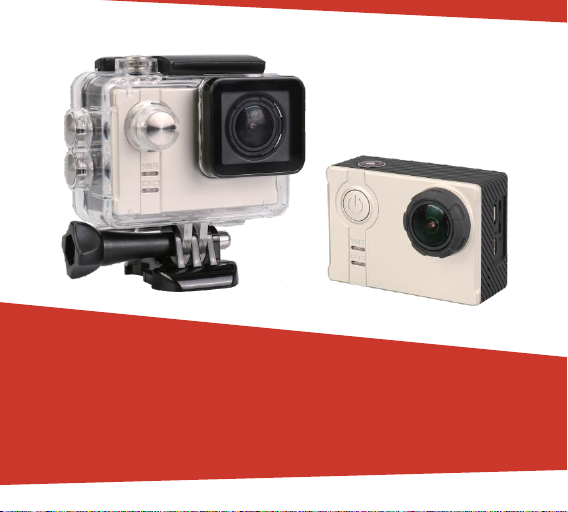
Action Camera
Waterproof up to 60m
WiFi
Full HD video 4K
12MP camera
Page 2
Warning
1.
It is a high-precision product, please do not fall or crash.
2.
Please do not exposet heunit to strong magnetic objects, such asmagnet and eletrical motor.
6.
While it is charging,keep the product out of children’sreach.
1.
Full high definition screen that displays fascinating videos recorded
5.
Car DVR recorder function
6.
HDMI HD output,Support FPV mode
3.Never leave the products to high temperatures and direct sunlight.
4.Please choose branded Micro SD card. Neutralcards are not quaranteed to work normally.
5.Please do not placeMicro SD card near strong magnetic objectsto avoid data loss.
7.Keep the devices in cool,dry, and insulatedplaces.
Preface
This product is a high-definition digital motion video recording device tailored to market demand. It has a variety of
industry-leading features,including: digital video recording, photo shooting, audio recording, and perfect for vehicle
data recording, outdoor sports, home security, deep-water probing, aerial photo,etc, allowing you to fil m at anytime
any where. And it has a variety ofpatents.
Mulitpurpose
Product Features
2.Ambarella A12S75 solution
3.12-megapixel photoshooting with 166 degree wide anglelens
4.Wireless wifit ransmission
7.Support storage cards up to 64GBmaximum
8.Multiple video recording formats:4K /1080P /720P
9.Support MP4 video recordingformat
10. Support Bluetooth function
Page 3
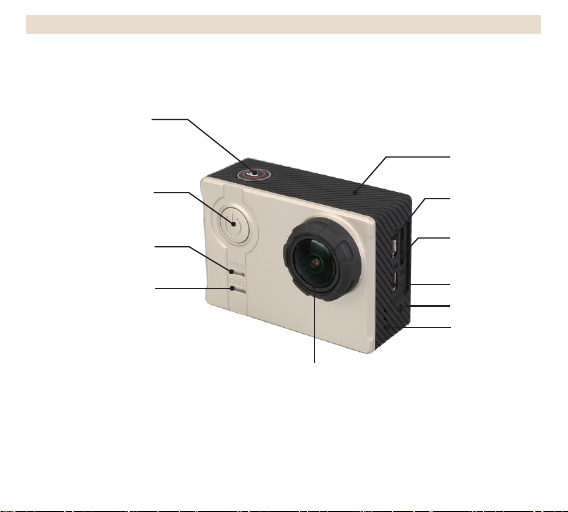
OK / WIFI
Power / Mode
WIFI Indicator
Operating Indicator
Micro
USB Slot
SD Card Slot
HDMI Port
External Mic
Speaker
Product Schematic
Microphone
Lens
Page 4
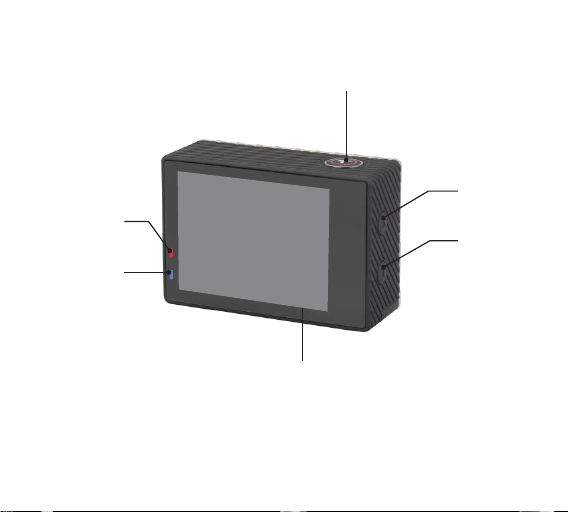
Charging
Indicator
Operating
Indicator 3
Up
Down
Screen
Operating
Indicator 2
Page 5
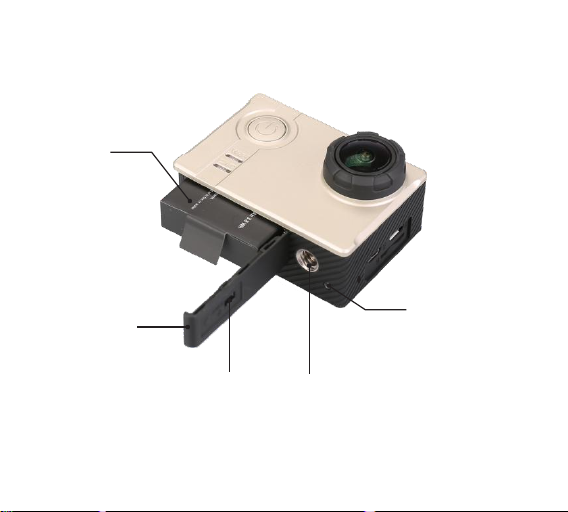
Battery
Battery cover
Aerial Photography
Indicator
Battery cover lock
1/4 nut
Page 6
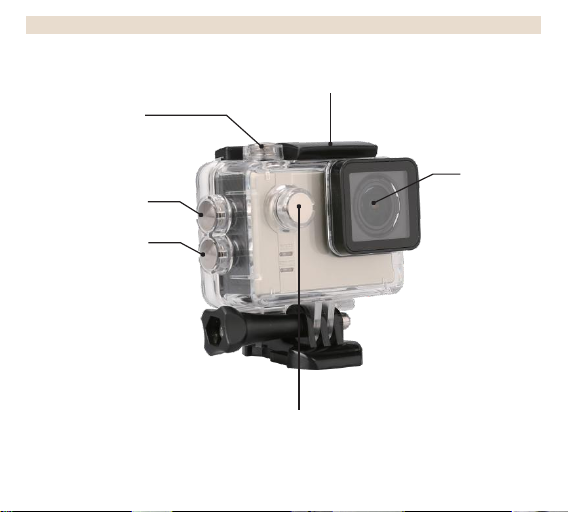
OK / WIFI
Up
Down
Waterproof cover Schematic
Waterproof case door lock
Lens
Power / Mode
Page 7

配件图
Waterproofcase
Bicycle stand
Base 1
Base 2
Fixed b a se
Switch support1
Switch support 2
Switch support 3
adapter
Charger
Helmet base
Ribbon
3M adhesive tape
Wire rope&Ribbon
USB cable
Wiper
back cover
User manual
Accessories
Page 8

Operation
1.
Inserting Micro SD Card
2.
Installing and removing battery
3.
Battery Charging
4.
Power mode
1.
After switching camera on, press the WIFI button for 2 seconds and turn on/off WIFI function.(W IFI icon will be
Note: Please choose branded Micro SD card and format it oncomputer ,before use. Neutral cards are not
guaranteed to worknormally.
A.The battery door has been lockedwhen the lock catch is in the”LOCK”, push the lock catch to “ ”,then to
“ ”, the battery door will be openagain.
B.Correctly install battery intocamera as indicated by+/- symbols anddi rection of arrows markedon battery until
it’s in place.
C.About battery power:please refer to the symbol: Full powermode “ ” low power mode“ ”.
D.Remove battery:O pen the battery capand take battery out.
Note: Please pusht helock catch to the position of”LOCK” beforeuse the device in case that battery looses orfalls
in the process of using.
A.Camera can charge by either connecting it to computeror power adapter.
B.Charging camera on vehicle by connecting it to carcharger.
C.Camera can recordv ideo while charging(switch into Vehicle-mountedMode in “menu”).
D.Charging can bedone even when it’s powered off.
Press and hold power for 3-5 seconds to turn iton/off.
5.Mode Switching
Switching between video recording/photo shooting/playback/menu by pressing “PowerOn-Off”button.
6.WIFI Control
Before use WIFI Control function, please install GoAction software to your mobile phone or tablet PC.
Note: Androidphone downloads APP in Google Play. IOS phone downloads APPin Apple Store.
Connection Steps:
display or disappear at the top right of the screen.) When turning on WIFI function, camera will reset. WIfi icon
become green after reseting and waitig for 5 seconds.(It expresses that WIFI can be connected normally now.)
2.Open the WIFI connection of mobile phone to search for the camera device:AMBA A12—XXXX from the
available wireless networks. (Password is 1234567890.)
3.Open the installation of GoAction software
7. Start the camera, shift to setting menu, find "Bluetooth Pair", then press "OK" button,the camera will display
"Bluetooth Pair Start", at the same time, press any key on the remote control, it will flash blue light. On the camera
screen, it displays "Bluetooth Pair", after around 20 seconds, you could see " Bluetooth Pair Success!", that means
connect successfully, then back to normal mode.
7. Start the camera, shift to setting menu, find "Bluetooth Pair", then press "OK" button,the camera will display
"Bluetooth Pair Start", at the same time, press any key on the remote control, it will flash blue light. On the camera
Page 9

screen, it displays "Bluetooth Pair", after around 20 seconds, you could see " Bluetooth Pair Success!", that means
Specifications
Image
Sensor
Type
1/2.3” CMOS 12.40MP (Sony IMX117)
Effective
Pixels
Approx. 12.40 Mega Pixels (4072 * 3046)
Output Pixels
Approx. 12.40 Mega Pixels
Lens
Focal Length
Lens f= 3mm
F No.
F= 2.8
F.O.V(D)
166°(H=120° V=89°)
LCD Display
2” 960*240 dots matrix TFT LCD
Viewfinder
Optical
No
connect successfully, then back to normal mode.
8. How to reocrd videos and configure reocrding setting
8-1. Video Recording
Switch to recording mode and there will be an “ ” icon in the upper left corner of the screen.
Press OK to start recording and the “ ” icon will start to flash. Press “OK”again if you want to stop and
disappear
8-2. Photo Shooting& Setting
Switch the camera on and press“Mode”to select “Photoshooting Mode”,there will be an “ ” icon in the upper
left corner of display screen and the camera is in photo shooting mode. Press “OK” to take photos.
8-3. Burst Mode& Setting
Switch the camera on and press“Mode”to select “Photo shooting Mode”,there will be an “ ” icon in the upper
left corner of display screen and the camera is in photo shooting mode. Press “OK” to take photos.
8-4. File Storage& Playing
Switch the camera to the “Playback Mode”(“ ”is shown on the top left cornerof v ideo preview mode,and
“ ” is shown on the top left corner of photo preview mode.), select files by using the UP and DOWN arrows,
then replay and stop video or review photos by pressing the shooting button. You can also replay by mobile
phones via WIFI.
Note: When camera crashs for malfunction, you can detach battery and install again, it will go back to normal
Page 10

Viewfinder
Focusing
Type
Fixed
Exposure
Control
Programmed AE
Compensation
±2EV (0.33 EV steps)
ISO
Equivalent
Auto, 100, 200, 400, 800, 1600
LED
Modes
No
White Balance
Auto / Incandescent /D4000/D5000/Daylight / Cloudy
/D9000/D10000/ Flash / Fluorescent/Water / Outdoor
Page 11

Video resolution
4K/30P
NTSC: 4K 3840x2160 30P 16:9
3840x2160 25P SuperView
2160P 2880x2160 30P 4:3
2.7K 2704x2028 30P 4:3
2704x1520 30P SuperView
2.7K 2704x1520 30P 16:9
2.5K 2560x1440 60P/30P 16:9
1440P: 1920x1440 60P/30P 4:3
1080P: 1920x1080 120P/100P/60P/30P 16:9
1920x1080 60P/30 SuperView
960P: 1280x960120P/60P/30P 4:3
720P: 1280x720 240P/200P/120P/60P/30P 16:9
1280x720 120P/30P SuperView
PAL: 4K 3840x2160 25P 16:9
3840x2160 25P SuperView
2160P 2880x2160 25P 4:3
2.7K 2704x2028 25P 4:3
2704x1520 25P SuperView
2.7K 2704x1520 25P 16:9
2.5K 2560x1440 50P/25P 16:9
1440P: 1920x1440 50P/25P 4:3
1080P: 1920*1080 100P/50P/25P 16:9
1920*1080 50P/25P SuperView
960P: 1280x1080 100P/50P/25P 4:3
720P: 1280x720 200P/100P/50P/25P 16:9
1280x720 100P/25P SuperView
Audio
Mic and Speaker (Mono) Equipped
Bluetooth
Bluetooth is about 12 meters from the maximum
Photo size
Media
Internal memory: no internal memory
External memory: supporting SDHC Card up to 64GB
Page 12

File Format
Photo : JPEG
Audio : PCM 48KHZ 16bit
Video : H.264 High Profile Level 4.2 MP4
Image Size
12Mp
16M(4608x3456 4:3)
14M(4254x3264 4:3)
12M (4000x3000 4:3)
8.3M(3840x2160 16:9)
5M(2560x1920 4:3)
3M(2048x1536 4:3)
Video Output
HDMI: Support NTSC 1920X1080P60,PAL1920X1080P50
output With CEC
Composite: NTSC/PAL
Time Lapse Function
OFF / 2 Seconds /3 Seconds / 5 Seconds / 10 Seconds / 30
Seconds / 60 Seconds
Photo Functions
Self Timer :OFF / 2 Seconds / 3 Seconds / 5 Seconds / 10
Seconds / 30 Seconds / 60 Seconds
Burst Rate :OFF / 3 P/s / 5 P/s / 10 P/s
Auto Shoot :OFF / 3 Seconds / 5 Seconds / 10 Seconds / 30
Seconds / 60 Seconds
Function option
Video Quality
S.Fine / Fine / Normal
Photo Quality
S.Fine / Fine / Normal
Page 13

Video Quality:
Off/ Date / Time / Dt_Tm
Photo Quality:
Off/ Date / Time / Dt_Tm
Default Mode
Video / Photo
Quick Capture
ON / OFF
EIS
On / OFF
Motion
Detection
Off / Low / Medium / High
Long
Exposure
Off / 1/30 seconds / 1 second / 2 seconds / 5 Seconds / 10
Seconds / 30 Seconds / 60 Seconds
Dual Streams
On / OFF
Loop Record
OFF /1 Min./ 2 Min. / 3 Min. / 5 Min.
Car DV:
ON / OFF
Delay Off :
Off / 5 Sec / 10 Sec / 20 Sec / 30 Sec / 60 Sec
TV Mode :
NTSC / PAL
Light Freq. :
50HZ / 60HZ
OSD :
ON / OFF
Page 14

Screen_Off :
OFF / 30 Seconds / 1 Min. / 3 Min. / 5 Min.
Auto
Shutdown :
OFF / 3 Min. / 5 Min. / 10 Min.
Status LED:
ON / 1 / 2 / 3 / 4
WiFi LED:
ON / OFF
TV OUT :
ON / OFF
Beep
ON / OFF
Mic
Volume :
OFF / 50% / 60% / 70% / 80% / 90% / 100%
Metering:
Center/Multi /Spot
Effect Mode
Normal /Art / Sepia / Negative / BW/VIVID/70Film
Sharpness :
Strong / Noraml / Soft
Scene
Mode :
Normal / Flashi/Night/Sports/Landscape/Portrait/Sunset
ISO :
Auto / 100 / 200 / 400 / 800 / 1600
EV :0.0
EV :-2.0 / -1.7 / -1.3 / -1.0 / -0.7 / -0.3 / 0.0 / +0.3 / +0.7 /
+1.0 / +1.3 / +1.7 / +2.0
Page 15

Time Setup
set-up time
Date Format
Y/M/D,D/M/Y,M/D/Y
Bluetooth Pair
Select Bluetooth Pair
WIFI:
ON / OFF
WiFi SSID :
AMBA_A12_XXXXXX
WiFi
Password :
1234567890
Format
YES/NO
Default
Setting
YES/NO
Version :
A12-VX.X
Language
English / Simple Chinese/ Traditional Chinese/ Russion /
German / Italian / French/ Korean / Japanese / Portuguese /
Spanish / Arabic / Polish
Interface
USB 2.0 : Recharging/File Transfer
Power Source
Li-ion rechargeable Battery 1050mAH
Accessories
Car power adaptor, Mount, USB Cable, HDMI Cable, AV
Cable
Page 16

Dimensions (W*H*D)
L: 61mm, W:42mm, H:23 mm(with lens part will be 33mm)
Weight
about 78.5g(With battery)
Support
Mass Storage Driver
Windows XP(Service pack 2) or later
Mac OS X 10.4.11 or later
System Requirements
For Windows
*PC with processor better than Pentium 4 3.2GHz
*Windows XP(Service pack 2) or later
*Minimum 1 GB System RAM
*Minimum 256 MB RAM Video Card
*USB port, CD-ROM drive
*1024*768 pixels, 32-bit color display compatible monitor
Page 17

FCC STATEMENT :
2.
Warning: Changes or modifications not expressly approved by the party responsible for compliance could void
This device complies with Part 15 of the FCC Rules. Operation is subject to the following two conditions:
(1) This device may not cause harmful interference, and (2) This device must accept any interference received,
including interference that may cause undesired operation.
the user's authority to operate the equipment.
NOTE: This equipment has been tested and found to comply with the limits for a Class B digital device, pursuant
to Part 15 of the FCC Rules. These limits are designed to provide reasonable protection against harmful
interference in a residential installation. This equipment generates uses and can radiate radio frequency energy
and, if not installed and used in accordance with the instructions, may cause harmful interference to radio
communications. However, there is no guarantee that interference will not occur in a particular installation. If this
equipment does cause harmful interference to radio or television reception, which can be determined by turning
the equipment off and on, the user is encouraged to try to correct the interference by one or more of the
following measures:
Reorient or relocate the receiving antenna.
Increase the separation between the equipment and receiver.
Connect the equipment into an outlet on a circuit different from that to which the receiver is connected.
Consult the dealer or an experienced radio/TV technician for help.
RF warning statement:
The device has been evaluated to meet general RF exposure requirement. The device can be used in portable
exposure condition without restriction.
 Loading...