

Page 1
Product Name
Description of product
Handheld, Rechargeable Vacuum Packaging System
Instruction Booklet
FreshSaver™ VS1200
Please read these instructions carefully
and retain for future reference.
®
Page 2

Page 3

Contents
Important Safeguards 4
Important Tips 5
Features of your FreshSaver
vacuum packaging system 6
Using your FreshSaver
vacuum packaging system 8
Storage and Cleaning Instructions 10
Vacuum Packaging Non-Food Items 11
Food Preparation and Storage Guide 12
Guidelines for Vacuum Packaging 13
Troubleshooting 14
™
™
handheld
handheld
Important instructions – retain for
future use.
Page 4

Important Safeguards
We are very safety conscious when designing and manufacturing consumer products, but it is
essential that the product user also exercise care when using an electrical appliance. Listed below
are the precautions which are essential for the safe use of an electrical appliance.
Read the Instructions Carefully and Save all the instructions provided with the appliance.
®
For your own safety, always follow these basic precautions when using the FoodSaver
appliance as recommended by Sunbeam and the FoodSaver
• The appliance must only be used as described
in this booklet.
• Do not use an appliance for any purpose other
than its intended use.
• Always turn the power off at the power outlet
before you insert or remove a plug. Remove by
grasping the plug - do not pull on the cord.
• Turn the power off and remove the plug
when the appliance is not in use and before
cleaning.
• Do not use your appliance with an extension
cord.
• Use only with the adaptor supplied with this
appliance.
• Always use your appliance from a power outlet
of the voltage (A.C. only) marked on the
appliance.
• This appliance is not intended for use by
persons (including children) with reduced
physical, sensory or mental capabilities, or
lack of experience and knowledge, unless they
have been given supervision or instruction
concerning use of the appliance by a person
responsible for their safety.
• Young children should be supervised to ensure
that they do not play with the appliance.
• Keep out of the reach of children. Do not
allow the appliance to be used as a toy.
• Never leave an appliance unattended while in
use.
• Do not place an appliance on or near a hot gas
flame, electric element or on a heated oven.
Do not place on top of any other appliance.
• For Household Use Only
• Please Save These Instructions
WARNING: To avoid dangers of suffocation, keep bag away from babies and children. This is not a toy.
If you have any concerns regarding the performance and use of your appliance,
please visit www.sunbeam.com.au or contact the Sunbeam Consumer Service Line.
Ensure the above safety precautions are understood.
• Do not use the appliance on wet or hot
• Do not immerse any part of the appliance,
• Do not let the power cord of an appliance hang
• Do not operate any electrical appliance with
• The external flexible cord of the adaptor cannot
• Use only accessories or attachments
• For additional protection, Sunbeam recommend
• Before scrapping the appliance, the battery must
• This appliance is intended to be used in
®
brand.
surfaces, near a heat source, or outdoors.
supply cord or plug in water or other liquid.
over the edge of a table or bench top or touch
any hot surface.
a damaged cord or after the appliance has
been damaged in any manner. If damage
is suspected, return the appliance to the
nearest Sunbeam Appointed Service Centre for
examination, repair or adjustment.
be replaced. If the cord is damaged, the
transformer should be scrapped.
recommended by Sunbeam and the FoodSaver
brand.
the use of a residual current device (RCD)
with a tripping current not exceeding 30mA in
the electrical circuit supplying power to your
appliances.
be removed and disposed of safely.
Do not remove the battery from the appliance
yourself. Please visit your nearest Sunbeam
service centre for the disposal of the appliance.
household and similar applications such as: staff
kitchen areas in shops, offices and other working
environments; farm houses; by clients in hotels,
motels and other residential type environments;
bed and breakfast type environments.
FreshSaver™
®
4
Page 5

Important Tips
• This appliance must be fully charged
before using for the first time.
• To reach optimum recharge capacity, the
batteries should initially be charged for 24
hours. Do not recharge for longer than this.
• On subsequent charging, you should
When Vacuum Packaging:
1. Vacuum packaging is NOT a substitute
for refrigeration.
2. Use ONLY zipper bags and containers
manufactured by Sunbeam and the
FoodSaver® brand.
3. Do not allow the vacuum channel to
fill up with liquids. This will render the
machine unusable. To prevent it, do not
use the appliance for liquid foods.
4. When vacuum packaging zipper bags,
small amounts of liquids, crumbs or food
particles can be inadvertently pulled into
the valve, creating a possible air leak. To
prevent this, follow these tips:
4.1 For soups, sauces and liqu
a container and then place in the
refrigerator. Sealing liquid in zipper bags
is not recommended.
4.2 For powdery or fine-grained products
such as flour, sugar and coffee grinds,
avoid overfilling the zipper bag or use a
container. You can also place a folded
paper towel at the top of the bag below
the valve area before vacuum packaging.
ids use
recharge for 24 hours. This will provide
6-8 minutes of cordless use.
• Insert the adaptor into the adaptor inlet
and plug the adaptor into a suitable mains
outlet and switch on.
4.3 Ensure the zipper is closed securely and
no food is trapped in the zipper. Food
trapped in the zipper can create a leak
which may cause the bag to lose vacuum
over time.
Always make sure the nozzle at the
5.
bottom of the appliance is attached
during vacuum packaging.
6. To avoid possible illness, do not reuse
bags after storing meats, fish or greasy
foods.
7. When packaging products with sharp
edges, protect the bag from punctures by
wrapping the products in a cushioning
material, such as paper towels,
styrofoam, tissue, etc. Products can also
be vacuum packaged in containers to
avoid any possibility of puncturing a bag.
5
Page 6
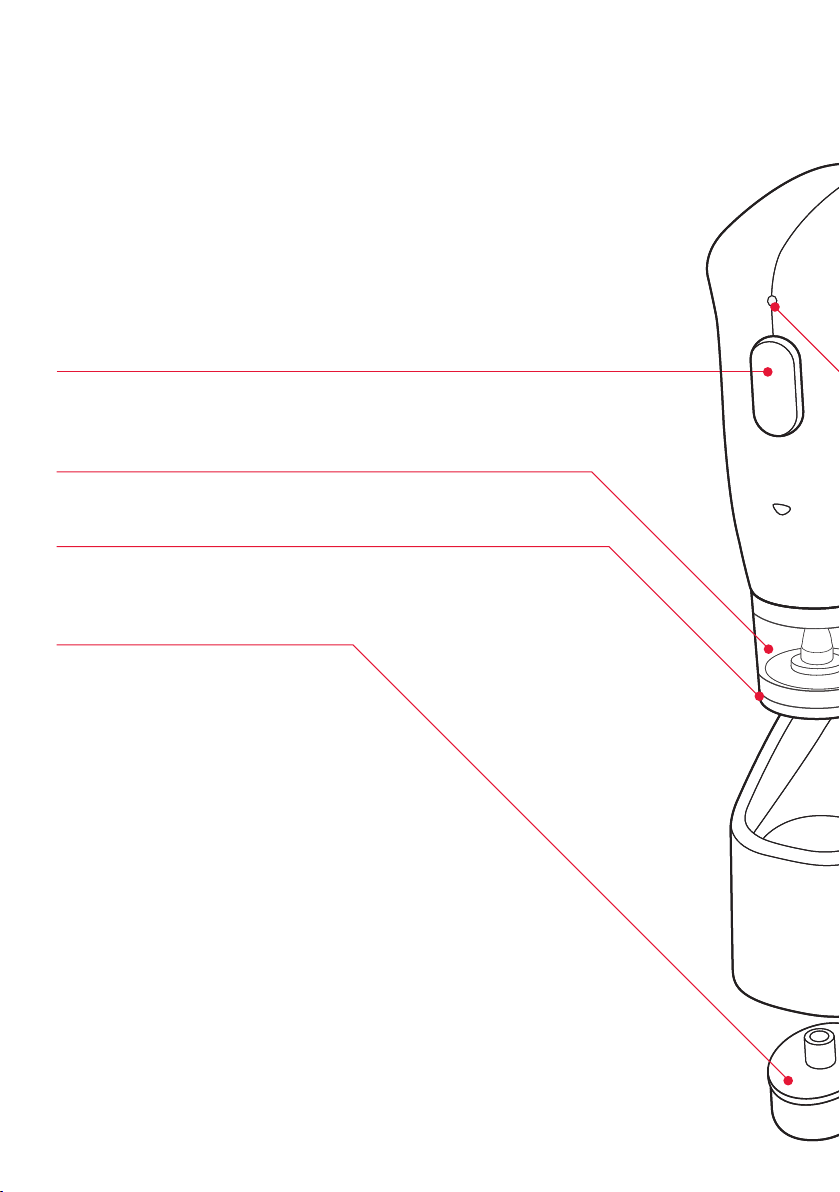
Features of your FreshSaver
™
handheld, rechargeable vacuum
packaging system
Vacuum button
Press to vacuum package.
Reservoir
Vacuum nozzle
Dishwasher safe for easy cleaning.
FoodSaver® Container adaptor
Conveniently stores on the bottom of the
charging base. Attach to bottom of vacuum
nozzle when using with FoodSaver® vacuum
storage containers.
6
Page 7

Charging light
Illuminates when connected to a mains
supply.
Adaptor inlet
Charging base
Place handheld appliance into charging base
for charging.
Adaptor
7
Page 8

Using your FreshSaver
™
handheld, rechargeable vacuum
packaging system
How to Vacuum package with FoodSaver®
Zipper Bags
1.Place item(s) in zipper bag, allowing at
least 2cm of space between bag contents
and top of bag.
2.Lay zipper bag on a flat surface with the
green circle facing upwards. Press the
zipper firmly and slide your fingers across
the zipper to close the bag.
3. Press the handheld appliance with the
vacuum nozzle on top of the green circle
on the Zipper bag and press the vacuum
button to remove air from the zipper bag.
Press the button until the
removed from the zipper bag.
4. Place the zipper bag into the refrigerator
when storing fresh/perishable foods like
deli meats and cheeses or in the pantry
when storing foods that do not need to stay
refrigerated.
air has been
8
Page 9

Using your FreshSaver™ handheld, rechargeable vacuum
packaging system continued
How to Vacuum package with FoodSaver® Deli
Containers
1. Place FoodSaver
surface. Remove the lid. Place the items to
be vacuumed inside the tray. Place the lid
on top of the container and press with
both hands to ensure container is firmly
closed.
2. Attach the FoodSaver
(which can be found on the bottom of
the charging base) to the bottom of the
vacuum nozzle by pushing as shown.
®
Deli Container on a flat
®
Container adaptor
3. Place the handheld appliance with the
vacuum nozzle and container adaptor
attached on top of the grey valve on the
container lid. Press the vacuum button for
10 seconds.
4. Remove the handheld appliance from the
container.
Place the Deli Container into the refrigerator.
9
Page 10

Storage and Cleaning Instructions
FreshSaver™ Storage
The FreshSaver™ handheld, rechargeable
appliance is small and compact and can
conveniently be stored on the bench top, in
a drawer or cupboard.
FreshSaver
1. Always unplug the appliance before
cleaning.
2. Clean using a mild dishwashing soap and
a warm, damp cloth. Do not immerse the
appliance in water. Dry thoroughly before
using.
3. Do not use abrasive products or materials
to clean any of the appliance’s components.
4. Remove reservoir after each use.
Wash in warm soapy wat
reservoir before placing it back on.
™
Appliance
er. Air dry the
®
FoodSaver
IMPORTANT: Do not reuse bags after storing
meats, fish or greasy foods.
1. Wash bags in warm water using a mild
dishwashing soap.
2. Bags can be washed in the dishwasher by
carefully turning the bags inside out and
spreading them over the top rack of the
dishwasher so that all surfaces are exposed
to the washing water.
3. Allow bags to dry thoroughly before
reusing. To avoid possible illness, do not
reuse bags after storing raw meats, fish or
greasy foods.
FoodSaver
use in the microwave or freezer
FoodSaver® Containers
1. The container base can be safely washed
in the top rack of the dishwasher. The lid
is not dishwasher safe. Alternatively, you
can wash both the container base and lid
in warm, soapy water. Rinse well and dry
thoroughly.
2. Do not attempt to remove the grey rubber
parts from the white housing.
3. FoodSaver® Containers are suitable for use
in the microwave, fridge and freezer.
IMPORTANT: All plastic components
deteriorate through the prolonged use of a
dishwasher for cleaning. Hand washing of
plastic components in warm soapy water is
always recommended.
Zipper Bags
®
Zipper Bags are not suitable for
.
10
Page 11

Vacuum Packaging Non-Food Items
Your FoodSaver® appliance also protects
non-food items from oxidation, corrosion
and moisture. Just follow the directions for
vacuum packaging using the FoodSaver
Zipper Bags and Containers.
• Vacuum package first aid kits and
emergency kits for your house, your boat
and your car. Items will all be in one
package and will stay dry and without
dirt and mold. Include flares, batteries,
flashlight, candles and matches.
• To vacuum package silver, wrap fork prongs
in soft cushioning material, such as a
paper towel, to avoid puncturing bag.
®
11
Page 12

Food Preparation & Storage Guide
Guidelines for Vacuum Packaging Food
Vacuum packaging is not a substitute for
canning nor can it reverse deteriorating
quality; it can only slow down changes in
quality. It is impossible to predict how long
a specific food will have top-quality flavour,
appearance and texture, because it depends
on the age and condition of the food on
the day it was vacuum packaged. Foods
that are extremely fresh will last longer
than foods that are already deteriorating.
Vacuum packaging extends the life of foods
by removing
container, thereby reducing oxidation
which affects nutritional value, flavour and
overall quality. However, most foods contain
enough water to support micro-organisms
which can grow with or without air. While
microorganisms are present everywhere, only
certain ones cause problems, and only under
certain conditions:
• Mould: Easy to identify because of its
characteristic fuzz. Moulds are virtually
eliminated by vacuum packaging because
they cannot grow in a low oxygen
environment.
• Yeast: Results in fermentat
frequently be identified by smell or taste.
Yeast requires water, sugar and a moderate
temperature to grow, and can grow with or
without air. Refrigeration slows the growth
of yeast.
• Bacteria: Frequently results in
discoloration, soft or slimy texture, and/or
an unpleasant odor. 'Clostridium botulinum'
(the organism that causes Botulism) can
grow without air under the right conditions,
cannot be detected by smell or taste,
and although extremely rare, can be very
dangerous.
nearly all the air in a sealed
ion, which can
The combination of vacuum packaging and
refrigeration will extend food freshness and
reduce the growth of bacteria in perishable
foods.
Maintaining low temperatures is a critical
factor in preserving foods safely.
NOTE: Vacuum packaging is NOT a substitute
for refrigeration or freezing. Any “perishable”
foods that require refrigeration prior to
vacuum packaging still must be refrigerated
after vacuum packaging.
NOTE: Use fresh, perishable foods soon
after purchase. Even under proper storage
conditions, foods lose freshness and nutritive
value if they are stored too long.
12
Page 13

Guidelines for Vacuum Packaging
Preparation Guidelines for Hard Cheeses
To keep cheese fresh, vacuum package it
after each use.
Preparation Guidelines for Fruits
We recommend using a FoodSaver
and storing it in the refrigerator.
Preparation Guidelines for Baked Goods
To vacuum package soft or airy baked goods,
we recommend using a FoodSaver
so they will hold their shape.
Compatibility Chart
Product code Product description Compatible with
VS0800 Small Zipper Bag (0.95l) VS1200
VS0850 Large Zipper Bag (3.78l) VS1200
VS0650 Deli Container VS1200
VS0300
VS0310
®
Container
®
Container
Pre-cut Bags VS4200, VS4400, VS6600,
Preparation Guidelines for Coffee
To prevent coffee granules from being drawn
into the vacuum reservoir, place a coffee
filter or paper towel at the top of the zipper
bag or container before vacuum packaging.
You can also keep the coffee in its original
bag inside a FoodSaver
Deli Container.
Preparation Guidelines for Snack Foods
Your snack foods will maintain their freshness
longer when you vacuum package them.
For best results, use a FoodSaver
for crushable items like crackers.
VS7800
®
Zipper Bag or
®
Container
VS0510
VS0520
VS0410
VS0420
VS0630
VS0610
Single Roll – 28cm
Double Roll – 28cm
Single Roll – 20cm
Double Roll – 20cm
Canister Set
Canister Set
VS4400, VS6600, VS7800
VS4200, VS4400, VS6600,
VS7800
VS4200, VS4400, VS6600,
VS7800
13
Page 14

Troubleshooting
Nothing happens when the vacuum button is
pressed:
• Check that the appliance is charged.
Air is not removed from the bag:
• To seal properly, ensure the zipper is firmly
closed. Slide fingers across the entire
zipper.
• Check that the air valve is on a flat
surface. Reposition the zipper bag so that
the air valve lies flat on the bench top or
table with no food under the valve.
• Bag may have a leak. To test, close the
zipper firmly with some air in the bag.
Submerge in water, and apply pressure.
Bubbles indicate a leak. Thro
and use another bag.
• Open the zipper and dry/wipe at top end of
zipper bag. Ensure no food particles are in/
around the top of bag.
• Air is blocked from the valve area inside
the bag.
w the bag out
Place a paper towel flat under the valve in
the bag. This provides a path for the air to be
evacuated.
Vacuum nozzle and air valve of zipper bag are
not making secure contact:
• Make sure the vacuum nozzle is centred
over the green circle of the zipper bag and
placed flat on air valve. Apply moderate
pressure.
14
Page 15

Troubleshooting continued
Air was removed from the bag, but has come
back into the bag:
• Leaks along the zipper or air valve can
be caused by wrinkles, crumbs, grease or
liquids. Reopen the zipper bag, wipe the
top inside of the bag and smooth it out
before resealing.
• The release of natural gases or
fermentation from foods (such as fresh
fruits and vegetables), may have occurred.
Open bag. If you think food has begun to
spoil, discard food. Lack of refrigeration or
fluctuating temperatures in the refrigerator
can cause food to spoil.
• Check the bag for a pu
which may have released the vacuum.
Cushion sharp edges in the contents of the
bag with paper towels.
ncture or hole,
Air is not removed from FoodSaver® Container
• Make sure the rubber part on the inside
of the container lid is free from food
materials.
• Make sure the rim of the container does
not have any cracks or scratches. Any gaps
can prevent a vacuum from forming.
• Make sure you aren’t over filling the
container too full prior to vacuum packaging.
Always leave at least 2cm between the
contents and the lid.
15
Page 16

Notes
Page 17

Notes
Page 18

Notes
Page 19

12 Month Replacement Guarantee
In the unlikely event that this appliance develops any malfunction
within 12 months of purchase (3 months commercial use) due to
faulty materials or manufacture, we will replace it for you
free of charge.
Should you experience any difficulties with
your appliance, please phone our customer
service line for advice on 1300 881 861 in
Australia, or 0800 786 232 in New Zealand.
Alternatively, you can send a written claim
to Sunbeam at the address listed below.
On receipt of your claim, Sunbeam will
seek to resolve your difficulties or, if the
appliance is defective, advise you on how
to obtain a replacement or refund.
Your Sunbeam 12 Month Replacement
Guarantee naturally does not cover misuse
or negligent handling and normal wear and
tear.
Similarly your 12 Month Replacement
Guarantee does not cover freight or any other
costs incurred in making a claim. Please
retain your receipt as proof of purchase.
The benefits given to you by this guarantee
are in addition to your other rights and
remedies under any laws which relate to the
appliance.
Our goods come with guarantees that cannot
be excluded under the Australian Consumer
Law and under the New Zealand Consumer
Guarantees Act.
In Australia you are entitled to a
replacement or refund for a major failure and
for compensation for any other reasonably
foreseeable loss or damage. You are also
entitled to have the goods repaired or
replaced if the goods fail to be of acceptable
quality and the failure does not amount to
a major failure.
Should your appliance require repair or
service after the guarantee period, contact
your nearest Sunbeam service centre.
For a complete list of Sunbeam’s authorised
service centres visit our website or call:
Australia
www.sunbeam.com.au
1300 881 861
Units 5 & 6, 13 Lord Street
Botany NSW 2019 Australia
New Zealand
www.sunbeam.co.nz
0800 786 232
26 Vestey Drive, Mt Wellington
Auckland, New Zealand
Page 20

Need help with your appliance?
Contact our customer service team or visit
our website for information and tips on
getting the most from your appliance.
In Australia
Visit www.sunbeam.com.au
Or call 1300 881 861
In New Zealand
Visit www.sunbeam.co.nz
Or call 0800 786 232
Distributed by:
Sunbeam Corporation Limited
ABN 45 000 006 771
Sunbeam Corporation is a division of GUD Holdings Ltd.
www.sunbeam.com.au
www.sunbeam.co.nz
Units 5 & 6, 13 Lord St Botany
NSW 2019 Australia
Unit 3, Building D, 26 Vestey Drive
Mt Wellington Auckland New Zealand
is a registered trademark of
Corporation Limited.
Sunbeam Products, Inc.
© 2011
doing business as Jarden Consumer Solutions. All rights reserved.
®
FoodSaver
Some images and text are copyrighted.
Printed in China.
Product made in China.
is a registered trademark of Sunbeam Products, Inc.
Sunbeam
8/11
 Loading...