

Page 1
Mighty Steam Cleaner
Operating Instructions
Model No. SB80
Read all instructions carefully before using this item.
Keep this manual for future reference.
Page 2

®
Sunbeam
Mighty Steam Cleaner
CONGRATULATIONS
Congratulations on your new purchase. The Sunbeam®
SB80 is an amazing handheld steam cleaner appliance
that combines the cleaning power of pressurized steam
with detergent to get rid of stains faster, easier and with
less hassle than traditional methods.
01
Page 3

IMPORTANT SAFEGUARDS
When using your steam cleaner, you must use basic safety
precautions, including but not limited to the following:
1. Read all instructions before using your steam cleaner. This
appliance is intended for household use only.
2. Follow all user instructions in this manual. Use your steam
cleaner only for its intended use.
3. Do not immerse any part of your steam cleaner in water or
other liquids to protect against a risk of electric shock.
4. To disconnect from outlet, grasp plug and pull from there-never
yank cord.
5. Do not allow cord to touch any hot surface. Allow the
system to completely cool before putting it away or
opening water tank by removing the safety cap.
6. When lling or emptying water from your steam cleaner,
always disconnect system from electrical outlet. Always
unscrew the safety cap slowly when opening the water tank
to allow any remaining steam to escape gradually.
02
Page 4

IMPORTANT SAFEGUARDS
7. Do not attempt to use your steam cleaner if it has a
damaged cord or plug, or if the appliance or any other part
of the system has been dropped or damaged. To avoid the
risk of electric shock, do not disassemble or attempt to
repair the steam cleaner. Instead, return the system to
the seller immediately. Incorrect re-assembly or repair puts
persons at risk of electrical shock or injury when using
steam cleaner.
8. Do not leave the system in use without surveillance or in
the presence of children.
9. Burns can occur from touching hot metal parts, hot water,
or steam. Use caution when draining unit after use, as
there may still be hot water in the unit. The steam is very
hot and can cause burns. Never direct steam at any person.
10. Do not operate in the presence of explosive and/or
ammable fumes.
11. Never use any chemicals or substance other than water in
the upper portion of the steam cleaner. Chemicals will
damage the machine and the use of these will automatically
void your warranty.
12. Never direct steam at any electrical appliance (TV, radio,
electrical oven).
13. Do not operate without shoes.
03
Page 5

IMPORTANT SAFETY INSTRUCTIONS
SAVE THESE INSTRUCTIONS
1. To avoid circuit overload, do not operate appliance
on the same socket circuit you are simultaneously
using for other appliances.
2. Do not leave steame cleaner unattended when plugged in.
3. Use only heavy-duty, high rated extension cord.
ATTENTION: This appliance is equipped with a 3
prong grounded power cord. Insert the 3 prong
grounded plug into a 3 prong ground power outlet.
Do not try to remove the contacts o the grounded
connection.
CAUTION: This product is not designed to be
disassembled. Any attempt to take your steam
cleaner apart will cause damage.
Do not leave the steam cleaner unattended.
04
Page 6
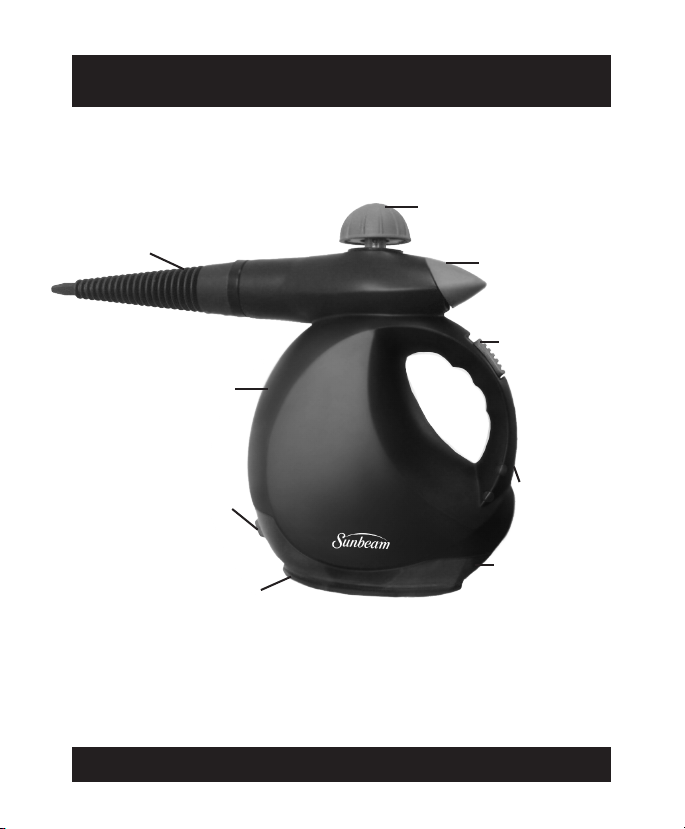
DESCRIPTION OF THE APPLIANCE
Removable
Bayonet Tip
Boiler Cap
Steam Lever
Detergent
Release Button
Body
Detergent Tank
Release Button
Detachable
Detergent Tank
Power Indicator
Light
Power Cord
05
Page 7
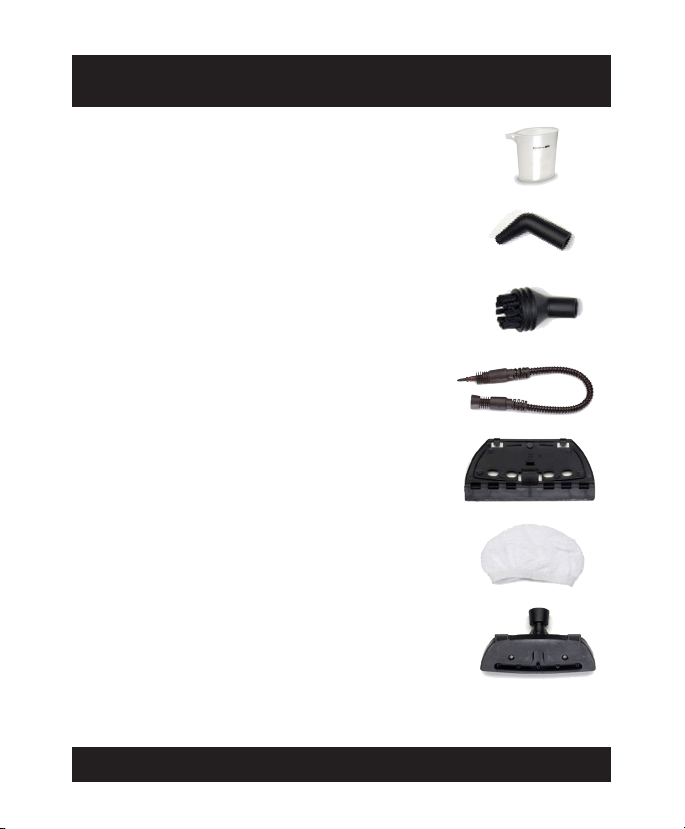
DESCRIPTION OF THE APPLIANCE
1. Rell Cup
2. Angled Nozzle
For door, grooves, appliances, and
reaching into small areas.
3. Nylon & Metal Brush
Perfect for scrubbing countertops,
stovetops, grills, vents, and tiles.
4. Extended Connecting Spray Nozzle
For hard-to-reach areas.
5. Window Squeegee
Works on windows, glass, countertops,
doors, vertical and slick surfaces.
6. Cloth Cover
Best for stain removal from upholstery
and carpets.
7. Uphostery Nozzle
Perfect for clothing, fabrics, stair removal,
drapes, cabinets, and larger areas.
These accessories are included with your
steam cleaner.
06
Page 8

INSTRUCTIONS
The Mighty Steam Cleaner can clean and remove stains
in most types of surfaces designed to withstand high
temperatures such as marble, ceramic, stone sealed
wood, sealed grout, cook tops, windows, mirrors, etc.
1. Remember that the steam cleaner can be used as a
steam cleaner or can be used as a clothing.
2. The STEAM ONLY function has a high degree of
cleaning and degreasing steam power. This pure
steam power can assist in the removal of dirt, grease
and grime on a wide variety of surfaces.
3. The power oered by the STEAM ONLY function
can also remove wrinkles from clothing, draperies,
and other cloth items that are not harmed by moisture.
4. The STEAM ONLY function is also eective in cleaning
hard to reach or detailed surfaces like exhaust lters
oven stoves, outdoor furniture, outdoor grills, golf
clubs, and other similar items.
5. By adding dish detergent you enhance the pure
steam capabilities by adding stain and grease removing
power that your dish detergent provides to your
cleaning tasks.
6. DO NOT USE the steam cleaner on unsealed wood surfaces,
unsealed ground, cold glass or soft plastic surfaces.
07
Page 9
HOW TO USE THE STEAM CLEANER
FILLING THE WATER COMPARTMENT
WARNING: Carefully read all instructions before
unscrewing the pressurized cap.
WARNING: Always unplug the appliance before lling
the water compartment.
WARNING: Do not add any other kind of detergents,
perfumes, oils, or chemical substances to
the water. Use tap water or distilled water if
tap water is too hard.
FOLLOW THESE INSTRUCTIONS TO AVOID WATER
FROM OVERFLOWING:
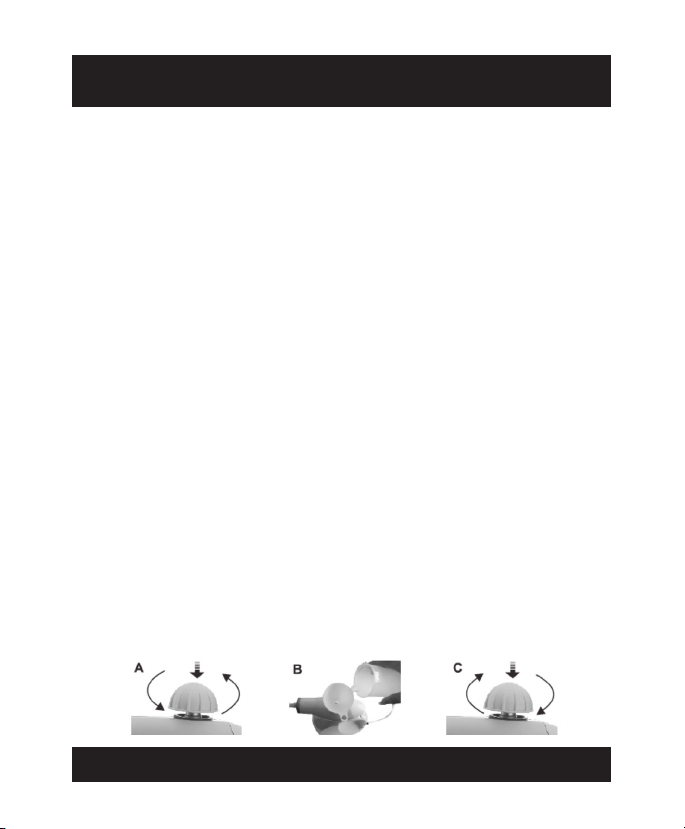
STEP 1: Filling the steam cleaner with water
A. To open press down the Pressurized Cap and
turn counter clockwise.
B. Fill the Rell Cup with water (10 oz./300 ml) and
ll the upper tank. DO NOT LET WATER OVERFLOW.
C. Replace Pressurized Cap by pressing down and turning
clockwise until complete resistance is felt. When you have
nished tightening it, the cap will popup and spin freely.
08
Page 10
HOW TO USE THE STEAM CLEANER
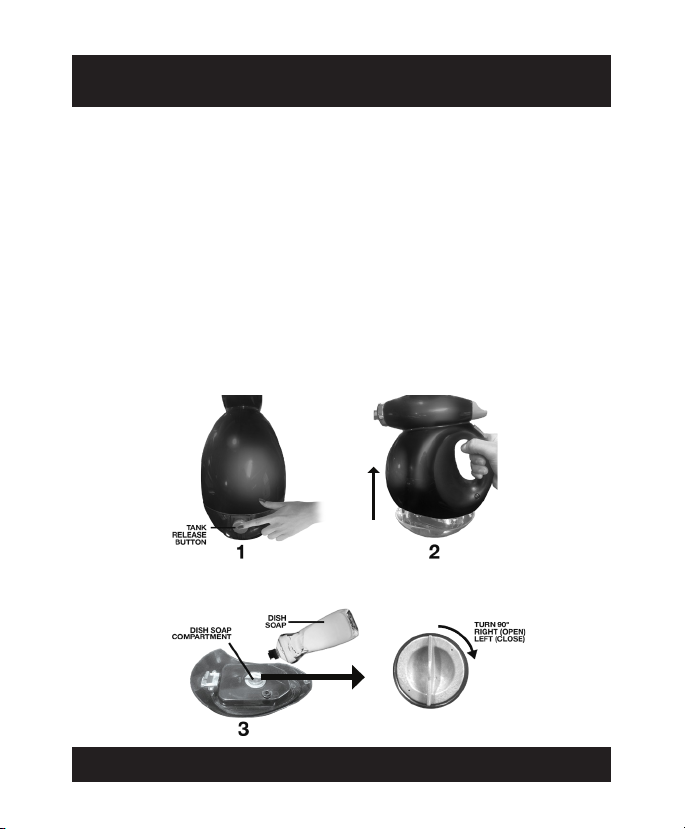
STEP 2: Filling the steam cleaner with detergent
A. The separate dish detergent tank can be lled by
pressing the release button on the front of the unit
while simultaneously pulling the base up. (as shown in 2)
B. Unscrew the pressurized cap sealing the compartment
and ll with detergent. You may ll the reservoir to
the top or with as much dish detergent as you want.
C. Re-seal the dish detergent compartment and re-attach
the tank to the bottom of the steam cleaner.
09
Page 11
HOW TO USE THE STEAM CLEANER
STEP 3: Attaching Accessories to your Steam Cleaner
A. After lling your steam cleaner with water, choose the
parts you will need for the job you are doing.
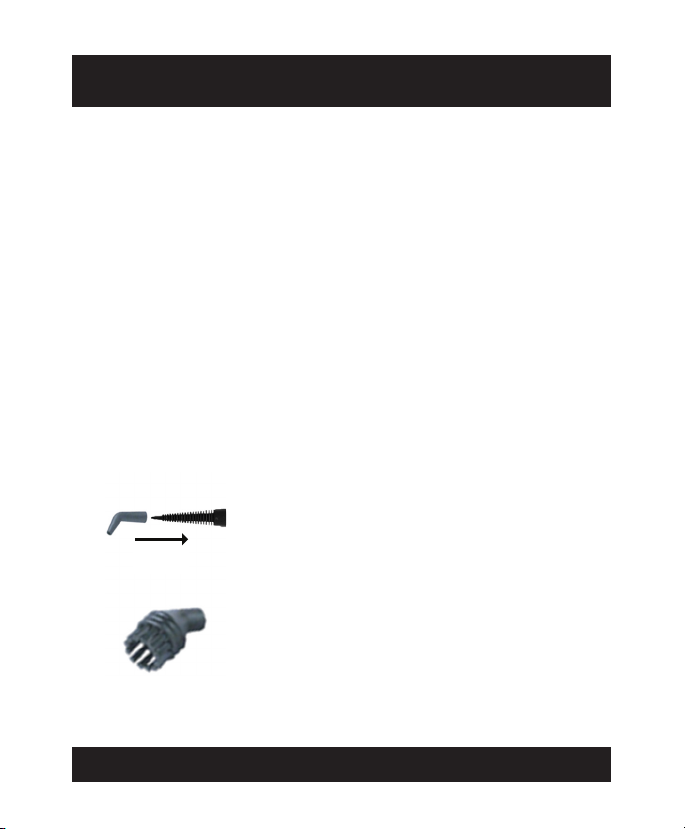
B. Based on the job, attach the Bayonet Tip to the
Extension Hose or directly to your steamer.
C. All attachments can be attached to either the
Bayonet Tip or theExtension Hose.
E. The Nylon Round Brush and Angled Nozzle can be
attached to the Bayonet Tip by pressing and turning
until snug.
Bayonet plus other accessories.
Perfect to extend your steam cleaner’s reach.
Metal & Nylon Round Brush
WARNING: Metal Brush will scratch surfaces.
Only use to remove tough debris on surfaces
able to withstand abrasive contact.
10
Page 12
HOW TO USE THE STEAM CLEANER
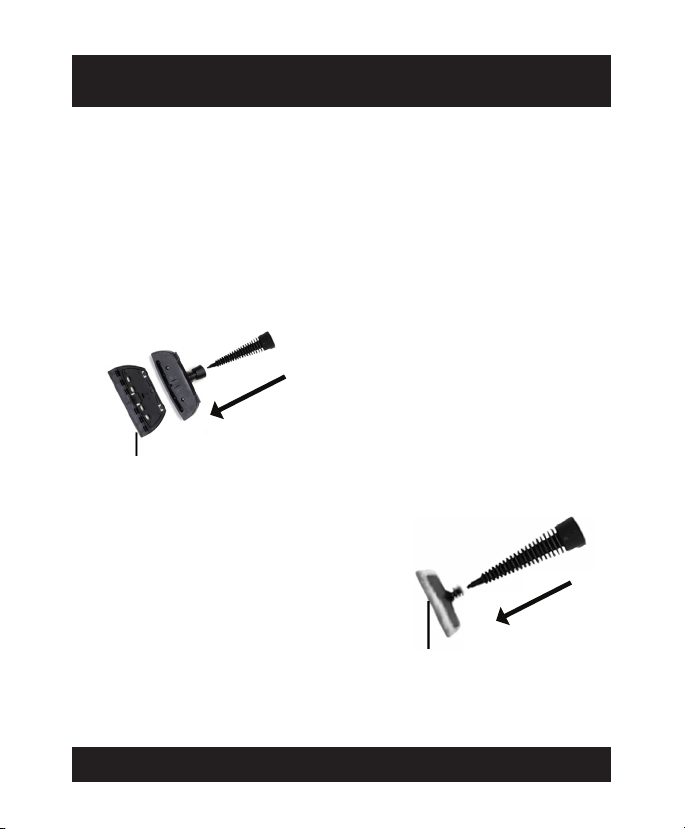
E. To use the Window Cleaning attachment it must be
clipped into the Fabric Accessory. Hook the hinges
onto the tabs and lift the the window cleaner around
to the top of the fabric tool and clip the latch onto the
fabric cleaner to secure in place. To remove the window
cleaner, simply lift the latch to unclip and separate.
WARNING:
Using window cleaner on cold glass
may cause the glass to crack or
break. Please proceed with caution
when carrying out this operation.
Window
Squeegee
F. To use the Fabric Accessory,
stretch the Cloth Covering to
t over it. It is recommended
that the Fabric Accessory be
attached to the exible hose
for maximum accessibility for
clothing, upholstery & window
furnishings.
Cloth Cover
11
Page 13

HOW TO USE THE STEAM CLEANER
STEP 3: Starting the steam cleaner
A. Insert the plug into a 3 prong grounded wall socket.
A red light on the lower side of the steam cleaner’s
handle will glow signaling that the appliance is heating
up. A green light right below the red one will also light
up to signal that the appliance is working.
NOTE: The red light is designed to show you that the appliance
has not yet reached its required temperature for use. When it is
ready, the red light will turn OFF. The green light will stay on as long
as the appliance is plugged into an outlet.
B. The steam cleaner should be ready to steam in 3-5 minutes.
You may ll it with warm water for faster starting time.
C. After 3-5 minutes, when the red light has turned
OFF, you are ready to go.
WARNING: Never leave your steam cleaner unattended.
D. To engage the STEAM ONLY function, simply press
the Steam Lever downward and hold in position.
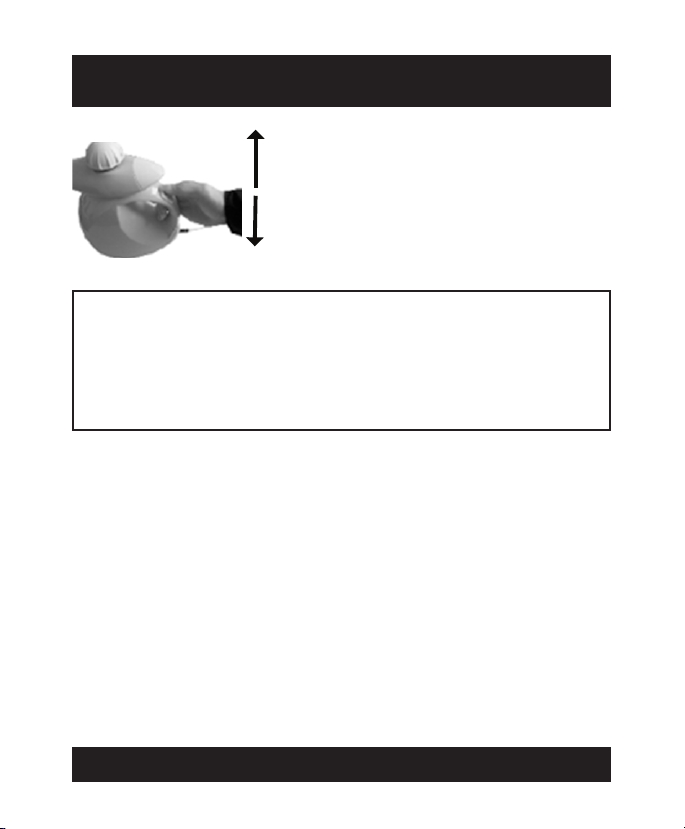
E. To engage the steam with dish detergent cleaning
and pressurized steam power, slide the release button
on the handle to the down position before pressing
the Steam Lever.
12
Page 14
HOW TO USE THE STEAM CLEANER
“Button Up: Detergent “OFF”
“Button Down: Detergent “ON”
NOTE: Please be aware that when on Detergent function,
the steam output may appear more humid.That is normal
because the hot steam gets mixed with the dish detergent
product and as a result the steam will appear thicker.
HELPFUL TIPS
A. Keep in mind that you can choose to either clean
with pure steam or add the power of dish detergent
to deodorize and clean thoroughly.
B. For especially stubborn stains or heavy soiling, hold
the end of the Bayonet Tip about 1/4” above the area
for several seconds and blast with steam.
C. If your water is hard, always use distilled water to
extend the life and power of your appliance.
13
Page 15

HOW TO USE THE STEAM CLEANER
REFILLING YOUR STEAM CLEANER
WATER
A. Unplug the power cord from the electrical outlet.
B. Press and hold Steam Lever until all pressure has
been released.
C. Before opening the Pressurized Water Tank Cap it
is important to wait approximately 3 minutes (or
more depending on how long the steam cleaner has
been in use) for the appliance to cool down. Slowly
give the cap only a half turn and wait for the hissing (if
any) to completely stop. The issuing sound may be
present due to residual pressure not released while
holding the steam lever down.
D. Carefully press the cap, unscrew it and follow process
outlined in Step #1, page 8.
DETERGENT COMPARTMENT
A. The separate detergent compartment can be lled
by pressing the release button and detaching the tank.
See Step #2, page 9.
14
Page 16

HOW TO USE THE STEAM CLEANER
MAINTENANCE
NOTE: Please ensure the steam cleaner has been
unplugged from the power source and cooled down
before any cleaning and maintenance is carried out.
• Always empty any excess water from water tank after each
use. This operation will prolong the life of your appliance.
• Always ensure the unit has cooled before putting it
away in a cool, dry place.
• To ensure the highest level of operation over a long period
of time, it is recommended that the water tank be rinsed
out with water at least once a month to clear out any
water calcication accumulated. Do not use vinegar or
other substances to remove lime scale deposits.
• To clean, ll with one measure of water (using the measuring
cup included), replace cap and shake your steam
cleaner to loosen any lime scale deposits. Remove cap
and empty water from tank.
WARNING: Do not immerse your steam cleaner in water.
15
Page 17

HOW TO USE THE STEAM CLEANER
NOTE: This appliance is not intended for use by persons
with reduced physical, sensory, or mental capabilities, or
lack of experience and knowledge, unless they have been
given supervision or instruction concerning use of the
appliance by a person responsible for their safety.
Children should be supervised to ensure that they do not
play with the this appliance.
TECHNICAL SPECIFICATIONS
Voltage: 100-120V, 60 Hz
Power: 1200 Watts
Tank capacity: 480 ml. / 16.3 oz.
16
Page 18

WARRANTY
This product has a warranty for 1 Year from provable date of purchase
against defects in material and workmanship. During this period such
defects will be repaired, or the product will be replaced at no charge.
This warranty does not cover damage caused by misuse, negligence
or improper installation. Warranty is also invalid in any case that the
product is taken apart or services by an unauthorized service station.
TO CLAIM
Purchaser must receive a Return Authorization Number by calling our service
center at 1-877-678-6232.
Once your return has been authorized, please send your package, prepaid postage,
with a copy of your proof of purchase. You will also need to enclose a letter explaining
the nature of your issue in detail. Please allow 2-4 weeks for return shipping.
Smartek USA Inc.
12 Hinsdale Street, NY 11207
1-877-678-6232
The Sunbeam® logo and Sunbeam® are registered trademarks of Sunbeam Products, Inc. used under
license.
SMR030716
17
Page 19

Page 20

 Loading...