

Page 1
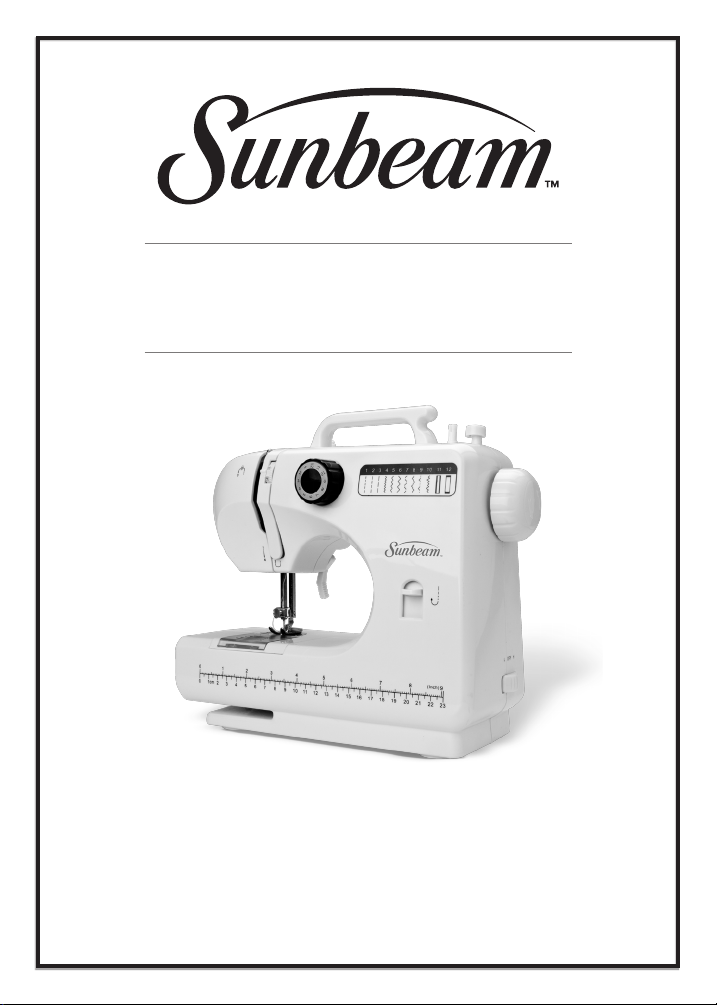
Compact Sewing Machine
Operating Instructions
Model Nos. SB1800/SB1818
Please read all instructions carefully before operating the
sewing machine.
Keep this manual for future reference.
SMT080811
Page 2

Thread clamp
Bobbin winder
Spool pin
Presser foot lever
Presser foot
Work lamp
Accessories drawer
AC/DC receptacle
Foot controller receptacle
Stitch pattern knob
Thread take-up lever
Upper tension control
Hand wheel
Reverse stich button
Thread cutter
Needle feed
Bobbin case
Power and speed switch
Components
Sewing Machine InstructionsPage 2
Page 3

Accessories
Foot control1.
2 spools of thread2.
2 bobbins3.
Needle threader4.
Needle5.
For Your Safety
Use this machine only as recommended in this manual.1.
Do not leave the unit unattended, especially near children.2.
To avoid electric shock, remove the adapter before cleaning or 3.
after use.
Keep ngers away from all inside electrical parts, especially 4.
around the needle.
Never operate the machine if it has a damaged power cord or 5.
has been dropped into water.
Do not use the machine outdoors.6.
Sewing Machine Instructions Page 3
Page 4

Preparations for Use
Plug one end of the adapter into the DC socket on the sewing •
machine, and the other end into an outlet.
Plug the foot control into its socket. •
Turn the power switch on.•
Caution: Always turn the switch on off before un-plugging the
machine.
Operating Instructions
Winding the bobbin
Place a spool of thread on the Spool Pin. 1.
(Figure 1) (Make sure that the machine’s
needle is not threaded at this time.)
Place the metal bobbin on the bobbin winder, 2.
making sure to insert it in the groove. (Figure
2) (Note: It is important to use metal bobbins
only. The Bobbin Case is magnetized and is
activated with metal.)
Guide the thread from the Spool Pin through 3.
the thread clamp (Figure 3) and to the bobbin.
Wind a small piece of thread around the
bobbin
clockwise.
(Figure 4)
Move the 4.
bobbin
Figure 4Figure 3
Sewing Machine InstructionsPage 4
Figure 1
Figure 2
Figure 5
Page 5
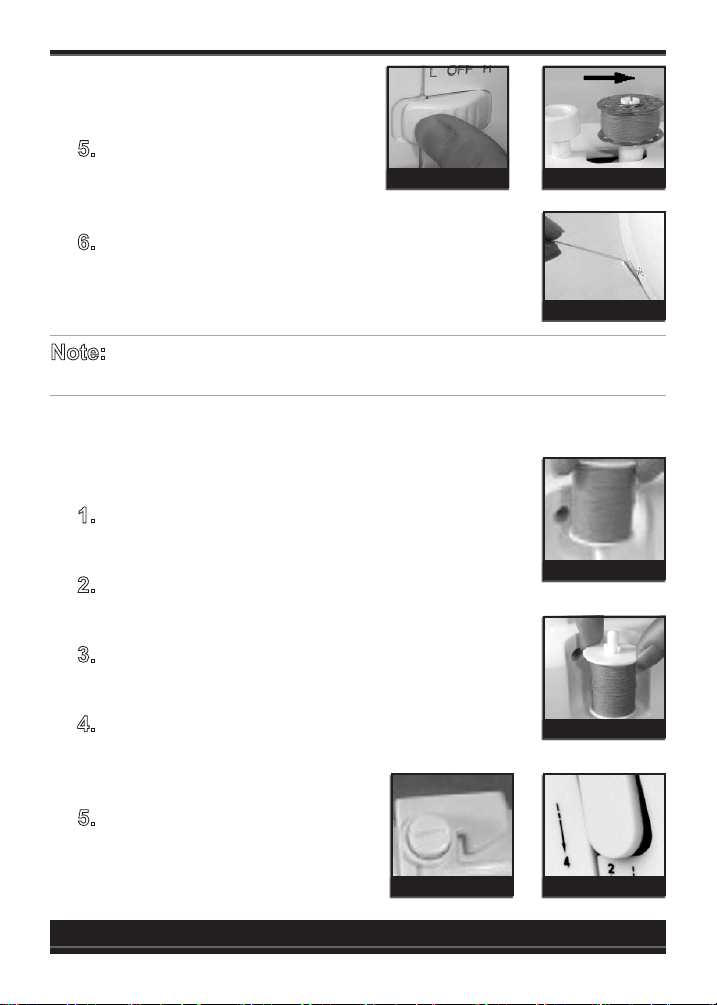
to the right, clicking it into
place. (Figure 5)
Select a speed switch. This 5.
will start the bobbin winding.
Figure 6 Figure 7
(Figure 6)
When you have your desired amount of thread 6.
on the bobbin, switch to OFF and move the
bobbin to the left (Figure 7) snip the thread.
(Figure 8)
Note: It is preferable to manually assist in the
winding of the bobbin. Use your hands to guide the thread.
Threading the machine
Make sure that the power switch is on OFF.
Place a spool of thread on the Spool Pin with 1.
the thread end facing rear. (Figure 9)
Clamp the reel cover over the Spool Pin so 2.
that the thread remains in place. (Figure 10)
Loop the thread around the outside of thread 3.
guide 1. (Figure 11)
Figure 8
Figure 9
Guide the thread into Groove 2, and pull 4.
Figure 10
toward the chrome take-up
lever. (Figure 12)
Feed the thread through the 5.
hole in the chrome take-up
lever and pull straight down
to the needle. (Figure 13)
Figure 11 Figure 12
Sewing Machine Instructions Page 5
Page 6
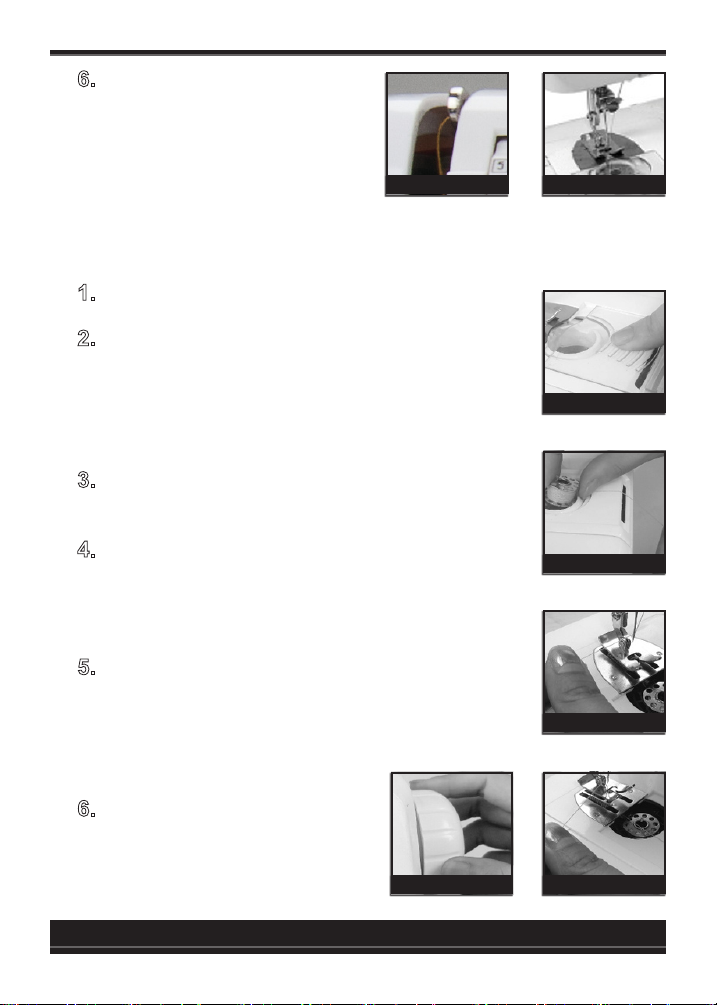
Feed the thread through the 6.
hole in the needle holder
and then through the eye of
the needle. (Figure 14) The
threading is now complete,
except for the bobbin.
Connecting the bobbin
Remove the Bobbin Cover. (Figure 15)1.
Place the bobbin into the Bobbin Case, 2.
(Figure 16) making sure that the thread
unwinds in a clockwise direction. Allow
approximately 4 inches of thread to extend
from the case.
Extend about 4 inches of thread from the 3.
machine’s needle. (Figure 17)
Figure 14Figure 13
Figure 15
Raise the presser foot. Hold the thread from 4.
the needle with your left hand while turning
the hand wheel with your right hand counterclockwise (toward you). (Figure 18)
Keep rotating the wheel till the needle goes 5.
through the plate down to the Bobbin Case
and then back up again. When the needle
comes back up, it will pull a loop of bobbin
thread with it.
Pull at the loop to get the raw 6.
edge of the bobbin thread
farther out of the Bobbin
Case. (Figure 19)
Figure 18 Figure 19
Sewing Machine InstructionsPage 6
Figure 16
Figure 17
Page 7
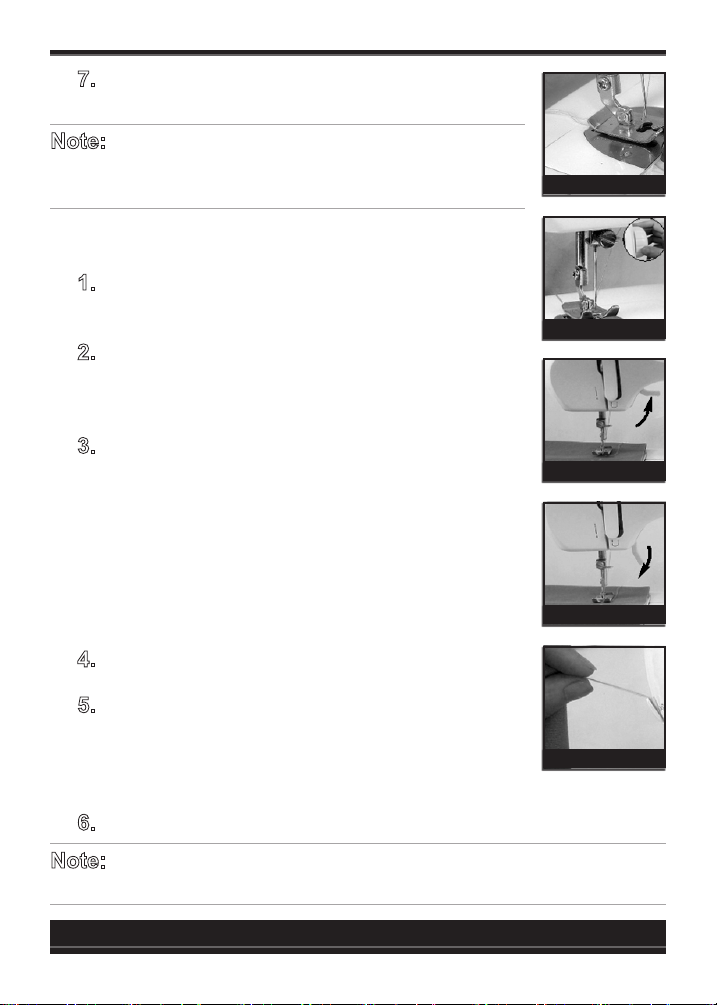
Pull both the bobbin and top thread toward the 7.
back of your presser foot. (Figure 20)
Note: Try a practice stitch before beginning to sew
to make sure you’ve threaded the machine
correctly.
How to sew
Turn the hand wheel counter-clockwise till the 1.
needle is at its highest position. (Figure 21)
Lift the presser foot. Place the fabric beneath 2.
the presser foot at exact spot where you want
to begin sewing. (Figure 22)
Lower the presser foot onto the fabric. (Figure 3.
23) Select a stitch pattern. Make sure the
power switch is ON. Lower the needle into
the fabric. Press down on the foot control and
begin sewing. The sewing speed depends on
the pressure applied to the paddle: the harder
you press, the faster the needle moves. Guide
the fabric gently with your hands.
Figure 20
Figure 21
Figure 22
Figure 23
When done, switch the power OFF.4.
Turn the hand wheel anti-clockwise till the 5.
needle is at its highest position. Lift the
presser foot. Gently ease the fabric away from
Figure 24
beneath the presser foot.
Snip the threads with the thread cutter. (Figure 24)6.
Note: Do not touch the pattern selection knob while the machine is
running.
Sewing Machine Instructions Page 7
Page 8

Note: Do not use this machine for stretchable or knitted fabrics, such
as towels, sweaters, etc., as this machine is not intended for
such use.
Adjusting tension
A good stitch is neither too tight nor too loose. Check
both the top and bottom threads to make sure they
Figure 25
are smooth and even. (Figure 25)
If the top thread on your sewing machine is too
loose, the bottom thread on your fabric will look like
a very straight line. To correct this, gradually turn the
Figure 26
thread clamp downward (numbers go up) to increase
tension, until the stitching is smooth and even. (Figure 26)
If the bottom thread on your sewing machine is too
loose, the top thread on your fabric will look like a
very straight line. To correct this, gradually turn the
Figure 27
thread clamp upward (numbers go down) to decrease
tension, until the stitches are smooth and even. (Figure 27)
Using the sewing arm
To sew sleeves, cuffs, or other narrow garments, use the sewing arm.
Lift the presser foot.1.
Position the narrow garment around the 2.
sewing arm. (Figure 28)
Lower the presser foot and follow the regular 3.
sewing instructions.
Figure 28
Replacing the needle
Caution: Make sure that the machine is on off before replacing the
needle.
Sewing Machine InstructionsPage 8
Page 9
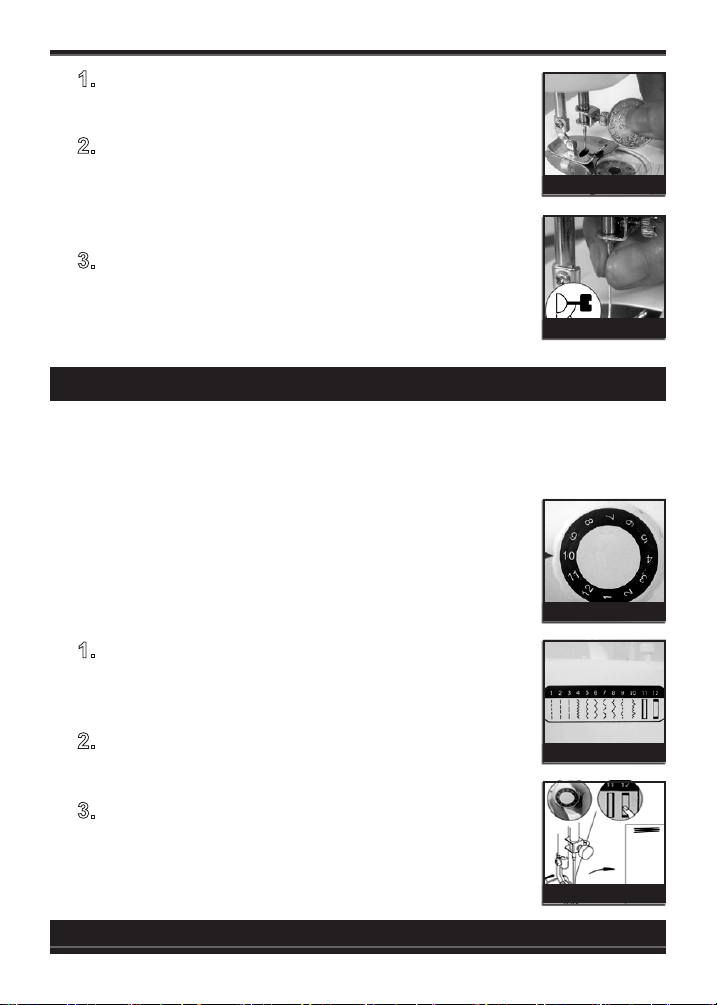
Make sure the power is OFF. Turn the hand 1.
wheel until the needle is at its highest position.
Hold the old needle with one hand while 2.
loosening the needle clamp screw with the
other. When the needle is loose, remove it
Figure 29
from its clamp. (Figure 29)
Insert a new needle in the clamp with the 3.
at side toward the right. When the needle
is rmly in place, tighten the needle clamp
screw. (Figure 30)
Figure 30
Features
Stitch patterns
This sewing machine offers a choice of 12 stitches: 3 straight, 7
zigzag, and 2 buttonhole stitches. The 12 stitches are
illustrated to the right of the stitch pattern knob.
(Figure 31) Turn the stitch pattern knob to the number
that corresponds to your desired stitch. (Figure 32)
Buttonhole stitch
Figure 31
Select #12 on the stitch pattern knob. Place 1.
fabric beneath the presser foot at the exact
spot of buttonhole.
Turn the switch ON. Sew about 3-4 stitches at 2.
low speed and turn switch OFF. (Figure 33)
Figure 32
Select #11 on the stitch pattern knob. Turn the 3.
switch ON. Sew several stitches until you
reach the desired length of the buttonhole.
Make sure you sew in a straight line. Turn
Figure 33
Sewing Machine Instructions Page 9
Page 10
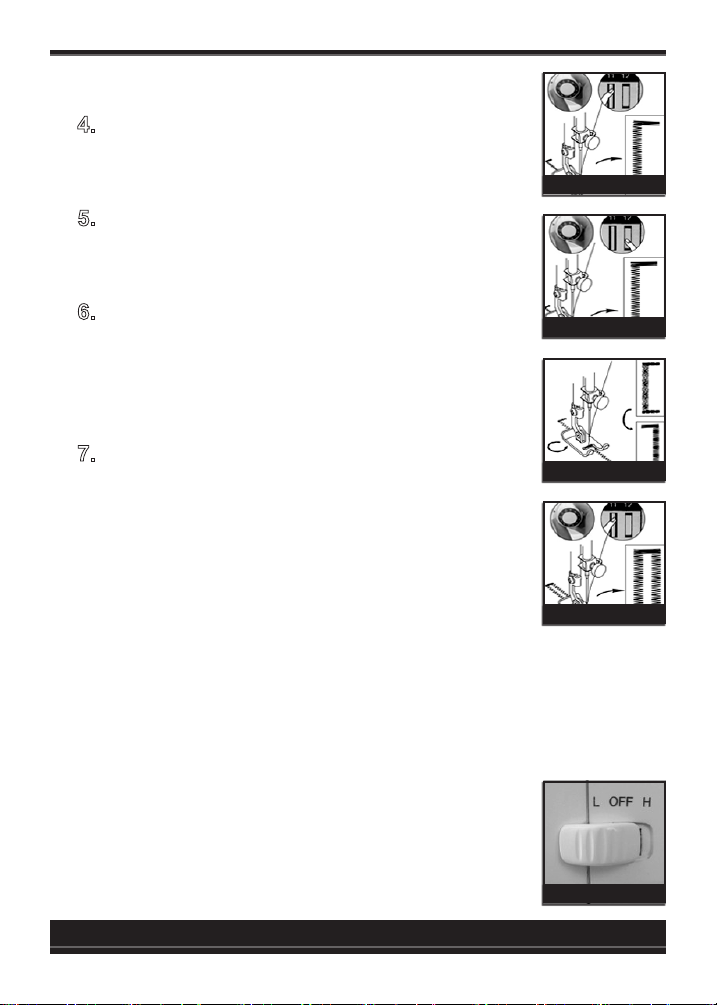
switch OFF. (Figure 34)
Lift the presser foot. Rotate the fabric so that 4.
you will now sew in the opposite direction.
(Figure 35)
Figure 34
Select #12 on the pattern stitch knob. Turn 5.
switch ON. Sew about 3-4 stitches at low speed. Turn switch
OFF. (Figure 36)
Select #11 on the pattern stitch knob. Turn 6.
switch ON. Sew several stitches in the
Figure 35
opposite direction of Step 3, till you meet the
original stitches of Step 2. Turn switch OFF.
(Figure 37)
Use a seam ripper to cut the space between 7.
stitches.
Figure 36
Work lamp
The work lamp provides direct lighting to the sewing
area. Use the light switch to turn the lamp ON or
OFF.
Figure 37
Reverse stitch button
Reverse stitching is good for reinforcing the two edges of a seam,
so that the stitches will not unravel. Press and hold the reverse stitch
button to sew backwards; release to sew in regular direction.
Sewing speeds
The Sewing Machine offers two speed settings: low
(L) and high (H). Depending on the type of sewing
you’re doing, select the appropriate setting. (Figure
38)
Figure 38
Sewing Machine InstructionsPage 10
Page 11
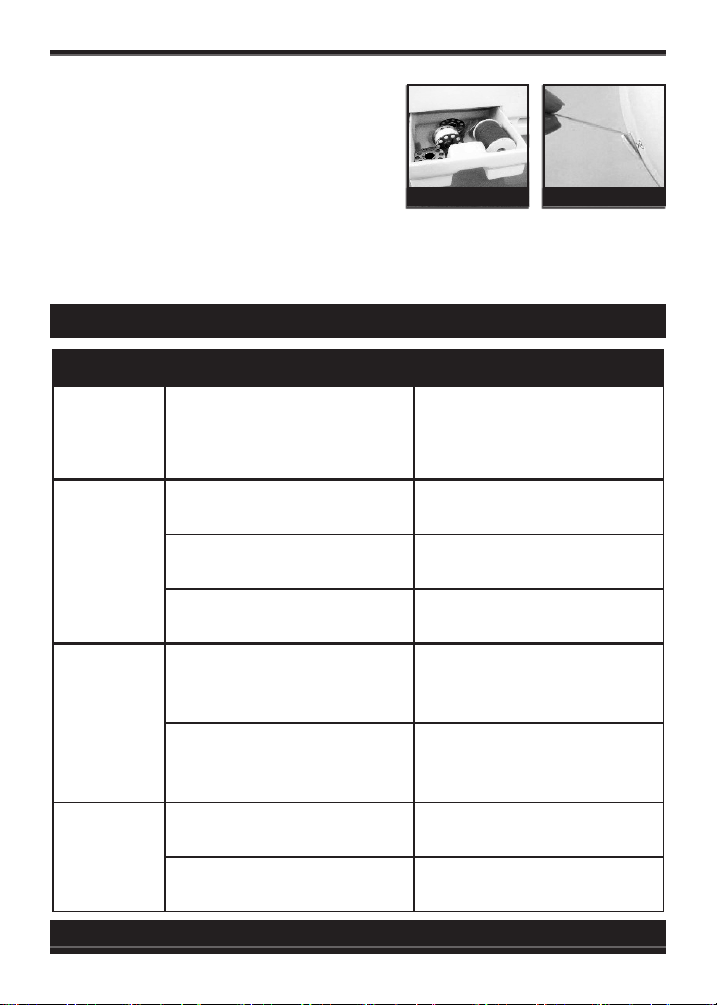
Accessories drawer
The accessories drawer has a
designated space for bobbins,
threads, and needles. (Figure 39)
Figure 39 Figure 40
Thread cutter
Use the handy thread cutter at the left side of the sewing machine to
snip threads after threading or sewing. (Figure 40)
Troubleshooting Guide
PROBLEM CAUSE SOLUTION
Machine
runs slowly
or not at all
Machine
skips
stitches
Bobbin
thread
cannot be
drawn up
Thread
keeps
breaking
Adapter power inadequate or
inappropriate
Adapter not plugged in
Needle eye not in the center
Needle bent
Presser foot too loose
Lower thread used up Wind thread onto bobbin
Machine incorrectly threaded
Thread blocked by lower
bobbin
Needle scarf too rough
Use a compatible adapter
and make sure it is plugged
in correctly to an outlet with
enough power
Remove and reinsert the
needle correctly
Remove and insert a new
needle
Tighten the screw of the
presser foot
Follow the instructions listed
above on threading this
machine
Thread the upper thread and
lower thread again
Remove and reinsert a new
needle
Sewing Machine Instructions Page 11
Page 12

Thread
keeps
breaking
Stitches too
loose or
uneven
Needle shank not seated in
the upper end
Thread tension dial, thread
guide or thread pulling bar
rough
Upper thread is too loose or
incorrectly threaded
Upper thread is too tight or
lower thread too loose
Insert the needle correctly
Polish with ne sand paper
Remove the spool of thread
from the spool pin, wind any
loose thread around it, and
rethread the machine
Adjust thread tension dial
according to the instructions
listed in “Adjusting Tension”
Needle bent or deformed
Remove and insert a new
needle
Insert a new needle and
Presser foot too loose
tighten the screw of the
presser foot
Needle
breaks
Pulling fabric with force while
sewing
Remove and insert a new
needle, and guide fabric
along gently
Remove and insert a new
Needle not lowered into fabric
when starting to sew
needle turn hand wheel to
lower the needle into fabric,
and then start sewing
1 YEAR LIMITED WARRANTY
The SB1800 / SB1818 Compact Sewing Machine is warranted for 1 year from provable date of purchase against defects in
During this period such defects will be repaired, or the product will be replaced without charge.
This warranty does not cover damage caused by misuse, negligence or improper installation. Warranty is also invalid in any
Send your package postage prepaid with a copy of your proof of purchase. You will also need to enclose a letter explaining
case that the product is taken apart or serviced by an unauthorized service station.
the nature of your difculty in detail. Please allow 2-4 weeks for return shipping.
SmartekUSAInc.•49BartlettStreetBrooklyn,NY11206•1-877-678-6232
Sunbeam™ logo is a trademark of Sunbeam Products, Inc. used under license.
material and workmanship.
Sewing Machine InstructionsPage 12
 Loading...