

Sunbeam Mixmaster FPSBHM1502, Mixmaster FPSBHM1801, Mixmaster 2525, FPSBHM2524R, Mixmaster 2526 User Manual
...Page 1
User Manual
Manual de Instrucciones
Mixmaster® Hand Mixer
Batidora Manual Mixmaster
®
MODELS/
MODELOS
2524, 2525, 2526, 2545,
2546, FPSBHM1801,
FPSBHM1502
www.sunbeam.com
For product questions:
Sunbeam Consumer Service
USA : 1.800.458.8407
Canada : 1.800.667.8623
www.sunbeam.com
© 2010 Sunbeam Products, Inc. doing business as Jarden Consumer
Solutions. All rights reserved. Distributed by Sunbeam Products, Inc.
doing business as Jarden Consumer Solutions, Boca Raton, Florida 33431.
SPR-121009
Para preguntas sobre los productos llame:
Sunbeam Consumer Service
EE.UU. : 1.800.458.8407
Canadá : 1.800.667.8623
www.sunbeam.com
© 2010 Sunbeam Products, Inc. operando bajo el nombre de Jarden
Consumer Solutions. Todos los derechos reservados. Distribuido por
Sunbeam Products, Inc. operando bajo el nombre de Jarden Consumer
Solutions, Boca Raton, Florida 33431.
Printed in China Impreso en China
P.N. 116161-003
Made with 100% recycled paper
C
Page 2

Th i s Un i T is f o r ho U s e h o l d Us e on l y
fo r Pr o d U c T s PU r c h a s e d i n T h e U.s. a n d ca n a d a on l y
To reduce the risk of electrical shock, this appliance has a
polarized plug (one blade is wider than the other). This plug fits a
polarized outlet only one way; if the plug does not fit fully in the
outlet, reverse the plug. If it still does not fit, contact a qualified
electrician. Do not attempt to defeat this safety feature.
fo r Pr o d U c T s PU r c h a s e d i n T h e U.s. a n d ca n a d a on l y
A short power-supply cord is provided to reduce the risk resulting
from becoming entangled in or tripping over a longer cord.
SAVE THESE INSTRUCTIONS
IMPORTANT SAFEGUARDS
When using electrical appliances, basic safety precautions should
always be followed, including the following:
1. Read all instructions before use.
2. To protect against risk of electrical shock, do not put hand mixer in
water or other liquid. This may cause personal injury and/or damage to
the product.
3. To disconnect, turn off controls and unplug from outlet.
4. Unplug from outlet while not in use, before putting on or taking off parts
and before cleaning.
5. Avoid contact with moving parts. Keep hands, hair, clothing, as well as
spatulas and other utensils away from beaters during operation to reduce
the risk of injury to persons and/or damage to the hand mixer.
6. Do not operate hand mixer with a damaged cord or plug, after the
appliance malfunctions, or if it is dropped or damaged in any manner.
Return appliance to the nearest Authorized Sunbeam Service Center for
examination, repair or electrical or mechanical adjustment.
7. Do not use with an extension cord.
8. The use of attachments not recommended or sold by Sunbeam Products
may cause fire, electrical shock or injury.
9. Do not let cord hang over edge of table or countertop.
10. Do not let cord touch hot surfaces, including a stove.
11. Do not use outdoors or for commercial purposes.
12. Remove beaters from hand mixer before washing them.
13. Do not place hand mixer on or near a hot burner or in a heated oven.
14. Do not use hand mixer for other than intended use.
15. Do not leave hand mixer unattended while it is operating.
16. Close supervision is necessary when mixer is used by or near children.
2
3
Page 3

fe a T U r e s o f yo U r
Mi x M a s T e r® ha n d Mi x e r
A. Speed Control Dial/Attachment Eject Button –
Speed control button that also functions as the beater eject button.
B. Burst of Power® Button (Models 2525, 2526, 2545, 2546, FBSBHM1801
& FBSBHM1502) – This feature allows for an added boost to the selected
speed setting at the press of a button.
C. Ergonomic Handle – The soft-grip open handle has been ergonomically
designed to provide comfort to prevent hand fatigue during heavy or long
mixing tasks.
D. Heel Rest – The newly designed heel rest provides exceptional stability.
E. Bowl Rest – The bowl rest tab allows you to easily rest the hand mixer
against the bowl to provide more stability and comfort while mixing.
F. Beaters – For creaming butter and sugar, plus mixing cake batter.
Other Attachments (see chart below for options for each model)
4
5
Mi xi n g gU i d e
Please keep in mind that the various mixing tasks and related speeds,
listed in the table below, may vary slightly from recipe to recipe.
For most recipes, it is better to begin your mixing on a slower speed
until the ingredients begin combining, then move to the appropriate
speed range for the particular task.
When mixing larger quantities you may need to increase the
Mixmaster
®
hand mixer speed due to the amount of mixing required
and the larger load on the machine.
sP e e d gU i d e f o r ha n d Mi x e r
Mix i ng
sP e e d Ta s k s ex a M P l e
1 Stir Use when stirring liquid ingredients or when mixing dry
and liquid together alternately in a recipe. Use when
preparing any of the ready-prepared or packaged instant
puddings
2 Mix Use when a recipe calls for combining ingredients
together. Use for quick breads or muffins that require a
brisk action, just enough to blend.
3 Blend Use when preparing cake mixes or for directions calling
for a medium speed. Use to cream butter and sugar
together.
4 Beat Use when preparing a frosting from a recipe or package.
Use when whipping cream for desserts.
5 – 6 Whip Use to mash potatoes to develop a light and fluffy
texture. Use when whipping egg whites.
FBSBHM FBSBHM
2524 2525 2526 2545 2546 1502 1801
G. Drink Rod •
H. Spatula •
I. Dough Hooks • •
J. Whisk •
K. Wire Beaters •
(Includes 2)
L. Retractable Cord • •
M. Storage Bag •
Page 4
6
7
fe a T U r e s o f yo U r
Mi x M a s T e r® ha n d Mi x e r
ac c e s s o r i e s
H. Drink Rod
I. Spatula
J. Dough Hooks
K. Whisk
L. Wire Beaters (2)
M. Storage Bag
A. Speed Control Dial/Attachment
Eject Button
B. Burst of Power® Button
C. Ergonomic Handle
D. Heel Rest
E. Bowl Rest
F. Beaters
G. Retractable Cord
A
B
C
F
E
G
D
H
I
J
K
L
M
Page 5
8
9
Pr e P a r i n g T h e ha n d Mi x e r f o r Us e
The Sunbeam® Hand Mixer has been designed to assist you in
preparing delicious foods.
Before using your mixer for the first time, wash the attachments in hot,
soapy water. Rinse and dry thoroughly. NOTE: All attachments are
dishwasher safe.
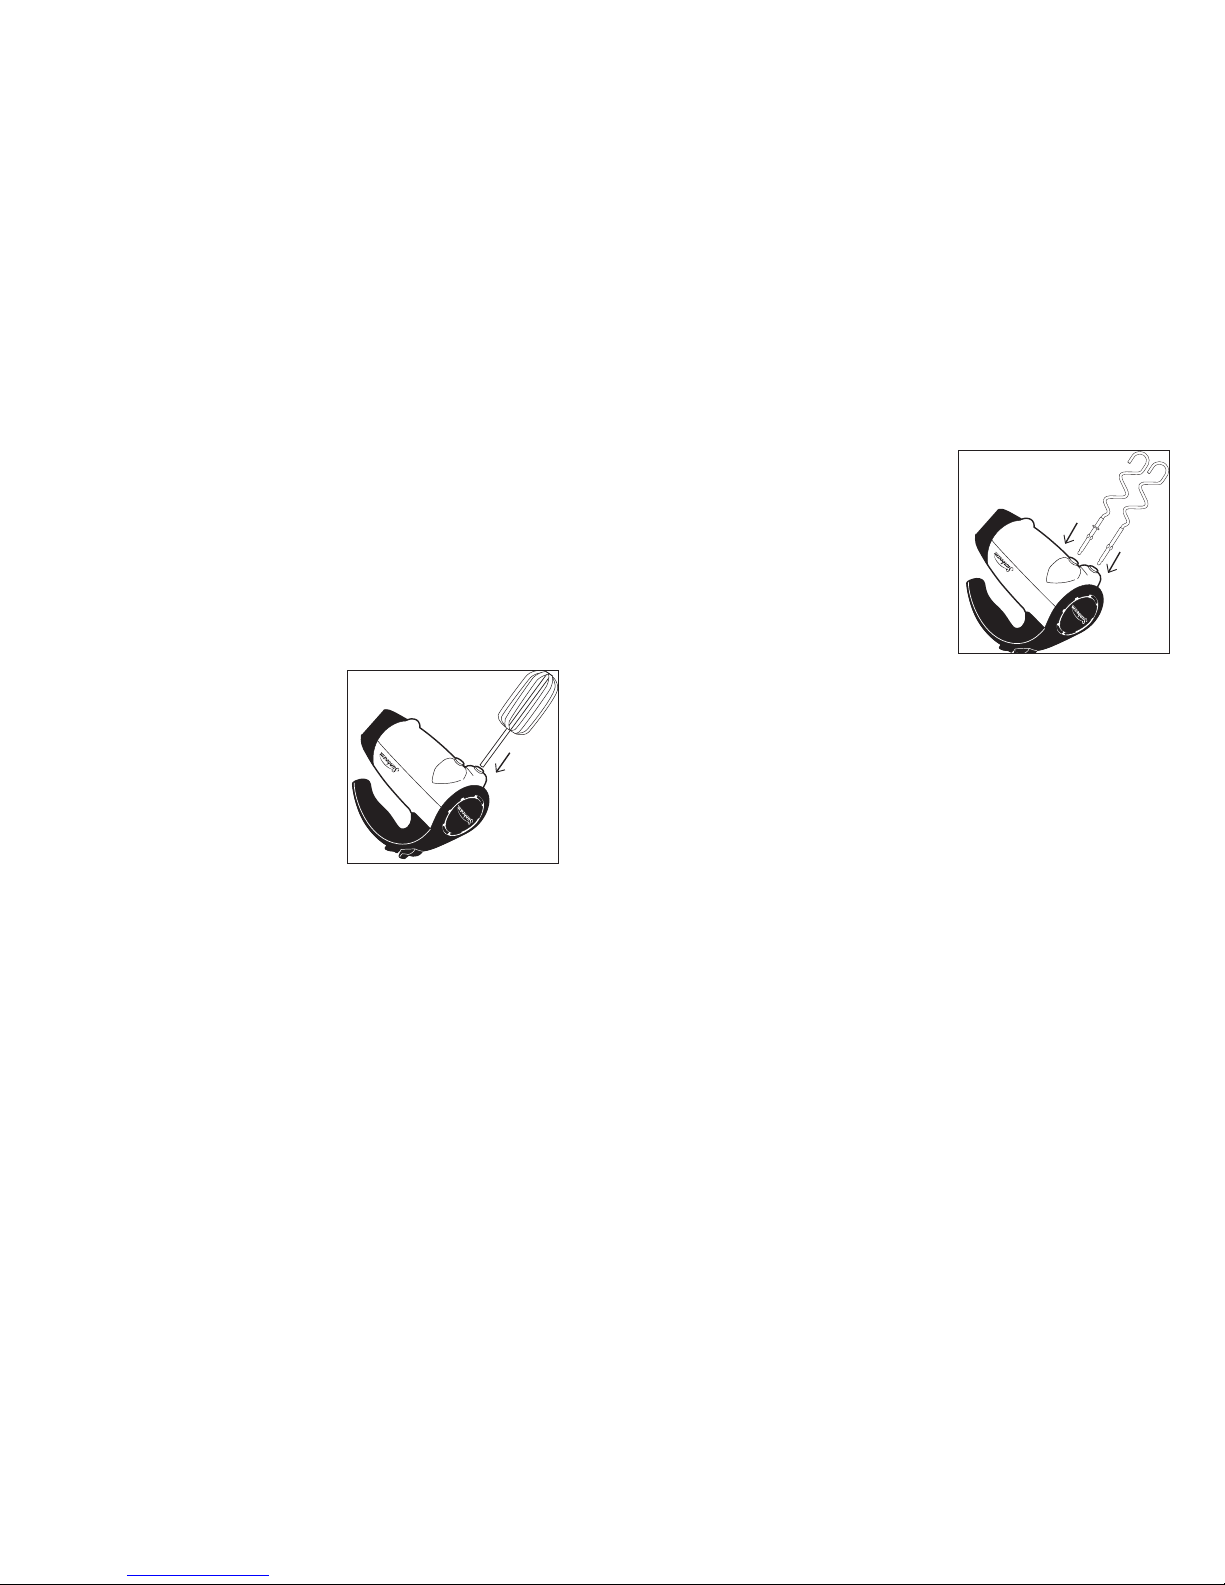
in s T a l l i n g aT T a c h M e n T s
Make sure the speed control is in the
“OFF” position and unplugged from
an electrical outlet. Insert attachments
one at a time by placing stem end into
the opening on the bottom of the mixer.
Turn attachment slightly and push in
until it clicks into position. (See Figure
A) Plug into the appropriate outlet.
Turn mixer on and adjust speed setting
using the control on the top of the unit.
NOTE: The whisk and drink rod may be inserted into either opening on
the bottom of the mixer.
aT T a c h M e n T s
Be a T e r s – The beater design allows for
thorough, fast mixing results for all
types of batters.
d
o U g h ho o k s – Use these hooks to
knead light dough or other heavy batters.
Use at lower speeds for best results.
NOTE: The dough hook with the collar
fits into the left drive hole and the other
one goes into the right. (See Figure B) If
dough hooks do not click into the drive holes, reverse and try again.
d
r i n k ro d – The drink rod is designed to mix all types of frozen or
powdered drinks. Recommended for use in plastic or metal beverage
containers only.
NOTE: Drink rod does not crush ice. For best use, add ice after mixing
beverage.
s
P a T U l a – The spatula is convenient to use for scraping unmixed
ingredients from the sides of the bowl and removing mixed ingredients
from the bowl, etc. The spatula is not heat-resistant and it will melt if
placed on or near hot surfaces.
W
h i s k – The whisk is used to beat air into mixtures such as egg whites.
W
i r e Be a T e r s – The wire beater design provides thorough mixing
results for light batters.
s
T o r a g e Ba g – Storage Bag to conveniently store the mixer and all
accessories. (FPSBHM1801 Only)
oP e r a T i n g in s T r U c T i o n s
When building up a recipe that requires the addition of dry ingredients,
such as flour, slow the speed down while these ingredients are being
added to avoid a snowstorm effect. Once the extra ingredients begin
combining, slowly increase to the appropriate speed for the particular
mixing task.
Us i n g yo U r ha n d Mi x e r
Slowly guide mixer around the sides and through the center of the
bowl, going in the same direction. Be careful not to over beat the
mixture. Over beating tends to make some mixtures tough.
Whenever scraping of the bowl is required, stop the mixer and scrape
sides and bottom of bowl with a rubber spatula as needed. Turn
speed control to “OFF” and rest mixer on its heel rest while adding
ingredients. Make sure to position beaters over mixing bowl so any
drippings will fall back into the mixing bowl.
Figure A
Figure B
Page 6

10
11
When mixing is complete, set speed control to “1” and raise beaters
slowly from batter to clean off clinging food. Make sure to turn unit to
“OFF” before raising beaters completely out of mixing bowl.
s
P e e d co n T r o l di a l /aT T a c h M e n T ej e c T BU T T o n – The hand mixer
features a large and conveniently located speed control button that also
functions as the beater eject button when in the “OFF” position. The
design allows for a smooth push of the thumb to release the beaters.
There will be a noticeable “click” when ejecting beaters.
B
U r s T o f Po W e r
®
BU T T o n (2525, 2526, 2545, 2546, FPSBHM1801 &
FPSBHM1502) – During especially heavy mixing tasks, press the button
to drive through the mixture with ease. Once the button is released, the
mixer will return to the original speed setting.
re T r a c T a B l e co r d se c T i o n (se l e c T Mo d e l s on l y )
1. When winding the cord, hold the plug with one hand, and press
the winding button with the other hand. (Failure to hold plug may
cause plug to fly.)
2. The cord reel is compact for multi-layer winding of the cord. In
case cord is not fully rewound, pull out the cord and steer cord
evenly on the reel.
3. In case the cord is not pulled out easily, pull cord firmly.
4. Select the amount of cord desired before plugging into an electrical
outlet.
5. Do not allow children to use retractable cord feature as the cord
may cause injury.
ca r i n g & cl e a n i n g o f yo U r Mi x e r
1. Before cleaning any part of the mixer, set the position selector to
the “OFF” position, then unplug the cord from the outlet and eject
the beaters. Make sure to wash and dry all parts thoroughly before
using them again.
2. The attachments may be washed in hot, soapy water or in a
dishwasher.
3. The mixer and the cord can be cleaned with a damp cloth but the
final clean must be with a dry cloth.
4. To remove stubborn spots, wipe surfaces with a piece of cloth,
slightly dampened, in soapy water or a mild, non-abrasive cleaner.
5. Do not use any abrasive cleaner or material to clean any part of the
hand mixer, as it can harm the body of the product.
sT o r a g e
Store the hand mixer on its heel rest in a clean, dry location such as a
cabinet or shelf. Store beaters in a drawer or in storage bag (for select
models only).
Ma i n T e n a n c e
Other than the recommended cleaning, no further user maintenance
should be necessary. If for any reason your hand mixer should require
repairs, do not try to fix it yourself. Send it to the nearest Authorized
Sunbeam Appliance Service Center.
ej e c T i n g Be a T e r s
Make sure the speed control is in the “OFF” position and unplugged
from an electrical outlet. Scrape off any excess batter with a rubber
spatula. Grasp the stems of the beaters with your hand and press the
beater eject button.
Page 7

12
13
One Year Limited Warranty
Sunbeam Products, Inc. doing business as Jarden Consumer Solutions or
if in Canada, Sunbeam Corporation (Canada) Limited doing business as
Jarden Consumer Solutions (collectively “JCS”) warrants that for a period
of one year from the date of purchase, this product will be free from defects
in material and workmanship. JCS, at its option, will repair or replace this
product or any component of the product found to be defective during the
warranty period. Replacement will be made with a new or remanufactured
product or component. If the product is no longer available, replacement
may be made with a similar product of equal or greater value. This is your
exclusive warranty. Do NOT attempt to repair or adjust any electrical or
mechanical functions on this product. Doing so will void this warranty.
This warranty is valid for the original retail purchaser from the date of initial
retail purchase and is not transferable. Keep the original sales receipt. Proof
of purchase is required to obtain warranty performance. JCS dealers, service
centers, or retail stores selling JCS products do not have the right to alter,
modify or any way change the terms and conditions of this warranty.
This warranty does not cover normal wear of parts or damage resulting from
any of the following: negligent use or misuse of the product, use on improper
voltage or current, use contrary to the operating instructions, disassembly,
repair or alteration by anyone other than JCS or an authorized JCS service
center. Further, the warranty does not cover: Acts of God, such as fire, flood,
hurricanes and tornadoes.
What are the limits on JCS’s Liability?
JCS shall not be liable for any incidental or consequential damages caused by
the breach of any express, implied or statutory warranty or condition.
Except to the extent prohibited by applicable law, any implied warranty or
condition of merchantability or fitness for a particular purpose is limited in
duration to the duration of the above warranty.
JCS disclaims all other warranties, conditions or representations, express,
implied, statutory or otherwise.
JCS shall not be liable for any damages of any kind resulting from the
purchase, use or misuse of, or inability to use the product including incidental,
special, consequential or similar damages or loss of profits, or for any breach
of contract, fundamental or otherwise, or for any claim brought against
purchaser by any other party.
Some provinces, states or jurisdictions do not allow the exclusion or limitation
of incidental or consequential damages or limitations on how long an implied
warranty lasts, so the above limitations or exclusion may not apply to you.
This warranty gives you specific legal rights, and you may also have other
rights that vary from province to province, state to state or jurisdiction to
jurisdiction.
How to Obtain Warranty Service
In the U.S.A.
If you have any question regarding this warranty or would like to obtain
warranty service, please call
1.800.458.8407
and a convenient service center
address will be provided to you.
In Canada
If you have any question regarding this warranty or would like to obtain
warranty service, please call
1.800.667.8623
and a convenient service center
address will be provided to you.
In the U.S.A., this warranty is offered by Sunbeam Products, Inc. doing
business as Jarden Consumer Solutions located in Boca Raton, Florida
33431. In Canada, this warranty is offered by Sunbeam Corporation
(Canada) Limited doing business as Jarden Consumer Solutions, located at
20 B Hereford Street, Brampton, Ontario L6Y 0M1. If you have any other
problem or claim in connection with this product, please write our Consumer
Service Department.
PLEASE DO NOT RETURN THIS PRODUCT TO ANY OF THESE
ADDRESSES OR TO THE PLACE OF PURCHASE.
Page 8

14
15
no T e s
no T a s
Page 9

16
17
es T a Un i d a d es só l o Pa r a Us o do M é s T i c o
só l o Pa r a Pr o d U c T o s co M P r a d o s e n es T a d o s Un i d o s y
ca n a d á
Para reducir el riesgo de descarga eléctrica, este aparato cuenta con una
clavija polarizada (una pata es más ancha que la otra) Esta clavija entra
sólo de una manera en un enchufe polarizado. Si la clavija no encaja en
el enchufe simplemente colóquela al revés. Si aún así no encaja llame
a un electricista calificado. Deninguna manera intente modificar esta
medida de seguridad.
só l o Pa r a Pr o d U c T o s co M P r a d o s e n es T a d o s Un i d o s y
ca n a d á
Se incluye un cable de tensión corto para evitar que se enrede o
que cause tropiezos.
GUARDE ESTAS INSTRUCCIONES
PRECAUCIONES IMPORTANTES
Cuando use algún aparato eléctrico siempre deben seguirse las precauciones
básicas de seguridad, incluyendo las siguientes:
1. Lea todas las instrucciones antes de usar.
2. Para protegerse contra una descarga eléctrica, no coloque la batidora
manual en agua o en otro líquidos. Esto puede ocasionar lesiones
personales o daños al producto.
3. Para desconectar, apague todos los controles y retire el enchufe del
tomacorriente.
4. Desconéctela del tomacorriente cuando el aparato no esté en uso, antes
de poner o quitar partes y antes de limpiar el electrodoméstico.
5. Evite el contacto las partes en movimiento. Mantenga las manos, cabello,
ropa así como también, las espátulas y otros utensilios lejos de los
batidoras durante el funcionamiento del aparato, para reducir el riesgo
de lesiones personales o daños a la batidora manual.
6. No opere la batidora manual con un cordón dañado o después de que el
aparato ha funcionado inadecuadamente o ha sido dañado de cualquier
manera. regerse el aparato a un Centro de Servicio Autorizado Sunbeam
para su examen, raparación o ajuste eléctrico o mecánico.
7. No use con un cable de extensión.
8. El uso de accesorios o aditamentos que no sean recomendados o
vendidos por Sunbeam Products, puede causar incendios, descargas
eleectricas o lesiones personales.
9. No permita que el cordón cuelgue sobre el borde de la mesa o mostrador.
10. No permita que el cordón entre en contacto con superficies calientes,
incluyendo la estufa.
11. No se use en exteriores o para propósitos comerciales.
12. Quite los batidores de la Batidora Manual antes de lavarlos.
13. No coloque la Batidora Manual sobre o cerca de quemadores de estufas
de gas o dentro de un horno caliente.
14. No use la Batidora Manual más que para lo que ha sido diseñada.
15. No opere la Batidora Manual sin continua supervisión.
16. Es necesario contar con supervisión continua cuando la Batidora es usada
o está cerca de niños.
Page 10

18 19
ca r a c T e r í s T i c a s d e sU Ba T i d o r a
Ma n U a l Mi x M a s T e r
®
A. Botón de Control de Velocidad y de Eyectar Batidores – Botón de
control de velocidad que también funciona para expulsar los batidores.
B. Función Burst of Power
®
(Modelos 2525, 2526, 2545, 2546,
FBSBHM1801 & FBSBHM1502) – Esta función permite reforzar la
velocidad seleccionada con sólo presionar un botón.
C. Manija Ergonómica – La manija abierta ha sido ergonómicamente
diseñada para mayor comodidad para prevenir el cansancio de la mano
durante batidos de larga duración o de mezclas muy espesas
D. Base de Batidora Manua – Diseño de base inferior de la batidora para
estabilidad excepcional.
E. Soporte para el Tazón – La soporte de resto de tazón permite que
usted fácilmente descanse la batidora de la mano contra el tazón para
proporcionar más estabilidad y la comodidad mezclando.
F. Batidores – Para formar crema con mantequilla y azúcar, y para prepara
mezclas de biscochos.
Otros Accesorios (Vea el cuadro de abajo para las opciones de cada modelo)
gU í a P a r a Me z c l a r
Tenga en cuenta que las diversas tareas de mezclado y velocidades
relacionadas listadas en la siguiente tabla pueden variar levemente de
una receta a otra.
Para la mayoría de las recetas, es mejor comenzar su proceso de
mezclado a una velocidad más lenta hasta que los ingredientes
comiencen a unirse; después, migrar al rango de velocidad adecuada
según la tarea específica.
Al mezclar grandes cantidades, puede ser necesario aumentar la
velocidad de la Mixmaster
®
debido a la cantidad de mezclado
requerida y a la mayor carga en la máquina.
gU í a d e Ve l o c i d a d e s P a r a l a Ba T i d o r a Ma n U a l
Ta r e a s d e
Ve l o c i d a d e s Me z c l a s ej e M P l o
1 Revolver Para revolver ingredientes líquidos o para mezclar
ingredientes secos y líquidos alternadamente en
una receta. Para preparar postres instantáneos ya
listos o envasados
2 Mezclar Para cuando la receta pide combinar los
ingredientes. Para panes rápidos o muffins que
requieren una acción rápida y breve, suficiente
para unir los ingredientes.
3 Licuar Para preparar mezclas para pasteles o para
instrucciones que indiquen media velocidad. Para
formar una crema con mantequilla y azúcar.
4 Batir Para preparar espuma de biscocho de una receta o
envasado. Para batir crema para postres.
5 – 6 Airear Para obtener un puré de papas ligero y esponjoso.
Para batir claras de huevo.
FBSBHM FBSBHM
2524 2525 2526 2545 2546 1502 1801
G. Mezclador •
de Bebidas
H. Espátula •
I. Amasadores • •
J. Batidor •
de Alambre
K. Batidores •
Delgados
(Incluye Dos)
L. Cordón Retráctil • •
M. Bolsa de •
almacenamiento
Page 11

20 21
fe a T U r e s o f yo U r
Mi x M a s T e r® ha n d Mi x e r
ac c e s o r i o s
H. Mezclador de Bebidas
I. Espátula
J. Amasadores
K. Batidor de Alambre
L. Batidores Delgado (2)
M. Bolsa de almacenamiento
A. Botón de Control de Velocidad y
de Eyectar Batidores
B. Función Burst of Power®
C. Manija Ergonómica
D. Base de Batidora Manua
E. Soporte para el Tazón
F. Batidores
G. Cordón Retráctil
A
B
C
F
E
G
D
H
I
J
K
L
M
Page 12
22
23
co M o Pr e P a r a r l a Ba T i d o r a Ma n U a l
P o r Pr i M e r a Ve z
La batidora de mano Sunbeam® ha sido diseñada para asistirle en la
preparación de deliciosas comidas.
Antes de usar la batidora manual por primera vez, lave los batidores en
agua caliente jabonosa. Enjuáguelas y séquelas bien. Nota: que todos
los accesorios se pueden lavar en la lavadora de platos.
in s T a l a n d o l o s ac c e s o r i o s
Asegúrese de que el control de velocidad
esté en la posición “OFF” (apagado) y
que la batidora esté desenchufada del
tomacorriente. Introduzca los batidores
uno por uno, poniendo el vástago de
la paleta en el orificio que está en la
parte inferior de la batidora. Gire el
batidor levemente y presione hasta
que el batidor hace clic en su posición.
(Vea Figura A) Enchufe la batidora en
un tomacorriente apropiado. Prenda
la batidora y ajuste la velocidad con el control que se encuentra en la
parte superior de la unidad. Nota: El batidor de alambre y el mezclador
de bebidas pueden ser insertados en una o la otra apertura en la parte
inferior de la batidora.
ac c e s o r i o s
Ba T i d o r e s – El diseño de los batidores de cromo permite una mezcla
rápida e integral de todo tipo de mezclas. Los batidores se pueden lavar
en el lavaplatos.
a
M a s a d o r e s – Use estos ganchos para triturar masa de pan, masa de
pizza u otras pastas y masas espesas. Para obtenea r mejores resultados,
úselos a baja velocidad.
NOTA: que cuando use los amasadores,
el amasador con la pestaña o collar
ajuste en el agujero izquierdo de la
impulsión y el otro entra en la derecha.
(Vea Figura B) Si los amasadores no
hacen clic en los agujeros de propulsión,
inviértalos y pruebe nuevamente.
M
e z c l a d o r d e Be B i d a s – El mezclador
de bebidas fue diseñado para mezclar
todo tipo de bebidas congeladas y
en polvo. Recomendado para uso en
recipientes de bebidas de plástico o metálicos únicamente.
NOTA: El mezclador de bebidas no machaca hielo. Para mejor uso,
agregue hielo después de mezclar bebidas.
e
s P á T U l a – Es conveniente usar la espátula para raspar los ingredientes
en los lados del tazón que faltan por mezclar, para sacar los ingredientes
del tazón, etc. La espátula no es resistente al calor y se derretirá si es
colocada sobre o cerca de superficies calientes.
B
a T i d o r e s de l g a d o s – El diseño de los delgados proporcionan un
resultado más completo en mezclas livianas.
Ba T i d o r d e al a M B r e – El batidor es usado para batir aire en las
mezclas tales como claras de huevos, yemas o crema.
B
o l s o P a r a al M a c e n a j e – Bolso para almacenar convenientemente la
batidora y todos los accesorios. (Modelo FPSBHM1801 solamente)
in s T r U c c i o n e s oP e r a T i V a s
Al preparar una receta que requiera del agregado de ingredientes secos
tales como harina, reduzca la velocidad mientras vaya incorporando
dichos ingredientes para evitar un efecto de tormenta de nieve. Una vez
que los ingredientes adicionales comiencen a unirse, vaya aumentando
lentamente la velocidad hasta alcanzar la deseada para la tarea de
mezclado específica.
Figure A
Figure B
Page 13

24 25
UT i l i z a c i ó n Ba T i d o r a Ma n U a l
Guíe lentamente la batidora alrededor de los costados y a través del centro del
tazón, siempre en la misma dirección. Cuide de no batir demasiado la mezcla.
El batido excesivo hace que algunas mezclas se pongan demasiado duras.
Cuando necesite raspar el tazón, pare la batidora y raspe los costados y el
fondo con una espátula de goma. Ponga el control de velocidad en “OFF”
(apagado) y apoye la batidora sobre su base de apoyo mientras añade
ingredientes. Asegúrese de que las paletas queden sobre el tazón de mezcla
para que goteen dentro del mismo.
Una vez completo el batido, ponga el control de velocidad en “1” y
levante las paletas lentamente de la mezcla para que se desprendan los
alimentos. Asegúrese de poner la unidad en “OFF” (apagado) antes de
levantar completamente las paletas y retirarlas del tazón.
B
o T ó n d e co n T r o l d e Ve l o c i d a d y d e ey e c Ta r Ba T i d o r e s – La
batidora manual tiene un botón de control de velocidad grande y
cómodamente localizado que también funciona para expulsar los
batidores cuando esta el la posición “Off” (apagado). El diseño permite
oprimir el botón suavemente con el pulgar para lanzar los batidores. Se
escuchará un “clic” cuando se expulsan los batidores.
f
U n c i ó n BU r s T o f Po W e r
®
(2525, 2526, 2545, 2546 & FPSBHM1801
& FPSBHM1502) – Durante batidos de mezclas especialmente espesas,
presione este botón para manejar la mezcla con facilidad. Cuando suelte el
botón, la batidora volverá a la velocidad original.
se c c i ó n d e l co r d ó n re T r a c T a B l e (Mo d e l o s se l e c c i o n a d o s
Ú
n i c a M e n t e )
1. Al enrollar el cordón, sostenga el enchufe con una mano, y presione
el botón de enrollar con la otra mano. (El fallar en sostener el enchufe
puede hacer que el enchufe salga volando.)
2. El carrete del cordón es compacto para enrollar múltiples capas del
cordón. En caso que el cordón no se rebobinara completamente,
saque el cordón y dirija el cable uniformemente en el carrete.
3. En el caso que el cordón no se sacara fácilmente, tire del cordón
firmemente.
4. Seleccione la cantidad de cordón deseada antes de enchufar en un
tomacorriente.
5. No permita a los niños usar la función retractable del cordón ya que
el cordón puede causar lesiones.
cU i d a d o y ll i M P i e z a d e s U Ba T i d o r a
1. Antes de limpiar cualquier parte de la batidora, coloque el selector
de posición en “OFF” (apagado), luego desenchufe el cordón
del tomacorriente y expulse los batidores. Asegúrese de secar
completamente todas las piezas antes de usarlas de nuevo.
2. Los accesorios pueden ser lavados en agua caliente jabonosa o en la
lavadora de platos.
3. La batidora y la cuerda pueden ser limpiados con un trapo húmedo,
pero la limpieza final debe ser efectuada con un trapo seco.
4. Para remover manchas resistentes, limpie la superficie con un trapo,
ligeramente húmedo, en agua jabonoso o con un limpiador suave
que no sea abrasivo.
5. No use ningún limpiador abrasivo para limpiar cualquier pieza de la
batidora manual ya que puede dañar la carcasa.
al M a c e n a j e
Guarde la batidora manual en la base, en un lugar seco, tal como un
gabinete o estante. Guarde los batidores en un cajón.
Ma n T e n i M i e n T o
Además de la limpieza recomendada, no es necesario ningún mantenimiento
adicional por parte del usuario. Si por cualquier razón su batidora manual
necesita reparación, no trate de repararla usted mismo. Envíela al Centro de
Servicio de Artefactos Sunbeam Autorizado más cercano.
ex P U l s i ó n d e Ba T i d o r e s
Asegúrese de que el control de velocidad esté en la posición “OFF”
(apagado) y que la batidora esté desenchufada del tomacorriente. Raspe
el exceso de mezcla con una espátula de goma. Tome los vástagos de las
paletas con la mano y presione el botón para expulsar las paletas. Las
paletas quedarán en su mano.
Page 14

26
27
Garantía Limitada de 1 Año
Sunbeam Products, Inc. operando bajo el nombre de Jarden Consumer
Solutions, o en Canadá, Sunbeam Corporation (Canada) Limited operando
bajo el nombre de Jarden Consumer Solutions, (en forma conjunta, “JCS”),
garantiza que por un período de un año a partir de la fecha de compra, este
producto estará libre de defectos de materiales y mano de obra. JCS, a su
elección, reparará o reemplazará este producto o cualquier componente del
mismo que presente defectos durante el período de garantía. El reemplazo se
realizará por un producto o componente nuevo o reparado. Si el producto ya
no estuviera disponible, se lo reemplazará por un producto similar de valor
igual o superior. Ésta es su garantía exclusiva. No intente reparar o ajustar
ninguna función eléctrica o mecánica de este producto. Al hacerlo elimínará
ésta garantía.
La garantía es válida para el comprador minorista original a partir de la fecha
de compra inicial y la misma no es transferible. Conserve el recibo de compra
original. Para solicitar servicio en garantía se requiere presentar un recibo de
compra. Los agentes y centros de servicio de JCS o las tiendas minoristas que
venden productos de JCS no tienen derecho a alterar, modificar ni cambiar de
ningún otro modo los términos y las condiciones de esta garantía.
Esta garantía no cubre el desgaste normal de las piezas ni los daños que se
produzcan como resultado de uso negligente o mal uso del producto, uso de
voltaje incorrecto o corriente inapropiada, uso contrario a las instrucciones
operativas, y desarme, reparación o alteración por parte de un tercero ajeno
a JCS o a un Centro de Servicio autorizado por JCS. Asimismo, la garantía
no cubre actos fortuitos tales como incendios, inundaciones, huracanes y
tornados.
Cuál es el límite de responsabilidad de JCS?
JCS no será responsable de daños incidentales o emergentes causados por el
incumplimiento de alguna garantía o condición expresa, implícita o legal.
Excepto en la medida en que lo prohíba la ley aplicable, cualquier garantía o
condición implícita de comerciabilidad o aptitud para un fin determinado se
limita, en cuanto a su duración, al plazo de la garantía antes mencionada.
JCS queda exenta de toda otra garantías, condiciones o manifestaciones,
expresa, implícita, legal o de cualquier otra naturaleza.
JCS no será responsable de ningún tipo de daño que resulte de la compra,
uso o mal uso del producto, o por la imposibilidad de usar el producto,
incluidos los daños incidentales, especiales, emergentes o similares, o la
pérdida de ganancias, ni de ningún incumplimiento contractual, sea de una
obligación esencial o de otra naturaleza, ni de ningún reclamo iniciado contra
el comprador por un tercero.
Algunas provincias, estados o jurisdicciones no permiten la exclusión o
limitación de los daños incidentales o emergentes ni las limitaciones a la
duración de las garantías implícitas, de modo que es posible que la exclusión
o las limitaciones antes mencionadas no se apliquen en su caso.
Esta garantía le otorga derechos legales específicos y es posible que usted tenga
otros derechos que varían de un estado, provincia o jurisdicción a otro.
Cómo solicitar el servicio en garantía
En los Estados Unidos
Si tiene alguna pregunta sobre esta garantía o desea recibir servicio de
garantía, llame al
1.800.458.8407
y podrá obtener la dirección del centro de
servicio que le resulte más conveniente.
En Canadá
Si tiene alguna pregunta sobre esta garantía o desea recibir servicio de
garantía, llame al
1.800.667.8623
y podrá obtener la dirección del centro de
servicio que le resulte más conveniente.
En los Estados Unidos, esta garantía es ofrecida por Sunbeam Products, Inc.
operando bajo el nombre de Jarden Consumer Solutions, Boca Ratón, Florida
33431. En Canadá, esta garantía es ofrecida por Sunbeam Corporation
(Canada) Limited operando bajo el nombre de Jarden Consumer Solutions,
20 B Hereford Street, Brampton, Ontario L6Y 0M1. Si usted tiene otro
problema o reclamo en conexión con este producto, por favor escriba al
Departamento de Servicio al Consumidor.
FAVOR NO DEVUELVA ESTE PRODUCTO A NINGUNA DE ESTAS
DIRECCIONES NI AL LUGAR DE COMPRA.
 Loading...