

Page 1
Quantum Evo Stainless
1.7 litre cordless kettle with
hinged locking lid
Instruction Booklet
KE6300
Please read these instructions carefully
and retain for future reference.
Page 2
Quantum Toasters
Instruction Booklet
This book covers the use and care of the following Sunbeam Toasters:
TA3220 Quantum 2 – 2 Slice Chrome cool-touch toaster
TA3220B Quantum 2 – 2 Slice brushed stainless cool-touch toaster
TA3420 Quantum 4 – 4 Slice Chrome cool-touch toaster
TA3420B Quantum 4 – 4 Slice brushed stainless cool-touch toaster
Please read these instructions carefully
and retain for future reference.
Page 3
Contents
Sunbeam’s Safety Precautions 1
Features of your Quantum Toaster 2
Using your Quantum Toaster 4
Toaster functions 5
Care and cleaning 6
Important instructions – retain for
future use.
Page 4

Sunbeam’s Safety Precautions
SAFETY PRECAUTIONS FOR YOUR
SUNBEAM TOASTER.
• Do not place any objects such as toast,
bread or similar on top of your toaster when
in use.
• Operate the toaster on a flat level surface.
• The bread may burn, therefore do not use
the toaster near or below combustible
material, such as curtains.
• Do not leave your toaster unattended when
in use.
Sunbeam is very safety conscious when
designing and manufacturing consumer products,
but it is essential that the product user also
exercise care when using an electrical appliance.
Listed below are precautions which are essential
for the safe use of an electrical appliance:
• Read carefully and save all the instructions
provided with an appliance.
• Always turn the power off at the power outlet
before you insert or remove a plug. Remove
by grasping the plug - do not pull on the cord.
• Turn the power off and remove the plug
when the appliance is not in use and
before cleaning.
• Do not use your appliance with an extension
cord unless this cord has been checked
and tested by a qualified technician or
service person.
• Always use your appliance from a power
outlet of the voltage (A.C. only) marked
on the appliance.
• Close supervision is necessary when your
appliance is being used by children or infirm
persons.
• Young children should be supervised to ensure
that they do not play with the appliance.
• Clean crumb tray regularly.
• Do not allow crumbs to accumulate in the
crumb tray.
• Do not toast stale bread, rice crackers or
similar on a high setting as they may catch
fire.
• WARNING: Never attempt to extract jammed
toast, crumpets or muffins with a knife or
any metal object, as contact with the live
element may cause electrocution.
• Never leave an appliance unattended while
in use.
• Do not use an appliance for any purpose
other than its intended use.
• Do not place an appliance on or near a hot gas
flame, electric element or on a heated oven.
Do not place on top of any other appliance.
• Do not let the power cord of an appliance hang
over the edge of a table or bench top or touch
any hot surface.
• Do not operate any electrical appliance with
a damaged cord or after the appliance has
been damaged in any manner. If damage is
suspected, return the appliance to the nearest
Sunbeam Appointed Service Centre
for examination, repair or adjustment.
• For additional protection, Sunbeam
recommend the use of a residual current
device (RCD) with a tripping current not
exceeding 30mA in the electrical circuit
supplying power to your appliances.
• Do not immerse the appliance in water
or any other liquid unless recommended.
• Appliances are not intended to be operated
by means of an external timer or separate
remote control system.
If you have any concerns regarding the performance and use of your appliance,
please visit www.sunbeam.com.au or contact the Sunbeam Consumer Service Line.
Ensure the above safety precautions are understood.
1
Page 5
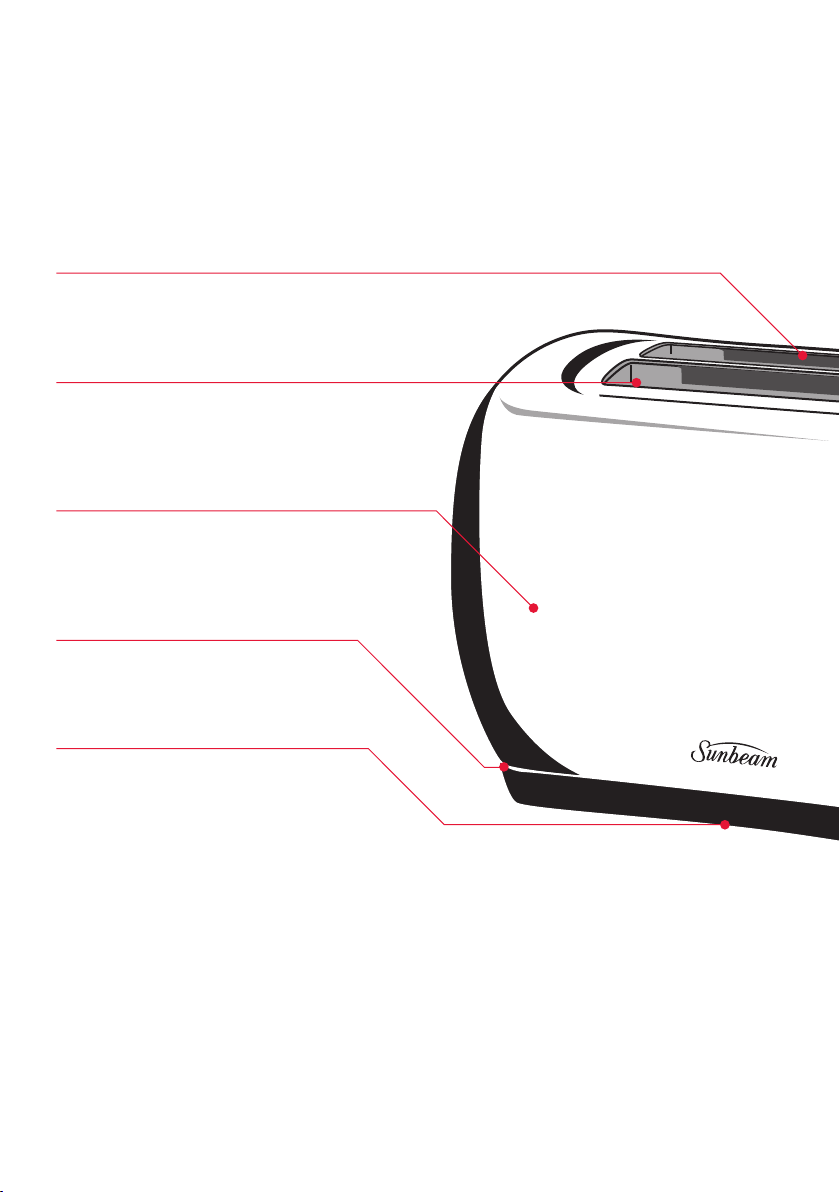
Features of your Quantum Toaster
Extra wide bread slots
Enables you to toast a large variety of breads both
thick and thin, bagels, crumpets and muffins.
Self-centring bread slots
Whether you are toasting thick or thin bread,
your bread will always be held in the centre of
the slot to ensure even toasting.
Cool touch exterior
Remains cool to touch preventing burns and
plastic wrappers clinging to the side of your
toaster.
Removable crumb tray
Pulls out from underneath your toaster
for easy removal of crumbs.
Cord storage
The cord can be wrapped underneath
for safe and convenient storage.
2
Page 6
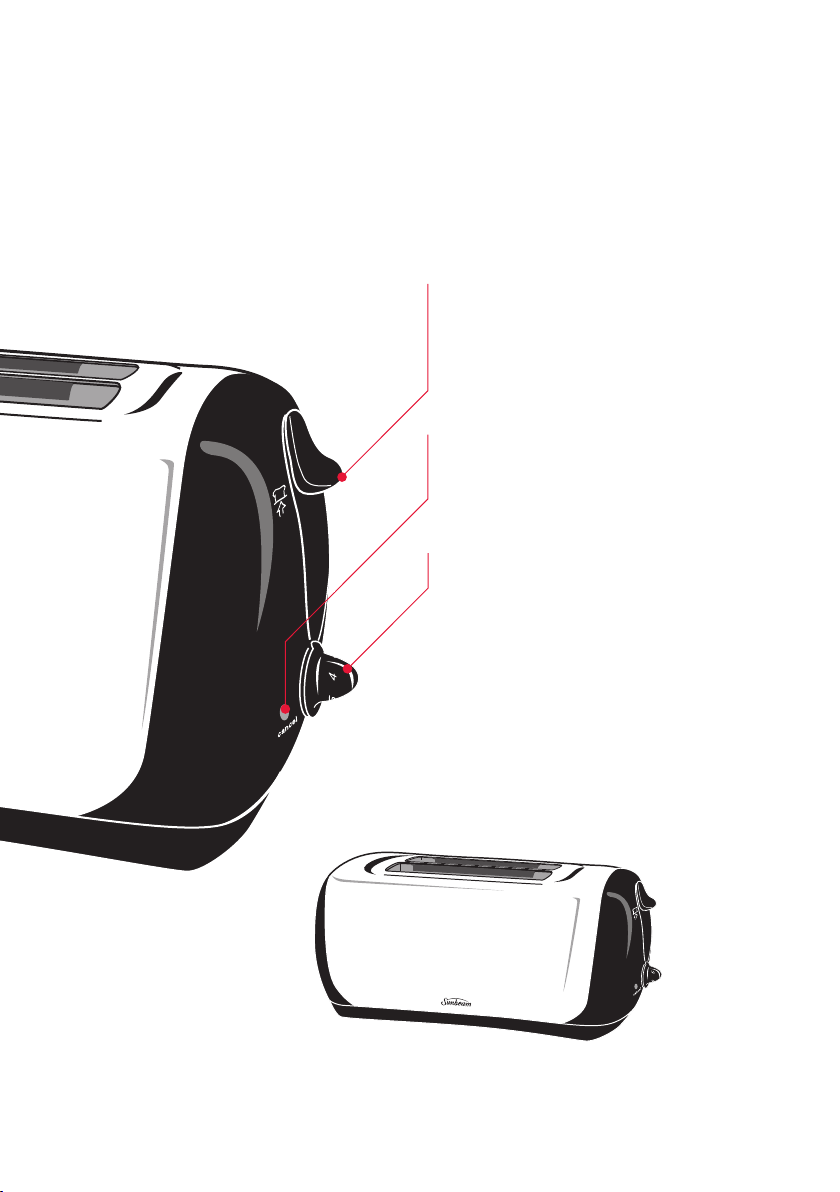
High-lift and toasting lever
Raises the toast above the starting position
so you can remove the toast from the toaster
without burning your fingers. Ideal for
crumpets and muffins.
Cancel button
Immediately interrupts any toasting cycle and
pops the toast up.
Electronic browning control
Variable toast settings from 1 - 6, toasts the
bread to your desired colour everytime.
Quantum 4 Slice Toaster - TA3420 & TA3420B
3
Page 7

Using your Quantum toaster
Plug the toaster into a 230-240 volt AC
power outlet and switch the power on.
Toasting Bread
1. Position the bread into the bread slot.
2. Select the desired colour setting using the
Electronic Browning Control.
Important: Do not toast stale bread, rice
crackers or similar on a high setting as they
may catch fire.
3. Push the Toasting Lever down to
commence the toasting cycle.
4. When the desired browning is achieved,
the toaster will automatically turn off and
pop the toast up. If you need to remove the
toast before the cycle is complete, then
press the Cancel button. The Cancel button
will immediately interrupt the toasting
cycle and pop the toast up.
5. To remove small pieces of toast or bagels,
use the High-lift Lever to lift the toast
above the starting position. This will
prevent burning your fingers as you remove
the toast.
4
Page 8

Toaster functions
Cancel button
The Cancel button immediately stops any of
the toasting cycles. As a consequence of this,
the toast will pop up.
High-lift lever
When toasting small pieces of bread,
crumpets or muffins we recommend using
the High-lift Lever to prevent you from
burning your fingers.
Toasting frozen bread
Turn the Electronic Browning control dial to
the Frozen setting. This function will toast
your frozen bread. The colour of your toast
on the Frozen setting will brown to setting
3 or 4.
Reheat feature
Turn the Electronic Browning control dial to
the ‘MIN’ setting. This feature allows toast to
be reheated once already toasted.
Toasting one or two pieces of bread in your
Quantum 4 Slice Toaster
Position the bread in the middle of the bread
slot. When toasting two pieces, position one
piece in the centre of each bread slot.
If your bread jams in the toaster, switch
power off, remove the plug from the power
outlet and ease the bread out of the toaster
Toasting in your toaster
If your bread jams in the toaster, switch
power off, remove the plug from the power
outlet and ease the bread out of the toaster.
Ensure muffins or bagels are cut into even
halves and fit freely into the bread slot. Do
not force them into the toaster.
WARNING: Never attempt to extract jammed
toast, muffins, bagels or crumpets with a knife
or any other metal object, as contact with the
live element may cause electrocution.
5
Page 9

Care and cleaning
Always turn the power OFF and remove the
plug from the power outlet after use and
before cleaning your toaster.
To clean the exterior.
Wipe exterior with a slightly dampened cloth
and polish with a soft dry cloth.
Do not use metal scourers or abrasives as this
may scratch the exterior surface.
Removable Crumb Tray.
To remove the crumbs, simply slide out the
tray, empty and place it back in the toaster.
Important: Clean the crumb tray regularly.
Do not allow crumbs to accumulate, as they
may cause a potential fire hazard.
To clean the toaster interior.
Clean inside the toaster regularly. To do this,
unplug the appliance, turn it upside down
over the sink and gently shake all the
crumbs out.
6
Page 10

Notes
Page 11

Notes
Page 12

12 Month Replacement Guarantee
We are so confident of the quality of our product, should
this appliance develop any malfunction within 12 months of
purchase (3 months commercial use) due to faulty materials
or manufacture, we will replace it for you absolutely free.
Should you experience any difficulties
with your appliance, please phone our
customer service line for advice on
1300 881 861 in Australia,
or 0800 786 232 in New Zealand.
Alternatively, simply return the faulty
appliance to your place of purchase,
along with your purchase receipt.
Your Sunbeam 12 Month Replacement
Guarantee naturally does not cover misuse
or negligent handling, and excludes
breakables such as glass or ceramic items,
and normal wear and tear.
Similarly, your 12 Month Replacement
Guarantee does not cover damage to
household surfaces as a result of water
or other substances leaking from your
appliance, nor does it cover freight costs.
In Australia, this guarantee is additional
to the conditions and guarantees which
are mandatory as implied under the
Trade Practices Act 1974 and State
and Territory legislation.
Sunbeam Service Centres
Sunbeam has established a network
of authorised service centres throughout
Australia and New Zealand to provide
quick, convenient service for our
customers.
Should your appliance require repair
or service, either during or after the
guarantee period, contact your nearest
service centre.
For a complete list of Sunbeam’s
authorised service centres:
Australia
www.sunbeam.com.au/service centres
1300 881 861
New Zealand
www.sunbeam.co.nz/service centres
0800 786 232
Page 13

Consumer Hotline
In Australia
Visit www.sunbeam.com.au
Or call 1300 881 861
In New Zealand
Visit www.sunbeam.co.nz
Or call 0800 786 232
is a registered Trademark of Sunbeam.
‘Quantum’ is a trademark of Sunbeam Corporation.
Made in China.
Due to minor changes in design or otherwise,
the product may differ from the one shown in this leaflet.
© Copyright. Sunbeam Corporation Limited 2008.
ABN 45 000 006 771
Sunbeam Corporation is a division of GUD Holdings Ltd.
12/07
Page 14

Contents
Important instructions – retain for
future use.
Sunbeam’s Safety Precautions 1
Features of your Quantum Evo Stainless 2
Using your Quantum Evo Stainless 4
Sunbeam’s 3-Way Safety System 5
Care and Cleaning 6
Page 15

1
If you have any concerns regarding the performance and use of your appliance,
please visit www.sunbeam.com.au or contact the Sunbeam Consumer Service Line.
Ensure the above safety precautions are understood.
Sunbeam’s Safety Precautions
SAFETY PRECAUTIONS FOR YOUR
SUNBEAM KETTLE.
• Boiling water will scald. Do not leave a boiling
or hot kettle near or where children
may touch it.
• Boiling water may be ejected, if overfilled.
• Do not leave the power cord near the edge
of a bench top where children may touch
or pull it.
• Do not move kettle while switched on.
• Always turn the power off and unplug the cord
while the kettle is NOT in use.
• Do not operate the kettle without water.
• Your Quantum Evo Stainless kettle must only
be used with the power base supplied.
• Always operate the kettle on a flat,
level surface.
Sunbeam are very safety conscious when
designing and manufacturing consumer products,
but it is essential that the product user also
exercise care when using an electrical appliance.
Listed below are precautions which are essential
for the safe use of an electrical appliance:
• Read carefully and save all the instructions
provided with an appliance.
• Always turn the power off at the power outlet
before you insert or remove a plug. Remove
by grasping the plug - do not pull on the cord.
• Turn the power off and remove the plug
when the appliance is not in use and
before cleaning.
• Do not use your appliance with an extension
cord unless this cord has been checked
and tested by a qualified technician or
service person.
• Always use your appliance from a power
outlet of the voltage (A.C. only) marked
on the appliance.
• This appliance is not intended for use by young
children or infirm persons unless they have
been adequately supervised by a responsible
adult to ensure that they can use the appliance
safely.
• Young children should be supervised to ensure
that they do not play with the appliance.
• Never leave an appliance unattended while
in use.
• Do not use an appliance for any purpose
other than its intended use.
• Do not place an appliance on or near a hot gas
flame, electric element or on a heated oven.
Do not place on top of any other appliance.
• Do not let the power cord of an appliance hang
over the edge of a table or bench top or touch
any hot surface.
• Do not operate any electrical appliance with
a damaged cord or after the appliance has
been damaged in any manner. If damage is
suspected, return the appliance to the nearest
Sunbeam Appointed Service Centre
for examination, repair or adjustment.
• For additional protection, Sunbeam
recommend the use of a residual current
device (RCD) with a tripping current not
exceeding 30mA in the electrical circuit
supplying power to your appliances.
• Do not immerse the appliance in water
or any other liquid unless recommended.
Page 16

2
Features of your Quantum Evo
Stainless
Two water level gauges
The full length water gauge indicates the volume of
water in the kettle up to 1.7 litres. The two gauges
make the kettle convenient to use for both left and
right handed users.
Stylish stainless steel design
Long life stainless steel to suit any kitchen décor.
2400 watt concealed element
The fast boil 2400 watt element is
concealed in the base of the kettle
for longer element life. The smooth
stainless floor reduces scale build
up and allows for easy cleaning.
Removable mesh filter
Keeps the water clean
of any foreign matter and
is removable for easy cleaning.
Page 17

3
Neon ON/OFF switch with auto cut-out
Lights up to indicate that the kettle is on and
heating. Switches the kettle off automatically
after boiling.
Hinged lid with safety lock
Hinged locking lid opens at the push of a
button for one-handed use and for safety,
locks shut to reduce the chance of accidental
scolding.
360 degree cordless power base
Designed to allow you to place the kettle on
the base in any direction. Convenient for both
left and right handed users.
Cord storage facility
Excess cord can be wound around the cord
storage facility underneath the power base.
3-Way Safety System.
1 – Automatically switches the kettle off after boiling.
2 – Cuts out for boil-dry production.
3 – Shuts down in case of overheating.
Page 18

4
360° power base
Using your Quantum Evo Stainless
Before using your kettle.
It is recommended that you clean your kettle
before use by filling the kettle with water,
up to the maximum level indicator, boil and
discard.
Using your kettle.
1. To fill the kettle, remove it from the power
base and lift the lid, by pressing the button
on the handle. Alternatively, the kettle may
be filled through the pouring spout.
2. Fill the kettle with the desired amount of
water. Always fill the kettle between the
minimum and maximum marks. Too little
water will result in the kettle switching off
before the water has boiled.
NOTE: Do not fill the kettle over the
maximum level, as water may spill out of
the spout when boiling.
3. Push the lid closed firmly until it locks into
position.
4. Place the kettle on the power base and
connect the plug into a 230/240 Volt
AC power outlet. Turn the power ON.
5. Press the ON/OFF button downwards at the
top of the handgrip. The power indicator
light will illuminate to indicate the kettle
is heating. The kettle will switch off
automatically once the water has boiled.
NOTE: Ensure that the ON/OFF switch is
clear of obstructions and the lid is firmly
closed. The kettle will not turn off if the
ON/OFF switch is constrained or if the lid
is left open. Do not remove the kettle from
the power base while in use.
6. Lift the kettle from the power base and
pour the water.
NOTE: Use caution when pouring the water
from your kettle, as boiling water will
scald.
7. The kettle may be stored on the power
base while not in use. The kettle will not
re-boil until the ON/OFF switch is pressed
downward.
NOTE: Ensure the power is turned off at the
power outlet when the kettle is not in use.
Should you accidentally allow the kettle to
operate without water, boil-dry protection
will automatically switch it off. If this
occurs, allow the kettle to cool before
filling with cold water and re-boiling.
Cord Storage Facility.
Excess cord can be stored by winding the
cord around the storage facility underneath
the power base.
Page 19

5
Safety is a major consideration in the
design of a Sunbeam kettle. This is why we
have developed our 3-Way Safety System,
which ensures that your kettle will:
1. Automatically switch off after boiling.
For convenience, safety and energy
efficiency, your Sunbeam kettle will
automatically switch off after boiling.
2. Cut-out for boil-dry protection.
If the kettle is operated without water, it
will automatically cut-out, preventing any
damage to the element.
If this occurs, allow the kettle to cool
before filling with cold water and
re-boiling.
3. Shut-down in case of overheating.
In the event of overheating, the kettle will
automatically shut down to prevent further
damage. Should this occur, take your kettle
to a Sunbeam Service Centre or Appointed
Service Agent.
Sunbeam’s 3-Way
Safety System
Page 20

6
Always disconnect the kettle from the
power outlet before cleaning.
Never immerse the kettle switch area, cord
or power base in water, or allow moisture to
come into contact with these parts.
Removal of mineral deposits.
Mineral deposits in tap water may cause
the interior of the water gauge to discolour.
To remove this build-up, use Sunbeam
Liquid Descaler, a simple to use, non-toxic
cleaner available from Sunbeam Appointed
Service Agents.
Alternatively:
1. Fill the kettle with 3 cups of white vinegar
and the remainder with water and allow to
stand overnight. DO NOT BOIL.
2. Empty the solution from the kettle. Any
stains remaining inside the spout can be
removed by rubbing with a damp cloth. Fill
the kettle with clean water, bring to boil
and then discard the water. Repeat and the
kettle will then be ready to use.
To clean the stainless exterior
The stainless steel surface may be wiped
over with a damp cloth and polished with a
soft dry cloth.
CAUTION: Do not use chemicals, steelwool,
or abrasive cleaners to clean the outside
of the kettle, as these will scratch the
stainless steel surface.
To clean the mesh filter
Press the button on the handle to open the
hinged lid. Grasp the top of the mesh filter
and pull upwards to remove. Wash in warm
soapy water and dry thoroughly before
replacing in the kettle.
Cleaning the concealed heating element
This kettle features a non-corrosive
stainless steel heating element. Over
time, scale may build up on the
concealed element inside the kettle,
causing discolouration that may have the
appearance of rust. Be assured this is
not rust. If this occurs clean with a green
Scotchbrite® scourer or similar and a
suitable abrasive cleaning cream. Rinse
and clean thoroughly with tap water before
using your kettle again.
Care and Cleaning
Page 21

‘Sunbeam’, & ‘Quantum’ are registered trademarks of
Sunbeam Corporation.
Made in China. Due to minor changes in design or
otherwise, the product may differ from the one shown
in this leaflet. Backed by Sunbeam’s 12 Month
Replacement Guarantee and National Service Network.
© Copyright. SUNBEAM CORPORATION LIMITED 2006.
(INCORPORATED IN N.S.W.) A.C.N. 000 006 771
Sunbeam Corporation is a division of GUD Holdings Ltd.
For more information or advice on this or any other
Sunbeam appliance, visit www.sunbeam.com.au or
contact the Sunbeam Consumer Service Line.
Australia 1800 025 059
New Zealand 0800 786 232.
03/06
Page 22

Consumer Hotline
Australia
1800 025 059
New Zealand
0800 786 232
www.sunbeam.com.au
is a registered Trademark of Sunbeam
Corporation Limited. ACN 000 006 771.
© Sunbeam Corporation Limited 2006.
 Loading...