

Page 1
Gelateria
®
Automatic Ice-Cream Maker
Instruction Booklet
GL8200
Please read these instructions carefully
and retain for future reference.
Page 2
Contents
Important instructions – retain for
future use.
Sunbeam’s Safety Precautions 1
Features of your Gelateria 2
Before using your Gelateria 5
Using your Gelateria 6
Handy Hints 9
Tips to making custard based ice-cream 10
Care and Cleaning 11
Recipes 12
Page 3

SAFETY PRECAUTIONS FOR YOUR
SUNBEAM GELATERIA, AUTOMATIC
ICE-CREAM MAKER.
• Do not immerse the paddle motor in water or
any other liquid.
• Always operate on a flat surface.
• Always store the Ice-Cream Maker in an upright
position.
• Ensure that the ventilation slots on either side
of the appliance are not obstructed.
1
Sunbeam’s Safety Precautions
If you have any concerns regarding the performance and use of your appliance,
please visit www.sunbeam.com.au or contact the Sunbeam Consumer Service Line.
Ensure the above safety precautions are understood.
Sunbeam is very safety conscious when
designing and manufacturing consumer products,
but it is essential that the product user also
exercise care when using an electrical appliance.
Listed below are precautions which are essential
for the safe use of an electrical appliance:
• Read carefully and save all the instructions
provided with an appliance.
• Always turn the power off at the power outlet
before you insert or remove a plug. Remove
by grasping the plug - do not pull on the cord.
• Turn the power off and remove the plug
when the appliance is not in use and
before cleaning.
• Do not use your appliance with an extension
cord unless this cord has been checked
and tested by a qualified technician or
service person.
• Always use your appliance from a power
outlet of the voltage (A.C. only) marked
on the appliance.
• This appliance is not intended for use by
persons (including children) with reduced
physical, sensory or mental capabilities, or
lack of experience and knowledge, unless they
have been given supervision or instruction
concerning use of the appliance by a person
responsible for their safety.
• Children should be supervised to ensure that
they do not play with the appliance.
• The temperature of accessible surfaces may be
high when the appliance is operating.
• Never leave an appliance unattended while
in use.
• Do not use an appliance for any purpose
other than its intended use.
• Do not place an appliance on or near a hot gas
flame, electric element or on a heated oven.
• Do not place on top of any other appliance.
• Do not let the power cord of an appliance hang
over the edge of a table or bench top or touch
any hot surface.
• Do not operate any electrical appliance with
a damaged cord or after the appliance has
been damaged in any manner. If damage is
suspected, return the appliance to the nearest
Sunbeam Appointed Service Centre
for examination, repair or adjustment.
• For additional protection, Sunbeam
recommend the use of a residual current
device (RCD) with a tripping current not
exceeding 30mA in the electrical circuit
supplying power to your appliances.
• Do not immerse the appliance in water
or any other liquid unless recommended.
• Appliances are not intended to be operated
by means of an external timer or separate
remote control system.
• This appliance is intended to be used in
household and similar applications such
as: staff kitchen areas in shops, offices and
other working environments; farm houses; by
clients in hotels, motels and other residential
type environments; bed and breakfast type
environments.
Page 4
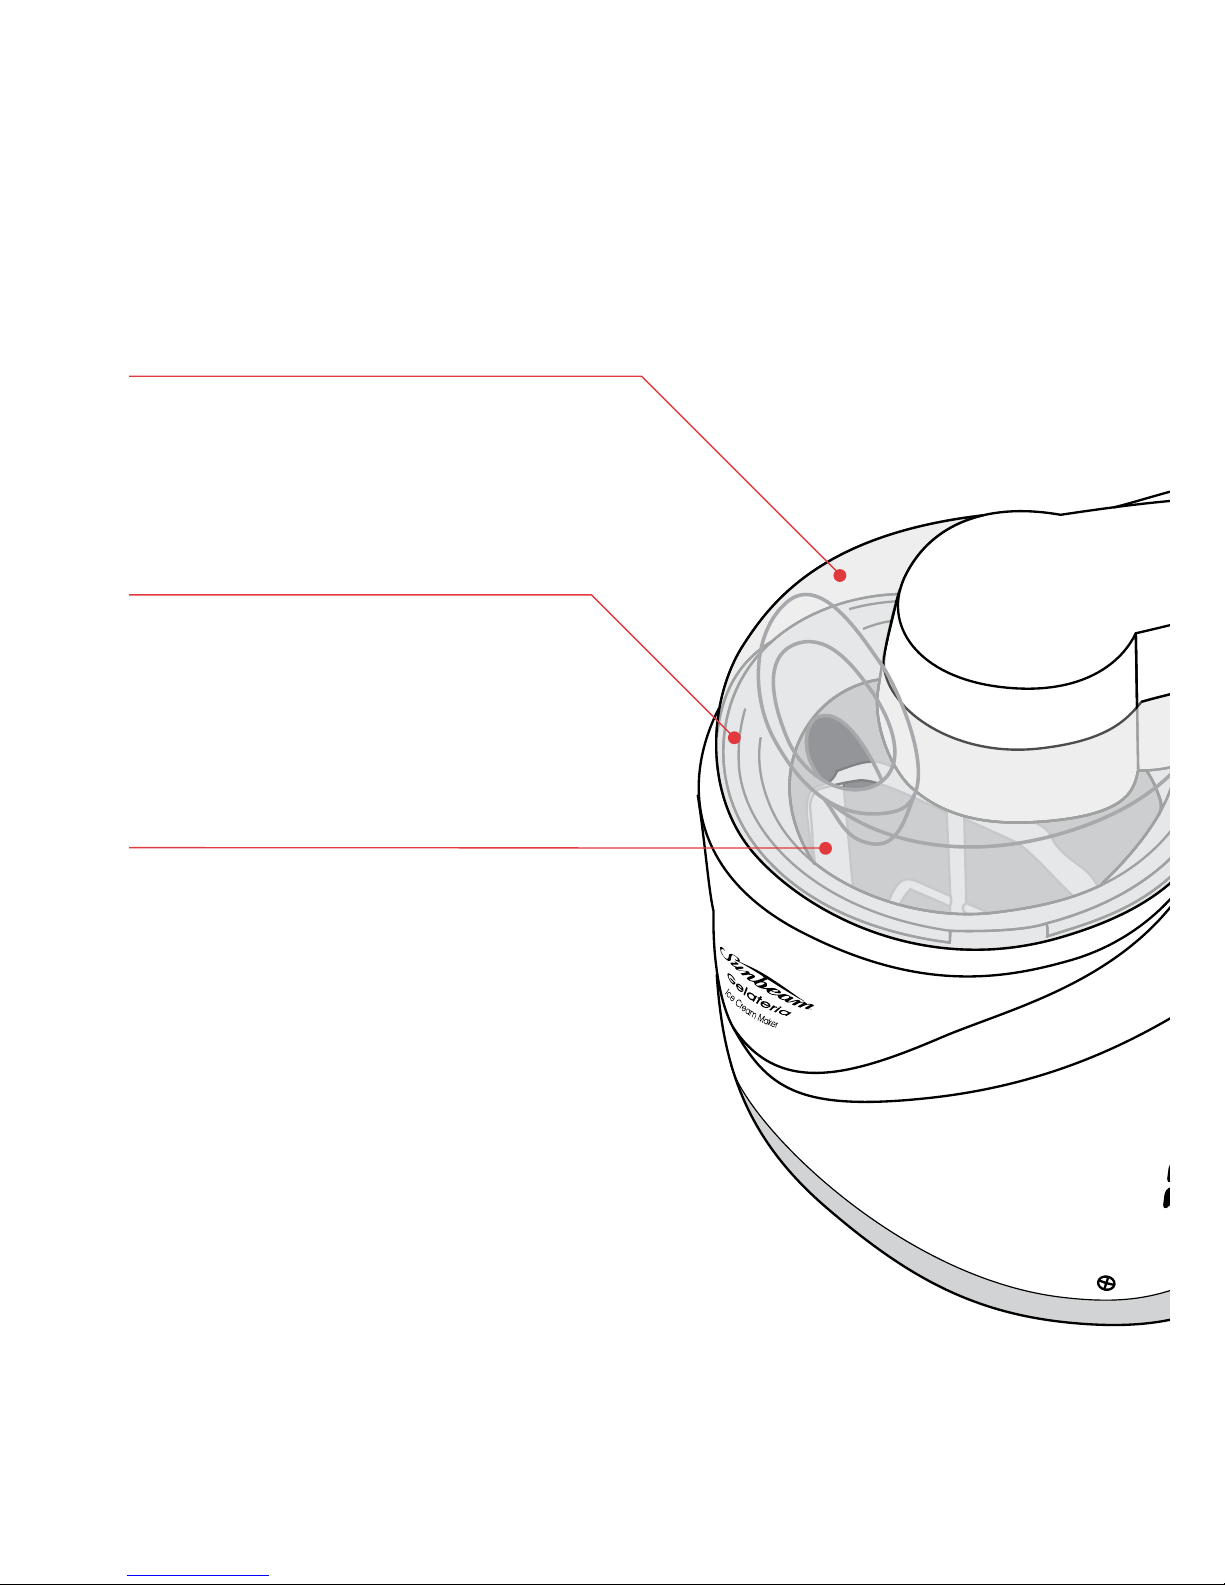
Features of your Gelateria
Transparent lid with pouring hole
Enables easy pouring of ingredients during
the mixing process and its transparency
allows observation of the ice-cream making
process.
Removable cylinder
This 1 Litre metal cylinder with carry handle
is easily removed from the appliance for the
serving of frozen desserts and a quick clean
up.
Paddle
The specially designed paddle guarantees
perfect aeration throughout the ice-cream
mixture, ensuring a deliciously creamy result
every time.
2
Page 5
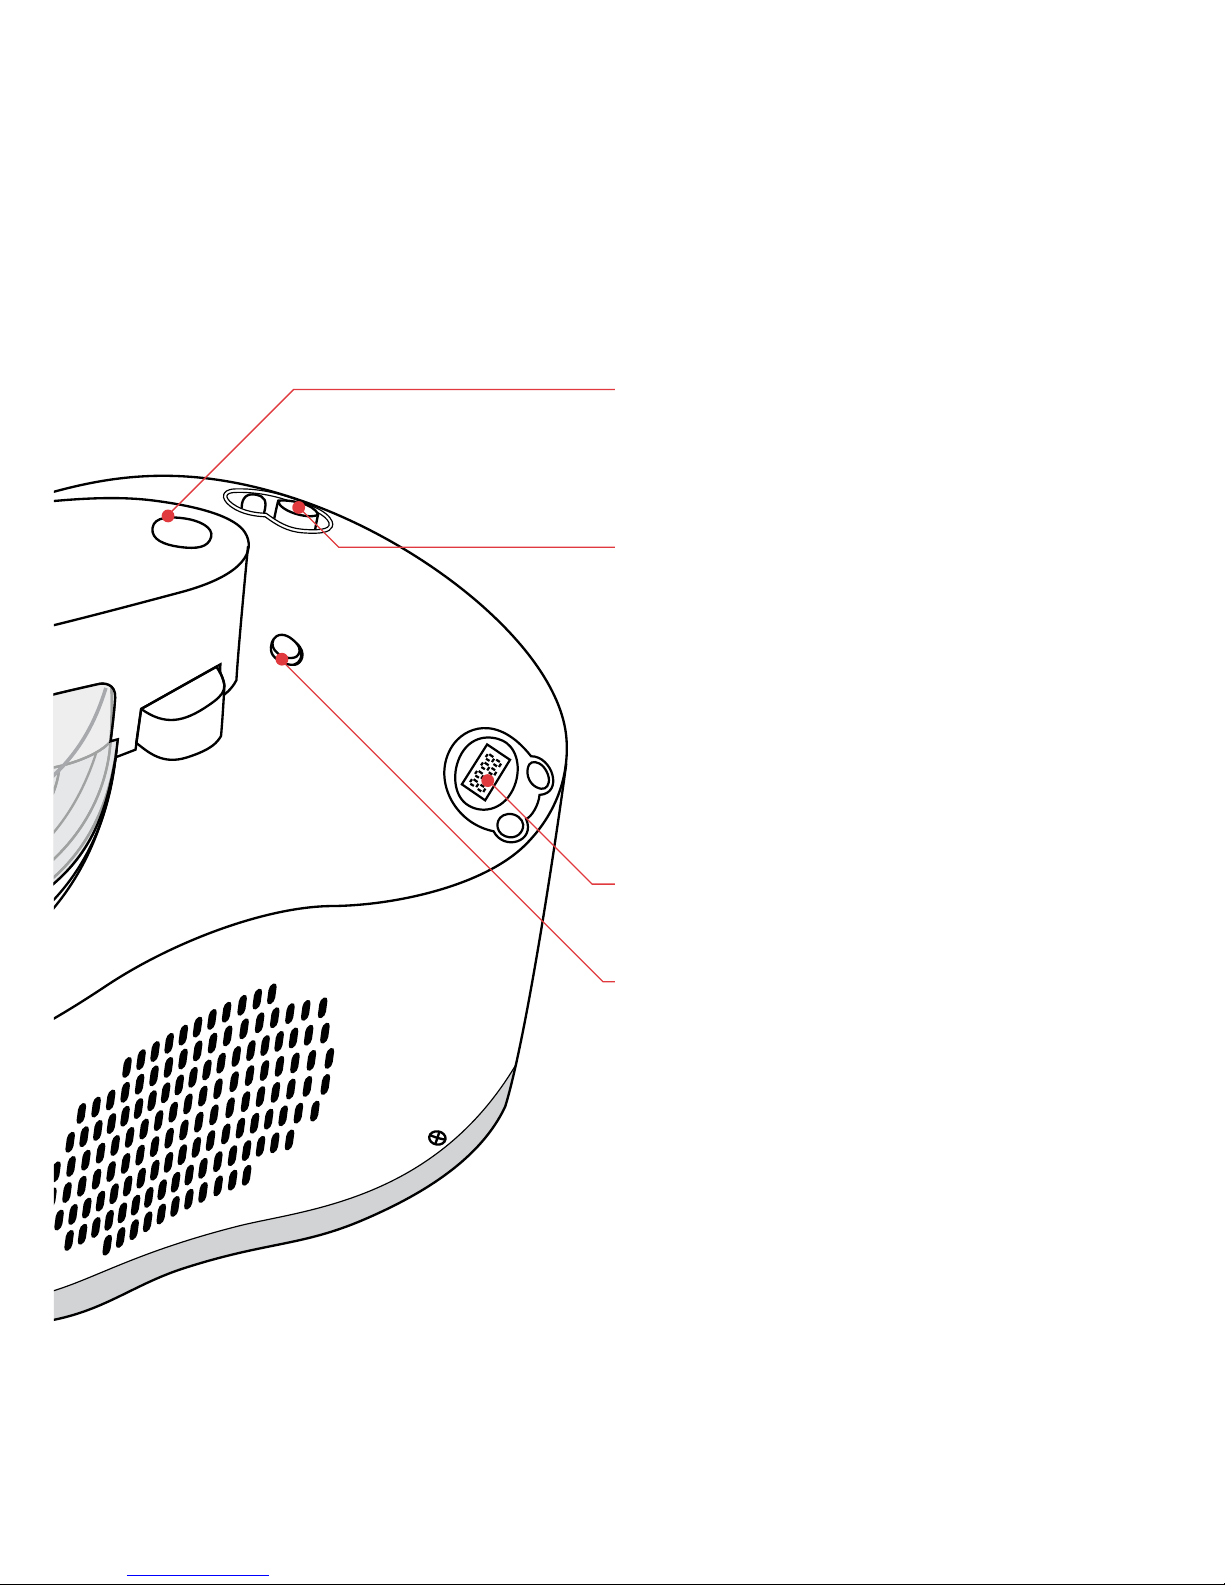
Paddle motor On/Off
Will start the churning of mixture inside the
cylinder, when used in conjunction with the
LED timer.
Chiller On/Off
The appliance is pre-chilled for 5 minutes
to ensure freezing temperatures as low as
-30°C are reached during the churning
process. This is possible due to an internal
compressor which creates the perfect freezing
environment to make frozen desserts at a
moments notice, eliminating the need to prefreeze canisters overnight. The indicator light
shows that the chilling system is operating.
LED timer display
Release button
Pressing the Release button enables the
paddle motor with transparent lid to be
removed from the appliance.
3
Page 6

4
Features of your Gelateria (continued)
LED timer display
Set time - The preselected time for churning
a mixture is displayed on the left side of the
panel in red and remains constant throughout
the churning process. This set time can be
increased with increments of 5 minutes until
a maximum of 60 minutes is reached. In the
event that additional time is required above
60 minutes, the appliance will reset to 5
minutes. Set time will flash to indicate that
the timer has not yet started.
Remaining time - the remaining time for
churning a mixture is displayed on the right
side of the panel in green and will decline
by 1 minute. When
minutes is reached,
the timer will flash and beep for 5 counts,
indicating that the churning will finish in 2
minutes. When the timer has reached the
set churning time, the remaining time will
display
and the timer will beep for 18
counts.
Start/Stop - Pressing the Start button will
commence the timer and rotation of the
paddle. Alternatively, whilst the appliance is
operating, pressing the Stop button will stop
the timer as well as the paddle. Additionally,
pressing the Stop button will cancel the
beeping notice of the timer, if desired.
Timer Select - Allows you to select the time
necessary to make a particular frozen dessert,
with 5 minute increments up to 60 minutes.
When this time is reached, the paddle motor
will switch off automatically and beep for 18
counts.
Page 7

5
HeadingBefore using your Gelateria
Important: Place the Gelateria upright on
a flat surface for at least 12 hours before
using it for the first time, to allow the oil
contained in the compressor to settle. The
same procedure should be followed in the
event that the ice-cream maker has been
accidentally placed in a non-upright position.
1. Before use, thoroughly wash all parts
that will come into contact with the icecream. The fixed stainless steel cylinder
should be cleaned using a damp cloth and
dried thoroughly. The removable cylinder,
transparent lid with pouring hole and
paddle should be washed in warm soapy
water, rinsed and dried thoroughly.
2. When your Ice-Cream Maker is first used,
you may experience an odour and possibly
a slight wisp of smoke from the appliance.
This is released by the insulation material
of the motor when the appliance is heated,
which protects the motor and is a normal
occurrence. After the first few uses, this
will no longer occur.
Page 8
HeadingUsing your Gelateria
1. Position the Ice-Cream Maker on a dry,
level surface, ensuring that the ventilation
slots on either side of the appliance are not
obstructed.
2. Ensure your Ice-Cream Maker is unplugged
from the power outlet before fitting the
connecting parts.
3. Pour a solution of salt and water into
the fixed stainless steel cylinder, using 1
tablespoon (20ml) water and a teaspoon
(5g) salt.
NOTE: The salt solution is recommended in
order to facilitate the transfer of freezing
temperatures from the fixed cylinder to
the removable cylinder and guarantee the
success of the frozen dessert.
4. Insert the removable cylinder inside the
fixed stainless steel cylinder. Be sure
to position the handle of the removable
cylinder in between the locking tab to
prevent the cylinder from moving during
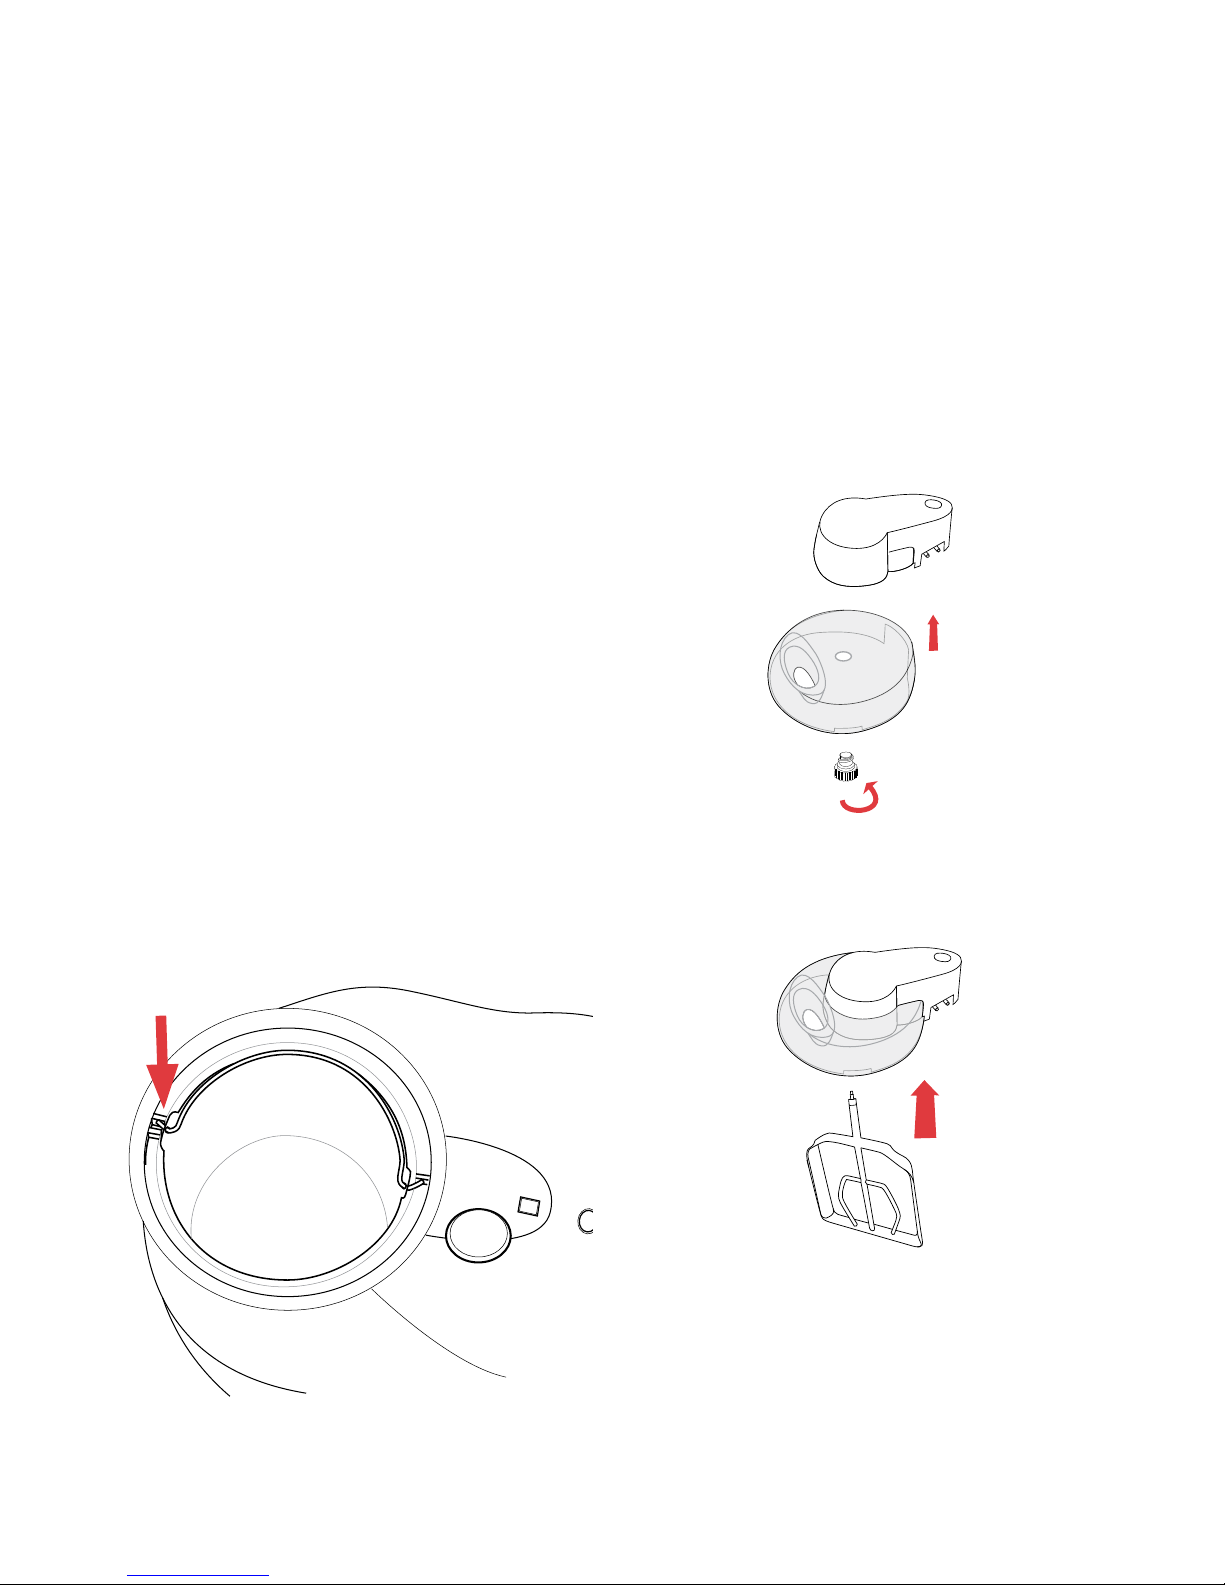
the churning process. See figure 1.
5. Attach the transparent lid with pouring
hole to the base of the paddle motor, using
the round cutout in the centre of both
parts to align correctly. Connect these two
parts together by rotating the plastic screw
in an anti-clockwise direction until firm.
See figure 2.
6. Insert the paddle into the opening at the
base of the paddle motor. See figure 3.
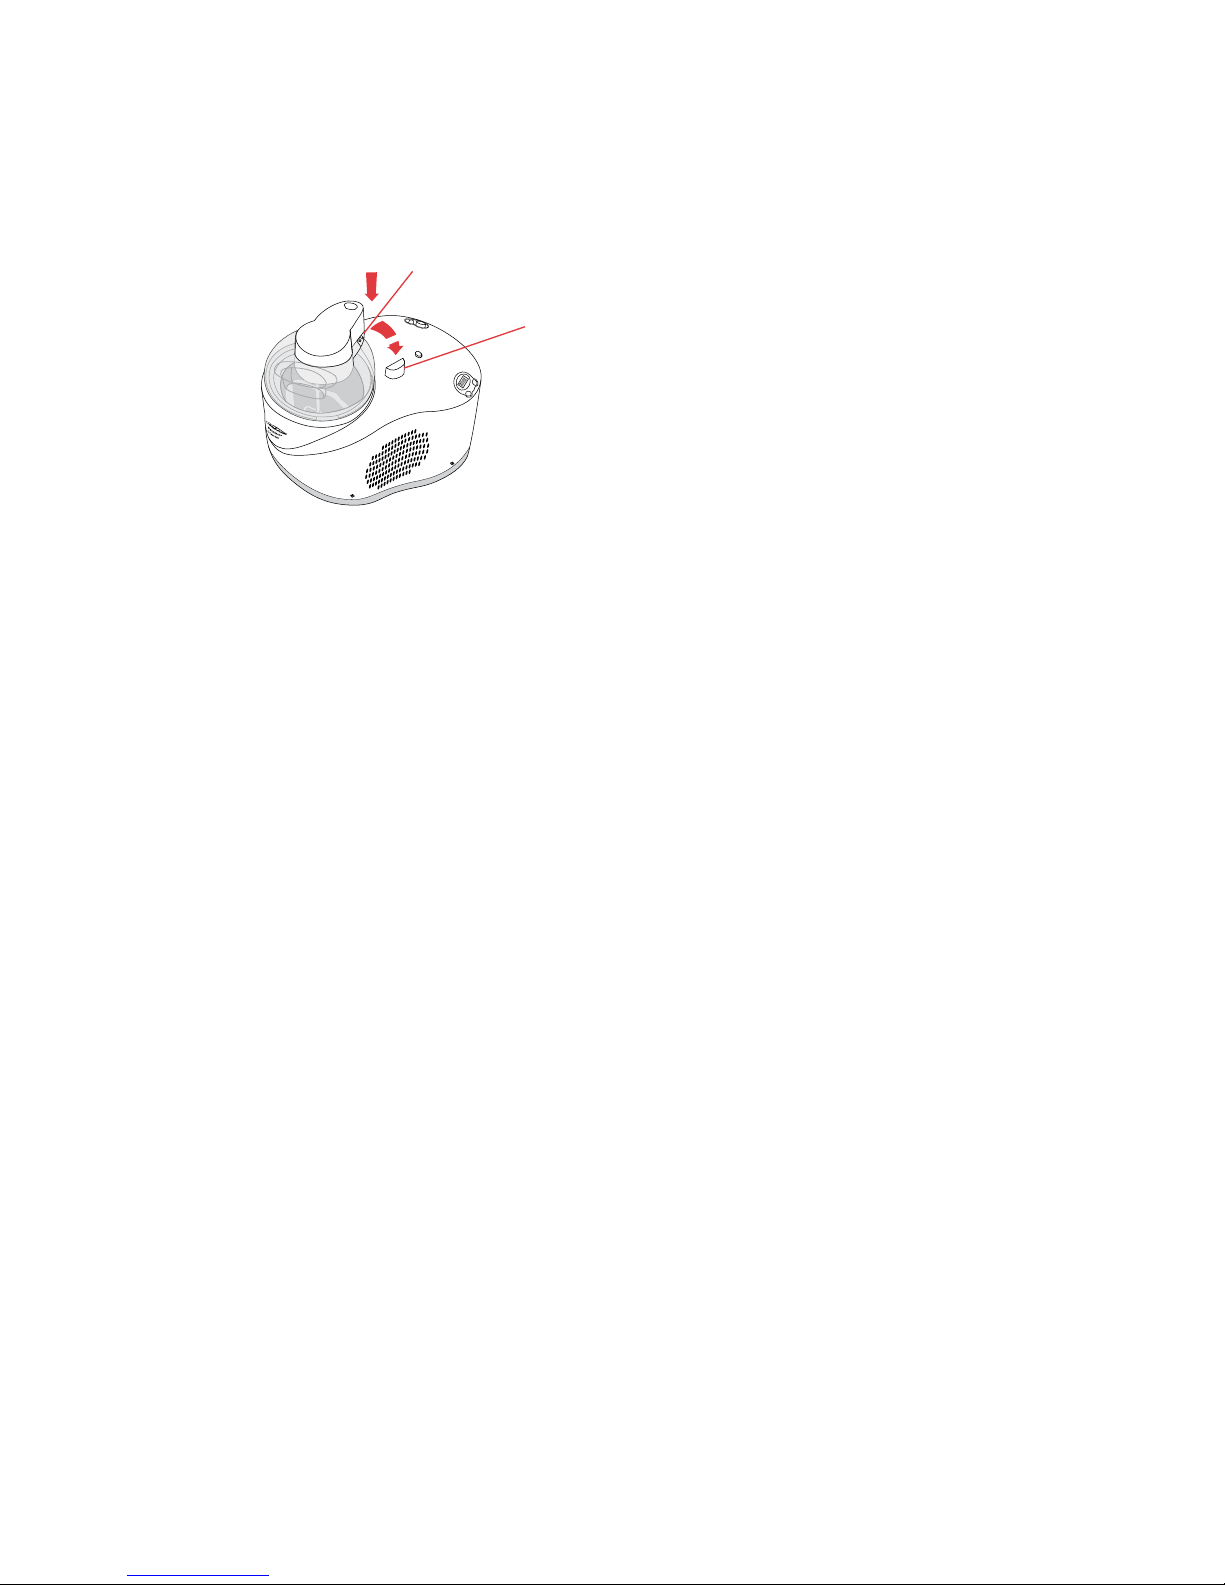
7. Position the paddle motor with paddle over
the cylinder and rotate clockwise until the
connection plug of the paddle motor locks
into the adjacent socket. See figure 4.
Figure 2
Figure 3
6
Figure 1
Locking
Tab
Page 9
7
Heading
8. Plug the power cord into a 230-240 volt
power outlet and turn the power on.
9. Turn the chill switch on. The indicator light
shows that the chilling system is operating.
Wait 5 minutes to allow the appliance to
chill.
NOTE: The LED timer can be used to time 5
minutes. Ensure the paddle motor button is
not depressed.
IMPORTANT: Do not turn off the chill switch
until after the ice-cream is ready. If the
switch is turned off, the chilling process
automatically ceases, jeopardising the
success of the ice-cream. When the chill
switch is turned on again, there will be a 5
minute delay before the chilling process will
recommence.
10. Select the necessary time required to
make the frozen dessert by pressing the
‘Timer Select’ button featured on the
lower right hand corner, of the LED timer
display. The ice-cream making process
generally takes between 25-55 minutes.
The left side of the LED panel will
display the preselected ‘Set Time’ and
will flash continuously until the timer
is turned on. The timer can be set for a
maximum of 60 minutes using 5 minute
increments.
NOTE: When the power is turned on, both
the Set Time and Remaining Time display 5
minutes.
11. Turn the paddle motor on.
12. Press Start on the LED control panel.
13. Pour the prepared frozen dessert mixture
through the pouring hole, into the
cylinder.
NOTE: Do not place hot liquids into the
cylinder. All ingredients should be at
refrigerator temperatures.
14. To add ingredients such as chocolate
chips and raisins, after the mixing
process has begun, gently add them
through the pouring hole on the
transparent lid.
NOTE: Alcohol inhibits the freezing process.
If adding alcohol to a recipe, add when the
mixture is almost frozen. The LED timer is
programmed to beep 5 times, 2 minutes
before the unit is switched off. This is the
ideal time to add alcohol to frozen dessert
mixtures.
15. When the preselected time has
been reached, the timer will beep
consecutively for 18 counts and
the paddle motor will switch off
automatically. This beeping notice can be
cancelled by pressing the ‘Stop’ button
located on the lower left hand corner of
the LED control panel.
NOTE 1: If at any time during the churning
process, the set time is insufficient to achieve
the right consistency for a frozen dessert, the
timer can be increased accordingly. There is
no need to stop the timer.
NOTE 2: If the ice-cream has reached a good
consistency, the paddle rotation reverses
direction, indicating that the ice-cream is
ready. Should this occur prior to reaching the
set time on the LED timer display, the paddle
motor should be turned off and the timer
stopped.
Using your Gelateria (continued)
Figure 4
Connection plug
Socket
Page 10

8
16. Turn the paddle motor off.
17. Turn the chill switch off.
NOTE: If you require slightly denser ice-
cream, leave the chill switch on for a further
5 to 10 minutes. After 10 minutes, the chill
switch should be turned off and the icecream transferred to an airtight container and
placed into the freezer. Leaving the ice-cream
in the cylinder for longer than 10 minutes
will make it difficult to remove.
18. Lightly press the release button and
then remove the paddle motor with
transparent lid by rotating anti-clockwise.
See figure 5.
19. Remove the paddle from the mixture.
20. Remove the removable cylinder from
the appliance. Only use plastic, wooden
or rubber utensils to serve from the
removable cylinder. Metal or sharp
utensils may damage the removable
cylinder.
Using your Gelateria (continued)
Figure 5
Page 11

9
• The time taken to make a frozen dessert
will depend on the ambient temperature of
a room, the appliance and the temperature
of the ingredients added to the removable
cylinder. As a general rule, the cooler these
elements, the faster the frozen dessert
making process. The ice-cream making
process generally takes between 25-55
minutes.
• When following recipes that require the
mixture to be pre-cooked, it is best to
prepare the mixture a day in advance. This
will allow the mixture sufficient time to
cool and expand.
• When preparing dessert mixtures that do
not require pre-cooking, always use an
electric mixer for maximum aeration.
• Foods such as cream, sugar, eggs and milk
are often the key ingredients in any icecream mixture. They may be substituted
with similar ingredients to suit your taste
and dietary requirements. For example,
different varieties of cream may be used,
which will produce varying flavours and
textures.
• Due to an increase in volume during
preparation, the maximum amount of
liquid mixture should not exceed 850ml.
However, sorbets do not expand as much
therefore can be up to 900ml. If using your
own recipes, adapt the volume of mixture
to these amounts. This 850ml will create
approximately 1 Litre.
• Alcohol inhibits the freezing process. If
adding alcohol to a recipe, add when the
mixture is almost frozen. The best way to
judge this, is when the mixture reaches the
top of the cylinder.
• The flavour of a sorbet will depend greatly
on the ripeness and sweetness of the fruit
and/ or juice. If a fruit is too tart, add a
little extra sugar in the sugar syrup: if the
fruit is very ripe, decrease the sugar in the
sugar syrup a little. Remember that once
frozen, your recipe will not be quite as
sweet as the original mixture.
• The consistency of the ice-cream/sorbets
will be a spoonable consistency when
finished. We recommend however placing
mixture in the freezer for a further 2 hours
before serving if using ice-cream cones.
• Artificial sweeteners may be used as a
substitute for sugar, but must be added
to cool or room temperature mixtures. If
the recipe calls for sugar to be dissolved
over heat and you wish to use an artificial
sweetener, then you should omit this
process. Simply stir the sweetener into the
cool mixture until dissolved.
• We recommend that you should use
an artificial sweetener that is in equal
proportion to sugar.
• When storing your frozen dessert, ensure
the container is no larger than 1 Litre and
well sealed. This will prevent ice crystals
forming inside the container.
• Frozen desserts may be stored in the
freezer for up to 2 weeks.
• If serving from the freezer, allow the
ice-cream to sit out at room temperature
for 5-10 minutes; this will make serving
easier.
Handy Hints
Page 12

10
Tips to making custard based
ice-cream
A traditional creamy ice-cream is made from
a custard base. Here are some steps to help
you achieve perfect custard every time.
• Make sure the eggs are fresh and are at
room temperature.
• Have your ingredients measured out and
ready so that you are not leaving anything
waiting.
• Using a wire whisk or electric hand mixer,
beat the egg yolks and sugar in a large
deep bowl for about 3-4 minutes or until
light and creamy. The colour will go quite
light.
• Place the milk/cream required for the
recipe in a saucepan.
• Heat the milk mixture on a low/medium
heat until the mixture looks like it is
almost about to boil. A good guide is when
little bubbles start to appear around the
edges of the milk. Be careful not to boil.
Should you boil the milk you will need to
start again.
• Using a wire whisk, whisk the hot milk
mixture gradually into the egg mixture
making sure that the two are well
combined.
• Return the mixture into a clean saucepan
and cook over a low heat, stirring
constantly with a wooden spoon. The
custard mixture is ready when it thickens
and coats the back of a spoon. To test this
place the wooden spoon into the custard
mixture then turn the spoon over. Run your
finger once down the back of the spoon. If
the custard is thick enough it will keep the
finger mark, if it is still runny the mixture
will either not grab onto the back of the
spoon and look very thin or the finger mark
will not stay.
• If the mixture separates or curdles then
heat is too high.
• Do not leave the custard unattended while
cooking.
• The custard will take anywhere from 5-15
minutes to thicken depending on the type/
size of saucepan used. It is best to use a
low heat as different stove types will vary
greatly in heat.
• Once the custard has thickened, transfer
the mixture into a heat proof bowl. Allow
the mixture to cool before placing into
the refrigerator, cover and chill for several
hours before use.
Page 13

11
Care and Cleaning
• Always turn the power off and remove the
plug from the power outlet after use and
before cleaning.
• Transparent lid with pouring hole and
paddle may be placed on the top shelf
of the dishwasher. Plastic screw may
be placed in the cutlery tray of the
dishwasher.
• The removable aluminium cylinder should
be washed in warm soapy water, rinsed
well and dried thoroughly.
• The fixed stainless steel cylinder should
be cleaned using a damp cloth to remove
the salt water solution and then dried
thoroughly.
• The paddle motor and surface of the
appliance can be cleaned by using a damp
cloth.
• Do not use sharp objects or metal utensils
inside the removable cylinder. Sharp
objects will scratch and damage the inside
of the removable cylinder. A plastic,
wooden or rubber spoon, or spatula, may
be used when the appliance is in the ‘OFF’
position.
• Never immerse the appliance, including
the paddle motor, in water.
Page 14

12
HeadingRecipes
Basic Vanilla Ice-cream 1 Makes 1 litre
1 cup (250ml) milk
2 cups (500ml) thickened cream
1 vanilla bean, seeds scraped*
5 egg yolks
½ cup (110g) caster sugar
1. Combine milk and cream in a saucepan.
Split vanilla bean in half lengthways.
Scrape out the seeds; add the pod
and the seeds to the saucepan.
Bring the mixture to simmering point
over low heat.
2. Whisk egg yolks and sugar together for
3-4 minutes, until light and creamy.
3. Gradually whisk in hot milk mixture into
yolk mixture until well combined.
4. Return the mixture into a clean
saucepan and cook, stirring constantly
with a wooden spoon, over low heat until
mixture thickens and coats the back of
the spoon.
5. Transfer mixture to a bowl and remove
vanilla pod. Allow to cool before placing
in the fridge to chill for several hours.
6. Position the Automatic Ice-cream Maker
as directed on pages 6-8. Turn unit on;
add mixture through the pouring hole.
7. Mixture will be ready once the paddle
starts to rotate in the other direction,
this will take about 25 minutes.
* Vanilla bean can be substituted with
2 teaspoons of vanilla essence
Variations to this recipe:
Chocolate Ice-cream Makes approx. 1 litre
1 quantity basic vanilla ice-cream 1
150g chopped dark chocolate
1. Follow steps 1-7 for basic vanilla icecream 1, heating the dark chocolate with
the cream and milk.
2. Omit vanilla bean.
Rum & Raisin Ice-cream Makes approx. 1 litre
1 quantity basic vanilla ice-cream 1
1
/3 cup (55g) chopped raisins
2 tablespoons rum
1. Follow steps 1-7 for basic vanilla icecream 1. Omit vanilla bean.
2. Soak
1
/3 cup (55g) chopped raisins with
2 tablespoons of rum for 1 hour.
3. At 2 minute timer check to see if
mixture is almost at the top of the
cylinder. This should take about 25
minutes. If so add the raisins and rum
or if not increase timer for a little longer.
The raisins and rum should only be
added once the mixture has almost come
to the top of the cylinder.
NOTE: Because of the addition of alcohol in
this mixture, it may not force the paddle to
rotate in the opposite direction; the best way
to judge if this recipe is ready is when the
mixture comes up to the top of the bowl.
Page 15

13
Heading
Recipes (continued)
Variations to basic vanilla ice-cream 1
continued:
White Chocolate
Ice-cream Makes approx. 1 litre
1 quantity basic vanilla ice-cream 1
150g chopped white chocolate
50g finely chopped white chocolate, extra
1. Follow steps 1-7 for basic vanilla icecream 1, on page 12. Heat the white
chocolate with the cream and milk. Omit
vanilla bean.
2. Add finely chopped chocolate to the
custard mixture through the pouring hole
when churning.
Peppermint Choc Chip Ice-cream
1 quantity basic vanilla ice-cream 1
1-2 teaspoons peppermint essence
1
/3 cup finely chopped dark chocolate
green food colouring (optional)
1. Follow steps 1-7 for basic vanilla icecream 1, on page 12. Omit vanilla bean.
2. Add peppermint essence to mixture
before churning.
3. Add finely chopped chocolate and food
colouring to the custard mixture through
the pouring hole when churning.
Basic Vanilla Ice-cream 2 Makes approx.800ml
1 cup (250ml) milk
1 cup (250ml) thickened cream
1 Vanilla Bean*
4 egg yolks
½ cup (110g) caster sugar
1. Combine milk and cream in a saucepan.
Split vanilla bean in half lengthways.
Scrape out the seeds and add the pod
and the seeds to the saucepan. Bring
the mixture to simmering point over low
heat.
2. Whisk egg yolks and sugar together for
3-4 minutes, until light and creamy.
3. Gradually whisk in hot milk mixture into
yolk mixture until well combined.
4. Return the mixture into a clean
saucepan and cook, stirring constantly
with a wooden spoon, over low heat until
mixture thickens and coats the back of
the spoon. Do not allow mixture to boil
or it will curdle.
5. Transfer mixture to a bowl and remove
vanilla pod. Allow to cool before placing
in the fridge to chill for several hours.
6. Position the Automatic Ice-Cream Maker
as directed on pages 6-8. Turn unit on;
add mixture through the pouring hole.
7. Mixture will be ready once the paddle
starts to rotate in the other direction,
this will take about 25 minutes.
* Vanilla bean can be substituted with 2
teaspoons of vanilla essence
Page 16

14
Heading
Recipes (continued)
Variations to basic vanilla ice-cream 2:
Coffee Ice-cream Makes 850ml
1 quantity basic vanilla ice-cream 2
60ml strong fresh espresso
1. Follow steps 1-7 for basic vanilla icecream 2, on page 13. Heating the coffee
with the cream and milk.
2. Omit vanilla bean.
Mango Ice-cream Makes approx. 1 litre
1 quantity basic vanilla ice-cream 2
300g fresh or frozen mango flesh, pureed
1. Follow steps 1-7 for basic vanilla icecream 2, on page 13. Omit vanilla bean.
2. Once custard is cold, stir through mango
puree and chill until ready to churn.
Strawberry Ice-cream Makes approx. 1 litre
1 quantity basic vanilla ice-cream 2
500g strawberries, hulled
¼ cup (55g) caster sugar
1. Follow steps 1-7 for basic vanilla icecream 2, on page 13. Add strawberry
mixture in step 6. Omit vanilla bean.
2. To make strawberry mixture process
strawberries in a food processor until
smooth. Press mixture through a fine
sieve; discard seeds.
3. Place strawberry puree and extra sugar
in a saucepan and stir over a low heat
until the sugar has dissolved. Increase
heat and boil, stirring occasionally, for
about 8 minutes or until the mixture has
reduced to 1 cup. Transfer to a heatproof
bowl or jug; chill for several hours.
4. Once custard is cold; stir through
strawberry mixture and chill until ready
to churn.
Choc Hazelnut Ice-cream Makes approx. 900ml
1 quantity basic vanilla ice-cream 2
¼ cup chocolate hazelnut spread
4 Ferrero Rocher Chocolates
1. Follow steps 1-7 for basic vanilla icecream 2, on page 13. Heat the hazelnut
spread with the cream and milk. Omit
vanilla bean.
2. Place chocolates into a small clean
plastic bag and crush with a mallet or
rolling pin. Add to the custard mixture
through the pouring hole when churning.
Quick Mix
Vanilla Ice-cream Makes approx. 1 litre
1½ cups (375 ml) milk
200g condensed milk
¾ cup (180ml) cream
1 teaspoon vanilla essence
1. Combine milk, condensed milk, cream
and vanilla essence together in a bowl;
mix well.
2. Refrigerate mixture until completely
chilled.
3. Position the Automatic Ice-Cream Maker
as directed on pages 6-8. Turn unit on;
add mixture through the pouring hole.
4. Mixture will be ready once the paddle
starts to rotate in the other direction,
this will take about 35 minutes.
Page 17

15
Heading
Recipes (continued)
Variations to quick mix vanilla ice-cream:
Choc-Nut Praline
Ice-cream Makes approx. 1.25 litres
1 quantity quick mix vanilla ice-cream
1 cup (220g) caster sugar
½ cup (125ml) water
½ cup (100g) dark chocolate, chopped finely
¼ cup (35gm) toasted flaked almonds
1. Follow steps 1-4 for quick mix vanilla
ice-cream on page 14.
2. Meanwhile, combine sugar and water in
a small heavy-based saucepan; stir over
low heat until sugar dissolves. Increase
heat; boil, uncovered, without stirring,
about 10 minutes or until syrup is a
deep golden colour.
3. Pour toffee mixture into a 20cm x 20cm
square pan; stand 5 minutes. Sprinkle
chocolate over hot toffee, spreading
with a spatula as chocolate melts, to
completely cover toffee. Sprinkle with
almonds; refrigerate for approximately
20 minutes or until set. Break chocnut praline into shards; pulse in a food
processor until coarsely chopped.
4. Once the ice-cream is finished stir
through 1 cup of the praline mixture;
stir to combine. Spoon into a plastic
container; cover and freeze until firm.
5. Sprinkle the remaining choc-nut praline
on top of ice-cream when serving.
Rocky Road
Ice-cream Makes approx. 1.2 litres
1 quantity quick mix vanilla ice-cream
1 cup (50g) mini marshmallows
100g dark chocolate, chopped coarsely
¼ cup (20g) shredded coconut, toasted
1. Follow steps 1-4 for quick mix vanilla
ice-cream on page 14.
2. Combine marshmallow, chocolate,
coconut in a large bowl.
3. Once the ice-cream is finished stir
through the marshmallow mixture. Spoon
into a plastic container; cover and freeze
until firm.
Coconut Ice-cream Makes approx. 1 litre
1 quantity of quick mix vanilla ice-cream,
omitting 1 cup of the milk
1 cup (250ml) light coconut milk
1 tablespoon desiccated coconut
1. Follow steps 1-4 for quick mix vanilla
ice-cream, on page 14, reducing the
milk to ½ cup (125ml) and replacing
with the coconut milk.
2. Add desiccated coconut to the mixture
through the pouring hole when churning.
Page 18

16
Low Fat Makes approx.
Vanilla Ice-cream 750ml (630g)
1½ teaspoons gelatine
2 tablespoons boiling water
400ml skim milk
100ml thickened light cream 18% milk fat
¼ cup (55g) caster sugar
2 teaspoons vanilla essence
1. Mix gelatine with boiling water and sir
until dissolved.
2. Combine milk, cream, sugar and vanilla
in a saucepan. Bring the mixture to
simmering point over low heat; stirring
occasionally until sugar dissolves.
3. Remove from heat and add the gelatine
mixture; mix well.
4. Refrigerate until completely chilled.
5. Position the Automatic Ice-Cream Maker
as directed on pages 6-8. Turn unit on;
add mixture through the pouring hole.
6. Mixture will be ready once the paddle
starts to rotate in the other direction,
this will take about 30 minutes.
Nutritional information per 100g
397kj; 3.1g total fat; 2g sat fat; 3.9g
protein; 13g carbohydrates; 13g sugars
Variations to low fat vanilla ice-cream:
Low Fat Makes approx.
Chocolate Ice-cream 750ml (680g)
1 quantity low fat vanilla ice-cream
¼ cup (30g) cocoa powder
¼ cup (55g) caster sugar
1. Follow steps 1-6 for low fat vanilla icecream, gently whisking the cocoa powder
and sugar into the hot milk until dissolved.
Nutritional information per 100g
560kj; 3.4g total fat; 2.2g sat fat; 4.4g
protein; 21g carbohydrates; 20g sugars
Low Fat Strawberry Makes approx.
Ice-Cream 1 litre (1180g)
1 quantity low fat vanilla ice-cream
500g strawberries, hulled
¼ cup (55g) caster sugar
1. Follow steps 1-6 for low fat vanilla icecream adding strawberry mixture in step 5.
2. To make strawberry mixture, process
strawberries in a food processor until
smooth. Press mixture through a fine sieve;
discard seeds.
3. Place strawberry puree and extra sugar in
a saucepan and stir over a low heat until
the sugar has dissolved. Increase heat
and boil, stirring occasionally, for about 8
minutes or until the mixture has reduced to
1 cup. Transfer to a heatproof bowl or jug;
chill for several hours.
4. Combine the ice-cream mixture and
strawberry mixture in a jug.
Nutritional information per 100g
326kj; 1.7g total fat; 1.1g sat fat; 2.8g
protein; 13g carbohydrates; 13g sugars
Recipes (continued)
Page 19

17
Reduced Fat Basic Vanilla Makes approx
Ice-cream 1 litre (1000g)
This recipe is 40% less fat than our original
Basic Vanilla Ice-cream 1 recipe on page 12.
1 cup (250ml) skim milk
2 cups (500ml) thickened light cream 18%
milk fat
1 vanilla bean, seeds scraped*
5 egg yolks
½ cup (110g) caster sugar
1. Combine milk and cream in a saucepan.
Split vanilla bean in half lengthways.
Scrape out the seeds; add the pod and the
seeds to the saucepan. Bring the mixture
to simmering point over low heat.
2. Whisk egg yolks and sugar together for 3-4
minutes, until light and creamy.
3. Gradually whisk in hot milk mixture into
yolk mixture until well combined.
4. Return the mixture into a clean saucepan
and cook, stirring constantly with a wooden
spoon, over low heat until mixture thickens
and coats the back of the spoon.
5. Transfer mixture to a bowl and remove
vanilla pod. Allow to cool before placing in
the fridge to chill for several hours.
6. Position the Automatic Ice-cream Maker as
directed on pages 6-8. Turn unit on; add
mixture through the pouring hole.
7. Mixture will be ready once the paddle
starts to rotate in the other direction, this
will take about 25 minutes.
*Vanilla bean can be substituted with 2
teaspoons of vanilla essence
Nutritional information per 100g
787kj; 12.5g total fat; 7.4g sat fat; 4.7g
protein; 15g carbohydrates; 15g sugars
Dairy & Egg Free Makes approx
Vanilla Ice-cream 1 litre (810g)
This recipe is also low in fat
2 teaspoons gelatine
¼ cup (60ml) apple juice
¼ cup (90g) honey
2½ cups (625ml) Vanilla Soy milk
or Rice milk
2 teaspoons vanilla essence
1. In a small bowl, sprinkle gelatine over
apple juice. Stir until gelatine dissolves
and softens.
2. Combine honey and milk in a saucepan.
Bring the mixture to simmering point
over low heat; stirring occasionally until
honey dissolves.
3. Remove from heat and add the gelatine
mixture & vanilla; mix well.
4. Refrigerate mixture until completely
chilled.
5. Position the Automatic Ice-Cream Maker
as directed on pages 6-8. Turn unit on;
add mixture through the pouring hole.
6. Mixture will be ready once the paddle
starts to rotate in the other direction.
Nutritional information per 100g
416kj; 2.5g total fat; 0.2g sat fat; 2.9g
protein; 16g carbohydrates; 14g sugars
Recipes (continued)
Page 20

18
Vegan Ice-cream Makes approx 1 litre
300g firm silken tofu
2 cups (500 ml) Soya milk or Rice milk
1
/3 cup maple syrup or brown rice syrup
2 teaspoons vanilla essence
1. Combine all ingredients in a food
processor or blender. Process until
thoroughly combined and smooth.
2. Refrigerate mixture until completely
chilled.
3. Position the Automatic Ice-Cream Maker
as directed on pages 6-8. Turn unit on;
add mixture through the pouring hole.
4. Mixture will be ready once the paddle
starts to rotate in the other direction.
No Added Sugar Makes approx
Ice-cream 1 litre (740g)
This recipe is also low in fat
1 cup (250 ml) Evaporated Skim milk
¼ cup sugar replacement
1½ cup (375 ml) skim milk
4 egg yolks
2 teaspoons vanilla essence
1. Combine ingredients in a large mixing
bowl and mix well.
2. Refrigerate mixture until completely
chilled.
3. Position the Automatic Ice-Cream Maker
as directed on pages 6-8. Turn unit on;
add mixture through the pouring hole.
4. Mixture will be ready once the paddle
starts to rotate in the other direction.
Nutritional information per 100g
328kj; 2.8g total fat; 0.9g sat fat; 6.8g
protein; 6.5g carbohydrates; 6.5g sugars
Gelato
There are many different styles of gelato;
we have chosen two styles, sugar syrup and
custard based. Sugar syrup gelato has a light
refreshing taste with a hint of creaminess
to them while a custard base gelato has
creamier texture but is lighter than ice-cream.
Sugar Syrup makes 1 ½ cups
1 cup (250ml) water
1 cup (220g) caster sugar
1. Place the water and sugar in a small
saucepan.
2. Stir over a low heat until the sugar
dissolves. Bring to the boil and cook for
2 minutes. Remove from heat. Store in
refrigerator.
Green Apple Gelato makes approx. 750ml
1 quantity sugar syrup
3 small green apples, juiced
2 tablespoons freshly squeezed lemon juice
2
/3 cup (160ml) thickened cream
1. Follow steps 1-2 for sugar syrup, including
the apple and lemon juice into the
mixture.
2. Strain mixture through a fine sieve.
Refrigerate for several hours or overnight.
3. Whisk together the apple syrup and cream
in a jug.
4. Position the Automatic Ice-cream Maker
as directed on pages 6-8. Turn unit on;
add mixture through the pouring hole.
5. Mixture will be ready once the paddle
starts to rotate in the other direction or
has thickened, this will take about 35
minutes.
Tip: For a slightly greener colour use 1-2
drops of green food colouring.
Recipes (continued)
Page 21

19
Recipes (continued)
Green Tea Gelato Makes approx 700ml
1 quantity sugar syrup
2 teaspoons green tea powder
1 cup (250ml) thickened cream
1. Follow steps 1-2 for sugar syrup, on
page 18. Remove from heat and whisk
through green tea powder.
2. Strain mixture through a fine sieve.
Refrigerate for several hours or overnight.
3. Whisk together the green tea syrup and
cream in a jug.
4. Position the Automatic Ice-cream Maker
as directed on pages 6-8. Turn unit on;
add mixture through the pouring hole.
5. Mixture will be ready once the paddle
starts to rotate in the other direction or
has thickened, this will take about 35
minutes.
Tip: Green tea powder is available from Asian
food stores
Lemon gelato Makes approx 750ml
1 quantity sugar syrup
¼ cup lemon zest
2
/3 cup (160ml) freshly squeezed lemon juice
2
/3 cup (160ml) thickened cream
1. Follow steps 1-2 for sugar syrup, on page
18, including the lemon zest and juice
into the mixture.
2. Strain mixture through a fine sieve.
Refrigerate for several hours or overnight.
3. Whisk together the lemon syrup and
cream in a jug.
4. Position the Automatic Ice-cream Maker
as directed on pages 6-8. Turn unit on;
add mixture through the pouring hole.
5. Mixture will be ready once the paddle
starts to rotate in the other direction or
has thickened, this will take about 35
minutes.
Ruby red
grapefruit gelato Makes approx. 750ml
1 quantity sugar syrup
1 tablespoon grated ruby red grapefruit zest
2
/3 cup (160ml) freshly squeezed ruby red
grapefruit juice
2
/3 cup (160ml) thickened cream
1-2 drops red food colouring, optional
1. Follow steps 1-2 for sugar syrup, on page
18, including the grapefruit zest and
juice into the mixture.
2. Strain mixture through a fine sieve.
Refrigerate for several hours or overnight.
3. Whisk together the ruby red grapefruit
syrup, cream and red food colouring in a
jug.
4. Position the Automatic Ice-cream Maker
as directed on pages 6-8. Turn unit on;
add mixture through the pouring hole.
5. Mixture will be ready once the paddle
starts to rotate in the other direction or
has thickened, this will take about 35
minutes.
Page 22

20
Recipes (continued)
Custard Based Gelato
Gelato Custard base Makes approx. 950ml
2 cups (500ml) milk
½ cup (125ml) light cream
5 egg yolks
½ cup (110g) caster sugar
1. Combine milk and cream in a saucepan.
Bring the mixture to simmering point
over low heat.
2. Whisk egg yolks and sugar together for
3-4 minutes, until light and creamy.
3. Gradually whisk in hot milk mixture into
yolk mixture until well combined.
4. Return the mixture into a clean
saucepan and cook, stirring constantly
with a wooden spoon, over low heat until
mixture thickens and coats the back of
the spoon. Do not allow mixture to boil
or it will curdle.
5. Transfer mixture to a bowl and remove
vanilla pod. Allow to cool before placing
in the fridge to chill for several hours.
6. Position the Automatic Ice-Cream Maker
as directed on pages 6-8. Turn unit on;
add mixture through the pouring hole.
7. Mixture will be ready once the paddle
starts to rotate in the other direction,
this will take about 25 minutes.
Gelato variations
Chocolate Nougat Gelato makes approx 1 litre
1 quantity gelato custard base
80g Toblorone chocolate, chopped
50g chopped Toblorone chocolate, extra
1. Follow steps 1-7 for gelato custard base.
Heating the 80g chocolate with the
cream and milk.
2. Add finely chopped chocolate to the
gelato mixture through the pouring hole
when churning.
Passionfruit Gelato makes approx 1 litre
You will need approximately 4 passionfruit
for this recipe
1 quantity gelato custard base
½ cup passionfruit pulp
1. Follow steps 1-7 for gelato custard base.
2. Stir passionfruit into the gelato mixture
before churning.
Pistachio Gelato makes approx 1 litre
1 quantity gelato custard base
1
/3 cup (50g) roasted and chopped pistachios
1. Follow steps 1-7 for gelato custard base.
2. Add chopped pistachios to the gelato
mixture through the pouring hole when
churning.
Page 23

21
Sorbet
A delicious dairy and fat free dessert which
is a perfect way to finish off a meal or enjoy
as a treat on a hot day! Sorbets have a sugar
syrup base.
Sugar Syrup makes 1 ½ cups
1 cup (250ml) water
1 cup (220g) caster sugar
1. Place the water and sugar in a small
saucepan.
2. Stir over a low heat until the sugar
dissolves. Bring to the boil and cook
for 2 minutes. Remove from heat and
allow to cool at room temperature before
refrigerating for a few hours or until cold.
Mixed Berry Sorbet Makes approx. 750ml
500g frozen mixed berries, thawed
1½ tablespoons lime juice
1 quantity sugar syrup
1. Place thawed berries and their juices in
a food processor and puree until smooth.
Push berries through a sieve to remove
the seeds. Chill.
2. Combine the sugar syrup, berries and
lime juice and stir to combine.
3. Position the Automatic Ice-cream Maker
as directed on pages 6-8. Turn unit on;
add mixture through the pouring hole.
4. Mixture will be ready once the paddle
starts to rotate in the other direction or
has thickened, this will take about 35
minutes.
Watermelon Sorbet Makes approx 950ml
You will need 1.2kg watermelon for this
recipe
1 quantity sugar syrup
2 cups (500ml) freshly juiced watermelon
¼ cup lemon juice
1. Combine the sugar syrup, watermelon
and lemon juice and stir to combine.
2. Position the Automatic Ice-cream Maker
as directed on pages 6-8. Turn unit on;
add mixture through the pouring hole.
3. Mixture will be ready once the paddle
starts to rotate in the other direction or
has thickened, this will take about 35
minutes.
Fresh Pineapple
and Mint Sorbet Makes approx 1 litre
You will need approximately 1 pineapple for
this recipe
1 quantity sugar syrup
2 cups (500ml) freshly juiced
pineapple juice
1 tablespoon finely shredded mint
1. Combine the sugar syrup, pineapple
juice and shredded mint and stir to
combine.
2. Position the Automatic Ice-cream Maker
as directed on pages 6-8. Turn unit on;
add mixture through the pouring hole.
3. Mixture will be ready once the paddle
starts to rotate in the other direction or
has thickened, this will take about 35
minutes.
Recipes (continued)
Page 24

22
Frozen Yogurt
Vanilla Frozen Yogurt Makes approx 1 litre
550g vanilla yogurt
260ml milk
135g caster sugar
½ teaspoon vanilla extract
1. Whisk ingredients together in a large jug.
2. Refrigerate for 1 hour or until well
chilled.
3. Position the Automatic Ice-cream Maker
as directed on pages 6-8. Turn unit on;
add mixture through the pouring hole.
4. Mixture will be ready once the paddle
starts to rotate in the other direction or
has thickened, this will take about 35
minutes.
Mango Swirl
Frozen Yogurt Makes approx 1 litre
400g mango flesh, fresh or frozen
375g low fat vanilla yogurt
175ml low fat milk
90g caster sugar
1. Blend or process mango flesh until
smooth. Reserve 150g of the flesh to be
swirled through the frozen yogurt at the
end.
2. Using an electric mixer, mix the
remaining mango with the yogurt, milk
and sugar until well combined.
3. Return mix to fridge until well chilled.
4. Position the Automatic Ice-cream Maker
as directed on pages 6-8. Turn unit on;
add mixture through the pouring hole.
5. Mixture will be ready once the paddle
starts to rotate in the other direction or
has thickened, this will take about 35
minutes.
6. Turn unit off; remove lid and paddle.
Using a spatula gently fold through the
remaining mango pulp just enough to
give a swirled effect. Carefully spoon
mixture into a plastic 1 litre container;
freeze until ready to serve.
Recipes (continued)
Page 25

23
Notes
Page 26

24
Notes
Page 27

Should you experience any difficulties with
your appliance, please contact our customer
service line for advice on 1300 881 861 in
Australia, or 0800 786 232 in New Zealand.
Alternatively, you can send a written claim to
Sunbeam at the address listed below. Upon
receipt of your claim, Sunbeam will seek to
resolve your difficulties or, if the appliance is
defective, advise you on how to arrange for it
to be repaired.
Your Sunbeam 12 Month REPAIR Guarantee
naturally does not cover misuse or improper
handling, and normal wear and tear. Similarly,
your 12 Month REPAIR Guarantee does not
cover freight or any other costs incurred in
making a claim.
It will be at the discretion of Sunbeam whether
to repair or replace any appliance that develops
a malfunction during the REPAIR Guarantee
period. Sunbeam is by no means obliged to
replace any appliance if it can be repaired.
If the appliance is irreparable due to any
claimed defect caused by faulty workmanship
or material, then Sunbeam will replace the
appliance.
Prior to any repairs being undertaken, a
purchase receipt must be provided as proof of
purchase. Sunbeam will not be responsible for
the cost of transport to and from any Sunbeam
authorized service centre, or any insurance
costs associated with this transport. Similarly
Sunbeam will not be responsible for any
damage or loss that occurs during transit to or
from any Sunbeam authorized service centre
for reasons not related to the malfunction.
The benefits given to you by this guarantee are
in addition to your other rights and remedies
under any laws which relate to the appliance.
Our goods come with guarantees that cannot
be excluded under the Australian Consumer
Law and under the New Zealand Consumer
Guarantees Act.
In Australia you are entitled to a replacement
or refund for a major failure and for
compensation for any other reasonably
foreseeable loss or damage. You are also
entitled to have the goods repaired or replaced
if the goods fail to be of acceptable quality
and the failure does amount
to a major failure.
Should your appliance require repair or service
after the guarantee period, contact your
nearest Sunbeam service centre.
For a complete list of Sunbeam’s authorised
service centres visit our website or call:
Australia
www.sunbeam.com.au
1300 881 861
Units 5 & 6, 13 Lord Street
Botany NSW 2019 Australia
New Zealand
www.sunbeam.co.nz
0800 786 232
26 Vestey Drive, Mt Wellington
Auckland, New Zealand
In the unlikely event that this appliance develops any malfunction
within 12 months of purchase due to faulty materials or
manufacture, we will REPAIR it for you free of charge.
12 Month Repair Guarantee
Page 28

is a registered trademark.
Need help with your appliance?
Contact our customer service team or visit
our website for information and tips on
getting the most from your appliance.
In Australia
Visit www.sunbeam.com.au
Or call 1300 881 861
In New Zealand
Visit www.sunbeam.co.nz
Or call 0800 786 232
‘Gelateria’ is a registered trademark of Sunbeam Corporation.
Made in China.
Due to minor changes in design or otherwise,
the product may differ from the one shown in this leaflet.
© Copyright.
Sunbeam Corporation Limited 2011.
ABN 45 000 006 771
Units 5 & 6, 13 Lord Street
Botany NSW 2019 Australia
Unit 3, Building D
26 Vestey Drive
Mt Wellington Auckland
New Zealand
Sunbeam Corporation is a division of GUD Holdings Ltd.
7/11
 Loading...