

Page 1
Instruction Manual Compact Iron
Manual de Instrucciones Plancha compacta
www.sunbeam.com
P.N.145667
MODELS/
GCSBTR-100
MODELOS
Garantía Limitada de 1 Año
S
unbeamProducts, Inc.operandobajo elnombre deJarden Consumer Solutions,o enCanadá,
SunbeamCorporation (Canada)Limited operando bajo el nombre de JardenConsumer Solutions,
(en formaconjunta, “JCS”), garantizaque porun períodode unaño apartir dela fechade compra,
este productoestará librede defectosde materialesy manode obra.JCS, asu elección,reparará o
reemplazaráeste productoo cualquiercomponente del mismo que presentedefectos durante el
períodode garantía.El reemplazose realizarápor unproducto o componentenuevo oreparado.
Si el productoya noestuviera disponible,se loreemplazará por un productosimilar devalor igual
o superior. Ésta es sugarantíaexclusiva. Nointente repararo ajustarninguna función eléctricao
mecánicade esteproducto. Al hacerloelimínará ésta garantía.
La garantíaes válidapara elcomprador minoristaoriginal apartir dela fecha de compra inicialy la
mismano es transferible.Conserve el recibo de compraoriginal. Parasolicitarservicio engarantía
se requierepresentar unrecibo de compra.Los agentesy centrosde serviciode JCSo las tiendas
minoristasque vendenproductosde JCSno tienenderecho aalterar,modificar ni cambiarde ningún
otromodo lostérminos ylas condicionesde estagarantía.
Estagarantía nocubre eldesgaste normal de las piezasni losdaños quese produzcancomo resultado
de uso negligenteo maluso delproducto, uso de voltajeincorrecto ocorriente inapropiada,uso
contrarioa lasinstrucciones operativas,y desarme, reparacióno alteración por parte de un tercero
ajenoa JCS o aun Centro de Servicioautorizado por JCS. Asimismo,la garantíano cubreactos
fortuitostales comoincendios,inundaciones, huracanesy tornados.
¿Cuáles el límite de responsabilidadde JCS?
JCS no será responsablede dañosincidentaleso emergentescausados por el incumplimientode alguna
garantíao condiciónexpresa,implícita olegal.
Exceptoen lamedida enque loprohíba laley aplicable,cualquier garantíao condiciónimplícita de
comerciabilidad o aptitud para un fin determinadose limita, en cuantoa su duración,al plazode la
garantíaantes mencionada.
JCS quedaexenta detoda otragarantías, condicioneso manifestaciones,expresa, implícita,legal ode
cualquierotra naturaleza.
JCS no será responsablede ningúntipo de daño que resultede la compra,uso omal usodel producto,
o por la imposibilidadde usarel producto,incluidos losdaños incidentales,especiales,emergentes o
similares,o lapérdida deganancias,ni de ningúnincumplimiento contractual,sea deuna obligación
esencialo deotra naturaleza, ni deningún reclamoiniciado contra el compradorpor untercero.
Algunasprovincias, estadoso jurisdicciones no permitenla exclusióno limitaciónde losdaños
incidentaleso emergentesni laslimitaciones ala duración de las garantíasimplícitas, de modo que es
posibleque laexclusión olas limitacionesantes mencionadasno seapliquen ensu caso.
Estagarantía leotorga derechos legalesespecíficos yes posible que ustedtenga otrosderechos que
varíande unestado, provincia o jurisdiccióna otro.
Cómosolicitar el servicioen garantía
En losEstados Unidos –
Si tiene algunapregunta sobreesta garantíao desearecibir servicio de garantía,llame al
1.800.458.8407 ypodrá obtenerla direccióndel centro de servicioque leresulte másconveniente.
En Canadá–
Si tiene algunapregunta sobreesta garantíao desearecibir servicio de garantía,llame al
1.800.667.8623 ypodrá obtenerla direccióndel centro de servicioque leresulte másconveniente.
En los EstadosUnidos, estagarantía es ofrecidapor SunbeamProducts, Inc. operandobajo elnombre
de JardenConsumer Solutions, Boca Ratón,Florida 33431.En Canadá, esta garantíaes ofrecidapor
SunbeamCorporation (Canada)Limited operando bajo el nombre de JardenConsumer Solutions, 20
B HerefordStreet, Brampton,Ontario L6Y0M1. Siusted tiene otro problemao reclamoen conexión
con este producto,por favorescriba al Departamentode Servicio al Consumidor.
POR FAVOR NO DEVUELVA ESTE PRODUCTO A NINGUNA
DE ESTAS DIRECCIONES NI AL LUGAR DECOMPRA.
1 Year Limited Warranty
Sunbeam Products,Inc. doing business asJarden Consumer Solutions orif in Canada, Sunbeam
Corporation (Canada)Limited doingbusiness as JardenConsumer Solutions (collectively “JCS”)
warrants thatfor a period ofone year from thedate of purchase, thisproduct will be freefrom
defects inmaterial and workmanship. JCS, at its option,will repair or replacethis product or any
component ofthe product found tobe defective during thewarranty period. Replacement willbe
made witha new or remanufacturedproduct or component. If the product isno longer available,
replacement maybe made with asimilar product of equalor greater value. This is yourexclusive
warranty. Do NOTattempt to repair oradjust any electrical ormechanical functions on this
product. Doing so will voidthis warranty.
This warrantyis valid for theoriginal retail purchaser fromthe date of initialretail purchase and is
not transferable. Keep the originalsales receipt. Proof ofpurchase is requiredto obtainwarranty
performance. JCSdealers, service centers, orretail stores selling JCSproducts do not havethe right
to alter, modify orany way change theterms and conditions ofthis warranty.
This warrantydoes not cover normalwear of parts ordamage resulting from anyof the following:
negligent useor misuse of theproduct, use on impropervoltage or current, usecontrary to the
operating instructions,disassembly, repairor alteration by anyoneother than JCS oran authorized
JCS servicecenter. Further, thewarranty does not cover:Acts of God, suchas fire, flood,
hurricanes andtornadoes.
What are the limits on JCS’sLiability?
JCS shallnot be liable forany incidental or consequentialdamages caused by thebreach of any
express, impliedor statutory warranty orcondition.
Except tothe extent prohibited byapplicable law,any implied warranty orcondition of
merchantability orfitness for a particularpurpose is limited induration to the durationof the
above warranty.
JCS disclaimsall other warranties, conditionsor representations, express, implied,statutory or
otherwise.
JCS shallnot be liable forany damages of anykind resulting from thepurchase, use or misuseof,
or inabilityto use the productincluding incidental, special, consequentialor similar damages or
loss ofprofits, or for anybreach of contract, fundamentalor otherwise, or forany claim brought
against purchaserby any other party.
Some provinces,states or jurisdictions donot allow the exclusionor limitation of incidentalor
consequential damagesor limitations on howlong an implied warrantylasts, so the above
limitations orexclusion may not applyto you.
This warrantygives you specific legalrights, and you mayalso have other rightsthat vary from
province toprovince, state to stateor jurisdiction to jurisdiction.
How to Obtain WarrantyService
In the U.S.A. –
If youhave any question regardingthis warranty or wouldlike to obtain warrantyservice,
please call1.800.458.8407 anda convenient servicecenter address will beprovided to you.
In Canada –
If youhave any question regardingthis warranty or wouldlike to obtain warrantyservice,
please call1.800.667.8623 anda convenient servicecenter address will beprovided to you.
In theU.S.A., this warranty isoffered by Sunbeam Products,Inc. doing business asJarden
Consumer Solutionslocated in Boca Raton,Florida 33431. In Canada,this warranty is offeredby
Sunbeam Corporation(Canada) Limited doing businessas Jarden Consumer Solutions,located at
20 BHereford Street, Brampton, OntarioL6Y 0M1. If youhave any otherproblem orclaim in
connection withthis product,please write ourConsumer Service Department.
PLEASE DO NOT RETURN THIS PRODUCT TO ANY OF THESE ADDRESSES
OR TO THE PLACE OF PURCHASE.
For productquestions:
Jarden ConsumerService
USA :1.800.458.8407
Canada :1.800.667.8623
www.sunbeam.com
© 2010Sunbeam Products, Inc. doingbusiness as Jarden ConsumerSolutions.
All rightsreserved. Distributed by SunbeamProducts, Inc. doing businessas
Jarden ConsumerSolutions, Boca Raton, Florida33431.
SPR-110810-776
Para preguntassobre los productos llame:
Jarden ConsumerService
EE.UU. :1.800.458.8407
Canadá :1.800.667.8623
www.sunbeam.com
© 2010 Sunbeam Products, Inc. operando bajo elnombre deJarden Consumer Solutions.
Todoslos derechosreservados. Distribuido por Sunbeam Products, Inc. operando bajo el
nombre de Jarden Consumer Solutions, Boca Raton, Florida 33431.
Printed inChina Impreso enChina
All manuals and user guides at all-guides.com
all-guides.com
Page 2
IMPORTANT SAFEGUARDS
When using elec tric al app lian ces , ba sic sa fet y p reca uti ons sh ould al way s b e
foll owed i nclu ding th e foll owin g:
READ ALL INSTRUCTIONS BEFORE USE
• Use irononly for itsintended use.
• To protect againstrisk of electric shock,do not immersethe ironin water or
other liquids.
• The SteamSwitch should alwaysbe turned OFF beforeplugging or unplugging fromoutlet.
Never yankcord to disconnect fromoutlet; instead, grasp plugand pull to disconnect.
• Do notallow cord totouch hotsurfaces. Let ironcool completely before puttingaway.
Loop cordloosely around iron whenstoring.
• Always disconnectiron from electricaloutlet whenfilling with wateror emptying and when
not inuse.
• Do notoperate iron witha damaged cord orif the iron hasbeen dropped or damaged.
Toavoid the riskof electric shock, donot disassemble the iron.Take itto an authorized
service centerfor examination and/or repair. Incorrect reassemblycan causea risk of
electric shockwhen the iron isused.
• Close supervisionis necessary forany appliance being usedby or near children.Do not leave
iron unattendedwhile plugged in orturned on or onan ironing board.
• Burns canoccur from touchinghot metalparts, hot wateror steam. Use cautionwhen you turn
a steamiron upside down –there may be hotwater in the reservoir.
• If theiron is notoperating normally,disconnect from the powersupply and have theiron
serviced byan authorized service center. Or callCustomer Serviceat 1.800.458.8407.
• YourSunbeam
®
ironis designedto reston theheel rest.Do notleave the iron unattended.
Do not set the iron on anunprotectedsurface, even if it is on its heel rest.
SPECIAL INSTRUCTIONS
• To avoid acircuit overload, do notoperate another highwattage applianceon the samecircuit.
• If anextension cord isabsolutely necessary,a 15-ampere cord shouldbe used. Cords ratedfor
less amperagemay overheat. Care shouldbe taken to arrangethe extension cord sothat it
cannot bepulled or tripped over.
FOR PRODUC TS PU RCHASED IN THE U NITED STATES AND C ANADA
Toreduce the riskof electrical shock, thisappliance has a polarizedplug (one blade is wider than
the other). Thisplug fits a polarizedoutlet only one way;if the plug doesnot fit fully intothe
outlet, reversethe plug. If itstill does not fit,contact a qualified electrician.Do not attempt to
defeat thissafety feature.
SAVETHESE INSTRUCTIONS
PRECAUCIONES IMPORTANTES
Cuando use algún aparato eléctrico siempre deben seguirse precauciones básicas de
seguridad incluyendo las siguientes:
LEA TODAS LAS INSTRUCCIONES ANTES DE USAR
• Use laplancha únicamente parael uso al queestá destinada.
• Para protegersecontra el riesgode un choque eléctrico,no sumerja la planchaen agua ni en
otros líquidos.
• La Palancadel Vaporsiempre debenestar enOFF antes de enchufaro desenchufarla plancha
del tomacorriente. Nunca tire delcable paradesconectarla deltomacorriente, sujeteel enchufe
y tirede élpara desconectarla.
• No permitaque elcable toquesuperficies calientes.Deje enfriarla plancha porcompleto antes de
guardarla.Envuelvael cableflojamentealrededorde laplancha para guardarla.
• Siempre desconectela plancha deltomacorriente eléctricocuanto esté llenándolade agua o
vaciándola ytambién cuando no estéen uso.
• No hagafuncionar laplancha si el cableestá dañadoo sila plancha seha caídoo dañado.
Para evitar elriesgo dechoque eléctrico,no desarmela plancha. Llévela aun centrode servicio
autorizado para quela examineny/o reparen.El rearmado incorrecto puede provocar elriesgo
de unchoque eléctricoal usarla plancha.
• Es necesariovigilar cuidadosamente alos niñoscuando usen cualquieraparato o se
encuentren cercade él. No dejela plancha sin vigilanciamientras esté enchufada, encendidao
sobre unatabla de planchar.
• Se puedenproducir quemaduras porcontacto conlas partes demetal calientes, el agua
caliente oel vapor.Tenga cuidadoal invertir una planchade vapor ya quepuede quedar agua
caliente enel reservorio.
• Si laplancha no funcionanormalmente, desconécteladel tomacorriente yhágala revisar por
un centrode servicio autorizado. Ollame a Servicio alCliente al 1.800.458.8407.
• Su planchaSunbeam
®
está diseñadapara apoyarse en eltalón de apoyo. Nodeje la plancha sin
vigilancia. Noapoye la plancha sobreuna superficie no protegida,aun cuando sea sobreel
talón deapoyo.
INSTRUCCIONES ESPECIALES
• Para evitaruna sobrecarga delcircuito no haga funcionarotro aparato de
alto vatajeen el mismo circuito.
• Si resultaabsolutamente necesariousar un cablede extensión, sedebe usarun cablede 15 amperios.
Los cablescon tensiones nominales menorespueden sobrecolentarse. Se debecuidar de poner
el cablede extensión de modotal que no puedaser arrancado o provocartropiezos.
PARA PRODUCTOS COMPRADOS EN LOS EE.UU. Y CANADÁ
Para reducirel riesgo de choqueeléctrico, este aparato tieneun enchufe polarizado (unapata es
más ancha que la otra). Este enchufecalza enun tomacorriente polarizadosólo de una manera;
si elenchufe no cabe totalmenteen el tomacorriente, gireel enchufe. Si aunasí no calza, consulte
a unelectricista calificado. No intenteanular esta característica deseguridad.
GUARDE ESTAS INSTRUCCIONES
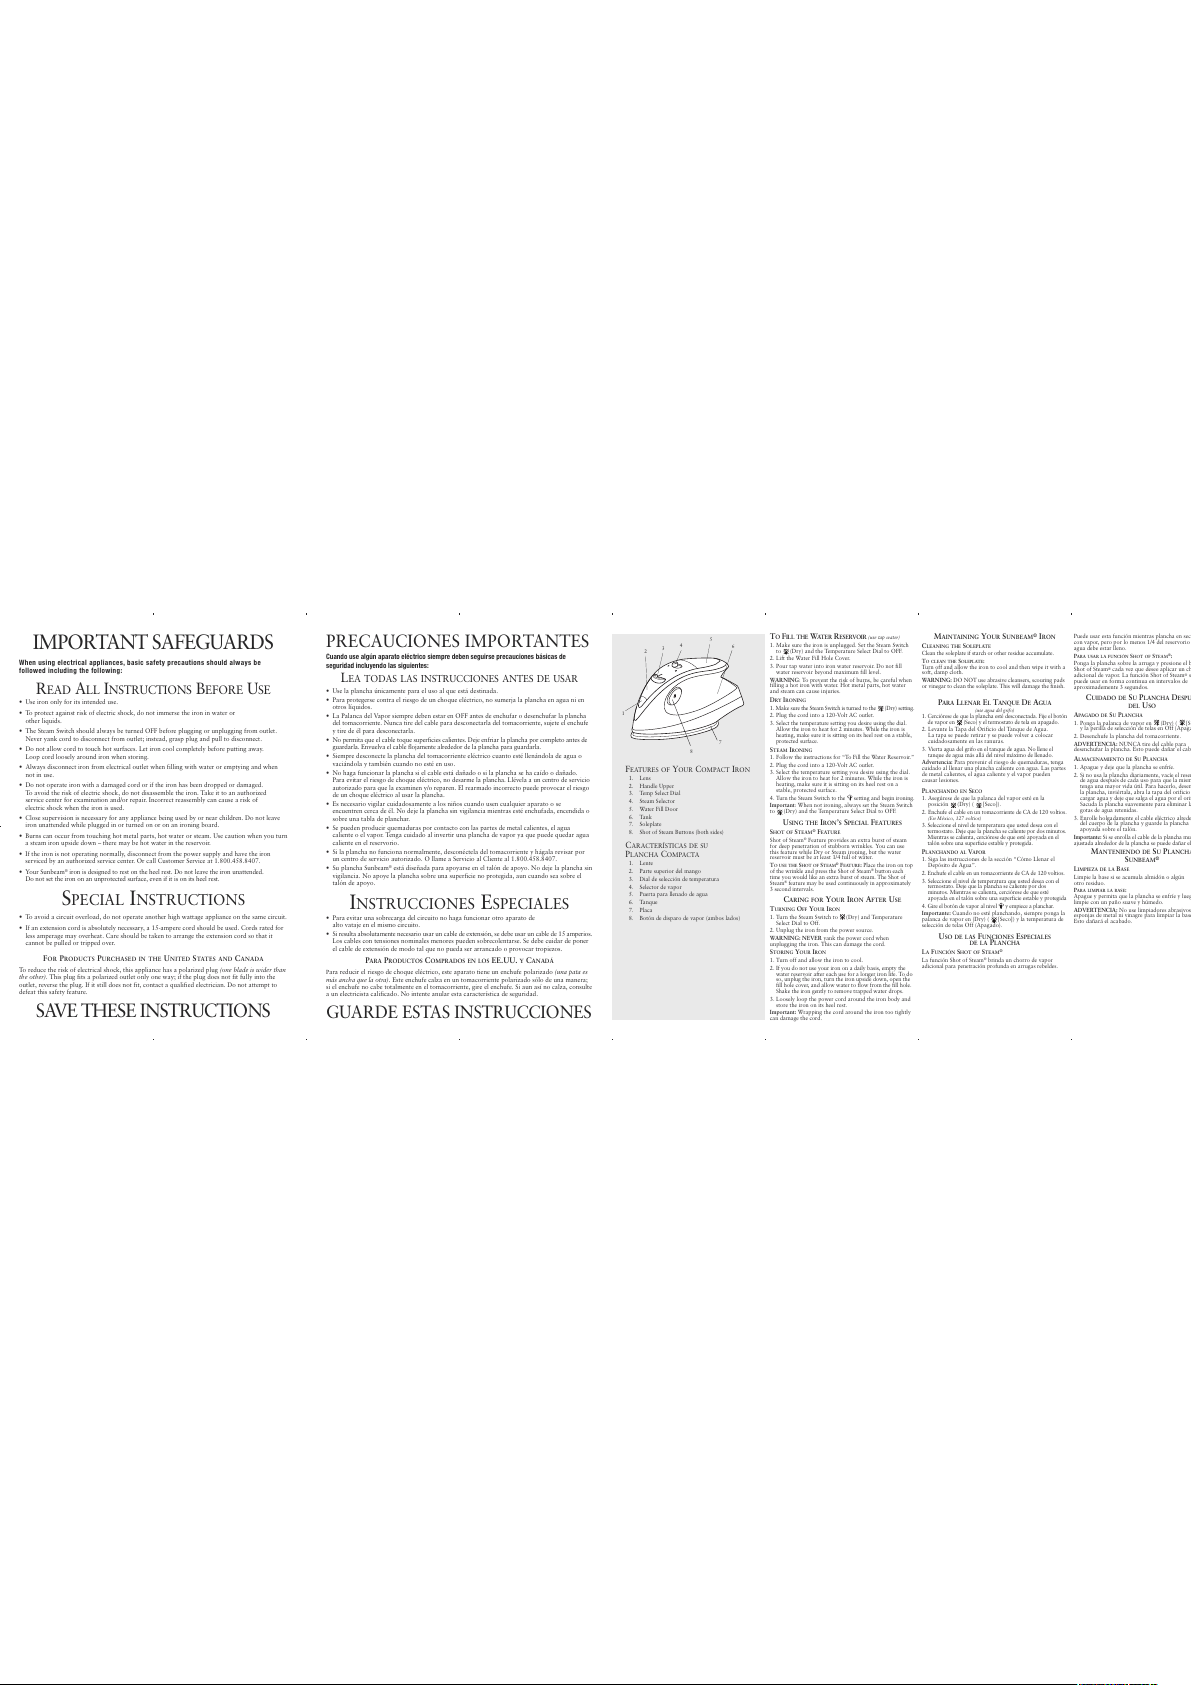
FEATURES OF YOUR COMPACT IRON
1. Lens
2. Handle Upper
3. TempSelect Dial
4. Steam Selector
5. WaterFill Door
6. Tank
7. Soleplate
8. Shot ofSteam Buttons(both sides)
CARACTERÍSTICAS DE SU
PLANCHA COMPACTA
1. Lente
2. Parte superiordel mango
3. Dial deselección detemperatura
4. Selector devapor
5. Puerta parallenado deagua
6. Tanque
7. Placa
8. Botón dedisparo devapor (ambos lados)
1
4
8
7
2
3
5
6
TO FI
LL THEWATERRESERVOIR
(use tap water)
1. Makesure theiron is unplugged.Set the SteamSwitch
to (Dry) andthe TemperatureSelect Dial toOFF.
2. Liftthe WaterFill Hole Cover.
3. Pourtap waterinto iron waterreservoir. Donot fill
water reservoirbeyond maximumfill level.
WARNING:To preventthe risk ofburns, be carefulwhen
filling ahot ironwith water.Hot metal parts,hot water
and steamcan causeinjuries.
DRY IRONING
1.Make sure theSteamSwitchis turned tothe (Dry)setting.
2. Plugthe cordinto a 120-VoltAC outlet.
3. Select thetemperaturesetting youdesire usingthe dial.
Allowthe iron to heatfor 2minutes. Whilethe ironis
heating,make sureit is sittingon its heelrest ona stable,
protectedsurface.
STEAM IRONING
1. Followthe instructionsfor “To Fillthe WaterReservoir.”
2. Plugthe cordinto a 120-VoltAC outlet.
3. Selectthe temperaturesetting you desireusing the dial.
Allow theiron toheat for 2minutes. While theiron is
heating, makesure itis sitting onits heel reston a
stable, protectedsurface.
4. Turn theSteam Switchto the settingand beginironing.
Important: Whennot ironing,always set theSteam Switch
to (Dry) andthe TemperatureSelect Dial toOFF.
USING THE IRON’S SPECIAL FEATURES
SHOT OF STEAM®FEATURE
Shot ofSteam®Feature providesan extraburst of steam
for deeppenetration ofstubborn wrinkles. You canuse
this featurewhile Dryor Steam ironing,but the water
reservoir mustbe atleast 1/4 fullof water.
TO USE THE SHOT OF STEAM®FEATURE:Place theiron ontop
of thewrinkle and press theShot ofSteam®buttoneach
timeyou would like anextra burstof steam.The Shotof
Steam®featuremay be used continuouslyin approximately
3 second intervals.
CARING FOR YOUR IRON AFTER USE
TURNING OFF YOUR IRON
1. Turn the SteamSwitch to (Dry)and Temperature
Select Dialto Off.
2. Unplugthe ironfrom the powersource.
WARNING:NEVER yank the powercord when
unplugging theiron. Thiscan damage thecord.
STORING YOUR IRON
1. Turn off andallow the ironto cool.
2. Ifyou donot useyour ironon adaily basis,empty the
waterreservoir aftereach usefor a longeriron life.To do
so, unplug the iron, turnthe ironupside down,open the
fillhole cover,and allowwater toflow fromthe fillhole.
Shakethe iron gently to remove trapped water drops.
3. Looselyloop thepower cord aroundthe iron bodyand
store theiron onits heel rest.
Important: Wrappingthe cord aroundthe iron tootightly
can damagethe cord.
MA
INTAININGYOURSUNBEAM
®
IR
ON
CLEANING THE SOLEPLATE
Cleanthe soleplateif starchor otherresidueaccumulate.
TO
CLEAN THESOLEPLATE
:
Turnoff and allowthe iron tocool andthen wipe itwith a
soft, dampcloth.
WARNING:DO NOTuse abrasivecleansers, scouring pads
or vinegarto cleanthe soleplate.This willdamage thefinish.
PARALLENAR EL TANQUE DE AGUA
(useagua del grifo)
1.Cercióresede quela planchaesté desconectada. Fije el botón
devapor en (Seco)y eltermostatode telaen apagado.
2. Levantela Tapadel Orificiodel Tanque deAgua.
La tapase puederetirar y sepuede volver acolocar
cuidadosamente enlas ranuras.
3. Viertaagua delgrifo en eltanquede agua.No llene el
tanquede aguamás allá del nivelmáximo dellenado.
Advertencia: Para prevenirel riesgode quemaduras, tenga
cuidado alllenar unaplancha caliente conagua. Las partes
de metalcalientes, elagua caliente yel vapor pueden
causar lesiones.
PLANCHANDO EN SECO
1. Asegúresede quela palanca delvapor esté enla
posición (Dry) ( [Seco]).
2. Enchufeel cableen untomacorrientede CAde 120voltios.
(En México, 127 voltios)
3.Seleccioneel nivelde temperaturaqueusted deseaconel
termostato.Deje quela planchase calientepor dosminutos.
Mientrasse calienta,cercióresede que estéapoyada enel
talónsobre una superficieestabley protegida.
PLANCHANDO AL VAPOR
1. Sigalas instruccionesde la sección“Cómo Llenar el
Depósito deAgua”.
2.Enchufe elcableen untomacorrientede CAde 120voltios.
3.Seleccione elnivelde temperatura queusted deseacon el
termostato.Dejeque laplancha secalientepor dos
minutos.Mientrasse calienta,cercióresede queesté
apoyadaen eltalón sobreuna superficie establey protegida
4.Gire elbotónde vaporal nivel y empiecea planchar.
Importante: Cuando noesté planchando,siempre ponga la
palanca devapor en(Dry) ( [Seco]) yla temperatura de
selección detelas Off(Apagado).
USO DE LAS FUNCIONES ESPECIALES
DE LA PLANCHA
LA FUNCIÓN SHOT OF STEAM
®
La funciónShot ofSteam®brinda unchorro devapor
adicionalpara penetraciónprofunda enarrugas rebeldes.
Puede usaresta funciónmientras plancha enseco o
con vapor, pero porlo menos 1/4del reservoriode
agua debeestar lleno.
PARA USAR LA FUNCIÓN SHOT OF STEAM®:
Ponga laplancha sobrela arruga ypresione el botón
Shot ofSteam®cada vezque deseeaplicar un chorro
adicional devapor. Lafunción Shotof Steam®se
puede usaren formacontinua en intervalosde
aproximademente 3segundos.
CUIDADO DE SU PLANCHA DESPUÉS
DEL
USO
AP
AGADO DE
SU PL
ANCHA
1. Pongala palancade vapor en (Dry)( [Seco])
y laperilla deselección de telasen Off (Apagado).
2. Desenchufela planchadel tomacorriente.
ADVERTENCIA:NUNCA tire delcable para
desenchufar laplancha. Estopuede dañar elcable.
ALMACENAMIENTO DE SU PLANCHA
1. Apaguey dejeque la planchase enfríe.
2. Sino usala planchadiariamente, vacíeel reservorio
de aguadespués decada usopara que lamisma
tenga unamayor vidaútil. Parahacerlo, desenchufe
la plancha,inviértala, abrala tapadel orificiopara
cargar aguay dejeque salgael agua porel orificio.
Sacuda laplancha suavementepara eliminarlas
gotas deagua retenidas.
3. Enrolleholgadamente elcable eléctrico alrededor
del cuerpode laplancha y guardela plancha
apoyada sobreel talón.
Importante:Si seenrollael cablede laplanchamuy
ajustadaalrededorde laplancha sepuededañar elcable.
MANTENIENDO DE SU PLANCHA
SUNBEAM
®
LIMPIEZA DE LA BASE
Limpie labase sise acumula almidóno algún
otro residuo.
PARA LIMPIAR LA BASE:
Apague ypermita quela plancha seenfríe y luego
limpie conun pañosuave y húmedo.
ADVERTENCIA:No use limpiadoresabrasivos,
esponjas demetal nivinagre para limpiarla base.
Esto dañaráel acabado.
All manuals and user guides at all-guides.com
 Loading...