

Page 1
GCSBNC-100
GCSBNC-101
Instruction Manual
Sunbeam® Corded/Cordless Iron
READ AND SAVE THESE INSTRUCTIONS
www.sunbeam.com P.N. 189843
®
For product questions:
Sunbeam Consumer Service
Canada : 1-800-667-8623
USA : 1-800-458-8407
www.sunbeam.com
© 2016 Sunbeam Products, Inc. doing business as Jarden Consumer Solutions.
All rights reserved. Distributed by Sunbeam Products, Inc. doing business as
Jarden Consumer Solutions, Boca Raton, Florida 33431.
Printed in China.
®
GCDS-SUN47596-SL
Page 2
IMPORTANT SAFEGUARDS
When using electrical appliances, basic safety precautions should always
be followed including the following:
READ ALL INSTRUCTIONS BEFORE USE
• Use iron only for its intended use.
• To protect against risk of electric shock, do not immerse the iron in water
or other liquids.
• The Steam Lever should always be turned to the dry setting before
plugging or unplugging from outlet. Never yank cord to disconnect from
outlet; instead, grasp plug and pull to disconnect.
• Do not allow cord to touch hot surfaces. Let iron cool completely before
storing. Loop cord loosely around iron when storing.
• Always disconnect iron from electrical outlet when filling with water,
cleaning, emptying or when not in use.
• Do not operate iron with a damaged cord or if the iron has been dropped
or damaged. To avoid the risk of electric shock, do not disassemble the
iron. Take it to an authorized service center for examination and/or repair.
Incorrect reassembly can cause a risk of electric shock when iron is used.
• Close supervision is necessary for any appliance being used by or near
children. Do not leave iron unattended while plugged in, turned on or on
an ironing board.
• Burns can occur from contact with hot metal parts, hot water or steam.
Use caution when you turn a steam iron upside down – there may be hot
water in the reservoir.
• If the iron is not operating normally, disconnect from the power supply
and have the iron serviced by an authorized service center or call
Customer Service at 1 (800) 458-8407.
• Your SUNBEAM® iron is designed to rest on the heel rest. Use only with
the heel rest provided. Do not leave the iron unattended. Do not set the
iron on an unprotected surface, even if it is on the heel rest.
-E2-
-E3-
SAVE THESE INSTRUCTIONS
For Products Purchased in the United States and Canada
To reduce the risk of electrical shock, this appliance has a polarized plug (one
blade is wider than the other). This plug fits a polarized outlet only one way;
if the plug does not fit fully into the outlet, reverse the plug. If it still does not
fit, contact a qualified electrician. Do not attempt to defeat this safety feature.
Thank you for purchasing the Sunbeam® Versa Glide® Corded/Cordless Iron.
The new Sunbeam® Versa Glide® Corded-Cordless iron makes ironing faster.
Detach the iron from the heating base and use it in cordless mode, or use it
in the corded mode for longer period of continuous heat and steam.
• This is a high wattage appliance. To avoid a circuit overload, do not
operate another high wattage appliance on the same circuit.
• If an extension cord is absolutely necessary, a cord with an ampere rating
equal to or greater than the maximum rating of the iron shall be used.
Cords rated for less amperage may overheat. Care should be taken to
arrange the extension cord so that it cannot be pulled or tripped over.
Page 3
-E4- -E5-
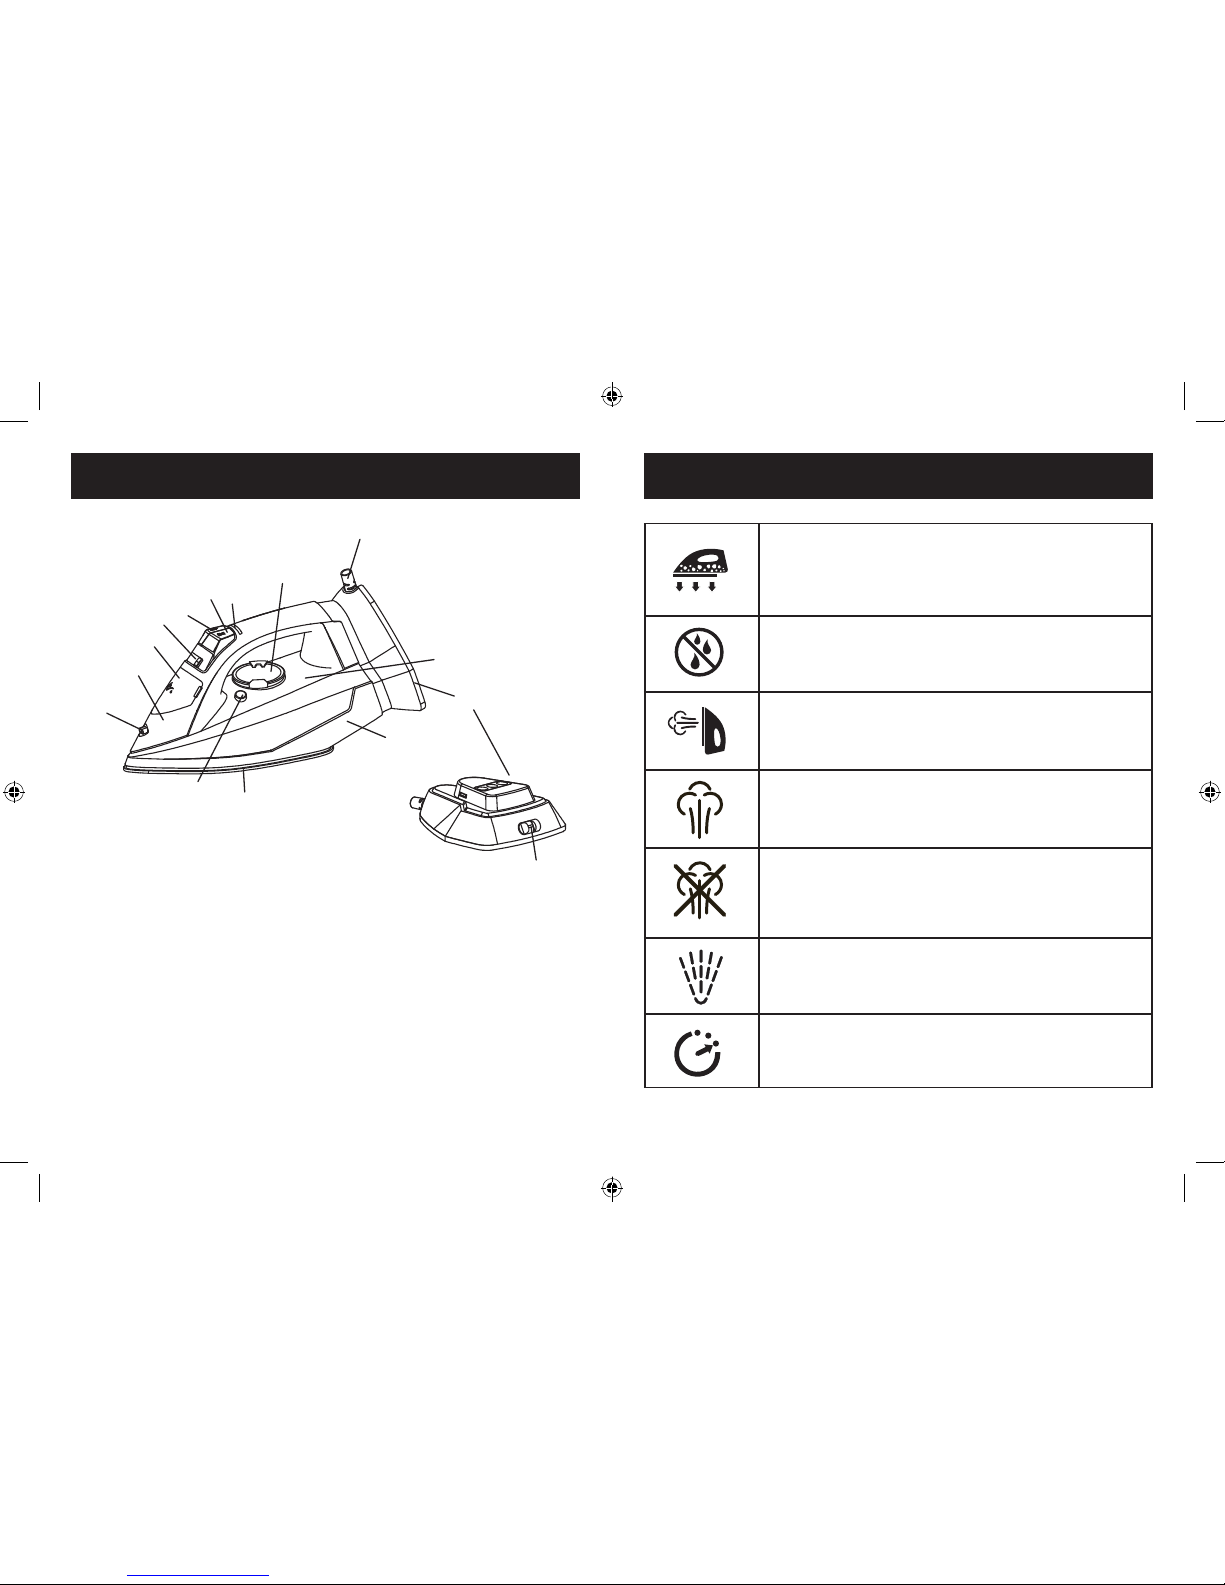
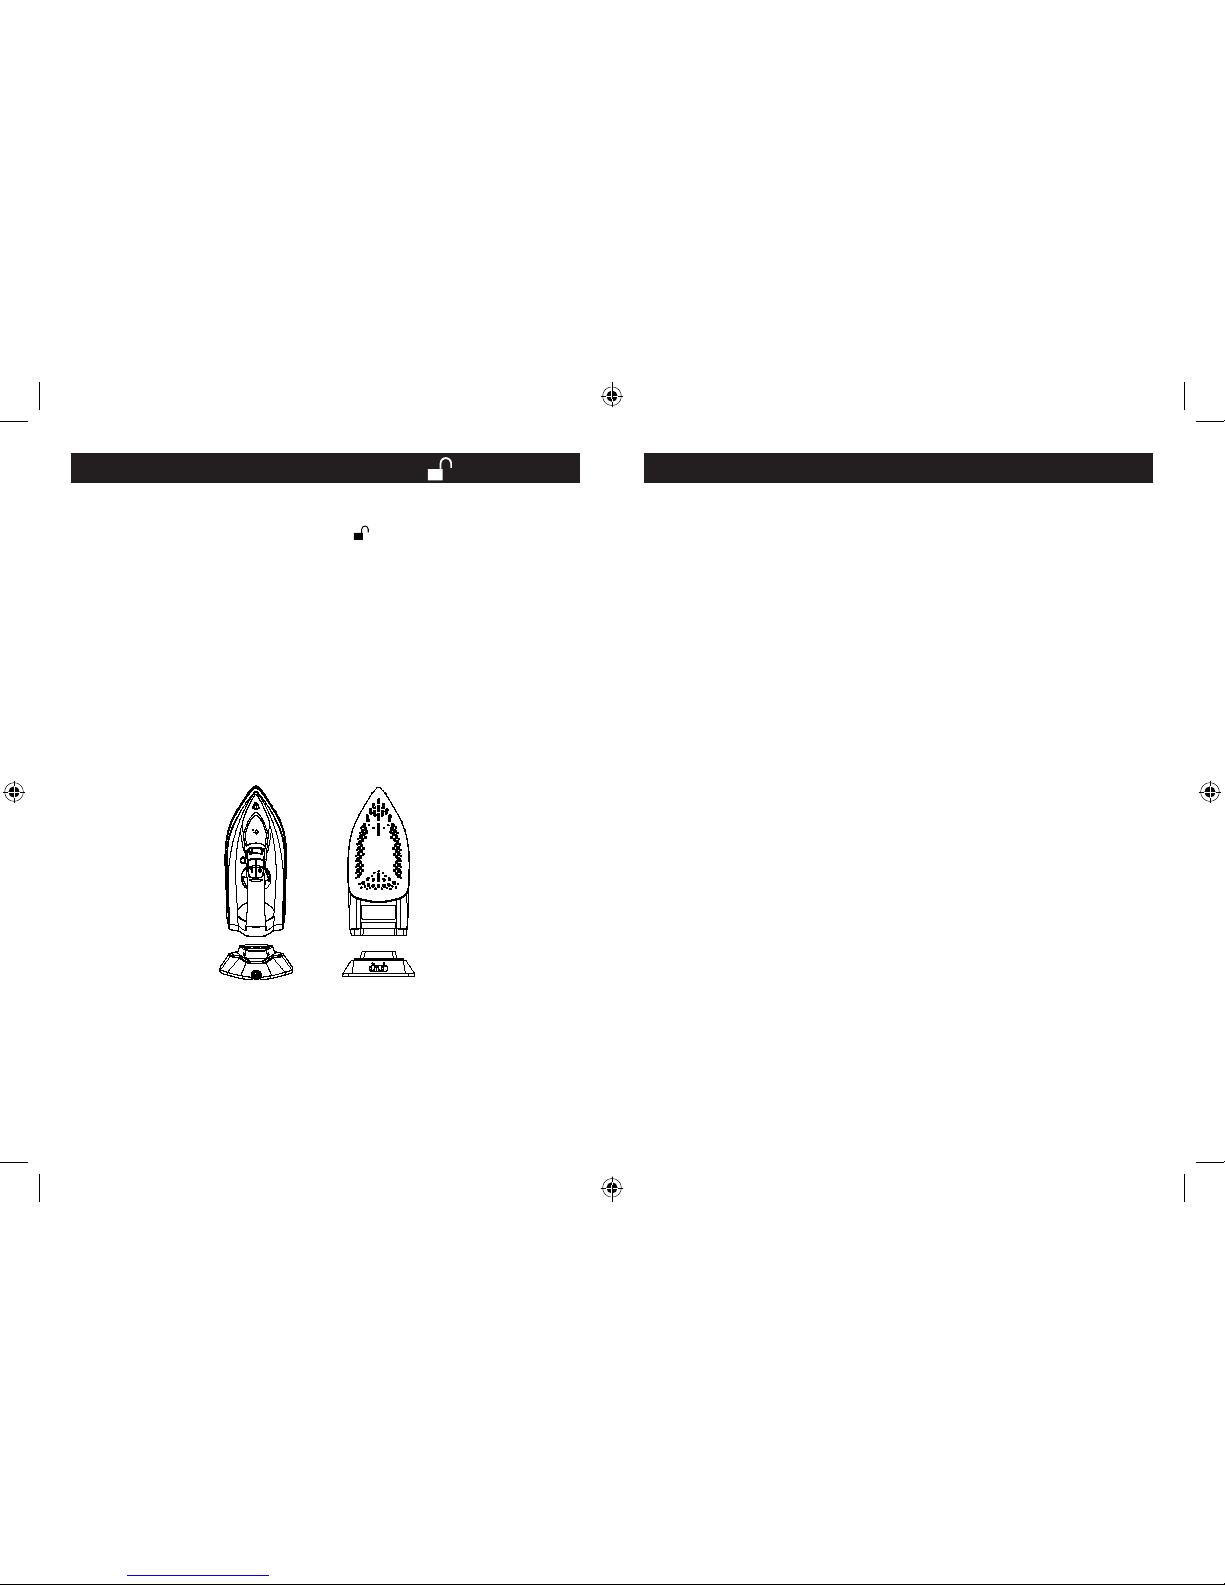
FEATURES ABOUT YOUR IRON ICONS/SYMBOLS
1. SPRAY MIST® Nozzle
2. Water Fill Hole
3. Water Fill Hole
Cover
4. Steam Lever
5. SPRAY MIST® Button
6. SHOT OF STEAM®
/ Vertical Steam
Button
7. Heating Indicator
Light
8. 10 ft- Swivel Cord
9. Heating Base
a. Lock/Unlock
Switch (for corded/
cordless ironing)
10. See-Through Water
Reservoir
11. Fabric Select Dial
12. Self-Clean Button
13. Soleplate
14. Anti-Calcium
System (inside)
8
9
10
11
7
5
6
4
14
13
12
1
2
3
a
ANTI-CALCIUM SYSTEM –A permanent system located
inside the water reservoir, designed to eliminate impurities.
Refer to the ANTI-CALCIUM SYSTEM section under
MAINTAINING AND CLEANING YOUR IRON for detailed
instructions.
ANTI-DRIP SYSTEM - Eliminates leaks and water spots
even.
SHOT OF STEAM® FEATURE - Allows iron to function
vertically as a garment steamer. Refer to SPECIAL FEATURES
section for detailed instructions.
SHOT OF STEAM® FEATURE - Provides and extra burst of
steam to help remove stubborn wrinkles.
NO STEAM – Provides the flexibility to iron without steam.
Refer to DRY IRONING section for detailed instructions.
SPRAY MIST® FEATURE – Provides a powerful water spray
mist that dampens the fabric to aid in removing wrinkles
from heavy fabrics and for setting creases. Refer to SPECIAL
FEATURES section for detailed instructions.
3-WAY MOTION SMART® AUTO-OFF FEATURE – This
feature automatically turns the iron off if left in one position
too long to avoid accidents.
Page 4
-E6-
FILLING WATER RESERVOIR (USE TAP WATER)
DRY IRONING
1. Move Steam Lever to Dry setting.
2. Place the iron with soleplate resting on a flat, clean surface.
3. Open the Water Fill Hole Cover by gripping side tabs and gently pulling out
the cover to open.
4. Use an easy-pour measuring cup to fill water reservoir with tap water through
the Water Fill Hole. Do not fill water reservoir beyond the MAX line.
5. Close the Water Fill Hole Cover securely after filling.
WARNING: To prevent the risk of burns, be careful when filling a hot iron with
water. Hot metal parts, hot water and steam can cause injuries.
1. Ensure Steam Lever is moved to the Dry setting and iron is locked in
position on the Heating Base on a flat, stable surface (follow instructions for
“Corded Ironing”).
2. Set Fabric Select Dial according to fabric type (Figure 1).
NOTE: If not sure of the fabric type, it is best to first test the temperature of the
iron on a hem or an inside seam.
Figure 1
3. Plug the solid cord into a 120-Volt AC outlet.
• The red Indicator Light comes on to indicate iron is heating up.
• When the Indicator Light turns solid green, the iron has reached required
temperature and is ready for use.
4. To use the iron without the cord, follow instructions for “Cordless Ironing.”
NOTE: While the Steam Lever is turned to the Dry setting, you may still use
the SHOT OF STEAM® or SPRAY MIST® feature, as long as the Fabric Select Dial is
set to wool, cotton, or linen / high temperature. Make sure the water reservoir is
approximately ¼ full of water.
-E7-
STEAM IRONING
CORDED IRONING
1. Follow the instructions for “Filling Water Reservoir” and “Corded Ironing.”
2. Move Steam Lever to desired steam setting. Set Fabric Select Dial according to
fabric type (refer to Figure 1).
NOTE: If not sure of the fabric type, it is best to first test the temperature of the
iron on a hem or an inside seam.
3. Plug the cord into a 120-Volt AC outlet.
• The red Indicator Light comes on, to indicate iron is heating up.
• When the Indicator Light turns solid green., the iron has reached required
temperature and is ready for use.
4. To use the iron without the cord, follow instructions for “Cordless Ironing.”
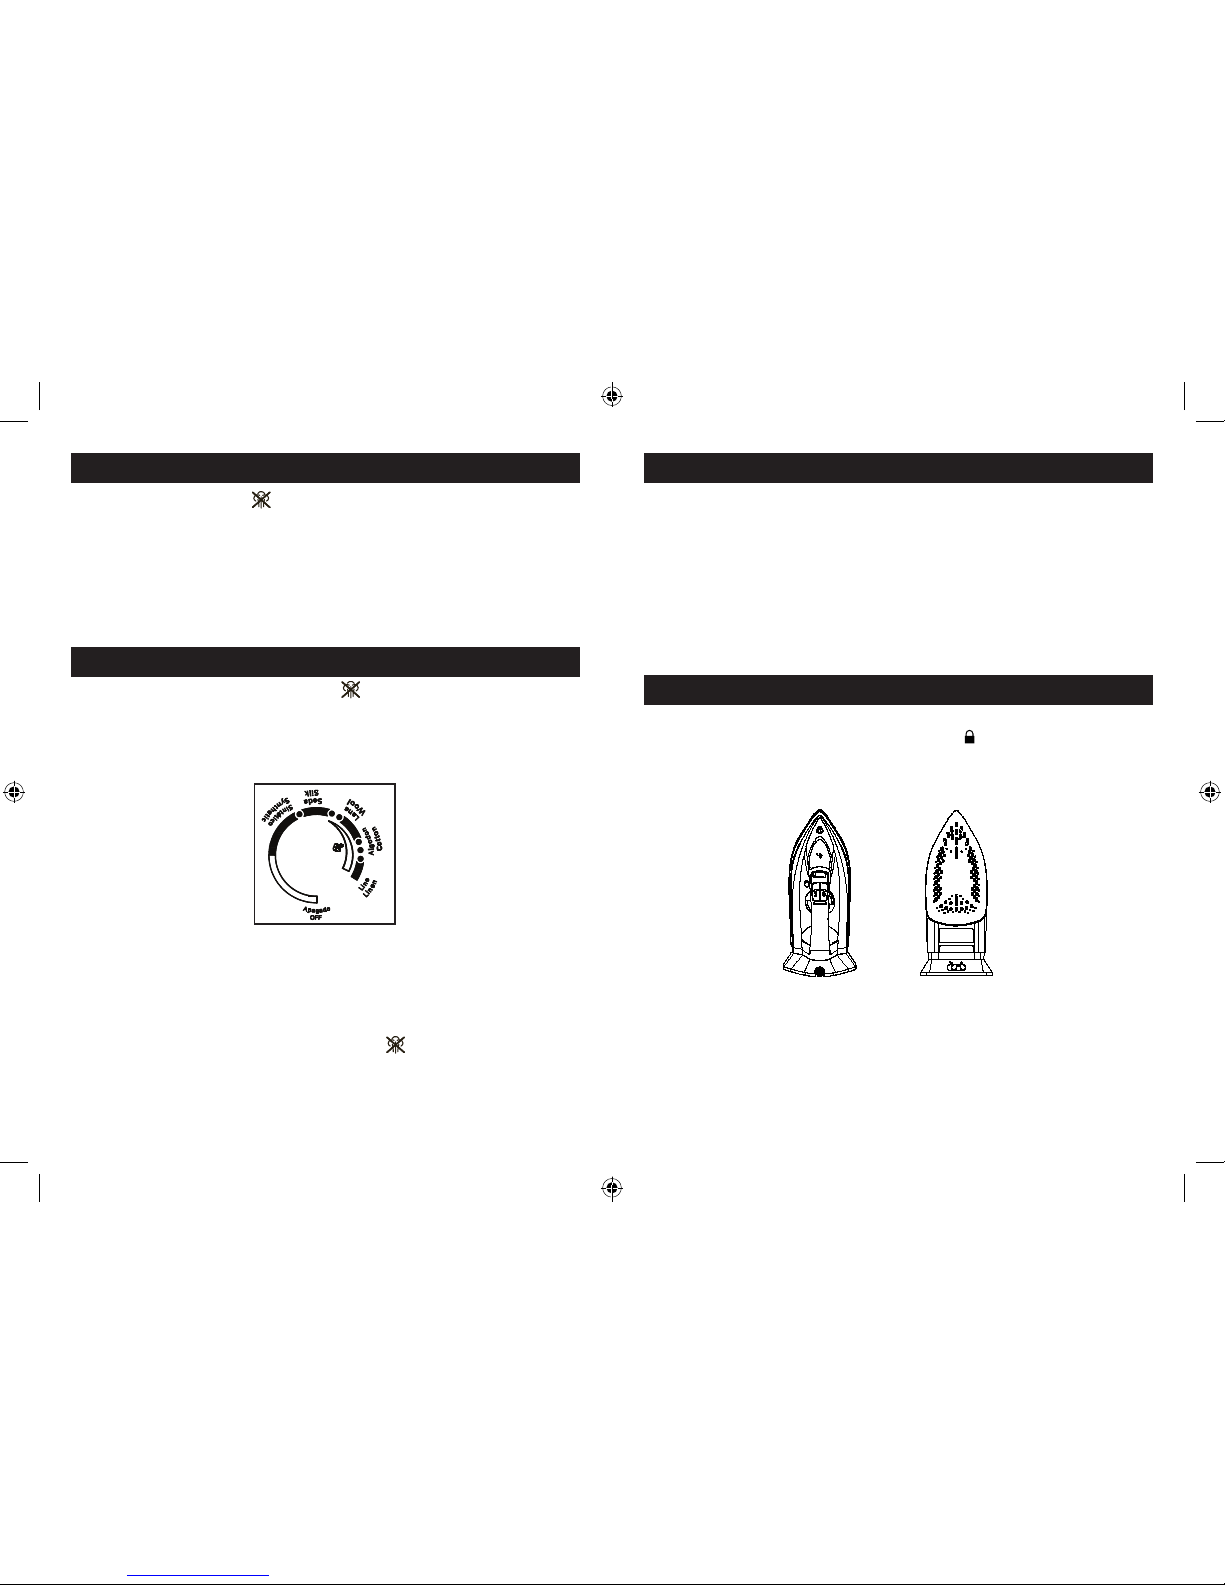
1. Set the iron in vertical position onto the Heating Base.
2. Move Lock/Unlock switch to the locked position . Lift the iron by the handle
to ensure that it is securely locked onto the base (Figure 2).
3. Keep the iron on the heel rest of the Heating Base when not ironing.
Figure 2
Page 5
-E9--E8-
CORDLESS IRONING SPECIAL FEATURES
ANTI-DRIP SYSTEM
Eliminates leaks and water spots.
SPRAY MIST® FEATURE
A powerful water spray mist that dampens the fabric to aid in removing wrinkles
from heavy fabrics and for setting creases.
TO USE: Press the SPRAY MIST® Button firmly.
SHOT OF STEAM® FEATURE
Provides an extra burst of steam for deep penetration of stubborn wrinkles. You
can use this feature while Dry or Steam ironing, as long as the Fabric Select Dial is
set to high temperature. The water reservoir must be at least ¼ full of water.
TO USE: Place the iron on top of the wrinkle and press the SHOT OF STEAM®
button each time you would like an extra burst of steam. The SHOT OF STEAM®
feature may be used continuously in approximately 3-second intervals.
SHOT OF STEAM® FEATURE
Allows iron to function vertically as a garment steamer.
TIP: When using vertical steam, hang clothing on a hanger for best results.
Hanging curtains and drapes may also be steamed.
TO USE:
1. Ensure that the iron is heated up.
2. Hold iron vertically near, but not touching the fabric you want to steam. Pull
the fabric tight.
3. Press SHOT OF STEAM® button in 3-second intervals as you move iron over
wrinkles.
WARNING: To prevent burns, keep hands away from the area being steamed.
WARNING: DO NOT steam garments while wearing them; this may result in
injuries.
1. Make sure the cord is plugged into a 120-Volt AC outlet.
2. UNLOCK THE IRON FROM THE BASE by moving the Lock/Unlock switch on
the Heating Base to the unlocked position .
3. WAIT until the Indicator Light turns solid green; the iron is ready for use. Hold
iron by the handle and remove from the base (Figure 3).
4. START IRONING.
5. PLACE the iron back on the Heating Base every time you stop ironing.
• The red Indicator Light comes on, to indicate the iron is reheating.
• When the Indicator Light turns solid green., the iron is ready for use.
IMPORTANT: When using the SHOT OF STEAM® feature, your iron might cool
down faster; therefore, it might take up to an additional time to reheat.
6. RESTART IRONING until the red Indicator Light tuns solid green again.
NOTE: The Cordless iron is NOT a rechargeable device. You cannot continuously
use this iron without placing it on the heating base.
Figure 3
Page 6
-E10-
This feature automatically turns the iron off if left in one position too long to
avoid accidents.
IF YOU LEAVE IRON ON:
• Horizontally without moving it, or accidentally tip the iron over, it will
automatically stop heating after 30 seconds. The light turns red when auto-off
activates and blinks.
• Vertically (on its heel rest) without moving it, the iron will automatically turn
off after 15 minutes. The light turns red when auto-off activates and blinks.
IMPORTANT: When the auto-off feature has been activated, the indicator light
will blink.
TO RESET: Move iron back and forth and reheat until the “Ready” indicator light
turns solid green.
1. To turn off the iron, move the Steam Lever to Dry setting and unplug the
iron.
WARNING: NEVER yank power cord when unplugging iron. This can damage
the cord.
2. If you do not use your iron on a daily basis, empty the water reservoir after
each use for a longer iron life. To do so, unplug the iron, turn the iron upside
down, open the Water Fill Hole Cover, and allow water to flow from the Fill
Hole. Shake the iron gently to remove trapped water drops.
3-WAY MOTION SMART® AUTO-OFF FEATURE.
CARING FOR YOUR IRON AFTER USE
-E11-
1. Unplug iron and allow to cool.
2. Empty water reservoir after each use and move Stem Lever to the Dry
setting.
3. Loosely loop the power cord around the iron and store iron in vertical
position on the Heating Base.
CAUTION: Wrapping the cord around the Heating Base too tightly can damage
the cord.
USING SELF-CLEAN FEATURE
Use the Self-Clean feature once a month to maintain optimal iron performance.
1. Unplug iron and remove from Heating Base.
2. Move Steam Lever back and forth to remove debris and minerals from
Steam Valve. This keeps water flowing into the steam chamber.
3. Fill water reservoir with tap water to MAX line.
4. Set iron and lock onto Heating Base the plug in iron and heat up for a
few seconds.
5. Unplug iron and remove from Heating Base. Holding iron over a sink in
a horizontal position, press Self-Clean Button and hold. Water will begin
dripping from the steam vents on the soleplate. Slowly rock iron side
to side and front to back for 30 seconds. Dip nose of the iron slightly
below the rear to circulate water. Release Self-Clean Button after one
minute.
6. Open Water Fill Hole Cover and empty remaining water. Carefully dry
soleplate with a towel after iron has cooled.
7. Plug in iron and heat for 1 minute to dry out completely. Unplug the
iron and allow to cool.
Clean soleplate after every 30 uses, or more frequently if starch is used or
build-up starts to accumulate. Before cleaning, ensure iron is unplugged and
cool.
WARNING: To avoid the risk of electric shock, do not immerse the iron in
water or other liquids.
Note: Do not use abrasive cleansers, scouring pads or vinegar to clean the
soleplate. This will damage the finish.
STORING YOUR IRON
MAINTAINING AND CLEANING YOUR IRON
CLEANING SOLEPLATE
Page 7

-E12-
Type of Debris/Build-Up Cleaning Recommendation
Light Dirt Use a cotton cloth or terrycloth towel
to wipe the soleplate with warm soapy
water.
Hard Water Deposits Use a cotton cloth or terrycloth towel to
wipe the soleplate with a 50/50 vinegar/
water mixture.
Heavy Starch or Residue
Build-up
Use Hot Iron Cleaner or Mr. Clean®
Magic Eraser® cleaning pad. Refer to the
manufacturer’s directions included with
these products for specific cleaner usage
instructions.
Mr. Clean® and Magic Eraser® are
registered trademarks owned by the
Procter & Gamble company.
ANTI-CALCIUM SYSTEM
Anti-calcium is a permanent system located inside the water reservoir to eliminate
impurities.
TO PROLONG EFFICIENCY, FOLLOW THESE STEPS ONCE A MONTH OR AFTER
EVERY 30 USES:
1. Turn off iron.
2. Add 1 teaspoon of salt to ¾ cup water and fill water reservoir with this
solution.
3. Leave solution in water reservoir for 15 minutes, shake occasionally, and then
empty through the water fill hole or through the “self-clean method”.
4. Fill water reservoir again with salt water solution, shake and empty after 15
minutes.
5. Fill water reservoir with fresh water to rinse and empty.
-E13-
IRONING TIPS
For more ironing tips and hints, please visit sunbeam.com
• Before ironing, check the garment label and follow manufacturer’s instructions. If
no instructions, start with a low-heat setting and test by ironing a small area, and
gradually increase heat.
• Sort garments by fabric type. Iron articles requiring a low-temperature setting
and gradually work up the temperature range.
• When changing from a high-temperature setting to a lower one, allow 5 minutes
for change to allow the iron to heat up or cool down.
• When steam ironing, use long, slow passes over the fabric to allow the steam to
penetrate the fabric and the heat of the soleplate to dry the moisture.
• Iron linen garments inside out to prevent shine. An ironing cloth or cotton fabric
can be used to reduce shine.
• Iron cotton while the fabric is still damp, or pre-moisten it with a spray bottle.
Set the temperature to a high setting and use steam for stubborn wrinkles and
creases
• Iron denim on the highest heat setting and use steam. Use starch for crisp, neatly
creased fabric.
• Ensure zippers are closed and flap is flat. Iron over the flap, holding the garment
taut.
• Spray starch makes the job easier.
IRONING SHIRTS
• Begin with the collar and work toward the middle from the outer edges. Iron
lengthwise, not in circles.
• Lay shoulder over narrow edge of the board and iron one side of the front. Then
iron the shoulder, across the back (below the collar line), the other shoulder and
the remainder of the front.
• Iron sleeves and cuffs, working down from the underarm seams. To remove
creases, shift the double layer of sleeve fabric and iron out.
• Iron body of garment, from half of the front around the back, then second half
of front. If your shirt does not open, slip over end of ironing board and iron front
and back in turn.
Page 8

IRONING PANTS
• Begin with the waistband and inseam area, then pockets and cuffs.
• Pull waistband on pointy end of the board, as if you’re “dressing” the ironing
board. Iron upper-front part of the pants, including the waistband.
• Place pants parallel to ironing board lengthwise so both legs are facing the same
direction. Iron each leg by moving the iron back and forth along the pant leg.
• Take cuff of the leg and bring it over towards the waistband to iron the inner part
of the leg. Repeat these 2 steps for the second leg.
-E14- -E15-
PROBLEM CAUSE/SOLUTION
Red Indicator Light is
blinking
• The light blinks to indicate that the iron auto-off
function has been activated.
• To stop the blinking and reset, move the iron back
and forth and allow to reheat.
Iron is not heating • Check that unit is plugged into the Heating Base and
that the electrical cord is plugged into a working
electrical outlet.
• Adjust Fabric Select Dial to the correct setting for
your garment.
• Verify the auto-off function is not active. Refer to
MOTION SMART® 3-WAY AUTO-OFF FEATURE
section for details.
Iron will not steam • Ensure water tank level is at least ¼ full.
• Ensure steam lever is set to a steam setting.
• Press SHOT OF STEAM® button several times to
prime.
Iron is leaking • Only fill with water to the Max level.
• SHOT OF STEAM® button has been pressed too
frequently. Only use in 3-second intervals or less.
• Empty de water reservoir after each use and move
Steam Lever to the Dry setting.
TROUBLESHOOTING
TROUBLESHOOTING CONT.
PROBLEM CAUSE/SOLUTION
Iron leaves spots/
flakes on clothing
• Empty water reservoir completely after each use.
• Clean soleplate when cool with a wet, damp cloth.
• Use self-cleaning feature once a month.
• Refer to the Anti-Calcium System section.
• Ensure water cup used to fill the iron is clean.
Wrinkles are not sufficiently
removed
• Use SHOT OF STEAM® or SPRAY MIST® features to
help remove stubborn wrinkles.
• Check that the Fabric Select Dial is set to the correct
fabric setting
• Refer to Ironing Tips or visit www.sunbeam.com for
more tips and hints.
Fabrics are getting an
unwanted “shine”
• Use an ironing cloth or a 100% white cotton fabric
and place it between the garment being ironed and
the iron to prevent “shine.”
IRONING TIPS CONT.
Page 9

-E16- -E17-
3-Year Limited Warranty
Sunbeam Products, Inc. doing business as Jarden Consumer Solutions or if in Canada,
Sunbeam Corporation (Canada) Limited doing business as Jarden Consumer Solutions
(collectively “JCS”) warrants that for a period of 3 years from the date of purchase,
this product will be free from defects in material and workmanship. JCS, at its option,
will repair or replace this product or any component of the product found to be defective
during the warranty period. Replacement will be made with a new or remanufactured
product or component. If the product is no longer available, replacement may be made
with a similar product of equal or greater value. This is your exclusive warranty. Do
NOT attempt to repair or adjust any electrical or mechanical functions on this product.
Doing so will void this warranty.
This warranty is valid for the original retail purchaser from the date of initial retail
purchase and is not transferable. Keep the original sales receipt. Proof of purchase
is required to obtain warranty performance. JCS dealers, service centers, or retail
stores selling JCS products do not have the right to alter, modify or any way change
the terms and conditions of this warranty.
This warranty does not cover normal wear of parts or damage resulting from any
of the following: negligent use or misuse of the product, use on improper voltage or
current, use contrary to the operating instructions, disassembly, repair or alteration
by anyone other than JCS or an authorized JCS service center. Further, the warranty
does not cover: Acts of God, such as re, ood, hurricanes and tornadoes.
What are the limits on JCS’s Liability?
JCS shall not be liable for any incidental or consequential damages caused by the
breach of any express, implied or statutory warranty or condition.
Except to the extent prohibited by applicable law, any implied warranty or condition
of merchantability or tness for a particular purpose is limited in duration to the
duration of the above warranty.
JCS disclaims all other warranties, conditions or representations, express, implied,
statutory or otherwise.
JCS shall not be liable for any damages of any kind resulting from the purchase, use or
misuse of, or inability to use the product including incidental, special, consequential or
similar damages or loss of prots, or for any breach of contract, fundamental or otherwise,
or for any claimbrought against purchaser by any other party.
Some provinces, states or jurisdictions do not allow the exclusion or limitation of
incidental or consequential damages or limitations on how long an implied warranty
lasts, so the above limitations or exclusion may not apply to you.
This warranty gives you specic legal rights, and you may also have other rights
that vary from province to province, state to state or jurisdiction to jurisdiction.
How to Obtain Warranty Service
In the U.S.A.
If you have any question regarding this warranty or would like to obtain warranty
service, please call 1-800-458-8407 and a convenient service center address will be
provided to you.
In Canada
If you have any question regarding this warranty or would like to obtain warranty
service, please call 1-800-667-8623 and a convenient service center address will be
provided to you.
In the U.S.A., this warranty is offered by Sunbeam Products, Inc. doing business as
Jarden Consumer Solutions located in Boca Raton, Florida 33431. In Canada, this
warranty is offered by Sunbeam Corporation (Canada) Limited doing business as
Jarden Consumer Solutions, located at 20 B Hereford Street, Brampton,Ontario L6Y
0M1. If you have any other problemor claimin connection with this product, please
write our Consumer Service Department.
PLEASE DO NOT RETURN THIS PRODUCT TO ANY OF THESE
ADDRESSES OR TO THE PLACE OF PURCHASE.
Page 10

GCSBNC-100
GCSBNC-101
Manual de Instrucciones
Plancha Sunbeam® con Cable/Sin Cable
LEA Y CONSERVE ESTAS INSTRUCCIONES
www.sunbeam.com P.N. 189843
®
de los daños incidentales o emergentes ni las limitaciones a la duración de las
garantías implícitas, de modo que es posible que la exclusión o las limitaciones
antes mencionadas no se apliquen en su caso.
Esta garantía le otorga derechos legales especícos y es posible que usted tenga
otros derechos que varían de un estado, provincia o jurisdicción a otro.
Cómo solicitar el servicio en garantía
En los Estados Unidos
Si tiene alguna pregunta sobre esta garantía o desea recibir servicio de garantía,
llame al 1-800-458-8407 y podrá obtener la dirección del centro de servicio que le
resulte más conveniente.
En Canadá
Si tiene alguna pregunta sobre esta garantía o desea recibir servicio de garantía,
llame al 1-800-667-8623 y podrá obtener la dirección del centro de servicio que le
resulte más conveniente.
En los Estados Unidos, esta garantía es ofrecida por Sunbeam Products, Inc.
operando bajo el nombre de Jarden Consumer Solutions, Boca Ratón, Florida 33431.
En Canadá, esta garantía es ofrecida por Sunbeam Corporation (Canada) Limited
operando bajo el nombre de Jarden Consumer Solutions, 20 B Hereford Street,
Brampton, Ontario L6Y 0M1. Si usted tiene otro problema o reclamo en conexión con
este producto, por favor escriba al Departamento de Servicio al Consumidor.
POR FAVOR NO DEVUELVA ESTE PRODUCTO A NINGUNA
DE ESTAS DIRECCIONES NI AL LUGAR DE COMPRA.
Para preguntas sobre los productos llame:
Sunbeam Consumer Service
Canada : 1-800-667-8623
États-Unis : 1-800-458-8407
www.sunbeam.com
© 2016 Sunbeam Products, Inc. operando bajo el nombre de Jarden Consumer Solutions.
Todos los derechos reservados. Distribuido por Sunbeam Products, Inc. operando
bajo el nombre de Jarden Consumer Solutions, Boca Raton, Florida 33431.
Impreso en China
®
Page 11

-S2-
PRECAUCIONES IMPORTANTES DE SEGURIDAD
Cuando se utilizan aparatos eléctricos, siempre deben seguirse
precauciones básicas de seguridad incluyendo las siguientes:
LEA TODAS LAS INSTRUCCIONES ANTES DE USAR
• Use la plancha solamente con el fin para el que ha sido deseñada.
• Para protegerse contra el riesgo de una descarga eléctrica, no sumerja la
plancha en agua ni en otros líquidos.
• La palanca de vapor siempre debe estar en la posición de seco antes
de enchufar o desenchufar la plancha del tomacorriente. Nunca le dé un
tirón al cable para desconectarlo del tomacorriente, sujete el enchufe y
tire de él para desconectarlo.
• No permita que el cable toque superficies calientes. Deje enfriar la
plancha por completo antes de guardarla. Enrolle el cable holgadamente
alrededor de la plancha para guardarla.
• Desconecte siempre la plancha del tomacorriente eléctrico cuando
esté llenándola con agua, limpiándola o vaciándola y cuando no la esté
usando.
• No haga funcionar la plancha si el cable está dañado o si la plancha
se ha caído o dañado. Para evitar el riesgo de descarga eléctrica, no
desensamble la plancha. Llévela a un centro de servicio autorizado para
que la examinen y/o reparen. El reensamblaje incorrecto puede provocar
el riesgo de una descarga eléctrica al usar la plancha.
• Es necesario vigilar cuidadosamente a los niños cuando usen cualquier
aparato o se encuentren cerca de él. No deje la plancha sin vigilancia
mientras esté enchufada, encendida o sobre una tabla de planchar.
• Se pueden producir quemaduras por contacto con las partes de metal
calientes, el agua caliente o el vapor. Tenga cuidado al invertir una
plancha de vapor ya que puede quedar agua caliente en el depósito de
agua.
• Si la plancha no funciona normalmente, desconéctela del tomacorriente
y hágala revisar por un centro de servicio autorizado o llame a Servicio al
Cliente al 1 (800) 458-8407.
-S3-
CONSERVE ESTAS INSTRUCCIONES
PARA PRODUCTOS COMPRADOS EN LOS EE.UU. Y CANADÁ
Para reducir el riesgo de descarga eléctrica, este aparato tiene un enchufe
polarizado (un contacto es más ancho que el otro). Este enchufe entra en
un tomacorriente polarizado sólo de una manera; si el enchufe no entra
totalmente en el tomacorriente, invierta el enchufe. Si aún así no entra,
consulte a un electricista calificado. No intente anular esta característica de
seguridad.
Gracias por comprar la Plancha Versa Glide® Con Cable/Sin Cable Sunbeam®.
La nueva Plancha Versa Glide® Con Cable/Sin Cable Sunbeam® le permitirá
planchar más rápido. Quite la base de calentamiento para usarla en el modo
sin cable, o tambien puede utilizarla en el modo con cable para periodos
continuos de calor y vapor.
• Su plancha SUNBEAM® está diseñada para apoyarse en el talón de
descanso. Use solamente con el talón de descanso proporcionado. No
deje la plancha sin vigilancia. No apoye la plancha sobre una superficie
no protegida, aun cuando sea sobre el talón de descanso.
• Este aparato funciona con alta potencia. Para evitar una sobrecarga del
circuito no haga funcionar otro aparato de alta potencia en el mismo
circuito.
• Si resulta absolutamente necesario usar un cable de extensión, Se debe
utilizar un cable con una capacidad eléctrica mayor o igual a la capacidad
eléctrica nominal de la plancha. Los cables de menor amperaje se pueden
sobrecalentar. Se debe tener cuidado de acomodar el cable de extensión
de modo tal que no pueda ser halado o provocar tropiezos.
Page 12

-S4- -S5-
CARACTERÍSTICAS
1. Boquilla de Rociado
Fino SPRAY MIST®
2. Orificio de Llenado
de Agua
3. Tapa del Orificio de
Llenado de Agua
4. Palanca de Vapor
5. Botón SPRAY MIST®
6. Botón SHOT OF
STEAM® / Vapor
Vertical
7. Luz Indicadora de
Calentamiento
8. Cable de 10 pies
Giratorio.
9. Base de
Calentamiento
a. Interruptor
con ajuste de
asegurado/abierto
(para planchar con
cable/sin cable)
10. Depósito de Agua
Transparente
11. Dial para
Seleccionar las Telas
12. Botón de
Autolimpieza
13. Suela
14. Sistema Antisarro
(adentro)
ACERCA DE LOS ICONOS/SÍMBOLOS DE SU PLANCHA
SISTEMA ANTISARRO (AntiCalc) – Un sistema permanente
localizado en el interior del depósito de agua, diseñado
para eliminar las impurezas. Consulte la sección SISTEMA
ANTISARRO (ANTI-CALC) bajo la sección de MANTENIMIENTO
Y LIMPIEZA DE SU PLANCHA para instrucciones detalladas.
SISTEMA ANTIGOTEO - Elimina el goteo y las manchas de
agua.
FUNCIÓN DE GOLPE DE VAPOR SHOT OF STEAM®
Permite que la plancha funcione verticalmente como un
vaporizador de prendas. Consulte la sección de FUNCIONES
ESPECIALES para instrucciones detalladas.
FUNCIÓN DE GOLPE DE VAPOR SHOT OF STEAM® -
Proporciona un golpe de vapor adicional para ayudar a
eliminar las arrugas más difíciles.
SIN VAPOR – Brinda la flexibilidad de planchar sin vapor.
Consulte la sección de PLANCHADO EN SECO para
instrucciones detalladas.
FUNCIÓN SPRAY MIST® - Produce un potente rocío fino
que humedece la tela para ayudar a eliminar arrugas en telas
gruesas y a definir pliegues.
FUNCIÓN DE APAGADO AUTOMÁTICO POR DETECCIÓN
DE MOVIMIENTO EN TRES POSICIONES MOTION
SMART®
Esta función apaga automáticamente la plancha si se deja en
una posición demasiado tiempo para evitar accidentes.
8
9
10
11
7
5
6
4
14
13
12
1
2
3
a
Page 13

-S6-
LLENADO DEL DEPÓSITO DE AGUA (USAR AGUA DE LA LLAVE)
PLANCHADO EN SECO
1. Mueva la palanca de vapor a la posición de seco .
2. Coloque la plancha con la suela descansando sobre una superficie plana y
limpia.
3. Abra la tapa del orificio de llenado de agua, sujetando ambas lengüetas a los
lados y tirando suavemente de la tapa para abrirla.
4. Use una taza medidora con boquilla de vertido fácil para llenar el depósito con
agua de la llave, a través del orificio de llenado de agua. No llene el depósito
de agua por encima del nivel de llenado máximo (MAX).
5. Cierre la tapa del orificio de llenado de agua de forma segura después del
llenado.
ADVERTENCIA: Para prevenir el riesgo de quemaduras, tenga cuidado al llenar
de agua una plancha caliente. Las piezas metálicas calientes, el agua caliente y el
vapor pueden provocar lesiones.
1. Asegúrese de que la palanca de vapor esté en la posición de seco y que la
plancha esté conectada a la base de calentamiento sobre una superficie plana
y estable (siga las instrucciones en la sección de “Planchado con Cable”).
2. Gire el dial selector de telas a la posición deseada, según el tipo de tela a
planchar (Figura 1).
NOTA: Si tiene dudas sobre el tipo de tela de su prenda, es mejor probar primero
la temperatura de la plancha en un ruedo o una costura interior.
3. Enchufe el cable a un tomacorriente de 120 voltios CA.
• La luz roja indicadora se ilumina para indicar que la plancha se está
calentando.
• Cuando la luz indicadora cambie a verde. La plancha ha alcanzado la
temperatura apropiada y está lista para ser utilizada.
4. Para usar la plancha sin el cable, siga las instrucciones en la sección
“Planchado Sin Cable”.
Figure 1
-S7-
PLANCHADO AL VAPOR
PLANCHADO CON CABLE
1. Siga las instrucciones en la sección de “Llenado del Depósito de Agua” y
“Planchado con Cable.”
2. Mueva la palanca de vapor a la posición deseada de vapor. Gire el dial selector
de telas a la posición deseada, según el tipo de tela a planchar (ver la Figura 1).
NOTA: Si tiene dudas sobre el tipo de tela de su prenda, es mejor probar primero
la temperatura de la plancha en un ruedo o una costura interior.
3. Enchufe el cable a un tomacorriente de 120 voltios CA.
• La luz roja indicadora se ilumina para indicar que la plancha se está
calentando.
• Cuando la luz indicadora cambie a verde. La plancha ha alcanzado la
temperatura apropiada y está lista para ser utilizada.
4. Para usar la plancha sin el cable, siga las instrucciones en la sección “Planchado
Sin Cable”.
1. Conecte la plancha en posición vertical en la base de calentamiento.
2. Mueva el interruptor con ajuste de asegurado/abierto a la posición de
asegurado . Sujete la plancha por el mango y álcela para verificar que esté
asegurada en la base (Figura 2).
3. Mantenga la plancha sobre el talón de descanso de la base de calentamiento
cuando no esté planchando.
NOTA: Aunque la palanca de vapor esté en la posición seco , podrá usar
las funciones de golpe de vapor SHOT OF STEAM® o de rociado SPRAY MIST®,
siempre que el dial selector de tela esté ajustado a lana, algodón o lino /
temperatura alta. El depósito debe tener por lo menos ¼ de nivel de agua.
Figure 2
Page 14

-S9--S8-
PLANCHADO SIN CABLE FUNCIONES ESPECIALES
SISTEMA ANTIGOTEO
Elimina el goteo y las manchas de agua.
FUNCIÓN SPRAY MIST®
Un potente rocío fino que humedece la tela para ayudar a eliminar arrugas en
telas gruesas y a definir pliegues.
Para usar: Presione firmemente el botón SPRAY MIST®.
FUNCIÓN DE GOLPE DE VAPOR SHOT OF STEAM®
Proporciona un golpe de vapor adicional que penetra profundamente en las
arrugas más difíciles. Esta función puede usarse mientras se plancha en seco o al
vapor, siempre que el dial selector de telas esté ajustado a temperatura alta . El
depósito de agua debe estar lleno por lo menos ¼ de nivel de agua.
PARA USAR: Coloque la plancha sobre la arruga y presione el botón de golpe de
vapor SHOT OF STEAM® siempre que necesite un golpe de vapor adicional. La
función de golpe de vapor SHOT OF STEAM® puede usarse continuamente en
intervalos aproximados de 3 segundos.
FUNCIÓN DE GOLPE DE VAPOR SHOT OF STEAM®
Permite a la plancha funcionar verticalmente como un vaporizador de prendas.
CONSEJO: Al usar la función de vapor vertical, cuelgue la prenda de vestir en
una percha para obtener los mejores resultados. También se pueden vaporizar las
cortinas colgadas.
PARA USAR:
1. Asegúrese que la plancha esté caliente.
2. Sujete la plancha en posición vertical, cerca de la tela que desee vaporizar,
pero sin tocarla. Hale la tela para estirarla.
3. Presione el botón de golpe de vapor SHOT OF STEAM® en intervalos de 3
segundos mientras mueve la plancha sobre las arrugas.
ADVERTENCIA: Para evitar quemaduras, mantenga las manos alejadas del área
que va a vaporizar.
ADVERTENCIA: NO vaporice prendas mientras las lleve puestas; esto podría
ocasionar lesiones.
1. Asegúrese de que el cable esté enchufado a un tomacorriente de 120 voltios CA.
2. LIBERE LA PLANCHA DE LA BASE moviendo el interruptor con ajuste de
asegurado/abierto a la posición de abierto .
3. ESPERE a que la luz roja indicadora cambie a verde; la plancha está lista para ser
usada. Sujete firmemente la plancha por el mango y retírela de la base (Figura 3).
4. COMIENCE A PLANCHAR.
5. COLOQUE la plancha en su base de calentamiento cada vez que pare de planchar.
• La luz roja indicadora se ilumina para indicar que la plancha se está recalentando.
• Cuando la luz indicadora cambie a verde, la plancha está lista para usarse de
nuevo.
IMPORTANTE: Si utiliza la función SHOT OF STEAM®, su plancha podría enfriarse más
rápido, lo cual puede hacer que se demore tiempo adicional para recalentarse.
6. COMIENCE A PLANCHAR DE NUEVO hasta que la luz roja indicadora cambie a
verde.
NOTA: La plancha en modo sin cable no es un dispositivo recargable. no puede utilizar
la plancha continuamente sin colorcala en su base de calentamiento.
Figure 3
Page 15

-S10-
Tipos de Residuos/
Acumulación
Limpieza Recomendada
Sucio Ligero Use un paño de algodón o toalla de
felpa para limpiar la base con agua tibia
jabonosa.
Depósitos de Agua Dura Use un paño de algodón o toalla de felpa
para limpiar la base con una mezcla de
50/50 de vinagre y agua.
Almidones Pesados o
Acumulación de Residuos
Utilice limpiador para planchas calientes
o almohadillas Mr. Clean® Magic Eraser®.
Consulte las instrucciones del fabricante
de estos productos para instrucciones
específicas de limpieza.
Mr. Clean® y Magic Eraser® son marcas
registradas propiedad de la compañía
Procter & Gamble.
-S11-
Esta función apaga automáticamente la plancha si se deja en una posición
demasiado tiempo para evitar accidentes.
SI DEJA LA PLANCHA ENCENDIDA:
• En posición horizontal sin moverla, o la vuelca accidentalmente, dejará de
calentarse automáticamente después de 30 segundos. La luz se vuelve roja
cuando el auto-apagado se activa y hace destellos.
• En posición vertical (sobre la base de apoyo) sin moverla, la plancha se
apagará automáticamente después de 15 minutos. La luz se vuelve roja
cuando el auto-apagado se activa y hace destellos.
IMPORTANTE: Cuando la función de auto-apagado se activa, la luz roja de
encendido hará destellos.
PARA RESTABLECER: Mueva la plancha hacia adelante y hacia atrás y caliente
hasta que la luz indicadora de “Lista” se vuelva verde.
1. Para apagar la plancha, mueva la palanca de vapor hacia la posición de seco
y desenchúfela.
ADVERTENCIA: NUNCA le de un tirón al cable de alimentación para
desenchufar la plancha ya que esto puede dañarlo.
2. Si no usa la plancha diariamente, vacíe el tanque de agua completamente
después de cada uso. Para hacerlo, voltee la plancha hacia abajo, abra la tapa
del orificio de llenado, y permita que el agua fluya del orificio de llenado.
Sacuda la plancha suavemente para eliminar las gotas de agua retenidas.
1. Apague la plancha, desenchufe y déjela enfriar.
2. Vacíe el depósito de agua por completo después de usar la plancha y mueva
la palanca de vapor a la posición de seco .
3. Enrolle el cable holgadamente alrededor de la plancha y almacene la plancha
colocada en posición vertical sobre la base de calentamiento.
IMPORTANTE: Enrollar el cable de forma apretada alrededor de la base de
calentamiento puede dañarlo.
USO DE LA FUNCIÓN DE LIMPIEZA AUTOMÁTICA
Use la función de limpieza automática una vez al mes para mantener el
rendimiento óptimo de la plancha.
1. Desenchufe la plancha y retire de la base de calentamiento.
2. Mueva la palanca de vapor de un lado a otro varias veces para eliminar los
desechos y los residuos minerales de la válvula de vapor. Esto mantendrá el
flujo de agua hacia la cámara de vapor.
3. Llene el depósito con agua de la llave hasta la línea de llenado máxima
(MAX).
4. Coloque la plancha en la base de calentamien, luego enchufe la plancha y
caliente por varios segundos.
5. Desenchufe la plancha y retire de la base de calentamiento. Sujete la plancha
en posición horizontal sobre un fregadero, oprima y mantenga presionado el
botón de limpieza automática (Self Clean). El agua comenzará a gotear por
las salidas de vapor en la suela. Agite la plancha lentamente de un lado a otro
y hacia adelante y hacia atrás, durante 30 segundos. Incline levemente hacia
abajo la punta de la plancha, de modo que quede más baja que la parte
posterior, para que el agua circule. Suelte el botón de limpieza automática
después de un minuto.
6. Abra la tapa del orificio de llenado y vierta el agua restante. Cuidadosamente
limpie la suela con una toalla después que la plancha se haya enfriado.
7. Enchufe la plancha y deje que se caliente durante 2 minutos para que se
seque por completo. Desenchufe la plancha y deje que se enfríe.
FUNCIÓN DE APAGADO AUTOMÁTICO POR DETECCIÓN DE
MOVIMIENTO EN TRES POSICIONES MOTION SMART®
ALMACENAMIENTO DE LA PLANCHA
MANTENIMIENTO Y LIMPIEZA DE SU PLANCHA
CUIDADO DE SU PLANCHA DESPUÉS DE USARLA
Page 16

-S12- -S13-
Limpie la suela después de cada 30 usos, o más frecuentemente si se usa almidón
o comienza a acumularse residuos. Antes de limpiar, asegúrese que la plancha
esté desenchufada y fría.
ADVERTENCIA: Para evitar el riesgo de una descarga eléctrica, no sumerja la
plancha en agua ni en otros líquidos.
NOTA: no la remoje en líquidos ni use limpiadores abrasivos, estropajos ni
vinagre para limpiar la suela, ya que esto puede dañar el acabado.
El antisarro es un sistema permanente localizado en el interior del depósito de
agua, que elimina las impurezas.
PARA PROLONGAR LA EFICIENCIA DE LA UNIDAD, SIGA ESTOS PASOS UNA VEZ
AL MES O DESPUÉS DE CADA 30 USOS:
1. Apague la plancha.
2. Agregue 1 cucharadita de sal en ¾ de taza de agua y llene el depósito de
agua con la solución.
3. Déjela reposar en el depósito durante 15 minutos, agítela ocasionalmente y
a continuación vacíe el depósito a través del orificio de llenado o mediante el
“método de auto-limpieza”.
4. Llene nuevamente el depósito de agua con una solución de agua salina,
agítela y deséchela después de 15 minutos.
5. Llene el depósito con agua limpia para enjuagarlo y vacíe el depósito.
Para consejos y trucos adicionales, por favor visite sunbeam.com
• Siempre lea las etiquetas de la prenda y siga las instrucciones de planchado
del fabricante.
• Antes de planchar, verifique la etiqueta de la prenda de vestir y siga las
instrucciones del fabricante. Si no tiene instrucciones, comience con una
posición de temperatura baja y pruébela planchando una área pequeña.
Aumente gradualmente la temperatura.
• Clasifique las prendas de acuerdo con el tipo de tela. Planche las prendas que
requieran una temperatura baja y aumente poco a poco la temperatura.
• Cuando cambie de un ajuste de temperatura alta a una baja, espere 5
minutos para cambiar para que la plancha se caliente o enfrie.
• Al planchar con vapor, aplique pasadas largas y lentas sobre la tela para
permitir que el vapor penetre en la tela y que el calor de la suela seque la
humedad.
• Planche las prendas de lino por el revés para evitar sacarles brillo. Para
disminuir el brillo puede usar un paño para planchar o una tela de algodón.
• Planche las prendas de algodón cuando la tela esté todavía humeda o prehumedezca con una botella aerosol. Ajuste a una temperatura alta y use la
función de golpe de vapor SHOT OF STEAM® para arrugas difíciles y definir
pliegues.
• Planche las prendas de mezclilla en la temperatura máxima y use la función
de golpe de vapor SHOT OF STEAM®. Use almidón para que la tela quede
dura y definir los pliegues.
• Cerciórese de que las cremalleras estén cerradas y que la solapa esté plana.
Planche sobre la solapa, manteniendo estirada la prenda de vestir.
• Los aerosoles de almidón facilitan la tarea de planchado.
PLANCHADO DE CAMISAS
• Comience por el cuello y avance hacia el centro desde los bordes exteriores.
Planche a lo largo, no en círculos.
• Coloque el hombro sobre el extremo más angosto de la tabla de planchar y
planche uno de los lados del frente. A continuación, planche el hombro, la
espalda (por debajo de la línea del cuello), el otro hombro y el otro lado del
frente.
• Planche las mangas y los puños, avanzando desde las costuras de la sisa,
hacia abajo. Para eliminar los pliegues, alterne la doble capa de tela de las
mangas y planche.
• Planche el cuerpo de la prenda, comenzando por una mitad del frente,
siguiendo por la espalda y terminando por la otra mitad del frente. Si la
camisa no se abre, deslícela por el extremo de la tabla de planchar, planche
la parte del frente y luego la de atrás.
PLANCHADO DE PANTALONES
• Comience por la cintura y el área de la entrepierna, y continúe por los
bolsillos y los puños.
• Tome el pantalón por la cintura e introdúzcalo por el extremo angosto de
la tabla, como si estuviera “vistiendo” la tabla de planchar. Planche la parte
superior frontal de los pantalones, incluso la faja de la cintura.
• Coloque los pantalones en posición paralela a la tabla de planchar, a lo largo,
de modo que ambas piernas queden en la misma dirección. Planche cada
pierna deslizando la plancha hacia arriba y hacia abajo por la pierna del
pantalón.
• Tome el ruedo de la pierna y páselo por encima de la faja de la cintura para
planchar la parte interna de la pierna. Repita estos dos pasos para la otra
pierna del pantalón.
LIMPIEZA DE LA SUELA
SISTEMA ANTISARRO (ANTICALC)
CONSEJOS PRACTICOS PARA PLANCHAR
Page 17

-S15-
Garantía Limitada de 3 Años
Sunbeam Products, Inc. operando bajo el nombre de Jarden Consumer Solutions, o en
Canadá, Sunbeam Corporation (Canada) Limited operando bajo el nombre de Jarden
Consumer Solutions, (en forma conjunta, “JCS”), garantiza que por un período de tres
años a partir de la fecha de compra, este producto estará libre de defectos de materiales
y mano de obra. JCS, a su elección, reparará o reemplazará este producto o cualquier
componente del mismo que presente defectos durante el período de garantía. El
reemplazo se realizará por un producto o componente nuevo o reparado. Si el producto
ya no estuviera disponible, se lo reemplazará por un producto similar de valor igual o
superior. Ésta es su garantía exclusiva. No intente reparar o ajustar ninguna función
eléctrica o mecánica de este producto. Al hacerlo elimínará ésta garantía.
La garantía es válida para el comprador minorista original a partir de la fecha de
compra inicial y la misma no es transferible. Conserve el recibo de compra original.
Para solicitar servicio en garantía se requiere presentar un recibo de compra. Los
agentes y centros de servicio de JCS o las tiendas minoristas que venden productos
de JCS no tienen derecho a alterar, modicar ni cambiar de ningún otro modo los
términos y las condiciones de esta garantía.
Esta garantía no cubre el desgaste normal de las piezas ni los daños que se
produzcan como resultado de uso negligente o mal uso del producto, uso de voltaje
incorrecto o corriente inapropiada, uso contrario a las instrucciones operativas, y
desarme, reparación o alteración por parte de un tercero ajeno a JCS o a un Centro
de Servicio autorizado por JCS. Asimismo, la garantía no cubre actos fortuitos tales
como incendios, inundaciones, huracanes y tornados.
¿Cuál es el límite de responsabilidad de JCS?
JCS no será responsable de daños incidentales o emergentes causados por el incumplimiento de alguna garantía o condición expresa, implícita o legal.
Excepto en la medida en que lo prohíba la ley aplicable, cualquier garantía o
condición implícita de comerciabilidad o aptitud para un n determinado se limita,
en cuanto a su duración, al plazo de la garantía antes mencionada.
JCS queda exenta de toda otra garantías, condiciones o manifestaciones, expresa,
implícita, legal o de cualquier otra naturaleza.
JCS no será responsable de ningún tipo de daño que resulte de la compra, uso o mal
uso del producto, o por la imposibilidad de usar el producto, incluidos los daños
incidentales, especiales, emergentes o similares, o la pérdida de ganancias, ni de
ningún incumplimiento contractual, sea de una obligación esencial o de otra naturaleza, ni de ningún reclamo iniciado contra el comprador por un tercero.
Algunas provincias, estados o jurisdicciones no permiten la exclusión o limitación
-S14-
PROBLEMA CAUSA/SOLUCIÓN
La luz roja de
calentamiento
parpadea
• La luz parpadea para indicar que la función de apagado automático está
activa.
• Para detener el parpadeo y calentar de nuevo, mueva la plancha hacia
atrás y hacia adelante y permita que la plancha se caliente de nuevo.
La plancha no
se calienta
• Asegúrese de que la plancha esté conectada en la base de calentamiento
y que el cable esté enchufado a un tomacorriente que funciona.
• Posicione el dial selector de telas al ajuste correcto para su prenda.
• Cerciórese de que la función de apagado automático no esté activada.
Consulte la sección de la FUNCIÓN DE APAGADO AUTOMÁTICO EN 3
POSICIONES MOTION SMART® para más detalles.
La plancha
no produce
vapor
• Cerciórese de que el depósito esté lleno hasta por lo menos ¼ del nivel
de agua.
• Verifique que la palanca de vapor esté en una posición de vapor.
• Presione el botón de golpe de vapor SHOT OF STEAM® varias veces para
preparar la válvula.
La plancha
gotea
• Llene el depósito solamente hasta la línea de nivel máxima (MAX).
• Se ha presionado el botón de golpe de vapor SHOT OF STEAM® muy
seguido. Use la función de golpe de vapor solamente en intervalos de 3
segundos o menos.
• Vacíe el depósito de agua después de cada uso y coloque la palanca de
vapor en la posición de seco .
Al planchar
quedan
manchas o
vetas en la
ropa
• Vacíe el depósito de agua por completo después de usar la plancha.
• Cuando se haya enfriado, limpie la suela con un paño húmedo.
• Use la función de limpieza automática una vez al mes.
• Consulte la sección de SISTEMA ANTISARRO.
• Cerciórese de que la taza medidora que use para llenar de agua la
plancha esté limpia.
Las arrugas no
se eliminan
por completo
• Use las funciones de golpe de vapor SHOT OF STEAM® o de rociado fino
SPRAY MIST® para ayudar a eliminar las arrugas más difíciles.
• Asegúrese de que el dial selector para telas esté posicionado en el ajuste
correcto.
• Consulte la sección de “Consejos Prácticos” o visite www.sunbeam.com
para consejos y trucos adicionales.
Las telas
adquieren un
“brillo” no
deseado
• Use un paño para planchar o una tela blanca de 100% algodón y
colóquela entre la prenda que va a planchar y la plancha para evitar
“sacarle brillo”.
RESOLUCIÓN DE PROBLEMAS
 Loading...