

Page 1
DWSB3607WW
DWSB3607BB
DWSB3607RR
Page 2
Dear Cus to me r,
Please c ar ef ul ly r ea d this manual before using th e di shwa sh er.
It wil l he lp y ou to us e an d maintain the dishwasher prope rl y.
Keep it to r ef er to a t a la te r da te .
Pass it on to any su bs equent owner of the appliance.
This m anual co nt ai ns sections of Safety Instruction s,
Operatin g Inst ru ctions , Installation Instru ctio ns a nd
Tro ubleshooting Tips, etc.
Review the s ecti on on Trouble shooting Tips to
solv e co mmon p roblem s.
If you can n ot res ol ve t he pro blems by yourself,
plea se cal l Cust om er Service 1-855-877-4085.
Contro l Pa ne l........... .... .... ....... .... .... ....... .... .... ......2
Dishwasher Fea tu re s.. .. .. .... .. .... .............. ..............
Filling th e Rins e Aid Dis penser... ...........................
Function of Detergent .. ............. ...... ....... .. .... .. .. .....
Recommendations....... ............. ......... ............. ......
Utensil Guide....... ............. ........... ............. ......... ...
Attent ion Before or After Loading the Dishwasher
Ba skets ................................. .. ...... .. .. .. ................
Lo adin g the Ba skets..... ..................... .. ............ ......
Cutler y Basket............. ........ .... .... ........................
Wash Cycle Table.. .. .. .. .. .. ...... .. .............................
Tur ning on the Appliance................... .. ........ .........
Ch angi ng the Wash Cycle.......... .... .. ............... ......
Forg et to Add a Dish?.......................... .................
At the End of the Wash Cycle ...... .. .. .. .. .. .. .... .. .........
Filtering Sy stem. .. .... .. .. ............................... .........
Caring f or t he D is hwashe r........ ........ .. .. ........ .........
2
3
4
6
6
6
7
8
9
9
10
10
10
11
12
The manu fa ctur er, following a policy of constant
developm ent an d updating of the product, may make
modifica tions wi thout giving prior notice.
Inst alla ti on Prepa ra ti on........................................
Positioning the Appliance.... .................................
About Power Co nnec ti on. ................. ........ .......... ..
Water Con ne ct io n.. .. ................. ........ .. .. .... .. .. .. .....
Connec tion of Dr ain Ho ses.... .... .. ............... .... ......
Star ting t he D ishwas her.. ........... .... ...... ........... ......
Before Calling for Service......................................
Error Cod es. ............. ............... ................. .. .........
Tech nical Infor mation. .. ....... .. ......................... .....
13
14
14
14
16
16
17
18
19
Page 3

READ ALL INSTRUCTIONS BEFORE USING AND SAVE FOR FUTURE REFERENCE.
When using your dishwasher, follow the precautions listed below:
GROUNDING INSTRUCTIONS
This appliance must be grounded. In the event of a
malfunction or breakdown, grounding will reduce
the risk of electric shock by providing a path of
least resistance of electric current. This appliance
is equipped with a cord having an equipmentgrounding conductor and a grounding plug.
The plug must be plugged into an appropriate outlet
that is installed and grounded in accordance with
all local codes and ordinances.
WARNING: PROPER USE
Do not abuse, sit on, or stand on the door or dish
rack of the dishwasher.
Do not touch the heating element during or
immediately after use.
(This instruction is only applicable to machines
with a visual heating element.)
Do not operate your dishwasher unless all
enclosure panels are properly in place. Open
the door very carefully if the dishwasher is
operating, there is a risk of water squirting out.
Do not place any heavy objects or stand on the
door when it is open. The appliance could tip
forward.
When loadi ng i te ms t o be w as he d:
1) Secure sh ar p it ems so t ha t th ey are not
likely t o da mage t he d oo r se al .
2 Kniv es a nd o th er u tens ils wi th
) WARNI NG:
shar p poin ts m us t be loaded in the basket
wi th the ir poi nt s do wn or placed in a
horizo nt al p osit ion.
When usi ng y our di sh wa sh er, you should
prev ent pl asti c it em s fr om c oming into contact
with h eating eleme nt . (T hi s instruction is only
applicab le to ma ch in es w it h a visual heating
element.)
Check that t he d et er gent is emp ty
after comp leti on of th e wa sh c yc le.
Do not wash plastic items unless they are marked
dishwasher safe or the equivalent. For plastic items
n
ot so marked, check the manufacturer's
recommendations.
Use only deterge nt a nd r inse additive s
designed for a n au to ma tic dish wa sher.
Never use soap , laun dr y de te rg ent, or hand
washing de te rg ent in y ou r dishwasher. Keep
these prod ucts o ut o f th e re ac h of chi ldren.
rece pt acle
Improper connection of the equipment-grounding
conductor can result in a risk of electric shock.
Check with a qualified electrician or service
representative if you are in doubt whether the
appliance is properly grounded. Do not modify the
plug provided with the appliance; If it is not fit for
the outlet. Have a proper outlet installed by a
qualified electrician.
Keep children away from detergent and rinse aid, keep
child away from the open door of the dishwasher,
ren
there could still be some detergent left inside.
This appliance is not intended for use by persons
(including children with reduced physical, sensory or
mental capabilities, or lack of experience and
knowledge, unless they have been given supervision
or instruction concerning use of the appliance by a
person responsible for their safety.
Children should be supervised to ensure that they do
not play with the appliance.
Dish washer d et er ge nts are st ro ngly alkaline, they
can be extreme ly d an ge ro us i f swallowed. Avoid
contact wi th s ki n an d ey es and keep children away
from the dis hw as he r wh en the door is op en.
The door s houl d no t be l ef t in the open position
since this cou ld p re se nt a tripping hazard.
If the s uppl y cord is damaged, it must b e replaced
by the manufactur er o r it s se rvic e agent or a
simi larly qualified person in order to avoid a
haza rd .
Remove the door to the washing compartment when
removing an old dishwasher from service or discarding
it.
Please d ispo se o f pa ck ing materials properly.
Use the dishwasher only for its intended function.
During ins ta ll at io n, the power supply m us t no t
be exc essi vely o r da nger ously bent or flattened.
Do not tamper with controls.
The applia nc e is t o be con ne cted to the water
ma ins usin g ne w ho se sets an d ol d ho se-sets
should n ot b e re us ed .
The maximu m nu mb er o f pla ce s ettings to be
washed is 6.
The maximu m pe rm is si ble inlet wa ter pressure is
1M pa.
The mini mum perm issi ble in let water pressure is
0.04 Mpa.
)
1
Page 4
IMPORTANT
To get the b est performance from your dishwasher, read all operating instruction s
before using it for the first time.
4
3
2
WQP6-3607-US
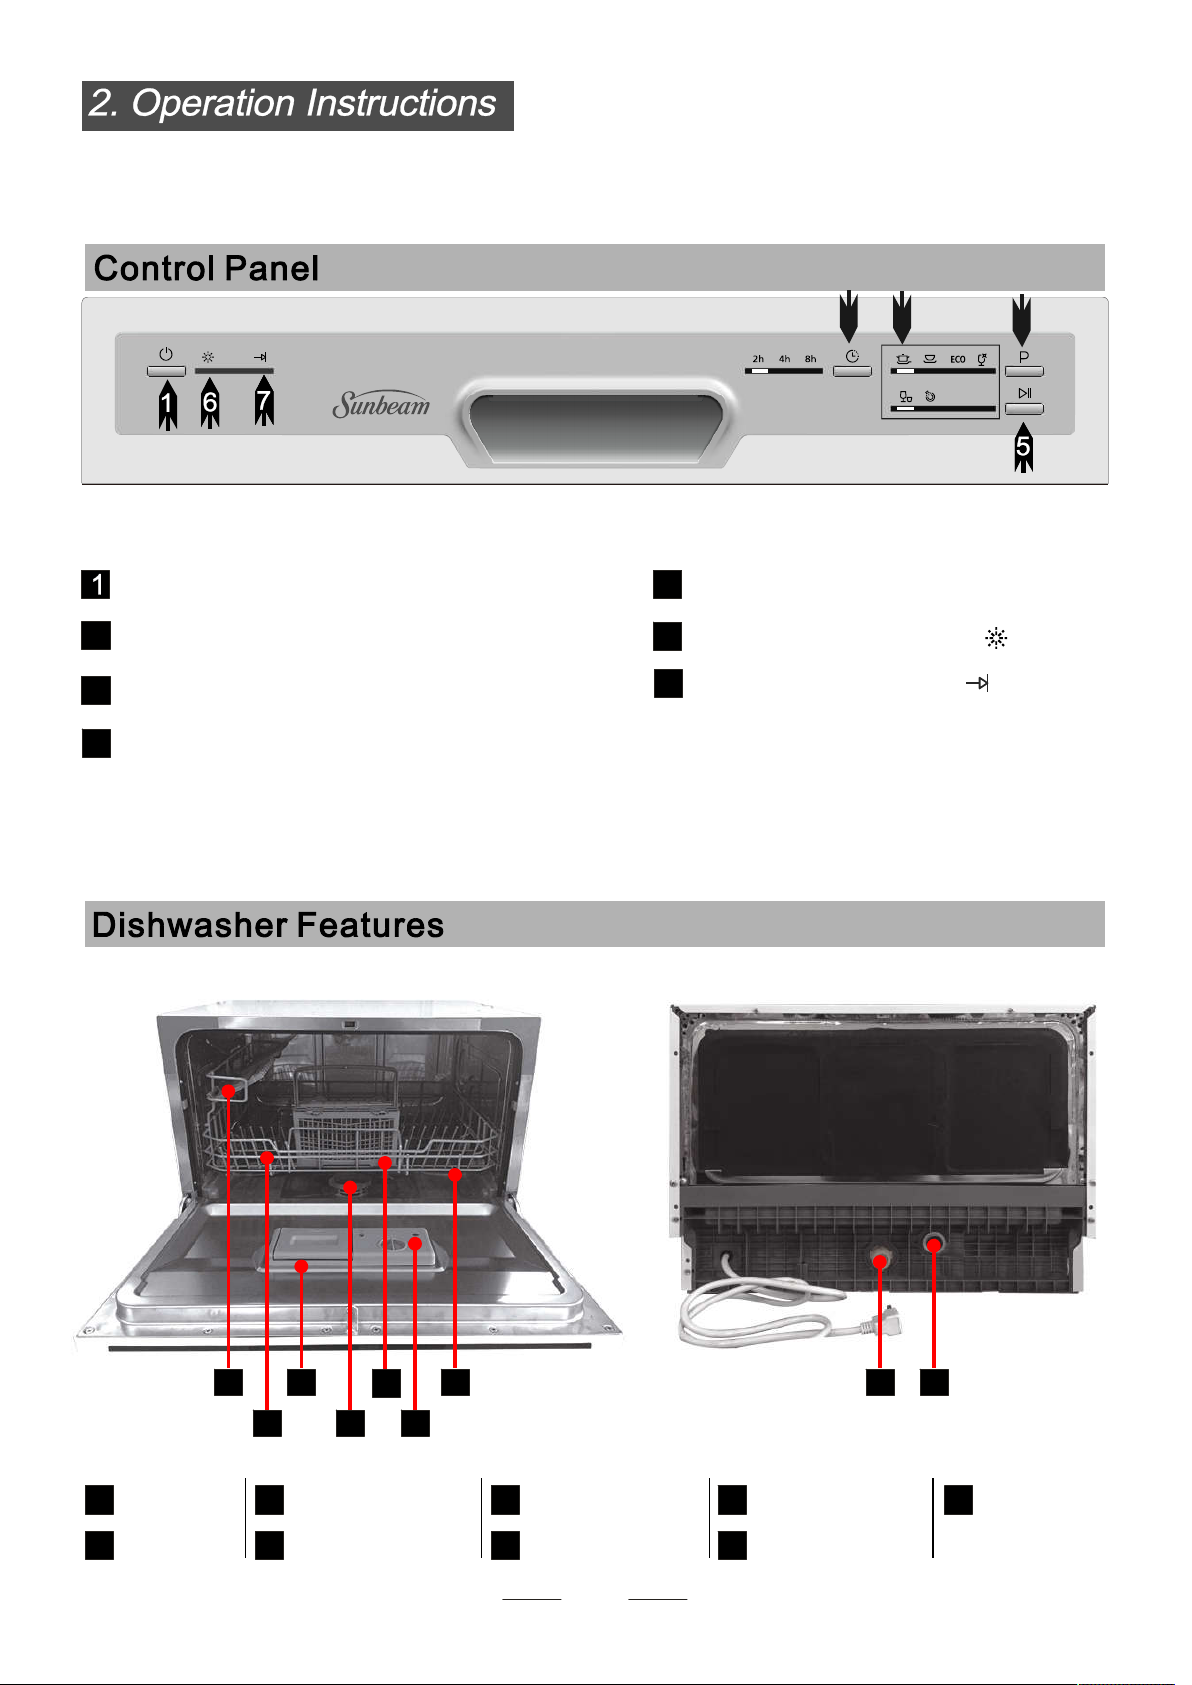
Power Button : To turn on/off the power supply.
Was h Cycle Se lector: Press the button
2
to select wash cyc le s.
Cycle Indi cato r Li gh t.
3
Delay Button : Pr es s th e bu tt on to delay.
4
.
Start/Paus e Butt on : Pr es s this button to s ta rt
5
or p ause t he d ishw as he r.
Rins e aid func ti on i nd icat or
6
Cycle en ding i ndic at or
7
1
2 4 6
Cup Shel f
1
2 4
3
Detergen t Di sp en ser
3
Filt er Asse mb lyBasket
5
7 8 9
Cutlery Bask et
5
Rins e Aid Dis pens er
6
2
Spray Arms
7
Inle t Pipe Con ne ct or
8
Drain Pi pe
9
Connec tor
Page 5
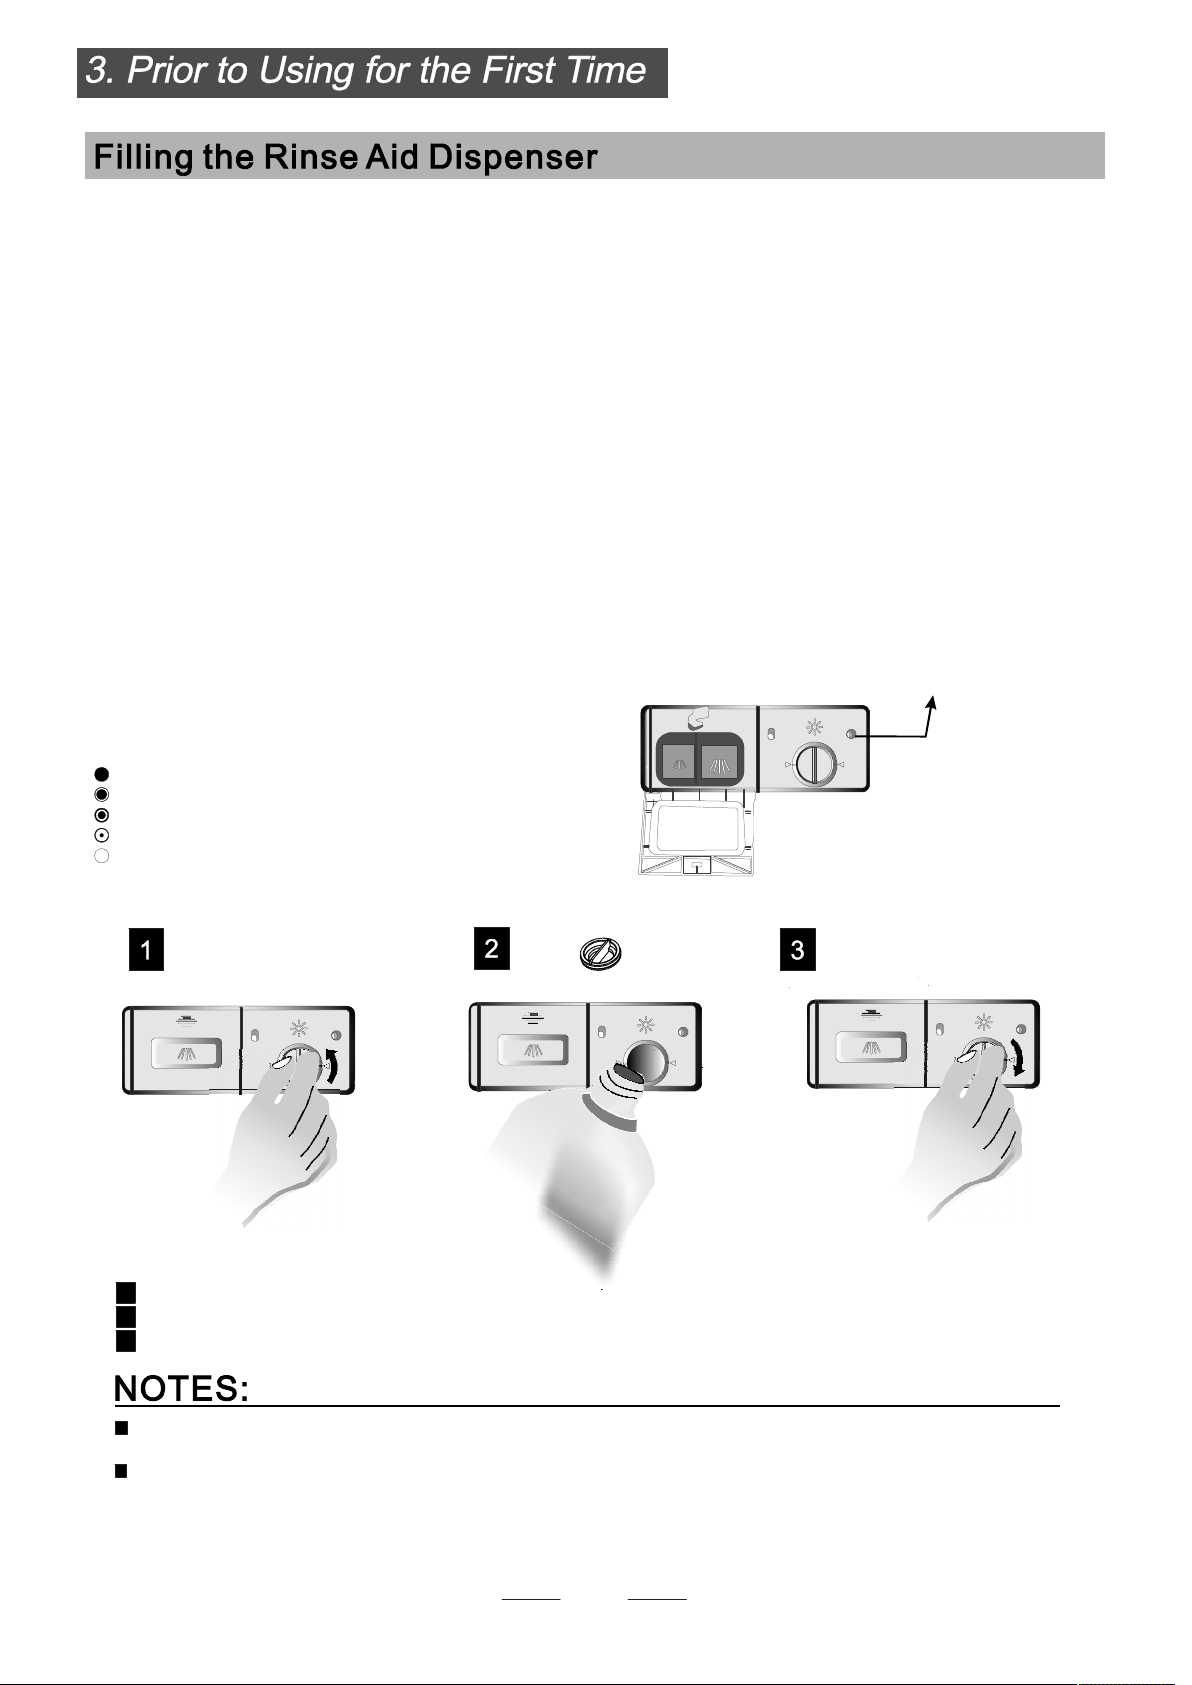
Rinse Aid Dispenser
Th e rins e ai d is rel eased du ring the fin al rinse to prevent wa ter from formin g droplets on yo ur dishes. That can leave
sp ots an d st re aks. It al so improves dr yi ng by allo wi ng water to sheet off the dishes. Your dis hwasher is designed to
us e li qu id r inse a ids. The rinse a id dis pens er i s lo ca ted inside the door next to the detergent dispenser. To fil l the
di sp enser, open the cap and pour the rinse aid int o th e di spen ser unti l the level indi cator tu rns completely black.
Th e volu me o f th e ri nse aid contai ne r is abo ut 3.7 ounc es .
Function of Rinse Aid
Rins e ai d is a ut omatical ly added during the last rinse, ensuring thorough r insing , and spot a nd streak free dr ying.
Attenti on!
Only use bra nded r in se a id for dis hwasher. Never fill the rinse aid dis penser with any other substanc es ( e. g. Dishwasher
cleaning age nt , li qu id d et erge nt). This wo ul d dama ge t he appliance.
When to Refill the Rinse Aid Dispenser
If there is no rin se a id warni ng light in the control panel, you ca n ju dge the amount of rinse aid by the color
of the optical lev el ind icat or l ocat ed next to the cap. When the ri ns e aid container is full, the whole
indicato r wi ll b e dark . As th e ri ns e aid dimini shes , the si ze o f the dark dot decreases. You should neve r le t
the rinse aid ge t be lo w1 /4 ful l.
As the rinse a id dim in is hes, t he size of the black dot
on the rin se a id l ev el i nd ic ator changes, as illustrated below.
Full
3/4 full
1/2 full
1 full - S houl d re fill to eliminate spottin g
/4
Empty
Rinse Aid Indicator
To open the dispenser, turn the cap t o th e "open " (l ef t) arrow and lift it out.
1
Pour the rinse aid into th e di spen se r, be ing ca reful not to overfill.
2
Replace th e cap by inse rt ing it a li gned wit h "open" arrow and turning it to the closed (right) arrow.
3
Clean up a ny rin se a id s pi lled duri ng fil ling w it h an a bsor be nt cloth to avoid excessive foaming during the
next wash.
Don' t forget t o repl ac e th e ca p be fo re you cl ose dish wa sh er doo r.
3
Page 6
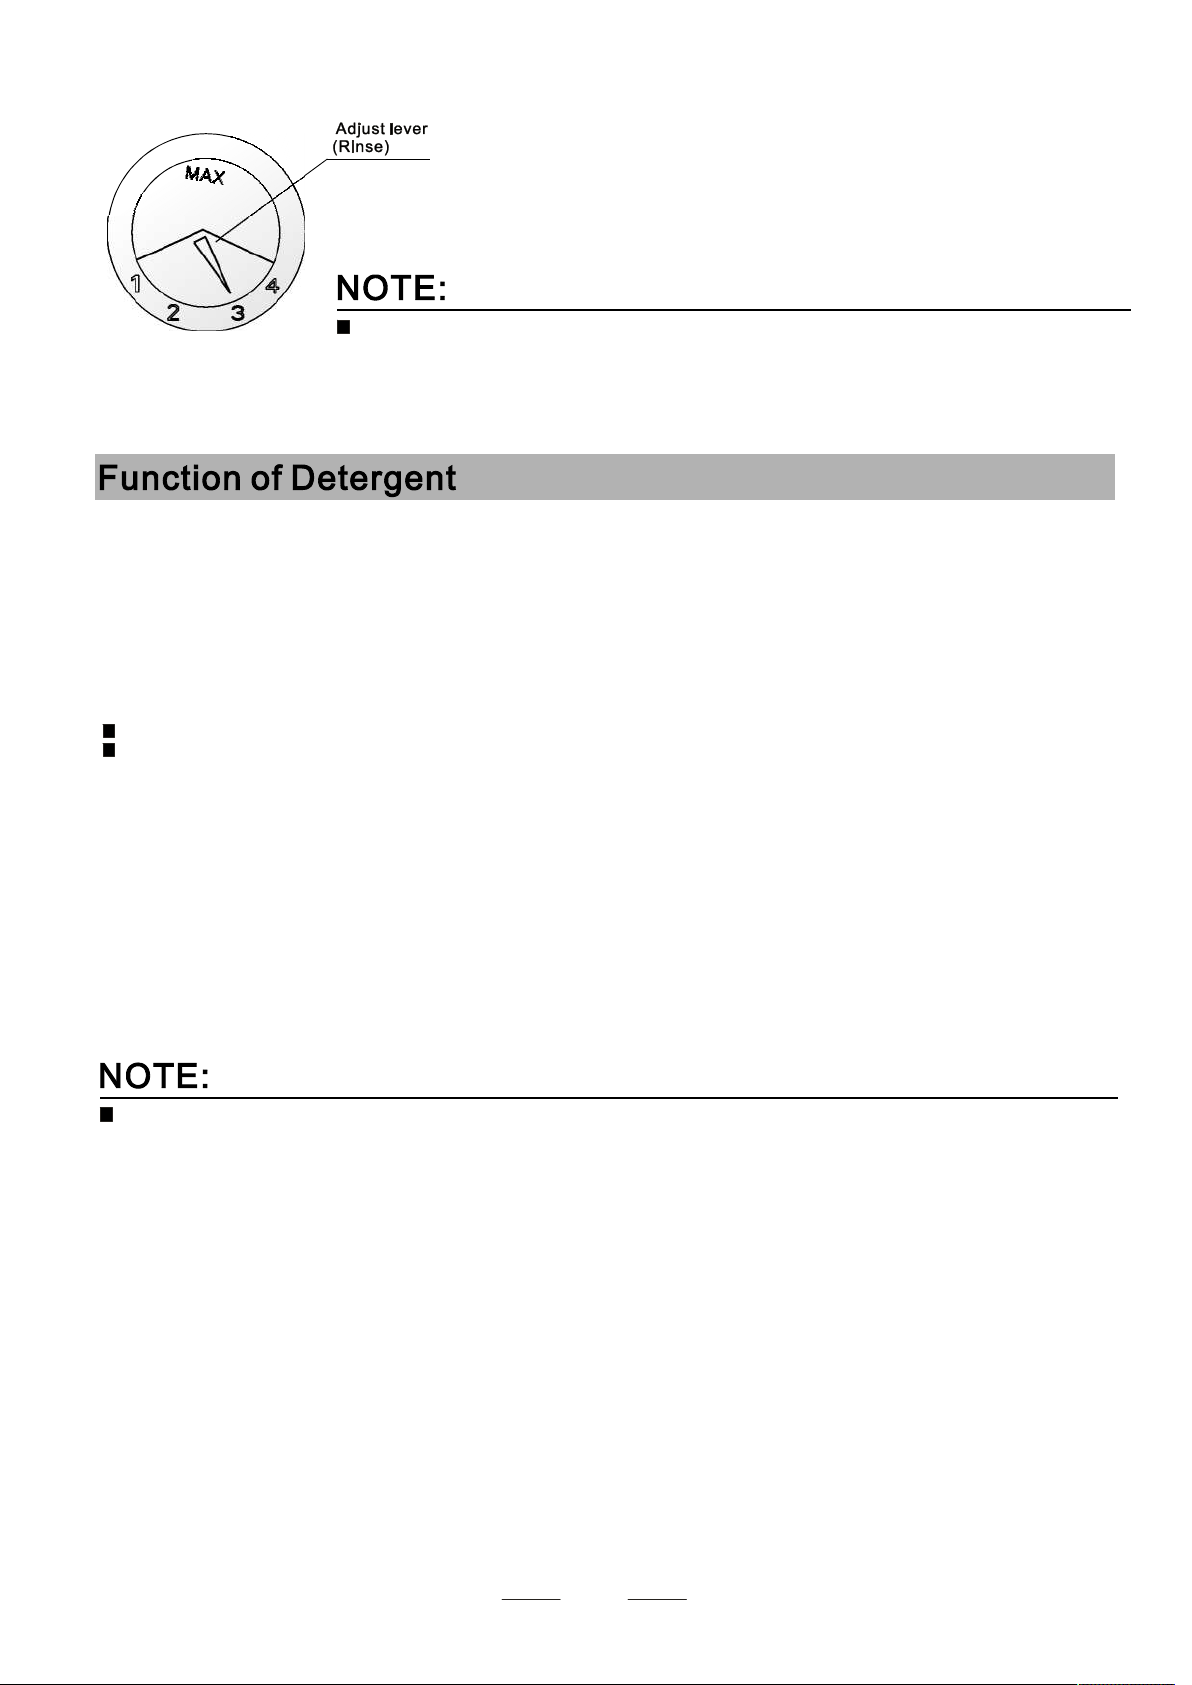
Adjusting Rinse Aid Dispenser
The rinse aid disp en ser has four settings. The rec omme nded setting is "3".
If the dishes sti ll are n ot d ry ing pr op er ly or ar e spot te d, adj ust the dial to the
next highes t level "4 ".
Increase the dose if there are drops o f water or l im e sp ot s on t he d is hes after washing. Reduce
it if there are sticky w hiti sh stains on you r dish es or a bl ui sh f ilm on glassware or knife blades.
Proper Use of Detergent
Detergen ts w ith it s ch emic al ingredients are necessary to remove dirt and transport it ou t of t he d is hw ashe r.
Use only deterge nt s pe cifi cally made for use in dishwashers. Keep your detergen t fres h
Don' t put powd er d et er ge nt int o the dispenser until you're ready to wash dishes.
and dr y.
Concentrated Detergent
Base d on t heir c hemi cal comp osit ion, detergent can be split in two basic types:
conven ti on al, al kali ne detergents with caustic components
low al kali ne c on ce nt ra ted detergents with natural enzymes
The use of norm al wa sh in g cy cl es i n co njunction with concentrated detergents reduces poll utio n an d is g oo d fo r
your dis hes; t hese w as h cycl es are specially matched to the dirt-dissolving pro perties of t he enz ymes o f th e
concen trat ed d et er ge nt. Fo r this reason wash cycles in whi ch c once ntrated detergents are used can achieve
the same
“ ”
“ ”norm al
results that c an o th er wi se onl y be achieved using heavy cycle.“ ”
Detergent Tablets
Detergen t tabl et s of d ifferent b ra nds diss ol ve at different speeds. For this reason some de te rg ent ta bl ets cann ot
dissol ve a nd d ev el op t heir f ull cleaning power during short wash cycles. Therefore please use long wash cycle s when
using de tergen t ta blet s, to ensure the comp lete r em oval of deterge nt res id uals .
Detergen t tabl et s ar e only for the models w ith 3 in 1 funct io n or 3 i n 1 cy cl e.
4
Page 7

Detergent Dispenser
The disp ense r mu st b e re fi lled before the start o f each w as h cycl e fo llowing the instructions provided in the Was h Cy cl e
Table. You r dish wa sh er u ses less detergen t and ri nse ai d th en conventional dis hw as he r. Ge ne rally, only one
tabl espo on of de te rgen t is needed for a normal wash load. Also, more heavily soile d items ne ed m or e de te rg ent.
Always add t he d et er gent j ust before starting the dishwasher, otherwise it could get dam p an d wi ll n ot d is solv e
proper ly.
Amount of Detergent to Use
Deterge nt powder
Deterge nt t ablet
If the lid is clos ed: pr es s re leas e butt on. The li d sp ri ngs open .
Always add t he d et er gent j ust before starting each wash cycle.
Only use b ra nded d eter ge nt aid for dishwash er.
Dish washer dete rgent is corrosive! Ta ke care to ke ep it out of reac h of children .
Filling the Detergent Dispenser
Fill the deterge nt d is pe nser with d et er gent .
The mark ing in dica te s th e do sing levels, as
illustrate d on r ig ht:
The d can load 0.5 o un ce s de te rg ent.etergent dispens er
A.
The d can load 0.9 o un ce s de te rg ent.etergent dispens er
B.
Please observe t he m anuf ac turers dosing and storage
reco mmen dati on s as stated on the detergen t pa ck ag in g.
Clos e the lid an d pr es s un ti l it locks in place .
If the dishes ar e he avil y so iled, place an additional
dete rg ent do se i n th e pr e-wa sh detergent chambe r. This detergent wil l ta ke e ffect during the pre-w ash ph as e.
Refer to informa ti on a bout t he amount of detergent for single wash cycles on page 9.
Please be aw ar e, t ha t acco rding to the le vel of s oi li ng a nd speci fic hardness of water differ en ces are possible.
Please observe t he m anuf ac turer's recommendations on the detergent packagin g.
5
Page 8

Consider buyin g uten si ls w hi ch are ide ntified as dishwasher-safe.
To preve nt dam ag e, do not ta ke glass an d cu tler y ou t of t he dis hwasher immediately after the
has ended.
Are no t suit able :
Cutlery wi th woo de n, horn china or
mo ther-of- pear l ha ndle s
Plas tic it em s that a re n ot
Older cutlery wi th g lu ed par ts that are not
temperature re si st an t
Bonded cut le ry i te ms o r di shes
Pewter or copp er i tems
Crysta l gl ass
Steel item s su bjec t to r us ting
Wooden platters
Item s made f ro m synthe ti c ma terials
For best p er fo rman ce o f th e di shwash er, follow these loading guidelines.
Featur es a nd app ea ra nce of baske ts and cutlery baskets may vary from your model.
heat resistant
Are of lim it ed s uita bi lity:
Some typ es o f glas se s ca n beco me
dull after a lar ge num be r of w as hes
Silv er and alu mi ni um p ar ts have a
tend ency to di sc ol or dur in g wash ing
Glazed patte rn s ma y fa de i f mach ine
washed frequ en tl y
wash cycle
Scrape off any large amounts of le ft over f oo d. Sof te n remn ants of burnt food in pans.
It is no t nece ss ar y to r in se t he dishes under running water.
Plac e obje cts in t he d is hwashe r in following way:
1. Items suc h as c up s, g la ss es , po ts/pan s, etc. are face down.
2. Curved it ems, o r th os e with rec esses, should be loaded at a slant so that water can run off.
3. All uten sils a re sta ck ed secur ely and can not tip over.
4. All uten sils a re p lace d in the way that the spray arm s ca n ro tated freely during washing.
Very small it ems sh ou ld n ot be washed in the dis hw as he r as t he y could easily fall out of the basket.
Load hol low item s su ch a s cups, glasses, pans etc. with the opening downwards so that wat er can not co ll ec t in t he
containe r or a d ee p ba se.
Dish es a nd ite ms o f cu tl ery must n ot lie inside one another, or cover each other.
To avoid damage to g la sses , th ey must not tou ch.
Load large ite ms whi ch a re m ost diffic ult to cle an i nt o the basket.
Long bla de d kn iv es s to re d in an upright pos it ion ar e a po tentia l hazard!
Long and /o r sh ar p item s of c ut le ry such as carv in g kn ives m us t be position ed h or izon ta ll y in the basket.
Please do not overlo ad your dishwashe r. This is impo rtant for good results and for reasonable energ y usage.
6
Page 9

Posi tion t he d is hes and cook wa re so that th ey wil l no t get mo ve d by the spray of water.
1
1
5
6
1
Cups
3
Glasses
5
Fruit Bo wl
7
Dinner P la tes
Cutlery Bask et
2
Servin g Bowl
4
Sauc er s
6
Oval Platter
8
Bread and
Butter Pla te s
9
Plate Ra cks of B as ke t
The basket i s fi tt ed w it h pl ate ra cks wh ich
can be stowed ho ri zo nt al ly if required.
7
Page 10

Cutlery sh ou ld b e pl ac ed in the cutlery basket with handles at the bottom. If the rack has side b aske ts, th e sp oo n
should b e lo ad ed i nd iv id uall y into the appropriate slots, especially long utensil s sh ou ld b e pl aced in the hor izon ta l
position at th e fr on t of t he upper baske t as shown.
Dinner Forks
1
2
Salad Forks
Knives
3
Teaspoons
4
Serving Spoons
5
Serving Forks
6
Do not let any item extend th rough bottom.
Always load sha rp utensi ls with the sharp po int down.
Fo r personal sa fety and a top quality clean, pla ce the silver ware in the basket :
Make sure cut lery does not nest together.
Pl ace silverware wit h handles down.
Pl ace kn ives and other pot entiall y dangerous utensils handles u p.
8
Page 11

( )
Me ans: need to fil l rins e in to the rinse aid disp en se r.
*AHAM DW-1-2005: This program is the test cycle, the rinse aid dis pe ns er set ti ng is recommended t o Posi ti on 3.
Program
Information
Pr e- wa sh
Pr e- wa sh
Wash
Wash
Ri nse
Ri nse
0. 6oz
100
0.49
Heavy
For the heaviest s oi led loads,
such as pots, pans, ca sserol e
dishes and dishes that have
been sitting with dried fo od
on them for a while.
Drying
Pr e- wa sh
No rm al
(* AHA M DW- 1-2 005)
For normally s oi le d lo ad s,
such a s po ts, plates , gl asse s
an d lightl y so iled pans.
Standard daily cycle .
Pr e- wa sh
Wash
Ri nse
Ri nse
Drying
0. 6oz
110
0.36
Pr e- Was h
Pr e- Was h
Was h
Rinse
Rinse
0.6oz
75
0. 27
EC O
For li ghtly so iled loads ,
such as glasses, cryst al a nd
fine china .
Drying
Pr e- Was h
Was h
Rinse
Rinse
Drying
0. 5oz
70 0. 28
Glas s
For lightly so iled
and glass.
dishes
Pr e- wa sh
Pr e- wa sh
Wash
Ri nse
0.5oz
45
0.31
Spee d
A shorter wash fo r lightl y
soiled loa ds t ha t do not
need dry ing.
Ri nse
Use for rins ing di sh es ,
Rinse
glasse s an d si lver wa re
that will no t be w as he d ri ght
away.
Pre-wa sh
Ma in-w ash
N/A
24
0.03
Starting a was h cy cl e:
1. Draw out the bask et (se e th e sect ion ti tled "Loading the Dishwasher Baskets").
2. Pour in t he det er ge nt ( se e th e se ction titled "Function of Detergent" and "Filling the Rinse Aide D ispe ns er ") .
3. Insert th e pl ug i nt o th e sock et. The power su pply is 12 0V /60H z.
4. Make sure that th e wate r su pply is turned on t o full press ur e.
5. Close t he doo r and p6.ress the button t .
on/o ff o tu rn on th e po we r su pply
Pr ess the pr og ra m button to select wash program you need
Heavy->Nor ma l->ECO ->Gl ass->Speed->Rinse
7.Then press t he S tart /P ause button, the dish wa sher w il l st ar t.
Wh en you pre ss the S ta rt/P au se button to pause du ring was hi ng, the displa y time will stop bl inking and the
cycl e will pau se and r emai n this cy cle till y ou resta rt it again.
9
Page 12

Premise : You can still modify the wash cycle if the cycle has just started. If cycle has begun the
detergent may have already been released and the appliance may have already drained the wash
water. If this is the case, the det ergent dispe nser must be refilled.
(See the section titled "Filling the Rinse Aide Dispenser").
To cha nge the , press
wash cycle pr ogram selector button f or more t han three seconds and the
th e
ma chine will be in standby mode, then you can change the program to the desired cycle se tting.
See the section entitled Starting a Wash Cycle.
Th e lights indicate the program/cyc le phase.
a) All phase lights off On standb y.
.....................................
b) The display shows no blinking lights ...........On pause.
c) The d isplay shows blinking l ights ... ............ Running.
If you o pen th e door mid -c ycle , the machine will pause.When you close the door, press Start/Paus e to r es um e cy ele.
A forgotten dish can be added any time before the detergent cup opens.
Press the Start/Pause button.
1 4
Add forgotten dishes.
Open the door to stop the washing.carefully
2
After the spray arms stop moving, you can open the door
3
completely.
When the cycle has fini sh ed, th e bu zzer of dishwasher will sound 8 seconds, then stop. Turn off the appliance
using th e On /Off button, shut off the water supply and open the door of th e di shwa sh er.
unloadin g the di sh wa sh er to avoid handling the dishes and utensils while they are sti ll h ot and mor e susc eptible to
breakage. They will also dry better.
withou t any operat io n.
Tur n Off the Dish wa sher
All panel ligh ts s ho uld be off, indica ting t he c ycle has ended.
1. Switc h off the dishwasher by pressi ng the O N/OF F bu tt on .
2. Turn off the water tap.
Open the D oor Carefu ll y
Hot di shes are The di sh es s ho uld th erefore be allowed to cool down around 15 minutes
befo re remov in g fr om t he appliance.
Open the dis hw ashe r' s do or, leave it ajar and wait a few minutes before removing the dis hes. Dis hes wi ll be co oler
and dryi ng w ill be i mp rove d.
Unload ing th e Di sh wa sh er
It is no rmal t ha t th e di sh wa sher is wet inside.
wash
Since the appl ianc e is on st andb y, it will po wer off after 30 m in ut es
suscep tible to b re ak age
.
Close the door.
5
Press the Start/Pause Button and the dishwasher will
6
after 10 seconds.
Wai t a few mi nutes before
auto maticall y
resume
It i s dangerous t o open the door , beca use the hot water may sc ald you.mid- cycle
10
Page 13

The filter p re ve nt s la rg er remnants of food or ot he r ob je cts fr om getting inside the pump.
The filter sys te m cons is ts of a coar se filter, a mflat ( ain filter)
and a mi cro fi lt er (fine filter).
C
Main filter
Food and soi l partic le s tr appe d by this filter are pulverized by a
special je t on t he s pr ay a rm a nd w as hed down the drai n.
A
A
B
Fine filter
This fil te r hold s so il and food residue in the sump area and
prevents it from bei ng d ep os it ed on the dishe s du ri ng was h cy cle.
Coarse filter
Larger items, such as pi ec es o f bone o r glas s, that could block
the drain ar e trap pe d in t he coarse filter. To re move the item s
caught by th e filt er, gen tl y sq ueez e the tap on the top of this
filt er and lift ou t.
B
C
Filter Assembly
The filter e fficiently
For best p er fo rman ce a nd results, the filter as se mb ly mus t be .
remo ve t he lar ge r food p articl es trapped in the filter after each wash cycle by rinsing the f ilte r an d cu p un de r
running wate r. To remove the filt er assem bl y, pull on the cup handle in th e up wa rd d irecti on.
removes food particl es f ro m th e wa sh water, allowing i t to b e re cy cl ed dur ing the cycle.
cl eaned an d ma in ta in ed reg ularly To clea n th e fi lt er,
Never run the dishw asher w ithout the filters in pl ace.
The di shwashe r must never be use d witho ut the filters.
Improp er replacement of th e filter may reduce th e performance level o f th e
applia nce and damage dishes and utensils.
Step 1: the filter assembly (A, B and C),
then lift it all up.
Counter rotate
C
B
Step 2: Lift B and C up from A;
A
C
B
The End.
A
Foll ow ste ps 1 t hr ough 3 t o re move the filter sys tem. R ev erse s teps 3 through 1 to r eins ta ll f il ter.
11
Page 14

Inspect th e fi lt er s fo r re si due/build up after each use.
By unscr ew in g th e co ar se fil ter you can remove the filter system. Remove an y fo od remnants and cl ean th e fi lt ers un der
running wate r.
The entire f ilte r as se mbly should be clea ne d on ce a wee k.
Cleaning The Filter
To clean the coa rs e fi lt er and the fine filter, use a cl ea ning b ru sh . Re assemble the filter parts as shown in the figures
in the l ast pa ge a nd rei ns ert th e entire assembly in the dishwasher, positioning in it s se at and press in g downwa rd.
Clean filt ers gently. Th ey a re s usceptible to damage. Damage to t he fil te r may result in re du ced
perfor mance of the app li ance .
The contro l pa ne l ca n be c le an ed by using a lightly dampened cloth and dry thoroughly.
The exteri or u se a goo d appl iance polish wax.
Never use sharp ob je ct s, scour in g pads or harsh cleaners on any part of the dishwasher.
Cleaning the Door
To clean the edge ar ound t he doo r, yo u sh ould use only a soft warm,
damp c loth. To avoid penetration of wate r in to t he d oo r lock and
electric al c ompo ne nts, do not use a spray cleaner of any kind.
Never use a spray cleaner to c lean the door p anel as it may damage th e door lock
an d electrical co mpone nts.
Ab rasive agent or some paper towel s hould not be used because of the risk of
scratchin g or lea ving sp ots on the stainless s teel surface.
Protect Against Freezing
Please tak e fros t prot ec ti on measures .for di shwa sh er s in winter condi ti ons After each cycle please do
the followin g:
1. Cut off electrical power to the d ishwas he r.
2. Turn off the water supply and disconne ct the w at er inlet pipe from the wa te r va lve.
3. Drain w ater fro m the in le t pipe and water valve. Use a pan to catch the water
4. Reconne ct the w at er inlet pipe to the water valv e.
5. Remove the fi lt er a t the bottom of the tub and use a spong e to wa te r in sum p.remove
If your di shwash er doe s no t wo rk becaus e of ice /win te r co nd itions , please contact a qualified service person.
12
Page 15

Cleaning the Spray Arms
The spray arms can be easi ly removed for periodic cleaning
of the nozzles, to p re vent p ossible clogging. Wash them
unde r runnin g wa ter and ca refully replace them in their seats,
checki ng tha t thei r ro tary m ovement is in no way impeded.
Grasp th e mi ddle o f the spra y arm, pull it upwards to remove
it. Wash the arms under a j et of running water and return them
care fully to the ir s ea t. After reassembly, che ck that th e sp ra y
arms turn fr eely. Otherwise, chec k th at t hey ha ve b een
installe d co rrec tl y.
How to Maintain Your Dishwasher
After Ev er y Wash
After every wa sh , tu rn o ff the water sup ply to the
applianc e an d le av e th e door s ligh tly open so that
mo isture and o do rs a re not trapped inside.
Remove the P lug
Before clean ing or p er forming maintenance, always
remo ve t he plu g from t he socke t.
No Solvents or Ab ra si ve C le aning
To cle an the ext er io r an d ru bber parts of the dishwasher,
do not u se s olve nt s or a brasive cleaning products.
Only use a c lo th wit h wa rm s oapy water.
To remove sp ots or s ta in s fr om the surface of the
inte ri or, u se a clo th dampened with wa ter with a little
vinegar, or a c le an in g pr od uct made specifically for
dishwash er s.
When Not i n Us e for Long D ur ations
It is recommend that you run a wash cycle with the
dishwash er empty and then remove the plug from the
sock et, tu rn off the water supply and lea ve t he doo r of
the ap pl iance slightly open. This will help the door
seals to last longer and prevent odors from forming
within the ap pl ia nc e.
Mo ving the Ap pl ia nc e
If the app lian ce m us t be moved, try to keep it in the
ve rt ical pos it ion. I f abso lute ly neces sary, it can be
position ed o n its ba ck .
Seals
One of the factors t ha t ca us e od ors to form in the
dishwasher i s fo od t ha t re ma in s tr ap ped in the seals.
Period ic c lean in g wi th a dam p sp onge wil l prevent this
from occ ur ri ng.
Attention!
The Instal lati on o f th e pipe s
and elec tr ical equ ip ment should
be done by p ro fe ss io nals .
Electrical Shock Hazard.
Disconnect el ectri cal power b efore
installing dishwasher.
Failure to do so can result in death
or e lectric al shock.
The inst allati on p os ition of dishwasher should be near the existing inlet and drain hos es a nd p ow er c or d.
One side o f the cabi ne t si nk s hould be chosen to facilitate the connection of drain hoses of the di shwash er.
13
Page 16

Posi tion t he a pp li an ce in the desired loc atio n. The back should res t agai ns t th e wa ll behind it,
and the side s, alo ng t he a djac ent cabinets or wall. The dish washer is equipped with water supply
and drain hose s th at c an b e po siti oned to the right or the left to facilitate proper installa tion.
Do not use an extension cord or an adapter plug with this appliance.
Do not, under any circumstances, cut or remove the earthi ng conn ection from the
po wer cord.
Electrical Requirements
Please l oo k at th e ra ti ng l abel to know the rating vol ta ge a nd connec t the dishwasher to the appropriate power su pply.
Use the required fuse 10 a mp, ti me d elay f us e or circuit breaker reco mm ende d and prov id e se parate circu it serving
only this appliance.
Electrical Connection
Ensure proper ground
exists before use
Ensu re the voltage and frequency of the power
those on the rating plate. Only in sert the plug into an e le ct rical so cket whi ch i s ea rt he d
prop er ly. If the electrical socket to which the app li ance must be connected is not
appr op ri ate for the plug , replace t he socket , ra ther t ha n us ing a adaptors, as
they c ou ld c ause overheating and burns.
bein g us ed, co rresponds to
Grounding Instructions
This appliance must be earthed. In the event of a malfunction or breakdown, earthing will reduce the risk of
electric shock by providing a path of least resistance for the electric current. This appliance is equipped with
a cord having an equipment-earthing conductor and an earthing plug. The plug must be plugged into an
appropriate outlet that is installed and earthed in accordance with all local standards and requirements.
Improper connection of the equipment earthing conductor can result in the risk of an
electric shock.
Check with a qualified electrician or service representative if you are in doubt whether
the appliance is properly earthed.
Do not modify the plug provided with the appliance. If the plug does not fit properly to
the outlet, please have a qualified electrician to install a proper outlet.
for personal safety:
DO NOT USE AN EXTENSION CORD OR AN ADAPTER PLUG WITH THIS APPLIANCE.
DO NOT, UNDER ANY CIRCUMSTANCES, CUT OR REMOVE THE
CONNECTION
FROM THE POWER CORD.
EARTHING
14
Page 17

Water Connection
Ba ck View
Your dishw asher comes equipped with a 'quick c onnec t' assembly ( includes inlet and d rain hose). The
fauc et adapter must be installed on the fau cet before you can connect the dish washer. This a dapte r is
included insi de y our dis hwasher. The faucet adapter is compatible with fa ucets inc lu sive of e ither male
(outside) or fema le (ins ide) threaded faucet connection s.
To avoid excess wa ter in the inlet hose, close the fauc et after use.
15
Page 18

Connection of Drain Hoses
Sc rew the fauce t adapter onto (or into) the faucet tap . Chec k for leaks (use tap e to eliminat e if
1
.
necessary).
Connect the six-sided co nnection of the drain ho se to the dra in port connection on the back of the
2.
dishwasher cabinet. Do not over-tight en (to avoid damag e to threads).
Connect the star-shaped connectio n of the inlet hose to the i nlet port on the back of the dishwasher
3.
cabine t. Do not ove r-tighten (to avoid da mage to threads).
Connect the circular connection of the drain hos e onto the lo nger (bottom) male connection on the quick
4.
connect.
Connect the circular connection of the inlet hos e onto the sh orter ( top) male con nection on the quick
5.
connect.
Atta ch the quic k connect ont o the fauce t adapter, by pulling d own the out er locking co llar on th e quick
6.
connect, while pushing the quick conn ect upward onto the fauc et adapter.
Wh en the quick connect snaps onto the faucet a dapter, it rel eases t he l oc king collar. Verify the connect ion
7.
is sec ur e.
Slowly open the hot water lin e and check for any sign of water lea ks at all hose connections. If leak s are
8.
locate d, immediately close the water supply and re pair the hose conn ecti ons.
IMPORTANT
1. Once you open the water supply line, (even if it is closed immediately thereafter), the inlet hose will be pressurized.
2. To relieve water pressure from inside the inlet hose, (make sure the water line (faucet) is closed): press and hold the
pressure relief button on the quick connect until the flow of water stops.
red
WARNING!
Failure to relieve water pressure before disconnecting the quick-connect from the faucet,will result in back-pressure
over-spray. The temperature of incoming water can be very hot, and back-pressure over-spray could cause severe
burns and /or scalding.
DANGER!
DO NOT LET CHILDREN DISCONNECT THE DISHWASHER; CLOSE SUPERVISION OF CHILDREN IS
ALWAYS IMPORTANT AROUND APPLIANCES.
Hard water condi ti ons wi ll adversely aff ec t th e wa shin g performance of your dishwasher. Hard water condi tions wi ll
also c ontribut e to ' lime ' (w hi te film substance) deposits and/or 'scaling' on the stainle ss ste el surface of the dishwas her
tub and heater e le me nt , loca ted in the sump underneath the removable filter screen. To assist in minimizing these
conditio ns, it is re co mm en de d to periodically operate/rinse the inside of the d ishwas he r (emp ty ) us ing 1 cu p of white
vinegar at lea st o nc e a we ek .
Disconnecting the Dishwasher
Shut off the water supply at the faucet.
1.
Disconnect the power supply cord
2.
The following things should be checked before starting the dishwasher.
The dishwasher is level and fixed properly
1
The inlet valve is open
2
3 There is no leakage at the connections of the conducts
The wires are tightly connected
4
The power is switched on
5
The inlet and drain hoses are knotted
6
All packing materials and printings should be taken out from the dishwasher
7
Attention!
After in stal la ti on , pl ease make sure to keep this manual. Th e content of this manual is very helpful to the users.
16
Page 19

Dishwasher doesn't
start
Fuse blown, or the
circuit breaker tripped.
Power supply is not
turned on.
Replace fuse or reset circuit breaker. Remove any other
appliances sharing the same circuit with the dishwasher
Make sure the dishwasher is turned on and the door is
closed securely.
Make sure the power cord is properly plugged into the
wall socket.
Technical
prob lems
Gene ral
prob lems
Water not pumped
from dishwasher
Suds in the tub
Stained interior
White film on
inside surface
Door of dishwasher
not properly closed.
Kink in drain hose.
Filter clogged.
Kitchen sink clogged.
Improper detergent.
Spilled rinse aid.
Detergent with
colors/dyes were used.
Hard water minerals
Closed dishwasher making sure that door latches.
Check drain hose.
Check coarse filter.
the
(see section titled )
Check kitchen sink to make sure it is draining well.
If problem is kitchen sink not draining, you may need
a plumber rather than a serviceman for dishwasher.
Use only the dishwasher detergent to avoid
suds. If this occurs, open the dishwasher and let suds
evaporate. Add 1 gallon of cold water to the tub. Close
and latch the dishwasher, then start the "soak" wash
cycle to drain out the water . Repeat if necessary.
Always wipe up rinse aid spills immediately.
Make sure that the detergent is the one without
colors/dyes.
To clean the interior, use a damp sponge with
dishwasher detergent and wear rubber gloves.
Never use any other cleaner than dishwasher
detergent for the risk of foaming or suds.
" Cleaning The Filter "
appropriate
Noise
There are rust
stains on cutlery
Knocking noise
in the wash cabinet
Rattling noise
in the wash cabinet
Knocking noise
in the water pipes
The affected items are
not corrosion resistant.
The sp ay arm is
r
knocking against
an item in a basket.
Dish es/ute ns il s ar e
not secu re d in the
washer.
This may be caused
by on-site installation
or the cross-section of
the piping.
17
Keep corrosive substances away.
Interrupt the program, and rearrange the items
which are obstructing the sp ay arm.r
Interrupt the program,
and rearrange the items properly.
This has no influence on dishwasher function.
if in doubt, contact a suitably qualified plumber.
Page 20

The dishes
are not clean
The dishes were not
loaded correctly.
The wash cycle was
not powerful enough.
Not enough detergent
was dispensed.
Item are blocking
the path of sp ay arms.r
See notes in " Loading the Dishwasher Baskets ".
Select a more intensive wash cycle.
See" Wash Cycle Table ."
Use more detergent, or change your detergent.
Rearrange the items so that the sp ay can rotate freely.r
Unsatisfactory
washing result
Cloudiness
on glassware
Black or gray
marks on dishes
Detergent left in
dispenser cups
The dishes
are not drying
Unsatisfactory
washing result
The filter combination
in the base of wash
cabinet is not clean or
is not correctly fitted.
This may cause
the sp ay arm jets
r
to get blocked.
Combination of soft
water and too much
detergent.
Aluminum utensils
have rubbed against
dishes.
Dishes block
detergent cups.
Improper loading.
Too little rinse aid.
Dishes are removed
too soon.
Wrong wash cycle
selection.
Using cutlery with
a low-quality coating.
Clean and/or fit the filter combination correctly.
Clean the sp ay arm jets. See "Cleaning the Spray
Arms".
Use less detergent if you have soft water and select
a shortest cycle to wash the glassware and to get
them clean.
Use a mild abrasive cleaner to eliminate those marks.
Re-loading the dishes properly.
Load the dishwasher as suggested in the directions.
Increase the amount of rinse aid/refill the rinse aid
dispenser.
Do not empty your dishwasher immediately after
washing. Open the door slightly so that the steam can
escape. Begin unloading the dishwasher only once t
he dishes are barely warm to the touch. Empty the low
basket first. This prevents water form dropping off
dishes in the upper basket.
In short wash cycles the washing temperature is lower.
This also lowers cleaning performance. Choose a
Water drainage is more difficult with these items.
Cutlery or dishes of this type are not suitable for
washing in the dishwasher.
r
with a long washing time.wash cycle
When malfunc tions occur, the appliance wil l display error codes to warn you:
Longer inlet time.
Overflow.
If overflow occurs, turn off the main water supply before calling a service.
If there is water in the base pan because of an overfill or small leak, the water should be
removed before restarting the dishwasher.
Faucets is not opened, or water intake is restricted,
or water pressure is too low.
Some element of dishwasher leaks.
18
Page 21

Height
19.7"
Width
Depth
Voltage
Water Pressure
Hot Water Connection
Power Supply
Capacity
2017 Sunbe am Pr oducts, Inc. do in g business as Jarden Consumer Solut io ns. Sunb ea m
logo is a trademar k of Sunbeam Pro ducts, In c. used under li ce nse. All righ ts reser ve d.
Manufacture d by Foshan Shun de Mi de a Wash ing Ap pl iances Man uf acturing Co. Lt d.
Distribut ed by Guangdong Mide a Kitchen Applia nc es Ma nufacturi ng Co ., Ltd.
1-year lim it ed warranty. F or service or supp or t, call toll-fr ee 1- 855-877-4 08 5.
21.7"
17.2"
120V A C
0.04-1.0MPa
should be 120 F°
120V A C
6 Place set tings
19
TM
 Loading...