

Page 1
Domestic 70 Stitch Sewing Machine
Operating Instructions
Model No. SB700
SMT081313
Page 2

Safety instructions
Component identication
Accessories
Fitting the snap-in sewing table
Connecting machine to the power source
Two-step presser foot lever
Attaching the presser foot holder
Winding the bobbin
Inserting bobbin
Changing the needle
Threading the upper thread
Automatic needle threader
Thread tension
Bringing up the lower thread
Finishing up
Matching needle / fabric / thread
How to choose your pattern
Straight stitching and needle position
Zig-zag sewing
Blind hem / lingerie stitch
Overlock stitches
Sewing on buttons
Utility sewing
Zippers and piping
Sewing with the hemmer foot
3 step zig-zag
Stitch selection
Smocking stitch
Sewing with the cording foot
Free motion darning
Practical stitches
Darning
Attaching lace
Applique
Twin needle
Quilting
Gathering x-foot
Patch work
Maintenance
Troubleshooting guide
03-04
05-06
07
08
09
10
11
12
13
14
15
16
17
18
19
20-21
22
23
24
25
26
27
28
29
30
31
32
33
34
35
36
37
38
39
40
41
42
43
44
45-46
Contents
02
Page 3

Safety instructions
When using an electrical appliance,
basic safety precautions should
always be followed, including the
following:
Read all instructions before using this
sewing machine.
DANGER - To reduce the risk of
electric shock:
1. An appliance should never be left
unattended when plugged in.
2. Always unplug this appliance from
the electric outlet inmediately after
using and before cleaning.
Always unplug before re-lamping.
Replace bulb with same type rated 10
watts.
dropped or damaged or dropped into
water.
4. Never operate this appliance with
any air openings blocked. Keep
ventilation openings of the sewing
machine and foot controller free from
accumulation of lint, dust and loose
cloth.
5. Keep ngers away from all moving
parts. Special care is required around
the sewing machine needle.
6. Always use the proper needle plate.
The wrong plate can cause the needle
to break.
7. Do not use bent needles.
WARNING - To reduce the risk of
burn, re, electric shock, or injury
to persons:
1. Do not allow to be used as a toy.
Close attention is necessary when this
appliance is used by or near children.
2. Use this appliance only for its
intended use as described in this
manual.
3. Never operate this appliance if it
has a damaged plug or cord, if it is not
working properly, if it has been
8. Do not pull or push fabric while
stitching. It may deect the needle
causing it to break.
9. Switch the sewing machine o (”O”)
when making any adjustments in the
needle area, such as threading needle,
changing needle, threading bobbin, or
changing presser foot, and the like.
10. Always unplug sewing machine
from the electrical outlet when
removing covers, lubricating, or when
making any other user servicing
adjustments mentioned in the
instruction manual.
03
Page 4

Safety instructions
11. Never drop or insert any object
into any opening.
12. Do not use outdoors.
13. Do not operate where aerosol
spray products are being used or
where oxygen is being administered.
14. To disconnect, turn all controls to
the o (”O”) position, then remove
plug from outlet.
15. Do not unplug by pulling on cord.
To unplug, grasp the plug, not the
cord.
SAVE THESE INSTRUCTIONS
This sewing machine is intended for
household use only.
04
04
Page 5
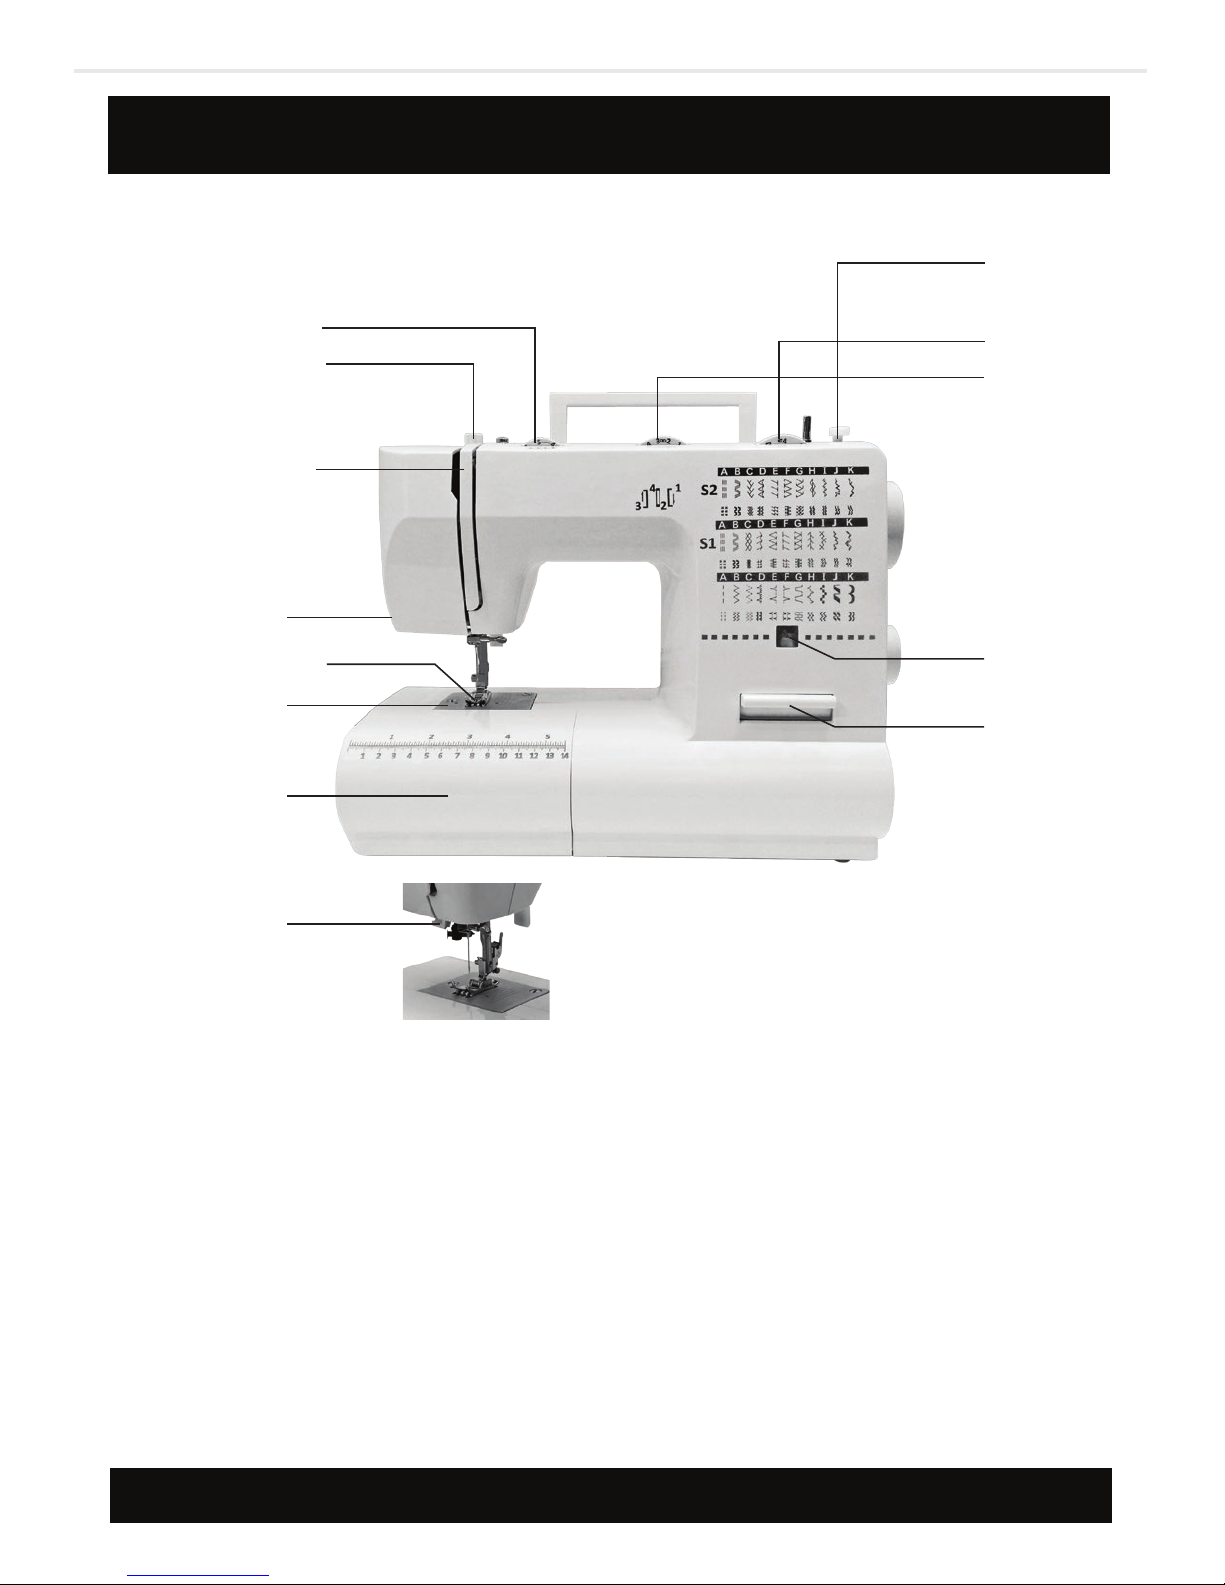
Component identication (Part 1)
1.
2.
3.
4.
5.
6.
7.
1
2
Thread tension dial
Presser foot pressure
Thread take-up lever
Thread cutting
Presser foot
Needle plate
Sewing table and accessory box
Bobbin stopper
Stitch length dial
Stitch width dial
Stitch display
Reverse sewing lever
Automatic threader (optional)
8.
9.
10.
11.
12.
13.
8
9
5
3
4
6
7
13
10
11
12
05
Page 6
23
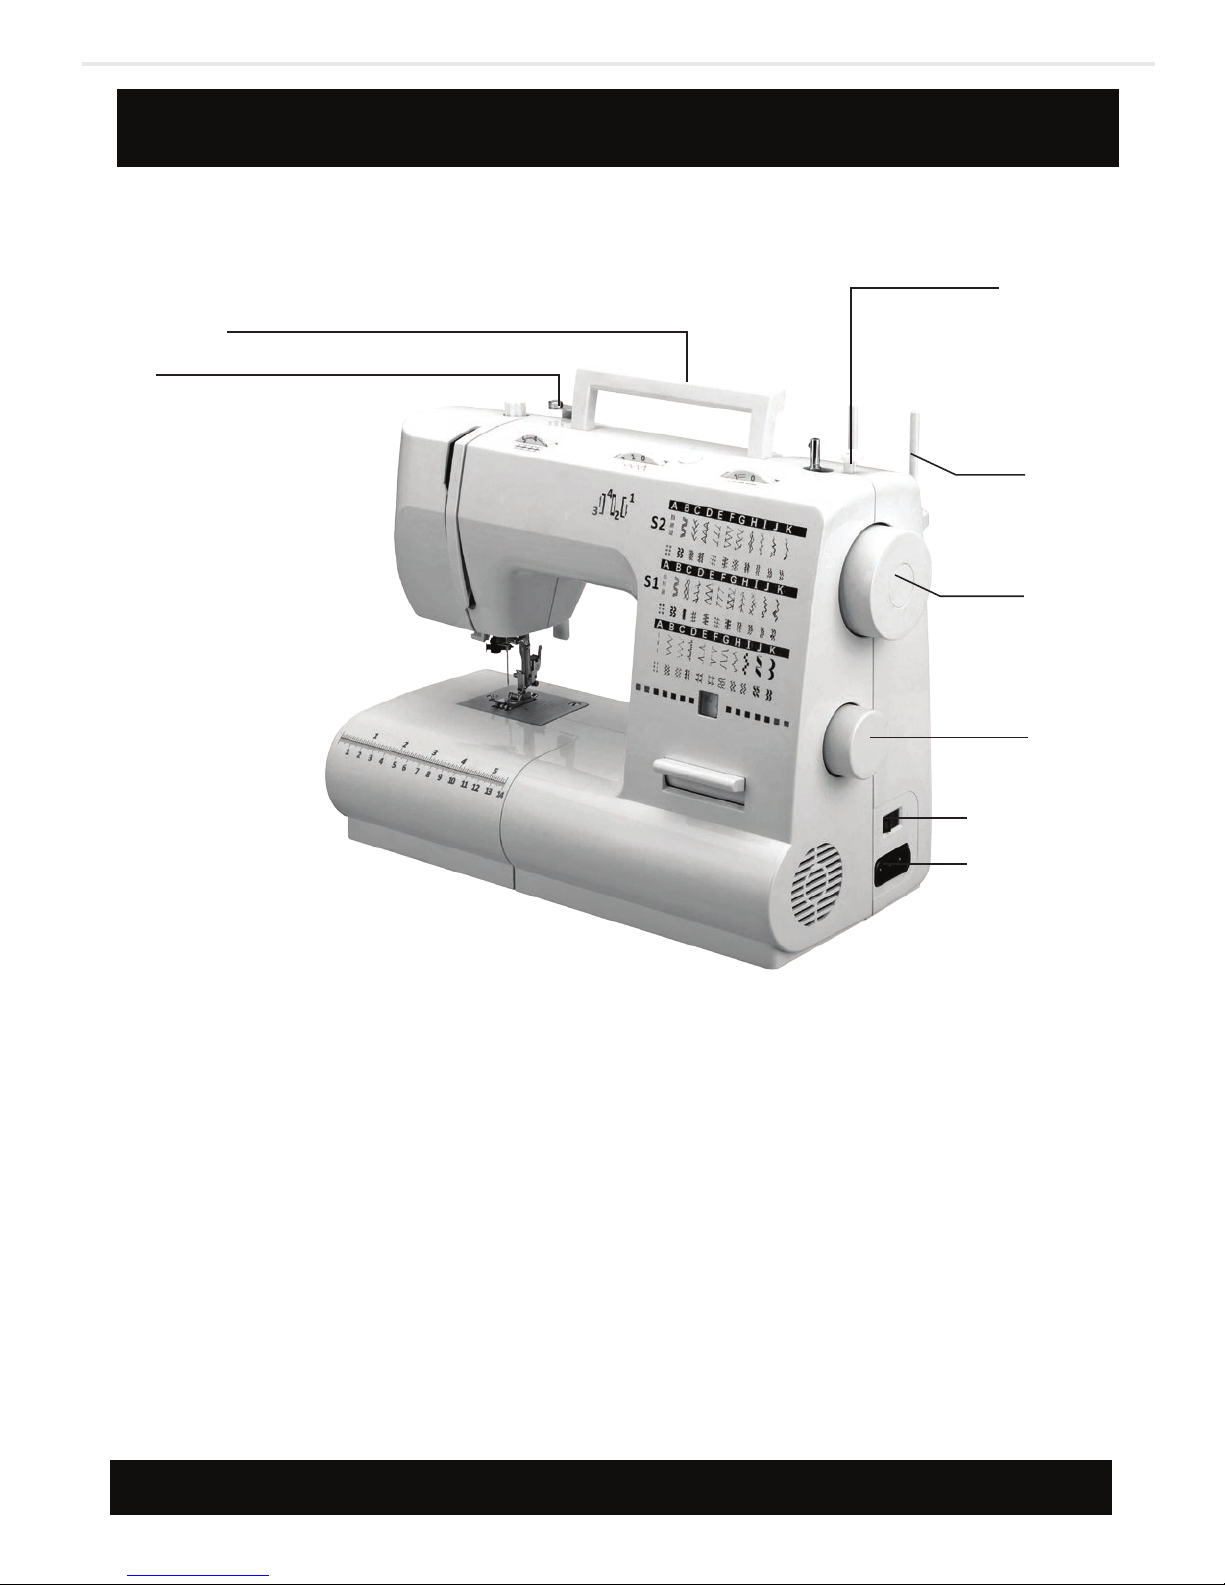
Component identication (Part 2)
17
16
18
19
14.
15.
16.
17.
18.
Upper thread guide
Presser foot lever
Handle
Bobbin winder
Spool pin
21.
22.
23.
20
21
22
Power switch
Main plug socket
Bobbin thread guide
19.
20.
Handwheel
Pattern selector dial
06
Page 7

Accessories
Standard Accessories (1)
a.
4 step buttonhole foot
b.
L shape screwdriver
c.
Seam ripper/brush
d.
Lubricate oil
e.
#14 needle x 3pcs (ORGAN brand)
f.
Bobbins x 3pcs in total
g.
Twin needle
h.
Screw driver (small)
i.
Screw driver (large)
j.
Edge/quilting guide
k.
Emboidering plate
l.
Spool holder
m.
All purpose foot
Optional Quilting Package (2)
n.
Zipper foot with double edge
o.
Button sewing foot
q.
Blind hem foot
r.
Hemmer foot
s.
Quilting foot
t.
Stain stitch foot
u.
Overcasting foot
v.
Darning/embroidering foot
w.
Gathering foot
x.
Cording foot
(To order optional accessories, please
call us at: 1- 877-678-6232).
07
Page 8
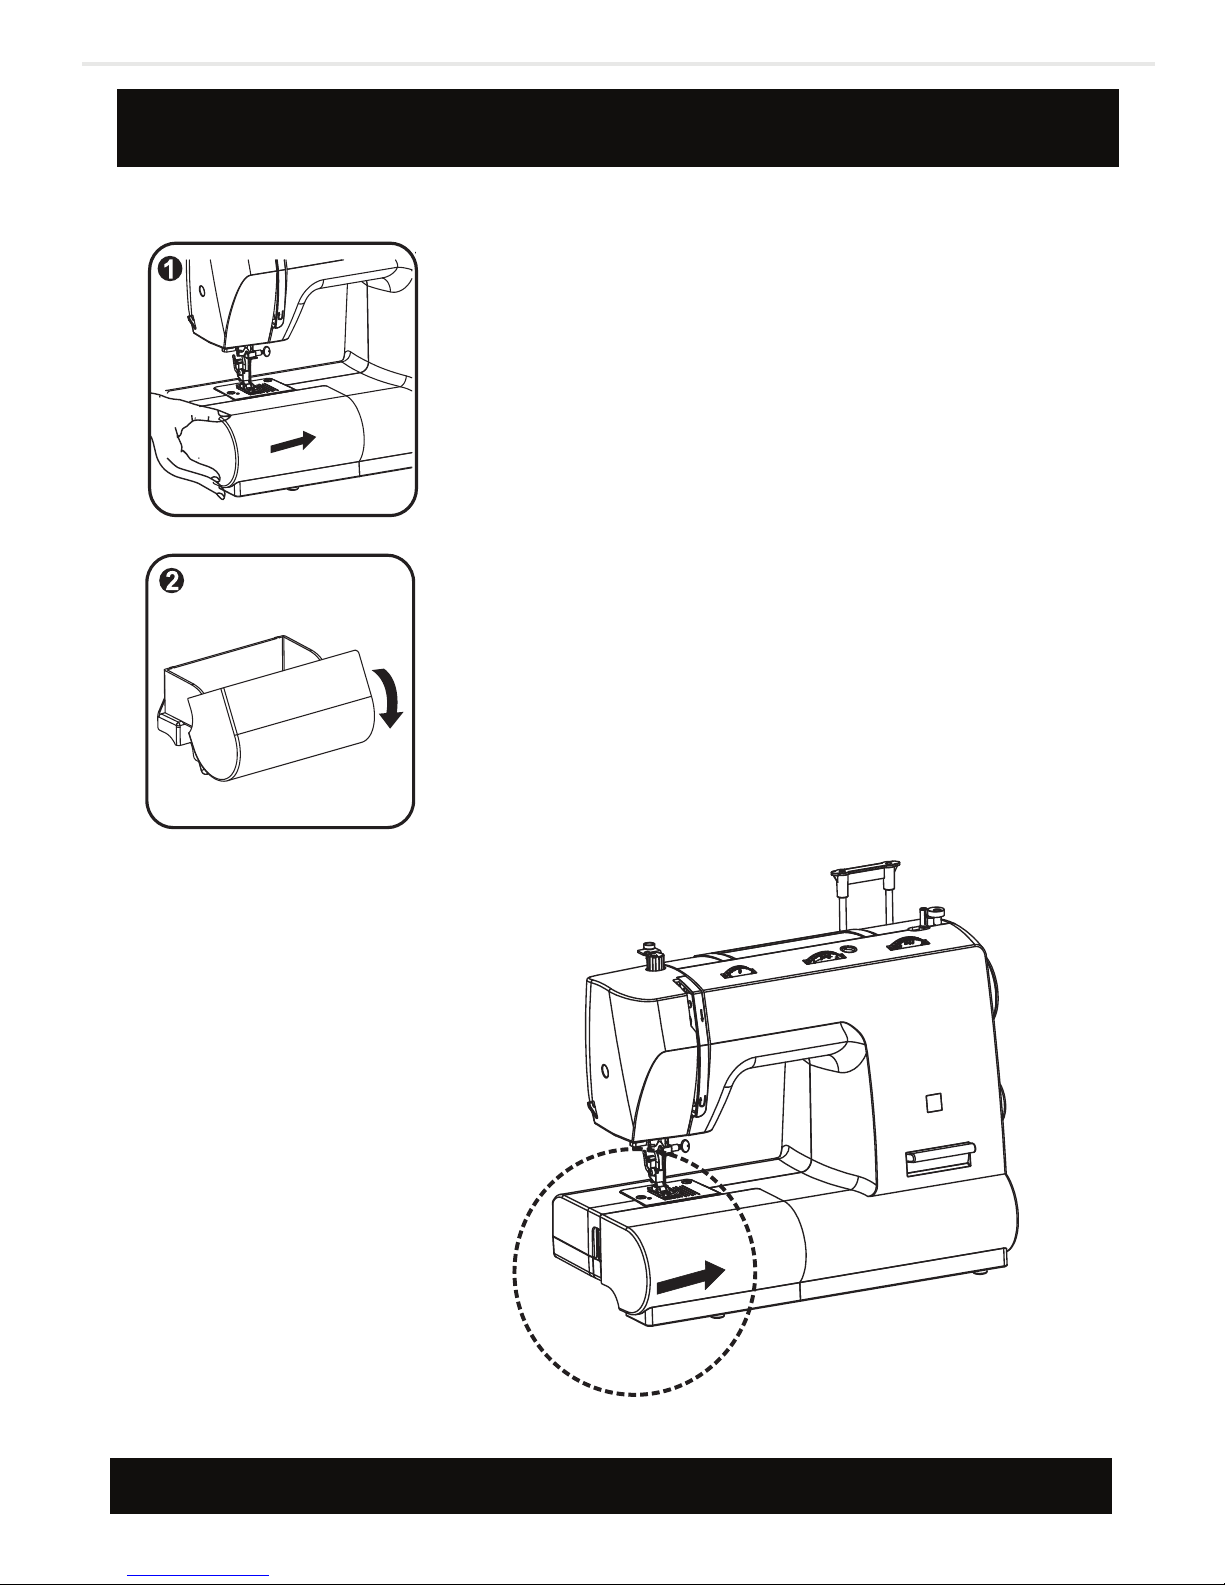
Fitting the snap-in sewing table
Hold the snap-in sewing table horizontal, and
push it in the direction of the arrow. (Fig.1)
The inside of the snap-in sewing table can be
utilized as an accessory box. To open, lift up at
the point of the arrow. (Fig.2)
08
Page 9
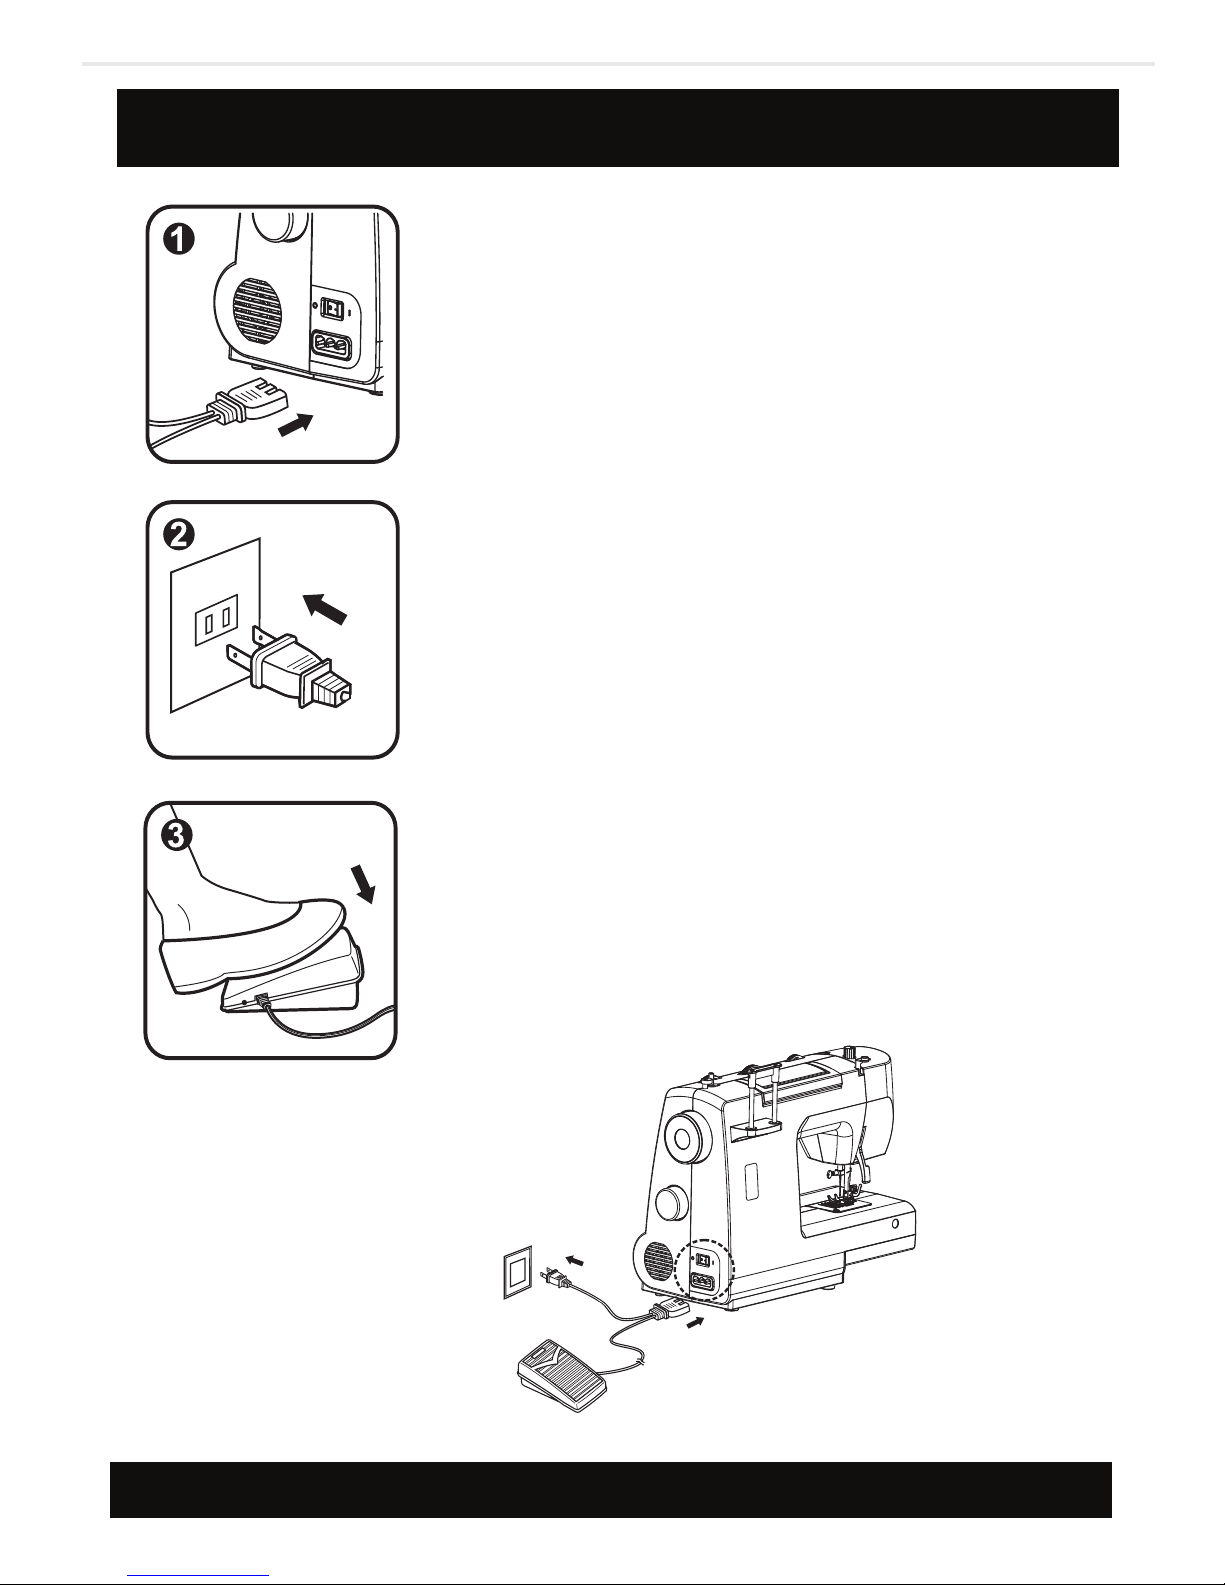
Connecting machine to power source
CAUTION:
Always make sure that the machine is unplugged from
power source and the main switch is on (O ) “0” when
the machine is not in use and before inserting or
removing parts.
- This machine is equipped with polarized plug which
must be used with an appropriate electrical outlet.
- Connect the machine to a power source as illustrated
(1/2).
-The power switch is located above the terminal box.
Your machine will not operate unless the switch is on
”I”. (1)
-Sewing light turns on automatically when the main
switch is on “I”.
-To start the machine, press the foot control (3). The
speed of the machine is regulated by the amount of
pressure exerted on the foot control.
ATTENTION:
Consult a qualied electrician if in doubt as to connect
the machine to power source. Unplug power cord
when machine is not in use.
09
Page 10
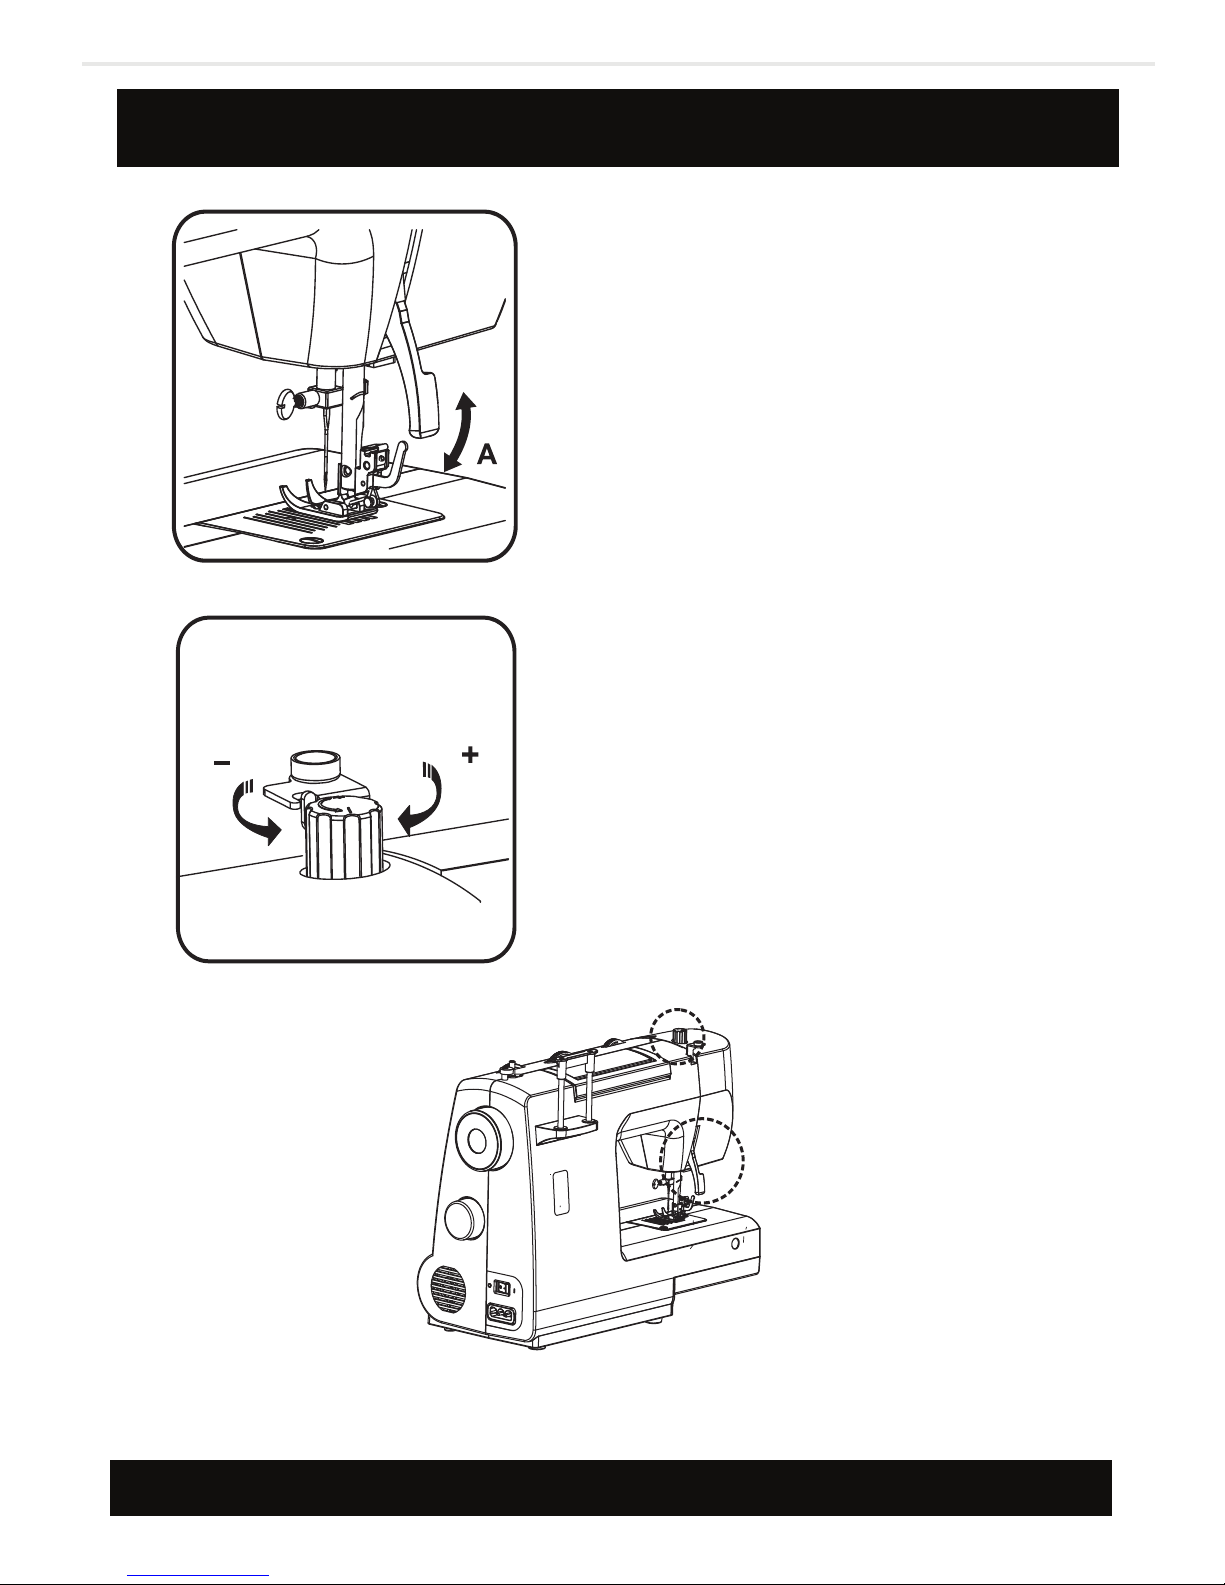
Two-step presser foot lever
When sewing several layers or thick
fabrics, the presser foot can be raised a
second stage for easy positioning of
the work. (A)
The presser foot pressure of the
machine has been pre-set and requires
no particular readjustment according
to the type of fabric (light or heavy
weight).
However, if you need to adjust the
presser foot pressure, turn the presser
foot pressure dial as shown above.
For sewing very thin fabric, loosen the
pressure by turning the dial counter
clockwise, and for heavy fabric, tighten
by turning it clockwise.
10
Page 11
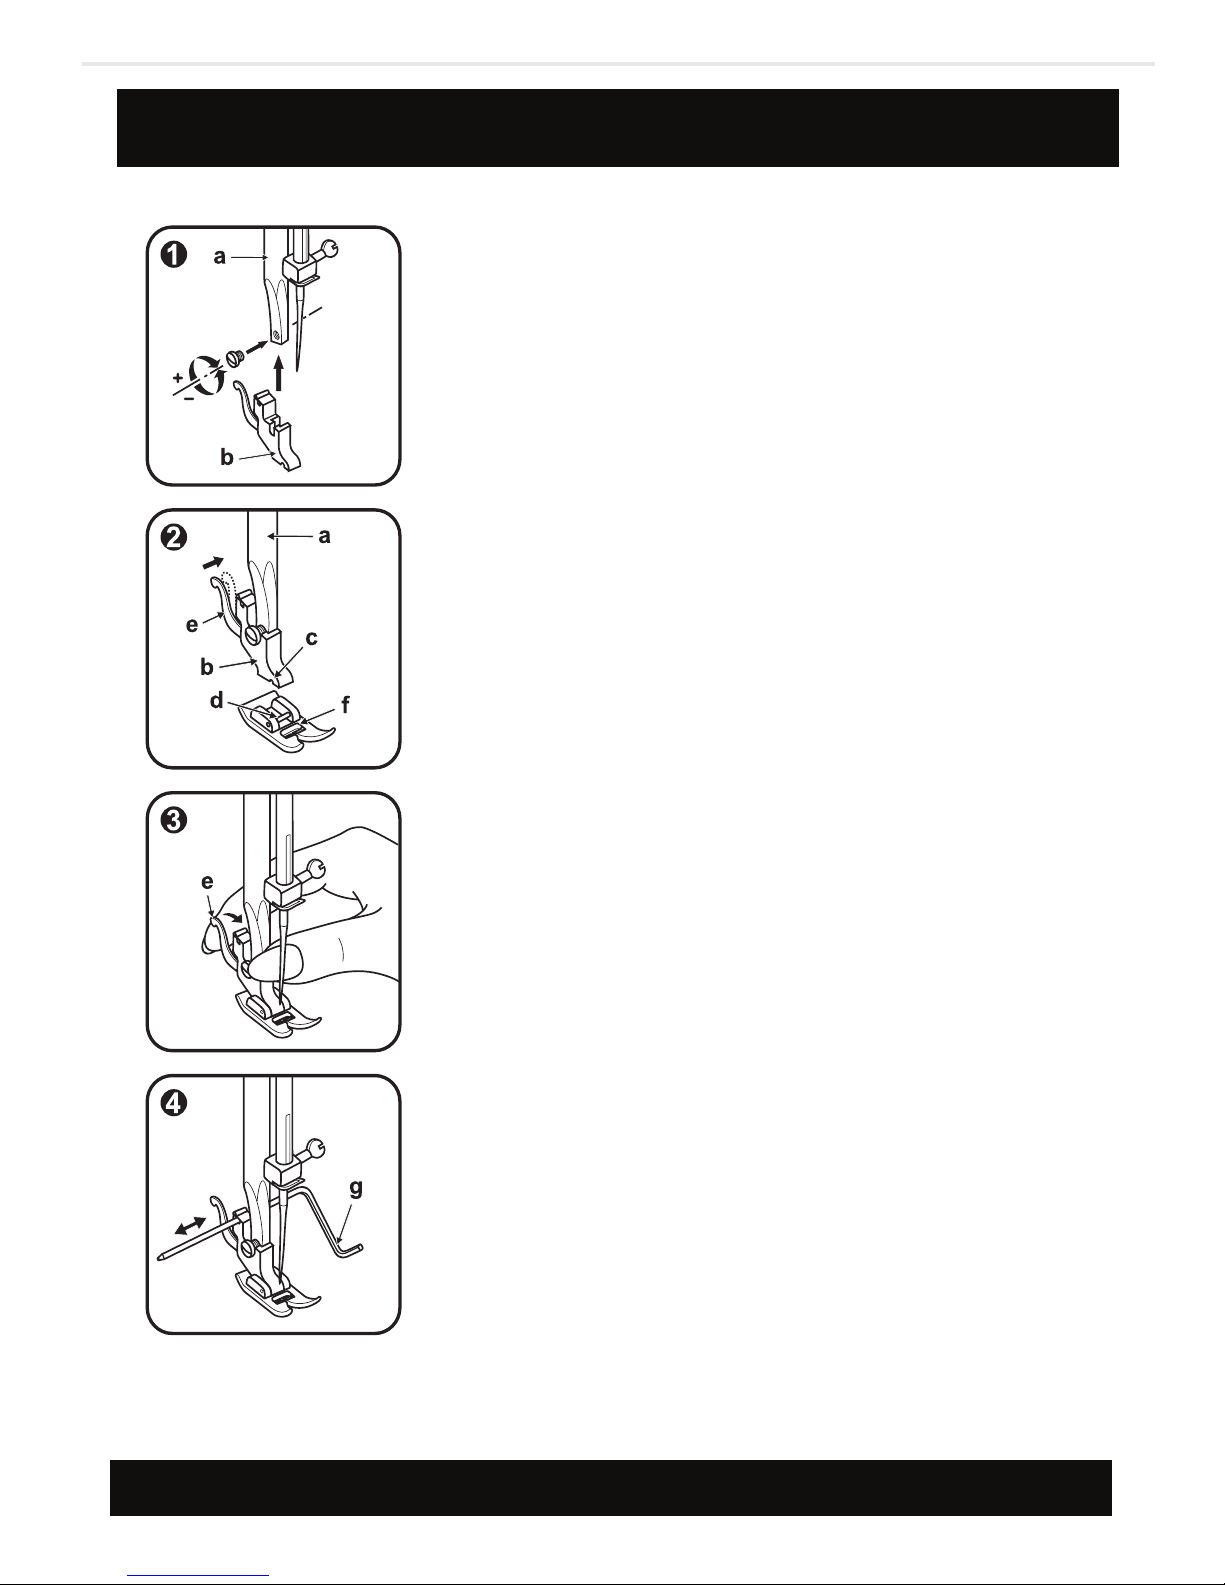
Attaching the presser foot holder
ATTENTION:
Turn power switch to “0” before carrying out
any of the operations below.
Raise the needle to its highest position and
raise the presser foot lever. Attach the presser
foot holder (b) to the presser foot bar (a). (1)
Attaching the presser foot:
Lower the presser foot holder (b) until the
cut-out (c) is directly above the pin (d). (2)
Lower the presser foot holder (b) and the
presser foot (f) will engage automatically.
Removing the presser foot:
Raise the presser foot.
Release the pressure foot by raising lever (e)
located at the back of the foot holder. (3)
Attaching the seam guide:
Attach the seam guide (g) in the slot as
illustrated. Adjust the distance as required for
hems, pleats, etc.... (4)
11
Page 12
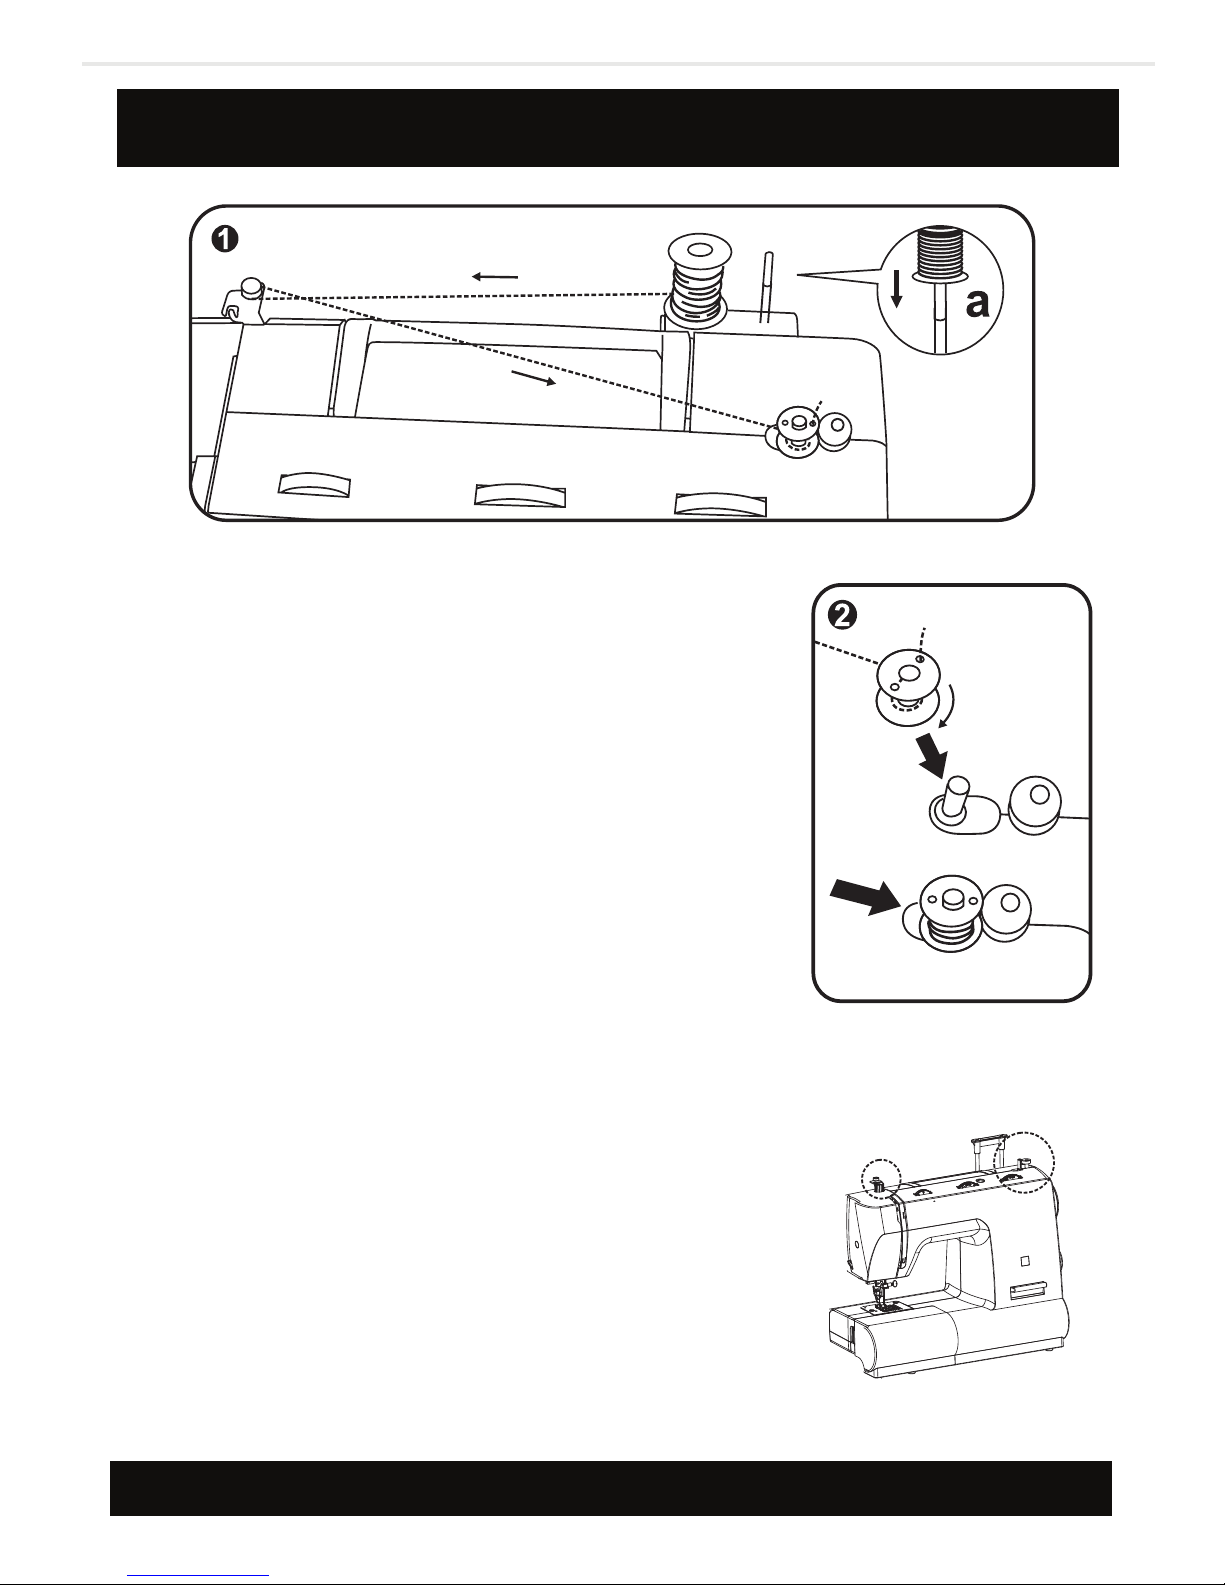
Winding the bobbin
Place an empty bobbin winder spindle.
Take the thread from the spool through the
bobbin winder tension disc. (1)
Wind the thread a few times by hand around
the empty bobbin in a clockwise direction. Push
the bobbin to the right towards the bobbin
winding position. (2)
Press the foot control gently. The bobbin will
stop winding when it is full. Push the bobbin to
the left to “sewing position” and remove it.
NOTE:
When the bobbin winder spindle is in “bobbin
winding” position, the machine will not sew and
the hand wheel will not turn. To start sewing,
push the bobbin winder spindle to the left
(sewing position).
a. Spool pin
12
Page 13
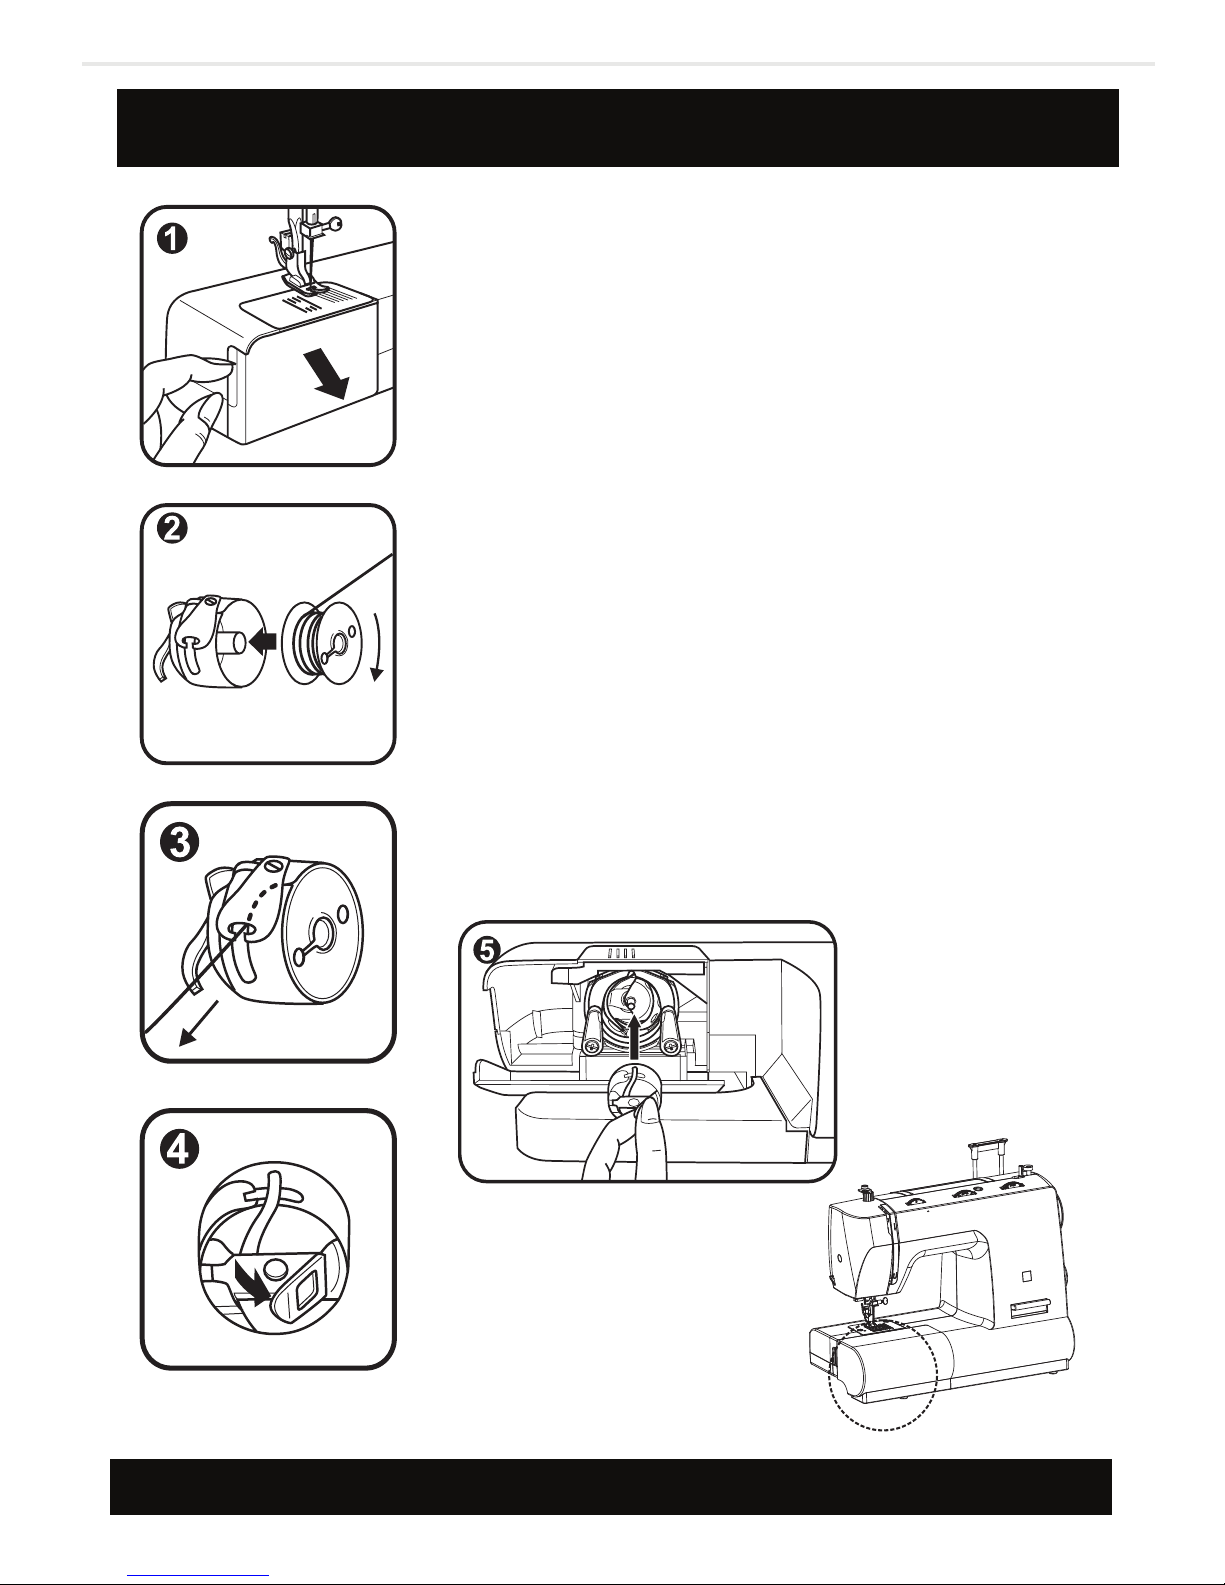
Inserting bobbin
ATTENTION:
Turn power switch to (O) “0” before inserting
or removing the bobbin.
When inserting or removing the bobbin, the
needle must be fully raised.
- Open the hinged cover. (1)
- Hold the bobbin case with one hand. Insert
the bobbin so that the thread runs in a
clockwise direction (arrow). (2)
- Pull the thread through the slot, down and to the
left until it enters the delivery eyelet (rectangular
opening) under the tension spring. (3)
- Hold the bobbin case by the hinged latch. (4)
- Insert the bobbin case fully into the shuttle
race and release the latch. Make sure that the
metal nger ts into the notch at the top of the
race cover. (5)
13
Page 14

Changing the needle
CAUTION:
Turn power switch to (O) “0” before inserting or removing the needle.
Replace the needle at the rst sign of thread breakage or skipped
stitches. Select the correct type and size of needle for the fabric to be
sewn. Turn the balance wheel towards you until the needle is at
highest position. Loosen the needle clamp screw (A) and tighten again
after inserting the new needle. (1)
The at side of the needle shaft should be facing away from you (B).
Push the needle up (C) into the needle clamp as far as it will go (D).
Tighten the needle clamp screw rmly. The sewing needle must always
be straight and sharp for smooth sewing. Replace the needle (2) if it is
bent (A), blunt (B) or the point is damaged (C).
14
Page 15
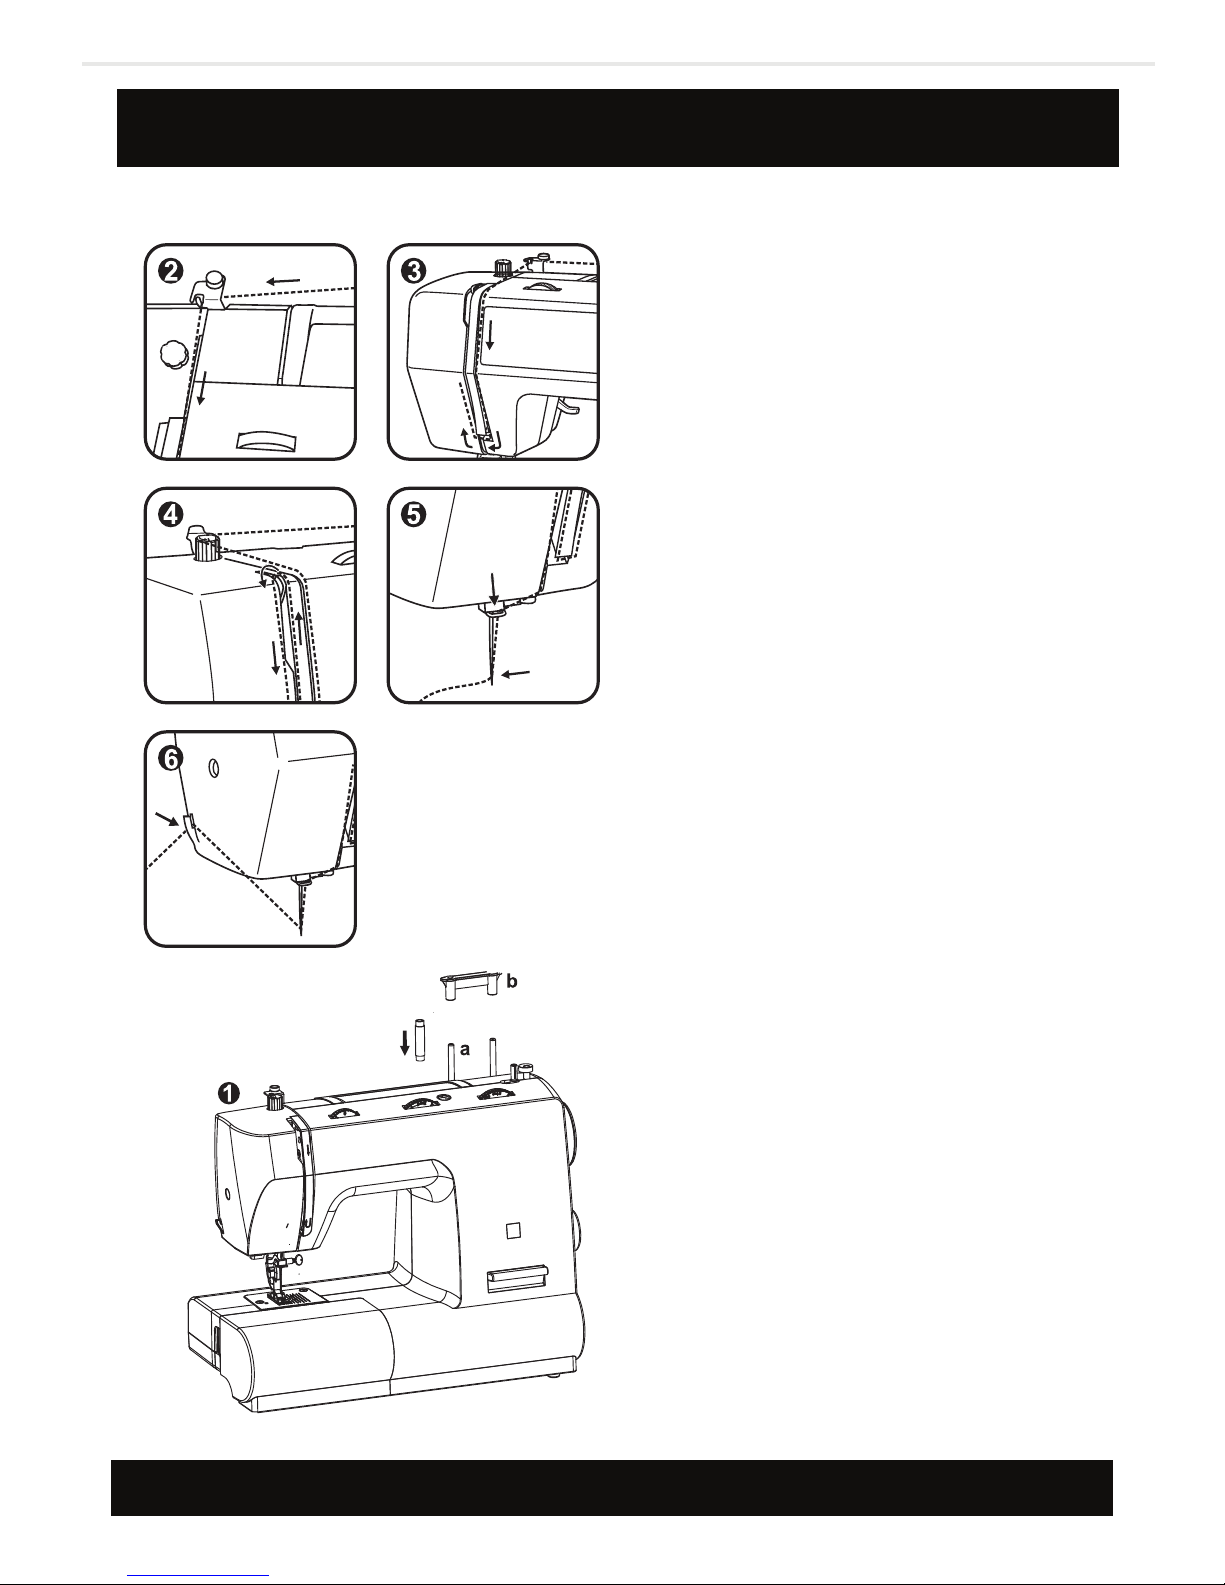
Threading the upper thread
CAUTION:
Before threading, turn power
switch to (O) “0”.
Raise the needle bar to its
highest position. Follow exactly
the numbered threading
sequence illustrated below. If you
skip a step or fail to properly
engage the thread in any of the
thread guides, the machine will
not sew properly. (1-5)
Continue to draw the thread
down and into the needle bar
thread guide. Insert the thread
through the eye of the needle
from front to back. Leave about
10cm (4”) of thread loose behind
the needle. (6)
a. Spool pin
b. Spool holder
15
Page 16

Automatic needle threader
*The automatic needle threader is an optional accessory not supplied
with your machine (to purchase call: 877-678-6232).
ATTENTION:
Turn power switch to (O) “0” before carrying out any of the following:
- Raise the needle to its highest position.
- Press lever (A) right down.
- The threader automatically swings to the threading position (B).
- Take the thread around the hook (C).
- Take the thread in front of the needle round the hook (D) from bottom
to top.
- Release lever (A).
- Pull the thread through the needle eye.
16
Page 17

Thread tension
NOTE:
The bobbin thread tension has been adjusted at
the factory and readjustment is usually not
required.
Lower thread tension
To test the bobbin thread tension, remove the
bobbin case and bobbin from the machine and
hold the bobbin case suspended by the thread.
Shake it once or twice. If the tension is correct,
the thread will unwind by about an inch or two.
If the tension is too tight, it will not unwind. If
the tension is too loose, the thread will unwind
for more than two inches. To adjust, turn the
small screw on the side of the bobbin case. (1)
Upper thread tension
Basic thread tension setting: “4”. (2)
To increase the tension, turn the dial up to a
higher number. To reduce the tension, turn the
dial to a lower number.
A. Normal thread tension.
B. Thread tension too loose.
C. Thread tension too tight.
17
Page 18

Bringing up the lower thread
Hold the upper thread with the left hand. Turn the handwheel towards
you with your right hand until the needle goes down and comes up
again to its highest position. (1)
- Lightly draw the needle thread forming a loop with the bobbin thread.
The upper thread should have caught the lower thread in a loop.
- Pull the needle thread toward you and the lower thread will come up
from the bobbin in a large loop. (2) Pull about 15cm (6”) of both threads
away from you under the presser foot.
18
Page 19

Finishing up
Reverse sewing
Reverse sewing is used for locking the end of
seams and where reinforcement is needed.
At the end of seam, press down the reverse
sewing lever and touch the foot control
lightly. Sew a few reverse stitches. Release
the lever and the machine will sew forwards
again. (A)
Removing the fabric
Turn the handwheel towards you to bring
the thread take up lever to its highest
position. Raise the presser foot and draw the
fabric away from you.
Cutting the thread
Hold the threads behind the presser foot.
Using both hands, guide them to the slit (B)
at the rear of the presser bar and press down
to cut the thread. You can also use the thread
cutter on the side of the machine.
19
Page 20

Matching needle / fabric / thread
NEEDLE
SIZE
9-11 (65-75)
12 (80)
14 (90)
16 (100)
FABRICS THREAD
Lightweight fabrics-thin cottons, voile,
serge, silk, muslin, Qiana, interlocks,
cotton knits, tricots, jerseys, drapes,
woven polyester, shirt & blouse fabrics.
Medium weight fabrics-cotton, satin,
kettleclote, sailcloth, double knits,
lightweight woolens.
Medium weight fabrics-cotton duck,
woolen, heavier knits, terrycloth,
denims.
Heavyweight fabrics-canvas, woolens,
outdoor tent and quilted fabrics,
denims, upholstery material (light to
medium).
Light-duty thread in cotton, nylon or
polyester.
Most threads sold are medium size
and suitable for these fabrics and
needle sizes. Use polyester threads
on synthetic materials and cotton
on natural woven fabrics for best
results. Always use the same thread
on top and bottom.
18 (110)
Heavy woolens, overcoat fabrics,
upholstery fabrics, some leathers and
vinyls.
Heavy duty thread, carpet thread.
(Use heavy foot pressure-large
numbers.)
IMPORTANT: Match needle size to thread size and weight of fabric.
20
Page 21

Matching needle / fabric / thread
NEEDLES EXPLANATION TYPE OF FABRIC
HAx 1
15x 1
15x 1/705H
(SIN)
15x 1/705HS
(SUK)
130 PCL
NOTE:
Standard sharp needles. Sizes range
thin to large. 9 (65) to 18 (110)
Semi-ball point needle, scarfed.
9 (65) to 18 (110)
Full ball point needle, scarfed.
9 (65) to 18 (110)
Leather needles. 12 (80) to 18 (110) Leather, vinyl, upholstery. Leaves
Natural woven fabrics-wool, cotton,
silk, etc. Qiana. Not recommended
for double knits.
Natural and synthetic woven fabrics,
polyester blends. Knits-polyesters,
interlocks, tricot, single and double
knits. Can be used instead of 15x 1
for sewing all fabrics.
Sweater knits, Lycra, swimsuit fabric,
elastic.
smaller hole than standard large
needle.
1. Twin needles, can be purchased for utility and decorative work.
2. When sewing with twin needles the stitch width dial should be set at
less than “2.5”.
3. European needles show sizes 65, 70, 80, etc. American and Japanese
needles show size 9, 11, 12, etc.
4. Replace needle often (approximately every other garment) and / or at
rst thread breakage or skipped stitches.
21
Page 22

1. Stitch width dial
2. Stitch length dial
3. Stitch display
4. Pattern selector dial
5. Reverse sewing lever
How to choose your pattern
For straight stitch select pattern “A”
with pattern selector dial (4). Adjust
the stitch length dial (2). You may
choose any needle position, by
turning the stitch width dial (1).
For zig-zag stitch, select pattern “B”
with pattern selector dial (4). Adjust
the stitch length (2) and stitch width
(1) according to the fabric being used.
To obtain any of the other patterns
shown in the upper row on the stitch
selection panel, select the letter
above the stitch with the pattern
selector dial. Adjust the stitch length
and width with the control dials
according to the result desired.
To obtain any of the patterns on the
second row, turn the stitch dial to “S1”,
select the pattern desired with
pattern selector dial, and adjust the
stitch width with the stitch width dial.
To obtain any of the patterns on the
third row, turn the stitch length dial to
“S2”, select the pattern desired with
pattern selector dial, and adjust the
stitch width with the stitch width dial.
22
Page 23

Straight stitching and needle position
Turn the pattern selector dial so that
the stitch display shows the straight
stitch position.
Generally speaking, the thicker the
fabric, thread and needle, the longer
the stitch should be.
Choose your needle poition, from left
position to right needle position by
changing the stitch width dial (1) from
“0” to “5”.
1. Stitch width dial
2. Stitch length dial
3. Stitch display
4. Pattern selector dial
5. Reverse sewing lever
23
Page 24

Zig-zag sewing
Turn the pattern selector dial to “B”.
Function of stitch width dial
The maximum ziz-zag stitch width for
zig-zag stitching is “5”; however, the width
increases as you move zig-zag dial from “0” “5”. For twin needle sewing, never set the
width wider than “2.5”. (1)
Function of stitch length dial while
zigzaging
The density of zig-zag stitches increases as
the setting of stitch length dial approaches
“0”. Neat zig-zag stitches are usually
achieved at “2.5” or below. (2)
Satin stitch
When the stitch length is set between “0” “1”, the stitches are very close together
producing the “satin stitch” which is used for
making buttonholes and decorative stitches.
Sewing thin fabrics:
When sewing very thin fabrics, it is
suggested that you use interfacing on the
backside of the fabric.
24
Page 25

Blind hem / lingerie stitch
*The blind hem foot is a standard accessory.
Blind hem for stretch fabrics. Position “D”
on selection dial.
Blind hem/lingerie for rm fabrics. Position
“E” or “F” on selection dial.
Set the machine as illustrated.
NOTE:
It takes practice to sew blind hems. Always make
a sewing test rst.
Fold the fabric as illustrated with the wrong side
a. Stitch width
b. Stitch length
c. Presser foot
uppermost. (1) Place the fabric under the foot.
Turn the handwheel forward by hand until the
needle swings fully to the left. It should just
pierce the fold of the fabric. If it does not, adjust
the stitch width accordingly. (2) Adjust the
guide (3) by turning the knob (4) so that the
guide just rests against the fold. Sew slowly, by
pressing the foot control lightly guiding the
fabric along the edge of the guide.
d. Stitch pattern
25
Page 26

Overlock stitches
*The overcasting foot is an optional accessory not
supplied with your machine (to purchase call:
877-678-6232).
Seams, neatening, visible hems.
Turn the stitch length dial to “S1”.
The stitch width can be adjusted to suit the fabric.
Stretch overlock:
For ne knits, jerseys, neck edges, ribbing. (A)
Double overlock stitch:
For ne knits, handknits, seams. (B)
All overlock stitches are suitable for sewing and
neatening edges and visible seams in one operation.
When neatening, the needle should just go over the
edge of the fabric.
ATTENTION:
Use new needles or ball point needles or stretch
needle.
26
Page 27

Sewing on buttons
Install the embroidering plate to the needle plate as
illustrated (1).
Change presser foot to button sewing foot.
Position the work under the foot. Place the button in
the desired position, lower the foot. Set the pattern
selector knob on zig-zag stitch. Adjust the stitch width
to “3” - “5” according to the distance between the two
holes of the button. Turn the handwheel to check that
the needle goes cleanly into the left and right holes of
the button. Set the pattern selector knob on straight
stitch, and sew a few securing stitches. Set the pattern
selector knob on zig-zag stitch, and slowly sew on the
button with about 10 stitches. Set the pattern selector
knob on straight stitch and sew a few securing stitches
(2).
If a shank is required, place a darning needle on top of
the button and sew (3). For buttons with 4 holes, sew
through the front two holes rst (2), push work
forward and then sew through the back two holes (3).
27
27
Page 28

Utility sewing
PREPARE:
1. Take o the all purpose foot and attach the
buttonhole foot.
2. Measure diameter and thickness of button and add
0.3cm (1/8”) for back tacks; mark buttonhole size on
fabric.
3. Place fabric under the foot, so that marking on the
buttonhole foot aligns with starting marking on
fabric. Lower the foot, so that the buttonhole center
line marked on the fabric aligns with the center of the
buttonhole foot.
Adjust the stitch length dial between “0.5 - 1” to set
stitch density.
NOTE:
Density varies according to the fabric. Always test sew
a buttonhole on the fabric you are using to sew the
buttonhole.
Follow the 4-step sequence changing from one step
to another with the stitch pattern selector dial. Take
care not to sew too many stitches in steps 2 and 4. Use
seam ripper and cut buttonhole open from both ends
towards the middle.
28
Page 29

Zippers and piping
Set the machine as illustrated. Dial selector on “A”.
Set stitch length control between “1” - “4”
(according to thickness of fabric).
The zipper foot can be inserted right or left,
depending on which side of the foot you are
going to sew. (1)
To sew past the zipper pull, lower the needle into
the fabric, raise the presser foot and push the
zipper pull behind the presser foot. Lower the
foot and continue to sew.
It is also possible to sew in a length of cord, into a
bias strip to form a “welt”. (2)
29
Page 30

Sewing with the hemmer foot
*The hemmer foot is an optional accessory not
supplied with your machine (to purchase call:
877-678-6232).
For hems in ne or sheer fabrics.
Set the machine as illustrated. Pattern selector
on “A”.
Neaten the edge of the fabric. At the beginning
of the hem, turn under the edge twice by about
3mm (1/8”) and sew 4-5 stitches to secure. Pull
the thread slightly towards the back. Insert the
needle into the fabric, raise the presser foot and
guide the fold into the scroll on the foot. (1)
Gently pull the fabric edge towards you and
lower the presser foot. Begin sewing, guiding
the fabric into the scroll by holding it upright
and slightly to the left. (2)
30
30
Page 31

3 step zig-zag
Sewing on lace and elastic, darning, mending,
reinforcing edges.
Set the machine as illustrated. Pattern selector on
“ C ”.
Place patch in position. The stitch length can be
shortened to produce very close stitches. (1)
When mending tears, it is advisable to use a
piece of backing fabric to reinforce. The stitch
density can be varied by adjusting the stitch
length. First sew over the center and then
overlap on both sides. Depending on the type of
fabric and damage, sew between 3 and 5 rows. (2)
31
Page 32

Stitch selection
Triple straight stitch: (1/3)
For hardwearing seams.
Pattern selector on “A”.
Turn the stitch length dial to “S1”.
The machine sews two stitches forward and one stitch backwards.
This gives triple reinforcement.
Triple zig-zag: (2/4)
For hardwearing seams, hems and decorative seams.
Pattern selector on “B”.
Turn the stitch length dial to “S1”.
Adjust the stitch width dial to between “3” and “5”.
Triple zig-zag is suitable for rm fabrics like denim, corduroy, etc.
32
Page 33

Smocking stitch
Seams, hems, T-shirts, underwear, etc.
Set the machine as illustrated.
This stitch can be used for all types of jersey as
well as for woven fabrics. (1)
Sew at 1cm (1/4”) from the fabric edge and trim
the surplus fabric. (2)
Pattern selector on “C”.
Turn the stitch length dial to “S1”.
33
Page 34

Sewing with the cording foot
*The cording foot is an optional accessory not
supplied with your machine (to purchase call:
877-678-6232).
Decorative eects, cushions, tablecloths, etc.
Set the machine as illustrated. Various stitches are
suitable for sewing on cord, e.g. Zig-zag, Triple
zig-zag, decorative stitches.
Insert the cord between the spring covering the
cord groove and the foot. The cord should run in
the groove. One, two or three cords can be sewn
on. The stitch width is adjusted according to the
number of cords and the stitch selected. (1/2)
34
34
Page 35

Free motion darning
*The darning foot is an optional accessory not
supplied with your machine (to purchase call:
877-678-6232).
Set the machine as illustrated. Install the
embroidering plate. (1) Remove the presser foot
clamp. (2) Attach the darning foot to the presser
foot bar. The lever (A) should be behind the needle
clamp screw (B). Press the darning foot on rmly
from behind with your index nger and tighten the
screw (C). (3)
First sew round the edge of the hole (to secure the
threads). (4) First row: Always work from left to right.
Turn work by 1/4 and oversew. A darning ring is
recommended for easier sewing and better results.
35
Page 36

Practical stitches
Set the machine as illustrated.
Turn the switch width dial and stitch length dial
to suit the fabric.
Shell hem (A)
For decorative edges.
Suitable for edges on sheer, ne and stretch
fabrics. The larger stitch should go just over the
edge of the fabric to create the shell eect.
Crescent stitch (B)
For a delicate edge nish along the edge of
fabric. Stitch length should be set from “0.5”
-”1.0”.
Rampart (C)
For at joining seams, sewing on elastic, visible
hems. The stitch can be used for rm, thicker
fabrics.
36
36
Page 37

Darning
- Turn stitch length dial to the desired length.
- Turn stitch selector to straight stitch, center
needle position.
- Position the fabric to be darned under the
presser foot together with the under laying
fabric to be used.
- Lower the presser foot and alternately sew
forward or reverse using the lever.
- Repeat this motion until the area to be darned
is lled with rows of stitching.
37
Page 38

Attaching lace
- Turn stitch length dial to the desired stitch
length.
- Turn stitch selector to straight stitch, center
needle position.
- Fold in the edge of the fabric approximately
6mm (1/4”).
- Place the lace under the folded edge of the
fabric allowing it to under lap the fabric slightly as
required by the pattern of the lace.
- Sew on the edge of the fabric fold.
- You can add a decorative touch by using the
satin stitch to sew the lace.
38
Page 39

Applique
- Turn stitch length dial to the desired length.
- Turn pattern selector dial to zig-zag.
- Select a narrow zig-zag width.
- Cut out the applique design and baste it to the
fabric.
- Sew slowly around the edge of the design.
- Trim excess material outside the stitching. Make
sure not to cut any stitches.
- Remove the basting thread.
- Tie top and bottom thread under the applique to
avoid unraveling.
39
39
Page 40

Twin needle
- Turn stitch length dial to the desired stitch
length.
- Turn stitch selector to straight stitch, center
needle position, width setting “0”.
- Make sure that the two threads used to thread
the twin needle are of the same weight. You can
use one or two colors.
- Insert the twin needle in the same way as single
needle. Flat side of needle should face away from
you.
- Follow instructions for single needle threading.
Thread each needle separately.
NOTE:
When sewing with twin needle, always proceed
slowly, and make sure to maintain a low speed to
ensure quality stitching. When using twin needle
on zig-zag make sure the stitch width dial is set
between “0” and “2.5”. Do not use twin needle at
setting above “2.5”.
40
Page 41

Quilting
*The quilting foot is an optional accessory not supplied with this
machine (to purchase call: 877-678-6232).
Set pattern selector as illustrated.
Insert the quilting guide in presser foot holder
and set the space as you desired.
Move the fabric over and sew successive rows
with the guide riding along on the previous
row of stitching.
NOTE:
Presser foot shown is the optional quilting foot
which does not come with your machine. If you
have not purchased this foot substitute the all
purpose foot.
41
41
Page 42

Gathering x-foot
*The gathering foot is an optional accessory not supplied with this
machine (to purchase call: 877-678-6232).
Set the pattern selector as illustrated.
1. Attach the gathering foot.
2. Sew a single row or multiple rows of straight
stitches.
3. If more gathering is required, loosen the upper
thread tension to below 2 so that the lower thread
lies on the underside of the material.
4. Pull the lower thread to gather more of the
material.
NOTE:
Presser foot shown is the optional gathering foot
which does not come with your machine. If you
have not purchased this foot substitute the all
purpose foot and gather fabric by hand by
lowering the tension setting to below 2 and
pulling the lower thread to gather the material.
42
42
Page 43

Patch work
These stitches are used to join two pieces of fabric while leaving a
space between their edges.
Fold over the edges of the two pieces of fabric
for the hem and baste the edges to a thin piece
of paper leaving a small space between them.
1.
After sewing, remove the basting and the
paper. Finish by tying knots on the reverse side
at the beginning and the end of the seams.
4.
Stitch along the edge, pulling both threads
slightly when beginning to sew.
* Use thicker than normal threads for sewing.
3.
Set the Pattern selector on “G”.
Turn the stitch length dial to “S1”.
2.
43
Page 44

Maintenance
CAUTION:
Turn the handwheel until the needle is fully raised.
Open the hinged front cover and unscrew the
needle plate screw with the screwdriver. (Fig.1)
Remove the stitch plate:
Remove the bobbin case and use the brush
supplied to clean the whole area. (Fig.2)
Cleaning the feed dog:
Fabric u and threads must be
removed regularly based on occasional
and frequent use.
IMPORTANT:
Remove the bobbin case. Snap the two hook
retaining arms (a) outwards. Remove the hook race
cover (b) and the hook (c) and clean with a soft cloth.
Lubricate at the points (d) (1-2 drops) with sewing
machine oil. Turn the handwheel until the hook race
(e) is in the left position. Replace the hook (c).
Replace the hook race cover and snap back the two
hook retaining arms. Insert the bobbin case and
bobbin and replace the stitch plate.
Cleaning and lubricating the hook:
Always make sure that the machine is unplugged
from power source and the main switch is on (O)
“0”. When the machine is not in use and before
inserting or removing parts.
44
Page 45

Troubleshooting guide
PROBLEM CAUSE CORRECTION
Upper
thread
breaks
Lower
thread
breaks
1. The machine is not threaded correctly.
2. The thread tension is too tight.
3. The thread is too thick for the needle.
4. The needle is not inserted correctly.
5. The thread is round wound the spool
holder pin.
6. The needle is damaged.
1. The bobbin case is not inserted
correctly.
2. The bobbin case is not correctly
threaded.
3. The lower thread tension is too tight.
1. Rethread machine.
2. Reduce the thread tension (lower
number).
3. Select a larger needle.
4. Remove and reinsert the needle
(at side towards the back).
5. Remove the reel and wind thread
onto reel.
6. Replace the needle.
1. Remove and reinsert the bobbin
case and pull on the thread. The
thread should pull easily.
2. Check both bobbin and bobbin
case.
3. Loosen lower thread tension as
described.
Skipped
stitches
Needle
breaks
1. The needle is not inserted correctly.
2. The needle is damaged.
3. The wrong size needle has been used.
4. The foot is not attached correctly.
1. The needle is damaged.
2. The needle is not correctly inserted.
3. Wrong needle size for the fabric.
4. The wrong foot is attached.
45
1. Remove and reinsert needle (at
side towards the back).
2. Insert a new needle.
3. Choose a needle to suit the thread
and fabric.
4. Check and attach correctly.
1. Insert a new needle.
2. Insert the needle correctly (at
size towards the back).
3. Choose a needle to suit the thread
and fabric.
4. Select the correct foot.
Page 46

Troubleshooting guide
PROBLEM CAUSE CORRECTION
Loose
stitches
Seams
gather
or pucker
Uneven
stitches,
uneven
feed
1. The machine is not threaded correctly.
2. The bobbin case is not correctly
threaded.
3. Needle/fabric/thread combination is
wrong.
4. Thread tension wrong.
1. The needle is too thick for the fabric.
2. The stitch length is adjusted
incorrectly.
3. The thread tension is too tight.
1. Poor quality thread.
2. The bobbin case is not correctly
threaded.
3. Fabric has been pulled.
1. Check the threading.
2. Thread the bobbin case as
illustrated.
3. The needle size must suit the
fabric.
4. Correct the thread tension.
1. Select a f iner needle.
2. Readjust the stitch length.
3. Loosen the thread tension.
1. Select a better quality thread.
2. Remove bobbin case, rethread
and insert correctly.
3. Do not pull on the fabric while
sewing, let it be taken up by the
machine.
The
machine
is noisy
The
machine
jams
47
1. The machine must be lubricated.
2. Flu or oil have collected on the hook
or needle bar.
3. Poor quality oil has been used.
4. The needle is damaged.
1. Thread is caught in the hook. 1. Remove the upper thread and
46
1. Lubricate as described.
2. Clean the hook and feed dog as
described.
3. Only use good quality sewing
machine oil.
4. Replace the needle.
bobbin case, turn the handwheel
backwards and forwards by hand
and remove the thread remains.
Lubricate as described.
Page 47

The SB700 Domestic 70 Stitch Sewing Machine is warranted for 1 year from provable
date of purchase against defects in material and workmanship. During this period
such defects will be repared, or the product will be replaced without a charge.
This warranty does not cover damage caused by misuse, negligence or improper
installation. Warranty is also invalid in any case that the product is taken apart or
serviced by an authorized service station.
 Loading...