

Page 1
Choccy
Chocolate Fountain
Instruction Booklet
CF4100
Please read these
instructions carefully
and retain for future
reference.
Page 2

Contents
Sunbeam’s Safety Precautions 1
Features of your Chocolate Fountain 2
Assembly Instructions 4
Using your Chocolate Fountain 6
Chocolate Measurements and Melting tips 7
Care & Cleaning 8
Troubleshooting 9
Serving Suggestions 10
Recipes 11
Important instructions – retain for
future use.
Page 3

1
If you have any concerns regarding the performance and use of your appliance,
please visit www.sunbeam.com.au or contact the Sunbeam Consumer Service Line.
Ensure the above safety precautions are understood.
Sunbeam’s Safety Precautions
Sunbeam are very safety conscious when
designing and manufacturing consumer products,
but it is essential that the product user also
exercise care when using an electrical appliance.
Listed below are precautions which are essential
for the safe use of an electrical appliance:
• Read carefully and save all the instructions
provided with an appliance.
• Always turn the power off at the power outlet
before you insert or remove a plug. Remove
by grasping the plug - do not pull on the cord.
• Turn the power off and remove the plug
when the appliance is not in use and
before cleaning.
• Do not use your appliance with an extension
cord unless this cord has been checked
and tested by a qualified technician or
service person.
• Always use your appliance from a power
outlet of the voltage (A.C. only) marked
on the appliance.
• Close supervision is necessary when your
appliance is being used near children or
infirm persons.
• Never leave an appliance unattended while
in use.
• Young children should be supervised to ensure
that they do not play with the appliance.
• Do not use an appliance for any purpose
other than its intended use.
• Do not place an appliance on or near a hot gas
flame, electric element or on a heated oven.
Do not place on top of any other appliance.
• Do not let the power cord of an appliance hang
over the edge of a table or bench top or touch
any hot surface.
• For safety reasons and to avoid maintenance
by unskilled persons, some appliances are
‘sealed’ using tamperproof screws. Such
appliances should always be returned to the
nearest Sunbeam Appointed Service Centre
for adjustment or repair if required.
• Do not operate any electrical appliance with a
damaged cord or after the appliance has been
dropped or damaged in any manner. If damage
is suspected, return the appliance to the
nearest Sunbeam Appointed Service Centre
for examination, repair or adjustment.
• For additional protection, Sunbeam
recommend the use of a residual current
device (RCD) with a tripping current not
exceeding 30mA in the electrical circuit
supplying power to your appliances.
• Do not immerse the appliance in water
or any other liquid unless recommended.
SAFETY PRECAUTIONS FOR CHOCCY THE
CHOCOLATE FOUNTAIN.
• This appliance is not a toy.
• Do not leave children unsupervised with the
chocolate fountain.
• Operate the chocolate fountain on a flat and
stable surface.
• Do not leave your chocolate fountain
unattended.
• Do not turn off for longer than 10 minutes if
planning to turn on again.
Page 4
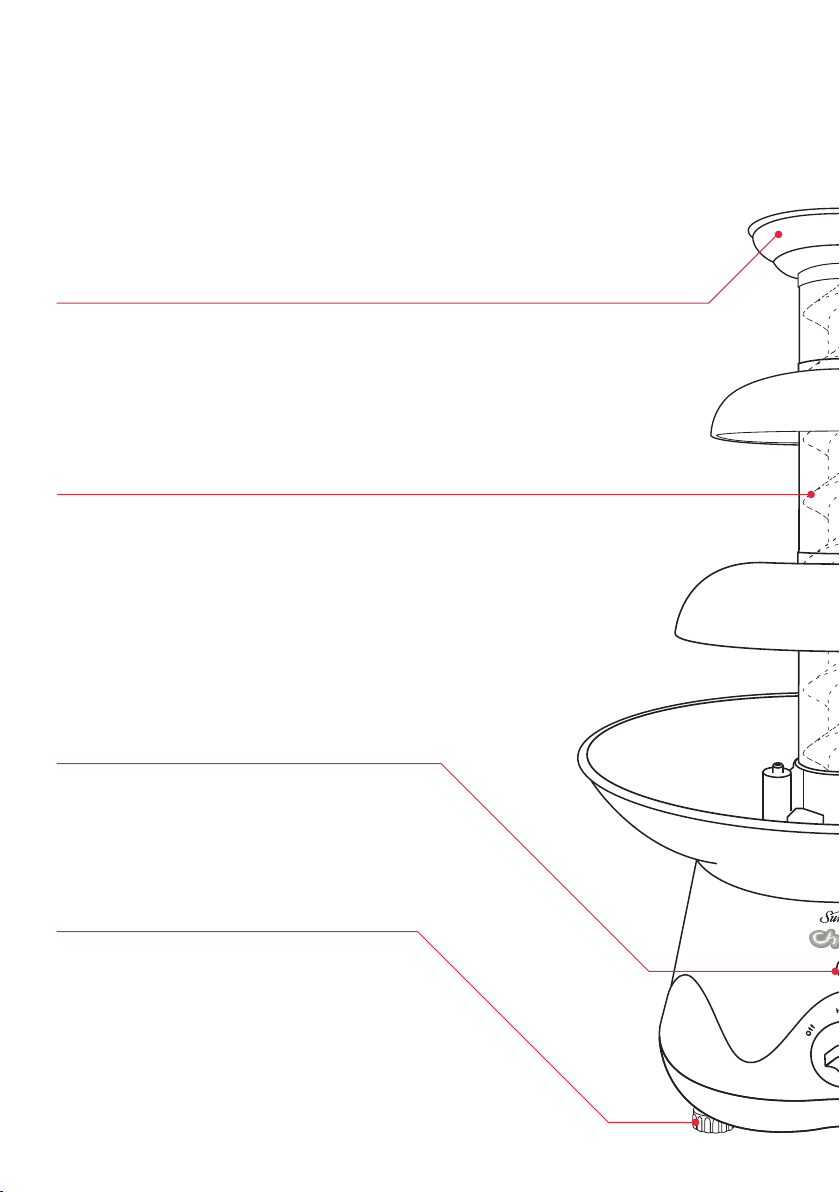
Features of ‘Choccy’ the
Chocolate Fountain
2
3 tier stainless steel chocolate tower
The chocolate fountain has been specially
designed for 3 levels of chocolate flow. Turn
the dial to 'heat and rotate' for a 3 tiered
chocolate founatin flow.
Plastic screw
The plastic screw rotates inside the tower to
distribute the chocolate flow. Chocolate is
moved from the base and cycled through the
screw, then distributed back at the top of the
fountain.
Indicator light
The light will glow on when the dial is
switched to the heat and the heat/rotate
function.
Adjustable feet
The adjustable feet ensure that there is
always an even flow of chocolate. Adjustable
for every surface.
Page 5
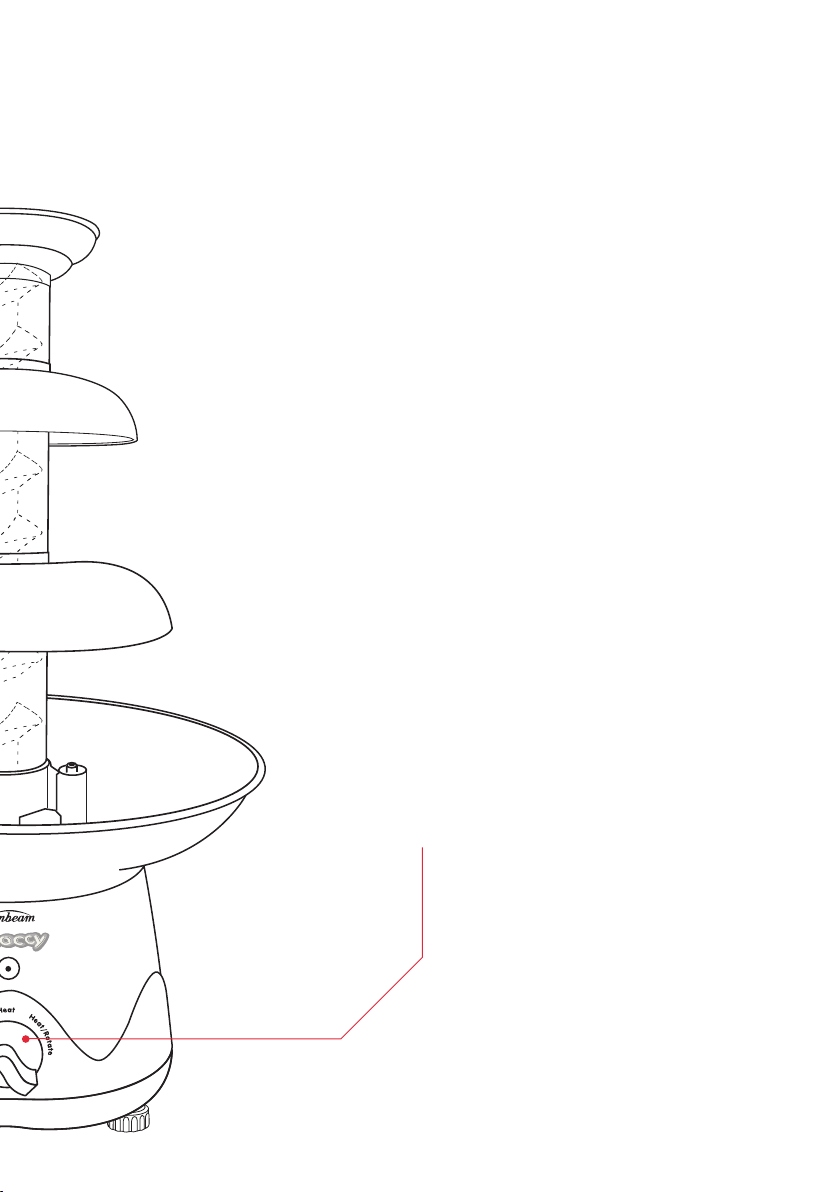
3
Control settings
Heat
Turn the 'heat' setting on prior to adding
the liquid chocolate. This warms the base
ensuring that warm chocolate does not 'set'
to the base.
Heat/rotate
Turn to 'heat/rotate' to see a decadent,
delicious flow of chocolate flow over 3 levels.
Page 6
1. Before using the chocolate fountain for
the first time, ensure that all packaging
materials are removed from all parts.
2. Wipe out the base using a warm cloth, and
dry well before use. Wash plastic screw and
tower in warm soapy water; dry well before
use.
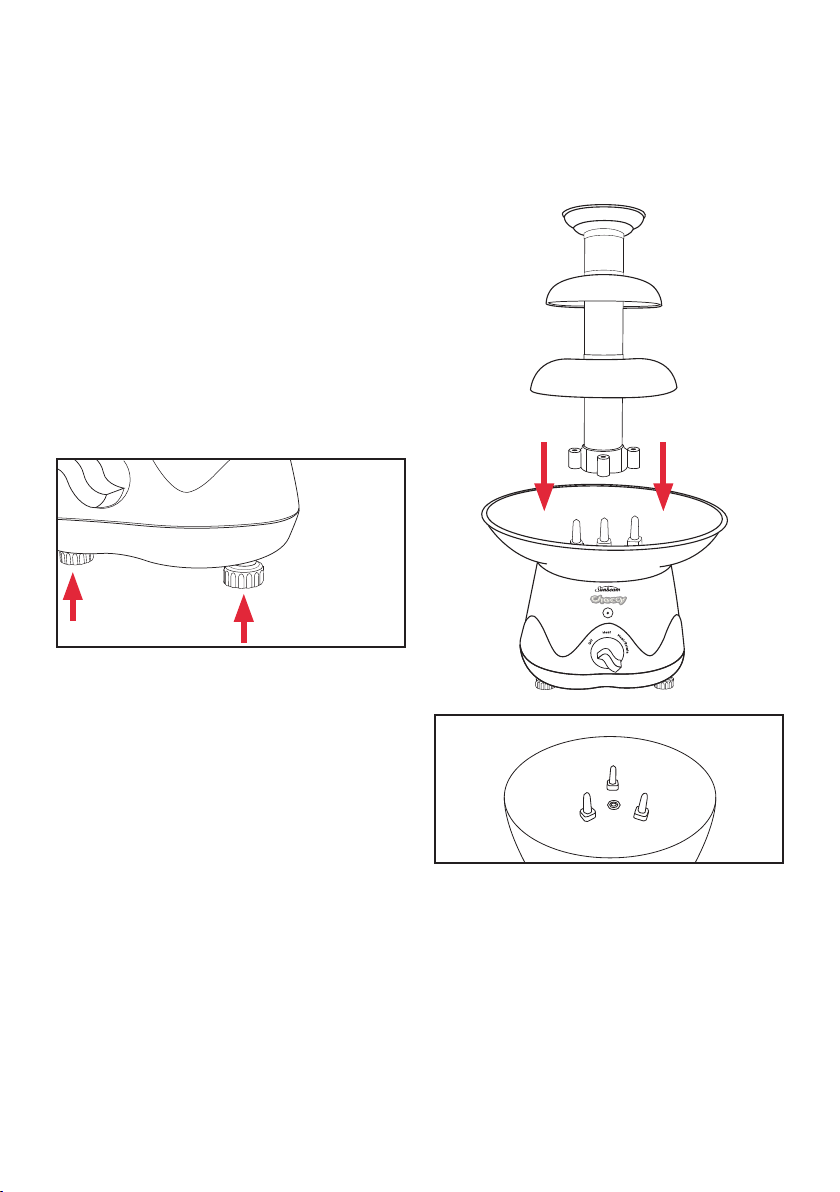
3. Screw the 3 adjustable feet onto the base
of the chocolate fountain. These can be
adjusted for every surface to ensure there
is always an even flow of chocolate.
4. Once adjustable feet have been screwed on
the base, turn base of chocolate fountain
upright to sit on the bench top. Place the
chocolate tower into the middle of the base
of the chocolate fountain – ensuring that it
aligns with the 3 points on the base.
4
Assembly Instructions
Page 7
5
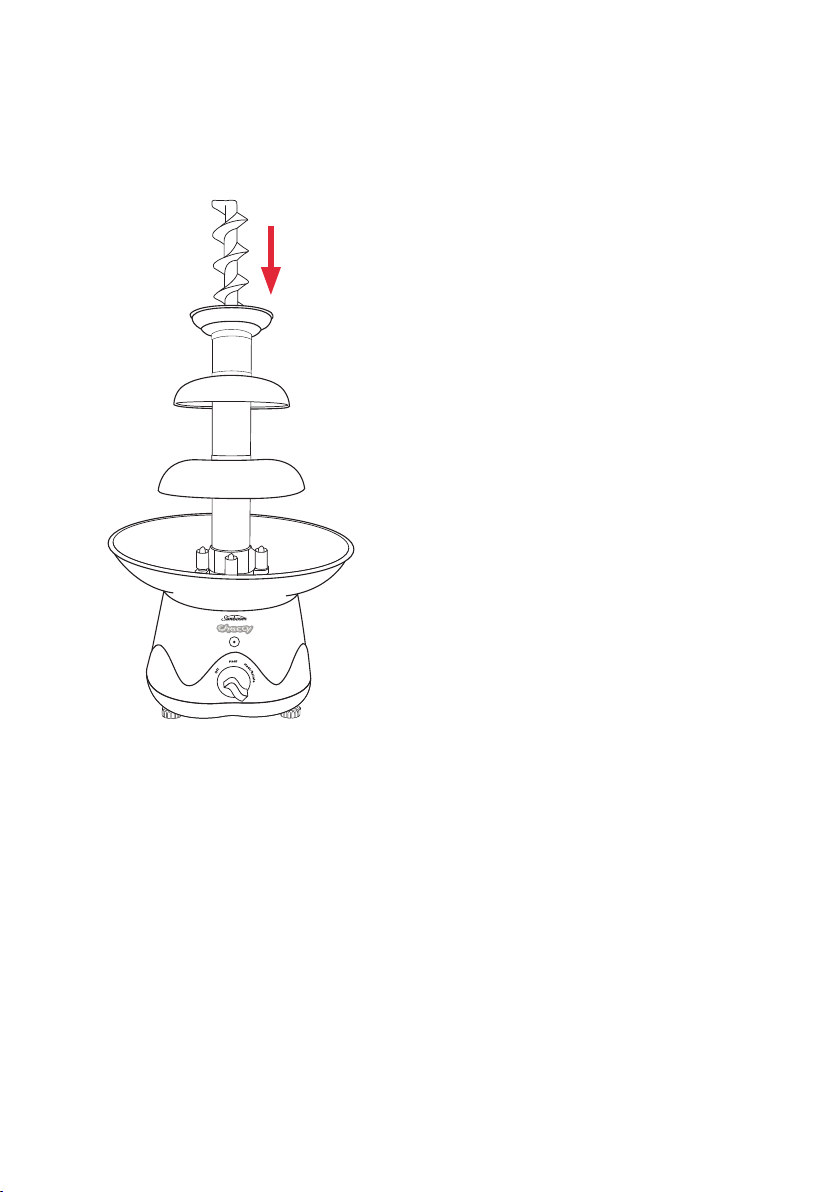
Assembly Instructions (continued)
5. After the chocolate tower is firmly in
place, place the plastic screw inside the
chocolate tower, ensuring that the plastic
screw sits on the driving shaft firmly.
Page 8

6
Using your 'Choccy' Chocolate
Fountain
1. Turn Choccy to the ‘off’ dial setting.
2. Plug the unit into a 230-240 volt AC
power outlet and switch the power on.
Note: Place choccy on a flat level bench.
Adjust feet if surface is not level.
3. Turn the dial to the ‘warm’ function to
allow the base to warm up for 5 minutes.
4. Melt chocolate according to directions on
page 7.
5. Pour the melted chocolate mixture into
the base of the fountain and switch the
dial to ‘heat and rotate’ to start the
chocolate fountain flow.
Note: To operate the chocolate fountain,
the chocolate must always be in liquid
form.
6. Allow the chocolate fountain to flow for at
least 5 minutes before adding extra oil or
adjusting feet.
Note: If the mixture is not flowing correctly
see troubleshooting on page 9.
Do not leave chocolate in the fountain
overnight in the 'warm' setting. This setting
is not a high enough temperature to keep the
chocolate from hardening.
Page 9

7
Chocolate Measurements &
Melting tips
Recommended quantities for Choccy are as
follows:
1 kg chocolate melts and ¾ cup canola oil
We recommend using good quality chocolate
melts. Other chocolates that are high in
cocoa solids work well also.
Note: Chocolate varies in quality; the
recommended oil quantities may need to be
adjusted to make the chocolate flow correctly.
Canola oil quantities can vary from 125ml to
250ml.
Microwave melting method
Note: Please allow for extra chocolate top ups
if using with lots of people.
Combine chocolate and oil in a heat proof
bowl. Heat in microwave on medium/low for 3
minutes. Stir chocolate mixture and heat for
a further 1 minute. Repeat, until chocolate
mixture has completely melted and is smooth
and warm.
Note: DO NOT overheat chocolate. This will
cause the chocolate to seize and harden. If
this occurs chocolate must be thrown away.
Stove top melting method
Combine chocolate and oil in a heat proof
bowl. Place bowl over a saucepan of
simmering water.
Note: Water should not touch base of bowl.
Stir chocolate and oil until chocolate mixture
has completely melted and is smooth and
warm.
Page 10

8
To clean the chocolate tower and screw
1. Ensure that Choccy is positioned to the
OFF position and remove the plug from the
power point.
2. Remove the screw and chocolate tower
from the center of Choccy. Drain the excess
chocolate by holding over the base until
the parts have stopped dripping.
Note: Do not throw excess chocolate down
drains. Package and dispose in rubbish
bin.
Note: For food safety reasons it is not
recommended to keep any remaining
chocolate after it has been eaten from.
3. Place the screw and chocolate tower in
warm soapy water before the chocolate sets
on to the parts. Screw and tower are top
shelf dishwasher safe.
4. Rinse chocolate tower and screw in hot
water and dry parts thoroughly.
To clean the base
1. Pour the chocolate from the base of the
chocolate fountain into a disposable
container.
Note: Do not throw excess chocolate down
drains. Package and dispose in rubbish
bin.
2. Wipe out the base of the fountain with a
warm cloth. Do not use abrasive sponges.
Care & Cleaning
Page 11

9
Problem Possible cause Suggested solution
The chocolate does
not cover the tiers
completely
The fountain is not
level
Ensure that the fountain and tiers are
level using the adjustable feet
Not enough chocolate Make sure that there is 1kg of
chocolate and ¾ cup canola oil
The chocolate is not
hot enough
Make sure that chocolate and oil are
warm enough. Chocolate should be
approximately 60°c
Not enough oil Make sure that the oil has been added.
If still thick add another 1 tablespoon
oil at a time until chocolate has
thinned
Chocolate is flowing
unevenly and is not
sheeting
The fountain is not
level
Ensure that the fountain and tiers are
level using the adjustable feet
There is a draft
hitting the chocolate
Fountain must be indoors and away
from any breeze. Close windows
Chocolate has stopped
flowing
Food stuck in base
of fountain
Turn machine off and unplug. Pour
excess chocolate into a bowl and check
for lumps of food. Separate parts and
remove food. Reassemble unit and
replace chocolate
Chocolate has gone very
hard during melting
Chocolate has
burnt/seized.
If chocolate has seized during the
melting, it has become too hot. The
chocolate will become grainy and firm
up. It will look like a dull, thick paste.
Chocolate must be thrown away and
start again.
There is a white film
around the base of the
chocolate
There is nothing wrong with the
chocolate, it is just from the churning
process that happens when the
chocolate is cycled through the unit.
Troubleshooting
Page 12

10
There are many different foods to serve with
Choccy. Make sure that all pieces are quite
large and serve with skewers.
Here are some suggestions:
• Strawberries (wash and dry well)
• Sliced bananas
• Apple wedges
• Mini cakes (see recipes)
• Marshmallows
• Wafer sticks
• Biscotti
• Dry fruits such as dates, figs and pineapple
• Kiwi fruit
• Liquorice
• Mini meringues
Serving Suggestions
Page 13

Chocolate fudge sauce Makes 1 litre
400g dark chocolate, chopped
100g marshmallow, chopped
600ml cream
1. Place all ingredients in medium saucepan;
stir over low heat without boiling, until
combined.
2. Assemble Choccy as directed on page 4.
Pour fudge sauce into preheated base and
turn unit on.
Note: We recommend that this mixture
does not run in Choccy for longer than 1
hour.
Caramel sauce Makes 1.25 litres
400g butter, chopped
2 cups firmly packed brown sugar
500ml cream
1. Melt butter in small saucepan, add sugar
and cream, stirring over low heat, until
combined. Allow mixture to cool for 20
minutes.
2. Assemble Choccy as directed on page
4. Pour 1 litre of the caramel sauce into
preheated base and turn unit on.
3. Use remaining caramel sauce to top up
unit when needed.
Chocolate and Orange sauce Makes
approximately 1 litre
1kg dark chocolate, chopped
¾ cup vegetable oil
¼ cup Conitreau
1. Place chocolate in medium heatproof bowl,
over medium saucepan of simmering water.
Cook, stirring, until chocolate has melted,
stir in oil and liquor.
2. Assemble Choccy as directed on page 4.
Pour chocolate sauce into preheated base
and turn unit on.
Note: Other liqueurs can be substituted.
Do not exceed the recommended quantities
as this will cause the chocolate to seize
(harden).
Nibbles for dipping
White chocolate blondie Makes 24
125g butter
¾ cup firmly packed brown sugar
1 cup plain flour
½ teaspoon baking powder
2 eggs, beaten lightly
100g white chocolate, chopped coarsely
1. Preheat oven 180�C fan forced. Grease
12 hole mini muffin pan.
2. Combine butter and sugar in small
saucepan, cook, stirring, until combined.
Transfer to medium bowl with flour, baking
powder and eggs, stirring, until combined.
Stir in chocolate.
3. Divide mixture among prepared holes.
Bake, in oven, about 15 minutes or until
cooked through. Stand in pan 5 minutes,
turn onto wire rack to cool.
Note: Use 1 level tablespoon of mixture
per muffin hole.
Recipes
11
Page 14

12
Chocolate brownies Makes 24
60g butter
200g dark chocolate, chopped
1 cup firmly packed brown sugar
2 eggs, beaten lightly
½ cup plain flour
1. Preheat oven 180�C fan forced. Grease
12 hole mini muffin pan.
2. Combine butter, chocolate and sugar in
small saucepan, cook, stirring over low
heat, until combined. Transfer to medium
bowl with flour and eggs, stirring, until
combined.
3. Divide mixture among prepared holes.
Bake, in oven, about 15 minutes or until
cooked through. Stand in pan 5 minutes,
turn onto wire rack to cool.
Note: Use 1 level tablespoon of mixture
per muffin hole.
Sticky date mini cakes Makes 36
This recipe is excellent with the caramel
sauce recipe on the previous page.
¾ cup seedless dates, chopped coarsely
¾ cup hot water
½ teaspoon bicarbonate of soda
60g butter, chopped
¾ cup firmly packed brown sugar
2 eggs
1 cup self raising flour
1. Preheat oven 180�C fan forced. Grease 12hole mini muffin pan.
2. Combine dates, water and bicarbonate of
soda in medium bowl, stand 10 minutes.
Blend or process date mixture until
smooth.
3. Meanwhile, beat butter, sugar and egg until
combined. Fold through flour and date
mixture.
4. Place level tablespoons of batter in each of
the prepared holes. Bake in oven about 15
minutes or until cooked through. Stand in
cake pan 5 minutes before turning onto a
wire rack to cool.
White chocolate mini cakes Makes 32
125g butter
100g white chocolate, chopped
¾ cup caster sugar
1/3 cup milk
¾ cup plain flour
1/4 cup self raising flour
1 egg, beaten lightly
1. Preheat oven 180�C fan forced. Lightly
grease 12 hole mini muffin pan.
2. Combine butter, chocolate, sugar and milk
in small saucepan stirring over low heat,
until combined.
3. Place sifted flours in medium bowl, add
cooled chocolate mixture and eggs, stirring,
until combined.
4. Drop level tablespoons of the batter into
prepared cake pan, bake, uncovered, in
oven about 20 minutes or until cooked
through. Stand cakes in pan 5 minutes,
before turning onto wire rack to cool.
Recipes (continued)
Page 15

12 Month Replacement Guarantee
We are so confident of the quality of our product, should
this appliance develop any malfunction within 12 months of
purchase (3 Months commercial use) due to faulty materials
or manufacture, we will replace it for you absolutely free.
Should you experience any difficulties
with your appliance, please phone our
free call customer service line for
advice on 1800 025 059 in Australia,
or 0800 786 232 in New Zealand.
Alternatively, simply return the faulty
appliance to your place of purchase,
along with your purchase receipt.
Your Sunbeam 12 Month Replacement
Guarantee naturally does not cover misuse
or negligent handling, and excludes
breakables such as glass or ceramic items,
and normal wear and tear.
Similarly, your 12 Month Replacement
Guarantee does not cover damage to
household surfaces as a result of water
or other substances leaking from your
appliance, nor does it cover freight costs.
In Australia, this guarantee is additional
to the conditions and guarantees which
are mandatory as implied under the
Trade Practices Act 1974 and State
and Territory legislation.
Sunbeam Service Centres
Sunbeam has established a network
of authorised service centres throughout
Australia and New Zealand to provide
quick, convenient service for our
customers.
Should your appliance require repair
or service, either during or after the
guarantee period, contact your nearest
service centre.
For a complete list of Sunbeam’s
authorised service centres:
Australia
www.sunbeam.com.au/servicecentres
1800 025 059
New Zealand
www.sunbeam.co.nz/servicecentres
0800 786 232
Page 16

Consumer Hotline
In Australia
Visit www.sunbeam.com.au
Or call 1800 025 059
In New Zealand
Visit www.sunbeam.co.nz
Or call 0800 786 232
‘Choccy’ is a trademark of Sunbeam Corporation.
Made in China.
Due to minor changes in design or otherwise,
the product may differ from the one shown in this leaflet.
© Copyright. Sunbeam Corporation Limited 2006.
ABN 45 000 006 771
Sunbeam Corporation is a division of GUD Holdings Ltd.
Is a registered Trademark of Sunbeam.
08/06
 Loading...