

Page 1

/MD
Coffeemaker / Cafetière
BVSBEHX Series / Serie BVSBEHX
User Manual /
Notice d’emploi
www.sunbeam.ca
Page 2

2
IMPORTANT SAFEGUARDS
To reduce the risk of fire, electric shock and/or injury to persons, basic safety precautions
should always be followed when using electrical appliances, including
the following:
1. READ ALL INSTRUCTIONS BEFORE USING THE COFFEEMAKER.
2. Do not touch the coffeemaker’s hot surfaces. Use handles or knobs.
3. To protect against electric shock, do not immerse the power cord, power plug
or coffeemaker in water or in any other liquid.
4. Close adult supervision is necessary when this appliance is used by
or near children.
5. Turn the coffeemaker OFF and unplug the power cord from the power source when the
coffeemaker and clock are not in use and before cleaning. Allow
the coffeemaker parts to cool before putting on or taking off parts and before cleaning
the appliance.
6. Do not operate any appliance with a damaged power cord or power plug, or operate
it after the appliance malfunctions, or has been damaged in any manner. Return this
appliance only to the nearest Authorized Service Center for examination, repair or
adjustment.
7. The use of accessory attachments other than Sunbeam
®
brand products
may cause hazards or injuries.
8. Do not use the coffeemaker outdoors.
9. Do not let the power cord hang over edge of table or counter,
or allow it to come into contact with hot surfaces.
10. Do not place this coffeemaker on or near a hot gas stove or electric burner
or in a heated oven.
11. To disconnect the coffeemaker, turn it OFF, then remove the power plug
from the power supply.
12. Place the appliance on a hard, flat level surface to avoid interruption of airflow
underneath the coffeemaker.
13. Avoid contact with any moving parts.
14. This coffeemaker is designed for household use only.
15. Do not use appliance for other than intended use.
DECANTER USE AND CARE
Follow the instructions below to reduce or eliminate the chance
of breaking the glass decanter or thermal carafe:
• This decanter is designed for use with your Sunbeam
®
coffeemaker and therefore must
never be used on a range top or in any oven, including a microwave oven.
• Do not set a hot decanter on a wet or cold surface.
• Do not use a cracked decanter or a decanter having a loose or weakened handle.
• Do not clean the decanter with abrasive cleaners, steel wool pads
or other abrasive materials.
• Discard the decanter immediately if it is ever boiled dry.
• Protect the decanter from sharp blows, scratches or rough handling.
NOTE: Scalding may occur if the lid is removed during brewing cycles.
RENSEIGNEMENTS DE GARANTIE
GARANTIE LIMITÉE D’UN AN
Sunbeam Products, Inc. faisant affaires sous le nom de Jarden Consumer Solutions ou, si au Canada,
Sunbeam Corporation (Canada) Limited faisant affaires sous le nom de Jarden Consumer Solutions
(collectivement « JCS ») garantit que pour une période d’un an à partir de la date d’achat, ce produit
sera exempt de défauts de pièces et de main-d’oeuvre. JCS, à sa discrétion, réparera ou remplacera
ce produit ou tout composant du produit déclaré défectueux pendant la période de garantie. Le produit
ou composant de remplacement sera soit neuf soit réusiné. Si le produit n’est plus disponible, il sera
remplacé par un produit similaire de valeur égale ou supérieure. Il s’agit de votre garantie exclusive.
N’essayez PAS de réparer ou d’ajuster toute fonction électrique ou mécanique de ce produit, cela
annulera cette garantie.
Cette garantie est valide pour l’acheteur initial du produit à la date d’achat initiale et ne peut être
transférée. Conservez votre facture d’achat originale. Les détaillants et les centres de service JCS ou
les magasins de détail vendant les produits JCS n’ont pas le droit d’altérer, de modifier ou de changer de
toute autre manière les termes et les conditions de cette garantie.
Cette garantie ne couvre pas l’usure normale des pièces ou les dommages résultant de toute cause
suivante : utilisation négligente ou mauvaise utilisation du produit, utilisation d’un voltage ou d’un courant
incorrects, utilisation contraire aux instructions d’utilisation, démontage, réparation ou altération par
quiconque autre que JCS ou un centre de service autorisé de JCS. En outre, la garantie ne couvre pas :
les catastrophes naturelles comme les feux, les inondations, les ouragans et les tornades.
Quelles sont les limites de responsabilité de JCS ?
JCS ne sera pas tenu responsable de tout dommage conséquent ou accessoire causé par la violation de
toute garantie ou condition expresse, implicite ou réglementaire.
Sauf si cela est interdit par les lois en vigueur, toute garantie ou condition implicite de valeur marchande
ou adéquation à un usage particulier est limitée en durée à la durée de la garantie énoncée ci-dessus.
JCS exclut toute autre garantie, condition ou représentation, expresse, implicite, réglementaire ou autre.
JCS ne sera pas tenu responsable de tout dommage de toute sorte résultant de l’achat, de l’usage ou du
mauvais usage, ou de l’incapacité à utiliser le produit y compris les dommages ou les pertes de profits
conséquents, accessoires, particuliers ou similaires, ou pour toute violation de contrat, fondamentale ou
autre, ou pour toute réclamation portée à l’encontre de l’acheteur par toute autre partie.
Certaines provinces, états ou juridictions ne permettent pas d’exclusion ou de limitation pour des
dommages conséquents ou accessoires ou de limitations sur la durée de la garantie implicite, de ce fait
les limitations ou exclusions ci-dessus peuvent ne pas s’appliquer à votre cas.
Cette garantie vous donne des droits juridiques particuliers et vous pouvez également disposer d’autres
droits pouvant varier d’une province à l’autre, d’un état à l’autre ou d’une juridiction à l’autre.
Comment obtenir le Service aux termes de la garantie
Aux É.U.
Si vous avez des questions concernant cette garantie ou si vous souhaitez obtenir le service aux termes
de la garantie, veuillez appeler au 1 800 458-8407 et l’adresse d’un centre de service approprié vous sera
fournie.
Au Canada
Si vous avez des questions concernant cette garantie ou si vous souhaitez obtenir le service aux termes
de la garantie, veuillez appeler au 1 800 667-8623 et l’adresse d’un centre de service approprié vous sera
fournie.
Aux É.U., cette garantie est offerte par Sunbeam Products, Inc. faisant affaires sous le nom de Jarden
Consumer Solutions, situé à Boca Raton, Floride 33431. Au Canada, cette garantie est offerte par Sunbeam
Corporation (Canada) Limited faisant affaires sous le nom de Jarden Consumer Solutions, situé au 20 B
Hereford Street, Brampton, Ontario L6Y 0M1. Pour tout autre problème ou réclamation en relation avec ce
produit, veuillez écrire à notre
Page 3

3
WARNING! To reduce the risk of fire or electric shock, do not remove any
service covers. There are no user serviceable parts
inside the coffeemaker. Only authorized personnel
should repair the coffeemaker.
Please read ALL of the instructions in this manual carefully before you begin
to use this appliance. Proper care and maintenance will ensure a long life and
a trouble-free operation for this appliance. Please save these instructions and
refer to them for cleaning and care tips.
SAVE THESE INSTRUCTIONS
INTRODUCTION
Welcome and congratulations on the purchase of your new Sunbeam® Coffeemaker. Your new
coffeemaker will wake up with you in the morning and provide you breaks and treats during
your hectic daily activities. How you enjoy your Sunbeam
®
Coffeemaker is up to you!
SPECIAL CORD SET INSTRUCTIONS
1. A short power supply cord is provided to reduce the hazards resulting from
a person or pet becoming entangled in, or tripping over, a longer cord.
2. An extension cord may be purchased and used if care is exercised in its use.
3. If an extension cord is used, the marked electrical rating of the extension cord must be at
least 10 amps and 120 volts. The resulting extended cord must be arranged so that it will not
drape over a countertop or tabletop where it can be pulled on by children or tripped over
accidentally.
4. This appliance has a polarized plug (one blade is wider than the other). To reduce the risk of
electric shock, this plug will fit in a polarized outlet only one way. If the plug does not fit fully in
the outlet, reverse the plug. If it still does not fit, contact a qualified electrician. Do not modify the
plug in any way.
You can customize the length of the power cord so that it is the exact length you desire.
To increase the length of the power cord: grasp the power cord (not the power plug) and
gently lift it out of the slot, then pull it away from the coffeemaker. To decrease the length
of the power cord: grasp the power cord (not the power plug), lift it out of the slot and
gently feed it into the coffeemaker. Lock the cord in the slot when finished.
Page 4

4
Table of Con
tents
Important Safeguards 2
Decanter Use and Care 2
Introduction 3
Special Cord Set Instructions 3
Table of Contents 4
Parts Diagram 5
Control Panel 6
Coffeemaker Features and Benefits 7
Clean Your Coffeemaker Before Using the First Time 8
Setting The Clock and Delay Brew Time 9
Preparing for Use 10
• Suggested Coffee Measurement Chart 10
• Adding Water and Ground Coffee 11
Brewing Coffee Now 12
Brewing Coffee Later (Delay Brew) 14
Cleaning and Maintaining Your Coffeemaker 15
Troubleshooting Your Sunbeam
®
Coffeemaker 17
Service and Maintenance 19
Warranty Information 20
PROBLÈME CAUSE POSSIBLE SOLUTION
Le café n’est pas chaud • Il y a une panne de courant • Attendez que le
• L’ARRÊT automatique a été activé • Pour obtenir les
Le café est insipide • Vous utilisez de la mouture de • Utilisez la mouture de
café autre que la mouture café recommandée
conseillée pour les cafetières pour les cafetières
goutte-à-goutte goutte-à-goutte
• Vous n’avez pas employé assez • Utilisez la mouture de
de mouture de café pour le café et l’eau dans les
volume d’eau proportions conseillées
• La cafetière a besoin d’être • Détartrez la cafetière
détartrée tel que décrit sous la
ll y a du marc dans le • Le filtre n’est pas convenablement • Placez correctement
café filtré placé dans le panier le filtre dans le panier
• Le filtre papier s’est affaissé • Retirez le filtre papier
et remplacez-le
Jarden Consumer Solutions au
Page 5
5
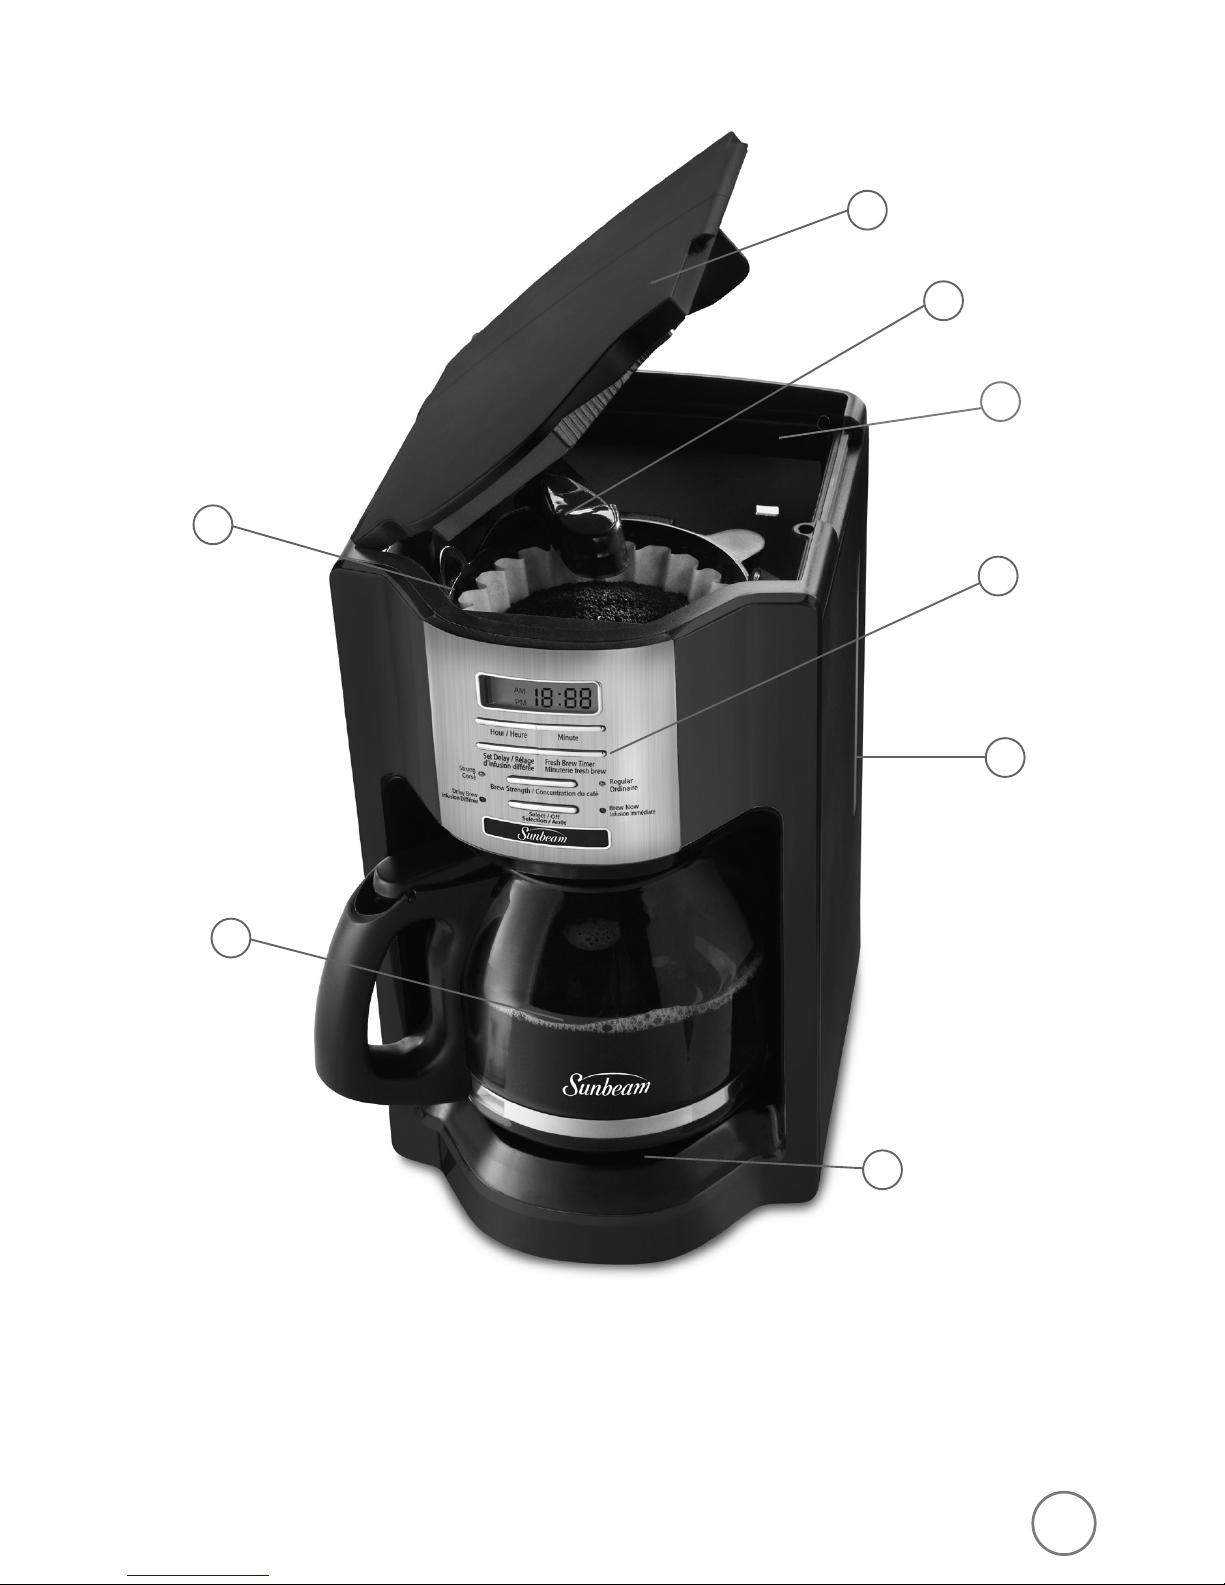
PARTS DIAGRAM
1. Brew Basket Lid
2. Shower Head
3. Water Reservoir
4. Fresh Brew timer
5. Water Window
6. Warming Plate
(not on thermal models)
7. Decanter
8. Removable Filter Basket
2
3
4
8
1
6
7
5
Page 6
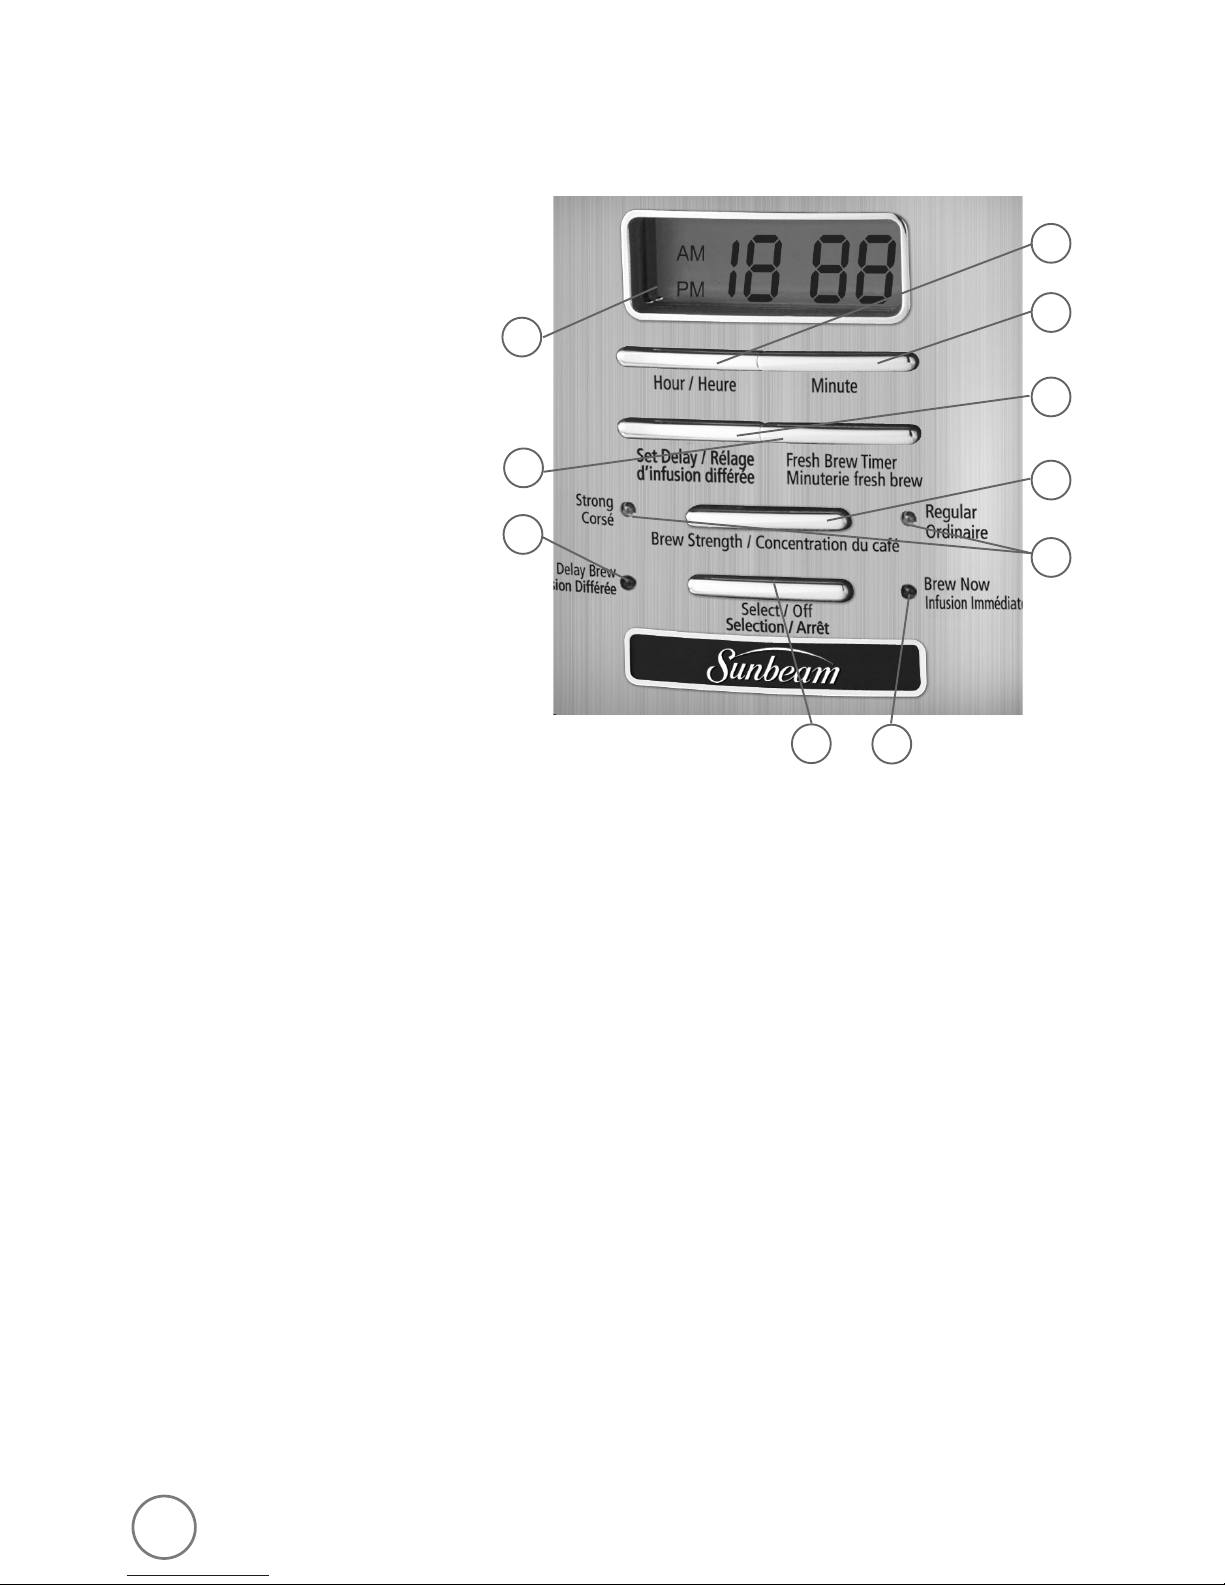
Control Panel
a. Clock Display / Fresh Brew™
Timer Display
b. Clock Display / Fresh Brew™
Timer Display Button
c. Delay Brew Indicator
d. Select/Off Button
e. Brew Now Indicator
f. Brew Strength Indicators
(Regular/Strong)
g. Brew Strength Button
h. Set Delay Button
i. Minute Button
j. Hour Button
a
b
c
d
e
f
g
h
j
i
Remplacement du filtre rond du système de filtrage de l’eau
Le filtre rond doit être remplacé une fois par mois (environ tous les 30 cycles).
Si vous ne vous servez pas de la cafetière pendant un certain temps, rincez le filtre sous l’eau
courante et nettoyez la cafetière avant de la remettre en service.
Détartrage de la verseuse
L’eau dure laisse un dépôt calcaire blanchâtre sur la surface intérieure de la verseuse et, au
contact du café, cette incrustation devient brune.
Pour faire disparaître les taches de la verseuse:
1. Remplissez la verseuse d’une solution moitié eau du robinet et moitié vinaigre puis laissez
reposer la solution dans la verseuse pendant environ 20 minutes.
2. Jetez la solution, lavez puis rincez la verseuse.
Ne vous servez pas de produits abrasifs qui risquent de rayer la verseuse et de la rendre
susceptible au bris.
6
Page 7

7
COFFEEMAKER FEATURES AND BENEFITS
Your new Sunbeam® coffeemaker has the following features:
• Brewing Capacity
– 12 Cups – glass decanter serie
– 8 Cups – thermal carafe series
• Removable Filter Basket – The filter basket lifts out for fast and easy cleaning and filling.
• Pause ‘n Serve – Can’t wait for the coffee to finish brewing? The Pause ‘n Serve feature
allows you up to 30 seconds to pour a cup of coffee while the coffeemaker is still brewing.
Carefully remove the decanter and the Pause ’n Serve feature will be automatically
activated, temporarily stopping the flow of coffee into the decanter.
• Water Window – Show amount of water in the reservoir for accurate filling.
• Non-Stick Warming Plate – (not on thermal models) This feature allows you
to keep your coffee hot after brewing. The non-stick attribute prevents the decanter from
sticking to the surface of the warming plate.
• Brew Strength Selector – Adjusts the brewing time to create a more full-flavoured coffee.
• Cord Storage – Safely stores excess cord to keep your countertop neat.
• Two-Hour Auto Shut-Off – Keeps your coffee hot for two hours, then automatically shuts
off. (Thermal models shut off immediately after brewing cycle is completed.)
• Programmable Controls:
– Clock – The clock serves as a handy kitchen clock and allows you to set the Delay Brew
feature and functions as the FRESH BREW
TM
TIMER feature.
– Fresh Brew
TM
Timer feature – Lets you know how long your coffee has been waiting for
you.
Page 8

8
• Delay Brew – Would you like to wake up to a fresh pot of coffee? The timer allows you to
preset when you would like the coffeemaker to automatically begin brewing your coffee,
up to 24 hours in advance.
NOTE: If you have selected any of the operating functions, the coffeemaker will act upon the
last operation selected if the power is restored within 10 seconds after a power outage.
CLEAN YOUR COFFEEMAKER BEFORE USING THE FIRST TIME
Make sure your first cup of coffee is as good as can be by cleaning your Sunbeam®
Coffeemaker before its first use. Just follow these simple steps:
1. Wash the decanter, decanter lid and the filter basket in a mixture of mild detergent and
water. Rinse each thoroughly (please refer to the Parts Diagram).
2. Replace all the parts and close the lid. Then, run a brew cycle with water only, without
adding coffee and coffee filter.
3. When brewing is complete, turn your coffeemaker off, discard the water in the decanter
and rinse the decanter, decanter lid, and filter basket.
Your coffeemaker is now ready to use. Enjoy it!
INFUSION DIFFÉRÉE DU CAFÉ
1. L’heure du jour et l’heure de mise en marche différée
désirée doivent être réglées tel que décrit sous la
rubrique Réglages de l’horloge et de mise en
marche différée.
2. Préparez la cafetière tel qu’indiqué sous Addition
d’eau et de mouture de café.
3. Pour activer la fonction DELAY BREW (infusion
différée) et programmer la cafetière afin qu’elle
filtre le café à heure choisie, appuyez deux fois
(figure 9) sur la touche SELECT (sélection). Le
voyant jaune DELAY BREW s’allumera. La cafetière
infusera automatiquement le café plus tard. Le
voyant de concentration du café s’allumera alors.
Il suffit d’appuyer sur la touche BREW STRENGTH
(concentration du café) pour changer le réglage.
4. À l’heure choisie, le voyant vert BREW NOW (infusion
immédiate) s’allumera et le voyant jaune DELAY BREW
(infusion différée) s’éteindra, signalant le début de
l’infusion à la concentration indiquée. La minuterie
FRESH BREW
en marche.
5. La plaque chauffante gardera le café filtré à la
température de service pendant 2 heures puis la
cafetière se mettra hors tension. Les modèles à
verseuse isotherme, eux, s’éteindront dès la fin du
cycle d’infusion.
REMARQUE: N’enlevez pas le couvercle durant
l’infusion, vous risqueriez de vous échauder.
Par mesure de sécurité, la cafetière ne se mettra
PAS automatiquement en marche le lendemain.
Si vous souhaitez que le café soit prêt à la même
heure le jour suivant, mettez tout simplement un
filtre neuf, de la mouture de café et de l’eau puis
réglez la cafetière à DELAY BREW (infusion différée),
en répétant les étapes 2 et 3 ci-dessus.
Annulation d’INFUSION DIFFÉRÉE
Pressez la touche SELECT (sélection) jusqu’à ce que tous
les voyants lumineux s’éteignent (figure 9).
Page 9

SETTING THE CLOCK AND DELAY BREW TIME
To Set the Clock:
1. Plug the power cord into a standard electrical outlet. The clock
will flash on the control panel to indicate that the time has not
been set yet.
2. Press and hold the HOUR and MINUTE buttons until you reach the
current time. The AM or PM indicator is at the left of the display
(Figures 1 and 2).
The clock is now set!
NOTE: Pressing any button before setting the clock will cause the
clock to start keeping time from 12:00 a.m. You must set the clock if
you want to use the Delay Brew feature.
To Set the Delay Brew Time:
While the display is in the clock mode, simply press the SET
DELAY button (Figure 3) and, while the DELAY BREW yellow light
is flashing, set the brew time by pressing the HOUR and MINUTE
buttons (Figure 4). The AM or PM indicator is at the left of the
clock display.
Within a few seconds the display will change
to the current time.
The Delay Brew Time is now set!
NOTE: To activate the DELAY BREW cycle,
see the Brewing Coffee Later section.
To check the programmed time, push the SET DELAY button.
The display will show the time you have programmed the coffee
to brew. If you press the SET DELAY button again or wait a few
seconds, the display will switch back.
9
F
igu re
1
F
igu re
2
F
igu re
3
F
igu re
4
Page 10

10
PREPARING FOR USE
Selecting and Measuring Ground Coffee
For best results, use a level tablespoon for ground coffee measurement.
Make sure you use medium grind coffee for a perfect brew.
A. Suggested Coffee Measurement Chart
To Brew Ground Coffee
12 Cups 9 tbsp.
10 Cups 7.5 tbsp.
8 Cups 6.5 tbsp.
6 Cups 4.5 tbsp.
4 Cups 3 tbsp.
1 level tablespoon (tbsp) = 5 gr./0.17 oz.
1 cup = 5 fl. oz. of brewed coffee
Use more or less coffee to suit your taste.
INFUSION IMMÉDIATE DU CAFÉ
1. Après avoir agi tel qu’indiqué sous Addition d’eau et
de mouture de café et la verseuse
ainsi que le panier-filtre étant placés tel que
préconisé, appuyez une fois sur la touche SELECT
(sélection). Le voyant lumineux vert BREW NOW
(infusion immédiate) s’allumera, signalant que la
cafetière est sous tension et qu’elle filtre le café
(figure 6).
2. Si vous désirez déguster un café plus corsé, appuyez
une fois sur la touche Brew Strength de concentration
du café. Le voyant rouge STRONG (café corsé)
s’allumera. Ce réglage sera maintenu jusqu’à ce que
vous le changiez au réglage de café ordinaire en
appuyant de nouveau sur la touche de concentration
du café ou jusqu’à ce que vous débranchiez la
cafetière (figure 7).
3. Quand le marc de café a refroidi, sortez prudemment
le panier-filtre et jetez le marc.
REMARQUE: Laissez toujours refroidir la cafetière avant
d’entreprendre son nettoyage.
Page 11

11
B. Adding Water and Ground Coffee
1. Open the brew basket lid. For your convenience,
you can lift out the removable filter basket.
2. Place a 10-12 cup paper basket-style filter
or a permanent filter into the removable filter
basket (Figure 5).
NOTE: If using paper filters, it is important that the
sides of the filter fit flush against the side of the
filter
basket. If filter collapse occurs, dampen
the filter
before placing in the filter basket and adding ground
coffee and water.
3. Add the desired amount of coffee and gently shake
to level the coffee. See the Suggested Coffee
Measurement Chart.
4. Be sure the removable filter basket is properly centered and all the way down in the brew
basket and close the lid.
5. Fill the decanter with cold, fresh water to the desired capacity (1 cup equals 5 ounces). For easy
and accurate filling, the water markings on the glass decanter and on the water window
show the amount of water needed to make the corresponding desired number of cups. Do
not fill past the “12 cup MAX line” or water will flow out of the overfill hole in the back of
the coffeemaker.
The amount of coffee brewed will always be slightly less than the amount of water poured
in the water reservoir. This is due to the minimum absorption of water by
the coffee grounds.
6. Lift the pour through reservoir lid and pour the water into the water reservoir. Close the lid
and place the empty decanter onto the warmer plate.
NOTE: Make sure the decanter is fully placed on the warming plate or the water and the
grounds will overflow from the filter basket. An overflow may cause personal injury or damage
to property.
CAUTION! To reduce the risk of damaging the decanter and/or the risk of personal
injury, do not add cold water to the decanter if the decanter is already hot. Allow the
decanter to cool before using.
F
igu re
5
Page 12

BREWING COFFEE NOW
1. After completing the steps in the Adding Water and
Coffee section and with the glass decanter and the
filter basket securely in place, turn the coffeemaker on
by pressing the SELECT button once. The BREW NOW
green light will turn on to signal that the coffeemaker is
on and brewing (Figure 6).
2. To enjoy a more full flavoured cup of coffee, press
the Brew Strength button once. The STRONG Brew
Strength red light will turn on. The coffeemaker will
remain in the Brew Strength you have selected until
you change it back to regular strength by pressing the
Brew Strength button or until you unplug the machine
(Figure 7).
3. After the used coffee grounds have cooled, carefully
remove the filter basket and discard them.
NOTE: Always allow the coffeemaker to cool down
before cleaning.
PRÉPARATIFS POUR L’INFUSION
Choix et quantité de mouture de café
Pour obtenir les résultats optimaux, utilisez non seulement des cuillerées à table rases de
mouture mais aussi de la mouture de café moyenne.
A. Tableau des quantités suggérées de mouture de café
F
igu re
6
F
igu re
7
12
Page 13

13
4. Prior to making a second pot of coffee, turn the
coffeemaker off. This will reset the FRESH BREW
™
TIMER feature. To turn the coffeemaker off, press the
SELECT button until all lights turn off.
5. Make sure the decanter is empty before starting to
brew coffee.
6. Be sure to turn your coffeemaker off when
no longer using it.
NOTE: Scalding may occur if the lid is removed during
brewing cycles.
The Fresh Brew™ Timer Feature
The FRESH BREW™ TIMER feature lets you know how
long your coffee has been waiting for you. At the start
of the brew cycle, the FRESH BREW
™
TIMER feature will
automatically be activated and the clock display will
change to show the time since brewing began.
Press the FRESH BREW
™
TIMER button once (Figure 8) to
go back to the clock function (while on the clock mode,
the FRESH BREW™ TIMER feature will keep counting).
The display will automatically change back to the clock
after 2 hours or when the unit is turned off.
NOTE: The BREW NOW green light must be on
for the FRESH BREW™ TIMER feature to operate.
The time and delay brew time cannot be set
when the fresh brew time is displayed.
F
igu re
8
Page 14

14
BREWING COFFEE LATER
1. You must first set the time for when you would like
the coffeemaker to begin brewing your coffee as
described in Setting the Clock and
the Delay Brew Timer section.
2. Prepare your coffeemaker as described in Adding
Water and Ground Coffee section.
3. To activate DELAY BREW and program your
coffeemaker to brew coffee at a later time, press the
SELECT button twice (Figure 9). The yellow DELAY
BREW light will turn on. The coffeemaker is now set
to automatically brew coffee at the pre-set later
time. At this time the brew strength light will turn on.
You can select the strength that you desire by pressing
the BREW STRENGTH button.
4. At the pre-set time, the green BREW NOW light will
turn on and the DELAY BREW yellow light will turn
off, indicating the brewing has started in the selected
brew strength. The FRESH BREW
™
TIMER feature will
start.
5. The coffeemaker warmer plate will keep your coffee hot for
2 hours and then automatically turn off. Thermal models will
turn off at the end of the brew cycle.
NOTE: Scalding may occur if the lid is removed during
brewing cycles.
As a safety feature, your coffeemaker will NOT start
again automatically the next day. If you
want your coffee to brew at the same time the
following day, simply add a new filter, coffee
and water and set DELAY BREW, by repeating
Steps 2 and 3 above.
To cancel DELAY BREW:
Press the SELECT button until all lights turn off (Figure 9).
– Infusion différée – Aimeriez-vous que le café soit prêt au saut du lit? La minuterie permet
de programmer l’heure à laquelle vous désirez que la cafetière commence automatiquement
à filtrer votre café – jusqu’à 24 heures à l’avance.
– Cycle spécial de détartrage – Automatique, il permet de détartrer facilement et
efficacement la cafetière.
REMARQUE: En présence d’une coupure de courant de moins de 10 secondes, la cafetière
procédera à la dernière fonction choisie, si vous en aviez sélectionné une.
NETTOYAGE DE LA CAFETIÈRE AVANT SA PREMIÈRE UTILISATION
Assurez-vous que le goût de la première tasse de café soit aussi fin que possible en nettoyant
votre cafetière Sunbeam
directives qui suivent.
1. Lavez la verseuse, son couvercle ainsi que le panier-filtre (consultez le schéma des pièces
qui est fourni) à l’eau additionnée d’un détergent liquide doux pour vaisselle. Rincez chaque
pièce à fond.
2. Replacez toutes les pièces puis fermez le couvercle. Soumettez alors la cafetière à un cycle
de fonctionnement, mais sans vous servir de filtre ou de mouture de café – uniquement de
l’eau.
3. À la fin du cycle, réglez la cafetière à l’arrêt, jetez l’eau qui a coulé dans la verseuse puis
rincez la verseuse, son couvercle ainsi que le panier-filtre.
Votre cafetière est alors prête à servir. Prenez plaisir à l’utiliser!
F
igu re
9
Page 15

CLEANING AND MAINTAINING
YOUR COFFEEMAKER
Daily Cleaning
Always turn off, unplug and allow the coffeemaker to cool before cleaning.
Remove the filter basket, decanter and decanter lid and wash them in a solution of hot water
and mild liquid soap.
Never use abrasive cleansers, steel wool pads or other abrasive materials. Dishwasher (top
rack) safe parts: glass decanter and lid and filter basket.
CAUTION! Never immerse the coffeemaker itself in water, in any other liquid or place
in the dishwasher.
Regular Cleaning and Maintenance
Decalcifying your Sunbeam® Coffeemaker
Minerals (calcium/limestone) found in water will leave deposits in your coffeemaker and affect
its performance. It’s recommended that you regularly remove these deposits using vinegar.
1. Pour 4 cups or 20 fl. oz. of undiluted, white household vinegar into the coffeemaker.
2. Place an empty 10-12 cup basket-style paper filter or permanent filter into the filter basket
and close the brew basket lid.
3. Place the empty decanter back in the unit, centered on the warming plate.
4. Run the coffeemaker.
5. Discard the vinegar and rinse the decanter thoroughly with clean water.
6. Fill the water reservoir with clean, fresh water.
7. Place the empty decanter back on the coffeemaker, centered on the warming plate.
8. Remove and discard the the paper filter used during the cleaning cycle.
If a permanent filter was used during cleaning, remove it and rinse it
thoroughly before replacing it in the filter basket.
9. Begin brewing and allow the full brew cycle to complete.
10. Repeat steps 5 through 9 one more time.
Your coffeemaker is now clean and ready to brew the next pot of
delicious, hot coffee!
15
Page 16

16
Suggested Decalcifying Interval
Type of Water Cleaning Frequency
Soft Water Every 80 Brew Cycles
Hard Water Every 40 Brew Cycles
Cleaning the Decanter
Hard water can leave a whitish stain on the decanter, and coffee may then turn this stain
brown.
To remove decanter stains:
1. Fill the decanter with a solution of equal parts water and vinegar and let the solution stand
in the decanter for approximately 20 minutes.
2. Discard the solution, then wash and rinse the decanter.
Do not use harsh abrasive cleaners that may scratch the decanter, scratches may cause the
decanter to break.
Tableau de commande
a. Affichage de l’heure et de la
minuterie Fresh Brew
fraîcheur d’infusion
b. Touche de l’horloge et de la
minuterie Fresh Brew
fraîcheur d’infusion
c. Voyant d’infusion différée
d. Touche de sélection
et d’arrêt
e. Voyant d’infusion immédiate
f. Voyants de concentration
(café corsé et café ordinaire)
g. Touche de concentration
du café
h. Touche de réglage d’infusion
différée
i. Touches des heures
j. Touches des minutes
Page 17

17
TROUBLESHOOTING YOUR SUNBEAM® COFFEEMAKER
Your Sunbeam® Coffeemaker has been carefully designed to give you many years of trouble-free
service. In the unlikely event that your new coffeemaker does not operate satisfactorily, please
review the following potential problems and try the steps recommended BEFORE you call an
Authorized Sunbeam® Service Center.
PROBLEM POSSIBLE CAUSE SOLUTION
The “Brew Now/On” • The appliance is unplugged. • Plug unit in.
light does not light up • There’s a power outage. • Wait for power to be
restored.
The coffee is • The appliance is unplugged. • Plug unit in.
not brewing • There’s a power outage. • Wait for power to be
restored.
• The water reservoir is empty. • Check the water
windows.
• The filter basket is not • Insert filter basket
properly inserted. correctly.
• The decanter is not • Place decanter
placed all the way on correctly on
the warming plate. warming plate.
The coffeemaker • There are no coffee grounds • Add the desired
only brews water in the filter basket. amount of coffee
to the filter.
The coffeemaker • The coffeemaker needs cleaning. • clean coffeemaker
brews slowly as described in
“CLEANING AND
MAINTAINING”
section.
The filter basket • The filter basket is not • Insert filter basket
overflows properly inserted. correctly.
• The decanter is not • Place decanter
placed all the way on correctly on
the warming plate. warming plate.
• The decanter lid is • Place lid on the
not on decanter. decanter.
• Too many coffee grounds • Removed filter, discard
were placed in the filter. grounds. If paper filter,
replace. If permanent
filter, rinse. Begin
brewing process again.
• The decanter was removed from • Turn off and unplug
the warming plate for more than unit. Allow to cool.
30 seconds. Wipe up the spill.
Do not set the hot
decanter back on the
wet warming plate or
it might crack.
Page 18

18
PROBLEM POSSIBLE CAUSE SOLUTION
The coffee is not hot • There’s a power outage. • Wait for power to
be restored.
• Auto SHUT-OFF has been activated. • For best results,
brew a fresh pot of
coffee.
The coffee tastes bad • Coffee grounds other than • Use coffee grounds
for an automatic drip coffeemaker recommended for
were used. automatic drip
coffeemakers.
• The ground coffee-to-water ratio • Use correct ground
was unbalanced. coffee-to-water
ratio.
• The coffeemaker needs cleaning. • Clean coffeemaker
as described in the
“MAINTAINING YOUR
COFFEEMAKER”
section.
The grounds are in • The filter is not properly seated • Seat filter properly
the coffee in the basket. within the filter
basket.
• The filter collapsed. • Remove filter and
replace.
Do you still have questions? You can call us toll-free at the Sunbeam Consumer Service
Department, 1-800-667-8623 or you can visit us at www.sunbeam.ca.
TROUBLESHOOTING YOUR SUNBEAM® COFFEEMAKER
Consignes importantes 21
Utilisation et entretien des verseuses 21
Introduction 22
Instructions spéciales relatives au cordon 22
Table des matières 23
Schéma des pièces 24
Tableau de commande 25
Caractéristiques et avantages de la cafetière 26
Nettoyage de la cafetière avant sa première utilisation 27
Réglages de l’horloge et d’infusion différée 28
Préparatifs en vue de l’utilisation 29
• Tableau des quantités suggérées de mouture de café
• Addition d’eau et de mouture de café
Infusion immédiate du café 31
Infusion différée du café 33
Nettoyage et entretien de la cafetière-filtre 34
Dépannage de la cafetière Sunbeam
Service et entretien 38
Renseignements de garantie 39
Page 19

19
SERVICE AND MAINTENANCE
Replacement Parts
• Decanters – You can usually purchase a replacement decanter from the store where you
purchased your coffeemaker. If you are unable to find a replacement, please call
1-800-667-8623 in Canada for information on where you can find a store that carries
replacement decanters.
Repairs
If your coffeemaker requires service, do not return it to the store where you purchased it. All
repairs and replacements must be made by Sunbeam
®
or an authorized Sunbeam® Service
Center. If you live in the U.S. or Canada, please call us at the following toll-free telephone
number to find the location of the nearest authorized service center:
Canada 1-800-667-8623
You may also visit our website at www.sunbeam.ca for a list of service centers.
To assist us in serving you, please have the coffeemaker model number and date
of purchase available when you call. The model number is stamped on the bottom
metal plate of the coffeemaker.
We welcome your questions, comments or suggestions.
In all your communications, please include your complete name, address and telephone
number and a description of the problem.
Visit our website at
www.sunbeam.ca and discover the secret to brewing the perfect
cup of coffee. You will also find a rich blend of gourmet recipes, entertaining tips and the
latest information on Sunbeam
®
products.
Page 20

Afin de réduire les risques d’incendies, de chocs électriques et de blessures corporelles, des
précautions fondamentales doivent être observées pour utiliser tout appareil électroménager,
y compris les suivantes:
1. LISEZ ATTENTIVEMENT LES INSTRUCTIONS AVANT D’UTILISER LA CAFETIÈRE.
2. Ne touchez pas aux surfaces chaudes. Servez-vous des poignées et des boutons.
3. Pour vous protéger des chocs électriques, ne plongez jamais le cordon, la fiche ou la
cafetière dans l’eau ou dans tout autre liquide.
4. Veillez à ce qu’un adulte assure toujours une surveillance assidue lorsque cet appareil
est employé par des enfants ou à proximité d’enfants.
5. Éteignez la cafetière (position OFF) et débranchez-la à la prise entre utilisations, lorsque
l’horloge ne sert pas et avant d’entreprendre le nettoyage. Attendez que les pièces soient
froides pour les démonter ou les remonter ainsi que pour nettoyer la cafetière.
6. N’utilisez pas un appareil dont le cordon ou la fiche est abîmé, qui a mal fonctionné ou
a été abîmé d’une manière quelconque. Retournez-le uniquement au centre de service
agréé le plus proche pour lui faire subir les contrôles, les réparations ou les réglages
nécessaires.
7. L’emploi d’accessoires autres que ceux de marques Sunbeam
dangereux ou entraîner des blessures.
8. N’utilisez pas la cafetière à l’air libre.
9. Ne laissez pas pendre le cordon au bord du plan de travail ou de la table et veillez à ce
qu’il ne soit en contact avec aucune surface chaude.
10. Ne placez pas la cafetière sur ou près de foyers de cuisson électriques ou à gaz chauds,
et ne la placez pas non plus dans un four chaud.
11. Pour débrancher la cafetière, réglez-la à l’arrêt (OFF) puis tirez délicatement sa fiche
hors de la prise de courant.
12. Ne posez la cafetière que sur une surface dure, plane et d’aplomb pour la faire
fonctionner, afin de ne pas entraver la circulation de l’air sous elle.
13. Évitez tout contact avec les pièces mobiles.
14. Cette cafetière n’est destinée qu’à l’usage domestique.
15. N’utilisez cette cafetière qu’aux fins auxquelles elle est destinée.
UTILISATION ET ENTRETIEN DES VERSEUSES
Observez les directives suivantes pour ne pas risquer de briser la verseuse en verre ou
d’abîmer la verseuse isotherme:
• Spécialement conçue pour la cafetière Sunbeam
de cuisson des cuisinières ni dans les fours, quels qu’ils soient.
• Ne posez jamais la verseuse en verre chaude sur une surface mouillée ou froide.
• N’utilisez pas une verseuse fêlée ou dont la poignée est desserrée ou branlante.
• Ne nettoyez pas la verseuse avec des poudres récurantes, des tampons métalliques à
récurer ou d’autres produits abrasifs de ce genre.
• Jetez immédiatement la verseuse si elle a bouilli à sec.
• Évitez de cogner ou de rayer la verseuse et de la manipuler brusquement.
REMARQUE: N’ôtez pas le couvercle durant l’infusion, vous pourriez vous échauder.
20
WARRANTY INFORMATION
1-YEAR LIMITED WARRANTY
Sunbeam Products, Inc. doing business as Jarden Consumer Solutions or if in Canada, Sunbeam
Corporation (Canada) Limited doing business as Jarden Consumer Solutions (collectively “JCS”)
warrants that for a period of one year from the date of purchase, this product will be free from defects
in material and workmanship. JCS, at its option, will repair or replace this product or any component of
the product found to be defective during the warranty period. Replacement will be made with a new or
remanufactured product or component. If the product is no longer available, replacement may be made
with a similar product of equal or greater value. This is your exclusive warranty. Do NOT attempt to repair
or adjust any electrical or mechanical functions on this product. Doing so will void this warranty.
This warranty is valid for the original retail purchaser from the date of initial retail purchase and is
not transferable. Keep the original sales receipt. Proof of purchase is required to obtain warranty
performance. JCS dealers, service centers, or retail stores selling JCS products do not have the right to
alter, modify or any way change the terms and conditions of this warranty.
This warranty does not cover normal wear of parts or damage resulting from any of the following: negligent
use or misuse of the product, use on improper voltage or current, use contrary to the operating instructions,
disassembly, repair or alteration by anyone other than JCS or an authorized JCS service center. Further, the
warranty does not cover: Acts of God, such as fire, flood, hurricanes and tornadoes.
What are the limits on JCS’s Liability?
JCS shall not be liable for any incidental or consequential damages caused by the breach of
any express, implied or statutory warranty or condition.
Except to the extent prohibited by applicable law, any implied warranty or condition of merchantability or
fitness for a particular purpose is limited in duration to the duration of the above warranty.
JCS disclaims all other warranties, conditions or representations, express, implied, statutory or otherwise.
JCS shall not be liable for any damages of any kind resulting from the purchase, use or misuse of,
or inability to use the product including incidental, special, consequential or similar damages or loss
of profits, or for any breach of contract, fundamental or otherwise, or for any claim brought against
purchaser by any other party.
Some provinces, states or jurisdictions do not allow the exclusion or limitation of incidental or
consequential damages or limitations on how long an implied warranty lasts, so the above limitations or
exclusion may not apply to you.
This warranty gives you specific legal rights, and you may also have other rights that vary from province
to province, state to state or jurisdiction to jurisdiction.
How to Obtain Warranty Service
In the U.S.A.
If you have any question regarding this warranty or would like to obtain warranty service,
please call 1-800-458-8407 and a convenient service center address will be provided to you.
In Canada
If you have any question regarding this warranty or would like to obtain warranty service,
please call 1-800-667-8623 and a convenient service center address will be provided to you.
In the U.S.A., this warranty is offered by Sunbeam Products, Inc. doing business as Jarden Consumer
Solutions located in Boca Raton, Florida 33431. In Canada, this warranty is offered by Sunbeam
Corporation (Canada) Limited doing business as Jarden Consumer Solutions, located
at 20 B Hereford Street, Brampton, Ontario L6Y 0M1. If you have any other problem or claim in connection
with this product, please write our Consumer Service Department.
PLEASE DO NOT RETURN THIS PRODUCT TO ANY OF THESE ADDRESSES
OR TO THE PLACE OF PURCHASE.
Page 21

/MD
For product questions contact:
Sunbeam Consumer Service
Canada : 1.800.667.8623
www.sunbeam.ca
© 2012 Sunbeam Products, Inc. doing business as Jarden Consumer Solutions.
All rights reserved. Imported and distributed by Sunbeam Corporation (Canada) Limited doing
business as Jarden Consumer Solutions, 20B Hereford Street, Brampton, Ontario L6Y 0M1.
Pour les questions de produit:
appelez le service à la clientèle de Sunbeam
Canada : 1.800.667.8623
www.sunbeam.ca
© 2012 Sunbeam Products, Inc. faisant affaire sous le nom de Jarden Consumer Solutions.
Tous droits réservés. Importée et distribuée par Sunbeam Corporation (Canada)
Limited faisant affaire sous le nom de Jarden Consumer Solutions, 20B Hereford Street,
Brampton (Ontario) L6Y 0M1.
Printed in China / Imprimé en Chine. GCDS-SUN26967-SZ P.N. 162680
User Manual /
Notice d’emploi
www.sunbeam.ca
 Loading...