

Page 1
– – –
FOLD
– – –
– – –
FOLD
– – –
– – –
FOLD
– – –
– – –
FOLD
– – –
– – –
FOLD
– – –
©2007 Sunbeam Products, Inc. doing business as Jarden Consumer Solutions.
All rights r
Limited, doing business as Jarden Consumer Solutions,Brampton, Ontario L6Y 0M1.
Visit us at www.sunbeam.com
You will find exciting and entertaining tips and ideas,
including great recipes!
Canada 1 800 667-8623
U.S. 1-800-334-0759
©2007 Sunbeam Products, Inc. faisant affaires sous le nom de Jarden Consumer
Solutions. T
(Canada) Limited, faisant affaires sous le nom de Jarden Consumer Solutions,
Brampton (Ontario) L6Y 0M1.
Visitez notre site au www.sunbeam.com
Vous y trouverez des idées originales pour vos réceptions ainsi qu’une variété de
ecettes gastronomiques!
r
GSC-IC0507
eserved. Imported and distributed by Sunbeam Corporation (Canada)
ous droits réservés.Importée et distribuée par Sunbeam Corporation
CLEANING
AND MAINTAINING
YOUR COFFEEMAKER
Daily Cleaning
Always unplug the coffeemaker and allow to cool before cleaning.
Remove the filter basket, carafe and carafe lid and wash them in a solution of hot water
and mild liquid soap.
Never use abrasive cleansers, steel wool pads or other abrasive materials.
CAUTION! Never immerse the coffeemaker itself in water,
in any other liquid or place in the dishwasher.
!
Regular Cleaning and Maintenance
Decalcifying your SUNBEAM®Coffeemaker
Minerals (calcium) found in water will leave deposits in your coffeemaker and will affect it. It’s
recommended that you regularly remove these deposits by using vinegar.
1. Pour 4 cups or 20 fl. oz. of undiluted, white household vinegar into the water reservoir.
2. Place an empty 8 cup basket-style paper filter into the filter basket and close coffeemaker lid.
3. Place the empty carafe back in the unit.
4. Brew three cups of cleaning solution through the coffeemaker.
5. Turn the coffeemaker off and let stand for 30 minutes.
6. Run the remainder of the cleaning solution through the coffeemaker.
7. Discard the cleaning solution and rinse the carafe thoroughly with clean water.
8. Fill the water reservoir with clean, fresh water.
9. Place the empty carafe back on the coffeemaker.
10. Remove and discard the paper filter used during the cleaning cycle.
11. Begin brewing and allow the full brew cycle to complete.
12. Repeat Steps 8 through 11 one more time.
our coffeemaker is now clean and ready to brew the next pot of delicious, hot coffee!
Y
Suggested Decalcifying Inter
Type of Water Cleaning Frequency
Soft Water Every 80 Brew Cycles
d Water Every 40 Brew Cycles
Har
Cleaning the Carafe
Hard water can leave a whitish stain on the decanter, and coffee may then turn this stain brown.
To remove carafe stains:
1. Fill the carafe with a solution of equal parts water and vinegar and let the solution stand in the
carafe for approximately 20 minutes.
2. Discard the solution, then wash and rinse the carafe.
Do not use harsh abrasive cleaners that may scratch the carafe, scratches may cause the
decanter to br
NOTE: Do not place Ther
eak.
mal carafe in the dishwasher
val
.
TROUBLESHOOTING YOUR COFFEEMAKER
Your SUNBEAM®Coffeemaker has been carefully designed to give you many years of trouble-free
service. In the unlikely event that your new coffeemaker does not operate satisfactorily, please review
the following potential problems and try the steps recommended BEFORE you call an Authorized JCS
Service Center.
PROBLEM POSSIBLE CAUSE SOLUTION
THE ON LIGHT The appliance is unplugged. PLUG UNIT IN.
DOES NOT LIGHT UP
There’s a power outage. WAIT FOR POWER TO BE RESTORED.
THE COFFEE IS The appliance is unplugged. PLUG UNIT IN.
NOT BREWING
There’s a power outage. WAIT FOR POWER TO BE RESTORED.
The water reservoir is empty. CHECK THE WATER WINDOWS.
The filter basket is not INSERT FILTER BASKET CORRECTLY.
properly inserted.
The carafe is not placed all the PLACE CARAFE CORRECTLY ON
way in on the base. BASE.
THE COFFEEMAKER There are no coffee grounds in ADD THE DESIRED AMOUNT
ONLY BREWS WATER the filter basket. OF COFFEE.
THE COFFEEMAKER The coffeemaker needs cleaning. CLEAN COFFEEMAKER AS
BREWS SLOWLY DESCRIBED IN “CLEANING
THE FILTER BASKET The filter basket is not INSERT FILTER BASKET CORRECTLY.
OVERFLOWS
THE COFFEE IS There’s a power outage. WAIT FOR POWER TO BE RESTORED.
NOT HOT
THE COFFEE Coffee grounds other than for an USE COFFEE GRIND RECOMMENDED
TASTES BAD automatic drip coffeemaker were FOR AUTOMATIC DRIP
THE GROUNDS ARE The filter is not properly seated SEAT FILTER PROPERLY WITHIN
IN THE COFFEE
pr
operly inserted.
The carafe is not placed PLACE CARAFE CORRECTLY
all the way in on the base. ON BASE.
The carafe lid is not on carafe. PLACE LID ON THE CARAFE.
Too many coffee grounds were REMOVE FILTER, DISCARD GROUNDS.
placed in the filter. REPLACE PAPER FILTER.
The carafe was r
the base for more than ALLOW TO COOL. WIPE UP THE
30 seconds. SPILL.
Auto SHUT-OFF has been activated. FOR BEST RESULTS, BREW A FRESH
used. COFFEEMAKERS.
The ground coffee-to-water ratio USE CORRECT GROUND
was unbalanced. COFFEE-TO-WATER RATIO.
feemaker needs cleaning.
The cof
in the basket.
The filter collapsed. REMOVE FILTER AND REPLACE.
emoved from TURN OFF AND UNPLUG THE UNIT.
AND MAINTAINING” SECTION.
BEGIN BREWING PROCESS AGAIN.
POT OF COFFEE.
CLEAN COFFEEMAKER AS DESCRIBED
IN “CLEANING AND MAINTAINING
YOUR COFFEEMAKER” SECTION.
THE FIL
TER BASKET
.
VICE AND MAINTENANCE
SER
Replacement Parts
• Carafe – You can usually purchase a replacement carafe from the store where you purchased your
coffeemaker. If you are unable to find a replacement, please visit sunbeam.com or call 1-800-6678623 in Canada or 1-800-672-6333 in the U.S. for information on where you can find a store
that carries replacement carafe.
Repairs
If your coffeemaker requires service, do not return it to the store where you purchased it. All repairs
and replacements must be made by JCS or by an authorized JCS Service Center. If you live in Canada
or the U.S., please call us at the following toll-free telephone numbers to find the location of the
nearest authorized service center:
Canada 1-800-667-8623
U.S. 1-800-672-6333
You may also visit our website at www.sunbeam.com for a list of service centers.
To assist us in serving you, please have the coffeemaker model number and date of purchase
available when you call. The model number is on the bottom of the coffeemaker.
We welcome your questions, comments or suggestions. In all your communications, please include
your complete name, address and telephone number and a description of the problem.
Visit our website at www.sunbeam.com and discover the secret to brewing the
perfect cup of coffee. You will also find a rich blend of gourmet recipes,
entertaining tips and the latest information on SUNBEAM
®
products.
ARRANTY INFORMATION
W
1-YEAR LIMITED WARRANTY
Sunbeam Products, Inc., doing business as Jarden Consumer Solutions, or if in Canada, Sunbeam
Corporation (Canada) Limited, doing business as Jarden Consumer Solutions, (collectively “
that for a period of one year from the date of purchase, this product will be free from defects in
material and workmanship.
product found to be defective during the warranty period. Replacement will be made with a new or
remanufactured product or component. If the product is no longer available, replacement may be made
with a similar product of equal or greater value. This is your exclusive warranty from
This warranty is valid for the original retail purchaser from the date of initial retail purchase and is
not transferable. Keep the original sales receipt. Proof of purchase is required to obtain warranty
JCS
performance.
alter, modify or any way change the terms and conditions of this warranty.
This warranty does not cover normal wear of parts or damage resulting from any of the following:
negligent use or misuse of the product, use on improper voltage or current, use contrary to the operating
instructions, disassembly, repair or alteration by anyone other than
Further, the warranty does not cover: Acts of God, such as fire, flood, hurricanes and tornadoes.
What are the Limits on JCS’s Liability?
JCS
shall not be liable for any incidental or consequential damages caused by the breach of any
express, implied or statutory warranty or condition.
Except to the extent prohibited by applicable law, any implied warranty or condition of merchantability or
fitness for a particular purpose is limited in duration to the duration of the above warranty.
JCS
disclaims all other warranties, or conditions or representations, express, implied, statutory or otherwise.
JCS
shall not be liable for any damages of any kind resulting from the purchase, use or misuse of, or inability to
use the product including incidental, special, consequential or similar damages or loss of profits, or for any
breach of contract, fundamental or otherwise, or for any claim brought against purchaser by any other
party.
Some provinces, states or jurisdictions do not allow the exclusion or limitation of incidental or
consequential damages or limitations on how long an implied warranty lasts, so the above limitations or
exclusions may not apply to you.
This warranty gives you specific legal rights, and you may also have other rights that vary from province
to province, state to state or jurisdiction to jurisdiction.
How to Obtain Warranty Service
In the U.S.A.
If you have any question regarding this warranty or would like to obtain warranty service,
please call 1-800-672-6333 and a convenient service center address will be provided to you.
In Canada
If you have any question regarding this warranty or would like to obtain warranty service, please call
1-800-667-8623 and a convenient service center address will be provided to you.
In the U.S.A., this warranty is offered by Sunbeam Products, Inc., doing business as Jarden Consumer
Solutions, located in Boca Raton, Florida 33431. In Canada, this warranty is offered by Sunbeam
Corporation (Canada) Limited, doing business as Jarden Consumer Solutions, located at 20 Hereford,
Brampton, Ontario L6Y 0M1.
dealers, service centers, or retail stores selling
JCS
, at its option, will repair or replace this product or any component of the
JCS
products do not have the right to
JCS
or an authorized
JCS
JCS
.
JCS
service center.
”) warrants
User Manual
Notice d’emploi
8-Cup Coffeemaker / Cafetière 8 tasses
Model / Modèle 3335-33
–––
FOLD
FOLD
Printed in China/Imprimé en Chine P.N. 121528
–––
–––
BREWING COFFEE NOW
1. After completing the steps in the “Adding Water and Coffee” section and with the carafe and
the filter basket secur
ogrammable models:Press the ON Button to begin the br
For Pr
indicator light will turn on to signal that the coffeemaker is brewing.
mal units will shut of
Ther
While the coffee is brewing, the Pause ‘n Serve feature allows you to sneak a cup of coffee from
the carafe. REPLACE THE CARAFE WITHIN 30 SECONDS TO PREVENT OVERFLOW AND
POSSIBLE INJUR
To turn the coffeemaker off, push the OFF button.
If the br
open the brew basket. Turn off the coffeemaker. Unplug the
!
coffeemaker and wait for the contents to cool before handling.
2. After the used coffee grounds have cooled, carefully open the filter basket and discard them.
3. Make sure the carafe is empty before starting to brew coffee.
BREWING COFFEE LA
o Set the Clock:
T
1. You must first set the time when you would like the coffeemaker to begin brewing your coffee as
described in
2. Prepare your coffeemaker as described in “Adding Water and Ground Coffee” section.
3. To activate DELAY BREW and program your coffeemaker to brew coffee at a later time, press the
Delay Brew button. The DELAY indicator light will illuminate. The coffeemaker is now set to
automatically brew coffee at the pre-set later time.
At the pre-set time the Green indicator light will turn on and the DELAY light will turn off, indicating
4.
the brewing has started.
5. Thermal units will shut off immediately after the brewing cycle is complete.
As a safety featur
day. If you want your coffee to brew at the same time the following day, simply
add a new filter, coffee and water and set DELAY BREW,
above.
o cancel DELA
T
n off.
tur
ely in place, turn the coffeemaker on.
f immediately after the br
Y.
ew basket over
flows or fails to empty into the carafe, do not
ewing cycle is complete.
TER
“Setting the Clock and the Delay Br
e,
your cof
Y BREW
feemaker will NOT star
:
ess the OFF button. The DELA
Pr
ewing cycle. The gr
imer”
ew T
t again automatically the next
Y BREW gr
section.
by repeating Steps 2 and 3
een indicator light will
een
English 7 English 9 English 10English 8
To Set the Delay Brew Time:
After setting the clock, simply press and hold the SET DELAY button
(Figure 1), and set the brew time by pressing the HOUR and MINUTE
buttons. The PM indicator will light up on the clock display
ime is now set!
ew T
Br
NOTE: To activate the DELAY BREW cycle, see the “Brewing
fee Later”
Cof
o check the pr
T
display will show the time you have programmed the coffee to brew.
section.
ogrammed time, push the SET DELA
. The Delay
Y button. The
e 1 – Set Delay)
(Figur
PREPARING FOR USE
Selecting and Measuring Ground Coffee
For best results, use a level tablespoon for ground coffee measurement. Make sure you use medium
grind cof
Suggested Coffee Measurement Chart
Adding Water and Ground Coffee
1.
2.
3.
4. Be sure the filter basket is properly centered and all the way down in
5.
6. Pour the water into the water reservoir. Close the lid and replace the empty carafe.
fee for a per
To Brew Ground Coffee
8 Cups
6 Cups 4.5 tbsp.
4 Cups 3 tbsp.
Lift and open the coffeemaker lid. For your convenience, you can lift
emovable filter basket.
out the r
Place a 8 cup paper basket-style filter into the r
e 2)
(Figur
NOTE: If using paper filters, it is important that the sides of the filter
fit flush against the side of the filter basket. If filter collapse occurs,
dampen the filter before placing in the filter basket and adding
ound cof
gr
Add the desir
Suggested Cof
See the
the filter basket.
Fill the carafe with cold, fresh water to the desired capacity (1 cup equals 5 ounces). For easy and
accurate filling, the water markings on the dual water windows show the amount of water needed
to make the corresponding desired number of cups. Do not fill past the “MAX line” or water will
flow out of the overfill hole in the back of the water reservoir.
The amount of coffee brewed will always be slightly less than the amount of
water pour
water by the coffee grounds.
NOTE: Make sure the carafe is fully placed on the base or the water and the grounds will overflow
om the filter basket. An over
fr
CAUTION! To reduce the risk of damaging the carafe and/or the risk of personal injury,
do not add cold water to the decanter if the carafe is already hot. Allow the carafe to cool
befor
!
fect brew.
6.5 tbsp.
fee and water.
ed amount of cof
ed in the water reservoir. This is due to the minimum absorption of
e using.
fee and gently shake to level the cof
fee Measurement Chart
flow may cause personal injur
1 level tablespoon (tbsp) = 5 gr./0.17 oz.
1 cup = 5 fl. oz. of br
Use more or less coffee to suit your taste.
emovable filter basket.
.
y or damage to pr
ewed cof
fee.
fee
e 2 – Adding water
(Figur
and ground coffee)
ty.
oper
Do you still have questions? Y
Please read ALL of the instructions in this manual carefully before you begin to use this appliance.
Proper care and maintenance will ensure a long life and trouble-free operation for this appliance.
Please save these instructions and refer to them for cleaning and care tips.
INTRODUCTION
Welcome and congratulations on the purchase of your new Sunbeam® coffeemaker. Your new
coffeemaker will wake up with you in the morning and provide you breaks and treats during your
hectic daily activities. How you enjoy your Sunbeam® coffeemaker is up to you!
1-800-667-8623 or you can visit us at www
COFFEEMAKER FEA
Your new SUNBEAM®coffeemaker has the following features:
Brewing Capacity
•
• Brew Basket with Removable Filter Basket – Lifts out for fast and easy cleaning and filling.
• Pause ‘n Serve – Can’t wait for the coffee to finish brewing? The Pause ‘n Serve feature allows you
up to 30 seconds to pour a cup of coffee while the coffeemaker is still brewing. Carefully remove the
decanter and the Pause ’n Serve feature will be automatically activated, temporarily stopping the flow
of coffee into the decanter.
• Dual Water Windows – Show amount of water in the reservoir for accurate filling.
• Cord Storage – Safely stores excess cord to keep your countertop neat.
• On/Off Indicator Light – Lets you know when your coffeemaker is “on”.
• Additional Programmable Control Features:
– Clock – The LED clock serves as a handy kitchen clock and allows you to set the Delay Brew
feature.
– Delay Brew – Would you like to wake up to a fresh pot of coffee? The time allows you to
preset when you would like the coffeemaker to automatically brew your coffee, up to 24
hours in advance.
– Auto Shut-Off
NOTE: If you have selected any of the operating functions, the cof
operation selected if the power is r
– 8 cups – Ther
ou can call us toll-fr
TURES AND BENEFITS
mal carafe series
estored within 10 seconds after a power outage.
ee at our Consumer Service Department at
.sunbeam.com.
feemaker will act upon the last
CLEAN YOUR COFFEEMAKER BEFORE
USING THE FIRST TIME
Make sure your first cup of coffee is as good as can be by cleaning your SUNBEAM®Coffeemaker before
its first use. Just follow these simple steps:
Wash the carafe, carafe lid and the filter basket in a mixture of mild detergent and water. Rinse each
1.
oughly (please refer to the parts diagram listed above).
thor
2. Replace all the parts and close the lid. Then, run a brew cycle with water only, without adding coffee
and coffee filter.
3. When brewing is complete, turn your coffeemaker off, discard the water in the carafe and rinse the
carafe, carafe lid, and filter basket.
our coffeemaker is now ready to use. Enjoy it!
Y
SETTING THE CLOCK AND DELAY BREW TIME
For Programmable Models Only
To Set the Clock:
1. Plug the power cord into a standard electrical outlet. The clock will flash on the control panel to
indicate that the time has not been set yet.
2. Press and hold the HOUR and MINUTE buttons until you reach the current time. The PM indicator will
light on the left of the display
NOTE: Pressing any button before setting the clock will cause the clock to start keeping time from 12:00
a.m. You must set the clock if you want to use the Delay Brew feature.
. The clock is now set!
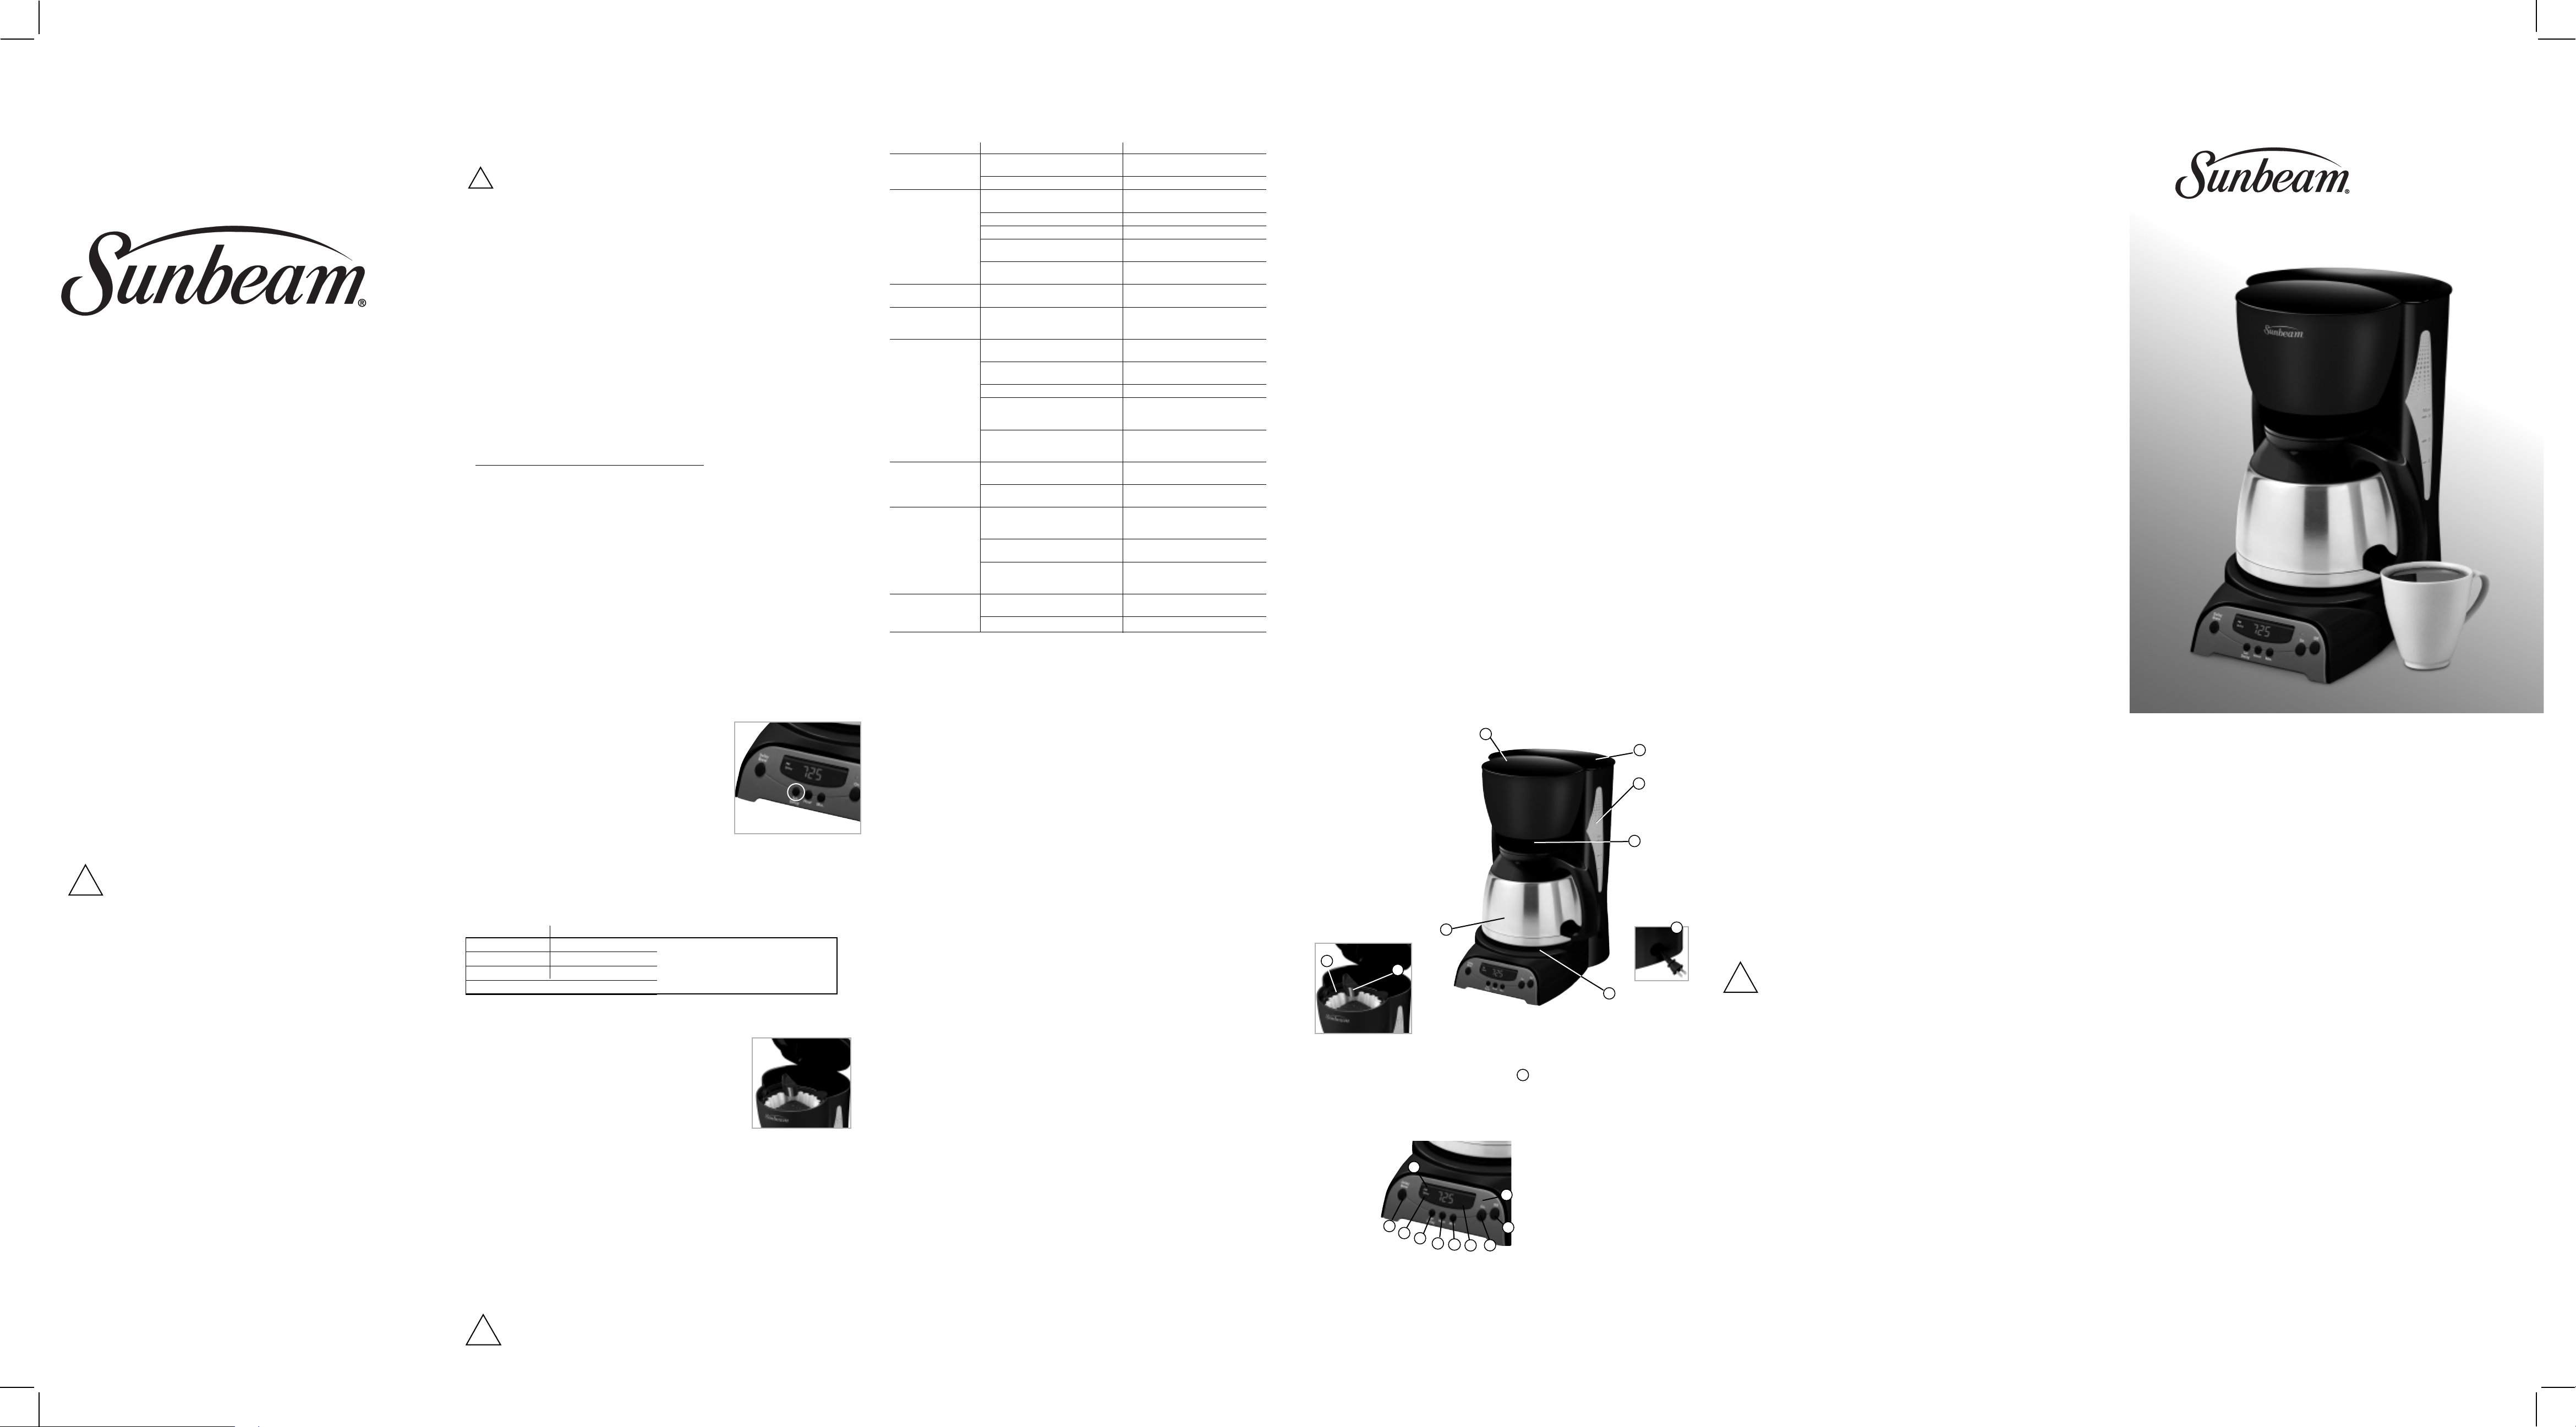
DIAGRAM OF P
1 Filter Basket Lid
ater Reservoir
2 W
feemaker Lid
3 Cof
4 Pause ’n Ser
5 Cord Storage
6 Base
7 Control Panel (see detail below)
8 Thermal Carafe
9 Removable Filter Basket
10 Shower Head
9
ve
0
1
i
h
j
g
ARTS
f
PLEASE DO NOT RETURN THIS PRODUCT TO ANY OF THESE
ADDRESSES OR TO THE PLACE OF PURCHASE
www.sunbeam.com
–––
FOLD
–––– ––
1
3
2
4
8
6
7 Control Panel,
Programmable
Models
On indicator light
a
b Off Button
c On Button
d Clock Display
e Minute Button
f Hour Button
a
g Set Delay Button
h Delay Indicator
i Delay Br
b
e
d
c
j PM Indicator
ew Button
5
CARAFE USE AND CARE
Follow the instr
uctions below to r
educe or eliminate the chance of breaking
the carafe:
• This carafe is designed for use with your SUNBEAM
®
coffeemaker and
therefore must never be used on a range top or in any oven, including a
owave oven.
micr
• Do not set a hot carafe on a wet or cold surface.
• Do not use a cracked carafe or a decanter having a loose or weakened
handle.
• Do not clean the carafe with abrasive cleaners, steel wool pads or other
abrasive materials.
otect the carafe from sharp blows, scratches or rough handling.
Pr
•
• Do not disassemble the thermal carafe.
• Do not place the thermal carafe in the dishwasher.
WARNING: To reduce the risk of fire or electric shock, do not remove
e no user ser
ar
vice covers. Ther
ser
any
coffeemaker. Only authorized personnel
!
inside
should repair the coffeemaker.
the
e
viceable par
ts
SAVE THESE INSTRUCTIONS
SPECIAL CORD SET INSTRUCTIONS
For your convenience the plug is stored inside the cord storage.
1.
ovided to reduce the hazards resulting from a person or pet
t power supply cor
A shor
2.
becoming entangled in, or tripping over, a longer cord.
3. An extension cord may be purchased and used if care is exercised in its use.
If an extension cor
4.
least 10 amps and 120 volts. The resulting extended cord must be arranged so that it will
not drape over a counter
over accidentally.
5. This appliance has a polarized plug (one blade is wider than the other). To reduce the risk of
electric shock, this plug will fit in a polarized outlet only one way
in the outlet, reverse the plug. If it still does not fit, contact a qualified electrician. Do not
modify the plug in any way. You can customize the length of the power cord so that it is the
exact length you desir
the power plug) and gently lift it out of the slot, then pull it away from the coffeemaker. To
ease the length of the power cord: Grasp the power cord (not the power plug), lift it out
decr
of the slot and gently feed it into the coffeemaker. Lock the cord in the slot when finished.
d is pr
d is used, the marked electrical rating of the extension cor
top or tabletop wher
e it can be pulled on by children or tripped
. If the plug does not fit fully
e. T
ease the length of the power cor
o incr
d: grasp the power cord (not
d must be at
IMPORTANT SAFEGUARDS
To reduce the risk of fire, electric shock and/or injury to persons, basic
safety precautions should always be followed when using electrical
appliances, including the following:
1. READ ALL INSTRUCTIONS BEFORE USING THE COFFEEMAKER.
2. Do not touch the coffeemaker’s hot surfaces. Use handles or knobs and
do not open the lid or cover while brewing. Scalding may occur if the
emoved during br
lid is r
o protect against electric shock, do not immerse the power cord,
T
3.
power plug or cof
Close adult super
4.
near childr
n the cof
ur
T
5.
ce when the cof
sour
en.
vision is necessar
feemaker OFF and unplug the power cor
cleaning. Allow the coffeemaker parts to cool before putting on or
ts and befor
taking of
Do not operate any appliance with a damaged power cor
6.
f par
plug, or operate it after the appliance malfunctions, or has been
damaged in any manner. Return this appliance only to the nearest
Authorized Service Center for examination, repair or adjustment.
7. The use of accessory attachments other than SUNBEAM
products may cause hazards or injuries.
8. Do not use the coffeemaker outdoors.
9. Do not let the power cord hang over edge of table or counter, or allow
it to come into contact with hot surfaces.
10. Do not place this coffeemaker on or near a hot gas stove or electric
bur
ner or in a heated oven.
11. To disconnect the coffeemaker, turn it OFF, then remove the power plug
from the power supply.
12. Place the appliance on a hard, flat level surface to avoid interruption
of airflow underneath the coffeemaker.
13. Avoid contact with any moving parts.
14. This coffeemaker is designed for household use only.
15. Do not use appliance for other than intended use.
ewing cycles.
feemaker in water or in any other liquid.
y when this appliance is used by or
om the power
d fr
feemaker and clock ar
e not in use and befor
e cleaning the appliance.
®
e
d or power
brand
English 6
– – –
FOLD
– – –
English 5
– – –
FOLD
– – –
English 4
– – –
FOLD
– – –
– – –
FOLD
– – –
English 2 English 1English 3
– – –
FOLD
– – –
Page 2
– – –
FOLD
– – –
– – –
FOLD
– – –
– – –
FOLD
– – –
– – –
FOLD
– – –
– – –
FOLD
– – –
CONSIGNES IMPORTANTES
Pour réduire les risques d’incendie, de choc électrique ou de blessures, il
est indispensable d’observer certaines précautions de base lors de
l’utilisation des appareils électroménagers, y compris les suivantes:
1.
LISEZ LES INSTRUCTIONS AVANT D’UTILISER LA CAFETIÈRE.
2. Ne touchez pas aux surfaces chaudes de la cafetière. Servez-vous des
poignées ou des boutons et n’ouvrez surtout pas le couvercle durant le
cycle d’infusion, vous risqueriez de vous échauder.
3.
Pour vous protéger des chocs électriques, n’immergez la fiche, le
cor
don ou la cafetière ni dans l’eau ni dans un autre liquide.
4. Soyez très prudent lorsque cet appareil est employé par des enfants ou
bien à proximité d’enfants.
5.
Réglez la cafetière à l’arrêt (OFF) et débranchez-la à la prise entre
utilisations, quand l’horloge ne ser
nettoyage. Laissez r
efroidir les pièces de la cafetière avant de monter
ou de démonter toute pièce et avant l’entr
6. Ne faites pas fonctionner un appareil dont le cordon ou la fiche est
abîmé, qui a mal fonctionné ou a été endommagé de quelque façon.
Apportez l’appareil au centre de service agréé le plus proche pour lui
fair
e subir les contrôles, réparations ou réglages nécessaires.
7. L’utilisation d’accessoires de marques autres que SUNBEAM
entraîner danger et blessur
es.
8. N’employez pas la cafetière à l’air libre.
9.
Ne laissez pas pendre le cordon d’alimentation et veillez à ce qu’il ne
soit en contact avec aucune sur
10. Ne posez pas la cafetière sur ou près de foyers de cuisson électriques
ou à gaz chauds; ne la mettez pas dans un four chaud.
11. Pour débrancher la cafetière, réglez-la à l’arrêt puis tirez délicatement
la fiche hors de la prise de courant.
12.
Posez la cafetière sur une surface dure, plane et d’aplomb afin de ne
pas entraver la cir
culation de l’air sous elle.
13. Évitez tout contact avec les pièces mobiles.
14.
Cette cafetière est uniquement destinée à l’usage domestique.
15. N’employez la cafetière qu’aux fins auxquelles elle est prévue.
t pas et avant d’entreprendre le
etien.
face chaude.
®
peut
UTILISA
Obser
•
La verseuse est spécialement étudiée et conçue pour votre cafetière
SUNBEAM
cuisinièr
•
Ne posez jamais la verseuse chaude sur une surface mouillée ou froide.
•
Ne vous servez pas d’une verseuse endommagée ou dont la poignée est
desser
TION ET ENTRETIEN DE LA VERSEUSE
vez les conseils suivants pour éviter d’endommager la verseuse:
®
et elle ne doit donc jamais êtr
e mise sur les feux des
es et dans les fours ordinaires ou à micro-ondes.
rée ou branlante.
• Ne nettoyez pas la verseuse avec des poudres récurantes, des tampons
métalliques à récurer ou d’autres produits abrasifs de ce genre.
•
Évitez de cogner ou de rayer la verseuse et de la manipuler brusquement.
• Ne démontez surtout jamais la verseuse isotherme.
• Ne lavez en aucune circonstance la verseuse isotherme au lave-vaisselle.
A
VERTISSEMENT:
Dans le but de
électrique, n’enlevez jamais les couver
!
cafetièr
e ne contient pas de pièces que vous puissiez réparer.
Confiez toujours les réparations au personnel autorisé
réduire les risques d’incendie ou de choc
cles d’entretien. La
.
GARDEZ CES INSTRUCTIONS
INSTRUCTIONS SPÉCIALES QUANT AU CORDON
1. Par mesure de commodité, la fiche se range dans le range-cordon.
2. Le cordon court qui est fourni ne devrait pas faire trébucher ou accrocher les pieds des
personnes ou animaux, comme pourrait le faire un cordon plus long.
3. Un cordon prolongateur peut être utilisé en observant toutes les précautions d’usage.
4. Lors de l’emploi d’un cordon de rallonge, ses caractéristiques électriques doivent être d’au
moins 10 ampères et 120 volts. Disposez-le de telle façon qu’il ne pende pas du plateau
de table ou du plan de travail, que les enfants ne risquent pas de le tirer et qu’il ne puisse
e accidentellement trébucher.
pas fair
5. Cet appareil est équipé d’une fiche polarisée (une branche est plus large que l’autre). Pour
e les risques de choc électrique, la fiche ne rentre dans les prises de courant que
réduir
dans un sens. Si la fiche n’enfonce pas totalement dans la prise, inversez la fiche. Si elle
ne pénètre toujours pas entièrement, entrez en rapport avec un électricien qualifié. Ne
modifiez la fiche en aucune façon.
ous pouvez modifier la longueur du cor
V
longueur requise. Pour augmenter la longueur: saisissez le cordon (et non la fiche) et tirez
délicatement la longueur voulue hors de la fente. Pour réduire la longueur du cordon:
saisissez le cor
la fente puis r
don (et non la fiche) du bout des doigts, levez-le un peu pour le dégager de
epoussez-le dans la cafetièr
don d’alimentation pour qu’il ait exactement la
e. Ceci fait, bloquez le cor
don dans la fente
.
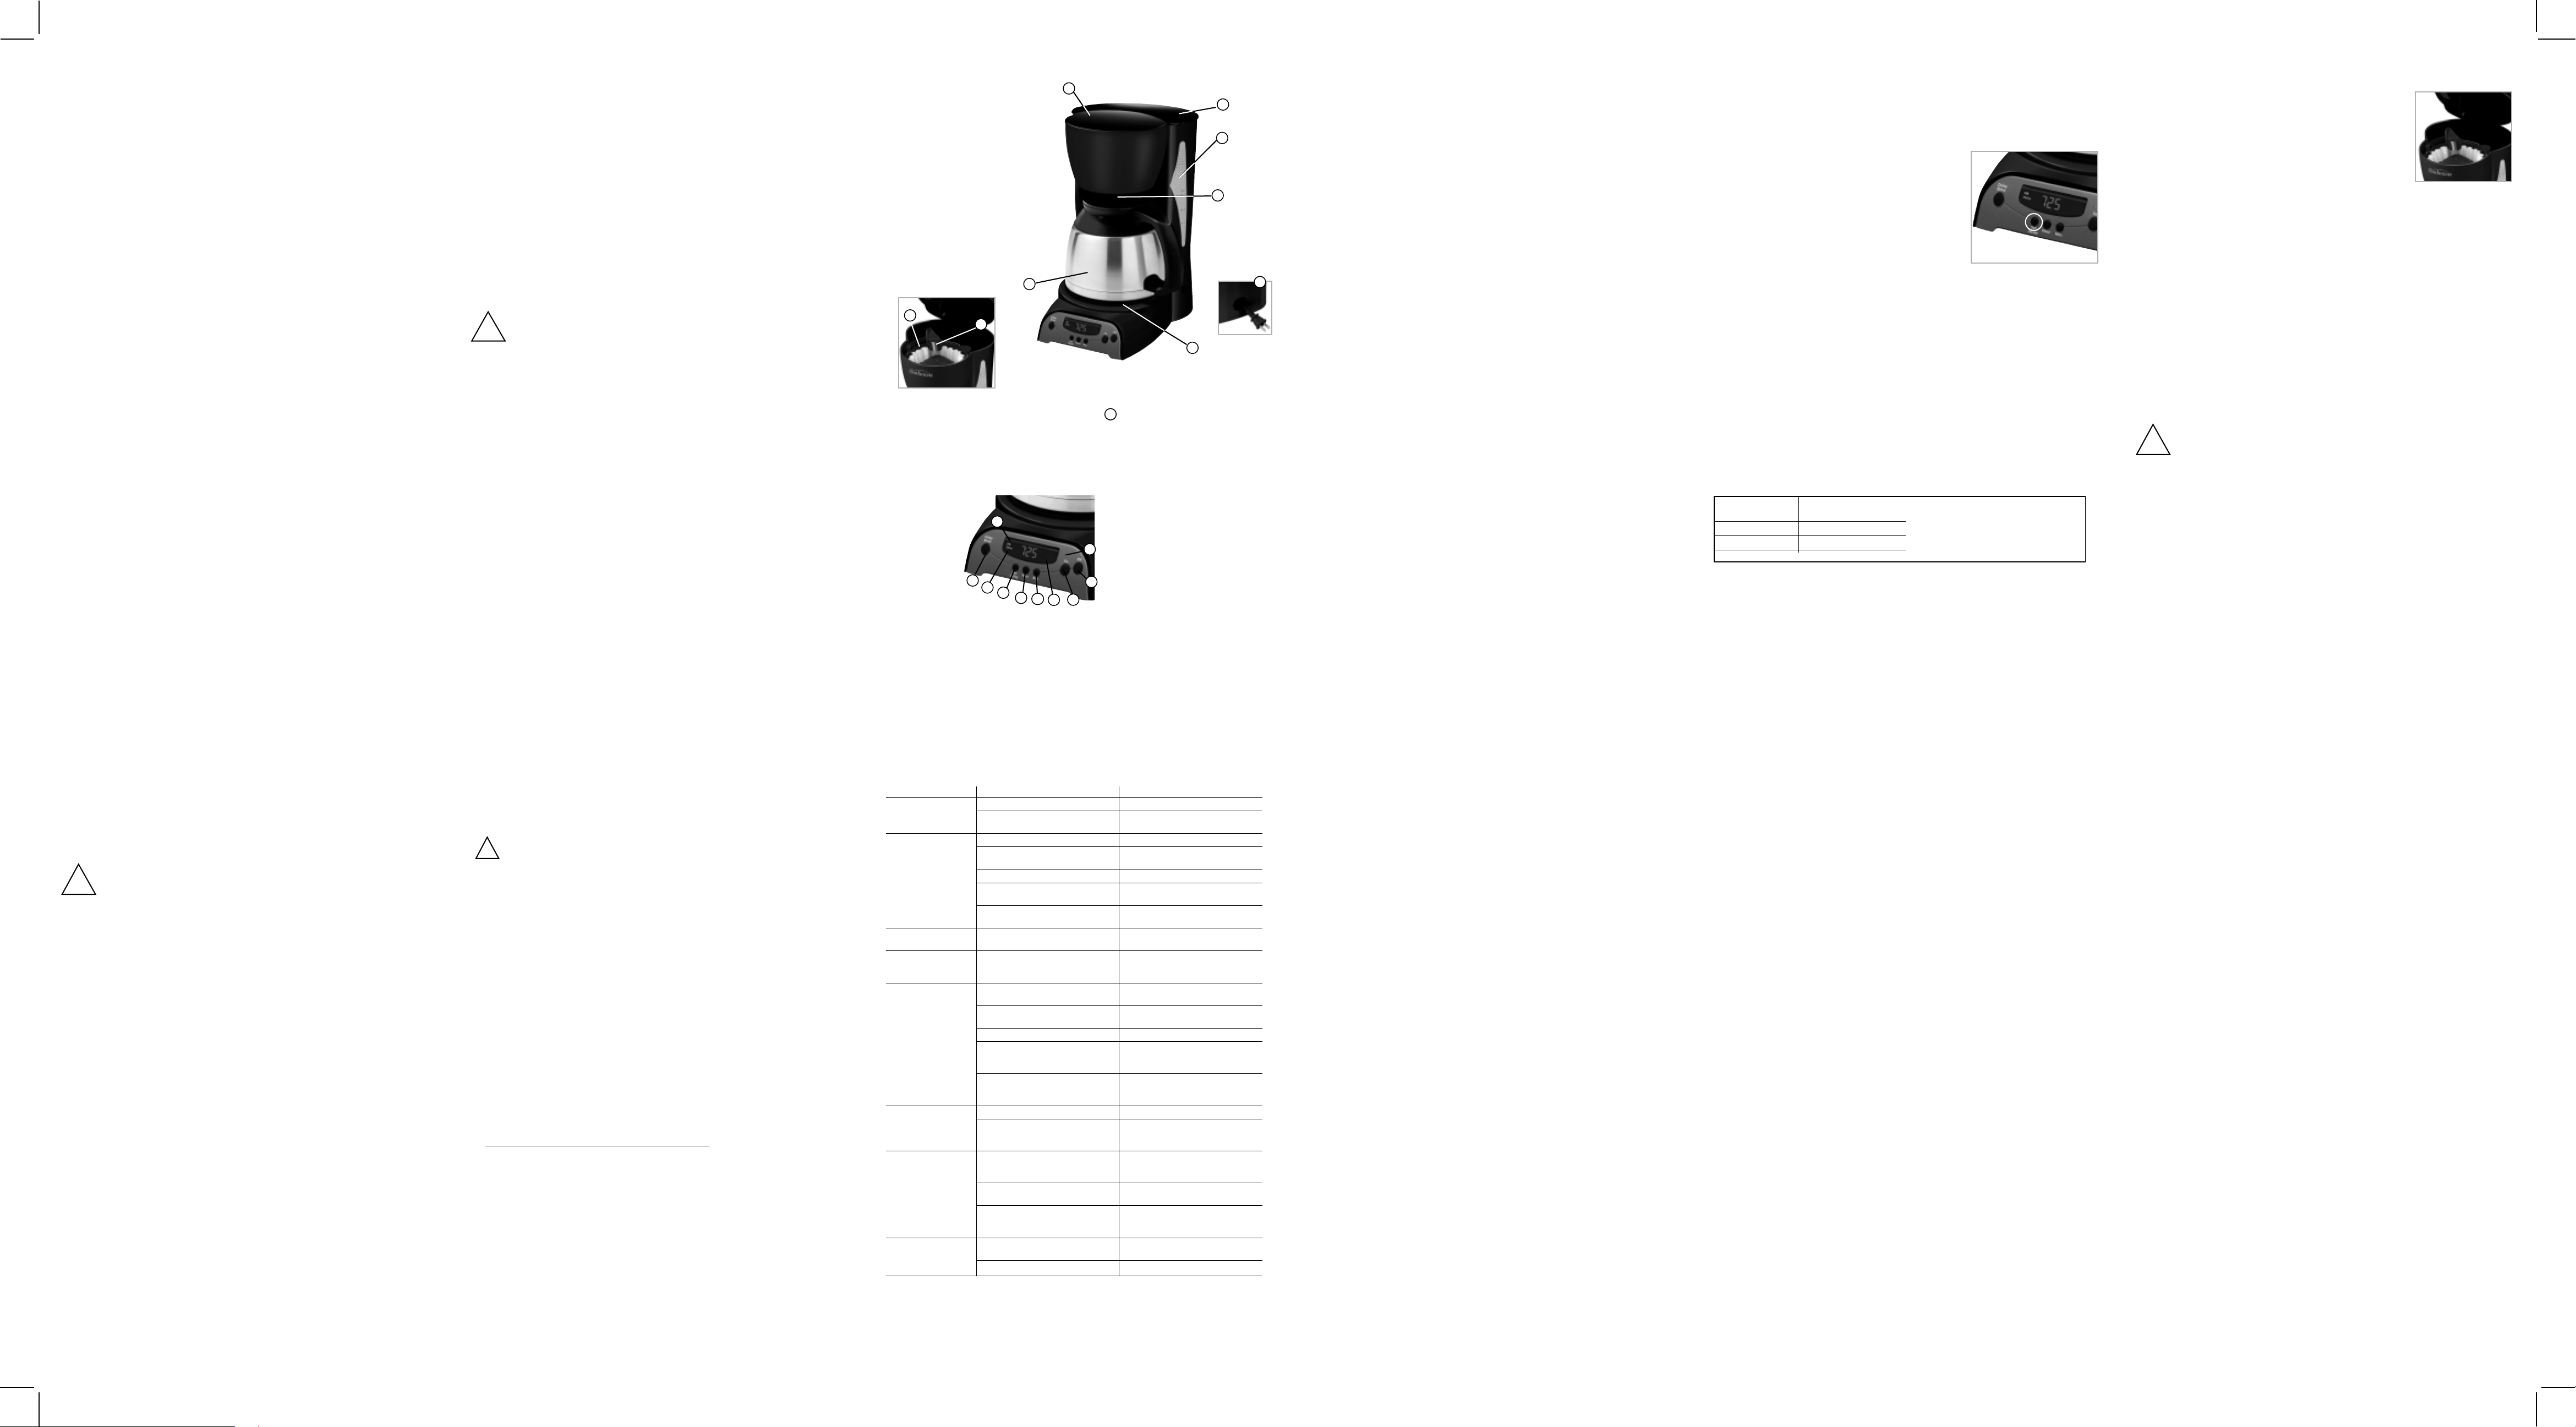
SCHÉMA DES PIÈCES
1 Couvercle du panier-filtre
2 Réservoir à eau
3 Deux hublots de niveau
4 Arrêt temporaire de service
5 Range-cordon
6 Base
7 Tableau de commande
(voyez les détails ci-dessous)
8 Verseuse isotherme
9 Porte-filtre amovible
10 Diffuseur d’eau chaude
8
9
10
j
i
h
g
e
f
Veuillez lire cette notice d’emploi en sa TOTALITÉ avant de commencer à utiliser la cafetière. Des
1
3
2
4
5
6
7 Tableau de
commande,
modèles
programmables
a Voyant de marche
b Bouton «Arrêt »
c Bouton «Marche»
d Afficheur de l’horloge
e Bouton des minutes
f Bouton des heur
g Réglage d’infusion
a
différée
h Indicateur d’infusion
b
c
d
férée
dif
i Infusion différée
es de 12 à 24
j Heur
es
soins et un entretien convenables assureront un long service sans ennuis. Conservez ces instructions
pour consulter les directives d’entetien et les conseils pratiques au besoin.
INTRODUCTION
®
Nous vous félicitons d’avoir acheté cette cafetière Sunbeam
réveiller en même temps que vous le matin, si vous le souhaitez, mais aussi vous aider à reprendre
agréablement le souffle durant vos journées chargées. La manière que vous choisissez d’apprécier
votre cafetière Sunbeam
®
ne dépend que de vous!
, une cafetière qui peut non seulement se
CARACTÉRISTIQUES ET
AVANTAGES DE LA CAFETIÈRE-FILTRE
Votre nouvelle cafetière SUNBEAM®présente certaines des caractéristiques suivantes:
• Contenance – 8 tasses – série à verseuse isotherme
• Panier-filtre à porte-filtre amovible – Le porte-filtre se retire aisément pour simplifier le
lavage et le remplissage.
• Arrêt temporaire de service – Vous avez hâte de déguster votre première tasse de café
aromatique? L’arrêt temporaire de service vous donne jusqu’à 30 secondes durant lesquelles
vous servir une première tasse de café au cours de l’infusion. Retirez prudemment la verseuse et
l’antigouttes arrête automatiquement – bien que temporairement – l’écoulement du café.
• Deux hublots de niveau – Permettent de mesurer l’eau du réservoir avec précision.
• Range-cordon – Accueille l’excédent de cordon pour réduire le fouillis sur le plan de travail.
• Témoin lumineux marche-arrêt – Vous rappelle que la cafetière est sous tension.
• Autres caractéristiques des modèles programmables :
– Horloge – L’horloge à DEL peut servir d’horloge de cuisine, elle permet de régler
l’heure d’infusion différée.
– Infusion différée – Aimeriez-vous que le café soit prêt quand vous sautez du lit? La
minuterie vous laisse prérégler l’heure à laquelle vous désirez que la cafetière se mette
automatiquement en marche, jusqu’à 24 heures à l’avance.
– Arrêt automatique
REMARQUE: Après une panne de courant, la cafetière reprendra la dernière fonction que vous
aviez sélectionnée, si le courant est rétabli sous 10 secondes.
NETTOYEZ LA CAFETIÈRE AVANT
SA TOUTE PREMIÈRE UTILISATION
SUNBEAM
Nettoyez votr
sera aussi délectable que les tasses subséquentes. Pour ceci, suivez les simples instructions ci-après:
1. Lavez la verseuse, son couvercle et le porte-filtre (voyez le schéma des pièces) à l’eau
additionnée d’un doux détergent liquide pour vaisselle. Rincez-les à fond.
Replacez les pièces et fer
2.
fonctionnement, sans utiliser de mouture ou de filtre papier – seulement de l’eau.
3. À la fin du filtrage de l’eau, réglez la cafetière à l’arrêt, jetez l’eau de la verseuse puis rincez la
verseuse, son couvercle ainsi que le porte-filtre.
Votre cafetière est prête à servir et à vous régaler. Profitez-en!
e cafetièr
e
®
avant sa pr
mez le couver
e utilisation et votr
emièr
cle. Soumettez alors la cafetière à un cycle de
e première tasse de café
RÉGLAGES DE L
ET DE L’HEURE D’INFUSION DIFFÉRÉE
Modèles programmables seulement
Réglage de l’horloge:
1. Branchez le cordon d’alimentation sur une prise de courant standard. L’afficheur clignotant
indique que l’heure n’a pas encore été réglée.
2. Appuyez longuement sur les boutons des HEURES et des
MINUTES jusqu’à ce que l’heure actuelle s’affiche.
L’indicateur «PM» des heures de 12 à 24 (à gauche de
l’afficheur) s’allumera. L’horloge est ainsi réglée!
REMARQUE: Si vous appuyez sur tout bouton avant de régler
l’horloge, l’horloge commencera à indiquer l’heure à compter
de 0 heure. Il est indispensable de régler l’horloge pour utiliser
la fonction d’infusion différée.
Réglage de l’heure d’infusion différée:
Après avoir réglé l’horloge, appuyez longuement sur le bouton
d’infusion différée (SET DELAY),
l’aide des boutons des HEURES et des MINUTES. Le voyant des
heures de 12 à 24 s’allumera à l’afficheur. L’heure d’infusion différée est alors réglée!
REMARQUE: Voyez «Infusion différée du café » pour la mise en marche.
Pour vérifier l’heure programmée, appuyez sur le bouton de RÉGLAGE D’INFUSION DIFFÉRÉE (SET
DELAY). L’heure programmée s’affichera.
PRÉP
Choix et quantité de mouture de café
Mesurez la mouture par cuillerées à table rases pour obtenir les résultats optimaux. Rappelez-vous
que la mouture de café moyenne est la mouture à employer.
Tableau des quantités suggérées de mouture
N
ARATIFS POUR L’INFUSION
e
br
de tasses Mouture de café
8 6,5 cuill. à table
6 4,5 cuill. à table
4 3 cuill. à table
’HORLOGE
figure 1, puis réglez l’heure à
1 cuillerée à table = 5 g/0,17 oz
1 tasse = 5 oz liq = 145 mL de café filtré
Modifiez la quantité de mouture selon
vos préfér
(Figure 1 –
Infusion différée)
ences.
Addition d’eau et de mouture de café
1. Levez et ouvrez le couvercle de la cafetière. Par mesure de
commodité, vous pouvez sortir le porte-filtre du panier.
2. Posez un filtre papier circulaire de format 8 tasses dans
le porte-filtre.
REMARQUE: Lors de l’utilisation d’un filtre papier, il est essentiel
que le pourtour du filtre papier soit tout contre la paroi du portefiltre. Si les filtres papier ont tendance à s’affaisser, humectez-les
avant de les placer dans le porte-filtre, d’y déposer la mouture et
avant de verser l’eau dans le réservoir.
3. Déposez la quantité requise de café moulu puis agitez le porte-filtre
pour égaliser la surface de la mouture. Voyez le
quantités suggérées de mouture
4. Veillez à ce que le porte-filtre soit convenablement centré et enfoncé
dans le panier-filtre.
5. Versez le volume requis d’eau froide juste tirée (1 tasse = 5 oz US = 145 mL de café filtré) dans
la verseuse. Pour vous aider, les repères indiqués sur les hublots de niveau donnent le volume
d’eau nécessaire pour le nombre correspondant de tasses de café. Ne remplissez pas le
réservoir au-delà de la ligne «MAX» sans quoi l’eau découlera par le trou de trop-plein prévu à
cet effet à l’arrière du réservoir.
Étant donné que la mouture de café absorbe un certain volume d’eau, la
quantité de café filtré sera toujours légèrement inférieure à la quantité d’eau
versée dans le réservoir.
6. Videz l’eau de la verseuse dans le réservoir. Fermez le couvercle et posez la verseuse vide sur la
base de la cafetière
REMARQUE: Veillez à ce que la verseuse soit parfaitement placée sur la base,
sans quoi eau et marc déborderont. Un tel déversement pourrait entraîner blessures
corporelles ou dommages matériels.
!
(Figure 2)
(Figure 2 – Addition d’eau
et de mouture de café)
tableau des
.
ATTENTION! Afin de ne pas risquer d’endommager la verseuse et
pour éviter tout risque de blessures corporelles, ne versez jamais d’eau
froide dans une verseuse chaude. Attendez que la verseuse ait refroidi
avant de recommencer à l’utiliser.
–––
FOLD
FOLD
–––
–––
INFUSION IMMÉDIATE DU CAFÉ
1. Après avoir agi tel qu’indiqué sous «Addition d’eau et de mouture de café» et la verseuse ainsi que
le panier-filtre étant placés comme il le faut, mettez la cafetière-filtre en marche.
:
Modèles pr
d’infusion. Le témoin vert s’allumera pour signaler le fonctionnement.
Les cafetières à verseuse isotherme se mettent hors tension dès que le cycle de filtrage se termine.
Durant le filtrage, l’ar
café filtré. REPLACEZ LA VERSEUSE SOUS 30 SECONDES AFIN QUE LE CAFÉ NE RISQUE PAS DE
DÉBORDER ET DE CAUSER DES BLESSURES CORPORELLES.
Pour éteindre la cafetière, appuyez simplement sur le bouton d’arrêt (OFF).
!
2. Quand le marc de café a refroidi, ouvrez prudemment le panier-filtre et jetez le marc.
3. Assurez-vous que la verseuse soit vide avant d’infuser un autre pot de café.
ogrammable
Si le panier
normalement dans la verseuse, n’ouvrez pas le couvercle de
la cafetièr
que son contenu ait refroidi pour la toucher.
s
Appuyez sur le bouton de mar
vice vous per
rêt temporair
-filtr
e. Éteignez la cafetièr
e de ser
e déborde ou bien si le café filtré ne coule pas
e, débranchez-la et attendez
che (ON) pour fair
met de vous ser
vir une pr
INFUSION DIFFÉRÉE DU CAFÉ
Pour régler l’horloge:
ous devez tout d’abord régler l’heure à laquelle vous désirez que la cafetière commence à infuser
V
1.
le café, tel que décrit sous
2. Préparez la cafetière – voyez «Addition d’eau et de mouture de café ».
Appuyez sur le bouton DELA
3.
qu’elle se mette en mar
est ainsi prête à se mettr
4. À l’heure désirée, le témoin vert s’allumera et le témoin lumineux d’infusion différée (DELAY)
s’éteindra, indiquant que l’infusion a débuté.
5. Les cafetières à verseuse isotherme se mettent hors tension dès que le cycle de filtrage se termine.
Par mesure de sécurité,
lendemain. Si vous souhaitez que le café soit prêt à la même heure le lendemain,
changez le filtr
puis réglez la fonction d’infusion différée (DELAY BREW)
Annulation de l’INFUSION DIFFÉRÉE:Appuyez sur le bouton d’ar
vert d’INFUSION DIFFÉRÉE s’éteindra.
e papier
«Réglages de l’horloge et de l’heure d’infusion différée».
Y BREW pour activer l’infusion différée et programmer la cafetière afin
che plus tard. Le témoin d’infusion différée (DELAY) s’allumera. La cafetière
e en marche à l’heure choisie.
la cafetière ne se mettra PAS automatiquement en marche le
, mesur
ez la moutur
e de café et le volume d’eau r
– étapes 2 et 3 ci-dessus.
rêt (OFF). Le témoin lumineux
e débuter le cycle
emière tasse du
equis
Français 2Français 1 Français 4 Français 5 Français 6Français 3
NETTOYAGE ET DÉTARTRAGE
DE LA CAFETIÈRE-FILTRE
Nettoyage quotidien
Débranchez et laissez toujours r
Sortez le porte-filtre, retirez la verseuse de la base ainsi que son couvercle puis lavez-les à l’eau
chaude additionnée d’un doux déter
Ne vous ser
abrasifs.
!
Entretien périodique
Détartrage de la cafetière SUNBEAM
Les minéraux de l’eau du robinet laissent un dépôt calcaire à l’intérieur de la cafetière et affectent le
fonctionnement à la longue. Nous conseillons de détartrer la cafetière régulièrement au vinaigre.
1. Versez 600 mL ou 20 oz US de vinaigre blanc non dilué dans le réservoir de la cafetière.
2. Placez un filtre papier circulaire de format 8 tasses dans le porte-filtre et fermez le couvercle de la
3. Centrez parfaitement la verseuse vide sur la base.
4. Laissez filtrer 450 mL (15 oz US) du vinaigre.
5. Éteignez la cafetière et laissez-la reposer 30 minutes.
6. Finissez de filtrer le vinaigre.
7.
8.
9. Replacez la verseuse vide sur la base en vous assurant qu’elle soit bien centrée.
10. Retirez et jetez le filtre papier utilisé pour le détartrage.
11.
12. Répétez les étapes de 8 à 11 une fois de plus.
otre cafetière est maintenant propre et prête à préparer un nouveau pot de délicieux café aromatique.
V
Intervalles suggérés entre détartrages
Détartrage de la verseuse
L’eau dure peut laisser un dépôt calcaire blanchâtre à l’intérieur de la verseuse et le café risque de
fair
Pour éliminer ces taches:
1. Remplissez la verseuse d’une solution moitié eau et moitié vinaigre puis laissez reposer la solution
2. Jetez la solution, lavez soigneusement la verseuse puis rincez-la à fond.
Ne vous servez pas de nettoyants abrasifs qui risqueraient de rayer la verseuse.
REMARQUE: Ne mettez pas la verseuse isotherme au lave-vaisselle.
vez jamais de produits récurants, de tampons de laine d’acier ou d’autres matériaux
La verseuse isotherme n’est pas lavable au lave-vaisselle.
ATTENTION!
ou dans tout autre liquide et ne le mettez pas au lave-vaisselle.
.
e
e-filtr
cafetièr
Jetez le contenu de la verseuse puis rincez celle-ci à fond à l’eau clair
Remplissez le réser
Mettez la cafetière en marche pour lui faire subir un cycle de fonctionnement complet.
e d’eau
Genr
Douce 80 cycles d’infusion
Calcaire (dure) 40 cycles d’infusion
er les taches au br
e vir
dans la verseuse pendant environ 20 minutes.
efroidir la cafetière avant de la nettoyer.
gent liquide à vaisselle.
N’immergez jamais cet appareil, dans l’eau
®
.
voir d’eau fr
Détar
un.
oide du r
obinet
trez tous les…
.
e
DIAGNOSTIC DES PANNES
La cafetière SUNBEAM®a été étudiée pour servir de nombreuses années sans ennuis. Au cas où elle
cesserait de vous procurer satisfaction, voyez les problèmes potentiels décrits ci-dessous et essayez
les solutions qui sont proposées AVANT de vous adresser à un centre de service agréé de JCS.
PROBLÈME RAISON POSSIBLE SOLUTION
Le témoin de La cafetière est débranchée Branchez la cafetière
fonctionnement
ne s’allume pas
Le café ne filtr
La cafetièr
que de l’eau
Le filtrage est très lent
Le café débor
panier-filtre dans le panier-filtre dans le panier-filtre
Le café n’est pas assez
chaud
Le café est insipide
Il y a du marc dans Le porte-filtre est mal positionné Positionnez correctement le porte-filtre
le café
D’autres questions? Appelez – sans frais d’interurbain – notre service à la clientèle en composant le
e pas
e ne filtr
de du Le porte-filtre est mal positionné Placez convenablement le porte-filtre
1 800 667-8623 ou bien visitez notre site Web au www.sunbeam.com.
Il y a une panne de courant Attendez que le courant soit rétabli
La cafetièr
Il y a une panne de courant
Le réservoir à eau est vide Vérifiez les hublots de niveau de l’eau
Le porte-filtre n’est pas convena- Placez convenablement le porte-filtre
blement placé dans la cafetière dans le panier-filtre
La verseuse est mal positionnée Centrez correctement la verseuse sur
sur la base la base de la cafetière
Il n’y a pas de moutur
e
dans le por
La cafetière a besoin d’être Détartrez la cafetière tel que conseillé
détar
La verseuse est mal placée Centrez correctement la verseuse sur
sur la base la base de la cafetière
La verseuse n’a pas son couvercle Mettez le couvercle sur la verseuse
Vous avez déposé trop de mouture Retirez le filtre puis jetez le marc;
dans le filtr
La verseuse a été retirée de la Éteignez la cafetière et débranchez-la ;
base pendant plus des laissez-la refroidir; essuyez toutes les
30 secondes per
Il y a une panne de courant Attendez que le courant soit rétabli
La fonction d’ARRÊT AUTOMATIQUE Pour obtenir les meilleurs résultats,
(modèles programmables seulement) préparez un nouveau pot de café
a été activée
V
autre que la mouture conseillée pour recommandée – la mouture moyenne
les cafetières goutte-à-goutte pour cafetières goutte-à-goutte
Vous n’avez pas utilisé assez de café Servez-vous d’une quantité adéquate
moulu pour le volume d’eau
La cafetièr
dans le panier
Le filtr
e est débranchée
e de café Mettez la quantité recommandée de
e
te-filtr
trée
e papier remplacez-le filtre-papier, puis
mises
ous utilisez de la moutur
e a besoin d’êtr
-filtr
e papier s’est affaissé Enlevez le filtre et remplacez-le
e de café Servez-vous de la mouture de café
e détar
e
pour recommencer à faire du café
Branchez la cafetièr
Attendez que le courant soit rétabli
ecommencer à fair
pour r
e de café dans le filtre papier
moutur
sous la rubrique «Nettoyage et
détartrage de la cafetière»
recommencez un cycle d’infusion
éclaboussur
de café pour le volume d’eau
Détar
trée
sous la rubrique «Nettoyage et
détartrage de la cafetière»
dans le panier
es
ez la cafetièr
tr
-filtr
e
e tel que conseillé
e
e du café
SERVICE ET ENTRETIEN
Pièces de rechange
• Verseuses – Vous devriez pouvoir vous procurer une verseuse de rechange au magasin où vous
avez acheté la cafetièr
composez le 1 800 667-8623 au Canada ou le 1 800 672-6333 aux États-Unis et nous vous
indiquerons le nom d’un magasin qui tient les verseuses de rechange.
Réparations
Si votre cafetière a besoin d’être réparée, ne la retournez pas au magasin où vous l’avez achetée.
Toutes les réparations doivent être effectuées par un centre de service agréé de JCS. Si vous habitez
au Canada ou aux États-Unis, veuillez composer le numér
si vous désirez connaître le centre de service le plus proche:
Canada 1 800 667-8623
États-Unis 1 800 672-6333
Ou bien visitez notre site Web: www.sunbeam.com où vous trouverez la liste intégrale des
centres de service.
Pour nous aider à bien vous servir, veuillez avoir le numéro de modèle de la cafetière ainsi que la
date d’achat sous la main. Le numér
Nous apprécions vos questions, observations et suggestions. Veuillez inclure votre nom entier, votre
adresse, votre numéro de téléphone et la description de la défectuosité dans toute communication.
isitez le site www
V
révélés. Vous y découvrirez également des recettes gastronomiques, des idées
délicieuses pour vos réceptions, de même que les tout der
elatifs aux pr
r
e. Si ce n’est pas le cas
o de modèle est indiqué dessous la cafetièr
.sunbeam.com, les secr
oduits SUNBEAM
®
.
, visitez notr
ets de la parfaite tasse de café y sont
e site Web au sunbeam.com ou bien
o sans frais appr
oprié, donné ci-dessous,
e.
enseignements
niers r
RENSEIGNEMENTS DE GARANTIE
GARANTIE LIMITÉE DE UN AN
Sunbeam Products, Inc., faisant affaires sous le nom de Jarden Consumer Solutions ou, au Canada,
Sunbeam Corporation (Canada) Limited, faisant affaires sous le nom de Jarden Consumer
Solutions, (collectivement «
pendant un (1) an courant à compter de la date de l’achat. JCS se réserve le droit de choisir entre
répar
cours de la période de garantie. Le r
Si l’article n’est plus disponible, il pourra être remplacé par un article semblable, de valeur égale
ou supérieur
Cette garantie n’est valable que pour l’acheteur au détail original, à par
détail initial, et elle n’est pas transférable. Veuillez garder votre reçu de caisse original. Une preuve
d’achat est requise pour obtenir le service prévu par la garantie. Les concessionnaires JCS, les
centr
modifier ou de changer d’une manièr
Cette garantie ne couvr
négligence, à l’utilisation abusive de l’article, au branchement sur un circuit de tension ou courant
inappr
par quiconque, sauf JCS ou un centre de service agréé JCS. Cette garantie ne couvre pas non plus
les cas de force majeure comme incendies, inondations, ouragans et tornades.
Quelles sont les limites de la responsabilité de JCS?
JCS
respect de toute garantie ou condition explicite, implicite ou générale.
Sauf dans la mesure interdite par la législation pertinente, toute garantie ou condition implicite de
qualité mar
condition ci-dessus.
JCS
l’utilisation nor
accessoir
similair
de négligence grossière ou de faute commise par JCS, ses agents ou employés; ou bien pour les
violations de contrat, fondamentales, ou autr
Certains États, certaines provinces ou juridictions interdisent d’exclure ou de limiter les dommages
accessoires ou indirects, ou ne permettent pas la limitation de la durée d’application de la garantie
implicite, de sorte que vous pouvez ne pas être assujetti aux limites ou exclusions énoncées ci-haut.
Cette garantie vous confère des droits juridiques précis et vous pouvez avoir d’autres droits, ces
oits variant d’un État ou d’une pr
dr
Service prévu par la garantie
Aux États-Unis
Pour toute question quant à la garantie ou pour obtenir le ser
1 800 672-6333 et nous vous four
Au Canada
Pour toute question quant à la garantie ou pour obtenir le service prévu par la garantie, composez le
1 800 667-8623 et nous vous fournirons l’adresse d’un centre de service agréé commodément situé.
Aux États-Unis, cette garantie est offerte par Sunbeam Products, Inc., faisant affaires sous le nom
de Jar
offerte par Sunbeam Corporation (Canada) Limited, faisant affaires sous le nom de
Jarden Consumer Solutions, du 20 Hereford, Brampton, Ontario L6Y 0M1.
emplacer l’ar
er ou r
e. La présente constitue la garantie exclusive qu’of
es de ser
n’assume aucune responsabilité pour les dommages accessoires ou indirects résultant du non-
n’assume aucune r
vice et les détaillants qui vendent des ar
oprié, au non-respect du mode d’emploi, au démontage et à la réparation ou à l’altération
chande ou d’application à un usage par
male ou abusive, ou de l’inaptitude à utiliser le produit, y compris les dommages
es, les dommages-intérêts particuliers, les dommages immatériels et les dommages
es ou pertes de profits; ou pour les dommages résultant de délits, y compris de négligence,
den Consumer Solutions, de Boca Raton, en Floride 33431. Au Canada, cette garantie est
JCS
») garantit cet article contre tout vice de matériau et de fabrication
ticle ou toute pièce de celui-ci dont la défectuosité a été constatée au
emplacement se fera au moyen d’une pièce neuve ou réusinée.
e
fr
JCS
.
tir de la date de l’achat au
ticles JCS n’ont pas le dr
e quelconque les modalités de cette garantie.
male des pièces ou l’endommagement attribuable à la
e pas l’usur
esponsabilité pour les dommages, quels qu’ils soient, résultant de l’achat, de
e nor
ticulier est limitée à la durée de la garantie ou
es, ou les réclamations contr
ovince ou juridiction à l’autr
ons l’adresse d’un centre de service agréé commodément situé.
nir
e.
vice prévu par la garantie, composez le
oit d’altér
e l’acheteur par un tiers.
er, de
–––
FOLD
–––– ––
NE RETOURNEZ CE PRODUIT NI À L’UNE DES ADRESSES
CI-DESSUS NI AU LIEU D’ACHAT
Français 7 Français 8 Français 9 Français 10 Français 11
– – –
FOLD
– – –
– – –
FOLD
– – –
– – –
FOLD
– – –
– – –
FOLD
– – –
– – –
FOLD
– – –
 Loading...