

Page 1
Instruction Manual
DELUXE MIXMASTER®MIXER
Mode d'Emploi
BATTEUR DELUXE MIXMASTER
®
Manual de Iinstrucciones
BATIDORA MIXMASTER® DELUXE
Instruzioni per l'Uso
DELUXE MIXMASTER®MIXER
Gebrauchsanleitung
DELUXE MIXMASTER®MIXER
Anvandarhandledning
DELUXE MIXMASTER®MIXERN
■
■
■
■
2356, 2358, 2359
&
2360
2356, 2358, 2359
&
2360
Page 2

2
When using electrical appliances, basic safety precautions should always
be followed including the following:
1. Read all instructions before using the Mixer.
2. To protect against risk of electrical shock, do not put Mixer in water or
other liquid. This may cause personal injury or damage to the product.
3. Close supervision is necessary when Mixer is used by or near children,
or incapacitated persons.
4. Unplug from outlet while not in use, before putting on or taking off parts
and before cleaning.
5. Avoid contacting moving parts. Keep hands, hair, clothing, as well as spatulas
and other utensils away from beaters during operation to reduce the risk
of injury to persons and/or damage to the Mixer.
6. If the power supply cord of this appliance is damaged, it must only be
replaced in a repair shop appointed by the manufacturer, because
special tools are required.
7. The use of attachments not recommended or sold by Sunbeam may cause fire,
electrical shock or injury.
8. Do not use outdoors or for commercial purposes.
9. Do not let cord hang over edge of table or counter or touch hot surfaces,
including the stove.
10. Remove beaters from Mixer before washing.
IMPORTANT SAFEGUARDS
Page 3
11,
Do not place Mixer or bowls on or near a hot gas or
electric burner, or in a heated oven.
12. Do not use Mixer for other than intended use.
13. Do not leave Mixer unattended while it is operating
THIS
UNIT FOR
HOUSEHOLD
USE
ONLY
When your Mixmaster” Mixer is first used,
an odor and possibly a slight wisp of smoke from your mixer
This is
motor
caused
by
the
heat curing of the insulation which protects the
and is normal. After the first few uses, this
you may
effect
experience
motor.
will disappear.
FOR PROOUCTS PURCHASEO IN U.S & CANADA ONLY:
TO reduce the risk of electrical shock, this appliance
has a polarized plug
safety feature, this plug will fit in a polarized plug only
(one
blade is wider than the other). As a
one
way.
If the plug does not fit fully in the outlet: reverse the plug.
If it
still
does not fit, contact a qualified electrician.
00 NOT ATTEMPT TO OEFEAT THIS SAFETY FEATURE.
Page 4
3
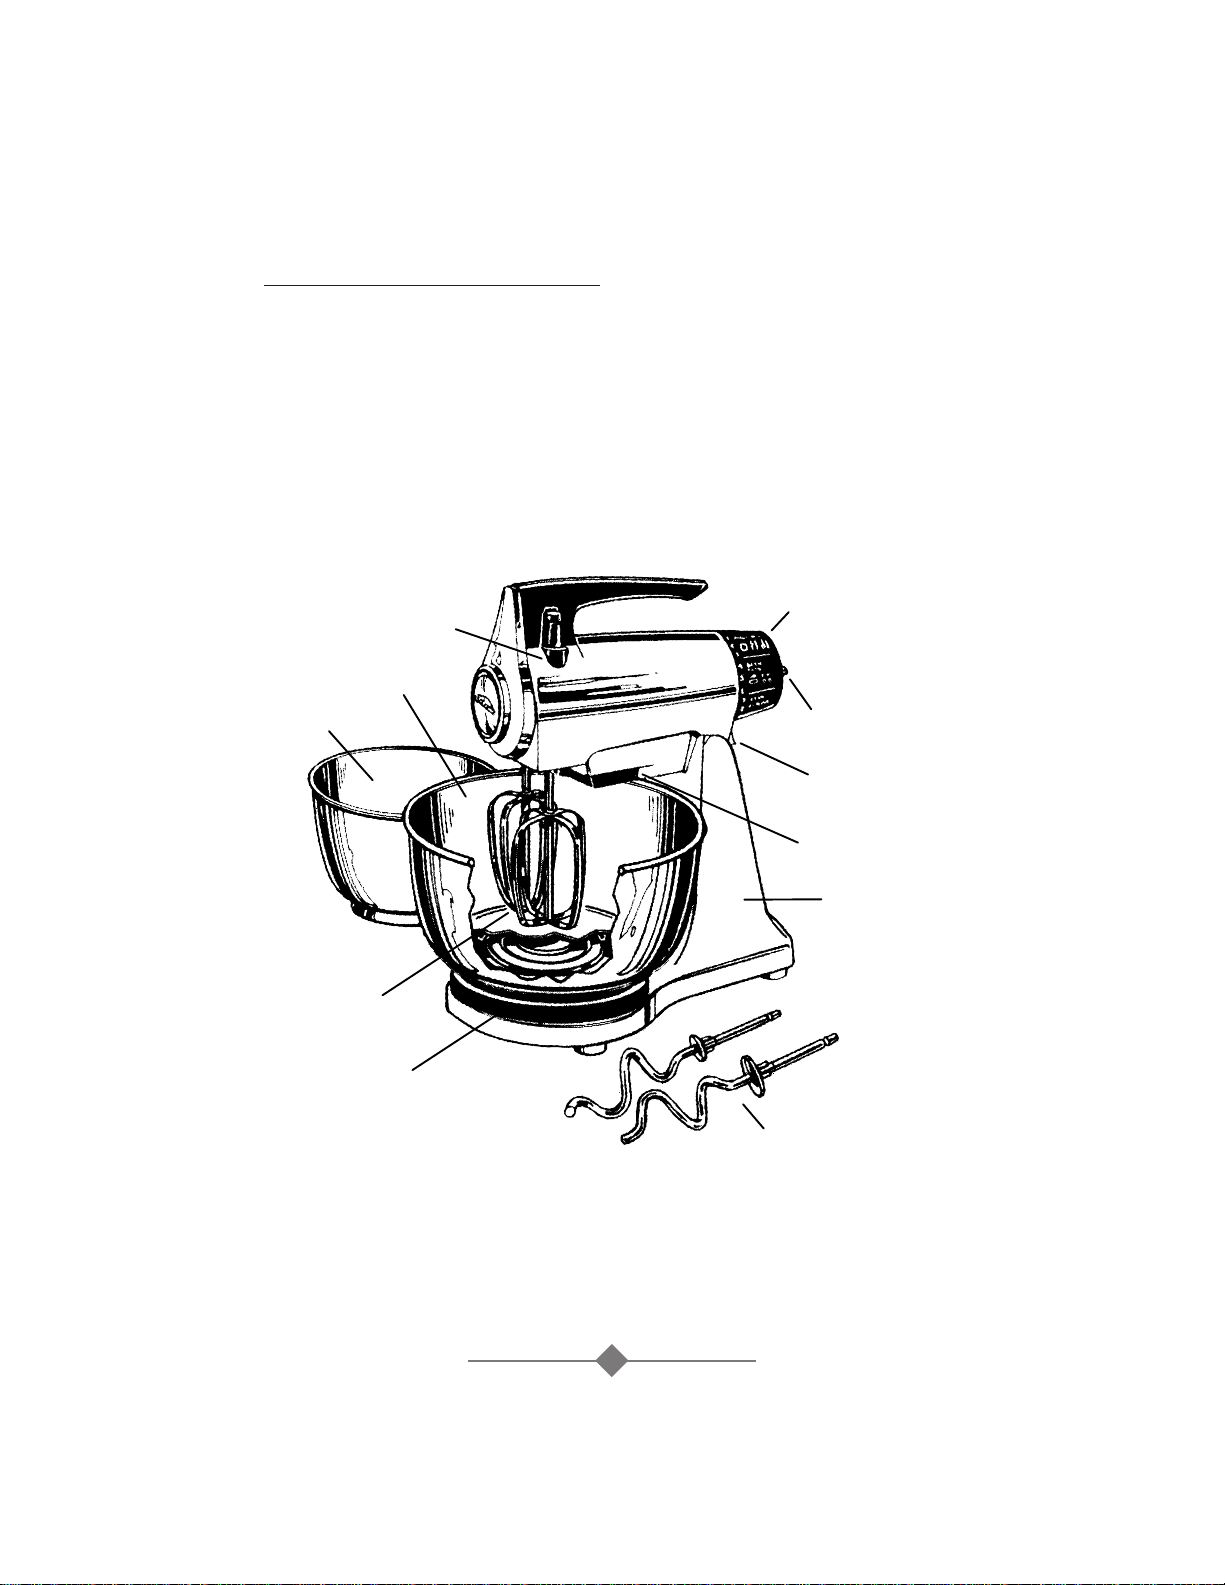
1. Beater Ejector
2. Large Mixing Bowl
3. Small Mixing Bowl
4. Bowl-Fit Beaters
5. Turntable
6. Dough Hooks
7. Stand
8. Worklight
*
9. Mixer-Release Trigger
10. Mix-Finder
®
Dial
11. Mixing Guide
*
Some models do not have
the worklight feature
.
F
EATURES
Thank you for choosing the Sunbeam
®
Deluxe Mixmaster®Mixer. For generations
we
have been helping cooks prepare moist
cakes, light and fluffy meringue, and chewy
cookies. You can even make bread with your
Sunbeam
®
Deluxe Mixmaster®Mixer.
The Sunbeam
®
Deluxe Mixmaster
®
Mixer offers you a choice of 12 different
mixing speeds. The bowl-fit beaters
and bowls have been designed to mix
ingredients thoroughly and evenly.
The Mix-Finder®dial tells you at a glance
which mixing speed to use. No problem
ejecting the beaters either – just push
the ejector button beside the handle.
When making bread, the Sunbeam
®
Deluxe Mixmaster®electronically
controls the speed of the dough hooks
to deliver just the right power for proper
kneading action.
You’ll love being able to make so many
things with your mixer!
1
2
3
4
5
6
7
8
9
10
11
Page 5
4
A
SSEMBLING THESTANDMIXER
Before assembling the mixer, be
sure the Mix-Finder
®
dial is in the
ZERO position and the electric cord
is unplugged.
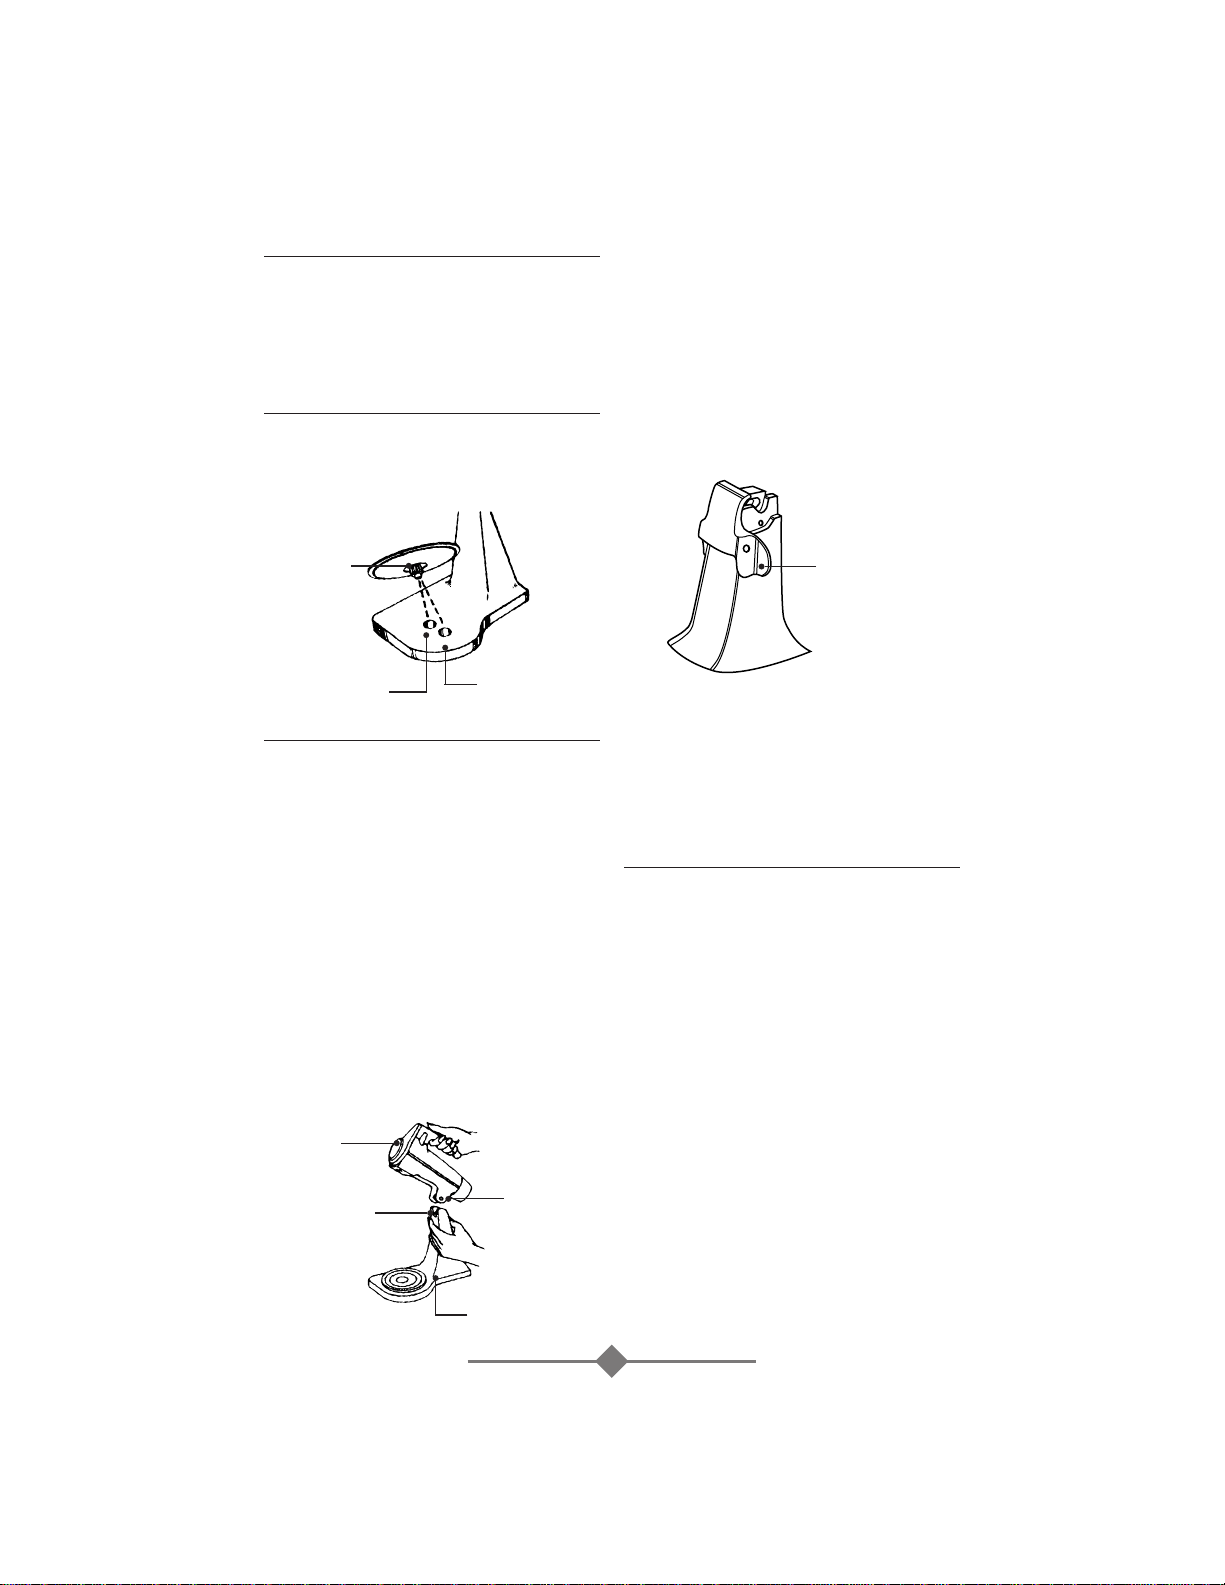
A
TTACHING THETURNTABLE
Place the revolving turntable into
the base of the stand using the socket
corresponding to the size of the bowl.
A
TTACHING THEMIXERHEAD
Press in on the mixer-release trigger,
located at the rear of the stand.
For models equipped with a head lock
feature – While pressing in on the
mixer-release trigger, press in on the
head-lock latch. This is best
accomplished by using the thumb and
forefinger of the same hand and
pressing inward.
This will open the top of the stand to
receive the mixer head. Place the mixer
head on the top of the stand so that the
metal pivot, located on the bottom of
the mixer head, goes into the open
groove on the top of the stand.
As you release the mixer-release trigger,
the top of the top of the trigger should
clamp around the metal pivot.
For models equipped with a head-lock
feature–To lower the mixer-head for
normal operation, support the mixer
head with one hand. Then press in on
the head-lock latch. Gently lower the
mixer head until the mixer head is in a
normal operating position.
Be sure the mixer head is securely
attached to the stand before using.
NOTE: This mixer is NOT intended
for use away from the stand.
A
DDING THEMIXINGBOWL
Place the desired mixing bowl onto
the turntable so that the groove in the
bottom of the bowl fits into the correct
groove in the turntable.
Mixing bowls should NEVER be used in
a conventional oven, microwave oven,
on top of the range, or on any other
heated surface.
NOTE: If mixing bowls are scratched
or chipped, do not use mixer. Mixer
bowl should not be used to blend in
hot liquids.
Mixer-Release
Trigger
Latched Opening
Ball Bearing
Extension
Small
Bowl
Large
Bowl
Mixer
Head
Mixer-Release
Trigger
Metal
Pivot
Stand
Page 6

5
Attaching the Beaters
Be sure the Mix-Finder®dial is in the
ZERO position and unplug electric cord
from the electrical outlet.
Lift mixer head up and back to pull it
out of the way of the bowl, while
holding in an upright position.
NOTE: It is important that the beaters go
into the correct sockets. Otherwise the
mixer will not give you the proper
mixing action. Do not risk ruining a
recipe or damaging your mixer. Read
the following instructions carefully.
One of the beaters is conical in shape
and has a nylon button on the bottom.
It goes into the socket on the side of
the mixer nearest the side of the bowl.
The other beater is square-shaped and
goes into the socket nearest the center
of the bowl. See beater symbols located
on the front of the mixer head.
Insert the beaters, one at a time,
using a combination pressing and
twisting motion, until the beaters
snap into position.
If a beater should not properly snap
into place, pull it out of the socket
and rotate it one quarter turn.
Reinsert the beater into the socket
until it snaps into position.
Attaching the Dough Hooks
Set the Mix-Finder®dial in the OFF
position and unplug the electric cord
from the electrical outlet.
Lift mixer head up and back to tilt it out
of the way of the bowl, while holding in
an upright position.
NOTE: The dough hooks must go into
the correct sockets. The mixer will
operate with the dough hooks in the
wrong position. However, you will not
get proper kneading action and you
could risk ruining a recipe or damaging
your mixer. Read the following
instructions carefully.
Nylon
Button
Square
Beater
Conical-Shaped
Beater
Side of
Bowl
Conical
Beater
Square
Beater
Page 7

6
The dough hook with the small washer
and foot goes into the socket on the
side of the mixer nearest the side of
the bowl. The other dough hook with
the large washer goes into the socket
nearest the center of the bowl. See the
dough hook symbols located on the
front of the mixer head.
Beater-Bowl Drive Adjustment
Automatic bowl rotation is factory set.
Occasionally, a simple adjustment
may be necessary when the bowl
fails to rotate.
To make this adjustment, tilt the mixer
head back. Hold the mixer head in an
upright position and locate the
adjustment screw on the underside
of the mixer head. Loosen the locking
nut and turn the adjustment screw on
the underside of the mixer head.
Loosen the locking nut and turn the
adjustment screw clockwise, to lower
the mixer head; or counter clockwise,
to raise the mixer head. Retighten the
locking nut. The beater with the nylon
button should lightly touch the bottom
of the mixing bowl.
About the Worklight Feature
Some of our models have a
worklight that lights the area
inside the mixing bowl.
As soon as the electric cord is
plugged in, the worklight will glow.
It will continue to glow until the
electric cord is unplugged from
the electrical outlet.
Operating Instructions
About the Mix-Finder® Dial
The Mix-Finder®dial is used for turning
the mixer ON and OFF and for selecting
its 12 mixing speeds.
Rotate the Mix-Finder®dial in a clockwise
direction, to increase mixing speed;
and in a counterclockwise direction,
to decrease mixing speed.
As you rotate the Mix-Finder
®
dial,
notice that a numbered speed
is aligned with the indicator on top
of the mixer head. This numbered
speed indicates the speed at which
the mixer is operating.
Rotate the Mix-Finder
®
dial until the
indicator is opposite the numbered
speed you wish to use.
Adjustment
Screw
Locking
Nut
Worklight
Speed
Indicator
Mixing
Guide
Mix-Finder
®
Dial
Page 8

7
NOTE: Due to variations in ingredient temperatures and quantities, the Mixing Guide
speeds are only suggested. If necessary, adjust speeds as needed to achieve
desired results.
Mixing Guide
The mixing guide on your mixer has been designed to help you take the guess work
out of preparing foods.
Next to each of the numbered speeds on the Mix-Finder®dial are descriptions
of the mixing task best suited to that mixing speed. Use those descriptions as
a mixing guide when preparing your favorite recipes.
Speed Mixing
Setting Guide Example
1 Fold-Kneaded Use when mixing dry ingredients or when folding
two portions of a recipe together, such as a beaten
egg white into a batter or when directions call for
LOW speed. Use for kneading bread.
2 Stir Use when stirring liquid ingredients or when gentle action
is needed to moisten dry ingredients.
3 Blend Use when quick breads require a brisk action,
just enoughto blend ingredients but not enough
to develop a smooth batter.
4 Mix Use when mixing dry ingredients and liquid ingredients
together alternately in a recipe.
5 Combine Use when recipe calls for combining ingredients together.
6 Cake Mixes Use when preparing packaged cake mixes or
when directions call for MEDIUM speed.
7 Cream Use when creaming sugar and butter together.
8 Whip Use to whip potatoes or to develop a smooth batter.
9 Whip/Cream Use to whip whipping cream or to develop a light,
fluffy texture.
10 Desserts Use to beat air into whipped desserts.
11 Frostings Use when preparing light, fluffy frostings and candies.
12 Egg Whites Use when aerating eggs and egg whites.
Use whendirections call for HIGH speed.
Page 9

8
CARING FOR YOUR MIXER
E
JECTING THEBEATERS ORDOUGHHOOKS
After you’ve finished mixing, turn the
Mix-Finder
®
dial to OFF and unplug the
electric cord from the electrical outlet.
Push the ejector button located near
the handle to remove beaters or
dough hooks.
Scrape excess batter off the beaters
using a rubber or plastic spatula. Do not
strike beaters on the rim of the bowl.
C
LEANINGYOURMIXER
To clean the mixer, wipe the mixer head,
stand, and turntable with a damp cloth,
then dry. DO NOT IMMERSE THE
MIXER HEAD OR STAND IN WATER.
Avoid the use of abrasive cleaners, as
they may mar the finish of the mixer.
Wash the beaters and bowls in hot,
soapy water after each use. Rinse
thoroughly and dry. Beaters and
bowls may also be washed in an
automatic dishwasher.
C
ARE ANDCLEANING OF THEWORKLIGHT
(For models with worklight feature only.).
The worklight bulb should be replaced
as soon as it burns out. You may also
wish to remove the worklight lens
periodically for cleaning.
To remove the worklight lens, place
the Mix-Finder®dial in the ZERO position
and unplug mixer from electrical outlet.
Remove beaters or dough hooks
from mixer sockets and remove
bowl from turntable.
Holding the mixer head in an upright
position, use a small screwdriver to
remove the screw holding the
worklight lens in place.
Squeeze the worklight lens, as shown,
until the tabs on the lens clear the
housing. Tilt the worklight lens down
and out of the housing.
To clean the worklight lens, wash in
warm, soapy water. Rinse and dry
thoroughly.
To replace the worklight bulb, unscrew
from socket. Replace with new bulb.
Page 10

9
NOTE: Replacement bulbs may be
purchased from local hardware or
department stores or from your
nearest authorized Sunbeam Service
Center (6 watt maximum bulb
can be used.)
To replace the worklight lens,
repeat the steps described in
“To remove the worklight lens”
in reverse order.
S
TORINGYOURMIXER
Store the mixer in a dry location,
such as on a counter top or table top,
or in a closet or cupboard.
Place the small mixing bowl inside
the large mixing bowl with the beaters
inserted into the proper sockets.
Place the dough hooks in the
small mixing bowl. Store the bowls
on the turntable. The beaters will help
hold the bowls in position. Wind the
electric cord into a coil, secure it
with a twist fastener.
M
AINTENANCE
The motor of your stand mixer has
been carefully lubricated at the
factory and does not require
any additional lubricant.
Other than the recommended
cleaning and worklight replacement,
no further user maintenance
should be necessary.
Return the mixer to the nearest
Sunbeam Service Center for
servicing or repairs.
MIXING AND BAKING SUGGESTIONS
• Ingredients should be added to the
mixing bowl as they are specified in
the recipe. When combining dry
and wet ingredients, you may wish
to moisten ingredients on Speed 1
or 2, then turn to the desired
mixing speed.
• Use the mixing speed that is
recommended in the recipe. When
using a recipe that is not in this book,
use the handy mixing guide on the
Mix-Finder
®
dial of the mixer to help
you find the correct speed to use.
• If times are specified in the recipe,
use them! BE CAREFUL NOT TO
OVERMIX. Overmixing can cause a
mixture to become very tough.
• Should an object, such as a spatula,
fall into the bowl while the mixer is
operating, turn the mixer off
immediately. Then, remove the object.
• Remove beaters and place in sink
for easy clean-up.
• When preparing your favorite
recipe, DO NOT exceed 3-1/2 cups
of flour grain in a recipe.
Page 11

10
BREADS
Special Instructions for Making
Kneaded Breads
When making kneaded breads,
your mixer will require more care
than when making ordinary mixtures,
such as cake batter and cookie dough.
The elasticity of the bread dough
and the shape of the dough hooks
may cause your mixer to do some
unusual things.
The bowl may tend to rock back and
forth. We suggest that you guide the
bowl with one hand to help control
the rocking action. AVOID GETTING
YOUR HANDS TOO NEAR THE
DOUGH HOOKS!
The kneading action may cause the
mixer to slide on a slippery work
surface. Be sure the work surface
and rubber feet on the bottom
of the mixer are clean and dry.
CAUTION: Do not use the mixer too near
the edge of a table or counter top,
where it could fall off.
DO NOT LEAVE YOUR MIXER
UNATTENDED WHEN USING THE
DOUGH HOOKS.
Bread Making Instructions
for Dough Hooks
Ingredients should be added to the
mixing bowl as they are specified
in the recipe.
Combine a small portion of the dry
ingredients with the wet ingredients.
Mix on Speed 6. Continue adding dry
ingredients until the mixture becomes
sticky, then turn to Speed 1. Gradually
add remaining dry ingredients.
If there is high humidity in the air,
it may be necessary to add additional
flour to the recipe. The high humidity
could also extend the amount of time
necessary for baking.
Guide the mixing bowl with your hands.
Use caution to keep hands out of the
way of the dough hooks.
Do not attempt to scrape the bowl
while the mixer is operating. Stop the
mixer and scrape the sides of the bowl
as necessary. Use a rubber or
plastic spatula only.
DO NOT attempt to feed dough into
the dough hooks with your hands,
a spatula, or any other utensil while
the mixer is plugged into an outlet
or in operation.
If times are specified in the recipe, use
them! BE CAREFUL NOT TO OVERMIX.
Overmixing can cause a mixture to
become tough. We suggest that
your total mixing time should be
6 – 8 minutes.
Should an object, such as a spatula,
fall into the bowl while the mixer
is operating, turn the mixer off
immediately. Then remove the object.
Remove dough hooks and place in
sink for easy clean-up.
Page 12

11
H
OW TOSHAPEDOUGH FOR ALOAFPAN
1. Using a rolling pin, roll dough
into a rectangle.
2. Roll dough into a loaf, starting
from narrow end.
3. Flatten ends with sides of hands,
as shown.
4. Pinch along seam to seal.
5. Fold ends under and place seam-side
down in a well-greased loaf pan.
D
OUGHRISINGTIPS
A large, well-greased, glass mixing bowl
is an excellent container in which to
raise or proof yeast dough. The ideal
temperature is 85°F in a draft-free area.
Cover with a light cloth.
The final rising should be after the
dough has been shaped and placed
on the greased baking sheet or pan
recommended in the recipe. Again,
cover the rising dough and place
in a warm draft-free area.
If you live in a high altitude area, yeast
breads will require a shorter rising time.
Allow the dough to rise only until it has
doubled in size. Slightly less flour
should be used because flour is dryer
at higher altitudes.
How to Punch Down Yeast Dough
1. Plunge fist into center of risen
dough to punch out excess air.
2. Fold outer edges over into center.
Turn dough over and let rise until
doubled, if recipe directions
so specify.
Page 13

&YEAR ~IITED WARRANTY
Sunbeam Products Inc. warrants that, for a period of two years from date of purchase, this product
shall be free of mechanical and electrical defects in material and workmanship. Our obligation
hereunder is limited to repair or replacement, at manufacturers option, of this product during the
warranty period, provided that the product(s) purchased in the United States are sent postage
prepaid directly to:
SUNBEAM APPLIANCE SERVICE STATION
117 Central Industrial Row
Purvis, MS 39475
Answers to questions regarding this warranty or your nearest U.S.A. authorized service location
may be obtained by calling toll free I-800-597-5978 or by writing to Sunbeam - Consumer Affairs
PO.
Box 948389, Maitland, Florida-332794-8389.
at
For products purchased in Canada please return them, postage prepaid, directly to:
SUNBEAM APPLIANCE SERVICE STATION (KND)
Please call 1-800-667-8623 or email us
consumeraffairs@consumer.sunbeam.com
Answers to questions regarding this warranty or your nearest Canadian authorized service location
may be obtained by calling toll free in Canada l-800-667-8623. For warranty information or an
authorized service location outside of the United States and Canada please see the warranty service
card inserted in the product packaging.
DO NOT RETURN THIS PRODUCT TO THE PLACE OF PURCHASE;
DOING SO MAY DELAY THE PROCESSING OF YOUR WARRANTY CLAIM.
This warranty does not cover normal wear of parts or damage resulting from any of the following:
negligent use or misuse of the product, use on improper voltage or current, use contrary to
operating instructions, or disassembly, repair, or alteration by any person other than an authorized
service center. Product repair or replacement as provided under this warranty is your exclusive
remedy. Sunbeam Products Inc. shall not be liable for any incidental or consequential damages for
breach of any expressed or implied warranty on this product. Except to the extent prohibited by
applicable law, any implied warranty of merchantability or fitness for a particular purpose on this
product is limited in duration to the duration of the above warranty. Some states and provinces do
not allow the exclusion or limitation of incidental or consequential damages, or allow limitation on
how long an implied warranty lasts, so the above limitations or exclusion may not apply to you.
This warranty gives you specific legal rights, and you may also have other rights which vary state
to state or province to province.
Page 14

©1997 Sunbeam Corporation or its affiliated companies. All rights reserved.
Sunbeam,®Mixmaster,®Mix-Finder®and Burst of Power®are registered trademarks
of Sunbeam Corporation or its affiliated companies.
The configuration and/or color combination of the Mixmaster®Mixer are trademarks
of Sunbeam Corporation or its affiliated companies.
Distributed by Sunbeam Products Inc., Delray Beach, Florida 33445, or an affiliated company.
©
1997 Sunbeam Corporation ou ses filiales. Tous droits réservés
Sunbea
m,®Mixmaster®, Mix-Finder
,®et Burst of Power®sont des marques déposées
de Sunbeam Corporation ou de ses filiales.
La configuration et/ou la combinaison de couleurs du batteur Mixmaster
®
sont des marques de commerce de Sunbeam Corporation ou de ses filiales.
Distribué par Sunbeam Products Inc., Delray Beach, Florida 33445,
ou de ses sociétés filiales
.
©1997 Sunbeam Corporation o sus compañías afiliadas. Todos los derechos reservados.
Sunbea
m,®Mixmaster®, Mix-Finder®y Burst of Power®son marcas registradas
de Sunbeam Corporation o de sus compañías afiliadas.
La configuración y/o la combinación de colores de la Batidora Mixmaster
®
son marcas registradas
de Sunbeam Corporation o de sus compañías afiliadas.
Distribuído por Sunbeam Products Inc., Delray Beach, Florida 33445,
ou par une de ses filiales
.
©1997 Sunbeam Corporation o società controllate. Tutti i diritti riservati
Sunbea
m,®Mixmaster
,®Mix-Finder®e Burst of Power®sono dei marchi registrati della
Sunbeam Corporation o delle società controllate. La configurazione e/o la combinazione di colori della Mixmaster
®
Mixer
sono dei marchi registrati della Sunbeam Corporation o società controllate.
Distribuito dalla Sunbeam Products, Inc. Delray Beach, Florida 33445
, o da una società consociata
.
©1997 Sunbeam Corporation oder die angeschlossenen Unternehmen. Alle Rechte vorbehalten.
Sunbea
m,®Mixmaster
,®Mix-Finder®und Burst of Power®sind eingetragene Warenzeichen der Sunbeam Corporation oder der
angeschlossenen Unternehmen. Die Konfiguration und/oder die Farbenkombination der Mixmaster
®
Mixer
sind Warenzeichen der Sunbeam Corporation oder der angeschlossenen Unternehmen.
Vertrieben durch Sunbeam Products Inc, Delray Beach, Florida 33445
, oder eine angegliederte Firma
.
©1997 Sunbeam Corporation eller närstående bolag. Alla rättigheter förbehålls.
Sunbea
m,®Mixmaster
,®Mix-Finder®och Burst of Power®är registrerade varumärken
tillhörande Sunbeam Corporation eller närstående bolag.
Mixern Mixmaster
®
's konfiguration och/eller färgkombination är varumärken
tillhörande Sunbeam Corporation eller närstående bolag.
Distribuerad av Sunbeam Products, Inc., Delray Beach, Florida 33545
, eller ett närstående bolag
.
U.S.PatentNo.4,277,181 P.N.30058-11
■
■
■
■
■
 Loading...