


Read Me
Important Safety Instructions
1) Read these instructions.
2) Keep these instructions.
3) Heed all warnings.
4) Follow all instructions.
5) Do not use this apparatus near water.
6) Clean only with dry cloth.
7) Do not block any ventilation openings. Install in accordance with the manufacturer’s
instructions.
8) Do not install near any heat sources such as radiators, heat registers, stoves, or other
apparatus (including amplifiers) that produce heat.
9) Protect the power cord from being walked on or pinched particularly at plugs,
convenience receptacles, and the point where they exit from the apparatus.
10) Only use attachments/accessories specified by the manufacturer.
11) Use only with the cart, stand, tripod, bracket, or table specified by the manufacturer,
or sold with the apparatus. When a cart is used, use caution when moving the cart/
apparatus combination to avoid injury from tip-over.
12) Unplug this apparatus during lightning storms or when unused for long periods of time.
13) Refer all servicing to qualified service personnel. Servicing is required when the
apparatus has been damaged in any way, such as power-supply cord or plug is damaged,
liquid has been spilled or objects have fallen into the apparatus, the apparatus has been
exposed to rain or moisture, does not operate normally, or has been dropped.
FCC NOTICE TO USERS:
FCC ID: 2AMSOCDC-632
Caution: Changes or modifications not expressly approved by the Party responsible for
compliance could void the user’s authority to operate the equipment.
Note: This equipment has been tested and found to comply with the limits for a Class B
digital device, pursuant to part 15 of the FCC Rules. These limits are designed to provide
reasonable protection Against harmful interference in a residential installation. This
equipment generates, uses and can radiate radio frequency energy and, if not installed
and used in accordance with the instructions, may cause harmful interference to radio
communications, however there is no guarantee that interference will not occur in a
particular installation. If this equipment does cause harmful interference to radio or
television reception, which can be determined by turning the equipment off and on, the
user is encouraged to try to correct the interference by one or more of the following
measures:
- Reorient or relocate the receiving antenna.
- Increase the separation between the equipment and receiver.
- Connect the equipment into an outlet on a circuit different from that to which the
receiver is connected.
- Consult the dealer or an experienced radio/TV technician for Help.
The device complies with part 15 of the FCC Rules. Operation is subject to the following
two conditions: (1) this device may not cause harmful interference, and (2) this device must
accept any interference received, including interference that may cause undesired operation.
The product from the body using the distance of not less than 20 cm
EN
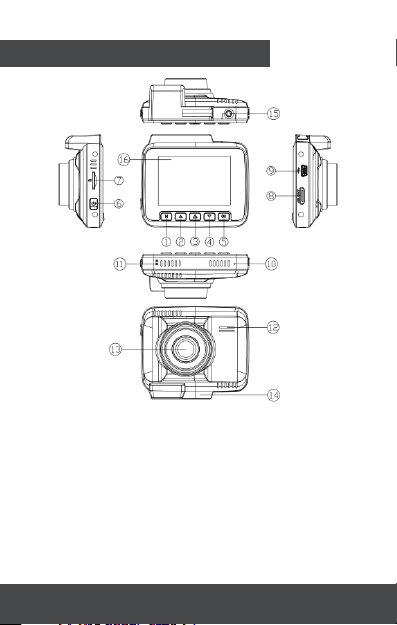
PRODUCT OVERVIEW
1) Menu/Mode Button
2) Up Button
3) SOS/WIFI Button
4) Down Button
5) OK Button
6) Power Button
7) SD Card Slot
8) HDMI Port
1
9) USB Port
10) Microphone
11) Reset Button
12) Speaker
13) Camera
14) Mount
15) TV Out Port
16) LCD Screen

Power
Reset
OK
Menu/Mode
Up
FUNCTIONS
1) Turn On: Press to turn the
dash cam on.
2) Turn Off: Press and hold to
turn the dash cam off.
If the device crashes, use a
small pin to press this button
and reset the dash cam.
1) In Video Mode, press to start
or stop recording.
2) In Photo Mode, press to take
a photo.
3) In Menus, press to conrm
settings.
4) In Playback Mode, press to
start or stop playback.
1) In Video Mode, press to
enter the Video Menu.
2) In Photo Mode, press to
enter the Photo Menu.
3) In Playback Mode, press to
enter the Playback Menu.
4) In any Menu, press to enter
the Settings Menu.
5) In any mode, press and hold
to switch modes (Video Mode/
Photo Mode/Playback Mode).
1) In any Menu, press to move
up in the options.
2) In Video Mode, press to
switch the mute on or off.
3) In Photo Mode, press to
zoom in.
2

1) In any Menu, press to move
Down
SD Card Slot
HDMI
USB Port
SOS/WIFI
down in the options.
2) In Photo Mode, press to
zoom out.
Insert the SD Card into this slot,
with the golden teeth facing the
camera side.
Connect to a TV to view videos
and photos.
1) Connect to a PC using the
included USB cable to view or
transfer videos and photos.
2) Connect to a charger to
charge the dash cam.
1) During recording, press to
immediately save the video and
prevent it from being overwritten during usage.
2) Press and hold to switch
WiFi.
CHARGING AND POWERING ON
Before using your dash cam, you must charge
the internal battery. You can charge it one
of two ways: by connecting it to your car’s
cigarette lighter, using the included plug, or
connecting the USB cable to a computer. The
green indicator light will be on when charging,
and should be fully charged within 1-2 hours.
The indicator light will turn off when it is fully
charged.
3

Note: The internal battery is meant to extend
the battery’s life in case of sudden loss of power. When using the dash cam, keep it plugged
in and powered.
When connected to your car’s cigarette lighter,
the dash cam will start up automatically when
the car is started. You can also manually
turn on the dash cam by pressing the Power
Button.
VIDEO MODE
In Video Mode, a video recording icon will appear in the top left of the screen. Press the OK
Button to start recording. A red light will start to
ash when the dash cam is recording. To stop
recording, press the OK Button.
To enter the Video Mode Menu, press the
Menu/Mode Button. A blue video icon will appear in the top right corner of the screen. You
can adjust the video resolution, set the length
of loop recording, adjust the exposure, adjust
the G-Sensor sensitivity, set the time stamp
and GPS stamp, track the speed, and more.
In this menu, select Motion Detection to turn
the function on or off. Motion Detection turns
the camera on when it senses movement,
and turns it off when it cannot sense any more
movement.
4

In this menu, select Parking Mode to turn the
function on or off. This option turns the camera
on and records for a minute when sudden
movement is detected (such as being hit while
parked), and automatically locks the video.
PHOTO MODE
When in Video Mode, press and hold the
Menu/Mode Button to switch to Photo Mode.
The photo icon will appear in the top left corner
of the screen. Press the OK Button to take a
picture.
To enter the Photo Mode Menu, press the
Menu/Mode Button. The photo icon will appear
in the top right corner of the screen. Here,
you can change the capture mode, resolution,
sequence, quality, and more.
PLAYBACK MODE
When in Photo Mode, press and hold the
Menu/Mode Button to switch to Playback
Mode. The playback icon will appear in the
top left corner of the screen. Use the Up and
Down Buttons to scroll through the available
les, and press the OK Button to play the
selected video.
When a le is selected, press the Menu/Mode
Button to open the options for that le. Here,
you can delete or protect the le from being
overwritten. You can also select “Slideshow,”
5

the Up and Down Buttons to select an option,
SETTINGS MENU
When in any Menu, press the Menu/Mode
Button again to enter the Settings Menu. In
this menu, you can adjust the WiFi, date and
time, display language, auto power off time,
sound, and more.
In this menu, you can also Format your mem-
tion, be sure to back up any important videos
-
and photos. You can also restore the Default
Settings, which will set your dash cam back to
the factory default, including all features you’ve
adjusted in the three Modes.
GPS
To check GPS information, you must first
install the app. Once the app is installed, go to
File, then Open and select the video file you
wish to view.
6

iOS users can download the app from the Apple
app store by searching for “Road Cover
Eye1Pro” app and then downloading.
Android users can download the app from the
Google play store by searching for “Road Cover
Eye1Pro” app and then downloading.

TROUBLESHOOTING
Cannot take picture or record video.
Check if there is enough space on the SD
card, and consider deleting some locked les
or formatting the SD card.
Stopping automatically while recording.
Check that your SD card is a high-speed Class
10 card with SDHC compatibility. Lower class-
es of cards will have difculty recording in HD.
“Wrong le” appears when replaying a
photo or video.
The le is incomplete because of an SD card
error, back up all important les and format the
SD card.
Fuzzy image.
Check if the lens is smudged or dirty, and
clean with a microber cloth.
Dark image when shooting a scene featuring sky or water.
Adjust the EV exposure in the Video Mode
Menu or the Photo Mode Menu.
Horizontal stripes appear in the image.
Change the Light Frequency option to either
60HZ or 50HZ.
8

SPECIFICATIONS
Display: 2.4” LCD Screen
Lens: F 1.8, 130
Photo Resolution:
High resolution
Medium resolution
Low resolution
Video Resolution:
2K UltraHD 30FPS
1296p SuperHD 30FPS
1080p FullHD 60FPS
(default setting)
1080p FullHD 30FPS
720p HD 120FPS
720p HD 30FPS
Video Format: H.264, MP4
Photo Format: JPG
Memory: SD Card, Class 10+, max. 64 GB.
Power: 5V 1.5A
Battery: Built-in Li-Ion Battery
o
A+ HD ultra wide angle
9
SUMMIT CE GROUP ONE YEAR LIMITED WARRANTY
SUMMIT CE GROUP LIMITED WARRANTY (“Warranty”) ― For Product
Categories Listed in Chart Below (as applicable, “Product”) Before returning your
Product for service under this Warranty, please (i) read the instruction manual
carefully. If you are still having trouble with your Product, please contact Technical
Support at support@cddashcams.com
Warning: Some Products may contain components that are small enough to be
swallowed. Please keep out of reach of children.
Subject to the terms and conditions herein, SUMMIT CE GROUP LLC
(hereinafter called “SUMMIT CE GROUP”) warrants to the original purchaser
of the Product (“Customer”) that for the applicable Warranty Period listed below,
the Product will be free from defects in material or workmanship under normal,
non-commercial use (“Defects”). Warranty Period encompasses, as listed below,
separate “Coverage Periods” for Parts and Labor, each Coverage Period for one
year, to begin from the original date of Customer purchase. If Customer returns
a defective Product (or any component thereof) during the applicable Warranty
Periods for Parts and Labor (as applicable) either: (i) repair the Product (or, as
applicable, any component thereof) or (ii) replace the Product (or, as applicable,
any component thereof) with a new or refurbished Product (or, as applicable, any
component thereof), in either case free of charge to Customer for Parts and/or
Labor (as
applicable shipping charges (noted below), for which the Customer is responsible.
The foregoing states the Customer’s exclusive remedy and SUMMIT CE
GROUP’s sole liability for breach of the limited warranty contained herein.
component thereof) that has been subject to or Defects resulting from: (a) any
neglect or misuse by a Customer, an accident, improper application, violation
of operating instructions for the Product, any other Customer-induced damage,
or the alteration or removal
or repair to Product (or, as applicable, any component thereof) by any party
other than SUMMIT CE GROUP or a party authorized in writing by SUMMIT
CE GROUP; (c) any damage to Product (or, as applicable, any component
thereof) due to power surges, incorrect electrical voltage, misconnection to any
device, or malfunction of any device used with the Product (or, as applicable,
any component thereof); (d) cosmetic damage to the Product (or, as applicable,
any component thereof) caused by normal wear and tear; (e) shipping damage
that occurs while the Product is in transit; (f) damage caused by heat sources,
sunlight, electromagnetic conditions, or other climatic conditions; or (g) any acts of
God. Product is sold to Customer for personal, non-commercial use only. Product
is not warranted for Customer’s commercial or rental use.
In addition, Product is not warranted against failure, and should not be used by
Customer for any application where (i) there is a risk that any data stored on
Product will be breached or otherwise compromised, or (ii) the data stored on
Product is relied upon for medical or lifesaving applications.
SUMMIT CE GROUP disclaims any Warranty for any of the foregoing uses to the
10
 Loading...