

Page 1
U
®
L
Porcelain Enamel and
Continuous Cleaning
This manual contains information for:
• Important Safeguards
• Installation
• Use and Care
Certain ranges come equipped with special features. Determine from a study of
your range which of the instructions given in this booklet pertain to your range.
This booklet gives valuable instructions covering the installation, adjustment and
use of your range.
HOW TO OBTAIN SERVICE AND/OR PARTS
When your range does not operate in accordance with the instructions in the
manual, you should contact the dealer in the immediate vicinity for service. Or,
the purchaser may contact the service organization noted on the warranty.
Coil Elements
Instructions for
Oven Interiors
Electric
Range
Read and Save These Instructions
IMPORTANT – Save for local electrical inspector’s use.
Page 2

Range
WARNING
!
Record in the space provided below the Model No. and Serial No. of this appliance. These
numbers are found on the serial plate located below the lift-up cooktop.
Model No. ________________________ Type Number ________________________
Serial No. ________________________ Purchase Date________________________
Record these numbers for future use.
IMPORTANT: Keep a copy of your bill of sale. The date on the bill establishes the
warranty period should service be required. If service is performed, it is in your best
interest to obtain and keep all receipts.
PLEASE DO THIS NOW!
The PRODUCT REGISTRATION CARD should be filled in completely, signed and
returned. This information will register your product and help us to serve you quickly in
the future if necessary.
Contents
Important Safeguards . . . . . . . . . . . . . . . . . . . . . . . . . . . . . . . . . . . . . . . . . . . . . . . . . . . 3-7
Energy Saving Ideas . . . . . . . . . . . . . . . . . . . . . . . . . . . . . . . . . . . . . . . . . . . . . . . . . . . . . 7
Installation Instructions . . . . . . . . . . . . . . . . . . . . . . . . . . . . . . . . . . . . . . . . . . . . . . . . 8-12
Backguard Installation Instructions . . . . . . . . . . . . . . . . . . . . . . . . . . . . . . . . . . . . . . . . . . 9
Cabinet Preparations . . . . . . . . . . . . . . . . . . . . . . . . . . . . . . . . . . . . . . . . . . . . . . . . . . . . 12
Surface Cooking . . . . . . . . . . . . . . . . . . . . . . . . . . . . . . . . . . . . . . . . . . . . . . . . . . . . . 13-14
Oven Operation . . . . . . . . . . . . . . . . . . . . . . . . . . . . . . . . . . . . . . . . . . . . . . . . . . . . . . . . 15
Optional Equipment . . . . . . . . . . . . . . . . . . . . . . . . . . . . . . . . . . . . . . . . . . . . . . . . . . 16-17
Care of Your Range . . . . . . . . . . . . . . . . . . . . . . . . . . . . . . . . . . . . . . . . . . . . . . . . . . 18-19
Alignments and Adjustments. . . . . . . . . . . . . . . . . . . . . . . . . . . . . . . . . . . . . . . . . . . . . . 20
Lift-Off Door . . . . . . . . . . . . . . . . . . . . . . . . . . . . . . . . . . . . . . . . . . . . . . . . . . . . . . . . . . 21
Wiring Diagrams-Electrical . . . . . . . . . . . . . . . . . . . . . . . . . . . . . . . . . . . . . . . . . . . . 23-24
Note: For warranty and service information, please see attachments packaged with range.
California Proposition 65B
Electric cooking appliances could produce or may contain some
products which are on a list of substances known by the State of
California to cause cancer or reproductive harm. California law
requires businesses to warn customers of potential exposure of such
substances. To minimize exposure to these substances, always install,
operate, and maintain this product according to the
"use and care"
manual.
2
Page 3

READ THE IMPORTANT SAFEGUARDS AND ALL
WARNING
!
WARNING
!
INSTRUCTIONS BEFORE USING THE APPLIANCE.
Remove all tape and packaging wrap before using the oven. If any glue remains, touch
the residue with the sticky side of the tape already removed. Or, use a cloth soaked with
rubbing alcohol. Use caution because rubbing alcohol is flammable. Rinse with warm
water and wipe dry.
Destroy the carton and plastic bags after the range is unpacked. Children should not
use packaging material for play. Cartons covered with rugs, bedspreads, or plastic sheets
can become air-tight chambers. Remove all staples from the carton. Staples can cause
severe cuts and destroy finishes if they come in contact with other appliances or furniture.
Be safety conscious. The preparation of food in an oven requires temperatures that could cause
severe burns. Before using this new appliance, carefully read and follow all instructions.
Users of this appliance are hereby warned there may be some low level exposure to some
of the listed substances including formaldehyde and carbon monoxide. This happens when
the oven, if equipped with a self-clean feature, is engaged in a self-clean cycle. Exposure to
these substances can be minimized by properly venting the oven, especially during the selfcleaning cycle, by opening a window or using a ventilating hood or fan.
Notice: Never keep pet birds in the kitchen. Birds have a very sensitive respiratory system.
Fumes released during the self-cleaning cycle, overheated cooking oil, fat, margarine or
overheated non-stick cookware may be harmful or fatal to birds.
PROPER INSTALLATION: Be sure your appliance is properly installed and grounded
by a qualified technician in accordance with the National Electrical Code ANSI/NFPA
NO. 70-latest edition and local electrical code requirements. Install only per installation
instructions provided in the literature package for this range. Be sure leveling legs are in place
at the bottom corners of the range. If necessary, raise or lower the leveling legs at the base of
the range by turning clockwise or counterclockwise to insure a level range.
Ask your dealer to recommend a qualified technician and an authorized repair service.
Have the technician label the proper switch or fuse at the electrical disconnect box and
show you how to disconnect the power to the range at the circuit breaker or fuse box in
case of an emergency.
• TO REDUCE THE RISK OF TIPPING OF THE RANGE, THE RANGE MUST BE SECURED
BY A PROPERLY INSTALLED ANTI-TIP BRACKET PROVIDED WITH THE RANGE. TO
CHECK IF THE DEVICE IS INSTALLED AND ENGAGED PROPERLY, CAREFULLY TIP
THE RANGE FORWARD. THE ANTI-TIP DEVICE SHOULD ENGAGE AND PREVENT THE
RANGE FROM TIPPING OVER. REFER TO THE INSTALLATION INSTRUCTIONS
PACKAGED WITH THE ANTI-TIP BRACKET FOR PROPER ANTI-TIP BRACKET
INSTALLATION.
• Never leave children alone or unattended in the area where an appliance is in use.
They should never be allowed to sit or stand on any part of the appliance. Never leave
the oven door open when the range is unattended.
• Do not store items of inter
backguard of a range.
seriously injured.
The California Safe Drinking Water and Toxic Enforcement Act of 1986
(Proposition 65)
substances known to the State of California to cause cancer or reproductive
harm. In addition, businesses must warn customers of potential exposure to
such substances.
The following situations may cause serious bodily harm, death or
property damage.
requires the Governor of California to publish a list of
est to childr
Children climbing on the range to reach the items could be
en in the cabinets above a range or
3
on the
Page 4

IMPORTANT SAFEGUARDS, Continued
CAUTION
!
WARNING
!
• Do not allow children to climb or play around the range. The weight of a child on an
open oven door may cause the range to tip, resulting in serious burns or other injury.
USER SERVICING: Do not repair or replace any part of the appliance unless it is
•
specifically recommended in this owner’s guide. To prevent personal injury and
damage to the range, servicing should be done only by a qualified technician.
Storage in or on appliance: Flammable materials should not be stored in an oven, near
•
surface elements or in the storage drawer (some models). This includes paper, plastic
and cloth items, such as cookbooks, plasticware and towels, as well as flammable
liquids. Do not use the oven for storage. Do not store explosives, such as aerosol cans,
on or near the range.
Remove the oven door from any unused range if it is to be stored or discarded.
•
• Stepping, leaning or sitting on the doors or drawers of this range can result in
serious injuries and cause damage to the range.
The following situations could cause bodily injury or property
damage.
• DO NOT TOUCH SURFACE UNITS, AREAS NEAR THESE UNITS, OVEN
HEATING ELEMENTS OR INTERIOR SURFACES OF THE OVEN UNTIL
THEY HAVE COOLED.
even though they are dark in color. Areas near surface units and interior surfaces of the
appliance may become hot enough to cause burns–these areas include the cooktop,
surfaces facing the cooktop and the oven vent openings, and surface near these
openings, oven doors and windows.
Both surface elements and oven heating elements may be hot
Make sure the reflector pans are always in place under the surface elements. This
•
avoids possible damage to wiring or components underneath and improves cooking
efficiency.
It’s good practice for each household to have an appropriate fire extinguisher for
•
use in the event of a house fire.
Wear proper apparel when operating the range. Loose fitting or hanging garments
•
should never be worn while using the appliance. Do not let clothing or other flammable
materials contact surface elements or interior surfaces of the oven until they have had
sufficient time to cool.
Never modify or alter the construction of the range such as removal of leveling legs,
•
panels, wire covers, anti-tip brackets or any other permanent part of the product.
NEVER use this appliance as a space heater to heat or warm the
•
room. Operating surface elements at the HIGH setting without pots or
pans on the elements, could damage the range and result in fire.
4
Page 5

IMPORTANT SAFEGUARDS, Continued
WARNING
!
• Stand to the side of the oven when opening the oven door. Slowly open the door to
allow hot air or steam to escape before removing or replacing food.
Keep children from touching the oven door (or glass window, if equipped) when the
•
range is operating as the door (or window) could get hot enough to cause serious burns.
When heating fat or grease, watch it closely. Fat or grease may catch fire if allowed
•
to become too hot.
Do not use water or flour on grease fires. Smoother the fire with a pan lid, baking soda
•
or use a dry chemical or foam-type extinguisher.
Use only dry potholders. Wet or damp potholders on hot surfaces could result in burns
•
from steam. Do not let the potholder touch hot heating areas. Do not use a towel or other
bulky cloth instead of a potholder.
Turn utensil handles inward, but not extending over other surface elements. This
•
will minimize the possibility of burns, ignition of flammable materials, and spillage due
to accidental contact with the utensil.
Never immerse or soak the removable surface elements in water. Surface elements
•
clean themselves during normal operations or can be wiped with a damp, sudsy cloth
when the elements are off and cool. Be sure the elements are off and cool before
touching them. Even when the elements appear dark in color, they may be hot.
Never leave the range unattended while the surface elements are on. Boilovers may
•
cause smoking, greasy spillovers may catch fire or a pan which has boiled dry may melt.
Do not use glass, earthenware or other ceramic-type cooking utensils for range top
•
cooking unless recommended by the utensil manufacturer.
break with sudden heat changes; most are designed to be used only in the oven.
• Do not use plastic salt and pepper shakers, spoon holders or plastic wrappings on
top of the range when it is in use.
or wooden spoons could catch fire if placed too close to the element.
Do not place hands between the spring tension hinge and the oven door frame when
•
you are removing the oven door. You could pinch your fingers.
Do not heat unopened food containers. Build-up of pressure may cause the container
•
to burst and result in injury.
Do not use aluminum foil to line the surface element reflector pans
•
and never cover an entire oven rack with aluminum foil. Improper use
of aluminum foil may result in shock or fire hazard. Refer to the Cleaning
section of this manual for more information on the use of aluminum foil.
Utensils of this type may
These items could melt or ignite. Potholders, towels
5
Page 6

IMPORTANT SAFEGUARDS, Continued
CAUTION
!
The following situations could cause bodily injury or property
damage.
• Disconnect the range from electrical supply before attempting to service or move
it.
• Do not use a wok on the cooking surface if it is equipped with a round metal ring
that extends beyond the bottom element.
damage the heating element, the surface cooking finish and the chrome pans under the
element.
Do not touch a hot oven light bulb with a damp cloth. Doing so could cause the bulb
•
to break and may cause steam burns. Disconnect the electrical service cord or shut off
the power to the oven before removing and replacing the bulb.
Allow parts to cool to room temperature before touching or removing them from
•
the range.
cause burns.
• Know which knob controls each element. Place a pan of food on the element before
turning it on, and turn the element off before removing the pan.
Do not use the broiler pan without its insert. Do not cover the insert with foil.
•
Exposed fat or grease could ignite. The broiler pan and its insert allow dripping fat to
drain and be kept away from the high heat of the broiler.
When a surface element is first turned off, the element is still hot enough to
Because this ring acts as a heat trap, it may
Do not allow dry, empty pans to cook on the heating element as this could ruin both
•
the pan and the heating element.
Clean the range regularly to keep all parts free of grease which could catch fire. Pay
•
particular attention to the area underneath each surface element. Exhaust fan ventilating
hoods and grease filters should be clean. Do not allow grease to accumulate. Greasy
deposits in the fan could catch fire. Refer to the hood manufacturer’s instructions for
cleaning.
Always place an oven rack in the desired location while the oven is cool. If a rack
•
must be moved when the oven is hot, use potholders and grasp the rack with both hands
to reposition. Do not let potholders contact the hot heating element in the oven.
Continuous Cleaning Ovens Only:
• Do not use oven cleaners. No commercial oven cleaner or oven liner protective coating
of any kind should be used in or around any part of the continuous cleaning oven.
NOTE: The instructions appearing in this owner
possible condition and situation that may occur. Common sense and caution must be
practiced when operating and maintaining any appliance.
s guide are not meant to cover every
’
6
Page 7

IMPORTANT SAFEGUARDS, Continued
VENTILATING HOODS
Clean Ventilating Hoods Frequently
Grease should not be allowed to accumulate on hood or filter. When flaming foods under
hood, turn hood fans on.
ENERGY-SAVING IDEAS
Surface Cooking
Turn surface elements off before cooking is completed. The units will stay hot long
enough to finish the cooking process.
Use lids when surface cooking. A lid traps steam and uses it to speed up the cooking
process. If you have a pressure cooker or vegetable steamer, use it. You’ll waste fewer
vitamins, save time and cut energy costs.
Use medium-weight, flat bottomed pans that match the sizes of the elements. Pick pans
made of a metal that conducts heat well.
When cooking on a surface element, use as little water as possible to reduce cooking time.
Never use the range to heat the kitchen. Using your range without utensils or pans to
absorb the element's heat risks damaging the surface and the controls.
Oven Cooking
Preheat the oven only when a recipe tells you. Put roasts and casseroles into a cold oven
and then turn the oven on.
Opening the oven door often to check on foods wastes electricity.
Use the oven to prepare complete meals. For instance, start a roast, add vegetables when
the meat is half-cooked, and then warm rolls or dessert after the main dishes are cooked.
Thaw frozen foods before cooking. Thawed food requires less cooking energy than frozen
food.
Make it a habit to turn the oven off before you remove the cooked food from it.
7
Page 8
INSTALLATION INSTRUCTIONS
WARNING
!
Be sure appliance is properly installed and grounded by a qualified technician.
It is the responsibility of the technician to make certain that your range is properly
installed. Situations caused by improper installation are not covered under the warranty.
Any expenses incurred due to such situations will not be paid by the manufacturer of the
appliance.
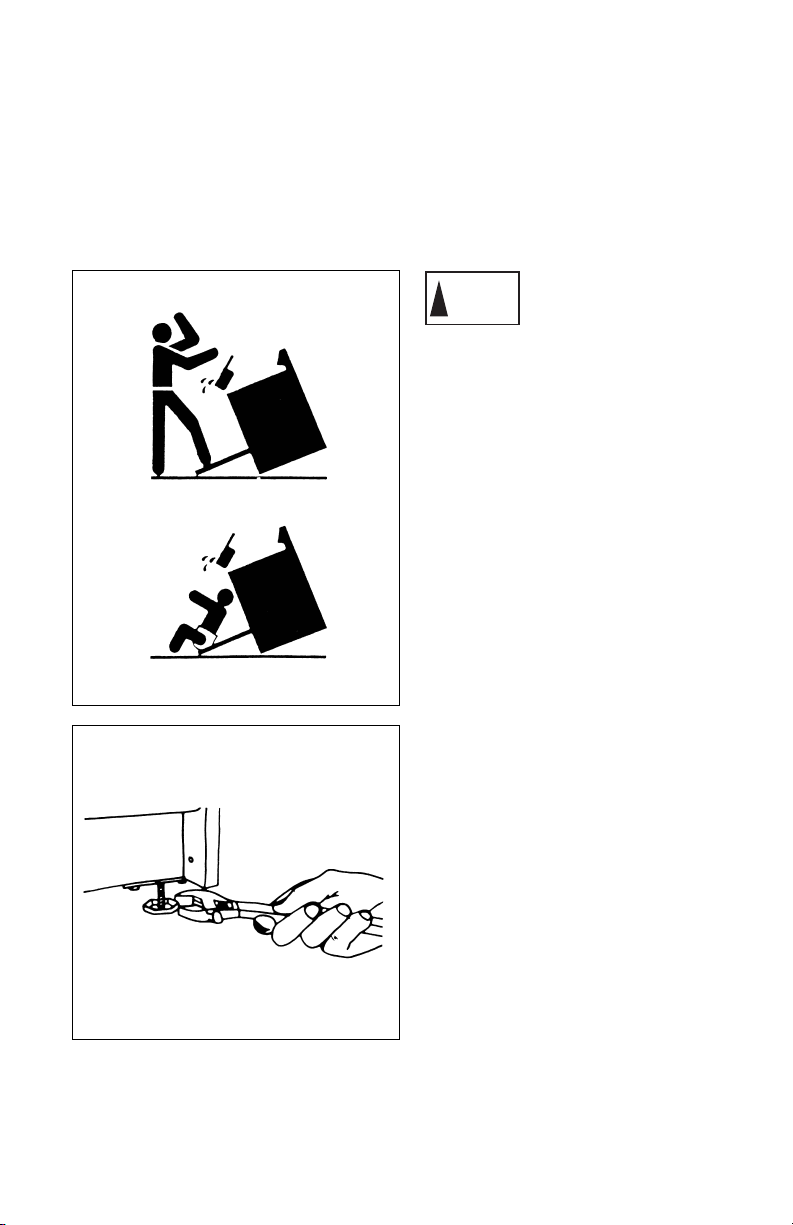
To reduce the risk of
tipping the appliance by
abnormal usage or
improper door loading, the appliance
must be secured by properly installing
the anti-tip device packed with the
appliance. To check if the device is
installed and engaged properly, carefully
tip the range forward. The Anti-Tip
device should engage and prevent the
range from tipping over.
See instructions packaged with the antitip device. These are packaged within
the oven during shipment of the range.
If this range is removed for any reason,
service or cleaning, etc., it must be
replaced as outlined in the installation
instructions before placing the range
back in operation.
Leveling a Free-Standing Range
All free-standing ranges must be level to
obtain proper cooking results. The
leveling legs should be screwed into the
corner brackets. Place a pan or a
measuring cup partially filled with water
or spirit level on oven rack. Adjust
leveling legs until the range is level. The
top of the side panels should be level
with countertop or work surface.
IMPORTANT: Be sure to keep the leg
levelers. Leveling of the range is ver
important.
8
y
Page 9

BACKGUARD INSTALLATION INSTRUCTIONS
WARNING
!
Electric Ranges
1. Move the main top forward. (Lift up and pull forward slightly.)
2. Place the backguard on top of end panels at the rear of range. Make certain the tabs of
the burner box cover rest on the outside of the burner box flanges. (See No. 1.)
3. If backguard is equipped with electrical features, connect the corresponding black and
white wires then tuck them into the connection channel. (See No. 2.)
4. Insert machine screws through lower inside flange of end caps and end panels. Secure
with hex nuts provided. (See No. 3.)
5. Insert machine screws through elongated holes at bottom of backguard and side flanges
of burner box. Secure with hex nuts provided. (See No. 4.)
6. Attach wire connection channel to the main back wire cover. Use the sheet metal screw
provided. (See No. 5.)
Power Connections to Appliances
Have the range installed by a qualified service technician or an authorized servicer.
Installation must conform with the National Electric Code
edition and local electrical code requirements.
ANSI/NFP
Be sure electric power is OFF at the fuse (breaker) box until the unit is
installed and ready to operate. See appliance rating plate for maximum
K.W. and amperage rating.
9
A NO. 70-latest
Page 10

CORD CONNECTED APPLIANCES
We recommend that you have the electrical hookup of your range done by a qualified
electrician. Have the electrician show you where your range disconnect is located. If you
fail to wire your range in accordance with governing codes, you may create a hazardous
condition.
Refer to the range’s rating plate for electrical requirements. The rating plate is located in
the burner box area on freestanding ranges and cook tops. Lift up the front edge of the
main top to find the rating plate. On built-in wall ovens, the plate can be found in the
storage compartment. Open the storage door panel to find the rating plate.
You must use a three-wire, single-phase AC 208/240 Volt, 60 Hertz electrical system to
operate your range. Use #8 wire and 40 Amp fuse or circuit breaker for 240 Volt and 208
Volt systems.
For ranges equipped with a terminal block, use only a 3-conductor or 4-conductor UL
listed 40 Amp 125/250 minimum volt electric range power cord. The cord must have open
end spade lugs with upturned ends or closed loop terminals. An appropriate strain relief
bracket must be provided on the power cord. Power cord strain relief must be used.
It is strongly suggested that your electric range be connected by means of a cord utilizing
copper conductors. Copper has always proven itself to be the most dependable
conductor. However, many homes may be wired to connect to a range by means of
aluminum wiring. This is not an ideal situation, and we ur
electrician change to a copper cord connection. If this is not possible, bare wire
connections can be made with the terminal adaptor kit packed in with the range.
10
ge you to have a qualified
Page 11

BLACK
BLACK
LEAD
GROUND
STRAP
POWER CORD
BRACKET
120/240 or 240 VAC
WHITE IF
EQUIPPED
JUNCTION
BLOCK
RED
STRAIN
RELIEF
CLAMP
THREE-WIRE CORD CONNECTION
1. Remove the top nuts on the junction
block studs.
2. Tighten the back nuts.
3. Install the three-wire cord and strain
relief provided on the cord set through
the hole in the power cord bracket.
WHITE
LEAD
RED
L
EAD
4. Connect the red and black leads to the
outer terminals and the white lead to the
center terminal. Use the top nuts
removed earlier in step 1.
5. Push the cord upward (to relieve strain)
while tightening the strain relief clamp.
If local codes do not allow grounding
through the neutral, refer to the
illustration below of FOUR-WIRE
CORD CONNECTION.
JUNCTION
BLOCK
WHITE IF
BLACK
BLACK
LEAD
GROUND
STRAP
CUT AND
DISCARD
GROUND
LEAD
POWER CORD
BRACKET
EQUIPPED
120/240 VAC
RED
STRAIN
RELIEF
CLAMP
WHITE
LEAD
RED
LEAD
Effective January 1, 1996 the National
Electrical Code requires that new construction
(not existing) utilize a 4-conductor connection
to an electric range.
FOUR-WIRE CORD CONNECTION
1. Remove the top nuts on the junction
block studs.
2. Tighten the back nuts.
3. Remove the green ground screw and cut
off the ground strap as close to the
junction block as possible.
4. Remove the ground strap.
5. Install the four-wire cord and strain relief
provided on the cord set through the hole
in the power cord bracket.
6. Connect the red and black leads to the
outer terminals and the white lead to the
center terminal. Use the top nuts
removed earlier in step 1.
7. Connect the ground lead below the
junction block with the ground screw that
was removed earlier in step 3.
8. Push the cord upward (to relieve strain)
while tightening the strain relief clamp.
NOTE: A 4-conductor cord is to be used
when the appliance is installed in a mobile
home or when local codes do not permit
grounding through the neutral.
11
Page 12

THREE-WIRE CONDUIT CONNECTION
JUNCTION
BLOCK
RED
WHITE
LEAD
STRAIN
RELIEF
CLAMP
& NUT
BLACK
BLACK
LEAD
GROUND
STRAP
POWER CORD
BRACKET
WHITE IF
EQUIPPED
120/240 or 240 VAC
If local codes do not allow grounding
through the neutral, refer to the
illustration below of FOUR-WIRE
CONDUIT CONNECTION.
JUNCTION
WHITE IF
BLACK
BLACK
LEAD
CUT
GROUND
STRAP
GROUND
LEAD
POWER CORD
BRACKET
EQUIPPED
120/240 VAC
Effective January 1, 1996 the National
Electrical Code requires that ne
(not existing) utilize a 4-conductor connection
to an electric range.
NOTE: A 4-conductor connection is to be
used when the appliance is installed in a
mobile home or when local codes do not
permit grounding through the neutral.
BLOCK
RED
ADAPT
BLOCKS
WHITE
LEAD
RED
LEAD
STRAIN
RELIEF
CLAMP
& NUT
w constr
NOTE: The power cord bracket will have
to be reversed for conduit installations.
Detach the bracket and flip its orientation.
Reattach the bracket to the range so the
conduit will pass through the smaller hole.
ADAPTOR
BLOCKS
1. Remove the top nuts on the junction
block studs.
2. Tighten the back nuts.
3. Install the terminal adaptor blocks for
bare wire connection. Use the top nuts
RED
LEAD
removed earlier in step 1.
4. Install the three-wire conduit and an
appropriate strain relief clamp through
the hole in the power cord bracket.
5. Insert the red and black leads into the
outer blocks and the white lead into the
center block. Tighten the set screws.
6. Secure the strain relief clamp around the
conduit and tighten the nut against the
power cord bracket.
FOUR-WIRE CONDUIT CONNECTION
NOTE: The power cord bracket will have
to be reversed for conduit installations.
Detach the bracket and flip its orientation.
Reattach the bracket to the range so the
OR
conduit will pass through the smaller hole.
1. Remove the top nuts on the junction
block studs. Then, tighten the back nuts.
2. Cut the ground strap as close to the
junction block as possible and at the
lower section with upturned sides.
3. Install the four-wire conduit and an
appropriate strain relief clamp through
the hole in the power cord bracket.
4. Use the section of ground strap with
upturned sides and the ground screw to
connect the ground lead below the
junction block.
5. Install the terminal adaptor blocks for
uction
bare wire connection. Use the top nuts
removed earlier in step 1.
6. Inser
t the red and b
lack leads into the
outer blocks and the white lead into the
center b
lock.
Tighten the set screws.
7. Secure the strain relief clamp around the
conduit and tighten the nut against the
er cord brack
w
po
et.
12
Page 13

CABINET PREPARATIONS
Free-Standing Ranges
“A”–––30 inches minimum clearance between the top of the cooking surface and the
bottom of an unprotected wood or metal cabinet; or
“A”–––24 inches minimum when bottom of wood or metal cabinet is protected by not less
than 1/4 inch “Flame Retardant” millboard covered with not less than No. 28
MSG sheet steel, 0.015 inch stainless steel, 0.024 inch aluminum or 0.020 inch
copper.
“B”–––Make opening between cabinet as shown in drawings. Level range so the main top
is level with the cabinet top. Make electrical connection and slide range into
opening.
RANGE SIZE
20'' 20 3/8'' 2''
24'' 24 3/8'' 0''
30'' 30 3/8'' 0''
36'' 36 3/8'' 0''
“B” DIMENSION “C” DIMENSION
“C”=Inches
from
combustible
vertical walls
above cooking
surface.
To eliminate the hazard of reaching over the heated surface units, cabinet storage space
located above the surface units should be avoided. If cabinet storage is to be provided, the
hazard can be reduced by installing a range hood that projects horizontally a minimum of
5 inches beyond the bottom of the cabinets.
13
Page 14

SURFACE COOKING
CAUTION
!
Cooking Utensils
Your range is equipped with tubular type top elements. Here are some helpful hints for
successful cooking.
For best result and energy conservation, choose cooking utensils which have the
following characteristics:
• Pans should have flat bottoms that make good contact with the entire element. Check for
flatness by rotating a ruler across the bottom. There should be no gaps between the pan
and the ruler.
• Pan sizes should
be used on a large element. Smaller pans should be used on a smaller element. Pans
should cover the entire element to absorb the maximum heat. Avoid using an undersized
utensil which would expose a portion of the element. This could result in dangerous
direct contact with a hot element, resulting in serious burns or clothing ignition. The size
of the pan should also suit the amount of food being prepared.
• Pans should be
• Pans should have
time. Lower heat settings may be used when pans are covered with lids.
• Pan materials should have
results for most cooking. The chart on page 13 gives suggestions for best results when
cooking with a variety of pan materials.
Specialty pans, such as woks, lobster pots, griddles and pressure cookers, must also have
•
flat bottoms and conform to cookware requirements.
• To heat, cookware bottoms must be in direct contact with the element. Do not use wire
trivets or warped cooking utensils. Glass cooking utensils are also not recommended
since they are poor conductors of heat.
match the size of the surface element. Large pans and skillets should
Do not use extremely large pans that extend more than one inch over the
edge of the surface element and touch the range surface.
surface elements to heat one large pan such as a roaster or griddle.
bottom surface of the pan in either of these situations could trap enough
heat to cause discoloring of the drip pans, damage to the surface elements
and/or crazing (fine cracking) of the porcelain enamel range surface.
well-balanced so that handles do not cause them to tilt.
tight-fitting lids to hold steam within the pans and reduce cooking
good heat conduction. Medium-weight aluminum gives good
Do not use two
The
To avoid spattering and to maximum efficiency, pan bottoms should be clean and dry
•
before coming in contact with the elements.
Wipe spills off the elements with a damp cloth as soon as they cool to cut down on clean
•
up time. Be sure the control is “off.”
14
Page 15

SURFACE COOKING, continued
CAUTION
!
Cooking Utensils, Continued
Material Characteristics Uses
Aluminum Excellent conductor of heat.
Available in various gauges.
Cast iron Heats unevely unless used
with low heat. Holds heat.
Subject to rust. Used for
skillets and Dutch ovens.
Ceramic/glass Relatively poor heat
conductor. Holds heat well.
Subject to chipping.
Enamelware Relatively poor heat
conductor. Subject to
chipping.
Stainless steel,
clad and inner
core
Plain stainless steel is a
relatively poor heat
conductor. It is often
combined with other
materials, either on the
bottom or in an inner core,
to improve heat transfer.
Easy to clean.
All foods. With thin gauge, cook
with some liquid. Thicker gauges
are suggested for frying, candy
and sauces.
Suggested for foods that require
long, slow cooking. Use medium
or low heat to preheat and brown
foods.
Use for long, low heat cooking
with liquids.
Use only with large quantities of
liquid.
Plain stainless steel should be
used only with large quantities of
liquid. Pans with other metals can
be used for all cooking.
*Caution: Permanent damage will take place if cookware fuses to the element.
To Operate Surface Units
The surface controls are easily operated. Simply push in and turn in either direction. When
the element is energized, the indicator light (cook top signal light) glows when one or
more of the elements is turned on.
The infinite switch has a variety of heat settings from low to high. The range of heat is
increased by turning the knob to “high.”
Do not use aluminum foil to line the surface element reflector pans. Improper use of
aluminum foil may result in shock or fire hazard. Foil may also interfere with heat
circulation and damage the range. 11-97
15
Page 16

OPERATIONAL CHECK
Check all connections to see that they are tight and have not become loosened during
transit. Each top element is controlled by a switch and when turned on the element should
heat up within a minute except for solid disk elements. These take approximately 3
minutes. (Solid elements do not get red in color when hot.) The oven bake element should
heat up within a minute when the temperature control is set in the bake area of the dial.
The broil element can be checked with dial in broil mode. With dial at 400ºF, temperature
should be reached within 10-12 minutes. The elements are covered with a protective
coating of oil. When heated up for the first time, open the oven door and allow the
thermostat to operate at 400ºF for about 10 minutes. This should evaporate the oil, and
dissipate odors and possible smoke caused by the burning off of this protective coating.
OVEN OPERATION
Opening Oven Door
Let hot air or steam escape before removing or replacing food.
Arranging Oven Racks
Always arrange the oven racks while the oven is cool. To remove the rack, pull forward
until it stops. Lift up the front and slide out. To replace, fit the rack onto the guides on the
oven walls. Tilt the front of the rack upward and slide back into place. Place the racks so
the food is “centered” in the oven.
When more than one utensil is used, be sure to stagger them allowing space between each
one. Don’t allow the utensils to touch any part of the oven, especially the glass window.
It is best to use both racks equipped with the oven, and place food so one utensil is not
directly over another.
Baking
By using the latest development in an electric oven heat control, a fast bake temperature
is obtained. However, preheating the oven for 10-12 minutes is recommended so the oven
can cycle properly before baking. Turn oven control clockwise to the temperature setting
of your choice. An indicator light will glow when there is electric power to the bake
element. When the oven temperature setting is reached, the indicator light will go off. It
lights up again when the power comes back on the bake element.
Broiling
Broiling may be slightly different from any previous broiling you may be acquainted with,
so be sure to read this section completely.
To broil, turn the temperature control knob clockwise to the “BROIL” position. This
action makes a switch in the oven thermostat engage the broiling element. Turning the
temperature knob away from this position will switch the thermostat back into bake mode.
Always broil with the oven door closed.
oven temperature while your food is broiled.
For most instances, the top oven rack position can be used for broiling. If broiling with
lower heat is needed, the second rack position from the top can be used. Lower rack
positions can be used for even lower broiling intensity
SELECT THE OVEN RACK POSITION BEFORE
The oven temperature control will maintain the
.
YOU BEGIN BROILING.
16
Page 17

OPTIONAL EQUIPMENT
Continuous Cleaning Feature
If your oven has the continuous cleaning feature, it will have a dull gray finish with white
speckles that has been blended with a special catalytic material. (If the oven has a glossy
finish, it is standard porcelain enamel without the continuous cleaning feature.)
Before Using Your Oven–Read These Instructions Carefully.
Using The Continuous Cleaning Oven
The catalytic finish will keep your oven presentably clean with some effort on your part.
Any time the oven is in use, the catalytic action will be working to eliminate normal
cooking spatters. Simply cook as you usually do. Average oven spatters should fade away.
If a great deal of spattering occurs during cooking, a small amount may remain on the
surface of the oven interior at the end of the cooking time. This is particularly true during
a short cooking cycle. The longer the cooking cycle, the better the catalytic action.
Cleaning time depends on the type, size and amount of soil, and oven temperature. The
cleaning time will vary from a few minutes to several hours. The oven will never get
completely clean–it will appear “presentably clean,” even though some stains or spatters
may be present.
Heavy Spillovers–Unusual Stains
The continuous cleaning oven feature will make cleanups easy. However, some spills or
food types are harder for the oven to clean without a little assistance. For heavy spillovers,
such as from an overfilled fruit pie or casserole, put a cookie sheet or aluminum foil on
the oven bottom. Be sure the foil does not touch the element or extend beyond it.
If you should get a heavy spillover on the oven bottom:
Brush off heavy soil with a nylon brush or plastic pad. DO NOT USE paper toweling,
1.
cloths or sponge. Oven walls are porous and particles of these materials will rub off on
walls. Rinse area well with clean water only. Do not allow insulation under oven
bottom to become wet.
2. If spillovers harden before they can be wiped away, they may become either a brittle
crust or a varnish-type coating. The brittle crusts will loosen and flake off in time. This
process can be speeded up by GENTLY tapping crust with a wooden or plastic utensil
and then brushing crust away.
3. Any remaining soil will gradually reduce with continued oven use at normal baking
temperatures.
DO NOT USE ANY TYPE OF OVEN CLEANER, POWERED CLEANSERS, SOAP,
DETERGENT OR PASTE ON ANY CONTINUOUS CLEANING SURFACE. ALSO,
DO NOT USE ANY ABRASIVE MATERIALS, STEEL WOOL, SHARP
INSTRUMENTS OR SCRAPERS. THEY WILL DAMAGE THE FINISH.
Note: Over a period of time, wear marks may appear on the embossed rack supports.
is normal and results from sliding the oven racks in and out of the oven. Wear marks will
not interfere with the overall cleaning action of the oven.
17
This
Page 18

OPTIONAL EQUIPMENT, Continued
WARNING
!
Backguard and Control Panel Features
Electrical Grounding Instructions: This Appliance must be properly
grounded and must be connected as shown in figure 1, 2 or 3 on page 11.
Do not alter wiring or electrical equipment.
The backguard equipment is optional, depending on model selection. The range you have
purchased may or may not be equipped with the features that are illustrated in this section.
The clocks have been placed into separate groups.
CLOCK WITH TIMER
To set a dial type clock, PUSH IN on the knob and turn it to the correct time.
NOTE: Release and then without pushing in rotate so that the timer hand is “OFF.” This
(
should be done after setting the time.) To set timer don’t push in on the knob, simply rotate
to the length of time you want. A signal will sound when the time has elapsed. To stop the
signal rotate the knob to “OFF.”
DIGITAL CLOCK WITH TIMER
clock
horloge
timer
minuterie
To set “time of day” press CLOCK. Press ▲ or ▼ to set correct time.
To set “cook time” press
(12 HRS IS MAXIMUM TIMER SETTING). Then press
Colon starts blinking indicating timer is counting down.
To clear timer press
To return to clock while timer is running, Press CLOCK.
▲
▼
TIMER (0:00 WILL APPEAR). Press ▲ to set minutes
TIMER again.
TIMER.
18
Page 19

CLEANING THE RANGE
Always keep cleaning materials and chemicals in a safe place and away from children.
Know what you are using. Make sure all parts of the range are COOL before cleaning. Be
sure to replace the parts correctly.
Using Commercial Oven Cleaners
Commercial oven cleaners may be used on porcelain lined ovens; however, many cleaners
are very strong, and it’s essential to follow instructions carefully.
Oven cleaners can coat or damage the thermostat sensing device (the long tube in the
oven) so that is will not respond to temperature accurately. If you use an oven cleaner, do
not let it contact the sensing bulb, or any chrome, aluminum, or plastic part of the range.
Do not apply or allow the cleaner to come in contact with any parts or surfaces other
than the oven interior.
Do not use harsh cleaners or degreasers on or around functional parts. This will damage
or drastically reduce the life of the part.
After using such cleaners, thoroughly rinse the oven with a solution of 1 tablespoon
vinegar to 1 cup of water.
Use only a mild solution of soap and water on
and painted surfaces. Never use harsh abrasives or cleaning powders that may scratch or
mar the surface. Make sure the cleaners and cleaning materials are suitable for use on the
area to be cleaned. Always keep cleaning materials in a safe place.
Knobs
Pull forward on the knobs to remove them. Wash in a water solution with a mild detergent
mix. Do not use an abrasive cleaner or any abrasive action. Abrasive action will scratch
away the knob markings.
If the knobs become loose on the stem, spread the spring slightly with a small screwdriver.
Tops
The porcelain finish top can be cleaned with detergent and warm water. A mild glass wax
can be used to shine the top.
Range tops finished in brushed chrome should be wiped clean after each use. Clean with
a paper towel or a damp cloth. For heavy spatters, use a mild detergent and water. Then,
wipe dry with a soft cloth.
A thin coating of vegetable oil should be applied periodically to the chrome top surface
and underside. This will help prevent moisture from penetrating the chrome surface.
backguards, aluminum control panels
19
Page 20

CLEANING THE RANGE, Continued
Aluminum Foil in Oven and Broiler
Aluminum foil when used improperly is a cause of many range fires. Make certain
heating elements aren’t covered or come in contact with aluminum foil.
Never cover a rack completely. A piece of foil slightly larger than the utensil can be placed
on the rack beneath the utensil.
Backguard Control Panel or Any Painted or Aluminum Surfaces
Use a mild solution of soap and water. Do not use any harsh abrasives or cleaning
powders that may scratch or mar the surface.
USER SERVICING
• Do not repair or replace any part of the appliance unless specifically recommended in
this manual. All other servicing should be referred to a qualified technician.
• Disconnect the range from electrical supply before attempting to service or move it.
• If you pull the range out from the wall for any reason, make sure the rear leg is returned
to its position in the anti-tip bracket when you push the range back.
Repair Parts
When repair parts are needed, contact the dealer from whom the range was purchased. In
case your range was purchased from some source other than an appliance dealer you may
prefer to contact the manufacturer of the range at the address shown in this manual.
MOISTURE
During initial heat-up of your range, the heat mixing with the cooler air in the oven cavity
may produce fogging of the door glass or a collection of water on the door. To prevent
this, open the oven door for the first few seconds of initial oven heat-up. This will allow
moist air within the oven to escape without the forming of visible moisture on the range.
The amount of moisture will depend upon the humidity of the air and water content of the
food being cooked. Fogging and even dripping water will usually occur in geographic
locations of high humidity.
OVEN VENT
The oven vent tube has been eliminated. By omitting the vent tube, a greater amount of
moisture is retained; therefore, baked foods with greater appeal are created. The food itself
retains more of its natural juices and has less tendency to dry out. The flavor is better.
20
Page 21

ALIGNMENTS AND ADJUSTMENTS
CAUTION
!
Oven Door Spring Adjustments
The oven door springs are properly adjusted before leaving the factory. The springs should
be adjusted to allow the door to remain open when pulled 90 degrees forward and yet pull
the door tight against the oven front frame when closed. If adjustments should become
necessary, remove the storage drawer and grasp spring with fingers, and pull downward.
To give more tension, push toward rear of range and attach in first slot. To make spring
adjustment on ranges without storage drawer, remove false panel and follow the same
procedure.
Make certain all surface elements are
cool and all switches are in the OFF
position prior to seating elements.
Seating Top Elements
The top element may need initial
seating after installation of the stove
or after they have been unplugged and
re-installed. Palm the element as
shown. Pick up on the rear section
with your fingers, while at the same
time, push down on the front of the
element with the palm of your hand.
Storage
Your electric range is equipped with a
storage area located beneath the oven cavity.
To access this compartment, gently lift on
the front edge of the “drop-down” panel and
let it fall forward as shown. ONLY LIFT ON
THE FRONT EDGE OF THE PANEL SO
AS TO NOT PINCH YOUR FINGERS. Do
use this panel as a step or shelf.
not
21
Page 22

LIFT-OFF DOORS
Lift-Off Oven Door (on some models)
The oven door is removable (on some models) but it is heavy. You may need help
removing and replacing the door.
To remove the door, open it to the full open position. Raise the locking mechanism by
applying force to the locking mechanism lever. Close the door until it stops against the
locking mechanism. Grasp firmly on each side and lift the door straight up and off the
hinges.
To replace the door, position the slots in the bottom of the door squarely over the hinges.
Then lower the door slowly and evenly over both hinges at the same time.
Open the door to the full open position and press the locking mechanism back into its
original position.
DO NOT ATTEMPT TO CLOSE THE DOOR UNTIL THIS STEP IS COMPLETE. THE
HINGE OR DOOR COULD BE DAMAGED.
22
Page 23

23
Page 24

NOTES
PART NO. 184-6C089
PN316000602 (11-05)
 Loading...