

Page 1

7
FELIX STORCH, INC.
ENGLISH: page 1
0
Manual for the Installation, use and maintenance
of stainless steel kitchen range hoods
Manual de instalación, uso y mantenimiento
de campanas de acero inoxidable
Manuel d’installation, d’utilisation et d’entretien
des hottes de cuisine en acier inoxydable
Models / Modelos / Modèles:
SEH1530C, SEIH1536CV3, SEIH4636CV4,
SEH15360C, SEH1548C, SEIH3536C, SEIH4648CV4, SEIH6624C
13
ESPAÑOL: página 17
FRANÇAIS: page 22
26
19
770 Garrison Avenue
Bronx, New York 10474
www.summitappliance.com
Page 2

Page 3

STAINLESS STEEL KITCHEN RANGE HOOD
SAFETY WARNINGS
a. This product is designed for domestic use.
b. Electric input for the device must be 120 Volt, 60 Hz.
c. This product must be connected to a grounded electrical source.
d. All of the electrical installation must be done by a qualified electrician.
Installations done by unqualified persons may result in poor performance,
failure of the device, and accidents.
e. If the lights in your device have been on for a long time, do not touch them.
They are hot enough to burn your hands.
f. Kitchen hoods are designed for cooking in domestic residences. There is a
risk of failure if they are used for other purposes, and this will void the warranty.
g. Comply with local codes and regulations related to discharging air. (This
warning does not apply to hoods with no stack).
h. Do not cook flammable foods below the hood.
i. Start the hood after placing pots or pans on your cooking surface. Otherwise,
high temperatures may result in deformation of parts of the hood.
j. Do not leave hot oil on the cooking surface. Pots that contain hot oil can ignite,
causing fires.
k. When frying foods, be watchful of curtains. They may catch fire.
l. Change the filters regularly. Oily residues could become fire risks.
m. When replacing filters, always use the same type of filter as the original.
Substitutes may be unsuitable.
n. Do not use the device without a filter. Do not remove filters while the device
is working.
o. If there is ignition or sparking, cut o the electric power to the device. (Turn
o the switch.)
p. If the device is not cleaned regularly, built-up grime and dirt could cause a
fire.
q. When you make the stack installation for your hood, use 150 mm (5.9”)
diameter pipes. The stack installation must be as short and with as few bends
as possible.
3
Page 4

r. Keep the packing materials away from children, as these materials could be
dangerous to them.
s. Ensure that children do not play with the device. Do not let little children use
the device.
t. If there is a fire, cut o the power to the hood and cooking devices and cover
the flame. Do not use water to extinguish the fire.
READ AND SAVE THESE INSTRUCTIONS
WARNING! TO REDUCE THE RISK OF A RANGE-TOP GREASE FIRE:
a. Never leave surface units unattended at high settings. Boilovers cause
smoking and greasy spillovers that may ignite. Heat oils slowly on low or
medium settings.
b. Always turn hood ON when cooking at high heat or when flambéing food.
c. Clean ventilating fans frequently. Grease should not be allowed to accumulate
on fan or filters.
d. Use proper pan size. Always use cookware appropriate for the size of the
surface element.
WARNING! TO REDUCE THE RISK OF INJURY TO PERSONS IN THE EVENT OF A
RANGE-TOP GREASE FIRE, OBSERVE THE FOLLOWING:
a. SMOTHER FLAMES with a close-fitting lid, cookie sheet or metal tray, then
turn o the burner. BE CAREFUL TO PREVENT BURNS. If the flames do not go out
immediately, EVACUATE AND CALL THE FIRE DEPARTMENT.
b. NEVER PICK UP A FLAMING PAN – you may be burned.
c. DO NOT USE WATER, including wet dishcloths or towels, to douse the fire – a
violent steam explosion could result.
d. Use an extinguisher ONLY if:
i. You know you have a Class ABC extinguisher, and you already know how
to operate it.
ii. The fire is small and contained in the area where it started.
iii. The fire department is being called.
iv. You can fight the fire with your back to an exit.
4
Page 5

WARNING! TO REDUCE THE RISK OF FIRE, ELECTRIC SHOCK, OR OTHER INJURY,
OBSERVE THE FOLLOWING:
a. Use this unit only in the manner intended by the manufacturer. If you have
questions, contact the manufacturer.
b. Before servicing or cleaning the unit, switch power o at the service panel and
lock the service-disconnecting means to prevent power from being switched
on accidentally. If the service-disconnecting means cannot be locked, securely
fasten a prominent warning device, such as a tag, to the service panel.
c. To Reduce The Risk Of Fire Or Electric Shock, Do Not Use This Fan With Any
Solid-State Speed Control Device.
d. TO REDUCE THE RISK OF FIRE, USE ONLY METAL DUCTWORK.
CAUTION:
a. The Fan In This Device Is For General Ventilating Use Only. Do Not Use To
Exhaust Hazardous Or Explosive Materials And Vapors.
b. To reduce the risk of fire and to properly exhaust air, be sure to duct air outside.
Do not vent exhaust air into spaces within wall, ceilings, attics, crawl spaces or
garages.
WARNINGS ABOUT HANDLING AND CARRYING
a. All the materials used in the packaging of your device are suitable for recycling.
b. Comply with the warning labels on the packs during transportation.
c. Grasp handling grips while carrying your device.
WARNING: This product can expose you to chemicals including Nickel
(Metallic) which is known to the State of California to cause cancer.
For more information go to www.P65Warnings.ca.gov
Note: Nickel is a component in all stainless steel and some other metal
components.
5
Page 6

4
A
B
D
C
E
F
6
Page 7
7
Page 8
6
6
8
Page 9

7
7
9
Page 10
8
8
2
P1
1
2 4
1 3
2 4
1 3
3
P2
1 2 3 4 5 6 7
10
P3
Page 11

7
4
P5
P6
1 2 3 4
1 2 3 4 5
1 2 3 4 5
P4
11
Page 12

10
12
Page 13

EN
Dear Customer,
Thank you for buying our range hood. Please follow diagrams on pages 6-9 for proper
installation, and carefully read the instructions below for more on installation, plus
information on optimum use and maintenance.
Note: The figures mentioned in this manual are on pages 6 through 12.
INSTALLATION
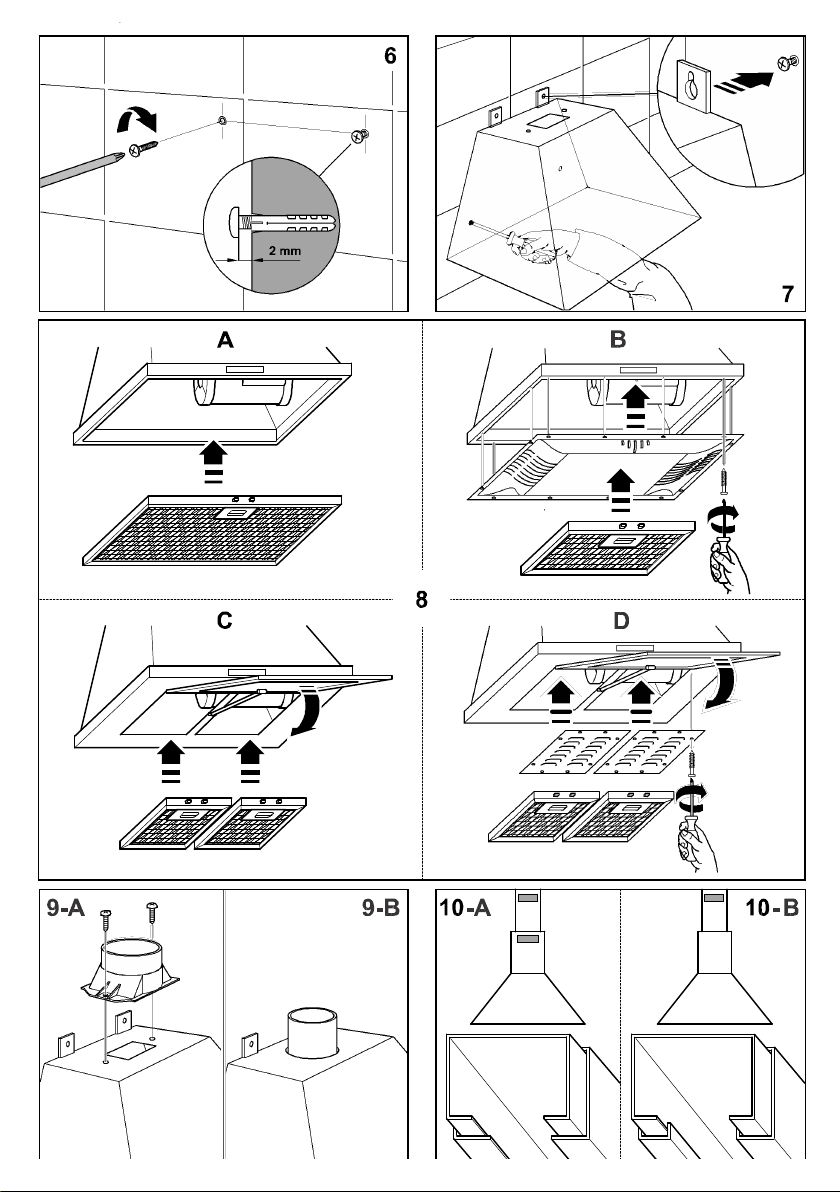
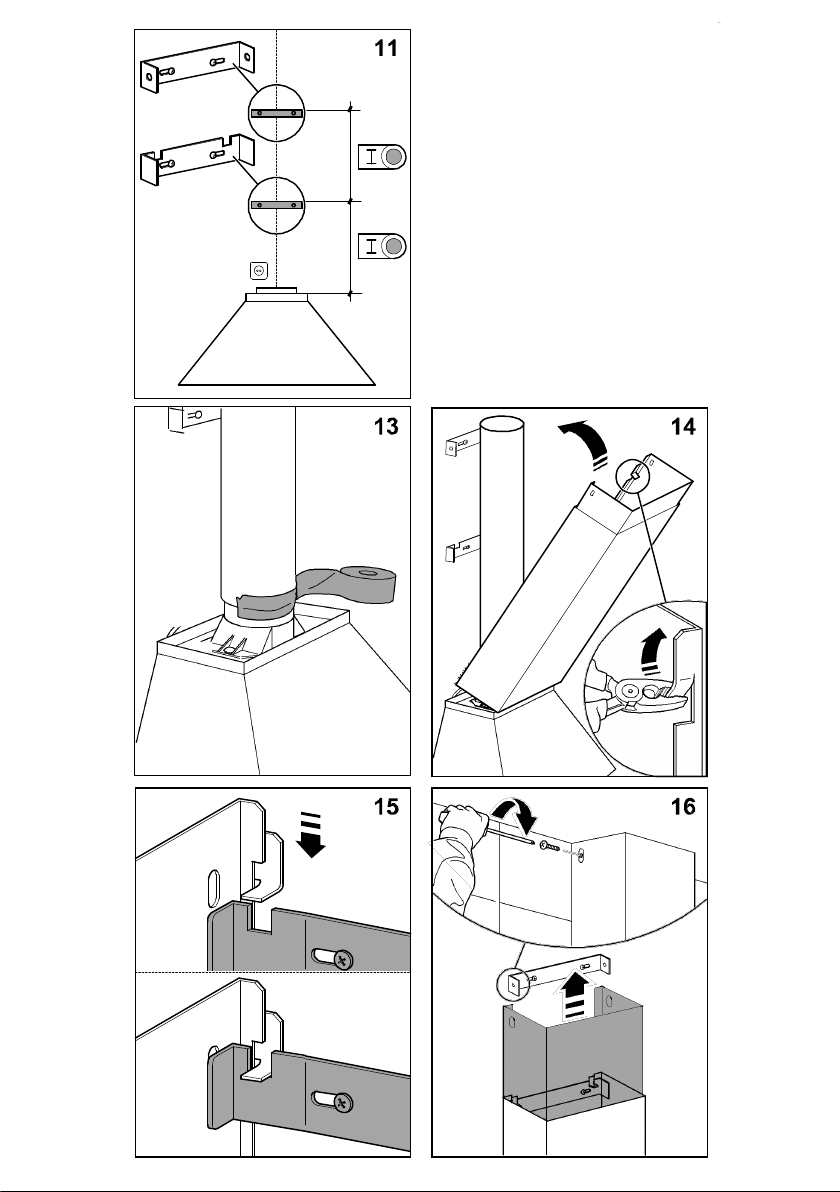
Hood installation on walls (pages 6-8)
Warning: Consult local regulations regarding fumes outlets. Do not connect
the hood to a fume, ventilation or hot air duct. Confirm that room ventilation is
appropriate with the local authorities. Make sure the maximum air extraction flow
rate for the appliances in the room does not exceed 4 Pa (0.04 mbar). The room
must have adequate ventilation if an extractor hood is used simultaneously with
appliances that run on gas or other fuels. The evacuated air must be extracted
through ducts that are used for evacuating fumes from appliances that run on
gas or other fuels. Regulations regarding air extraction must be complied with.
WARNING – TO REDUCE THE RISK OF FIRE, ELECTRIC SHOCK, OR INJURY TO
PERSONS, OBSERVE THE FOLLOWING:
a) Installation work and electrical wiring must be done by qualified person(s)
in accordance with all applicable codes and standards, including fire-rated
construction.
b) Suicient air is needed for proper combustion and exhausting of gases
through the flue (chimney) or fuel burning equipment to prevent back drafting.
Follow the heating equipment manufacturer’s guideline and safety standards
such as those published by the National Fire Protection Association (NFPA), and
the American Society for Heating, Refrigeration and Air Conditioning Engineers
(ASHRAE), and the local code authorities.
c) When cutting or drilling into wall or ceiling, do not damage electrical wiring
and other hidden utilities.
d) Ducted fans must always be vented to the outdoors.
•Use rigid metal ductwork with a minimum diameter of 150 mm (about 4¾”) to evacuate
fumes outside.
• The above restrictions do not apply to hoods with no fumes outlet to outside
(recirculation system with activated charcoal filter).
• Install the hood in line with the instructions on the template provided.
• Use only with range hood cord-connection kits that have been investigated and
13
Page 14

found acceptable for use with this model range hood.
• The minimum distance to the hood must be at least 65 cm (about 25”).
Hood installation on ceiling (page 9)
• Remove the Styrofoam protective piece before use.
• The accessories needed for installation are inside the hood.
• Use the two screws to attach the reducer pipe H to the upper platen (Fig. 1). Connect
the 6” non-flammable pipe to the opening in the ceiling.
• Confirm that the ceiling will support the weight of the hood. Drill 4 holes in the ceiling
using a 5/6” bit and insert the plugs (Fig. 2).
• Adjust the length of the telescopic structure and attach the two pieces with 8 screws
and washers. Bear in mind that the minimum distance from working surface to the
base of the hood should not be less than 25” (Fig. 3).
• Attach the previously adjusted telescopic structure to the ceiling using 4 screws and
washers (Fig. 4).
• Introduce pipe J with the grate on the upper part and attach the telescopic structure
using 2 screws (Fig. 4).
• Introduce pipe K and keep it raised (Fig. 5).
• Aix the hood to the telescopic structure using the nuts and washers (Fig. 5).
• Lower pipe K and attach it to the hood with 2 screws (Fig. 5)
Connecting the hood to the grid
Warning: Before connecting the hood: Switch o the electricity supply and
check that the supplied voltage and frequency coincide with that indicated on
the appliance nameplate.
Connect the hood directly to the electrical grid, protected by a separator device
accessible for disconnection, in line with local regulations.
USE OF THE HOOD
WARNING: NOT SUITABLE FOR USE WITH SOLID-STATE SPEED CONTROLS.
Safety
Warning: The hood may stop working during an electrostatic discharge (e. g.
lightning). This involves no risk of damage. Switch o the electrical supply to the
hood and reconnect after one minute.
Do not allow the hood to be used by children or persons with reduced (physical, sensory
14
Page 15

or mental) capabilities or lack of experience and knowledge, unless they have been
given instruction concerning use of the appliance by a person responsible for their
safety.
Children should be supervised so that they do not play with the appliance.
To avoid the risk of fire, clean the metal filter regularly, be especially careful with pans
containing hot oil and do not flambé food below the hood.
Do not use the hood if it shows signs of damage or imperfection. Contact an oicial
distributor or authorized dealer.
Accessible parts may heat up when using cooking appliances.
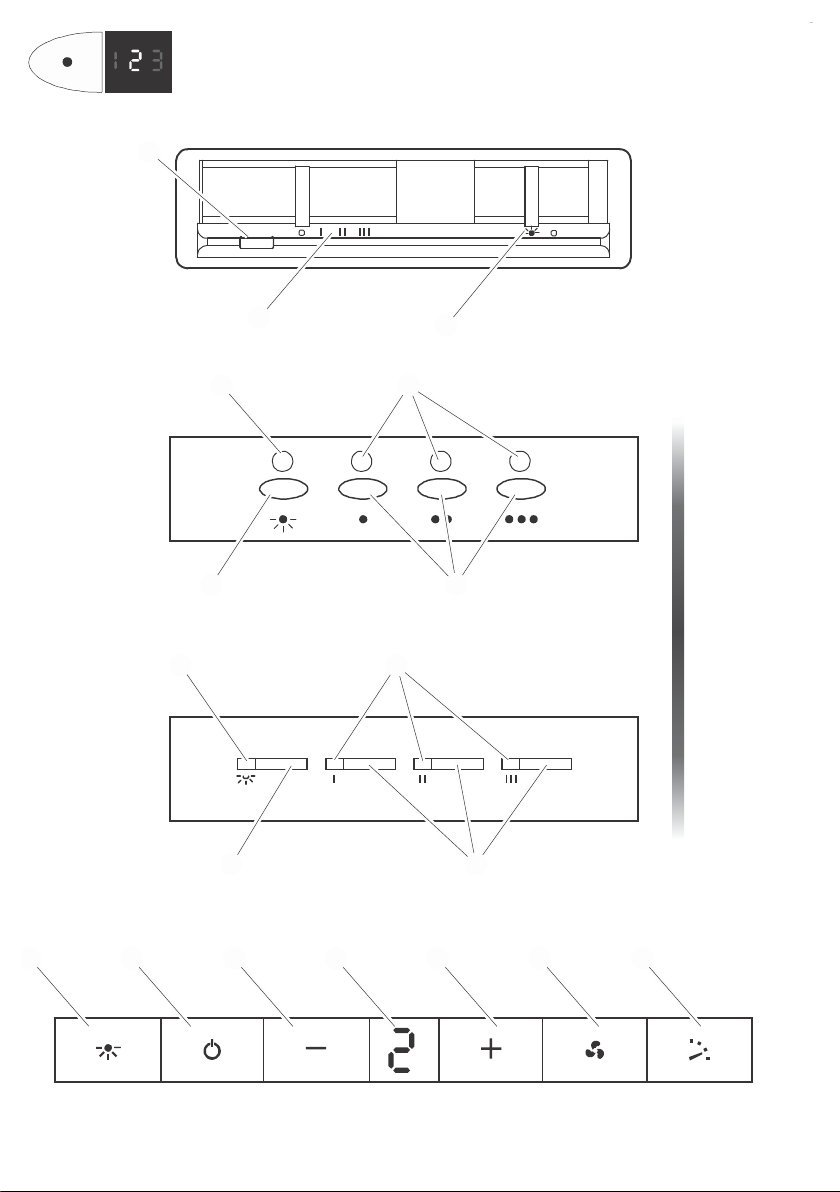
Control Panel
The dierent control panels are described below. Check the panel model installed on
your hood and see the figure indicated in each case.
Panel with sliding switch (Fig. P1 on page 10)
1. Extractor fan speed - positions: OFF, speed 1, 2 and 3
2. Extractor fan operating control pilot light.
3. Lighting on and o switch.
Panel with electronic button (Fig. P2 on page 10)
1. Lighting on and o.
2. Lighting operating control pilot light.
3. Extractor fan speed - button: speed 1, 2 and 3.
Press the current speed again to switch o the extractor fan.
4. Extractor fan operating speed control pilot light.
Timer: Keep the chosen speed button pressed down for two seconds until the
display flashes. The extractor fan stops after 15 minutes and the lighting switches
o. To cancel the timer: Press the chosen speed button once.
Four-speed panel - Digital display (Fig. P3 on page 10)
1. Lighting on and o.
2. Extractor fan on and o.
3. Decrease extractor fan speed.
4. Extractor fan speed display panel.
5. Increase extractor fan speed.
6. Enable extractor fan turbo speed.
7. Enable and disable extractor fan timer.
Timer: The extractor fan works for 5 minutes at the current speed and another 5
15
Page 16

minutes at each of the lower speeds until it stops and the lighting switches o.
Five-button panel (Fig. P4 on page 11)
1. Extractor fan operating control pilot light.
2. Lighting on and o.
3. Extractor fan o.
4. Extractor fan speed - button: speed 1, 2 and 3
Touch panel (Fig. P5 on page 11)
1. Filter clean warning display/button. Warning of the need to replace the filter
– press to deactivate once the filter has been cleaned or replaced.
2. Enable and disable extractor fan timer.
3. Lighting on and o. Keep pressed down to adjust the lighting intensity.
4. Extractor fan on and o.
5. Extractor fan speed - button: speed 1, 2 and 3/4
Timer: The extractor fan works for 5 minutes at the current speed and another 5
minutes at each of the lower speeds until it stops.
Sliding touch panel (Fig. P6 on page 11)
1. Extractor fan on and o.
2. Sliding touch panel for extractor fan speed control. Also used in combination
with button -3-.
3. Lighting on and o. Press the button and, while it is flashing, adjust the
lighting intensity using the sliding touch panel -2-.
4. Enable and disable extractor fan timer.
5. Clean Filter warning display/button. Warning of the need to replace the filter
– Press to deactivate once the filter has been cleaned or replaced.
Timer: The extractor fan works for 2 minutes at the current speed and another 2
minutes at each of the lower speeds until it stops and the lighting switches o.
Warning on the ZEN Model: The front panel automatically extends and retracts on
switching the hood on/o.
HOOD MAINTENANCE
Warning: Always switch o the electricity supply before carrying out
maintenance work on the hood. In the event of a fault, contact an oicial
distributor or authorized dealer.
Exterior cleaning: Use non-corrosive, liquid detergent and avoid the use of abrasive
16
Page 17

cleaning products.
Grease filters: To avoid fires, clean thoroughly once a month or whenever the display
pilot light indicates the need. To do so, remove the filters and wash with hot water and
detergent. If using a dishwasher, position the filters vertically to prevent solid remains
from depositing on them.
Activated charcoal filters: Replace every 3 months.
Important: increase the filter cleaning/replacement frequency if the hood is used
for more than 2 hours a day. Always use genuine filters from the manufacturer.
Bulb replacement (look for the symbol in the figures on page 12)
Warning: Do not handle the bulbs until the electricity supply has been switched
o and they have cooled.
Important: Use new bulbs according to the type indicated on the hood
nameplate.
Use bulbs with an aluminum reflector to replace halogen bulbs. Do not use dichroic
bulbs – risk of overheating.
On kitchen hoods equipped with tungsten lamps, the lights should only be used during
operation of the motor. They should not be left on permanently and used as a light
source.
LEGAL INFORMATION
The manufacturer declares that this product meets all basic requirements regarding low-voltage electrical equipment es tablished in the 2014/35/EU Directive
and electro-magnetic compatibilished in the 2014/30/EU Directive.
17
Page 18

16
LIMITED WARRANTY
FELIX STORCH, INC.
Summit Appliance Division
770 Garrison Avenue
Bronx, New York 10474
www.summitappliance.com
SUMMIT Appliance warrants this product to be free from defects in materials and
workmanship for a period of one year from the date of original purchase or delivery. Any
parts determined to be defective will be replaced by SUMMIT at no charge to you. Plastic
parts, liners, and outer cabinets are warranted to be manufactured to commercially
acceptable standards and free from defects at the time of delivery.
This limited warranty does not apply to:
1. Improper installation
2. Customer misuse, negligence or damage
3. Incorrect electrical current
4. Products with serial number altered or removed
5. Products sold or used outside the fifty United States or District of Columbia
6. Commercial or industrial users
7. Damage to this product from accidents, alterations, failure to follow
instructions, fire, floods, earthquakes, war, civil disturbance or Acts of God.
SUMMIT is not liable for consequential or incidental damage.
DISCLAIMER OF IMPLIED WARRANTIES; LIMITATION OF REMEDIES
CUSTOMER'S SOLE AND EXCLUSIVE REMEDY UNDER THIS LIMITED
WARRANTY SHALL BE PRODUCT REPAIR AS PROVIDED HEREIN. IMPLIED
WARRANTIES, INCLUDING WARRANTIES OF MERCHANTABILITY OR
FITNESS FOR A PARTICULAR PURPOSE, ARE LIMITED TO ONE YEAR.
WARRANTOR SHALL NOT BE LIABLE FOR INCIDENTAL OR
CONSEQUENTIAL DAMAGES. SOME STATES DO NOT ALLOW THE
EXCLUSION OR LIMITATION OF INCIDENTAL OR CONSEQUENTIAL
DAMAGES, OR LIMITATIONS ON THE DURATION OF IMPLIED WARRANTIES
OF MERCHANTABILITY OR FITNESS, SO THESE EXCLUSIONS OR
LIMITATIONS MAY NOT APPLY TO YOU. THIS WARRANTY GIVES YOU
SPECIFIC LEGAL RIGHTS AND YOU MAY ALSO HAVE OTHER RIGHTS,
WHICH VARY FROM STATE TO STATE.
For parts and accessory ordering, troubleshooting and helpful hints, visit:
www.summitappliance.com/support
or call 1-800-932-4267
18
Page 19

ES
Estimado cliente:
Agradecemos la compra de nuestra campana. Por favor, siga los diagramas en las
páginas 6 a 9 para la correcta instalación y lea cuidadosamente las instrucciones a
continuación para más información sobre la instalación, además de información sobre
el uso óptimo y el mantenimiento.
Notas: Las figuras mencionadas en el presente manual están en las páginas 6 a 12.
Atención: Consulte las normas locales sobre salida de humos.
No conecte la campana a un conducto de humo, aireación o aire caliente.
Confirme con la autoridad local que la ventilación del ambiente es apropiada.
Asegúrese que el caudal máximo de extracción de aire de los aparatos del
ambiente no supera 4 Pa (0,04 mbar). Debe estar prevista una ventilación
conveniente de la habitación si se utilizan simultáneamente una campana
extractora de cocina y aparatos alimentados por gas u otro combustible. El aire
evacuado no debe ser enviado por conductos que se utilicen para evacuar los
humos de aparatos alimentados por gas u otro combustible. Los reglamentos
respecto a la evacuación de aire tienen que ser respetados.
ATENCIÓN - PARA REDUCIR EL RIESGO DE INCENDIOS, DESCARGAS
ELÉCTRICAS O LESIONES PERSONALES, OBSERVE LO SIGUIENTE:
• El trabajo de instalación y el cableado eléctrico deben ser realizados por
personal calificado de acuerdo con todos los códigos y normas aplicables,
incluyendo la construcción clasificado por el fuego.
• Se necesita suficiente aire para la combustión y descarga adecuadas de
los gases a través del tubo de humos (chimenea) o equipos que queman
combustibles para prevenir retroalimentación. Siga las directrices del fabricante
del equipo de calefacción y las normas de seguridad tales como los publicados
por la National Fire Protection Association (NFPA) y la Sociedad Americana de
Calefacción, Refrigeración y Aire Acondicionado (ASHRAE) y las autoridades de
los códigos locales.
• Al cortar o perforar la pared o el techo, no dañe el cableado eléctrico ni otros
servicios ocultos.
• Los ventiladores con conductos siempre deben tener salida al exterior.
Para la evacuación de humos al exterior usar un tubo de metal rígido de mín. Ø 150 mm.
Las restricciones anteriores no aplican a campanas sin salida de humos al exterior
(sistema de recirculación con filtro de carbón activo).
CAMPANA EXTRACTORA DE ACERO INOXIDABLE
19
Page 20

Instalación de la campana en la pared
• Instale la campana según las instrucciones de la plantilla provista y las indicaciones
de la fig. 1 a la fig. 16 en las páginas 6 a 8.
• Respetar lo indicado por el fabricante del aparato de cocción si la altura desde la
superficie de cocción a la campana (ver la fig. 3) es superior a la indicada en la plantilla
provista.
• Use únicamente con los kits para el conexión de cables que han sido investigados y
considerados aceptables para su uso con este modelo de campana.
• La distancia mínima hasta la campana debe ser como mínimo 65 cms.
Instalación de la campana en el techo (página 9)
• Retire la pieza protectora de espuma de poliestireno antes de su uso.
• Los accesorios necesarios para la instalación se encuentran dentro de la campana.
• Utilice los dos tornillos para fijar el tubo reductor H a la placa superior (Fig. 1). Conectar
la tubería no inflamable de 6” a la abertura en el techo.
• Asegúrese de que el techo puede soportar el peso de la campana. Taladre cuatro
agujeros en el techo con una broca de 5/6” y coloque los tacos (Fig. 2).
• Ajuste la longitud de la estructura telescópica y adjunte las dos piezas con 8 tornillos
y arandelas. Tenga en cuenta que la distancia mínima desde la superficie de trabajo a
la base de la campana no debe ser menor de 25” (Fig. 3).
• Fijar la estructura telescópica previamente ajustada al techo con 4 tornillos y
arandelas (Fig. 4).
• Introducir el tubo J con la rejilla en la parte superior y colocar la estructura telescópica
con 2 tornillos (Fig. 4).
• Introducir el tubo K y manténgalo elevado (Fig. 5).
Fije la campana a la estructura telescópica con las tuercas y las arandelas (Fig. 5).
•
• Baje la tubería K y adjúntelo a la campana con 2 tornillos (Fig. 5)
Conexión de la campana a la red
Atención: Antes de conectar la campana: corte el suministro eléctrico y
compruebe que la tensión y frecuencia suministrada coincide con la indicada en
la placa de características del equipo.
Conecte el aparato directamente a la red eléctrica, protegida por un dispositivo
separador accesible para su desconexión, acorde a la reglamentación local.
20
Page 21

USO DE LA CAMPANA
ATENCIÓN: NO ADECUADA PARA USO CON CONTROLES DE VELOCIDAD DE ESTADO
SÓLIDO.
Seguridad
Atención: Durante una descarga electroestática (p. ej. un rayo) la campana
puede dejar de funcionar. Esto no supone riesgo de daños.
Corte el suministro eléctrico de la campana y vuelva a conectar transcurrido un
minuto.
No permita que la campana sea usada por niños o personas con apacidades (físicas,
sensoriales o mentales) reducidas, o carezcan de experiencia y/o conocimiento, salvo que
hayan recibido instrucciones sobre el uso del equipo por una persona responsable de su
seguridad.
Los niños deben ser supervisados para asegurar que no jueguen con el aparato.
Para evitar posibles incendios limpie periódicamente el filtro metálico, controle
permanentemente los recipientes con aceite caliente y no flamee alimentos bajo la campana.
No utilice la campana si presenta daños o desperfectos. Contacte a un distribuidor oficial o
un agente autorizado.
Las partes accesibles pueden calentarse cuando se utiliza con aparatos de cocción.
Panel de mando
Se describen a continuación los diferentes paneles de mando. Compruebe el modelo
de panel instalado en su campana y vea también la figura indicada en cada caso.
Panel con conmutador deslizante (fig. P1 en página 10)
1- Velocidad del extractor - posiciones: OFF, 1º, 2º y 3º vel.
2- Testigo de control funcionamiento del extractor.
3- Interruptor para encendido y apagado de la iluminación.
Panel con botón electrónico (fig. P2 en página 10)
1- Encendido y apagado de la iluminación.
2- Testigo de control funcionamiento de la iluminación.
3- Velocidad del extractor - pulsador: 1º, 2º y 3º vel. Pulsando de nuevo la
velocidad en curso se apaga el extractor.
4- Testigo de control velocidad de funcionamiento del extractor.
Temporizador: Mantenga presionado por dos segundos el pulsador de la velocidad
escogida, hasta que el indicador parpadee. Transcurridos 15 min. se detiene el extractor
y se apaga la iluminación. Para anular la temporizador: presione una vez el pulsador de
la velocidad escogida.
21
Page 22

Panel de cuatro velocidades - Indicador digital (P3 en página 10)
1- Encendido y apagado de la iluminación.
2- Encendido y apagado del extractor.
3- Disminuir la velocidad del extractor.
4- Panel indicador de la velocidad del extractor.
5- Aumentar velocidad del extractor.
6- Activar la velocidad turbo del extractor.
7- Activar y desactivar la temporizador del extractor.
Temporizador: El extractor funciona 5 min. a la velocidad en curso y 5 min. más en
cada una de las velocidades inferiores hasta que se detiene y se apaga la iluminación.
Panel de cinco pulsadores (fig. P4 en página 11)
1- Testigo de control funcionamiento del extractor.
2- Encendido y apagado de la iluminación.
3- Apagado del extractor.
4- Velocidad del extractor - pulsador: 1º, 2º y 3º vel.
Panel Táctil (fig. P5 en página 11)
1- Testigo indicador/pulsador aviso limpieza de filtros. Alerta sobre la necesidad
de cambiar el filtro – pulse para desactivar una vez limpiado o cambiado el filtro.
2- Activar y desactivar la temporizador del extractor.
3- Encendido y apagado de la iluminación. Mantenga pulsado para regular la
intensidad de la iluminación.
4- Encendido y apagado del extractor.
5- Velocidad del extractor - pulsador: 1º, 2º y 3º/4º vel.
Temporizador: El extractor funciona 5 min. a la velocidad en curso y 5 min. más en
cada una de las velocidades inferiores hasta que se detiene.
Panel Táctil Deslizante (fig. P6 en página 11)
1- Encendido y apagado del extractor.
2- Panel táctil deslizante para control de velocidad del extractor. Se usa también
en combinación con el pulsador -3-.
3- Encendido apagado de la iluminación. Presione el pulsador y, mientras
parpadea, regule la intensidad de la iluminación con el panel táctil deslizante
-2-.
4- Activar y desactivar la temporizador del extractor.
5- Testigo indicador/pulsador aviso: limpieza de filtros. Alerta sobre la necesidad
de cambiar el filtro – pulse para desactivar una vez limpio o cambiado el filtro.
Temporizador: El extractor funciona 2 min. a la velocidad en curso y 2 min. más en cada
22
Page 23

una de las velocidades inferiores hasta que se detiene y se apaga la iluminación.
Aviso sobre el Modelo ZEN
El panel frontal se extiende y retrae automáticamente al encender/apagar la
campana.
MANTENIMIENTO DE LA CAMPANA
Atención: Corte siempre el suministro eléctrico antes de realizar el mantenimiento
de la campana. En caso de avería, contacte a un distribuidor oficial o un agente
autorizado.
Limpieza externa: Use detergente líquido, no corrosivo y evite el uso de productos de
limpieza abrasivos.
Filtros de grasa: para evitar posibles incendios, límpielos rigurosamente una vez al
mes o cuando el testigo indicador lo advierta. Para ello, desmonte los filtros y lávelos
con agua caliente y detergente. Si usa lavavajillas, disponga verticalmente los filtros
para evitar que se depositen restos sólidos.
Filtros de carbón activo: Deben ser reemplazados cada 3 meses.
Importante: Aumente la frecuencia de limpieza/sustitución de filtros si la
campana se usa más de 2 horas diarias. Utilice siempre filtros originales del
fabricante.
Reemplazo lámparas (busque el símbolo en las figuras en página 12)
Atención: No manipule las lámparas hasta que se haya cortado el suministro
eléctrico y haya disminuido su temperatura.
Importante: Utilice lámparas nuevas de acuerdo a lo indicado en la placa de
características de la campana.
Utilice lámparas con reflector de aluminio para sustituir lámparas halógenas. No
utilice lámparas dicroicas - riesgo de sobrecalentamiento.
En campanas equipadas con lámparas incandescentes, éstas solamente se deberían
utilizar durante el funcionamiento del motor.
No deben dejarse encendidas de forma permanente usándolas como fuente de
iluminación.
INFORMACIÓN LEGAL
El fabricante:
El fabricante declara que este producto cumple todos los requisitos esenciales
sobre el material eléctrico de baja tensión prescritos en la directiva 2014/35/ EU y de
compatibilidad electromagnética prescrita por la directiva 2014/30/EU.
23
Page 24

· No se hace responsable por la no observación de las indicaciones del presente
manual y las normas de seguridad vigentes para el correcto uso del equipo.
· Se reserva el derecho de efectuar cualquier modificación sin previo aviso en el equipo
o el presente manual.
Contacte con nuestro distribuidor oficial en caso que necesite asistencia técnica o
información adicional sobre nuestros productos.
24
Page 25

FR
Cher client,
Nous vous remercions d’avoir acheté notre hotte. S’il vous plaît suivez les diagrammes
aux pages 6-9 pour une installation correcte, et lire attentivement les instructions cidessous pour plus sur l’installation, ainsi que des informations sur l’utilisation optimale
et la maintenance.
Remarques: Les illustrations mentionnées dans cette notice se trouvent dans les
pages 6 à 12.
Attention: Appliquez les normes locales relatives à l’évacuation des fumées.
Entre autres: Ne reliez pas la hotte à un conduit de fumée, d’aération ou d’air
chaud déjà utilisé. Confirmez avec l’autorité locale que votre
raccordement est conforme. Assurez-vous que le débit maximal d’extraction d’air
des appareils environnants ne dépasse pas 4 Pa (0,04 mbar). Une ventilation
convenable de la pièce doit être prévue lorsqu’une hotte de cuisine est utilisée
simultanément avec des appareils utilisant du gaz ou un autre combustible. L’air
évacué ne doit pas être envoyé dans un conduit utilisé pour évacuer les fumées
d’appareils utilisant du gaz ou un autre combustible. Règlement concernant
l’extraction de l’air doit être respecté.
HOTTE ASPIRANTE EN ACIER INOXYDABLE
INSTALLATION
ATTENTION - POUR RÉDUIRE LE RISQUE D’INCENDIE, DE CHOC ÉLECTRIQUE
OU DE BLESSURES, SUIVEZ LES INSTRUCTIONS SUIVANTES:
a) Les travaux d’installation et le câblage électrique doivent être eectués
par une personne qualifiée en conformité avec tous les codes et normes
applicables, y compris la construction coupe-feu.
b) D’air suisant est nécessaire pour la combustion et l’évacuation complète des
gaz par la cheminée ou appareils de combustion pour prévenir un refoulement.
Suivez les consignes du fabricant de l’équipement de chauage et les normes
de sécurité telles que celles publiées par la National Fire Protection Association
(NFPA) et l’American Society for Heating, Refrigeration
and Air Conditioning Engineers (ASHRAE), et les responsables des codes locaux.
c) Lorsque vous coupez ou perforez un mur ou un plafond, ne pas endommager
le câblage électrique et autres utilités cachées.
d) Les ventilateurs avec conduits doivent toujours être évacués à l’extérieur.
25
Page 26

Pour l’évacuation des fumées vers l’extérieur, utiliser un tuyau en métal rigide d’un
diamètre idéal de 150 mm.
Les restrictions précédentes ne concernent pas les hottes dépourvues d’évacuation
vers l’extérieur (utilisation en recyclage avec filtre à charbon actif).
Installation de la hotte au mur (pages 6 à 8)
• Installez la hotte conformément aux instructions du schéma de montage fourni et aux
indications des illustrations 1 à 16 (voir les pages 6 à 8).
• Utilisez uniquement avec des trousses de cordon de accordement des hottes qui ont
été étudiées et jugées acceptables pour une utilisation avec ce modèle de hotte.
• La distance minimale à respecter entre la surface support des récipients de cuisson
et la partie la plus basse de la hotte de cuisine doit être d’au moins 65 cm.
Installation de la hotte au plafond (page 9)
• Retirez la pièce de protection en Styrofoam avant de l’utiliser.
• Les accessoires nécessaires pour l’installation se trouvent à l’intérieur de la hotte.
• Utilisez les deux vis pour fixer le tuyau réducteur H à la platine supérieure (Fig. 1).
Connectez le tuyau ininflammable de 6” à l’ouverture dans le plafond.
• Assurez-vous que le plafond peut supporter le poids de la hotte. Percez 4 trous dans
le plafond à l’aide d’une mèche de 5/6” et insérez les chevilles (Fig. 2).
• Ajustez la longueur de la structure télescopique et fixez les deux pièces avec 8 vis et
rondelles. Gardez à l’esprit que la distance minimale entre la surface de travail à la
base de la hotte ne doit pas être inférieure à 25 “(fig. 3).
• Fixez la structure télescopique préalablement ajustée au plafond à l’aide de 4 vis et
rondelles (fig. 4).
• Introduisez le tuyau J avec la grille sur la partie supérieure et fixez la structure
télescopique à l’aide de 2 vis (Fig. 4).
• Introduisez le tuyau K et le gardez surélevé (fig. 5).
• Fixez la hotte à la structure télescopique en utilisant les écrous et les rondelles (fig. 5).
• Abaissez le tuyau K et le fixez à la hotte avec 2 vis (Fig. 5)
Branchement électrique de la hotte
Attention: Avant de brancher la hotte: coupez l’alimentation électrique. Vérifiez
que la tension et la fréquence existantes correspondent à celles indiquées sur
la plaque signalétique de la hotte.
Raccordez-le directement à l’installation électrique, sur un circuit protégé par un
26
Page 27

dispositif omnipolaire de séparation facile d’accès pour pouvoir le déconnecter,
conformément à la réglementation locale.
Utilisation de la hotte
ATTENTION: NE CONVIENT PAS POUR UNE UTILISATION AVEC CONTRÔLE DE VITESSE A
L’ÉTAT SOLIDE.
Sécurité
Attention: En cas de décharge électrostatique (par ex. la foudre) la hotte peut
cesser de fonctionner. Cela ne suppose aucun risque de dommages. Coupez
l’alimentation électrique de la hotte et rebranchez-la une minute plus tard.
Cet appareil n’est pas prévu pour être utilisé par des personnes (y compris les
enfants) dont les capacités physiques, sensorielles ou mentales sont réduites, ou des
personnes dénuées d’expérience ou de connaissance, sauf si elles ont pu bénéficier,
par l’intermédiaire d’une personne responsable de leur sécurité, d’une surveillance ou
d’instructions préalables concernant l’utilisation de l’appareil. Il convient de surveiller
les enfants pour s’assurer qu’ils ne jouent pas avec l’appareil.
Les enfants doivent être surveillés pour s’assurer qu’ils ne jouent pas avec l’appareil.
Il y a risque d’incendie si le nettoyage n’est pas eectué conformément aux instructions;
ne pas flamber d’aliments sous la hotte de cuisine.
ATTENTION: Les parties accessibles de cet appareil peuvent devenir chaudes
lorsqu’il est utilisé avec des appareils de cuisson.
Si le câble d’alimentation électrique est endommagé, celui-ci devra être impérativement
changé par un service oiciel ou par un agent autorisé.
Pupitre de commande
Vous trouverez ci-après la description des diérents pupitres de commande possibles.
Vérifiez le modèle du pupitre de commande de votre hotte et reportez-vous à
l’illustration correspondante.
Pupitre avec commutateur à glissière (illustration P1, page 10)
1. Vitesse d’extraction - positions : OFF, 1ère, 2ème et 3ème vitesses.
2. Témoin de contrôle de fonctionnement d’extraction.
3. Interrupteur marche / arrêt de l’éclairage.
27
Page 28

Pupitre avec bouton électrique (illustration P2, page 10)
1. Marche / arrêt de l’éclairage.
2. Témoin de contrôle de fonctionnement de l’éclairage.
3. Vitesse d’extraction - touche : 1ère, 2ème et 3ème vitesses. En appuyant de
nouveau sur la vitesse actuelle, l’extracteur s’éteint.
4. Témoin de contrôle de vitesse de fonctionnement de l’extraction.
Minuterie: Maintenez appuyée pendant deux secondes la touche de la vitesse choisie,
jusqu’à ce que l’indicateur clignote. 15 min plus tard, l’extracteur s’arrête et l’éclairage
s’éteint. Pour annuler la minuterie: Appuyez une fois sur la touche de la vitesse choisie.
Pupitre à quatre vitesses - Aicheur numérique (illustration P3, page 10)
1. Marche / arrêt de l’éclairage.
2. Marche / arrêt d’extraction.
3. Réduire la vitesse d’extraction.
4. Pupitre indicateur de la vitesse d’extraction.
5. Augmenter la vitesse d’extraction.
6. Activer la vitesse turbo d’extraction.
7. Activer et désactiver la minuterie d’extraction.
Minuterie: L’extracteur fonctionne 5 min. à la vitesse choisie et 5 min. supplémentaires
à chacune des vitesses inférieures jusqu’à ce qu’il s’arrête et que l’éclairage s’éteigne.
Pupitre à cinq touches (illustration P4, page 11)
1. Témoin de contrôle de fonctionnement d’extraction.
2. Marche / arrêt de l’éclairage.
3. Arrêt d’extraction.
4. Vitesse d’extraction: Touche : 1ère, 2ème et 3ème vitesses
Pupitre tactile (illustration P5, page 11)
1. Témoin indicateur / touche d’avertissement de nettoyage des filtres. Alerte de
remplacement du filtre nécessaire - Appuyez pour désactiver une fois le filtre
nettoyé ou remplacé.
2. Activer et désactiver la minuterie de l’extracteur.
3. Marche / arrêt de l’éclairage. Maintenez appuyé pour régler l’intensité de
l’éclairage.
4. Marche / arrêt d’extraction.
5. Vitesse d’extraction - touche: 1ère, 2ème, 3ème et 4ème vitesses
Minuterie: L’extracteur fonctionne 5 min. à la vitesse choisie et 5 min. supplémentaires
à chacune des vitesses inférieures jusqu’à ce qu’il s’arrête.
28
Page 29

Pupitre tactile progressif (illustration P6, page 11)
1. Marche / arrêt d’extraction.
2. Pupitre tactile à glissière de contrôle de la vitesse d’extraction. Également
utilisé en combinaison avec la touche -3-.
3. Marche / arrêt de l’éclairage. Appuyez sur la touche et, pendant qu’elle
clignote, réglez l’intensité de l’éclairage avec le pupitre tactile progressif -2-.
4. Active et désactive la minuterie d’extraction.
5. Témoin indicateur / touche d’avertissement de nettoyage des filtres.
Alerte de remplacement du filtre nécessaire - Appuyez pour désactiver l’alerte
une fois le filtre propre ou remplacé.
Minuterie: L’extracteur fonctionne 2 min. à la vitesse choisie et 2 min. supplémentaires
à chacune des vitesses inférieures jusqu’à ce qu’il s’arrête et que l’éclairage s’éteigne.
Avertissement concernant le Modèle ZEN
Le panneau avant s’allonge et se rétracte automatiquement en mettant en marche /
arrêtant la hotte.
Entretien de la hotte
Attention: Coupez toujours l’alimentation électrique avant d’intervenir sur la
hotte. En cas de défaut, contactez un distributeur oiciel ou un agent agréé.
Nettoyage externe: Utilisez un détergent liquide, non corrosif et n’utilisez pas des
produits de nettoyage abrasifs.
Filtres à graisse: Il y a risque d’incendie si le nettoyage n’est pas eectué conformément
aux instructions. Pour cela, démontez les filtres et lavez-les à l’eau chaude et avec du
détergent neutre. Si vous utilisez un lave-vaisselle, placez les filtres à la verticale afin
d’éviter le dépôt de restes solides.
Filtres à charbon actif : Ils doivent être remplacés tous les trois mois.
Important: Augmente la fréquence de nettoyage / remplacement des filtres si la
hotte est utilisée plus de 2 heures par jour. Utilisez toujours des filtres d’origine
du fabricant.
29
Page 30

Remplacement des ampoules (recherchez le symbole sur les
illustrations dans la page 12)
Attention: Ne manipulez pas les ampoules avant d’avoir coupé l’alimentation
électrique et que leur température n’ait baissé.
Important: Utilisez des ampoules neuves conformément à ce qui apparaît sur la
plaque signalétique de la hotte.
Utilisez des ampoules à réflecteur en aluminium pour remplacer des ampoules
halogènes. N’utilisez pas d’ampoules dichroïques - risque de surchaue.
Sur les hottes équipées de lampes à filament de tungstène, l’éclairage doit être
uniquement utilisé lorsque le moteur est en fonctionnement. Ces lampes ne peuvent
fonctionner en permanence et doivent servir d’éclairage ponctuel.
Informations légales
Le fabricant:
• Le fabricant déclare que ce produit répond aux normes relatives au matériel
électrique basse tension établies par la directive 2014/35/EU et à la compatibilité
électromagnétique définie par la directive 2014/30/EU.
• N’est pas responsable du non respect des indications de la présente notice et des
normes de sécurité en vigueur pour l’utilisation correcte de l’équipement.
• Se réserve le droit d’eectuer toute modification sur l’équipement ou dans la présente
notice sans avertissement préalable.
Contactez notre distributeur oiciel si vous avez besoin d’assistance technique ou
d’informations supplémentaires concernant nos produits.
30
Page 31

Page 32

60812195.02.05.2019
 Loading...