

Page 1
FELIX STORCH, INC.
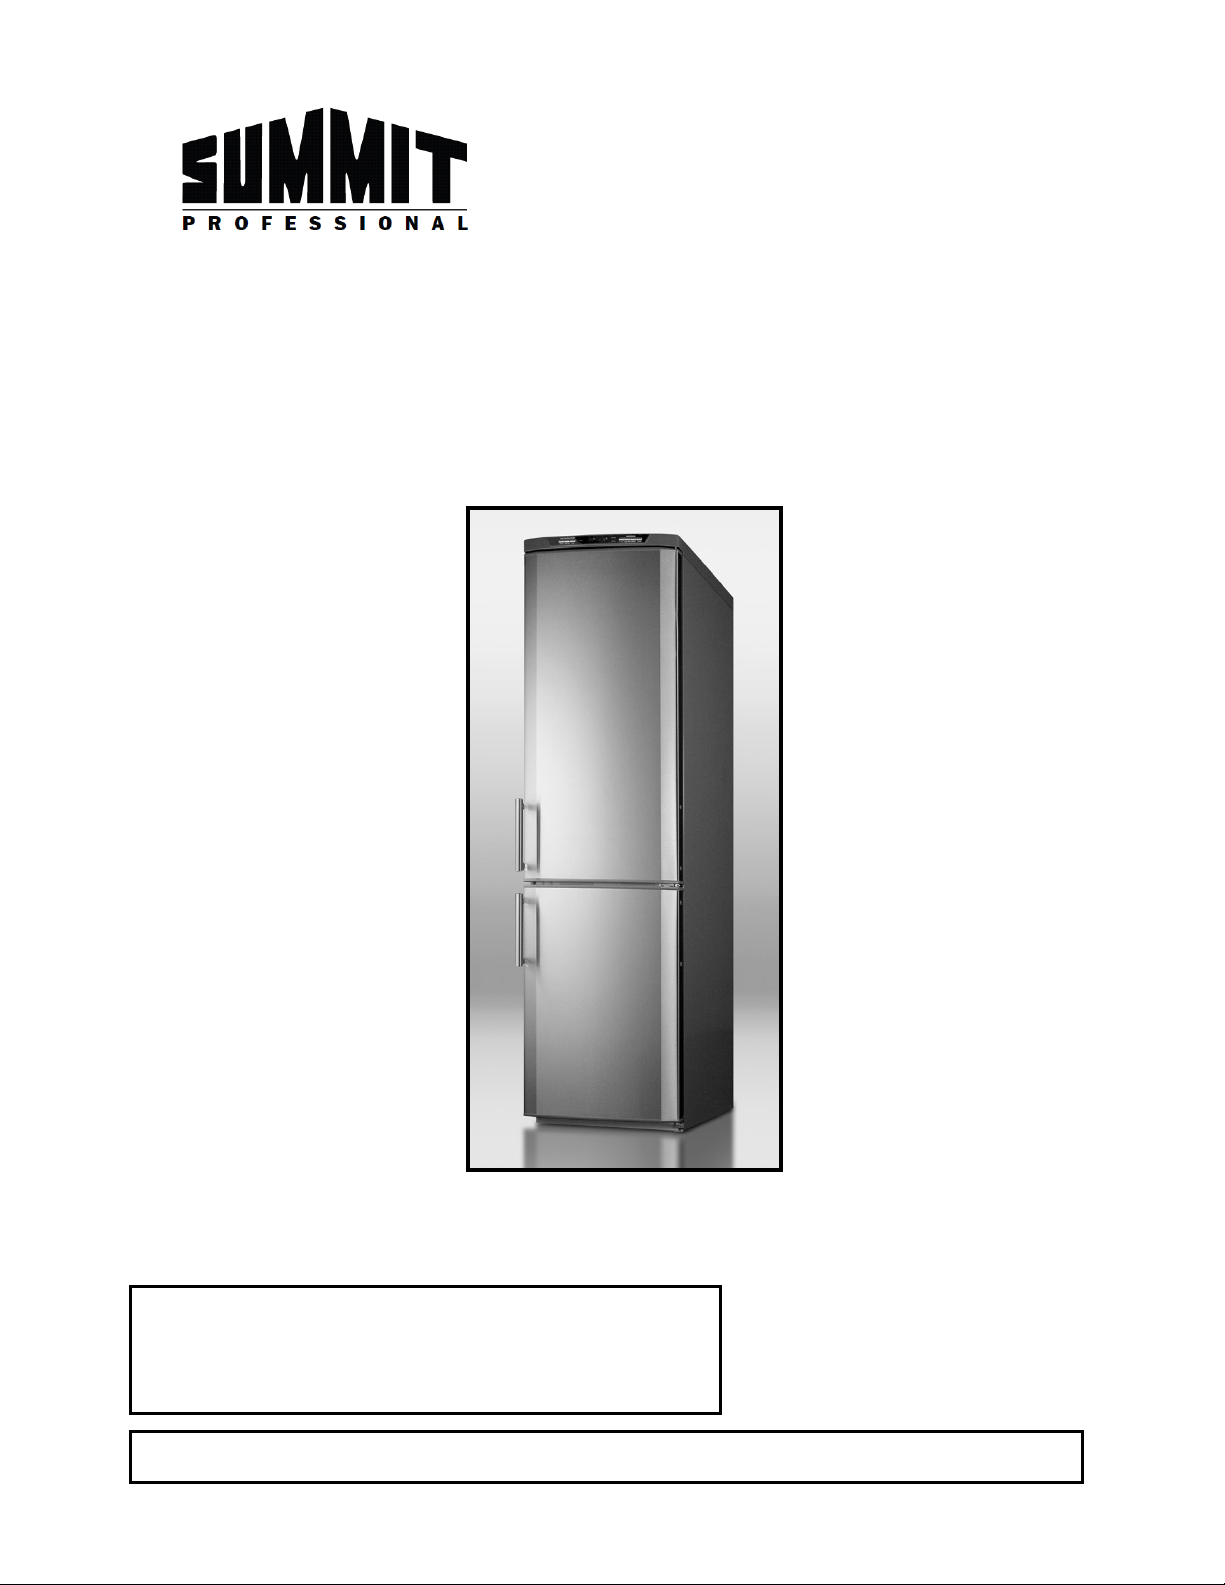
TWO-DOOR REFRIGERATOR
with BOTTOM FREEZER
Model No. FFBF171SS
Please record the serial number, which is found on a label
inside the refrigerator.
________________________________________________
User's Manual
Staple your receipt to this manual. You will need it to obtain warranty service.
770 Garrison Avenue
Bronx, New York 10474
www.summitappliance.com
Page 2

1
Table of Contents
Important Safeguards .............................................................................. 2 - 3
Parts and Features ......................................................................................... 4
Installation ................................................................................................ 5 - 8
Transporting your appliance .................................................................. 5
Setting up the appliance ........................................................................ 5
Location ........................................................................................... 5 - 6
Electrical requirements .......................................................................... 6
Reversing the door swing ................................................................ 6 - 7
Door handle reversal ............................................................................. 8
Movable shelves ................................................................................... 8
Before starting up the appliance ............................................................ 8
Operation ................................................................................................ 8 - 11
Control panel ................................................................................. 8 - 10
Refrigerator compartment ................................................................... 10
Freezer compartment .................................................................. 10 - 11
Food Storage Information ................................................................... 11 - 12
Fresh food ........................................................................................... 11
Frozen food ......................................................................................... 12
Examples of proper food storage ........................................................ 12
Cleaning and Care ............................................................................... 13 - 14
Interior and exterior surfaces ............................................................... 13
Changing the light bulb ............................................................... 13 - 14
If there is a power failure ..................................................................... 14
Normal Operating Noises ............................................................................ 14
Troubleshooting ........................................................................................... 15
Limited Warranty .................................................................................. 16 - 17
Page 3

2
IMPORTANT SAFEGUARDS
Read all of the instructions before using this appliance. If instructions are not
followed, you may lose your right to free service during the warranty period.
Please keep this manual in a safe place and pass it on to later users if
applicable.
When using this appliance, always exercise basic safety precautions, including
the following:
1. Do not connect your appliance to the power supply until all packing and
transit protectors have been removed.
2. Let it stand upright for at least 4 hours before switching it on to allow the
refrigerant system to settle if transported horizontally.
3. This appliance should not be used in a cold, unheated room such as a garage
or shed, or on an outdoor patio.
4. Upon delivery, check to make sure that the product is not damaged and that
all the parts and accessories are in perfect condition. Do not operate a
damaged appliance.
5. Use this appliance only for its intended purpose, that is, the storing and
freezing of edible foodst u f fs.
6. This refrigerator must be properly installed in accordance with the Installation
instructions before it is used. See “Electrical Requirements” in the Installation
section.
7. Any electrical service cords that have become frayed or otherwise damaged
must be repaired or replaced immediately. Do not use a cord that shows
cracks or abrasion damage along its length or at the plug or connector end.
8. Unplug your refrigerator before cleaning or making any repairs.
NOTE: If for any reason this product requires service, we strongly
recommend that a certified technician perform the service.
9. Never unplug your refrigerator by pulling on the power cord. Always grasp the
plug firmly and pull straight out from the outlet.
10. Do not use any electrical device or any sharp instrument in defrosting your
refrigerator.
11. If your old refrigerator is not being used, we recommend that you remove the
doors and leave the shelves in place. This will reduce the possibility of danger
to children.
12. After your refrigerator is in operation, do not touch the cold surfaces in the
freezer compartment, particularly when hands are damp or wet. Skin may
adhere to these extremely cold surfaces.
13. Do not refreeze foods which have been thawed completely. The United
States Department of Ag ri cu lt ur e in Home and Garden Bulletin No. 69 reads:
"...You may safely refreeze frozen foods that have thawed if they still contain
ice crystals or if they are still cold – below 40°F.
Page 4

3
"...Thawed ground meats, poultry or fish that have any off-odor or off-color
should not be refrozen and should not be eaten. Thawed ice cream should be
discarded. If the odor or color of any food is poor or questionable, discard it.
The food may be dangerous to eat.
"...Even partial thaw i ng and re-freezing reduce the eating quality of foods,
particularly fruits, vegetables and prepared foods. The eating quality of red
meats is affected less than that of many other foods. Use refrozen foods as
soon as possible, to save as much of their eating quality as you can."
14. This refrigerator should not be recessed or built into an enclosed cabinet. It is
designed for freestanding installation only. See Installation instructions.
15. Do not operate your refrigerator in the presence of explosive fumes.
16. Do not allow children to play with the appliance, or to sit or stand on the
appliance or on pull-out parts.
17. Do not hang on the appliance doors.
18. Do not dispose of the appliance in a fire. The appliance contains substances
in the insulation which are flammable.
19. Avoid touching the metal condenser wiring on the back of the appliance.
There is a risk of injury.
20. In the event of a possible malfunction, disconnect the appliance from the
power supply first.
21. Prior to cleaning, always unplug the appliance or switch off the circuit breaker.
DANGER! Risk of child entrapment!
• Before you throw away your old refrigerator or freezer, take off the
doors. Leave the shelves in place so that children may not easily climb
inside.
• Never allow children to operate, play with, or crawl inside the
refrigerator.
! WARNING!
• Keep ventilation openings on the appliance enclosure clear of obstruction.
• Do not use mechanical devices or other means to accelerate the defrosting
process, other than those recommended by the manufacturer.
• Do not damage the refrigerant circuit.
• Do not use electrical devices inside the food storage compartments of the
appliance, unless they are of the type recommended by the manufacturer.
SAVE THESE INSTRUCTIONS
Page 5
4
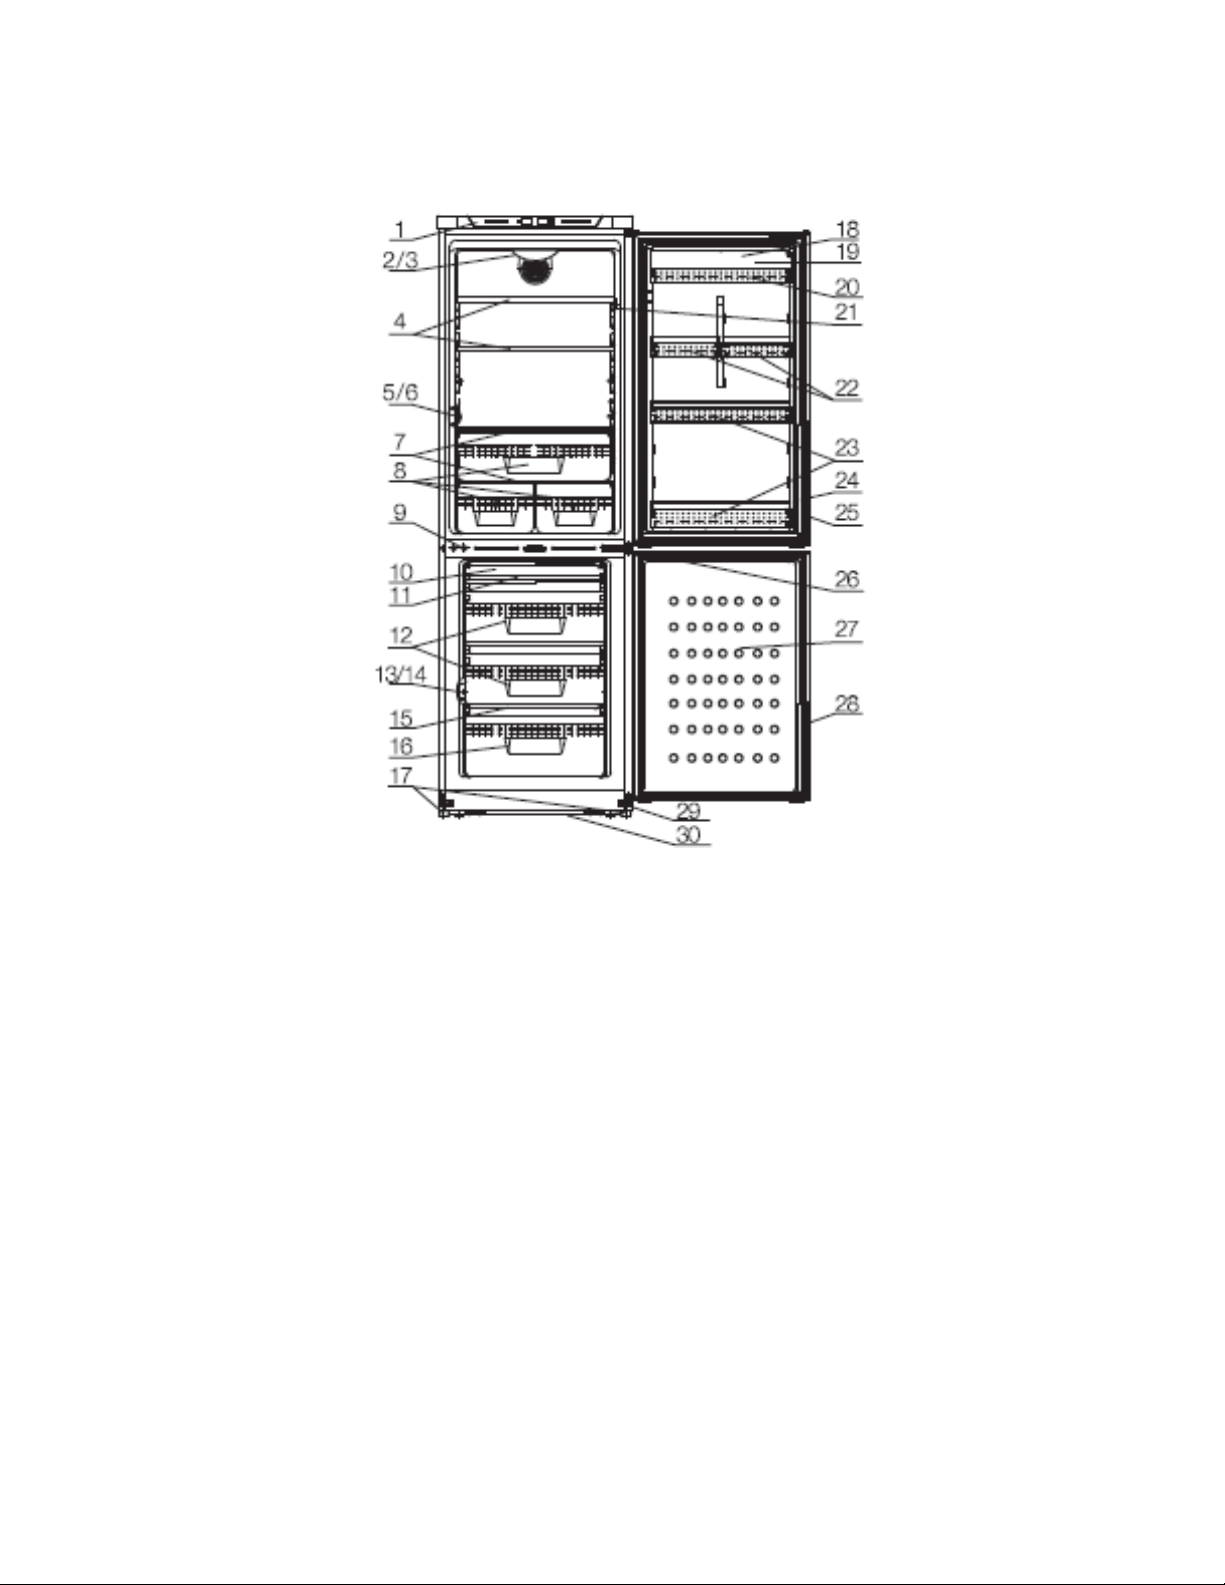
Parts and Features
NOTE: Due to unceasing modification of our products, the features of your refrigerator may be
1. Control panel 16. Freezer lower drawer
2. Interior light 17. Adjustable feet
3. Light cover 18. Door rack cover
4. Refrigerator shelves 19. Egg rack (inside)
5. Temperature head guard 20. Door rack
6. Temperature sensor 21. Door switch
7. Crisper cover 22. Door rack
8. Crisper 23. Door rack
9. Screw hole cover
10. Ice tray (inside)
11. Freezer upper drawer
12. Freezer middle drawers
13. Temperature head guard
14. Temperature sensor
15. Glass shelf (inside)
slightly different than shown here, but its functions and method of usage remain the same.
24. Door gasket
25. Refrigerator door
26. Middle hinge
27. Freezer door
28. Door gasket
29. Right lower hinge
30. Compressor support board
Page 6

5
Installation
SN
+16°C to +32°C (60.8°F to 89.6°F)
Transporting your appliance
1. The ap pliance should only be transported in the upright position.
2. The packaging as supplied must remain intact during transportation.
3. If the unit has been transported or carried in the horizontal position, it may only
be plugged in after standing in the vertical positi on for 4 hours . Plugging in the
appliance any sooner may result in damage to the refrigerator-freezer and
affect your warranty.
Setting up the appliance
• Do not operate your appliance in a room where the temperature is likely to fall
below 10°C (50°F) at night and especially in winter. At lower temperatures the
appliance may not operate, resulting in a reduction in the storage life of the
food.
• The climate class rating of your appliance is given on the rating label located
inside the appliance. It specifies the appr opr iate operating ambient
temperatures as shown below:
Climatic class Ambient temperatures
+10°C to +32°C (50.0°F to 89.6°F)
N
ST
T
+16°C to +38°C (60.8°F to 100.4°F)
+16°C to +43°C (60.8°F to 109.4°F)
This appliance performs well from conditions N to T, but may not work properly
if it is left for a longer period at a temperature above or below the indicated
range.
• Before using this appliance for the first time, wash the interior and all internal
accessories with a dilute solution of lukewarm water and mild dishwashing
liquid in order to remove the typical smell of a brand new product, then dry
thoroughly.
Location
• The unit should be placed in a dry room which can be aired.
• Avoid direct sunlight or direct heat sources such as a stove or radiator.
• To make sure that sufficient room is provided around the appliance to ensure
free air circulat ion , allow at least 3” at the back, and 4” at the top and sides.
• Allow enough space in front of the unit for the doors to swing open160°.
• The appliance should be located on a smooth surface. The two leveling legs at
the front corners of the appliance can be adjusted as requir ed.
Page 7

6
• Leveling legs can be adjusted by turning them counter-clockwise to raise the
refrigerator or clockwise to lower it. Correct adjustment of the feet avoids
excessive vibration and noise.
Electrical requirements
Any electrical work required to install this appliance should be carried out by a
qualified or authorized person.
! WARNING! This appliance must be grounded!
• Do not use an extension cord.
• Make sure there is a suitable power outlet (115V AC, 60Hz, 15 amps) with
proper grounding to power the refrigerator-freezer.
• The electrical safety of the appliance is only assured when the grounding
system in the house is installed in accordance with regulations.
• When positioning the appliance, do not let the power cable get stuck under it;
otherwise, the cable will be damaged.
• Ensure that plug remains easily accessible. Do not use a multiple adapter bar.
• Avoid the use of three-to-two prong adapters or cutting off the third grounding
prong in order to accommodate a two-prong outlet. This is a dangerous
practice since it provides no effective grounding for the refrigerator and may
result in shock hazard.
Reversing the door swing
This appliance allows you to reverse the door opening from left to right and back.
(When you receive the appliance, the doors open from the left.) Y ou ca n change
the direction of the door opening by following this pr oce dur e to make the change.
You will need a small adjustable wrench, a Phillips-head screwdriver and a thinbladed flathead screwdriver (or putty knife).
1. First, disconnec t the appl iance from the power supply.
2. Remove all food, loo se ite ms and fit ti ng s from the ap pl iance and door
shelves. Remove the base grill.
3. Remove the left upper hinge cover. Then remove the
right upper hinge cover and the three bolts. Remove
the upper hinge that holds the door in place. Lift the
door and place it on a padded surface to prevent
scratching it.
4. Remove the two flange screws, then remove the
middle hinge that holds the lower door in place. Lift off
the lower door and place it on a padded surface to
prevent scratching it.
Page 8

7
5. Remove the i nstal l e d door st op per fro m the bottom of
the upper door and put it beside the instruction manual
bag.
6. Take the other door stopper from the instruction
manual bag and fit it on the opposite bottom edge of the
upper door using the screw removed from the righthand door stopper.
7. Remove the screws that hold the lower hinge, and
transfer them to the accessory package.
8. Take the alternate lower hinge from the accessory
package and fit it into the left hinge position.
9. Transfer the lower door to the hinge location. Secure
the door in a level position and put the lower hinge pin
into the lower hole of the door, then tighten the bolts.
10. Reverse the middle hinge by 180° then transfer it to the
left hinge position. Put the middle hinge pin in the upper
hole of the lower door, then tighten the bolts.
11.Transfer the upper door to the hinge position. Secure the door, making sure it
is level. Insert the middle hinge pin into the lower hole of the upper door.
12. Reverse the directi on of the upper hinge by 180° and
transfer it to the left hinge position. Put the upper hinge
pin into the upper hole of the door, then tighten the
screws to secure the door.
13. Place the right upper hinge cover on the left position. Take another right
upper hinge cover from the accessory package and set it into the right-hand
hinge position.
14.Replace the base gri ll .
Page 9

8
Door handle reversal (if door swing is reversed)
°C
°F
°C
°F
°C
°F
°C
°F
-25
-13.0
-18
-0.4
1
33.8
8
46.4
Remove the handle screws that hold the handle to the door
on the left side as illustrated, and transfer them to the
covered holes on the right side. Use the screws to affix the
handle to the right side of the door and place the hole
coverings over the holes on the left side of the door.
Do the same for each of the doors.
Movable shelves
The walls of the refrigerator are equipped with a series of runners so that the
shelves can be positioned as desired. To remove a shelf, gradually pull it in the
direction of the arrows until it comes free, then reposition as required.
Before starting up the appliance
Wait for at least 4 hours to allow the system to settle before switching on.
Before you begin operating your refrigerator-freezer, check the following points
for safety:
• Is the appliance standing firmly on the floor?
• Is there sufficient space for good air circulation?
• Is the interior clean? (See Cleaning and Care.)
Now connect the appliance to the power supply.
Operation
Control panel
The control panel is located at the top front of the unit. Among other things, it
contains the thermostat which controls the temperatures inside the Refrigerator
compartment and the Freezer compartment.
This appliance displays temperatures in Celsius degrees (°C). You can use the
chart below to estimate corresponding temperatures in Fahrenheit (°F).
-24 -11.2 -17 1.4 2 35.6 10 50.0
-23 -9.4 -16 3.2 3 37.4 15 59.0
-22 -7.6 -15 5.0 4 39.2 20 68.0
-21 -5.8 -10 14.0 5 41.0 25 77.0
-20 -4.0 -5 23.0 6 42.8 30 86.0
-19 -2.2 0 32.0 7 44.6
Page 10

9
Operation of the variou s contr ols is described below:
REFRIGERATOR ON/OFF
Press this button once and the refrigerator turns on. Pressing it a second
time will turn the refrigerator off.
SUPER COOL
If you need the temperature inside the refrigerator to drop rapidly, press the
SUPER COOL button and the refrigerator will run in SUPER COOL mode until
the temperature inside the refrigerator reaches 2°C (35.6°F). Press the
SUPER COOL button again to exit the SUPER COOL mode.
NOTE: Whe n the refrigerator is shut off, the SUPER COOL mode will be
exited and the SUPER COOL button will not operate. In SUPER
COOL mode, additional energy will be consumed.
REFRIGERATOR TEMPERATURE ( )
You can set the temperature inside the refrigerator by pressing the and
buttons until the required temperature is displayed. The refrigerator
temperature range is from +2°C to +8°C (35.6°F to 46.4°F). An average
temperature of 5°C (41°F) in the refrigerator is normal.
NOTE: When the refrigerator is shut off or running in SUPER COOL mode,
the temperature set buttons for the refrigerator are unusable.
FREEZER ON/OFF
Press this button once to turn the freezer on; press it a second time to turn
the freezer off.
SUPER FREEZE
If you need the temperature inside the freezer to drop rapidly, press the
SUPER FREEZE button. The freezer compartment will operate in SUPER
FREEZE mode; the compressor will work continuously for 26 hours. Press the
SUPER FREEZE button again and the unit will exit the SUPER FREEZE
mode.
NOTE: If the freezer is shut off, it will exit the SUPER FREEZE mode and the
SUPER FREEZE button will be unusable. When in SUPER FREEZE
mode, additional energy will be consumed.
FREEZER TEMPERATURE ( )
You can set the temperature inside the freezer by pressing the and
buttons until the required temperature is displayed. The freezer temperature
range is from -15°C to -24°C (5°F to -11.2°F).
ALARMS
Door Alarm: If the refrigerator door is left open for 2 minutes, an alarm will
sound to remind you to close it. When you hear the alarm, check that the door
is properly closed.
Page 11

10
Freezer Temperature Al ar m
abnormally high, the over-temperature alarm will be heard. A buzzer will
sound for 10 seconds, and at the same time the alarm LED on the control
panel will begin to flash.
Press the Alarm/M button once to stop the buzzer. The LED will stop flashing
but remain illuminated until the freezer temperature returns to normal.
: When the temperature in the freezer is
Refrigerator compartment
Food storage
The refrigerator compartment is for the short-term storage of fresh food and
drinks. Position food so that air can circulate around it freely.
Raw meat is best kept wrapped or in a sealed plastic bag near the bottom of the
refrigerator compartment.
Allow hot foods and beverages to cool to room temperature prior to placing them
in the refrigerator.
Defrosting
The refrigerator compartment defrosts automatically. The
thawing water flows through the drain channel into a collection
container at the rear of the appliance.
Check the flow of the thawed water from time to time. The drain
hole may become plugged occasionally. Clean it with a Q-tip or
similar item. See figure.
:
:
Freezer compartment
Freezing food
You can use the appliance for freez i ng fresh f ood as well as for storing pre-
frozen food. Please refer to the recommendations given on the food packaging.
:
! Attention
Do not freeze carbonated beverages, as the container may burst when the
liquid is frozen.
Do not exceed the freezing capacity of your appliance. See the rating label
inside the unit. In or der to maintain the quality of the food, the freezing must
take place as rapidly as possible. Thus, the freezing capacity will not be
exceeded and the temperature inside the freezer will not rise.
! Attention
Keep freshly placed food separated from already deep-frozen foods.
If warm or hot food is placed in the freezer, the cooling compressor will work
until the food is completely frozen. This can temporarily cause excessive
cooling of the refrigerator compartment.
If you find the freezer door difficult to open just after you have closed it, don’t
worry. This is due to a pressure difference which will equalize and allow the
door to open normally after a few minutes.
Page 12

11
Defrosting
:
The freezer compartment defrosts automatic all y.
! WARNINGS!
• The fan inside the freezer compartment circulates cold air. Never insert
any object through the guard. Do not allow children to play with the freezer
fan.
• To ensure that you obtain the best possible performance from your
appliance, do not obstruct the fre ezer fan guard.
• Never store products that contain inflammable propellant gas (e.g., spray
cans) or explosive substances.
Food Storage Information
Fresh food
• When storing fresh food that is not prepackaged, be sure to wrap or store it in
airtight and moisture-proof material unless otherwise noted. This will ensure
proper shelf life and prevent the transfer of odors and tastes.
• Wipe containers before storing to avoid needless messes.
• Eggs should be stored in an upright position in their original carton or in the
supplied egg tray to maximize shelf life.
• Fruit should be washed and dried, then put into in sealed plastic bags before
storing in the refrigerator.
• Vegetables with skins should be stored in plastic bags or containers.
• Leafy vegetables should be washed and dried, then stored in plastic bags or
containers.
• Hot food should be allowed to cool before storing in the refrigerator. This will
prevent unnecessary energy use.
• Fresh seafood should be used the same day as purchased.
• When storing meats in the fresh food section, keep in the original packaging or
rewrap as necessary. Follow the suggestions below for safe storage:
Chicken 1 - 2 days
Ground beef 1 - 2 days
Cold cuts 3 - 5 days
Steaks/roasts 3 - 5 days
Smoked/cured meats 7 - 10 days
All others 1 - 2 days
If longer periods of storage are required, store immediately in the freezer section.
Page 13

12
Frozen Food
• Proper freezer storage requires correct packaging. All foods must be in
packages that do not allow the flow of air or moisture in or out. Improper
storage will allow the transfer of odors and taste and will result in the drying
out of the improperly packaged food.
• Follow package or container instructions for proper storage.
• Packaging recommendations
:
Plastic containers with air-tight lids
Heavy-duty aluminum foil
Plastic wrap made from saran film
Self-sealing plastic bags.
• Do not refreeze defrosted/thawed foods.
• It is recommended that the freezing date be marked on the packaging.
Examples of proper food storage
White wine, beer and mineral water
Chill before use.
Bananas Do not store in refrigerator.
Fish or organ meats Store in plastic bags only.
Cheese Use airtight containers or plastic bags;
for best results, take out of the
refrigerator an hour before
consumption.
Melons Store only for a short period of time,
use airtight packaging/wrapping.
Raw meat and poultry Do not store unwrapped with delicate
items like cooked food and milk.
Page 14

13
Cleaning and Care
! Warning! To avoid electric shock, always unplug your refrigerator or
switch off the circuit breaker before cleaning. Ignoring this warning may
result in death or injury.
Interior and exterior surfaces
• Remove foods from the appliance before cleaning and store them in a cool,
covered place.
• Never clean the appliance with a steam cleaner. Moisture could accumulate in
electrical components.
• Before cleaning the interior, remove shelves and drawers.
• Prepare a cleaning solution of 3-4 tablespoons of baking soda mixed with
warm water. Use a sponge or soft cloth dampened with the cleaning solution
to wipe down your appliance, as well as the shelves and drawers.
• Rinse with clean warm water and dry with a soft cloth.
• Do not use harsh chemicals, abrasives, ammonia, chlorine bleach,
concentrated detergents, organic solvents or metal scouring pads. Som e of
these chemicals may dissolve, damage and/or discolor your refrigerator.
• Do not allow water to come into contact with the electrical connections on the
temperature control or the interior light.
• Once everything is dry, return the shelves, drawers and food to the interior
and put the appliance back into service.
• If the appliance is not going to be used for a long time, switch it off and
remove all food. Clean the appliance and keep the doors open.
• To preserve the appearance of your appliance, you can polish the exterior and
the door accessories with a silicone wax.
• Clean the condenser coils at the back of the appliance once a year using a
brush or a vacuum cleaner. Dust build-up leads to increased energy
consumption.
• Clean door gaske ts every three months using a baking soda solution as
described above. Gaskets must be kept clean and pliable to ensure a proper
seal.
• Petroleum jelly applied lightly on the hinge side of gaskets will keep the
gaskets pliable and ensure a good seal.
Changing the light bulb
! Warning! If the LED light bulb is damaged, DO NOT ATTEMPT TO
CHANGE IT BY YOURSELF. Changing the light bulb may cause injury
or a serious malfunction if carried out by an inexperienced person.
To change the light bulb:
a) Switch off the appliance and pull out the power plug.
Page 15

14
b) Remove the plastic light cover with one hand while
forcefully pressing the middle of the cover with the
other hand. See illustrati on.
c) Replace the bulb with a 10-watt (or less) LED bulb that
is of the same shape and size as the original.
d) Replace the plastic cover and reconnect the unit.
If there is a power failure
Try to avoid opening the doors during a power failure. Frozen food in the freezer
compartment should not be affected if the power failure lasts no longer than a
day or two.
If the power failure lasts longer than this, the food should be checked and either
consumed immediately or cooked and then re-frozen.
Normal Operating Noises
Various sounds you will hear are completely normal and are caused by the
operation of the cooling system of your appliance:
• Gurgling, hissing, boiling or bubbling noises are caused by the refrigerant
circulating inside the cooling system. These noises can still be heard for a
short time after the compressor shuts off.
• Sudden sharp cracking or popping noises are caused by the expansion and
contraction of the inside walls or some components inside the cabinets.
• Buzzing, whirring, pulsating or high-pitched humming noises are caused by
the compressor. These noises are slightly louder at the start-up of the
compressor cycle and reduce when the appliance reaches the operating
temperatures.
To avoid disturbing vibrations and unnecessary noises, make sure that:
• Your refrigerator is standing level on all four feet.
• Your refrigerator is not in contact with the walls, surrounding objects or kitchen
cabinets and furniture.
• Cans, bottle or dishes inside the refrigerator are not touching and rattling
against each other.
• All shelves and bins are mounted correctly inside the refrigerator cabinets and
doors.
Page 16

15
Troubleshooting
Problem
Possible Cause
Solution
Not every malfunction is a case for our customer service. Very often, you can
easily resolve the problem without requesting service. Before requesting service,
please check the list below to see if the call can be avoided.
Appliance is not switched on. Switch on the appliance.
Appliance does
not work.
Appliance cools
too much.
The food is
too warm.
Interior lighting
does not work.
Heavy build-up of
frost, possibly also
on door seal.
Unusual noises
The compressor
does not start
immediately after
changing the
temperature setting.
Water on the floor or
storage shelves
Main plug is not plugged in or is
loose.
Fuse has blown or is defective. Check fuse, replace if necessary.
Outlet is defective.
Temperature is set too cold.
Temperature is not properly
adjusted.
Door was open for an extended
period.
A large quantity of warm food was
placed in the appliance within the
last 24 hours.
The appliance is near a heat
source.
Light bulb is defective.
Door seal is not air-tight (possibly
after reversing the doors).
Appliance is not level. Readjust the feet.
The appliance is touching the wall
or other objects.
A component, e.g. a pipe, on the
rear of the appliance is touching
another part of the appliance or
the wall.
This is normal, no error has
occurred.
Water drain hole is blocked.
Plug the appliance into the electrical
socket.
Defective parts need to be repaired
by an electrician.
Turn the temperature regulator to a
warmer setting temporarily.
Please refer to Refrigerator
Temperature section on page 8..
Open the door only as long as
necessary.
Set the temperature control to a
lower setting temporarily.
Please refer to Location section on
page 5.
Please refer to Changing the Light
Bulb on pages 13-14.
Carefully warm the leaking sections
of the door seal with a hair dryer (on
a cool setting). At the same time,
shape the warmed door seal by hand
so that it sits correctly.
Move the appliance slightly.
If necessary, carefully bend the
component out of the way.
The compressor starts after a period
of time.
Refer to Defrosting on page 9.
Page 17

16
Limited Warranty
PARTS AND LABOR WARRANTY INFORM ATION
SUMMIT Appliances are manufactured to provide outstanding value, and your satisfaction is our goal
on every product. All SUMMIT major appliances carry a one year limited warranty on both parts and
labor. All refrigerators and freezers carry an additional four years on the compressor. Certain
exclusions may apply.
Certain models (including SUMMIT ranges, wall ovens, and cook tops) are manufactured for us in the
U.S. and carry the manufacturer's warranty (also one year parts and on-site labor).
For details on specific warranty issues, please refer to the warranty packed with the product, or contact
us.
GENERAL PARTS AND LABOR WARRANTY
Summit warrants, to the original purchaser of every new unit, the cabinet and all parts thereof, to
be free from defects in material or workmanship, under normal and proper use and maintenance
service as specified by Summit and upon proper installation and start-up in accordance with the
instruction packet supplied with each Summit unit. Summit’s obligation under this warranty is
limited to a period of 12 months from the date of original purchase.
Any parts covered under this warranty that are determined by Summit to have been defective,
within the above said period, are limited to the repair or replacement, including labor charges, of
defective parts or assemblies. The labor warranty shall incl ude pr e-approved standard straight
time labor charges only and reasonable travel time, as determined by Summit.
COMPRESSOR WARRANTY
In addition to the warranty period stated above, Summit warrants its hermetically sealed
compressor to be free from defects in both material and workmanship, under normal and proper
use and maintenance, for a period of 60 months from the date of original purchase. Compressors
determined by Summit to have been defective within this extended time period will, at Summit’s
option, be either repaired or replaced with a compressor or compressor parts of similar design
and capacity. The above said extended compressor warranty applies only to hermetically sealed
parts of the compressor and DOES NOT apply to any other parts or components, including, but
not limited to, cabinet, paint finish, temperature control, refrigerant, metering device, driers, motor
starting equipment, fan assembly, or any other electrical component, etc.
WARRANTY CLAIMS
All claims for labor or parts must be made directly through Summit. All claims should include:
model number of the unit, the serial number of the cabinet, proof of purchase, date of installation,
and all pertinent information supporting the existence of the alleged defect. In case of
compressor warranty, the compressor model tag must be returned to Summit along with the
above listed information. All claims should be filed within 30 days of completed repair or the
warranty claim could be refused.
THINGS NOT COVERED BY THIS WARRANTY
Summit’s sole obligation under this warranty is limited to either repair or replacement of parts,
subject to the additional limitations below. This warranty neither assumes nor authorizes any
person to assume obligations other than those expressly covered by this warranty.
• NO CONSEQUENTIAL DAMAGES: Summit is not responsible for economic loss; profit loss;
or special, direct, indirect, or consequential damages, including without limitation, losses or
damages arising from food or product spoilage claims whether or not on account of
refrigeration failure.
WARRANTY IS NOT TRANSFERRABLE: This warranty is not assignable and applies only in
•
favor of the original purchaser/user to whom delivered. Any such assignment or transfer shall
Page 18

17
void the warranties herein made and shall void all warranties, express or implied, including
WARNING! This product may contain chemicals known to the state of California
higher than threshold limits: NONE.
Printed in China
any warranty of merchantability or fitness for a particular purpose.
• IMPROPER USE: Summit assumes no liability for parts or labor coverage for component
failure or other damages resulting from improper usage or installation or failure to clean and/or
maintain product as set forth in the warranty packet provided with the unit.
• ALTERATION, NEGLECT, ABUSE, MISUSE, ACCIDENT, DAMAGE DURING TRANSIT OR
INSTALLATION, FIRE, FLOOD, ACTS OF GOD: Summit is not responsible for the repair or
replacement of any parts that Summit determines have been subjected after the date of
manufacture to alteration, neglect, abuse, misuse, accident, damage during transit or
installation, fire, flood, or act of God.
• IMPROPER ELECTRICAL CONNECTIONS: Summit is not responsible for the repair or
replacement of failed or damaged components resulting from electrical power failure, the use
of extension cords, low voltage, or voltage drops to the unit.
• NO IMPLIED WARRANTY OF MERCHANTABILITY OR FITNESS FOR A PARTICULAR
PURPOSE: There are no other warranties, expressed, implied or statutory, except the parts
& labor warranty and the extended compressor warranty specifically described above. These
warranties are exclusive and in lieu of all other warranties, including implied warranty and
merchantability or fitness for a particular purpose. There are no other warranties which
extend beyond the description on the face hereof.
• OUTSIDE CONTIGUOUS UNITED STATES: This warranty does not apply to, and
Summit is not responsible for, any warranty claims made on products sold or used
outside the contiguous (48) United States. To be clear, this warranty excludes the states
of Alaska and Hawaii and all off-shore territories.
REQUESTING SERVICE
If you are in need of service, please either fill out a service request on our website,
http://www.summitappliance.com/support, or call us at 800-932-4267 or 718-893-3900. Please be
prepared to give us the following information: your name, address, phone, email, model, serial number,
date of purchase, place of purchase, and the problem you are having.
to cause cancer or birth defects or other reproductive harm. For more information,
visit: www.summitappliance.com/p rop 65
Chemicals known by the manufacturer to be p resent in this product in c oncentrations
 Loading...