

Page 1
REFRIGERATOR – FREEZERS
Models
FFBF100W
FFBF101SS
Use and Care Guide
BEFORE USE, PLEASE READ AND FOLLOW ALL SAFETY RULES AND
OPERATING INSTRUCTIONS.
Keep proof of original sales date (such as your sales slip) with this
manual to establish the warranty period.
Write the Model and S eri al Num bers h ere. Y ou’ ll fin d t hem on a pl at e
located either on the back of the appliance or on an interior wall.
Model No. _____________________________
Serial No. _____________________________
Felix Storch, Inc.
770 Garrison Avenu e
Bronx, NY 10474
www.summitappliance.com
Page 2
IMPORTANT SAFEGUARDS
Before the refrigerator -freezer is used, it must be proper ly posit ioned a nd inst alled as
described in this manual, so read the manual carefully. To reduce the risk of fire,
electrical shock or injury when using this appliance, follow basic precautions,
including the following:
• Plug into a grounded 3-prong outlet, do not remove groundin g prong, do not use an adapter , and do
not use an extension cord .
• It is recommended that a separat e circuit, serving only your refrigerator-freezer, be provided. Use
receptacles that cannot be turned off by a switch or pull c hain.
• Never clean refrigerator parts with flammable fluid s. These fumes can create a fire hazard or
explosion.
• Do not store or use gasoline or other flamma ble vap ors and liquids inside or in the vicinity of this or
any other appliance. The fumes can create a fire h azard or explosion.
• Do not use flammable sprays in the vicinity of this appliance.
• Before proceeding with c leaning and maintenance oper at ions, make sure the power line of the unit
is disconnected.
• Do not connect or disconnect the electric plug when your hands are wet.
• Unplug the appliance or di sconnect power bef ore cleaning or serv icing. Failure t o do so can result in
electrical shock or death.
• Do not attempt to repair or replace any part of your refri ger at or-freezer unless it is specifically
recommended in this manual. All other servicing should be referred to a qua li f i ed technician.
• This appliance is CFC- an d HF C-free and contains a small quantity of Isobutane (R600a) w hich is
environmentally friendly but flammable. I t does not damage the ozon e layer , nor does it incr ease the
greenhouse effect. Care must be taken during t ransportation and sett ing up of the appliance that no
parts of the cooling system are damaged. Leaking cool ant can ignite and may damage t he eyes.
• In the event of any damage:
- Avoid open flames and anything that creates a spark,
- Disconnect from the electrica l pow er line,
- Air the room in which the appliance is lo cated for several minutes, and
- Contact the Service Departm ent for advice.
• The more coolant there is in an a ppliance, the larger the room it should be installed in. In the ev ent
of a leakage, if the ap pliance is in a sm all room, there is the danger of c ombustible gases bui lding up.
For every ounce of coolant , at least 32 5 cubic feet o f room space is required. The amount o f coolant
in the appliance is stated on the data plate either on the back of the appliance or on an interior wall.
It is hazardous for anyone other t han an auth oriz ed Serv ice Per son t o carr y out serv icing or r epai r s
to this appliance.
• Take serious care when handling, moving, and using the appliance t o avoid either damaging the
refrigerant tubing or incre asing the risk of a leak.
• Replacing component par ts and ser vici ng shal l be done by factor y-authorized service personn el so
as to minimize the risk of possible ignition due to incorrect par ts or improper service.
1
Page 3
• DANGER! Risk of child entrapment!
Child entrapment and suffocation are not problems of the past. Jun ked or abandoned refrigerators
are still dangerous, even i f t hey will "just sit in the garage a few days."
√ Befor e you throw away your old refriger ator: Take off the doors. Leave the shelves in place
so that children may not easi ly cli mb inside.
√ Never allow children to operate, play with, or cr awl inside the refrigerator.
• Use two or more people to move and install the refrigerator-freezer. Failure to do so can result in
back or other injury.
• To ensure proper ventilation for your appliance, the front of the unit must be completely
unobstructed. Choose a well-ventilated area w ith t emperatures above 60°F (16°C) and below 90°F
(32°C). This unit must be installed in an area protect ed from the elem ents, such as w ind, rain, water
spray or drips.
• The refrigerator-freezer should not be located next t o ovens, grills or other sources of hi gh heat.
• The appliance must be installed with all electrical, water and drain connections in accordance with
state and local codes. A standard electrical supply (115 V AC only, 60 Hz), properly grounded in
accordance with the Natio nal Electrical Code and local codes and ordinances, is required.
• Do not kink or pinch the power supply cord of the refrigerator-freezer.
• The fuse (or circuit brea ker) size should be 15 ampe r es.
• It is important for the appliance t o be leveled in order to wor k properly. You may need to make
several adjustments t o level it.
• Check for leaks after connect ion.
• Never allow children to oper at e, play with or crawl inside the refrigerator.
• This appliance is not intended f or use by persons (including children) with reduced physic al, sensory
or mental capabilities, or l ack of experience and knowledg e, unless they have been given
supervision or instruction concerning use of the applia nce by a person responsib le for t heir safety.
• IMPORTANT: Do not use mechanical devices or other means to accelerate the defrostin g pr ocess,
other than those recommended by the manufacturer.
• IMPORTANT: Do not damage the refrigerant circuit.
• IMPORTANT: Do not use electrical appliances inside t he foo d storage compartments of the
appliance unless they ar e of a type recommended by t he manu fact urer .
• Do not use solvent-based clea ning agents or abrasiv es on the interior . Thes e cleaners may damag e
or discolor the interior.
• This type of refrigerator-fr eezer is widely used in p laces suc h as hot els, offices, student dormitories
and houses. It is most suitable for refrigerating and storing food items. Do not use this appar atus for
other than its intended purpose.
SAVE THESE INSTRUCTIONS
2
Page 4
1. INSTALLATION
1.1 Location
When selecting a position for your unit you should make sure the floor is flat and firm, and the
room is well ventilated. Avoid locating your unit near a heat source, e.g. stove, boiler or radiator.
Also avoid direct sunlight as it may increase the electrical consumption. Extremely cold ambient
temperatures may also cause the unit not to perform properly. This unit is not designed for use in
a garage or outdoor installation. Do not drape the unit with any covering.
When installing the unit, be sure that 7¾ in. of free space is left at both sides, 7¾ in. at the rear
and 12 in. at the top of the unit. This will allow cold air to circulate around the appliance and
improve the efficiency of the cooling process.
1.2 Reversing the Door Swing
Tools Required: Phillips screwdriver / Flat-bladed screwdriver / Hexagonal wrench
◆ If you want to have the door swing reversed, we recommend that you contact a
qualified technician. You should only try to reverse the door yourself if you believe that
you are qualified to do so.
◆ Ensure the unit is unplugged and empty.
◆ Adjust the two leveling feet to their highest position.
◆ To take the door off it is necessary to tilt the unit backwards. You should rest the unit on
something solid so that it will not slip during the door reversing process.
◆ All parts removed must be saved for the reinstallation of the door.
◆ Do not lay the unit flat as this may damage the coolant system.
◆ We recommend that 2 people handle the unit during assembly.
1) Remove the hinge co ver. Unscrew and
remove the top hinge.
2) Lift the freezer door up and away from
the appliance.
3
Page 5
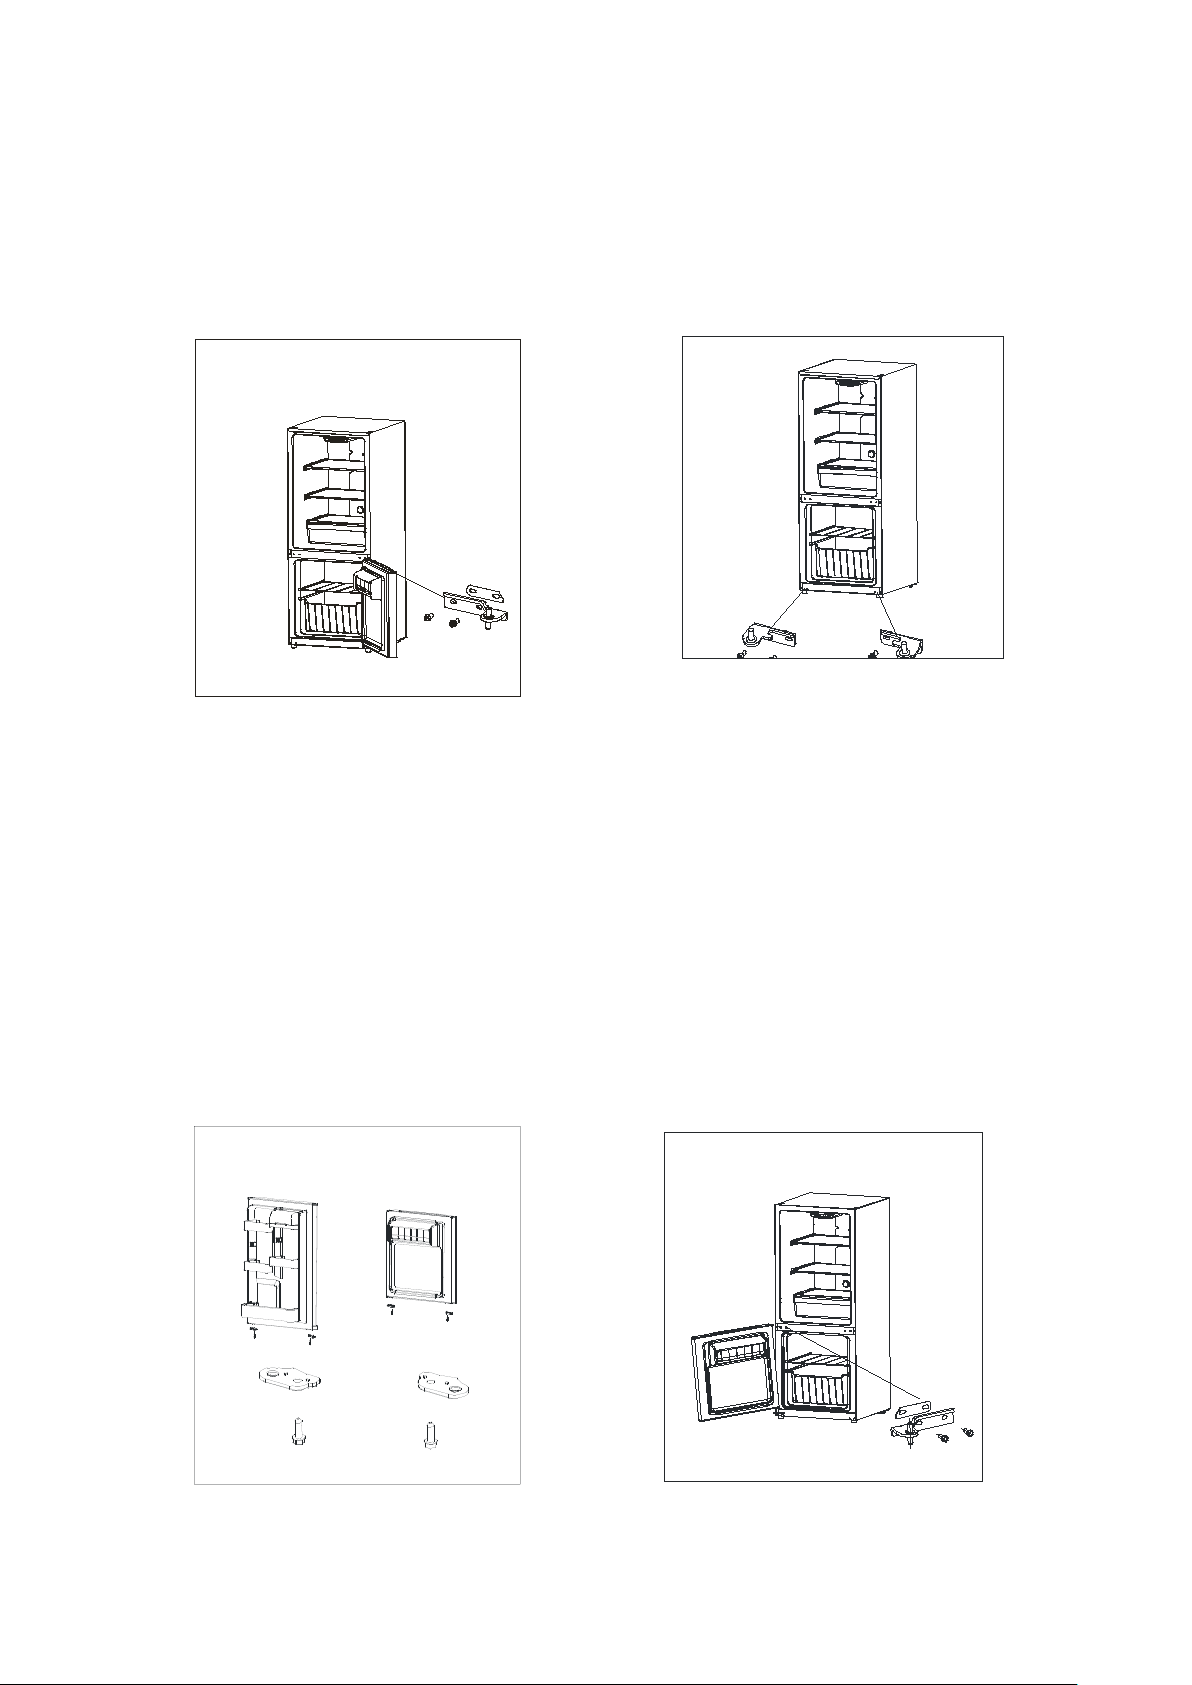
3) Remove the screws from the middle
hinge. Lift the refrigerator door up and
away from the appliance.
5) Remove the pin assembly from the
bottom of the freezer and refrigerator
doors. On the opposite side, attach the
replacement pin assembly (located in the
plastic bag with the Use and Care Manual)
with a screwdriver. NOTE: You must
re-use the screw from the pin assembly
that is removed in this step when
attaching the new assembly.
4) First loosen the screws and remove the
right hinge and gasket. Take out the left
hinge and remove the screws fixed to the
left hinge and shim. Finally attach the left
hinge and gasket using the screw holes on
the left side of the refrigerator.
6) Place the freezer door on the bottom
hinge. Be sure the door is aligned
horizontally and vertically, and that the
gasket seals on all sides before attaching
the middle hinge. Attach the middle hinge
using a screwdriver.
4
Page 6
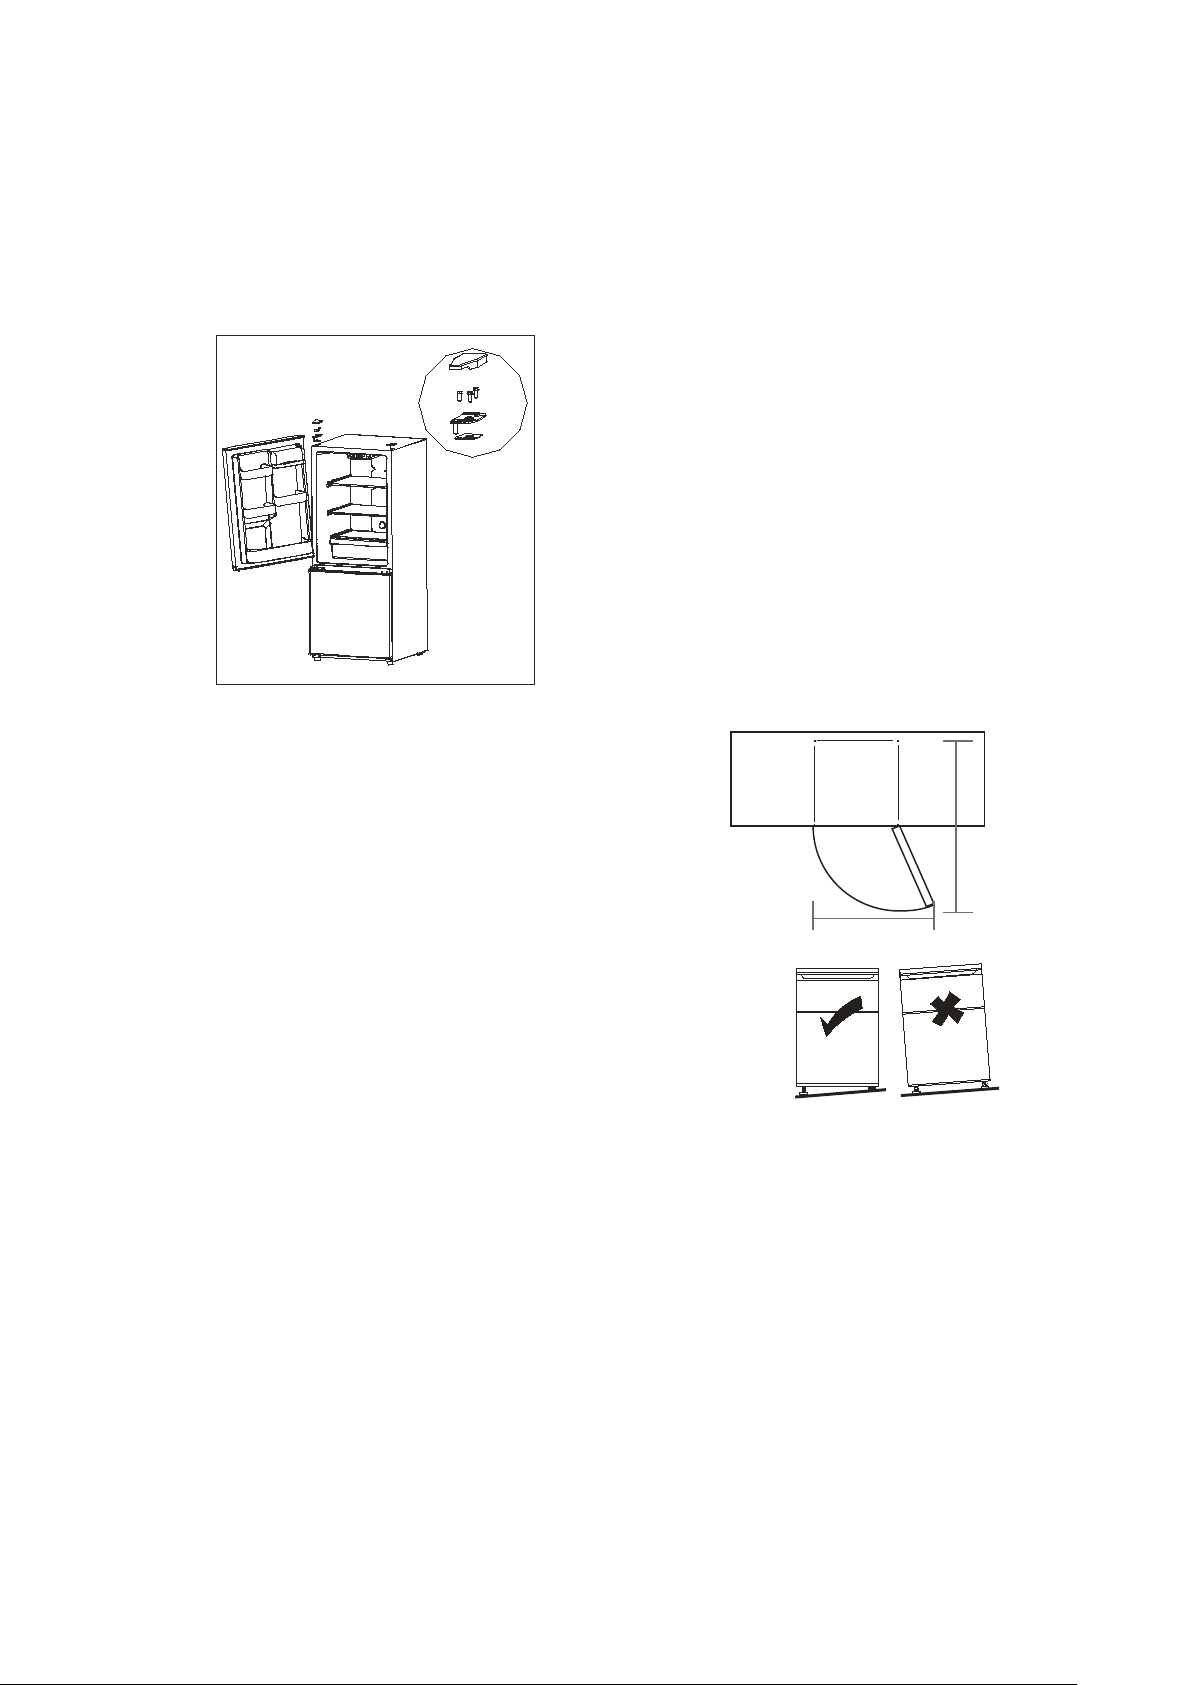
7) Place the refrigerator door on the middle
W
D
hinge. Be sure the door is aligned
horizontally and vertically, and that the
gasket seals on all sides before attaching
the top hinge. Attach the top hinge and
replace the hinge cover.
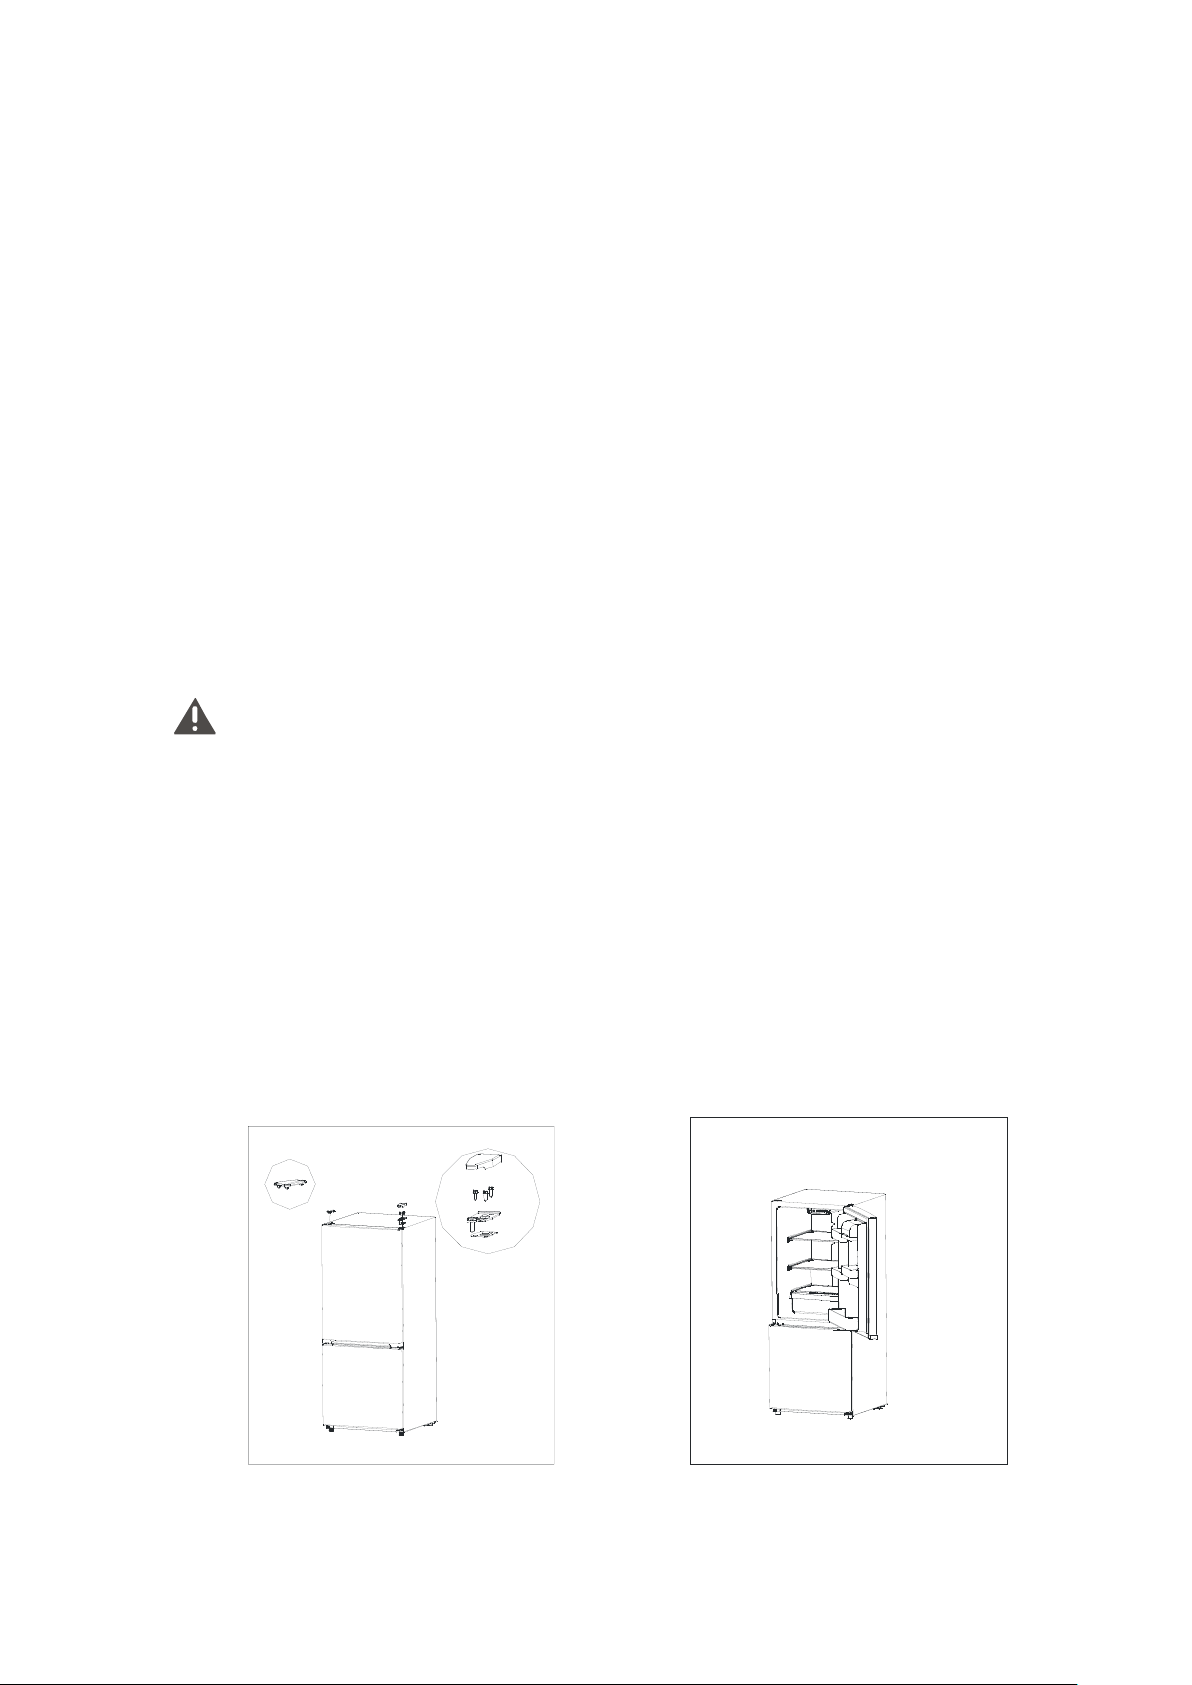
1.3 Door Space Requirements
The unit's door must be able to open fully as shown.
W×D ≥ 41.3”×42.9”
1.4 Leveling the Unit
If the appliance is not leveled during installation, the doors may not
close or seal properly, causing cooling, frost, or moisture problems.
It is very important for the refrigerator-freezer to be level in order to
function properly.
To level your refrigerator-freezer, you may either turn the adjustable foot clockwise to raise that side
of the appliance or turn it counter-clockwise to lower that side.
NOTE: Having someone push against the top of the refrigerator-freezer will take some weight off the
adjustable foot and make it easier to turn.
1.5 Cleaning before Use
Wipe the inside of the unit with a weak solution of bicarbonate soda. Then rinse with warm water
using a wrung-out sponge or cloth. Wash the shelves and salad bin in warm soapy water and dry
completely before replacing in the unit. Clean the exterior of the unit with a damp cloth.
If you require more information refer to the Cleaning section.
5
Page 7
1.6 Before Using Your Unit
The refrigerator requires 115V/60Hz AC power, voltage fluctuations beyond the range of 98 to 132V
will cause a malfunction or even damage, so a 750 W automatic voltage regulator must be installed
in concert with the AC power.
To promote safe usage, do not damage the power cord and do not use the appliance when the
power cord is damaged or the plug is worn.
To prevent damage to the product and avoid a fire hazard, do not put flammable, explosive, volatile
or highly corrosive items in the refrigerator.
To avoid a fire hazard, do not place flammable items near the refrigerator.
This product is a household refrigerator and is suitable only for the storage of food. According to
national standards, household refrigerators must not be used for other purposes, such as the
storage of blood, drugs or biological products.
Do not place bottled or sealed containers of liquids such as beer and other beverages in the freezer
to prevent bursts and other damage.
Before placing any food in your unit, turn it on and wait for 24 hours to make sure it is working
properly and to allow time for it to fall to the correct temperature. Do not overfill the unit.
◆ Before plugging in
Check that your electric socket is compatible with the plug supplied with the unit.
◆ Before turning on!
Do not turn on the unit until two hours after moving it. The coolant fluid needs time to settle.
1.7 Interior Accessories
Various glass or plastic storage shelves are included with your appliance – different models have
different combinations.
You should always slide one of the full-size glass storage shelves into the lowest set of guides, above
the fruit and vegetable containers, and keep it in this position. To do this, pull the storage shelf
forward until it can be swiveled upward or downward and removed.
Please do the same in reverse to insert the shelf at a different height.
In order to make the most of the volume of the fresh food and frozen-food storage
compartments, the user can remove one or more shelves or drawers out of the appliance, according
to daily use.
6
Page 8
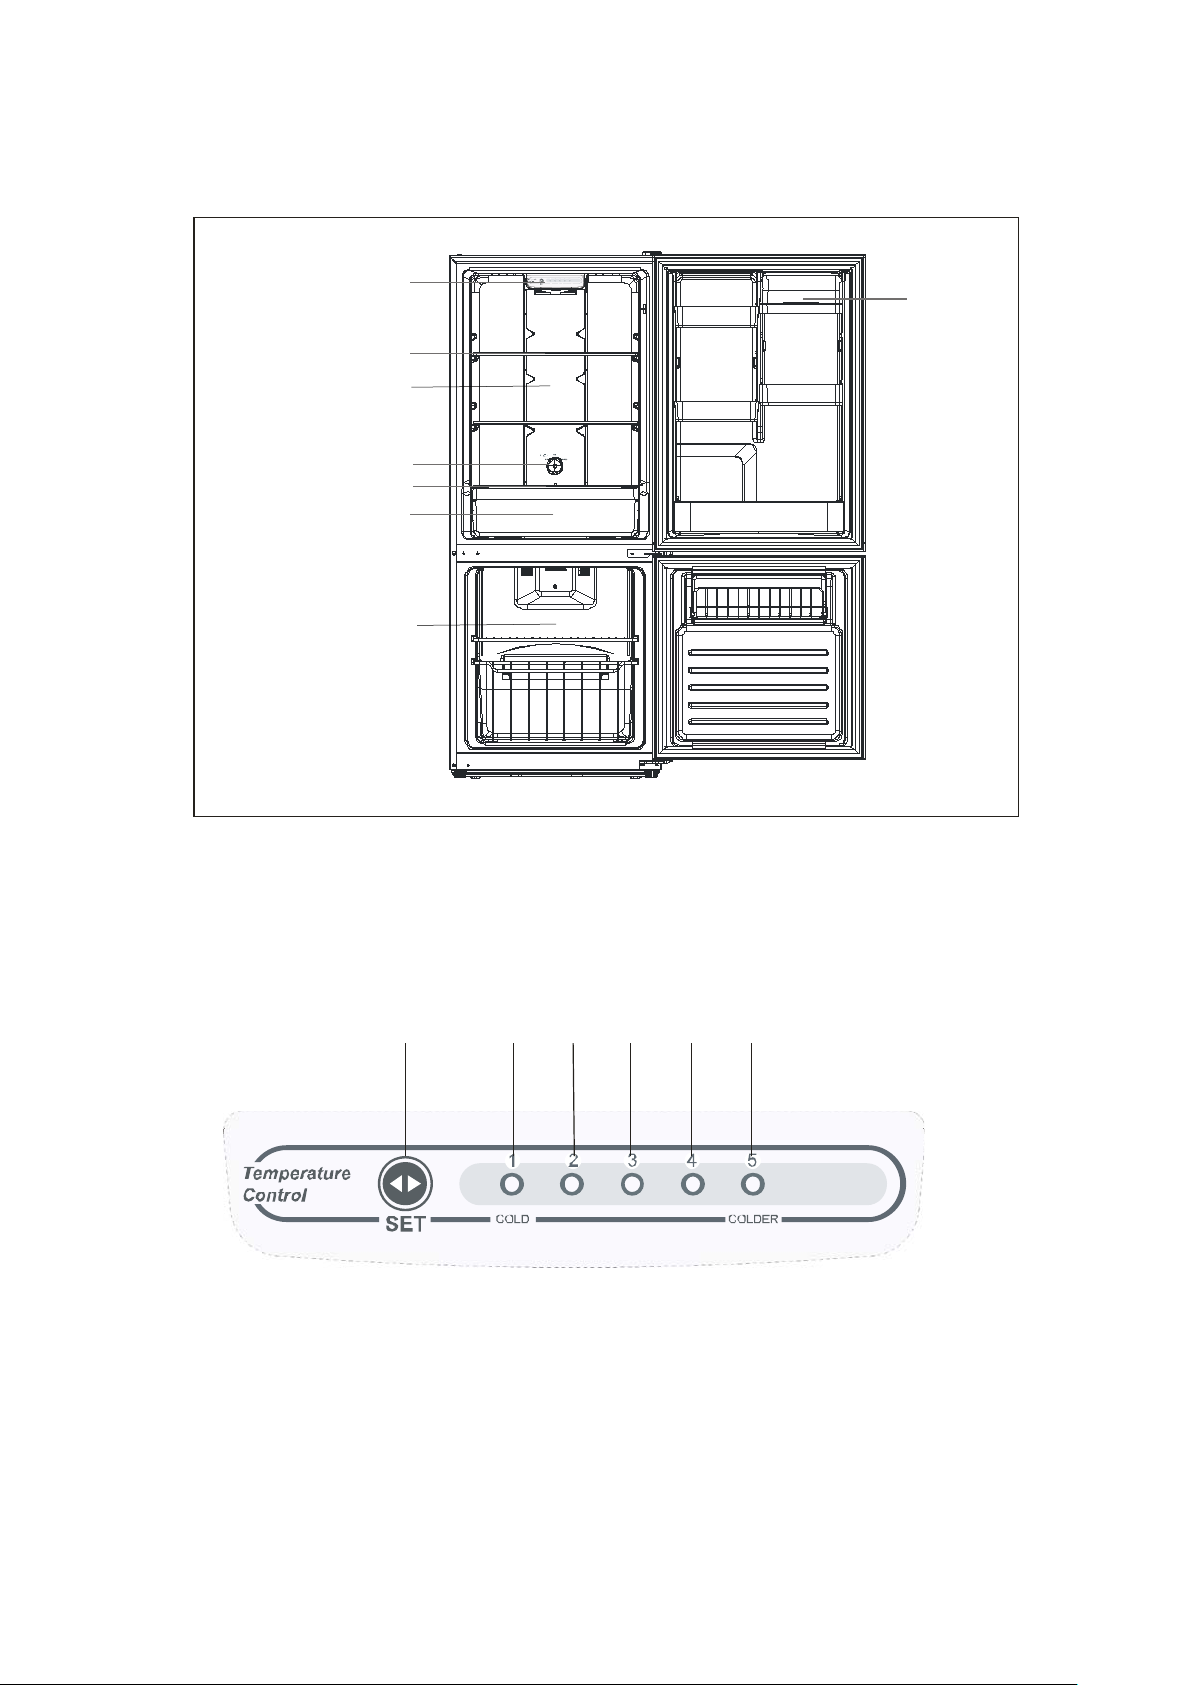
2. PRODUCT OVERVIEW
Control Dial
Glass Shelves
Adjustable
Doo r Shelf
Salad Bin
Salad Bin
Cov er
Temperatu re control panel
A ① ② ③ ④ ⑤
Temperature control dial
for freezer compartment
for refrigerator compartment
Refrigerator compartment
Freezer compartment
Temperature control panel
*All images in this instruction manual are for general information only; please refer to your individual unit for details.
3. OPERATION
3.1 Key
3.2 Display screen
HMI (Human-Machine Interface) and keys operation
The keys in the HMI and display layout are referred to in the following figure:
A: SET position set key
① Shift 1
② Shift 2
③ Shift 3
④ Shift 4
⑤ Shift 5
7
Page 9
3.3 Display
◆ Once initially powered on,the display screen (including the key light) is on full display for
3 seconds,and then displays the actual operation position.
◆ Normal operation display
In case of a failure, the appropriate LED lights in combination show the failure code (in recycling
display); see “3.5 Fault indication” below.
If there is no failure, the actual operation position of the refrigerator will be on display.
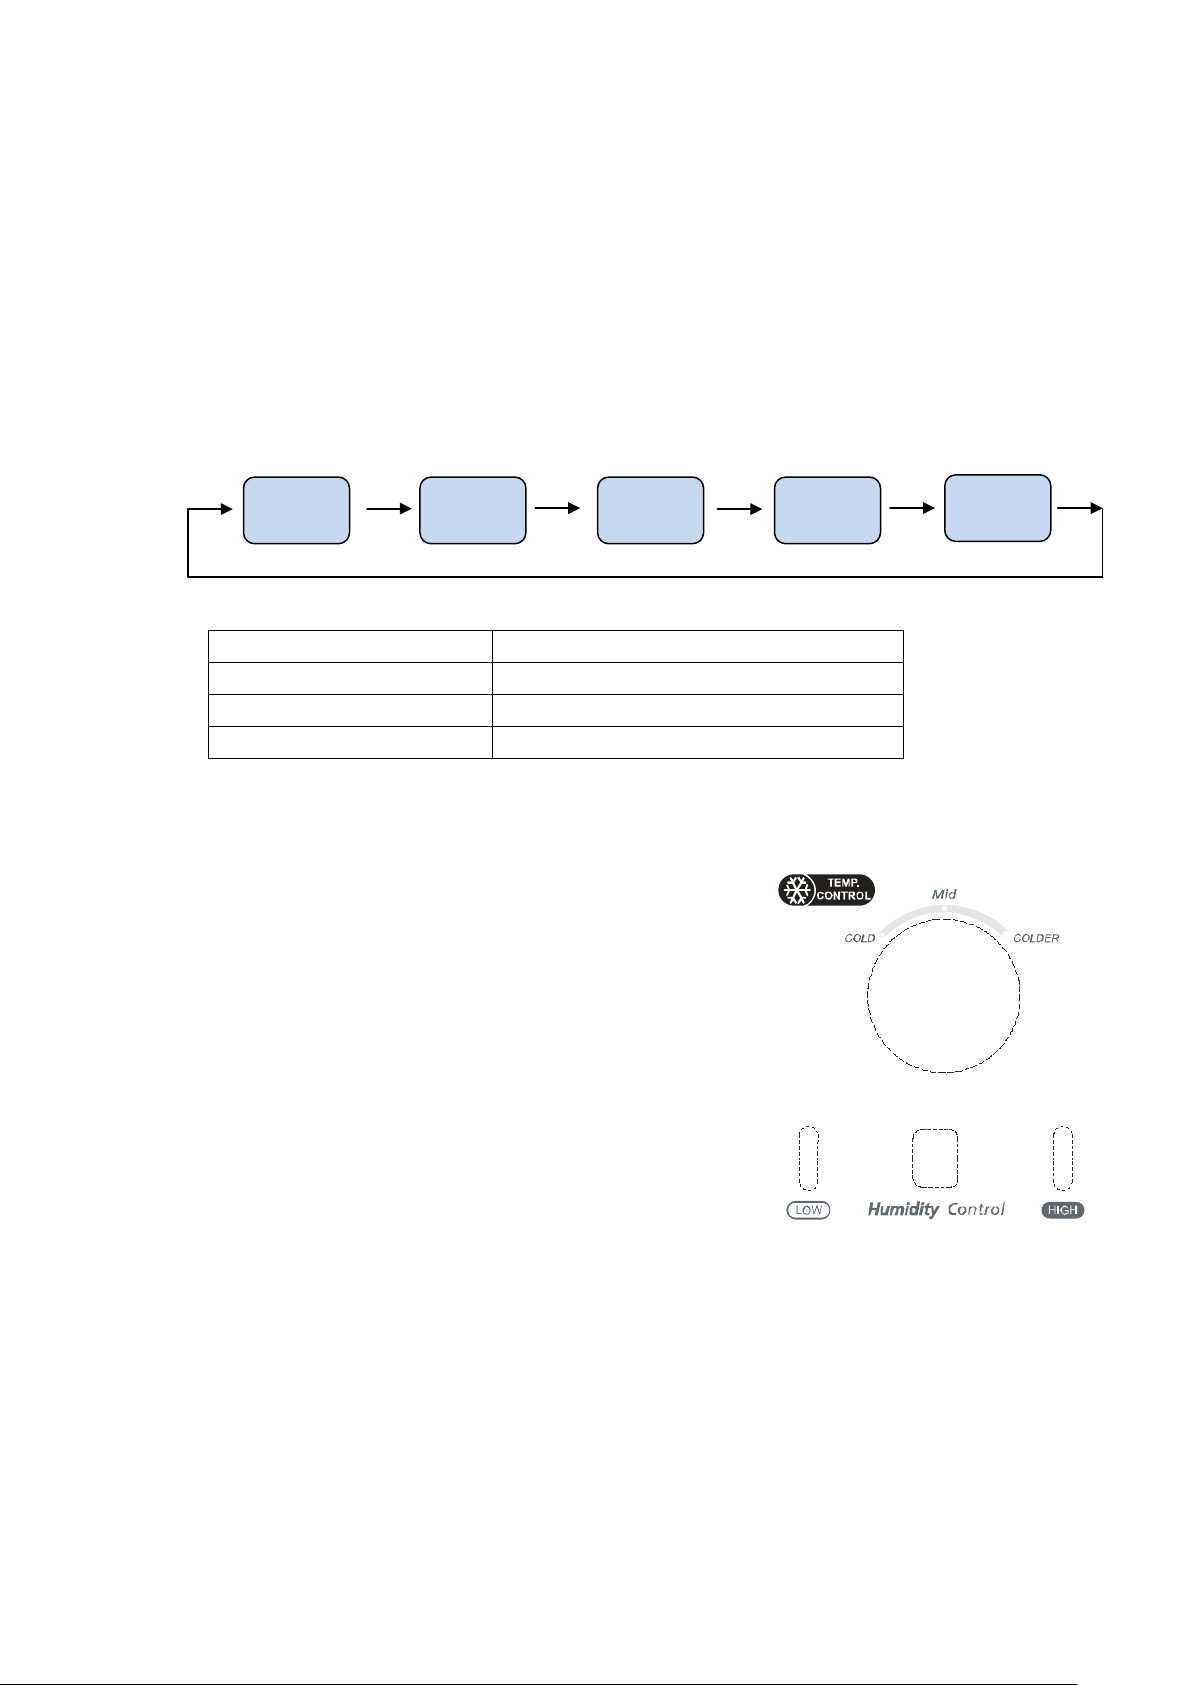
3.4 Shift setting
Each time the shift setting key A is pressed,the shift setting changes by one position. After the shift
setting has been completed, the refrigerator will operate according to the set value after 5 seconds.
From left to right, the set temperature becomes lower.
The shift regulation is:
Shift 1 Shift 2 Shift 3 Shift 4
Shift 5
3.5 Fault indication
Display Malfunction
LED1 and LED2 are lit Refrigerator temperature sensor circuit
LED1 and LED3 are lit Freezer defrost sensor
LED1 and LED4 are lit Ambient temperature sensor
3.6 Temperature Control
On the refrigerator co mpa rtme nt control panel (above), Shift 1 is the warmest setting while Shift 5 is the coldest.
For normal ambient temperatures, Shift 3 should be selected.
On the freezer compartment control knob (at right), select the Mid position
when the ambient temperature is normal.
If the ambient temperature will be lower than 55°F for an extended period of
time, the control knob should be placed at the COLDER position.
If the ambient temperature is higher than 90°F for a long time or a fast freeze
is needed, place t he control knob in the COLD position.
3.7 Fruit and Vegetable Box Humidity Control
By toggling the humidity-adjusting control (at right), you can adjust
the humidity in the fruit and vegetable drawer.
4. CLEANING
4.1 Defrosting
Auto-defrost for Frost-free Refrigerator
4.2 Cleaning the Interior and the Exterior of the Unit
◆ Remove all the shelves and the salad bin. To remove the salad bin, first remove the lower door
sh elf.
8
Page 10

◆ Wipe the inside of the unit with a weak solution of bicarbonate soda and then rinse with
warm water using a wrung-out sponge or cloth. Wipe completely dry before replacing the
shelves and salad bin.
◆ For model FFBF100W, use a damp cloth to clean the exterior, and then wipe with a standard
furniture polish. Make sure that the door is closed to avoid the polish getting on the magnetic
door seal or inside the unit. For model FFBF101SS, use a cleaner recommended for stainless
steel.
◆ The grille of the condenser at the back of the unit and the adjacent components can be
vacuumed using a soft brush attachment.
4.3 Cleaning Tips
Condensation may appear on the outside of the unit. This may be due to a change in room
temperature. Wipe off any moisture residue. If the problem continues, please contact a qualified
technician for assistance.
5. MAINTENANCE
5.1 Changing the Internal Light Bulb
Bulb must be replaced by professionals.
Illuminating lamp power: Max 15W
5.2 Care When Handling / Moving Your Unit
Hold the unit around its sides or base when moving it. Under no circumstances should it be lifted by
holding the edges of the top surface.
Do not turn the unit upside down or place it horizontally. Do not shake the refrigera tor. T he carrying
angle must not be greater than 45°.
5.3 Servicing
The unit should be serviced only by an authorized technician; only approved spare parts should be
used. Under no circumstances should you attempt to repair the unit yourself. Repairs carried out by
inexperienced persons may cause injury or serious malfunction. Contact a qualified technician.
5.4 Switching Off for Long Periods of Time
When the unit is not in use for a long period of time, disconnect it from the power supply, remove
all stored food and clean the appliance, leaving the door ajar to prevent unpleasant smells.
9
Page 11

6. TROUBLESHOOTING
In case of a malfunction, you can solve many common prob lems easily.
If your refrigerator-freezer does not operate:
Is the power cord plugged in?
If the doors will not close completely:
Are the drawers out of position?
Are the gaskets dirty?
Is the refrigerator-freez er level?
If the refrigerator-freezer is noisy when running:
Check that the appliance is level and is not in contact with another appliance or ar t icl e of
kitchen furniture.
If the refrigerator-freezer does not c ool s uf f iciently :
Have the doors been opened too often, or have they been left open for a while? If so, it
will take time for the refriger at or -freezer to reach its set temperat ur e.
Has the airflow at the rear of the appliance been reduced due to insufficient clearance?
The following c ha r acteristics should not be look ed upon as a problem :
• A gentle tric klin g sound caused by coolant flow ing through the pipes.
• Compressor operating at high t em per at ur e.
Requesting Assistance or Service:
If the problem is not due to one of the items listed in Troubleshooting, contact the dealer or
authorized service company. You can also call our SUMMIT® Cust omer Service line at
1-800-932-4267 weekdays from 8:30 AM to 5:00PM (ET).
10
Page 12
Limited Warranty
FELIX STORCH, INC.
Chemicals known by the manufacturer to be present in this product in
ONE-YEAR LIMIT ED W ARRANTY
Within the 48 contiguous United States, for one year from the date of purchase, when this appliance is operated and
maintained according to i nstru ctions at tached t o or fur nished w ith the produ ct, w arrantor w ill pay for fact ory -specified p arts
and repair labor to correct defects in materials or workman ship. Service must be provi ded by a desi gnated servi ce company.
Outside the 48 stat es, al l p art s are warranted for one year fr om manufacturing defe cts. Plastic parts, shelv es and c abin et s
are warranted to be manufactured to commercially acceptable standards, and are not covered from damage during
handling or breakage.
5-YEAR COMPRESSOR WARRANTY
1. The compressor is covered for 5 years.
2. Replacement does not include labor.
ITEMS WARRANTOR WILL NOT PAY FOR:
1. Service calls to correct the installation of your appliance, to instruct you how to use your
appliance, to replace or repair fuses or to correct wiring or plumbing.
2. Service calls to repair or replace appliance light bulbs or broken shelves. Consumable parts
(such as filters) are excluded from warranty coverage.
3. Damage resulting from accident, alteration, misuse, abuse, fire, flood, acts of God, improper
installation, installation not in accordance with electrical or plumbing codes, or use of products
not approved by warrantor.
4. Replacement parts or repair labor costs for units operated outside the United States.
5. Repairs to parts or systems resulting from unauthorized modifications made to the applianc e.
6. Expenses for travel and transportation for product service in remote locations.
7. The removal and reinstallation of your appliance if it is installed in an inaccessible location or is
not installed in accordance with published installation instructions.
CUSTOMER'S SOLE AND EXCLUSIVE REMEDY UNDER THIS LIMITED WARRANTY SHALL BE PRODUCT REPAIR AS
PROVIDED HEREIN. IMPLIED WARRANTIES, INCLUDING WARRANTIES OF MERCHANTABILITY OR FITNESS FOR A
PARTICULAR PURPOSE, ARE LIMITED TO ONE YEAR. WARRANTOR SHALL NOT BE LIABLE FOR INCIDENTAL OR
CONSEQUENTIAL DAMAGES. SOME STATES DO NOT ALLOW THE EXCLUSION OR LIMITATION OF INCIDENTAL OR
CONSEQUENTIAL DAMAGES, OR LIMITA TIONS ON THE DURATION OF IMPLIED WARRANTIES OF MERCHANTABILITY OR
FITNESS, SO THESE EXCLUSIONS OR LIMITATI ONS MAY NOT APPLY TO YOU. THIS WARRANTY GIVES YOU SPECIFIC
LEGAL RIGHTS AND YOU MAY ALSO HAVE OTHER RIGHTS, WHICH VARY FROM STATE TO STATE.
DISCLAIMER OF IMPLI ED W ARRANTIES – LIMITATION OF REMEDIES
WARNING! This product may contain chemicals known to the state of California to
cause cancer or birth defects or other reproductive harm. For more information,
visit: www.summitappliance.com/prop65
concentrations higher than threshold limits: NONE.
770 Garrison Avenue
Bronx, NY 10474
Phone: (718) 893-3900
Fax: (844) 478-8799
www.summitappliance.com
For parts and accessory ordering,
troubleshooting and helpful hints, visit:
www.summitappliance.com/support
Printed in China
 Loading...