

Page 1

G AS BBQ GRILLS
USE &CARE INFORMATION
Page 2

CONTENTS
Introducing Wolf Gas BBQ Grills 3
Safety Instructions & Precautions 4
Wolf Gas BBQ Grill Features 6
Wolf Gas BBQ Grill Use & Care 7
Wolf BBQ Grilling Guide 17
Wolf Troubleshooting Guide 21
Wolf Service Information 22
Wolf Warranty 23
WOLF®is a registered trademark of Wolf Appliance Company, LLC
As you read this Use & Care Information,
take particular note of the CAUTION and
ARNING symbols when they appear.
W
This information is important for safe and
ficient use of the Wolf equipment.
ef
signals a situation where minor injury or
oduct damage may occur if you do not
pr
follow instructions.
states a hazard that may cause serious
injury or death if precautions are not
followed.
mation may
In addition, this Use & Car
ANT NOTE which highlights
signal an IMPOR
mation that is especially important.
infor
T
e Infor
Page 3

INTRODUCING WOLF GAS BBQ GRILLS
THANK YOU
Your purchase of a Wolf BBQ grill attests to
the importance you place upon the quality
nd performance of your cooking equipment.
a
We understand this importance and have
designed and built your grill with quality
aterials and workmanship to give you years
m
of dependable service.
We know you are eager to start grilling, but
before you do, please take some time to read
this Use & Care Information. Whether you are
a beginning cook or an expert chef, it will be
to your benefit to familiarize yourself with the
safety practices, features, operation and care
recommendations of the Wolf BBQ grill.
We appreciate your choice of a Wolf Appliance product and welcome any suggestions
or comments you may have. To share your
opinions with us, please call 800-332-9513.
If the information in this book is
not followed exactly, a fire or
explosion may result, causing
property damage, personal injury
or death.
Do not store or use gasoline or
other flammable vapors and
liquids in the vicinity of this or
any other appliance.
An LP gas cylinder not connected
for use shall NOT be stored in the
vicinity of this or any other
appliance.
CONTACT
INFORMATION
Wolf Customer
Service:
800-332-9513
Website:
wolfappliance.com
Your Wolf BBQ grill is protected by a warranty
that is one of the finest in the industry. Take a
moment to read the warranty statement on
page 23 and refer to it should service become
necessary.
IMPORTANT NOTE:
Installation and service must be
performed by a qualified installer,
service agency or the gas supplier.
Warranty service must be performed
by a Wolf authorized service center.
WHAT TO DO IF YOU SMELL GAS:
Shut off gas to the appliance.
Extinguish any open flame.
Open the lid or hood.
If the odor continues, immediately
call your gas supplier or fire
department.
3
Page 4

SAFETY INSTRUCTIONS AND PRECAUTIONS
WHAT TO DO
IMPORTANT NOTE: Read all
instructions before using this
appliance.
Make certain your unit is properly
installed
your unit was designed for. Do not
use LP gas in a natural gas unit or
vice versa. Do not use charcoal,
wood chips or other material in
your grill.
Make certain the installer shows
you where the gas shut-off valve is
so you can shut off the gas supply in
an emergency. If you smell gas, the
connections are not properly sealed
or you may have a hole in the gas
supply pipe or hose. Determining
where the gas leak is should be left
to a qualified technician. Request
service from a qualified technician
and use only genuine Wolf
replacement parts.
Use a covered hand when opening
the hood
heat and steam to escape. Never
lean over an open grill.
and connected to the gas
and do so slowly to allow
Keep the rotisserie motor cord away
from heated areas of the grill.
When cooking in windy conditions,
provide a wind break.
unit with proper clearance from
combustible surfaces.
Keep the ventilation openings at the
rear of the cart free and clear.
Spiders and insects can nest in the
burners
and airflow to the burner ports. This
may cause a fire from behind the
manifold cover. Inspect or clean the
burners periodically, as shown on
page 16.
Use sturdy, properly insulated
gloves or pot holders.
other substitutes can become
entangled, causing burns. Keep pot
holders dry. Wet pot holders create
steam and cause burns. Keep pot
holders away from open flames
when lifting or moving utensils.
Use long-handled grill tools to avoid
burns when cooking.
of the grill and block the gas
Locate the
Dish towels or
When lighting a burner, always pay
close attention.
pushing the correct ignition button
for the burner you want to light.
Look for a flame through the
vation slots above each grill
obser
ner knob. Remove the rotisserie
bur
burner cover before lighting and
using the rotisserie.
Befor
e storing, make certain the grill
is cool.
remove and store outside in a well
ventilated area.
4
If using an LP gas cylinder,
Be certain you are
Select the correct pan size for size
ner.
of bur
enough to avoid boilovers or
spillovers. This will save cleaning
and prevent accumulations of food,
heavy splattering or spillovers that
can catch fire.
The handle of the utensil should be
positioned
over adjacent sur
fere with closing the hood. This
inter
will minimize burns, ignition of
flammable materials and possible
spillage. Let hot pans cool in a safe
place out of reach of children.
Be cer
tain the pan is large
so that it does not extend
face bur
ners or
Page 5

WHAT NOT TO DO
Children should not be left alone or
unattended
in an area where the
grill is being used. Never allow them
to sit, stand or play on or around the
grill at any time. Do not store items
of interest to children around or
below the grill. Never allow children
to crawl inside a cart or enclosure.
When using the grill, do not touch
the grill grates, open burner grates
or immediate surrounding areas.
These surfaces become extremely
hot and could cause burns. Be
certain all controls are turned off
and the unit has cooled before
touching or cleaning any surfaces.
Never grill without the drip tray in
place.
Make certain it is pushed all
the way to the back and grease
collection tray is in proper position
to catch the drippings. Let the
grease cool before attempting to
remove for cleaning or disposal.
Clean the grease collection tray
often. Do not allow a large amount
of grease to accumulate as it can
catch on fire.
Never leave the grill unattended.
High flame and fatty meats promote
e-ups.
flar
Do not permit the grill or open
ners to be used as a storage ar
bur
for flammable or plastic items,
which may ignite, melt and burn. Do
not store spare LP gas cylinders or
flammable materials in the cart or
under a built-in location.
ea
The Wolf BBQ grill is for outdoor
use only! Do not operate it in
enclosed areas. This could result
in carbon monoxide buildup
which would result in injury or
death.
Do not use aluminum foil to line
drip tray, grease collection tray, grill
grates or open burner grates.
This
can hamper combustion and airflow.
It can trap excessive heat, which
could melt valve knobs and
electronic push button igniters or
warp the grill radiants and grill tank
liners.
Do not heat unopened glass or
metal containers
of food on the grill.
Pressure may build up and cause the
container to burst, resulting in
serious personal harm or damage to
the grill.
Clothing fires are potential hazards.
Do not wear long flowing sleeves
around the grill. They are easily
caught on pan handles or ignited by
ners. Highly flammable clothing,
bur
especially synthetic fabrics, should
not be worn while cooking.
Avoid pans that are unstable and
easily tipped. Look for easily grasped
handles that will stay cool. Pans that
are too heavy to move easily when
filled can also present a hazard. If a
pan handle twists and cannot be
tightened, discar
d the pan.
5
Page 6
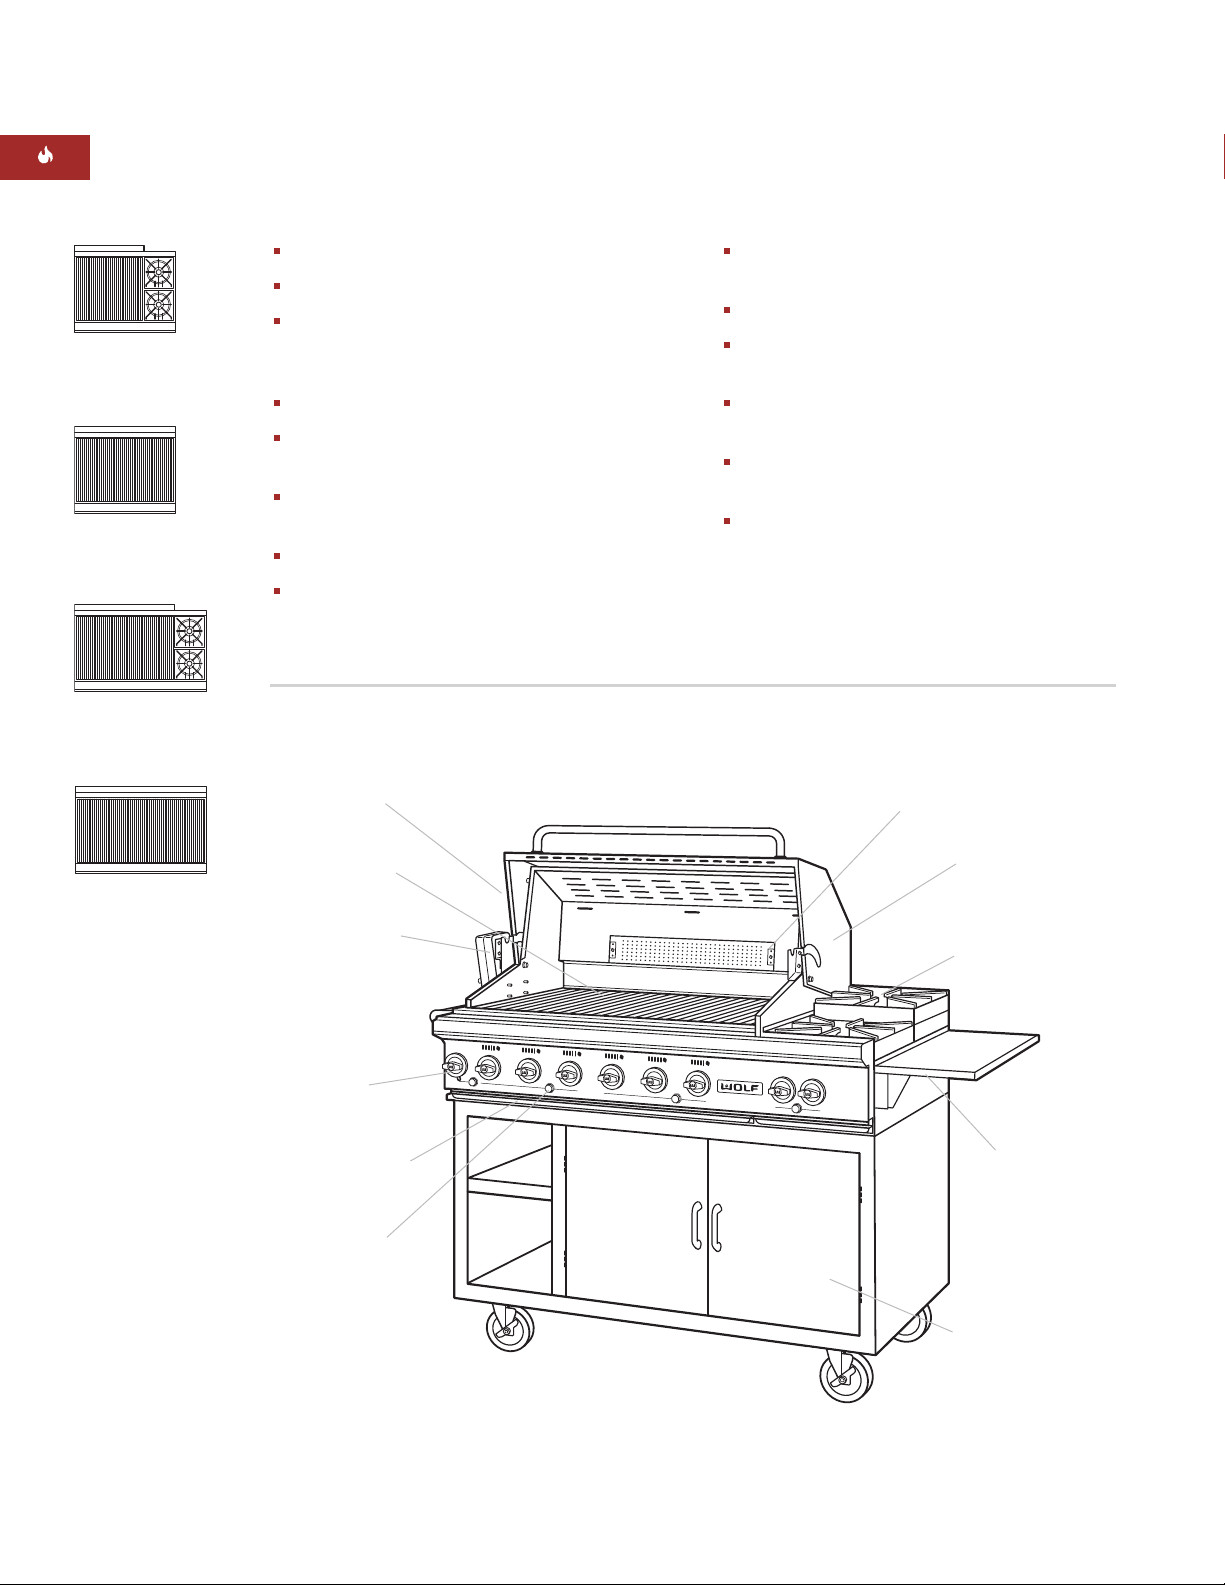
WOLF GAS BBQ GRILL FEATURES
GAS BBQ GRILL FEATURES
Model BBQ242BI
Model BBQ242C
Model BBQ36BI
Model BBQ36C
Model BBQ362BI
Model BBQ362C
Natural or LP gas models
Built-in (BI) or free-standing cart (C) models
Heavy-duty 18-gauge stainless steel
construction with classic stainless steel
exterior finish
Push-button, battery-powered ignition
Individually controlled 10,000 Btu/hr
(2.9 kW) burners spaced 5" (127) apart
Optional 16,000 Btu/hr (4.7 kW) step-up cast
iron side burners
Porcelain-coated cast iron grill grates
Burner radiant plates
48" (1219) GAS BBQ GRILL
Model BBQ362C shown
Stainless steel
exterior finish
115-volt rotisserie motor and infrared rear
rotisserie burner
Two-piece stainless steel hood and handle
LP gas models include gas regulator, hose
and 20-pound gas cylinder
Heavy-duty locking swivel casters on cart
models
Optional insulated liner for built-in
applications
Scraper and protective canvas cover
included
Infrared rotisserie
burner
Model BBQ48BI
Model BBQ48C
Porcelain coated
grill grates
Rotisserie motor
Gas contr
knob
Pull-out drip tray Fold-down plate
Ignition button
ol
Two-piece hood and
handle
Step-up side
burners (optional)
shelf
48" (1219)
ee-standing cart
fr
(optional)
6
Page 7
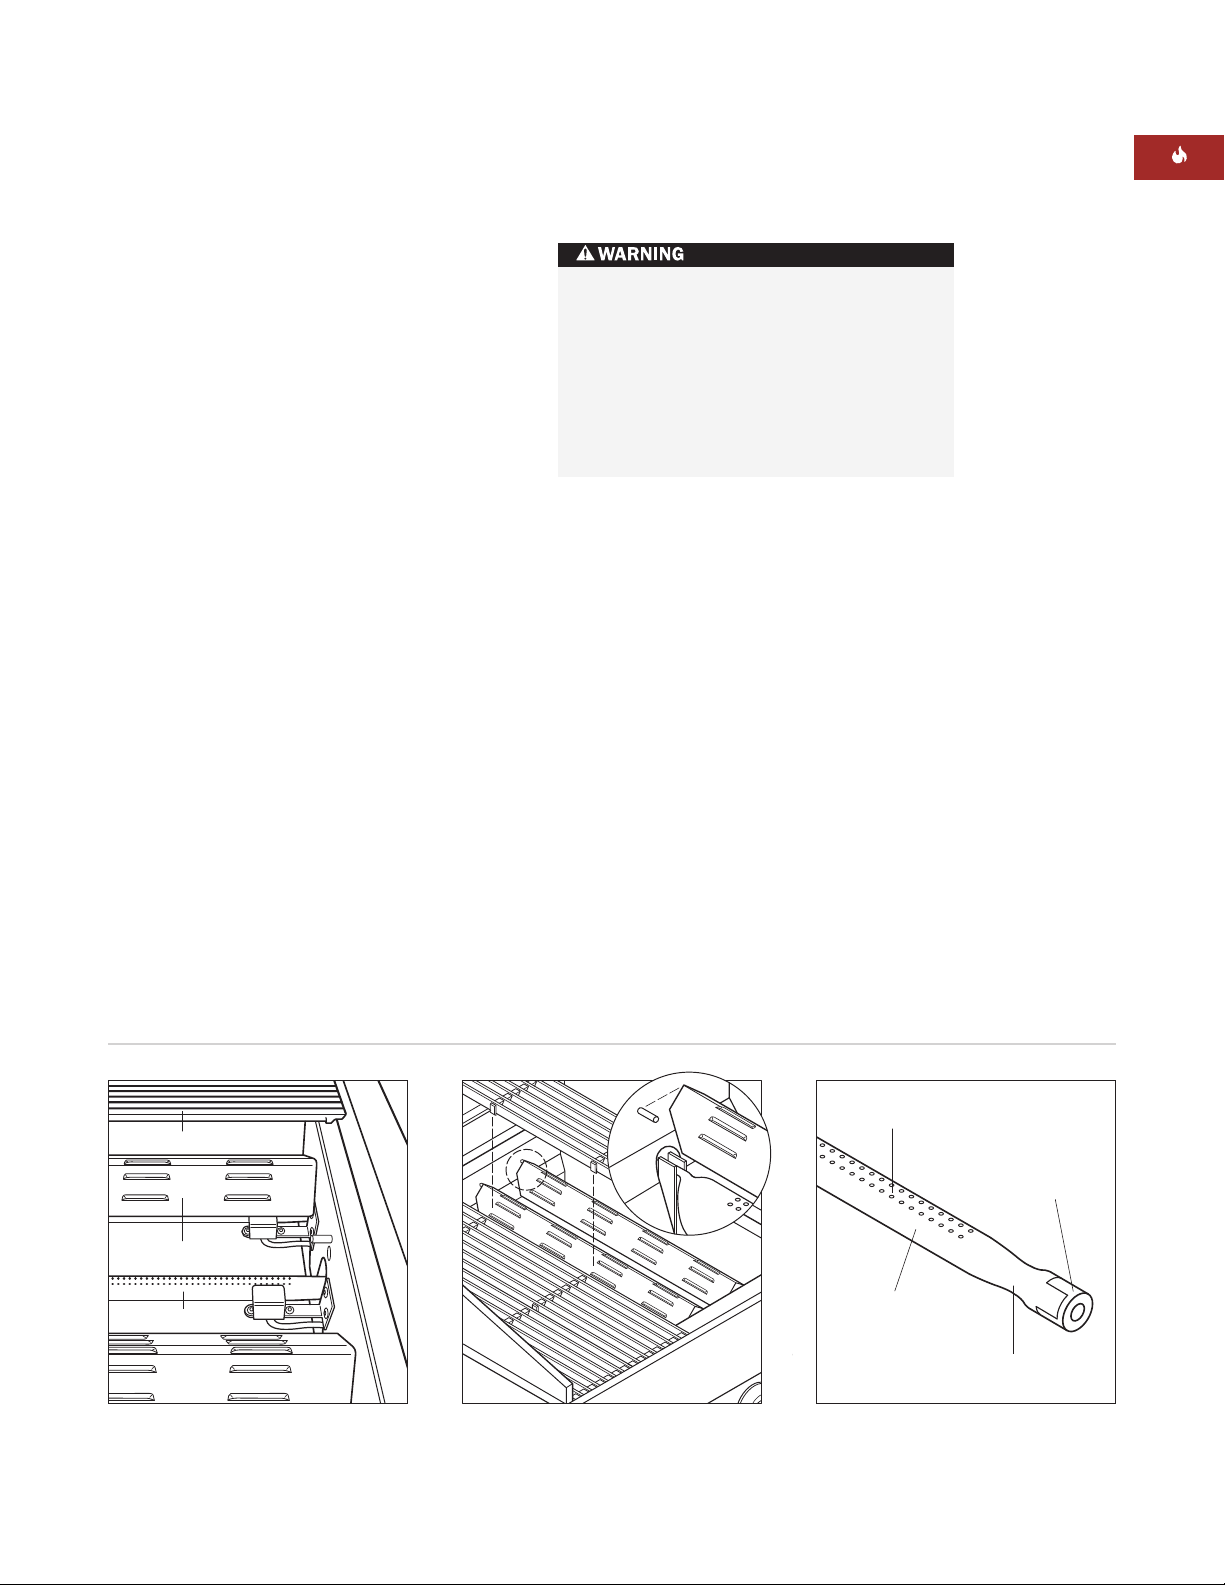
WOLF GAS BBQ GRILL USE & CARE
Burner
Radiant
Grill Grate
Venturi Tube
Burner Ports
Grill Burner
Air Shutter
BBQ GRILL COMPONENTS
The porcelain-coated cast iron grill grates are
5" (127) wide for easy handling and cleaning.
elow the heavy-duty grill grates are the
B
stainless steel heat radiants located every 5"
(127). These radiants, provided with the BBQ
rill, are positioned over the grill burners to
g
concentrate the heat. Refer to the illustrations
below.
The radiants are supported on each end by a
pin located just above the grill burner. Be sure
the heat radiants are oriented so that the
triangular cut-out is positioned to the rear of
the grill.
The Wolf BBQ grill design eliminates the use of
briquettes or lava rocks. The grill burners
produce 10,000 Btu/hr (2.9 kW) per burner.
Burning gas cooking fuel generates some
by-products that are on the list of
substances known to cause cancer or
reproductive harm. To minimize exposure
to these substances, always operate
these units according to the instructions
contained in this book and provide good
ventilation.
WOLF
WARRANTY
Wolf products are
covered by a two
and five year
residential warranty
(exclusions apply).
See warranty
details at the end
of this guide.
BBQ grill components Detail of burnerRadiant positioning
Dimensions in parentheses are in
millimeters unless otherwise specified.
7
Page 8
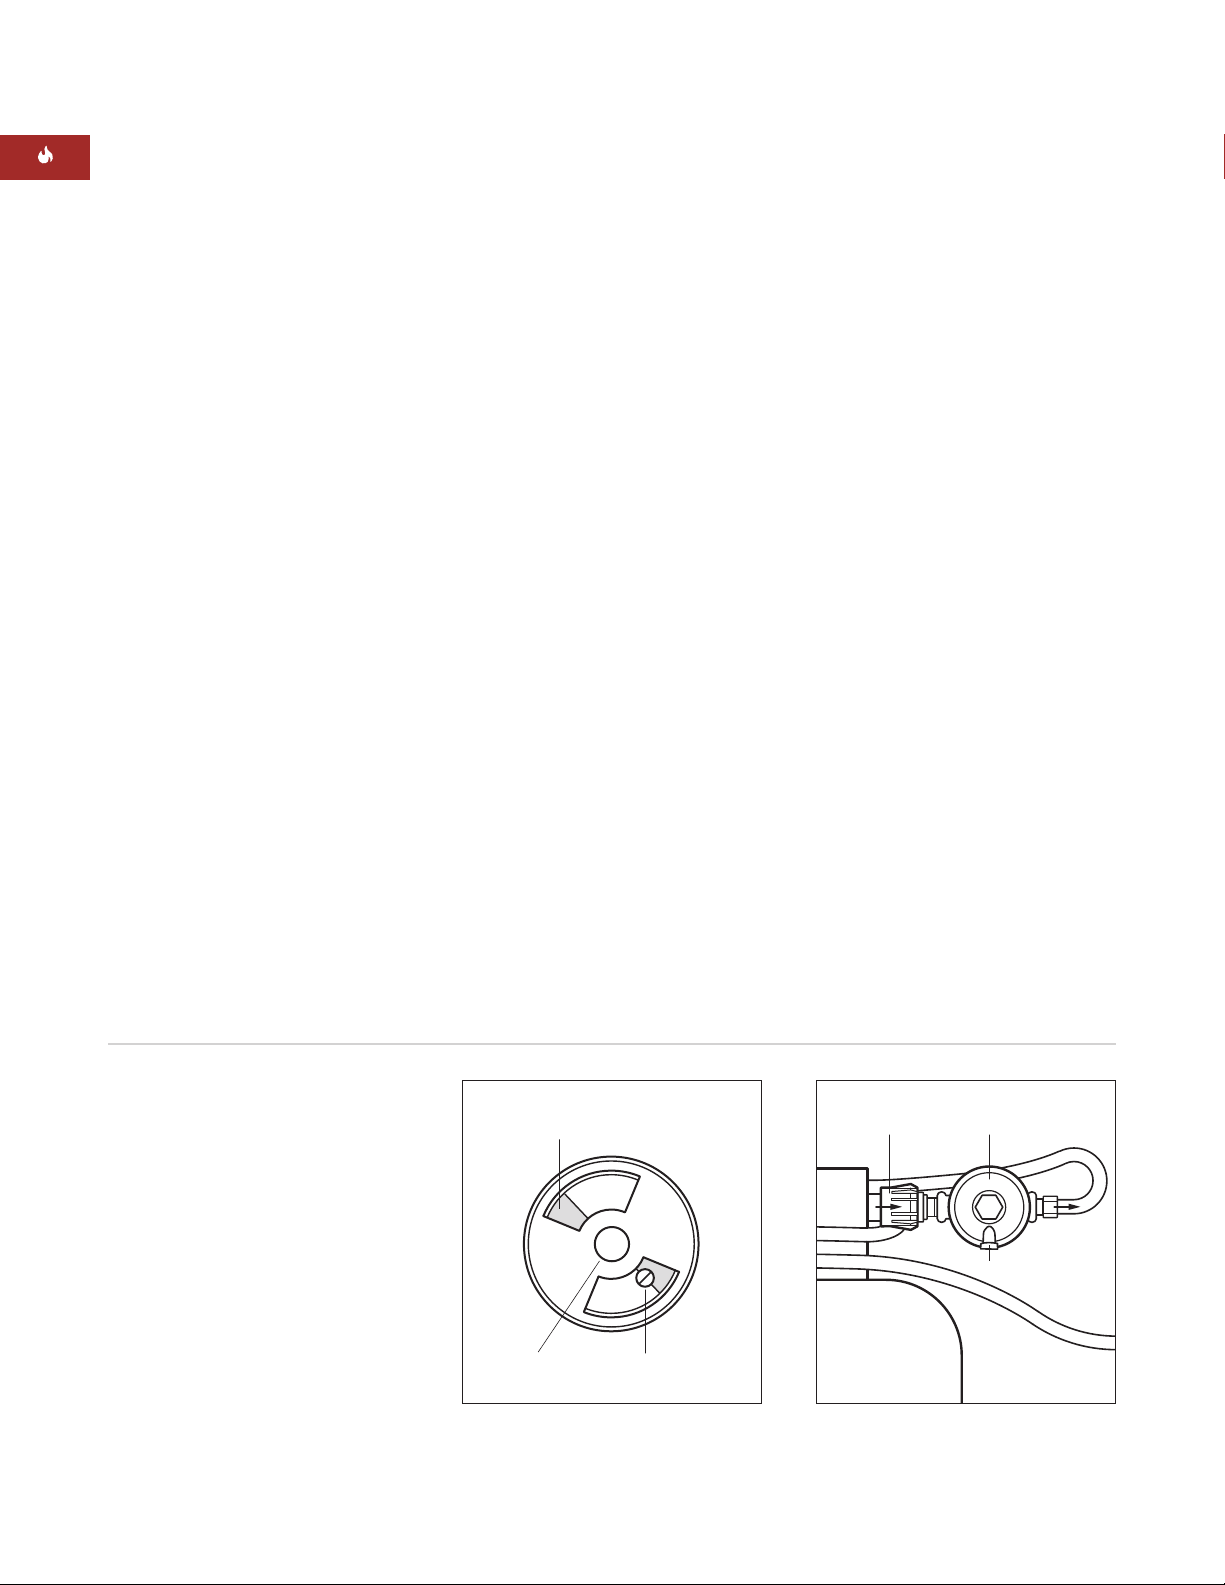
WOLF GAS BBQ GRILL USE & CARE
Air Shutter ScrewVenturi
1
/16" (2) Open for Natural Gas
1
/4" (6) Open for LP Gas
Coupling Nut
LP Gas
Cylinder
To Grill
Vent Points Down
Regulator
FLAME ADJUSTMENT
IMPORTANT NOTE:
Your Wolf BBQ grill is
preadjusted for the gas you specified when
ou purchased your unit, either natural or
y
LP gas.
A properly adjusted flame should have an
inner cone of bluish-green and an outer mantle
f dark blue. The flame characteristics should
o
be clean and soft, with minimal yellow tips.
Blowing or lifting of the flame should not
occur.
If the flame does not appear as described
above, the burners should be removed as
described in Cleaning the Burners on page 16.
The air shutters should be open, as shown in
the illustration below. The shutter adjustment
is made by loosening the air shutter screw,
setting the opening, then retightening the
screw. This should give you the correct
mixture of air and gas for a proper flame.
BEFORE LIGHTING
Prior to turning on the gas, inspect the gas
supply piping or hose. Look for evidence of
brasion, cuts, wear and tear, or other damage
a
that could require replacement prior to use.
Only use the supplied regulator and hose.
ake sure all burner control knobs are in the
M
OFF position. Do not attempt to light the
burners if the smell of gas is present. Make
sure the heat radiants are located properly
over the grill burners.
For LP gas BBQ grills, after attaching the hose,
check the connection for leaks with a solution
of half liquid soap and half water. Make sure
there is gas in the LP gas cylinder and that the
cylinder is upright. The vent hole on the
regulator must point down to prevent freeze
up during operation of the grill. Refer to the
illustration below.
BEFORE GRILLING THE FIRST TIME
Turn the grill on at the highest heat setting for
15 minutes with the hood closed. This will heat
all the internal parts. Smoking from the grill is
normal because it is burning off protective oils
on the metal parts.
8
Air shutter adjustment LP gas regulator
Page 9

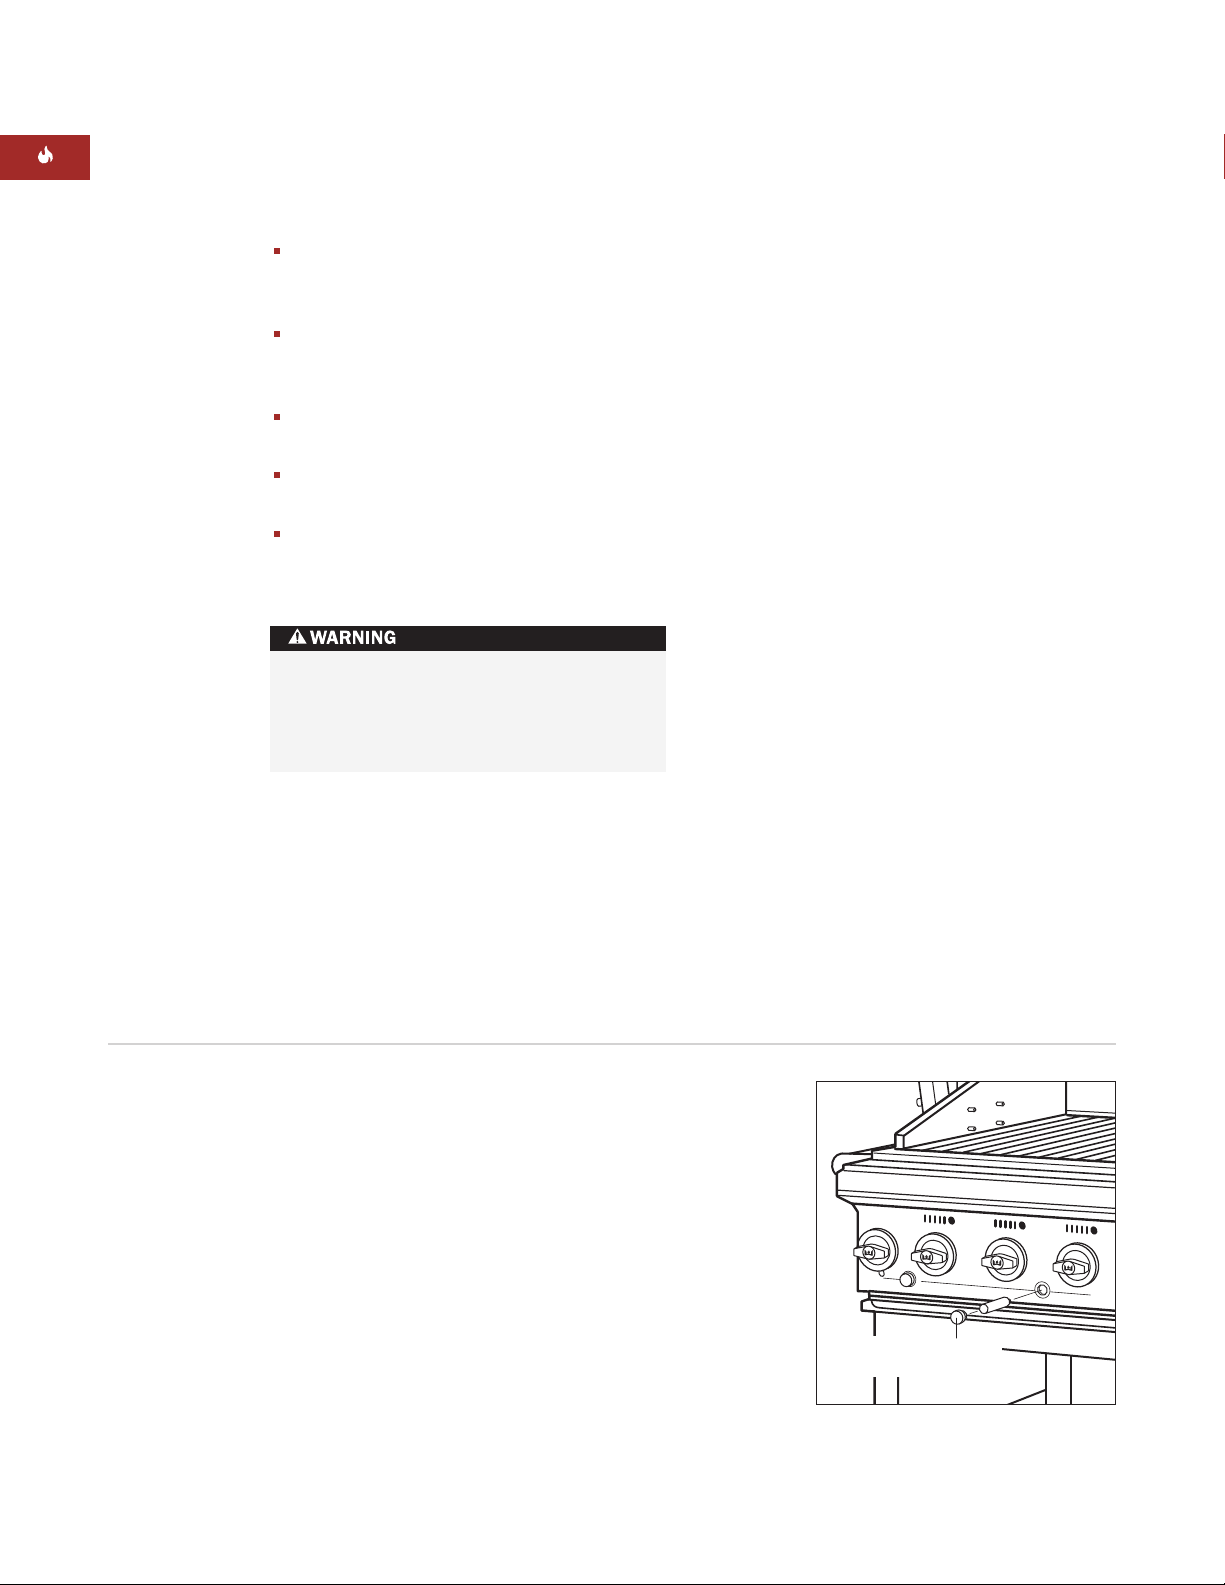
WOLF GAS BBQ GRILL USE & CARE
LIGHTING THE BBQ GRILL
Open the hood.
Push in and turn the gas control knob
counterclockwise to HIGH.
Keep your face as far away from the
burners as possible.
Press and hold the ignition button that
corresponds with the gas control knob until
the burner lights.
Listen for a ”woosh” sound. If the burner
does not light after approximately five
seconds, turn the control knob to the
OFF position. Wait five minutes until the
gas clears.
Repeat the procedure or use the manual
lighting procedure described on page 10.
If a burner is lit, flames will be visible
through a series of vertical slots just above
the control knob of the corresponding
burner. Keep your face away from the front
panel.
Upon successful lighting, repeat the
process for the other burners you wish
to light.
OPEN BURNERS
Wolf BBQ grill open burner models are
equipped with heavy-duty porcelain coated
ast iron grates and burners, similar to those
c
used on Wolf ranges. The burners are rated at
16,000 Btu/hr (4.7 kW) and have a push-button
park ignition.
s
LIGHTING THE OPEN BURNERS
Remove the open burner cover and any
utensils on the grate.
Follow the same steps as for lighting the
grill. Note that the open burners, front and
rear, are lit by a single electrode. Turn on
the gas to the desired burner, then press
the ignition button. One ignition button
lights both burners.
FLAME HEIGHT
The correct flame height is dependent on the
size and material of the cookware being used,
the food being cooked and the amount of
liquid in the pan. Cookware that conducts heat
slowly, such as glass or ceramic, should be
used with a low or medium flame, unless you
are cooking with a large volume of liquid. The
flame height should not extend beyond the
bottom of the pan.
Dimensions in parentheses are in
millimeters unless otherwise specified.
9
Page 10

WOLF GAS BBQ GRILL USE & CARE
Insert match /lanyard holder
for manual lighting
LIGHTING THE ROTISSERIE BURNER
The position of the infrared rotisserie burner
makes it more susceptible to being blown out;
he rotisserie should not be used during windy
t
conditions or in an unprotected area. For this
reason, the burner is equipped with a safety
alve that will prevent the burner from
v
operating unless the pilot is lit.
Open the hood and remove the rotisserie
burner cover.
Push in and turn the rotisserie gas control
knob to HIGH only.
After about 15 to 30 seconds, push the
ignition button for the rotisserie. This will
give the gas time to travel through the
tubing to the pilot at the left of the burner.
Once the pilot is lit, it will light the burner in
about 30 seconds. The flame is not visible
but it will give off high heat and a
red-orange glow after a few minutes.
MANUAL LIGHTING
Grill burners:
You may manually light the grill
burners with the match/lanyard holder. Place
he match in the clasp of the lanyard. Insert
t
into the
1
/2" (13) diameter hole above the grill
valve knob. Position the match tip near the
urner ports, push and turn the gas control
b
knob counterclockwise to HIGH, and light the
burner. Repeat to light the other burners. Refer
to the illustration below.
Open burners:
The open burners can be lit
directly from the top along the orifice holes
around the burner heads.
Rotisserie burner:
The rotisserie burner must
be manually lit at the pilot. Once the pilot is lit,
the burner will light within 30 seconds.
If the rotisserie burner flame goes out
while the BBQ grill is in use, turn OFF the
gas control knobs immediately. Keep the
hood open and wait five minutes for the
gas to clear before relighting the burner.
10
Manual lighting
Page 11

WOLF GAS BBQ GRILL USE & CARE
USING THE ROTISSERIE
The Wolf BBQ grill rotisserie system uses
infrared heat to cook items from the back. The
ntensity of this radiant heat sears in the
i
natural juices, while the motor turns the meat
for even cooking and self-basting.
After lighting, the rotisserie burner will reach
ooking temperature in approximately two
c
minutes. The red-orange glow will even out in
about five minutes.
The stainless steel above the rotisserie burner
will change to a dark blue color after the first
use. This is normal due to the high heat.
The rotisserie motor is equipped with phenolic
gears and is capable of turning a balanced
10 lb (4.5 kg) roast or whole poultry. The motor
is mounted to a metal bracket that attaches to
the side of the BBQ grill.
The rotisserie motor must be electrically
grounded in accordance with local codes, or in
the absence of local codes, with the National
Electric Code, ANSI/NFPA 70, latest edition of
the Canadian Electrical Code, CSA C22.1.
Keep the rotisserie motor power supply cord
away from the heated surfaces of the BBQ
grill. Remove and store the motor in a dry
location when not in use.
The rod for the rotisserie system is assembled
into the motor by placing the pointed end into
the motor and resting the threaded end on the
support at the side of the grill. Once the rod is
pushed as far as possible into the motor, the
grooved end of the rod should rest on the right
side bracket. The r
be removed when using the open bur
emovable rod handle should
ners.
PREPARING FOOD
o load the rotisserie rod, hold the handle
T
firmly and slide one prong onto the rod,
tines pointing away from the handle. Push
he rod through the center of the food.
t
Slide the other prong (tines toward the
food) onto the rod. Center the meat on the
rod and push the prongs firmly together.
Tighten the thumb screws with a pair of
pliers.
Use butcher string to secure any loose
portions of the meat. Never use nylon or
plastic string. To prepare poultry on the
rotisserie, refer to instructions on the
following page.
If necessary, slide on the counterbalance
and use it to offset unbalanced loads.
Tighten the thumb screws on the rod where
desired.
Place the pointed end of the rod into the
motor and rest the threaded end onto the
support at the side of the BBQ grill. Push
the rod as far into the motor as possible.
Remove the handle if using the open
burners.
Light the infrared rotisserie burner and
desired grill burners as directed on pages
9–10. Turn on the rotisserie motor.
Close the hood once the rotisserie burner is
lit.
Cook food according to the length of time
indicated in the Wolf BBQ Grilling Guide on
pages 17–20.
The rotisserie motor is equipped with a
3-prong grounding plug for your
protection against shock hazard and
should be plugged directly into a properly
ounded 3-prong receptacle.
gr
DO NOT cut or remove the grounding
prong from this plug.
Dimensions in parentheses are in
millimeters unless otherwise specified.
11
Page 12

WOLF GAS BBQ GRILL USE & CARE
USING THE ROTISSERIE
COOKING POULTRY
lide one prong onto the rod with tines
S
facing away from the handle. Tighten the
thumb screw by hand.
Insert the rod through the bird, pressing it
onto the prong.
Cut a piece of butcher string approximately
18" (457) long (adjust length according to
the size of the bird). Place the bird over the
center of the string as shown in illustration
1 below.
Bring the ends of the string up over the
wings. Bring the string tightly together
and knot over the breast as shown in
illustration 2.
Cut a piece of butcher string approximately
12" (305) long. Bring it up under the skewer
and around the end of the legs.
Cross the legs over on top of the skewer.
Knot the string tightly around the legs as
shown in illustration 3.
Slide the second prong onto the rod with
tines facing toward the bird. Push the tines
nto the bird. Center the bird on the rod,
i
loosening the thumb screw of the first
prong if needed. Tighten thumb screws with
pliers. Refer to illustration 4 below.
a
lace the pointed end of the rod into the
P
motor and rest the threaded end onto the
support at the side of the BBQ grill. Push
the rod as far into the motor as possible.
Remove the handle if using the open
burners.
Light the infrared rotisserie burner and
desired grill burners as directed on pages
9–10.
Turn on the rotisserie motor. Close the hood
once the rotisserie burner is lit.
Cook food according to the length of time
indicated in the Wolf BBQ Grilling Guide on
pages 17–20.
Illustration 1
12
Illustration 2
Illustration 3
Illustration 4
Page 13

WOLF GAS BBQ GRILL USE & CARE
USING THE BBQ GRILL
Refer to the Wolf BBQ Grilling Guide on
ages 17–20 to select grilling method:
p
direct, indirect or rotisserie.
ight the BBQ grill according to directions
L
on page 9.
Preheat the grill for 10 minutes on HIGH
with hood closed.
Set burners at the desired level.
If cooking with indirect heat, turn off the
burners that are under the food.
Refer to the Wolf BBQ Grilling Guide on
pages 17–20 to estimate grilling time.
HEAT SETTINGS
HIGH
– Used for quick searing of meats and
vegetables.
MEDIUM
– Grill steaks, pork chops and
hamburgers. You may also sear meats on
medium and cook them on low.
LOW
– Used for cooking dense vegetables,
roasts, thick cuts of meat, poultry and fish.
TIPS FOR SUCCESSFUL GRILLING
Never leave food unattended.
Cooking with the hood closed will provide
an even temperature, conserve gas, lessen
lare-ups and improve flavor.
f
Trim excess fat from meats and slit the
remaining fat at two-inch intervals to avoid
flare-ups and curling. Fatty meats may be
cooked indirectly on lower heat settings.
Refer to the indirect grilling method
instructions.
When opening the BBQ grill hood, wear a
pot holder mitt that covers your wrist.
Stand to the side of the grill and lift the
hood handle slowly.
To burn off grease drippings after cooking,
operate at HIGH for five minutes. When the
BBQ grill cools down, remove and clean the
grease collection tray.
IMPORTANT NOTE:
Do not use aluminum
foil, as food grease may be trapped,
causing flame flare-up.
Allow meat to defrost in the refrigerator
overnight rather than microwaving it to
help retain juices.
GRILLING METHODS
Direct method:
Food is cooked directly over
the heat source. Turn food halfway through
grilling time for even cooking. The hood may
be open or closed. Used for steaks, chicken
pieces, chops and vegetables.
Indirect method:
heated ar
ea, not on top of it. Place food in the
Food is placed next to
middle of the grill with the outside burners on.
Hood must be closed. Used for ribs, large
roasts, whole poultry and rotisserie grilling of
.
oasts or poultr
ge r
lar
Dimensions in parentheses are in
millimeters unless otherwise specified.
y
Apply salt only after cooking to prevent
drying out the meat.
Use a spatula or tongs to turn meat instead
of pier
cing with a pr
ong to prevent juices
from escaping.
13
Page 14
WOLF GAS BBQ GRILL USE & CARE
Insert battery behind
ignition button
TIPS FOR SUCCESSFUL GRILLING
Baste meat with barbecue sauce or other
ugar-based sauces only during the last few
s
minutes of cooking to prevent burning.
rush vegetables and lean cuts of meat,
B
skinless poultry, fish and seafood with oil
to prevent sticking.
Turn food only once, halfway through
cooking time.
Grilling with the hood closed decreases
cooking time.
If using bamboo skewers, soak the skewers
in cold water for 30 minutes before cooking
time.
Some components become hot during
use. It may be necessary to use a
protective glove when operating the
control knobs and hood handle.
BATTERY INSTALLATION
The battery-powered ignition uses a AAA
battery, provided with the BBQ grill, to be
nstalled behind each ignition button.
i
o install or replace, remove the ignition
T
button by unscrewing in a counterclockwise
direction. Insert the AAA battery into the
avity, positive end first, and replace the
c
ignition button. Refer to the illustration below.
To make sure the sparker is operating, press
the ignition button and listen for a spark.
14
Battery installation
Page 15

WOLF GAS BBQ GRILL USE & CARE
CLEANING AND MAINTENANCE
Correct care and maintenance will keep your
Wolf BBQ grill operating smoothly. Clean
nternal parts of the grill regularly, as
i
determined by the amount of use and type of
foods cooked. Clean the entire grill each year.
leaning should be done where detergents
C
will not stain or harm your outdoor surface,
whether it be cement or grass.
EXTERIOR CLEANING
Most of the Wolf BBQ grill is made of heavy
duty stainless steel. These surfaces may be
cleaned with soap and water or one of the
many stainless steel cleaners available on the
market. They may also be used in conjunction
with a non-scratch pad for removal of grease
that bakes onto the surface. To clean or touch
up scratches, always scrub in the direction of
the grain.
CLEANING INTERNAL PARTS
rill burner grates:The grill burner grates
G
are made of durable cast iron with a porcelain
enamel finish. Running the BBQ grill on HIGH
or a few minutes after cooking to burn off
f
excess food is part of the cleaning process.
Protect your hands with pot holder mitts while
cleaning the hot grill with the brush provided.
The grates may be more thoroughly cleaned
after they have cooled by removing them
and spraying with a grill and stainless steel
cleaner. Rinse and dry the grates before
replacing them. Never immerse a hot grate in
water.
Because of rapid temperature changes on the
grates, porcelain may pop off the edges. This
will not harm or affect the use of the grates.
The exposed cast iron will darken to match the
porcelain. Use care where the porcelain has
come off. Edges may be sharp and may need
to be touched up with an emery cloth or very
fine grit sandpaper.
Open burner grates:
These grates are
porcelain-coated cast iron and can be wiped
clean while in place with warm soapy water or
removed and washed separately when cool.
Dimensions in parentheses are in
millimeters unless otherwise specified.
Drip tray and grease collection tray:
The
drip trays may accumulate food particles and
spills. After cooling, they should be slid out
and wiped clean. The gr
ease collection tray
under the grill section will catch most of the
grease and should be emptied out and
cleaned after each cooking.
15
Page 16

WOLF GAS BBQ GRILL USE & CARE
Burner
Radiant
Grill Grate
Venturi
Insert Venturi Brush
to Clean
CLEANING AND MAINTENANCE
CLEANING THE BURNERS
piders or small insects may spin webs or
S
build nests inside the burners, especially in
late summer and fall when spiders are most
ctive. These nests can obstruct gas flow and
a
cause a fire in and around the valve. Such a
fire can cause operator injury and serious
damage to your BBQ grill.
To help prevent a blockage and ensure full
heat output, clean and inspect the burners
once or twice a month.
Spider webs or wasps’ nests inside the
burner may cause a fire at the burner
valve.
To access grill burners:
Remove the grill
grates and stainless steel radiants. The
radiants are supported on each end by a pin
located just above each grill burner. Lift the
burner tubes up in the back and off the orifice
at the front.
Wash burners in warm soapy water, rinse
and dry.
Using a flashlight, look inside the end of the
urners for webs or mud nests.
b
Using the special venturi cleaner brush
provided, push the brush through the full
length of each burner several times. Refer
to the illustration below.
For burner ports, clean the gas holes with a
paper clip if blocked.
To replace the burners, slide the
bell-shaped or cylindrical end over the
valve orifices.
Test-light to see if the burner is operating
properly.
Cleaning the grill tank bottom:
Before you
put back the grill burners, check to see if you
have an accumulation of carbon and burned
food on the bottom of the grill tank. If so, use a
spatula or scraper and push the carbon to the
front and into the drip tray to collect and
dispose of.
To access side burners:
After removing the
burner grates on the open burner section, lift
the porcelain-coated cast iron burners up at
the rear and off the orifice at the front.
BBQ grill components
Cleaning the burner
16
Page 17

WOLF BBQ GRILLING GUIDE
B
EEF
Hamburgers
T
hickness/Weight Flame Internal Temp. Timing Heat Rotisserie Comments
1
/2"–3/4" (13–19) thick Medium 160˚F (70˚C) 8–12 min Direct No Grill, turning once when
High 160˚F (70˚C) 4–8 min juices rise to the surface.
Do not leave unattended.
S
teaks, Rare 1" (25) thick High 140˚F (60˚C) 10–15 min Direct No Remove excess fat from
11/2" (38) thick High 140˚F (60˚C) 15–20 min edges. Slash remaining
fat. Turn halfway through
S
teaks, Medium 1" (25) thick Medium to High 160˚F (70˚C) 15–20 min Direct No cooking time.
S
teaks, Well Done 1" (25) thick Medium 170˚F (75˚C) 20–25 min Direct No
1
/2" (38) thick Medium to High 160˚F (70˚C) 20–25 min
1
11/2" (38) thick Medium 170˚F (75˚C) 25–30 min
Tenderloin 3
1
/2–4 lbs (1.6–1.8 kg) Medium 140˚F (60˚C) 1–2 hours Direct Yes Turn burners beneath
(whole) on medium.
Rib-Eye Roast 5–6 lbs (2.3–2.7 kg) Medium 140˚F (60˚C) 1
1
/2–2 hours Direct Yes Turn burners beneath
(boneless) on medium.
Rib Roast
12–14 lbs (5.4–6.4 kg) Medium 140˚F (60˚C) 15–18 min/lb Direct Yes Turn burners beneath
(boneless) on medium.
Veal Chops 1" (25) thick Medium 140˚F (60˚C) 10–12 min Direct Yes Turn burners beneath
on medium.
Kabobs
1
/4" (32) cubes
Medium 145˚F (65˚C) 8–10 min Direct No Turn halfway through
1
cooking time.
PORK
Chops
Thickness/Weight Flame Internal Temp. Timing Heat Rotisserie Comments
3
/4" (19) thick Medium 160˚F (70˚C) 8–10 min Direct No Turn halfway through
1" (25) thick Medium 160˚F (70˚C) 12–15 min cooking time.
Ribs 3–4 lbs (1.4–1.8 kg) Medium 160˚F (70˚C) 1
1
/2–2 hours Indirect No Turn halfway through
cooking time. Brush with
BBQ sauce only during
last few minutes.
Tenderloin 1–1
1
/2 lbs (.5–.7 kg) Medium 160˚F (70˚C) 25–30 min Direct No Turn halfway through
(whole) cooking time.
1
Kabobs 1
/4" (32) cubes Medium 160˚F (70˚C) 10–15 min Direct No Turn halfway through
cooking time.
Ham Steaks
1
/2" (13) thick High 140˚F (60˚C) 4–8 min Direct No Turn halfway through
cooking time.
Sausages Medium 140˚F (60˚C) 10–15 min Direct No Turn halfway through
(fully cooked) cooking time.
Sausages Medium 160˚F (70˚C) 20–25 min Direct No Pierce skins with fork
(raw) before grilling.
Hot Dogs Medium 140˚F (60˚C) 5–10 min Direct No Turn as often as needed
to evenly br
own outsides.
17
Page 18

WOLF BBQ GRILLING GUIDE
L
AMB
T
hickness/Weight Flame Internal Temp. Timing Heat Rotisserie Comments
Chops and Steaks, 1" (25) thick Medium 140˚F (60˚C) 10–15 min Direct No Remove excess fat from
1
Rare 1
/2" (38) thick Medium 140˚F (60˚C) 14–18 min edges. Slash remaining
fat. Turn halfway through
Chops and Steaks, 1" (25) thick Medium to High 160˚F (70˚C) 13–20 min Direct No cooking time.
Medium 1
C
hops and Steaks, 1" (25) thick Medium 170˚F (75˚C) 18–30 min Direct No
1
/2" (38) thick Medium to High 160˚F (70˚C) 18–25 min
Well Done 11/2" (38) thick Medium 170˚F (75˚C) 20–35 min
Leg 1
(
butterflied) cooking time.
Leg 6–7 lbs (2.7–3.2 kg) Medium 150˚F (65˚C) 2–2
1
/2 lbs (.7 kg) Medium 150˚F (65˚C) 25–30 min Direct No Turn halfway through
1
/2 hours Direct Yes Turn burners beneath
(semi-boneless rolled) on medium.
Rib Crown Roast 3–4 lbs (1.4–1.8 kg) Medium 150˚F (65˚C) 1–11/2 hours Indirect No
Rack 1–1
1
/2 lbs (.5–.7 kg) Medium 150˚F (65˚C) 25–30 min Direct No Turn halfway through
cooking time.
Kabobs 1
1
/4" (32) cubes Medium 150˚F (65˚C) 12–15 min Direct No Turn halfway through
cooking time.
FISH / SEAFOOD
Fish Fillets
or Steaks
Thickness/Weight Flame Internal Temp. Timing Heat Rotisserie Comments
1
/4"–1/2" (6.3–13) thick High 3–5 min Direct No Cook skin side down.
1
/2"–1" (13–25) thick Medium 5–10 min
1"–11/4" (25–32) thick Medium 15–20 min
Fish (whole) 1 lb (.5 kg) Medium 15–20 min Indirect No Cook skin side down.
1
/2 lbs (.9–1.1 kg) Medium 20–30 min
2–2
3 lbs (1.4 kg)
Medium
30–45 min
Shrimp High 3–6 min Direct No Turn halfway through
cooking time.
Scallops
High
3–6 min Direct No Turn halfway through
cooking time.
18
Page 19

WOLF BBQ GRILLING GUIDE
P
OULTRY
T
hickness/Weight Flame Internal Temp. Timing Heat Rotisserie Comments
Chicken 3–5 lbs (1.4–2.3 kg) Medium 180˚F (80˚C) 11/2–2 hours Direct Yes Turn burners beneath
(whole) (in thigh) on medium.
1
Chicken 3–5 lbs (1.4–2.3 kg) Medium 180˚F (80˚C) 1–1
(
whole, cut in half) (in thigh) cooking time.
/4 hours Direct No Turn halfway through
Chicken Medium 170˚F (75˚C) 30–45 min Direct No Turn halfway through
(bone-in breasts) cooking time.
C
hicken Breasts 4 oz (.14 kg) each Medium 170˚F (75˚C) 10–15 min Direct No Turn halfway through
(boneless and skinless) cooking time.
Chicken Medium 180˚F (80˚C) 30–45 min Direct No Turn halfway through
(bone-in legs and thighs) (in thigh) cooking time.
Chicken Kabobs 1
1
/4" (32) cubes Medium 180˚F (80˚C) 10–12 min Direct No Turn halfway through
cooking time.
Cornish Hens 1
1
/2–2 lbs (.7–.9 kg) Medium 180˚F (80˚C) 45–60 min Direct Yes Turn burners beneath
(in thigh) on medium.
Duck (whole)
4–5 lbs (1.8–2.3 kg) Medium 185˚F (85˚C) 2–2
1
/2 hours
Indirect Yes Remove as much visible
(in thigh) (place fat as possible. Turn
pan under burners on either side of
duck) duck to low. Do not turn
on burners directly
beneath.
Goose (whole) 8–12 lbs (3.6–5.4 kg) Low 180˚F (80˚C) 18–20 min/lb Indirect Yes Remove as much visible
(in thigh) (place fat as possible. Turn
pan under burners on either side of
goose) goose to low. Do not turn
ectly
ners dir
on bur
beneath.
Turkey (whole) 16 lbs (7.2 kg) or less Low 180˚F (80˚C) 10–15 min/lb Direct No Do not stuff. Turn burners
(in thigh) underneath on low.
Turkey (halves) 16 lbs (7.2 kg) or less Medium 180˚F (80˚C) 15–20 min/lb Direct No Turn halfway through
(in thigh) cooking time.
Turkey Breast 4–5 lbs (1.8–2.3 kg) Medium 170˚F (75˚C) 1–1
(bone in)
1
/2 hours Indirect No Turn halfway through
cooking time.
Turkey 8–16 oz (.2–.5 kg) each Medium 180˚F (80˚C) 45–60 min Direct No Turn halfway through
(drumsticks or thighs) cooking time.
Dimensions in parentheses are in
millimeters unless otherwise specified.
19
Page 20

WOLF BBQ GRILLING GUIDE
V
EGETABLES
T
hickness/Weight Flame Timing Heat Rotisserie Comments
Asparagus Medium 6–8 min Direct No Turn halfway through cooking time.
Baste with butter.
Bell Peppers (whole) High 10–15 min Direct No Turn as often as needed
t
o evenly cook sides.
Bell Peppers Medium 6–8 min Direct No Turn halfway through cooking time.
(halved or quartered)
C
orn Medium 15–20 min Direct No Soak in water for 10 minutes
(husks removed) before grilling. Turn as often as
needed to evenly cook outsides.
Eggplant (sliced)
1
/2" (13) thick Medium 8–10 min Direct No Turn halfway through cooking time.
Mushrooms, Portabello Medium 12–15 min Direct No Turn halfway through cooking time.
Onion (sliced)
1
/2" (13) thick Medium
8–12 min
Dir
ect
No
Turn halfway through cooking time.
Potatoes (whole) Medium 45 min–1 hr Indirect No
Potatoes (sliced)
1
/2" (13) thick
Medium
14–16 min
ect No Turn halfway through cooking time.
Dir
Squash, Summer Medium 40–60 min Direct No Turn halfway through cooking time.
Squash, Winter (halved) Medium 40–60 min Indirect No Turn halfway through cooking time.
Sweet Potatoes (whole) Medium 50–60 min Indirect No Turn halfway through cooking time.
Zucchini (halved) Medium 6–10 min Direct No Turn halfway through cooking time.
FRUIT
Thickness/Weight Flame Timing Heat Rotisserie Comments
Apples (whole) Medium 35–40 min Indirect No Turn halfway through cooking time.
Apples (sliced)
1
/2" (13) thick
Medium 4–6 min Direct No Turn halfway through cooking time.
Bananas Medium 6–8 min Direct No Slice in half lengthwise before
grilling. Turn halfway through
cooking time.
Peaches Medium 8–10 min Direct No Peel, cut in half lengthwise and
remove pit before grilling.
n halfway through cooking time.
ur
T
Pears
Medium
10–12 min
Dir
ect
No Cut in half lengthwise and core
before grilling. Turn halfway
through cooking time.
Pineapple Medium 5–10 min Direct No Peel, core and cut into
1
/2" (13)
thick rings or 1" (25) thick wedges
e grilling. Turn halfway
befor
through cooking time.
20
Page 21

WOLF TROUBLESHOOTING GUIDE
TROUBLESHOOTING GUIDE
PROBLEM PROBABLE CAUSE POSSIBLE SOLUTION
urner will not light
B
Burner lights with
match, but will not light
with ignition button
Yellow flame
Incomplete burner flame
Flame blows out in
the wind
ack of gas or crimped hose. Check air shutter adjustment,
L
Blockage in burners, burner (see page 8).
ports, orifice/valve or hose. Check gas supply.
Regulator failure. Clean orifice and burner.
Improper burner location/ Check regulator to be sure vent
enturi not over orifice. hole points down, (see page 8).
v
No spark. Check igniter battery.
Battery dead.
Obstructed burner causing Clear burner obstruction.
lean fuel mixture. Check igniter battery.
Broken ignition electrode.
Damaged ignition or wire.
If a spark appears in the box,
the ignition system is operating.
No spark, terminal disconnected
from electronic ignition.
Battery dead.
Rich air mixture. Check air shutter adjustment,
Broken ignition electrode. (see page 8).
Clogged, broken or Needs cleaning. Check air shutter
worn-out burner. adjustment, (see page 8).
Plugged orifice. Check orifices.
Lack of gas supply. Check gas supply.
Partly clogged orifice or Clean orifice and burner.
burner tube. Provide a wind break.
Burner pops and
blows out
Lack of heat
Broken burner or Check burners and air shutter
fuel mixtur
Partly blocked orifice or burner. Clean orifice and burner.
Low gas or dirty regulator vent. Check gas supply.
Incorrectly installed radiant. Verify triangle cut-out is
oo much heat
T
Damaged orifice or no orifice.
Unauthorized regulator Check regulator adjustment.
adjustment.
Incorrectly installed radiant. toward back.
Excessive flar
e-up
Build-up of gr
internal parts. grill tank bottom.
Overload from fatty meats or
excessive cooking temperature.
Uneven heat
Dimensions in parentheses are in
millimeters unless otherwise specified.
Improper radiant orientation. Check for correct radiant
e too lean.
adjustment, (see page 8).
toward back.
Check orifices.
erify that triangle cut-out is
V
ease on Clean internal parts, including
orientation.
21
Page 22

WOLF SERVICE INFORMATION
SERVICE INFORMATION
CONTACT
INFORMATION
Wolf Customer
Service:
800-332-9513
Website:
wolfappliance.com
When requesting information, literature,
replacement parts or service, always refer to
he model and serial number of your BBQ grill.
t
This information is found on the product rating
plate located on the rear panel of the grill.
ecord the rating plate information below for
R
future reference.
Model Number
Serial Number
Installation Date
Wolf Authorized Service Center and Phone
Wolf Dealer and Phone
BEFORE CALLING FOR SERVICE
Before calling your Wolf authorized service
center, refer to the Troubleshooting Guide on
page 21.
PRODUCT REGISTRATION
egister your new Wolf product today so that
R
we may ensure your satisfaction. You may
register by one of the following options:
1)
Mail in the completed Wolf Product
Registration Card.
2)
Register online at
3)
Register by phone by calling the Wolf
wolfappliance.com
.
Customer Service Department at
800-332-9513
.
The model and serial numbers of your appliance are printed on the enclosed Wolf Product
Registration Card. If you provide us with your
e-mail address, we will send you exciting new
product updates and recipes as they become
available, along with information on special
events.
22
The information and images are the copyright
property of Wolf Appliance Company, LLC,
an affiliate of Sub-Zero Freezer Company, Inc.
Neither this book nor any information or images
contained herein may be copied or used in
whole or in part without the express written
permission of Wolf Appliance Company, LLC,
an affiliate of Sub-Zero Freezer Company, Inc.
©Wolf Appliance Company, LLC all rights
ved.
eser
r
Page 23

W OLF A PPLIANCE P RODUCTS
L IMITED W ARRANTY
RESIDENTIAL USE ONLY
ULL TWO YEAR WARRANTY*
F
or two years from the date of original installation, your Wolf Appliance product warranty covers all
F
parts and labor to repair or replace any part of the product that proves to be defective in materials
or workmanship. All service provided by Wolf Appliance Company under the above warranty must
be performed by a Wolf Appliance authorized service center, unless otherwise specified by Wolf
ppliance Company. Service will be provided in the home during normal business hours.
A
LIMITED THIRD THROUGH FIFTH YEAR WARRANTY
From the third through fifth year from the date of original installation, Wolf Appliance Company will
repair or replace the following parts that prove to be defective in materials or workmanship. Labor to
remove and replace defective parts is not covered. Wolf Appliance Company recommends that you
use a Wolf Appliance authorized service center to perform such service.
Gas Burners (excluding appearance), Electric Heating Elements, Blower Motors (vent hoods),
Electronic Control Boards, Magnetron Tubes and Induction Generators
LIMITED LIFETIME WARRANTY
For the life of the product, Wolf Appliance Company will repair or replace any BBQ body or BBQ hood
that rusts through due to defective material or workmanship. Labor to remove and replace defective
parts is not covered. Wolf Appliance Company recommends that you use a Wolf Appliance authorized service center to perform such service.
TERMS APPLICABLE TO EACH WARRANTY
The warranty applies only to products installed for normal residential use. The warranty applies only
to products installed in any one of the fifty states of the United States, the District of Columbia or
the ten provinces of Canada. This warranty does not cover any parts or labor to correct any defect
caused by negligence, accident or improper use, maintenance, installation, service or repair.
THE REMEDIES DESCRIBED ABOVE FOR EACH WARRANTY ARE THE ONLY ONES THAT WOLF
APPLIANCE COMPANY, LLC WILL PROVIDE, EITHER UNDER THIS WARRANTY OR UNDER ANY
ARRANTY
W
RESPONSIBLE FOR
BREACH OF THIS WARRANTY OR ANY OTHER WARRANTY, WHETHER EXPRESS, IMPLIED OR
STATUTORY.
Some states do not allow the exclusion or limitation of incidental or consequential damages, so the
above limitation or exclusion may not apply to you. This warranty gives you specific legal rights and
you may also have other legal rights that vary from state to state.
To receive parts and/or service and the name of the Wolf Appliance authorized service center
nearest you, contact Wolf Appliance Company, LLC, P. O. Box 44848, Madison, Wisconsin 53744;
k the Locator section of our website
chec
* Stainless Steel (classic, platinum and carbon) doors, panels and product frames are covered by a
limited 60 day parts and labor warranty for cosmetic defects.
ARISING BY OPERATION OF LAW. WOLF APPLIANCE COMPANY, LLC WILL NOT BE
AMAGES ARISING FROM THE
ANY CONSEQUENTIAL OR INCIDENT
ppliance
, wolfa
AL D
.com, or call 800-332-9513.
23
Page 24

OLF APPLIANCE COMPANY, LLC P. O. BOX 44848 MADISON, WI 53744 800-332-9513 WOLFAPPLIANCE.COM
W
807579 1
2/2005
 Loading...