


Subaru Tomtom Navigation Unit 2011 Owner's Manual

AUDIO VIDEO & NAVIGATION SYSTEM OWNER’S MANUAL
The symbols described below are found in this instruction manual as well
as on the device itself to ensure its proper and safe usage and to prevent
injury or damage to properties. Make sure you understand the meanings
of these symbols before reading the rest of this manual.
Handling Notes
Basic safety rules that you must follow and useful operational information
are provided with the following symbols.
ATTENTION
Useful information for smooth operation
CHECK
Facts to keep in mind when operating
• Please read all materials such as manuals and warranties that have
come with the product.
Subaru will not be responsible for unsatisfactory product performance
due to a failure to follow these instructions.
• Changes to product specifications may result in differences between
the content of the manual and features of the product.
The illustrations of screens shown in this manual may differ from the actual
screens of this product.
WARNING
This symbol indicates a situation in which incorrect handling through disregard
of a symbol may result in death or serious personal injury.
CAUTION
This symbol indicates a situation in which incorrect handling through disregard
of a symbol may result in personal injury or may result solely in damage to
property.
IMPORTANT
Follow this advice to prevent malfunctions or damage to the device.
Perform the indicated action in the event of a malfunction.
Please exercise care when handling the manual.
Forcefully spreading or pulling on pages may result in some pages falling out of
the binding.
Use the manual carefully.

Table of Contents
1-Before Use
Safety precautions........................................ 5
Before use ..................................................... 7
Discs............................................................................ 9
PND ...........................................................................12
Accessories ............................................................... 12
2-Operation
About This Receiver ................................... 13
Control Names and Operations .................................13
Turning the POWER ON or OFF ...............................14
Switching Between the Audio and
Navigation Screen ..................................................... 14
Turning the PND Display ON and OFF .....................15
Attachment and Detachment the PND ......................15
Using the Audio Cover............................................... 16
Hands-Free Microphone and Light Sensor................ 16
Adjusting the Display Angle ....................................... 17
Loading/Unloading a Disc.......................................... 17
Sub-display ................................................................ 19
Operation Conditions of this Receiver .......................19
Setup of This Receiver ................................20
Setup of This Receiver...............................................20
Screen Adjustment and Setting .................................21
Adjusting the Screen..................................................22
Switching the Audio Source .......................24
Switching the audio source ........................................24
Volume Control ............................................25
Adjusting the audio volume ........................................25
Muting the Volume .....................................................25
Adjusting the sound quality .......................26
Switching Audio Control Modes .................................26
3-Radio Operations
Using the Radio ...........................................28
Listening to the Radio ................................................28
Tune a Desired Station ..............................................28
Selecting a Radio Band .............................................29
- 1 -

Table of Contents
Saving a Station in Memory.......................................29
Preset Scan ............................................................... 30
Displaying the information ......................................... 30
Turning the Radio OFF ..............................................30
4-CD Player Operations
Using the CD Player.................................... 31
Listening To a CD ...................................................... 31
Selecting a Desired Track .........................................31
Fast Forward/Rewind ................................................32
Finding a Desired Title............................................... 32
Repeating the Same Track ........................................ 32
Random Play .............................................................32
Track Data Display .................................................... 33
Switching Between CD-DA and MP3/WMA...............33
Stopping the CD Play ................................................ 33
5-MP3/WMA Player Operations
Using the MP3/WMA Player ....................... 34
Playing an MP3/WMA File .........................................34
Selecting a Desired Folder.........................................34
Selecting a Desired Music File...................................35
Fast Forward/Rewind.................................................35
Returning To the Root Directory ................................35
Finding a Desired Music File......................................36
Repeating a Music File ..............................................36
Random Play .............................................................37
Displaying of Music File Information ..........................38
Switching Between CD-DA and MP3/WMA...............38
Stopping the MP3/WMA File......................................38
MP3/WMA..................................................................38
Creating and Playing MP3/WMA Files .......................41
6-USB Music File Player Operations
Using the USB Music File Player................43
Playing USB Music Files............................................43
Fast Forward/Rewind.................................................43
Selecting a Desired Music File...................................44
Finding a Desired Music File......................................44
Repeatedly Playing the Same Music File ..................45
Random Play of Music Files ......................................45
About the TEXT button ..............................................45
- 2 -

Table of Contents
Stopping the USB Music File Player.......................... 45
Playable USB Memory Standards .............................45
Playable MP3 File Standards .................................... 45
ID3 Tags .................................................................... 46
Format of USB Memory ............................................. 46
7-DVD Player Operations
Before Using the DVD Player..................... 47
Advantages of Digital Versatile Disc (DVD)............... 47
Discs.......................................................................... 48
Products equipped with Macrovision .........................49
Operation Flow .......................................................... 50
Using the DVD Player ................................. 51
Watching a DVD Video .............................................. 51
Video Operations ....................................................... 51
Disc Menu Operations ...............................................52
About the TEXT button ..............................................52
Stopping a DVD ......................................................... 52
Finding a Desired Video ............................................ 53
Changing the Touch Switch Display ..........................54
Changing the Screen Display and Audio Mode .........54
DVD Player Setting ....................................................55
Language Code List...................................................60
8-iPod Player Operations
Using the iPod Player..................................61
Listening to the iPod ..................................................61
Fast Forward/Rewind.................................................62
Selecting the Desired Music or Video File .................62
Finding a Desired Music File......................................62
Setting to the iPod Video Mode .................................63
Playing .......................................................................64
Pausing ......................................................................64
Repeatedly Playing the Same Music File ..................64
Random Play of Music Files ......................................64
Switching Aspect Ratio of Screen ..............................64
About the TEXT button ..............................................64
Compatible iPod models ............................................65
Stopping the iPod.......................................................65
- 3 -

Table of Contents
9- AUX Operations
Using the AUX ............................................. 66
Switching the AUX Mode ON and OFF ..................... 66
Listening to the Portable Audio Player ......................67
TEXT Button ..............................................................67
Turning off the Portable Audio Player........................ 67
10-Steering Wheel Switch Operations
About the Steering Wheel Switches.......... 68
Compatibility with Steering Wheel Switches..............68
11-Rearview Camera Operations
Rearview Camera Operations .................... 70
Playing a Video through the Rearview Camera......... 71
12-Reference
Troubleshooting Guide ...............................72
If the Following Messages Appear.............................72
Basic Trouble Shooting..............................................75
How to Contact Subaru ...............................78
Contact information....................................................78
Defective products/Warranty......................................78
- 4 -
Before Use
Safety precautions
WARNING
• Note that the data for roads, location names,
facility information, and charges, etc. may
not be the most recent and that there may
be inadequacies.
• Do not modify this system for any uses other
than that specified herein. Subaru will not be
held liable for damages including, but not
limited to serious injury, death or property
damage resulting from modifications that
enable unintended operation.
• For safety, make selections only when
vehicle is stopped. Use judgment and obey
traffic rules. Some map data may be
incorrect. See user manual for complete
instructions.
• When the vehicle is in motion, never take
your eyes off the road to make adjustments
to the main unit. You must pay attention to
the road at all times to avoid accidents; do
not let operation or adjustment of the main
unit distract you from operating the vehicle
responsibly.
• The driver should not look at the screen
while driving. Doing so may result in an
accident.
• Do not place foreign objects in the disc
insertion slot or USB input terminal. Fire or
shocks may result.
WARNING
• Do not disassemble or alter this main unit.
An accident, fires or shock may result.
• Do not let water or foreign objects enter the
internal parts of this main unit. Doing so may
result in smoke, fire or shock.
• Do not use when main unit is malfunctioning
(the screen is not lit or no sound comes out).
Doing so may result in an accident, fire or
shock.
• If foreign objects or water enters the main
unit, smoke or a strange odor may be
emitted. If this occurs, stop using the main
unit immediately and contact your dealer.
Accidents, fire, or shocks may result if you
continue to use the main unit under these
conditions.
• The driver should not change the CD or USB
memory while driving.
Doing so may result in an accident. You must
first stop or park your car in a safe location
and then proceed to remove or insert the CD
and/or USB.
• Be sure to park the vehicle in a safe location
and set the parking brake before watching
DVDs or videos. For safety reasons, only the
sound of DVDs or videos will be emitted
while the vehicle is in motion.
CAUTION
• Keep volume to a reasonable level so that
you can hear sounds from outside the
vehicle, including warning sounds, voices,
and sirens. Failure to do so may cause an
accident.
• Be careful that your hands and fingers do
not get pinched when adjusting the tilting
angle or closing the display. Otherwise
injuries may result.
• Do not put your hands or fingers into the
disc insertion slot or USB input terminal.
Injuries may result.
• Do not touch heat dissipating parts of the
main unit as you may be burnt.
• The volume should be set at a moderate
level to avoid hearing damage when the
main unit is powered on.
• Do not operate when sound such as
distortion is being emitted.
1
- 5 -

Before Use
CAUTION
• This main unit uses invisible laser light. Do
not disassemble or alter this main unit. If any
problems occur, contact the dealer where
you purchased the main unit.
Altering this main unit may cause exposure
to laser emissions (which may damage your
eyesight), or result in an accident, fire or
shocks.
• Using the vehicle speed pulse signal, you
can use the route guidance function even in
locations where normally no guidance is
given (e.g.: in a tunnel). However, the
accuracy of the guidance is not guaranteed
since the guidance is performed using the
information about road surface conditions
and vehicle speed.
IMPORTANT
• When there is a lot of vibration – when
driving on a bad road for example – the main
unit may become inoperable due to it not
being able to read data from the disc.
• If using this receiver immediately after
having purchased it or after having stored it
disconnected from the vehicle battery, the
present location may not be displayed
accurately. Wait a short while and the GPS
positioning will correct the displayed
position.
• This device is a precision-engineered
equipment and the information that you
record on it after purchase can be lost as a
result of static electricity, electrical noise,
vibration and other influences. It is
recommended that you keep a separate
record of the information you store in the
main unit.
IMPORTANT
• Note that the following events are not
covered by the warranty.
1 Corruption or loss of the data stored in the
main unit by the purchaser resulting from
failure or incorrect operation of the main unit,
or any problems associated with it, or due to
the effects of electrical noise or other
influences.
2 Corruption of loss of the data stored in the
main unit by the purchaser resulting from
misuse of the main unit by the purchaser or a
third party.
3 Corruption or loss of data stored in the main
unit by the purchaser resulting from failure /
repair of the main unit.
• Please note that by installing or using the
main unit, you are regarded as having
consented to the points above.
- 6 -

Before Use
Before use
CAUTION
• Be very careful and pay full attention to
safety when operating the audio controls
while driving, otherwise accidents may
occur. Also, be sure to set the volume so
that you can still adequately hear sounds
outside the vehicle.
Improper use may result in a traffic accident.
CAUTION
• Never continue to use the system if it is
malfunctioning in any way. If smoke,
abnormal noises or abnormal odors are
noticed, turn off the power immediately.
Immediately turn off the audio in such
situations.
Exercise caution regarding the temperature
inside the vehicle.
• Do not use volatile chemicals such as
benzene or thinners when cleaning the main
unit. The main unit may be damaged and the
paintwork may be affected.
Please use a soft cloth (silicon cross, etc.) to
clean the main unit. Please follow the
directions when you use a chemical dust
cloth.
CAUTION
• Do not disassemble or modify this receiver.
The main unit has a precisely designed
structure, so consult your dealer in the event
any unsatisfactory performance is observed.
• Do not apply excessive force to the monitor.
Otherwise damage may result.
1
- 7 -

Before Use
CAUTION
• Do not leave the monitor in tilt position when
you are not using it.
Otherwise, it may be damaged.
• Do not insert any objects other than discs
into the disc slot.
Otherwise damage may result.
CAUTION
• Be careful not to get your fingers or other
objects caught behind the monitor when it is
being retracted into place.
Interference can cause an injury or damage
the main unit.
CAUTION
• When removing a disc from the main unit,
remove it in the horizontally level direction.
Do not pull them up or press down on them
forcibly while removing them.
Improper removal may result in the disc
becoming scratched, cause the receiver to
emit unusual noises, or result in other
damage.
- 8 -
Before Use
Discs
ATTENTION
• In cold or rainy weather, just as the interior
glass surface becomes fogged, dew (water
condensation) may also settle on the main
unit. (Condensing) When this occurs, disc
playback may become intermittent or
impossible. Dehumidify the air in the vehicle
for a while before resuming playback.
• If a problem occurs, the player function stops
automatically to protect its internal parts. If
the player does not operate even when you
follow the on-screen messages, the player
may have failed. Consult the dealer you
purchased it from.
• Playback may be intermittent when the player
is subjected to severe vibrations while
traveling over a rough surface.
• Please do not use a commercially available
lens cleaner because it may cause damage
to the pickup of the player.
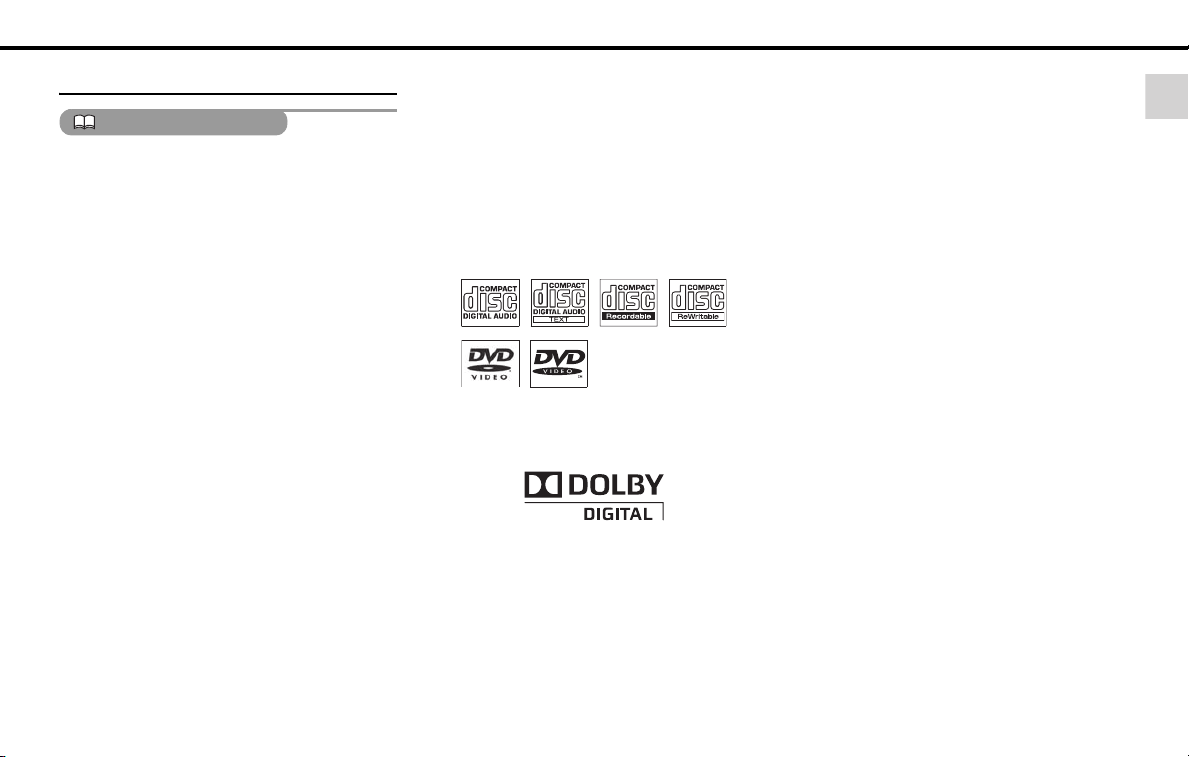
■ Format of discs
• An audio disc or DVD video disc bearing one
of the marks below can be played.
When using a DVD±R/RW
(DVD±Recordable/ReWritable) disc, note that
only the disc whose contents were recorded
in the video mode can be played. Discs
whose contents were recorded in the video
recording (VR) mode and audio mode cannot
be played.
• The DolbyDigital format is supported and
discs with the logo shown below can be
played.
This product is manufactured under license
from Dolby Laboratories. Dolby and the
double-D symbol are registered trademarks
of Dolby Laboratories.
• It is possible that a CD-R (CD-Recordable) or
CD-RW (CD-ReWritable) disc will not play on
the main unit due to the characteristics of the
recording or special disc, scratches, dirt or
deterioration caused by long-term storage in
the vehicle. Also, a CD-R or CD-RW disc that
has not yet been finalized and a CD-R or CDRW disc recorded in UDF format cannot be
played.
• It is possible that a DVD±R/RW
(DVD±Recordable/ReWritable) disc will not
play on this receiver due to the
characteristics of the recording or special
disc, scratches, dirt or deterioration caused
by long storage in the vehicle. Also, a
DVD±R/RW disc that has not yet been
finalized cannot be played. It may not be
possible to play a disc that has been
recorded on a personal computer, depending
on the application setting and the
environment.
• The CD-TEXT function can be used only for
CD-text CDs available on the market.
Characters written on a CD-R and CD-RW
discs may not be displayed correctly.
• Do not use a CD or C-thruDisc with a
transparent or semi-transparent recording
area as they may fail to load or unload or play
their contents.
1
- 9 -

Before Use
• A Copy Control CD (CCCD) may not be
played as it does not meet the official CD
Standard.
■ Handling discs
• Do not place discs in direct sunlight. They
should be stored in their protective cases.
Otherwise, they may warp and fail to play.
• Do not apply paper-based tape to either
the recording side or label side of a disc.
Damage could result.
• Keep cracked or warped discs out of the
player to avoid damaging the main unit.
• Do not touch the recording area (the
rainbow color) side of a disc. Otherwise,
the disc may be soiled and the playback
may be intermittent.
• If you play a dirty disc, the disc surface may
be scratched and its play may be
intermittent. Use a commercially available
compact disc cleaner to clean a CD, wiping
gently from the center to the edge.
- 10 -

Before Use
■ Brand new CDs ■ Rental discs
• You may notice that some brand new discs
are rough around the center hole or
outside. In this case, remove burrs or
flakes around the edge using the side of a
ballpoint pen before using a new disc. Not
doing so may result in burrs or flakes
becoming stuck on the recording side,
preventing playback.
Rough edges
Ballpoint pen
Rough edges
• Do not use a rental disc with glue or
remnants of adhesive tape or labels. They
may cause the disc to get stuck inside or
damage the main unit.
Recorded surface
■ Irregularly-shaped CDs
• Specially-shaped or octagonal CDs, like
heart-shaped cannot be played. Do not
attempt to play them, even with an adapter,
since they may damage the player.
Cellophane tape
■ Disc accessories
• Do not use accessories (stabilizers,
protective seals, laser lens cleaners, etc.)
sold for “improving sound performance” or
“protecting CDs.” The changes in CD
thickness or outside dimensions made by
these accessories may cause problems in
the player.
• Please be sure NOT to attach any ringshape protector (or other accessory) to
your discs. Those protectors are
commercially available and said to protect
discs and to improve sound quality (and
antivibration effect), but they can do more
harm than good in regular uses. The most
common problems are Insert/Eject related
problems and “No playback” problems due
to the protector ring that may have come
off in a disc mechanism.
CD ring
1
- 11 -

Before Use
PND
IMPORTANT
To protect the battery, the temperature range
within which the battery can be charged is 32°F to
+113°F (0°C to +45°C). When the PND battery
temperature falls outside of this range, battery
charging rate will be reduced to a trickle charge.
To help prevent the PND from exceeding the
charging temperature, remove the PND from
vehicle when not in use. If necessary, please use
the supplied USB cable and continue charging
from a PC.
PND battery charging status indication
Battery
condition
Charging
Full
Charging in
High Temp
Empty High
Temp
ATTENTION
For your convenience, it is recommended to
regularly update the PND on the TomTom Web
site. (www.tomtom.com)
Please see the instructions in the TomTom
HOME CD for details.
"Charging"
" "
" "
" "
Indicator
(Green with
Moving)
(Green)
(No indication)
(Green half)
(No indication)
(Red)
(No indication)
Accessories
aYour TomTom
bDocumentation pack
cConnector cover
dUSB cable
- 12 -
About This Receiver
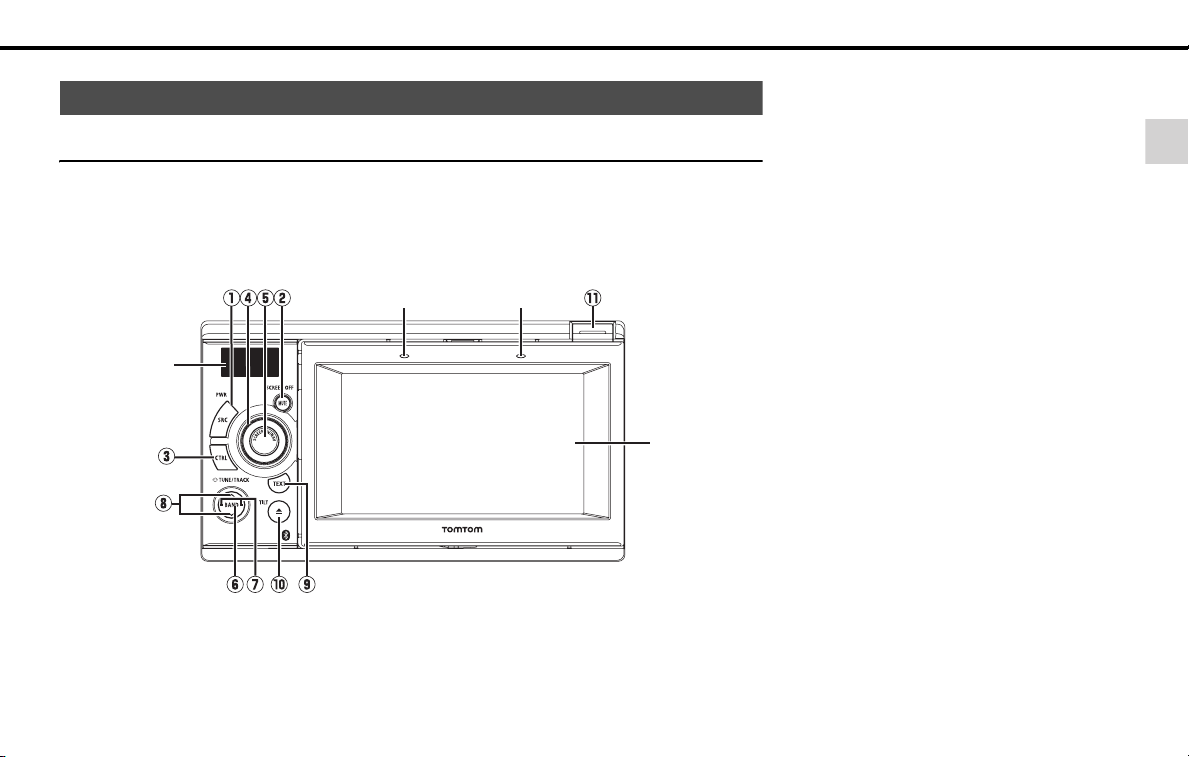
Control Names and Operations
You can operate this receiver by pressing the panel buttons (panel switches) or by touching the
switches displayed on the screen (touch switches).
■ Panel Switches
Identification of controls and functions.
Light sensorMicrophone
Sub-display
PND display
Operation
1 [SRC] button
Short press: Switches SOURCE.
Press and hold: Turns the audio mode
OFF.
Press and long hold (more than 5
seconds): Turns the power completely
OFF.
2 [MUTE] button
Short press: Turns MUTE ON or OFF.
Press and hold: Turns the PND display
OFF.
3 [CTRL] button
Short press: Switches the audio controls.
Press and hold: Switches to the Screen
setting menu. You can switch to the
setting mode when PND is connected and
the audio power is off.
4 [VOL] rotary knob
Adjusts volume.
5 [SCREEN AV/NAV] button
Short press: Switches between the NAVI
screen and AV screen. Turns the PND
display ON when it is OFF.
Press and hold: Displays the CAMERA
screen when a camera is connected.
6 [BAND] button
Changes radio bands, or playback format
between CD-DA and MP3/WMA.
2
- 13 -

Operation
7 [SELECT (Right/Left)] button
Short press: Tunes radio stations, selects
CD/MP3/WMA, iPod and USB tracks, or
selects DVD chapters.
Press and hold: Tunes preset radio
stations, or fast forward or rewind a DVD,
CD, MP3, WMA, iPod and USB.
8 [SELECT (Upper/Lower)] button
Short press: Tunes radio stations by
SEEK UP/DOWN. Selects folders in the
CD (MP3/WMA) mode.
Long press: Continues SEEK UP/DOWN
of radio stations.
Long press of the DOWN button: Returns
to the root directory in the MP3/WMA
mode.
9 [TEXT] button
Displays frequency, Track No., or current
audio mode on the Subdisplay when the
PND is attached.
Track No., elapsed time, volume level and
title will be shown when the PND is
disconnected.
0 [ (OPEN/EJECT)] button
Short press: Ejects the disc or opens and
closes the front panel.
Press and hold: Tilts the front panel step
by step or forcibly ejects the disc when the
front panel is open.
A [Release] button
Removes the right side of the PND from
the main unit.
Turning the POWER ON or OFF
When the power is turned OFF the last mode on
the main unit (CD and Tuner) will be restored.
WARNING
When the main unit's power is turned on for the
first time or if the battery terminals have been
disconnected, e.g. for vehicle maintenance, and
the power is then turned back on, the main unit will
start up in the FM mode.
IMPORTANT
Even though the audio source is turned off, the
navigation screen is displayed continuously as
long as it is selected.
(1) When the power is OFF, press [SRC].
The power will come ON.
(2) Press and hold the [SRC] button until a
beep is heard while the power is on, and
release the button.
All audio sources will be turned OFF.
(3) When the power is ON, hold down the
[SRC] button for 5 or more seconds.
The audio and navigation will be turned off.
Switching Between the Audio and
Navigation Screen
(1) Each time you press the [SCREEN AV/
NAV] button, the display switches
between the AUDIO and NAVIGATION
screen.
- 14 -
Operation
Turning the PND Display ON and OFF
(1) When the PND display is OFF, press the
[SCREEN AV/NAV] button.
The PND display will come ON.
(2) When the PND display is ON, hold down
the [MUTE] button for 1 or more
seconds.
The PND display will go OFF.
Attachment and Detachment the PND
■ Using the PND
CAUTION
To avoid injury, use the audio cover when the PND
is removed.
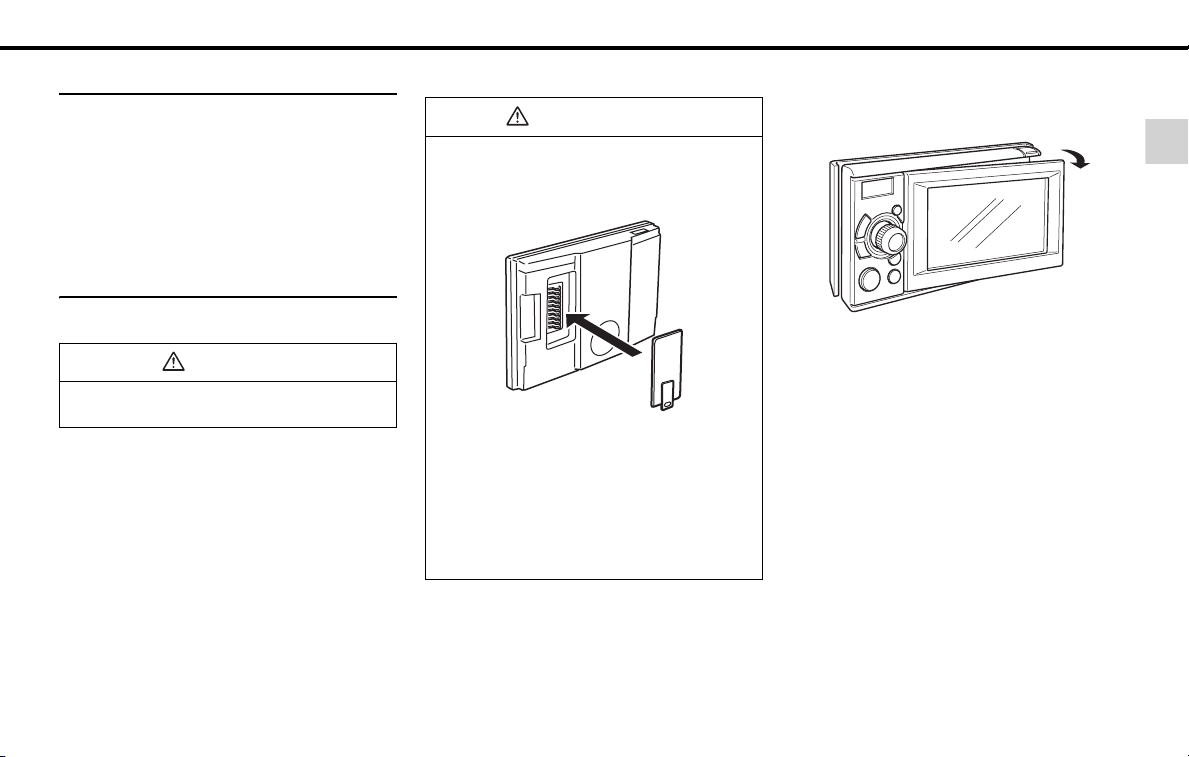
■ How to Detach the PND from the Main Unit
IMPORTANT
• When detaching the PND, Do not touch the
PND rear connector.
• After detaching the PND, mount the
connector cover to the PND rear side.
• Do not attach the PND to the audio unit
when connector cover is mounted.
• When attaching the PND, do not press the
monitor display.
• If the PND gets wet, do not attach it to the
main unit.
• When the PND is detached, the audio cover
should be installed.
(1) Press the [Release] button.
The right-hand side of PND will be unlatched
from this receiver.
(2) Remove the PND.
Hold the PND on the right side, lift up and pull it
toward you to remove it.
2
- 15 -

Operation
■ Attaching the PND
(1) Latch the left-hand side of PND to the
receiver.
Engage the catch at the left end of the PND with
the lock on the main unit.
(2) Attach the PND to the receiver.
Press the right-hand side of PND until it clicks in
position.
Using the Audio Cover
■ Using the Audio Cover
After detaching the PND, we recommend you to
use the audio cover for this receiver.
■ Fitting the Audio Cover
(1) Mount the left end of audio cover on
this receiver.
Engage the catch at the left end of the audio
cover with the lock on the main unit.
(2) Mount the entire audio cover on this
receiver.
Press the right-hand side of audio cover so that it
fits and clicks.
How to Detach the Audio Cover from the
■
Main Unit
(1) Press the [Release] button.
This removes the right edge of the audio cover
from the main unit.
(2) Remove the audio cover.
Hold the audio cover on the right side, lift it up
and pull it toward you to remove it.
Hands-Free Microphone and Light
Sensor
The PND is equipped with a built-in hands-free
microphone and a light sensor. For details on
how to use the hands-free call function or
configure light sensor settings, refer to the
operation manual of the PND.
IMPORTANT
Pressing a sharp object against the hands-free
microphone or the light sensor may damage them.
Light sensor
Built-in hands-free microphone
- 16 -

Operation
Adjusting the Display Angle
When the screen shines due to ambient
sunlight, you can adjust the angle of the display.
CAUTION
When adjusting its angle, take care not to pinch
your fingers. Otherwise you may hurt yourself or
cause mechanical damage.
IMPORTANT
Do not mount a disc when the display is tilted.
Otherwise the disc or this receiver will be
scratched and damaged.
(1) Hold down the [ (OPEN/EJECT)]
button for 2-3 second until BEEP sound.
• You can change the tilt angle in one step each
time you press the button.
• The angle can be changed in 5° increments,
and can be tilted up to 30°.
ATTENTION
• You can open the display even when it is
tilted. When you close the display, it returns
to the preset angle.
• If you tilt the display and turn the ACC OFF,
the display will return to the upright position.
However, when you turn the ACC ON, the
display returns to the preset angle.
Loading/Unloading a Disc
To listen to music, insert the music CD in the
slot, and to play a DVD, insert the DVD disc in
the slot.
■ Loading Steps
CAUTION
• Do not place a cup or can on the display
while the display is opened. Doing so may
damage the display.
• Do not press the [ (OPEN/EJECT)] button
while inserting a disc into the slot.
IMPORTANT
This receiver can play 8cm CDs and 8cm DVDs.
To avoid disc problems, insert a disc without using
an adapter.
2
- 17 -

Operation
(1) Press the [ (OPEN/EJECT)] button.
The display will open and the disc insertion slot
will open.
(2) Insert a disc into the slot.
• The display will close automatically when the
disc is inserted.
• Hold a DVD or CD correctly (by inserting your
finger in its center hole and by holding the disc
edge by another finger), face the disc label side
upward, and insert the disc into the slot.
• When you insert a DVD into slot, its movie will
be played in the DVD mode.
• When you insert a CD into slot, its music will be
played or the MP3/WMA play will start.
CD, MP3/WMA, DVD disc
CD/DVD unloading steps
■
IMPORTANT
• Do not close the display when the ejected
disc remains in the slot. Doing so may
damage the unit or the disc.
• Do not push and close the display by hand,
or the display will be damaged.
• Wipe and clean the display immediately if
juice or another liquid drops on it. If not the
display will be damaged.
• To protect the display from heat and dust,
keep the display closed except when you
load or unload a disc.
• If the disc does not eject (for example, if it is
jammed), hold down the [ (OPEN/
EJECT)] button for more than 5 seconds.
(1) Press the [ (OPEN/EJECT)] button.
This will opens the display and ejects the disc.
(2) After the disc has been ejected, remove
the disc and then press the [ (OPEN/
EJECT)] button.
ATTENTION
As this receiver has a single disc slot, you can
load only one CD or DVD disc at a time.
- 18 -

Operation
Sub-display
• Sub-display may look white or black when
viewed from an angle.
• Also, the screen may shine and became
difficult to watch due to ambient sunlight.
Operation Conditions of this Receiver
You can or cannot operate this receiver in the following conditions (the ignition key positions).
: Operable; ×: Inoperable
Engine switch position
OFF
(LOCK)
Audio
function
Video
function
*1 When the parking brake is engaged
*2 DVD and iPod-video are not displayed during driving.
×
×
ACC
ON when
stopped
* 1
* 1
ON
when running
Some functions are
inoperable for safety
reasons.
Voice guidance and music
play are active.
Some functions are
inoperable for safety
reasons.
For your safety, only voice
guidance and music play
are active.
*2
Display opened
×
Audio is played.
Disc is ejected.
Only Vol is enabled for
operation.
×
Both image and audio
(iPod-Video only) are
played.
Disc is ejected.
Only Vol is enabled for
operation.
2
- 19 -

Operation
Setup of This Receiver
Setup of This Receiver
You can select the guide tone, illumination and
another useful functions of this receiver.
ATTENTION
The VTR function cannot be used.
■ Enable guide tone
Turn the “Guide tone” ON or OFF. If turned ON,
a guidance tone can be heard when you
operate a button.
(1) Hold down the [SRC] button for 1 or
more seconds.
Audio mode will be turned OFF.
(2) Hold down the [CTRL] button for 1 or
more seconds.
(3) Touch .
(4) Touch .
(5) Touch .
• If the DISC is not removed within 15 seconds
after ejecting the DISC, a BEEP is sounded
regardless of whether this setting is ON or
OFF.
• A BEEP is sounded regardless of whether
this setting is ON or OFF when the audio
mode is set to OFF.
■ Enable AUX
Turn the “AUX setting” ON or OFF. It is
recommended that the AUX setting is left in the
“ON” setting. If it is ON, you can select source
from the AUX input.
(1) Hold down the [SRC] button for 1 or
Enable guide tone
It turns ON and OFF each time you touch
Enable guide tone
. (Default is OFF.)
Next
Done
ATTENTION
more seconds.
Audio mode will be turned OFF.
(2) Hold down the [CTRL] button for 1 or
more seconds.
(3) Touch .
(4) Touch .
(5) Touch .
■ Dim sub-display
If “Enabled”, the sub-display brightness
changes when you turn the car lights (side
marker light, tail light, and license plate light)
ON.
(1) Hold down the [SRC] button for 1 or
(2) Hold down the [CTRL] button for 1 or
(3) Touch .
(4) Touch .
(5) Touch .
Enable AUX
It turns ON and OFF each time you touch
Enable AUX
. (Default is ON.)
Next
Done
more seconds.
Audio mode will be turned OFF.
more seconds.
Dim sub-display
It turns ON and OFF each time you touch
Dim sub-display
. (Default is ON.)
Next
Done
- 20 -

Operation
■ Link night view to headlights
If it is set to “Enabled” and if the Dim subdisplay is ON, the PND display switches to the
night view mode when you turn the car lights
ON.
(1) Hold down the [SRC] button for 1 or
more seconds.
Audio mode will be turned OFF.
(2) Hold down the [CTRL] button for 1 or
more seconds.
(3) Touch
Link night view to headlight
It turns ON and OFF each time you touch
Link night view to headlight
(Default is ON.)
(4) Touch .
(5) Touch .
■ Illumination
Next
Done
.
.
The illumination colors can be switched.
(1) Hold down the [SRC] button for 1 or
more seconds.
Audio mode will be turned OFF.
(2) Hold down the [CTRL] button for 1 or
more seconds.
(3) Touch .
Next
(4) Touch .
(5) Touch .
Change
The illumination is switched as follows each time
you touch the .
Red (Default) ↔ Blue
Change
Done
ATTENTION
The illumination brightness of the main unit
changes as the vehicle’s illumination brightness
is adjusted using the vehicle's illumination
control dial.
■ Voice guidance
Select the Right or Left navigation voice
channel.
(1) Hold down the [SRC] button for 1 or
more seconds.
Audio mode will be turned OFF.
(2) Hold down the [CTRL] button for 1 or
more seconds.
(3) Touch .
(4) Touch .
(5) Touch .
Next
Change
The Right and Left navigation voice channels are
switched each time you touch the .
(Right channel is selected by default.)
Change
Done
■ Camera setting
Set the camera to the AUTO or MANUAL
operation mode.
In the AUTO mode, camera view is displayed on
the PND when you shift the lever to reverse
position or when you long press the [SCREEN
AV/NAV] button. In the manual mode, camera
view is displayed when you long press the
[SCREEN AV/NAV] button.
(1) Hold down the [SRC] button for 1 or
more seconds.
Audio mode will be turned OFF.
(2) Hold down the [CTRL] button for 1 or
more seconds.
(3) Touch .
(4) Touch .
(5) Touch .
Next
Change
The AUTO and MANUAL operations are switched
each time you touch . (AUTO is set
by default.)
Change
Done
Screen Adjustment and Setting
■ Turn Display OFF
(1) Press and hold the [MUTE] button.
Press the [SCREEN AV/NAV] button to return to
the previous screen.
2
- 21 -
Operation
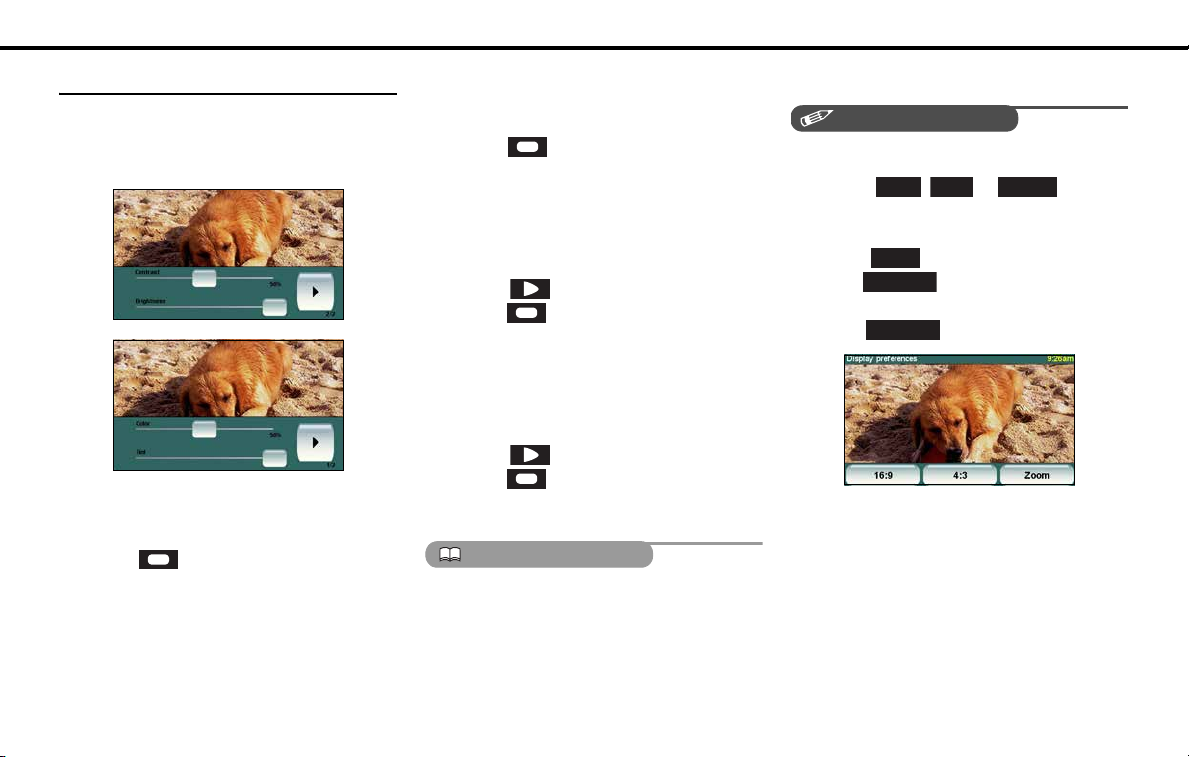
Adjusting the Screen
When you have stopped the car, you can switch
from DVD or iPod-video image to the
Adjustment screen and you can adjust the
display contrast and brightness.
Contrast
(1) Press and hold the [CTRL] button
during DVD image display.
(2) Slide to the right to enhance the
contrast, and slide it to the left to
reduce the contrast.
Brightness
(1) Press and hold the [CTRL] button
during DVD image display.
(2) Slide to the right to make the
display brighter, and slide it to the left
to make the display darker.
Color
(1) Press and hold the [CTRL] button
during DVD image display.
(2) Touch .
(3) Slide to the right to enrich the
color, and slide it to the left to lighten
the color.
Tint (only for NTSC video)
(1) Press and hold the [CTRL] button
during DVD image display.
(2) Touch .
(3) Slide to the right to enrich the
green, and slide it to the left to enrich
the red.
ATTENTION
If no adjustments are made within 6 seconds,
the image quality adjustment screen will be
canceled.
■ Setting the Aspect Ratio of Screen
CHECK
You can set an aspect ratio of DVD, iPod-video
screen.
(1) Touch , or .
16:9 4:3 Zoom
You can display the switch as follows.
DVD :
Next
Touch on the operation screen, and
Display
touch .
iPod-video:
Display
Touch on the operation screen.
- 22 -
Operation
2
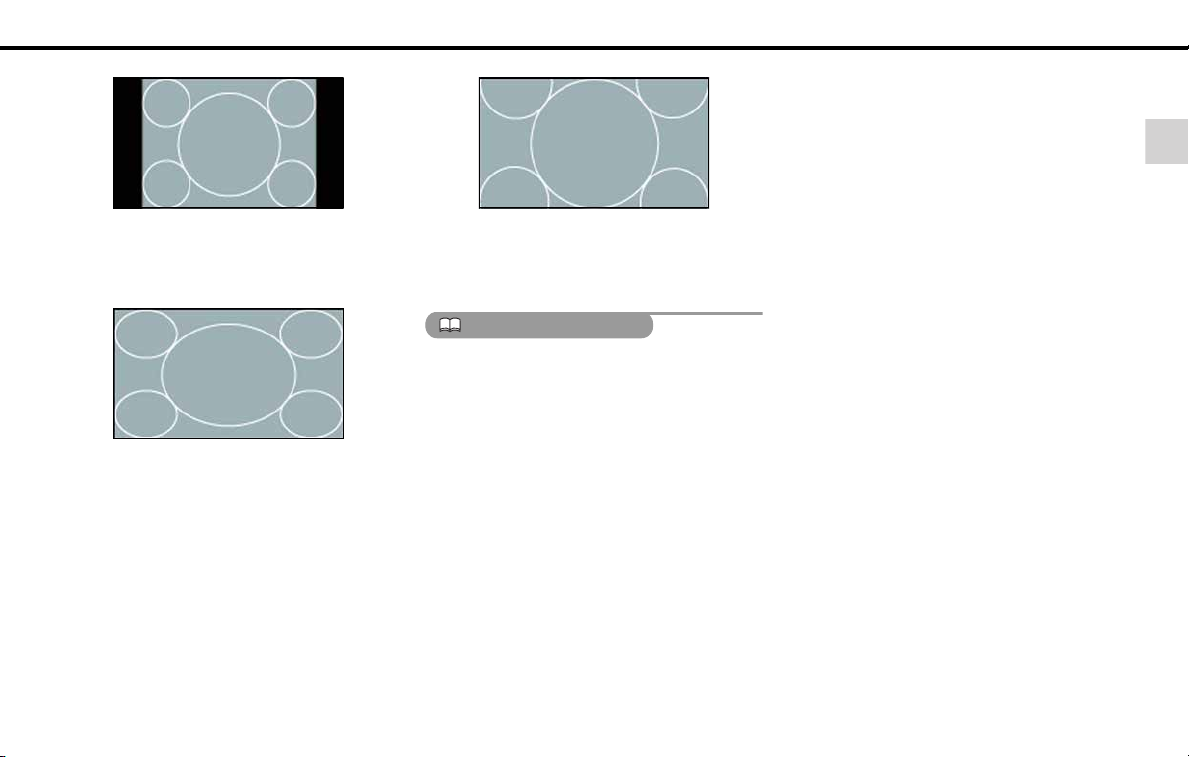
• 4:3 mode
Enlarges or reduces the screen with the 3
(vertical) by 4 (horizontal) aspect ratio. Black
stripes are displayed at both sides.
• 16:9 mode
Enlarges or reduces the screen with the 9
(vertical) by 16 (horizontal) aspect ratio. (This is
the normal DVD display screen size).
• Zoom mode
Enlarges or reduces the screen equally in the
vertical and horizontal directions, fitting the
width to the screen size.
ATTENTION
The user should not experience any problems
when watching a video on the wide screen on a
personal basis. If you compress or enlarge the
screen for commercial purposes or to display to
the public, it may infringe a copyright that is
protected by copyright laws.
- 23 -

Operation
Switching the Audio Source
Switching the audio source
(1) Press the [SRC] button.
The audio source is switched as follows each
time you press the [SRC] button.
FM/AM → DISC (CD or DVD)
*3
→ iPod
*1*4
→ FM/AM → ...
AUX
*1 Cannot be selected if the corresponding
device is not connected to the main unit.
*2 Cannot be selected if no disc is loaded.
*3 Cannot be selected if the AUX setting is set to
OFF.
*4 If the PND is not connected to the main unit,
you cannot select the USB mode or iPod
mode.
*2
→ USB
*1*4
→
- 24 -