

Subaru Impreza Wrx-Sti 2012 Owner's Manual

Subaru of America, Inc., Subaru Plaza,
P.O. Box 6000, Cherry Hill, NJ 08034-6000
2012
Impreza WRX and
Impreza WRX STI
MSA5B1205A
Issued July 2011
Printed in USA 11/11
Quick Reference Guide

Complete U.S. specications and illustrations may
not have been available at time of publication.
Specications are based on the latest product
information available at time of publication. Some
images shown are for illustration purposes only.
Some equipment shown may be optional at
extra cost. Specic options may be available
only in combination with other options. Specic
combinations of equipment or features may vary
from time to time and by geographic area. Certain
accessories and equipment may not be available at
the time of publication.
This Quick Reference Guide applies to all
Impreza WRX & Impreza WRX STI models.
Therefore, some explanations may be for equipment
not installed on your vehicle. Subaru of America,
Inc., reserves the right to change or discontinue at
any time, without notice, prices, colors, materials,
equipment, accessories, specications, models
and packages without incurring any obligation to
make the same or similar changes on vehicles
previously sold. Colors shown may vary due to
reproduction process.
For detailed operating and safety information,
please consult the Owner’s Manual.
Subaru, Outback, Legacy, Forester, Impreza,
WRX, WRX/STI, BOXER, SI-DRIVE, Lineartronic,
Alcantara, Circle Surround, XM and Sirius are
registered trademarks.
All rights reserved. Contents may not be reprinted or
electronically reproduced in whole or in part without
prior written approval of Subaru of America, Inc.
© 2011 Subaru of America, Inc.

Table of Contents
Getting Started
Instrument Panel
Gauges
Personalize
Controls
While Operating
Safety / In Case of Emergency
Additional Information
2 - 3
4 - 7
8 - 11
12 - 13
14 - 21
22 - 29
30 - 31
32 - 33

3
Remote Keyless Entry
3
Ins
tru
t
a
e
Gau
s
Per
ali
e
Con
tro
ls
Whi
le
O
Saf
ety
/
In
Cas
Add
iti
l
o
a
on
3
Get
Get
ting
d
Started
Lock/Arm
t1SFTTUPMPDLBMMEPPSTBOE
rear gate or trunk.
t*GBOZPGUIFEPPSTPSUIFSFBS
gate (or trunk) are not fully
closed, an electronic chirp
will sound ve times and the
hazard lights will ash ve
times to alert you that the
doors or the rear gate are not
properly closed.
t5PBDUJWBUFUIFWFIJDMFýOEFS
function, press three times
(within ve seconds). If you are
within 30 feet of the vehicle,
the horn will sound one time
and the hazard lights will ash
three times.
Trunk Lid Release Lock (4-Door only)
Prevent unauthorized entry into the trunk by locking the trunk release lever. Insert the ignition
LFZJOUPUIFLFZDZMJOEFSBOEUVSOUIFLFZDPVOUFSDMPDLXJTFUPUIFi-0$,wQPTJUJPO
Unlock/Disarm
t1SFTTPODFUPVOMPDLUIF
driver’s door.
t1SFTTUXJDFXJUIJOýWF
seconds) to unlock all doors.
t8IFOUIFi6OMPDL%JTBSNw
button is pressed, the dome
and map lights will illuminate
if the dome light switch is in
the middle position.
Unlocking the Rear
Gate/Opening the
Trunk Lid
Press the button to unlock
the rear gate (5-Door). Press
and hold to unlock the
trunk (4-Door).
Seating
Seat Controls
1. Forward/Backward
Pull up on the lever below the front
of the driver’s seat to move the seat
forward or backward.
2. Raise/Lower Seat Cushion
To adjust the height of the driver’s
seat, push or pull the seat height
adjustment lever located on the
lower left front of the seat.
3. Recline Seatback
To adjust the seatback to the desired
position, pull up on the recline lever
located on the lower left rear of the
driver’s seat or lower right rear of the
passenger’s seat. Do not adjust seats
while driving.
2 3
1
Heated Seats
(if equipped)
The switches are located on
the center console between
the driver and passenger seats.
Choose low (bottom of switch)
for normal heating or high (top of
switch) for rapid heating. Choose
the center position to turn off the
seat heaters.
Folding Down the
Rear Seats
Lower the headrests. Pull up on
the release knob on the seat side
that you want to fold down. To
return the seatback to its original
position, raise the seatback until
it locks into place making sure
that it is securely locked.
Started
Getting
Started
Started
Starte
Getting
Getting
ting
Instrument
Panel
P
n
men
l
Gauges
ge
Personalize Controls While
son
z
Operating
perating
Safety / In Case
of Emergency
of Emergency
e
Information
Inf
Additional
rm
ona
ti
2
3

Impreza WRX Instrument Panel
5
Get
tin
d
Ins
tru
t
a
e
Gau
s
Per
ali
e
Con
tro
ls
Whi
le
O
Saf
ety
/
In
Cas
Add
iti
l
o
a
on
5
5
5
Started
Starte
Getting
g
Instrument
Instrument
Panel
Panel
P
n
men
l
Gauges
ge
Personalize Controls While
son
z
pg. 14 pg. 20 pg. 18-19pg. 21pg. 12
4 5
pg. 8-11 pg. 15 pg. 23pg. 16-17
Clock
1S
FTTUIFiwCVUUPOUPBEWBODFUIFUJNFPSUIF
iowCVUUPOUPSFWFSTFUIFUJNF7FIJDMFTXJUIB
navigation system, please refer to the separate
i0QFSBUJOH*OTUSVDUJPOTGPS/BWJHBUJPO4ZTUFNw
Operating
perating
Safety / In Case
of Emergency
of Emergency
e
Information
Inf
Additional
rm
ona
ti
5

Impreza WRX STI Instrument Panel
Get
tin
d
Ins
tru
t
a
e
Gau
s
Per
ali
e
Con
tro
ls
Whi
le
O
Saf
ety
/
In
Cas
Add
iti
l
o
a
on
Started
Starte
Getting
g
Instrument
Instrument
Panel
Panel
P
n
men
l
Gauges
ge
Personalize Controls While
son
z
pg. 14 pg. 18-19pg. 21pg. 20
6 7
pg. 12 pg. 8-11 pg. 15 pg. 23pg. 16-17
Clock
1S
FTTUIFiwCVUUPOUPBEWBODFUIFUJNFPSUIF
iowCVUUPOUPSFWFSTFUIFUJNF7FIJDMFTXJUIB
navigation system, please refer to the separate
i0QFSBUJOH*OTUSVDUJPOTGPS/BWJHBUJPO4ZTUFNw
Operating
perating
Safety / In Case
of Emergency
of Emergency
e
Information
Inf
Additional
rm
ona
ti
7

Impreza WRX Gauges
9
Get
tin
Ins
tru
t
a
e
Per
ali
e
Con
tro
ls
Whi
le
O
g
Saf
ety
/
In
Cas
y
Add
iti
l
o
a
on
Immediate Attention
Fuel Gauge
Caution Informational
Tachometer
Speedometer
Started
Started
Started
Getting
Getting
g
Instrument
Instrument
Panel
Panel
P
n
men
l
Gauges
Gauges
Gauges
Gauges
Temperature Gauge
Seatbelt warning
Front passenger seatbelt
warning
SRS airbag system
Security indicator light
Door open
Charge warning
Oil pressure warning
Trip meter and odometer
Brake system
High beam indicator light
ABS warning
Low fuel
Vehicle Dynamics
Control/Vehicle Dynamics
Control operation
Vehicle Dynamics
Control OFF
$)&$,&/(*/&
Malfunction indicator
Trip meter A/B selection and trip meter reset knob
Tire pressure warning light
Front passenger frontal
BJSCBH0/
Front passenger frontal
airbag OFF
Turn signals
Front fog light indicator light (if
equipped)
Headlight indicator light
Cruise control
indicator light
Cruise control set
indicator light
Personalize Controls While
Personalize Controls While
son
z
Operating
Operating
peratin
Safety / In Case
Safety / In Case
of Emergency
of Emergency
of Emergenc
e
Information
Information
Inf
Additional
Additional
rm
ona
ti
98

Impreza WRX STI Gauges
Get
tin
Ins
tru
t
a
e
Per
ali
e
Con
tro
ls
Whi
le
O
g
Saf
ety
/
In
Cas
y
Add
iti
l
o
a
on
Immediate Attention
Fuel Gauge
Caution Informational
Tachometer
Speedometer
Started
Started
Started
Getting
Getting
g
Instrument
Instrument
Panel
Panel
P
n
men
l
Gauges
Gauges
Gauges
Gauges
Temperature Gauge
Seatbelt warning
Front passenger
seatbelt warning
SRS airbag system
Security indicator light
Door open
Charge warning
Oil pressure warning
REV indicator
Brake system
Rear differential oil
temp warning
High beam indicator light
ABS warning
Low fuel
Vehicle Dynamics
Control/Vehicle Dynamics
Control operation
Vehicle Dynamics Control
OFF / Traction Control
OFF
$)&$,&/(*/&
Malfunction indicator
Trip meter and odometer
Tire pressure warning light
Front passenger frontal
BJSCBH0/
Front passenger frontal
airbag OFF
Turn signals
Front fog light indicator light
(if equipped)
Headlight indicator light
Cruise control
indicator light
Cruise control set
indicator light
Trip meter A/B selection and trip
meter reset knob
Driver’s control center
differential auto indicator
Sport (S) mode
Intelligent (I) mode
Sport Sharp (S#) mode
Shift-up indicator
Personalize Controls While
Personalize Controls While
son
z
Operating
Operating
peratin
Safety / In Case
Safety / In Case
of Emergency
of Emergency
of Emergenc
e
Information
Information
Inf
Additional
Additional
rm
ona
ti
1110

13
Get
tin
Ins
tru
t
a
e
Gau
P
li
e
Con
tro
ls
Whi
le
O
g
Saf
ety
/
In
Cas
y
Add
iti
l
o
a
on
Personalize
Tilt and Telescopic
Steering Column
Push the lever down rmly to adjust the height
and lengthwise position of the column; rmly
push the lever back up to lock the column in
place. Do not adjust while driving.
Started
Started
Getting
g
Instrument
Panel
P
n
men
l
Gauges
ges
Personalize
Personalize Controls While
ersona
2
4
z
Power Exterior Mirrors
1VTIUIFNJSSPSTFMFDUJPOTXJUDIUPUIFi-w
TJEFUPBEKVTUUIFMFGUIBOENJSSPSPSUPUIFi3w
side to adjust the right-hand mirror. Push and
hold the direction mirror control switch in the
direction you want to move the mirror. Push
the mirror selection switch back to the middle
to prevent unintended operation.
1
3
Power Moonroof (if equipped)
With the moonroof in the fully closed position,
press the switch
Press and hold the switch
moonroof. Press the switch
the moonroof. Press the switch
the moonroof. To stop the moonroof in a
midway position while opening or closing,
momentarily press the switch to the
2
or
side.
4
to tilt the moonroof up.
3
to lower the
2
to fully open
1
to close
1
side
Operating
peratin
Safety / In Case
of Emergency
of Emergenc
e
Information
Inf
Additional
rm
ona
ti
1312

15
Get
tin
d
Ins
tru
t
a
e
Gau
s
Per
ali
e
Con
Whi
le
O
Saf
ety
/
In
Cas
Add
iti
l
o
a
on
Controls
Started
Starte
Getting
Light Controls
Push up for right
turn signal.
Push down for
left turn signal.
Illumination
Brightness
Control
While the light switch
is on, rotate the dial
downward to dim
the instrument panel
illumination. Rotate the
dial upward to make
the illumination
brighter. When the
dial is fully rotated
upward, the instrument
panel illumination
becomes full bright.
Turns on instrument panel lights,
taillights, parking lights and
license plate lights.
Turns on headlights, instrument
panel illumination, parking lights,
taillights and license plate lights.
Headlight Beam
Leveler
Your vehicle’s High-Intensity
Discharge (HID) headlights
generate more light than
conventional halogen
headlights. Therefore, a driver
of an oncoming vehicle may
experience too much glare
when your headlight beam
height adjustment is high
because the vehicle is carrying
a heavy load. The headlight
beam leveler can be used to
adjust beam height to avoid
such a condition. To lower the
beam, turn the knob to the
higher numbers.
(if equipped)
Turns on
fog lights
(if equipped).
OFF
INT.
1
2
LOW
3
HIGH
Windshield Wipers
To turn on the wipers, press the wiper control lever down one level for intermittent,
UXPMFWFMTGPSMPXPSUISFFMFWFMTGPSIJHITQFFE3FUVSOUIFMFWFSUPUIFi0''w
position to stop the wipers. For a single wipe, pull the lever toward you. To spray
washer uid, press and hold the button at the end of the lever.
To operate the rear wiper, rotate the end of the knob upward to the intermittent,
continuous, or wash position. When the rear wiper is off, rotate the knob downward
to wash and wipe the rear window.
Daytime Running Lights
Daytime running lights are standard on your vehicle. Only a reduced brightness high
beam will be automatically turned on when the engine has started and the parking
CSBLFJTGVMMZSFMFBTFEBOEUIFMJHIUTXJUDIJTJOUIFi0''wPSi
brightness of the illumination of the high beam headlights is reduced by the daytime
running light system. You must always switch on your headlights when it’s dark
outside by turning the light switch to the
position.
wQPTJUJPO5IF
g
Instrument
Panel
P
n
men
l
Gauges
ge
Personalize Controls While
son
z
trols
Operating
perating
Safety / In Case
of Emergency
of Emergency
e
Information
Inf
Additional
rm
ona
ti
1514
Controls

Get
tin
d
Ins
tru
t
a
e
Gau
s
Per
ali
e
Con
Whi
le
O
Saf
ety
/
In
Cas
Add
iti
l
o
a
on
Controls
Started
Starte
Getting
g
Instrument
Panel
P
n
men
l
Gauges
ge
Automatic Climate Control
1. Air Flow Control Dial
On the automatic setting, the system
determines the air ow location to achieve
the desired temperature or you can
choose the direction of air ow. Rotate the
dial for the desired air ow position.
Defrost / Defog
To clear the windshield and front door
windows of fog or frost, rotate the air ow
control dial to the defrost position, set the
temperature control to the red position,
and set the fan speed control to the
fastest speed.
3
5
(if equipped)
2. Rear Window Defogger Button
Press the rear window defogger button
to turn on the defogger. The defogger
will automatically shut off after about 15
minutes. If the window clears before that
time, you can press the button again to
turn it off.
3. Fan Speed Control Dial
On the automatic setting, the system
determines the fan speed to achieve the
desired temperature or you can manually
rotate the fan speed control dial to select
one of seven fan speeds.
6
Personalize Controls While
4
1
2
4. Air Conditioning Button
1SFTTUIFi"$wCVUUPOUPBDUJWBUFUIF
air conditioning. Press it again to turn
off the air conditioning.
5. Recirculated / Outside Air Button
In the automatic mode, the system will
determine if recirculated air is needed
to achieve a desired temperature.
In manual mode, press the air inlet
selection button to prevent outside air
from being drawn into the passenger
compartment. If the button is pushed
in, press it again to draw outside air
JOUPUIFDPNQBSUNFOU5013&7&/5
8*/%4)*&-%'0((*/(%0/05
3&."*/*/5)&3&$*3$6-"5&%
.0%&'03"/&95&/%&%1&3*0%
OF TIME.
6. Temperature Control Dial
Rotate the temperature control dial
from 65 for cool to 85 for warm.
son
z
Controls
trols
Operating
perating
Safety / In Case
of Emergency
of Emergency
e
Information
Inf
Additional
rm
ona
ti
1716

19
Get
tin
d
Ins
tru
t
a
e
Gau
s
Per
ali
e
Con
Whi
le
O
Saf
ety
/
In
Cas
Add
iti
l
o
a
on
Controls
9
12
1
10
3
7
8
AM/FM Stereo with Single
Disc CD/MP3/WMA Player
Radio Functions
1. Power / Volume Control
Press the power / volume control knob
for on or off; rotate the knob to control
the volume.
2. Bass, Middle, Treble, Fader and Balance
&BDIQSFTTPGUIFi56/&53"$,$)w
button will cycle you through Bass,
Midrange, Treble, Fade or Balance. Rotate
UIFi56/&53"$,$)wLOPCUPBEKVTU
the desired level.
3. FM / AM
1SFTTUIFi'.".wCVUUPOUPDIPPTF
FM1, FM2, FM3 or AM reception.
4. Tune / Track
3PUBUFUIFi56/&53"$,$)w
knob clockwise to increase the
tuning frequency; rotate the knob
counterclockwise to decrease it.
5 5
14
4
18
16
14
6
5. Seek
1SFTTUIFSJHIUPSMFGUBSSPXPGUIFi4&&,w
button to pick up the next highest or
lowest frequency.
6. Presets
You can save up to six favorite stations
GPSFBDICBOEo'.'.'.BOE".
Select a frequency and press one of the
preset buttons until a conrmation beep
is heard.
7. Satellite Radio
An optional satellite radio tuner and
antenna can be connected to this audio
unit. You can hear satellite radio programs
CZQSFTTJOHUIFi4"5wCVUUPOBGUFS
connecting optional equipment. To receive
satellite radio service, it is necessary to
enter into a separate contract with a
satellite radio provider.
2
17
13
11
15
8. PTY / CAT
1SFTTUIFi15:$"5wCVUUPOUP
change to program type selection
mode. The PTY group that you are
currently listening to is displayed
for 10 seconds.
CD Player Functions
9. Load
Insert a disc into the slot. The CD
will automatically be drawn in and
will begin play at the rst track.
10. Play CD
1SFTTUIFi$%"69wCVUUPOBOE
playback will begin.
11. Repeat / Random
1SFTTUIFi3153%.wCVUUPOPODF
to repeat the current track; press
twice to repeat the current folder.
1SFTTBOEIPMEUIFi3153%.w
button once to randomize all
tracks in a folder; press twice to
randomize the entire disc.
12. Eject
Press the button to eject the disc.
13. Forward / Reverse
3PUBUFUIFi56/&53"$,$)w
knob clockwise to skip to the
beginning of the next track; rotate
the knob counterclockwise to
skip to the beginning of the
current track. Rotate the knob
counterclockwise again to go to
the previous selection.
14. Fast Forward / Fast Reverse
Press and hold the right arrow
PGUIFi4&&,wCVUUPOGPSNPSF
than one second to fast forward.
Release the button to stop. To fast
reverse, press and hold the left
arrow for more than one second
and release the button to stop.
15. Scan
1SFTTUIFi4$"/wCVUUPOUPCFHJO
previewing the rst 10 seconds
PGFBDIUSBDLPOUIFEJTD/PSNBM
playback will resume after all
tracks have been scanned. Press
UIFi4$"/wCVUUPOBHBJOUPTUPQ
scanning and listen to the track
being previewed.
MP3/WMA Formatted CD
Player Functions
16. Folder Selection
Press the up arrow of the
i'0-%&3wCVUUPOUPTFMFDUUIF
next folder. Press the down arrow
to go back to the rst music le.
Quickly press the down arrow
again to go back to the
previous folder.
17. Page Scroll
1SFTTUIFi5&95wCVUUPOUPTFMFDU
title display. Press and hold again
to scroll through the title, 8
characters at a time up to a
maximum of 64 characters.
18. Display
1SFTTBOEIPMEUIFi5&95wCVUUPO
during playback to change the
display to show the play time, disc
title, artist name and track title. If
the disc is formatted with MP3/
8."TQSFTTUIFi5&95wCVUUPOUP
change the display to show play
time, folder name and le name.
Started
Starte
Getting
g
Instrument
Panel
P
n
men
l
Gauges
ge
Personalize Controls While
son
z
trols
Operating
perating
Safety / In Case
of Emergency
of Emergency
e
Information
Inf
Additional
rm
ona
ti
1918
Controls

Controls
Get
tin
d
Ins
tru
t
a
e
Gau
s
Per
ali
e
Con
Whi
le
O
Saf
ety
/
In
Cas
Add
iti
l
o
a
on
Cruise Control
Started
Starte
Getting
Steering Wheel Audio Controls (if equipped)
t1SFTTUIFiwCVUUPOUP
increase the volume. Press
UIFiwCVUUPOUPSFEVDF
the volume.
t8JUIBOZPGUIFSBEJPNPEFTTFMFDUFEQVTI
the switch up or down to nd the desired
frequency. In CD mode, push the switch up
or down to skip forward or back a track.
Auxiliary Input Jack or
RCA A/V Jack
The auxiliary jack is located in the
center console. You can connect a
portable music player to the auxiliary
jack and hear the music stored on it
through the vehicle speakers. Press the
i$%"69wCVUUPOMPDBUFEPOUIFBVEJP
system to select the auxiliary mode.
USB Storage Device /
®
iPod
You can connect a USB equipped
portable music player to the USB
connector and hear the music stored
on it through the vehicle speakers.
1SFTTUIFi$%"69wCVUUPOSFQFBUFEMZ
until the USB / iPod
t1SFTTUIFCVUUPOUPTFMFDU
UIFEFTJSFEBVEJPNPEFo
FM, AM, SAT, CD, AUX.
(if equipped)
(if equipped)
®
mode is selected.
t5PBDUJWBUFUIFDSVJTFDPOUSPMQSFTTUIF
i$36*4&wCVUUPO5IFi$36*4&wJOEJDBUPS
light on the instrument panel will turn on.
To deactivate cruise control, press the
i$36*4&wCVUUPOBHBJO
t5PDBODFMUIFDSVJTFDPOUSPMQVTI
the brake pedal or press the
i$"/$&-wCVUUPO*GZPVIBWFB
manual transmission, you can push
in the clutch pedal.
Increase speed
1SFTTUIFi3&4"$$wCVUUPO
hold until your vehicle reaches
the desired speed, and release.
To increase speed using the
accelerator pedal, press the pedal
until you reach the desired speed.
1SFTTUIFi4&5$0"45wCVUUPOUP
set the speed.
t5PSFTVNFZPVSTQFFEBGUFS
DBODFMJOHQSFTTUIFi3&4
"$$wCVUUPO
t1SFTTUIFBDDFMFSBUPSQFEBMVOUJM
your vehicle reaches the desired
TQFFE1SFTTUIFi4&5$0"45w
button. Ease off the accelerator
pedal. Your vehicle will maintain
the desired speed.
Decrease speed
1SFTTUIFi4&5$0"45wCVUUPO
hold until your vehicle slows to
the desired speed, and release.
To decrease the speed using the
brake pedal, press the pedal to
release cruise control temporarily.
When the speed decreases to the
EFTJSFETQFFEQSFTTUIFi4&5
$0"45wCVUUPOUPTFUUIFTQFFE
g
Instrument
Panel
P
n
men
l
Gauges
ge
Personalize Controls While
son
z
trols
Operating
perating
Safety / In Case
of Emergency
of Emergency
e
Information
Inf
Additional
rm
ona
ti
2120
2
Controls

While Operating
3
Get
tin
d
Ins
tru
t
a
e
Gau
Per
ali
e
Con
tro
ls
Whil
O
g
Saf
ety
/
In
Cas
Add
iti
l
o
a
on
Fuel Filler Lid Release
To open the fuel ller lid, pull the fuel ller lever up and release.
Started
Starte
Getting
g
Instrument
Panel
P
n
men
l
Gauges
ges
Vehicle Dynamics Control OFF Switch (Impreza WRX only)
Pressing the switch to deactivate the Vehicle Dynamics Control system can help in the
following situations:
t"TUBOEJOHTUBSUPOBTUFFQMZTMPQJOHSPBEXJUIBTOPXZHSBWFMDPWFSFEPSPUIFSXJTF
slippery surface.
t8IFOUIFWFIJDMFTXIFFMTBSFTUVDLJONVEPSEFFQTOPX
Multi-Mode Vehicle Dynamics Control Switch
(Impreza WRX STI only)
Traction Mode
Press the switch to enter traction mode. This mode restricts the functions of the Traction
Control System and Vehicle Dynamics Control system and thus delays utilizing their functions
as a reaction to vehicle behavior. This mode should be used in driving situations where the
vehicle dynamic performance will improve without decreasing engine torque control. The
indicator light in the gauge cluster will turn green.
Vehicle Dynamics Control OFF Mode
Press and hold the switch to enter Vehicle Dynamics Control Off mode. This mode should be
used in emergency situations, such as getting out of mud or deep snow. The indicator light in
the gauge cluster will turn yellow.
REV Alarm System
(Impreza WRX STI only)
The REV alarm system automatically issues a warning
using the REV indicator light whenever the tachometer
needle enters the red zone. The REV alarm level can
be set manually to an engine speed of your choosing
between 2,000 and 7,000 rpm using the trip knob.
The trip knob is also used to select a warning alarm
buzzer in addition to the light. The REV alarm set
level can be viewed in the odometer/tripmeter by
UVSOJOHUIFJHOJUJPOTXJUDIUPUIFi-0$,wQPTJUJPOBGUFSUIFWFIJDMFIBTTUPQQFE
and then pressing the trip knob. Please refer to our Owner’s Manual for more
detailed instructions on setting the engine speed alarm level and selecting the
warning buzzer.
6-Speed Manual Transmission
(Impreza WRX STI only)
This manual transmission is a fully
synchromeshed 6 - forward and 1 - reverse
speed transmission. Before you can shift into
reverse gear, you must raise the slider ring
and hold it in that position. Only pull the slider
ring up when shifting into Reverse gear.
Personalize Controls While
son
z
Operating
While
Operating
peratin
e
Safety / In Case
of Emergency
of Emergency
e
Information
Inf
Additional
rm
ona
ti
22
2322
2

5
Get
tin
d
Ins
tru
t
a
e
Gau
s
Per
ali
e
Con
tro
ls
Whil
O
Saf
ety
/
In
Cas
Add
iti
l
o
a
on
Tires
The factory-tted tires on your vehicle are summer
tires. Summer tires are high-speed capability tires
best suited for highway driving under dry conditions.
Summer tires are inadequate for driving on slippery
roads, such as on snow-covered or icy roads.
If you drive your vehicle on
WRX STI
WRX
snow-covered or icy roads, we
strongly recommend the use
of winter (snow) tires for all four
wheels. Please note that these
originally equipped summer
tires offer advanced grip
performance and will wear out
quicker than ordinary tires.
Limited Slip Differential
(Impreza WRX STI only)
The Limited Slip Differential (LSD) provides optimum distribution of power according to
the difference in revolution between the right and left rear wheels that may be caused
by certain driving conditions, thereby improving driving stability on snow-covered,
muddy or other slippery roads or during high speed driving. Due to the nature of this
mechanical Limited Slip Differential, the rear differential gears may make a vibration
and/or noise when making turns. When servicing the LSD, use only specied gear oil.
Front Fender Vents
The front fender has functional side vents that increase
air ow through the engine compartment. This provides
additional cooling for the intercooler and engine.
Front Hood and Hood Scoop
Due to the lightweight material, a slight vibration
is normal at higher speeds and will not affect the
durability of the hood. To avoid deforming the
front hood when closing, do not press down
on the hood with your hands. You can release
your hold on the front hood approximately
12 inches above the closing position and its
weight should cause it to close securely.
Driver Control Center
Differential (DCCD)
(Impreza WRX STI only)
This system adjusts the torque-distribution
ratio between the front and rear wheels
of the center differential to suit driving and
road surface conditions. The DCCD can be
operated automatically or manually. When
the system is in the automatic mode, the
i"650wJOEJDBUPSMJHIUJOUIFDPNCJOBUJPONFUFSDPNFT
PO5IF%$$%DBOCFUBLFOPVUPGi"650wNPEF
BOEVTFENBOVBMMZCZQSFTTJOHUIFi"650."/6w
switch located on the center console. Use the DCCD
control switch located beside the parking brake lever for
NBOVBMPQFSBUJPO1SFTTJOHUIFi"650."/6wTXJUDI
BHBJOXJMMSFUVSOUIFTZTUFNUPi"650wNPEF8IFO
using the system manually, if the control switch is set
DMPTFSUPPSBUUIFi-PDLwQPTJUJPOUIFQPXFSUSBJONBZ
make a vibration or noise when the vehicle is in
tight turns at slow speeds (torque binding). In addition, if the rear differential oil
exceeds a certain temperature, the DCCD will automatically cancel the current
torque-distribution ratio setting and adopt its minimum ratio.
Started
Starte
Getting
g
Instrument
Panel
P
n
men
l
Gauges
ge
Personalize Controls While
son
z
Operating
While
Operating
perating
e
Safety / In Case
of Emergency
of Emergency
24 2
2524
e
Information
Inf
Additional
rm
ona
ti
Get
tin
S
d
Ins
tru
t
a
e
Gau
Per
ali
e
Con
tro
ls
Whil
O
g
Saf
ety
/
In
Cas
y
Add
iti
l
o
a
on
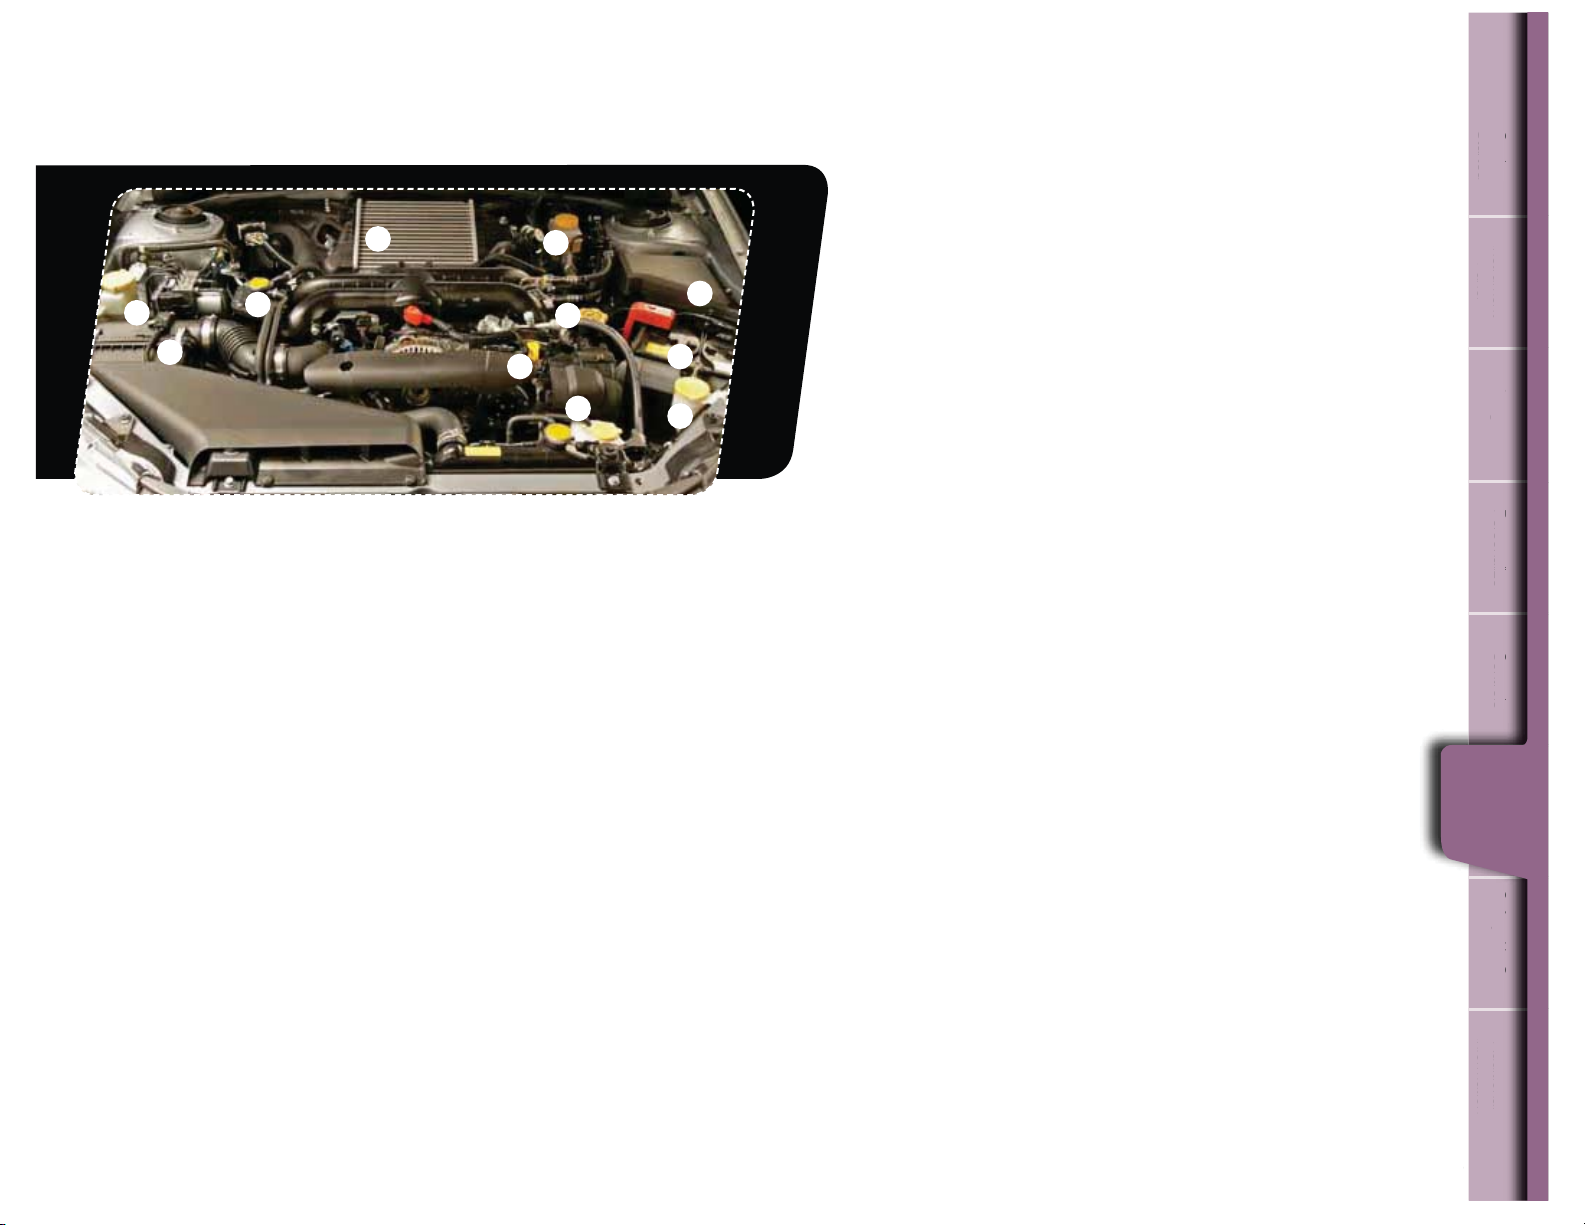
Impreza WRX Engine Compartment
1
2
1. Power Steering Fluid Reservoir
Check your power steering uid level
monthly. The power steering uid expands
greatly as its temperature rises and
the uid level differs according to uid
temperature. Therefore, the reservoir tank
has two different checking ranges for
hot and cold uid. Please refer to your
Owner’s Manual for details.
2. Air Cleaner Element
This element lters intake air. Follow the
NBJOUFOBODFHVJEFMJOFTJOZPVSi8BSSBOUZ
BOE.BJOUFOBODFwCPPLMFU8IFO
necessary, replace this element with a
genuine Subaru air cleaner.
3. Radiator Cap
If your engine overheats, safely pull off the
road and stop your vehicle in a safe place.
/FWFSBUUFNQUUPSFNPWFUIFSBEJBUPSDBQ
until the engine has been shut off and has
fully cooled down. If steam is coming from
the engine compartment, turn the engine
off and move everyone away from the
vehicle until it cools. Please refer to your
Owner’s Manual for details.
3
4
4. Intercooler
The intercooler is positioned behind
the throttle body to cool intake air and
improve supercharging efciency. (Intake
air passing through the turbocharger gets
very warm, which could result in lower
supercharging efciency.) To prevent
damage to this important system, avoid
placing tools and other objects on
the intercooler.
5. Engine Oil Level Gauge
Check the engine oil level at each fuel
stop. Pull out the dipstick, wipe it clean,
and insert it again. Pull it out and check
the oil level. If it’s below the lower level,
add oil to bring the level up to the
upper level. (Use only engine oil of the
recommended grade and viscosity.
Please refer to your Owner’s Manual
for oil recommendations and other
important details.)
8
7
5
6
10
Started
Getting
tarte
6. Engine Coolant Reservoir
Check your coolant level at each
fuel stop. Observe the coolant
level on the outside of the reservoir
while the engine is cool. If the level
11
9
JTDMPTFUPoPSMPXFSUIBOoUIF
i-08wMFWFMNBSLBEEDPPMBOUUP
UIFi'6--wMFWFMNBSL*GUIFSFTFSWF
tank is empty, remove the radiator
cap and rell as required. Please
refer to your Owner’s Manual for
details.
7. Engine Oil Filler Cap
Change your oil according to
the maintenance schedule in
ZPVSi8BSSBOUZBOE.BJOUFOBODF
#PPLMFUw:PVSFOHJOFPJMNVTUCF
changed more frequently when you
drive on dusty roads, frequently
make short trips, or when you drive
in extremely cold weather.
8. Brake Fluid Reservoir
Check your brake uid level
monthly. Observe the uid level on
the outside of the reservoir. If the
MFWFMJTCFMPXUIFi.*/wMFWFMNBSL
add the recommended brake uid
'.744/PGSFTI%05PS
CSBLFþVJEUPUIFi."9wMFWFM
mark. Use only brake uid from
a sealed container.
9. Battery
When your vehicle does not start
due to a battery that has run down,
the vehicle may be jump-started by
connecting your battery to another
battery with jumper cables.
Jump-starting is dangerous if
done incorrectly. Please refer
to your Owner’s Manual for
instructions. If you’re unsure
about how to jump-start your
vehicle, please consult a
competent mechanic.
10. Windshield Washer Tank
It’s a good idea to check your
washer uid every time you stop
for fuel. If the level is low, ll the
windshield washer tank to the
neck of the reservoir with
windshield washer uid. In cold
weather, use a freeze resistant
windshield washer uid.
11. Main Fuse Box
Your Impreza WRX has two fuse
boxes. One is located under the
instrument panel, behind the
fuse box cover on the driver’s
seat side. The other is housed
in your engine compartment, as
shown here. Fuses are designed
to melt during an overload
situation in order to prevent
damage to the wiring harness and
electrical equipment. If any lights,
accessories or electrical controls
fail to operate properly, inspect
the corresponding fuse. If it has
blown, replace it in accordance
with the instructions in your
Owner’s Manual. The fuse puller
and spare fuses are located
in the main fuse box in the
engine compartment.
g
Instrument
Panel
P
n
men
l
Gauges
ges
Personalize Controls While
son
z
Operating
Operating
peratin
e
Safety / In Case
of Emergency
of Emergenc
e
Information
Inf
Additional
rm
ona
ti
2726
27
While

9
Get
tin
S
d
Ins
tru
t
a
e
Gau
Per
ali
e
Con
tro
ls
Whil
O
g
Saf
ety
/
In
Cas
y
Add
iti
l
o
a
on
Impreza WRX STI Engine Compartment
8
7
6
11
9
10
1
2
1. Power Steering Fluid Reservoir
Check your power steering uid level
monthly. The power steering uid expands
greatly as its temperature rises and
the uid level differs according to uid
temperature. Therefore, the reservoir tank
has two different checking ranges for
hot and cold uid. Please refer to your
Owner’s Manual for details.
2. Air Cleaner Element
This element lters intake air. Follow the
NBJOUFOBODFHVJEFMJOFTJOZPVSi8BSSBOUZ
BOE.BJOUFOBODFwCPPLMFU8IFO
necessary, replace this element with a
genuine Subaru air cleaner.
3. Radiator Cap
If your engine overheats, safely pull off the
road and stop your vehicle in a safe place.
/FWFSBUUFNQUUPSFNPWFUIFSBEJBUPSDBQ
until the engine has been shut off and has
fully cooled down. If steam is coming from
the engine compartment, turn the engine
off and move everyone away from the
vehicle until it cools. Please refer to your
Owner’s Manual for details.
3
4
5
4. Intercooler
The intercooler is positioned behind
the throttle body to cool intake air and
improve supercharging efciency. (Intake
air passing through the turbocharger gets
very warm, which could result in lower
supercharging efciency.) To prevent
damage to this important system, avoid
placing tools and other objects on
the intercooler.
5. Engine Oil Level Gauge
Check the engine oil level at each fuel
stop. Pull out the dipstick, wipe it clean,
and insert it again. Pull it out and check
the oil level. If it’s below the lower level,
add oil to bring the level up to the
upper level. (Use only engine oil of the
recommended grade and viscosity.
Please refer to your Owner’s Manual
for oil recommendations and other
important details.)
6. Engine Coolant Reservoir
Check your coolant level at each
fuel stop. Observe the coolant
level on the outside of the reservoir
while the engine is cool. If the level
JTDMPTFUPoPSMPXFSUIBOoUIF
i-08wMFWFMNBSLBEEDPPMBOUUP
UIFi'6--wMFWFMNBSL*GUIFSFTFSWF
tank is empty, remove the radiator
cap and rell as required. Please
refer to your Owner’s Manual for
details.
7. Engine Oil Filler Cap
Change your oil according to
the maintenance schedule in
ZPVSi8BSSBOUZBOE.BJOUFOBODF
#PPLMFUw:PVSFOHJOFPJMNVTUCF
changed more frequently when you
drive on dusty roads, frequently
make short trips, or when you drive
in extremely cold weather.
8. Brake Fluid Reservoir
Check your brake uid level
monthly. Observe the uid level on
the outside of the reservoir. If the
MFWFMJTCFMPXUIFi.*/wMFWFMNBSL
add the recommended brake uid
'.744/PGSFTI%05PS
CSBLFþVJEUPUIFi."9wMFWFM
mark. Use only brake uid from
a sealed container.
9. Battery
When your vehicle does not start
due to a battery that has run down,
the vehicle may be jump-started by
connecting your battery to another
battery with jumper cables.
Jump-starting is dangerous if
done incorrectly. Please refer
to your Owner’s Manual for
instructions. If you’re unsure about
how to jump-start your vehicle,
please consult a competent
mechanic.
10. Windshield Washer Tank
It’s a good idea to check your
washer uid every time you stop
for fuel. If the level is low, ll the
windshield washer tank to the
neck of the reservoir with
windshield washer uid. In cold
weather, use a freeze resistant
windshield washer uid.
11. Main Fuse Box
Your Impreza WRX STI has two
fuse boxes. One is located under
the instrument panel, behind
the fuse box cover on the driver’s
seat side. The other is housed
in your engine compartment, as
shown here. Fuses are designed
to melt during an overload
situation in order to prevent
damage to the wiring harness and
electrical equipment. If any lights,
accessories or electrical controls
fail to operate properly, inspect
the corresponding fuse. If it has
blown, replace it in accordance
with the instructions in your
Owner’s Manual. The fuse puller
and spare fuses are located in
the main fuse box in the
engine compartment.
Started
Getting
tarte
g
Instrument
Panel
P
n
men
l
Gauges
ges
Personalize Controls While
son
z
Operating
Operating
peratin
e
Safety / In Case
of Emergency
of Emergenc
e
Information
Inf
Additional
rm
ona
ti
2928
2
While

31
Get
tin
d
Ins
tru
t
a
e
Gau
s
Per
ali
e
Con
tro
ls
Whi
le
O
Saf
/
Cas
s
s
e
e
e
ee e
ncy
cy
cy
y
Add
iti
l
o
a
on
Safety / In Case of Emergency
Started
Starte
Getting
g
Child Restraint System
For maximum safety, rst carefully read the LATCH system instructions from the device
manufacturer, as well as the installation instructions in your Owner’s Manual, to properly
install the LATCH compatible restraint system. Use the appropriate seatbelts or anchorages
provided in your vehicle. Children age 12 and under must properly occupy the rear seat at
all times.
Child Safety Locks
The child safety locks are
located on the inside edges of
the rear doors. In the locked
position, the rear doors can only
be opened from the outside.
Internal Child Safety
Trunk Release with
Self-Illuminating Handle
(4-Door only)
In the event that children or adults become
locked inside the trunk, this luminescent
handle allows them to open the lid from inside
the trunk. To open, simply pull the yellow
handle downward as indicated by the arrow
on the handle, and then push up on the lid.
30
Location of Spare Tire and Jack
A jack and other maintenance tools are stored
in the tool bucket in the center of the spare
tire, located in the trunk or cargo area.
Towing Your All-Wheel Drive Vehicle
Since all-wheel drive distributes engine power to all four wheels, improper
towing will severely damage your AWD system. A atbed truck is the only
recommended way to properly transport your AWD vehicle. If towing is
necessary, it is best done by your Subaru dealer or a commercial towing service.
Subaru Roadside Assistance
Subaru Roadside Assistance is free and standard on every 2011 Subaru vehicle.
Coverage is automatic; there are no forms to complete. Subaru Roadside
Assistance is available anytime during the 3-year/36,000-mile Subaru Limited
Warranty, whichever comes rst.* A Subaru Roadside Assistance decal has
been afxed to the driver’s door window.
Subaru Roadside Assistance: 1-800-261-2155
Exclusions
Specically excluded from Subaru Roadside Assistance coverage are service
requests or claims resulting from: accidents, vandalism, acts of God, violation of
any laws, or vehicle modications not recommended by the manufacturer.
*See your dealer for details.
Instrument
Panel
P
n
men
l
Gauges
ge
Personalize Controls While
son
z
Operating
perating
Emergency
In Case of
Safety / In Case
of Emergency
of Emerge
Safety /
ety
In
Information
Inf
Additional
rm
ona
ti
3130

33
Get
tin
d
Ins
tru
t
a
e
Gau
s
Per
ali
e
Con
tro
ls
Whi
le
O
Saf
ety
/
In
Cas
e
e
e
e
e e
Add
iti
l
o
a
on
Additional Information
Started
Starte
Getting
Fuel
t'PS*NQSF[B839VTFPOMZQSFNJVNVOMFBEFEHBTPMJOFXJUIBO
PDUBOFSBUJOHPG",*PSIJHIFS
t'PS*NQSF[B83945*VTFQSFNJVNVOMFBEFEHBTPMJOFXJUIBO
PDUBOFSBUJOHPG",*PSIJHIFS*G",*GVFMJTOPUSFBEJMZ
available in your area, premium unleaded gasoline with an octane
SBUJOHPG",*NBZCFVTFEXJUIOPEFUSJNFOUUPFOHJOFEVSBCJMJUZ
or driveability. However, you may notice a slight decrease in
NBYJNVNFOHJOFQFSGPSNBODFXIJMFVTJOH",*GVFM
Fuel Capacity
t64HBMMJUFST*NQHBM
t8IFOUIFMPXGVFMJOEJDBUPSMJHIUJTEJTQMBZFEPO
the instrument panel, approximately 2.6 US gallons
(10.0 liters, or 2.2 Imp gal) of fuel remain.
t*GZPVIBWFSFDFOUMZGVFMFEZPVSWFIJDMFUIFDIFDL
engine light on the instrument panel may stay on due
to a missing or loose fuel ller cap (the cap should be
tightened until a click is heard).
Engine Oil
Use only the following oils:
g
Instrument
Panel
P
n
men
l
Gauges
ge
Personalize Controls While
son
z
MY.SUBARU.COM
Your Subaru vehicle comes with a unique online resource that helps make your ownership
experience more convenient and enjoyable. My.Subaru.com is a website that you can
personalize and offers useful features and content that makes it easy for you to manage your
vehicle care and enjoy all the benets of Subaru ownership. Log on to My.Subaru.com to
access features such as: automated service history, e-mail maintenance reminders, online
Owner’s Manual, warranty information, maintenance schedules and much more...
Access your site today @ My.Subaru.com
t8TZOUIFUJDSFQMBDFNFOUJOUFSWBMNJMFTOP
requirement at the rst 3,000 miles.
t*-4"$('PS('XIJDIDBOCFJEFOUJýFEXJUIUIF
ILSAC certication mark (Starburst mark).
t0S"1*DMBTTJýDBUJPO4/PS4.XJUIUIFXPSET
i&/&3(:$0/4&37*/(w
Engine Oil Capacity
4.4 US qt (4.2 liters, 3.7 Imp qt)
Operating
perating
Safety / In Case
of Emergency
of Emergency
Information
Additional
Information
Inf
Additional
rm
ona
ti
3332

Subaru Delivery Checklist
Owner Information
VEHICLE ID #
DELIVERY DATE
OWNER NAME
OWNER NAME
Owner Resources & Warranty
Present the Subaru Owner’s Manual & Quick Reference Guide (detailed review in
“Operation & Controls” section)
Review Subaru Roadside Assistance, Owner Cards & Provide
Toll-Free Number 1-800-261-2155
Explain 3/36 BASIC Warranty / 5/60 Powertrain Warranty / Explain Wear Items &
Adjustments / PZEV (if applicable) / Review Rust Perforation Warranty / Tire Warranty
Review Service & Maintenance Schedules & Terms
Explain Normal vs. Extreme Schedules (if applicable)
Review New Owner’s MY.SUBARU.
Review The Subaru Mastercard Program from CHASE & Explain The Card Benefits
Explain Dealership’s New Owner Follow Up Procedure
Customer Signature
Review Dealership Service Department Location, Payment Options & Hours of Operation
Introduce The Subaru Service Advisor & Provide Their Business Card
Explain Dealership Service Appointment Scheduling & Early Morning Service
Drop Off Procedures
Review Dealership Parts Department Location & Hours
Vehicle Condition
Exterior Condition Approval (New Owner indicates exterior of vehicle is clean & undamaged)
Interior Condition Approval (New Owner indicates interior of vehicle is clean & undamaged)
Operational Condition Approval (New Owner has driven vehicle & approves it is ready
for delivery)
NEW OWNER SIGNATURE
CONSULTANT SIGNATURE
SALES
MANAGER SIGNATURE
SALES
COM Website
Fold back and remove this
checklist from the QRG. Place
this completed checklist in the
deal jacket for future reference.
Additional copies of this checklist
can be made by photocopying.

Operation & Controls
Please use & reference the SUBARU OWNER’S MANUAL
& QUICK REFERENCE GUIDE
OPERATION & CONTROLS
Review Master & Valet Keys
Show Keyless Entry, Alarm System
& Remote Start (if equipped)
Show Hood & Gas Door Releases
REAR & SIDE
Show Trunk Release & Valet Feature
(4-Door only)
Show Spare Tire, Tools & Jack Location
Explain Temporary Spare Tire
Usage & Limitations
INTERIOR
Explain Operation of Manual Transmission
& Incline Start Assist (if equipped)
Explain Operation of Automatic
Transmission & Review Manual
Mode (if equipped)
Show All Weather Package – Heated Front
Seats, Windshield Wiper De-Icer & Heated
Side Mirrors (if equipped)
Show Yellow Caps & Explain Checking
& Filling of Vehicle Fluids
Show Fuel Filler Door & Gas
Cap Operation
Show Location of Both Fuse Boxes
Explain AWD Towing
Requirements & Limitations
Show LATCH System & Tethers
Show Child Safety Lock Operation
Show Seatbelt & Head Restraint Functions
Show Tilt Steering Column & Telescopic
Feature (if equipped)
Explain the Subaru Advanced Frontal
Airbag System (SRS), Front Seat Side
Pelvis/Torso Airbags (SRS) & Side-Curtain
Airbags (SRS)
DRIVER CONTROLS & OPERATION
Show Power Windows, Door Locks
& Side-View Mirror Operation
Explain Cruise Control & Power
Moonroof Operation (if equipped)
Show Headlights, Daytime Running
Lights, Parking Lights, Hazard Lights &
Fog Lights (if equipped)
Show Interior Lighting, Map Light
& Clock
Show Front & Rear Wiper
& Washer Controls
Show Climate Control System Including
Front & Rear Defrosters
Show & Explain Operation of VDC
Control Switch
Review Instrument Panel Gauges
& Warning Lights
Explain Tire Pressure Monitoring
System Light
Show Audio System, Station Presets,
Tone, Balance & Fade Controls
Activate Satellite Radio System
(if equipped)
Show GPS Navigation System
(if equipped)
Explain Operation of Other Vehicle
Options, Equipment, or Genuine
Subaru Accessories Not Referenced
Above Where Applicable

2012
Consumer Electronics/
Bluetooth
®
& Audio Technology
Quick Reference Guide

Table of Contents
Bluetooth Basics
Bluetooth without Navigation System
Impreza 2.0i / WRX / WRX/STI /
Forester 2.5X
Legacy and Outback
BlueConnect®
Tribeca
Bluetooth with Navigation System
Impreza 2.0i / WRX / WRX/STI /
Forester 2.5X
Legacy and Outback
Bluetooth with TomTom® Navigation
Select Forester 2.5X Premium
2 - 3
4 - 7
8 - 11
12 - 13
14 - 17
18 - 21
22 - 23

Bluetooth Basics
t5IF)BOETGSFFTZTUFNNBZOPUPQFSBUFQSPQFSMZVOEFSUIFGPMMPXJOHDPOEJUJPOT
o The cell phone is turned off.
P5IFDFMMQIPOFJTOPUDPOOFDUFEUPUIF)BOETGSFFTZTUFN
o The cell phone is not in the phone call area.
o The battery of the cell phone has run down.
o The cell phone is behind the seat or in the glove box.
o A metal material covers or touches the cell phone.
t%FQFOEJOHPOUIFUZQFPGDFMMQIPOFUIBUJTVTFEUIFTDSFFOPOUIFDFMMQIPOFNBZSFNBJO
illuminated while the ignition switch is in the “ON” position. If this occurs, consult your cell
phone manual to adjust the cell phone settings.
t%FQFOEJOHPOUIFTFUUJOHPGUIFDFMMQIPOFUIFEJBMMPDLGVODUJPONBZCFBDUJWBUFEBGUFS
NBLJOHBDBMM%FBDUJWBUFUIFBVUPNBUJDEJBMMPDLGVODUJPOPGUIFDFMMQIPOFCFGPSFVTJOHUIF
)BOETGSFFTZTUFN%POPUQFSGPSNUIJTPQFSBUJPOXIJMFESJWJOH
t%FQFOEJOHPOUIFUZQFPGDFMMQIPOFUIBUJTVTFEPQFSBUJPOBOEUIFTPVOEWPMVNF
may vary.
t%FQFOEJOHPOUIFUZQFPGDFMMQIPOFUIBUJTVTFEOPUBMMQIPOFGVODUJPOTNBZCF
compatible with your vehicle.
t8IFOUIFJHOJUJPOTXJUDIJTUVSOFEUPUIFi-0$,0''wQPTJUJPOEVSJOHBDBMMUIFDBMMNBZ
be disconnected or continued on the cell phone depending on the type of cell phone that is
used. Note that operation of the cell phone may be necessary if the call is continued on the
cell phone.
2

t%POPUTQFBLBUUIFTBNFUJNFBTUIFPUIFSQBSUZEVSJOHBDBMM*GZPVBOE
3
Blu
oth
Ba
sic
c
c
s
ss
s
Blu
eto
oth
wi
tho
ut
Blu
eCo
ct
®
Blu
eto
oth
wi
th
N
Blu
eto
oth
wi
th
m
®
the other party speak at the same time, it may be difcult for the other party
to hear your voice and vice versa. This is normal.
t5IFSFDFJWFSTPVOEWPMVNFTIPVMECFTFUBTMPXBTQPTTJCMF0UIFSXJTF
the party you are calling may notice an undesirable echo sound.
t4QFBLDMFBSMZBOEMPVEMZ
t:PVSWPJDFNBZCFEJGýDVMUUPCFIFBSECZUIFSFDFJWJOHQBSUZVOEFSUIF
GPMMPXJOHDPOEJUJPOT
P%SJWJOHPOBSPVHISPBE
P%SJWJOHBUBIJHITQFFE
P%SJWJOHXJUIBXJOEPXPQFO
o When air from the ventilator blows directly towards the microphone.
o When the sound coming from the ventilator is loud.
o When the cell phone is positioned too closely to the microphone.
t5IFTPVOERVBMJUZNBZEFHSBEFEVFUPUIFJOþVFODFPGUIFDFMMQIPOFUIBUJT
connected to the system or the circumstances of the Bluetooth network.
t8IFOBOPUIFS#MVFUPPUIEFWJDFJTTJNVMUBOFPVTMZDPOOFDUFEOPJTFNBZCFIFBSE
in the voice coming from the hands-free phone.
Bluetooth Basics
Bluetooth
Basics
eto
Navigation System
Navigation System
Bluetooth without
BlueConnect
nne
®
Navigation System
avigation System
Bluetooth with
TomTom
TomTo
Bluetooth with
®
Navigation
Navigation
3

Bluetooth for AM/FM Stereo
and Single Disc CD Player
(Impreza 2.0i/WRX/WRX STI, Forester 2.5X)
Forester 2.5X/WRX/WRX STI Impreza 2.0i
Phone off
hook button
Phone on
hook button
Talk button Talk button
Phone off
hook button
Pairing Your Cell Phone
Press the phone off hook button and listen to phone prompts.
Press the talk button and name your phone.
Phone on
hook button
4

Press the talk button and say “conrm.”
5
Blu
eto
oth
Ba
sic
s
ut
em
m
m
Blu
eCo
ct
®
Blu
eto
oth
wi
th
N
Blu
eto
oth
wi
th
To m
®
n
Bluetooth Basics
Navigation System
Navigation Syst
Bluetooth without
Bluetooth witho
Nav. System
Bluetooth
without
Pass-key for pairing will be given audibly as well as be displayed on the radio display.
y.
Put your phone into Bluetooth pairing mode and pair your phone to the system using
the pass-key provided. When phone is successfully paired you will hear “The phone is
is
paired and ready for use.”
BlueConnect
nne
®
Navigation System
avigation System
Bluetooth with
TomTom
To m
Bluetooth with
®
Navigation
Navigatio
5

Making a Call
1SFTTQIPOFPGGIPPLCVUUPO1SFTTUIFUBMLCVUUPOUIFOTBZi%JBMCZOVNCFSw
Press the talk button again and say the number.
6
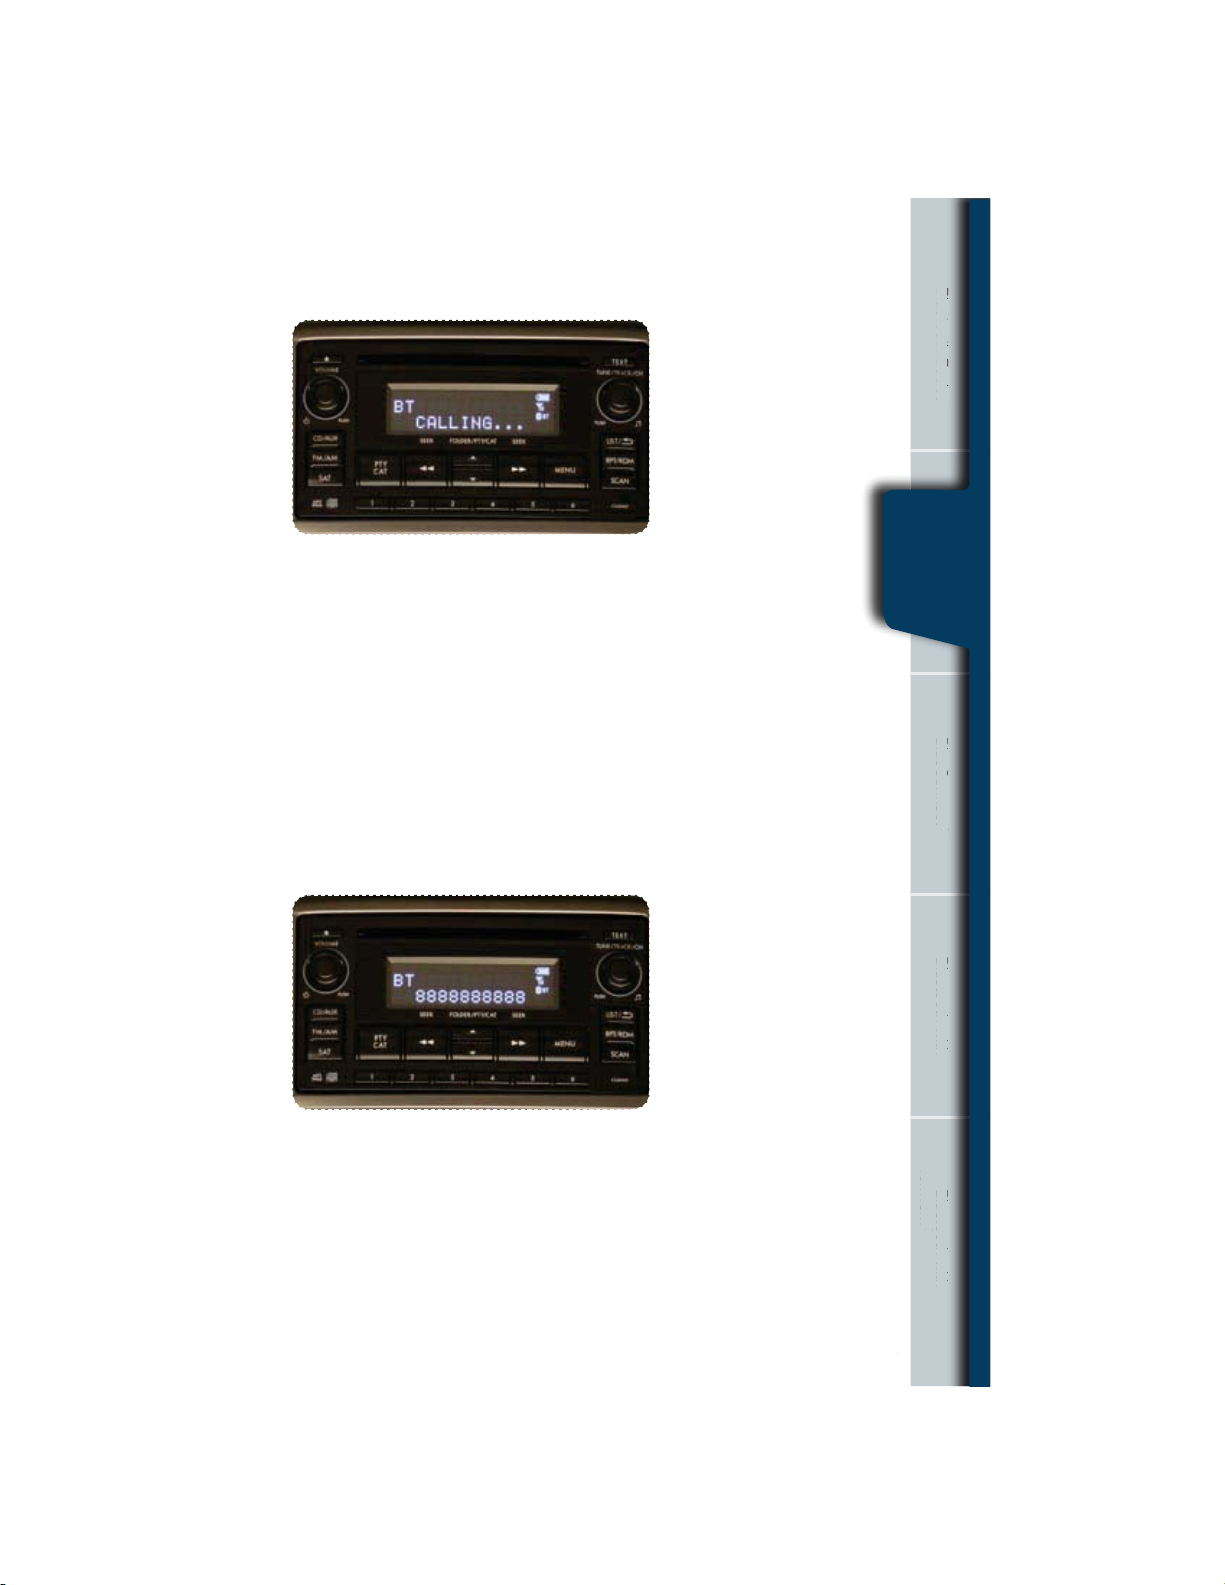
Press the phone off hook button to dial or press the talk button to add more
Blu
eto
oth
Ba
sic
s
ut
em
m
m
Blu
eCo
ct
®
Blu
eto
oth
wi
th
N
Blu
eto
oth
wi
th
To m
®
numbers. The phone will start dialing.
To end the call, press the phone on hook button.
Bluetooth Basics
Navigation System
Navigation Syst
Bluetooth without
Bluetooth witho
Nav. System
Bluetooth
without
BlueConnect
Receiving a Call
When a call comes in you will be notied. If the audio system is on, the audio
system will mute and a voice prompt will inform you. Press the phone off hook
button to accept the call.
t*GZPVXBOUUPQVUUIFDBMMPOIPMEQSFTTUIFQIPOFPOIPPLCVUUPO
t*GZPVXBOUUPEFDMJOFUIFJODPNJOHDBMMQSFTTBOEIPMEUIFQIPOFPO
hook button.
t*GZPVXBOUUPBEKVTUUIFWPMVNFPGUIFDBMMVTFUIFQMVTPSNJOVTTXJUDIPOUIF
steering wheel.
nne
®
Navigation System
avigation System
Bluetooth with
TomTom
To m
Bluetooth with
®
Navigation
Navigation
7

Bluetooth for AM/FM Stereo with
Display Type Radio (Legacy and Outback)
Phone off
hook button
Phone on
hook button
Pairing Your Cell Phone
Press the phone off hook button.
Rotate the tune knob, to select “Pair Phone”.
Talk button
8
 Loading...