

Page 1

D950 Digital Mixing System
D950 Session Configuration Tool
Operating Instructions
Version V1.0
Order No. 10.27.4410
Page 2

D950 Digital Mixing System
CONTENTSCONTENTS
1 IMPORTANT.................................................................................................................................................................4
1.1 ATTENTION ................................................................................................................................................................4
1.2 AGREEMENT ON SOFTWARE LICENCE TERMS AND CONDITIONS.....................................................................................4
1.2.1 Programmes covered by the Agreement...............................................................................................................5
1.2.1.1 Licence Programmes of STUDER................................................................................................................................... 5
1.2.1.2 Programmes of Third Parties..........................................................................................................................................5
1.2.2 Right of Use........................................................................................................................................................5
1.2.2.1 Principle ........................................................................................................................................................................ 5
1.2.2.2 Customised Configurations and Reverse Engineering .....................................................................................................6
1.2.2.3 Copying the Licence Material ......................................................................................................................................... 6
1.2.2.4 Disclosure of Licence Material.......................................................................................................................................6
1.2.2.5 Assignability..................................................................................................................................................................6
1.2.3 Rights to Licence Material..................................................................................................................................7
1.2.4 Royalties.............................................................................................................................................................7
1.2.5 Warranty, Disclaimer and Liability.....................................................................................................................7
1.2.5.1 Warranty and Disclaimer regarding the functionality of the Licence Material.................................................................. 7
1.2.5.2 Remedy of defects..........................................................................................................................................................8
1.2.5.3 Warranty and Disclaimer regarding the Proprietary Rights..............................................................................................8
1.2.5.4 Liability.........................................................................................................................................................................9
1.2.6 Miscellaneous.....................................................................................................................................................9
1.2.7 Applicable Law and Jurisdiction.........................................................................................................................9
2 INSTALLATION.......................................................................................................................................................... 10
2.1 WHERE TO INSTALL?.................................................................................................................................................10
2.2 HOW TO INSTALL ......................................................................................................................................................10
2.2.1 Installing from a compressed file.......................................................................................................................10
2.2.2 Installing from a removable medium .................................................................................................................11
2.2.3 Check the installation ....................................................................................................................................... 11
3 INTRODUCTION ........................................................................................................................................................15
3.1 FEATURES & BENEFITS ............................................................................................................................................. 15
3.2 THE CONCEPT OF A VIRTUAL MIXING CONSOLE (VMC)..............................................................................................17
3.3 THE PRACTICAL SIDE.................................................................................................................................................18
3.3.1 Data compatibility ............................................................................................................................................20
4 THE FAST LANE - TRY IT! .......................................................................................................................................21
4.1 DO YOUR OWN - USE EXISTING OR START FROM SCRATCH? ........................................................................................21
4.1.1 Use an existing VMC......................................................................................................................................... 21
4.1.2 Start from Scratch.............................................................................................................................................21
4.2 GENERATE THE D950 CONFIGURATION FILES.............................................................................................................22
4.2.1 Does my D950 have enough power? ..................................................................................................................26
4.3 GENERATE THE CORE FILE.........................................................................................................................................28
4.4 TRANSFER THE FILES TO THE CONSOLE......................................................................................................................30
5 DETAILED TUTORIAL.............................................................................................................................................. 31
5.1 SET YOUR OWN WORKSPACE .....................................................................................................................................31
5.2 THE CHANNEL/BUS PAGE..........................................................................................................................................32
5.2.1 Add / Edit channels...........................................................................................................................................33
5.2.2 V1.0 Function Library .......................................................................................................................................35
5.2.3 Add/ Edit Busses ...............................................................................................................................................36
5.2.4 Special Configuration functions: MultiDesk and Stems .....................................................................................38
5.2.4.1 The Concept of MultiDesk Control Groups................................................................................................................... 38
5.2.4.2 The Concept of Stems ..................................................................................................................................................40
5.3 THE INTERFACE PAGE ...............................................................................................................................................42
5.4 THE CORE PAGE ....................................................................................................................................................... 45
5.5 THE SHARED FUNCTION PAGE ...................................................................................................................................46
2/58 D950 Session Configuration Tool V1.0 Edition: 22 July 1998
Page 3

D950 Digital Mixing System
5.6 THE SESSION CONFIGURATION TOOL MENU...............................................................................................................46
5.6.1 The File Menu...................................................................................................................................................47
5.6.2 The Edit Menu .................................................................................................................................................. 47
5.6.3 The View Menu ................................................................................................................................................. 47
5.6.4 The Insert Menu................................................................................................................................................48
5.6.5 The Generate Menu........................................................................................................................................... 49
5.6.6 The Options Menu .............................................................................................................................................51
5.6.7 The Window Menu............................................................................................................................................. 51
6 MAINTENANCE.......................................................................................................................................................... 52
6.1 MANAGING THE FILES - WHICH FILE IS WHERE?.........................................................................................................52
6.2 THE D950CFGTOOL.INI FILE.....................................................................................................................................53
6.2.1 Related entries in the D950system.ini................................................................................................................ 53
6.2.2 Example of an VMC Overview File ...................................................................................................................54
6.2.3 Example of an VMC Distribution Info File........................................................................................................55
6.2.4 Troubleshooting................................................................................................................................................57
6.2.4.1 Errors during Generate Process / in Log File.................................................................................................................57
Edition: 22 July 1998 V1.0 D950 Session Configuration Tool 3/58
Page 4

D950 Digital Mixing System
11 IMPORTANTIMPORTANT
The D950 Digital Mixing System may be easily reconfigured using
the optional Session Configuration Tool. Whereas the ability for
reconfiguration is a great feature of the D950, it is important for an
operator to fully understand the Session Configuration Tool and it’s
functions. There is no safeguard functionality to prevent someone
from configuring a console without e.g. the summing busses - in
this case, the console may not function properly upon loading of
such a configuration. Please consult the separate D950 Operating
Instructions for more details on the D950 Digital Mixing System.
The D950 Session Configuration Tool is an option to the D950
Digital Mixing System. The functions, features and the appearance
of the D950 Session Configuration Tool may be changed by
adding or modifying the software. For this reason the operation of
the Tool and it’s parts as described in this manual may be slightly
different from your version.
Information contained in this manual has been carefully checked
and is believed to be correct and complete. But, as we all know,
everybody makes mistakes, and we are not immune either. If you
detect a mistake, please write or send an e-mail to the addresses
printed on the cover. We will be thankful for your feedback. No
responsibility is taken by us for any inaccuracies, errors or
omissions nor is any liability assumed for any loss or damage
resulting either directly or indirectly from use of the information
contained in the manual and any accompanying documentation.
1.11.1 AttentionAttention
USE OF THE SOFTWARE IS SUBJECT TO THE STUDER
PROFESSIONAL AUDIO SOFTWARE LICENSE AGREEMENT
SET FORTH BELOW. USING THE SOFTWARE INDICATES
YOUR ACCEPTANCE OF THIS LICENSE AGREEMENT. IF YOU
DO NOT ACCEPT THESE LICENSE TERMS, YOU ARE NOT
AUTHORIZED TO USE THIS SOFTWARE.
1.21.2 Agreement on SoftwAgreement on Software Licence Terms and Conditionsare Licence Terms and Conditions
Under the condition and within the scope of the following Terms
and Conditions STUDER Audio Professional AG (hereinafter
„STUDER") grants the right to use programmes developed by
STUDER as well as those of third parties which have been
installed by STUDER on or within its products. References to the
licence programmes shall be references to the newest release of a
licence programme installed at the Customer’s site.
4/58 D950 Session Configuration Tool V1.0 Edition: 22 July 1998
Page 5

1.2.11.2.1 Programmes covered by the AgreementProgrammes covered by the Agreement
1.2.1.1 Licence Programmes of STUDER
The following Terms and Conditions grant the right to use all
system programmes of STUDER, all user programmes which carry
the brand „STUDER" and are part of the D950 Digital Mixing
System and/or its options at the time of its delivery to the
Customer as well as the installation software on the original data
disk and the accompanying documentation („Licence Material"). In
this Agreement the word „Programmes" shall have the meaning of
programmes and data written in machine code.
1.2.1.2 Programmes of Third Parties
Programmes of third parties are all programmes which constitute
part of the D950 and/or its options at the time of delivery to the
Customer but have not been developed by STUDER. The
following conditions are applicable to programmes of third parties:
D950 Digital Mixing System
1.2.21.2.2 Right of UseRight of Use
1.2.2.1 Principle
The right to use Microsoft Windows NT is governed by the Licence
Agreement attached hereto (if applicable), which is an integral part
of this Agreement. The Customer shall sign any and all Licence
Agreements for all further programmes of third parties installed on
the D950 by STUDER with the third parties. The Customer shall be
deemed to have received all Licence Agreements upon delivery of
the D950 and/or its options.
Studer shall accept no responsibility or liability for, and gives no
warranties (express or implied) as to the programmes of third
parties. The Customer waives any and all claims versus STUDER
for any consequential damages, which might occur due to defects
of these programmes.
STUDER grants the Customer the non-exclusive right to use the
Licence Material in one copy on the D950 and/or its options as laid
down by the Sales Agreement concluded between the parties and
all Terms and Conditions which shall be deemed to form and be
read and construed as part of the Sales Agreement. This right is
assignable according to para. 1.2.2.5 hereinafter.
Edition: 22 July 1998 V1.0 D950 Session Configuration Tool 5/58
Page 6

D950 Digital Mixing System
1.2.2.2 Customised Configurations and Reverse Engineering
The Customer is not entitled to alter or develop further the Licence
Material except within the expressly permitted configuration
possibilities given by the Session Configuration Tool installed on
the D950 or elsewhere. All altered programmes, including but not
limited to the products altered within the permitted configuration
possibilities, are covered by this Licence Agreement.
Reverse engineering is only permitted with the express consent of
STUDER. The consent of STUDER can be obtained but is not
limited to the case in which the interface-software can not be
provided by STUDER. In any case STUDER has to be informed
immediately upon complete or partial reverse engineering.
1.2.2.3 Copying the Licence Material
The Customer is entitled to make copies of all or parts of the
Licence Material as is necessary for the use according to this
Agreement, namely to make safety copies. The Customer shall
apply the copyright of STUDER found on the Licence Material onto
all copies made by him. Records shall be kept by the Customer
regarding the amount of copies made and their place of keeping.
The responsibility for the original programme and all copies made
lies with the Customer. STUDER is entitled to check these records
on first request. Copies not needed any more have to be
destroyed immediately.
1.2.2.4 Disclosure of Licence Material
The Licence Material is a business secret of STUDER. The
Customer shall not hand out or in any way give access to parts or
the complete Licence Material to third parties nor to publish any
part of the Licence Material without prior written consent of
STUDER. The Customer shall protect the Licence Material and
any copies made according to para. 1.2.2.3 aforementioned by
appropriate defence measures against unauthorised access. This
obligation of non-disclosure is a perpetual obligation.
Third parties are entitled to have access to the Licence Material if
they use the Licence Material at the Customer in compliance with
this Agreement.
Under no circumstance are third parties entitled to have access to
the installation software on the original data disc. The Customer
shall safeguard the original data disc accordingly.
1.2.2.5 Assignability
The rights granted to the Customer according to this Licence
Agreement shall only be assignable to a third party together with
the transfer of the D950 and/or its options and after the prior
written consent of STUDER.
6/58 D950 Session Configuration Tool V1.0 Edition: 22 July 1998
Page 7

1.2.31.2.3 Rights to Licence MaterialRights to Licence Material
With the exception of the right of use granted by this Licence
Agreement all proprietary rights to the Licence Material, especially
the ownership and the intellectual property rights (such as but not
limited to patents and copyright) remain with STUDER even if
alterations, customised changes or amendments have been made
to the Licence Material.
Studer’s proprietary rights are acknowledged by the Customer.
The Customer shall undertake no infringements and make no
claims of any patent, registered design, copyright, trade mark or
trade name, or other intellectual property right.
1.2.41.2.4 RoyaltiesRoyalties
The Customer shall pay STUDER a non refundable lump sum as
royalty for the rights granted under para. 1.2.2, which is owed
together with the purchase price of the D950 and/or its options
according to the Sales Agreement or the confirmation of the order
respectively.
D950 Digital Mixing System
1.2.51.2.5 Warranty, Disclaimer and LiabilityWarranty, Disclaimer and Liability
1.2.5.1 Warranty and Disclaimer regarding the functionality of the Licence Material
Except as stated in para. 1.2.1.2 STUDER hereby represents and
warrants the functionality of the Licence Material according to the
specifications agreed upon between the parties. The functions of
the programmes covered by this Agreement were thoroughly
checked at the time of the acceptance test. The Customer shall be
deemed to have satisfied himself as to the compliance of the
programmes with the specifications agreed upon as stated in the
protocol of the acceptance test.
STUDER shall take no liability for any malfunctions of the
programmes due to circumstances it is not responsible for, as for
example but not limited to any change in the use or the operating
conditions by the Customer, alterations to the Licence Material
undertaken by the Customer or third parties, disturbances caused
by machines and programmes not delivered by STUDER as well
as user mistakes of the Customer or third parties.
STUDER shall take on no further responsibility or liability for the
Licence Material. The Customer carries the full responsibility for
the use of the Licence Material as well as for the results achieved.
STUDER expressly does not warrant that the Licence Material can
be used without interruption and free of any mistakes in all
combinations and under all conditions the Customer wishes.
Edition: 22 July 1998 V1.0 D950 Session Configuration Tool 7/58
Page 8

D950 Digital Mixing System
1.2.5.2 Remedy of defects
STUDER shall undertake, at no cost to the Customer, to remedy
defects of the valid, unaltered version of the Licence Material for
the period of three months, beginning with the delivery of the D950
Mixing System and/or its options to the Customer, or, should the
acceptance test take place at the Customer, upon termination of
the acceptance test, unless otherwise agreed. The obligation of
STUDER to remedy expires after the above-mentioned period of
three months, in any case however, at latest nine months after
delivery of the mixing console to the Customer. This right of the
Customer to remedy is subject to the correct documentation of the
defects by the Customer and the ability of STUDER to reproduce
the defects.
STUDER can choose whether the defect shall be remedied by the
installation of a correction code / corrected version of the Licence
Material or the description of a solution to evade the defect without
any amendment to the functionality. If the use of the Licence
Material is not restricted due to the defect, such defect has to only
be remedied in the next programme version.
1.2.5.3 Warranty and Disclaimer regarding the Proprietary Rights
STUDER herewith declares that it has either developed the
Licence Material itself and has therefore procured the
corresponding proprietary rights or has been granted the rights to
use and distribute the Licence Material.
In the event that the Customer is charged with infringement of third
parties’ alleged proprietary rights resulting from the use of the
Licence Material, then STUDER shall assume all costs of the
proceedings as well as the costs and damages resulting from a
court order in the maximum amount of the royalty paid by the
Customer for the component causing the infringement, provided
however that the Customer immediately informs STUDER about
the dispute and authorises STUDER in writing to conduct the
proceedings, including the right to settle the dispute.
Should the Licence Material infringe the proprietary rights of third
parties according to a court decision or Studer’s free discretion,
STUDER is entitled to make alterations at its own cost to remedy
the infringement or to purchase the necessary rights from the third
party. Should this remedy not be successful and should the
infringement be established by a final court decision STUDER
would pay damages for the loss of the right of use in the amount
of the royalties paid by the Customer for the component causing
the infringement reduced by the usual depreciation for the time of
use.
STUDER is released from the aforementioned obligations if the
infringement is due to an alteration made to the Licence Material
by the Customer, to the use of the Licence Material combined with
8/58 D950 Session Configuration Tool V1.0 Edition: 22 July 1998
Page 9

1.2.5.4 Liability
D950 Digital Mixing System
own products or those of third parties or to the use of the Licence
Material for other uses than those meant for. The Customer
expressly waives all and any further claims versus STUDER.
STUDER shall only take on liability for damages which occur to the
Customer due to defects of the Licence Material or failure to
comply with the Agreement, if they result from unlawful intent or
gross negligence on the part of STUDER. All further liability,
especially liability for simple negligence, concerning the use of the
Licence Material and the achieved results is expressly excluded by
STUDER. Furthermore STUDER shall not be made liable for any
damages which arise through acts of an employee of STUDER.
The Customer expressly waives all such claims.
STUDER shall not be liable for failure to comply with the
Agreement if the performance of the obligations is impossible due
to circumstances which STUDER can not influence. No damage
claims can be made versus employees of STUDER.
1.2.61.2.6 MiscellaneousMiscellaneous
This Agreement is integral part of the Sales Agreement for the
D950 mixing console and/or the written confirmation of order and
enters into force upon signature of the Sales Agreement by the
Customer. The Sales Agreement can be substituted by a
confirmation of order making explicit reference to and enclosing
these Terms and Conditions.
Should there be any discrepancies between the Sales Agreement /
confirmation of order, this Agreement and the offer, then the
wording of the Sales Agreement / confirmation of order precedes
that of this Agreement, which again precedes the offer.
The parties are obliged to assign all rights and obligations resulting
from this Agreement to their subsequent successors, transferees
and assigns.
1.2.71.2.7 Applicable Law and JurisdictionApplicable Law and Jurisdiction
This Agreement shall be governed by and interpreted and
construed in accordance with the substantive domestic laws of
Switzerland.
Exclusive Jurisdiction is Zurich.
If you have any questions regarding this Agreement or if you wish
to request any information from Studer Professional Audio, please
contact the firm in writing.
Edition: 22 July 1998 V1.0 D950 Session Configuration Tool 9/58
Page 10

D950 Digital Mixing System
22 INSTALLATIONINSTALLATION
Note A good level of understanding the PC-basics is assumed for this
Environment The D950 Session Configuration Tool will run under Microsoft
Minimum Requirements The D950 Session Configuration Tool requires the following
installation. You may need to copy files between various media
and create subdirectories. You will be required to edit a simple .ini
file to adjust the environment of your PC. Please have an
instruction manual for the Windows version you are using at your
disposal if necessary.
Windows 95 or higher, or Windows NT 4.0 environments.
minimum environment to run properly:
n Windows 95 or Windows NT
n Pentium processor, min. 200MHz recommended
n 32 (preferably 64) MB of RAM
n Display resolution 1024x768
2.12.1 Where to install?Where to install?
2.22.2 How to installHow to install
The D950 Session Configuration Tool may be installed on:
n the D950 Control PC
n any other PC, provided that above requirements are met
We recommend installation on a PC different than the D950
Control PC. The programme requires a lot of processor power
when it compiles. Whilst it will run without any problem in a
multitasking environment with multiple programmes running at the
same time, it’s performance may be considerably slowed down
under such circumstances. If speed is essential, we recommend
running the D950 Session Configuration Tool alone on a PC.
In some cases, the D950 Digital Mixing System may be delivered
with the D950 Session Configuration Tool already installed.
Delivery of the software will usually be on a data medium (usually
a 100MB ZIP disk) containing all the necessary files for installation
of the D950 Session Configuration Tool in compressed or noncompressed form.
2.2.12.2.1 Installing from a compressed fileInstalling from a compressed file
If you have obtained the D950 Session Configuration Tool in
compressed form (usually via e-mail), then you will start by copying
the file (usually called D950cfg.EXE) into the target directory and
then running the self-extracting file. This will decompress the
original files and create the necessary directories for you.
10/58 D950 Session Configuration Tool V1.0 Edition: 22 July 1998
Page 11

You need to extract the original files into a root directory of a drive
(C, D, E, ...) on your PC. Please make sure that the „:\ADI_DSP“
directory has been placed directly under the root of your selected
drive as indicated above, otherwise the Configuration Tool may not
work properly.
You may now erase the files:
n D950install
n i.bat
n make.bat
if you wish. They would have only been needed if you had
installed from a removable medium.
Now please proceed with the instructions found in chapter „Check
the installation“.
2.2.22.2.2 Installing from a removable mediumInstalling from a removable medium
D950 Digital Mixing System
To install the complete D950 Session Configuration Tool from a
removable medium (usually a 100MB ZIP disk), please proceed as
follows.
On the removable disk drive, start the programme „D950install“.
This will start a DOS batch file requesting you to select a drive
letter on your target PC to install to.
We recommend to select the „C“ drive. You may select a different
drive than „C“ (D, E, ...) if you wish. Please proceed by typing:
make c
followed by Enter. This will copy all necessary files to the selected
drive.
Note The directory C:\D950SYSTEMDB will already exist if you are
installing on to a D950 Control PC. In this case, please use the „C“
drive for your installation.
2.2.32.2.3 Check the installationCheck the installation
Check the results Please use the Windows Explorer to check the results of your work
now. The following (or similar) file structure should now be found
on your target PC (assuming „C“ was selected as the target drive):
C:\D950cfg \tmpFiles\ (subdirectory) contains temporary files
\Ar111297.ach DSP Processor Element architecture file
\CoreFunc150798.lib DSP source code library
\D950CfgTool.exe the Session Configuration programme
\Mn150498.exe executable used for the core files
\Rt070798.a DSP RTOS (operating system library)
Edition: 22 July 1998 V1.0 D950 Session Configuration Tool 11/58
Page 12

D950 Digital Mixing System
C:\ADI_DSP\21K\Bin \asm21k.exe Sharc assembler file
C:\ADI_DSP\21K\Etc \a21000.exe Sharc assembler file
C:\D950SYSTEMDB \Example\ (subdirectory) contains an example D950 Configuration
The above file names may be different, or have different date
stamps in your case! This is normal.
\go32.exe Sharc assembler file
\ld21k.exe Sharc assembler file
\lib21k.exe Sharc assembler file
\cpp.exe Sharc assembler file
Please make sure that the „:\ADI_DSP“ directory has been placed
directly under the root of your selected drive as indicated above,
otherwise the Configuration Tool may not work properly.
\MyConfig1\ (subdirectory) any previously existing Configurations
...
The next step will be to create a Shortcut and then to set several
options within the system.
Create a Shortcut Usually the fastest way to use a programme is to create a so-
called Shortcut on the Windows Desktop. To create a Shortcut for
the D950 Session Configuration Tool, please click on the file
„d950CfgTool.exe“ in the Windows Explorer, then use the right
mouse button and drag the file to the desktop. Now you are ready
to run the Configuration Tool for the first time.
Start the Programme Double-click on the shortcut. There will probably be an error
message „Unable to open file: xxxx“. This is because the .ini file
options have not yet been set. Quit the message and the D950
Session Configuration Tool screen will appear.
Set the options Click on the menu item „Options“ and then on „Directories/Files“.
The following setup screen will appear:
12/58 D950 Session Configuration Tool V1.0 Edition: 22 July 1998
Page 13

D950 Digital Mixing System
Here the names of directories and appropriate files that you’ve just
copied have to be entered. The above graphic shows factory
default files and paths. Since those may vary for every installation
and software version, you will now need to update this entries by
using appropriate file names and paths as installed on your
system. The Browse button can be used to select the appropriate
file, except for the following two entries:
n Temp Files Path
n Config Path,
for which the appropriate paths must be entered by hand and
must be followed by a backslash (\) sign.
Using the example of our installation, you would need to adapt the
entries as follows:
Core Function Library File Name C:\D950cfg\CoreFunc150798.lib (file form CoreFuncDDMMYY.lib)
Rtos Library C:\D950cfg\Rt070798.a (file form RtDDMMYY.a)
PE Architecture File C:\D950cfg\Ar111297.ach (file form ArDDMMYY.ach)
MemNet Task of PE1 C:\D950cfg\Mn150498.exe (file form RtDDMMYY.a)
MemNet Task of PE2 C:\D950cfg\Mn150498.exe (file form RtDDMMYY.a)
Temp Files Path C:\D950cfg\tmpFiles\
Log File Name C:\D950cfg\tmpFiles\LogFile.txt
Config Path C:\D950SYSTEMDB\
The above file names may be different, or have different date
stamps in your case! This is normal.
Now please click „OK“ to finish the preparations and to store the
edited „D950CfgTool.ini“ file automatically. This will create the
Edition: 22 July 1998 V1.0 D950 Session Configuration Tool 13/58
Page 14

D950 Digital Mixing System
Test the Installation Now that you have installed all files and set the basic options, you
C:\Windows\D950CfgTool.ini file. To learn more about the use of
the .ini file, please refer to the chapter „Maintenance“.
can proceed to test the whole installation. For this, you will load the
included example configuration and run the compilation (known as
the „Generate process“) to generate a DSP core file. This is how
you will proceed:
Use the menu item „File“ and click on „Open“. A windows dialogue
screen will appear and should point to the selected config path (in
our example C:\D950SYSTEMDB). Select the folder „Example“
and you will see the file „Example.VMC“. Open the file.
Disregard the appearance of the screen for now, you will be able
to set your workspace later on. Select the menu item „Generate“
and then „All“. This will start the process of generating the DSP
and control software that is needed to run a new Session
Configuration on your D950. Various messages will be displayed
and after a while, a message similar to the following one should
appear:
After the message „Build All finished successfully !!“ appears, click
on „OK“ to finish the successful installation and test procedure.
14/58 D950 Session Configuration Tool V1.0 Edition: 22 July 1998
Page 15

33 INTRODUCTIONINTRODUCTION
3.13.1 Features & BenefitsFeatures & Benefits
The D950 DSP concept The concept of the D950 allows to use multiple DSP processors in
a fully scaleable and configurable way. It is possible to specify the
power of the DSP core in fine steps in order to fulfil the exact need
of an application. It can be said that the D950 has a scaleable
DSP resource pool of computational power, which can be used in
many different combinations.
Session Configuration So the concept of a „Session Configuration“ was born, which
allows to create many completely different mixers that can run on
the same existing hardware. The operator is now able to choose
the ideal mixer for the task he or she wants to work on.
D950 Digital Mixing System
For this, the Session Configurations can be loaded and the D950
console restarted in a matter of seconds. Each Session
Configuration can contain a different console configuration based
on the available DSP power. In the ever-changing studio
environment, it is now possible to have a new mixer every day:
Day 1 Day 2 Day 3
Live Broadcast configuration Multitrack Recording configuration Mixdown configuration
48 Mono Input Channels with
- EQ
- Delay
24 Stereo Input Channels with
- EQ
0 Routing busses 48 Routing busses 8 Routing busses
8 Groups with
- EQ
2 Master Outputs with
- Output Limiter
- EQ
8 Mono Auxiliaries
2 Stereo Auxiliaries
12 Clean feed busses 0 Clean feed busses 0 Clean feed busses
48 Inline Channels with
- EQ in monitor path
- Comp/Lim/Exp/Gate in input path
- Delay
4 Stereo Input Channels with
- EQ
0 Groups 16 Groups
4 Master Outputs 8 Master Outputs
4 Mono Auxiliaries
4 Stereo Auxiliaries
96 Mono Input Channels
with
- EQ
- Delay
- Comp/Lim/Exp/Gate
- IPL
- Surround PAN
4 Stereo Input Channels
with
- EQ
12 Mono Auxiliaries
4 Stereo Auxiliaries
Channel types All channels within the DSP core can be configured as Mono
channels or Stereo channels. The number of channels for any
channel type is defined through the Session Configuration.
Moreover, any channel type can be fitted with the available
function blocks from the processing library. So EQ, delay or
Dynamics can be fitted to Input Channels, but also to Group
Edition: 22 July 1998 V1.0 D950 Session Configuration Tool 15/58
Page 16

D950 Digital Mixing System
DSP boards The D950 system can contain 4 board types.
Channels, Master Channels or Auxiliaries in any number and
combination. Any combination of Auxiliary, Clean-feed, Multitrack
Routing, audio Subgroup and Master Busses can be configured in
the system.
n PE - DSP board with 6 DSP processors
n PEAES - DSP board with 6 DSP processors, 8 AES/EBU inputs
(2 of which with SFC) and 8 AES/EBU outputs
n MADI I/O board with 2 MADI inputs and 2 MADI outputs
n MEMNET board for communication and control
The system must contain one communication and control board
called the MEMNET board.
The total number of boards in any combination can be 21 at the
maximum.
System size & numbers The size and power of the system is defined by the number of
DSP processors and I/O boards installed. The total DSP power
can be compared to a bucket of water (Installed DSP Capacity).
The contents of the big bucket can be distributed to 4 smaller
buckets (channels with fader + EQ). Alternatively, the same
contents can be distributed to only 2 buckets which are larger
(channels with fader+EQ+Dyn+Delay+3D-PAN...).
FADER
EQ
Channels
FADER
DYN
Channels
FADER
INS
Channels
FADER
EQ
Channels
DSP
Installed DSP Capacity
FADER, EQ,
DYN, DELAY
3D-PAN,
48 TRACK, ...
FADER, EQ,
DYN, DELAY
3D-PAN,
48 TRACK, ...
Channels
Channels
So, the number of available channels depends on two things:
n total installed capacity (1 - 20 DSP boards)
n load required by each of the channels types and their quantity
16/58 D950 Session Configuration Tool V1.0 Edition: 22 July 1998
Page 17

To complicate matters slightly, the total number of channels also
depends on the number of summing busses and the number of
physical I/O interfaces. To illustrate this, we can look at 3 different
ways to use the same installed DSP power.
Input & Output Interfaces
max
800
D950 Digital Mixing System
The DSP Capacity takes care
of the I/O’s and the Console Channels...
400
200
100
0
96 mono input channels,
16 output channels,
900 I/O’s
All 3 Configurations use the same DSP Capacity
128 mono input channels,
24 output channels, 48 Tracks,
350 I/O’s
100 200
256 mono input channels,
24 output channels,
150 I/O’s
Console DSP Channels
(Inputs, Groups, AUX-es, Masters ...)
The D950 Session Configuration Tool will tell you exactly how
many DSP and I/O boards you will need in order to run a certain
configuration defined by the number and type of channels, the
number of summing busses and the number of physical I/O
interfaces. As a consequence, there is no finite maximum number
of channels on the D950 - the maximum can be anywhere
between 100 and 300 channels!
3.23.2 The concept of a Virtual Mixing Console (VMC)The concept of a Virtual Mixing Console (VMC)
max
The D950 Digital Mixing System bases its operation on the
concept of a Virtual Mixing Console (VMC). The VMC is a software
structure that runs on the D950’s control PC and consists of two
parts:
n console configuration (structure)
n current audio settings of the console (data)
Structure The VMC describes all the parameters of a certain console
configuration such as the number of input channels, the number of
multitrack busses, whether there is EQ on each channel, etc.
Data Moreover, the VMC is a real-time data container that keeps the
actual settings of a console, such as „input channel 13 EQ gain =
+12dB“, „master 4 fader = -10dB“, etc. The VMC will only keep
data for the channels and console parts that are defined in the
structure part of the VMC. Active controls on the console such as
the faders, rotary encoders, pushbuttons and the GC
keyboard/trackerball control, but also the Snapshot system and the
AutoTouch Automation system can write data to the VMC. Other
console parts such as lamps, displays and the GC screen can read
data from the VMC and display them. It can generally be said, that
Edition: 22 July 1998 V1.0 D950 Session Configuration Tool 17/58
Page 18

D950 Digital Mixing System
almost all settings and conditions of the D950 console are a part of
the VMC.
Make and edit a Configuration The D950 Session Configuration Tool can be used to make a new
configuration, or to edit an existing one. This is the first part of the
process of preparing a VMC for the D950 console. That part is
done off-line, even if the Configuration Tool is running on the
D950’s Control PC. The result of this part is a:
n „meta“ VMC file - the definition of the console structure
n a DSP core file - software that tells the DSP core what to do
Use a Configuration When we operate the D950 console, we speak of „loading a
configuration“. This means loading the „meta“ VMC file to the
memory of the D950’s Control PC. This process will remove the
current file from the D950 memory and load a different one. The
D950 Control software will then, based on information contained in
the new files, run a VMC that corresponds to the information from
the „meta“ VMC file. It will also remove the current DSP core file,
replacing it with a new one, thus activating a new VMC. Now the
D950 is ready to work with the new Session Configuration.
There can only be one VMC that is active on the D950 console at
any one time, but there can be multiple VMCs configured and
stored for later use. For more information on loading a
configuration and using the D950, please consult the D950
Operators Instructions.
3.33.3 The practical sideThe practical side
The purpose of the D950 Session Configuration Tool is to allow
creating and modifying „meta“ VMC files and generating the DSP
files from the information contained in the „meta“ VMC file. We call
this process „making a Session Configuration“. There are always
two files that are the result of making a Session Configuration:
n the „meta“ VMC file called MyConfig1.vmc
n the DSP core file called MyConfig1.cor
The name „MyConfig1“ stands for any name selected by the user.
The endings „.vmc“ and „.cor“ are obligatory and are automatically
created by the Tool and do not have to be typed.
It is good practice to keep all Session Configurations in the same
Windows folder, because both the D950 Session Configuration
Tool and the D950 System software can be set to search in this
folder automatically. The Configuration Tool will automatically
create a subdirectory (folder) with the same name as the Session
Configuration, so the folder structure my look similar to this:
18/58 D950 Session Configuration Tool V1.0 Edition: 22 July 1998
Page 19

D950 Digital Mixing System
Each of the subdirectory folders will contain the two files with the
corresponding names when the Configuration process is finished.
In the above example, the whole file structure is as follows:
C:\D950SYSTEMDB \Example\Example.VMC
\Example\Example.cor
\MyConfig1\MyConfig1.VMC
\MyConfig1\MyConfig1.cor
\MyConfig2\MyConfig2.VMC
\MyConfig2\MyConfig2.cor
\Small\Small.VMC
\Small\Small.cor
Both the D950 Session Configuration Tool and the D950 System
software should be set to search in the folder C:\D950SYSTEMDB.
On the D950’s PC If you are running the D950 Session Configuration Tool on the
D950’s PC, and the search paths are set as above, there is
nothing more you need to do in order to load a configuration.
Edition: 22 July 1998 V1.0 D950 Session Configuration Tool 19/58
Page 20

D950 Digital Mixing System
On a separate PC If you are running the D950 Session Configuration Tool on a
Simply switch to the D950 operating system (the GC) and load a
new configuration from the D950 system File menu.
separate PC, you will need to transfer the configuration files to the
D950 control PC. Since all files are Windows files, it is a simple
matter of using a transfer medium (floppy, ZIP or even a LAN
network) to transport the files. Care has to be taken to store the
files under the appropriate directory on the D950 control PC as
described above. The only files that must be transferred for each
configuration are:
n MyConfig1.vmc
n MyConfig1.cor
Both files must be in the same subdirectory, otherwise the D950
will not be able to load this configuration. The best practice is to
always copy the whole folder < MyConfig1> with both files inside
and paste it to the C:\D950SYSTEMDB directory.
3.3.13.3.1 Data compatibilityData compatibility
Import rules A simple set of rules will apply for the import:
D950 features such as Snapshot, AutoTouch Automation, etc. use
Windows compatible files to store data. Since the contents of such
files are dependent on the current configuration, each file is
internally stamped with the Session Configuration ID. The
configurations may be quite different - the resulting snapshot or
automation files will be different too.
A Snapshot file made under Session Configuration A can not,
therefore, be directly recalled under a different configuration B. A
function called Import must first be performed using the
appropriate controls within the D950 GC. For more information on
the Import function, please consult the D950 Operators
Instructions V1.1A or higher.
n unnecessary data are truncated
n only items of identical type can be imported, e.g. data for mono
input channels can only come from mono input channels
n If the source configuration A has 48 mono input channels and
the current configuration B has only 32, just the channels 1
through 32 are imported and the rest of the source channels
are ignored. When the item is saved it will have 32 channels in
it.
n If the source configuration A has 32 mono input channels and
the current configuration B has 48, just the channels 1 through
32 are imported and the rest of the current channels are
ignored. User can edit and save channels 33-48 manually.
When the item is saved it will have 48 channels in it.
n same rules apply to the existence of processing blocks EQ,
Dynamics, etc.
20/58 D950 Session Configuration Tool V1.0 Edition: 22 July 1998
Page 21

D950 Digital Mixing System
44 THE FAST LANE - TRYTHE FAST LANE - TRY IT! IT!
4.14.1 Do your Own - Use Existing or start from Scratch?Do your Own - Use Existing or start from Scratch?
4.1.14.1.1 Use an existing VMCUse an existing VMC
Usually the changes that need to be made to a configuration are
small. Adding two more AUXes or replacing the mono input
channels by stereo input channels may be two examples of such
small changes. In such cases, an existing .VMC file can be loaded
and modified. For the first try, you can use the included
Example.VMC and try changing it. Or you can use the .VMC file
that was delivered with your console as a starting point.
The .VMC files can be treated in a similar way as word processing
documents. They can be opened, saved, saved under a different
name, moved and deleted.
Tip FF Please be careful to first save the file under a different name in
order to keep the D950 basic configuration intact! Use the Save As
item in the File menu.
Modifying the .vmc file that had been delivered with your console is
the simplest way to create a configuration that will run properly on
your existing D950 console. On your console, there are several
things that can not simply be changed by editing the configuration:
n all external I/O wiring
n monitoring wiring and monitoring configuration
n number of mic preamplifiers and their wiring
n Signaling (fader start, ...) wiring and configuration
It is not very likely that you will be changing any of the above all
the time - that is why you will want to use the existing configuration
as a starting point for your work, without having to think of
configuring the right I/O every time.
4.1.24.1.2 Start from ScratchStart from Scratch
It is sometimes handy to find out how many DSP boards would be
needed for a certain configuration. You can always configure the
mixing console of any description by starting with an empty (New)
.VMC file. For this, you will use the File/New menu. The approach
of starting from scratch will be useful if you do not have to modify
an existing console, but are really starting a new project.
Edition: 22 July 1998 V1.0 D950 Session Configuration Tool 21/58
Page 22

D950 Digital Mixing System
Tip FF If you want the new configuration to really run on your existing
console, you need to be careful to think of all the elements of a
configuration - channel numbers and types, summing busses, I/O
configuration, shared functions, etc. Otherwise your new
configuration may not be able to be loaded properly on an existing
console.
4.24.2 Generate the D950 Configuration FilesGenerate the D950 Configuration Files
In this chapter, a simplified but complete configuration exercise is
described. The example VMC file will be used as the starting point
and modified. A DSP core file will be generated. You will need to
start the D950 Session Configuration Tool first.
Open the file Use the „File/Open“ menu or the „open folder“ icon in the toolbar to
open the Example.VMC file. You may need to search for the right
folder first. Double click on the Example.VMC file or use the Open
button to open the file.
Save VMC As To keep the original file intact, use the „Save VMC As“ command
from the File menu. Save the file as Example_2. Note that you do
not have to type the extension .VMC. A new folder and a new VMC
file will be automatically created.
View the configuration Use the „View/Channel Bus“ command from the menu bar to
display the configuration contents. You may want to maximise the
window in order to see all the components.
Channel
types &
Numbers
Summing
Bus types
& Numbers
This is a display of all the configured channel types and numbers
and all the configured summing busses as well as their
interconnections.
Add new
Channels
Which
Channels
Add new
Summing
Busses
22/58 D950 Session Configuration Tool V1.0 Edition: 22 July 1998
go to which
Busses ?
Page 23

D950 Digital Mixing System
As you can see, the configuration is for a console which has:
n 4 mono input channels
n 2 stereo input channels
n 2 mono groups + 2 group busses
n 2 mono masters + 2 master busses
n 4 mono Auxes + 4 mono AUX busses
n 2 stereo Auxes + 2 stereo AUX busses
n 2 SOLO busses
n 1 stereo PFL bus
Add more Channels Double click on the channel area labelled „Input mono“. This will
open an editing dialogue box which will allow you, among other
things, to change the number of mono channels.
Go to the „Number of channels“ area and change the number from
4 to 8. Click on OK. Now you have increased the number of mono
input channels to 8.
Edit the stereo input channel Now we will change the stereo input channel configuration and
name. Double click on the channel area labelled „input stereo“. On
the left hand side, in the area called „X Bar Section“, double click
on the „Dynamics“ and on the „Delay 100ms“. This will remove
those two functions from the stereo input channel. Now move to
the area called „Library / Available Functions“ and double click on
the „Delay 240ms“. Then go to the „User Label“ field and type in
„my stereo“. Click on OK.
Add more AUXes Now we will add two more mono AUX masters. Double click on the
channel area labelled „AUX mono“ and change the number of
channels to 6. Click on OK.
Edition: 22 July 1998 V1.0 D950 Session Configuration Tool 23/58
Page 24

D950 Digital Mixing System
Now you will have to adapt the number of AUX mono busses to
reflect the above change. Double click on the area labelled „Aux m
Bus“.
This will open a dialogue that will allow you to set the number of
busses to 6 - this will match the new number of AUX mono
channels.
Enter 6 instead of 4 and click on OK. This will add 2 more AUX
mono busses to the system.
Add new group channels Now double click on the channel area labelled „new“. This will
allow you to select a channel type and set it’s contents and
number. Click on „Channel Attributes / Type“ and select „Group
mono“.
This will select the channel type to mono group. Set the „Number
of channels“ to 2. Add „4 Band EQ“ from the library by double
clicking on this item. Type in „my GRP“ in the user label area and
click on OK. This will add two more audio groups including EQ to
the configuration. Note that you now have two sets of mono group
channels with completely different audio processing sections
called „my GRP“ and „Example“. Note also that the bus
connections have been extended with the small „on/off“ boxes
indicating that the new 2 groups will have access to Master, Solo,
24/58 D950 Session Configuration Tool V1.0 Edition: 22 July 1998
Page 25

D950 Digital Mixing System
PFL and AUX busses. By clicking on the „on/off“ box
corresponding to the Master Bus, you can disable access from the
new groups to the masters - so they can only be used for direct
outputs.
Finished? Not quite. We still have to increase the number of Group
Busses to a total of 4. Oops! The number is already 4! The original
Example.VMC had 2 groups, but it had 4 group busses.
Tip FF It is legal to have more busses that corresponding channel types,
as in the above example. The reason for this is because the
busses (unlike in analogue consoles) are valid audio signals and
can be used as such in the D950’s patch. They are simply
summation busses which will output the sum of all assigned inputs.
The newly edited configuration now looks as follows:
n 8 mono input channels
n 2 stereo input channels with changed processing
n 2 + 2 mono groups, different processing + 4 group busses
n 2 mono masters + 2 master busses
n 6 mono Auxes + 6 mono AUX busses
n 2 stereo Auxes + 2 stereo AUX busses
n 2 SOLO busses
n 1 stereo PFL bus
Check the interfaces We will assume that for this example, the interfacing does not
need to be changed. We will only have a look at what interfacing is
available in the configuration we just changed. For this, select
„Interface“ from the „View“ menu.
Show&Edit
input
AES/EBU
interfaces
Show&Edit
output
AES/EBU
interfaces
Show&Edit
input MADI
interfaces
Edition: 22 July 1998 V1.0 D950 Session Configuration Tool 25/58
Show&Edit
output MADI
interfaces
Page 26

D950 Digital Mixing System
There are 8 AES/EBU input interfaces, 8 AES/EBU output
interfaces, 1 MADI input with 48 configured channels and 1 MADI
output with 48 configured channels. This accounts for a total of 64
mono equivalent inputs and 64 mono equivalent outputs.
Tip FF Although we have been through many actions and have edited the
original configuration quite a bit, we did not yet touch on all
possibilities of the Configuration Tool. Please read on and
acquaint yourself with all the details before you attempt to make a
configuration and load it on your console.
4.2.14.2.1 Does my D950 have enough power?Does my D950 have enough power?
In order to see the console statistics, now select „Core“ in the
„View“ menu. This will display the statistics of the channels, busses
and I/O’s as well as the occupancy of the DSP core. Let’s first look
at the core before we did any of the above changes by opening
the original Example.VMC file:
Shows a
possible
core layout
overview
Shows the
mixing
console
statistics
Shows the load on
the DSP system
bus
Shows the
required number
and type of DSP
boards
We can see that the original configuration had a total of:
16 channels
18 busses
1 PE board
1 PEAES board
1 MADI board and 1 MEMNET board.
If we now open the Example_2.VMC file, we can see that we now
have a configuration that requires:
26/58 D950 Session Configuration Tool V1.0 Edition: 22 July 1998
Page 27

24 channels
20 busses
2 PE boards
1 PEAES board
1 MADI board and 1 MEMNET board.
D950 Digital Mixing System
So, one PE board more than before is needed. There are 3
possibilities from this point on:
Generate Core and check again The indication on the Core View shows Core Statistics as a rough
estimation. It uses a simple fitting algorithm to estimate the
required number of boards. To get to the real number of boards,
the full Generate Core process has to be done first, as explained
in the next chapter. After that is finished, it may happen that the
requirements are less then estimated and that your newly edited
configuration could fit on the existing core.
Tip FF It is always recommended to run the Generate process before
deciding whether a desired configuration will fit on a given DSP
core.
Reduce the requirements If you do not have enough installed DSP power, you can either
reduce your configuration slightly, by reducing the number of
channels, taking out some of the Dynamics or EQs you do not
really need, or reducing the number of I/O’s, until the configuration
matches your actual board number.
Add more power The other way is to plug in the additional required number of PE or
PEAES cards into the DSP rack and load your new configuration.
Edition: 22 July 1998 V1.0 D950 Session Configuration Tool 27/58
Page 28

D950 Digital Mixing System
You can even do this with power on. You may need to add some
I/O wiring on the back of the DSP rack if you are expanding the
number of physical I/O’s.
4.34.3 Generate the Core fileGenerate the Core file
To generate the core file for our new configuration, simply click on
the „Generate / All“ menu item. This starts an automatic process
which will end up with a core file being saved in the same folder as
the .VMC file.
A fairly complicated procedure called Load Balancing will try to
compress all the required components of the new configuration
into as few DSP boards as possible, at the same time trying to
distribute the workload evenly across all necessary DSP boards.
You can follow what is happening on the screen. Most of the
information shown on screen will also be stored into a LOG file for
later viewing.
Build VMC and processes the Load Balancer first generates the VMC structure and checks
the channels, shared processes, busses and builds a DSP library.
Compile processes A DSP compiler/assembler generates all the individual DSP files
needed to perform EQ, Dynamics, Summing, etc.
28/58 D950 Session Configuration Tool V1.0 Edition: 22 July 1998
Page 29

D950 Digital Mixing System
First all channels and then all the summing busses are allocated to
the required DSP board processors. Then the final core file is
assembled out of individual components:
Finished ... And finally, the finished core file is automatically stored. You only
have to click on OK to finish the whole process after the message
„Build All finished successfully!“.
Edition: 22 July 1998 V1.0 D950 Session Configuration Tool 29/58
Page 30

D950 Digital Mixing System
Tip FF Note that if you now display the core View, the lettering „(rough
estimation)“ will be missing, indicating that the numbers displayed
are now the real, load-balanced ones. You will also find out that, in
our example, the Load Balancing was more successful in
economising than the rough estimation algorithm - again only 1 PE
board is required, despite the increased configuration.
4.44.4 Transfer the Files to the ConsoleTransfer the Files to the Console
The Core file and the „meta“ VMC files are now ready to be used
on a D950.
On the D950’s PC If you are running the D950 Session Configuration Tool on the
D950’s PC, and the search paths are set as described before,
there is nothing more you need to do in order to load a
configuration. Simply switch to the D950 operating system (the
GC) and load a new configuration from the D950 system File
menu.
On a separate PC If you are running the D950 Session Configuration Tool on a
separate PC, you will need to transfer the configuration files to the
D950 control PC. Since all files are Windows files, it is a simple
matter of using a transfer medium (floppy, ZIP or even a LAN
network) to transport the files. Care has to be taken to store the
files under the appropriate directory on the D950 control PC as
described above. The only files that must be transferred for each
configuration in the above example are:
n Example_2.vmc
n Example_2.cor
Both files must be in the same subdirectory, otherwise the D950
will not be able to load this configuration. The best practice is to
always copy the whole folder < Example_2> with both files inside
and paste it to the C:\D950SYSTEMDB directory.
30/58 D950 Session Configuration Tool V1.0 Edition: 22 July 1998
Page 31

55 DETAILED TUTORIALDETAILED TUTORIAL
The previous chapter gives a brief run through all the basics
needed to configure a D950 console. We recommend reading it
before you proceed with the detailed tutorial, found in this chapter.
5.15.1 Set your own WorkspaceSet your own Workspace
The D950 Session Configuration Tool supports multiple windows.
Up to now, a single view Window was used to operate the
Configuration Tool functions. For a better overview of the
configuration process, we recommend using two windows at the
same time - the Channel/Bus page alternatively with the Interface
page and the Core page in addition. This allows to follow the rough
estimation of the core requirements on-line, as you edit channels,
busses and interfaces.
D950 Digital Mixing System
channel/Bus View
to work on
Core View to
Minimised
Interface View
check the
statistics
The last used Workspace setup will be stored when you close the
D950 Session Configuration Tool, and will be recalled the next
time you start the program.
Edition: 22 July 1998 V1.0 D950 Session Configuration Tool 31/58
Page 32

D950 Digital Mixing System
5.25.2 The Channel/Bus PageThe Channel/Bus Page
The Channel/Bus page is the main working area of the D950
Session Configuration Tool. It allows to make new or edit existing
channels, busses and their interconnections, displaying the
configured console in a matrix display. It displays in a condensed
way all the configured channel types and their functions.
Channel
types &
Numbers
Summing
Bus types
& Numbers
Add new
Summing
Busses
Add new
Channels
Double click
to edit
Which
Channels
go to which
Busses ?
How to:
Add new channels double click on „new“ in the channel area
Add new busses double click on „new bus“ in the bus area
Edit channels double click on an existing channel type in the channel area
Edit busses double click on an existing bus type in the bus area
Assign/Deassign busses double click on the „On/Off“ button where the corresponding
channel and bus cross. All channels of the selected type will have
access to all busses of the selected type if the button is set.
32/58 D950 Session Configuration Tool V1.0 Edition: 22 July 1998
Page 33

5.2.15.2.1 Add / Edit channelsAdd / Edit channels
To:
Add new channels double click on „new“ in the channel area of the Channel/Bus page
Edit channels double click on an existing channel type in the channel area of the
Channel/Bus page
Both actions will open the „Add Channel“ dialogue box that allows
to edit all the entries for new or existing channels.
Current channel Select type/number Available channel functions
D950 Digital Mixing System
Double click to
add functions
Select
Double click to
remove
functions
Add / remove
functions
- channel type
- enter a label
- enter the number
select channel type Click on the box to display the available channel types. Currently,
the following channel types are available:
- mono input
- mono Multitrack input
- mono Multitrack monitor input
- mono group
- mono master
- mono AUX master
- mono Control Master
- stereo input
- stereo group
- stereo master
- stereo AUX master
Edition: 22 July 1998 V1.0 D950 Session Configuration Tool 33/58
Page 34

D950 Digital Mixing System
Mtrk Input / Monitor These channel types largely correspond to what is known as „in-
Control Master The mono Control Master is a special channel type which does not
All channel types correspond to similar channels of an analogue
console. Each channel will be assigned to a channel strip on the
D950 Desk upon loading of the configuration. AUX mono and
stereo masters are treated as normal channels in this respect. On
selection, a set of factory default functions will be loaded to the
Channel Structure area, depending on channel type.
line“ channel. They have a very similar structure as input channels,
and the only major difference is in the way they are both assigned
to the D950 desk. The Mtrk Monitor channel is always
automatically assigned to the upper layer of a bank and the Mtrk
Input channel to the lower layer. This simulates an in-line desk
layout. Please refer to the D950 Operating Instructions for more
information on D950 Desk layer/bank concept.
have any audio functions - it is the Control Group Master used for
the „VCA“ style control groups. Up to 16 such Control Masters may
be configured.
User Label User label is an optional text label that can be entered to
additionally differentiate the channel types. Usually, labels are
used to differentiate channels of the same type but with different
functions, e.g. Input Mono „with EQ“, Input Mono „w/o Dyn“, etc.
Number of channels Any number can be entered here to define the quantity for this
particular channel type. The maximum numbers are in function of
the overall installed DSP capacity (check the Core page to see
how requirements change) and, for some channel types the
maximum number is limited by the capacity of the D950 Desk to
operate them. Here the Desk limitations:
Aux Mono max. 8, can be extended to 16 if no Aux stereo extension
Aux stereo max. 4, can be extended to 8 if no Aux mono extension
Master Mono max. 8
Master stereo max. 8
Group Mono + Stereo max. 48, stereo counts as 2 (e.g. 32 mono + 8 stereo groups)
Control Master max. 16
MultiDesk Groups will be explained later in this chapter
Current Channel Structure This area displays the functions that have been selected for the
current channel type. There are 5 sections of each channel,
corresponding to the audio signal flow:
n Input Section
n X-Bar Section (order of functions can be set in the D950 GC per
drag-n-drop)
n Output Section
n Pan Section
n Meter Section
The functions have icons in different colours corresponding to
each of the above 5 sections. Functions can be removed from the
current channel by double clicking on the function or by using the
>>>> button. Each of the functions requires DSP power, therefore
34/58 D950 Session Configuration Tool V1.0 Edition: 22 July 1998
Page 35

D950 Digital Mixing System
it is prudent to keep only the functions that are really needed. The
minimum functions of a channel are:
n Input Selector
n Fader
n Direct Out
Library / Available Functions In this area, the available functions from the system library are
listed. The list changes slightly depending on the channel type
(e.g. master channels do not have a Pan function available), but
most functions are the same for all channel types. This means that
master channels may be configured with an EQ, or an Aux master
can have a limiter if needed. Functions can be added to the
current channel by double clicking on the function in the library or
by using the <<<< button.
Please note that several restrictions to the x-Bar section apply:
n The X-Bar section can contain a maximum of 6 functions
n „Delay 100ms“ and „Delay 240ms“ must not be used at the
same time
n „4Band EQ“ and „4Band EQ Notch“ must not be used at the
same time
n the „VSP Surround PAN“ requires a lot of DSP power and can
not be used in a full channel, otherwise an error will be
displayed during the Generate process. It is usually sufficient to
remove the Dynamics or EQ + Delay functions to allow fitting of
the VSP PAN.
Remove channels Simply click on the channel type to be removed and hit the „delete“
key.
Tip FF Note how the requirements shown in the „Core Statistics“ area in
the Core page change as you add or remove channels, change
their number or add/remove functions.
5.2.25.2.2 V1.0 Function LibraryV1.0 Function Library
Most of the functions can be used for both
mono and stereo channels:
Input Selector 3-way input selector
Input HPF/LPF & Gain variable HP and LP filters, channel gain +- 24dB
Insert Insert function with dry/wet mix feature
Delay 100ms VariabIe audio delay 0-100 ms
Delay 240ms VariabIe audio delay 0-240 ms
4 Band EQ Fully parametric 4-Band EQ with Bell/Shelve switch in the LO and
HI bands, Constant Q/Constant Range switch in the HIMID and
LOMID bands
4 Band EQ Notch Fully parametric 5-Band EQ with Bell/Shelve switch in the LO and
HI bands, Constant Q / Constant Range switch in the HIMID and
LOMID bands, Notch filter
Dynamics Full dynamic section with Compressor, Limiter, Expander, Gate,
Lookforward circuit and Auto Make-up gain, Sidechain with HP/LP
Filter
Edition: 22 July 1998 V1.0 D950 Session Configuration Tool 35/58
Page 36

D950 Digital Mixing System
Input Mode Phase Phase reversal switch
Multiformat Pan Multiformat Surround Pan (MPAN), Format selection: 2CH, LCR,
HRTF Surround Pan HRTF Surround Pan (HPAN), Format selection: 2CH, LCR, LCRS,
VSP Surround Pan VSP (Virtual Surround Panning) Pan (VSP), Format selection:
IPL In - Process - Listen functions, allows listening into various points
along the signal flow
Meter Precision metering function, switchable to channel input or after
fader
Only mono channels:
LR Pan standard Left/Right panner
LCRS, 5.1, Amplitude Panning, selectable Divergence, Panaround
feature
5.1, Amplitude Panning, selectable Divergence, Panaround
feature, Intensity, Frequency-Dependent and echo Pan modes,
Simulation algorithms for several surround microphone types
(HRTF, ORTF, AB, Sphere)
2CH, LCR, LCRS, 5.1, Amplitude Panning, selectable Divergence,
Panaround feature, Intensity, Frequency-Dependent and echo
Pan modes, Simulation algorithms for several surround
microphone types (HRTF, ORTF, AB, Sphere), Simulation of
Virtual Rooms with Room Size Control, Ambiance & Absorption
Controls, Variable Source Distance
Only stereo channels:
Input MS Mode Phase MS/XY decoding matrix, stereo mode (Normal, LL, LR, reverse,
Mono) and Phase switch L, R, LR
Input MS Mode Phase Width MS/XY decoding matrix, stereo mode (Normal, LL, LR, reverse,
Mono) and Phase switch L, R, LR, stereo Width control 0-200%
Pan Bal stereo panorama
Pan Bal Width stereo panorama, stereo Width control 0-200%
5.2.35.2.3 Add/ Edit BussesAdd/ Edit Busses
to:
Add new busses double click on „new bus“ in the bus area
Edit busses double click on an existing bus type in the bus area
Assign/Deassign busses double click on the „On/Off“ button where the corresponding
channel and bus cross. All channels of the selected type will have
access to all busses of the selected type if the button is set.
Both the Add and the Edit actions will open the „Edit Bus“ dialogue
box that allows to edit all the entries for new or existing busses.
36/58 D950 Session Configuration Tool V1.0 Edition: 22 July 1998
Page 37

D950 Digital Mixing System
Select
- bus type
- enter the number
select bus type Click on the box to display the available bus types. Currently, the
following bus types are available:
- mono master bus
- mono group bus
- mono Multitrack bus
- mono AUX bus
- stereo AUX bus
- mono SOLO bus
- stereo PFL bus
- mono N-1 bus
- stereo N-1 bus
Number of busses Any number can be entered here to define the quantity for this
particular bus type. The maximum numbers are in function of the
overall installed DSP capacity (check the Core page to see how
requirements change) and, for some bus types the maximum
number is limited by the capacity of the D950 Desk to operate
them. Here the Desk limitations:
Aux Mono max. 48
Aux stereo max. 48
N-1 Mono max. 48
N-1 stereo max. 48
Master Mono max. 8
Master stereo max. 8
Group Mono + Stereo max. 48, stereo counts as 2 (e.g. 32 mono + 8 stereo groups)
Bus conventions there are 3 types of stereo busses
n Aux stereo bus
n PFL stereo bus
n N-1 stereo bus
Edition: 22 July 1998 V1.0 D950 Session Configuration Tool 37/58
Page 38

D950 Digital Mixing System
These bus types have to be entered bearing in mind that their
number is counted as stereo. All other bus types are mono,
regardless how they are used. For example, having 8 mono
master channels and 8 stereo master channels will need a total of
24 mono master busses.
The required numbers are automatically entered into the Edit Bus
dialogue based on the number of corresponding channels. So, in
the above example, the Edit Bus box will propose 24 busses
automatically.
For busses which do not correspond to channels (Multitrack,
SOLO, PFL and N-1 busses), the proposed number will be initially
zero and must be set by hand.
Tip FF Typically, there will only be one stereo PFL bus. The number of
SOLO busses has to comply with the surround format - for the 5.1
format you will need 6 SOLO busses.
Tip FF It is legal to have more busses that corresponding channel types.
The reason for this is because the busses (unlike in analogue
consoles) are valid audio signals and can be used as such in the
D950’s patch. They are simply summation busses which will output
the sum of all assigned inputs. That is the reason the busses can
also be used as components of multiformat stems.
Remove busses Simply click on the bus type to be removed and hit the „delete“
key.
MultiDesk Groups will be explained later in this chapter
5.2.45.2.4 Special Configuration functions: MultiDesk and StemsSpecial Configuration functions: MultiDesk and Stems
Here a brief explanation of two concepts that are unique to the
D950.
5.2.4.1 The Concept of MultiDesk Control Groups
Up to four individual operating desks can access the same DSP
Core on the D950. Each of these desks can have a separate
Monitor section, PFL busses, Solo busses, and a set of Outputs.
The four desks can work on individual tasks in different studios,
but they share the available DSP power of the core and the
AutoTouch automation. It is also possible that any or all four desks
access the same audio channels. Using the built-in digital router,
audio resources such as input converters can also be shared
among the studios. This allows to have up to four operators (in
four different locations or in the same room) working on the same
task or to have four independent mixing consoles working on four
separate tasks.
38/58 D950 Session Configuration Tool V1.0 Edition: 22 July 1998
Page 39

D950 Digital Mixing System
The Session Configuration defines and configures the way how
several Desks in a MultiDesk setup work and share DSP power.
Tip FF It must be noted that there are two limitations to this concept:
n regardless of the number of desks in a MultiDesk system, they
must all work with the same Timecode, since there is only one
TC input to the system
n since there is only one control system, and only one Session
Configuration, individual desks can not be reconfigured and a
configuration loaded independently from other desks. This
means that all (up to 4 ) desks are always loaded at the same
time.
Please also note that having made a MultiDesk configuration is
only a part of the work. The D950 desk has also to be
manufactured and equipped in an appropriate way, as well as all
peripheral devices configured to serve the MultiDesk purpose. The
next section describes the principle of making two very different
MultiDesk configurations. In both cases we will make a 2-Desk
configuration for reasons of simplicity.
How to make a split desk? Use the MultiDesk Groups checkboxes in the Edit Bus and Add
Channel dialogues to assign channels and busses to the two
desks (operators). The following example shows a two-operator
split desk, whereby the desks are independent of each other:
8 input channels
and 2 masters
selected to Desk 1
12 input channels
and 4 masters
selected to Desk 2
Exclusive bus
access
Edition: 22 July 1998 V1.0 D950 Session Configuration Tool 39/58
Page 40

D950 Digital Mixing System
The DSP capacity is sufficient for a total of 20 input channels and
6 master channels. Operator 1 sees 8 input channels and 2 master
channels, whereas Operator 2 sees 12 different input channels
and 4 different master channels.
How to make a parallel desk? Use the MultiDesk Groups checkboxes in the Edit Bus and Add
Channel dialogues to assign channels and busses to the two
desks (operators). The following example shows a two-operator
parallel desk configuration, whereby the inputs of the desks are
8 input channels
selected to Desk 1
independent of each other, but the masters are common and both
operators have access to the same master busses. The DSP
capacity again is sufficient for a total of 20 input channels and 6
master channels. Operator 1 sees 8 input channels and all 6
master channels, and Operator 2 sees 12 different input channels
and all 6 master channels.
5.2.4.2 The Concept of Stems
For Film style mixing, bits and pieces of film sound are put
together from a variety of surround formats ranging from mono to 8
channels. Very often, there may be hundreds of audio sources that
need to be mixed together and put into the right spatial image. In
order to bring some order to such a vast number of sources and
formats, a concept of Stems is often used.
12 input channels
selected to Desk 2
Common bus
and master
access
40/58 D950 Session Configuration Tool V1.0 Edition: 22 July 1998
Page 41

D950 Digital Mixing System
A Stem is a group of sounds (i.e. audio summing busses) that
belong together. Stems can be 1-channel to 8-channel wide. For
example, a console may be configured to have:
2 stereo stems for music
3 LCR stems for simple effects
1 5.1 stem for effects
1 stereo stem for dialogue, etc.
1 8-CH stem for effects
2 Dolby Surround (4-CH) stems for predubs
The basic Stem setup is defined in the Session Configuration - the
number, type and assignment of Stem busses is fixed. In the D950
GC, there are controls for dynamic Stem setup and for
assignments of the related recorder tracks. In this way, the Stem
setup may be changed dynamically as the need arises.
The restriction to the total number of Stems is the number of
busses for a certain Session Configuration. D950’s Master, Mono
Group and/or Track busses are used to build a system of Stems
(each stem consists of a number of busses) up to a maximum of
104 Stem busses at any time.
stereo stem for music
stereo stem for music
LCR stem for simple effects
LCR stem for simple effects
LCR stem for simple effects
5.1 stem for effects
stereo stem for dialogue, etc.
8-CH stem for effects
Dolby Surround (4-CH) stems
for predubs
Dolby Surround (4-CH) stems
for predubs
Edition: 22 July 1998 V1.0 D950 Session Configuration Tool 41/58
Page 42
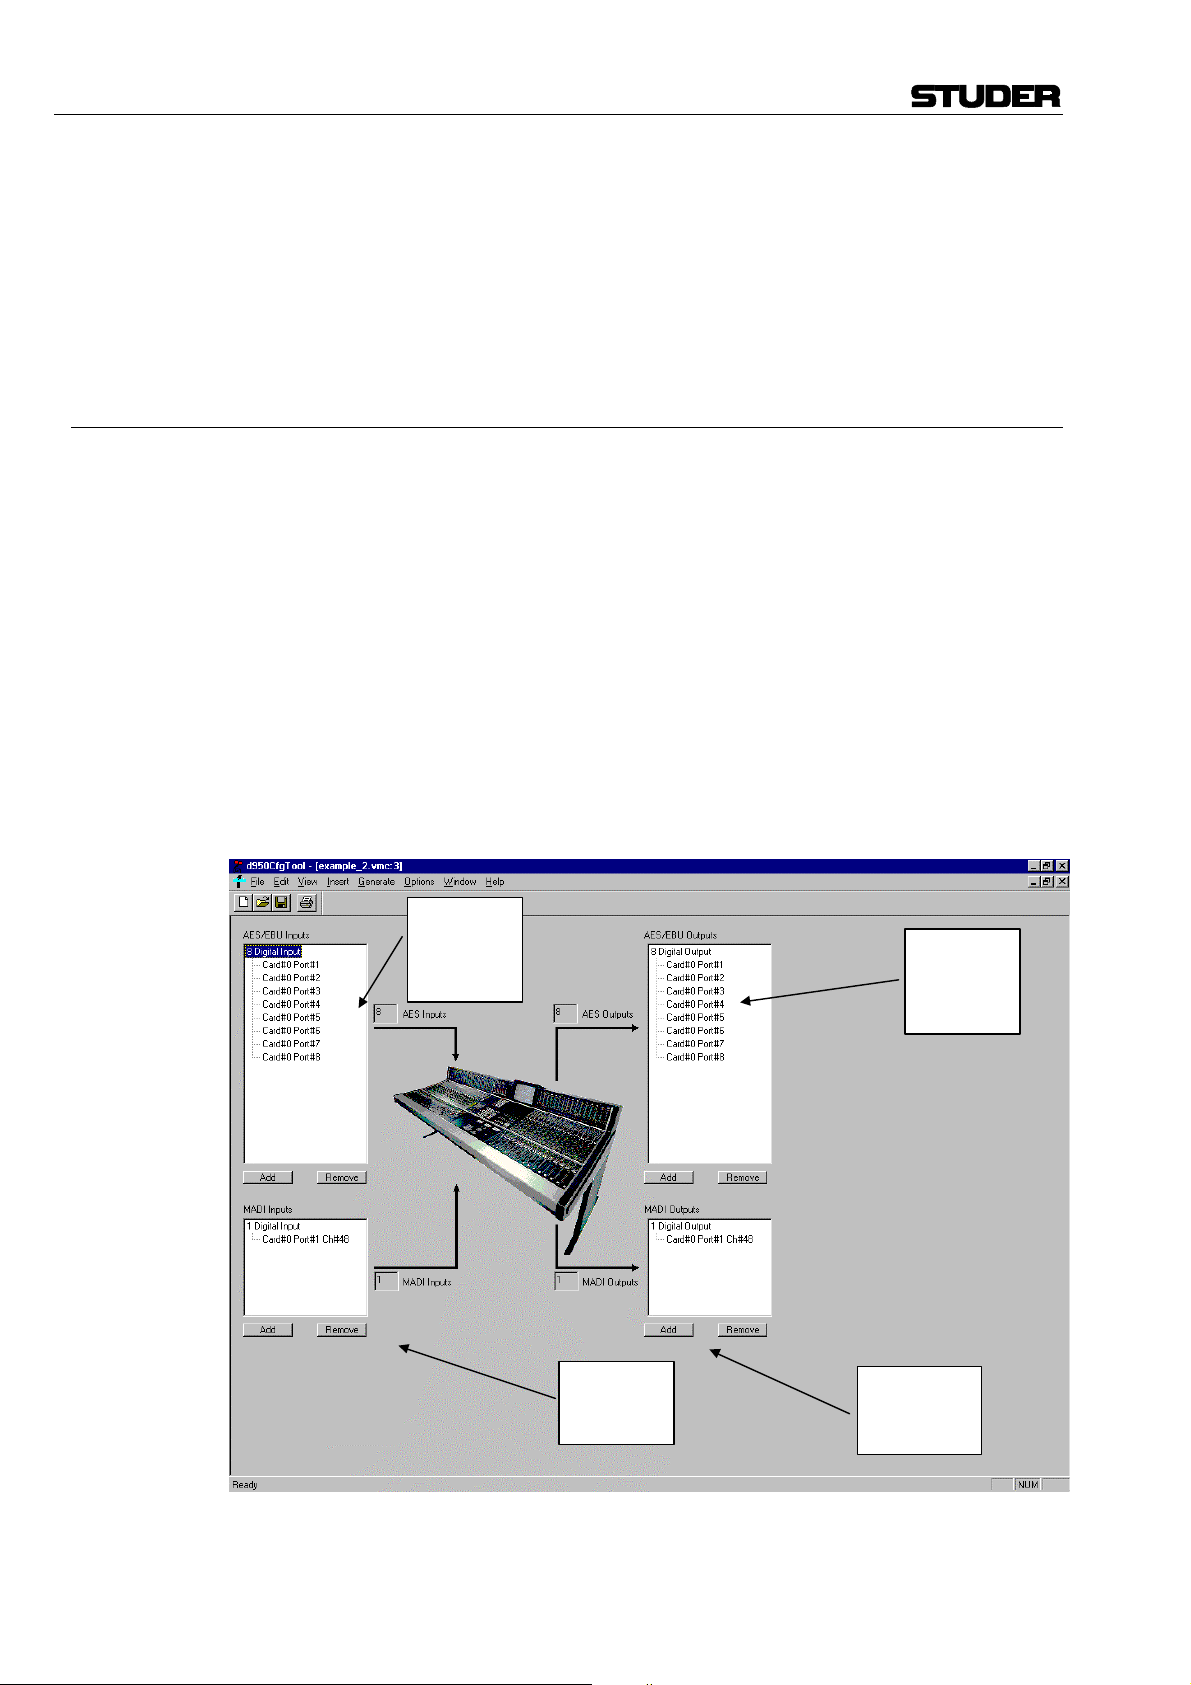
D950 Digital Mixing System
5.35.3 The Interface PageThe Interface Page
In this example, the bus structure has been set to allow for the
above stem configuration using multitrack busses as Stem busses.
A total of 37 multitrack busses has been configured by adding new
busses for a stem of 2, a stem of 2, a stem of 3, etc. All 136 input
and group channels have access to all 10 stems.
The interface page allows viewing and editing of the audio
interfacing to the DSP core. It is important to assign enough audio
input and output interfaces so that the configured system can work
satisfactorily. There are only 4 types of interfaces that can be
edited here:
n AES/EBU inputs
n AES/EBU outputs
n MADI inputs
n MADI outputs
All those require a little DSP power and, obviously, the right DSP
board type and quantity. Only the direct-to-core interfaces are
relevant for the core load. Any mic preamps, A/D or D/A converters
or other digital format converters must be connected to the above
four direct-to-core interface types. The Interface page has 4 areas
corresponding to the 4 interface types:
Show&Edit
input
AES/EBU
interfaces
Show&Edit
input MADI
interfaces
Show&Edit
output
AES/EBU
interfaces
Show&Edit
output MADI
interfaces
The D950 system can contain 2 I/O board types that are relevant
for the interfacing:
42/58 D950 Session Configuration Tool V1.0 Edition: 22 July 1998
Page 43

D950 Digital Mixing System
n PEAES - DSP board with 6 DSP processors, 8 AES/EBU inputs
(2 of which with SFC) and 8 AES/EBU outputs
n MADI I/O board with 2 MADI optical input connectors and 2
MADI optical output connectors per board
The D950 Session Configuration Tool will check all the relevant
requirements as you enter the numbers and will calculate the
necessary DSP power, the board types and their number and
display that information on the Core page.
Edit AES/EBU interfaces To add AES/EBU input interfaces to the system configuration,
simply click on the Add button in the AES/EBU Inputs area and a
dialogue box will appear:
Enter the
number of
input AES
interfaces
Most of the time it is sufficient only to enter the total number of
interfaces, bearing in mind that the number of AES/EBU interfaces
will mean twice the number of available mono-equivalent audio
inputs - if you enter 24, this will mean 48 mono signals that can
enter the DSP system.
The Configuration Tool will calculate the total number of PEAES
boards needed (3 in the above case). Normally, the other entries in
the box will never have to be used.
Only for the specialist ! II The „start board“ entry allows to set the board where the first
interface will be placed by the system (normally starts with board
00). The „AES Port“ entry allows to set the first of the 8 AES ports
on the selected board. The „Interface Function“ entry only allows
Digital Input to be set -> no current function.
To add AES/EBU output interfaces to the system configuration,
simply click on the Add button in the AES/EBU Outputs area and a
similar dialogue box will appear, allowing to set the number of
AES/EBU outputs.
The total number of AES/EBU inputs does not have to be the
same as the number of outputs. Since all AES/EBU inputs and
Edition: 22 July 1998 V1.0 D950 Session Configuration Tool 43/58
Page 44

D950 Digital Mixing System
Edit MADI interfaces To add MADI input interfaces to the system configuration, simply
outputs require a little DSP power, it is prudent to keep the
numbers as low as necessary.
After adding the required interfacing, the display will show the total
number of interfaces and their distribution on the PEAES board,
starting with board number 00.
To remove AES/EBU input interfaces from the system
configuration, simply select the interface to be removed (or to
remove all, select the uppermost line) and click on the Remove
button, or use the „delete“ key.
click on the Add button in the MADI Inputs area and a dialogue box
will appear:
Enter the
number of
input MADI
interfaces
The number of channels per each MADI interface has to be
entered, and the process repeated for every MADI interface.
The Configuration Tool will calculate the total number of MADI I/O
boards needed. Normally, the other entries in the box will never
have to be used.
Only for the specialist ! II The „start board“ entry allows to set the board where the first
interface will be placed by the system (normally starts with board
00). The „MADI Port“ entry allows to set the first or second of the 2
MADI ports on the selected board. The „Interface Function“ entry
only allows Digital Input to be set -> no current function.
To add MADI output interfaces to the system configuration, simply
click on the Add button in the MADI Outputs area and a similar
dialogue box will appear, allowing to set the number of MADI
outputs.
The total number of MADI inputs does not have to be the same as
the number of outputs. Since a new MADI board is added per each
2 new MADI interfaces, it is prudent to keep the numbers as low as
necessary. Since all individual channels within a single MADI
interface require a little DSP power, it is also prudent only to enter
the required number. If you need to interface a 24 track digital
recorder via MADI, then only enter 24 in the „Nr. of MADI
44/58 D950 Session Configuration Tool V1.0 Edition: 22 July 1998
Page 45

5.45.4 The Core The Core PagePage
D950 Digital Mixing System
channels“ box, and not 56, which would be the maximum a
standard MADI interface will support.
After adding the required interfacing, the display will show the total
number of interfaces and their distribution on the PEAES board,
starting with board number 00.
To remove MADI input interfaces from the system configuration,
simply select the interface to be removed (or to remove all, select
the uppermost line) and click on the Remove button, or use the
„delete“ key.
The core page displays the statistics of the channels, busses and
I/O’s as well as the occupancy of the DSP core. The page has four
parts:
Shows a
possible
core layout
overview
Shows the
mixing
console
statistics
Shows the load on
the DSP system
bus
Shows the
required number
and type of DSP
boards
Mixing Console Statistics This area indicates the configured number of channels, busses,
shared processes (test tone generator, side-chain links), and input
and output interfaces. These numbers reflect all the entries that
have been made during the configuration process.
Core Statistics Shows the calculated number of various DSP core boards. The
indication on the Core View shows Core Statistics as a rough
estimation. It uses a simple fitting algorithm to estimate the
required number of boards. To get to the real number of boards,
the full Generate Core process has to be done first, as explained
Edition: 22 July 1998 V1.0 D950 Session Configuration Tool 45/58
Page 46

D950 Digital Mixing System
in the next chapter. After that is finished, the display will show the
real numbers and the text (rough estimation) will disappear. The
total number of boards must not exceed 21.
Global Busses Shows the current communication load on the DSP system
communication bus (not to be mistaken for audio busses in the
mixing console). The number of busses must not exceed 1210.
Core Overview Indicates graphically all the boards and the setting of their I/O
addresses. The actual physical position in the core frame is
irrelevant at this point.
5.55.5 The Shared Function PageThe Shared Function Page
The shared functions page allows adding and editing the so-called
shared functions. There are currently the following shared
functions:
n test generator
n dynamics sidechain link
Test Generator the test generator us used to test the console with sine, white
noise and pink noise signals. The number is automatically set to 1.
Dynamics sidechain link The dynamics sidechain link allows to link the controls (sidechains)
of up to 8 dynamics sections of 8 different channels. It is similar to
the stereo link function found on many compressor/limiters, but the
number of linkable channels has been set to 8 rather than only 2,
so that all current surround formats can be supported. The
dynamics sidechain link requires DSP power, so the number is
best set to the required minimum. The default number is 0, and the
number can be set freely.
To edit To edit the numbers of shared functions, click on the „View/ shared
functions“ menu. This will bring up the dialogue box, allowing to
edit the numbers:
Double click on the shared function you wish to edit and enter the
required number.
5.65.6 The Session Configuration Tool MenuThe Session Configuration Tool Menu
Most of the functions of the D950 Session Configuration Tool are
controlled directly from the 4 View pages as described in the
46/58 D950 Session Configuration Tool V1.0 Edition: 22 July 1998
Page 47

5.6.15.6.1 The File MenuThe File Menu
New Opens a new, empty .VMC configuration file. Only the factory
Open Opens an existing .VMC configuration file. First looks into the
Close Closes current .VMC configuration file.
Save VMC Saves current .VMC configuration file under the same name, thus
Save VMC As Saves current .VMC configuration file under a different name. The
Save VMC Overview Saves the Overview of the current .VMC configuration file as a text
Save Distribution Info Saves the results of the Generate process of the current .VMC
Print VMC Overview Prints the Overview of the current .VMC configuration file. The
Print preview Shows the Overview of the current .VMC configuration file on
Print Setup Standard Windows printer setup.
1, 2, 3, 4 List of last 4 used .VMC configuration files.
Exit Quits the D950 Session Configuration Tool.
D950 Digital Mixing System
previous chapters. There are, nevertheless, some functions that
are accessible only via the menus. The following descriptions
briefly explain all the menu items, and only go into details for
functions not explained in the previous chapters.
defaults are set.
folder as stated in the „options/Directories/Files“ menu, usually
C:\D950SYSTEMDB.
overwriting it.
ending .VMC does not have to be typed out. Generates a new
folder with the same name as the .VMC configuration file and
saves the .VMC configuration file there.
(.txt) file. The overview contains condensed information about the
current configuration. An example is given in the next chapter.
configuration file as a text (.txt) file. The Distribution info contains
condensed information about the distribution of the load onto DSP
PE and PEAES boards and individual PE processors. This
information may be helpful during trouble shooting of the D950
system. An example is given in the next chapter.
overview contains condensed information about the current
configuration.
screen.
5.6.25.6.2 The Edit MenuThe Edit Menu
Remove last process An „Undo“ function to remove the last added process (added
channel or bus).
5.6.35.6.3 The View MenuThe View Menu
Vmc Only for the specialist ! II
FuncLib Only for the specialist ! II
Log File Shows the Log File that contains information about the last several
Generate runs. The oldest information is shown at the top of the
file.
Tool Bar, Status Bar Switches on and off the Tool Bar and The Status Bar.
Edition: 22 July 1998 V1.0 D950 Session Configuration Tool 47/58
Page 48

D950 Digital Mixing System
Channel Bus Brings up the Channel Bus page. For a description, please see
Interface Brings up the Interface page. For a description, please see
Shared Functions Brings up the Shared Functions page. For a description, please
Core Brings up the Core page. For a description, please see previous
5.6.45.6.4 The Insert MenuThe Insert Menu
Channel opens the „Add Channel“ dialogue box. For a description, please
AES Input opens the „Add AES“ dialogue box. For a description, please see
AES Output opens the „Add AES“ dialogue box. For a description, please see
MADI Input opens the „Add MADI“ dialogue box. For a description, please see
MADI Output opens the „Add MADI“ dialogue box. For a description, please see
External Devices opens the „External Devices“ dialogue box.
previous chapters.
previous chapters.
see previous chapters.
chapters.
see previous chapters.
previous chapters.
previous chapters.
previous chapters.
previous chapters.
This box allows entering the number of remotely controlled
devices. Currently, only the D19 MicAD can be remotely controlled
from a D950. Enter the number of devices as required. The
number can be higher than the actual number of connected
devices.
Important Tip FF The number of devices is set to 0 per default. It is important to
enter the number of devices here, otherwise there will be no
remote control possibility.
Shared Functions opens the „Shared functions“ dialogue box. For a description,
please see previous chapters.
48/58 D950 Session Configuration Tool V1.0 Edition: 22 July 1998
Page 49
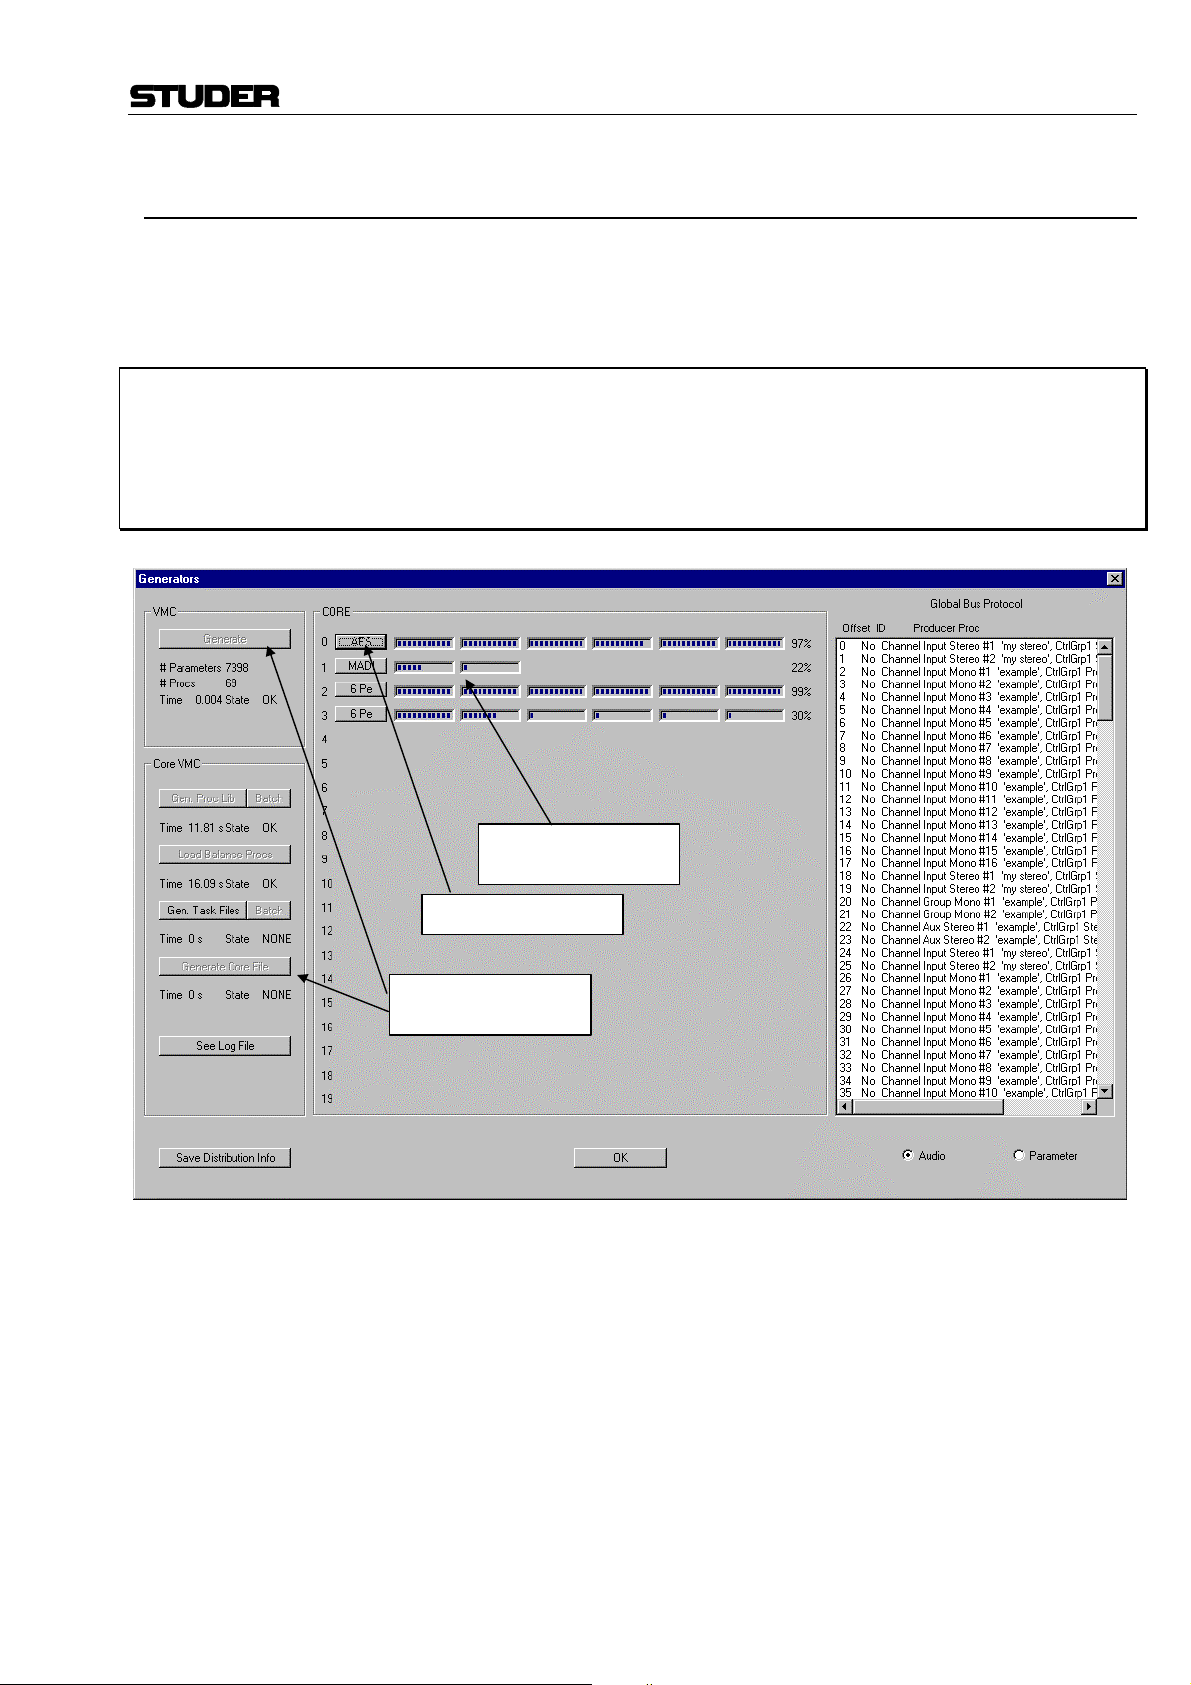
D950 Digital Mixing System
5.6.55.6.5 The Generate MenuThe Generate Menu
Detailed This menu opens up an interactive dialogue box that allows to start
step-by-step manual Load Balancing and generation of the DSP
core file. It allows the specialist to see more details about the
current configuration than when Generate/All is used.
Only for the specialist ! II It is not necessary to go to this menu item to do the whole
generate process. The main reason for looking at this page is to
see the load distribution to various DSP boards and individual PE
processors. There is a lot of other information here that does not
mean much to the ordinary humans.
Activating „Detailed“ will bring up the following box:
Shows results of
Load Balancing
Click here for details
Step-by-Step Core
file Generator
If a Generate process has already been done, the area „CORE“
will show the results of load balancing and distribution of the load
to DSP boards. Click on one of the buttons to see the load
distribution on one DSP board in detail. If the Generate process
has not yet been done, the „CORE“ area is empty.
To do the Generate process from here, all 7 boxes in the „VMC“
area have to be clicked in turn, always waiting for the result of the
previous action to appear before the next box is clicked. The order
of the individual processes is as follows:
- Generate (VMC)
- Gen Proc Lib
- Batch
Edition: 22 July 1998 V1.0 D950 Session Configuration Tool 49/58
Page 50

D950 Digital Mixing System
- Load Balance Procs (now the „CORE“ area will be filled)
- Gen Task Files
- Batch
- Generate Core File
If all steps are completed, the new core file is generated.
Tip FF If you only wish to see the results of load balancing, but not to
generate a core file, use only the following three boxes:
- Generate (VMC)
- Gen Proc Lib
- Load Balance Procs
which will display the „CORE“ area. Click on one of the buttons in
the „CORE“ area to see the load distribution on one DSP board in
detail. Here the display for the PEAES Board 00 as an example:
Some of these details can also be found if the Distribution info is
saved. An example of this file is given in the next chapter. The
page and the file contain condensed information about the
distribution of the load onto DSP PE and PEAES boards and
individual PE processors. This information may be helpful during
troubleshooting of the D950 system because all the individual
channels, busses and functions can be precisely located to a
particular board.
All Starts the Load Balancing and automatic generation of the DSP
core file. For a description, please see previous chapters.
50/58 D950 Session Configuration Tool V1.0 Edition: 22 July 1998
Page 51

5.6.65.6.6 The Options MenuThe Options Menu
Core Constants Only for the specialist ! II Do not change anything here!
Directories/Files... Allows to edit the D950CfgTool.Ini file, as described in the previous
chapters.
5.6.75.6.7 The Window MenuThe Window Menu
This menu contains standard Windows functions for the
management of windows. Multiple windows and copies of existing
windows are allowed.
New Channel Bus Opens a new Channel Bus page. If there are already Channel Bus
pages, creates a new copy of the page.
New Interface Opens a new Interface page. If there are already Interface pages,
creates a new copy of the page.
New Core Opens a new Core page. If there are already Core pages, creates
a new copy of the page.
Cascade Arranges the Workspace as cascaded windows.
Tile Arranges the Workspace as tiled windows.
1,2,3,... Brings the selected page to the top of the workspace
D950 Digital Mixing System
Edition: 22 July 1998 V1.0 D950 Session Configuration Tool 51/58
Page 52

D950 Digital Mixing System
66 MAINTENANCEMAINTENANCE
6.16.1 Managing the Files - Which File is Where?Managing the Files - Which File is Where?
Any Session Configuration starts with only two files:
n myvmc.vmc
n myvmc.cor
As a Session Configuration is used by the D950 console, there will
be more session-specific files stored in the Session Configuration
folders on the D950 PC. These files are generated by the D950
System automatically. Here a brief explanation of the files:
C:\D950SYSTEMDB
\lastknownsession.ini stores last used session configuration and title
\<myvmc1> session directory named after the .vmc file name
\<myvmc1>.vmc session configuration .vmc file
\<myvmc1>.cor DSP executable programme
\<preset2>.pre preset
\... preset
\<myvmc1>.snp start snapshot (periodically updated via the Autosave option)
\<myvmc1>.asg strip setup for the desk
\<myvmc1>.stp start snapshot for the stem assignment
\<myvmc1>.trk start snapshot for the track assignment
...
\<myvmc2> session directory named after the .vmc file name
\<myvmc2>.vmc session config .vmc file
\...
Note Names enclosed in brackets are free to choose/edit. Extensions
and names not enclosed in brackets must not be changed. The
extension makes it easier for the system to search data files. But it
is not the only ID to identify a data file of a certain type, in addition
a file ID in the file itself is used to check the file type.
The described directory structure is the default structure generated
by the system and is also the location where the system first looks
for user data. This structure can be changed by the user. The path
for productions and system database is set via D950system.ini and
the D950CfgTool.ini files, please see later.
The D950 Productions or Titles are not linked with a specific
session configuration. Each snapshot, sequence and mix file
contains a session reference which makes it possible to identify
session and data belonging to that session. That means one can
open a title with data files belonging to different session
configurations. The system can convert those files if needed (D950
Software V1.1).
52/58 D950 Session Configuration Tool V1.0 Edition: 22 July 1998
Page 53

D950 Digital Mixing System
6.26.2 The D950CfgTool.ini FileThe D950CfgTool.ini File
The :\Windows_Root directory contains the file „D950CfgTool.ini“.
This file tells the Configuration Tool where to look for various
components and what the basic settings are. This root directory
may be called similarly to „Windows“, „Win95“ or WINNT40“ and is
usually found on the C: drive of every PC.
The contents of this file are set by the D950 Session Configuration
Tool software. The user should not find it necessary to edit the file
using a text editor.
The contents of this file have four parts:
[globals] Set via the Options/Core
DpramAMessageChOffset=0 Constants menu. Should
DpramAAudioChOffset=666 never be changed!
DpramABoardChStartOffset=700
DpramALength=992
DpramBMessageChOffset=64
DpramBParamChOffset=128
DpramBAudioChOffset=666
DpramBBoardChStartOffset=700
DpramBLength=992
DpramReadWaitStates=0
DpramWriteWaitStates=0
DpramABeginWrite=0xc00000
DpramABeginRead=0x400400
[dir and file settings] Set via the Options/Directories/Files
CoreFuncLibFile=C:\D950cfg\coreFunc220498.lib menu.
LogFile=C:\D950cfg\tmpFiles\LogFile.txt
CoreMemNet1File=C:\D950cfg\Membeta.exe
CoreMemNet2File=C:\D950cfg\Membeta.exe
PearchFile=C:\D950cfg\Core.ach
RtosFile=C:\Programs\D950cfg\Rbeta.a
CoreTempFilesPath=C:\Programs\D950cfg\tmpFiles\
CfgPath=C:\D950SYSTEMDB\
[GUI settings] Last workspace setting. Stored
ShowWindow=3 when quitting
View=ChanBusView,3,44,44,844,502,0,0
[Recent File List] Last VMC files used. Stored
File1=C:\D950SYSTEMDB\example\example.VMC when quitting
File2=C:\D950GC\D950SYSTEMDB\CfgToolManual\CfgToolManual.VMC
File3=C:\D950GC\D950SYSTEMDB\Untitled\Untitled.VMC
6.2.16.2.1 Related entries in the D950system.iniRelated entries in the D950system.ini
The actual D950 System software uses the D950system.ini file to
set some defaults. Please consult the D950 Operating Instructions
for more details. There are two entries in this file that are related to
the Session Configuration, here the keywords:
LastKnownIniFile=C:\D950SYSTEMDB\lastknownsession.INI The keyword points to the
.ini file which indicates the last
used session and last used
production/title.
Edition: 22 July 1998 V1.0 D950 Session Configuration Tool 53/58
Page 54

D950 Digital Mixing System
DefaultSystemdbDir=C:\D950SYSTEMDB This path points at the starting
directory for the file dialogue
box when changing a session.
6.2.26.2.2 Example of an VMC Overview FileExample of an VMC Overview File
The overview file contains condensed information about the
current configuration. It can be stored from the „File“ menu.
Configuration 'C:\D950SYSTEMDB\example_2\example_2.txt'
===============================================================
Channels:
8 Input Mono 'example' Channels
Input Selector
Input HPF/LPF & Gain
Input Mode Phase
4 Band EQ
Insert
Dynamics
Delay 100ms
Fader
Direct Out
Multi Format Pan
Meter
2 Group Mono 'example' Channels
Input Selector
Input HPF/LPF & Gain
Input Mode Phase
Dynamics
Insert
Fader
Direct Out
VSP Surround Pan
Meter
2 Master Mono 'example' Channels
Input Selector
Insert
Fader
Direct Out Simple
Meter
6 Aux Mono 'example' Channels
Input Selector
Insert
Fader
Direct Out Simple
Meter
2 Input Stereo 'my stereo' Channels
Input Selector
Input HPF/LPF & Gain
Input MS Mode Phase
4 Band EQ
Insert
Fader
Direct Out
Pan Bal Width
Meter
54/58 D950 Session Configuration Tool V1.0 Edition: 22 July 1998
Page 55

2 Aux Stereo 'example' Channels
Input Selector
Insert
Fader
Direct Out Simple
Meter
2 Group Mono 'My GRP' Channels
Input Selector
Input HPF/LPF & Gain
Input Mode Phase
4 Band EQ
Insert
Fader
Direct Out
LR Pan
Meter
Busses:
2 Master Busses
4 Group Busses
6 Aux m Busses
2 Aux s Busses
2 Solo Busses
1 Pfl s Bus
D950 Digital Mixing System
Interfaces:
8 Digital Input AES Interfaces
8 Digital Output AES Interfaces
1 Digital Input MADI Interface
1 Digital Output MADI Interface
6.2.36.2.3 Example of an VMC Distribution Info FileExample of an VMC Distribution Info File
The Distribution info file contains condensed information about the
distribution of the load onto DSP PE and PEAES boards and
individual PE processors as well as the MADI and MEMNET
boards. This information may be helpful during trouble shooting of
the D950 system. An example is given here:
Configuration ' C:\D950SYSTEMDB\example_2\example_2_dst.txt'
===============================================================
6Pe 8Aes Boards: 1
6Pe Boards: 1
2Madi Boards: 1
MemNet Boards: 1
BOARD:Type: AES Interface Number:0
PE 1:
PE 2:
PE 3:
No Summation
Channel Group Mono #1 'example', CtrlGrp1
Channel Master Mono #1 'example', CtrlGrp1
Channel Group Mono #2 'example', CtrlGrp1
Channel Master Mono #2 'example', CtrlGrp1
AES/EBU Port#0
AES/EBU Port#1
AES/EBU Port#0
AES/EBU Port#1
Channel Input Mono #1 'example', CtrlGrp1
Channel Group Mono #3 'My GRP', CtrlGrp1
Channel Aux Stereo #1 'example', CtrlGrp1
Edition: 22 July 1998 V1.0 D950 Session Configuration Tool 55/58
Page 56

D950 Digital Mixing System
PE 4:
PE 5:
PE 6:
BOARD: Type: MADI
PE 1:
PE 2:
AES/EBU Port#2
AES/EBU Port#3
AES/EBU Port#2
AES/EBU Port#3
Channel Input Mono #2 'example', CtrlGrp1
Channel Group Mono #4 'My GRP', CtrlGrp1
Channel Aux Stereo #2 'example', CtrlGrp1
AES/EBU Port#4
AES/EBU Port#5
AES/EBU Port#4
AES/EBU Port#5
Channel Input Mono #3 'example', CtrlGrp1
SharedProc
SharedProc
SharedProc
AES/EBU Port#6
AES/EBU Port#7
AES/EBU Port#6
AES/EBU Port#7
Channel Input Mono #4 'example', CtrlGrp1
SharedProc
Channel Aux Mono #1 'example', CtrlGrp1
Channel Aux Mono #2 'example', CtrlGrp1
Channel Aux Mono #3 'example', CtrlGrp1
No Summation
MADI B#0 P#0 48 ch
MADI B#0 P#0 48 ch
BOARD: Type: 6 Pe
Summing Busses:
PE 1:
PE 2:
PE 3:
Bus Master #1 (#0 in stem), CtrlGrp1
Bus Master #2 (#1 in stem), CtrlGrp1
Bus Aux m #1 (#0 in stem), CtrlGrp1
Bus Aux m #2 (#1 in stem), CtrlGrp1
Bus Aux m #3 (#2 in stem), CtrlGrp1
Bus Aux m #4 (#3 in stem), CtrlGrp1
Bus Aux m #5 (#4 in stem), CtrlGrp1
Bus Aux m #6 (#5 in stem), CtrlGrp1
Bus Solo #1 (#0 in stem), CtrlGrp1
Bus Solo #2 (#1 in stem), CtrlGrp1
Bus Group #1 (#0 in stem), CtrlGrp1
Bus Group #2 (#1 in stem), CtrlGrp1
Bus Group #3 (#2 in stem), CtrlGrp1
Bus Group #4 (#3 in stem), CtrlGrp1
Bus Aux s #1 (#0 in stem), CtrlGrp1 left
Bus Aux s #1 (#0 in stem), CtrlGrp1 right
Bus Aux s #2 (#1 in stem), CtrlGrp1 left
Bus Aux s #2 (#1 in stem), CtrlGrp1 right
Bus Pfl s #1 (#0 in stem), CtrlGrp1 left
Bus Pfl s #1 (#0 in stem), CtrlGrp1 right
Channel Input Mono #5 'example', CtrlGrp1
Channel Input Mono #6 'example', CtrlGrp1
No Summing
Channel Input Mono #7 'example', CtrlGrp1
Channel Input Mono #8 'example', CtrlGrp1
No Summing
Channel Input Stereo #1 'my stereo', CtrlGrp1
Channel Input Stereo #2 'my stereo', CtrlGrp1
Channel Aux Mono #4 'example', CtrlGrp1
Channel Aux Mono #5 'example', CtrlGrp1
Channel Aux Mono #6 'example', CtrlGrp1
No Summing
56/58 D950 Session Configuration Tool V1.0 Edition: 22 July 1998
Page 57

D950 Digital Mixing System
PE 4:
PE 5:
PE 6:
BOARD: Type: Mem Net
SharedProc
Summing: 20 B (0 to 27)
Summing: 20 B (27 to 48)
No Summing
No Summation
6.2.46.2.4 TroubleshootingTroubleshooting
The Session Configuration Tool was checked for over a year at the
factory for malfunctions and erroneous operations. We tried
hundreds of different configurations and have made all sorts of
tests. Nevertheless, since there exists an almost infinite number of
combinations of channel, bus and I/O configurations, we could not
test them all. So it may happen that on a very rare occasion, an
error message will be issued during editing or during the Generate
process. Here a description of some of the typical error messages:
6.2.4.1 Errors during Generate Process / in Log File
error! cannot load balance vmc process
(check core funcLib requirements)!
Process requirements:
cyclesAudio=726<800-RTOScyclesAudio
cyclesPrep=2724<10000
cyclesPostp=112<2000 Too many functions in a channel. Typically happens with
pmco=2521<12288 full channels including the VSP Pan. Take out the Dynamics or EQ
pmda=7961<7700 and run Generate again.
dmda=11774<28000
ERROR: I/O Overflow on PE 4 of board 0
Typical for a Load Balancing error. Try to slightly change the
channel configuration so that the load on the board 0 / PE 4 shifts
a little and run Generate again.
Edition: 22 July 1998 V1.0 D950 Session Configuration Tool 57/58
Page 58

D950 Digital Mixing System
Studer Professional Audio AG
Althardstrasse 30,
CH-8105 Regensdorf
Switzerland
Tel. +41 1 870 75 11
Fax. +41 1 840 47 37
Contact and more information:
http://www.studer.ch
Copyright by Studer Professional Audio AG
58/58 D950 Session Configuration Tool V1.0 Edition: 22 July 1998
 Loading...