

Stuart SBS40 Instruction Manual

Shaking Water Bath
SBS40
Instruction Manual
Version 1.5

English
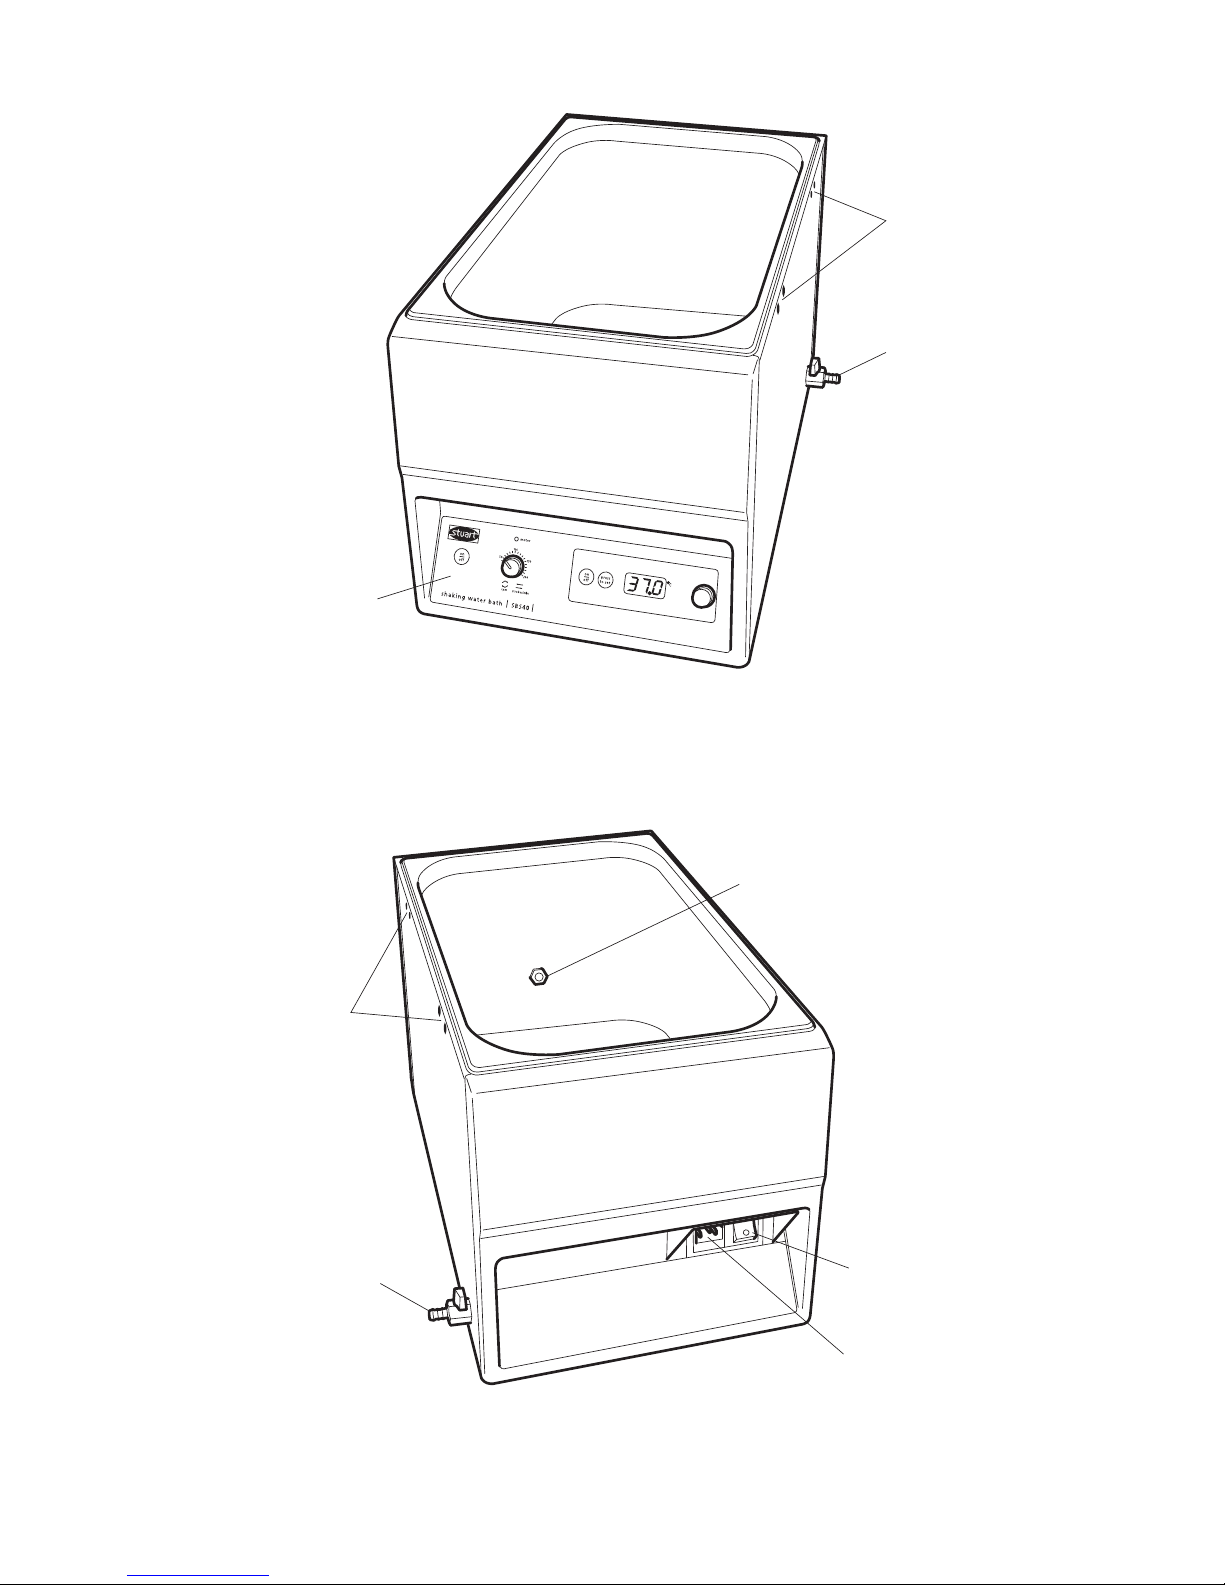
Figure 1: Front view
Figure 2: Rear view
Control panel
Hinge points
Drain
Hinge points
Low level water sensor
ON/OFF switch
IEC connector
Drain

1
SHAKING WATER BATH
SBS40
1. Introduction
Thank you for purchasing this piece of Stuart
equipment. To get the best performance from
the equipment please read these instructions
carefully before use.
Before discarding the packaging check that all
parts are present and correct.
For your own safety and that of others
please read and understand the safety
advice given below before using the
equipment.
2. General Description
The Stuart SBS40 shaking water bath is the ideal
instrument for mixing, gently heating and
aerating biological and chemical samples in the
laboratory. The unique design allows a choice of
either linear or orbital mixing action, depending
on the application. Both platforms will
accommodate up to 15 springs, which will hold
almost any size and combination of flasks,
bottles or beakers. Max load for both platforms
is 10kg.
3. Safety Advice before use
If the equipment is not used in the manner
described in this manual and with
accessories other than those recommended by
Cole-Parmer the protection provided might be
impaired.
This equipment is designed to operate under the
following conditions: -
❖ For indoor use only
❖ Use in a well ventilated area
❖ Ambient temperature range +5°C to +40°C
❖ Altitude to 2000m
❖ Relative humidity not exceeding 80%
❖ Mains supply fluctuation not exceeding 10%
❖ Over-voltage category II IEC60364-4-443
❖ Pollution degree 2
❖ Use with a minimum distance all around of
200mm from walls or other items
❖ DO NOT mix combustible liquids or use the
equipment in hazardous atmospheres.
❖ When empty the unit should be carried using
both hands.
❖ The unit is designed for use with aqueous
liquids. It may be dangerous to use other
liquids (especially inflammable substances) in
the bath.
❖ Do not attempt to stop movement by hand.
❖ Never move or carry the unit when in use or
connected to the mains electricity supply.
❖ In the case of mains interruption, the unit will
not restart on restoration of the electricity
supply.
❖ In the case of mechanical interruption, (e.g.
motor stall), the unit will continue operating
on removal of interruption.
❖ Mechanical energy can lead to breakage of
glass vessels. Use with care.
❖ DO NOT position the product so that it is
difficult to access the ON/OFF switch.
❖ DO NOT position the product so that it is
difficult to disconnect it from the mains
supply using the mains plug.
❖ The mains outlet socket used should be
located close to the equipment and readily
identifiable and accessible to users.
Never move or carry the unit when filled
with water.

4. Preparation for Use
4.1 Electrical Installation
THIS INSTRUMENT MUST
BE EARTHED
Before connection please read and understand
these instructions and ensure that the line supply
corresponds to that shown on the rating plate.
All models are designed for use on 230V 50Hz.
The power consumption of each unit is 1400W.
The instruments are fitted with an IEC socket at
the rear of the instrument for connection of the
mains lead.
Caution: Fuses fitted in both live and neutral
lines.
These units are supplied with two mains leads
fitted with IEC plugs for connection to the
instrument. One lead has a U.K. 3 pin plug and
the other has a 2-pin “Schuko” plug for
connection to the mains. Choose the lead
appropriate for your electrical installation and
discard the other.
Should neither lead be suitable, take the lead with
the U.K. plug and replace the plug with a suitable
alternative. This involves cutting off the moulded
plug, preparing the cable and connecting to the
rewireable plug in accordance with its instructions.
IT IS IMPORTANT THAT THIS OPERATION
SHOULD ONLY BE UNDERTAKEN BY A
QUALIFIED ELECTRICIAN
NOTE: Refer to the equipment’s rating plate to
ensure that the plug and fusing are suitable for
the voltage and wattage stated.
The wires in the mains cable are coloured as
follows:
LIVE - BROWN
NEUTRAL - BLUE
EARTH - GREEN/YELLOW
The appropriate mains lead should be connected
to the instrument BEFORE connection to the
mains supply.
Should the mains lead need replacement a cable
of 1mm
2
of harmonised code H05VV-F connected
to an IEC320 plug should be used.
N.B. The U.K. mains lead is protected by a 10A
fuse mounted in the plug top.
IF IN DOUBT CONSULT A QUALIFIED
ELECTRICIAN
2

5. Operation
5.1 General
Connect to the electricity supply – DO NOT
SWITCH ON. Place the unit on a firm level
non-slip surface and
fill the bath with the required level of water,
ensuring that the level sensor is below the water
level.
5.2 Recommended Bath Water
The inner containers of the Stuart water baths
are manufactured from grade 304 stainless steel,
a material which is extremely hardwearing, easy
to clean and with excellent corrosion resistance.
It is important to remember that although
stainless steel has a higher resistance to
oxidation than ordinary steel in various
environmental conditions, it is not rust and
corrosion proof. Care must be taken when using
the baths not to use or introduce chemicals
which may cause damage to the surface of the
bath. Regular cleaning and maintenance will
prolong the life of the bath and enable
continued use for many years.
For the Stuart baths we recommend water,
preferably distilled or deionised, with neutral pH.
Ultra pure deionised or RO water with a
resistivity >1Mohm should not be used, as this
can leach the iron from the stainless steel and
lead to corrosion. If necessary, add a little tap
water to the pure water in the bath. Hard tap
water should also be avoided as this can cause
build up of scale inside the bath and on the
heating elements. Other salts in tap water such
as chlorides and sodium ions can also lead to
pitting and corrosion.
5.3 Loading the platform
Arrange the vessels on the platform outside the
bath. Position the retaining springs where
required to secure the load. When the load is
secured place the platform inside the bath.
NB For safety, Do NOT remove the platform
from the bath when the water is hot.
5.4 Setting the speed
Switch the shaking unit ON by pressing ON/OFF
key (see fig 3). The red indicator light above the
speed control will illuminate. To select the speed,
turn the speed control knob clockwise, until the
desired setting is obtained.
The speed can be adjusted without halting the
unit.
Shaking can be halted at any time by pressing
ON/OFF key.
5.5 Setting the temperature.
The shaking water bath temperature control is
located on the right hand side of the control
panel. To turn the temperature control ON,
press the ON/OFF key (see figure 3). The LED
display will show the current temperature of the
water within the bath.
3
Figure 3: SBS40 control panel
Temperature control
ON/OFF key
Temperature
display
Motor 'on'
indicator light
Temperature
press to set key
Shaking
unit
ON/OFF
key
Temperature
selector knob
Shaking speed
control

To set the temperature, press and hold the ‘press
to set’ key and at the same time rotate the
temperature selector knob until the required
temperature is shown on the digital display.
Release the ‘press to set’ key and the
temperature will display will revert back to the
current bath temperature.
The shaking water bath will now automatically
heat up to the set temperature.
5.6 Low level water sensor
The low-level water sensor is designed to provide
a warning when the water level has become too
low in order to protect the bath from
overheating. The sensor is located towards the
bottom of the tank on the sidewall (see figure
2). When the water level drops below the
sensor, the LED display will flash ‘H20’ and ‘ERR’
to indicate that the water level is too low and
the heater will switch off. The heater may be
restarted by filling the bath with water to the
required level above that of the sensor.
NB The lens of the sensor must be wiped
clean with a damp cloth at regular intervals
to ensure correct function.
5.7 Draining the bath
To empty the bath, ensure that the water has
cooled to below 60°C. The drain tap is located
at the rear of the bath (see figure 1). Attach a
suitable pipe to the drain tap and place the end
of the pipe over a drain or container. Turn the
drain tap anticlockwise to empty the bath.
When the bath is empty ensure that the drain
tap is closed.
Never move or carry the unit when filled
with water.
6. Maintenance, Servicing
& Repair
WARNING: Ensure the unit is disconnected
from the mains electricity supply before
attempting maintenance or servicing.
This range of equipment does not require routine
servicing. The only maintenance required is to
clean external surfaces with a damp cloth and
mild detergent. Spillages or splashes should be
cleaned up straightaway after isolating the unit
from the mains electricity supply.
6.1 Repairs
Any repairs or replacement of parts MUST be
undertaken by suitably qualified personnel.
Only spare parts supplied or specified by
Cole-Parmer or its agent should be used.
Fitting of non-approved parts may affect the
performance of the safety features designed
into the instrument.
For a comprehensive list of parts required by
service engineers conducting internal repairs, or
to receive a service manual, please contact the
Sales Department of Cole-Parmer quoting both
the model and serial number.
If in any doubt please contact the Technical
Department of Cole-Parmer.
6.2 Cleaning
Periodically clean the bath with a damp cloth
and if necessary a mild detergent solution.
Do not use harsh or abrasive cleaning agents.
De-scaling may be required depending on the
hardness of the water.
If the bath is to be left unused for more than a
couple of days, drain the bath to prevent build
up of unwanted scale.
In some cases small spots may be visible in the
baths which resemble rust spots. In most cases
these will be small ferrous particles on the
surface of the bath which have oxidised causing
the appearance of rust. These can usually be
cleaned away using a standard stainless steel
cleaner and plastic scourer.
4

6.3 Accessories
The following range of accessories is available:
SBS40/1 Platform, linear shaking action
SBS40/2 Platform, orbital shaking action
SBS40/3 Platform, perforated
SBS40/4 Polycarbonate cover, hinged
SWB24/1 Stainless steel cover
SBS40/5 Test tube rack, 143 x 1.5ml micro tubes
SBS40/6 Test tube rack, 120 x 13mm culture tubes
SBS40/7 Test tube rack, 72 x 16mm culture tubes
SBS40/8 Test tube rack, 56 x 15ml centrifuge tubes
SBS40/9 Test tube rack, 30 x 26mm culture tubes
SBS40/10 Test tube rack, 25 x 50ml centrifuge tubes
SBS30/1 Spare springs (pack of 10)
The perforated platform (SBS40/3) is available to
convert the SBS40 shaking water bath to an unstirred
bath.
A choice of stainless steel (SWB24/1) or polycarbonate
gabled cover(SBS40/4) is also available. The SBS40 has
hinge points at either side enabling the polycarbonate
cover to be hinged on preference.
6.4 Technical Specification
Capacity 24L
Temperature range Ambient +5°C to
95°C
Temperature stability ±0.25°C
Shaking speed 20-130rpm
Shaking orbit/amplitude 20mm
Internal dimensions (w x d x h) 300 x 500 x 200mm
Overall dimensions (w x d x h) 335 x 580 x 330mm
Net weight 17kg
Electrical supply 230V, 50hz 1400W
5
7. Warranty
Cole-Parmer Ltd. warrants this instrument to be
free from defects in material and workmanship,
when used under normal laboratory conditions,
for a period of three (3) years. In the event of a
justified claim, Cole-Parmer will replace any
defective component or replace the unit free of
charge.
This warranty does NOT apply if damage is
caused by fire, accident, misuse, neglect,
incorrect adjustment or repair, damage caused by
installation, adaptation, modification, fitting of
non-approved parts or repair by unauthorized
personnel.
Cole-Parmer Ltd.
Beacon Road,
Stone, Staffordshire,
ST15 0SA, United Kingdom
Tel: +44 (0)1785 812121
Email: cpservice@coleparmer.com
Web: www.stuart-equipment.com
6
Français
Figure 1: Vue de face
Figure 2: Vue arrière
Panneau de
commande
Points de montage
des charnières
Vidange
Points de montage
des charnières
Capteur de niveau
d’eau bas
Interrupteur
Marche/Arrêt
Connecteur IEC
Vidange

7
Bain-marie à agitation
SBS40
1. Introduction
Merci d’avoir acheté ce matériel Stuart. Pour en
obtenir les meilleures performances, lisez
attentivement le présent mode d’emploi avant
d’utiliser l’appareil.
Avant de jeter l’emballage, vérifiez que toutes les
pièces sont présentes et en bon état.
Pour votre propre sécurité comme pour celle
des autres, lisez et assimilez les conseils de
sécurité donnés ci-dessous avant d’utiliser ce
matériel.
2. Description générale
Le bain-marie à agitation Stuart SBS40 est
l’appareil idéal pour mélanger, réchauffer en
douceur et aérer les échantillons biologiques et
chimiques en laboratoire. Sa conception unique
permet de choisir une action de mélange linéaire
ou orbitale, selon l’application. Les deux
plates-formes peuvent recevoir jusqu’à 15
ressorts permettant de maintenir pratiquement
n’importe quelle dimension et n’importe quelle
combinaison de flacons, bouteilles ou béchers.
La charge maximale des deux plateformes est de
10kg.
3. Conseils de sécurité
avant utilisation
Si ce matériel n’est pas utilisé de la
manière décrite dans le présent manuel,
ou avec des accessoires autres que ceux
recommandés par Cole-Parmer, la protection
fournie risque d’être compromise.
Ce matériel est conçu pour fonctionner dans les
conditions suivantes: -
❖ Réservé à une utilisation en intérieur
❖ Utilisation dans un endroit bien ventilé
❖ Plage de température ambiante: +5 à +40°C
❖ Altitude : jusqu’à 2000m
❖ Humidité relative ne dépassant pas 80%
❖ Fluctuations de l’alimentation sur secteur ne
dépassant pas 10%
❖ Surtension de catégorie II selon la norme
IEC60364-4-443
❖ Degré de pollution 2
❖ Utilisation avec une distance minimale de
200 mm des murs ou autres articles sur tout
le pourtour.
❖ Porter l’appareil vide en le tenant à deux
mains.
❖ L’appareil a été conçu pour être utilisé avec
les liquides aqueux. Il peut s’avérer
dangereux d’employer d’autres liquides (en
particulier des substances inflammables) dans
le bain-marie.
❖ N’essayez pas d’arrêter le mouvement à la
main.
❖ Ne déplacez et ne transportez jamais
l’appareil lorsqu’il est en service ou branché
à l’alimentation électrique sur secteur.
❖ En cas de coupure secteur, l’appareil ne
redémarre pas quand l’alimentation
électrique est rétablie.
❖ En cas d’interruption mécanique (par ex.
moteur calé), l’appareil recommence à
fonctionner dès que l’interruption disparaît.
❖ L’énergie mécanique peut entraîner le bris
des récipients en verre. Utilisez ce matériel
avec précautions.
Ne jamais déplacer ou transporter l’appareil
quand il est rempli d’eau.

4. Préparation
4.1 Installation électrique
CET APPAREIL DOIT ETRE
RELIE A LA TERRE.
Avant de procéder au branchement, lisez et
assimilez le présent mode d’emploi et vérifiez
que l’alimentation sur secteur correspond à celle
indiquée sur la plaque signalétique de l’appareil.
Tous les modèles ont été conçus pour
fonctionner sur une alimentation à 230V et
50Hz. La consommation électrique de chaque
appareil est de 1400W.
Les appareils sont dotés à l’arrière d’une prise
IEC permettant le branchement du cordon
secteur.
Prudence: fusibles installés sur la phase et
le neutre.
Ces appareils sont livrés avec deux cordons
secteur équipés de fiches IEC permettant le
branchement. L’un des cordons présente une
fiche à 3 broches type Royaume-Uni et l’autre est
équipé d’une fiche «Schuko» à 2 broches
permettant le branchement sur secteur.
Choisissez le cordon adapté à votre installation
électrique et jetez l’autre.
Si aucun cordon n’est adapté, prenez le cordon
équipé de la fiche type Royaume-Uni et
remplacez la fiche par une prise de rechange
adaptée. Il s’agit de couper la fiche moulée,
préparer le câble et le connecter à la fiche à
câbler, conformément aux instructions du
fabricant.
IMPORTANT: CETTE OPERATION NE DOIT
ETRE EFFECTUEE QUE PAR UN ELECTRICIEN
QUALIFIE
Remarque: consultez la plaque signalétique du
matériel pour vérifier que la fiche et les fusibles
sont adaptés à la tension et à la puissance
indiquées.
Les fils du câble secteur présentent les couleurs
suivantes:
PHASE = MARRON
NEUTRE = BLEU
TERRE = VERT/JAUNE
Branchez le cordon secteur adapté à l’appareil
AVANT de le brancher à l’alimentation sur
secteur.
S’il s’avère nécessaire de remplacer le cordon
secteur, utilisez un câble de 1mm
2
au code
harmonisé H05VV-F raccordé à une fiche IEC320.
NB: le cordon secteur type Royaume-Uni est
protégé par un fusible 10A monté sur le dessus
de la fiche.
EN CAS DE DOUTE, CONSULTEZ UN
ELECTRICIEN QUALIFIE
8
 Loading...