

Stuart CB160, CC162, CB161, CB162, SB160 Instructions For Use Manual
...
Version 1.2
Hotplates & Stirrers
Instructions for use
Manuel d’utilisation
Istruzioni per l’uso
Instrucciones de funcionamiento
Bedienungsanweisung
CB160 CB161 CB162 CC162
SB160 SB161 SB162 SC162

English
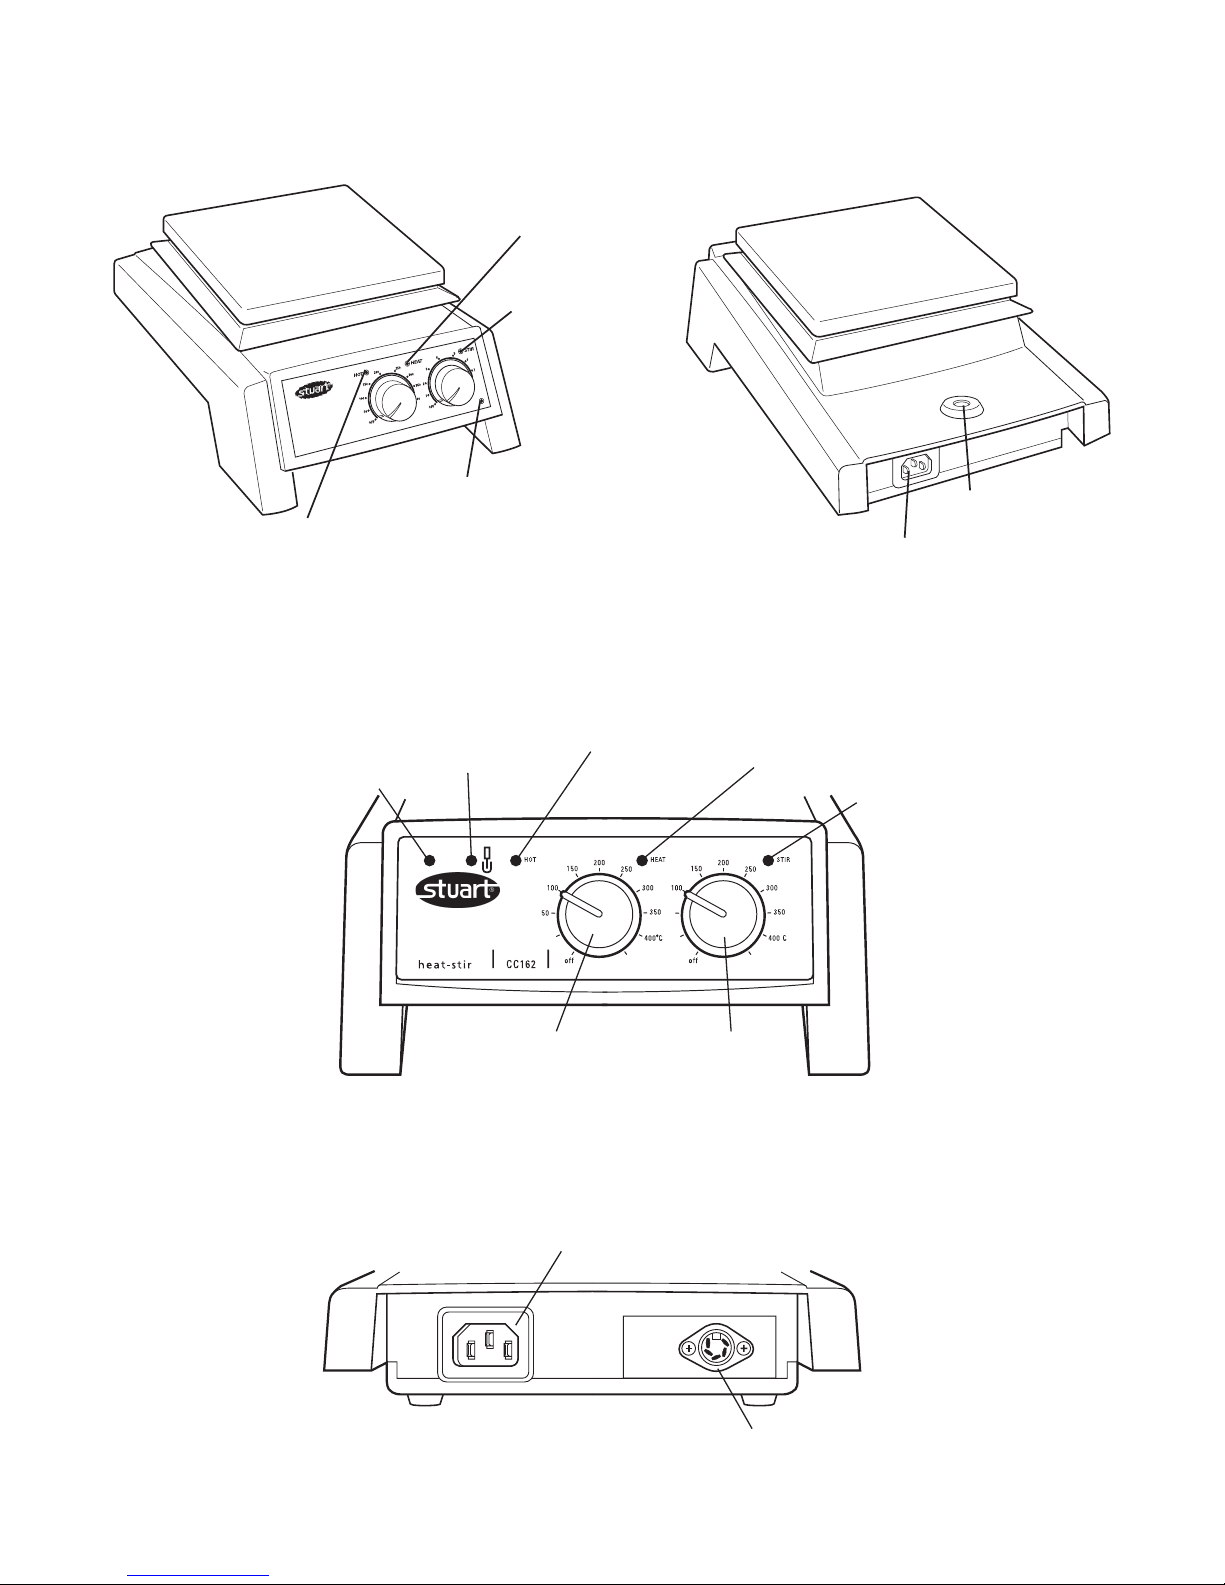
Figure
2 - Rear view
IEC socket
Retort rod fitting
Figure
1 - Front view
‘Hot’ warning light
Heater on light
Stirrer
on
light
Mains on light
Figure 3 - SC162 & CC162 front view
Figure 4 -
SC162 & CC162
rear view
Power LED
Control LED
‘Hot’ warning
light
DIN probe socket
IEC power socket
Heat on LED
Stir on LED
Stir control
Heat control

Thank you for purchasing this Bibby
Scientific product. To get the best
performance from the equipment, and for
your personal safety, please read these
instructions carefully before use.
Bibby Scientific hotplates and stirrers are designed
to operate under the following conditions:-
❖ For indoor use only
❖Use in a well ventilated area
❖Ambient temperature range +5°C to +40°C
❖Altitude to 2000m
❖Relative humidity not exceeding 80%
❖Mains supply fluctuations not exceeding 10%
of nominal
❖Overvoltage category II IEC60364-4-443
❖Pollution degree 2 IEC664
❖Use with a minimum distance all round of
200mm from walls or other items
If the equipment is not used in the manner
described in this manual the protection provided
by the equipment may be impaired.
Electrical Installation
THIS EQUIPMENT MUST BE EARTHED
Before connection please ensure that the
line supply corresponds to that stated on the
rating label.
Power requirements:
Model Wattage Model Wattage
CB160 500W SB160 700W
CB161 50W SB161 50W
CB162 550W SB162 750W
CC162 550W SC162 750W
There is an IEC socket at the rear of the
instrument for connection to the mains supply,
(see figure 2). The unit is supplied with two mains
leads fitted with IEC plugs for connection to the
instrument. One has a U.K. 3 pin plug and the
other has a 2 pin “Shuko” plug for connection to
the mains. Choose the lead appropriate for your
electrical installation and discard the other.
Should neither lead be suitable, take the lead
with the U.K. plug and replace the plug with a
1
suitable alternative. See the enclosed instruction
sheet for advice on how to carry out this
procedure.
Should the mains lead require replacement a
cable of 1mm
2
of harmonised code H05W-F
connected to an IEC 320 plug should be used.
IF IN DOUBT CONSULT A QUALIFIED
ELECTRICIAN
The mains lead should be connected to the
instrument BEFORE connection to the mains
supply.
NOTE that when connected to the mains supply a
green neon light on the front of the unit
illuminates, (see figure 1).
Operation
Heating
CB160, CB162, SB160, SB162
The control knob labelled “Heat” on the front
panel controls the heat output and hence the
plate temperature. It is graduated with an
approximate temperature scale. This scale refers
to the temperature of the top plate and not to
the temperature of the contents of the vessel
being heated, When the heat is switched on an
amber pilot light illuminates, (see figure 1).
When the surface becomes too hot to touch a
red warning light on the front panel will begin to
flash, (see figure 1). This will continue to flash
while the plate temperature is above 50°C so
long as the unit remains connected to the
electricity supply.
WARNING: The top surface of the instrument
may be HOT In free air a surface temperature of
450°C can be achieved on the ceramic top
models and 325°C on the metal top models. Do
not leave heaters switched on when not in use.
Stirring
CB161, CB162, SB161, SB162
The control knob labelled “Stir” on the front
panel controls the stirrer speed. When switched
on an amber pilot light illuminates, (see figure 1).
The knob is graduated with an arbitrary 1-9 scale.
Turning the knob to a higher number increases
the stirrer speed.

2
SC162 & CC162
The SC162 metal top and CC162 ceramic top
hotplates are designed for use with the Stuart
SCT1 temperature controller. The SCT1
temperature controller allows accurate
temperature control of aqueous and oil based
samples in the laboratory and can be used in two
different modes, as a precise temperature
controller from 20 to 200°C or as a digital
thermometer from -4 to 325°C.
Connection of the SCT1 temperature controller
probe is via the DIN probe socket located at the
rear of the hotplate (figure 4). The analogue heat
control is disabled, allowing precise setting of
temperature via the SCT1 temperature controller.
The illuminated control LED indicates
communication between the SCT1 temperature
controller and hotplate (figure 3). For full
instructions on use please refer to the SCT1
temperature controller manual.
When the SC162 or CC162 are not in use with
the SCT1 temperature controller, the hotplate
heating and stirring functions operate as the
CB160, CB162, SB160 and SB162. In this case
the control LED remains inactive and the DIN
probe socket is not utilised.
Safety Advice
❖Do not use the instrument to heat inflammable
liquids
❖Never lift or carry the instrument until it has
been switched off and allowed to cool for at
least 30 minutes. The hot warning light will
give guidance.
❖The unit should be carried using both hands
with the fingers under the side edges.
❖Never move or carry the unit with containers
on the top plate or while still connected to the
mains supply.
❖There is a danger of liquid spillage if containers
are over-filled and stirred at high speed. Always
build stirrer speed slowly and never stir more
rapidly than necessary.
❖NEVER place a cold glass vessel onto a hotplate
which is already hot.
Cleaning and Care
Before attempting cleaning:-
Ensure that the top is cool, disconnect from the
mains electricity supply.
The metal casing should be cleaned using a damp
cloth and a mild detergent solution.
Ceramic top units:
A damp cloth will normally remove most types of
contamination. For more difficult stains a
domestic cream cleanser is recommended.
Cleaning is made easier if spillages are attended
to promptly. In any case, spillages of alkali,
phosphoric acid and hydrofluoric acid MUST be
removed immediately as these chemicals can
attack and damage the glass ceramic. Ensure that
the appropriate safety precautions are observed.
During cleaning and general operation take care
not to scratch the surface of the top plate as this
could result in subsequent thermal breakage.
WARNING: A ceramic top which is scratched,
chipped, chemically etched or damaged must not
be used.
Metal top units:
The metal top plate should be cleaned using a
damp cloth and a mild detergent solution.
Cleaning is made easier if spillages are attended
to promptly. In any case, spillages of acids and
alkalis MUST be removed immediately as these
chemicals can attack and damage the the surface
of the aluminium alloy. Ensure that the
appropriate safety precautions are observed.
Preparation of Media
Take particular care when heating liquids having
a high viscosity. Viscous liquids can act as thermal
insulators and can cause thermal breakage of the
glassware. This is very important with media
solutions as the viscosity will usually increase as
the temperature rises.
❖Check that the stirring action is sufficient to
agitate the whole of the liquid. Unstirred areas
in the liquid can result in uneven heat transfer
and “hot spots” in the glassware. This can
induce thermal stress and so cause failure.
❖Check the stirring action regularly to ensure
that it remains adequate as the viscosity of the
solution increases.

3
❖Always use the largest magnetic follower
possible and, if necessary, use a mechanical
overhead stirrer.
❖Do not use glass vessels with thick walls, e.g.
Pyrex Heavy Duty Ware or standard beakers
and flasks having capacities of 5 litres or
greater.
❖NEVER heat glass bottles on a hotplate.
❖Ensure that the heat is built up slowly to avoid
localised overheating.
❖Ensure the glassware is completely free from
scratches or other defects.
❖Place the hotplate in a tray large enough to
contain the liquid in the event of glassware
failure.
❖Wear the appropriate safety clothing - e.g.
gloves, goggles, protective apron etc.
Accessory
A rod is available to support apparatus used with
the instrument. The instrument is equipped with
a fitting on the rear to accept the support rod catalogue number SR1, (see figure 2). To fit the
rod to your instrument, first isolate from the
mains supply and allow to cool. Then simply
screw the threaded end of the support rod into
the fitting on the rear of the instrument.
Servicing and Repair
This product range does not require any routine
servicing.
Note: There are no internal user replaceable
parts.
In the event of product failure it is recommended
that any repair is only undertaken by suitably
qualified personnel. For advice or to receive a
service manual please contact the Service
Department of Bibby Scientific Ltd.
Only spare parts supplied by Bibby Scientific or its
agent should be used. Fitting of non-approved
parts may affect the performance of the safety
features of the instrument.
Note: The magnetic stirrer drive utilises
strong magnets.
If in doubt, please contact the Service
Department of Bibby Scientific Ltd.
Stone, Staffordshire ST15 0SA
United Kingdom
Tel: +44 (0)1785 812121
Fax: +44 (0)1785 813748
e-mail info@bibby-scientific.com
www.bibby-scientific.com
Spares
The following spare parts are available from your
laboratory supplier. For a comprehensive parts list
please contact the Service Department of Bibby
Scientific Ltd quoting model and serial number.
Description Cat. No.
Control knob SB160/CK
Rubber feet, set of 4 SB160/RF
Retort rod, SR1
Warranty
Bibby Scientific Ltd warrants this instrument to be
free from defects in material and workmanship,
when used under normal laboratory conditions,
for a period of three (3) years. In the event of a
justified claim Bibby Scientific Ltd will replace any
defective component free of charge.
This warranty does NOT apply if,
1. A ceramic top has broken due to mechanical
impact, scratching, chipping or chemical
etching.
2. Any repair has been made or attempted other
than by Bibby Scientific or its agent.
4
Français
Figure
2 - Vue arriere
Enbase CEE
Fixation statif
Figure
1 - Vue de face
Voyant ‘Hot”
Voyant de chauffage
Voyant
d’agitation
Voyant nise sous tension
Figure 3 -
SC162 et CC162
- vue de face
Figure 4 -
SC162 et CC162
- vue de arrière
DEL secteur
DEL de contrôle
Voyant d’alerte
‘chaud’
Prise de sonde DIN
Prise d’alimentation IEC
DEL de chauffage
DEL d’agitation
Commande
d’agitation
Commande
de cauffage

5
Merci d’acheter ce produit de Bibby
Scientific. Pour obtenir le bon
fonctionnement de l’équipement, et pour
votre sécurité, lire avec attention les
instructions ci-dessous avant l’utilisation.
Les plaques chauffantes et les agitateurs Bibby
Scientific sont conçus pour fonctionner dans les
conditions suivantes : -
❖ Pour l’usage en intérieur seulement
❖ Utilisation dans une pièce bien aérée
❖ Température ambiante +5°C à +40°C
❖ Altitude inférieure à 2000m
❖ Humidité relative n’excédant pas 80%
❖ Fluctuations de l’alimentation électrique
n’excédant pas 10% de la valeur nominale
❖ Catégorie II IEC60364-4-443 de surtension
❖ Degré 2 IEC664 de pollution
❖ Utilisation à une distance minimum de 200mm
autour des murs ou d’autres appareils
Si l’équipement n’est pas utilisé de la façon
décrite dans ce manuel les différentes fonctions
de l’appareil peuvent être altérées.
Installation Électrique
CET ÉQUIPEMENT DOIT TRE MIS À LA
TERRE
Avant le raccordement, s’assurer que
l’alimentation électrique convient. Les plaques
chauffantes et agitateurs Bibby Scientific
nécessitent une tension secteur de 230V, 50Hz,
monophasé.
Alimentation électrique:
Modèle Puissance Modèle Puissance
CB160 500W SB160 700W
CB161 50W SB161 50W
CB162 550W SB162 750W
CC162 550W SC162 750W
Une embase CEE est située à l’arrière de
l’instrument pour le raccordement à
l’alimentation électrique, (voir le schéma 2).
L’appareil est fourni avec deux câbles équipés de
prise CEE pour le raccordement à l’instrument.
Un avec une prise anglaise et un autre avec une
prise de “Shuko” 2P+T pour le raccordement au
secteur. Choisir le câble approprié pour votre
installation électrique et jeter l’autre.
Si ni l’un ni l’autre ne conviennent, prendre celui
avec la prise anglaise et remplacer la prise par
celle appropriée. Voir la feuille d’instruction
incluse pour le montage de cette nouvelle prise.
Si le câble exige un remplacement, un câble de
1mm
2
à la norme H05W-F relié à une prise CEE
320 doit être employé.
EN CAS DE DOUTE CONSULTER UN
ÉLECTRICIEN QUALIFIÉ
Le câble d’alimentation électrique doit être relié à
l’instrument avant le raccordement au secteur.
Une fois connecté, une lampe néon verte sur
l’avant de l’appareil s’illumine, (voir le schéma 1).
Fonctionnement
Chauffage
Modèles CB160, CB162, SB160, SB162
Le bouton de commande marqué “HEAT” sur la
face avant de l’appareil commande le chauffage.
Il est gradué en température de façon
approximative. Cette indication se rapporte à la
température de surface et non du liquide chauffé.
Lorsque le chauffage est en cour, une lampe
témoin ambre s’illumine, (voir le schéma 1).
Quand la surface devient trop chaude au toucher,
un voyant d’alarme rouge en façade clignote,
(voir le schéma 1). Ceci continuera à clignoter
tant que la température de surface est au-dessus
de 50°C et que l’appareil est relié à son
alimentation électrique.
AVERTISSEMENT: La surface de l’instrument peut
être CHAUDE. Une température de surface de
450°C peut être atteinte sur les modèles en
céramique et de 325°C sur les modèles en métal.
Ne pas laisser les appareils chauffer inutilement
lorsqu’ils ne sont pas utilisés.

6
Agitation
Modèles CB161, CB162, SB161, SB162
Le bouton de commande marqué “Stir” sur la
face avant de l’appareil commande la vitesse
d’agitation. Lors du fonctionnement, une lampe
témoin ambre s’illumine, (voir le schéma 1).
Le bouton est gradué arbitrairement de 1 à 9. La
rotation du bouton vers un nombre plus élevé
augmente la vitesse d’agitation.
SC162 et CC162
Les plaques chauffantes métalliques SC162 et
céramiques CC162 sont conçues pour être
utilisées avec le contrôleur de température SCT1.
Le contrôleur de température SCT1 permet de
réguler avec précision la température des
échantillons en phase aqueuse et huileuse en
laboratoire, et peut être utilisé dans deux modes
différents, comme un régulateur précis de la
température, de 20 à 200°C, ou comme un
thermomètre numérique, de -4 à 325°C.
La sonde du contrôleur de température SCT1 se
connecte au moyen de la prise DIN pour sonde
située à l’arrière de la plaque chauffante (figure
4). La commande analogique de chauffage est
désactivée, ce qui permet de régler précisément
la température par l’intermédiaire du contrôleur
de température SCT1. La DEL de contrôle
allumée signale la communication entre le
contrôleur de température SCT1 et la plaque
chauffante (figure 3). Pour le mode d’emploi
complet, consulter le manuel du contrôleur de
température SCT1.
Si SC162 ou CC162 ne sont pas utilisés avec le
contrôleur de température SCT1, les fonctions de
chauffage et d’agitation de la plaque chauffante
fonctionnent comme sur les modèles CB160,
CB162, SB160 et SB162. Dans ce cas, la DEL de
contrôle reste inactive et la prise DIN pour sonde
n’est pas utilisée.
Conseils de Sécurité
❖ Ne pas utiliser l’instrument pour chauffer des
liquides inflammables
❖ Ne jamais soulever ou porter l’instrument s’il
n’a pas été éteint et / ou laisser refroidir
pendant au moins 30 minutes. Le voyant
d’alarme “chaud” est là pour vous en informer.
❖ L’unité doit être déplacée en utilisant les deux
mains sous les bords latéraux.
❖ Ne jamais déplacer ou porter l’appareil avec
des récipients posés dessus ou s’il est encore
relié à son alimentation secteur.
❖ Il y a un risque de débordement du liquide si
les récipients sont trop remplis et / ou agités à
une vitesse excessive. Toujours régler la vitesse
d’agitation progressivement.
❖ Ne jamais placer un contenant en verre froid
sur une plaque chauffante chaude.
Nettoyage
Avant de procéder au nettoyage, s’assurer que la
surface est froide. Déconnecter l’appareil de son
alimentation électrique.
La surface métallique doit être nettoyée en
utilisant un tissu humide et une solution
détergente douce.
Surface en céramique:
Un chiffon humide enlèvera normalement la
plupart des types de contamination. Pour des
taches plus difficiles, une crème de récurage
domestique est recommandée. Le nettoyage est
facilité s’il est fait rapidement après salissures. Les
éclaboussures de substances alcalines, d’acide
phosphorique ou d’acide fluorhydrique DOIVENT
être éliminées immédiatement avant que ces
produits chimiques n’attaquent et endommagent
la céramique. S’assurer que l’on respecte les
mesures de sécurité appropriées.
Pendant le nettoyage et l’entretien général, ne
pas rayer la surface ceci pouvant avoir comme
conséquence une rupture thermique lors de
l’utilisation suivante.
AVERTISSEMENT: Un dessus en céramique qui est
rayé, ébréché, ou chimiquement attaqué ne doit
pas être utilisé.
Surface métallique:
La surface en métal doit être nettoyée en utilisant
un tissu humide et une solution détergente
douce.
Le nettoyage est facilité s’il est fait rapidement
après salissures. Les éclaboussures de substances
alcalines, d’acide phosphorique ou d’acide
fluorhydrique DOIVENT être éliminées
immédiatement avant que ces produits chimiques
n’attaquent et endommagent la partie
métallique. S’assurer que l’on respecte les
mesures de sécurité appropriées.
 Loading...