

Page 1
Michael Graves with Stryker
Patient Chairs and Ottoman
Michael Graves en collaboration avec Stryker
Pour les fauteuils de patient et repose-pieds
4850
4851
4852
4853
4854
4855
4856
4857
Operations/Maintenance Manual
Manuel d’utilisation et d’entretien
2015/09 G.1 4850-009-001 REV G www.stryker.com
Page 2

Page 3

Table of Contents
Symbols and Definitions ...................................................................1-2
Symbols ...........................................................................1-2
Warning/Caution/Note Definition ..........................................................1-2
Introduction ............................................................................1-3
Intended Use ........................................................................1-3
Product Description ...................................................................1-3
Specifications .......................................................................1-4
Contact Information ...................................................................1- 5
Serial Number Location ................................................................1-5
Product Illustration....................................................................1- 6
Summary of Safety Precautions .............................................................1-7
Operation Guide.........................................................................1- 9
Stowing the Ottoman ..................................................................1-9
Preventative Maintenance .................................................................1-10
Checklist ..........................................................................1-10
Cleaning..............................................................................1-11
Fabric Cleaning and Maintenance .......................................................1-1 1
Frame and Arm Cleaning ..............................................................1-14
Quick Reference Replacement Parts List .....................................................1-15
Service Information......................................................................1-16
Leg Glide Replacement (All Models)......................................................1-16
Chair Back Replacement (For Models 4850, 4851, 4852, 4853, and 4854)..........................1-17
Chair Back Replacement (For Models 4855 and 4856) ........................................1-18
Seat Cushion Replacement (All Models)...................................................1-19
Model 4850 - Patient Chair, Lowback, Armless .................................................1-20
Model 4851 - Patient Chair, Lowback, Low Seat ................................................1-21
Model 4852 - Patient Chair, Lowback 22”, High Seat .............................................1-2 2
Model 4853 - Patient Chair, Highback, Low Seat ................................................1-2 3
Model 4854 - Patient Chair, Highback 22”, High Seat.............................................1-2 4
Model 4855 - Patient Chair, Comfort-Flex, Low Seat .............................................1-2 5
Model 4856 - Patient Chair, Comfort-Flex 22”, High Seat ..........................................1-2 7
Model 4857 - Ottoman . . . . . . . . . . . . . . . . . . . . . . . . . . . . . . . . . . . . . . . . . . . . . . . . . . . . . . . . . . . . . . . . . . .1-29
Warranty .............................................................................1-30
Limited Lifetime Warranty ..............................................................1-3 0
To Obtain Parts and Service ...........................................................1-30
Return Authorization..................................................................1-30
Damaged Merchandise ...............................................................1-3 0
International Warranty Clause...........................................................1-3 0
English
www.stryker.com 485 0-0 09 -001 RE V G 1-1
Page 4
Symbols and Definitions
English
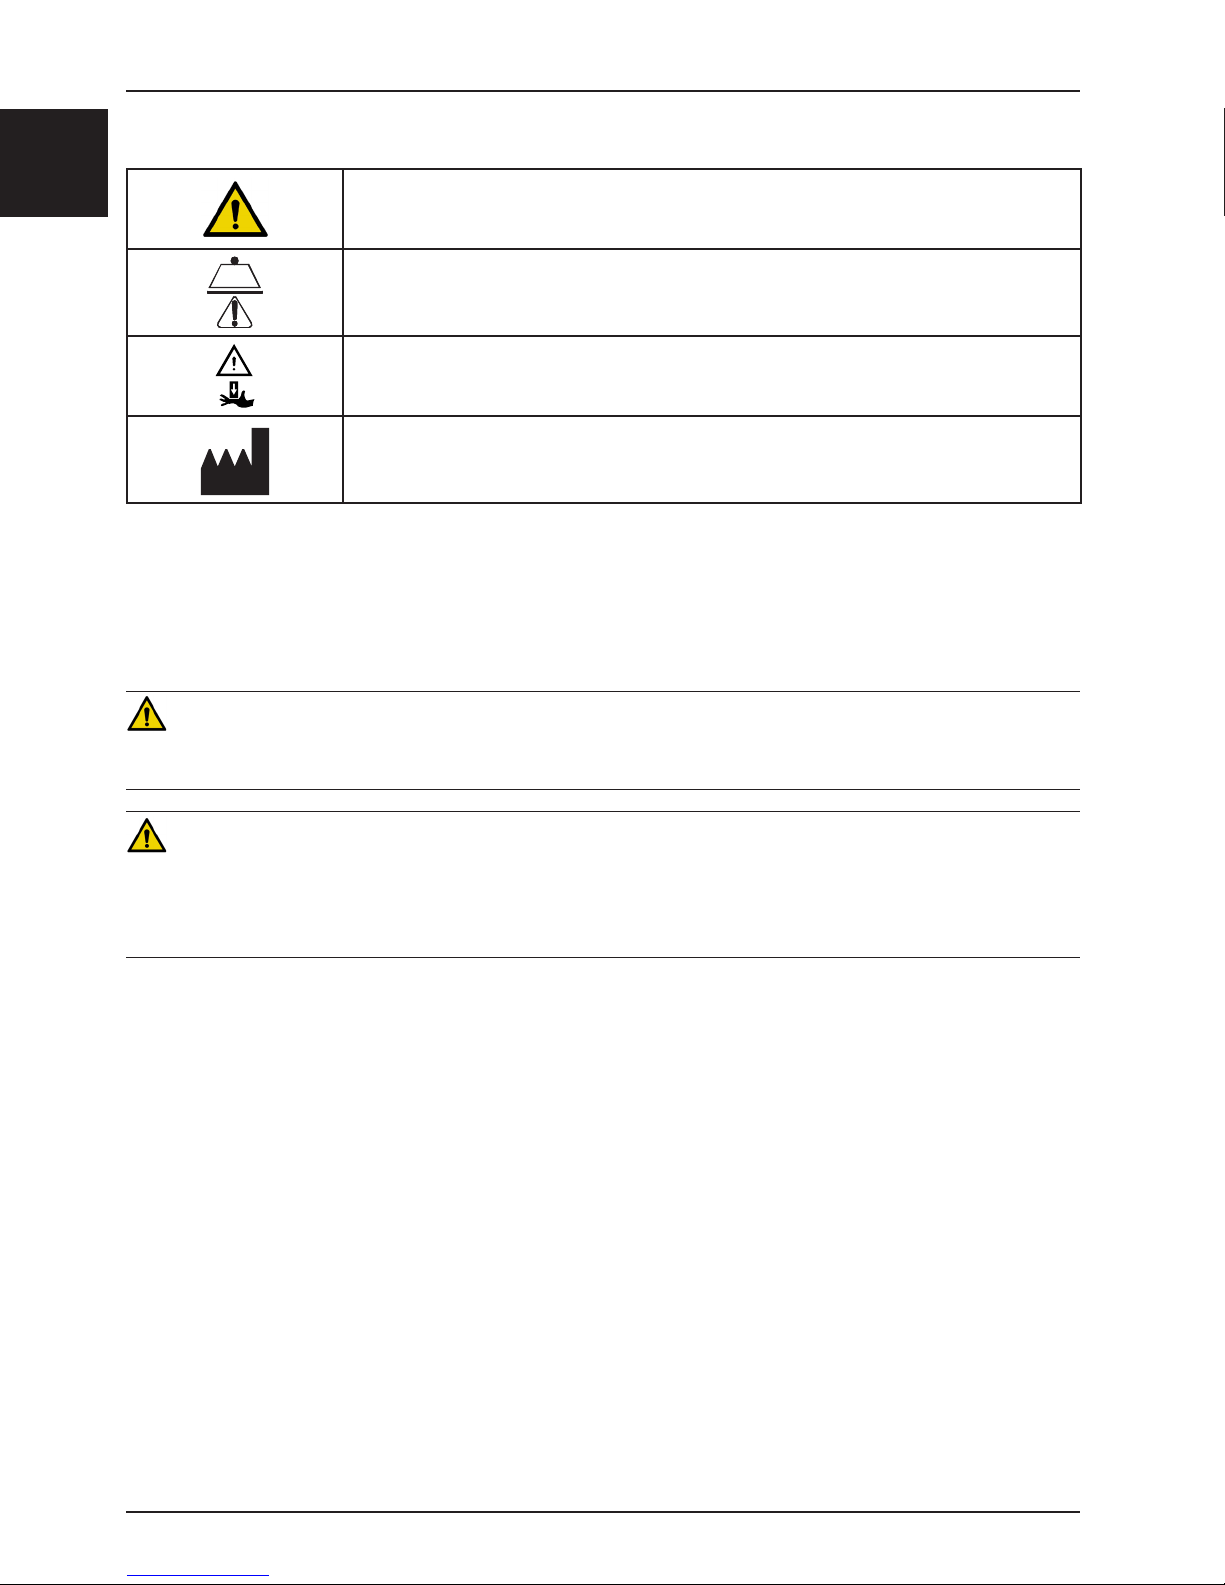
SYMBOLS
Warning/Caution: Consult accompanying documentation
Safe Working Load
Pinch Point
Manufacturer
WARNING/CAUTION/NOTE DEFINITION
The words WARNING, CAUTION and NOTE carry special meanings and should be carefully reviewed.
WARNING
Alerts the reader about a situation which, if not avoided, could result in death or serious injury. It may also describe
potential serious adverse reactions and safety hazards.
CAUTION
Alerts the reader of a potentially hazardous situation which, if not avoided, may result in minor or moderate injury to the
user or patient or damage to the equipment or other property. This includes special care necessary for the safe and
effective use of the device and the care necessary to avoid damage to a device that may occur as a result of use or
misuse.
NOTE
Provides special information to make maintenance easier or important instructions clearer.
Return To Table of Contents
1-2 485 0-0 09 -001 RE V G www.stryker.com
Page 5

Introduction
This manual is designed to assist you with the operation of Michael Graves with Stryker Patient Chairs and Ottoman.
Read this manual thoroughly before using the equipment or beginning maintenance on it. To ensure safe operation of
this equipment, it is recommended that methods and procedures be established for educating and training staff on the
safe operation of this unit.
INTENDED USE
The Michael Graves with Stryker Patient Chairs and Ottoman are intended for pediatric and adult person guest and
patient seating use in an indoor medical setting. These products are not intended for infant use or the placement of
infant carriers.
The product line consists of chairs without wheels and not electrically powered which, by reason of special shape arms,
assist in the ingress or egress of patients, or patients undergoing treatment or examination:
• Model 4851 – Michael Graves with Stryker Lowback Patient Chair
• Model 4852 – Michael Graves with Stryker Lowback 22” Seat Height Patient Chair
• Model 4853 – Michael Graves with Stryker Highback Patient Chair
• Model 4854 – Michael Graves with Stryker Highback 22” Seat Height Patient Chair
• Model 4855 – Michael Graves with Stryker Comfort-Flex Patient Chair
• Model 4856 – Michael Graves with Stryker Comfort-Flex 22” Seat Height Patient Chair
In addition, the product line consists of a chair without arms, without wheels and not electrically powered:
• Model 4850 – Michael Graves with Stryker Armless Patient Chair
Furthermore, the product line consists of an ottoman for foot rest and auxiliary seating use without wheels and not
electronically powered and stowable under aforementioned chair models:
• Model 4857 – Michael Graves with Stryker Ottoman
English
Expected use of the units would have the patient seated on the provided cushioning of the chair, not sitting on the
arms, not leaning on arms or chair back while in a standing position, and not standing on the chair seat or ottoman.
For Comfort-Flex (models 4855 and 4856), patients with restriction of fore/aft rocking should not be placed in this unit.
Under typical use, the Michael Graves with Stryker Patient Chairs and Ottoman have an expected life of 10 years and
weight capacity of 300 lb (136 kg). One use is defined as an ingress and egress event. Typical use is defined as two
uses per day.
PRODUCT DESCRIPTION
The Michael Graves with Stryker Patient Chairs are designed to aid in nose-over-toes positioning. The noteworthy
aesthetics of this new patient chair pave the way for superior functionality. The chair is available armless or with arms
offering two seat heights with lowback, highback, or Comfort-Flex configurations. An ottoman is also available for foot
rest and additional seating.
www.stryker.com 485 0-0 09 -001 RE V G 1-3
Return To Table of Contents
Page 6
English
Introduction
SPECIFICATIONS
Note: All dimensions are rounded to the nearest .5 in.
4850
Armless
Safe Working Load 300 lb (136 kg) 300 lb (136 kg) 300 lb (136 kg) 300 lb (136 kg)
Overall Width 22 in (56 cm) 26.5 in (67 cm) 26.5 in (67 cm) 26.5 in (67 cm)
Overall Height 35 in (89 cm) 35 in (89 cm) 39.5 in (100 cm) 43 in (109 cm)
Overall Depth 28 in (71 cm) 30.5 in (77.5 cm) 30.5 in (77.5 cm) 31.5 in (80 cm)
Seat Height from Floor 19 in (48 cm) 19 in (48 cm) 23.5 in (60 cm) 19 in (48 cm)
Seat Depth 20 in (51 cm) 20 in (51 cm) 20 in (51 cm) 20 in (51 cm)
Back Height from Seat 17 in (43 cm) 17 in (43 cm) 17 in (43 cm) 25.5 in (65 cm)
Arm Height from Floor
(at mid point seat depth)
Not applicable 26 in (66 cm) 30 in (76 cm) 26 in (66 cm)
4854
Highback 22”
Safe Working Load 300 lb (136 kg) 300 lb (136 kg) 300 lb (136 kg) 300 lb (136 kg)
4851
Lowback
4855
Comfort-Flex
4852
Lowback 22”
4856
Comfort-Flex 22”
4853
Highback
4857
Ottoman
Overall Width 26.5 in (67 cm) 26.5 in (67 cm) 26.5 in (67 cm) 18.5 in (47 cm)
Overall Height 47 in (119.5 cm) 43 in (109 cm) 47 in (119.5 cm) 13 in (33 cm)
Overall Depth 31.5 in (80 cm) 31.5 in (80 cm) 31.5 in (80 cm) 17.5 in (44.5 cm)
Seat Height from Floor 23.5 in (60 cm) 19 in (48 cm) 23.5 in (60 cm) Not applicable
Seat Depth 20 in (51 cm) 20 in (51 cm) 20 in (51 cm) Not applicable
Back Height from Seat 25.5 in (65 cm) 25 in (63.5 cm) 25 in (63.5 cm) Not applicable
Arm Height from Floor
(at mid point seat depth)
Stryker reserves the right to change specifications without notice.
30 in (76 cm) 26 in (66 cm) 30 in (76 cm) Not applicable
Return To Table of Contents
1-4 485 0-0 09 -001 RE V G www.stryker.com
Page 7
Introduction
CONTACT INFORMATION
Contact Stryker Customer Service or Technical Support at (800) 327-0770.
Stryker Medical
3800 E. Centre Avenue
Portage, MI 49002
USA
Please have the serial number of your Stryker product available when
calling Stryker Customer Service or Technical Support. Include the
serial number in all written communication.
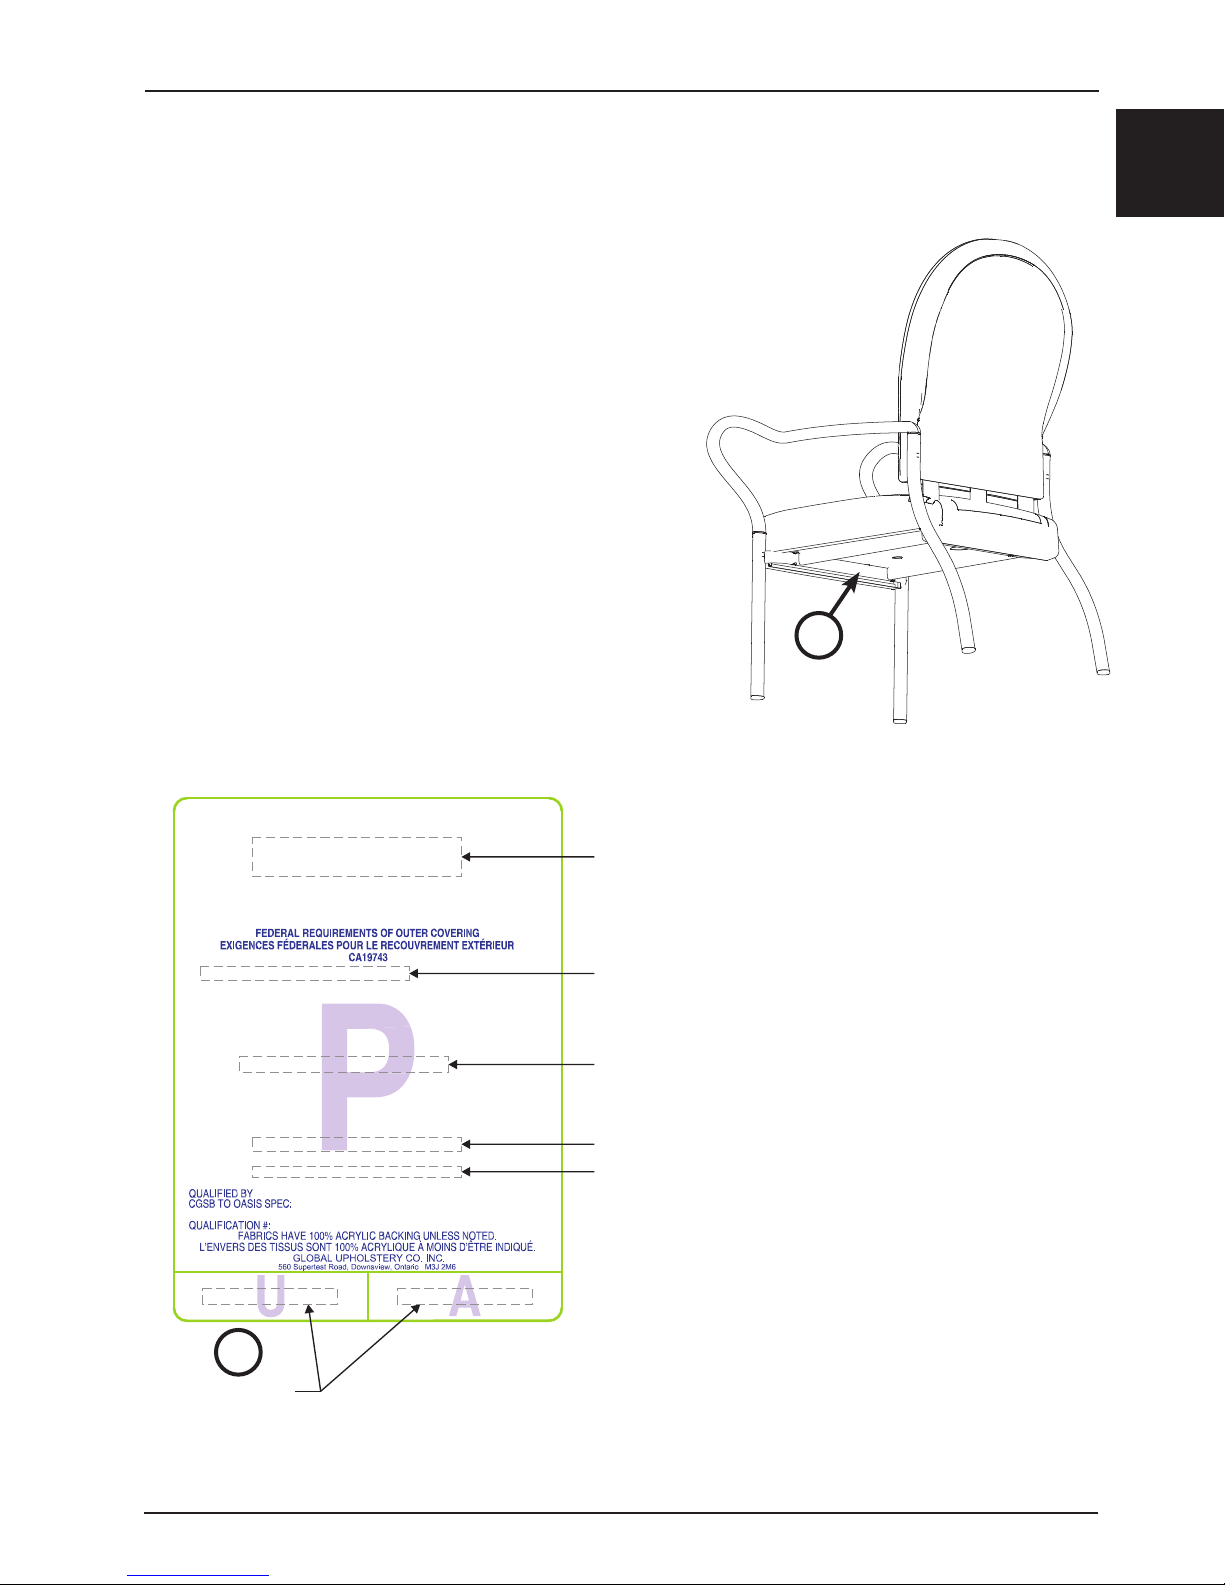
SERIAL NUMBER LOCATION
The serial number (A) for your chair is located on the back of the
frame bar under the chair seat (Figure 1) on the content label (Figure
2).
English
A
SERIAL NUMBER
FABRIC INFO
STRYKER SKU
DATE
CARB INFO
Figure 1: Serial Number Location
A
SERIAL NUMBER
Figure 2: Content Label - Located on Bottom of Seat Cushion
www.stryker.com 485 0-0 09 -001 RE V G 1-5
Return To Table of Contents
Page 8
Introduction
English
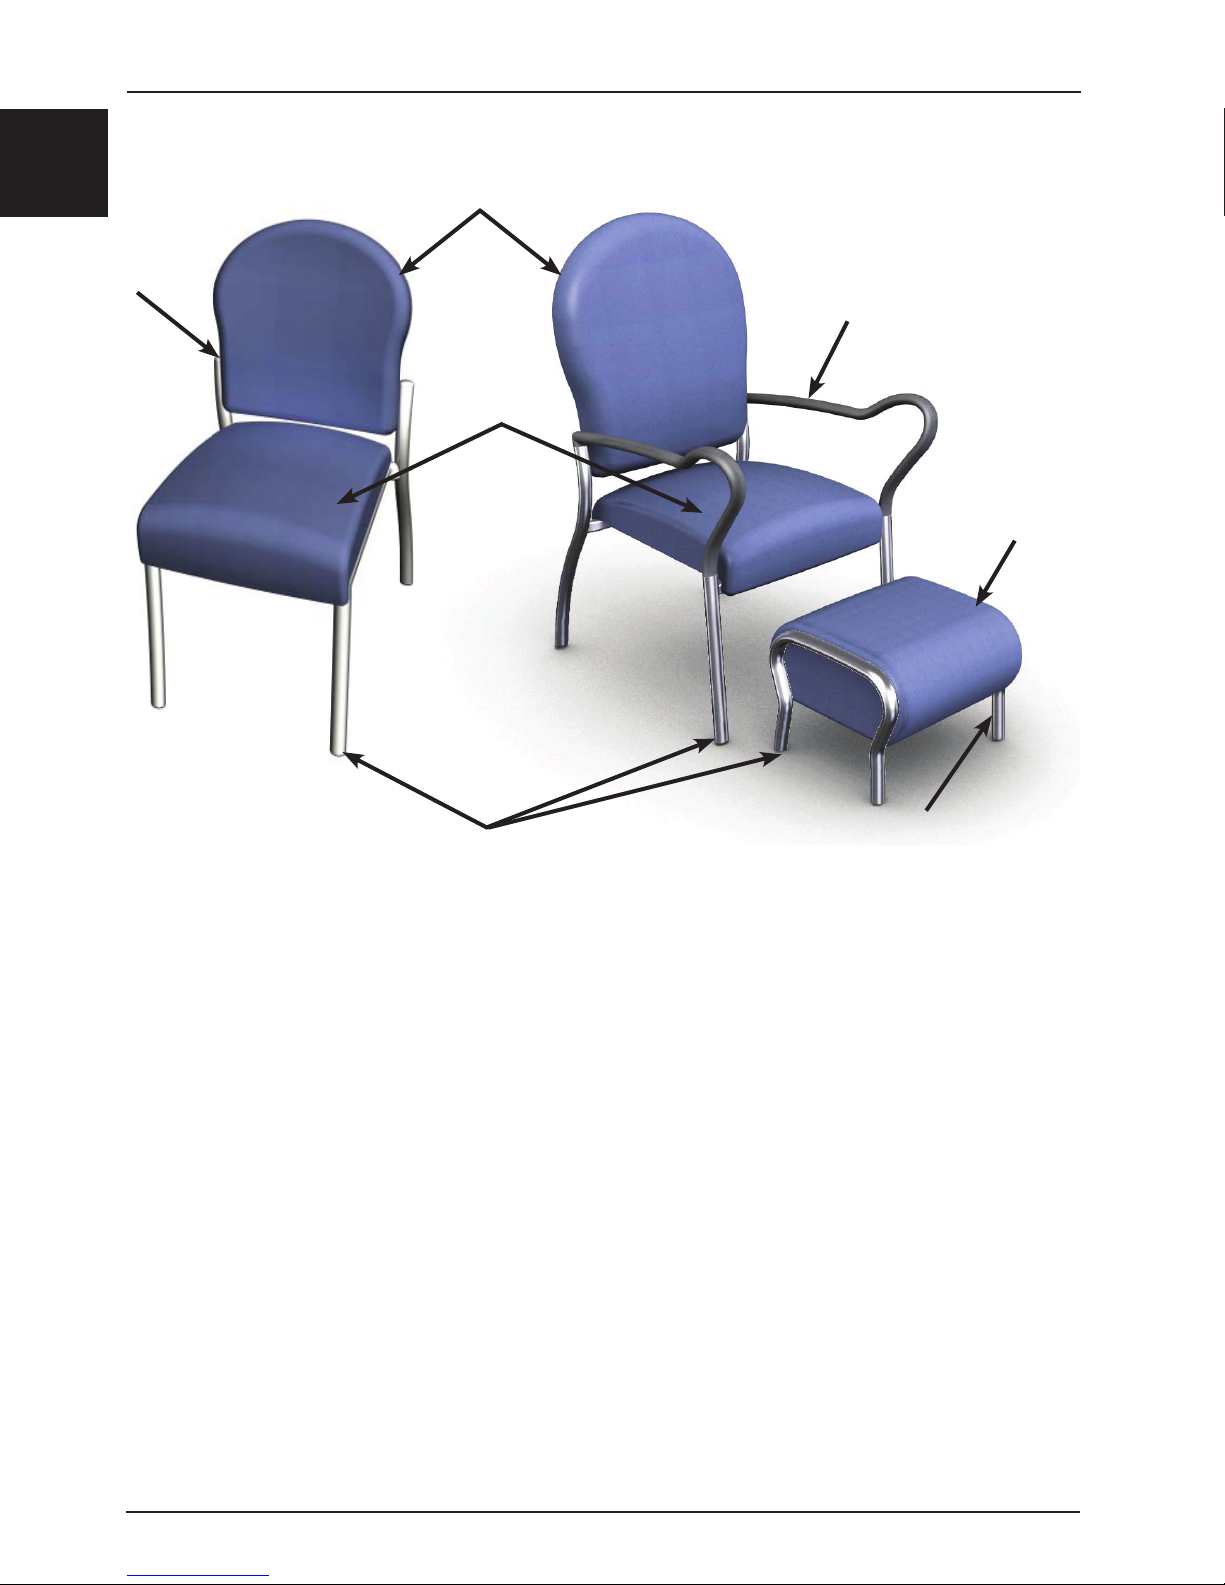
PRODUCT ILLUSTRATION
Chair Back
Plastic Cap
Chair Arm
Chair Seat
Ottoman Seat
Glides
Figure 3: Product Illustration
Ottoman Leg
Return To Table of Contents
1-6 485 0-0 09 -001 RE V G www.stryker.com
Page 9

Summary of Safety Precautions
WARNING
• To avoid the risk of serious injury or product damage, do not stand on chair seat or ottoman.
• To avoid the risk of serious injury or product damage, do not sit on chair arms.
• To avoid the risk of serious injury or product damage, while standing behind the chair, do not lean on chair backrest
or chair arms.
• To avoid the risk of serious injury or product damage, keep all four chair legs on the ground when seated.
• To avoid the risk of serious injury or product damage, do not lay infants or infant carriers in the chair or on the
ottoman.
• To avoid the risk of serious injury, for Comfort-Flex chairs only, do not place patients with restriction of fore/aft
rocking in this unit.
• If punctures or tears are present in the chair arms, upholstered chair seat frame assembly, upholstered chair back,
upholstered chair back panel, or upholstered ottoman assembly, replace the assembly or component as this could
lead to biocontamination.
• For armless chairs, do not use if plastic caps are missing as this could lead to biocontamination.
• Stow the ottoman under the chair when not in use to avoid a tripping hazard.
• Failure to properly clean a contaminated surface will increase the risk of exposure to bloodborne pathogens.
CAUTION
• To avoid the risk of ottoman upholstery damage, with Comfort-Flex chairs only, do not force the ottoman back into
the chair frame components.
• To avoid the risk of product or floor damage, do not use chairs and/or ottoman if all glides are not present.
• Use a soft, white cloth to clean stained or soiled areas. Avoid use of paper towels.
• Cleaning products may be harmful to your skin and/or eyes. Use protective gloves and eye protection. Protect the
surrounding area and clothing from exposure to cleaners. Do not inhale or swallow any cleaning agents. Follow
all cleaning product manufacturer’s warnings.
• The use of certain agents can be harmful to the surface appearance and lifespan of fabrics. Check compatibility
of any cleaning product with other surfaces on the furniture, such as painted surfaces or varnish.
• Clean all stains immediately as some stains may become permanent if not removed quickly.
• This information is not a guarantee and does not relieve the user from the responsibility of the proper and safe use
of these fabrics and all cleaning agents.
• To avoid the risk of equipment damage to the new back panel, make sure that each push rivet is aligned with each
T-nut prior to installation.
• When cleaning vinyl fabrics, the use of conditioners or protectants is not recommended and should be avoided.
• The use of quaternary cleaners that contain diethylene glycol butyl ether or alcohol to the underside surfaces of
the chair and ottoman may result in compromised legibility of the pre-printed labels. Should this occur, see “Product
LabelsProduct Labels” on page 1-11 for the original label text.
English
www.stryker.com 485 0-0 09 -001 RE V G 1-7
Return To Table of Contents
Page 10
Summary of Safety Precautions
English
CAUTION (CONTINUED)
• A preventative maintenance program should be established for all equipment. Preventative maintenance may need
to be performed more frequently based on the usage level of the product. For additional maintenance information,
see the “Checklist” on page 1-10.
• Improper maintenance can cause injury or damage to the product. Maintain the unit as described in this manual.
Use only Stryker approved parts and maintenance procedures. Using unapproved parts and procedures could
cause unpredictable operation and/or injury and will void the product warranty (see “Warranty” on page 1-30).
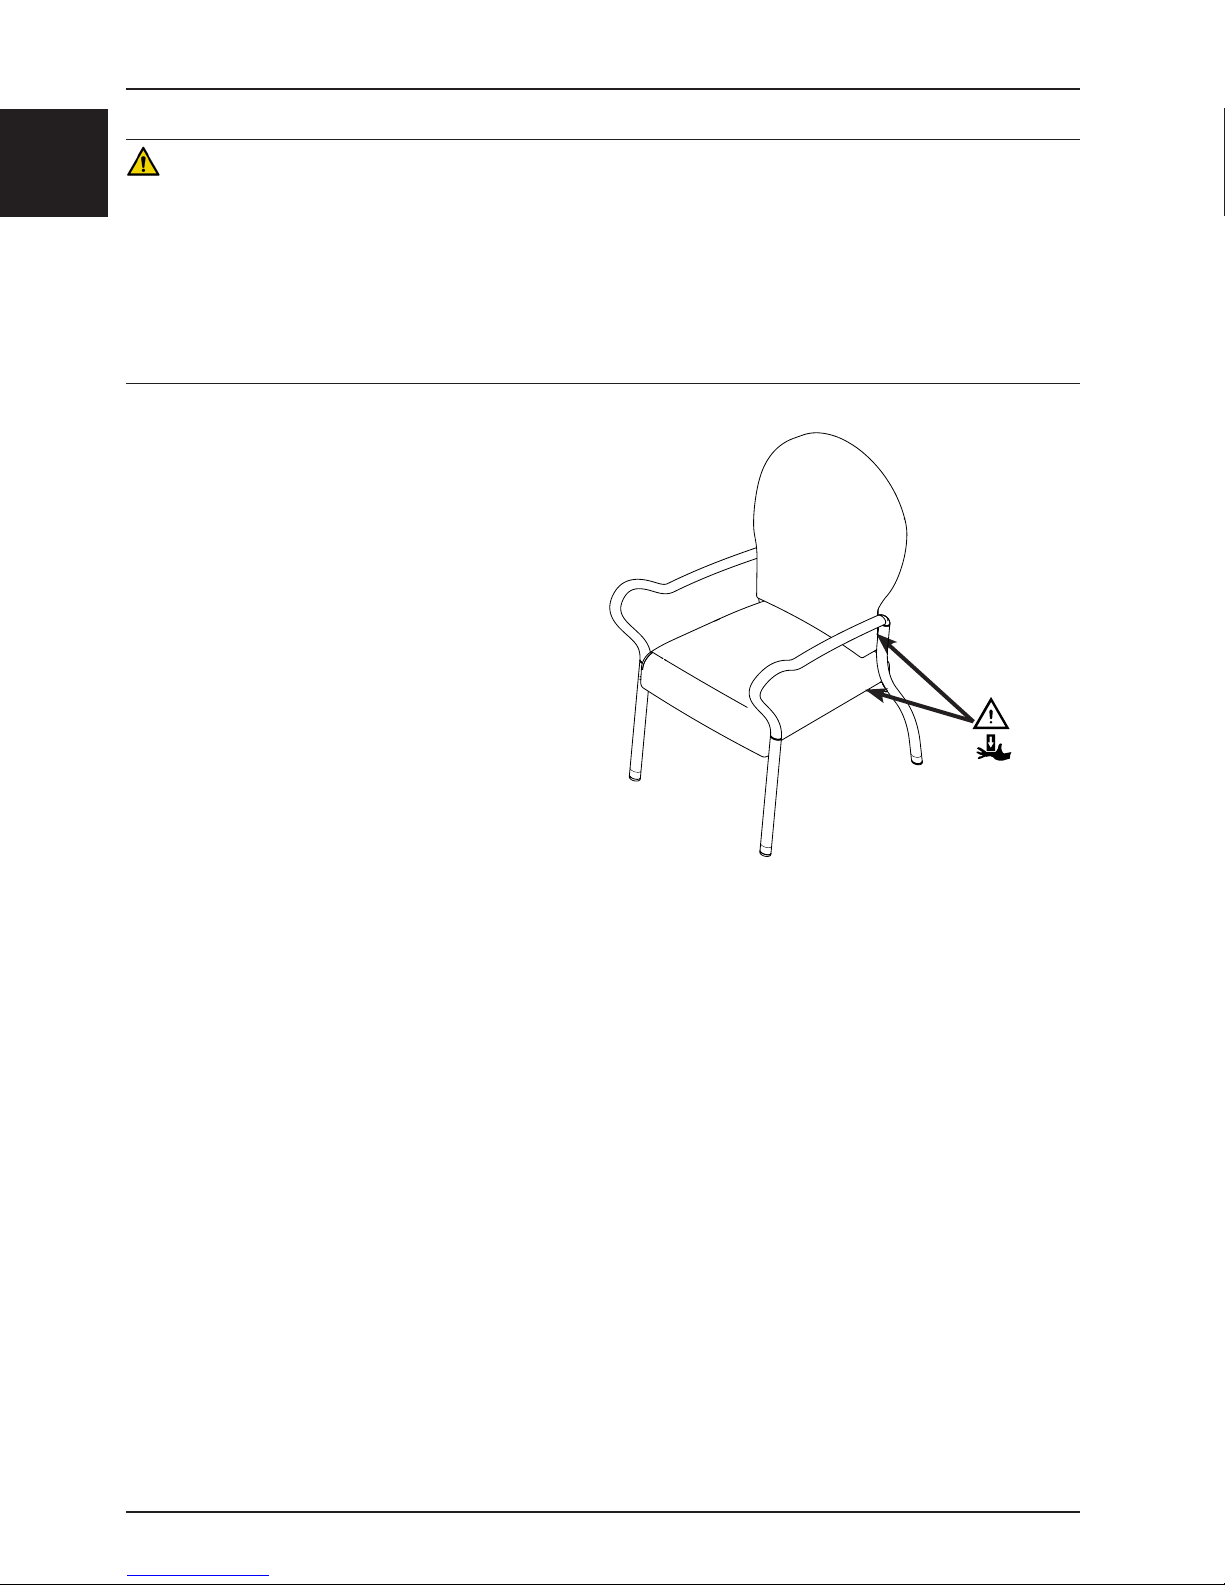
• When using the Comfort-Flex models 4855 and 4856, keep extremities away from identified locations as shown in
Figure 4 as potential pinch points exist, which may result in minor or moderate injury.
Figure 4: Comfort-Flex Pinch Points
Return To Table of Contents
1-8 485 0-0 09 -001 RE V G www.stryker.com
Page 11
Operation Guide
STOWING THE OTTOMAN
WARNING
Stow the ottoman under the chair when not in use to avoid a tripping hazard.
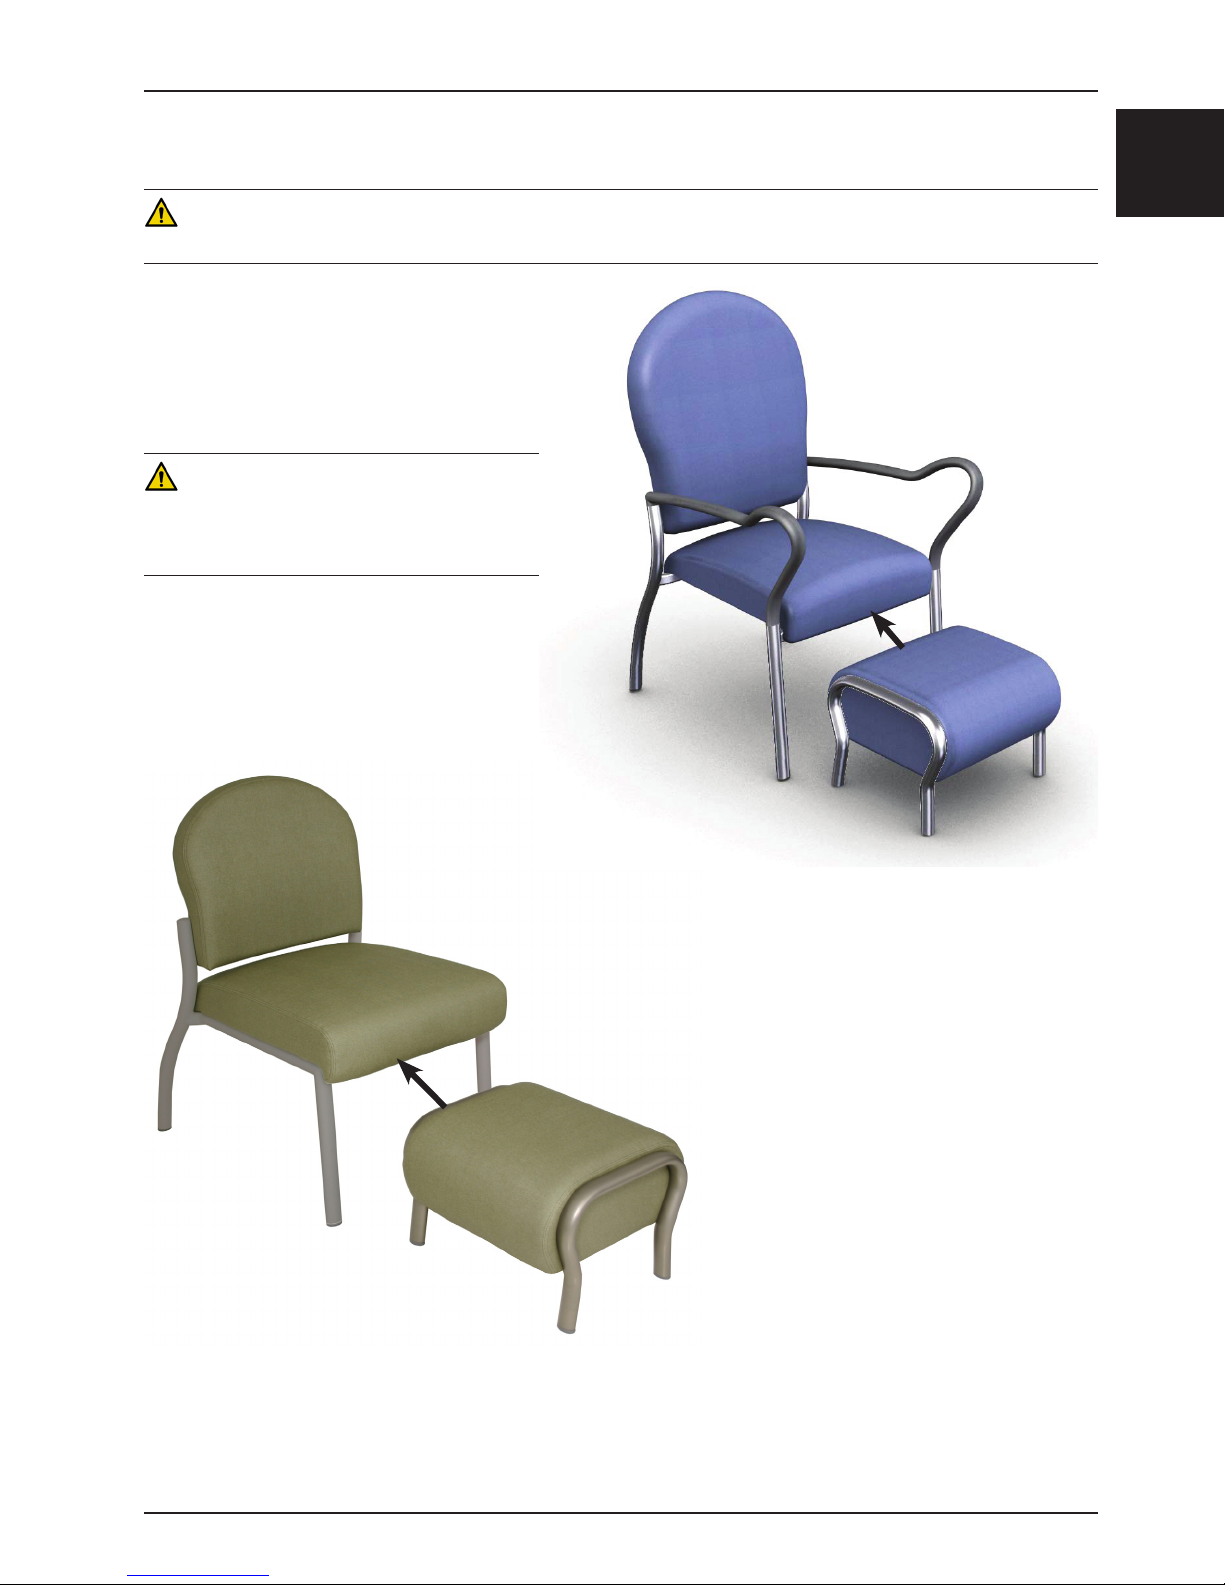
For model 4851, 4852, 4853, 4854, 4855, and
4856 only, stow the ottoman laterally under the
chair from the front when not in use as shown in
Figure 5.
CAUTION
To avoid the risk of ottoman upholstery damage,
with Comfort-Flex chairs only, do not force the
ottoman back into the chair frame components.
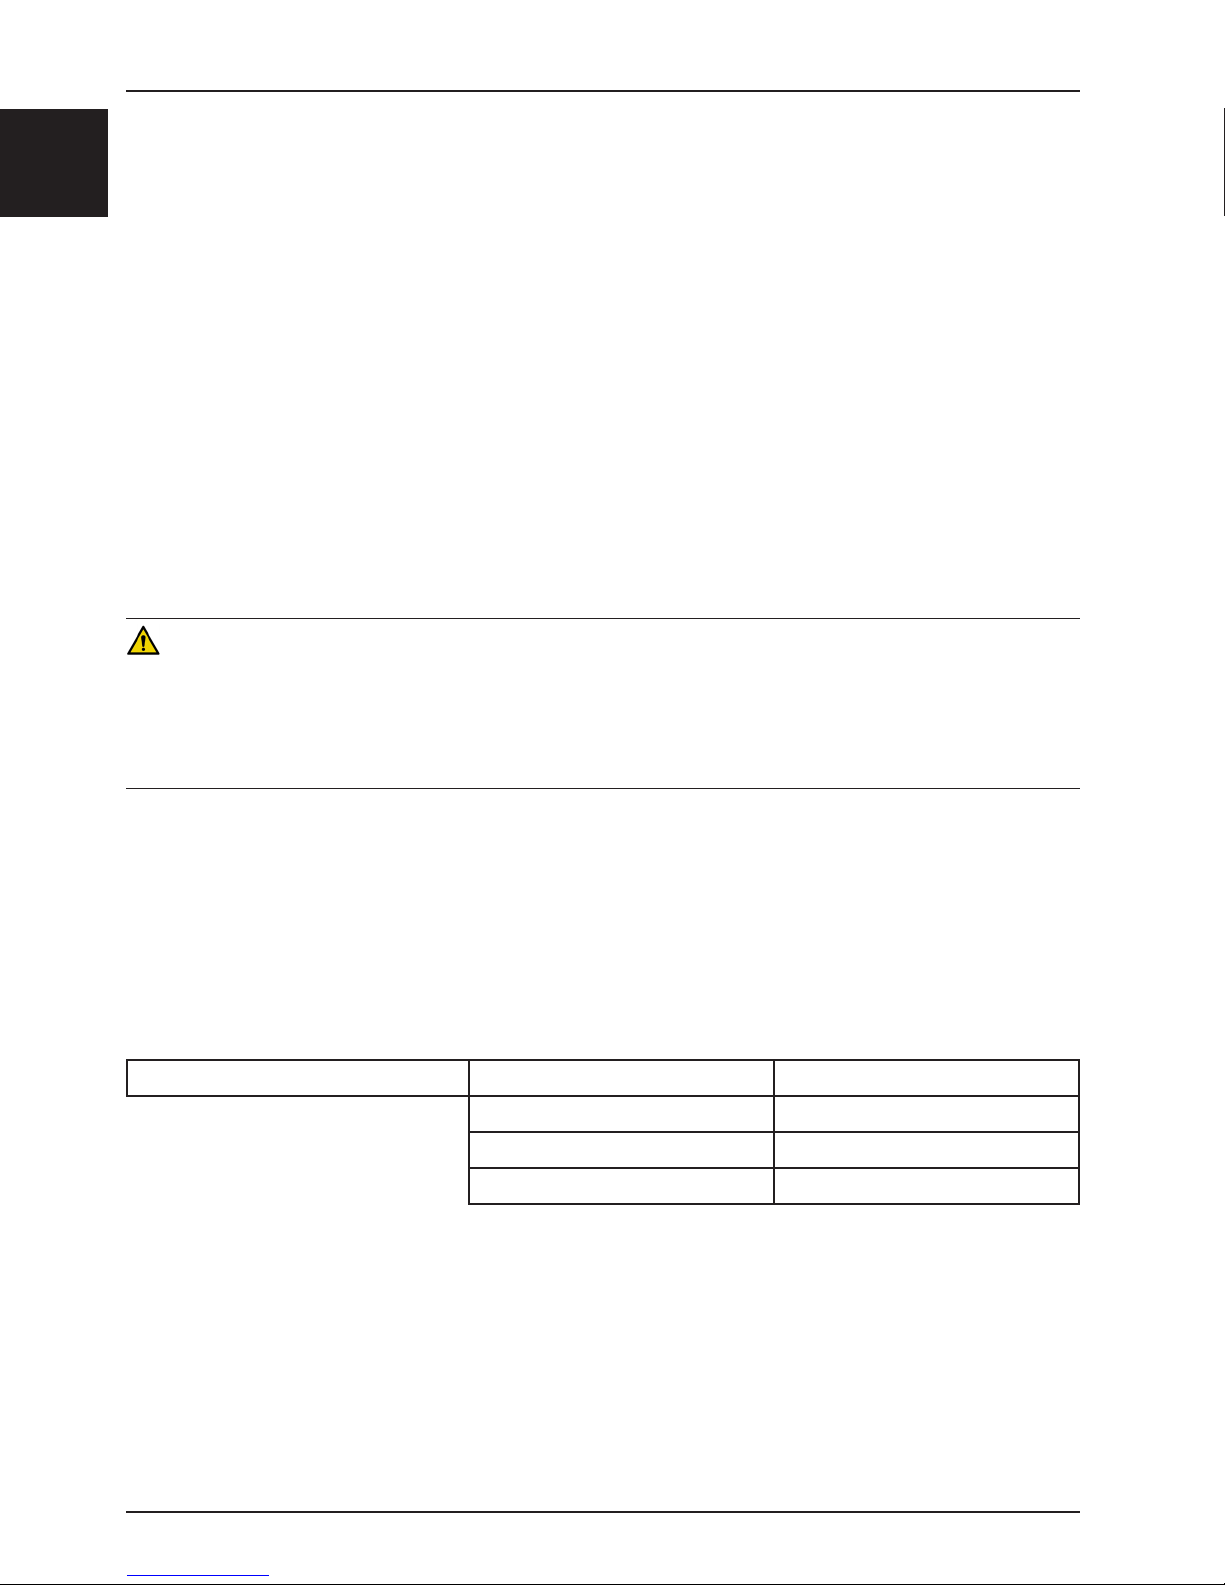
For models 4850 only, stow the ottoman rotated
under the chair from the front when not in use as
shown in Figure 6.
English
Figure 5: Stow the Ottoman Laterally (as shown) -
Models 4851, 4852, 4853, 4854, 4855 and 4856 Only
Figure 6: Stow the Ottoman Rotated (as shown) -
Model 4850 Only
www.stryker.com 485 0-0 09 -001 RE V G 1-9
Return To Table of Contents
Page 12
Preventative Maintenance
English
Preventative maintenance should be performed at a minimum of annually. A preventative maintenance program should
be established for all Stryker Medical equipment. Preventative maintenance may need to be performed more frequently
based on the usage level of the product.
CHECKLIST
_____ All fasteners secure and intact
_____ All foot glides secure and intact to prevent floor damage
_____ All chair backs and seat cushions secure and intact
_____ Both arms are secure and intact
_____ All welds (metal frames) are secure and intact
_____ No punctures or tears in the chair arms, upholstered chair seat frame assembly, upholstered chair back, upholstered
chair back panel, or upholstered ottoman assembly
_____ All plastic caps are secure and intact (armless chairs only)
_____ Comfort-Flex mechanism is functional and moves smoothly (Comfort-Flex chairs only)
_____ Check labels as specified in the Operations/Maintenance manual for legibility, proper adherence and integrity
CAUTION
• A preventative maintenance program should be established for all equipment. Preventative maintenance may need
to be performed more frequently based on the usage level of the product.
• Improper maintenance can cause injury or damage to the product. Maintain the unit as described in this manual.
Use only Stryker approved parts and maintenance procedures. Using unapproved parts and procedures could cause
unpredictable operation and/or injury and will void the product warranty (see “Warranty” on page 1-3 0).
Unit Serial Number:
Completed by: ____________________________________________ Date: _____________________
Return To Table of Contents
1-10 4850 -009- 001 REV G www.stryker.com
Page 13
Cleaning
FABRIC CLEANING AND MAINTENANCE
WARNING
Failure to properly clean a contaminated surface will increase the risk of exposure to bloodborne pathogens.
Follow these instructions to ensure that you are cleaning your Stryker Medical fabrics (vinyl, PVC-Free, PVC-Free with
Agion®, Crypton®, Crypton® Green, or Woven Agion®) thoroughly and safely. Deviating from these instructions may
cause damage to the material and hinder its performance.
CAUTION
• Use a soft, white cloth to clean stained or soiled areas. Avoid use of paper towels.
• Cleaning products may be harmful to your skin and/or eyes. Use protective gloves and eye protection. Protect the
surrounding area and clothing from exposure to cleaners. Do not inhale or swallow any cleaning agents. Follow
all cleaning product manufacturer’s warnings.
• The use of certain agents can be harmful to the surface appearance and lifespan of fabrics. Check compatibility
of any cleaning product with other surfaces on the furniture, such as painted surfaces or varnish.
• Clean all stains immediately as some stains may become permanent if not removed quickly.
• This information is not a guarantee and does not relieve the user from the responsibility of the proper and safe use
of these fabrics and all cleaning agents.
Vinyl
Clean all stains as quickly as possible and use the following cleaning procedures in order for best results.
English
CAUTION
When cleaning vinyl fabrics, the use of conditioners or protectants is not recommended and should be avoided.
Cleaning Protocol A (see table on page 1-12):
• Remove excess spill with a damp, clean cloth. Clean with a 10 percent mixture of liquid soap and warm water.
Rinse with water and dry.
• For stubborn stains, use a straight application of commercially available butyl-based water solvent cleaner. Wipe
with a clean cloth. Rinse with water and dry.
• If the stain persists, use a 1 to 1 mixture of isopropyl alcohol and water. Rinse thoroughly with water and then pat
dry with a clean, lint-free cloth. If the stain persists after six attempts, then the stain has set and probably cannot
be removed.
• For more stubborn or difficult stains, use a 9 to 1 mixture of bleach and water (10 percent bleach to 90 percent
water mixture). Rinse with water and dry. If the stain persists, use a clean cloth saturated with the diluted cleaning
material and rub the stain in a circular motion. Pat dry with a different clean cloth. Repeat, if necessary.
Cleaning Protocol B (see table on page 1-12):
• Remove excess spill with a damp, clean cloth. Clean with a 10 percent mixture of liquid soap and warm water.
Rinse with water and dry.
• For stubborn stains, apply a solution of liquid cleanser and water with a soft brush. Wipe away the residue with
a damp, clean cloth. Dampen a white, clean cloth with a solution of household bleach (10 percent bleach to
90 percent water mixture). Rub gently. Rinse with a damp, clean cloth to remove the bleach concentration.
• If the stain persists, allow a 1 to 10 diluted mixture of bleach and water to puddle on the affected area or apply
with a damp, clean cloth for approximately 30 minutes. Rinse with a damp, clean cloth to remove any remaining
bleach concentration.
www.stryker.com 485 0-0 09 -001 RE V G 1- 11
Return To Table of Contents
Page 14
Cleaning
English
FABRIC CLEANING AND MAINTENANCE (CONTINUED)
Suggested Vinyl Cleaning Protocols:
Follow the cleaning instructions for protocol A or protocol B, as described on page 1-11, for the pattern as shown
below.
Pattern Protocol A Protocol B
Abacus X
Aspen X
Avant X
Banyan X
Bari X
Bistro X
Bon Voyage X
Capreni X
Carlisle X
Casablanca X
Checkmate X
Chroma X
Cirque X
Dash X
Dodge Ball X
Facet X
Geomet X
Juxy X
Laredo X
Lava X
Martini X
Pattern Protocol A Protocol B
Matrix X
Natural World X
Oakwood X
Olympus X
Oxford X
Petals X
Prisma X
Raffia X
Rally X
Rialto X
Rivera X
Script X
Shantung X
Smile X
Southampton X
Tendril X
Tessuto X
Walk the Line X
Whitney X
Ybor X
Ziggy X
Return To Table of Contents
1-12 4850- 009 -001 REV G www.stryker.com
Page 15

Cleaning
FABRIC CLEANING AND MAINTENANCE (CONTINUED)
PVC-Free and PVC-Free with Agion
Clean all stains as quickly as possible and use the following cleaning procedures in order for best results.
• Remove any excess spills with a damp, clean cloth. Clean with a 10 percent mixture of liquid soap and warm water.
Rinse with water and dry.
• For stubborn stains, use a 1 to 1 mixture of a commercially available butyl-based water solvent cleaner and water.
Rinse with water. Wipe with a clean cloth.
• For more difficult stains, use a 5 to 1 mixture of water and bleach solution (5 parts water to 1 part bleach mixture).
Rinse with water and dry. Never use bleach in full strength to clean and/or disinfect PVC-free products.
Note: Use a soft brush or clean cloth saturated with cleaning material. Always test cleaning methods on an inconspicuous
area of furniture.
Crypton® and Crypton Green
To prevent overall soiling, vacuum regularly or brush lightly to remove dirt, dust, and grime is recommended. Spot clean
using the foam from a water-based cleaning agent such as a mild detergent or non-solvent upholstery shampoo. Apply
foam with a soft rag or brush in a circular motion. Vacuum when dry. Always pretest a small area before proceeding.
Remove all soil and spills as quickly as possible.
• Wipe up any spills before they dry using a clean cloth.
• If stain has dried, lightly brush or scrape off the residual and wipe with a wet towel.
• If stain remains, clean fabric with an enzymatic detergent mixed with water (5 parts water with 1 part enzyme
detergent mixture). Scrub the area for one minute using a soft nylon brush. Rinse with water leaving no residue.
Dry with a clean cloth.
• Repeat if necessary.
®
®
English
Do not use solvent based cleaners as they may harm the fabric.
Woven Agion
®
You can use water-based cleaning agents and foam for cleaning Woven Agion®. You can also clean with mild, waterfree solvents. Cleaning by a professional service is recommended.
• For easy cleaning of recent soiling, most stains can be wiped off with a clean cloth.
• For stubborn stains, clean with a 10 percent mixture of liquid soap and warm water. Apply diluted cleaning solution
to a clean cloth or soft brush. Moisten a clean cloth with clear water and revisit stain to wipe off and rinse. Let
air dry.
• For more stubborn or difficult stains, use a mild solvent cleaner mixed with water. Rinse with water. Wipe with
clean cloth.
• If the stain persists, use a 1 to 5 mixture of bleach solution and water (1 part bleach to 5 parts water mixture) with
a maximum of 20 percent bleach. Blot stain with a clean cloth saturated in the diluted bleach mixture. Rinse stain
area with a damp, clean cloth and let dry. Bleach solutions not completely removed could fade the fabric. Never
use bleach in full strength to clean these fabrics.
Note: Use a soft brush or cloth saturated with cleaning material. Test cleaning methods on an inconspicuous area of
the furniture. If the stain persists, then the stain has probably set. Although these fabrics are resistant to most common
stains, some agents, such as ink, can create a permanent stain. Clean all stains as quickly as possible.
www.stryker.com 485 0-0 09 -001 RE V G 1-13
Return To Table of Contents
Page 16

Cleaning
English
FRAME AND ARM CLEANING
Cleaners for frame and arm cleaning include:
• Quaternary (active ingredient - ammonium chloride)
• Phenolic (active ingredient - o-phenylphenol)
• Alcohol-based (maximum 70 percent alcohol content)
• Bleach (1 part bleach to 100 parts water)
A recommended cleaner is a chlorinated bleach solution (less than 1 part bleach to 100 parts water mixture). For
example, a 6 percent bleach solution diluted to 165 milliliter of bleach solution per 1 liter of water or 20 ounces of
bleach solution per 1 gallon of water. Thoroughly rinse the solution from the product surface. If other hospital-grade
cleaning agents listed above are used, follow the instructions provided by the cleaning solution’s manufacturer. Do
not allow cleaning solutions or other fluids to pool on the unit. Wipe the surface with a dry, clean cloth to remove any
moisture.
CAUTION
The use of quaternary cleaners that contain diethylene glycol butyl ether or alcohol to the underside surfaces of
the chair and ottoman may result in compromised legibility of the pre-printed labels. Should this occur, see “Product
LabelsProduct Labels” on page 1-11 for the original label text.
Return To Table of Contents
1-14 4 850 - 00 9-0 01 REV G www.stryker.com
Page 17
Quick Reference Replacement Parts List
The parts and accessories listed on this page are all currently available for purchase. Some of the parts identified on
the assembly drawing parts in this manual may not be individually available for purchase. Please call Stryker Customer
Service USA at 1-800-327-0770 for availability and pricing.
Part Name Part Number
Back Cushion Kit, Lowback 4850-700-001
Back Cushion Kit, Highback 4853-700-001
Back Cushion Kit, Comfort-Flex 4856-700-001
Glide, Black (Color packages A, D, and E only) 4850-100-12 7
Glide, Stone (Color packages B and C only) 4850-100-12 8
Plastic Cap, Chestnut (Armless chair - color package A only) 4850-100-115
Plastic Cap, White (Armless chair - color package B only) 4850-100-117
Plastic Cap, Satin Nickel (Armless chair - color package C only) 485 0 -100-116
Plastic Cap, Orange/Brown (Armless chair - color package D only) 4 8 5 0-100 -118
Plastic Cap, Black (Armless chair - color package E only) 485 0 -100-114
Seat Foam Assembly, Upholstered (Armless chair only) 4850-020-100
English
Seat Foam Assembly, Upholstered (Chairs with arms only) 4853-020-100
www.stryker.com 485 0-0 09 -001 RE V G 1-15
Return To Table of Contents
Page 18
English
Service Information
LEG GLIDE REPLACEMENT (ALL MODELS)
Tools Required:
• Hammer
• Slotted Screwdriver
Procedure:
1. Flip the chair or ottoman upside down, so the legs are off the ground.
Note: Place a sheet or equivalent on the floor to protect the chair or ottoman fabric from damage.
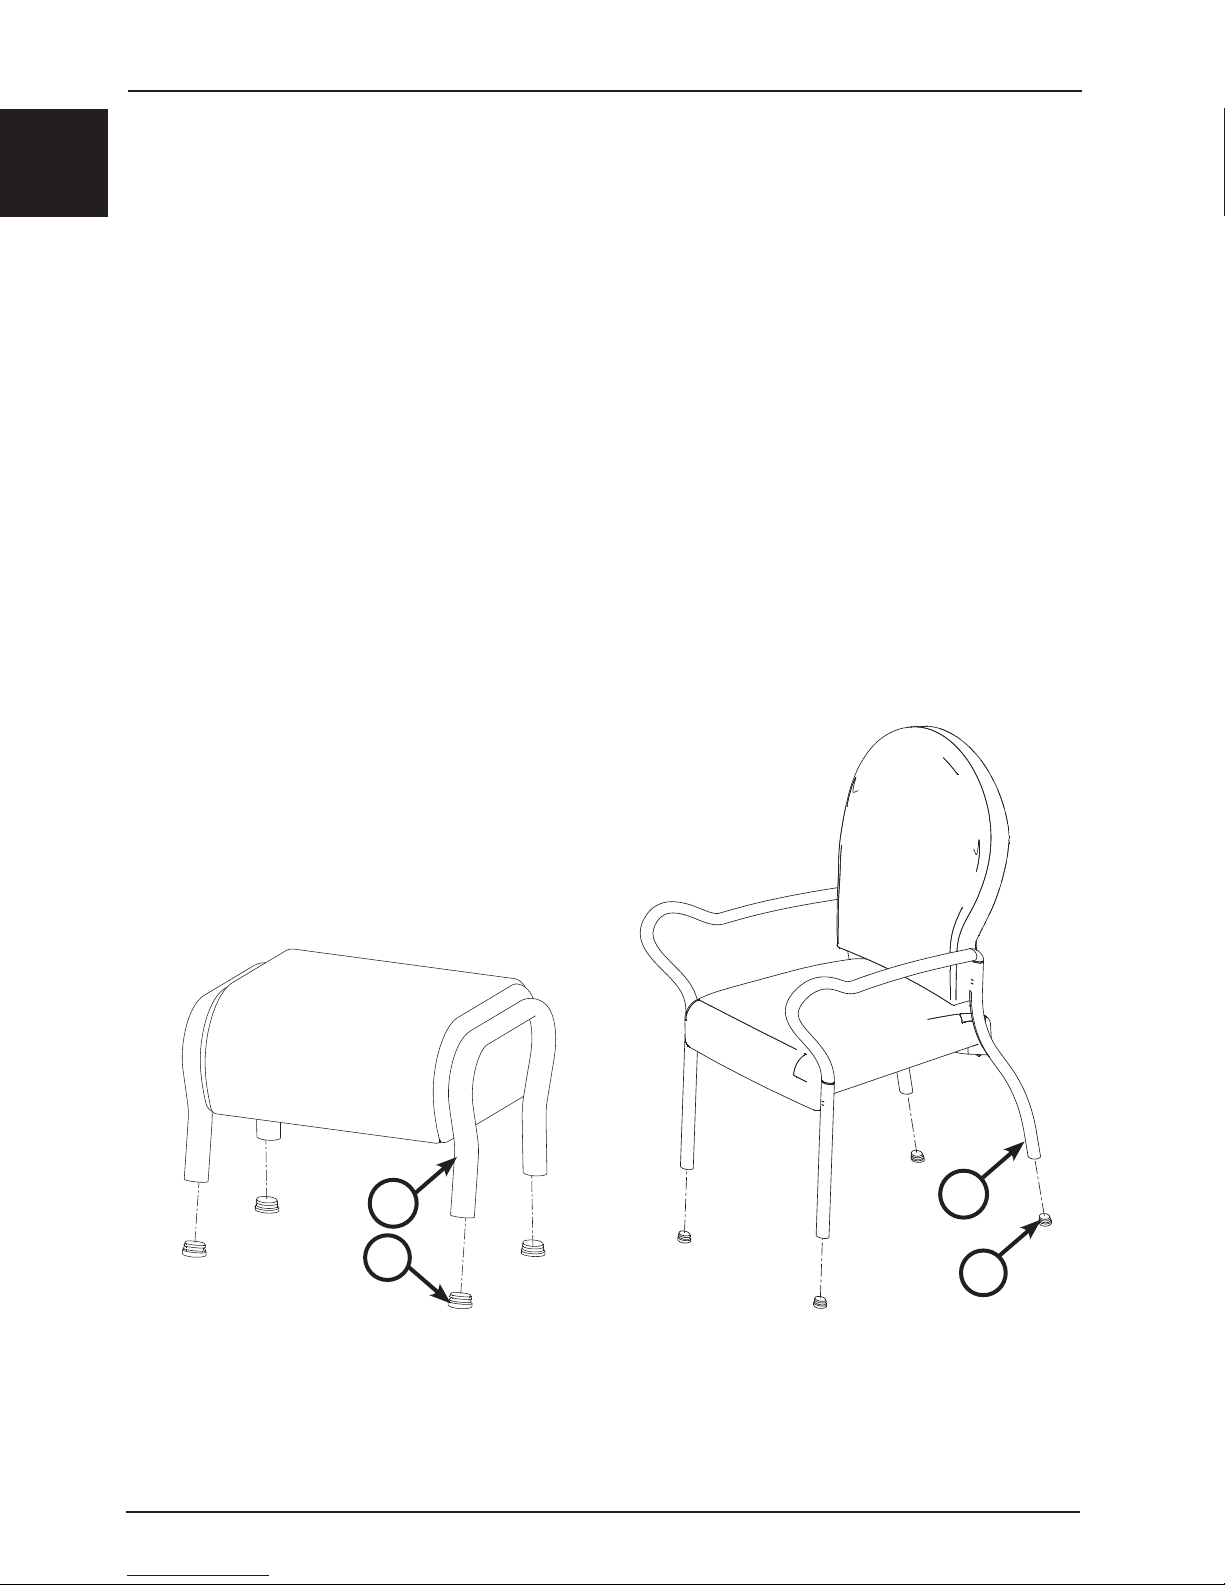
2. Using a hammer and slotted screwdriver, carefully remove the damaged leg glide (A) from the leg (B) as shown in
Figure 7 (ottoman leg) or Figure 8 (chair leg). Discard the glide.
3. Using a hammer, install the new leg glide by hitting it into the chair or ottoman leg until it is flush with the end of
the leg.
Note: The leg glide is tapered. Before installing, make sure that the thinner side is positioned inward to the middle
of the chair or ottoman.
4. Flip the chair or ottoman back upright.
5. Verify proper operation of the unit before returning it to service.
B
A
Return To Table of Contents
1-16 4850 - 009- 001 REV G www.stryker.com
B
A
Figure 8: Chair Leg Glide ReplacementFigure 7: Ottoman Leg Glide Replacement
Page 19
Service Information
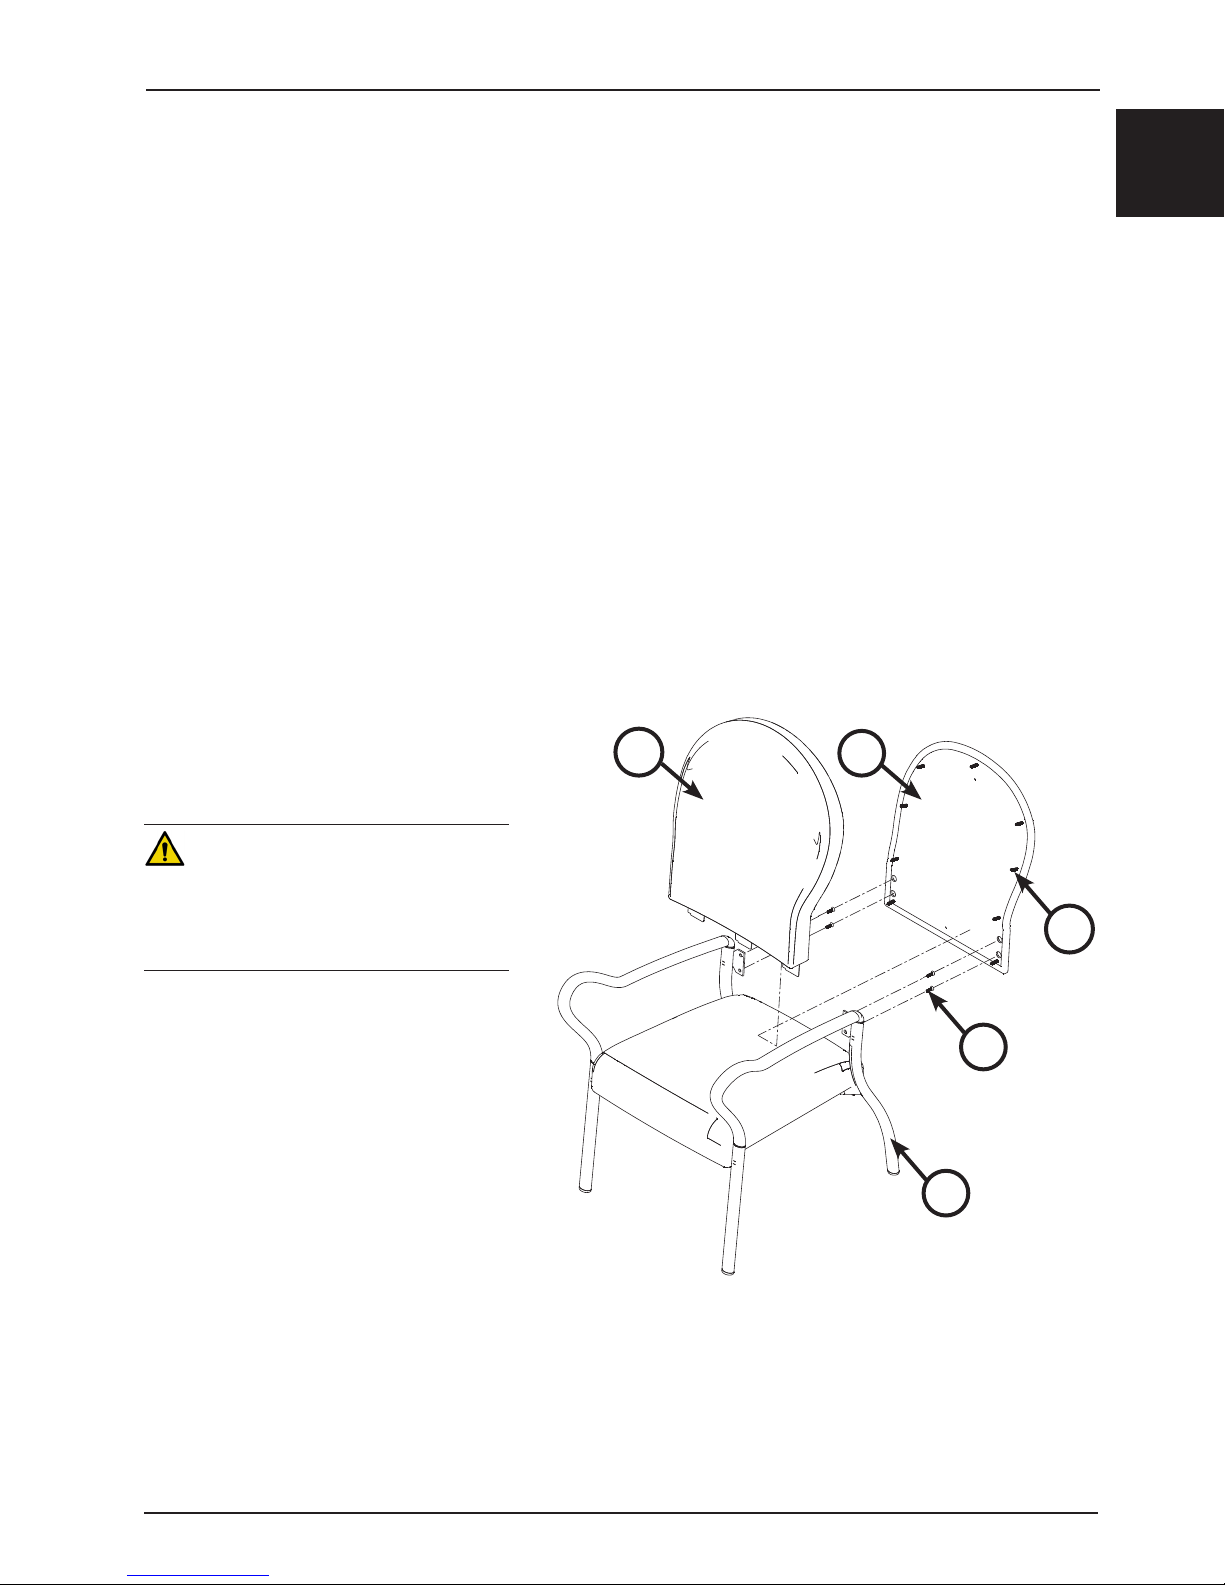
CHAIR BACK REPLACEMENT (FOR MODELS 4850, 4851, 4852, 4853, AND 4854)
For Models 4850, 4851, and 4852, install kit (p/n 4850-700-001)
For Models 4853 and 4854, install kit (p/n 4853-700-001)
Tools Required:
• Large Slotted Screwdriver
• #3 Phillips Screwdriver
Procedure:
1. Using a large slotted screwdriver, carefully remove the back panel (A) from the back cushion (B) (Figure 9).
Note: There are seven push rivets (C) for models 4850, 4851, and 4852 that secure the back panel to the back
cushion. There are nine push rivets (C) for models 4853 and 4854 that secure the back panel to the back cushion
(Figure 9).
2. Using a #3 Phillips screwdriver, remove the four screws (D) that secure the back cushion to the chair frame (E)
and remove the back cushion (Figure 9). Discard the back cushion, back panel, and screws.
3. Using a #3 Phillips screwdriver, install the supplied four screws to secure the new back cushion to the chair frame.
Start each screw first, then tighten all four.
4. Install the new back panel into the new back cushion by aligning all seven push rivets to the back cushion T-nuts.
Push each push rivet in carefully by feeling for it from the outside of the fabric.
English
Note: Make sure that each push rivet is
fully seated and the back panel is tight to
the back cushion.
CAUTION
To avoid the risk of equipment damage to
the new back panel, make sure that each
push rivet is aligned with each T-nut prior to
installation.
5. Verify proper operation of the unit before
returning it to service.
B
A
D
E
Figure 9: Back Replacement (Model 4853 shown)
C
www.stryker.com 485 0-0 09 -001 RE V G 1-17
Return To Table of Contents
Page 20
English
Service Information
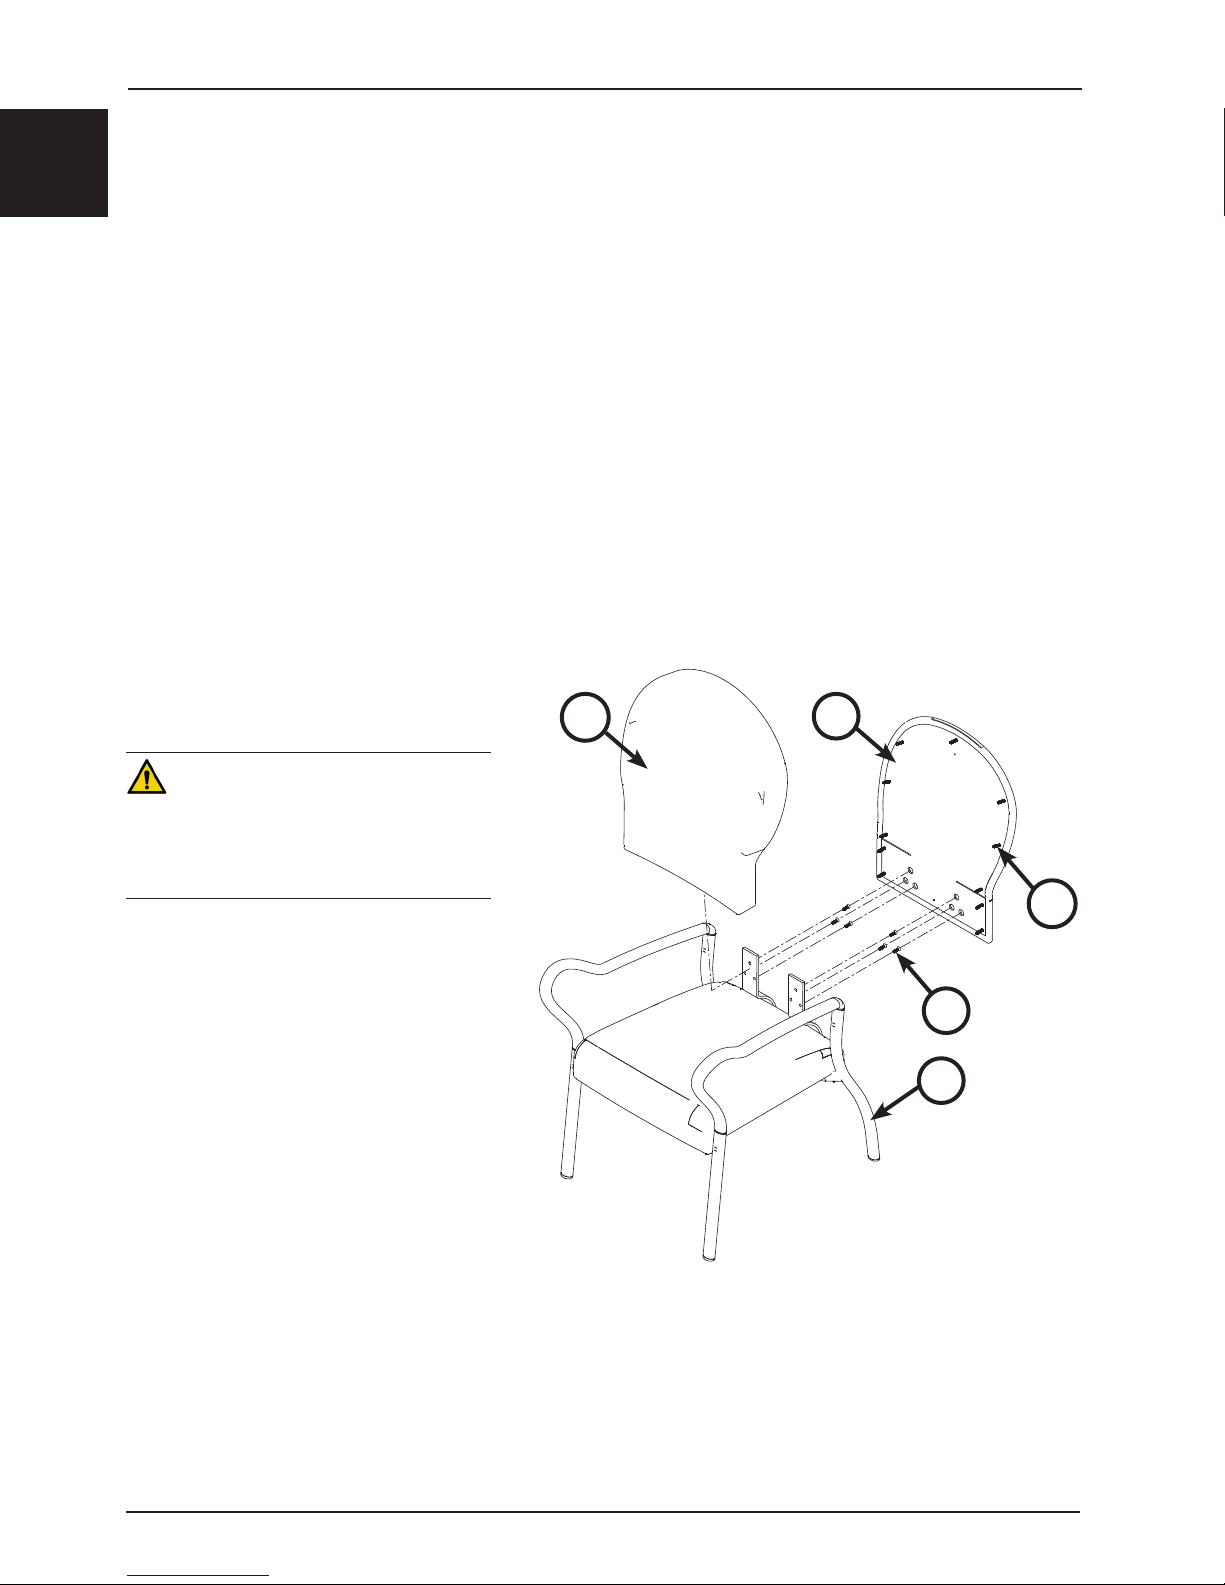
CHAIR BACK REPLACEMENT (FOR MODELS 4855 AND 4856)
For Models 4855 and 4856, install kit (p/n 4856-700-001)
Tools Required:
• Slotted Screwdriver
• #3 Phillips Screwdriver
Procedure:
1. Using a large slotted screwdriver, carefully remove the back panel (A) from the back cushion (B) (Figure 10).
Note: There are eleven push rivets (C) that secure the back panel to the back cushion (Figure 10).
2. Using a #3 Phillips screwdriver, remove the six screws (D) that secure the back cushion to the chair frame (E) and
remove the back cushion (Figure 10). Discard the back cushion, back panel, and screws.
3. Using a #3 Phillips screwdriver, install the supplied six screws to secure the new back cushion to the chair frame.
Start each screw first, then tighten all six.
4. Install the new back panel into the new back cushion by aligning all eleven push rivets to the back cushion T-nuts.
Push each push rivet in carefully by feeling for it from the outside of the fabric.
Note: Make sure that each push rivet is
fully seated and the back panel is tight to
the back cushion.
CAUTION
To avoid the risk of equipment damage to
the new back panel, make sure that each
push rivet is aligned with each T-nut prior to
installation.
5. Verify proper operation of the unit before
returning it to service.
B
A
C
D
E
Return To Table of Contents
1-18 4850 - 009- 001 REV G www.stryker.com
Figure 10: Back Replacement (Model 4855 shown)
Page 21

Service Information
SEAT CUSHION REPLACEMENT (ALL MODELS)
Tools Required:
• #3 Phillips Screwdriver
Procedure:
1. Flip the chair upside down, so the chair legs are off the ground.
Note: Place a sheet or equivalent on the floor to protect the chair fabric from damage.
2. Using a #3 Phillips screwdriver, remove the four screws (A) that secure the seat cushion (B) to the chair frame (C)
and remove the cushion (Figure 11). Discard the cushion and screws.
3. Using a #3 Phillips screwdriver, install the supplied four screws to secure the new seat cushion to the chair frame.
Start each screw first, then tighten all four.
4. Flip the chair back upright.
5. Verify proper operation of the unit before returning it to service.
English
B
C
A
Figure 11: Seat Cushion Replacement
www.stryker.com 485 0-0 09 -001 RE V G 1-19
Return To Table of Contents
Page 22

English
Model 4850 - Patient Chair, Lowback, Armless
4850-010-000 Rev D (Reference Only)
Item Description Qty. 4850-010-001
Chestnut (A)
A Frame Assembly,
Armless
B Glide 4 485 0 -100-12 7 4850-100-12 8 4850-100-128 4850-100-12 7 4850-100-127
C Plastic Cap 2 4850 -100-115 4 85 0 -100-117 4850-100-116 4850-100-118 4850 -100-114
D Seat Foam Assy,
Upholstered
E Socket Head
Cap Screw
F Back, Lowback,
Upholstered
G Socket Head
Cap Screw
H Back Panel,
Lowback,
Upholstered
* Shown for reference only. These parts or assemblies are not available individually for sale.
** For kits, see “Quick Reference Replacement Parts List” on page 1-15.
Return To Table of Contents
1-20 485 0-0 09 -001 RE V G www.stryker.com
1 4850-110-012* 4850-110-014* 4850-110-013* 4850-110-015* 4 85 0-110- 011*
1 4850-020-100 4850-020-100 4850-020-100 4850-020-100 4850-020-100
4 0004-001-002 0004-001-002 0004-001-002 0004-001-002 0004-001-002
1 4851-010-100** 4851-010-100** 4851-010-100** 4851-010-100** 4851-010-100**
4 0004-001-003** 0004-001-003** 0004-001-003** 0004-001-003** 0004-001-003**
1 4851-011-100** 4851-011-100** 4851-011-100** 4851-011-100** 4851-011-100**
4850-010-002
White (B)
4850-010-003
Satin Nickel
(C)
4850-010-004
Orange/
Brown (D)
4850-010-005
Black (E)
Page 23

Model 4851 - Patient Chair, Lowback, Low Seat
4851-010-000 Rev D (Reference Only)
English
Item Description Qty. 4851-010-001
Chestnut (A)
A Frame Assembly,
Low Seat
B Glide 4 4850-100-127 4850-100-128 4850-100-128 4850-100-12 7 4850-100-127
C Tube Connector 4 0018-040-000* 0018-040-000* 0018-040-000* 0018-040-000* 0018-040-000*
D Hex Head
Cap Screw
E Arm, Left 1 4851-200-031* 4851-200-032* 4851-200-032* 4851-200-031* 4851-200-031*
F Arm, Right 1 4851-200-041* 4851-200-042* 4851-200-042* 4851-200-041* 4851-200-041*
G Seat Foam Assy,
Upholstered
H Socket Head
Cap Screw
J Back, Lowback,
Upholstered
K Socket Head
Cap Screw
L Back Panel,
Lowback,
Upholstered
P Sleeve, Arm Post 2 4851-200-001 4851-200-001 4851-200-001 4851-200-001 4851-200-001
1 4 85 3-110- 012* 4853 -110 -014* 4853-110-013* 4 85 3-110- 015* 4853 -110 -011*
4 0003-149-000* 0003-149-000* 0003-149-000* 0003-149-000* 0003-149-000*
1 4853-020-100 4853-020-100 4853-020-100 4853-020-100 4853-020-100
4 0004-001-002 0004-001-002 0004-001-002 0004-001-002 0004-001-002
1 4851-010-100** 4851-010-100** 4851-010-100** 4851-010-100** 4851-010-100**
4 0004-001-003** 0004-001-003** 0004-001-003** 0004-001-003** 0004-001-003**
1 4851-011-100** 4851-011-100** 4851-011-100** 4851-011-100 ** 4851-011-100**
4851-010-002
White (B)
4851-010-003
Satin Nickel
(C)
4851-010-004
Orange/
Brown (D)
4851-010-005
Black (E)
* Shown for reference only. These parts or assemblies are not available individually for sale.
** For kits, see “Quick Reference Replacement Parts List” on page 1-15.
www.stryker.com 485 0-0 09 -001 RE V G 1-21
Return To Table of Contents
Page 24

English
Model 4852 - Patient Chair, Lowback 22”, High Seat
4852-010-000 Rev C (Reference Only)
Item Description Qty. 4852-010-001
Chestnut (A)
A Frame Assembly,
High Seat
B Glide 4 48 5 0-100-127 4850 -100-128 4850-100-128 4850-100-127 4850-100-127
C Tube Connector 4 0018-040-000* 0018-040-000* 0018-040-000* 0018-040-000* 0018-040-000*
D Hex Head
Cap Screw
E Arm, Left 1 4851-200-031* 4851-200-032* 4851-200-032* 4851-200-031* 4851-200-031*
F Arm, Right 1 4851-200-041* 4851-200-042* 4851-200-042* 4851-200-041* 4851-200-041*
G Seat Foam Assy,
Upholstered
H Socket Head
Cap Screw
J Back, Lowback,
Upholstered
K Socket Head
Cap Screw
L Back Panel,
Lowback,
Upholstered
P Sleeve, Arm Post 2 4851-200-001 4851-200-001 4851-200-001 4851-200-001 4851-200-001
1 4854-110-012* 4854-110-014* 4854-110-013* 4854-110-015* 4 8 54 -110 -011*
4 0003-149-000* 0003-149-000* 0003-149-000* 0003-149-000* 0003-149-000*
1 4853-020-100 4853-020-100 4853-020-100 4853-020-100 4853-020-100
4 0004-001-002 0004-001-002 0004-001-002 0004-001-002 0004-001-002
1 4851-010-100** 4851-010-100** 4851-010-100** 4851-010-100** 4851-010-100**
4 0004-001-003** 0004-001-003** 0004-001-003** 0004-001-003** 0004-001-003**
1 4851-011-100** 4851-011-100** 4851-011-100** 4851-011-100 ** 4851-011-100**
4852-010-002
White (B)
4852-010-003
Satin Nickel
(C)
4852-010-004
Orange/
Brown (D)
4852-010-005
Black (E)
* Shown for reference only. These parts or assemblies are not available individually for sale.
** For kits, see “Quick Reference Replacement Parts List” on page 1-15.
Return To Table of Contents
1-22 485 0-0 09 -001 RE V G www.stryker.com
Page 25

Model 4853 - Patient Chair, Highback, Low Seat
4853-010-000 Rev D (Reference Only)
English
Item Description Qty. 4853-010-001
Chestnut (A)
A Frame Assembly,
Low Seat
B Glide 4 4850-100-127 4850-100-128 4850-100-128 4850-100-12 7 4850-100-127
C Tube Connector 4 0018-040-000* 0018-040-000* 0018-040-000* 0018-040-000* 0018-040-000*
D Hex Head
Cap Screw
E Arm, Left 1 4851-200-031* 4851-200-032* 4851-200-032* 4851-200-031* 4851-200-031*
F Arm, Right 1 4851-200-041* 4851-200-042* 4851-200-042* 4851-200-041* 4851-200-041*
G Seat Foam Assy,
Upholstered
H Socket Head
Cap Screw
J Back, Highback,
Upholstered
K Socket Head
Cap Screw
L Back Panel,
Highback,
Upholstered
P Sleeve, Arm Post 2 4851-200-001 4851-200-001 4851-200-001 4851-200-001 4851-200-001
1 4 85 3-110- 012* 4853 -110 -014* 4853-110-013* 4 85 3-110- 015* 4853 -110 -011*
4 0003-149-000* 0003-149-000* 0003-149-000* 0003-149-000* 0003-149-000*
1 4853-020-100 4853-020-100 4853-020-100 4853-020-100 4853-020-100
4 0004-001-002 0004-001-002 0004-001-002 0004-001-002 0004-001-002
1 4853-010-100** 4853-010-100** 4853-010-100 ** 4853-010 -100** 4853-010-100**
4 0004-001-003** 0004-001-003** 0004-001-003** 0004-001-003** 0004-001-003**
1 4853-011-100** 4853-011-100** 4853-011-100** 4853-011-100** 4853-011-100**
4853-010-002
White (B)
4853-010-003
Satin Nickel
(C)
4853-010-004
Orange/
Brown (D)
4853-010-005
Black (E)
* Shown for reference only. These parts or assemblies are not available individually for sale.
** For kits, see “Quick Reference Replacement Parts List” on page 1-15.
www.stryker.com 485 0-0 09 -001 RE V G 1-23
Return To Table of Contents
Page 26

English
Model 4854 - Patient Chair, Highback 22”, High Seat
4854-010-000 Rev C (Reference Only)
Item Description Qty. 4854-010-001
Chestnut (A)
A Frame Assembly,
High Seat
B Glide 4 48 5 0-100-127 4850 -100-128 4850-100-128 4850-100-127 4850-100-127
C Tube Connector 4 0018-040-000* 0018-040-000* 0018-040-000* 0018-040-000* 0018-040-000*
D Hex Head
Cap Screw
E Arm, Left 1 4851-200-031* 4851-200-032* 4851-200-032* 4851-200-031* 4851-200-031*
F Arm, Right 1 4851-200-041* 4851-200-042* 4851-200-042* 4851-200-041* 4851-200-041*
G Seat Foam Assy,
Upholstered
H Socket Head
Cap Screw
J Back, Highback,
Upholstered
K Socket Head
Cap Screw
L Back Panel,
Highback,
Upholstered
P Sleeve, Arm Post 2 4851-200-001 4851-200-001 4851-200-001 4851-200-001 4851-200-001
1 4854-110-012* 4854-110-014* 4854-110-013* 4854-110-015* 4 854 -110 -011*
4 0003-149-000* 0003-149-000* 0003-149-000* 0003-149-000* 0003-149-000*
1 4853-020-100 4853-020-100 4853-020-100 4853-020-100 4853-020-100
4 0004-001-002 0004-001-002 0004-001-002 0004-001-002 0004-001-002
1 4853-010-100** 4853-010-100** 4853-010-100 ** 4853-010 -100** 4853-010-100**
4 0004-001-003** 0004-001-003** 0004-001-003** 0004-001-003** 0004-001-003**
1 4853-011-100** 4853-011-100** 4853-011-100** 4853-011-100** 4853-011-100**
4854-010-002
White (B)
4854-010-003
Satin Nickel
(C)
4854-010-004
Orange/
Brown (D)
4854-010-005
Black (E)
* Shown for reference only. These parts or assemblies are not available individually for sale.
** For kits, see “Quick Reference Replacement Parts List” on page 1-15.
Return To Table of Contents
1-24 4 850- 00 9-0 01 REV G www.stryker.com
Page 27

Model 4855 - Patient Chair, Comfort-Flex, Low Seat
4855-010-000 Rev F (Reference Only)
English
www.stryker.com 485 0-0 09 -001 RE V G 1-25
Return To Table of Contents
Page 28

English
Model 4855 - Patient Chair, Comfort-Flex, Low Seat
Item Description Qty. 4855-010-001
Chestnut (A)
A Frame Assembly,
Low Seat,
Flexback
B Glide 4 48 5 0-100-127 4850 -100-128 4850-100-128 4850-100-127 4850-100-127
C Tube Connector 4 0018-040-000* 0018-040-000* 0018-040-000* 0018-040-000* 0018-040-000*
D Hex Head
Cap Screw
E Arm, Left 1 4851-200-031* 4851-200-032* 4851-200-032* 4851-200-031* 4851-200-031*
F Arm, Right 1 4851-200-041* 4851-200-042* 4851-200-042* 4851-200-041* 4851-200-041*
G Seat Foam
Assembly,
Upholstered
H Socket Head
Cap Screw
J J-Bar Bracket 2 4 8 5 5-100 -135 4855 -100 -137 4855 -100 -136 4855 -100-138 4855 -100-134
K Hex Head
Cap Screw
L Back, Flexback,
Upholstered
M Socket Head
Cap Screw
N Back Panel,
Flexback,
Upholstered
T Lock Washer 6 0012-001-001 0012-001-001 0012-001-001 0012-001-001 0012-001-001
U Sleeve, Arm Post 2 4851-200-001 4851-200-001 4851-200-001 4851-200-001 4851-200-001
1 4 85 5-110- 012* 4855 -110 -014* 4855-110-013* 48 5 5-110- 015* 4855 -110 -011*
4 0003-149-000* 0003-149-000* 0003-149-000* 0003-149-000* 0003-149-000*
1 4853-020-100 4853-020-100 4853-020-100 4853-020-100 4853-020-100
4 0004-001-002 0004-001-002 0004-001-002 0004-001-002 0004-001-002
6 0004-001-004 0004-001-004 0004-001-004 0004-001-004 0004-001-004
1 4855-010-100** 4855-010-100** 4855-010-100** 4855-010-100** 4855-010-100**
6 0004-001-003** 0004-001-003** 0004-001-003** 0004-001-003** 0004-001-003**
1 4855-011-100** 4855-011-100** 4855-011-100** 4855-011-100** 4855-011-100**
4855-010-002
White (B)
4855-010-003
Satin Nickel
(C)
4855-010-004
Orange/
Brown (D)
4855-010-005
Black (E)
* Shown for reference only. These parts or assemblies are not available individually for sale.
** For kits, see “Quick Reference Replacement Parts List” on page 1-15.
Return To Table of Contents
1-26 485 0-0 09 -001 RE V G www.stryker.com
Page 29

Model 4856 - Patient Chair, Comfort-Flex 22”, High Seat
4856-010-000 Rev E (Reference Only)
English
www.stryker.com 485 0-0 09 -001 RE V G 1-27
Return To Table of Contents
Page 30

English
Model 4856 - Patient Chair, Comfort-Flex 22”, High Seat
Item Description Qty. 4856-010-001
Chestnut (A)
A Frame
Assembly, High
Seat, Flexback
B Glide 4 48 5 0-100 -127 4850 -100 -128 4850 -100 -128 4850 -100-127 4850 -100-127
C Tube Connector 4 0018-040-000* 0018-040-000* 0018-040-000* 0018-040-000* 0018-040-000*
D Hex Head
Cap Screw
E Arm, Left 1 4851-200-031* 4851-200-032* 4851-200-032* 4851-200-031* 4851-200-031*
F Arm, Right 1 4851-200-041* 4851-200-042* 4851-200-042* 4851-200-041* 4851-200-041*
G Seat Foam
Assembly,
Upholstered
H Socket Head
Cap Screw
J J-Bar Bracket 2 4855 -100-13 5 4 85 5 -100-137 4855-100-13 6 4 8 55 -100-13 8 48 5 5 -100-134
K Hex Head
Cap Screw
L Back,
Flexback,
Upholstered
M Socket Head
Cap Screw
N Back Panel,
Flexback,
Upholstered
T Lock Washer 6 0012-001-001 0012-001-001 0012-001-001 0012-001-001 0012-001-001
P Sleeve,
Arm Post
1 4 85 6-110- 012* 4856 -110 -014* 4856-110-013* 48 5 6-110- 015* 4856 -110 -011
4 0003-149-000* 0003-149-000* 0003-149-000* 0003-149-000* 0003-149-000*
1 4853-020-100 4853-020-100 4853-020-100 4853-020-100 4853-020-100
4 0004-001-002 0004-001-002 0004-001-002 0004-001-002 0004-001-002
6 0004-001-004 0004-001-004 0004-001-004 0004-001-004 0004-001-004
1 4855-010-100** 4855-010-100** 4855-010-100** 4855-010-100** 4855-010-100**
6 0004-001-003** 0004-001-003** 0004-001-003** 0004-001-003** 0004-001-003**
1 4855-011-100** 4855-011-100** 4855-011-100** 4855-011-100** 4855-011-100**
2 4851-200-001 4851-200-001 4851-200-001 4851-200-001 4851-200-001
4856-010-002
White (B)
4856-010-003
Satin Nickel
(C)
4856-010-004
Orange/
Brown (D)
4856-010-005
Black (E)
* Shown for reference only. These parts or assemblies are not available individually for sale.
** For kits, see “Quick Reference Replacement Parts List” on page 1-15.
Return To Table of Contents
1-28 485 0-0 09 -001 RE V G www.stryker.com
Page 31

4857-010-000 Rev E (Reference Only)
Model 4857 - Ottoman
English
Item Description Qty. 4857-010-001
Chestnut (A)
A Frame Assembly,
Ottoman
B Glide 4 4 85 0 -100-127 4 85 0 -100-12 8 48 5 0-100-128 4 85 0 -100-127 48 5 0-100-127
C Ottoman
Assembly,
Upholstered
D Nylock Hex Nut 8 0016-142-000* 0016-142-000* 0016-142-000* 0016-142-000* 0016-142-000*
E Ottoman
Cardboard
H Washer 8 0011-001-004* 0011-001-004* 0011-001-004* 0011-001-004* 0011-001-004*
* Shown for reference only. These parts or assemblies are not available individually for sale.
2 4 85 7-110- 012* 4 857-110 - 014* 4857-110-013* 4 85 7-110- 015* 4 857-110 - 011*
1 4857-020-100* 4857-020-100* 4857-020-100* 4857-020-100* 4857-020-100*
1 48 57- 020 -130* 4857-020 -130* 4857-02 0 -130* 4857-020 -130* 4857-0 2 0 -130*
4857-010-002
White (B)
4857-010-003
Satin
Nickel (C)
4857-010-004
Orange/
Brown (D)
4857-010-005
Black (E)
www.stryker.com 485 0-0 09 -001 RE V G 1-29
Return To Table of Contents
Page 32

Warranty
English
Stryker Medical stands behind the craftsmanship of our products. Providing our customers quality products is our
mission, and we pledge to do everything we can to quickly resolve any problems encountered within the terms of the
warranties listed below.
LIMITED LIFETIME WARRANTY
Stryker Medical warrants our Michael Graves with Stryker Patient Chairs and Ottoman for the lifetime of the product,
classified as 10 years, under normal use and proper care. Subject to the limitations set below, Stryker will repair or, at
our option, replace defective merchandise free of charge.
Michael Graves with Stryker Patient Chairs and Ottoman
• 10 years on steel frames and arms
• 10 years on wood frame components
• 3 years on Stryker Medical textiles and foam
The Limited Lifetime warranty listed above is void in cases of modifications, misuse, improper assembly or maintenance,
accidents, damage caused by a carrier other than Stryker Medical, and the use of customer’s own material.
Stryker makes no other warranty or representation, either expressed or implied, except as set forth herein. There is no
warranty of merchantability and there are no warranties of fitness for any particular purpose. In no event shall Stryker
be liable hereunder for incidental or consequential damages arising from or in any manner related to sales or use of
any such equipment.
TO OBTAIN PARTS AND SERVICE
Stryker products are supported by a nationwide network of dedicated Stryker Field Service Representatives. These
representatives are factory trained, available locally, and carry a substantial spare parts inventory to minimize repair
time. Simply call your local representative, or call Stryker Customer Service USA at 1-800-327−0770.
RETURN AUTHORIZATION
Merchandise cannot be returned without approval from the Stryker Customer Service Department. An authorization
number will be provided which must be printed on the returned merchandise. Stryker reserves the right to charge shipping and restocking fees on returned items. Special, modified, or discontinued, items not subject to return.
DAMAGED MERCHANDISE
ICC Regulations require that claims for damaged merchandise must be made with the carrier within fifteen (15) days of
receipt of merchandise. Do not accept damaged shipments unless such damage is noted on the delivery receipt at
the time of receipt. Upon prompt notification, Stryker will file a freight claim with the appropriate carrier for damages
incurred. Claim will be limited in amount to the actual replacement cost. In the event that this information is not
received by Stryker within the fifteen (15) day period following the delivery of the merchandise, or the damage was not
noted on the delivery receipt at the time of receipt, the customer will be responsible for payment of the original invoice
in full. Claims for any short shipment must be made within thirty (30) days of invoice.
INTERNATIONAL WARRANTY CLAUSE
This warranty reflects U.S. domestic policy. Warranty outside the U.S. may vary by country. Please contact your local
Stryker Medical representative for additional information.
Return To Table of Contents
1-30 485 0-0 09 -001 RE V G www.stryker.com
Page 33

Page 34

Table des matières
Symboles et définitions................................................................... 2-2
Symboles ......................................................................... 2-2
Définition de « Avertissement », « Attention » et « Remarque »................................... 2-2
Introduction ........................................................................... 2-3
Utilisation prévue .................................................................... 2-3
Description du produit ................................................................ 2-3
Renseignements techniques............................................................ 2-4
Coordonnées....................................................................... 2-5
Emplacement du numéro de série ....................................................... 2-5
Illustration du produit ................................................................. 2-6
Résumé des consignes de sécurité.......................................................... 2-7
Guide d’utilisation .......................................................................2-9
Rangement du repose-pieds............................................................ 2-9
Entretien préventif ......................................................................2 -10
Liste de vérification ..................................................................2 -10
Nettoyage.............................................................................2-11
Entretien et nettoyage du tissu ..........................................................2-11
Nettoyage du châssis et des bras........................................................2 -14
Liste de référence rapide des pièces de rechange...............................................2 -15
Information relative au service .............................................................2 -16
Remplacement des patins de pieds (tous les modèles) ........................................2-1 6
Remplacement du dossier de fauteuil (modèles 4850, 4851, 4852, 4853 et 4854) ....................2 -17
Remplacement du dossier de fauteuil (modèles 4855 et 4856) ..................................2 -18
Remplacement du coussin de siège (tous les modèles)........................................2 -19
Modèle 4850 : fauteuil de patient, dossier bas, sans bras .........................................2-20
Modèle 4851 : fauteuil de patient, dossier bas, siège bas .........................................2-21
Modèle 4852 : fauteuil de patient, dossier bas 56 cm (22 po), siège haut..............................2-22
Modèle 4853 : fauteuil de patient, dossier haut, siège bas .........................................2-23
Modèle 4854 : fauteuil de patient, dossier haut 56 cm (22 po), siège haut .............................2-24
Modèle 4855 : fauteuil de patient, Comfort-Flex, siège bas ........................................2-25
Modèle 4856 : fauteuil de patient, Comfort-Flex 56 cm (22 po), siège haut.............................2-27
Modèle 4857 : repose-pieds ...............................................................2-29
Garantie............................................................................. 2-30
Garantie limitée à vie ................................................................ 2-30
Pièces de rechange et service ......................................................... 2-30
Autorisation de renvoi ............................................................... 2-30
Marchandise endommagée ........................................................... 2-30
Clause de garantie internationale ....................................................... 2-30
Français
www.stryker.com 485 0-0 09 -001 RE V G 2-1
Page 35

SYMBOLES
Symboles et définitions
Avertissement/Attention : Consulter la documentation associée
Français
Charge maximale de sécurité
Point de pincement
Fabricant
DÉFINITION DE « AVERTISSEMENT », « ATTENTION » ET « REMARQUE »
Les rubriques AVERTISSEMENT, ATTENTION et REMARQUE sont particulièrement importantes et doivent faire
l’objet d’une lecture attentive.
AVERTISSEMENT
Alerte le lecteur qu’une situation, si elle n’est pas évitée, peut entraîner des blessures graves voire la mort. Ce symbole
peut également décrire des réactions potentiellement adverses et des risques importants pour la sécurité.
ATTENTION
Alerte le lecteur d’une situation potentiellement dangereuse susceptible d’entraîner des blessures mineures ou modérées
au patient ou à l’usager si elle n’est pas évitée, et l’endommagement de l’équipement ou d’autres biens. Couvre
notamment les précautions à prendre afin d’assurer l’utilisation sécuritaire et efficace de l’équipement et d’éviter les
dommages qui pourraient découler de son utilisation ou d’une mauvaise utilisation.
REMARQUE :
Fournit des renseignements particuliers pour faciliter l’entretien ou clarifier des instructions importantes.
Retour à la table des matières
2-2 485 0-0 09 -001 RE V G www.stryker.com
Page 36

Introduction
Ce manuel est conçu pour faciliter l’utilisation du mobilier Michael Graves en collaboration avec Stryker pour les
fauteuils de patient et repose-pieds. Lire attentivement ce manuel avant d’utiliser cet équipement ou de procéder à son
entretien. Pour assurer une utilisation en toute sécurité de cet équipement, il est recommandé d’établir des méthodes
et des procédures afin de renseigner et de former le personnel à l’utilisation sécuritaire de cette unité.
UTILISATION PRÉVUE
Le mobilier Michael Graves en collaboration avec Stryker pour les fauteuils de patient et repose-pieds est destiné à
permettre aux patients et invités adultes et pédiatriques de s’asseoir à l’intérieur dans un cadre médical. Ces produits
ne sont pas destinés aux nourrissons ou à accueillir des nacelles porte-bébé.
La gamme de produits comprend des fauteuils sans roulettes et non motorisés qui, en raison de leurs bras de forme
spéciale, permettent aux patients d’atteindre et de quitter leur fauteuil pour se lever ou s’asseoir, ou aident les patients
au cours d’un traitement ou d’un examen :
• Modèle 4851 : Michael Graves en collaboration avec Stryker pour les fauteuils de patient et repose-pieds
à dossier bas
• Modèle 4852 : Michael Graves en collaboration avec Stryker pour les fauteuils de patient et repose-pieds
à dossier bas et hauteur de siège de 56 cm (22 po)
• Modèle 4853 : Michael Graves en collaboration avec Stryker pour les fauteuils de patient et repose-pieds
à dossier haut
• Modèle 4854 : Michael Graves en collaboration avec Stryker pour les fauteuils de patient et repose-pieds
à dossier haut et hauteur de siège de 56 cm (22 po)
• Modèle 4855 : Michael Graves en collaboration avec Stryker pour les fauteuils de patient et repose-pieds
Comfort-Flex
• Modèle 4856 : Michael Graves en collaboration avec Stryker pour les fauteuils de patient et repose-pieds
Comfort-Flex à hauteur de siège de 56 cm (22 po)
La gamme de produits propose en outre un fauteuil sans bras, sans roulettes et non motorisé :
• Modèle 4850 : Michael Graves en collaboration avec Stryker pour les fauteuils de patient et repose-pieds
sans bras
Français
La gamme de produits comprend également un repose-pieds et un siège auxiliaire sans roulettes et non motorisé qui
se range sous les modèles de fauteuils mentionnés plus haut :
• Modèle 4857 : Michael Graves en collaboration avec Stryker pour les fauteuils de patient et repose-pieds
L’utilisation prévue des unités exige que le patient soit assis sur le coussin et non sur les bras du fauteuil, sans
s’appuyer sur les bras ou le dossier du fauteuil en position debout, et sans se tenir debout sur le siège ou le reposepieds du fauteuil.
Pour les modèles Comfort-Flex (modèles 4855 et 4856), ne pas installer les patients avec une restriction du basculement d’avant en arrière dans cette unité.
En condition d’utilisation normale, le mobilier Michael Graves en collaboration avec Stryker pour les fauteuils de patient
et repose-pieds a une espérance de vie de dix (10) ans et une capacité pondérale de 136 kg (300 lb). Cette utilisation
est définie par le fait d’atteindre et de quitter le fauteuil. Une utilisation typique est deux tels événements par jour.
DESCRIPTION DU PRODUIT
Le mobilier Michael Graves en collaboration avec Stryker pour les fauteuils de patient et repose-pieds est conçu pour
aider à garder la bonne posture. L’esthétique remarquable de ce nouveau fauteuil de patient annonce clairement une
fonctionnalité supérieure. Le fauteuil est disponible avec ou sans bras et propose deux réglages de hauteur avec les
configurations à dossier bas, dossier haut ou Comfort-Flex. Un repose-pieds est également disponible pour l’appui
des pieds ou un siège supplémentaire.
Retour à la table des matières
www.stryker.com 485 0-0 09 -001 RE V G 2-3
Page 37

Introduction
RENSEIGNEMENTS TECHNIQUES
Remarque : Toutes les dimensions sont arrondies à 1,27 cm (0,5 pouce).
Français
4850
Sans bras
Charge maximale
de sécurité
Largeur globale 56 cm (22 po) 67 cm (26,5 po) 67 cm (26,5 po) 67 cm (26,5 po)
Hauteur globale 89 cm (35 po) 89 cm (35 po) 100 cm (39,5 po) 109 cm (43 po)
Profondeur globale 71 cm (28 po) 77,5 cm (30,5 po) 77,5 cm (30,5 po) 80 cm (31,5 po)
Hauteur de siège
à partir du sol
Profondeur du siège 51 cm (20 po) 51 cm (20 po) 51 cm (20 po) 51 cm (20 po)
Hauteur de dossier
depuis le siège
Hauteur de bras depuis le
sol (au point médian de
la profondeur de siège)
136 kg (300 lb) 136 kg (300 lb) 136 kg (300 lb) 136 kg (300 lb)
48 cm (19 po) 48 cm (19 po) 60 cm (23,5 po) 48 cm (19 po)
43 cm (17 po) 43 cm (17 po) 43 cm (17 po) 65 cm (25,5 po)
Non applicable 66 cm (26 po) 76 cm (30 po) 66 cm (26 po)
4854
Dossier haut
56 cm (22 po)
4851
Dossier bas
4855
Comfort-Flex
4852
Dossier bas
56 cm (22 po)
4856
Comfort-Flex
56 cm (22 po)
4853
Dossier haut
4857
Repose-pieds
Charge maximale
de sécurité
Largeur globale 67 cm (26,5 po) 67 cm (26,5 po) 67 cm (26,5 po) 47 cm (18,5 po)
Hauteur globale 119,5 cm (47 po) 109 cm (43 po) 119,5 cm (47 po) 33 cm (13 po)
Profondeur globale 80 cm (31,5 po) 80 cm (31,5 po) 80 cm (31,5 po) 44,5 cm (17,5 po)
Hauteur de siège
à partir du sol
Profondeur du siège 51 cm (20 po) 51 cm (20 po) 51 cm (20 po) Non applicable
Hauteur de dossier
depuis le siège
Hauteur de bras depuis
le sol (point médian de
la profondeur de siège)
Stryker se réserve le droit de modifier ces caractéristiques sans préavis.
136 kg (300 lb) 136 kg (300 lb) 136 kg (300 lb) 136 kg (300 lb)
60 cm (23,5 po) 48 cm (19 po) 60 cm (23,5 po) Non applicable
65 cm (25,5 po) 63,5 cm (25 po) 63,5 cm (25 po) Non applicable
76 cm (30 po) 66 cm (26 po) 76 cm (30 po) Non applicable
Retour à la table des matières
2-4 485 0-0 09 -001 RE V G www.stryker.com
Page 38

Introduction
COORDONNÉES
L’utilisateur peut communiquer avec le service à la clientèle ou le soutien technique de Stryker au 1-800-327-0770.
Stryker Medical
3800 E. Centre Avenue
Portage, MI 49002
États-Unis
Garder le numéro de série du produit Stryker à portée de main
avant d’appeler le service à la clientèle ou le support technique de
Stryker. Indiquer le numéro de série dans toutes les communications
écrites.
EMPLACEMENT DU NUMÉRO DE SÉRIE
Le numéro de série (A) du fauteuil est situé derrière le barreau
du châssis sous le siège (Figure 1) sur l’étiquette du contenu
(Figure 2).
A
Français
Figure 1 : Emplacement du numéro de série
NUMÉRO
SERIAL NUMBER
DE SÉRIE
INFOS TISSU
FABRIC INFO
UGS STRYKER
STRYKER SKU
DATE
DATE
INFOS CARB
CARB INFO
A
NUMÉRO DE SÉRIE
SERIAL NUMBER
Figure 2 : Étiquette de contenu : située sous le coussin du siège
www.stryker.com 485 0-0 09 -001 RE V G 2-5
Retour à la table des matières
Page 39

Français
Introduction
ILLUSTRATION DU PRODUIT
Dossier de fauteuil
Capuchon
en
plastique
Bras de fauteuil
Siège de fauteuil
Repose-pieds
Patins
Figure 3 : Illustration du produit
Pied de repose-pieds
Retour à la table des matières
2-6 485 0-0 09 -001 RE V G www.stryker.com
Page 40

Résumé des consignes de sécurité
AVERTISSEMENT
• Pour éviter le risque de blessure grave ou l’endommagement du produit, on ne doit pas se tenir debout sur
le siège du fauteuil ou le repose-pieds.
• Pour éviter le risque de blessure grave ou l’endommagement du produit, ne pas s’assoir sur les bras du fauteuil.
• Pour éviter le risque de blessure grave ou l’endommagement du produit en se tenant derrière le fauteuil, ne pas
s’appuyer sur le dossier et les bras du fauteuil.
• Pour éviter le risque de blessure grave ou l’endommagement du produit, maintenir les quatre pieds du fauteuil
au sol en étant assis.
• Pour éviter le risque de blessure grave ou l’endommagement du produit, ne pas poser de nourrissons ou de
nacelles porte-bébé sur le fauteuil ou le repose-pieds.
• Pour éviter le risque de blessure grave, uniquement pour les fauteuils Comfort-Flex, ne pas positionner les patients
avec une restriction du basculement d’avant en arrière dans cette unité.
• En présence de perforations ou de déchirures dans les bras du fauteuil, sur l’ensemble châssis du fauteuil à siège
capitonné, le dossier du fauteuil capitonné, le panneau dorsal du fauteuil capitonné ou l’ensemble repose-pieds
capitonné, remplacer l’ensemble ou le composant afin d’éviter une biocontamination.
• Pour les fauteuils sans bras, ne pas utiliser le produit en l’absence des capuchons en plastique afin d’éviter
une biocontamination.
• Ranger le repose-pieds sous le fauteuil quand il n’est pas utilisé pour éviter les risque de trébuchement.
• L’absence d’un nettoyage adéquat d’une surface contaminée augmente le risque d’exposition aux pathogènes à
diffusion hématogène.
Français
MISE EN GARDE
• Pour ne pas endommager le capitonnage du repose-pieds, ne pas forcer le repose-pieds contre les composants
du châssis du fauteuil (fauteuils Comfort-Flex uniquement).
• Pour éviter le risque d’endommagement du produit ou du sol, ne pas utiliser le fauteuil et/ou le repose-pieds
si tous les patins ne sont pas présents.
• Utiliser un chiffon blanc et doux pour nettoyer les zones souillées ou tachées. Éviter d’utiliser des serviettes
essuie-tout.
• Les produits nettoyants peuvent être nocifs à la peau et/ou aux yeux. Utiliser des gants de protection et des
protections pour les yeux. Protéger la zone et le tissu environnants de l’exposition aux nettoyants. Ne pas inhaler
ni ingérer les agents de nettoyage. Suivre toutes les mises en garde du fabricant du produit nettoyant.
• L’utilisation de certains agents peut nuire à l’aspect de la surface et à la durée de vie des tissus. Vérifier la
compatibilité des produits nettoyants avec d’autres surfaces du mobilier, telles que les surfaces peintes ou vernies.
• Nettoyer toutes les taches sans attendre, car certaines taches deviennent permanentes si elles ne sont pas
éliminées rapidement.
• Cette information ne constitue pas une garantie et ne dégage pas de la responsabilité d’utiliser correctement et
en toute sécurité ces tissus et tous les agents de nettoyage.
• Pour éviter le risque d’endommagement par l’équipement du nouveau panneau arrière, vérifier que chaque rivet à
pression est aligné avec son écrou encastré avant l’installation.
• En nettoyant des tissus en vinyle, l’utilisation de produits à action revitalisante ou protectrice n’est pas recommandée et doit être évitée.
• L’utilisation d’agents nettoyants quaternaires contenant de l’éther butylique de diéthylène glycol ou de l’alcool sur les
surfaces inférieures du fauteuil et du repose-pieds risque de compromettre la lisibilité des étiquettes préimprimées.
Si cela se produit, se reporter à “Étiquettes de produitRetour à la table des matièresÉtiquettes de produit” on page
www.stryker.com 485 0-0 09 -001 RE V G 2-7
Retour à la table des matières
Page 41

Français
Résumé des consignes de sécurité
ATTENTION (SUITE)
2-11 pour lire le texte original de l’étiquette.
• Il convient d’établir un programme d’entretien préventif pour tous les équipements. On jugera nécessaire
d’augmenter la fréquence des entretiens préventifs en fonction des conditions d’utilisation du matériel. Pour des
informations supplémentaires sur l’entretien, se reporter à la “Liste de vérification” on page 2-10.
• Un entretien incorrect peut provoquer des blessures ou endommager le produit. Maintenir l’unité tel que décrit
dans ce manuel. Utiliser uniquement les pièces et les procédures d’entretien approuvées par Stryker. L’utilisation
de pièces et de procédures non approuvée pourrait entraîner des opérations imprévisibles et/ou des blessures et
annulera la garantie du produit (voir “Garantie” on page 2-30).
• En utilisant les modèles Comfort-Flex 4855 et 4856, tenir les extrémités éloignées des points identifiés dans la
figure 4, en raison de la présence de points de pincement éventuels pouvant entraîner des blessures mineures ou
modérées.
Figure 4 : Points de pincement Comfort-Flex
Retour à la table des matières
2-8 485 0-0 09 -001 RE V G www.stryker.com
Page 42

Guide d’utilisation
RANGEMENT DU REPOSE-PIEDS
AVERTISSEMENT
Ranger le repose-pieds sous le fauteuil quand il n’est pas utilisé pour éviter les risques de trébuchement.
Pour les modèles 4851, 4852, 4853, 4854, 4855
et 4856 uniquement, quand il n’est pas utilisé,
ranger le repose-pieds latéralement sous l’avant
du fauteuil conformément à la figure 5.
MISE EN GARDE
Pour ne pas endommager le capitonnage du
repose-pieds, ne pas forcer le repose-pieds
contre les composants du châssis du fauteuil
(fauteuils Comfort-Flex uniquement).
Français
Pour les modèles 4850 uniquement, quand il
n’est pas utilisé, ranger le repose-pieds en le faisant pivoter sous le fauteuil depuis l’avant conformément à la figure 6.
Figure 5 : Rangement latéral du repose-pieds (comme illustré) -
Modèles 4851, 4852, 4853, 4854, 4855 et 4856 uniquement
Figure 6 : Rangement pivoté du repose-pieds (comme illustré) -
Modèle 4850 uniquement
www.stryker.com 485 0-0 09 -001 RE V G 2-9
Retour à la table des matières
Page 43

Français
Entretien préventif
L’entretien préventif doit être effectué au minimum une fois par an. Il convient d’établir un programme d’entretien
préventif pour tous les équipements Stryker Medical. On jugera nécessaire d’augmenter la fréquence des entretiens
préventifs en fonction des conditions d’utilisation du matériel.
LISTE DE VÉRIFICATION
_____ Toutes les fermetures sont solides et intactes
_____ Tous les patins de pied sont solides et intacts pour ne pas endommager le sol
_____ Tous les coussins de siège et les dossiers de fauteuil sont solides et intacts
_____ Les deux bras sont bien fixés et intacts
_____ Toutes les soudures (châssis métalliques) sont bien fixées et intactes
_____ Absence de perforation ou de déchirure dans les bras du fauteuil, ensemble châssis du siège de fauteuil
capitonné, dossier de fauteuil capitonné, panneau arrière de fauteuil capitonné ou ensemble repose-pieds
capitonné
_____ Tous les capuchons en plastique sont bien fixés et intacts (fauteuils sans bras uniquement)
_____ Le mécanisme Comfort-Flex est fonctionnel et fonctionne sans problème (fauteuils Comfort-Flex uniquement)
_____ Vérifier la lisibilité, l’adhérence et l’intégrité des étiquettes mentionnées dans les manuels d’utilisation et
d’entretien.
MISE EN GARDE
• Il convient d’établir un programme d’entretien préventif pour tous les équipements. On jugera nécessaire
d’augmenter la fréquence des entretiens préventifs en fonction des conditions d’utilisation du matériel.
• Un entretien incorrect peut provoquer des blessures ou endommager le produit. Maintenir l’unité tel que décrit
dans ce manuel. Utiliser uniquement les pièces et les procédures d’entretien approuvées par Stryker. L’utilisation
de pièces et de procédures non approuvées pourrait entraîner des opérations imprévisibles et/ou des blessures et
annulera la garantie du produit (voir “Garantie” on page 2-30).
Numéro de série de l’unité :
Date :
Vérification réalisée par : ____________________________________
_____________________
Retour à la table des matières
2-10 4 850- 009-0 01 REV G www.stryker.com
Page 44

Nettoyage
ENTRETIEN ET NETTOYAGE DU TISSU
AVERTISSEMENT
L’absence de nettoyage adéquat d’une surface contaminée augmente le risque d’exposition aux pathogènes à diffusion
hématogène.
L’utilisateur doit suivre ces instructions pour être sûr de bien nettoyer les tissus Stryker Medical (vinyle, sans PVC, sans
PVC avec Agion®, Crypton®, Crypton® Green ou Agion® tissé) en toute sécurité. Le non respect de ces instructions peut
endommager le matériel et perturber ses performances.
ATTENTION
• Utiliser un chiffon blanc et doux pour nettoyer les zones souillées ou tachées. Éviter d’utiliser des serviettes
essuie-tout.
• Les produits nettoyants peuvent être nocifs à la peau et/ou aux yeux. Utiliser des gants de protection et des
protections des yeux. Protéger la zone et le tissu environnants de l’exposition aux nettoyants. Ne pas inhaler ni
ingérer les agents de nettoyage. Suivre toutes les mises en garde du fabricant du produit nettoyant.
• L’utilisation de certains agents peut nuire à l’aspect de la surface et à la durée de vie des tissus. Vérifier la
compatibilité des produits nettoyants avec d’autres surfaces du mobilier, telles que les surfaces peintes ou vernies.
• Nettoyer toutes les taches sans attendre, car certaines taches deviennent permanentes si elles ne sont pas
éliminées rapidement.
• Cette information ne constitue pas une garantie et ne dégage pas de la responsabilité d’utiliser correctement et en
toute sécurité ces tissus et tous les agents de nettoyage.
Français
Vinyle
Nettoyer toutes les taches le plus rapidement possible et utiliser les procédures de nettoyage suivantes pour obtenir
des résultats optimaux.
ATTENTION
En nettoyant des tissus en vinyle, l’utilisation de produits à action revitalisante ou protectrice n’est pas recommandée et
doit être évitée.
Protocole de nettoyage A (voir tableau page 2-12) :
• Éponger tout écoulement excessif avec un chiffon humide et propre. Nettoyer avec un mélange d’eau chaude et
de 10 % de savon liquide. Rincer à l’eau claire et sécher.
• Pour les taches rebelles, utiliser une application directe de nettoyant liquide vendu dans le commerce à base de
solvant et de butyle. Essuyer avec un chiffon propre. Rincer à l’eau claire et sécher.
• Si la tache persiste, utiliser un mélange 1:1 d’eau et d’alcool isopropyle. Rincer abondamment à l’eau puis sécher
en tamponnant la surface avec un chiffon non pelucheux. Si elle persiste après six tentatives, la tache s’est
imprégnée et ne peut sans doute plus être éliminée.
• Pour les taches plus rebelles ou difficiles, utiliser un mélange de 9:1 d’eau et d’eau de Javel (mélanger 10 % d’eau
de Javel pour 90 % d’eau). Rincer à l’eau claire et sécher. Si la tache persiste, utiliser un chiffon propre saturé de
produit de nettoyage dilué et frotter la tache d’un geste circulaire. Essuyer en tamponnant avec un autre chiffon
propre. Répéter l’opération le cas échéant.
Protocole de nettoyage B (voir tableau page 2-12) :
• Éponger tout écoulement excessif avec un chiffon humide et propre. Nettoyer avec un mélange d’eau chaude et
de 10 % de savon liquide. Rincer à l’eau claire et sécher.
• Pour les taches rebelles, appliquer une solution de produit nettoyant liquide et d’eau avec une brosse souple.
Éliminer les résidus avec un chiffon humide et propre. Humidifier un chiffon blanc et propre avec une solution
d’eau de Javel chlorée (10 % d’eau de Javel pour 90 % d’eau). Frotter délicatement. Rincer à l’aide d’un chiffon
humide et propre pour éliminer la concentration d’eau de Javel.
www.stryker.com 485 0-0 09 -001 RE V G 2- 11
Retour à la table des matières
Page 45

Français
Nettoyage
ENTRETIEN ET NETTOYAGE DU TISSU (SUITE)
• Si la tache persiste, laisser s’accumuler un mélange dilué de 1:10 d’eau et d’eau de Javel et sur la zone affectée,
ou appliquer à l’aide d’un chiffon humide et propre pendant environ 30 minutes. Rincer à l’aide d’un chiffon
humide et propre pour éliminer la concentration d’eau de Javel restante.
Protocoles de nettoyage recommandé pour le vinyle :
Respecter les instructions de nettoyage du protocole A ou du protocole B décrits page 2-11 conformément aux motifs
ci-dessous.
Motif Protocole A Protocole B
Abacus X
Aspen X
Avant X
Banyan X
Bari X
Bistro X
Bon Voyage X
Capreni X
Carlisle X
Casablanca X
Checkmate X
Chroma X
Cirque X
Dash X
Dodge Ball X
Facet X
Geomet X
Juxy X
Laredo X
Lava X
Martini X
Motif Protocole A Protocole B
Matrix X
Natural World X
Oakwood X
Olympus X
Oxford X
Petals X
Prisma X
Raffia X
Rally X
Rialto X
Rivera X
Script X
Shantung X
Smile X
Southampton X
Tendril X
Tessuto X
Walk the Line X
Whitney X
Ybor X
Ziggy X
Retour à la table des matières
2-12 4850- 009 -001 REV G www.stryker.com
Page 46

Nettoyage
ENTRETIEN ET NETTOYAGE DU TISSU (SUITE)
Sans PVC et sans PVC avec Agion
®
Nettoyer toutes les taches le plus rapidement possible et utiliser les procédures de nettoyage suivantes pour obtenir
des résultats optimaux.
• Éponger tout écoulement excessif avec un chiffon humide et propre. Nettoyer avec un mélange d’eau chaude et
de 10 % de savon liquide. Rincer à l’eau claire et sécher.
• Pour les taches rebelles, utiliser un mélange 1:1 d’eau et de produit nettoyant liquide vendu dans le commerce à
base de solvant et de butyle. Rincer à l’eau claire. Essuyer avec un chiffon propre.
• Pour les taches plus rebelles ou difficiles, utiliser un mélange 5:1 d’eau et d’eau de Javel (mélanger 5 parts d’eau
et 1 part d’eau de Javel). Rincer à l’eau claire et sécher. Ne jamais utiliser d’eau de Javel pure pour nettoyer et/
ou désinfecter les produits sans PVC.
Remarque : Utiliser une brosse souple ou un chiffon propre saturé de produit de nettoyage. Toujours tester les
méthodes de nettoyage sur une région non visible du mobilier.
Crypton
®
et Crypton Green
®
Pour éviter l’encrassement global, il est recommandé de passer régulièrement l’aspirateur ou de brosser légèrement le
mobilier pour éliminer les impuretés, la poussière et la saleté. Enlever les taches en utilisant la mousse d’un agent de
nettoyage à base d’eau tel qu’un détergent doux ou un shampoing d’ameublement sans solvant. Appliquer la mousse
avec un chiffon doux ou une brosse d’un geste circulaire. Passer l’aspirateur quand la surface est sèche. Toujours
tester préalablement une petite zone avant de poursuivre.
Éliminer toutes les impuretés et les écoulements le plus rapidement possible.
Français
• Essuyer les écoulements avant qu’ils ne sèchent à l’aide d’un chiffon propre.
• Si la tache a séché, brosser ou gratter légèrement le résidu et essuyer à l’aide d’une serviette humide.
• Si la tache persiste, nettoyer le tissu avec un mélange d’eau et de détergent enzymatique (mélanger 5 parts d’eau
pour 1 part de détergent enzymatique). Frotter la zone pendant une minute en utilisant un brosse en nylon souple.
Rincer à l’eau claire en ne laissant pas de résidus. Sécher avec un chiffon propre.
• Répéter le cas échéant.
Ne pas utiliser de produits nettoyants à base de solvants car ils risquent d’endommager le tissu.
Agion® tissé
On peut utiliser des agents de nettoyage à base d’eau et de la mousse de nettoyage Agion® tissé. Des solvants doux
sans eau peuvent également être utilisés pour nettoyer. Un nettoyage par un service professionnel est recommandé.
• Pour nettoyer facilement les souillures récentes, la plupart des taches peuvent être essuyées à l’aide d’un chiffon
propre.
• Pour les taches rebelles, nettoyer avec un mélange d’eau chaude et de 10 % de savon liquide. Appliquer une
solution de nettoyage diluée sur un chiffon propre ou une brosse souple. Humidifier un chiffon propre à l’eau claire
et reprendre la tache pour l’essuyer et rincer. Laisser sécher à l’air.
• Pour les taches plus rebelles ou difficiles, utiliser un mélange d’eau et de produit nettoyant doux à base de solvant.
Rincer à l’eau claire. Essuyer avec un chiffon propre.
• Si la tache persiste, utiliser un mélange 1:5 d’eau et de solution d’eau de Javel (mélanger 5 parts d’eau pour 1 part
d’eau de Javel) avec une solution contenant au maximum 20 % d’eau de Javel. Tamponner la tache à l’aide d’un
chiffon propre saturé dans le mélange d’eau de Javel dilué. Rincer la région de la tache avec un chiffon humide
et propre et laisser sécher. Les solutions d’eau de Javel feraient pâlir le tissu si elles ne sont pas complètement
éliminées. Ne jamais utiliser d’eau de Javel pure pour nettoyer ces tissus.
www.stryker.com 485 0-0 09 -001 RE V G 2 -13
Retour à la table des matières
Page 47

Français
Nettoyage
ENTRETIEN ET NETTOYAGE DU TISSU (SUITE)
Remarque : Utiliser une brosse souple ou un chiffon propre saturé de produit de nettoyage. Tester les méthodes
de nettoyage sur une région non visible du mobilier. Si la tache persiste, elle s’est probablement incrustée. Même si
ces tissus résistent à la plupart des taches, certains agents tels que l’encre peuvent produire une tache permanente.
Éliminer toutes les taches le plus rapidement possible.
NETTOYAGE DU CHÂSSIS ET DES BRAS
Les produits nettoyants pour le châssis et les bras sont les suivants :
• ammoniums quaternaires (substance active : chlorure d’ammonium)
• nettoyants phénoliques (substance active : o-phénylphénol)
• nettoyants à base d’alcool (teneur maximum en alcool de 70 %)
• Solution d’eau de Javel (une part d’eau de Javel pour 100 parts d’eau).
L’eau de Javel chlorée est recommandée comme nettoyant (moins d’une part d’eau de Javel pour 100 parts d’eau).
Par exemple, une solution d’eau de Javel à 6 % diluée dans 165 millilitres de solution d’eau de Javel par litre d’eau,
ou 20 onces de solution d’eau de Javel par gallon d’eau. Rincer la solution de la surface du produit pour éliminer
toute trace d’eau de Javel. Si d’autres agents de nettoyage de classe hospitalière sont utilisés, suivre les instructions
fournies par le fabricant de la solution de nettoyage. Ne pas laisser de solutions de nettoyage ou d’autres fluides
s’accumuler sur l’unité. Essuyer la surface de l’unité avec un linge doux et sec pour retirer toute trace d’humidité.
ATTENTION
L’utilisation d’agents nettoyants quaternaires contenant de l’éther butylique de diéthylène glycol ou de l’alcool sur les
surfaces inférieures du fauteuil et du repose-pieds risque de compromettre la lisibilité des étiquettes préimprimées. Si
cela se produit, se reporter à “Étiquettes de produitRetour à la table des matièresÉtiquettes de produit” on page 2-11
pour lire le texte original de l’étiquette.
Retour à la table des matières
2- 14 4850 - 00 9-0 01 REV G www.stryker.com
Page 48

Liste de référence rapide des pièces de rechange
Tous les accessoires et les pièces indiqués sur cette page sont actuellement disponibles à la vente. Certaines des
pièces indiquées sur les vues éclatées de ce manuel peuvent ne pas être disponibles à la vente individuellement.
L’utilisateur doit communiquer avec le service à la clientèle de Stryker au 1-800-327-0770 (États-Unis) pour connaître
la disponibilité et les prix.
Nom de la pièce Référence
Trousse de coussin dorsal, dossier bas 4850-700-001
Trousse de coussin dorsal, dossier haut 4853-700-001
Trousse de coussin dorsal, Comfort-Flex 4856-700-001
Patin, noir (modules de couleur A, D et E uniquement) 48 5 0-100 -127
Patin, pierre (modules de couleur B et C uniquement) 4850 -100-128
Capuchon plastique, châtaigne (fauteuil sans bras : module de couleur A uniquement) 485 0 -100-115
Capuchon plastique, blanc (fauteuil sans bras : module de couleur B uniquement) 48 5 0-100-117
Capuchon plastique, nickel satiné (fauteuil sans bras : module de couleur C uniquement) 4850-100-116
Capuchon plastique, orange/marron (fauteuil sans bras : module de couleur D uniquement) 4850 -100 -118
Capuchon plastique, noir (fauteuil sans bras : module de couleur E uniquement) 4 8 50 -100-114
Ensemble siège en mousse, capitonné (fauteuil sans bras uniquement) 4850-020-100
Ensemble siège en mousse, capitonné (fauteuils avec bras uniquement) 4853-020-100
Français
www.stryker.com 485 0-0 09 -001 RE V G 2 -15
Retour à la table des matières
Page 49

Français
Information relative au service
REMPLACEMENT DES PATINS DE PIEDS (TOUS LES MODÈLES)
Outils requis :
• Marteau
• Tournevis à lame plate
Procédure :
1. Mettre le fauteuil ou le repose-pieds à l’envers de façon à lever ses pieds du sol.
Remarque : Placer une feuille de papier ou une surface équivalente sur le sol pour ne pas abîmer le tissu du
fauteuil ou du repose-pieds.
2. À l’aide d’un tournevis à lame plate ou d’un marteau, détacher soigneusement le patin endommagé (A) du pied (B)
conformément à la figure 7 (pied de repose-pieds) ou de la figure 8 (pied de fauteuil). Jeter le patin.
3. À l’aide d’un marteau, monter le nouveau patin en l’enfonçant dans le pied du fauteuil ou du repose-pieds de façon
à le faire affleurer avec l’extrémité du pied.
Remarque : Le patin de pied est conique. Avant l’installation, s’assurer que le côté effilé est positionné vers
l’intérieur et le milieu du fauteuil ou du repose-pieds.
4. Remettre le fauteuil ou le repose-pieds à l’endroit.
5. Vérifier le bon fonctionnement de l’unité avant de la remettre en service.
B
B
A
Figure 7 : Remplacement des patins de pieds du
repose-pieds
Retour à la table des matières
2-16 4 85 0- 009 -001 REV G www.stryker.com
A
Figure 8 : Remplacement des patins de pieds du
fauteuil
Page 50

Information relative au service
REMPLACEMENT DU DOSSIER DE FAUTEUIL (MODÈLES 4850, 4851, 4852, 4853 ET 4854)
Pour les modèles 4850, 4851 et 4852, installer la trousse (réf. 4850-700-001)
Pour les modèles 4853 et 4854, installer la trousse (réf. 4853-700-001)
Outils requis :
• Tournevis à large lame plate
• Tournevis cruciforme nº 3
Procédure :
1. À l’aide d’un tournevis à lame plate no 2, détacher soigneusement le panneau arrière (A) du coussin dorsal (B)
(Figure 9).
Remarque : Pour les modèles 4850, 4851 et 4852, sept rivets à pression (C) maintiennent le panneau arrière
au coussin dorsal. Pour les modèles 4853 et 4854, neuf rivets à pression (C) maintiennent le panneau arrière au
coussin dorsal (Figure 9).
2. À l’aide d’un tournevis cruciforme nº 3, retirer les quatre vis (D) qui maintiennent le coussin dorsal au châssis du
fauteuil (E) et retirer le coussin du dossier (Figure 9). Jeter le coussin dorsal, le panneau arrière et les vis.
3. À l’aide d’un tournevis cruciforme nº 3, monter les quatre vis fournies pour fixer le nouveau coussin dorsal au
châssis du fauteuil. Commencer par enfiler chaque vis avant de serrer toutes les quatre.
4. Installer le nouveau panneau arrière dans le nouveau coussin dorsal en alignant les sept rivets à pression avec
les écrous encastrés du coussin dorsal.
Enfoncer soigneusement chaque rivet
à pression après les avoir localisés de
l’extérieur à travers le tissu.
Remarque : S’assurer que chaque rivet
à pression est bien positionné et que
le panneau arrière est en contact étroit
avec le coussin.
B
A
C
Français
ATTENTION
Pour éviter le risque d’endommagement par
l’équipement du nouveau panneau arrière,
vérifier que chaque rivet à pression est aligné
avec son écrou encastré avant l’installation.
5. Vérifier le bon fonctionnement de l’unité
avant de la remettre en service.
D
E
Figure 9 : Remplacement du dossier (modèle 4853 illustré)
Retour à la table des matières
www.stryker.com 485 0-0 09 -001 RE V G 2 -17
Page 51

Information relative au service
REMPLACEMENT DU DOSSIER DE FAUTEUIL (MODÈLES 4855 ET 4856)
Pour les modèles 4855 et 4856, installer la trousse (réf. 4856-700-001)
Outils requis :
Français
• Tournevis à lame plate
• Tournevis cruciforme nº 3
Procédure :
1. À l’aide d’un tournevis à lame plate no 2, détacher soigneusement le panneau arrière (A) du coussin de dossier
(B) (Figure 10).
Remarque : Onze rivets à pression (C) maintiennent le panneau arrière au coussin du dossier (Figure 10).
2. À l’aide d’un tournevis cruciforme nº 3, retirer les six vis (D) qui maintiennent le coussin dorsal au châssis du
fauteuil (E) et retirer le coussin dorsal (Figure 10). Jeter le coussin dorsal, le panneau arrière et les vis.
3. À l’aide d’un tournevis cruciforme nº 3, monter les six vis fournies qui maintiennent le nouveau coussin dorsal au
châssis du fauteuil. Commencer par enfiler chaque vis avant de serrer toutes les six.
4. Installer le nouveau panneau arrière dans le nouveau coussin dorsal en alignant les onze rivets à pression avec
les écrous encastrés du coussin dorsal. Enfoncer soigneusement chaque rivet à pression après les avoir localisés
de l’extérieur à travers le tissu.
Remarque : S’assurer que chaque rivet
à pression est bien positionné et que
le panneau arrière est en contact étroit
avec le coussin.
ATTENTION
B
A
Pour éviter le risque d’endommagement
de l’équipement au nouveau panneau arrière,
vérifier que chaque rivet à pression est aligné
avec son écrou encastré avant l’installation.
5. Vérifier le bon fonctionnement de l’unité
avant de la remettre en service.
C
D
E
Figure 10 : Remplacement du dossier (modèle 4855 illustré)
Retour à la table des matières
2-18 4 85 0- 009 -001 REV G www.stryker.com
Page 52

Information relative au service
REMPLACEMENT DU COUSSIN DE SIÈGE (TOUS LES MODÈLES)
Outils requis :
• Tournevis cruciforme nº 3
Procédure :
1. Mettre le fauteuil à l’envers de façon à lever ses pieds du sol.
Remarque : Placer une feuille de papier ou une surface équivalente sur le sol pour ne pas abîmer le tissu du
fauteuil.
2. À l’aide d’un tournevis cruciforme nº 3, retirer les quatre vis (A) qui maintiennent le coussin du siège (B) au châssis
du fauteuil (C), et retirer le coussin (Figure 11). Jeter le coussin et les vis.
3. À l’aide d’un tournevis cruciforme nº 3, monter les quatre vis fournies qui maintiennent le nouveau coussin de siège
au châssis du fauteuil. Commencer par enfiler chaque vis avant de serrer toutes les quatre.
4. Remettre le fauteuil à l’endroit.
5. Vérifier le bon fonctionnement de l’unité avant de la remettre en service.
Français
B
C
A
Figure 11 : Remplacement du coussin du siège
www.stryker.com 485 0-0 09 -001 RE V G 2 -19
Retour à la table des matières
Page 53

Français
Modèle 4850 : fauteuil de patient, dossier bas, sans bras
4850-010-000 Rév. D (Référence uniquement)
Article Description Qté 4850-010-001
Châtaigne (A)
A Ensemble châs-
sis, sans bras
B Patin 4 485 0 -100-127 4850-10 0 -12 8 485 0 -100-128 4850-10 0 -12 7 48 5 0 -100-127
C Capuchon en
plastique
D Ensemble siège
en mousse,
capitonné
E Vis d’assemblage
à six pans creux
F Dossier, dossier
bas, capitonné
G Vis d’assemblage
à six pans creux
H Panneau ar-
rière, dossier
bas, capitonné
1 4850-110-012* 4850-110-014* 4850-110-013* 4850-110-015* 4 8 50 -110 - 011*
2 4 850-10 0 -115 4850-100-117 4 8 5 0 -10 0 -116 48 5 0 -100-118 4850-100-114
1 4850-020-100 4850-020-100 4850-020-100 4850-020-100 4850-020-100
4 0004-001-002 0004-001-002 0004-001-002 0004-001-002 0004-001-002
1 4851- 010 -100** 4851-010-100** 4851-010-100** 4851-010-100** 4851-010 -100**
4 0004-001-003** 0004-001-003** 0004-001-003** 0004-001-003** 0004-001-003**
1 4851-011-100** 4851-011-100** 4851-011-100** 4851-011-100** 4851-011-100**
4850-010-002
Blanc (B)
4850-010-003
Nickel
satiné (C)
4850-010-004
Orange/
Marron (D)
4850-010-005
Noir (E)
* Indiqué à titre de référence uniquement. Ces ensembles ou pièces ne sont pas vendus séparément.
** Pour les trousses, voir la “Liste de référence rapide des pièces de rechange” on page 2-15.
Retour à la table des matières
2-20 4850- 009-0 01 REV G www.stryker.com
Page 54

Modèle 4851 : fauteuil de patient, dossier bas, siège bas
4851-010-000 Rév. D (Référence uniquement)
Français
Article Description Qté 4851-010-001
Châtaigne (A)
A Ensemble châs-
sis, siège bas
B Patin 4 485 0 -100-127 4 850-10 0 -128 4850-100-128 4850-10 0 -127 4850 -100 -127
C Tube de
raccordement
D Vis d’assemblage
à tête hexagonale
E Bras, gauche 1 4851-200-031* 4851-200-032* 4851-200-032* 4851-200-031* 4851-200-031*
F Bras, droit 1 4851-200-041* 4851-200-042* 4851-200-042* 4851-200-041* 4851-200-041*
G Ensemble siège en
mousse, capitonné
H Vis d’assemblage
à six pans creux
J Dossier, dossier
bas, capitonné
K Vis d’assemblage
à six pans creux
L Panneau ar-
rière, dossier
bas, capitonné
P Machon,
Appui Bras
1 4853-110-012* 4853-110-014* 4853-110-013* 4853-110-015* 4 8 5 3 -110 - 0 11*
4 0018-040-000* 0018-040-000* 0018-040-000* 0018-040-000* 0018-040-000*
4 0003-149-000* 0003-149-000* 0003-149-000* 0003-149-000* 0003-149-000*
1 4853-020-100 4853-020-100 4853-020-100 4853-020-100 4853-020-100
4 0004-001-002 0004-001-002 0004-001-002 0004-001-002 0004-001-002
1 4851- 010 -100** 4 851-010-100** 4851-010-100** 4851-010-100** 4851- 010 -100**
4 0004-001-003** 0004-001-003** 0004-001-003** 0004-001-003** 0004-001-003**
1 4851-011-100** 4851-011-100** 4851-011-100** 4851-011-100** 4851-011-100**
2 4851-200-001 4851-200-001 4851-200-001 4851-200-001 4851-200-001
4851-010-002
Blanc (B)
4851-010-003
Nickel
satiné (C)
4851-010-004
Orange/
Marron (D)
4851-010-005
Noir (E)
* Indiqué à titre de référence uniquement. Ces ensembles ou pièces ne sont pas vendus séparément.
** Pour les trousses, voir la “Liste de référence rapide des pièces de rechange” on page 2-15.
www.stryker.com 485 0-0 09 -001 RE V G 2-21
Retour à la table des matières
Page 55

Français
Modèle 4852 : fauteuil de patient, dossier bas 56 cm (22 po),
siège haut
4852-010-000 Rév. C (Référence uniquement)
Article Description Qté 4852-010-001
Châtaigne (A)
A Ensemble châs-
sis, siège haut
B Patin 4 4850 -100 -127 4 850-10 0 -128 4850 -100-128 4850-10 0 -127 485 0 -100-127
C Tube de
raccordement
D Vis d’assemblage
à tête hexagonale
E Bras, gauche 1 4851-200-031* 4851-200-032* 4851-200-032* 4851-200-031* 4851-200-031*
F Bras, droit 1 4851-200-041* 4851-200-042* 4851-200-042* 4851-200-041* 4851-200-041*
G Ensemble siège en
mousse, capitonné
H Vis d’assemblage
à six pans creux
J Dossier, dossier
bas, capitonné
K Vis d’assemblage
à six pans creux
L Panneau ar-
rière, dossier
bas, capitonné
P Machon,
Appui Bras
1 4854-110-012* 4854-110-014* 4854-110-013* 4854-110-015* 4 8 5 4-110 - 011*
4 0018-040-000* 0018-040-000* 0018-040-000* 0018-040-000* 0018-040-000*
4 0003-149-000* 0003-149-000* 0003-149-000* 0003-149-000* 0003-149-000*
1 4853-020-100 4853-020-100 4853-020-100 4853-020-100 4853-020-100
4 0004-001-002 0004-001-002 0004-001-002 0004-001-002 0004-001-002
1 4851-010-100** 4851-010-100** 4851-010-100** 4851-010-100** 4 851-010-100**
4 0004-001-003** 0004-001-003** 0004-001-003** 0004-001-003** 0004-001-003**
1 4851-011-100** 4851-011-100** 4851-011-100** 4851-011-100** 4851-011-100**
2 4851-200-001 4851-200-001 4851-200-001 4851-200-001 4851-200-001
4852-010-002
Blanc (B)
4852-010-003
Nickel
satiné (C)
4852-010-004
Orange/
Marron (D)
4852-010-005
Noir (E)
* Indiqué à titre de référence uniquement. Ces ensembles ou pièces ne sont pas vendus séparément.
** Pour les trousses, voir la “Liste de référence rapide des pièces de rechange” on page 2-15.
Retour à la table des matières
2-22 4850- 009-0 01 REV G www.stryker.com
Page 56

Modèle 4853 : fauteuil de patient, dossier haut, siège bas
4853-010-000 Rév. D (Référence uniquement)
Français
Article Description Qté 4853-010-001
Châtaigne (A)
A Ensemble châs-
sis, siège bas
B Patin 4 4850-100-127 4850-100-128 4850-10 0 -128 4850 -100 -127 4850-100-127
C Tube de
raccordement
D Vis d’assemblage
à tête hexagonale
E Bras, gauche 1 4851-200-031* 4851-200-032* 4851-200-032* 4851-200-031* 4851-200-031*
F Bras, droit 1 4851-200-041* 4851-200-042* 4851-200-042* 4851-200-041* 4851-200-041*
G Ensemble siège en
mousse, capitonné
H Vis d’assemblage
à six pans creux
J Dossier, dossier
haut, capitonné
K Vis d’assemblage
à six pans creux
L Panneau ar-
rière, dossier
haut, capitonné
P Machon,
Appui Bras
1 4853-110-012* 4853-110-014* 4853-110-013* 4853-110-015* 4853 -110 - 0 11*
4 0018-040-000* 0018-040-000* 0018-040-000* 0018-040-000* 0018-040-000*
4 0003-149-000* 0003-149-000* 0003-149-000* 0003-149-000* 0003-149-000*
1 4853-020-100 4853-020-100 4853-020-100 4853-020-100 4853-020-100
4 0004-001-002 0004-001-002 0004-001-002 0004-001-002 0004-001-002
1 4853- 010 -100** 4853-010-100** 4 853-010-100** 4853 -010-100** 4853-010 -100**
4 0004-001-003** 0004-001-003** 0004-001-003** 0004-001-003** 0004-001-003**
1 4853-011-100** 4853-011-100** 4853-011-100** 4853-011-100** 4853-011-100**
2 4851-200-001 4851-200-001 4851-200-001 4851-200-001 4851-200-001
4853-010-002
Blanc (B)
4853-010-003
Nickel
satiné (C)
4853-010-004
Orange/
Marron (D)
4853-010-005
Noir (E)
* Indiqué à titre de référence uniquement. Ces ensembles ou pièces ne sont pas vendus séparément.
** Pour les trousses, voir la “Liste de référence rapide des pièces de rechange” on page 2-15.
www.stryker.com 485 0-0 09 -001 RE V G 2-23
Retour à la table des matières
Page 57

Français
Modèle 4854 : fauteuil de patient, dossier haut 56 cm (22 po),
siège haut
4854-010-000 Rév. C (Référence uniquement)
Article Description Qté 4854-010-001
Châtaigne (A)
A Ensemble châs-
sis, siège haut
B Patin 4 4850-10 0 -12 7 4850-100 -12 8 4850-100-128 48 50 -10 0 -127 48 5 0 -10 0-12 7
C Tube de
raccordement
D Vis d’assemblage
à tête hexagonale
E Bras, gauche 1 4851-200-031* 4851-200-032* 4851-200-032* 4851-200-031* 4851-200-031*
F Bras, droit 1 4851-200-041* 4851-200-042* 4851-200-042* 4851-200-041* 4851-200-041*
G Ensemble siège en
mousse, capitonné
H Vis d’assemblage
à six pans creux
J Dossier, dossier
haut, capitonné
K Vis d’assemblage
à six pans creux
L Panneau arrière,
dossier haut,
capitonné
P Machon,
Appui Bras
1 4854-110-012* 4854-110-014* 4854-110-013* 4854-110-015* 485 4 -110 - 011*
4 0018-040-000* 0018-040-000* 0018-040-000* 0018-040-000* 0018-040-000*
4 0003-149-000* 0003-149-000* 0003-149-000* 0003-149-000* 0003-149-000*
1 4853-020-100 4853-020-100 4853-020-100 4853-020-100 4853-020-100
4 0004-001-002 0004-001-002 0004-001-002 0004-001-002 0004-001-002
1 4853-010-100** 4853-010-100** 4853-010-100** 4853-010-100** 4853 -010-100**
4 0004-001-003** 0004-001-003** 0004-001-003** 0004-001-003** 0004-001-003**
1 4853-011-100** 4853-011-100** 4853-011-100** 4853-011-100** 4853-011-100**
2 4851-200-001 4851-200-001 4851-200-001 4851-200-001 4851-200-001
4854-010-002
Blanc (B)
4854-010-003
Nickel
satiné (C)
4854-010-004
Orange/
Marron (D)
4854-010-005
Noir (E)
* Indiqué à titre de référence uniquement. Ces ensembles ou pièces ne sont pas vendus séparément.
** Pour les trousses, voir la “Liste de référence rapide des pièces de rechange” on page 2-15.
Retour à la table des matières
2-24 4 850- 00 9-0 01 REV G www.stryker.com
Page 58

Modèle 4855 : fauteuil de patient, Comfort-Flex, siège bas
4855-010-000 Rév F (Référence uniquement)
Français
www.stryker.com 485 0-0 09 -001 RE V G 2-25
Retour à la table des matières
Page 59

Modèle 4855 : fauteuil de patient, Comfort-Flex, siège bas
Français
Article Description Qté 4855-010-001
Châtaigne (A)
A Ensemble châs-
sis, siège bas,
dossier souple
B Patin 4 4850-100 -127 48 5 0 -10 0-12 8 48 5 0 -100-128 4 8 50-10 0 -127 485 0 -100-127
C Tube de
raccordement
D Vis d’assemblage
à tête hexagonale
E Bras, gauche 1 4851-200-031* 4851-200-032* 4851-200-032* 4851-200-031* 4851-200-031*
F Bras, droit 1 4851-200-041* 4851-200-042* 4851-200-042* 4851-200-041* 4851-200-041*
G Ensemble siège
en mousse,
capitonné
H Vis d’assemblage
à six pans creux
J Support de
barre en J
K Vis d’assemblage
à tête hexagonale
L Dossier, dossier
souple, capitonné
M Vis d’assemblage
à six pans creux
N Dossier, dossier
souple, capitonné
T Rondelle de
blocage
U Machon,
Appui Bras
1 4855-110-012* 4855-110-014* 4855-110-013* 4855-110-015* 485 5 -110 - 011*
4 0018-040-000* 0018-040-000* 0018-040-000* 0018-040-000* 0018-040-000*
4 0003-149-000* 0003-149-000* 0003-149-000* 0003-149-000* 0003-149-000*
1 4853-020-100 4853-020-100 4853-020-100 4853-020-100 4853-020-100
4 0004-001-002 0004-001-002 0004-001-002 0004-001-002 0004-001-002
2 4855-10 0 -135 485 5 -100-137 4855-10 0 -13 6 4855-10 0 -138 4 8 55 -10 0 -134
6 0004-001-004 0004-001-004 0004-001-004 0004-001-004 0004-001-004
1 4855-010-100** 4 855-010-100** 4855 -010-100** 4855-010-100** 4855-010-100**
6 0004-001-003** 0004-001-003** 0004-001-003** 0004-001-003** 0004-001-003**
1 4855-011-100** 4855-011-100** 4855-011-100** 4855-011-100** 4855-011-100**
6 0012-001-001 0012-001-001 0012-001-001 0012-001-001 0012-001-001
2 4851-200-001 4851-200-001 4851-200-001 4851-200-001 4851-200-001
4855-010-002
Blanc (B)
4855-010-003
Nickel
satiné (C)
4855-010-004
Orange/
Marron (D)
4855-010-005
Noir (E)
* Indiqué à titre de référence uniquement. Ces ensembles ou pièces ne sont pas vendus séparément.
** Pour les trousses, voir la “Liste de référence rapide des pièces de rechange” on page 2-15.
Retour à la table des matières
2-26 4850- 009-0 01 REV G www.stryker.com
Page 60

Modèle 4856 : fauteuil de patient, Comfort-Flex 56 cm (22 po),
siège haut
4856-010-000 Rév. E (Référence uniquement)
Français
www.stryker.com 485 0-0 09 -001 RE V G 2-27
Retour à la table des matières
Page 61

Modèle 4856 : fauteuil de patient, Comfort-Flex 56 cm (22 po),
siège haut
Français
Article Description Qté 4856-010-001
Châtaigne (A)
A Ensemble châs-
sis, siège haut,
dossier souple
B Patin 4 4 8 50-10 0 -127 4850-10 0 -12 8 48 5 0 -100-128 4850-100 -12 7 4850-100-127
C Tube de
raccordement
D Vis d’assemblage
à tête hexagonale
E Bras, gauche 1 4851-200-031* 4851-200-032* 4851-200-032* 4851-200-031* 4851-200-031*
F Bras, droit 1 4851-200-041* 4851-200-042* 4851-200-042* 4851-200-041* 4851-200-041*
G Ensemble siège
en mousse,
capitonné
H Vis d’assemblage
à six pans creux
J Support de
barre en J
K Vis d’assemblage
à tête hexagonale
L Dossier, dossier
souple, capitonné
M Vis d’assemblage
à six pans creux
N Panneau arrière,
dossier souple,
capitonné
T Rondelle de
blocage
P Machon,
Appui Bras
1 4856-110-012* 4856-110-014* 4856-110-013* 4856-110-015* 485 6 -110 - 011
4 0018-040-000* 0018-040-000* 0018-040-000* 0018-040-000* 0018-040-000*
4 0003-149-000* 0003-149-000* 0003-149-000* 0003-149-000* 0003-149-000*
1 4853-020-100 4853-020-100 4853-020-100 4853-020-100 4853-020-100
4 0004-001-002 0004-001-002 0004-001-002 0004-001-002 0004-001-002
2 4855-10 0 -135 4855-100-137 48 55 -10 0 -136 4 8 5 5 -100-138 4 8 55 -10 0-13 4
6 0004-001-004 0004-001-004 0004-001-004 0004-001-004 0004-001-004
1 4855-010-100** 4855-010-100** 4855 -010-100** 4855- 010 -100** 4855- 010 -100**
6 0004-001-003** 0004-001-003** 0004-001-003** 0004-001-003** 0004-001-003**
1 4855-011-100** 4855-011-100** 4855-011-100** 4855-011-100** 4855-011-100**
6 0012-001-001 0012-001-001 0012-001-001 0012-001-001 0012-001-001
2 4851-200-001 4851-200-001 4851-200-001 4851-200-001 4851-200-001
4856-010-002
Blanc (B)
4856-010-003
Nickel
satiné (C)
4856-010-004
Orange/
Marron (D)
4856-010-005
Noir (E)
* Indiqué à titre de référence uniquement. Ces ensembles ou pièces ne sont pas vendus séparément.
** Pour les trousses, voir la “Liste de référence rapide des pièces de rechange” on page 2-15.
Retour à la table des matières
2-28 4850- 009 -001 REV G www.stryker.com
Page 62

Modèle 4857 : repose-pieds
4857-010-000 Rév E (Référence uniquement)
Français
Article Description Qté 4857-010-001
Châtaigne (A)
A Ensemble châs-
sis, repose-pieds
B Patin 4 4 850-10 0 -127 4850-10 0 -12 8 4850 -100 -128 4850-100-127 4 8 5 0 -100-127
C Ensemble repose-
pieds, capitonné
D Écrou frein hexagonal 8 0016-142-000* 0016-142-000* 0016-142-000* 0016-142-000* 0016-142-000*
E Carton du
repose-pieds
H Rondelle 8 0011-001-004* 0011-001-004* 0011-001-004* 0011-001-004* 0011-001-004*
2 4857-110-012* 4857-110-014* 4857-110-013* 4857-110-015* 48 57-110 - 011*
1 4857-020-100* 4857-020-100* 4857-020-100* 4857-020-100* 4857-020-100*
1 4857-020-130* 4857-020-130* 4857-020-130* 4857-020-130* 4857-020-130*
4857-010-002
Blanc (B)
4857-010-003
Nickel
satiné (C)
4857-010-004
Orange/
Marron (D)
4857-010-005
Noir (E)
* Indiqué à titre de référence uniquement. Ces ensembles ou pièces ne sont vendus séparément.
www.stryker.com 485 0-0 09 -001 RE V G 2-29
Retour à la table des matières
Page 63

Garantie
Le savoir-faire de Stryker Medical se tient derrière tous nos produits. Notre mission est d’offrir à nos clients des
produits de qualité et nous nous engageons à résoudre tout problème dans les plus brefs délais selon les conditions
stipulées dans les garanties ci-dessous.
GARANTIE LIMITÉE À VIE
Français
Stryker garantit notre mobilier Michael Graves en collaboration avec Stryker pour les fauteuils de patient et reposepieds pendant la durée de vie prévue de dix (10) ans dans les conditions normales d’utilisation et d’entretien appropriées. Sous réserve des limitations décrites plus bas, Stryker réparera ou, à son entière discrétion, remplacera les
produits défectueux sans frais.
Mobilier Michael Graves en collaboration avec Stryker pour les fauteuils de patient et repose-pieds
• 10 ans sur les bras et les châssis en acier
• 10 ans sur les composants de châssis en bois
• 3 ans sur la mousse et les textiles de Stryker Medical
La garantie limitée à vie mentionnée plus haut sera sans effet en cas de modifications, de mauvaise utilisation,
d’assemblage ou d’entretien inappropriés, d’accidents ou de dommages causés par un transporteur autre que Stryker
Medical, et par l’utilisation du propre matériel du client.
Hormis les clauses énoncées aux présentes, Stryker ne fait aucune autre garantie ou déclaration, expresse ou implicite.
Aucune garantie n’est faite quant à la qualité marchande ou l’adéquation à un usage particulier. En aucun cas, Stryker
ne peut être tenue responsable, au titre des présentes, de tout dommage accessoire ou indirect découlant de ou lié de
toute autre manière à la vente ou à l’utilisation d’un tel équipement.
PIÈCES DE RECHANGE ET SERVICE
Les produits Stryker bénéficient du soutien d’un réseau national de représentants de service spécialisés Stryker. Ces
représentants locaux sont formés dans nos usines et disposent de stocks importants de pièces de rechange, ce qui
permet de réduire au minimum les délais de réparation. Il suffit d’appeler le représentant local ou de contacter le
service à la clientèle Stryker aux États-Unis au 1-800-327−0770.
AUTORISATION DE RENVOI
Le renvoi de produits ne peut être effectué sans l’accord du service à la clientèle de Stryker. Le numéro d’autorisation
qui sera fourni doit être inscrit sur le produit renvoyé. Stryker se réserve le droit de facturer des frais d’expédition et
de stockage sur les articles retournés. Les articles spéciaux, modifiés ou de fin de série ne peuvent pas faire l’objet
d’un renvoi.
MARCHANDISE ENDOMMAGÉE
La réglementation ICC (Interstate Commerce Commission) exige que les réclamations relatives aux produits endommagés
soient remises au transporteur dans les quinze (15) jours suivant la réception du produit. Ne pas accepter de livraisons
endommagées à moins que lesdits dommages ne soient signalés sur le bordereau de livraison au moment de
la réception. Aviser immédiatement Stryker, qui formulera une réclamation auprès du transporteur approprié pour
dommages encourus. Le montant de la demande de règlement sera limité au coût de remplacement réel. Si cette
information n’est pas reçue par Stryker dans les quinze (15) jours suivant la livraison du produit ou si les dommages
ne sont pas signalés sur le bordereau de livraison au moment de la réception, le client reste redevable du paiement
intégral de la facture d’origine. Les demandes de règlement pour livraison incomplète doivent être déposées dans les
trente (30) jours suivant la date de la facture.
CLAUSE DE GARANTIE INTERNATIONALE
La présente garantie reflète les dispositions en vigueur aux États-Unis. Hors des États-Unis, la garantie peut différer selon le pays. L’utilisateur doit communiquer avec le représentant local de Stryker Medical pour de plus amples
renseignements.
Retour à la table des matières
2-30 4850- 009-0 01 REV G www.stryker.com
Page 64

Page 65

Page 66

Stryker Medical
3800 E. Centre Ave.,
Portage, Michigan 49002
USA
2015/09 4850-009-001 REV G www.stryker.com
 Loading...