

Page 1

Digitaler HD+ Satelliten Receiver
SRT 7806
Bedienungsanleitung
User Manual
Kullanıcı Kılavuzul
Page 2

Page 3
Page 4

Supplied by STRONG & Co, Japan
Represented by
STRONG Ges.m.b.H.
Franz-Josefs-Kai 1
1010 Vienna
Austria
Email: [email protected]
12 Oct 2016 18:44
Page 5

Licenses
ANY USE OF THIS PRODUCT IN ANY MANNER OTHER THAN PERSONAL USE THAT COMPLIES WITH
THE MPEG-2 STANDARD FOR ENCODING VIDEO INFORMATION FOR PACKAGED MEDIA IS EXPRESSLY
PROHIBITED WITHOUT A LICENSE UNDER APPLICABLE PATENTS IN THE MPEG-2 PATENT PORTFOLIO,
WHICH LICENSE IS AVAILABLE FROM MPEG LA, LLC, 6312 S. Fiddlers Green Circle, Suite 400E,
Greenwood Village, Colorado 80111 U.S.A.
THIS PRODUCT IS LICENSED UNDER THE AVC PATENT PORTFOLIO LICENSE FOR THE PERSONAL AND
NONCOMMERCIAL USE OF A CONSUMER TO (i) ENCODE VIDEO IN COMPLIANCE WITH THE AVC
STANDARD (“AVC VIDEO”) AND/OR (ii) DECODE AVC VIDEO THAT WAS ENCODED BY A CONSUMER
ENGAGED IN A PERSONAL AND NON-COMMERCIAL ACTIVITY AND/OR WAS OBTAINED FROM A
VIDEO PROVIDER LICENSED TO PROVIDE AVC VIDEO. NO LICENSE IS GRANTED OR SHALL BE IMPLIED
FOR ANY OTHER USE. ADDITIONAL INFORMATION MAY BE OBTAINED FROM MPEG LA, L.L.C. SEE
HTTP://WWW.MPEGLA.COM
This product contains one or more programmes protected under international and U.S. copyright laws
as unpublished works. They are confidential and proprietary to Dolby Laboratories. Their reproduction
or disclosure, in whole or in part, or the production of derivative works therefrom without the express
permission of Dolby Laboratories is prohibited. Copyright 2003-2009 by Dolby Laboratories. All rights
reserved.
This product incorporates copyright protection technology that is protected by U.S. patents and other
intellectual property rights. Use of this copyright protection technology must be authorized by Rovi
Corporation, and is intended for home and other limited viewing uses only unless otherwise authorized
by Rovi Corporation. Reverse engineering or disassembly is prohibited.
English
12 Oct 2016 18:42
1
Page 6

TABLE OF CONTENT
1.0 INTRODUCTION 3
1.1 Safety Instructions 3
1.2 Storage 3
1.3 Equipment Set-up 3
1.4 Accessories 4
1.5 Usage of external USB devices 4
2.0 YOUR RECEIVER 4
2.1 DEFAULT PIN-CODE: 0000 4
2.2 Front Panel 4
2.3 Side Panel 4
2.4 Rear Panel 4
2.5 Remote Control 5
2.6 Installing the batteries 6
2.7 Using the remote control 6
3.0 CONNECTIONS 6
3.1 Connecting the Antenna and LNB (Low Noise Block) to the receiver 6
3.2 Connecting to digital audio amplifier 6
3.3 Basic connection using an HDMI cable 6
3.4 Basic connection using a SCART cable 7
3.5 Connecting to the Internet 7
3.6 Connection to main power supply 7
4.0 STARTING UP FOR THE FIRST TIME 7
4.1 Language selection 7
4.2 Antenna Settings 7
4.3 Channel Search 8
5.0 QUICK GUIDE FOR USING YOUR RECEIVER 8
6.0 OPERATION 9
6.1 Selecting channels 9
6.2 Volume Control 10
6.3 Programme Information (Info banner) 10
6.4 Selecting audio language 10
6.5 Selecting subtitle language 11
6.6 Viewing the teletext 11
6.7 Quick changing of Screen settings 11
6.8 Electronic Programme Guide (EPG) 11
6.9 Favourite channels 12
7.0 MAIN MENU 12
7.1 Channel 12
7.2 Settings 13
7.3 Multimedia 17
7.4 Network 18
7.5 Installation 19
8.0 TROUBLESHOOTING 21
9.0 SPECIFICATIONS 22
10.0 TERMS & CONDITIONS HD+ IN GERMAN 24
STRONG declares that this item complies with the basic requirements and other relevant regulations of directives CE 2004/108/EC and
73/23/EC, RoHS 2002/95/EC
Subject to alterations. In consequence of continuous research and development technical specifications, design and appearance of
products may change. Manufactured under license from Dolby Laboratories. Dolby Audio, Dolby Digital, Dolby Digital Plus and the
double-D symbol are trademarks of Dolby Laboratories. HDMI, the HDMI logo and High-Definition Multimedia Interface are trademarks or
registered trademarks of HDMI Licensing LLC in the United States and other countries. The HD+ card is subject of use within the Federal
Republic of Germany. All product names are trademarks or registered trademarks of their respective owners.
© STRONG 2016. All rights reserved.
2
Page 7

1.0 INTRODUCTION
1.1 Safety Instructions
DO NOT INSTALL YOUR RECEIVER:
In a closed or poorly ventilated cabinet; directly on top of or under any other equipment; on a
surface which might obstruct the ventilation slots.
DO NOT EXPOSE THE RECEIVER OR ITS ACCESSORIES:
To direct sunlight or any other equipment that generates heat; to rain or intense moisture; to
intense vibration and to any shock which may cause permanent damage to your receiver or
to any magnetic objects, such as loudspeakers, transformers, etc.
Do not use a damaged power cord. It may cause a fire or an electric shock. Do not touch a
power cord with wet hands. It may cause an electric shock.
When the receiver is not used for a long period of time, you should unplug the power cord
from the wall socket.
Do not use alcohol or ammonia based liquids to clean the receiver. If you wish, you may clean
your receiver with a soft lint-free cloth slightly made damp with a mild soap solution, and only
after disconnecting from the mains voltage supply. Make sure no foreign objects fall through
the ventilation slots because this could cause fire or an electric shock.
Do not place any objects on top of the receiver because this might prevent proper cooling of
the components inside.
Safety Precautions
Never try to open the receiver. It is dangerous to touch the inside of the receiver due to high
voltages and possible electrical hazards. Opening the receiver will void the warranty of the
product. Refer all maintenance or servicing to suitably qualified personnel.
When you are connecting cables, be sure that the receiver is disconnected from the mains
supply voltage. Wait a few seconds after switching off the receiver before you move the
receiver or disconnect any equipment.
It is a necessity that you only use an approved extension and compatible wiring that is
suitable for the electrical power consumption of the installed equipment. Please ensure that
the electrical power supply corresponds with the voltage on the electrical identification plate
at the back of the receiver.
If the receiver does not operate normally, even after strictly following the instructions in this user manual
it is recommended to consult your dealer or the appropriate service for your country.
English
1.2 Storage
Your receiver and its accessories are stored and delivered in a packaging designed to protect against
electric shocks and moisture. When unpacking it, make sure that all the parts are included and keep the
packaging away from children. When transporting the receiver from one place to another or if you are
returning it under warranty conditions, make sure to repack the receiver in its original packaging with its
accessories. Failing to comply with such packaging procedures could damage the product and void your
warranty.
1.3 Equipment Set-up
We recommend you to consult a professional installer to set up your equipment. Otherwise, please
follow the instructions below:
Refer to the user manual of your TV and your antenna.
Make sure that the HDMI cable and outdoor components are in a good condition and the
HDMI connections are well shielded and from good quality.
This user manual provides complete instructions for installing and using this receiver. The symbols serve
as follows.
WARNING Indicates warning information.
3
Page 8

NOTE Indicates any other additional important or helpful information.
MENU Represents a button on the remote control or the receiver. (BOLD CHARACTERS)
Move to Represents a menu item within a screen. (Italic characters)
1.4 Accessories
1x user manual
1x remote control unit
2x 1.5 V batteries
1x adapter 12 V, 1.5 A
1x HD+ smartcard
1.5 Usage of external USB devices
It is recommended to use USB 2.0 storage devices. If your device is not compatible to USB 2.0
specifications, the playback with your receiver might not work properly.
If you are going to use external USB HDD (Hard Disk Drive) please consider that the power
specifications might exceed the supported output of your receiver (5 V/800 mA). If so, please
connect your USB HDD to an according external power adapter.
STRONG cannot guarantee compatibility with all types of USB storage devices.
It is advised not to store important information on USB storage devices used with the
receiver. Always make backups of data on your USB storage device before using it with this
receiver. STRONG will not take responsibility for any loss of information or circumstances
caused by loss of information.
Please ensure that either the USB device is already formatted to NTFS or FAT32 or format the
USB device via your receiver. Formatting requires entering the PIN code (default 0000)
STRONG cannot guarantee the playback of all files although extensions are listed, as it
depends on file size, codec, bit rate and resolution.
2.0 YOUR RECEIVER
2.1 DEFAULT PIN-CODE: 0000
2.2 Front Panel
1. Power button
Switch the receiver to Standby or On
2. P-/P+: To change channels without using the remote control
3. LED Display Displays channel number, time, videotext page or recording modes
4. Standby indicator:
Shows power state of the receiver: Red LED - receiver is in standby mode
5. USB To connect your USB storage device
Fig.1
2.3 Side Panel
1. Smart card slot
To insert your HD+ smart card with the golden chip facing down.
2.4 Rear Panel
1. SAT IN To connect to the LNB of your satellite antenna for reception of satellite broadcast
signal
2. S/PDIF (coax.)
To connect to a digital amplifier or home theatre using a coaxial cable
4
Fig.2
Fig. 3
Page 9

3. HDMI To connect to the HDMI input of your TV set using a good quality HDMI cable
4. TV SCART To connect to TV using a SCART cable
5. Ethernet To connect to a network switch, router or modem
6. DC POWER To connect to the original included main power adapter (Input ~230 V 50~60 Hz/
Output 12 V, 1.5 A DC
)
2.5 Remote Control
1. q Turns the receiver ON/Standby
2. ! To turn the sound on or off
3. 0~9 Channel number and numeric value input
4. TV/R Toggles between TV and radio mode
5.
No function
6. FAV To access your favourite channels. Toggles between available favourite groups
7.
To switch between the last viewed channels
8. AUDIO Displays the audio selection menu with selections for available languages and
9. INFO Press to display channel number/name and current/coming information. Press
10. EPG Viewing mode: Displays the EPG (Electronic Program Guide)
11. pq Switches to the next/previous channel in viewing mode, switches to the next/
12. OK Viewing mode: Displays the channel list. Menu: activation of the highlighted item
13. tu Decreasing/increasing the volume level in viewing mode/navigating through the
14. MENU To open the main menu in viewing mode or to go one step back in the menu
Cancellation of current process/exit from main menu to viewing mode
15.
16. VOL+/ Increases/decreases the volume level in TV mode
17. P+/P Jumps 10 places up or down in channel list or any other list.
18. LIST Displays the channel list.
19. CH+/ Channel up/down
20. OPT Quick Screen setting
21. TEXT To open Teletext if available on the current channel.
22. SUB To select subtitles language out of available ones on the current channel
23. Mail list
24. 2 Hold play during playback
25. 5 Searches backwards during playback. Each pressing increases the speed (x2 – x32)
26. 6 Searches forwards during playback. Each pressing increases the speed (x2 – x32)
27. 4 No function.
28. u Starts/resumes the playback
29. 7 Jumps to the previous file during playback.
30. 8 Jumps to the next file during playback.
31. 3 Stops playback of multimedia files
32. RED Flexible functions in OSD menu and Teletext.
33. GREEN Flexible functions in OSD menu and Teletext.
34. YELLOW Flexible functions in OSD menu and Teletext.
35. BLUE In viewing mode: displays the schedule menu for easy setup timers; Flexible
audio modes
twice to display detailed event information.
previous page in channel list or moving the highlight up/down in the menu
menus/changing values of settings in a menu
Changes the picture resolution in viewing mode.
Changes the picture Aspect Ratio in viewing mode.
functions in OSD menu and Teletext.
Fig. 4
English
5
Page 10
2.6 Installing the batteries
Remove the battery cover from the remote control and put 2x AAA size batteries inside the
compartment.
The diagram inside the battery compartment shows the correct way to install the batteries.
1. Open the cover 2. Install batteries 3. Close the cover
Fig. 5
NOTE: The batteries should not be recharged, disassembled, electrically short-circuited, be
mixed or used with other types of batteries.
2.7 Using the remote control
Fig. 6
To use the remote control, point it towards the front of the digital receiver. The remote control has a
range of up to 7 metres from the receiver, if properly aligned towards the IR eye on the front panel.
The remote control will not operate if its path is blocked.
NOTE: Sunlight or very bright light might decrease the sensitivity of the remote control.
3.0 CONNECTIONS
This section explains the most important functions to ensure that you can directly watch television with
your new receiver. Please note additional adjustments may be required.
NOTE: Do not connect the receiver to the main power yet.
3.1 Connecting the Antenna and LNB (Low Noise Block) to the
receiver
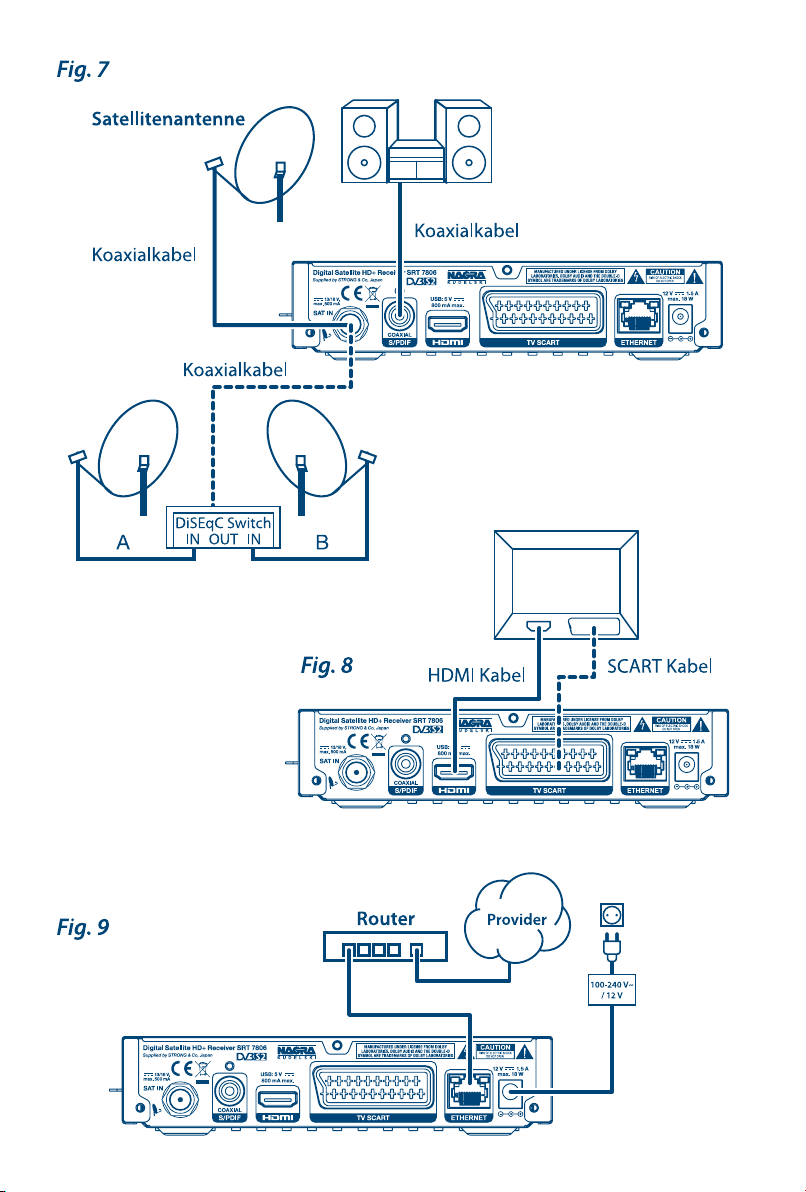
Connect the LNB of your satellite antenna to the SAT IN connector of your receiver using a good quality
coaxial cable and suitable ‘F-connector’ plugs.
Fig. 7
3.1.1 Connection of multiple xed antennas via DiSEqC 1.0
a. Connect the LNBs of your fixed antenna to the inputs of a DiSEqC 1.0 switch using a good quality
coaxial cable and suitable ‘F-connectors’.
b. Connect the output or “to receiver” of the DiSEqC 1.0 switch to the SAT IN connector on your receiver.
Use good quality coaxial cable and suitable “F-connectors”.
c. Plug the power adapter jack to the receiver and the other end to a suitable wall outlet.
Fig. 7
3.2 Connecting to digital audio amplier
Connect one end of a good quality coaxial audio cable to the S/PDIF output of your receiver and the
other end to the coaxial audio input of your home theatre, amplifier or any other device supporting
digital audio.
3.3 Basic connection using an HDMI cable
6
Fig. 7
Fig. 8
Page 11

a. Connect the LNB of your satellite antenna to the SAT IN connector of your receiver using a good
quality coaxial cable and suitable ‘F-connector’ plugs.
b. Connect one end of a good quality HDMI cable to the HDMI output on your receiver and the other end
to the HDMI input of your TV.
c. Plug the power adapter to a suitable wall outlet.
3.4 Basic connection using a SCART cable
Fig. 8
a. Connect the LNB of your satellite antenna to the SAT IN connector of your receiver using a good
quality coax cable and suitable ‘F-connector’ plugs.
b. Connect one end of a good quality Scart cable to the TV SCART connector on your receiver and the
other end to the SCART input of your TV.
c. Plug the power adapter to a suitable wall outlet.
3.5 Connecting to the Internet
The receiver connects to the Internet through the Internet router or DSL/cable modem in your home
network. It connects to the home network over its Ethernet port.
Fig.9
Connect one end of the Ethernet cable to the receiver and the other end to the LAN port at the router or
DSL/cable modem.
3.6 Connection to main power supply
Fig. 9
After all the connections are done you can connect your receiver to power using the supplied external
AC/DC adapter. Now plug the adapter into the wall socket.
4.0 STARTING UP FOR THE FIRST TIME
Once you properly installed and connected all cables of the receiver, setup your receiver step by step by
First Time Installation procedure.
It will guide you through the basic installation and channel searching process.
4.1 Language selection
Select your preferred language for the on screen menu.
Use p q to change language and press OK to confirm your selection.
English
4.2 Antenna Settings
4.2.1 Satellite selection
To set up the receiver for the type of connected antenna, follow the instructions below.
You have technical possibility to configure your receiver to get signal from up to 4 satellites. Select LNB
to set specific satellite or leave it unassigned. Select the satellites you wish to receive with the receiver.
Each of the satellites in the built-in satellite list is configured with predefined default parameters. You
could use RED button to perform Dish setting for selected satellite,
step and GREEN button to continue (refer chapter 4.3 Channel Search). In case you use just Astra 19.2E
satellite, you could skip this step and also press GREEN button.
LNB 1 Select Astra 19.2E or Astra 23.5E satellite. Default value for LNB1 is Astra 19.2E.
LNB 2 – 4 Select from the list additional satellites from which you wish to view channels with
your receiver. Default value for LNB2 is Hotbird 13E. Default value for LNB3 and LNB4 is
Not assigned.
button to return to previous
7
Page 12

4.2.2 Dish Setting
Satellite Get information about your satellite setting. It cannot be changed.
LNB Power Select On to supply powering for selected LNB or Off to switch it off.
LNB Type Select Universal for most standard LNBs or SatCR if you have a SatCR LNB or
LNB Freq (Low/High)
22KHz Tone The receiver uses 0 or 22 kHz signal to control the band of the LNB.
DiSEqC1.0 Get information about the selected satellite LNB.
Tone Burst Get information about the provided tone burst control for satellite switch.
Transponder This option allows you to set the transponder which is used as a reference for the
Signal Strength and Signal Quality bars
multiswitch. You can set another LNB type, using User defined parameter.
The LOF (Local Oscillator Frequency) of the LNB is usually printed on the LNB itself or
in its documentation. You can set the High and Low LOF frequencies to match the LNB
here.
satellite signal strength.
In two level bar meters, on the bottom of the screen, you can see the strength and
quality of the signal coming from the antenna dish to the tuners. These two meters
can be used while doing a fine-tuning of the antenna position. The antenna has to be
adjusted to maximum possible signal strength and signal quality.
4.3 Channel Search
In order to view video programmes, you must do a channel search with or without smartcard in order to
install the channel list of your choice.
For HD+ channels, first insert HD+ smartcard at the right-hand side of the receiver before you start the
channel search. Then the receiver will install the associated channel list of the HD+ bouquet (FTA and
encrypted).
For FTA only channels or for channels from other satellites you do not need to insert a HD+ smartcard.
Select the search scheme you wish the wizard to follow:
1. Select HD+ channels to search for channels of the HD+ bouquet (channels 100 and above).
2. Select Preinstalled channels to restore a predefined German channel list from the receiver’s
memory (channels 1~99).
3. Select Advanced channel search to search for channels on all transponders for the selected
satellite (channels above the HD+ bouquet).
Finding and storing the channels
Select preferred option or press the GREEN button on the remote control to start the channel search.
Once a channel search has started, a progress bar and list of channels will be displayed. At any time, you
may stop the search by pressing
receiver will save all found channels into the channel list and exit to the preview mode.
on the remote control. After the channel search is completed, the
NOTE: If you see the messages No list found or No channels found, please check the antenna
connections and signal levels of the satellite dish.
5.0 QUICK GUIDE FOR USING YOUR RECEIVER
We at STRONG understand that you can’t wait to enjoy your new HD+ receiver.
However, we advise you to read this manual to get the best performance from your STRONG HD+
receiver. To turn your receiver ON or to go to Standby mode, press q on the remote control. Choose
channels with CH+/ or p q. Alternatively, you can also enter the channel number with the 0~9
8
Page 13

buttons on the remote control or press OK in viewing mode to display the channel list. The volume can
be adjusted with VOL+/ or with t u.
6.0 OPERATION
In viewing mode, several features are available to make watching TV a true pleasure. This paragraph
describes these features. Please also read chapter 7 to get familiar with the menu of your new HD+
receiver.
6.1 Selecting channels
There are different ways to change channels with your receiver.
Via direct access
Via the channel list
Via the CH+/ or p q buttons
Via the button
6.1.1 Direct access
To gain direct access to a certain channel simply enter its number with the 0~9 keys on the remote
control. Channel numbers can be up to 4 digits long. Entering numbers and values with less than 4 digits
is possible. Just wait a few seconds and your receiver will switch to the selected channel.
6.1.2 Channel list
Press OK or the LIST button in viewing mode to display the channel list.
Use p q to highlight your channel of choice and press OK to select the highlighted channel for
preview. Use the FAV button to get access to a group of favourite lists. Press OK to select only channels
from a particular list. Refer to chapter 7.1.1 TV Manager to organize channels into favourite lists.
Use the RED button to get access to group of satellites, which channels were stored to receiver during
installation procedure. Press OK to select only channels from particular satellite. Refer chapter 7.5.1 Dish
Setting to add more satellites for scanning.
The channel list is equipped with a Filter function to make it easier to find channels. Use GREEN button
to get access to TV Program List filter. There are 4 options to help to find channel. Use p q to select
option. Use t u to switch between Filter option, Group parameter and Channel list.
Use OK to confirm selection.
ALL for sequential search through complete list of all channels, which are stored in your
receiver from all satellites.
A-Z to search for the channel from the list in alphabetical order. In Group parameter define
first letter of channel name. At right side on screen you will see only channels, which
name starting from selected letter.
FAV to search for the channel within your favourite lists.
SAT to search for the channel by satellites, which channels were stored to receiver.
English
NOTE: The bottom row on the screen provides technical information of the selected
channel.
6.1.3 Using the CH+/ or pq buttons
CH+ or p will switch to a higher channel.
CH or q will switch a lower channel.
6.1.4 Using the button
Use the button to return to the last viewed channel.
9
Page 14

6.2 Volume Control
The volume control allows you to adjust the audio volume. Press VOL+/ or t u button to adjust the
audio volume. Press the ! button to temporarily mute audio. Press it again to come back to normal
volume.
NOTE: The ! function remains set while you switch channels.
6.3 Programme Information (Info banner)
Programme information is always displayed for a certain period of time whenever you switch channels.
You also can view the programme information by pressing the INFO button while watching a
programme.
Press
to hide the info banner.
Info banner:
Indicates channel number and name
Indicates current time and date
Informs about current programme name
Indicates name and schedule of the next programme
Displays satellite signal strength and quality bars
Provides programme encryption information
Provides video and audio parameters for broadcasted programme
Provides subtitle and teletext information (displayed if available with the programme
Use the p q buttons of the remote control to switch channels.
Use the t u buttons of the remote control to scroll information through previous/next channel
information for current time.
6.3.1 Extended information panel
To access the extended information, press INFO button:
The details of the current programme information (name and description of the current programme) will
be provided in an additional window*. If the programme description does not fit in the display area, you
can use p q to scroll through this information. To view information about the next programme, use
t u or press INFO. Press to close extended information panel.
broadcast).
once during presence of the information banner on screen
twice in viewing mode.
NOTE: You can change the on-screen duration of the info banner in the Output Settings
menu. Please refer to section 7.2.2 for more details.
* Information will be displayed if available. Availability depends on the broadcaster.
6.4 Selecting audio language
Some channels support a choice of audio formats and/or languages.
Press AUDIO in viewing mode to display a list of available audio languages.
Use p q to highlight the language of choice and press OK to confirm.
With t u you can additionally select audio mode of Stereo (for stereo sound), Mix (both speakers will
produce same mixed from both channels sound) and Left or Right (both speakers will produce sound
respectively from left or right sound channel).
10
Page 15

6.5 Selecting subtitle language
Press SUB in viewing mode to display a list of available subtitles languages.
Use p q to select the subtitle language and press OK to confirm.
Additionally you can adjust your preferred subtitle language as described in chapter 7.2.1.
Press SUB in viewing mode to display a list of available subtitle languages. Use p q to select the
subtitle language and press OK to confirm. Additionally you can adjust your preferred subtitle language
as described in chapter 7.2.1.
English
NOTE: Please consider that this function supports DVB and TXT subtitles and this selection
only displays them temporarily. Subtitles may not be supported by every channel or
broadcaster.
6.6 Viewing the teletext
To access the teletext, press the TEXT button in viewing mode. Use 0~9 or p q buttons to select the
number of the page you wish to see. Subpages (if loaded and available) can be selected with the t u
buttons. Press to go back to viewing mode.
6.7 Quick changing of Screen settings
To quickly change parameters of screen setting press the OPT button in viewing mode.
It is possible to change HDMI Resolution, Aspect Ratio and Aspect Conversion.
6.7.1 Changing HDMI Resolution
Use t u buttons to pick the resolution of the HDMI output: Auto, 576i, 576p, 720p, 1080i and 1080p.
Please refer to section 7.2.2 Output Settings of the menu description for more details.
6.7.2 Changing the Aspect Ratio
Use t u buttons to select the aspect ratio of your TV screen and choose between 16:9 and 4:3. Please
refer to section 7.2.2 Output Settings of menu description for more details.
6.7.3 Changing the Aspect Conversion
Use t u buttons to select Aspect Conversion of picture on your TV screen between Pan&Scan, Letterbox,
Combined and Ignore. Please refer to section 7.2.2 Output Settings of the menu description for more
details.
6.8 Electronic Programme Guide (EPG)
The Electronic Program Guide is a very useful function that allows you to watch program schedules and
information on screen and not to miss any important event by setting Timer for it.
Press EPG button to activate this guide (you can also enter EPG through the menu). Use p q to select a
channel. Use t u to scroll through programmes on selected channel to display programme information
on the screen or to book timer for it. Press BLUE or YELLOW buttons to scroll through programmes to
display programme information for the next/previous 6 hours. Press GREEN button to return to actual
time EPG screen. Press INFO button to display detailed information for selected program. Press RED
button to book the selected programme (timer will be set for this event). To view the booked events and
timers press LIST button. Use OK button to switch to the selected channel to live program. Use
to return to previous step. Press to go back to viewing mode.
button
NOTE: Availability of EPG data depends on broadcaster.
11
Page 16

6.8.1 Booking a programme from EPG
Select a programme as described above. Press RED button.
Selected programme will be booked. Next to the programme name the
the programme description will contain the text “Booked”.
To cancel programme booking just press the RED button again. You can also make a correction of the
booking event via Timer list. Please refer to section Timer 7.2.5 for more details.
symbol will appear and
6.9 Favourite channels
Use the FAV button to access your favourite channel groups. Using p q select created earlier one of
available favourite groups and press OK or t to switch to channel list within selected group. Use p q
to select channel and press OK to start viewing it. Now you will navigate (switch channels with CH+/ or
p q buttons) only within this group. To get access to channel outside this group you could use direct
access (enter channel number with 0~9 keys) or switch to another favourite group with FAV or OK
button. Select View List in list of favourite channel groups to return to full channel list. Please refer to
section 7.1.1 for details on how to manage favourite lists.
7.0 MAIN MENU
To enter the main menu, press MENU on your remote control. In the main menu you can manage
channels, timers, specific receiver settings, get access to multimedia and internet functions and receive
useful information about the receiver, programmes, operator messages, etc.
The main menu contains the following chapters: Channel, Settings, Multimedia, Network and Installation.
By entering the menu and pressing MENU or
By pressing the
button you will exit the menu.
7.1 Channel
Use t u to access the menu Channel, which includes thefollowing submenus: TV Manager, Radio
Manager and Electronic Program Guide. Use p q to select the submenu and press OK.
7.1.1 TV Manager
To edit your channel list Favourite, Delete, Lock or Move, use p q to select Operation and afterwards
press OK to start it. If the Programme Lock field of the PIN-Code Management menu is activated, you will
be asked to enter a PIN code to continue. Refer to chapter 7.2.3 for more details.
Use the
mode.
button to return to the previous step. Press to exit the menu and to go back to the viewing
buttons, you will level up within the menu or close it.
Manage your favourites
Your receiver allows you to organize channels in up to 6 favourite lists. Due to the large number of
channels available on satellite nowadays, this can be a very useful function.
1. With p q select Favourite from the Operation list (left column) and press OK. In the Favourite
group you will see the available favourite lists FAV1, FAV2, … FAV6. You can rename any group
as you wish by pressing the RED button and using the virtual on-screen keyboard. Please
consider to obtain the information, provided on screen.
2. With p q select your favourite list and press OK to manage it. You will be switched to full
Channel list (central column). Use p q to select a channel and OK to add it to your Favourite list
and to the selected list (right column).
3. If you want to remove a channel from your Favourite list, press the u button to switch to the list.
With p q select the required channel and press OK to remove it.
4. With t u you can switch between groups and fields. Repeat previous steps to add or remove
more programmes to other favourite lists.
12
Page 17

5. Press or to confirm or cancel your changes and exit from the management of your
favourite lists.
Deleting of TV programmes
1. By pressing p q select Delete from the Operation list (left column) and press OK.
2. You will be switched to the full Channel list (central column). Use the p q buttons to select a
channel and OK to mark it for deletion. This will add it to your Selected list (right column).
3. If you do not want to delete any selected channels, you can remove them from the Selected list.
Press the u button to switch to the list. With p q select the required channel and press OK to
remove it.
4. Press
Locking TV programmes
You can lock selected programmes for restricted view.
1. With p q select Lock from the Operation list (left column) and press OK.
2. You will be switched to the full Channel list (central column). Use p q to select a channel and
3. If you do not want to lock any selected channels, you can remove them from the Selected list.
4. Press
To view the locked programme, you need to enter a PIN code. We recommend you to change the
default PIN code and enter a new PIN code. Refer to chapter 7.2.3 for more details.
Moving TV programmes
1. With p q select Move from the Operation list (left column) and press OK.
2. You will be switched to the full Channel list (central column). Use p q to select a channel.
3. Press the RED button to specify a new channel number or OK to add a channel in the Selected
4. Repeat the previous step to add more channels to a new position within the Selected list.
5. Press the u button to switch to the Selected list.
6. With p q select the required channel and press the RED button to define a new channel
7. Repeat the previous step to specify numbers for each selected channel you want to move or
8. Press
or to confirm or cancel your changes and exit the deleting mode.
OK to mark it for locking. This will add it to the Selected list (right column).
Press the u button to switch to the list. With p q select the required channel and press OK to
remove it.
or to confirm or cancel your changes and exit from the locking mode.
list (right column) for moving it later.
number in the channel list (enter the new channel number with 0~9 keys).
press OK to remove it from the list (channel will not change its number).
or to confirm or cancel any changes and exit the locking mode.
7.1.2 Radio Manager
In the Radio Manager menu you can do the same operations which were done in chapter 7.1.1 TV
Manager.
English
7.1.3 Electronic Program Guide (EPG)
Please refer to section 6.8 above.
7.2 Settings
Use t u to access the menu Settings, which includes the following submenus: Language, Output
Settings, PIN code management, Time settings, Timer and Software Update (OTA).
Use p q to select the submenu and press OK.
Use t u to change the value or OK to select it from the list.
Use the
Press
button to return to the previous step.
to exit the menu and to go back to the viewing mode.
13
Page 18

7.2.1 Language
OSD Language: Select the preferred language for the On Screen display.
1st Audio Language:
Digital TV allows the operator to transmit more than one audio track or language. If a channel has
multiple audio tracks or languages, the receiver will select the suitable audio track automatically
according to your selection.
In the viewing mode you can change this selection to a more suitable variation, as described in
chapter 6.4.
If the language is not available, the default programme language will be used.
2nd Audio Language:
Subtitle Type: Choose your preferred subtitle type between Normal and Hard of hearing.
Subtitle Display: Set to On to enable the display of subtitles, to disable set to Off.
1st Subtitle Language:
2nd Subtitle Language:
Select the preferred audio language for watching TV channels. This setting allows you
to define the default audio track or language.
The receiver will use this language if the first language selection is not available
Select the preferred subtitle language for watching TV channels.
This setting allows you to define the default subtitle language. Digital TV allows the
operator to transfer subtitles in one or more languages.
In the viewing mode you can change this selection to a more suitable variation, as
described in chapter 6.5. If the language is not available, the default language will be set.
The receiver will use this language if the first subtitle selection is not available.
7.2.2 Output Settings
This submenu allows you to set the output parameters of the receiver according to a connected TV set
and to the audio amplifier (if applicable).
HDMI Resolution: Select the screen resolution according to the characteristics and supported modes of
your TV set. Available options: 576i, 576p, 720p, 1080i and 1080p.
NOTE: Experiment with the settings to find the options that suit the best for you. You can
NOTE: Do not forget about the possibility to control the screen format from the menu of
Aspect Ratio: Select an aspect ratio depending on your TV set screen format.
Aspect Conversion: Change the aspect conversion.
NOTE: If the receiver is connected to a TV with 4:3 aspect ratio, the most recommended
14
change the parameters of the viewing mode by pressing OPT.
your TV (depending on your TV device).
Available options: 4:3 or 16:9.
Available options: Pan&Scan, LetterBox, Combined and Ignore.
mode is LetterBox. In this mode the video in 4:3 format will not be converted and
the 16:9 format will be converted to display in full size and without geometric
transformations (displays full screen width and top and bottom of the screen shows
black horizontal bars).
Page 19

Other options available for conversion of 16:9 video format:
4:3 TV Pan&Scan Displays full screen and high size, but the left and right sides of the screen are cut.
Combined Cuts left and right sides of screen to a minor extent and displays black horizontal bars
at upper and lower parts.
SCART Output: This setting is only relevant when the receiver is connected to the TV set via SCART.
Select RGB for the best picture quality or CVBS if your TV does not support RGB.
HDCP: Available options: On or Off, please see the note below.
English
NOTE: HDCP (High Definition Content Protection) is set to On to default as nowadays all
HDMI Audio Output:
SPDIF Audio Output:
OSD Transparency:
Banner Time Out: Define the duration of the info banner display in the viewing mode. Available options:
Audio Description: Set this function to On if you want to enable the playback of the audio description: a
AD Volume Offset: Define the difference between the normal TV broadcast sound and the Audio
TV sets with an HDMI connector support HDCP. If you face problems with the HDMI
connection, you can deactivate HDCP, which allows watching via HDMI without
problems. Please consider that movies which are broadcasted with an extra content
protection might not be shown when HDCP is set to Off.
Adjust this setting in accordance to the connected audio equipment. Set to Auto for
the most common connections. Set the BitStream option to bypass original audio
bitstream through HDMI to a connected audio equipment which can decode complex
digital audio formats. Set the PCM option to convert complex digital audio formats
supported by the receiver to STEREO audio and pass it to the HDMI output.
Adjust this setting in accordance to the connected audio equipment.
Set the BitStream option to bypass original audio bitstream through S/PDIF to a
connected audio equipment that can decode complex digital audio formats. Set the
PCM option to convert complex digital audio formats supported by the receiver to
STEREO audio and pass it to the S/PDIF output.
Define the transparency of menus and other system information windows. Available
options: Not transparent, 10, 20, ... 50.
3 Seconds, 5 Seconds, 7 Seconds and 10 Seconds.
narrator will describe what is happening on the screen for blind or visually impaired
viewers
description volume.
7.2.3 PIN Code Management
This submenu allows you to control the blocking of certain programmes from unrestricted viewing,
access to certain menu options and usage of the EPG based on parental rating system if supported by
the local broadcast.
Before entering this submenu, you have to enter the correct PIN code. The default value is 0000.
Programme Lock: Select Off or On. The default value is Off. If you select On, you cannot view the locked
Programme Lock age:
channel in the TV Manager submenu without the correct password.
Activates the parental control rate setting.
Available options: All Blocked, 4 years old, 5 years old, …, 18 years old, Disable (default
value).
15
Page 20

NOTE: The correct functionality highly depends on the information from the operator. It is
recommended to set this parameter to the age of the youngest child who has access
to television with this receiver. Whenever zapping through channels which submit
EPG based on parental rate system and if the rate of current broadcasts is higher
than the adjusted rate, it requires the PIN code for viewing.
Smartcard PIN code change:
STB PIN code change:
NOTE: To change the PIN code, you have to know the previous PIN code. Then you can
WARNING: You only have 3 (!) attempts to enter the correct active PIN code. If you exceed this
To change the PIN code of your smartcard. This function is only available while the
smartcard is inserted.
To change the PIN code of your receiver.
enter and confirm the new PIN code.
quantity, you have to contact your operator for help.
7.2.4 Time Setting
This submenu provides options to adjust the time and date settings.
GMT Offset: Select the offset from GMT standard time. Set to Auto to adjust it automatically.
Summer Time: Enable/disable the summer daylight saving time offset. Select On or Off depending on
Date: Set the current date.
Time: Set the current time.
Standby time display:
Auto Standby After:
the season. The parameter can only be changed if GMT Offset is not set to Auto.
Show the current time on the STB’s LED display in Standby mode.
Define the period of time of the receiver automatically switching to Standby mode if
no commands have been received from the remote control. Available options: Disable,
1 Hour, 2 Hours, 3 Hours (default value),…, 12 Hours.
7.2.5 Timer
This submenu allows you to automatically switch to the defined channels at a particular date and
time and to turn the receiver ON and OFF based on scheduled events. Timers can be set via the EPG
(recommended and most convenient). Please refer to section 6.8 above for more details.
However, you can set timers manually in this submenu. In the submenu Timer a summary of all timers
will be displayed: Number, Channel Name, Date, Starting time, Duration and Timer status.
Use p q to select a timer, press OK to book a new timer or to edit an existing one.
Timer Status: If no timer was booked yet, this parameter is set to Off
Option Once means that the timer will be executed once, after it will be removed from
the timer list.
Option Monday-Friday – the timer will run each working day of the week at a specified
time (Start Time field).
Option Daily – the timer will run every day at a specified time (Start Time field).
Option Weekly – the timer will run every week at a specified week day (Day field) and at
a specified time (Time field).
16
Page 21

Timer Action: Select a type of event to happen during timer activation. The only available option
is Timer which means that the timer will inform you about an upcoming event and
switch to the specified channel. Other options will be available later.
Channel: Press OK to access the channel list, use p q to select a channel and press OK to
confirm. The name of this channel will appear in the option field.
Start Date: Enter the date of the timer start. Date format dd.mm.yyyy.
Start Time: Enter the time of the timer activation. Time format hh:mm.
Duration: Enter the time interval of the timer activation. Time format hh:mm.
Save: Save your timer settings and press OK to activate the timer.
7.2.6 Software Update (OTA)
Your receiver can update the software via digital broadcast.
You can find out via your local support or dealer whether there is a new software version broadcasted.
If a new software is available, enter this submenu to check for the new version and to start the update
procedure from the broadcasting signal.
English
NOTE: If the operator forces the software update procedure while you are watching TV or
During software update procedure the receiver will enter the update mode and will show the Software
update screen, which contains information about your current and new software versions and further
reference details.
During update procedure the progress bar will inform you about the remaining time.
After finishing the software update, the receiver will reboot automatically and tune to the last viewed
channel.
WARNING: - Do not take any action during the update procedure, if the receiver has not
radio channels, the receiver can automatically switch to update mode.
restarted yet or if an error message appears.
- Do not disconnect the receiver from the mains nor switch off until the software
update has been completed.
7.3 Multimedia
In this menu you can playback video and music files and view pictures.
Use t u to access the menu Multimedia, which includes the following submenus: Movies, Music and
Pictures.
Use p q to select the submenu and press OK.
Use p q to select a folder or file you want to playback and press OK to open or start the playback.
Use 1 2 3 5 6 to control the playback of multimedia files.
Use the
mode.
button to return to the previous step. Press to exit the menu and to go back to the viewing
NOTE: Before you use the multimedia functions of your receiver, please make sure that your
USB storage device is properly connected to the receiver and that it is formatted in
the required file system.
17
Page 22

7.3.1 Movies
Buttons to use in playback preview mode:
OK Switch from window preview to full screen viewing.
INFO Get additional information about the video file.
VOL+/VOL Adjust the volume control.
Buttons to use in Full Screen mode:
OK Switch from window preview to full screen viewing.
VOL+/VOL Adjust the volume control.
RED Jump and go to the selected time for preview.
GREEN Hide the info banner.
YELLOW Select and choose the audio mode: Stereo, Mono, Right and Left.
7.3.2 Music
Buttons to use:
OK Playback the selected file.
VOL+/VOL Adjust the volume control.
RED Displays the play mode - change the playback options regarding the playback
sequence.
7.3.3 Photos
Buttons to use:
OK Playback the selected file.
RED Select the time interval - change the duration of your slide preview.
Available options: Off, 3s, 5s and 7s.
7.4 Network
Use t u to access the menu Network, which includes the following submenus: RSS, Weather and
Ethernet Config. Use p q to select the submenu and press OK.
NOTE: Before you use the network functions of your receiver, please ensure that it is
connected to the Internet. Refer to chapter 3.5 above for more details. Usually the
Internet connection can be established without any problems. Check the status
of your connection in the Ethernet Config submenu. The Cable status field should
indicate Plug In and the receiver must obtain a valid IP address.
7.4.1 RSS (Really Simple Syndication)
This submenu allows you to select the link of RSS news from different sources or to add your own link.
Use p q to highlight a link of your choice and press OK to open it. You can delete (pressing RED),
add a new feed (pressing GREEN) and edit an existing RSS feed (pressing the YELLOW) of your own
choice. Use the virtual on-screen keyboard to enter any text characters. Please consider to obtain further
information displayed on your screen . To confirm new RSS feeds or to save changes, select Save and
press OK. Use the button to return to the previous step. Press to exit the menu and to go back to
the viewing mode.
18
Page 23

7.4.2 Weather
This submenu allows you to watch the weather in your region. Information about current weather
conditions and forecasts will be provided on your screen. You can refresh the information about weather
conditions (RED), change the location (GREEN) or select a city from the list (YELLOW). Use the virtual onscreen keyboard to enter text characters. Please consider the information provided on your screen. To
confirm the location/city, select Save and press OK. To change the standard temperature from Celsius to
Fahrenheit and vise versa press the BLUE button. Use the
to exit the menu and to go back to the viewing mode.
button to return to the previous step. Press
7.4.3 Ethernet Cong
This submenu allows you to setup or check the Internet connection. The default selection for DHCP field
is On. Normally all settings and connection are done automatically. To test if the Internet connection
works, select SET field and press OK. If successful, on-screen messages will confirm and you can start
using it. Otherwise please check your cable and router. You can set the DHCP field to Off and define all
required IP addresses manually using the 0~9 keys. To save all new address definitions, please select the
SET field and press OK.
7.5 Installation
Use t u to access the menu Installation, which includes the following submenus: Dish Setting, Channel
Search, Information, Factory Default and CA INFO. Use p q to select the submenu and press OK.
7.5.1 Dish Setting
The dish setting procedure from the menu is almost the same, as it was described in the First Time
Installation chapter 4.2.2. This section contains more detailed information of how to add or modify your
antenna parameters. Use p q to select required parameters. Use t u to change option values or OK to
select it from the list. Use the button to return to the previous step. Press to exit the menu and to
go back to the viewing mode.
Satellite: Select a satellite to be configured and scanned.
LNB Power: Set the LNB power On or Off.
LNB Type: Select the LNB type. The Universal LNB (09750/10600 MHz) is supported and is the
LNB Freq (Low/High):
22KHz Tone: Switch the 22KHz oscillator signal to ON (22K) or OFF (0). Refer to information of
DiSEqC1.0: Select the correct port of the corresponding LNB.
Tone Burst: Set the tone control of your LNB. Available options: Off, LNB 1, LNB 2
Transponder: Select one of the available transponders of the chosen satellites in order to check your
The Signal Strength and Signal Quality indicators on the 2nd half of the screen will help you to make sure
that you get the signal with the selected parameters, as well as to adjust the antenna if necessary.
Press RED to scan the selected satellite signal. A window with the scan progess will be
appear.
most common on the market. SatCR is used for SatCR systems. See information below
for more details. It is possible to define the LNB type manually by selecting User
defined.
Set the frequency of the selected LNB type.
Universal LNB.
Available options: Off, LNB 1, …, LNB 4
reception or align the antenna.
English
SatCR
If a SatCR LNB is used, please refer to the manual of the respective LNB to obtain technical data on user
bands numbers and corresponding frequencies.
19
Page 24

NOTE: SatCR can only work in combination with an optional multi-output (max. 8) satellite
splitter and a SatCR LNB, an example is STRONG type SRT L780 (max. 4 users).
NOTE: SatCR cannot be combined with any other DiSEqC function. SatCR systems are
mainly installed by professional experts.
7.5.2 Channel Search
The channel search procedure from the menu is almost the same as described in First Time Installation
chapter 4.3. This section contains more detailed information on how to add, modify or update your
channel list. In order to view video programmes, you must do a channel search with or without
smartcard in order to install the channel list of your choice. For HD+ channels, first insert HD+ smartcard
at the side panel of the receiver before you start the channel search. Then the receiver will install the
associated channel list of the HD+ bouquet (FTA and encrypted). For FTA channels only or for channels
from other satellites you do not need to insert the HD+ smartcard.
Select the search scheme you wish the wizard to follow:
1. Select HD+ channels to search for channels of the HD+ bouquet (channels numbered 100 and
above).
2. Select Preinstalled channels to restore a predefined German channel list from the receiver’s
memory (channels numbered 1~99).
3. Select Advanced channel search to search for channels on all/selected transponders for the
selected satellite (channels numbered above HD+ bouquet numbers).
Use the p q buttons to select the required search scheme. Use the t u buttons when you want to
change the value or press OK to select it from the list. Use GREEN to perform an HD+ channel update.
Use RED to restore the original HD+ channel list.
Use the
mode.
Advanced channel search
Satellite: Select a satellite to be configured and scanned.
Transponder: Select the transponder you want to scan from the list of existing transponders.
Frequency: Get information about the transponder frequency.
Symbol: Get information about the symbol rate of the selected transponder.
Polarization: Get information about the polarization of the selected transponder.
Search Mode: Select the channels that shall be installed. Available options: Free, Scrambled or All.
Channel Type: Select the type of channels that shall be installed. Available options: TV, Radio or
Search on:: Select where to search for new channels. Available options: One Transponder, One
The Signal Strength and Signal Quality indicators on the 2nd half of the screen will help you to make sure
that you get the signal with the selected parameters, as well as to adjust the antenna if necessary.
button to return to the previous step. Press to exit the menu and to go back to the viewing
NOTE: If the messages No list found or No channels found are displayed, please check
the antenna connections, select correct satellite and check signal level and other
parameters from the satellite dish for selected satellites, as described in chapter 7.5.1.
Press RED to edit the parameters of the selected transponder. Press GREEN to add
a new transponder. Press YELLOW to delete the selected transponder (required
confirmation).
TV&Radio.
Satellite or Selected Satellites.
20
Page 25

After configuring, press RED to start the scanning with the selected settings.
Your receiver will now perform an automatic channel search. The scanning progress is displayed. During
the channel search you can skip transponders by pressing the MENU button or quit the scanning
process by pressing
By the time the process is completed, all listed channels will be stored and the receiver will switch to the
first channel.
(required confirmation).
7.5.3 Information
This submenu shows all receiver related information e.g. hardware and software version. It also displays
technical information from the currently selected channel, signal strength and signal quality.
Please refer to the information given on screen when you call a hotline support. The support center
employee might ask for the information given on screen.
7.5.4 Factory Default
This submenu allows you to reset your receiver to the default factory settings. You will be asked to enter
the PIN code (default PIN code is 0000). Select Factory Reset to delete all settings and channels. Press OK
to confirm. Select Channel Reset to delete all channels. Press OK to confirm. All previous settings will not
be changed.
The receiver will reboot and start with the First Installation menu.
WARNING: A factory reset will permanently delete all your personal settings, timers and stored
channels. Please consider this before you perform a factory reset. Please use this
option with caution.
7.5.5 CA INFO
Smartcard Information
This menu section is only accessible when an HD+ smartcard is inserted into the receiver. It provides
information about the HD+ smartcard. Please consult your installer or card provider for information
regarding the usage of your HD+ smartcard.
NOTE: Always make sure to insert the smartcard with the golden chip facing down.
Mail List
This submenu allows you to read messages from the operator.
NOTE: Messages from the operator will be displayed at the upper left corner of the TV
screen, showing the
to read the message.
icon. Press on the remote control or open the submenu
English
Use the p q buttons to select the message and press OK to open and read it. Press RED to delete all
messages from the list. Press GREEN to move up one page in the list. Press YELLOW to move down one
page in the list. Press BLUE to delete the selected message. Press
Press to exit the menu and go back to viewing mode.
button to return to previous step.
8.0 TROUBLESHOOTING
There may be various reasons for faulty operation of the receiver. Please check the receiver according
to the procedures shown below. If the receiver does not work properly after checking it, please contact
your local service line or STRONG dealer. Alternatively you can send a support e-mail via our website:
www.strong.tv.
21
Page 26

NEVER open or disassemble your receiver. This may cause a dangerous situation and will void the
warranty.
Symptom Cause Remedy
The standby indicator
does not light up
There is no image, no
sound, no display
There are small blocks in
the video, occasionally
no sound, occasionally
no signal
Scrambled channel
message
No response to remote
control
Password forgotten The default password is 0000 Contact the local Service Hotline
The external USB HDD
does not start.
The receiver switches to
standby automatically.
The mains lead is unplugged/the
multipoint connector is switched off.
There is no power supply Check the connection cables
There is a short circuit in coaxial
cable
Cables are missing or defective. Check your connecting cables
A wrong video format was selected
in the OSD settings
The signal is too weak Check for defective cables or
The channel is scrambled. Select an alternative channel.
The receiver is off. Plug in and turn on the plug.
The handset is not aimed correctly. Aim the handset at the IR sensor.
The IR sensor is obstructed. Check for obstructions.
The handset batteries are
exhausted.
The power consumption is too
high.
The Auto Standby function is
activated and has reached the set
time (default 3 hours).
Check the mains lead/switch the
multipoint connector on.
Disconnect device from mains power
supply, eliminate the short circuit
in the coaxial cable or connections,
reconnect, and activate device
Check the settings to make sure your
TV supports the selected format
connectors. Alternatively, reduce the
coaxial cable length
Replace the handset batteries.
or send an email to our support via
www.strong.tv
Connect an extra power supply
adapter to your USB HDD device.
Set the power down time or disable
it in the SettingsTime Setting menu,
parameter Auto Standby After.
9.0 SPECIFICATIONS
Demodulator
Demodulation: QPSK, 8PSK
Input symbol rate: DVB-S QPSK: 1 ~ 45 Ms/s
DVB-S2 8PSK/QPSK: 1 ~ 45 Ms/s
FEC decoder: Auto, 1/2, 2/3, 3/4, 5/6, 7/8 in DVB-S mode
1/4, 1/3, 2/5, 1/2, 3/5, 2/3, 3/4, 4/5, 5/6, 8/9, 9/10 in DVB-S2 QPSK mode
3/5, 2/3, 3/4, 5/6, 8/9, 9/10 in DVB-S2 8PSK mode
Video
Profi le level: MPEG-2 MP@ML, MPEG-4 AVC high profile H.264 [email protected]/[email protected]
Max. video resolution: 1920x1080p
Aspect ratio: 4:3 and 16:9, Pan & Scan Automatic adjustment for 16:9 TV sets,
22
Letterbox supported
Page 27

Video resolution: PAL: 576i/p, 720p, 1080i, 1080p over HDMI surface
Audio
Audio mode: Mono L/R, Stereo, Dolby® Digital, Dolby® Digital Plus*, PCM.
Transcoding to S/PDIF: Dolby Digital Plus to Dolby Digital or PCM
*Dolby Digital Plus and the double-D symbol are registered trademarks of Dolby Laboratories
Tuner
Type1 F Type, IEC169-24, Female
Input frequency range: 950 – 2150 MHz
RF impedance: 75 Ohm unbalanced
Signal level: -65 to -25 dBm
LNB power: 13/18 V DC (+/- 1 V), max. 500 mA, overload protected
DiSEqC version: 1.0, SatCR EN50494/EN50607
System & memory
Main processor: STiH237 (Nagra)
Flash memory: 8 MB
System memory: 256 MB NAND + 512 MB DDR3
Connectors
SAT IN
S/PDIF (coax.)
HDMI
TV Scart
Ethernet (RJ45)
Power adapter (12 V/1.5 A)
USB 2.0 port,Type A: 5 V/800 mA (max.) supported
General Data
Power supply: AC 100 - 240 V 50/60 Hz
Input voltage: DC 12 V, 1.5 A
Power consumption: max. 18 W, typ.6 W
Power consumption in standby: max 0.5 W
Operating temperature: 0 ~ +40 °C
Storage temperature: -10 ~ +50 °C
Operating humidity range: 10 ~ 85% RH, non-condensing
Size (W x D x H) in mm: 169 x 133 x 40
Weight in kg: 0,36
English
23
Page 28

10.0 TERMS & CONDITIONS HD+ IN GERMAN
Stand: Juli 2014
1. Geltungsbereich, Vertragsgegenstand und HD+ Karte
1.1. Diese allgemeinen Geschäftsbedingungen der HD PLUS GmbH mit Sitz in der Betastraße 1-10, 85774 Unterföhring („HDP“) gelten
ausschließlich für den HD+ Service.
1.2. HDP überlässt dem Nutzer nach Maßgabe dieser allgemeinen Geschäftsbedingungen den Besitz an einem Datenträger („HD+ Karte“).
Die auf der HD+ Karte gespeicherte Software bzw. Daten (zusammen die „HD+ Software“) sind lediglich technische Voraussetzung
zum entschlüsselten Empfang bestimmter, digital verschlüsselt ausgestrahlter TV- Angebote („Programmangebote“) über einen
Digitalempfänger mit HD+ Zertifizierung („HD+ Service“).
1.3. HDP räumt dem Nutzer eine nicht ausschließliche, nicht übertragbare Lizenz zur bedingungsgemäßen Nutzung der auf der HD+
Karte befindlichen HD+ Software zum Zwecke der vertragsgemäßen Entschlüsselung von Programmangeboten ein. Dieses Recht
ist auf das Gebiet der Bundesrepublik Deutschland beschränkt. Es ist dem Nutzer untersagt, die HD+ Karte außerhalb Deutschlands
zu nutzen. HDP kann verlangen, dass die HD+ Karte ausschließlich in Verbindung mit einem ihr zugeordneten Digitalempfänger
verwendet wird. Außerdem ist HDP berechtigt, dies technisch sicherzustellen (sog. Pairing von Digitalempfänger und HD+ Karte).
1.4. Die Aktivierung der HD+ Karte obliegt dem Nutzer. Die HD+ Karte darf nicht anders als vereinbart verwendet werden. Der Nutzer ist
nicht berechtigt, die HD+ Software zu kopieren, zu modifizieren, zu disassemblieren, zu dekompilieren oder andere Verfahren auf sie
anzuwenden, um deren Quellcode oder deren Struktur zu erfahren oder Prozesse oder deren Zustandsrepräsentation unberechtigt in
Erfahrung zu bringen oder zu beeinflussen. Gesetzliche Dekompilierungsrechte bleiben unberührt.
1.5. Der Digitalempfänger, das Wiedergabegerät (z. B. TV) und die Programmangebote sind ausdrücklich nicht Leistungsgegenstand.
Zertifizierte Digitalempfänger sind im Handel erhältlich. Ihre Installation obliegt dem Nutzer. Im Falle technischer oder allgemeiner
Probleme mit dem Digitalempfänger liegt die Verantwortung für den Kundenservice beim Hersteller des Digitalempfängers.
1.6. Die Anzahl und Zusammenstellung der Programmangebote kann sich während der Vertragslaufzeit ändern.
1.7. HDP behält sich vor, die zur Nutzung des HD+ Services sowie zu dessen Ergänzung oder Änderung erforderliche Software auf die
HD+ Karte sowie den Digitalempfänger in unregelmäßigen Zeitabständen kostenfrei aufzuspielen oder dort vorhandene HD+
Software zu aktualisieren, zu ergänzen oder zu ändern. Unbeschadet der vorstehenden Regelungen ist die Haftung von HDP bei
Datenverlusten auf den typischen Wiederherstellungsaufwand beschränkt.
1.8. HDP behält sich vor, HD+ Karten zu sperren bzw. nicht mehr zu unterstützen, die aufgrund von Rechtsverletzungen auch durch
Dritte die unerlaubte Nutzung des HD+ Services bzw. eine Umgehung der Verschlüsselung ermöglichen. Eine Verlängerung des HD+
Services nach Ablauf der Freischaltung gemäß Ziffer 3.1 ist auf gesperrten bzw. nicht mehr unterstützten HD+ Karten nicht möglich.
2. Nutzerkreis und Nutzungsvoraussetzungen
2.1. Der HD+ Service steht natürlichen Personen im Alter von mindestens 18 Jahren zur Verfügung und ist ausschließlich für die private,
nicht-gewerbliche Nutzung bestimmt. Die Nutzung außerhalb des privaten Haushalts bzw. die Weitergabe an Dritte zur Nutzung ist
nicht gestattet.
2.2. Voraussetzung für die Nutzung des HD+ Services ist eine digitaltaugliche Satellitempfangsanlage, welche auf einen von HDP
genutzten Satellit ausgerichtet ist bzw. vereinzelt auch Kabel-Empfang (siehe www.hd-plus.de/faq) sowie die Verwendung eines
mit dem HD+ Logo gekennzeichneten Digitalempfängers und ein Wiedergabegerät (z. B. TV), die im Leistungsumfang jedoch nicht
enthalten sind (vgl. Ziffer 1.5).
2.3. Eine uneingeschränkte, vollumfängliche Nutzung des HD+ Services ist nur bei der Verwendung von HD+ zertifizierten
Digitalempfängern möglich. Bei der Verwendung von Digitalempfängern ohne HD+ Zertifizierung kann es zu technischen
Nutzungseinschränkungen des HD+ Services kommen, auch wenn HD+ zertifizierte Common-Interface-+ Empfangsmodule
verwendet werden. Insbesondere kann es sein, dass die Entschlüsselung bzw. Darstellung einzelner Programmangebote nicht
möglich ist. Der Nutzer hat deswegen gegenüber HDP weder einen Gewährleistungsanspruch noch ein Sonderkündigungsrecht.
3. Servicepauschale / Laufzeit und Verlängerung des HD+ Services
3.1. Im Rahmen von Vermarktungsangeboten, beispielsweise in Verbindung mit dem Kauf eines für HD+ zertifizierten Digitalempfängers,
werden HD+ Karten ausgegeben, die bereits eine Freischaltung über mehrere Monate für den HD+ Service ohne weitere Kosten für
den Nutzer beinhalten.
3.2. Im Übrigen fällt für die Nutzung des HD+ Services eine Servicepauschale zu den jeweiligen besonderen Bedingungen an.
3.3. Die Laufzeit der Nutzung des HD+ Services beginnt mit Aktivierung der HD+ Karte. Aktiviert wird eine Karte, wenn sie in den dafür
vorgesehenen Schacht eines für HD+ zertifizierten Digitalempfängers steckt und ein HD+ Programm damit erstmals entschlüsselt
wird bzw. mit Verlängerung und Freischaltung durch den Nutzer
3.4. Rechtzeitig vor Ablauf der jeweiligen Freischaltung des HD+ Services wird der Nutzer durch eine Einblendung auf dem
Wiedergabegerät auf Ablauf und eventuell mögliche Verlängerungs- bzw. Neukaufoptionen für die Nutzung des HD+ Services
aufmerksam gemacht. Die Freischaltung einer HD+ Karte sollte erst nach Einblendung auf dem Wiedergabegerät verlängert werden.
Andernfalls kann sich der Zeitraum einer bestehenden Freischaltung verkürzen. Der Erwerb einer HD+ Karte beinhaltet jedoch nicht
den Anspruch auf Verlängerung derselben.
3.5. Die Programmangebote und Services Dritter und deren Empfang bzw. Nutzung können gesonderte Kosten auslösen, für die der
Nutzer selbst verantwortlich ist.
4. Beachtung von Urheberrechten
4.1. Die HD+ Software und die HD+ Karte sind rechtlich geschützt. Soweit Programme von Lizenzgebern zur Anwendung kommen, ist
deren Eigentum in gleichem Umfang geschützt. Die unerlaubte Vervielfältigung oder Verbreitung der HD+ Software oder der HD+
Karte und/oder deren Nachahmung wird HDP durch zivil-, gegebenenfalls auch strafrechtliche Maßnahmen verfolgen.
5. Rechte und Pichten des Nutzers
5.1. Jeder Nutzer des HD+ Services trägt selbst die Verantwortung für die bestimmungsgemäße Nutzung; der Nutzer hat insbesondere
sicherzustellen, dass jugendgefährdende Sendeinhalte nur dem gesetzlich zugelassenen Personenkreis zugänglich sind.
5.2. Der Nutzer darf den HD+ Service nicht missbräuchlich nutzen und ist verpflichtet, seine HD+ Karte vor Verlust und Missbrauch zu
schützen. Der Nutzer darf insbesondere keine Eingriffe in die HD+ Software vornehmen oder vornehmen lassen, um beispielsweise
den unberechtigten Empfang von verschlüsselten Programmangeboten zu ermöglichen. Auch die Benutzung von Vorrichtungen zur
Umgehung der Verschlüsselung ist verboten. Solche Missbräuche können zivil- und strafrechtlich verfolgt werden. Auf Ziffer 6 und
Ziffer 7.3wird verwiesen.
24
Page 29

5.3. Ersetzt HDP die HD+ Karte aufgrund einer vom Nutzer zu vertretenden Beschädigung oder eines Verlustes, hat dieser Schadensersatz
zu leisten.
5.4. Wird die Bereitstellung des HD+ Services aufgrund von Eingriffen in die Software oder Hardware des Nutzers beeinträchtigt oder
unterbrochen, die HDP nicht zu vertreten hat, ist der Nutzer nicht zur Rückerstattung einer bereits entrichteten Servicepauschale
berechtigt. Dies gilt auch, wenn die HD+ Karte beschädigt wurde oder abhanden gekommen ist.
6. Freistellung
6.1. Der Nutzer haftet gegenüber HDP für die Einhaltung der in den Ziffern 4 und 5 aufgeführten Pflichten. Er stellt HDP von sämtlichen
Ansprüchen Dritter frei, die infolge einer schuldhaften Verletzung dieser Pflichten und/oder schädigender Handlungen des Nutzers
gegen HDP geltend gemacht werden und leistet Ersatz für darüber hinausgehende Schäden einschließlich der Kosten für eine
eventuell erforderliche Rechtsverfolgung und -verteidigung.
7. Rechte und Pichten von HDP
7.1. HDP wird den Nutzer von einer nicht nur unwesentlichen vorübergehenden Leistungseinstellung oder -beschränkung unterrichten.
Diese Mitteilungspflicht besteht nicht, wenn die Unterrichtung nach den jeweiligen Umständen objektiv vor Beginn der
Leistungseinstellung oder -beschränkung nicht möglich ist oder die Beseitigung bereits eingetretener Unterbrechungen verzögern
würde.
7.2. HDP behält sich vor, ohne weitere Ankündigung Wartungs- und Instandhaltungsarbeiten an ihren technischen Anlagen zur
Aufrechterhaltung bzw. Verbesserung des HD+ Services durchzuführen. In diesem Wartungsfenster kann es zu Unterbrechungen
oder Beeinträchtigungen beim Empfang der Programmangebote kommen, die den Nutzer jedoch nicht zur Minderung berechtigen.
7.3. Bei einem Verstoß gegen diese Nutzungsbedingungen oder dem begründeten Verdacht eines Verstoßes durch den Nutzer,
insbesondere im Sinne der vorstehenden Ziffern 4 und 5, ist HDP nach eigenem Ermessen berechtigt:
7.3.1. den Nutzer vorübergehend oder dauerhaft von der Nutzung des HD+ Services auszuschließen und/oder
7.3.2. das Nutzungsverhältnis außerordentlich gemäß Ziffer 10.1zu kündigen.
7.4. HDP wird den Nutzer vor Ausschluss oder Kündigung abmahnen, wenn nicht der Verstoß so schwer wiegt, dass HDP eine Fortsetzung
des Nutzungsverhältnisses nicht zumutbar ist.
7.5. Bei einem auf dem Verschulden des Nutzers beruhenden Nutzungsausschluss gemäß Ziffer 7.3 bleibt der Nutzer auch für den
Zeitraum des Nutzungsausschlusses und der Leistungsunterbrechung zur Zahlung der Vergütung verpflichtet.
8. Gewährleistung
8.1. HDP erbringt Leistungen unter Inanspruchnahme von Kommunikationsnetzen oder technischen Einrichtungen Dritter, die sich
außerhalb der Kontrolle von HDP befinden. Zeitweilige Beschränkungen, Beeinträchtigungen oder Ausfälle des HD+ Services
aufgrund von Einflüssen, die HDP nicht zu vertreten hat, kann HDP darum nicht ausschließen. HDP übernimmt insbesondere keine
Gewähr dafür, dass bestimmte Programmangebote zu einem bestimmten Zeitpunkt empfangen werden können; dies gilt nicht,
soweit HDP eine Störung zu vertreten hat.
8.2. Der Nutzer erkennt an, dass die Qualität der entschlüsselten bzw. zugänglich gemachten Programmangebote einerseits von
der durch Dritte bereitgestellten Signalqualität und andererseits von der Leistungsfähigkeit der vom Nutzer eingesetzten
Wiedergabegeräte abhängig ist und beides außerhalb des Verantwortungsbereiches der HDP liegt. Der Nutzer erkennt ebenfalls an,
dass die Aufnahme und Wiedergabe aufgezeichneter Programmangebote durch Dritte eingeschränkt werden kann.
8.3. HDP weist darauf hin, dass Softwareprogramme nicht so entwickelt werden können, dass sie für alle Anforderungen fehlerfrei laufen.
8.4. HDP behebt im Rahmen der bestehenden technischen und betrieblichen Möglichkeiten alle ihr gemeldeten Störungen des HD+
Services, für deren Behebung es nicht des Austauschs der HD+ Karte bedarf, unverzüglich. Die Kosten für die Inanspruchnahme des
Kundendienstes von HDP trägt der Nutzer. Vorübergehende Beeinträchtigungen des Empfanges durch atmosphärische Störungen
oder Sender-, oder Satellit-/Kabelnetzausfall berechtigen den Nutzer nicht zur Minderung.
9. Haftung
9.1. HDP haftet nur, soweit HDP, ihren Erfüllungsgehilfen und/oder gesetzlichen Vertretern ein vorsätzlichesoder grob fahrlässiges
Verhalten zur Last fällt.
9.2. Bei leicht fahrlässig verursachten Schäden haftet HDP nur, wenn eine wesentliche Vertragspflicht verletzt wurde oder ein Fall des
Verzugs oder der Unmöglichkeit vorliegt. In diesen Fällen ist die Haftung auf den typischen vorhersehbaren Schaden begrenzt.
9.3. Soweit es zu zeitweiligen Beeinträchtigungen beim Empfang der Programmangebote kommen sollte, die außerhalb des
Einflussbereichs von HDP liegen, insbesondere bei einem Ausfall des Signals, den HDP nicht zu vertreten hat, haftet HDP nicht.
9.4. HDP ist nicht verantwortlich für die von ihr entschlüsselten zugänglich gemachten Programmangebote und deren Inhalte.
9.5. Eine gesetzlich vorgeschriebene, verschuldensunabhängige Haftung von HDP, insbesondere eine Haftung nach
Produkthaftungsgesetz sowie eine gesetzliche Garantiehaftung, bleibt von den vorstehenden Haftungseinschränkungen
unberührt. Gleiches gilt für die Haftung von HDP bei schuldhafter Verletzung von Leben, Körper oder Gesundheit eines Nutzers. Die
verschuldensunabhängige Haftung gemäß § 536a BGB ist ausgeschlossen, wenn HDP dem Nutzer eine HD+ Karte überlässt.
9.6. Die Ziffern 9.1, 9.2und 9.5 umfassen sämtliche vertraglichen und gesetzlichen Ansprüche, die wegen der Nutzung des HD+ Services
geltend gemacht werden können.
10. Kündigung des Vertrages und Änderung des HD+ Services
10.1. Der Vertrag über die Nutzung des HD+ Service läuft für die jeweils vereinbarte Dauer ab Aktivierung der HD+ Karte Eine
Verlängerung setzt voraus, dass die HD+ Karte nicht gem. Ziffer 1.8gesperrt ist. Unberührt hiervon bleiben etwaige außerordentliche
Kündigungsrechte.
10.2. Der Nutzer kann nicht außerordentlich kündigen, weil sich die Anzahl oder Zusammenstellung der Programmangebote, welche der
Nutzer mithilfe der HD+ Software entschlüsseln kann, während der Vertragslaufzeit ändert.
10.3. Kündigt HDP den HD+ Service nach Abmahnung im Fall der Ziffer 7.3, kann HDP Schadensersatz nach den gesetzlichen Vorschriften
fordern.
11. Datenschutz
11.1. Einzelheiten zur Datenverarbeitung sind im Datenschutzmerkblatt enthalten (siehe www.hd-plus.de/datenschutz).
12. Schlussbestimmungen
12.1. HDP ist berechtigt, ihre Rechte und Pflichten aus diesem Vertrag ganz oder teilweise auf einen zur ordnungsgemäßen Fortführung
des Vertrages geeigneten Dritten zu übertragen. Der Nutzer ist in diesem Fall berechtigt, das Vertragsverhältnis mit Wirksamkeit zum
Zeitpunkt der Übertragung zu kündigen.
12.2. Es gilt das Recht der Bundesrepublik Deutschland. Die Anwendung von UN-Kaufrecht ist ausgeschlossen.
English
25
Page 30

GEWÄHRLEISTUNGSKARTE
GEWÄHRLEISTUNGSKARTE
DEUTSCHLAND & ÖSTERREICH
Bitte füllen Sie alle folgenden Felder leserlich aus.
RMA Nummer: _____________________________________________________________________
Modell Nummer: _____________________________________________________________________
Kaufdatum: _____________________________________________________________________
Geschäft:
(nur auszufüllen, wenn unleserlich auf dem Originalbeleg)
Name: _____________________________________________________________________
Straße: _____________________________________________________________________
PLZ _____________________________________________________________________
Ort: _____________________________________________________________________
Tel: _____________________________________________________________________
Käufer:
Vorname/ Name: _____________________________________________________________________
Straße: _____________________________________________________________________
PLZ _____________________________________________________________________
Ort: _____________________________________________________________________
Tel: _____________________________________________________________________
Fehlerbeschreibung
(Reklamationen können nur bei einer detaillierten Fehlerbeschreibung bearbeitet werden)
______________________________________________________________________________________
______________________________________________________________________________________
______________________________________________________________________________________
______________________________________________________________________________________
______________________________________________________________________________________
______________________________________________________________________________________
______________________________________________________________________________________
Datum/ Unterschrift: _____________________________________________________________________
Gewährleistung für dieses Gerät ab Kaufdatum 24 Monate. Die Gewährleistungsbedingungen
beschränken sich nur auf Deutschland und Österreich. Außerhalb dieser beiden Länder wenden Sie sich
bitte an die Verkaufstelle, wo Sie dieses Gerät erworben haben. Ausgeschlossen von der kostenlosen
Serviceleistung sind:
n Unsachgemäße Behandlung und Bedienung
n Aufspielen von nicht von STRONG autorisierter Software
n Beschädigung durch Dritte oder höhere Gewalt
n Transportschäden
n Eingriff durch nicht autorisierte Personen
Eine eventuell kostenpflichtige Reparatur kann nur nach Rücksprache mit Ihnen und auf ausdrücklichen Wunsch durchgeführt werden.
GEWÄHRLEISTUNGSKARTE
WICHTIGE UNTERLAGE FÜR DEN GEWÄHRLEISTUNGSFALL!
BITTE UNBEDINGT AUFBEWAHREN!
All customers outside Germany or Austria please contact your local retailer for further service support information.
Sehr geehrter Kunde,
ergeben sich an Ihrem Gerät wider Erwarten technische Probleme, dann beachten Sie bitte
folgende Punkte:
Rufen Sie bitte ZUERST unsere HOTLINE an – oft kann Ihnen unser Fachpersonal bei
kleineren Problemen telefonisch weiterhelfen.
DEUTSCHLAND: 0180 501 49 91
ÖSTERREICH: 0820 400 150
Halten Sie hierzu bitte Ihren Kaufbeleg, die genaue Typenbezeichnung und die
Seriennummer des Gerätes bereit.
(0,14 Euro/Min. vom deutschen Festnetz; maximal 0,42 Euro/Min. aus Mobilfunknetzen)
(0,12 Euro/Min. vom österreichischen Festnetz)
Dieser Service ist im Rahmen der gesetzlichen Gewährleistungsbestimmungen kostenlos. Davon
ausgenommen sind Schäden durch Gebrauch und/oder Verschleiß (wie z.B. Batterie). Nach Ablauf
der Gewährleistung bzw. bei Schäden, für die wir keine Gewährleistung übernehmen können,
erhalten Sie umgehend einen Kostenvoranschlag. Zur Einsendung des Gerätes trennen Sie
bitte die Gewährleistungskarte ab und senden Sie diese mit dem kompletten Gerät frei Haus an
folgende Service-Anschrift:
DEUTSCHLAND:
ÖSTERREICH: STRONG Servicecenter • c/o Digital – Electronic – Center Service GmbH •
Kunden können das Gerät mit ausgefüllter Gewährleistungskarte auch während der
Öffnungszeiten abgeben: Mo bis Do von 8:30 bis 17:00 Uhr, Freitag von 8:30 bis 13:30 Uhr
STRONG Servicecenter • c/o SVS Service – Center• Pömmelter Straße 2 •
39218 Schönebeck*
Kelsenstraße 2 • 1030 Wien*
ACHTUNG! DIE GEWÄHRLEISTUNG IST NUR MIT AUSGEFÜLLTER
GEWÄHRLEISTUNGSKARTE UND BEIGELEGTEM
ORIGINALKASSENBELEG GÜLTIG. BITTE ACHTEN SIE DARAUF,
DAS GERÄT GUT VERPACKT – AM BESTEN IM ORIGINALKARTON –
EINZUSENDEN!
*Adressänderung vorbehalten. Die aktuelle Adresse finden Sie auf unserer Website: www.strong.tv
Page 31

GEWÄHRLEISTUNGSKARTE
GEWÄHRLEISTUNGSKARTE
DEUTSCHLAND & ÖSTERREICH
Bitte füllen Sie alle folgenden Felder leserlich aus.
RMA Nummer: _____________________________________________________________________
Modell Nummer: _____________________________________________________________________
Kaufdatum: _____________________________________________________________________
Geschäft:
(nur auszufüllen, wenn unleserlich auf dem Originalbeleg)
Name: _____________________________________________________________________
Straße: _____________________________________________________________________
PLZ _____________________________________________________________________
Ort: _____________________________________________________________________
Tel: _____________________________________________________________________
Käufer:
Vorname/ Name: _____________________________________________________________________
Straße: _____________________________________________________________________
PLZ _____________________________________________________________________
Ort: _____________________________________________________________________
Tel: _____________________________________________________________________
Fehlerbeschreibung
(Reklamationen können nur bei einer detaillierten Fehlerbeschreibung bearbeitet werden)
______________________________________________________________________________________
______________________________________________________________________________________
______________________________________________________________________________________
______________________________________________________________________________________
______________________________________________________________________________________
______________________________________________________________________________________
______________________________________________________________________________________
Datum/ Unterschrift: _____________________________________________________________________
Gewährleistung für dieses Gerät ab Kaufdatum 24 Monate. Die Gewährleistungsbedingungen
beschränken sich nur auf Deutschland und Österreich. Außerhalb dieser beiden Länder wenden Sie sich
bitte an die Verkaufstelle, wo Sie dieses Gerät erworben haben. Ausgeschlossen von der kostenlosen
Serviceleistung sind:
n Unsachgemäße Behandlung und Bedienung
n Aufspielen von nicht von STRONG autorisierter Software
n Beschädigung durch Dritte oder höhere Gewalt
n Transportschäden
n Eingriff durch nicht autorisierte Personen
Eine eventuell kostenpflichtige Reparatur kann nur nach Rücksprache mit Ihnen und auf ausdrücklichen Wunsch durchgeführt werden.
Page 32

28
 Loading...