

Page 1
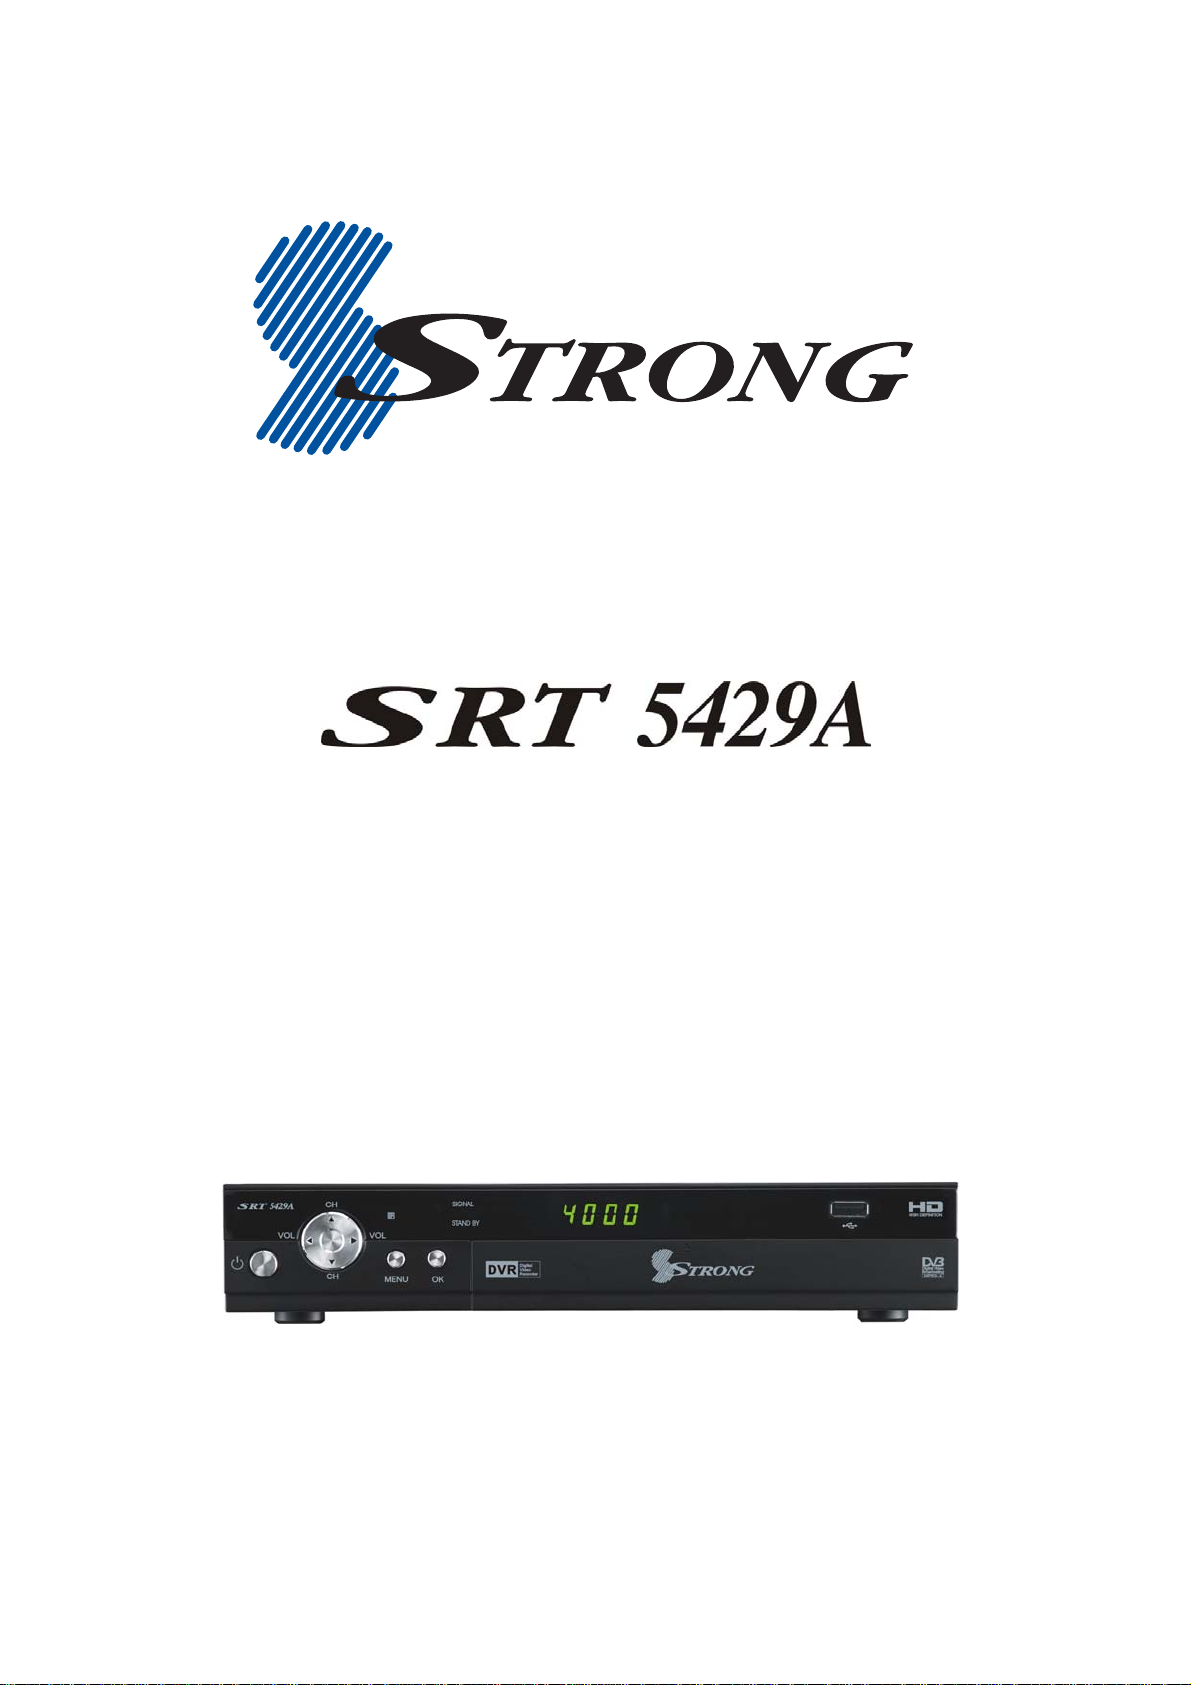
High Definition Digital Terrestrial Receiver
USER’S MANUAL
Page 2

Important Safety Instructions
• To avoid electric shock, do not open the unit.
• There are no user-serviceable parts inside. Servicing can only be performed by qualified service
personnel.
• Connection can only be to a 240V AC mains supply.
• All safety and operating instructions should be read before the product is operated.
• All warnings on the product and in this user’s manual should be adhered to.
• The antenna cable must be earthed.
• Do not use attachments not recommended by the product manufacturer as they may cause hazards or
damage the equipment.
• Do not overload adaptors, wall sockets or extension cables as this can result in unit failure or electric
shock.
• For cleaning, use only a dry or lightly dampened cloth. Do not use liquid cleaners or aerosol cleaning
products.
• Do not place this product on an uneven surface.
• Do not block the ventilation slots on the top of the unit.
2
Page 3

Overview
Thank you for purchasing this Strong Digital Terrestrial Television Receiver.
This product has been manufactured in accordance with strict quality control procedures and is fully
compliant with Australian specifications.
Your new receiver will enable you to experience superior picture and sound quality, widescreen images,
extra channels plus a variety of new features.
• For a complete list of all of our digital television receivers— terrestrial and satellite—please go to our
website: www.strong.com.au
• For technical assistance, please call our Technical Support Help Line on 1 800 820 030
Main Features
• High Definition Multimedia Interface (HDMI) output • Decodes high definition and standard definition
broadcasts
• Component output (Y/Pb/Pr) • Dolby Digital audio output: S/PDIF coaxial
• Composite output • USB2.0 Host for Video&MP3 Playback and JPEG
Viewing
• Multi-video definitions: 576i/ 576p/720p/1080i • Auto and manual channel searching
• Fully featured infra-red remote control • Band selection: 7M & 8M
• Tuner loop-through • CD-quality audio (stereo)
• Favourite channels and stations list • EPG: Electronic Program Guide
• 16:9 and 4:3 aspect ratios • Signal level and quality indicators
• Subtitles • Parental guidance locking
• 8 timer event settings • USB port for software upgrades
• COFDM demodulation • DVB/T and MPEG-4(H.264) compliant
3
Page 4

Contents
Important Safety Instructions ..........................................................................................................................................2
Overview............................................................................................................................................................................3
Main Features....................................................................................................................................................................3
Checklist of Accessories.................................................................................................................................................. 5
Controls and Indicators....................................................................................................................................................6
Front panel.......................................................................................................................错误!未定义书签。
Rear panel...................................................................................................................................................... 7
Remote Control.................................................................................................................................................................8
Installing the batteries in the remote control .............................................................................................. 9
How to Connect...............................................................................................................................................................10
Step 1: Connect to the antenna................................................................................................................... 10
Step 2: Choose an installation method........................................................................................................ 10
A: High Definition Multimedia Interface.................................................................................................... 11
B: Y/Pb/Pr (Component) using a RCA blue–red–green cable................................................................. 11
C: CVBS (Composite) using the supplied RCA red–white–yellow cable................................................. 12
Step 3: Optional connections....................................................................................................................... 13
Dolby Digital ............................................................................................................................................. 13
Looping Out (for VCR recording) ............................................................................................................. 13
Getting Started................................................................................................................................................................14
First-time use ............................................................................................................................................... 14
Operation.........................................................................................................................................................................15
Basic operations........................................................................................................................................... 15
Selecting a channel..................................................................................................................................15
Adjusting the volume................................................................................................................................ 16
Getting channel Information..................................................................................................................... 16
TV/Radio switching................................................................................................................................... 16
Closed captions........................................................................................................................................ 17
Picture freeze ........................................................................................................................................... 17
Favourites list............................................................................................................................................... 17
Adding channels or stations to your favourites list................................................................................... 18
Selecting a favourite to watch or listen to................................................................................................. 20
Organising channels and stations................................................................................................................ 20
USB.......................................................................................................................................................... 21
USB update.............................................................................................................................................. 22
USB Media ...............................................................................................................................................22
Instructions for recording TV programs.................................................................................................... 22
Selecting a Partition and Partitioning your USB HDD.............................................................................. 23
WARNING................................................................................................................................................ 23
Electronic Program Guide (EPG)................................................................................................................. 23
Displaying program infornation .................................................................................................................. 24
Rescanning for channels and stations......................................................................................................... 24
Multi-language and Dolby Digital broadcasting ........................................................................................... 26
User Settings...................................................................................................................................................................27
Audio–Visual (AV) settings .......................................................................................................................... 27
Parent control............................................................................................................................................... 28
Timer settings............................................................................................................................................... 29
System Maintenance.......................................................................................................................................................31
System information................................................................................................................................. 31
Software upgrades................................................................................................................................... 31
Clearing and resetting date……………………………………………………………………………….………33
Troubleshooting............................................................................................................................................................. .34
Support ............................................................................................................................................................................35
Specifications..................................................................................................................................................................36
4
Page 5
Checklist of Accessories
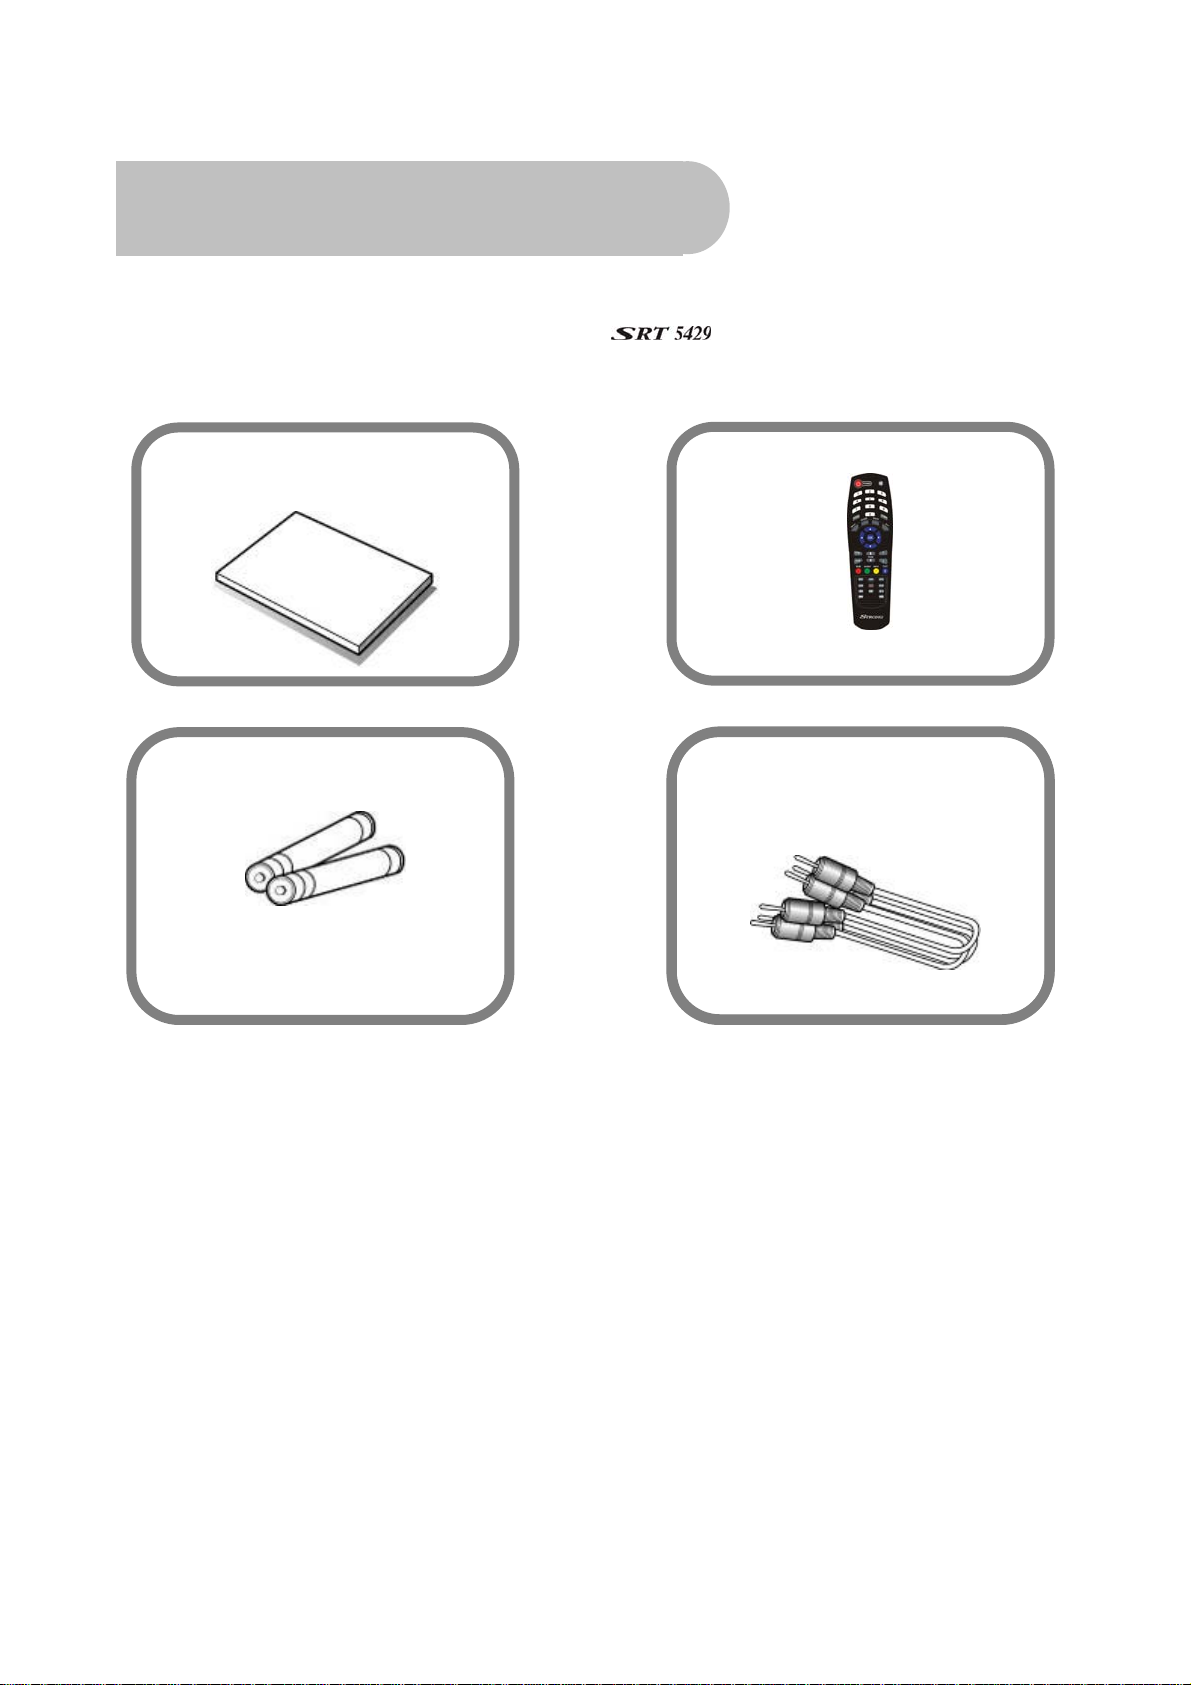
The following accessories have been supplied with your
retailer from whom you purchased the unit.
. If any were not supplied, contact the
User’s manual : 1
Batteries (AAA type) : 2
Remote control : 1
CVBS Composite video and
audio cable
(yellow, white, red) : 1
5
Page 6
Controls and Indicators
Front panel
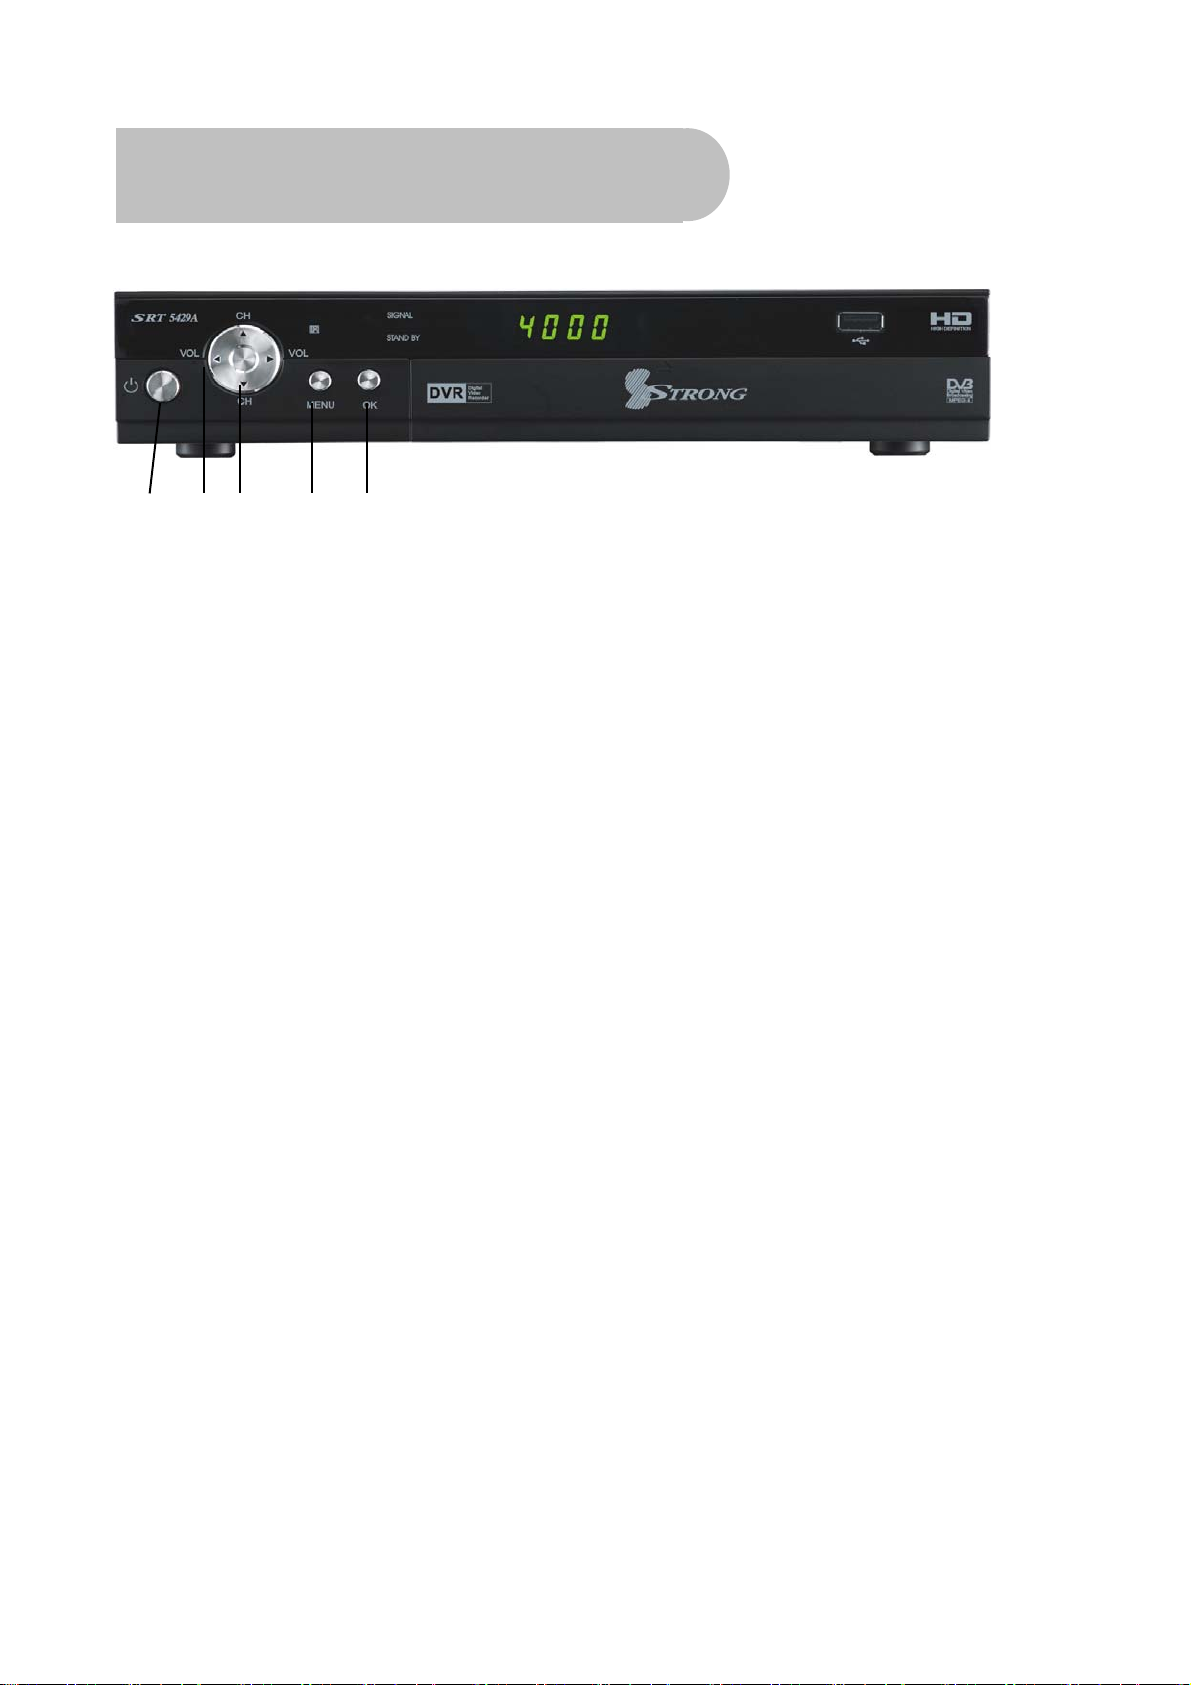
1 2 3 4 5
1 To switch the receiver between stand-by mode and power-on mode.
2 To change the volume, or next option in a menu.
3 To select the previous channel, or previous option in a menu.
4 To display the main menu,or return to a previous menu
5
To confirm menu selection.
6
Page 7
Rear panel
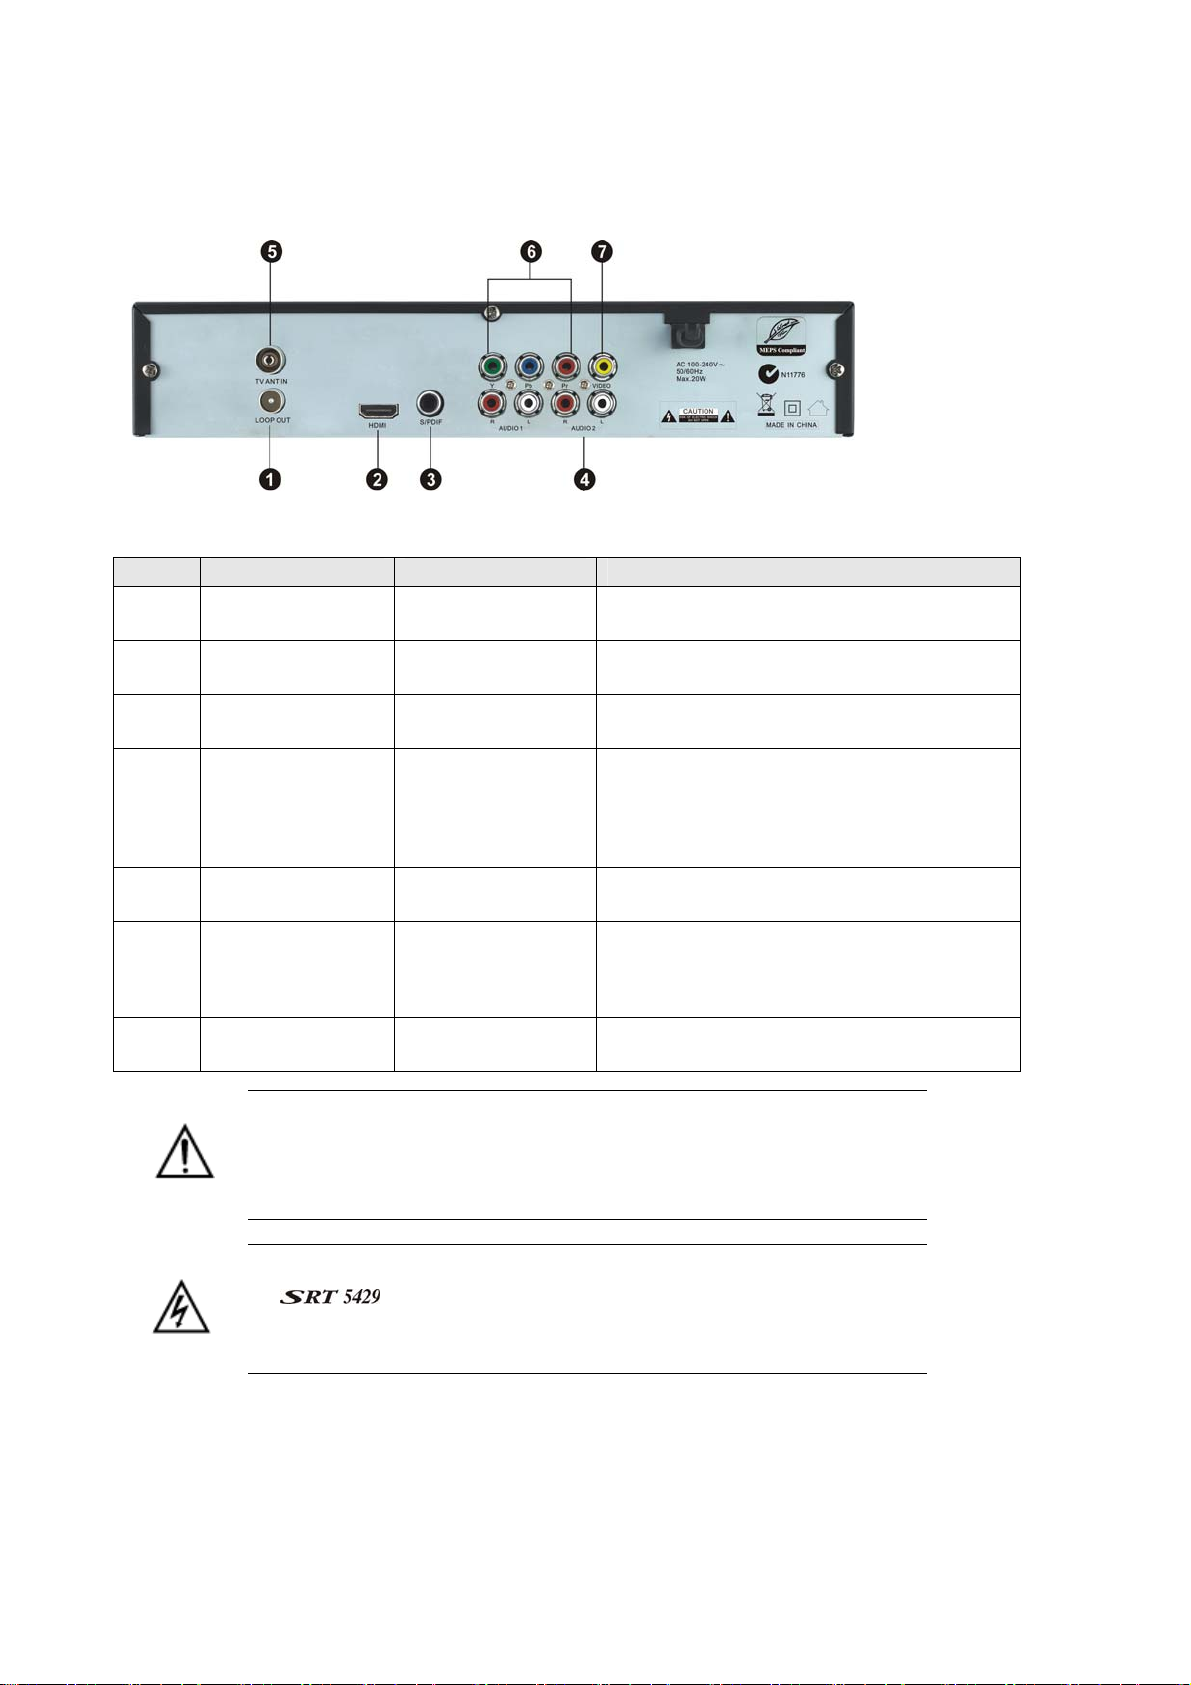
No. Name Connector Function
1 LOOP OUT IEC 169-24 female Loop-through output to VCR, etc.
2 HDMI HDMI cable HDMI video-and-audio connection
3 S/PDIF RCA Coaxial Digital audio output (coaxial)
4 Audio (Left and
Right)
5 TV ANT IN IEC 169-24 female Input from terrestrial antenna
6 Y/Pb/Pr RCA
Component
7 Video RCA RCA cinch( yellow) Composite video connection
、Note the presence of this symbol on the rear panel. This indicates that
important operating and maintenance instructions accompany the
product. These are set out in this manual. It is highly recommended that
you read this manual thoroughly before using the product.
To reduce the risk of electric shock, do not remove any panel of
the . Even when the unit is turned off, voltages may be present
within it that are of sufficient magnitude to constitute a risk of electric
shock.
RCA cinch
• white: left
audio
• red: right audio
RCA cinch
(green/blue/red)
Left and right audio for Component or
Composite connection
Component connection (Y/Pb/Pr)
7
Page 8
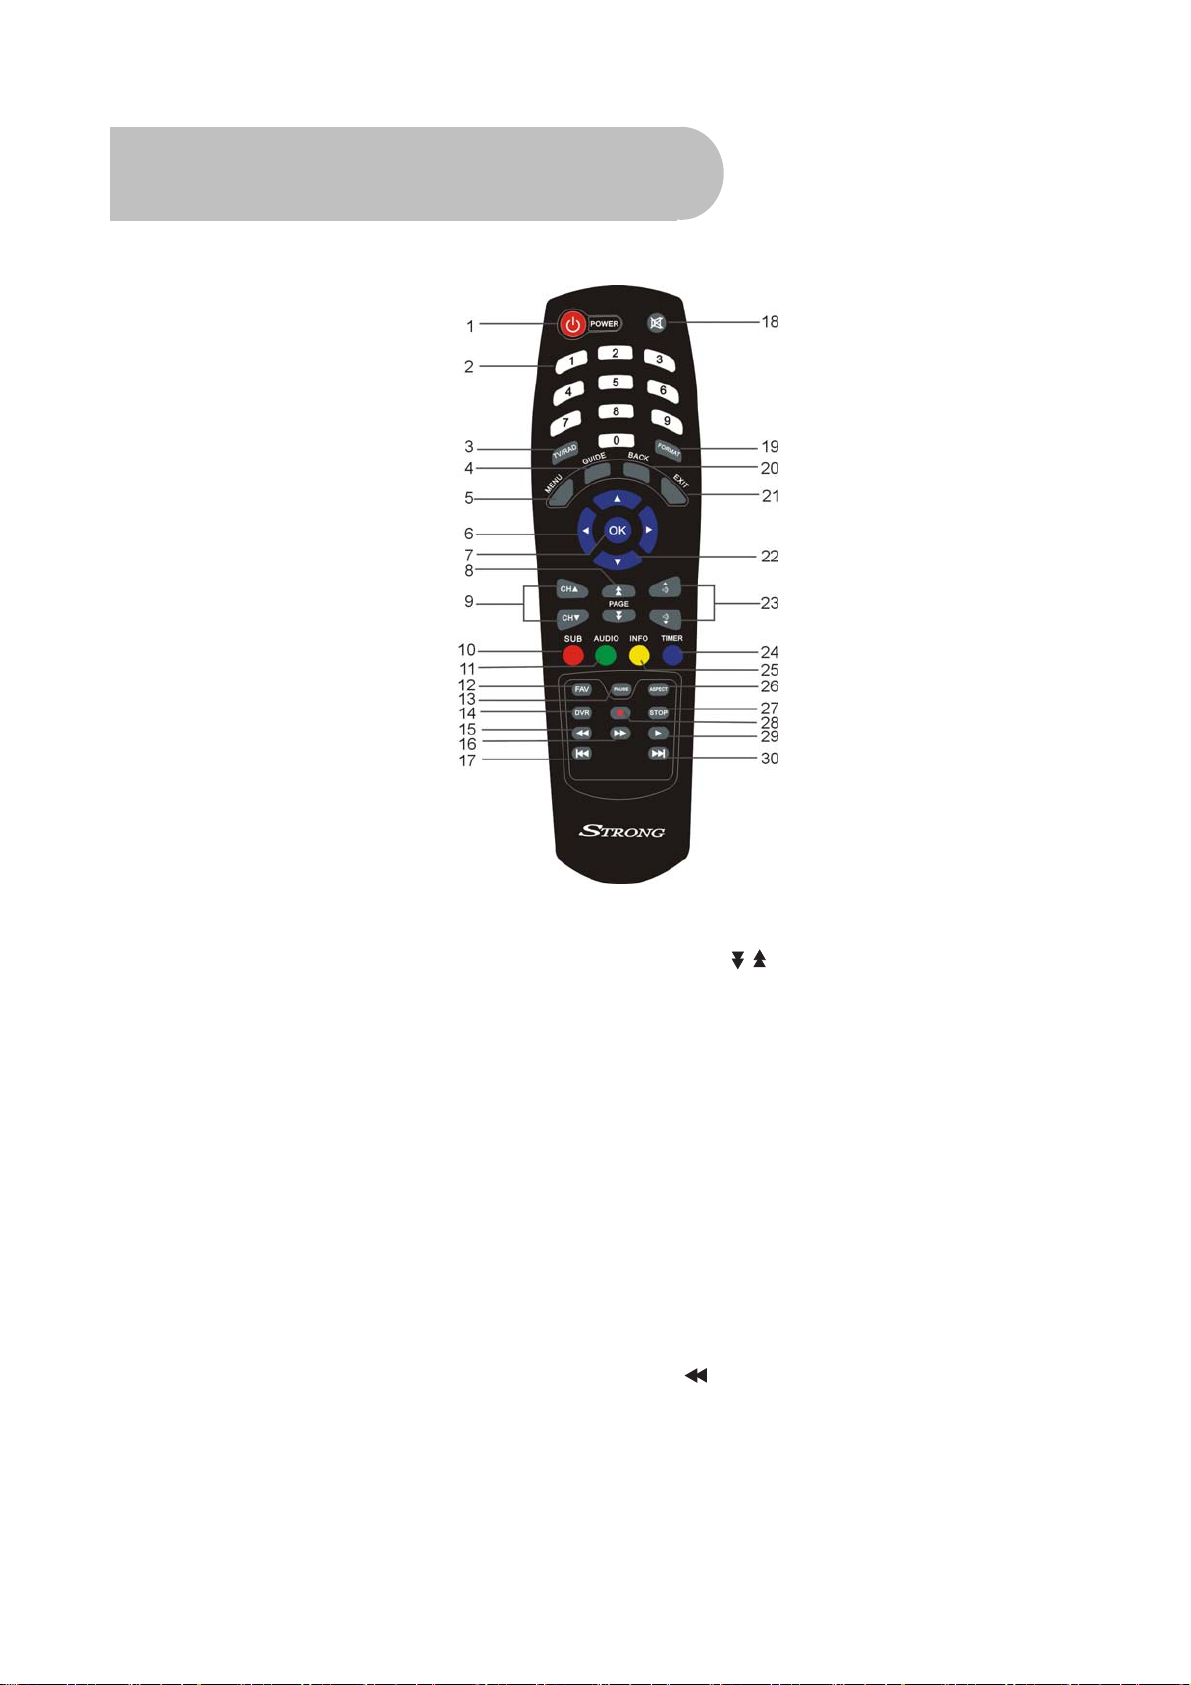
Remote Control
1. STANDBY: To switch to stand-by mode when the
receiver is on (or vice versa)
2. Numeric Keys (0–9): To choose a channel directly,
or to enter numeric information in a menu
3. TV/RAD: To switch between TV and radio (and vice
versa)
4. GUIDE (Electronic Program Guide): To show the TV
and radio program guide
5. MENU: To display the main menu, or return to a
previous menu
6. ( / )▲▼: To change the channel, or to move the
cursor up or down in a menu
8. PAGE
page
9. CH ( / )▲▼: To change the channel, or to
move the cursor up or down in a menu
10. SUB: To turn subtitles on or off
11. AUDIO: To choose speakers (left, right or
stereo), audio format and audio language
12. FAV: To display the favourites list in
viewing mode, and to select a favourite
13. PAUSE: To freeze the screen
14. DVR:To Access DVR Menu directly
To move to the next or previous
/ :
7. OK: To show the channel list in viewing mode, and
to select an item (or confirm a choice) in a menu
8
15.
To fast rewind a movie or music track
Page 9

16.
/
To fast forward in a movie or music track
24.TIMER:To access timer menu directly.
17.
18. MUTE: To turn the sound on or off
19. FORMAT: To cycle through the video definitions:
576i, 576p, 720p and 1080i
20 . BACK: To return to the previous channel or
21. EXIT: To close the current menu and return to
22. ( / )▲▼: To change the channel, or to move the
23. . VOL (
To go to the end of a movie or music
track, or show the next photo
station
normal viewing
cursor up or down in a menu
/): To change the volume in viewing
mode, or to change an option or setting in a menu
25. INFO: To show information about the
current program
26. ASPECT: To cycle through the aspect
ratios: 16:9 and 4:3
27.STOP: To stop a movie or music track, or to
stop recording a movie
28.
To start recording a movie
/
29.
30.
To start or pause a movie or music
track
To go to the end of a movie or music
track, or show the next photo
Installing the batteries in the remote control
1. Press down on the retaining catch on the lid of the battery recess on the remote control and remove
the lid.
2. Insert two AAA batteries into the recess.
Be careful to insert the batteries as shown in the diagram inside the recess.
3. Replace the lid over the recess and gently push down on the lid until it snaps firmly into place.
9
Page 10
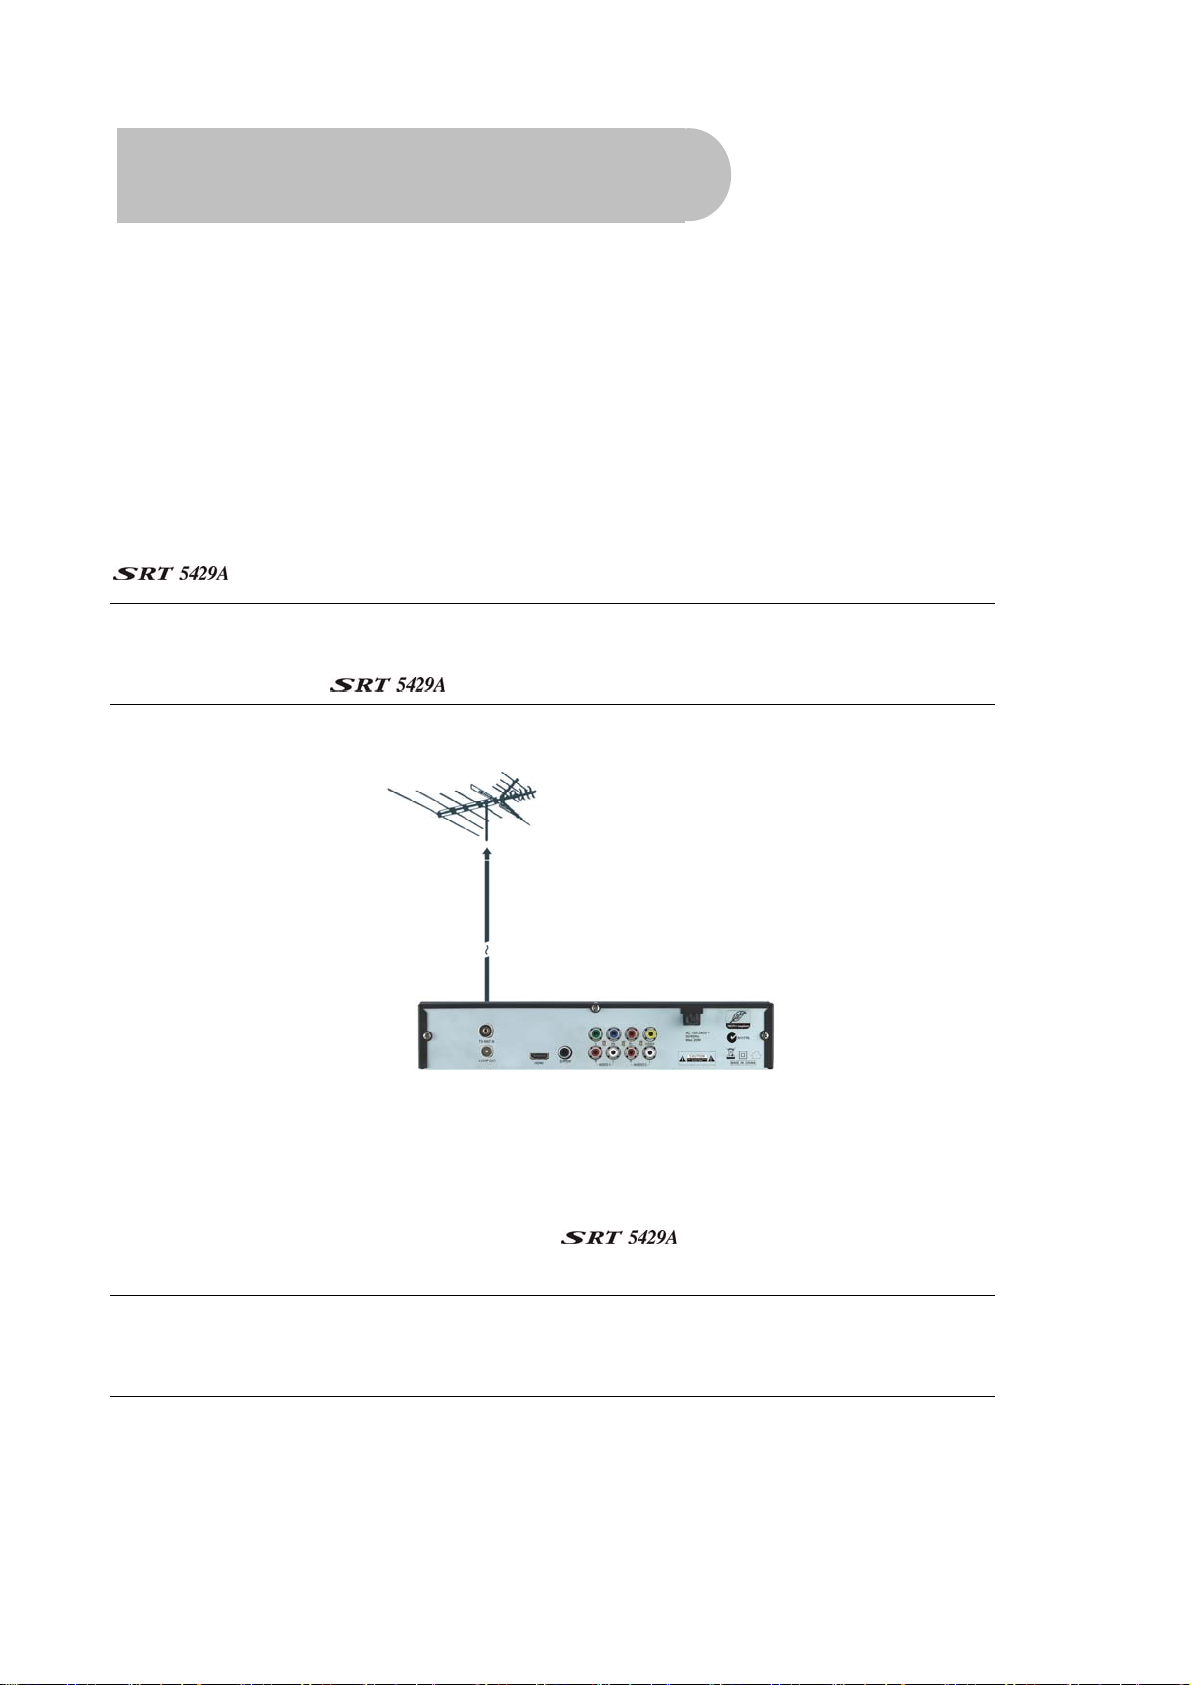
How to Connect
Refer to the diagram on page 7 for the location of the sockets identified by numbers in the procedures in
this section.
Make sure you have installed the batteries in the remote control before you begin connecting the receiver
to your TV. Depending on the connection method you choose, you may need to adjust certain settings
using the remote control before you can see a digital broadcast.
Step 1: Connect to the antenna
Connect the antenna lead coming from your antenna wall plate to the TV ANT IN socket on the
(socket 5).
TIP: You probably already have an antenna lead coming from your antenna wall plate to the TV
ANT IN socket on the back of your TV. If so, simply unplug the lead at the TV and plug it into the
TV ANT IN socket on the
.
Step 2: Choose an installation method
There are a number of methods of connecting the . These methods are labelled A, B, C and D
below.
NOTE: The various video connection options available provide differing degrees of video quality.
In ascending order of quality, these connections are Composite (good),, Component (better )
and HDMI (best).
10
Page 11

A: High Definition Multimedia Interface
If your TV has an HDMI socket, connect an HDMI cable between the HDMI socket on the
(socket 2) and the HDMI socket on your TV.
A HDMI connection incorporates video and audio. You do not need to make separate connections for audio.
A HDMI cable is not provided with the
.
B: Y/Pb/Pr (Component) using a RCA blue–red–green cable
For Component video, connect to your TV with a Y/Pb/Pr Component cable (with blue, red and green leads,
note component cable is not supplied). Connect the leads between the Y, Pb and Pr sockets on the
(socket group 6, taking care to match the colour of a lead with the colour of the socket), and the
corresponding Component sockets on your TV. (The Component sockets on the TV have the same colourcoding.)
You will need to make separate connections for left and right audio via the audio sockets in socket group 4.
This can be done using the supplied RCA cable. (Match the colour of the plugs with the colour of the
sockets.)
11
Page 12
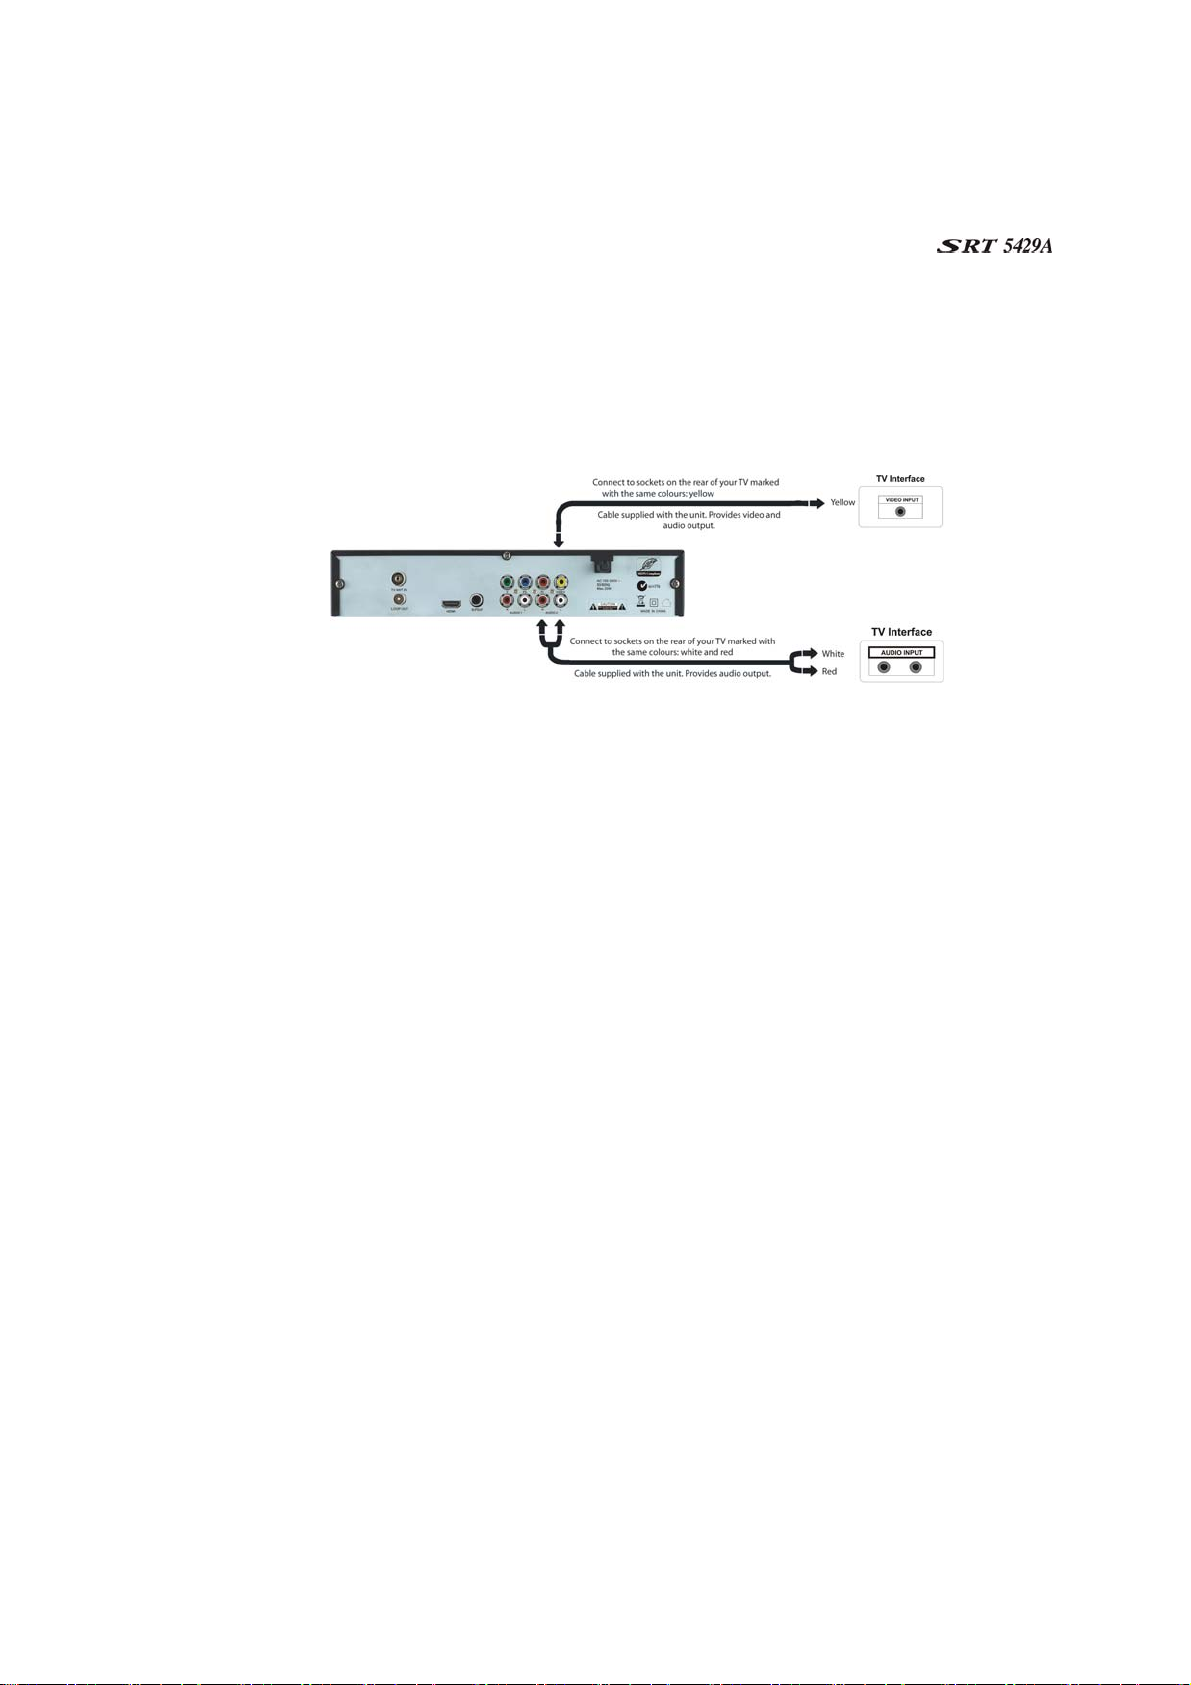
C: CVBS (Composite) using the supplied RCA red–white–yellow cable
Using the appropriate socket colour-coding on sockets 4 and 7, you can connect to your TV with the
supplied red–white–yellow RCA cable. This gives you CVBS (Composite Video) and MPEG-4 stereo audio.
For video, connect the yellow RCA lead between the yellow video socket (socket 7) on the
and the corresponding socket on your TV.
For audio, connect the same RCA cable between the white and red sockets in socket group 4 and the
corresponding sockets on your TV. Match the colour of the leads—white and red—with the colour of the
sockets. (All three leads of the cable—yellow, white and red—should be plugged into the same socket
group on your TV.)
12
Page 13
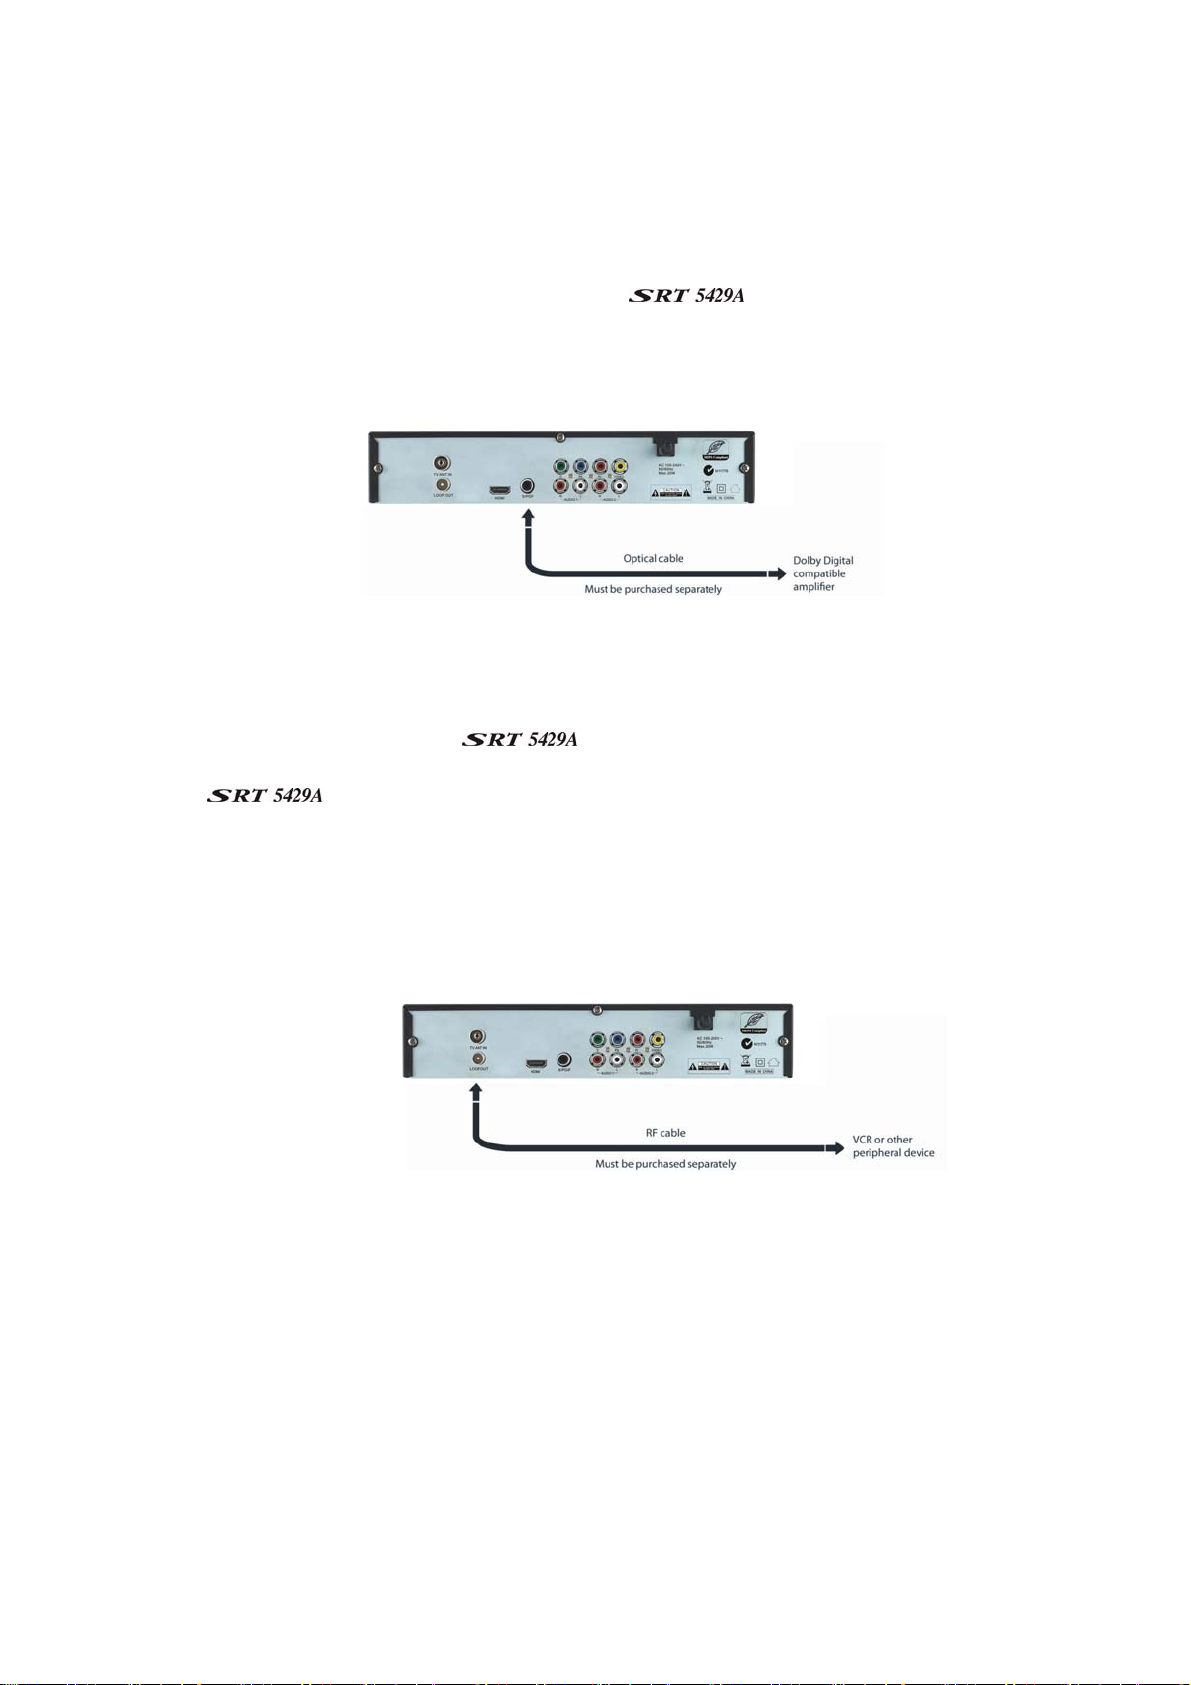
Step 3: Coaxial connections
Dolby Digital
Dolby digital bitstream audio S/PDIF can be achieved using a coaxial cable. (This cable is not supplied.)
The cable should be connected between socket 3 on the
Digital decoder amplifier.
Looping Out (for VCR recording)
In order to watch one channel while recording another on a VCR, connect an RF cable (not supplied)
between the LOOP OUT socket on the
that VCR recordings are only analogue, not digital. To ensure that you are able to watch TV via your VCR
while the
section. To do this press the Menu button, then using the arrows keys select System Settings. In the
system settings menu select Low Power. Then using the arrows keys change the setting from Low Power
to Normal. Then press the EXIT button to return to normal viewing.
is in standby mode you need to set the receiver to Normal in the Low Power
(socket 1) and the RF IN socket on your VCR. Note
and the S/PDIF socket on your Dolby
13
Page 14
Getting Started
First-time use
Once you have connected the to your antenna and to your television, you need to:
1. Turn on the television.
2. Plug the
4. Select the video or AV input channel to which the
pressing the TV/AV or VIDEO button on your TV remote control. (Refer to your TV user’s manual for
instructions.)
The Strong banner appears on your TV screen, followed by a message asking if you want to
automatically search for channels and stations.
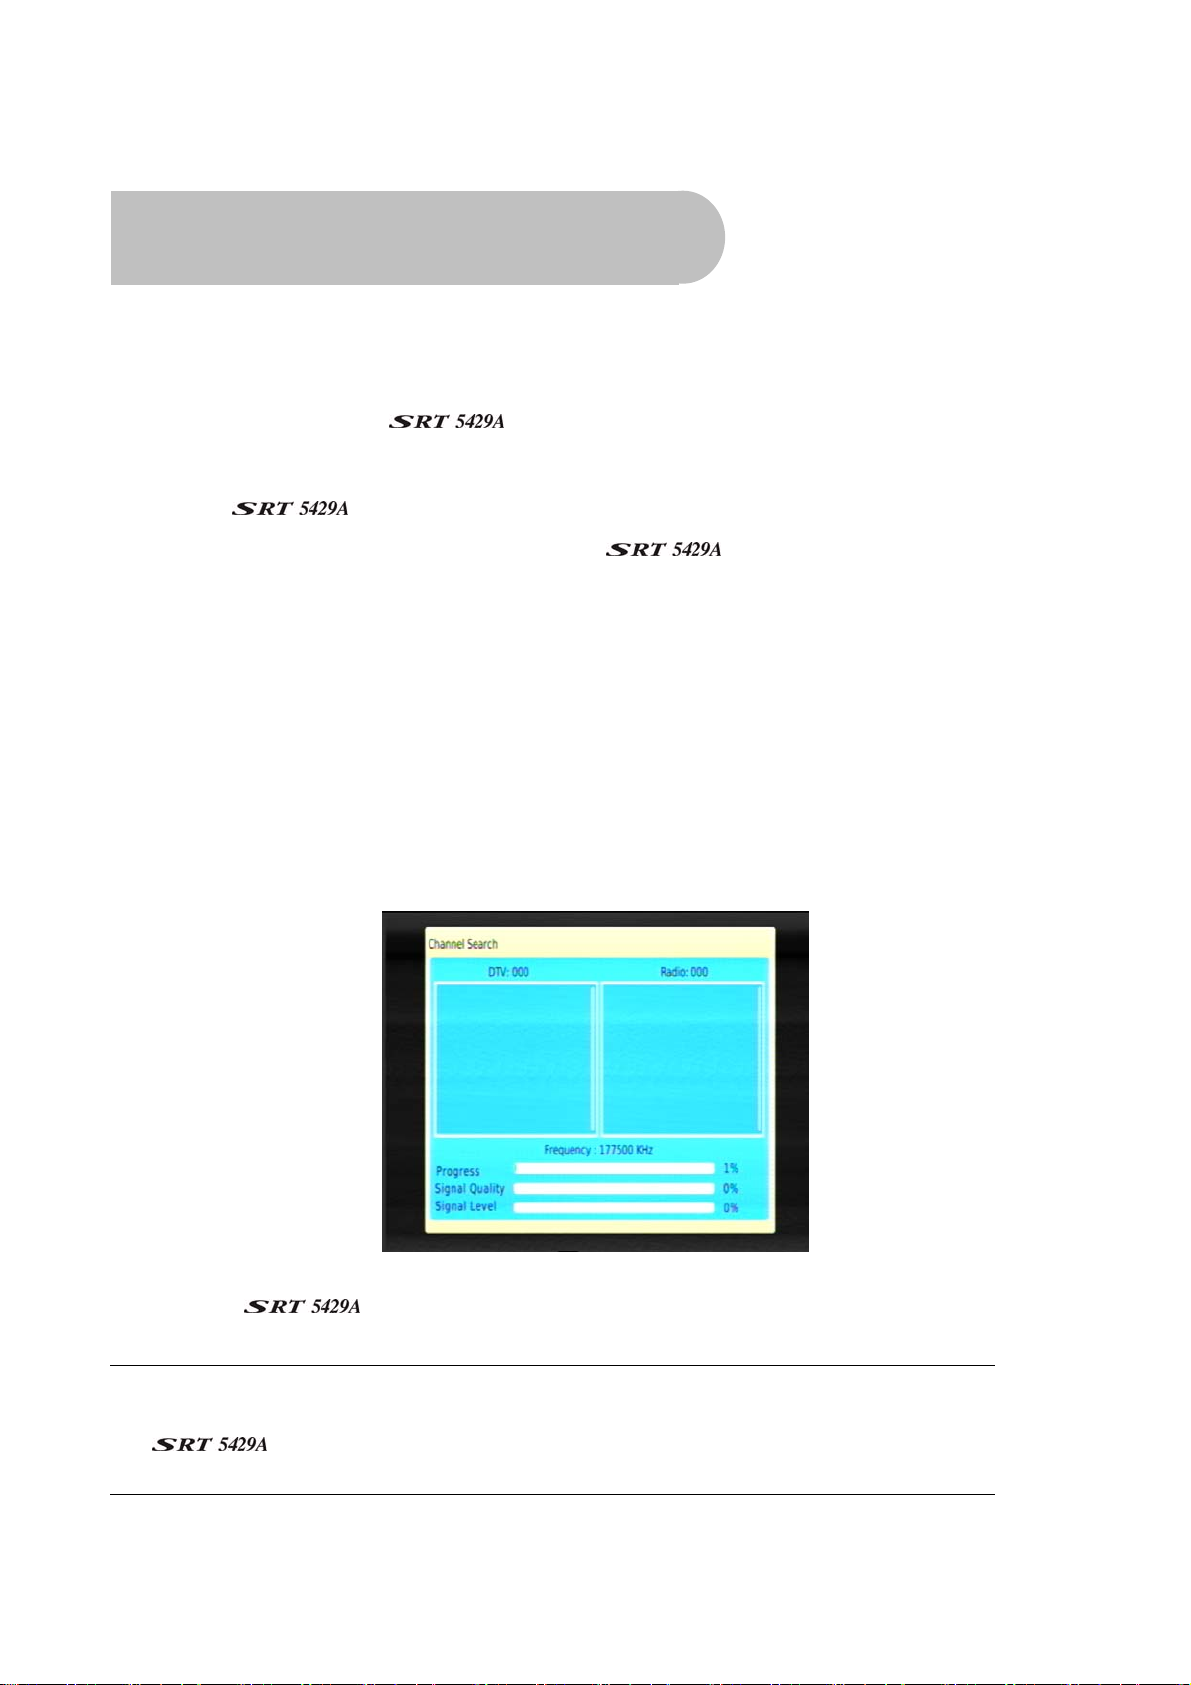
5. To search for available channels and stations, press OK on the remote control. The Auto window
appears and the searching begins.
If you want to search for channels and stations yourself, see “Rescanning for channels and stations” on
page 24 or instructions and ignore the rest of this procedure.
As channels and stations are found, they are displayed on the Auto window.
into mains power.
is connected: this can be done by
When the can find no more channels and stations, the search ends and one of the TV
stations found will appear on the screen.
NOTE: You can now start watching digital TV stations and listening to digital radio stations.
However, there are settings that you should consider that will improve your enjoyment of
your
watching TV straight away, see “Basic operations ” on page 15 for instructions.
These are explained in “User Settings” on page 27 . But if you want to start
.
14
Page 15
Operation
Basic operatio ns
Selecting a channel
There are a number of ways to select a TV channel or radio station:
• Number pad on the remote control: If you know the channel number, enter the number using the
numeric keys on the remote control and then press OK. (If you don’t press OK, the channel selected
appears after approximately 2 seconds.)
To choose a radio station using the number keys, press TV/RADIO first and then enter the number.
(For example, 201 is the number for ABC Dig Jazz.)
NOTE: The
samples of primary LCN channel numbers are:
1 = Ten network and affiliates
2 = ABC
3 = SBS
7 = Seven network and affiliates
9 = Nine network and affiliates
Secondary channels can be selected by pressing the primary number followed by another number.
(For example, pressing 2 gives you ABC1, and pressing 22 gives you ABC2.)
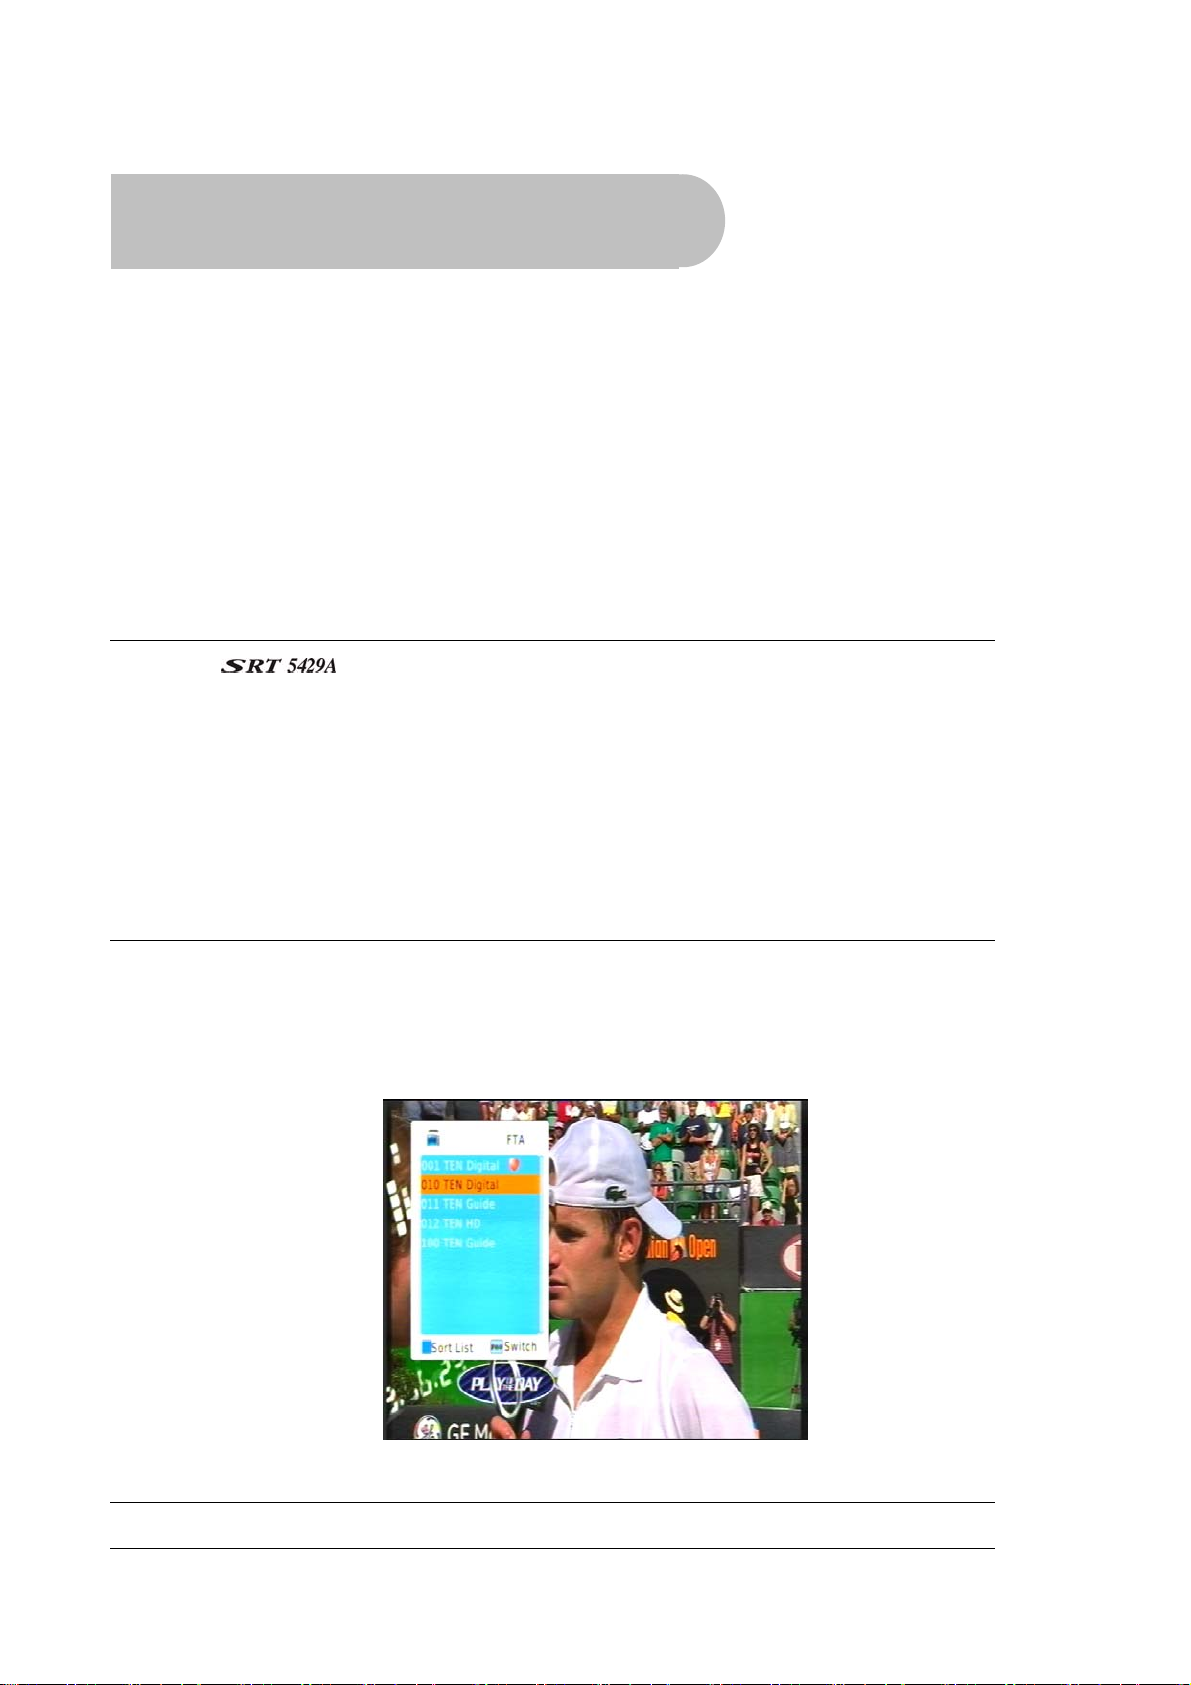
• Channel list: Press OK on the remote control. This displays the channel list. (To list radio stations
instead of TV channels, press TV/RADIO before pressing OK.)
Press or on the remote control until the channel or station you want is highlighted and then press
OK.
uses the Logical Channel Numbering system (LCN) by default. Some
TIP: Press the PAGE button to quickly scroll through a long list of channels.
15
Page 16

• Favourites list: Press FAV on the remote control to see the first channel or station in your favourites
list. Press or
creating a favourites list.
• Scroll: Press or on the remote control to scroll through the channels in channel number order.
(You can also scroll through the channels in order by pressing the channel up and channel down
buttons on the front panel of the
• By EPG: Press EPG on the remote control, select the channel from the electronic program guide (EPG),
and press EPG again. The EPG is explained on page 23.
• Previous channel: Press the BACK button to return to the previous channel or station.
to see each favourite in turn. See “Favourites” on page 17 for instructions on
.)
Adjusting the volume
While you are watching TV or listening to the radio, press
increase the volume respectively.
or on the remote control to decrease or
Turning the sound off (muting)
To turn off the sound altogether, press the MUTE button on the remote control (button 18 in the diagram
on page 8). The mute icon is displayed on the screen. Press the MUTE button again to restore the sound.
Getting channel Information
• Press INFO on the remote control to display the information banner.
Information about the current and the next program is provided. The headings along the top of the
banner are SUB (Subtitles) and LOCK,STEREO. A heading will be highlighted if the corresponding
option applies (for example, if the broadcast is in high definition, if subtitles are available, if stereo
are available, and so on).
The information banner will stay displayed for a few seconds. To hide it sooner, press EXIT on the
remote control.
TV/Radio switching
Press TV/RADIO on the remote control to switch between TV channels and radio stations (or vice versa).
16
Page 17
Closed captions
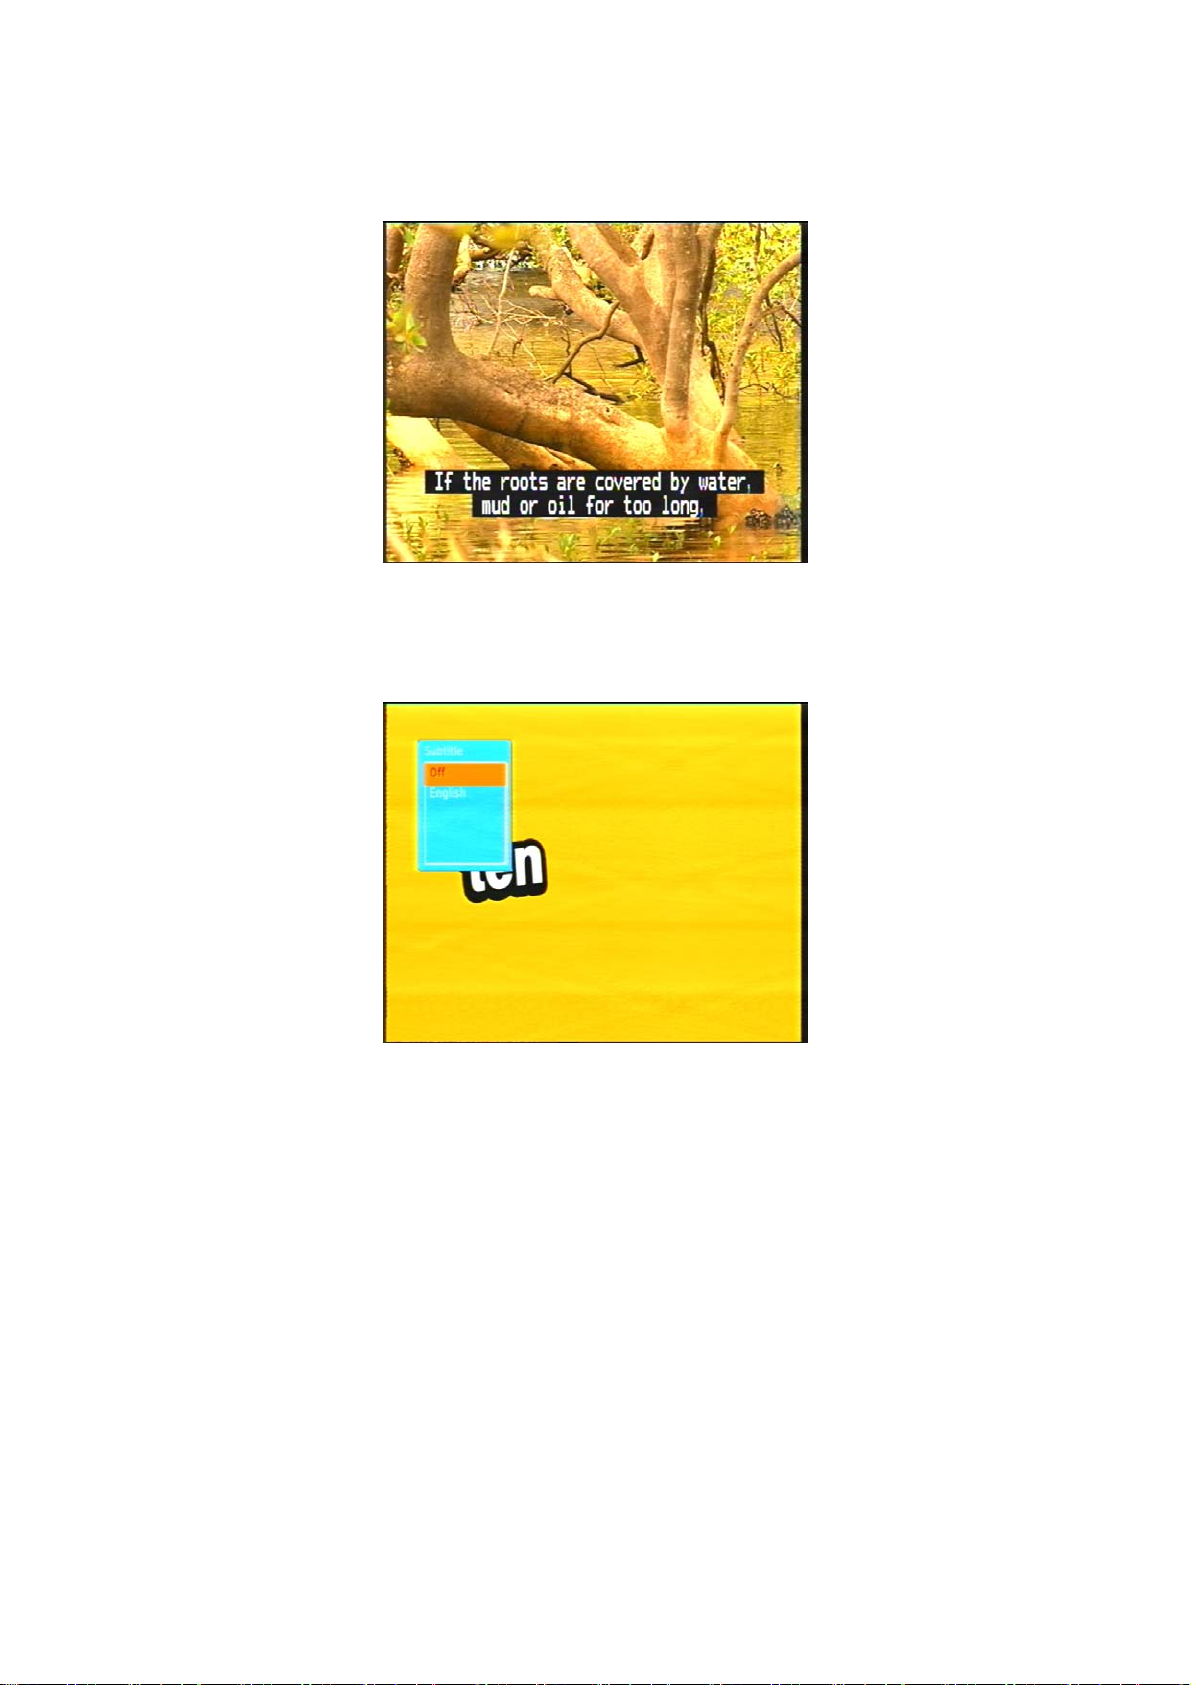
Closed captions are the spoken words written on the screen. This option is particularly useful for the hardof-hearing.
To turn on closed captions (or turn them off):
1. Press the SUB button on the remote control. The Subtitle window appears.
2. With Off highlighted, press or until the option you want—Off or Language—is shown.
3. If the subtitles are being broadcast in more than one language and you want to choose a language
other than the one shown on the screen, press to highlight the Language option and then press
or
until the language you want is shown.
3. Press OK.
Picture freeze
• Press PAUSE on the remote control to freeze the display.
• Press PAUSE again to resume normal viewing.
Favourites list
You can create a favourites list of channels and then select a channel from that list. This makes it easier
to choose and switch between channels if there are many channels available in your area.
17
Page 18
You display your favourites lists by pressing FAV on the remote control. You then press or
through each favourite. Stop pressing when you reach the favourite you want.
Adding channels or stations to your favourites list
Follow this procedure to add channels or stations to your favourites list, or to remove them.
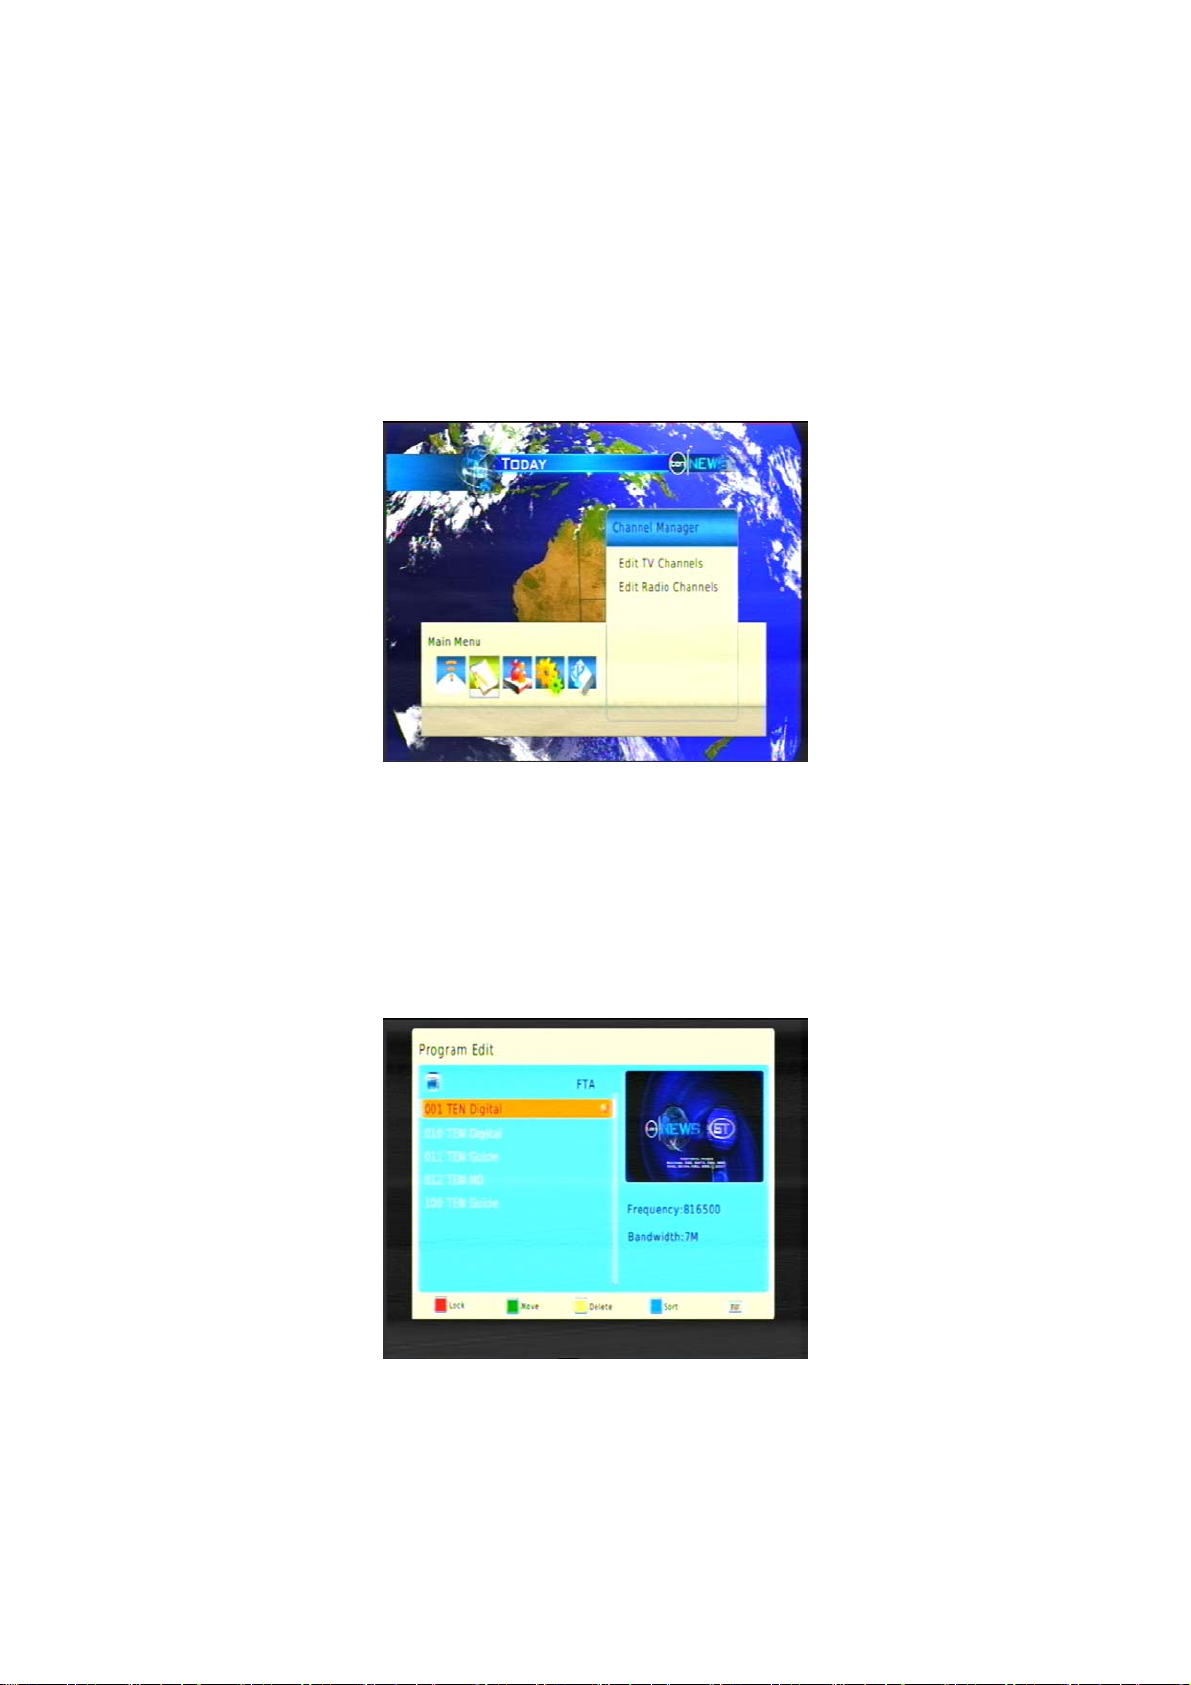
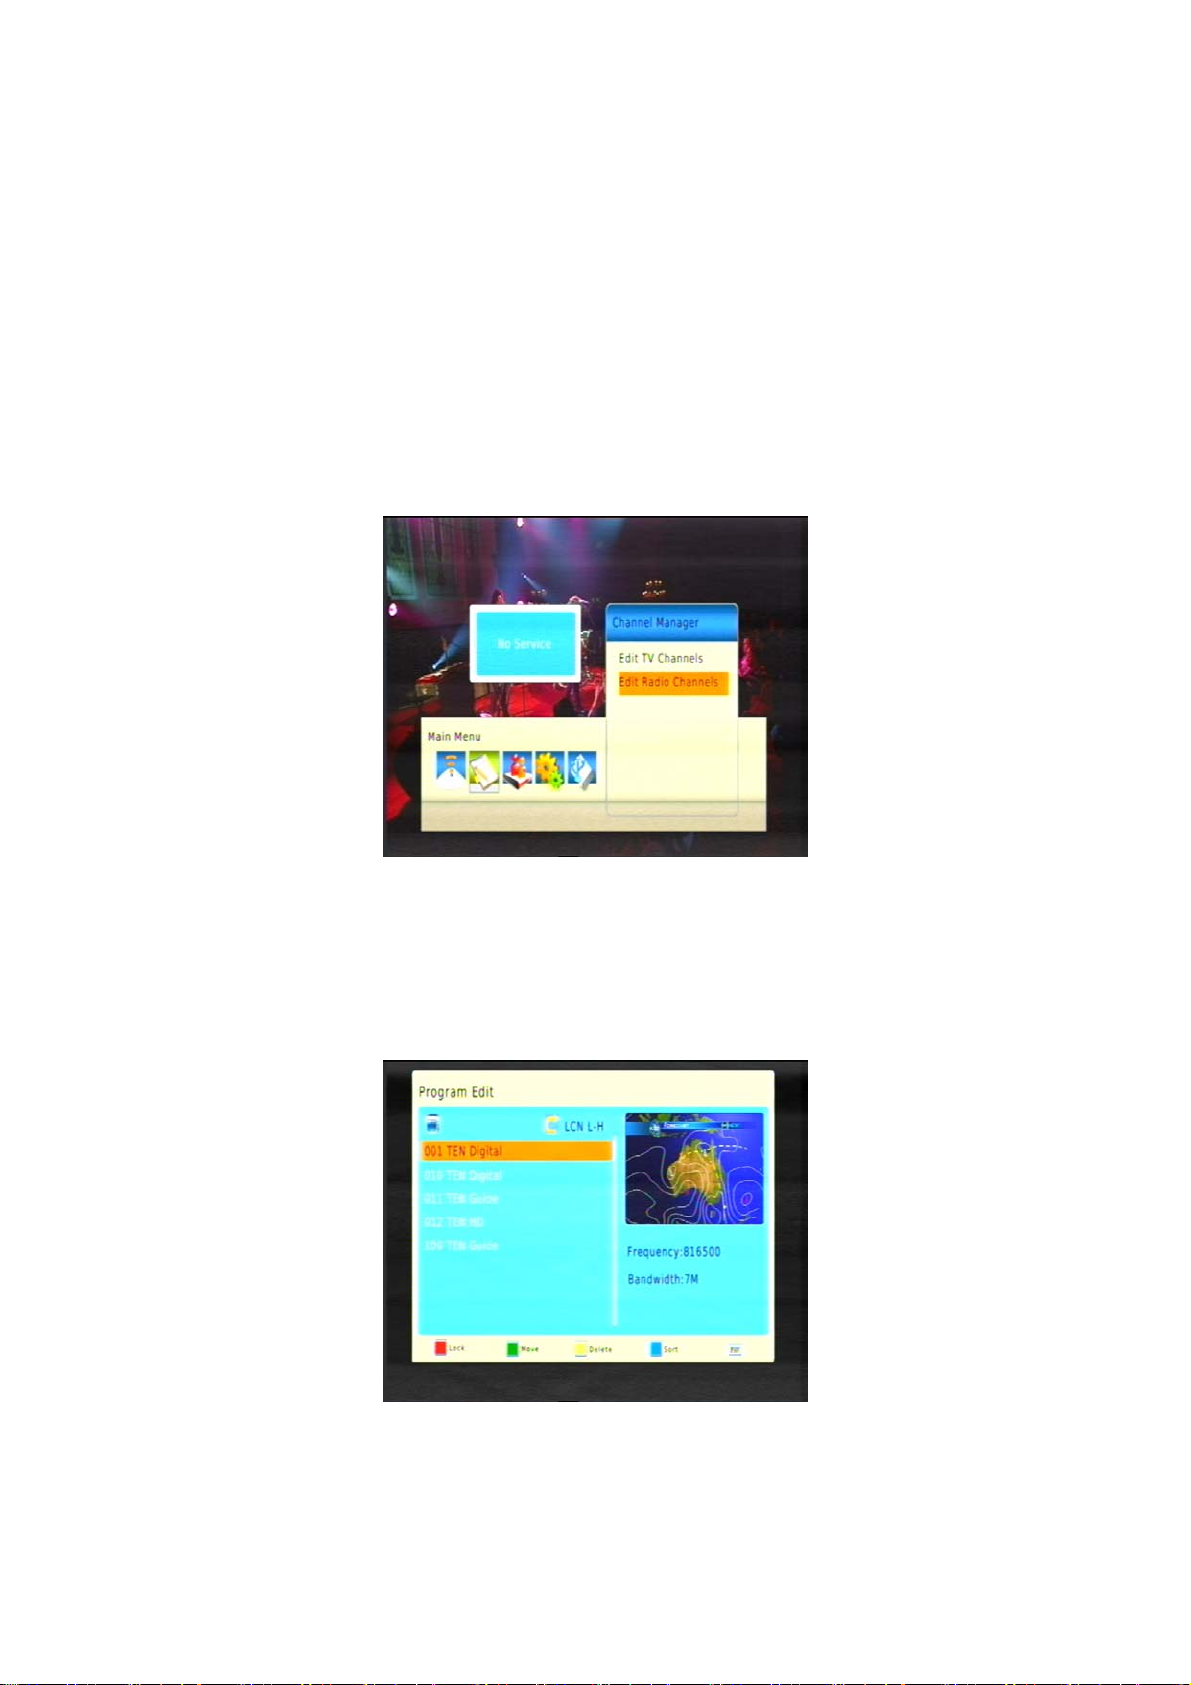
1. Press MENU on the remote control. The Main Menu appears.
or
2. If Channel Manager is not seen in the main menu, press
Channel Manager menu appears.
until it is and then press OK. The
to step
3. If you want to make a TV channel a favourite, make sure Edit TV Channels is highlighted; if you want
to make a radio station a favourite, make sure Edit Radio Channels is highlighted. With the option you
want highlighted, press OK.
A list of channels or stations appears.
4. Press or until the channel or station you want to select is highlighted.
5. Press the FAV button on the remote control to mark the highlighted channel or station as a favourite
(or to mark it for removal from your favourites list). An icon of a heart appears beside the channel or
station name to indicate that it is to become a favourite (or the icon disappears if it was already a a
favourite).
18
Page 19

6. If you want to select another channel or station as a favourite, repeat from step 4.
7. Press EXIT. A message appears asking you to confirm that you want to save the changes.
8. To Save,Select Yes,To cancel, Select NO.
9. Press OK. to return to normal viewing.
19
Page 20
Selecting a favourite to watch or listen to
Press FAV on the remote control. The first channel or station or channel in your favourites list appears.
Note that the information panel reads FAV channel.
Organising channels and stations
The Channel Manager option on the Main Menu enables you to organise channels and stations.
1. Press MENU on the remote control. The Main Menu appears.
2. If Channel Manager is not highlighted on the main menu, press
The Channel Manager menu appears.
3. If you want to organise a channel, make sure Edit TV Channels is highlighted; or if you want to delete
a station, make sure Edit Radio Channels is highlighted. With the option you want highlighted, press
OK.
A list of channels or stations appears.
or
until it is and then press OK.
4.LOCK:Press or
button(the red button)again the program will be un-locked.(The default password is 000000)
until the channel or station you want to lock is highlighted.Press SUB
20
Page 21

5.MOVE:Press
or until the channel or station you want to lock is highlighted.Press AUDIO
button(the green button),the Move logo will appear on the sreen. Press
what you want.
6.DELETE:Press or until the channel or station you want to delete is highlighted.
. Press the INFO button on the remote contron,the following will appear “Do you want to delete this.”
Pessing OK will delete,Pressing EXIT will cancel.
. If you want to delete another channel or station, repeat from step 4.
7.SORT:Press TIMER button (the blue button) to sort channels.The sort icon will appear at the top of the
channels list.
8.FAV: Press or until the channel or station you want to select is highlighted.
Press the FAV button on the remote control to mark the highlighted channel or station as a
favourite (or to mark it for removal from your favourites list). An icon of a heart appears beside
the channel or station name to indicate that it is to become a favourite (or the icon disappears if it
was already a a favourite).
If you want to select another channel or station as a favourite, repeat from step 4.
Press EXIT. A message appears asking you to confirm that you want to save the changes.
To Save,Select Yes,To cancel, Select NO.
or
to move to the place
NOTE:You can delete channels and stations that you are never likely to watch or listen to. If you want to
re-instate a channel or station that you have deleted, you will need to rescan for it. See “Rescanning for
channels and stations” on page 24 for instructions.
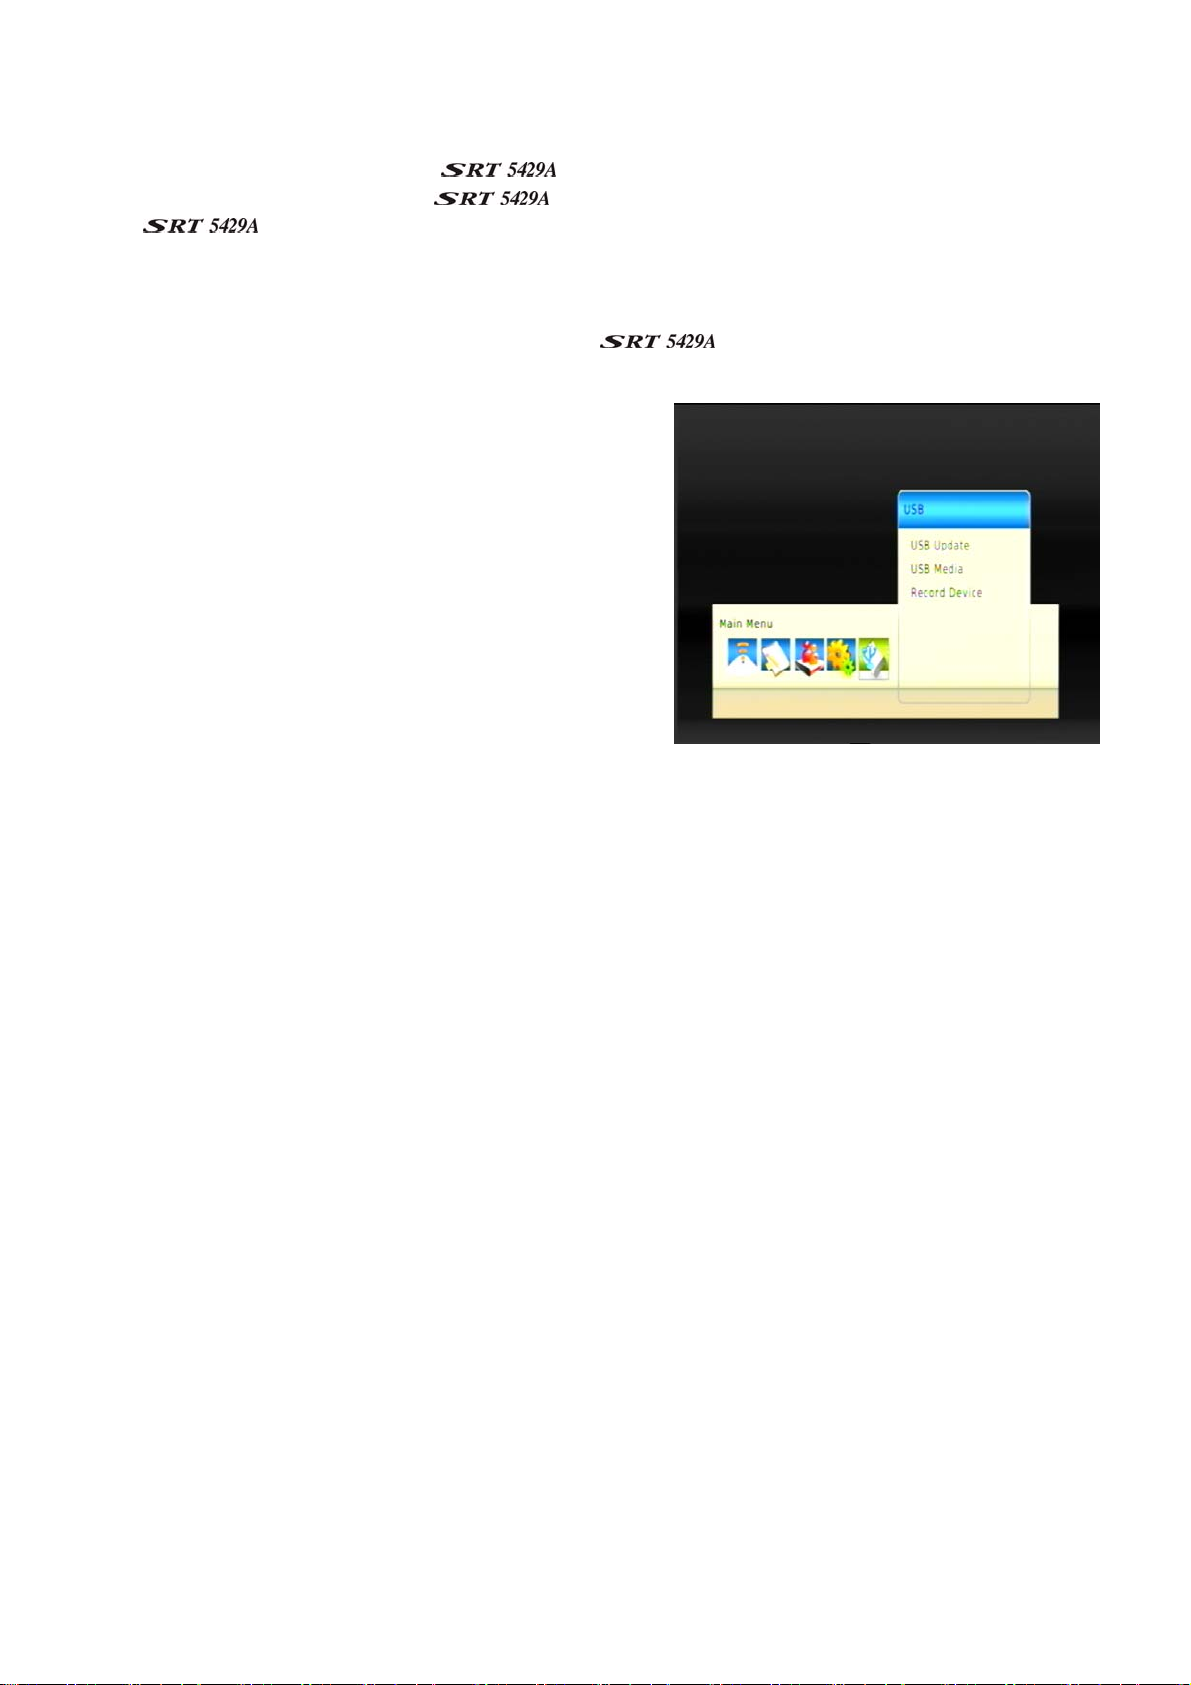
USB
To play USB files, record a program or update software through USB port.
The USB function supports a number of file formats:
TS,TRP,DAT,MPG,MPEG,AVI,MKV,MOV,MP4,VOB,3PG,MP3,WMA,ACC,BMP,JPG,PNG and so on.
1. Press MENU on the remote control. The Main Menu appears.
2. If USB is not highlighted on the main menu, press
appears.
or
until it is and then press OK. The USB menu
21
Page 22
USB Update
If a new version of software for the
your PC and then transfer it to your
the
). Visit the Strong website for announcements of software upgrades.
becomes available, you can download the software to
. You will need a USB memory stick (not supplied with
1. Once you have obtained an upgrade file, transfer it to a USB memory stick. You need to place the file
at the root (or top) level on the memory stick, not inside a folder or directory.
2. Insert the stick in the USB port on the front of the
.
3. Press MENU on the remote control. The Main Menu
screen appears.
4. If USB is not highlighted on the menu, press
or
until it is and then press OK.
The USB window appears.
5. press or Select USB Update and press OK. Receiver
will automatically search for software file on USB memory
stick and will load new software on to receiver.
NOTE: the updated file must be “STRONG5429A.AP”They
must be at the root level on the memory stick, not inside a
folder or directory.
USB Media
.Press or to select the USB Media option, then Press OK, Multimedia appears.
If you have an external USB device connected to the receiver you will need to select which HDD
you wish to access. 1.HDD refers to the inbuilt 500Gb HDD 2.USB refers to the external USB HDD.
Press ok to select the desired HDD, the Multimedia screen relevant to the particular HDD will be
displayed.
1. MUSIC: press
2. PHOTO: press
or to select Music.Select the audio file what you want to play.
or to select Photo. Select the photo what you want to view. Press the PLAY key
to view next picture.
3. Movie: press
or to select Movie. Select the video file what you want to play.
4. DVR:
Supported Device:
1) Most popular USB2.0 Hard Disk Drives are supported by our STB, however due to many types of HDD
being available in the market, if you find one particular HDD that does not work with our STB, please
kindly provide us the details and we will be happy to solve it for you if possible.
2) System required: FAT32
Note: Instructions are included on our website on how to format your USB device into FAT32 format.
Record Device
If you have an external HDD connected press or
to select the desired HDD to use as the default drive
22
Page 23

for recording.
Instructions for recording TV programs:
1. To record a TV program you are currently viewing press the RECORD button. The default
recording time is 3 Hours. If you wish to edit the default recording time, press the RECORD
button again then manually enter the desired time using the numeric buttons.
2. To record a TV program from the EPG, press the EPG button, select the program you wish to
record using the or
buttons then press the Reserve/Rec GREEN button. The program
information will be displyed in the timer menu. Scroll down to MODE and select RECORD, then
press the OK button to confirm and EXIT to return to live viewing. The receiver is now set to
record this program. Please note that if you are watching another channel at this time the
receiver will automatically change to the channel set for the recording.
• During recording, EPG; SUB; Multi AUDIO functions can not be operated.
• Recorded TV programs will not support EPG: and SUB: Multi AUDIO.
Recording one TV programs while watching another:
1. The
will allow you to record one program while watching another from the sa
me network (e.g. While recording ABC you can watch ABC2, ABC3, or ABC HD)
2. To do this, while you are recording one channel either use the up or down arrow keys,
the Ch Up or Ch Down keys or key in the number of the channel you wish to view.
Accessing Recorded TV programs:
1. To access the TV programs you have recorded press the DVR button on your remote control. The
full list of the prgrams you have recorded will be displyed on the screen. To play these programs
highlight them by using the up and down arrow buttons and select them by pressing the OK
button, this will preview the program. To watch the program full screen press the GREEN button.
Deleting Recorded TV programs:
1. To delete a recorded TV program press the DVR button, when the list of recorded files is
displayed select the file you wish to delete by pressing the up or down arrow buttons. Select the
file to be deleted by pressing the BLUE button. A tick will be placed next to the file you have
selected to delete.(You can select more than one program at a time to delete) Press the OK
button to delete the file. You will be then prompted to confirm the deletion of files. To confirm
deletion press the OK button.
Timeshifting TV programs:
1. To timeshift the TV program you are currently watching press the PLAY button. The Timeshift
function will activate automatically.
2. You can now Pause and Rewind the program you were watching from the point where Timeshift
23
Page 24
was first activated. To change channels you must stop the receiver Timeshifting.
3. To stop the Timeshift feature press the STOP button and press OK to confirm or EXIT to cancel.
4. There is no default time limit for the Timeshift feature. The receiver will Timeshift for as long as
HDD space allows. Once HDD is full Timeshift will stop automatically.
Selecting a Partition and Partitioning your USB HDD:
How do I choose and set different partitions from my HDD ?
Usually there are several partitions available in HDD’s, and our STB can allow you to choose diffe
rent partitions for recording purposes, choose from DVR partition menu, menu of Device List will p
opup, it lists all partitions your HDD has, choose the one you want, and press the OK button to save.
Then the recorded video file will be stored into this partition. The recorded file will be saved in t
he DVRRECORD folder.
WARNING
Using USB1.1 or USB2.0 Key or Stick (Including MP3 player)
1) We strongly suggest not to record any TV program by USB Key or Stick. Due to the large variety of USB
Key’s or Stick’s being available in the market with different quality levels, we cannot guarantee that
your USB Key or Stick will not be damaged by attempting to record on to it.
2) Do not remove your USB device from the STB while it is in use during any USB multimedia function.
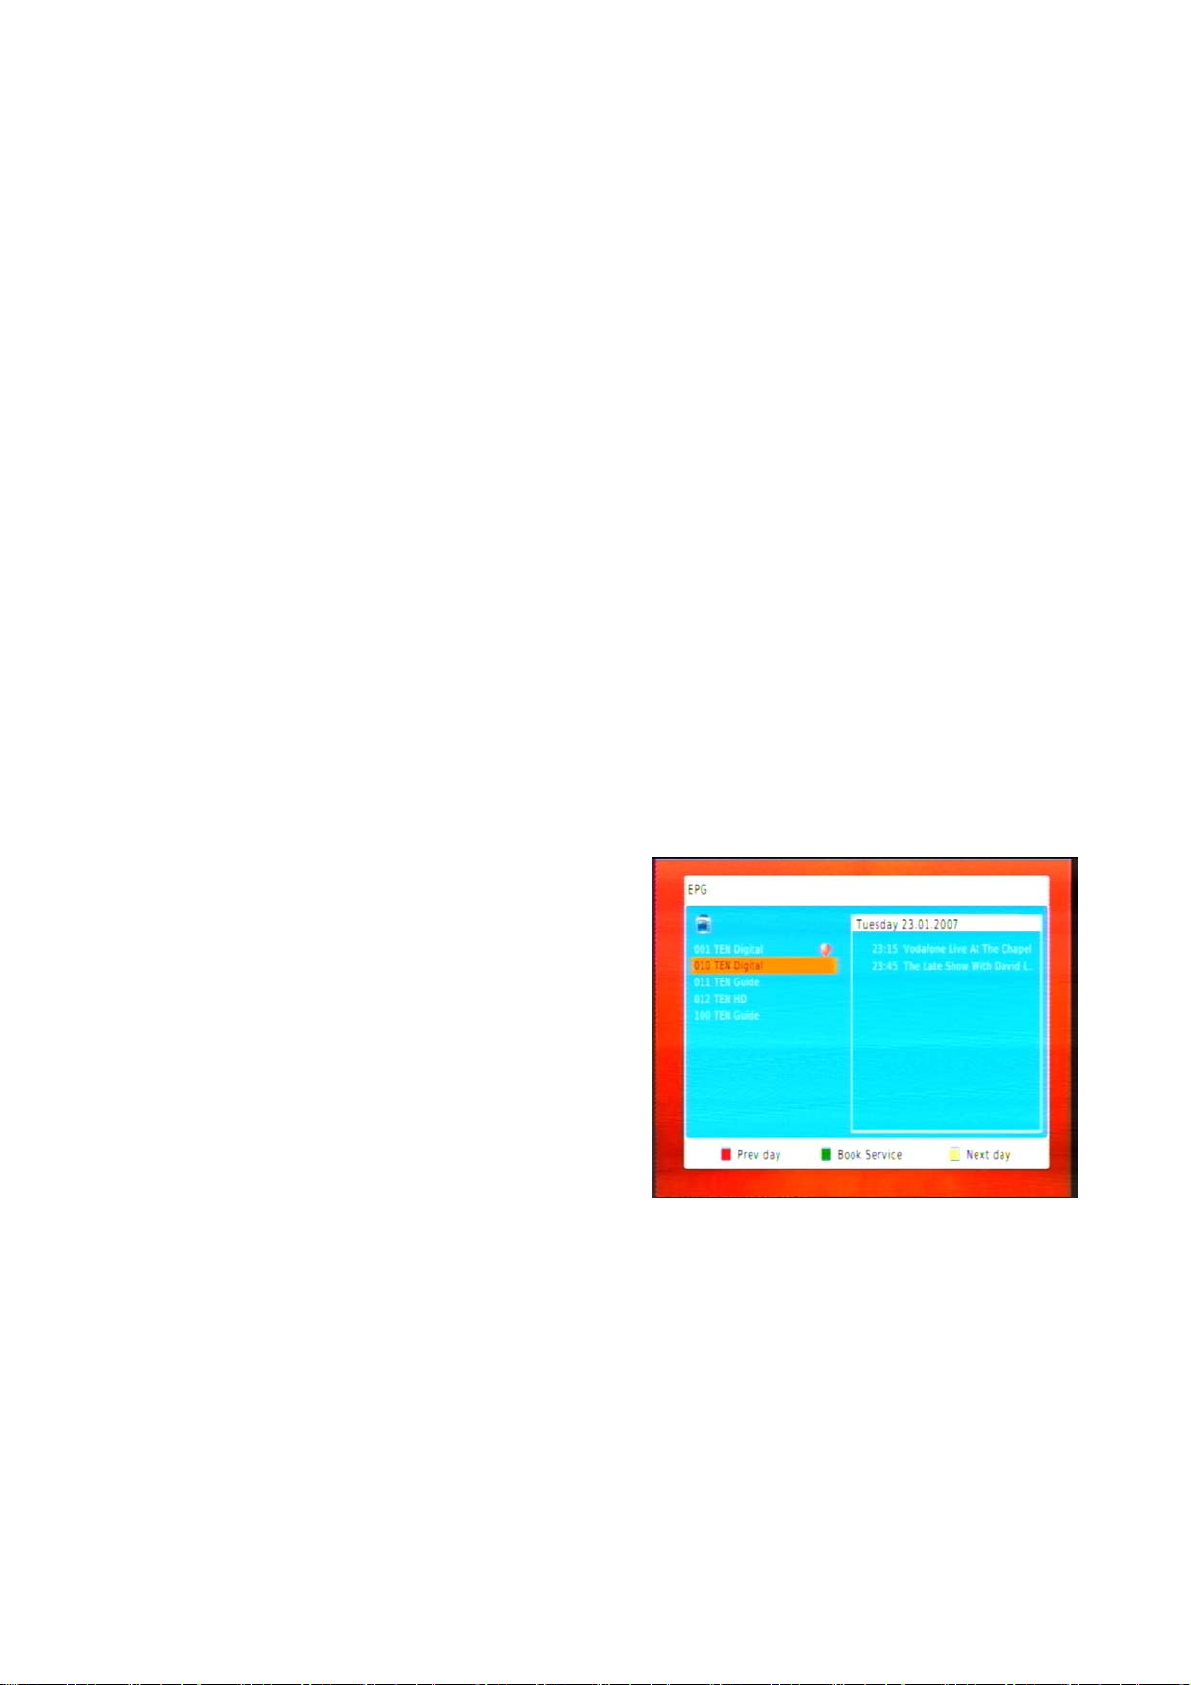
Electronic Program Guide (EPG)
Some providers broadcast information about their
programs. This information is available on screen via an
electronic program guide, displayed by pressing GUIDE on
the remote control. An example is shown below.
You can navigate through the EPG looking for information about channels and programs (explained in the
next section) or press EPG or EXIT to close the guide.
Displaying program information
The information displayed when you press GUIDE is information about the channel that is showing at the
time. At the left of the screen is information about the current channel list; at the right of the screen is a
list of upcoming programs.
To display information about the programs on another channel, press or until the channel you want
information about is highlighted at the left of the screen.
24
Page 25
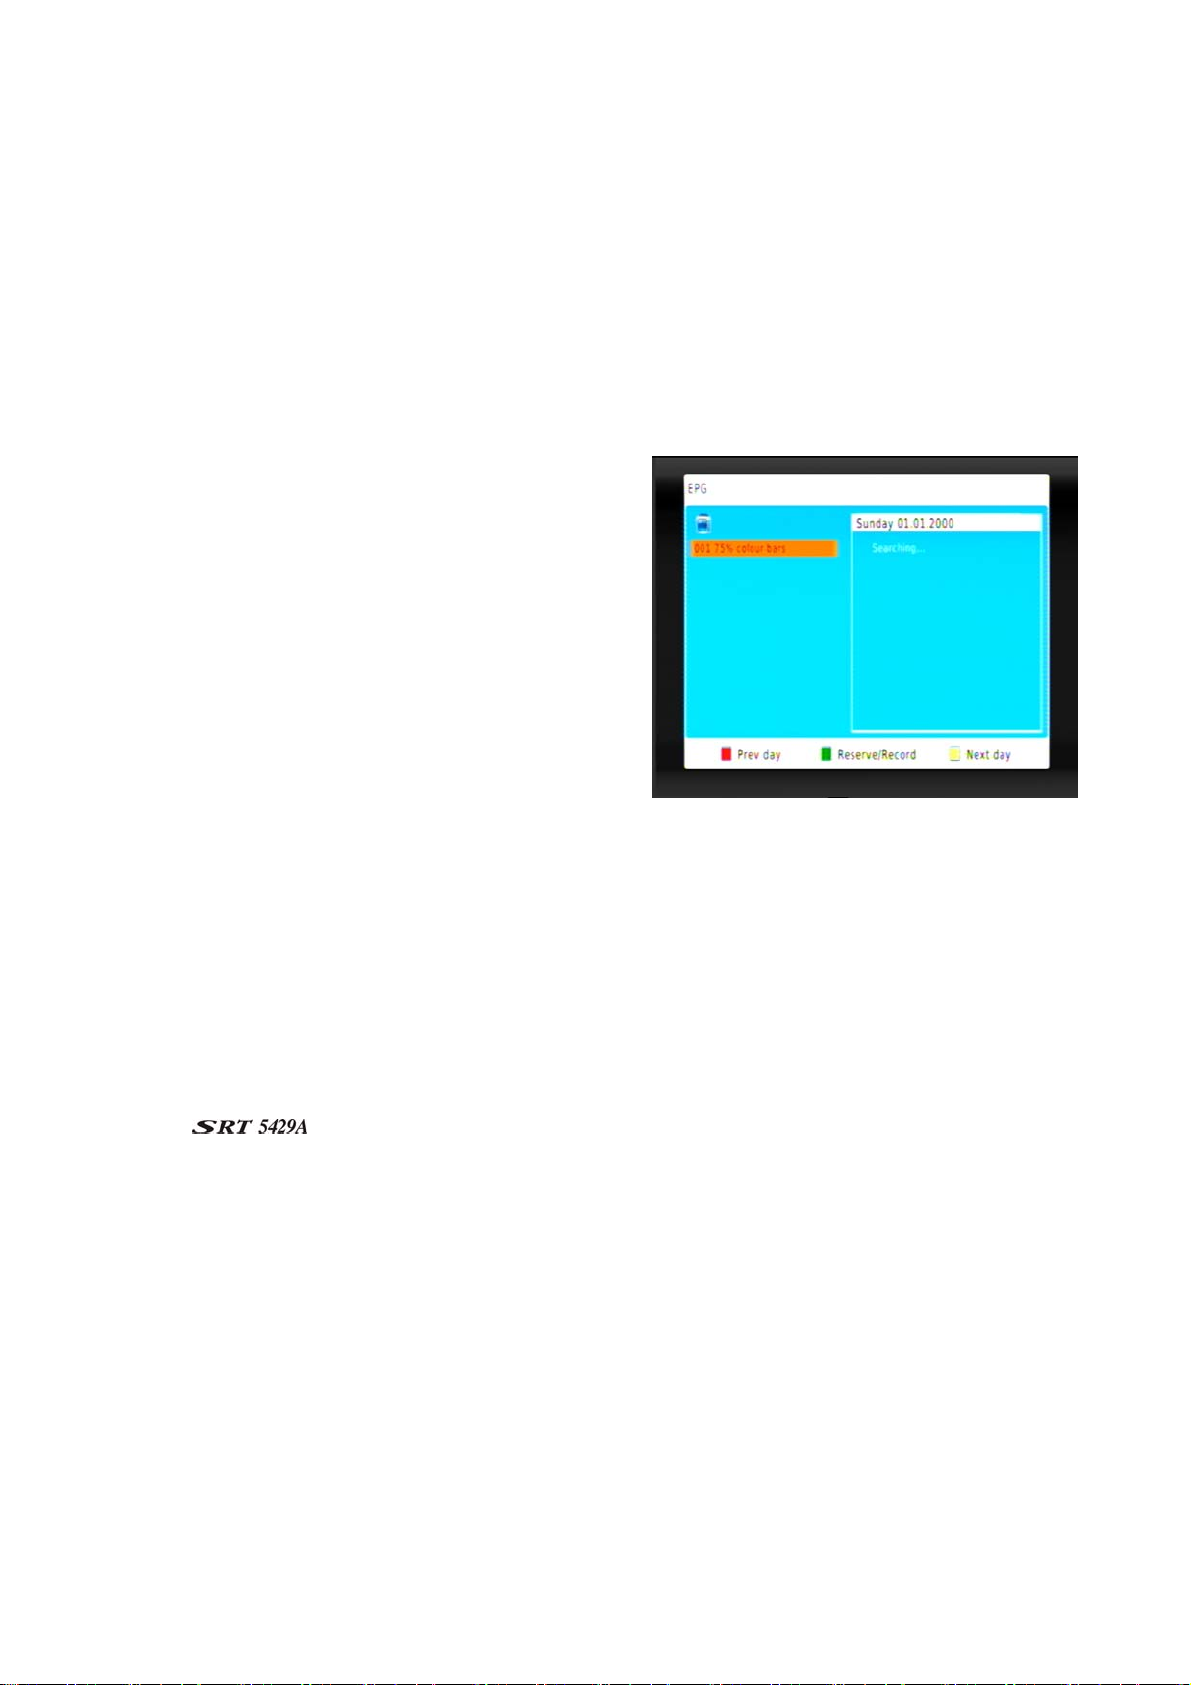
To display more information than is currently shown about a selected channel, you can move the channel
name pane (at the left of the window) and move the program name pane & press OK. (at the right of the
window) and vice versa.
• To move to the program pane, press OK.
• To display program information for next day, press INFO key to step through the days.
• To display program information for previous day, press SUB key to step through the days.
• To scroll through the programs for a day, press or
• To move back to the channel list in the left pane of the window, press
.
or
Selecting a channel to watch from the
EPG
1. With the channel name panel selected, press CH or
CH
until the channel you want to watch is selected.
2. Press GUIDE. The current program of the selected
channel is now showing.
Reserve/Rec:Press AUDIO button( the green button) to
set a timer.
Rescanning for channels and
stations
The Install option on the main menu enables you to scan for—that is, detect—digital TV and radio stations
available in your area. You will need to rescan if new channels or stations become available, if you want
to reinstate a channel or station you have deleted, or if you move to a new location.
There are two scanning options:
• Auto Search
The
their details.
• Manual Search
This option lets you search for a particular channel (or all channels from a specified broadcaster).
will automatically search for all digital TV and radio stations it can detect and store
Automatic Search
1. Press MENU on the remote control.
2. If Installation is not highlighted on the main menu, press
The Installation sub-menu appears.
3. If Auto Search is not highlighted on the sub-menu, press or until it is and then press OK.
The Auto window appears, and the search begins automatically. When the search is finished, a
channel that has been found will begin playing.
25
or
until it is and then press OK.
Page 26
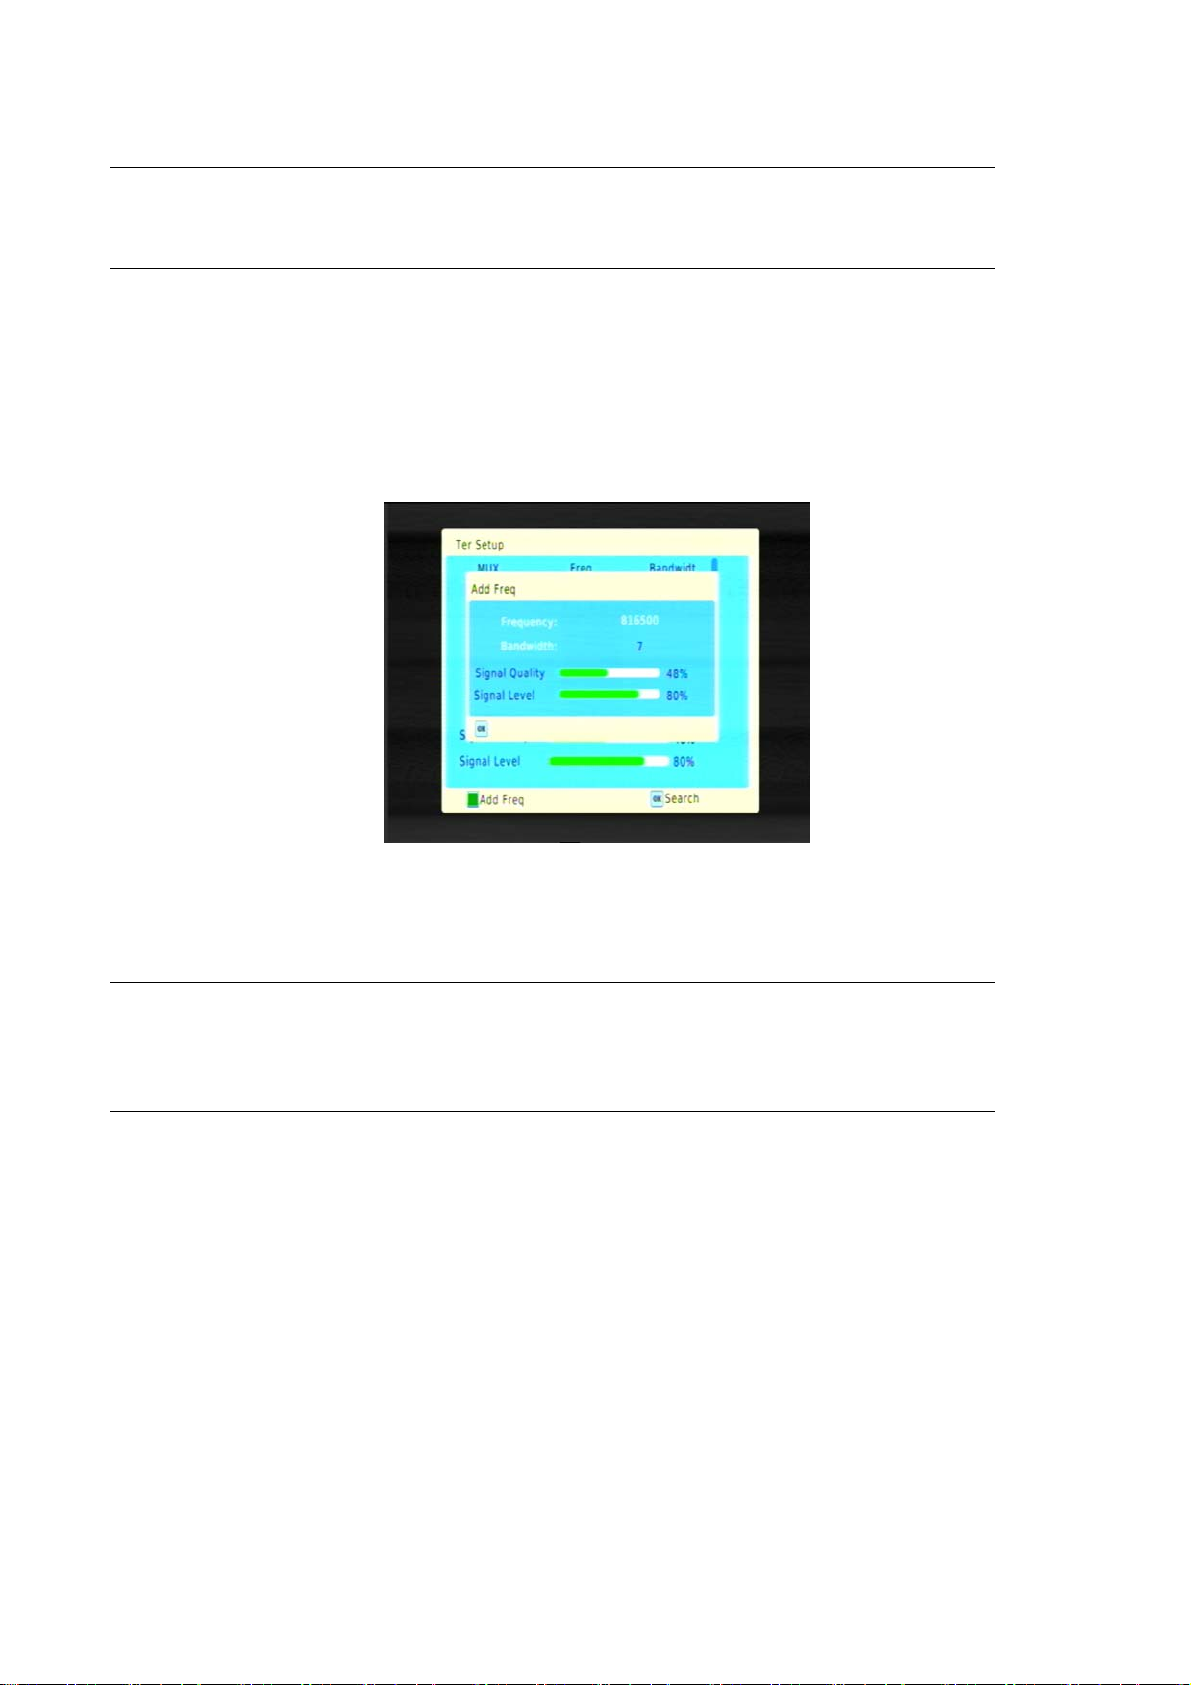
Manual Searching
NOTE: Automatic searching (described above) is suitable in most cases. You might use manual
searching if you have deleted a channel and now want to access it again. In this case, you would
just search for that particular channel.
1. Press MENU on the remote control.
2. If Installation is not highlighted on the main menu, press
The Installation sub-menu appears.
3. If Manual Search is not highlighted on the sub-menu, press
The Manual Search window appears.
5. Press or
to select the Frequency what you wish to search.
or
until it is and then press OK.
CH or CH
until it is and then press OK.
6. Press AUDIO button (the green button) to add the Frequency what you wish to add .
TIP: To avoid a fruitless search, check the strength and quality of the signal beforehand. These
are shown by the Level and Quality bars at the bottom of the screen. Poor strength or quality
indicates that it may be difficult to scan for that channel or that the reception might be too poor
for you to comfortably watch the channel.
4. Press OK to begin scanning. When the search is finished, the channel will begin playing if it has been
found; otherwise the previous channel will reappear.
26
Page 27
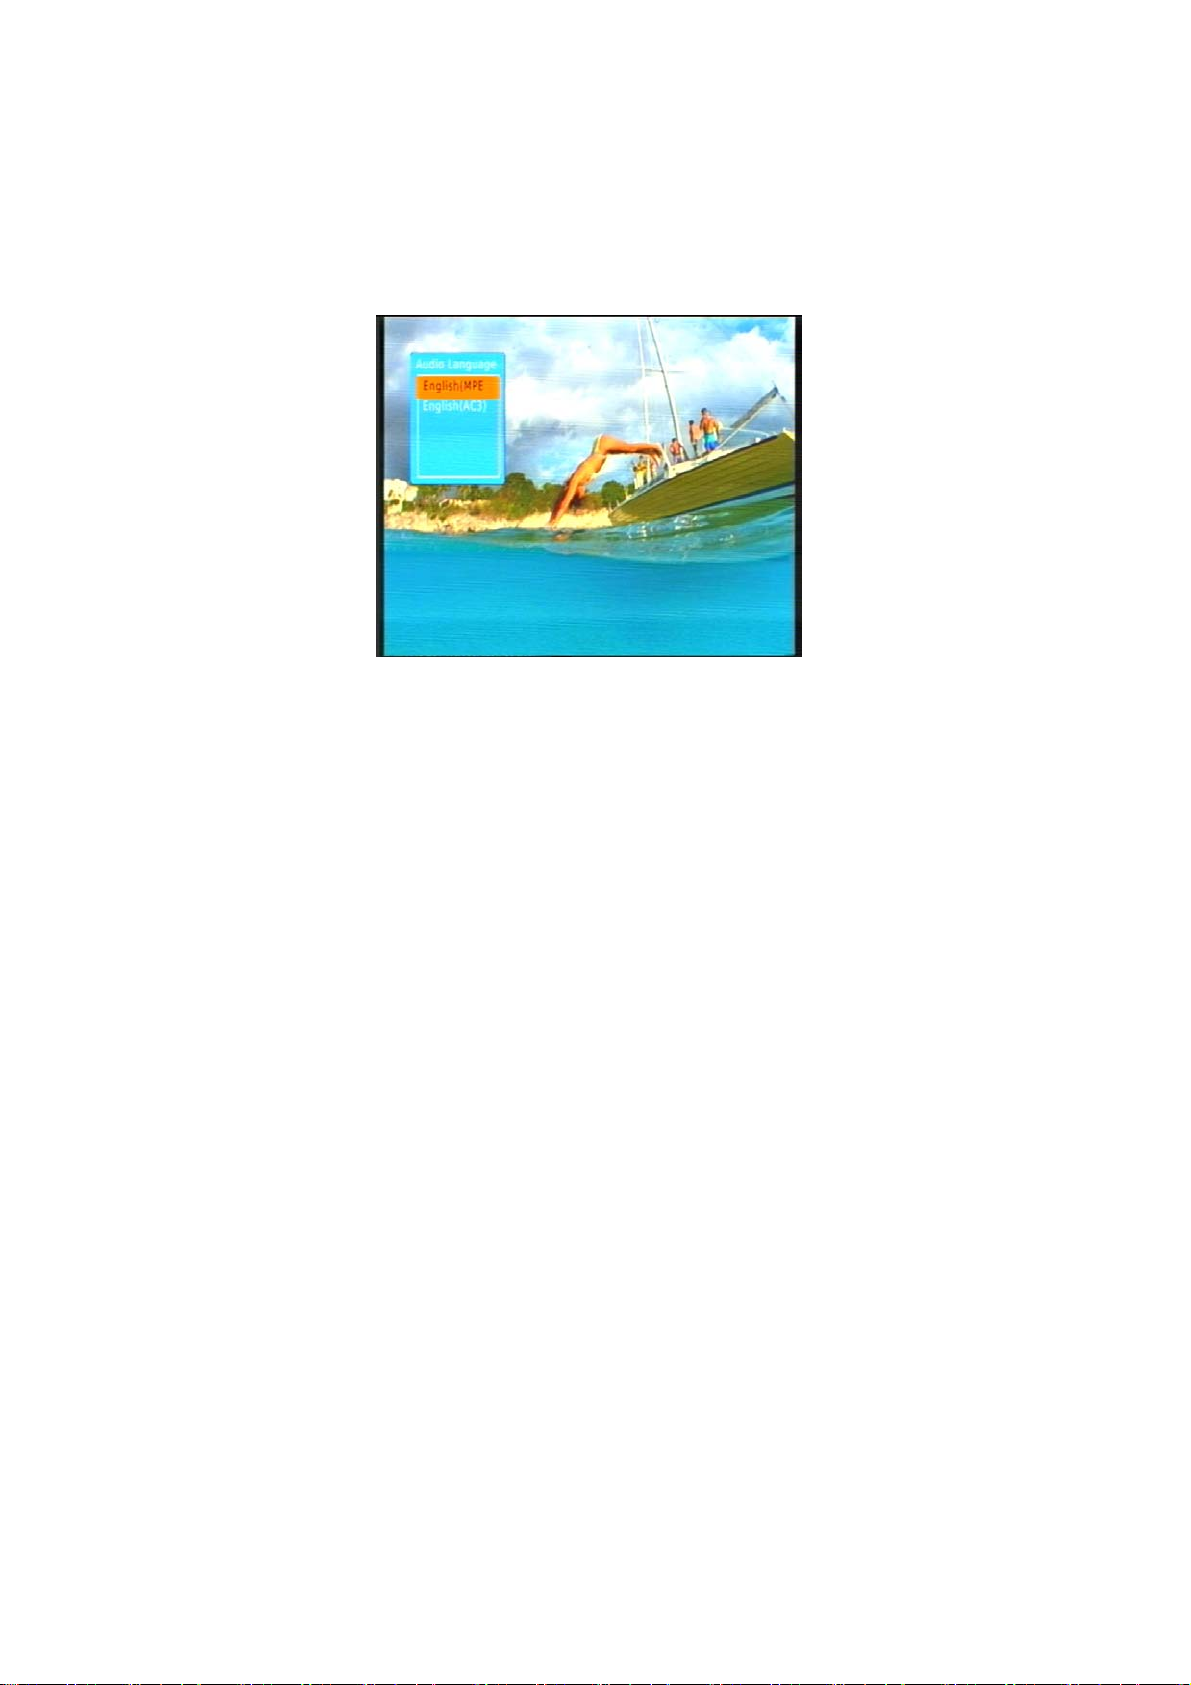
Multi-language and Dolby Digital broadcasting
If a channel is being broadcast in more than one audio language, you can choose which language to listen
to. Similarly, if a channel is being broadcast in more than one audio format, you can choose which format
to listen to.
1. Press the AUDIO button (the green button) on the remote control. The Audio setting window appears.
2. If more than one audio language or format is being broadcast, pressing or
language and format.
If a channel is being broadcast in Dolby Digital, the language will be shown with an AC3 suffix, as in
English (AC3). Non-Dolby broadcasts will have an MP2 suffix, as in English (MPEG2).
3. Press EXIT to close the Audio setting window and return to normal viewing.
will cycle through each
27
Page 28
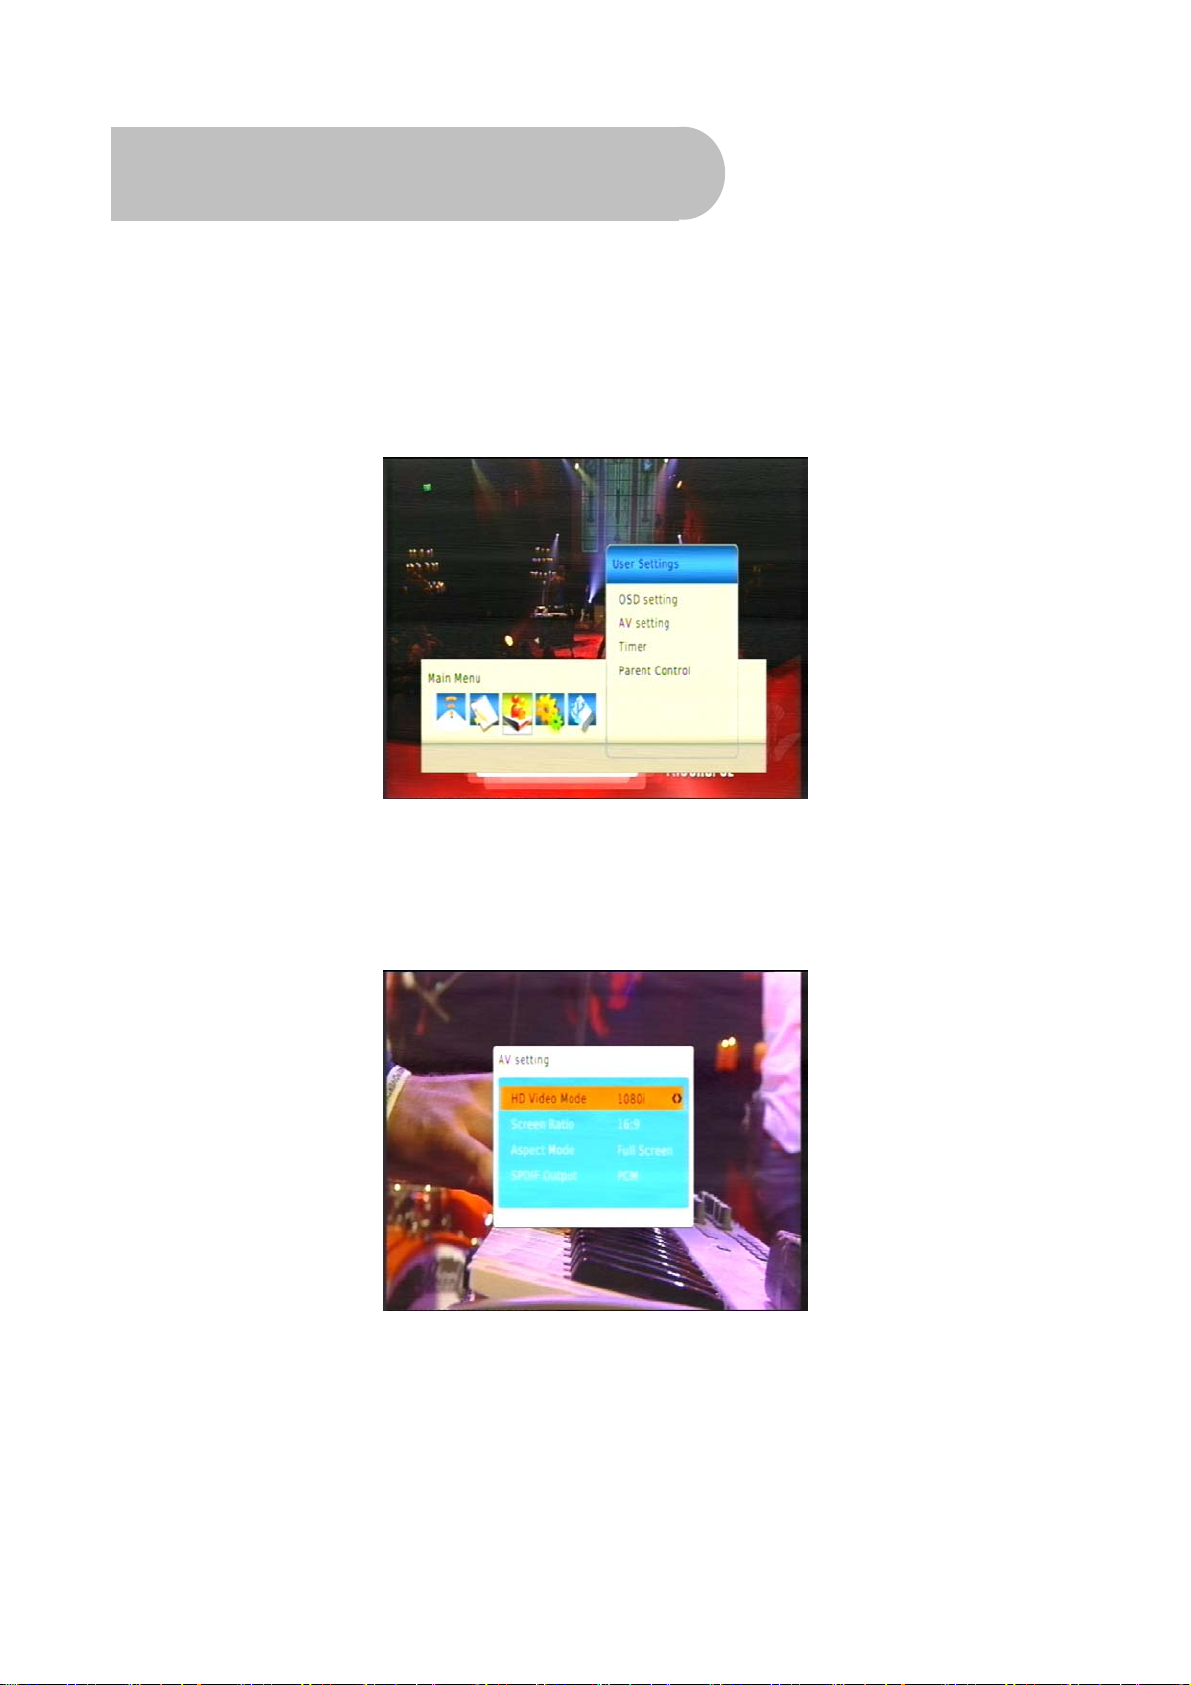
User Settings
Audio–Visual (AV) settings
1. Press MENU on the remote control. The Main Menu appears.
2. If User Setting is not highlighted on the main menu, press
User Setting menu appears.
or
until it is and then press OK. The
If OSD Setting is not highlighted on the menu, press or until it is and then press OK. The OSD
Settings menu appears.
3. If AV Setting is not highlighted on the menu, press or until it is and then press OK. The AV
Setting menu appears.
With this menu you can control the following settings:
• Sceen ratio – 4:3 or 16:9
• Aspect mode – Full screen, Letterbox or Pan &
Scan
• HD Video Mode – 576i, 576p, 720p and 1080i
• S/PDIF output – PCM ,AC3,RAW
28
Page 29
Note that some of these settings are restricted by the type of connection you have made between the
and your TV. For example:
• If you have connected the
setting must be set to AC3.
4. Select an option you want to change. If necessary, press or until the option is highlighted.
5. With the option you want to change highlighted, press or
(shown in the panel at the right of the screen). Stop when the value you want is displayed.
6. If there is another option you want to change, repeat this procedure from step 4.
7. When you have finished, press EXIT to save and return previous menu.
to a Dolby Digital decoder amplifier, the S/PDIF output
to step through the allowable values
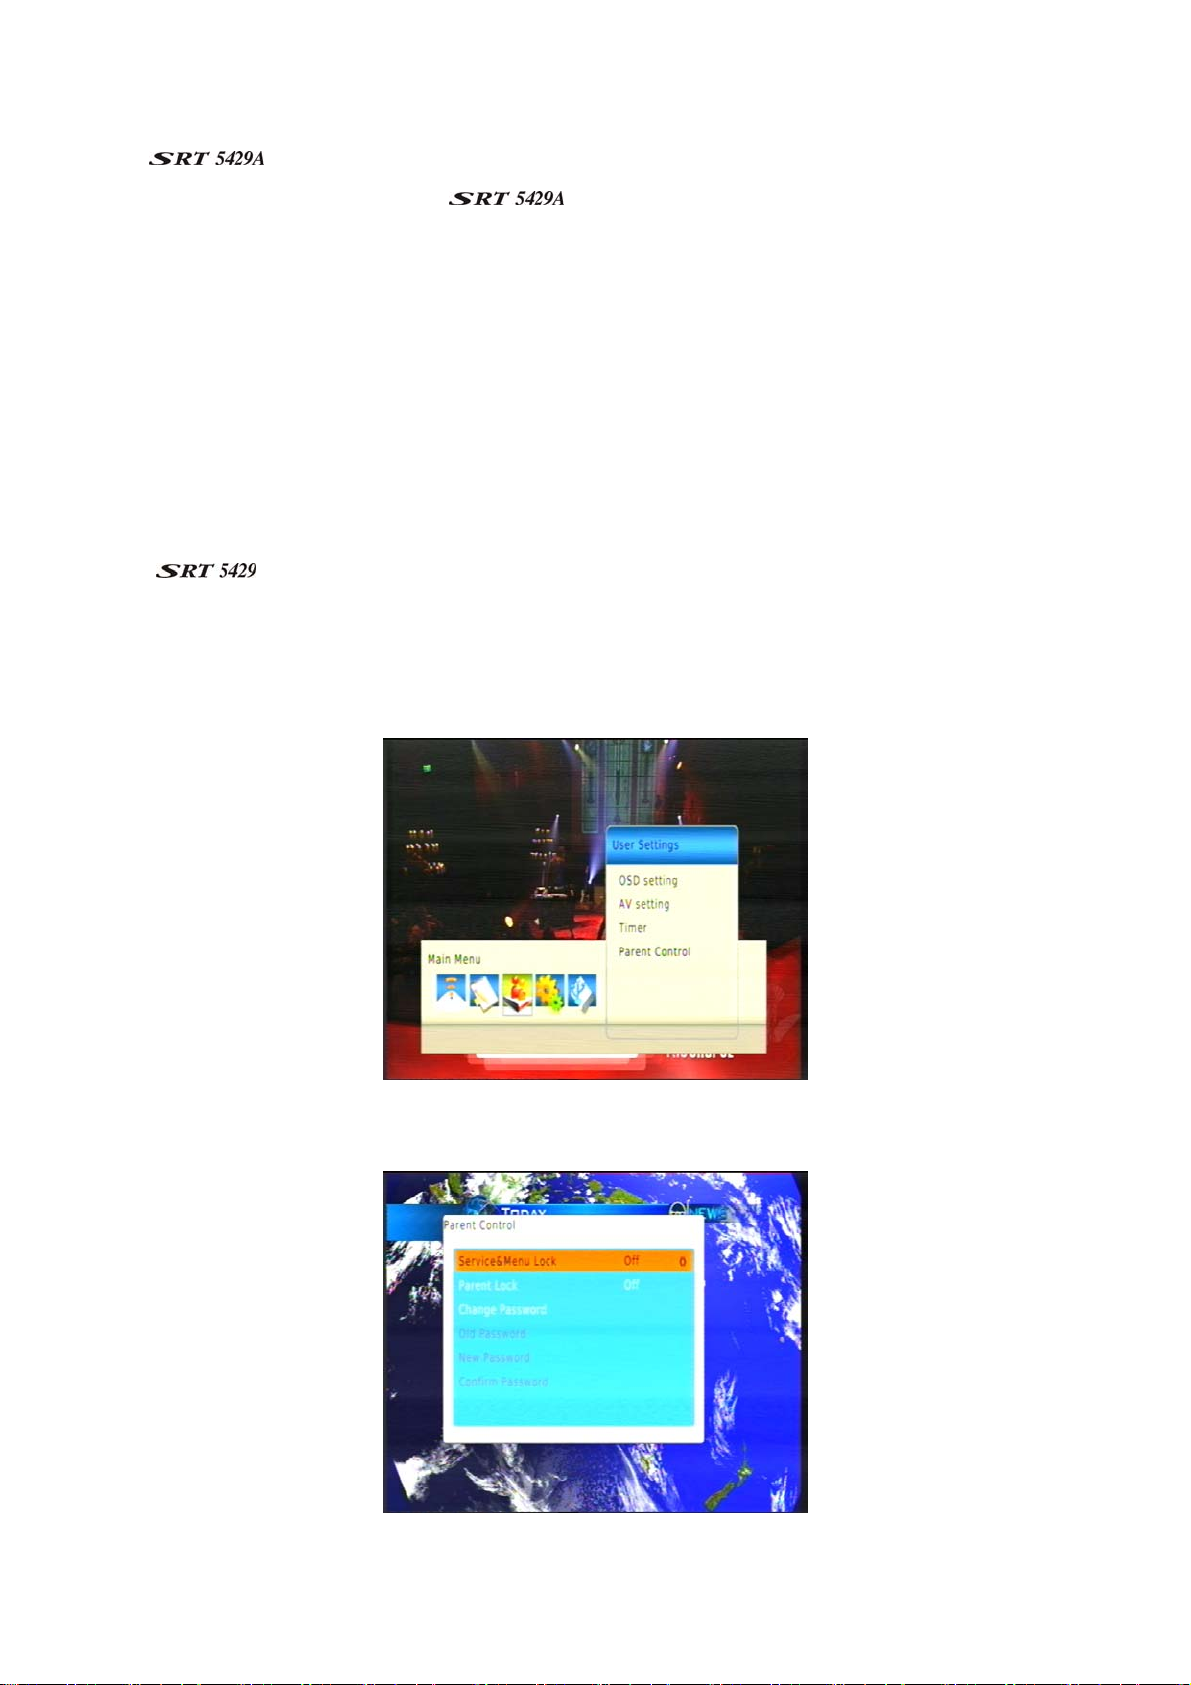
Parental control
The
The PIN is required if you have enabled the parental lock. To change the PIN:
1. Press MENU on the remote control. The Main Menu appears.
2. If User Settings is not highlighted in the main menu, press
User Settings menu appears.
is shipped with a default personal identification number (PIN). The default PIN is 000000.
or
until it is and then press OK. The
3. If Parent Control is not highlighted, press or until it is and then press OK & Input Password. The
Parent Control menu appears.
29
Page 30
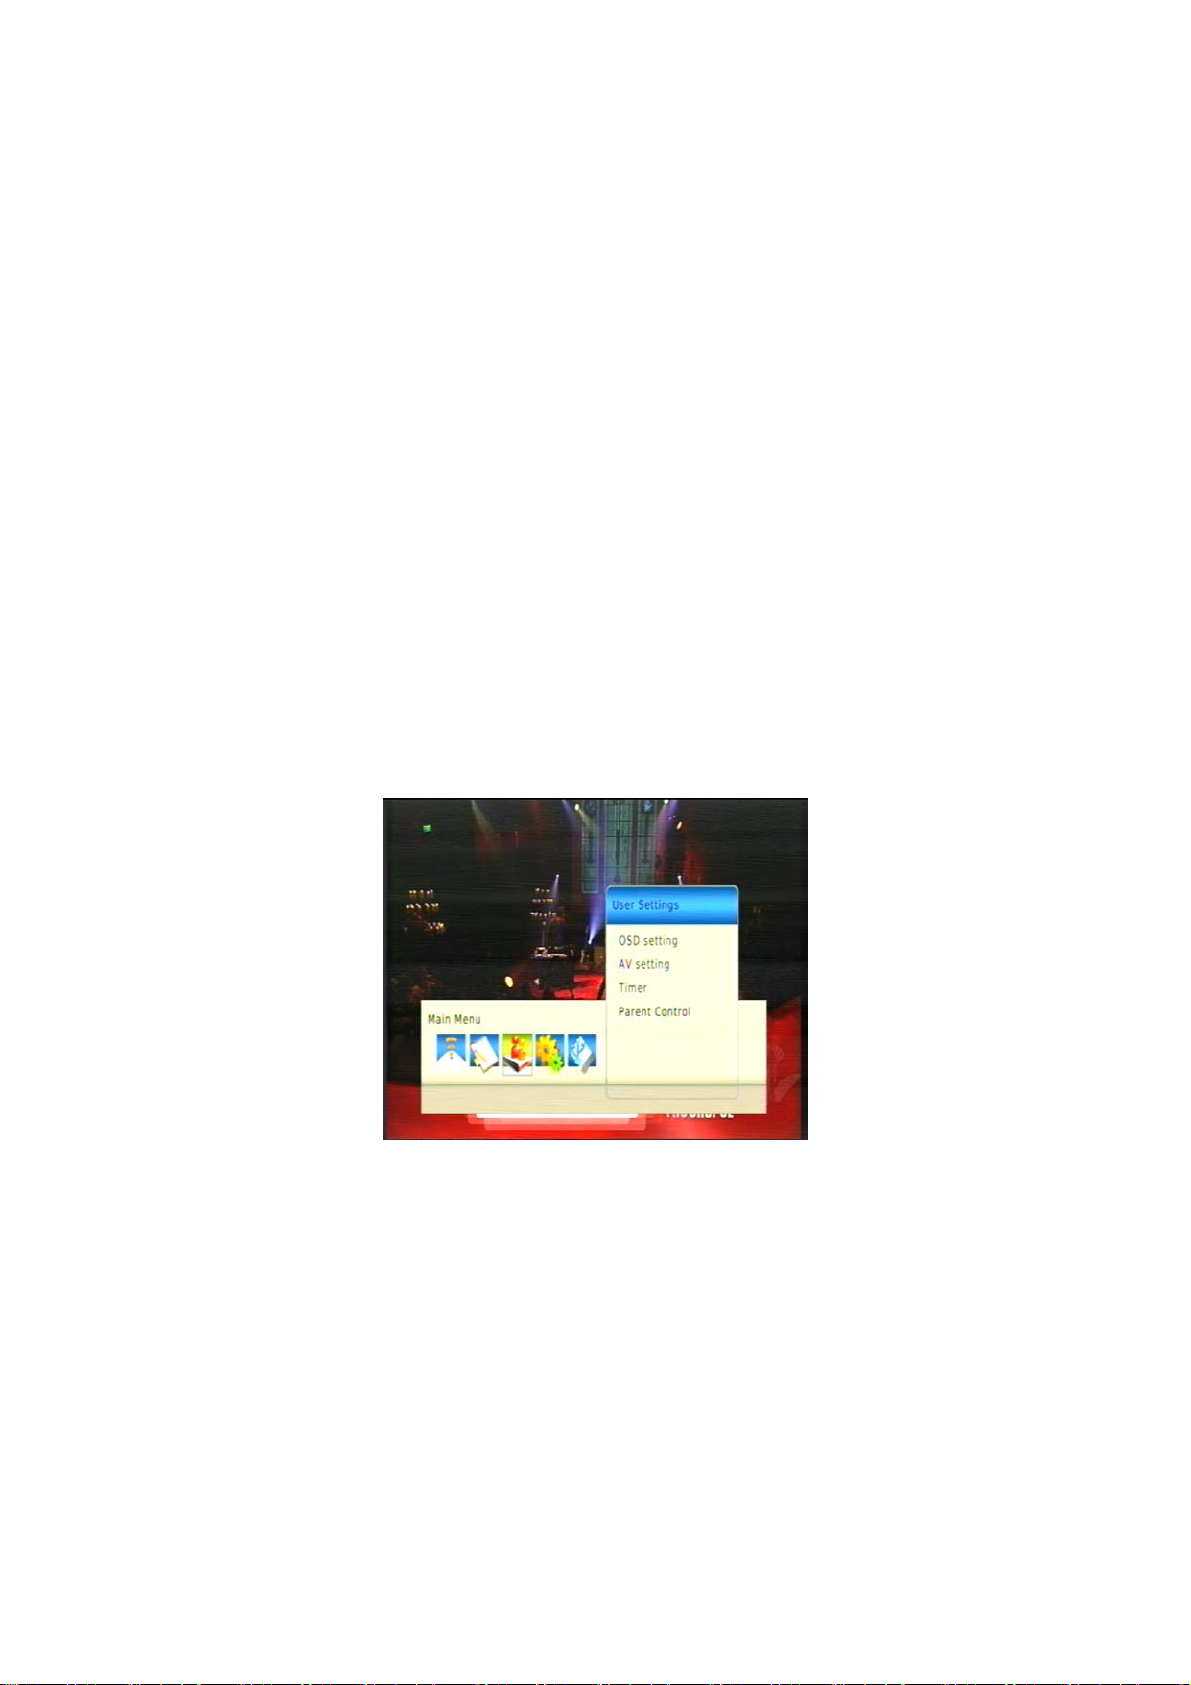
4. If Parent Lock is not highlighted, press
or until it is and then press OK The Parent Lock menu
appears. You can press
above, MA and above, M and above, PG and above and G above).
5.Press to move to the Change Password option,Press OK to Old Password option
and enter the current PIN using the number keys on the remote control. (If you haven’t previously
changed the PIN, this will be the default PIN: 000000.)
4. Press
5. Press
6. Press OK to save your changes, and then EXIT to return to normal viewing.
CH to move to the New pin option and enter a new PIN. (A PIN must be six digits long.)
CH to move to the Confirm pin option and re-enter the new PIN.
or to select the Level of parental guidance (All, R and above, AV and
Timer settings
You can set up to eight timers at which specified channels can automatically be shown or recorded or to
have the unit turn off. Follow this procedure to set or change a timer.
1. Press MENU on the remote control. The Main Menu appears.
2. If User settings is not highlighted in the main menu, press or until it is and then press OK. The
User Settings menu appears.
3. If Timer is not highlighted, press or until it is and then press OK. The Schedule window appears.
30
Page 31
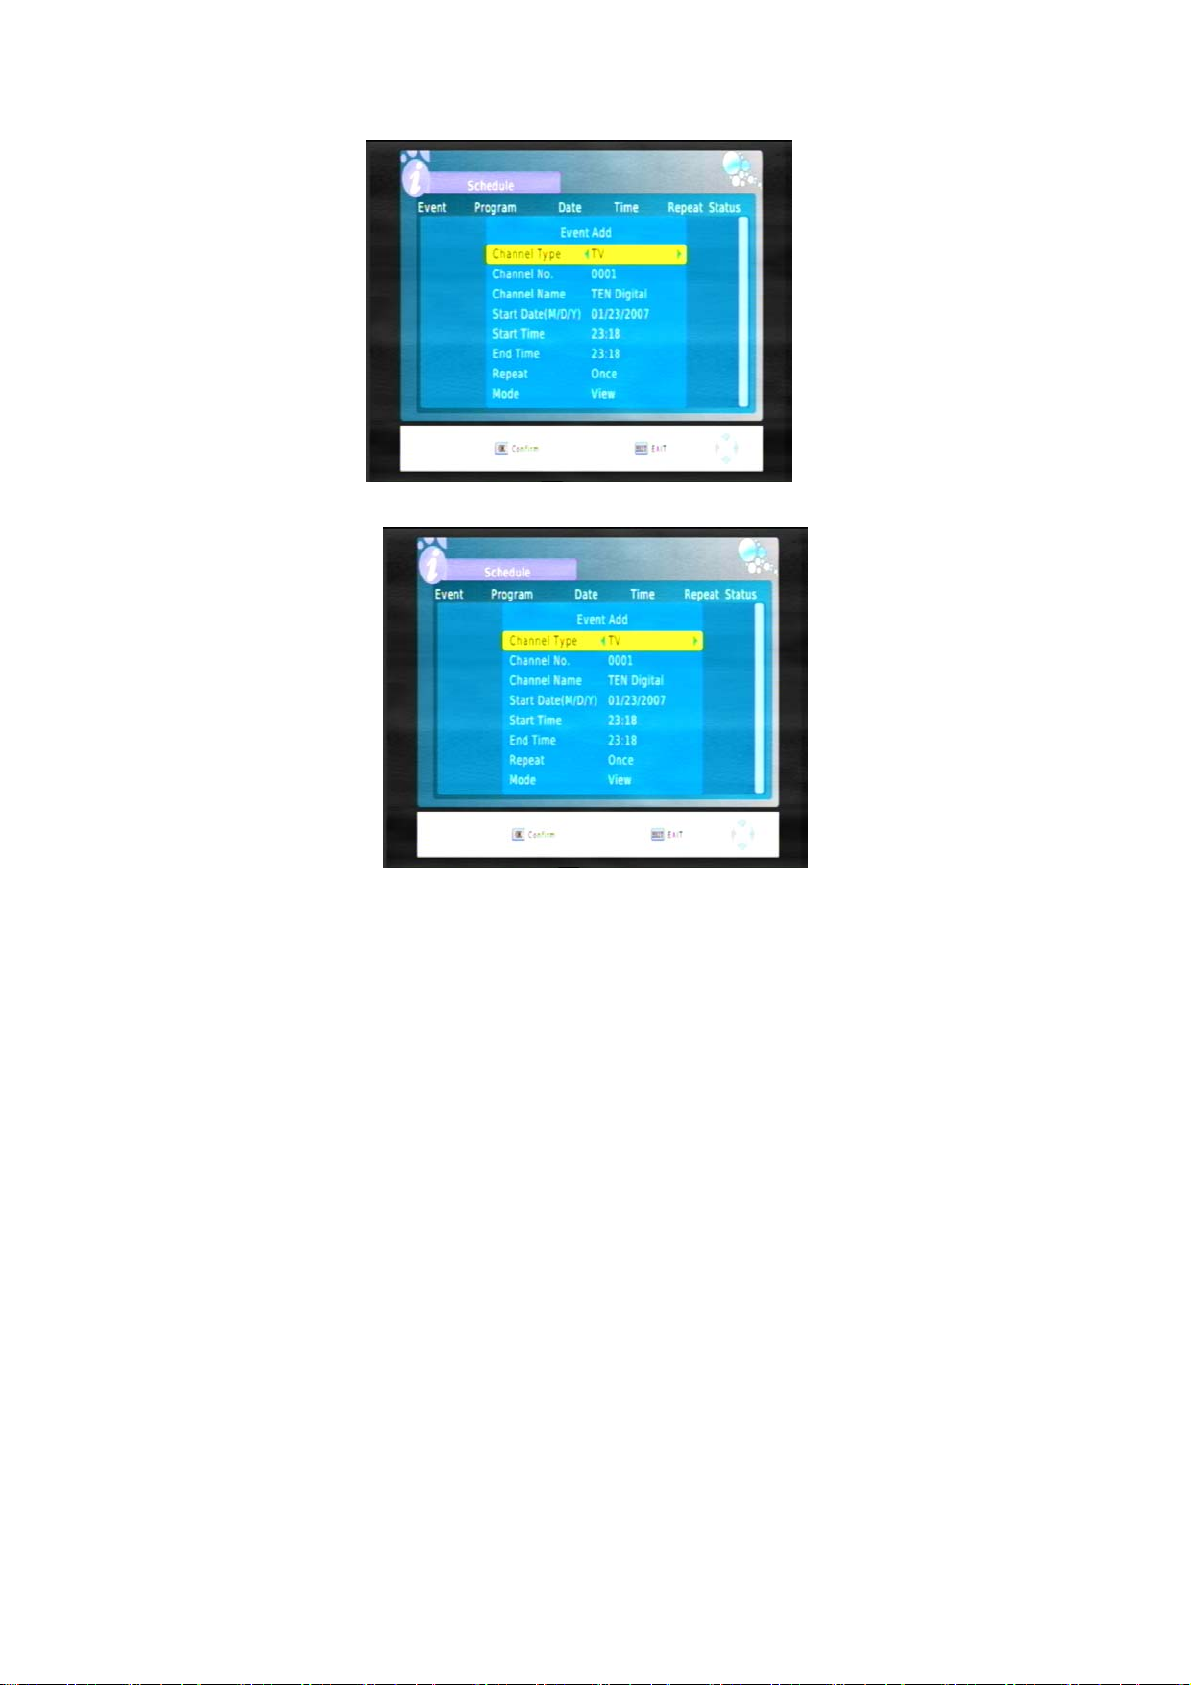
4. Press SUB key ( the red button) to add a timer you want to.The Event Add screen appears.
5, All the timer options should now be available to you (see below). Press
CH or CH
to activate to
select a timer you want to set.You can Edit and Delete the timer.
6,If you have selected a timer that has already been set and want to edit it, press the AUDIO key(the
green button) to edit the timer.
7, If you have selected a timer that has already been set and want to cancel it, press Timer key(the blue
button) to delete the timer.
8,All the timer options should now be available to you (see below). Press
option. Press
9, Press
CH to select the Channel No.option. Press VOL
VOL
or
VOL
to set channel type . You can set channel type to TV or Radio.
VOL
or
to select the channel you want
CH to select the Channel Type
displayed.
10, Press
CH to select the Start Date,Start Time or End time options. Use the number keys on the
remote control to enter the time you what the to turn on or turn off .
Note that times must be entered using the 24-hour clock format. For example, 8 o’clock in the
morning is entered as 0800, while 8 o’clock in the evening is entered as 2000.
11, Press
12, Press
CH to select the Repeat option.You can set the timer to Once, Daily or Weekly. Press VOL
VOL
until the timer service option you want is displayed.
CH to select the Mode option.You can set the timer to View or Record. Press VOL
until the timer service option you want is displayed.
31
or
VOL
or
Page 32
13. Press the ok button on the remote control. Your timer settings are saved.
System Maintenance
You can upgrade the software in your as new versions become available. Information about
the current version (and information about the hardware) is available from the menu to help you
determine if you need to upgrade. This information might also be useful if you need to obtain technical
support from Strong.
You can also reset the
by reinstating the default settings it had when it left the factory.
System information
To display system information about your , such as the model number, software version,
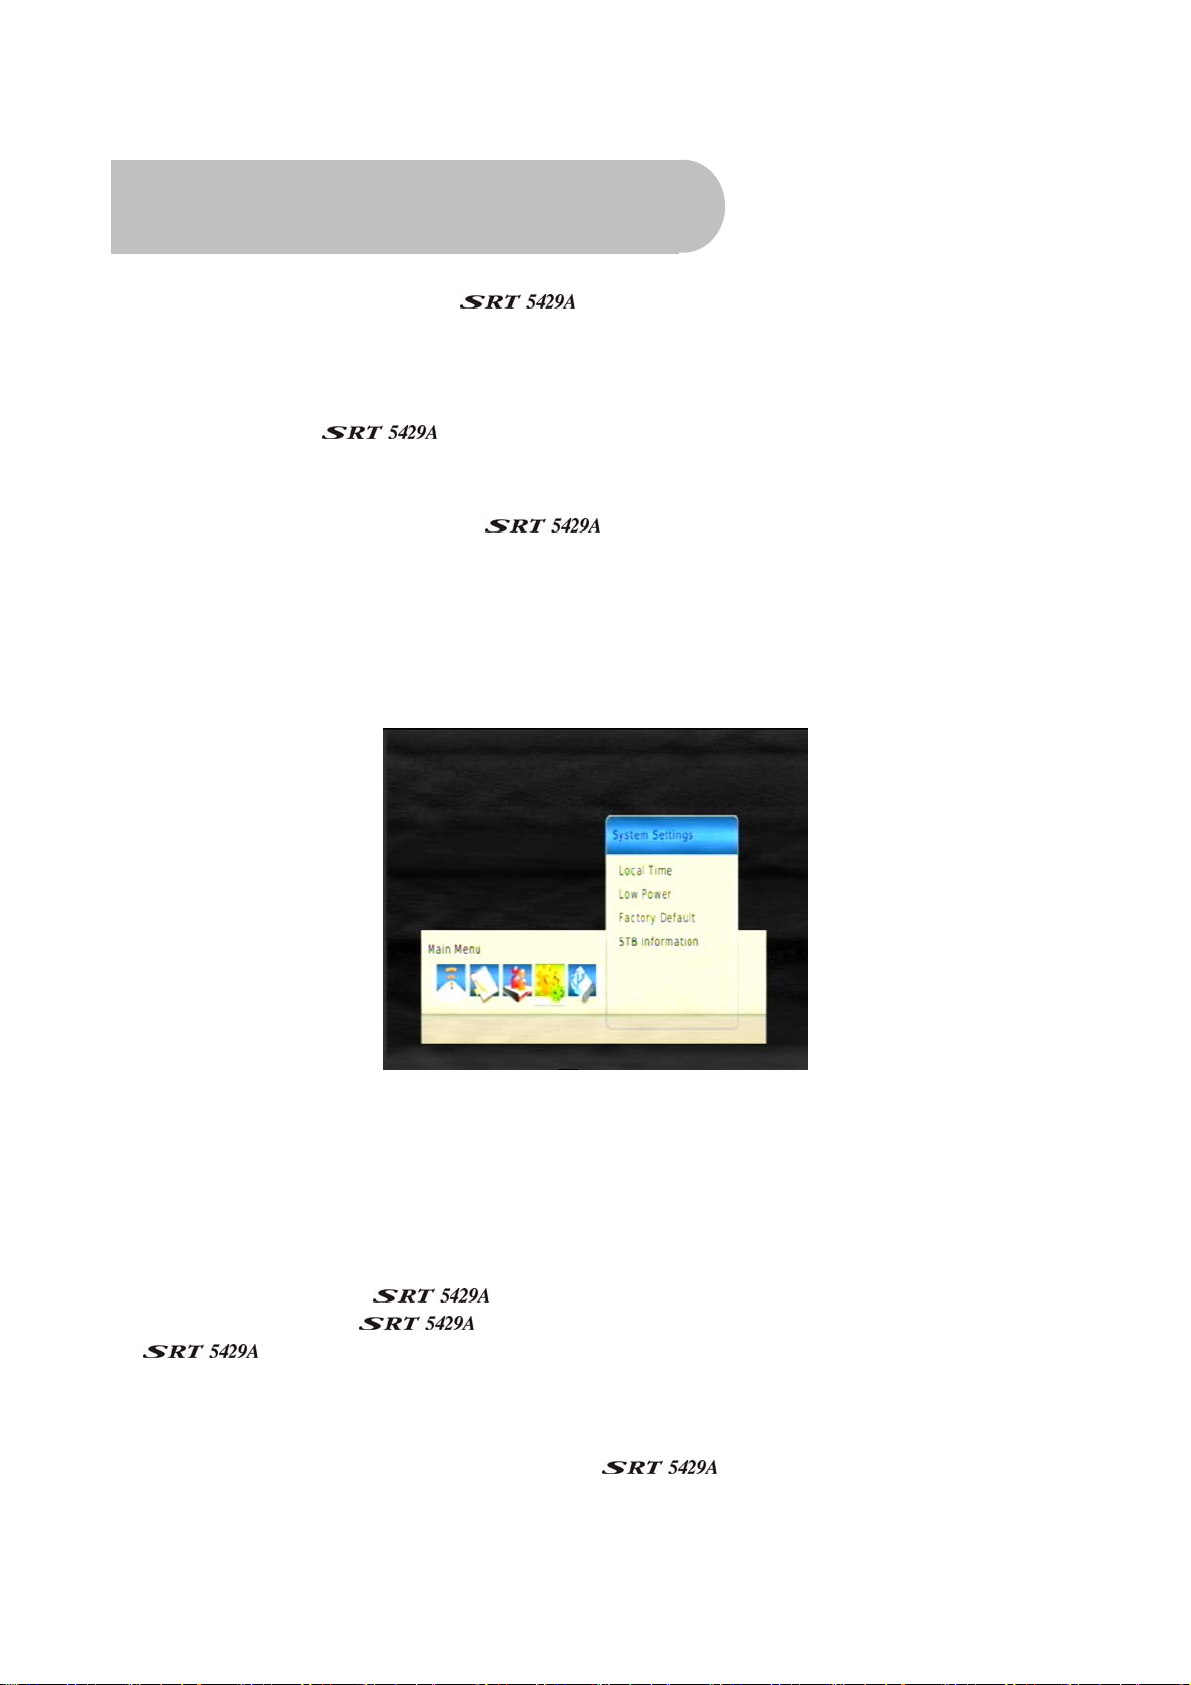
hardware version:
1. Press MENU on the remote control. The Main Menu screen appears.
2. If System Settings is not highlighted on the menu, press
The System Settings window appears.
or
until it is and then press OK.
Make a note of the information on this window if you are intending to contact Strong for technical
support.
3. Press EXIT or MENU twice to return to normal viewing.
Software upgrades
If a new version of software becomes available, you can download the software to your PC
and then transfer it to your
the
1. Once you have obtained an upgrade file, transfer it to a USB memory stick. You need to place the file
at the root (or top) level on the memory stick, not inside a folder or directory.
2. Insert the stick in the USB port on the rear of the
3. Press MENU on the remote control. The Main Menu screen appears.
4. If USB is not highlighted on the menu, press
). Visit the Strong website for announcements of software upgrades.
. You will need a USB memory stick (not supplied with
or
until it is and then press OK.
32
Page 33

The USB window appears.
5.Select USB Update and press OK. Receiver will automatically search for software file on USB memory
stick and will load new software on to receiver.
NOTE: the updated file must be “STRONG5429A.AP”They must be at the root level on the memory stick,
not inside a folder or directory.
33
Page 34
Clearing and resetting data
You can reset the , by restoring the unit to the default settings it had when it left the factory.
This clears all channels, stations, preferences and other user settings. You will need to rescan for channels
and stations before you can continue watching digital TV or listening to digital radio.
WARNING: This procedure returns the
as time zone, channels, stations and timers) will be lost.
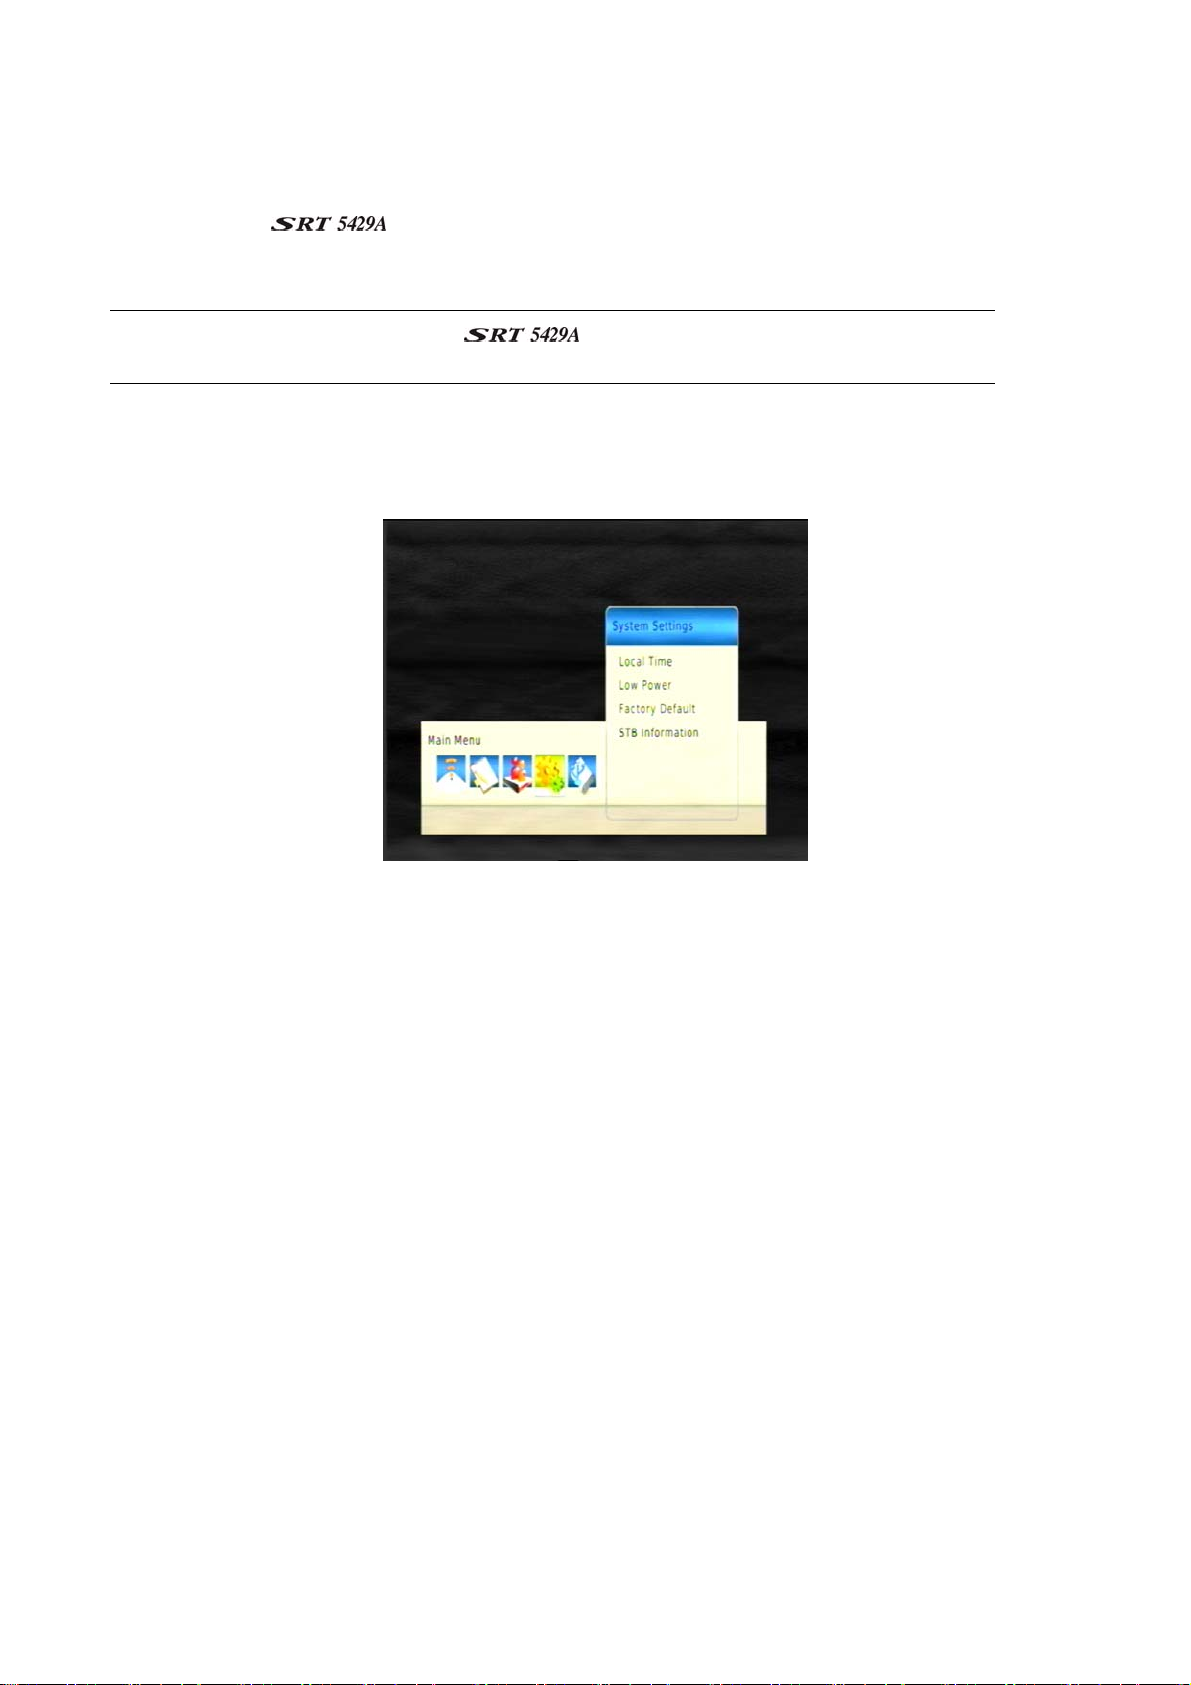
1. Press MENU on the remote control. The Main Menu screen appears.
2. If System Settings is not highlighted on the menu, press
System Settings menu appears.
to its default factory settings. All data (such
or
until it is and then press OK. The
3. If Factory Default is not highlighted on the menu, press or until it is and then press OK.
4. A warning message appears asking if you are sure you want to clear all services and reset all settings.
To continue, press OK. To cancel, press EXIT and ignore the rest of this procedure.
34
Page 35
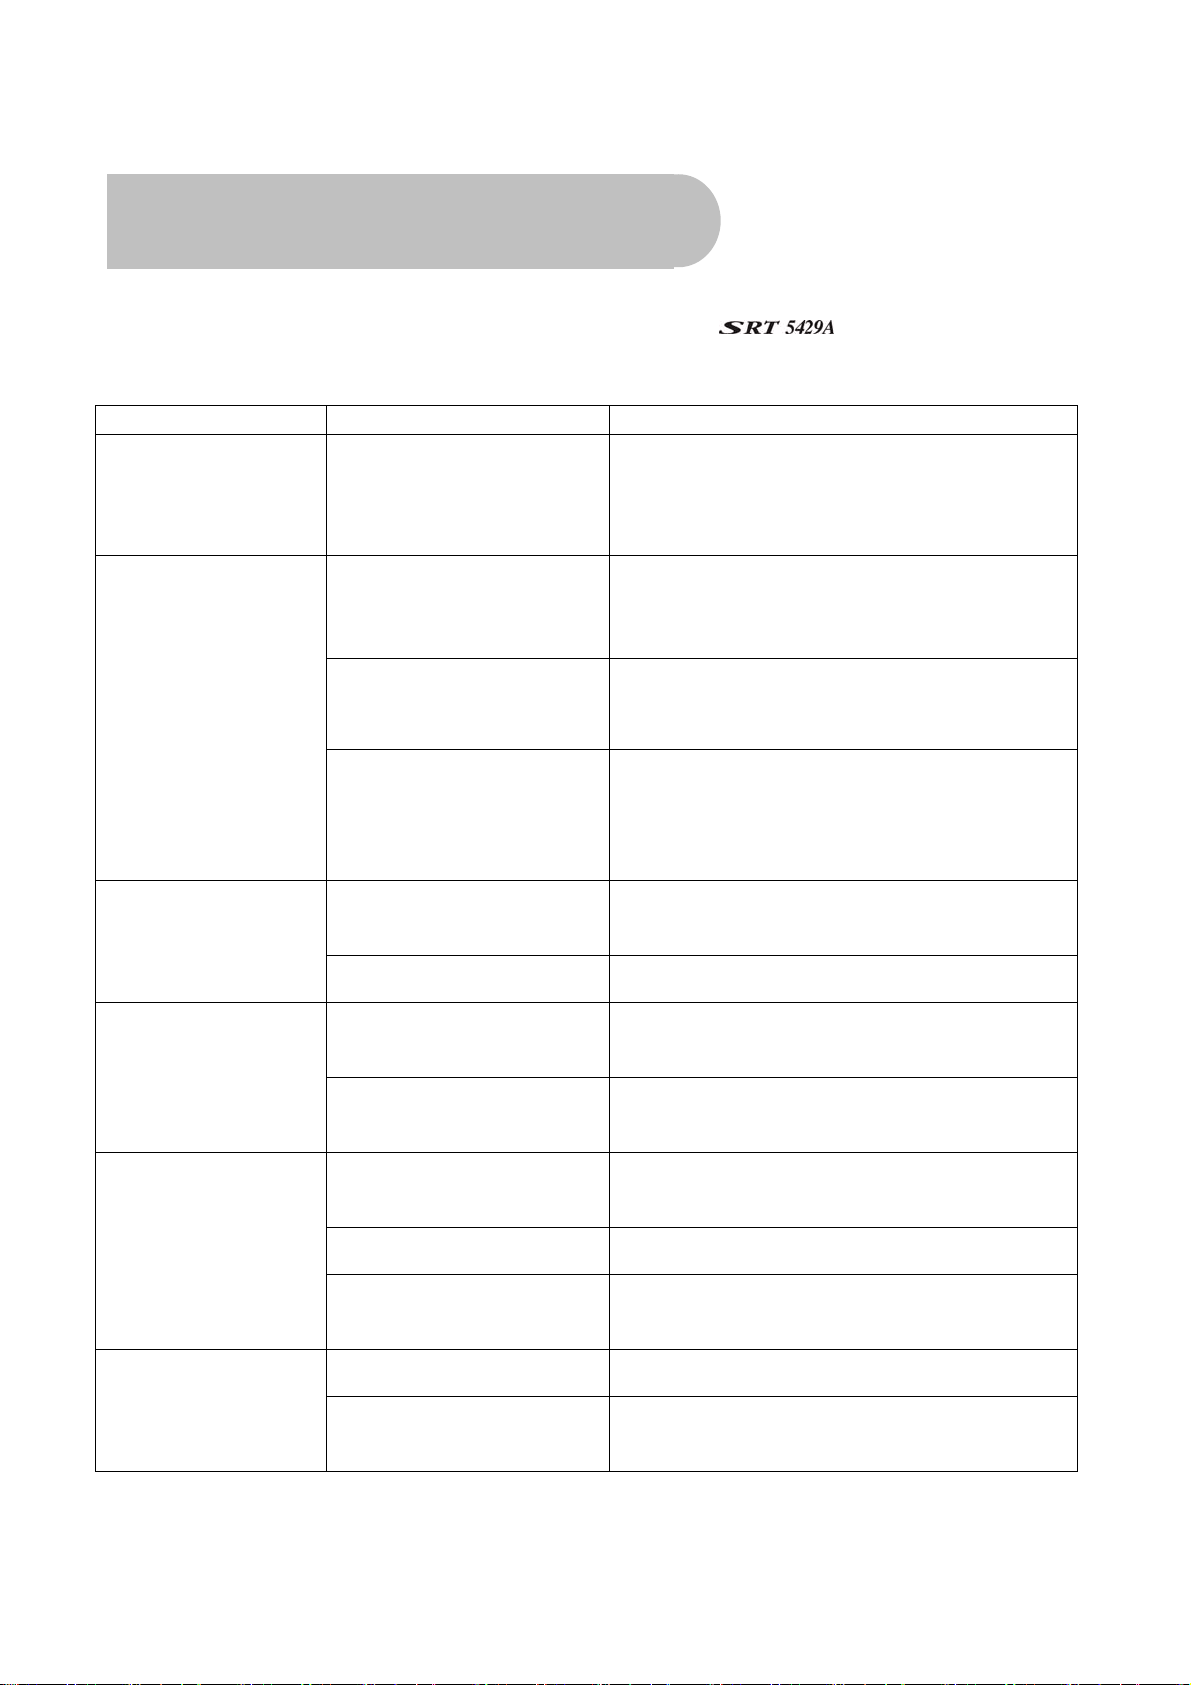
Troubleshooting
There may be a number of causes of abnormal operation. Occasionally receivers can hang (just as a PC
will do from time to time). In this case, you should disconnect the
30 seconds and then reconnect it to mains power. If the unit is still not operating correctly, refer to the
following table for the indicated problem and likely solution.
Symptoms Possible causes Solution
Indicators on front
panel do not light up
AC power cord is not
connected
Check that the power cord is plugged into the
wall socket.
Make sure the power switch is on.
from mains power, wait
No picture and sound
Picture and/or audio
glitch
No sound
The cables connecting the
TV and the receiver are not
properly connected
The TV mode is not correct Check that the correct video or AV input has
Incorrect video definition If you have a Composite or S-Video connection to
Insufficient signal strength Check that the antenna cable is securely plugged
Electrical interference Check that all antenna cabling is quad-shielded.
The receiver or TV is in
mute mode
Initial volume level has not
been set on your TV
Make sure that the correct cable is connected
between the TV and the receiver, and that the
antenna is connected.
been selected on your TV.
your TV, video definition must be set to 576i.
Press EXIT and then FORMAT on the remote
control until you see a picture.
in and that the signal is adequate.
Press the MUTE button on the receiver and on
the TV.
Select the desired TV volume level using the TV
remote control.
Remote control is not
working
Music files on a USB
memory stick don’t
appear
Batteries not inserted, or
incorrect polarity
Batteries are flat Change the batteries in the remote control.
Remote control is outside
the range of operation
Files are of wrong format. Check that the format
Files are not at the root or
top level.
Insert batteries, ensure the batteries are
inserted as per the diagram inside battery cover
Aim the remote control directly at the receiver.
is, MP3.
Move the files out of folders or directories.
35
Page 36

Support
For Technical Assistance: Please call our Technical Support Help Line on 1800 820 030
For General Enquiries: Please email us at: [email protected]
Product Return Tracking: If you need to send your receiver to Strong for repair or evaluation, please
keep a record of the unit’s serial number. This will ensure ease of tracking
and identification on your behalf.
36
Page 37
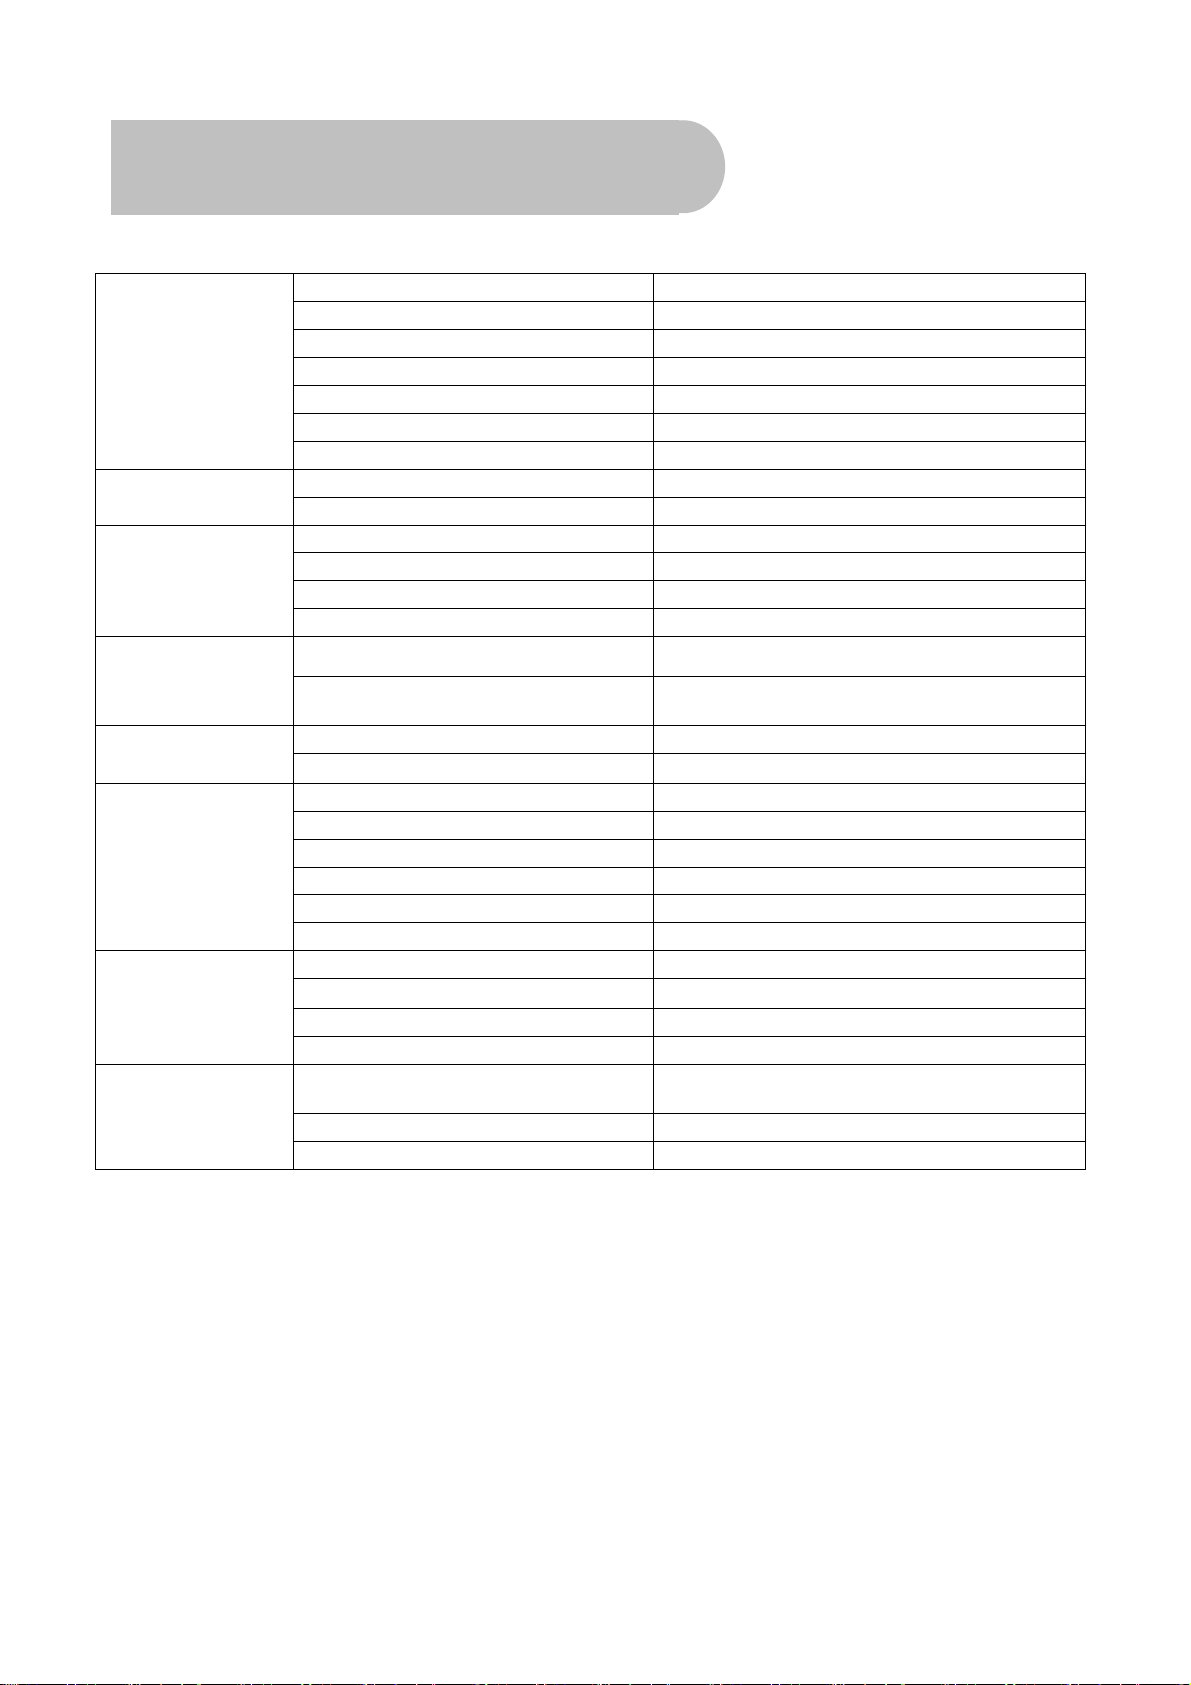
Specifications
Input Connector Antenna IEC 169-2 Female
Output Connector – RF Loop Out IEC 162-2 Male
Tuner
& Channel Decoder
MPEG Transport
Stream
Video Decoding
Audio Decoding
Main System
Audio & Video In/Out
Power Supply
Physical
Frequency range 174MHz–230MHz, 474MHz–868MHz
Input impedance 75Ω
IF bandwidth 7 and 8 MHz (switchable)
Code Rate 1/2, 2/3, 3/4, 5/6, 7/8
Guard Interval 1/4, 1/8, 1/16, 1/32
Standard MPEG-4 [email protected] 1920 × 1080 @ 50MHz
Rate 64 Mbps
Profile Level MPEG-4 [email protected] 1920 × 1080 @ 50MHz
Input Rate 80 Mbps
Aspect Ratio 4:3, Letter Box, 16:9, Pan & Scan
Video Resolution 1080i, 720p, 576p, 576i
Standard MPEG Layer 1,2, 3; Dolby AC-3, 12S S/PDIF
Channels
Main Processor ARM926
Memory 4Mb Flash; 128Mb SDRAM
HDMI HDMI 1.2 connector ((with HDCP copy protection)
Video Component Y / Pb / Pr Component YUV
Video SVHS 4-pin Din Connector
Video Composite RCA/Cinch, Video Output (CVBS)
S/PDIF Coaxial Digital Audio Output
USB USB 2.0
Input Voltage 100–240V AC
Power Consumption
Protection Seprate internal fuse
Type Switch-mode
Dimensions
Weight 1.38 kg
Optimum operating temperature 0–50°C
Single, Dual Mono, Stereo, Joint Stereo, Dolby
Digital bit-streams
20W maximum,MEPS Compliant
W250mm x H38mm x D175mm (case only)/185mm
(to end of connectors)
37
Page 38

STRONG AUSTRALIA PTY LTD.
60 WEDGEWOOD ROAD, HALLAM, VICTORIA 3803
PH: +61 3 8795 7990 FAX: +61 3 8795 7991
TECHNICAL SUPPORT: 1800 820 030
STRONG & CO. (FAR EAST), LTD.
P. O. BOX 85, YOKOHAMA, KANAGAWA-KEN
JAPAN 231-91
www.strong.com.au
Email: [email protected]
FAX: +81 45 651-1842
© Strong Australia Pty Ltd., 2010
 Loading...