


High Definition Digital Terrestrial Receiver
USER’S MANUAL

Important Safety Instructions
• To avoid electric shock, do not open the unit.
• There are no user-serviceable parts inside. Servicing can only be performed by qualified service
personnel.
• Connection can only be to a 240V AC mains supply.
• All safety and operating instructions should be read before the product is operated.
• All warnings on the product and in this user’s manual should be adhered to.
• The antenna cable must be earthed.
• Do not use attachments not recommended by the product manufacturer as they may cause
hazards or damage the equipment.
• Do not overload adaptors, wall sockets or extension cables as this can result in unit failure or
electric shock.
• For cleaning, use only a dry or lightly dampened cloth. Do not use liquid cleaners or aerosol
cleaning products.
• Do not place this product on an uneven surface.
• Do not block the ventilation slots on the top of the unit.
2

Overview
Thank you for purchasing this Strong Digital Terrestrial Television Receiver.
This product has been manufactured in accordance with strict quality control procedures and is
fully compliant with Australian specifications.
Your new receiver will enable you to experience superior picture and sound quality, widescreen
images, extra channels plus a variety of new features.
• For a complete list of all of our digital terrestrial television receivers and satellite receivers, please
go to our website: www.strong-technologies.com
• For general enquiries, please email us at techau@strong-technologies.com
• For technical assistance, please call our Technical Support Help Line on 1 800 820 030
Main Features
• High Definition Multimedia Interface (HDMI) • Dolby Digital: S/PDIF Optical
• Component: Y/Pb/Pr • MPEG-2/MPEG-4 AVC HD/H.264 compliant
• RCA/Cinch: CVBS + L/R Audio • CD-quality audio (mono and stereo)
• Tuner loop-through • Auto & Manual Search Modes
• Favourite Channels and Stations Lists • EPG: Electronic Program Guide
• 16:9 and 4:3 aspect ratio • Signal Level and Quality Indicators
• Captions and Teletext • Time Clock Settings
• 8 Timer Event Settings • Parental and Menu Lock
• COFDM Demodulation • USB Port for Software Upgrade
• Full Function Infra-Red Remote Control • DVB/T compliant
• Multi-language support • Dimensions: W360mm x D230mm x H63mm
3

Contents
Important Safety Instructions ..........................................................................................................................................2
Overview ............................................................................................................................................................................ 3
Main Features .................................................................................................................................................................... 3
Checklist of Accessories.................................................................................................................................................. 6
Controls and Indicators.................................................................................................................................................... 7
Front panel ..................................................................................................................................................... 7
Rear panel...................................................................................................................................................... 8
Remote Control ................................................................................................................................................................. 9
Installing the batteries in the remote control ............................................................................................ 10
How to Connect............................................................................................................................................................... 11
Step 1: Connect to the antenna ................................................................................................................... 11
Step 2: Choose an installation method ........................................................................................................ 11
A: High Definition Multimedia Interface .................................................................................................... 11
B: Y/Pb/Pr (Component) using the supplied RCA blue–red–green lead ................................................. 11
C: CVBS (Composite) using the supplied RCA red–white–yellow lead ................................................... 12
Step 3: Optional connections ....................................................................................................................... 12
Dolby Digital ............................................................................................................................................. 12
Looping Out (for VCR recording) ............................................................................................................. 12
Getting Started ................................................................................................................................................................ 13
Configuration wizard .................................................................................................................................... 13
How to use the wizard .............................................................................................................................. 13
Window 1: Thank You .............................................................................................................................. 14
Window 2: Language Setting ................................................................................................................... 14
Window 3: Connect Antenna.................................................................................................................... 14
Window 4: Connection Guide................................................................................................................... 15
Window 5: Set-Up .................................................................................................................................... 15
Window 6: Broadcast Language Settings ................................................................................................ 16
Window 7: Screen Mode .......................................................................................................................... 16
Window 8: Channel Searching................................................................................................................. 17
Operation ......................................................................................................................................................................... 18
Basic operations........................................................................................................................................... 18
Selecting a channel .................................................................................................................................. 18
Adjusting the volume ................................................................................................................................ 19
Getting channel Information ..................................................................................................................... 19
TV/Radio switching................................................................................................................................... 19
Closed captions........................................................................................................................................ 20
Teletext..................................................................................................................................................... 21
Picture freeze ........................................................................................................................................... 21
Organising channels .................................................................................................................................... 21
Locking channels...................................................................................................................................... 21
Deleting channels..................................................................................................................................... 22
Renaming channels and stations ............................................................................................................. 23
Re-sorting channels and stations............................................................................................................. 24
Favourites lists ............................................................................................................................................. 25
Setting up a favourites list ........................................................................................................................ 25
Selecting a favourite to watch or listen to................................................................................................. 27
Renaming a favourites list ........................................................................................................................ 28
Changing the order of channels or stations in a favourites list ................................................................ 29
Electronic Program Guide (EPG)................................................................................................................. 30
Selecting a channel .................................................................................................................................. 31
Displaying multi-channel information ....................................................................................................... 31
Displaying the next day’s programs ......................................................................................................... 31
Displaying program information................................................................................................................ 31
Automatically setting a timer .................................................................................................................... 32
Watching a selected channel ................................................................................................................... 32
4

Using the timer ............................................................................................................................................. 32
Setting or deleting a timer ........................................................................................................................ 33
Rescanning for channels and stations......................................................................................................... 34
User Settings ................................................................................................................................................................... 37
Choosing languages .................................................................................................................................... 37
Setting display options ................................................................................................................................. 38
Setting the time ............................................................................................................................................ 38
Setting security options................................................................................................................................ 39
To cancel a lock ....................................................................................................................................... 41
Audio–Video settings ................................................................................................................................... 41
System Maintenance....................................................................................................................................................... 42
System information................................................................................................................................... 42
HDMI information ..................................................................................................................................... 42
Software upgrades ................................................................................................................................... 43
Clearing and resetting data ...................................................................................................................... 43
Troubleshooting.............................................................................................................................................................. 45
Specifications.................................................................................................................................................................. 46
5
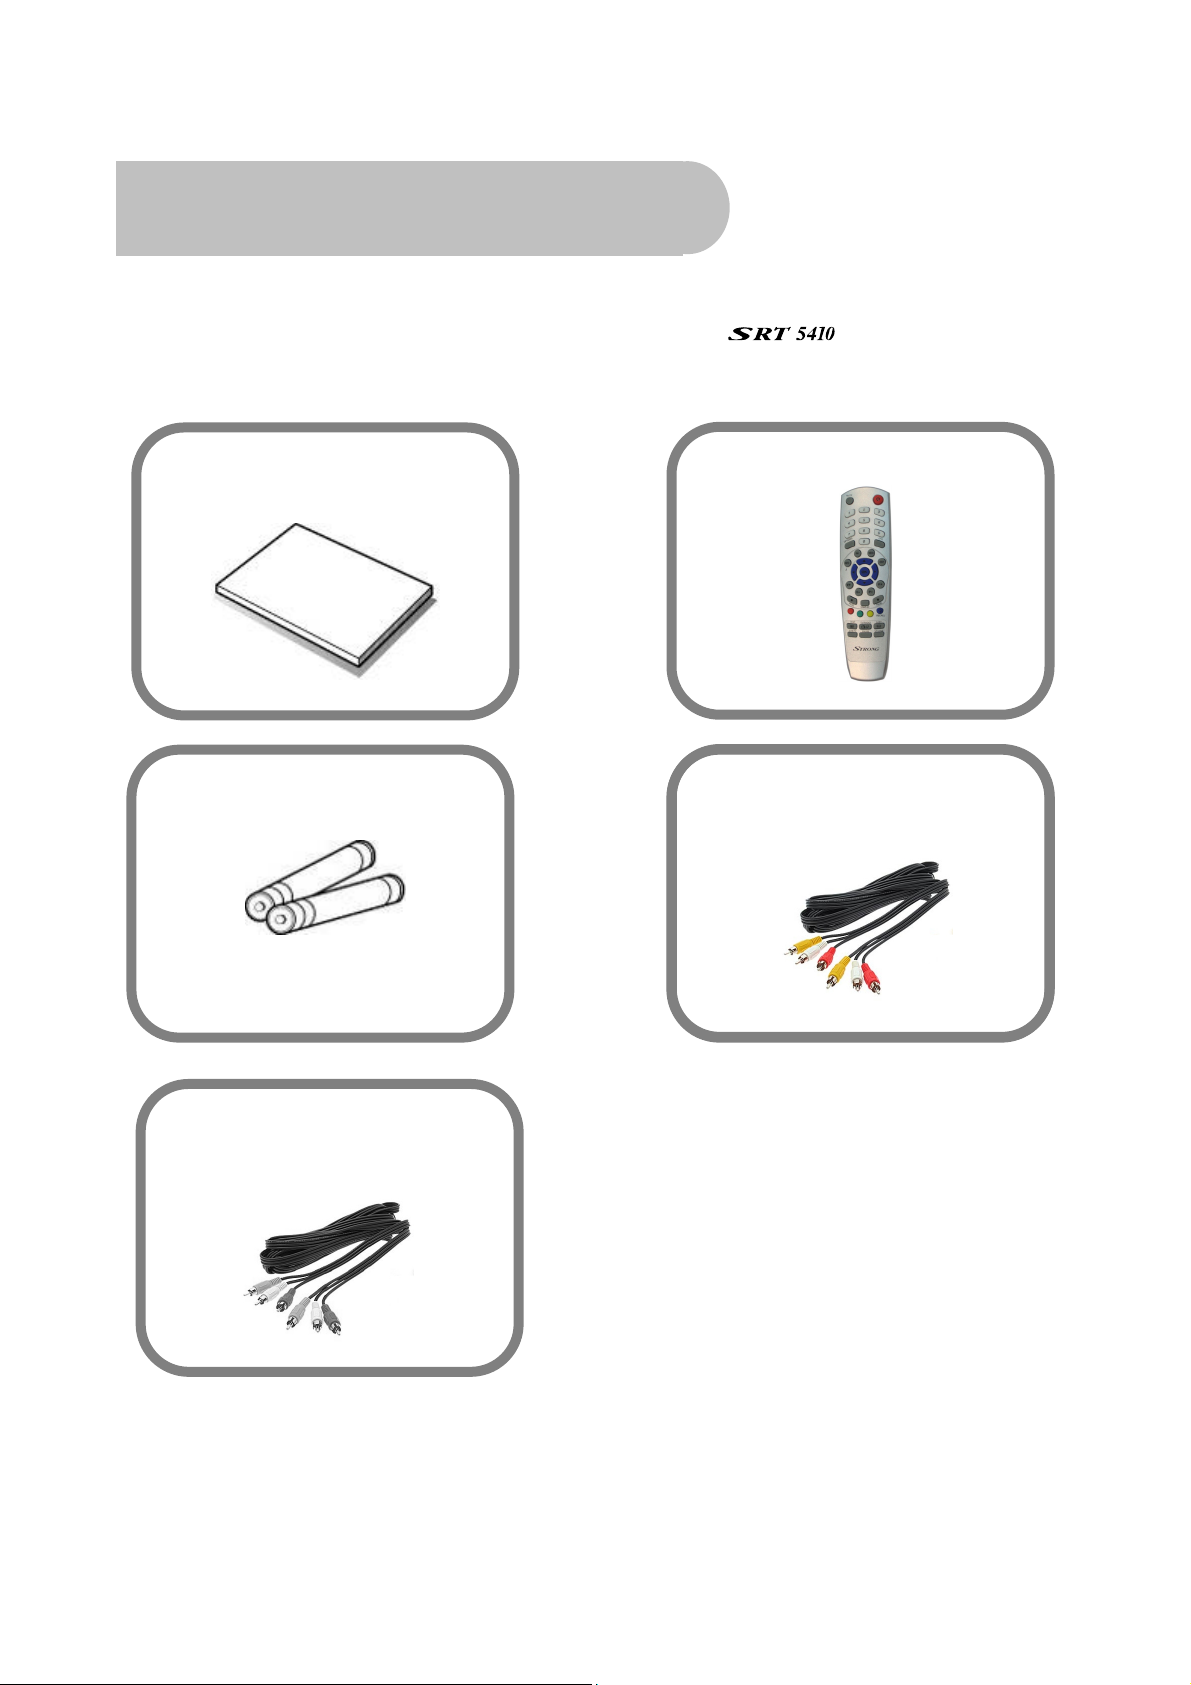
Checklist of Accessories
The following accessories should have been supplied with your
supplied, contact the retailer from whom you purchased the unit.
. If any were not
User’s manual : 1
Batteries (AAA type) : 2
CVBS Composite Video and
Remote control : 1
Audio Cable
(yellow, white, red) : 1
Y / Pb / Pr Component Cable
(blue, red, green) : 1
6
Controls and Indicators
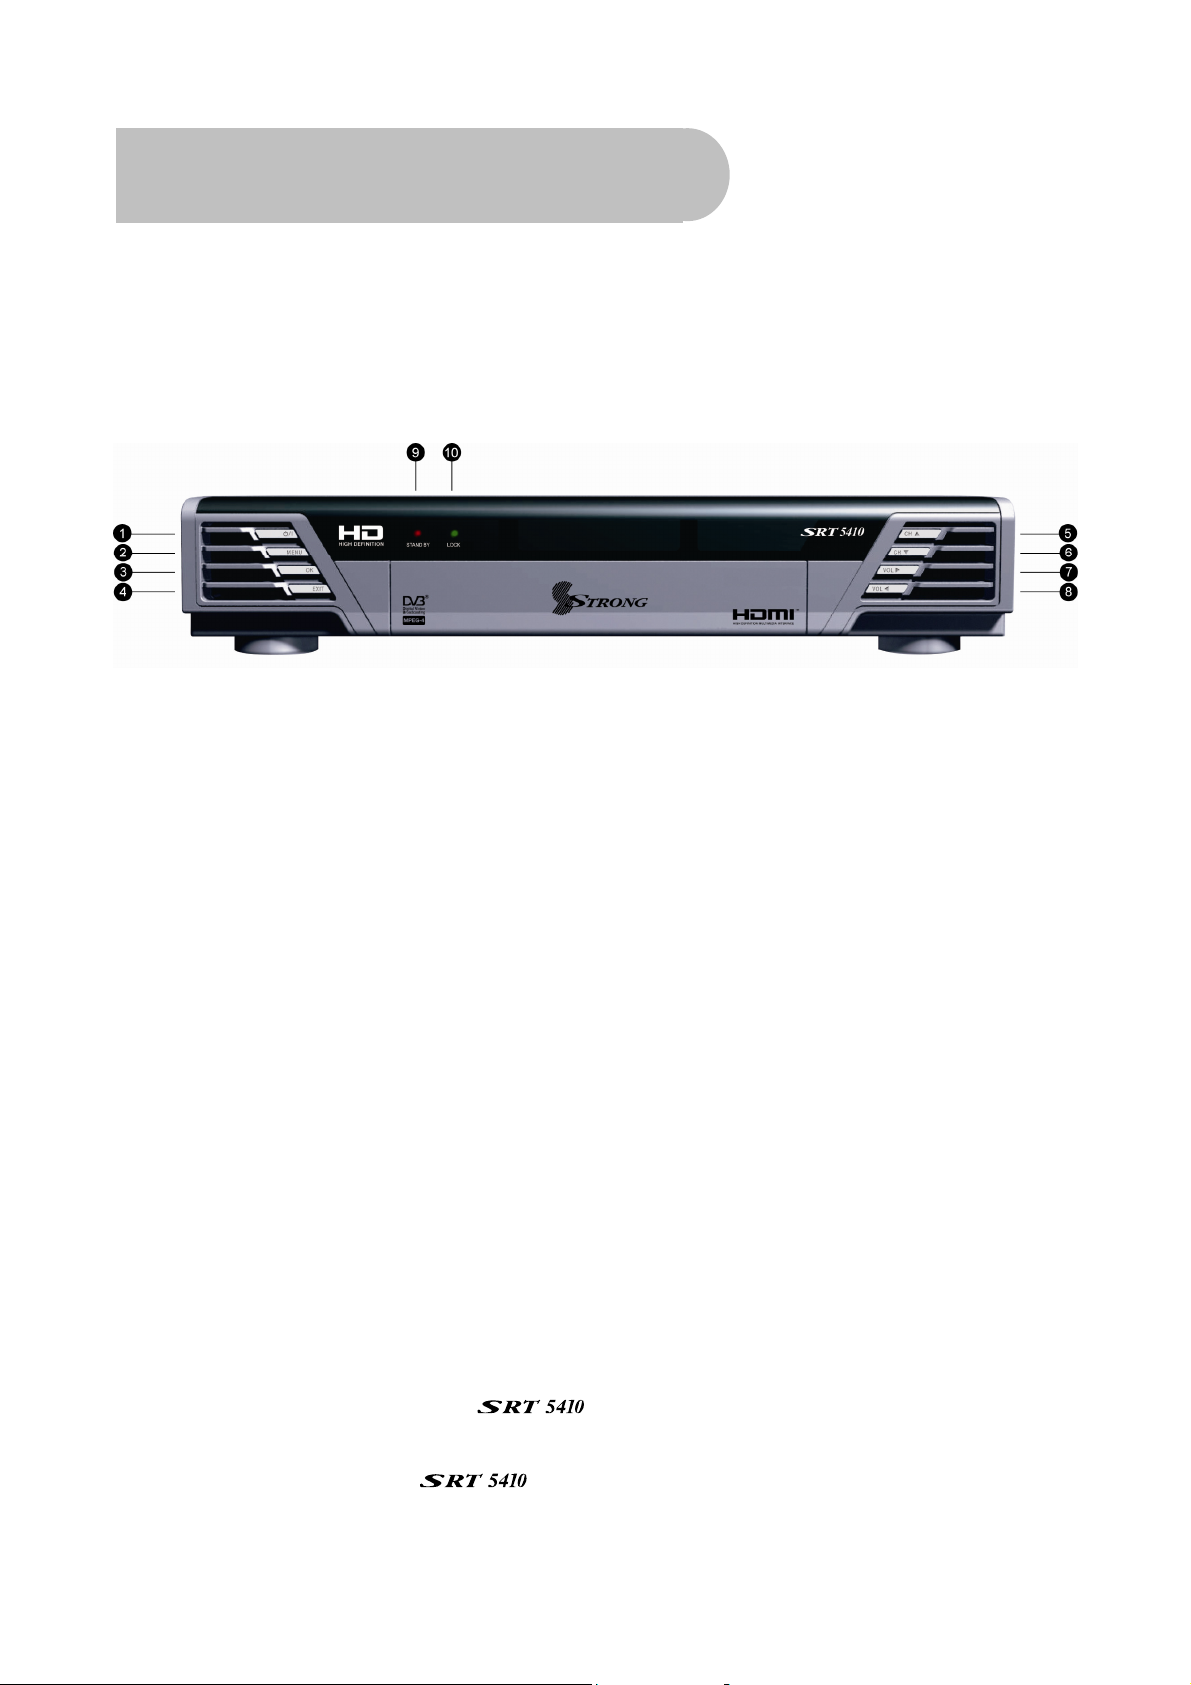
Front panel
1 STANDBY Switches the receiver between stand-by mode and power-on
mode
2 MENU Displays the main menu, or closes the main menu if the menu
is already open
3 SELECT Selects the option or value shown on the menu
4 EXIT Returns to the previous menu
5 CH Selects the next channel, or next option in a menu
6 CH Selects the previous channel, or previous option in a menu
7 VOL+ Increases the volume, or moves between values in a menu
8 VOL– Decreases the volume, or moves between values in a menu
9 STANDBY Light: illuminated when in standby mode
10 LOCK Light: illuminated when locked onto a channel or station
The buttons on the front panel of the
you lose the remote control or if the remote control runs out of power.
Although you can operate the
panel buttons, all the procedures in this manual assume that you are using the remote control.
enable you to continue operating the unit should
equally with the remote control and with the front-
7
Rear panel
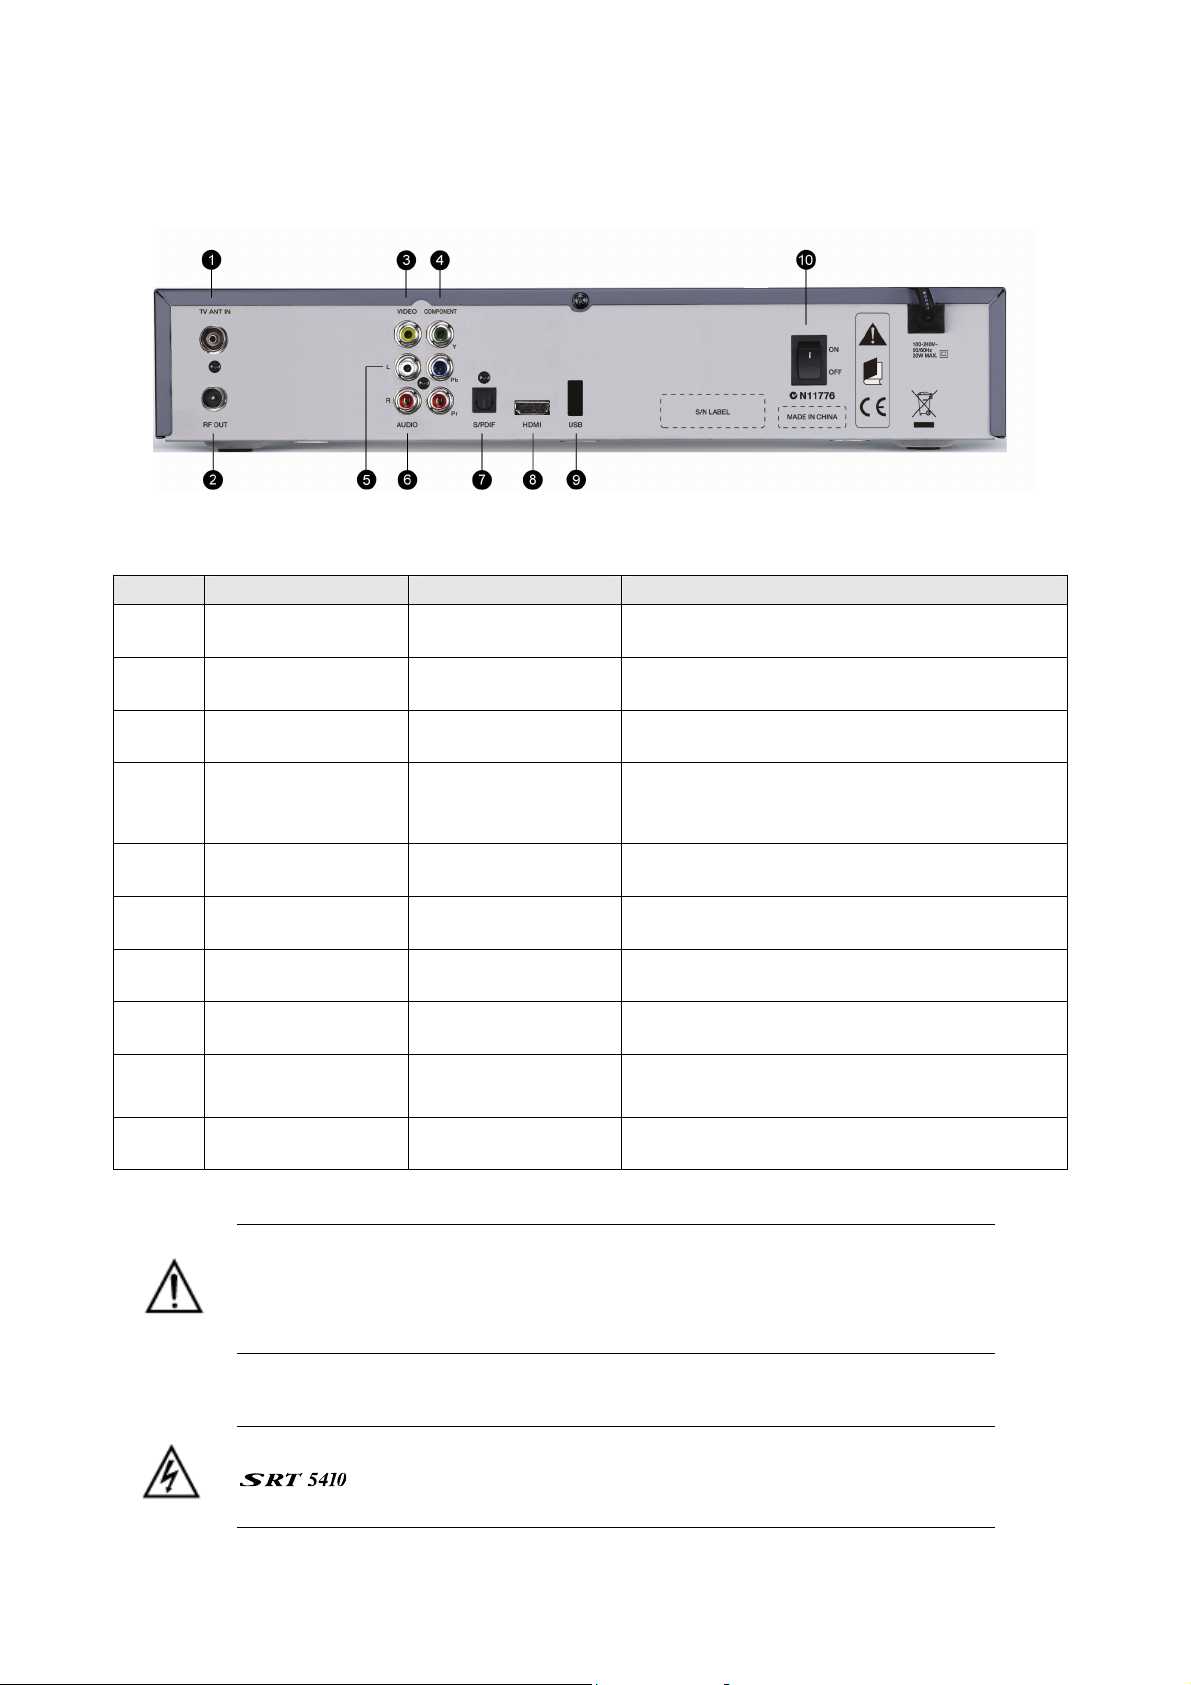
No. Name Connector Function
1 TV ANT IN IEC 169-24 female Input from terrestrial antenna
2 RF OUT IEC 169-24 female Loop-through output to TV, VCR, etc.
3 Video RCA RCA cinch (yellow) Composite video connection
4 Y/Pb/Pr RCA A/V RCA cinch
(green/blue/red)
5 Audio (Left) RCA cinch (white) Left audio
6 Audio (Right) RCA cinch (red) Right audio
7 S/PDIF Fibre optic Digital audio output (optical)
8 HDMI HDMI cable HDMI video-and-audio connection
9 USB USB 2.0 A-type
cable
10 Power Switch – To turn unit on or off
Note the presence of this symbol on the rear panel. This indicates that
important operating and maintenance instructions accompany the product.
These are set out in this manual. It is highly recommended that you read this
manual thoroughly before using the product.
Component video connection (Y/Pb/Pr)
Software upgrades
To reduce the risk of electric shock, do not remove any panel of the
. Even when the unit is turned off, voltages may be present within it
that are of sufficient magnitude to constitute a risk of electric shock.
8
Remote Control
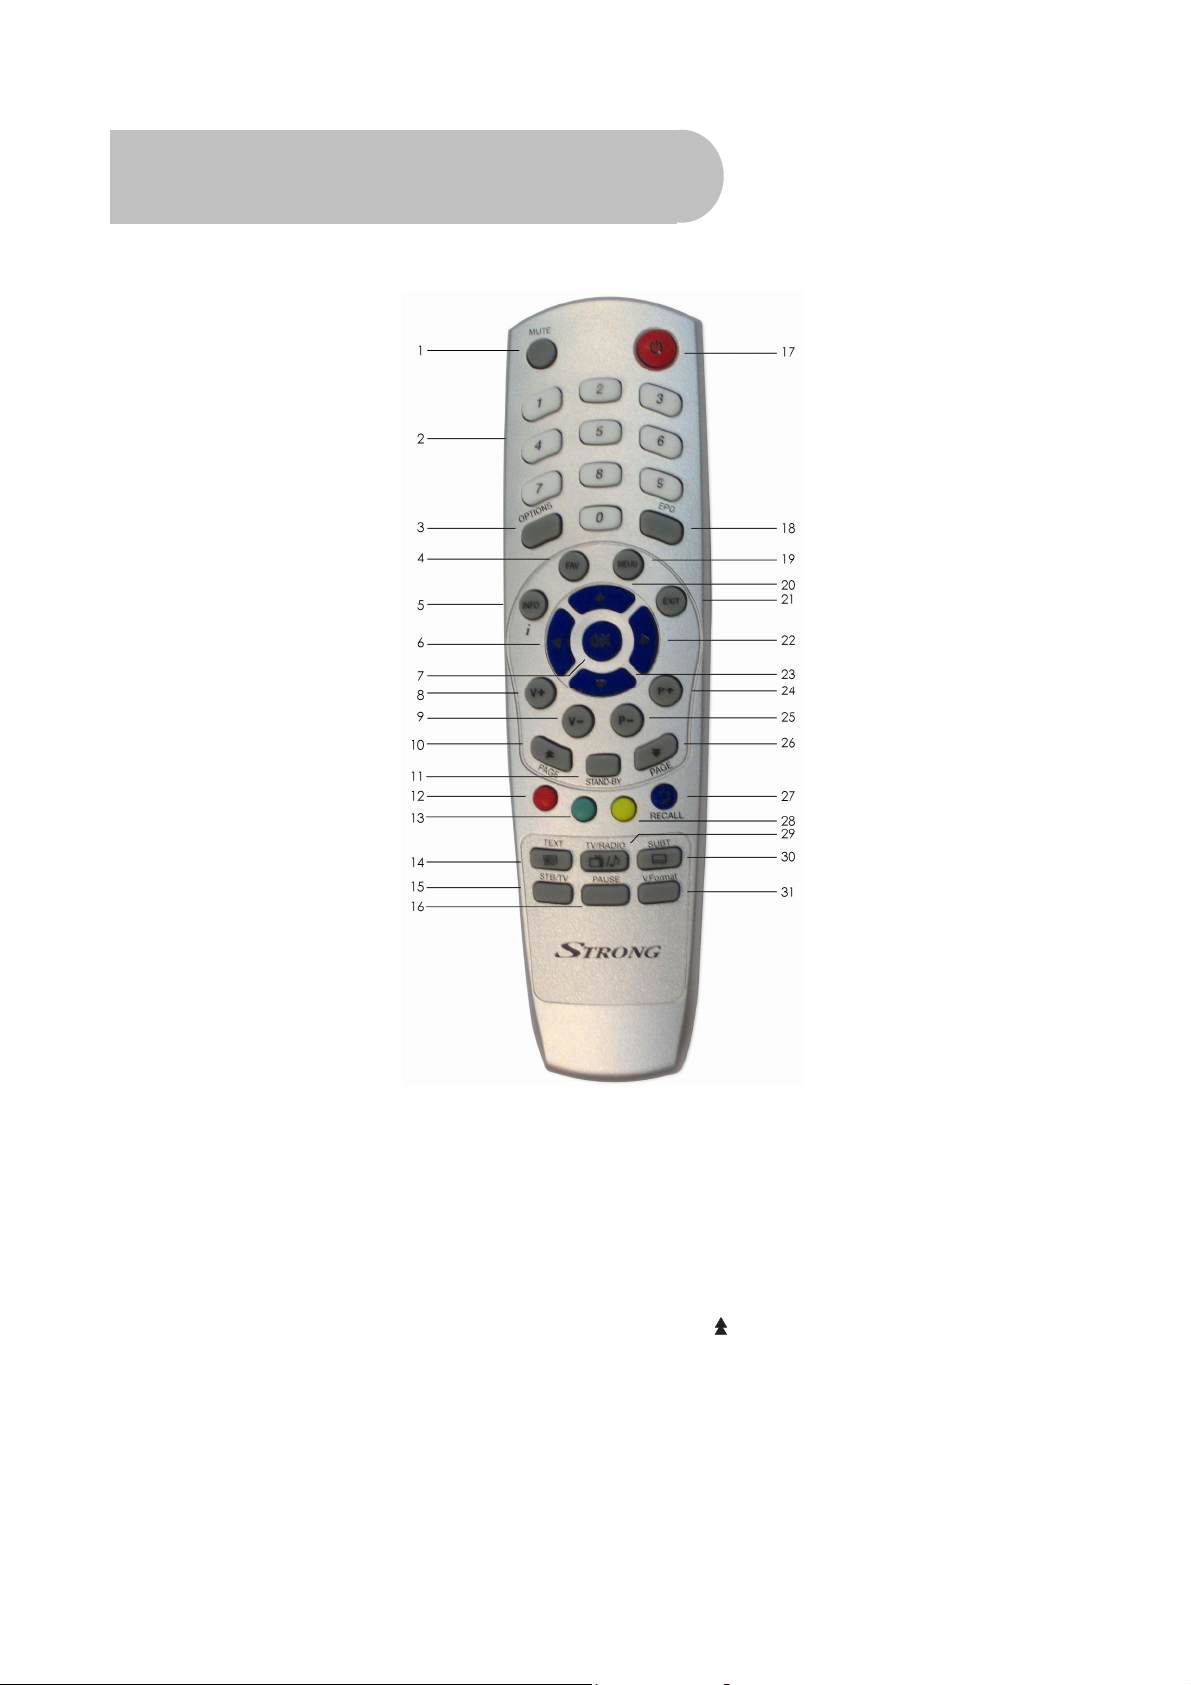
1. MUTE: To turn the sound on or off
2. Numeric Buttons (0–9): To choose a channel
directly, or to enter numeric information in a
menu
3. OPTIONS: To enable a quick choice of
audio, teletext and subtitle options
4. FAV: To display the favourites lists in viewing
mode, and to select a favourite
5. INFO: To show information about the current
program
6. : To decrease volume, or to change an
option or setting in a menu
7. OK: To show the channel list or to select an
item (or confirm a choice) in a menu
8. V+: To increase volume, or to change an
option or setting in a menu
9. V–: To decrease volume, or to change an
option or setting in a menu
10. PAGE [
there is more than one page
11. STANDBY: To switch to stand-by mode when
the receiver is on
12. [Red button] Performs different functions in
different menus
9
]: To move to the previous page if

13. [Green button] Performs different functions
in different menus
23.
To choose the previous channel, or
change an option or setting in a menu
14. TXT: To show or hide Teletext
15 STB/TV: To switch audio–visual input
between the TV and the
vice versa
16. PAUSE: To freeze or unfreeze the screen
17. [Standby]: To switch between power-on
and stand-by modes
18. EPG (Electronic Program Guide): To show
the TV and radio program guide
19. MENU: To display the main menu, or return
to normal viewing
20. : To choose the next channel, or change
an option or setting in a menu
21. EXIT: To close the current menu and return
to the previous menu or screen
22. : To increase volume, or change an
option or setting in a menu
and
24. P+: To choose the next channel, or change
an option or setting in a menu
25. P–: To choose the previous channel, or
change an option or setting in a menu
26. PAGE [
is more than one page
27. RECALL: To return to the previous channel.
(Also performs various functions in the
menus.)
28. [Yellow button] Performs different functions
in different menus
29. TV/RADIO: To switch between TV and radio
(and vice versa)
30. SUBT: To turn subtitles on or off
31. V.Format: To choose a video mode (1080i,
720p, 576p or 576i)
]: To move to the next page if there
Installing the batteries in the remote control
1. Press down on the retaining catch on the lid of the battery recess and remove the lid.
2. Insert two AAA batteries into the recess.
Be careful to insert the batteries as shown in the diagram inside the recess.
3. Replace the lid over the recess and gently push down on the lid until it snaps firmly into place.
10

How to Connect
Refer to the diagram on page 8 for the location of the sockets identified by numbers in the
following procedures.
Step 1: Connect to the antenna
Connect the antenna lead coming from your antenna wall plate to the ANT IN socket on the
(socket 1).
Step 2: Choose an installation method
There are a number of methods of connecting the , depending on your preference and
the connection types on your TV. These methods are labelled A, B and C below.
TIP: The various video connection options available provide differing degrees of video
quality. In ascending order of quality, these connections are Composite (good),
Component (better) and HDMI (best).
A: High Definition Multimedia Interface
If your TV has a HDMI socket, connect an HDMI cable between the HDMI socket on the
(socket 8) and the HDMI socket on your TV.
A HDMI connection incorporates video and audio. You do not need to make separate connections for
audio.
An HDMI cable is not provided with the
.
B: Y/Pb/Pr (Component) using the supplied RCA blue–red–green lead
For Component video, connect to your TV with the supplied Y/Pb/Pr Component cable (with blue, red
and green leads). Connect the leads between the Y, Pb and Pr sockets on the
group 4, taking care to match the colour of a lead with the colour of the socket), and the
corresponding Component sockets on your TV. (The Component sockets on the TV have the same
colour-coding.)
You will need to make separate connections for left and right audio via the audio sockets 5 and 6.
This can be done using the supplied RCA cable. (Match the colour of the plugs with the colour of
the sockets.)
(socket
11

C: CVBS (Composite) using the supplied RCA red–white–yellow lead
Using the appropriate socket colour-coding on sockets 3, 5 and 6, you can connect to your TV with
the supplied RCA cable. This gives you CVBS (Composite Video) and MPEG-2 stereo audio.
For video, connect the yellow RCA lead between the yellow video socket (socket 3) on the
and the corresponding socket on your TV.
For left audio, connect the white RCA lead between socket 5 on the
corresponding socket on your TV.
For right audio, connect the red RCA lead between socket in socket 6 on the
corresponding socket on your TV.
and the
and the
Step 3: Optional connections
Dolby Digital
Dolby digital bitstream audio S/PDIF can be achieved using a fibre optic cable. (This cable is not
supplied.) The cable should be connected between socket 7 on the
socket on your Dolby Digital decoder amplifier. See “Audio–Video settings” on page 41 for
instructions on how to choose Dolby audio.
Looping Out (for VCR recording)
In order to watch one channel while recording another on a VCR, connect an RF cable (not
supplied) between the RF OUT socket on the
VCR. Note that VCR recordings are only analogue, not digital.
(socket 2) and the RF IN socket on your
and the S/PDIF
12

Getting Started
Once you have connected the
1. Install the batteries in the remote control (see page 10).
2. Turn on the television.
to your antenna and to your television, you need to:
3. Plug the
4. Turn on the
the diagram on page 8).
5. Select the video or AV input channel to which the
by pressing the TV/AV or VIDEO button on your TV remote control. (Refer to your TV user’s
manual for instructions.)
The Strong Technologies banner page briefly appears, followed by the installation wizard
(explained in the next section).
into mains power and turn on the power at the mains switch.
using the power-on switch on the back of the receiver (number 10 in
is connected: this can be done
Installation wizard
The first time you turn on the (and whenever you reset he unit) the installation wizard
appears. The installation wizard is a set of windows that enables you to easily specify all the
important settings. The first window of the wizard is shown below.
How to use the wizard
• You move from window to window by pressing the blue button on the remote control.
• On most windows, you can step back to the previous window by pressing the smaller of the two
red buttons on the remote control (near the bottom left of the remote control).
• Where a setting has a number of options, it is shown enclosed in angled brackets (as in
<English>). If you need to choose an option other than the one showing, press
option you want is showing.
13
or until the
• If there are a number of settings on a window, you press
NOTE: The settings you choose using the installation wizard can be changed later from the
menus.
or to move from one to another.
Window 1: Thank You
The first window on the installation wizard is the welcome window (shown above). When you are
ready to begin configuring your
Language Setting window appears.
, press the blue button on the remote control. The
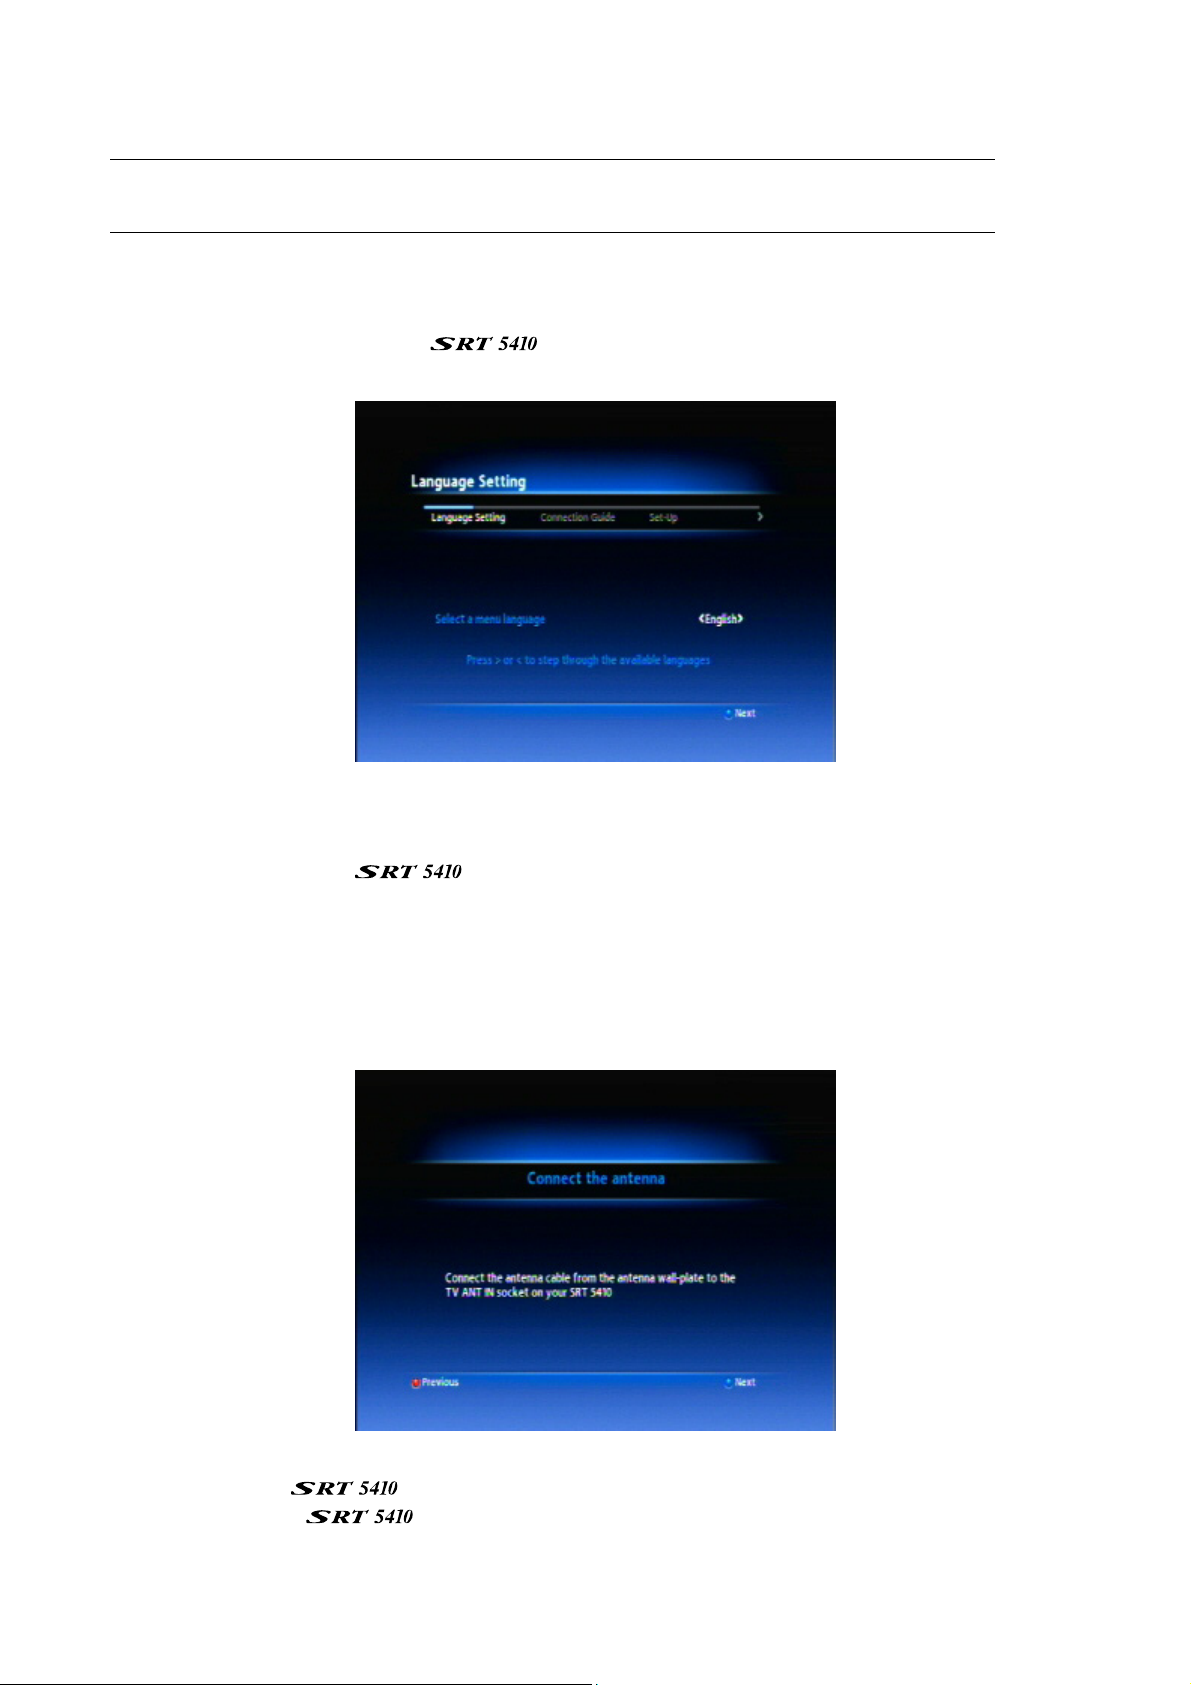
Window 2: Language Setting
On the Language Setting window you select the language for the menus you will see on your TV
once you start using the
1. If you need to choose a language other than the one showing, press
you want is showing.
2. Press the blue button on the remote control to proceed to the Connect Antenna window.
.
or until the language
Window 3: Connect Antenna
1. The antenna lead coming from your antenna wall plate needs to be connected to the ANT IN
socket on the
connected the
2. Press the blue button on the remote control to proceed to the Connection Guide window.
(socket 1 in the diagram on page 8 above). If you have not yet
to an antenna, do so now.
14
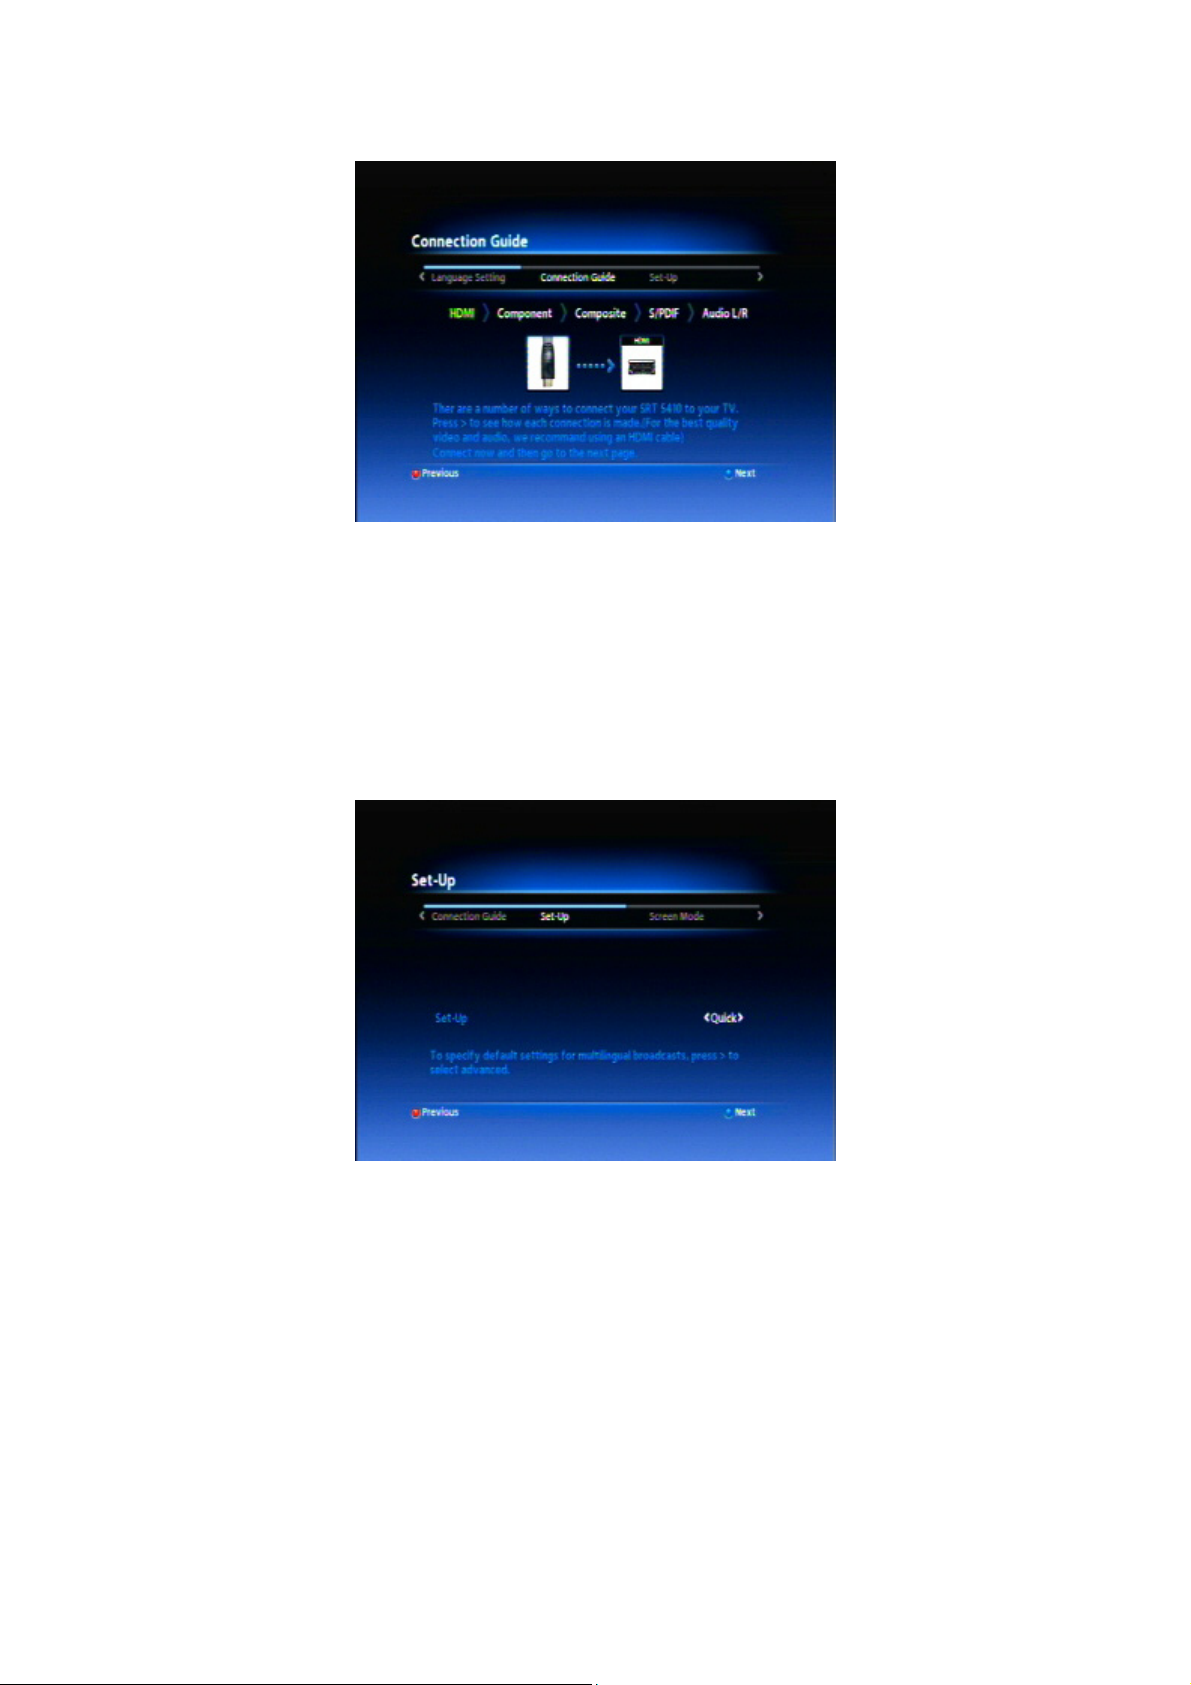
Window 4: Connection Guide
The Connection Guide window shows you what cables go into what sockets for various types of
connection.
1. Press
connections you have already made to match the description shown in the screen. (The
connection types are also described in “How to Connect” on page 11 above.)
2. Press the blue button on the remote control to proceed to the Set-Up window.
or to display information about each type of connection. If necessary, modify the
Window 5: Set-Up
1. If you want to choose the default languages for multi-lingual broadcasts, press or to select
Advanced.
2. Press the blue button on the remote control.
If you chose Advanced as the installation method, the Language Settings window appears.
Proceed with Window 6 below.
If you chose the default installation method, the Screen Mode window appears. Proceed with
Window 7 below.
15

Window 6: Language Settings
On the Language Settings window, you can select your preferred audio and subtitle languages
(first and second preference) for multi-lingual broadcasts.
1. If you want to change the default language for your first preference audio language, press
or until the language you want is shown.
2. Press to select Secondary Audio.
3. If you want to change the default language for your second preference audio language, press
or until the language you want is shown.
4. Press to select Primary Subtitle.
5. If you want to change the default language for your first preference subtitle language, press
or until the language you want is shown.
6. Press to select Secondary Subtitle.
7. If you want to change the default language for your second preference subtitle language,
press
8. Press the blue button on the remote control to proceed to the Screen Mode window.
or until the language you want is shown.
Window 7: Screen Mode
1. If you want to change the default screen mode from widescreen to standard (or vice versa),
press
or until the mode you want is shown.
16

2. Press the blue button on the remote control to proceed to the Channel Searching window.
Window 8: Channel Searching
1. With the Channel Searching window displayed, press the blue button on the remote control to
begin scanning for digital TV channels and digital radio stations in your area.
As channels and stations are found, they are displayed on the Channel Searching window.
2. When the can find no more channels and stations, a message appears at the
bottom of the window stating that channel searching is finished. Press the blue button on the
remote control to save the search results and begin watching digital TV.
NOTE: You have now finished specifying enough settings for you to start watching digital TV.
See “User Settings” starting on page 37 for instructions on how to specify additional settings.
17

Operation
Basic operations
Selecting a channel
There are a number of ways to select a channel:
• Number pad on the remote control: If you know the channel number, enter the number using
the number keys on the remote control and then press OK. (If you don’t press OK, the channel
selected appears after 2 seconds.)
NOTE: The
Some samples of primary LCN channel numbers are:
1 = Ten network and affiliates
2 = ABC
3 = SBS
7 = Seven network and affiliates
9 = Nine network and affiliates
Secondary channels can be selected by pressing the primary number followed by another
number. (For example, pressing 2 gives you ABC1, and pressing 22 gives you ABC2.)
• Channel list: Press OK on the remote control. This displays the channel list (which shows the
channel number and channel name of all the scanned channels). Press or on the remote
control to select the channel you want, press OK and then press EXIT.
uses the Logical Channel Numbering system (LCN) by default.
To list radio stations rather than TV channels, press
If you have placed channels in a favourites list, the channels displayed on the channel list might
only be those channels in a favourites list. (It depends on previous choices you have made.) To
see the channels in another favourites list, or to see all the channels, press or until the
channel you are interested in appears.
TIP: Press a PAGE button to quickly scroll through a long list of channels.
18
or or press TV/RADIO.

• Favourites lists: Press FAV on the remote control to see a list of favourites lists (that is, groups into
which you have added one or more favourite channels or stations). Press or on the remote
control to select a favourites list and then press OK. The first channel or station in that list begins
to play. To move to another channel or station in that list, press or (or P– or P+). See
“Favourites” on page 25 for instructions on creating a favourites list.
• Scroll: Press or (or P– or P+) on the remote control to scroll through the channels in channel
number order. (You can also scroll through the channels in order by pressing the channel up
and channel down buttons on the front panel of the
• By EPG: Press EPG on the remote control, select the channel from the electronic program guide
(EPG), and press EPG again. The EPG is explained on page 30.
• Previous channel: Press the RECALL button (the blue button) to display the previous channel.
TIP: You can use the same techniques to select a digital radio station.
.)
Adjusting the volume
While you are watching a program, press or (or V– or V+) on the remote control to decrease or
increase the volume respectively.
Turning off the sound (muting)
To turn off the sound altogether, press the MUTE button on the remote control (button 1 in the
diagram on page 9). The mute icon is displayed on the screen. Press the MUTE button again to
restore the sound.
Getting channel Information
• Press INFO on the remote control to display the information banner.
• With the information banner displayed, press INFO again to display more detailed information.
Press EXIT on the remote control to hide the information screen.
TV/Radio switching
Press TV/RADIO on the remote control to switch between TV channels and radio stations (or vice
versa).
19

Closed captions
Closed captions are the spoken words written on the screen. This option is particularly useful for the
hard-of-hearing.
To turn on closed captions (or turn them off):
1. Press the SUBT button on the remote control.
2. With the OPTIONS window displayed, press or until the language you want is highlighted (or
until Off is highlighted, if you want to turn closed captions off).
3. Press OK.
20

Teletext
Teletext is a text-based data service. It is available only when the broadcasting signal carries such
data.
1. Select a channel that is broadcasting teletext.
2. Press TEXT on the remote control.
3. Select a teletext page by pressing the corresponding number or colour button on the remote
control.
Press EXIT on the remote control to cancel teletext.
Picture freeze
• Press PAUSE on the remote control to freeze the display.
• Press PAUSE again to resume normal viewing.
Organising channels
• The Edit Channel option on the Channel Manager menu enables you to lock, delete and
rename channels.
• From the channel list—displayed by pressing OK— you to lock, delete and rename channels,
and change the order in which channels appear on the channel list.
Locking channels
Locking a channel requires a password to be entered before that channel can be viewed.
NOTE: You can also lock radio stations.
To lock or unlock a channel or station:
1. Press MENU on the remote control.
2. If Channel Manager is not highlighted in the main menu at the left of the screen, press or
until it is and then press OK.
21

3. If Edit Channel is not highlighted in the sub-menu at the right of the screen, press or until it is
and then press OK.
The Edit Channel window appears.
4. If you want to lock (or unlock) radio stations rather than TV channels, press TV/RADIO on the
remote control. A list of radio stations appears. Pressing TV/RADIO again redisplays the TV
channels.
5. Press or until the channel or station you want to lock or unlock is highlighted.
6. Press the smaller red button on the remote control to lock (or unlock) the highlighted channel or
station. An icon of a padlock appears beside the channel or station name to indicate that it is
locked. (If you are unlocking a locked channel or station, the padlock icon disappears.)
7. If you want to lock or unlock another channel or station, repeat from step 5.
8. Press MENU or EXIT.
Deleting channels
You can delete channels that you are never likely to watch. If you want to re-instate a channel that
you have deleted, you will need to rescan for it. See “Rescanning for channels and stations” on
page 34 for instructions.
If you want to delete all channels at once, see “Clearing and resetting data” on page 43.
NOTE: You can also delete radio stations.
1. Press MENU on the remote control.
2. If Channel Manager is not highlighted in the main menu at the left of the screen, press or
until it is and then press OK.
3. If Edit Channel is not highlighted in the sub-menu at the right of the screen, press or until it is
and then press OK.
The Edit Channel window appears.
22

4. If you want to delete radio stations rather than TV channels, press TV/RADIO on the remote
control. A list of radio stations appears. Pressing TV/RADIO again redisplays the TV channels.
5. Press or until the channel or station you want to delete is highlighted.
6. Press the green button on the remote control to mark the highlighted channel or station for
deletion. An icon of a cross appears beside the channel or station name to indicate that it is to
be deleted. (Press the green button again to unmark the highlighted channel or station.)
7. If you want to delete another channel or station, repeat from step 5.
8. Press MENU or EXIT. The channels and stations marked for deletion are now deleted.
Renaming channels and stations
1. Press MENU on the remote control.
2. If Channel Manager is not highlighted in the main menu at the left of the screen, press or
until it is and then press OK.
3. If Edit Channel is not highlighted in the sub-menu at the right of the screen, press or until it is
and then press OK.
The Edit Channel window appears.
4. If you want to rename a radio station rather than a TV channel, press TV/RADIO on the remote
control. A list of radio stations appears. Pressing TV/RADIO again redisplays the TV channels.
5. Press or until the channel or station you want to rename is highlighted.
6. Press the blue button on the remote control. The Channel Name on-screen keyboard appears.
23

7. Press , , or until the first character of the new name is highlighted, and then press OK.
The highlighted character replaces the previous name near the top of the screen. Continue to
move to and select characters until you have finished spelling the new name of the channel or
station.
If you select the wrong character, press the small red button on the remote control to delete it.
To cancel the new name and restore the previous name, press EXIT and ignore the rest of this
procedure.
8. When you have finished spelling out the new name, press the green button on the remote. The
Edit Channel window re-appears, showing the new name of the channel or station.
9. If you want to rename another channel or station, repeat from step 5.
10. Press MENU or EXIT.
Re-sorting channels and stations
1. Press OK. The channel list is displayed.
2. To resort radio stations rather than TV channels, press TV/RADIO. (Pressing TV/RADIO again
redisplays the TV channels.)
3. Press the smaller red button in the remote control. The Sort sub-menu appears.
The order in which the channels or stations are currently displayed is shown in green at the top
of the sub-menu. (In the example above, the current order is by LCN—Logical Channel
Numbering.)
4. Press or until the sort order you want is highlighted.
24

The sort order options available are:
• ABC/ZYX = alphabetical order (by name of channel or station)
• Date = by new or old channels or stations (where the date is determined by when you
added them to your channel list (or found them through scanning)
• Free/$ = by free-to-air or pay-for
• LCN = by the Logical Channel Numbering system
Except for the LCN option, each option has two sub-options. Once you have highlighted the
main option, you press OK to choose between the sub-options. The sub-options are:
• ABC = ascending alphabetical order; ZYX = descending alphabetical order
• NEW = group by new channels or stations first; OLD = group by old channels or stations first
• FREE = group by free-to-air channels or stations first; $ = group by pay-for channels or
stations first
The sub-option you choose appears at the top of the Sort sub-menu. (Note that CAS—which
stands for ‘conditional access system’—appears when you choose $.)
5. If you want to choose a sort sub-option (described in the previous step), press OK.
6. If you want to return to the sort option that was current at the time you opened the SORT submenu, select UNDO as your sort option.
7. Press MENU.
8. A message appears asking you to confirm that you want to save your changes. Press OK to
confirm your changes (or press or to select CANCEL and then press OK to cancel your
changes).
9. Press MENU to return to normal viewing.
Favourites lists
You can create up to four favourites lists of channels and then select a channel from a favourites
list. This makes it easier to choose and switch between channels if there are many channels
available in your area.
You display your favourites lists by pressing FAV on the remote control. You can then select a
favourite by choosing a list and pressing OK. (If you have many channels in the list, you may have
to press to reach the one you want.)
NOTE: You can also add radio stations to a favourites list.
Setting up a favourites list
To add a channel or station to a favourites lists, or to remove it from a favourites list:
1. Press MENU on the remote control.
2. If Channel Manager is not highlighted in the main menu at the left of the screen, press or
until it is and then press OK.
25

3. If Edit Favourites List is not highlighted in the sub-menu at the right of the screen, press or
until it is and then press OK.
The Edit Favourites List window appears.
4. If you want to add a radio station to a favourites list (or remove it), press TV/RADIO on the
remote control. A list of radio stations appears. Pressing TV/RADIO again redisplays the TV
channels.
5. Press FAV on the remote control. A list of the available favourites lists appears. By default, these
are called Fav1, Fav2, Fav3 and Fav4 (but you can rename them).
6. Press or until the list you want to put channels into (or remove channels from) is highlighted,
and then press OK. The name of the selected list appears at the top of the list at the right of the
screen.
7. To add a channel or station to the selected list, press or until that channel or station is
highlighted and then press OK. The channel or station is now listed at the right of the screen.
26

A channel or station that is already in a favourites list has an icon beside its name.
8. To remove a channel or station from the selected favourites lists, press or to move to the list
at the right of the screen, press or until that channel or station is highlighted and then press
OK. To remove other channels or stations, highlight them and press OK. If necessary, press or
to move back to the full list of channels or stations at the left of the screen when you have
finished adding or removing favourites.
9. If you want to add another channel or station to the same favourites list, repeat from step 7.
10. If you want to add a channel or station to another favourites list (or delete one from another list),
repeat from step 5.
11. Press EXIT.
12. A message appears asking you to confirm that you want to save your changes. Press OK to
accept (or press or to select CANCEL and then press OK to cancel your changes).
13. Press MENU to return to normal viewing.
Selecting a favourite to watch or listen to
1. Press FAV on the remote control to see a list of favourites lists.
Note that a favourites list will not be listed if it is empty.
2. Press or on the remote control to select a favourites list and then press OK.
The first channel or station in that list begins to play. To move to another channel or station in
that list, press or (or P– or P+).
27

Renaming a favourites list
By default, the favourites lists are named Fav1, Fav2, Fav3 and Fav4; but you can rename them.
1. Press MENU on the remote control.
2. If Channel Manager is not highlighted in the main menu at the left of the screen, press or
until it is and then press OK.
3. If Edit Favourites List is not highlighted in the sub-menu at the right of the screen, press or
until it is and then press OK.
The Edit Favourites List window appears.
4. Press FAV on the remote control. A list of the available favourites lists appears.
5. Press or until the list you want to rename is highlighted, and then press OK. The name of the
selected list appears at the top of the list at the right of the screen.
6. Press or to move to the list at the right of the screen. Note that the menu at the bottom of
the screen changes.
28

7. Press the yellow button on the remote control. The on-screen keyboard appears.
8. Press , , or until the first character of the new name is highlighted, and then press OK.
The highlighted character replaces the previous name near the top of the screen. Continue to
move to and select characters until you have finished spelling the new name of the list.
If you select the wrong character, press the small red button on the remote control to delete it.
To cancel the new name and restore the previous name, press EXIT and ignore the rest of this
procedure.
9. When you have finished spelling out the new name, press the green button on the remote. The
Edit Favourite window re-appears, showing the new name of the list.
10. If you want to rename another favourites list, repeat from step 4.
11. Press EXIT.
12. A message appears asking you to confirm that you want to save your changes. Press OK to
confirm your changes (or press or to select CANCEL and then press OK to cancel your
changes).
13. Press MENU to return to normal viewing.
Changing the order of channels or stations in a favourites list
When you select a favourites list, the first channel or station in it begins to play. You press or to
play the next or previous channel or station. To change the order in which channels or stations play:
1. Press MENU on the remote control.
2. If Channel Manager is not highlighted in the main menu at the left of the screen, press or
until it is and then press OK.
3. If Edit Favourite is not highlighted in the sub-menu at the right of the screen, press or until it is
and then press OK.
The Edit Favourite window appears.
4. Press FAV on the remote control. A list of the available favourites lists appears.
5. Press or until the list you want to reorder is highlighted, and then press OK. The name of the
selected list appears at the top of the list at the right of the screen.
6. Press or to move to the list at the right of the screen. Note that the menu at the bottom of
the screen changes.
29

7. Press or until the channel or station whose position in the list you want to change is
highlighted.
8. Press the green button on the remote control and then press or . Note that with each press,
the highlighted channel or station moves down or up in the list.
9. When the channel or station is in the correct position, press the green button again.
10. To change the position of other channels or stations, repeat from step 7.
11. Press EXIT.
12. A message appears asking you to confirm that you want to save your changes. Press OK to
confirm your changes (or press or to select CANCEL and then press OK to cancel your
changes).
13. Press MENU to return to normal viewing.
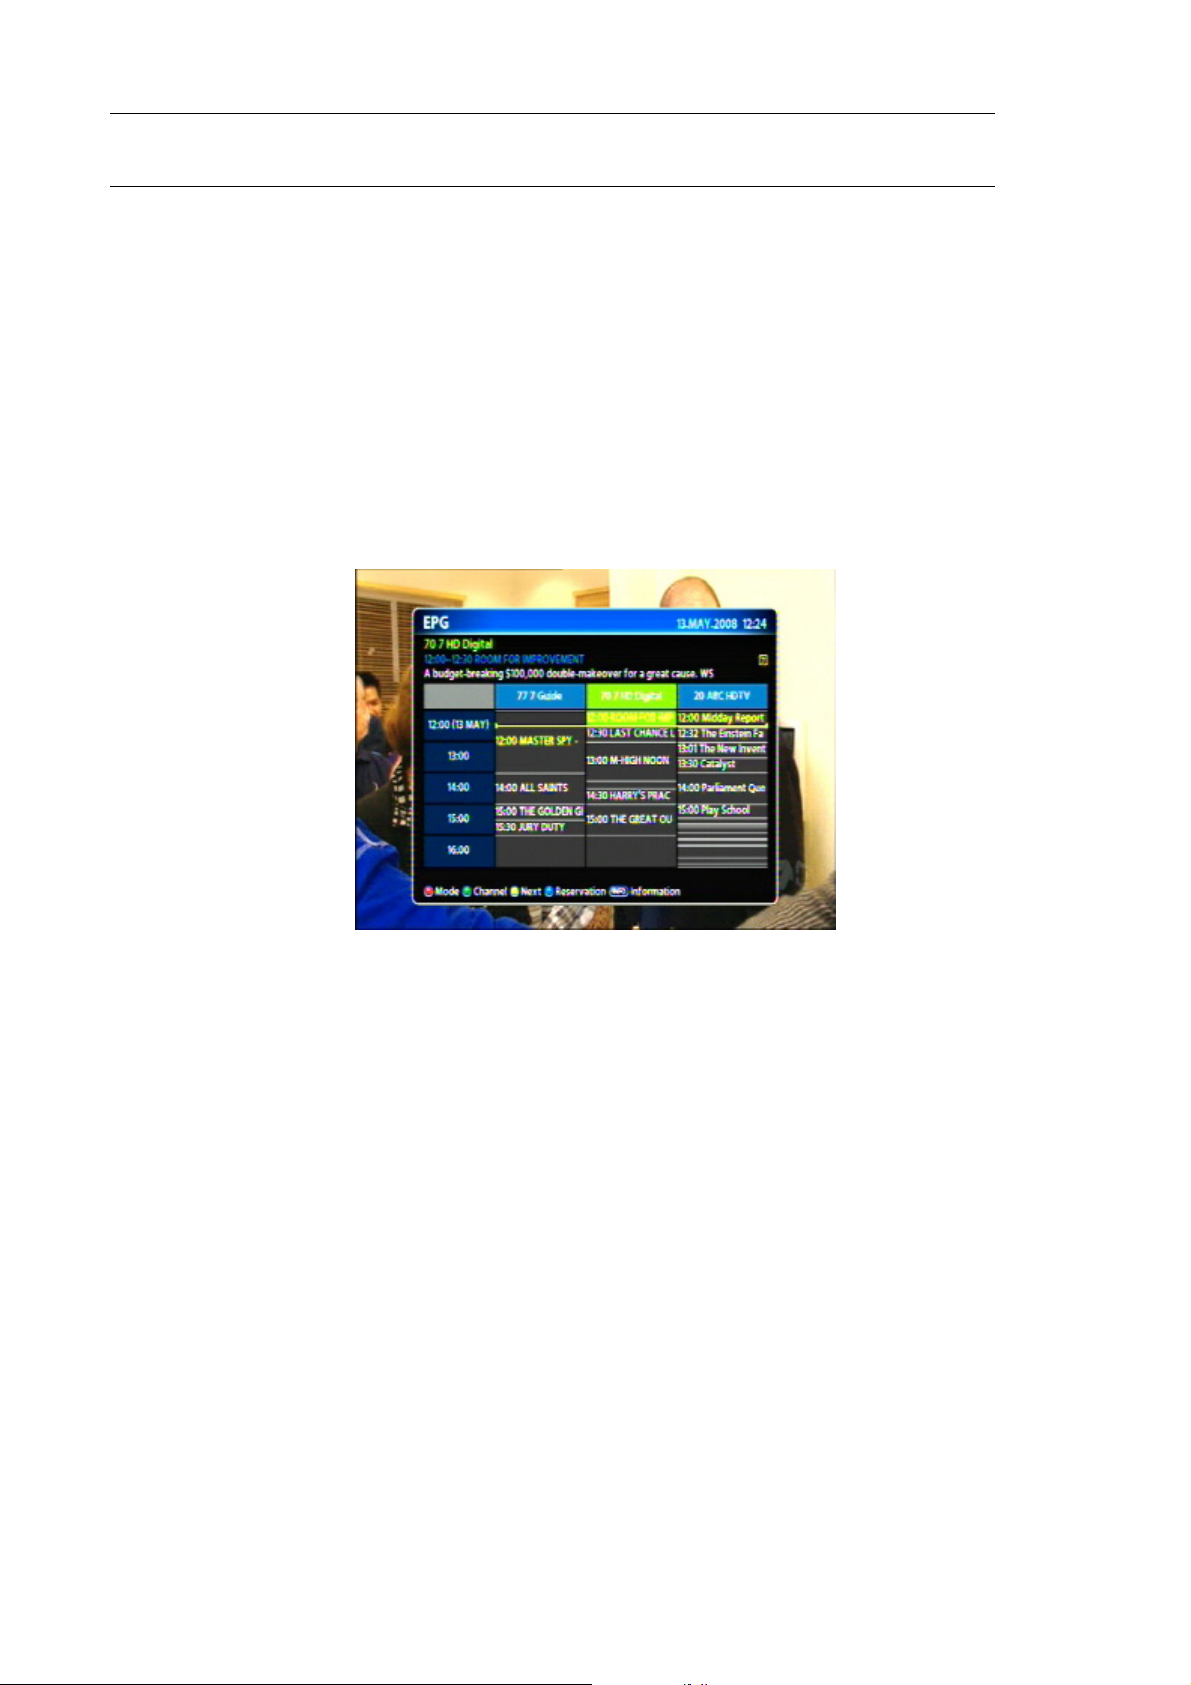
Electronic Program Guide (EPG)
Some providers broadcast information about their programs. This information is available on screen
via an electronic program guide, displayed by pressing EPG on the remote control. An example is
shown below.
Note that in the default view, shown in the example above, the current day’s programs of the
highlighted channel are listed. A brief description of the current program is displayed near the top
of the screen.
30
NOTE: If a favourites list is currently selected, only the channels in that list will appear in the
EPG. To see all channels in the EPG, select TV from the channel list before opening the EPG.
Selecting a channel
To see the day’s programs of another channel, either:
• press or to move from one channel to another or
• press the green button on the remote control, press or until the channel is highlighted in the
channel list and then press OK.
Displaying multi-channel information
The default view of the EPG provides program information about one channel. You can see
program information about three channels at a time by pressing the smaller red button on the
remote control.
Press the red button again to switch back to single-channel mode.
Displaying the next day’s programs
• Keep pressing until the program times pass midnight or
• Press the yellow key on the remote control
Displaying program information
1. If necessary, press or until the program you want information about is highlighted.
2. Press INFO on the remote control. An information window appears.
31

3. If there is more than one page of information about the program, press a PAGE button on the
remote control to display the next page.
4. Press INFO to close the information window.
Automatically setting a timer
A timer enables you to specify a time at which a particular event occurs: turning, turning it off or
changing the channels. You can automatically create a timer from the EPG.
1. If necessary, press or until the program you want to switch on or turn over to is highlighted.
If that program already has a timer set for it, a blue icon appears near the top right corner of
the screen.
2. Press the blue button on the remote control. A timer is automatically set with the details of the
selected program. The default timer mode is to turn on the TV. If you want the timer simply to
change to the selected channel, press the blue button one more time. (You can cycle through
the available timer modes—turn on, change channels and cancel timer—by repeatedly
pressing the blue button.)
Timers are discussed in detail in “Using the timer” on page 32.
Watching a selected channel
1. If necessary, press or until the program you want to watch is highlighted.
2. Press EPG. The EPG closes with the selected program is playing.
Using the timer
You can set up to eight times at which the switches to specified channel (or station),
turns on, or turns off.
There are two ways to set or cancel a timer: from the EPG and from the User Settings menu. See
“Automatically setting a timer” on page 32 for instructions on how to set a timer from the EPG. The
following section explains how to set a timer from the User Settings menu.
32

Setting or deleting a timer
1. Press MENU on the remote control.
2. If User Settings is not highlighted in the main menu at the left of the screen, press or until it is
and then press OK.
The User Settings sub-menu appears.
3. If Timer is not highlighted in the sub-menu, press or until it is and then press OK.
The Timer Setting window appears, listing any timers you have already set.
4. To delete all listed timers, press the yellow button on the remote key.
5. To delete a particular timer, press or until it is highlighted and then press the green button
on the remote control.
6. To add a new timer, press the red button on the remote key. The Timer Event window appears.
7. The default timer mode is Channel Change. In this mode, the will switch to
whatever channel you specify at the date and time you specify. The other modes available are
Power Off and Power On. To switch modes, press or until the mode you want is highlighted.
8. Press to move to the Channel field and press OK.
9. Press or until the channel or station you want to come on at the specified time is
highlighted and then press OK.
If the channel or station is not listed when you display the channel list, press or until the list
displays it.
33

10. Press to move to the Time field.
11. Set the date and time that you want the event to occur by pressing or until the cursor is
beneath a digit of the date or time you want to change. Then press the correct number button
on the remote control. Repeat this for each digit of the date and time that you want to change.
12. Press to move to the next field.
13. If you chose Power On as the timer mode, you can set a time for how long the
stay on. You do this in the Duration field. The default value in this field is 2:00 (that is, two hours). If
you want to change this value, press or until the cursor is beneath a digit of the duration
you want to change, and then press the correct number button on the remote control. Repeat
this for each digit you want to change. Press when you are finished.
14. In the Cycle field, choose how often the event is to occur: One Time, Every Day or Every Week.
(Press or to step through these options until the one you want is highlighted.)
15. Press EXIT to save the timer. It now appears in the Timer Setting list.
16. Repeat from step 6 if you want to set another timer.
17. Press EXIT.
18. A message appears asking you to confirm that you want to save your changes. Press OK to
confirm your changes (or press or to select CANCEL and then press OK to cancel your
changes).
19. Press MENU to return to normal viewing.
is to
Rescanning for channels and stations
The Channel Search option on the main menu enables you to scan for—that is, detect—digital TV
and radio stations available in your area. When you initially configured the
was done automatically. But you will need to rescan if new channels or stations become available,
if you want to reinstate a channel or station you have deleted, or if you move to a new location.
There are two scanning options:
• Automatic Search
The
store their details.
• Manual Search
This option lets you search for a particular channel (or all channels from a specified
broadcaster).
will automatically search for all digital TV and radio stations it can detect and
scanning
Automatic Search
1. Press MENU on the remote control.
2. If Channel Search is not highlighted in the main menu at the left of the screen, press or until
it is and then press OK.
The Channel Search sub-menu appears.
3. If Automatic Search is not highlighted in the sub-menu, press or until it is and then press OK.
The Automatic Search window appears.
34

4. By default, the will search for all channels: free-to-air and those you must pay to
watch. If you only want to search for free-to-air channels, press or to change the Search
Mode field to FTA Only.
5. Press the smaller red button on the remote control. The
channels and stations.
6. When scanning is finished, a message appears asking you to confirm that you want to save
details of the channels and stations that have been detected. Press OK to save the details (or
press or to select CANCEL and then press OK to reject the channels and stations).
7. Press MENU to return to normal viewing.
begins scanning for
Manual Searching
NOTE: Automatic searching (described above) is suitable in most cases. You might use
manual searching if you have deleted a channel and now want to access it again. In this
case, you would just search for that particular channel.
To avoid a fruitless search, you may want to check the strength and quality of the signal
beforehand. To do so, select Signal Level from the Tools menu and press or until the
channel and frequency of the broadcast you will be searching for appears on the screen.
The bars at the top of the screen indicate the strength and quality of the signal. Poor
strength or quality indicate that it may be difficult to scan for that channel or that the
reception might be too poor for you to comfortably watch the channel.
1. Press MENU on the remote control.
2. If Channel Search is not highlighted in the main menu at the left of the screen, press or until
it is and then press OK.
The Channel Search sub-menu appears.
3. If Manual Search is not highlighted in the sub-menu, press or until it is and then press OK.
The Manual Search window appears.
35

4. In the Channel List field, press or until the appropriate channel number or frequency
appears.
5. Press to move to the Search Mode field and then press or to select the appropriate
search mode: All or FTA Only (that is, search for all channels from the specified broadcaster or
just those that are free-to-air).
6. Press the smaller red button on the remote control. The
begins scanning.
7. If the channel or channels can be found, the details are shown on the screen. A message
appears asking you to confirm that you want to save details of the channels and stations that
have been detected. Press OK to save the details (or press or to select CANCEL and then
press OK to reject the channels and stations).
If the channel or channels cannot be found, a message appears to that effect. Press OK to
close the message.
8. Press MENU to return to normal viewing.
36

User Settings
Choosing languages
1. Press MENU on the remote control.
2. If User Settings is not highlighted in the main menu at the left of the screen, press or until it is
and then press OK. The User Settings sub-menu appears.
3. If Language is not highlighted in the sub-menu, press or until it is and then press OK.
You now have access to the language fields.
The options available are:
• Menu: the language of the menus that appear on the screen as you use the
• Primary Audio: your first preference for the audio language in multi-lingual broadcasts.
• Secondary Audio: your second preference for the audio language in multi-lingual
broadcasts.
• Subtitle: used to turn closed captions on or off.
• Primary Subtitle: your first preference for the language of closed captions.
• Secondary Subtitle: your second preference for the language of closed captions.
Note that the primary and secondary subtitle fields are only available if closed captions are on.
4. Press or until a language option you want to change is highlighted, and then press OK.
5. For all options other than Subtitle, a sub-menu of languages appears. Press or until the
language you want is highlighted and then press OK and EXIT.
6. If you chose Subtitle, the Subtitle window appears. To turn on closed captions, press or until
TEXT or DVB is highlighted, and then press OK and EXIT.
.
7. If you want to make other language selections, repeat from step 4.
8. Press MENU, and then click OK when asked if you want to save the changes.
37

Setting display options
You can set how long information panels stay on the screen before they fade-out and how
transparent menus and information panels are to be. You can also restore the default settings after
you have made changes.
1. Press MENU on the remote control.
2. If User Settings is not highlighted in the main menu at the left of the screen, press or until it is
and then press OK.
The User Settings sub-menu appears.
3. If Display is not highlighted in the sub-menu, press or until it is and then press OK.
The Display sub-menu appears.
4. Press or until an option you want to change is highlighted.
5. Press OK to display a menu of values, press or to highlight the value you want, press OK
and then EXIT.
6. If you want o change another option, repeat from step 4.
NOTE: If you changed a setting but want to restore it to its default value (that is, the value it
had when the left the factory), select the Load Default option and set its value
to Yes.
7. Press MENU, and then click OK when asked if you want to save the changes.
Setting the time
The time is set for you automatically once you have scanned and detected digital stations. If you
find that the time is not correct, you can change it as follows:
1. Press MENU on the remote control.
2. If User Settings is not highlighted in the main menu at the left of the screen, press or until it is
and then press OK.
The User Settings sub-menu appears.
38

3. If Time is not highlighted in the sub-menu, press or until it is and then press OK.
The Time sub-menu appears.
4. With Time Zone highlighted, press OK. The Time Mode menu appears.
5. Press or until your state or territory is highlighted. (If no state or territory is appropriate,
highlight Not Used.)
6. Press OK and then EXIT.
7. If you chose a state or territory, the correct current time is displayed on the screen and the Time
field is disabled. Press MENU, and then click OK when asked if you want to save the change.
You have finished setting the time and can ignore the rest of this procedure.
8. If you chose Not Used as the Time Mode, you will need to manually enter the date and time.
Press to move to the Time field and then press OK.
9. On the Time window, enter the date and time using the number keys on the remote control.
10. Press OK and then EXIT.
11. Press MENU, and then click OK when asked if you want to save the change.
Setting security options
You can restrict access to the by specifying that a password must be entered in order
to:
• view a program that has been given age rating by the television classification authorities (Age
Lock)
• access the menus (Menu Lock)
39

To set security settings, or to change the password:
1. Press MENU on the remote control.
2. If User Settings is not highlighted in the main menu at the left of the screen, press or until it is
and then press OK.
The User Settings sub-menu appears.
3. If Lock is not highlighted in the sub-menu, press or until it is and then press OK.
4. Enter the password.
If you have not changed the default password, the password is 0000.
The Lock window appears.
5. If you want to set an age lock—thus requiring the password to be entered before any agerated program can be viewed—press or to change the Age Lock field to Yes. Otherwise,
press to move to the Change Password field and continue from step 7.
6. If you set an age lock, press to move to the Age Limit field and then press or to select the
age such that any program with a higher age rating can only be viewed if the password is
entered. You can choose an age between 7 and 18. When you have chosen an age, press
to move to the Change Password field.
7. If you want to change the current password, enter the current password in the Change
Password field. The current password is either:
• 0000 if you have not set a password before (0000 is the default factory setting); or
• whatever password was last set for the
.
8. If you have chosen to change the password, the New Password option will be highlighted. Enter
a new 4-digit password sing the numeric keys on the remote control.
9. If you have chosen to change the password, the Confirm Password option will now be
highlighted. Enter the same password you entered in the previous step.
10. If you want to lock access to menus unless the password is entered, press or to change the
Menu Lock field to Yes.
11. Press EXIT, and then click OK when asked if you want to save the changes.
12. Press MENU to return to normal viewing.
40

To cancel a lock
Follow the procedure in the previous section, changing the value of the Age Lock, Menu Lock or
both to No as required.
Audio–Video settings
You can set the screen mode to 4:3 or 16:9, the aspect ratio to letterbox, pan–scan or combined,
and the audio mode to stereo or multichannel. (For Dolby Digital audio, choose multichannel.)
1. Press MENU on the remote control.
2. If User Settings is not highlighted in the main menu at the left of the screen, press or until it is
and then press OK.
The User Settings sub-menu appears.
3. If A/V Output is not highlighted in the sub-menu, press or until it is and then press OK.
The A/V Output sub-menu appears.
4. Press or until an option you want to change is highlighted.
5. Press OK to display a menu of values, press or to highlight the value you want, press OK
and then EXIT.
6. If you want o change another option, repeat from step 4.
7. Press MENU, and then click OK when asked if you want to save the change.
NOTE: Another video setting—the video format or mode—can be set using the remote
control. To change the video mode, press V.Format on the remote control and choose the
mode you want: 1080i, 720p, 576p or 576i.
41

System Maintenance
You can upgrade the software in your as new versions become available. Information
about the current version (and information about the hardware) is available from the menu to help
you determine if you need to upgrade. This information might also be useful if you need to obtain
technical support from Strong Technologies.
You can also reset the
• clearing all the channels and stations or
• clearing all channels, stations, preferences and other user settings (thereby restoring the unit to
the default settings it had when it left the factory).
, either by:
System information
To display system information about your , such as the model number, software version,
hardware version and so on:
1. Press MENU on the remote control.
2. If Tools is not highlighted in the main menu at the left of the screen, press or until it is and
then press OK.
The Tools sub-menu appears.
3. If System Info. is not highlighted in the sub-menu, press or until it is and then press OK.
The System Info. window appears.
Make a note of the information on this window if you are intending to contact Strong
Technologies for technical support.
4. Press EXIT to return to the Tools sub-menu or MENU to return to normal viewing.
HDMI information
If you are using an HDMI cable to connect to your TV, you can get information about the
connection by selecting HDMI information from the Tools menu.
42

Software upgrades
If a new version of the software becomes available, you can download the software
to your PC and then transfer it to your
with the
upgrades.
1. Once you have obtained an upgrade file, transfer it to a USB memory stick and insert the stick in
the USB port on the rear of the
2. Press MENU on the remote control.
3. If Tools is not highlighted in the main menu at the left of the screen, press or until it is and
then press OK.
The Tools sub-menu appears.
4. If S/W Upgrade is not highlighted in the sub-menu, press or until it is and then press OK.
5. The USB Upgrade sub-menu appears. Press OK to display the USB Upgrade screen.
). Watch the Strong Technologies website for announcements of software
. You will need a USB memory stick (not supplied
(socket 9 in the diagram on page 8) and your PC.
6. Press or until the upgrade file is highlighted and then press OK.
The upgrade process will take a few minutes, and then you will be returned to normal viewing.
Clearing and resetting data
You can reset the , either by:
• clearing all the channels and stations or
• clearing all channels, stations, preferences and other user settings (thereby restoring the unit to
the default settings it had when it left the factory).
1. Press MENU on the remote control.
2. If Tools is not highlighted in the main menu at the left of the screen, press or until it is and
then press OK.
The Tools sub-menu appears.
3. If System Reset is not highlighted in the sub-menu, press or until it is and then press OK.
The System Reset sub-menu appears.
43

4. Select the type of reset:
• To return the
to its factory settings (thus erasing all channel and station
information and settings you have added), highlight Factory Reset and press OK.
• To clear all the channels and stations, but keep your user settings, highlight Channel List
Reset and press OK.
5. A warning message appears advising you of what will be deleted if you continue. To continue,
press or to select OK and then press OK on the remote control (or press OK when Cancel is
highlighted to cancel your changes).
6. If asked, enter the password. A further message appears asking you if you are sure you want to
proceed. To continue with the reset, make sure OK is highlighted and then press OK on the
remote control.
If you selected Factory Reset, the installation wizard appears. For help with the wizard, see
“Installation wizard” on page 13.
If you selected Channel List Reset, the Channel Search sub-menu appears. If you want to
continue using your
, you will need to rescan for channels. For help, see “Rescanning
for channels and stations” on page 34.
44

Troubleshooting
There may be a number of causes of abnormal operation. Occasionally receivers can hang (just as
a PC will do from time to time). In this case, you should disconnect it from mains power, wait 30
seconds and then reconnect it to mains power. If the unit still does not operate correctly, refer to
the following table for the indicated problem and likely solution.
Symptoms Possible causes Solution
AC power cord is not connected Check that the power cord is
Indicators on front
panel do not light up
plugged into the wall socket.
Make sure the power switch is on.
No picture and sound
Picture and/or audio
glitch
No sound
The cables connecting the TV and
the receiver are not properly
connected
The TV mode is not correct Check that the correct video or AV
Insufficient signal strength Check that the antenna cable is
Electrical interference Check that all antenna cabling is
The receiver or TV is in mute mode Press the MUTE button on the
Initial volume level has not been
set on your TV
Batteries not inserted Insert batteries
Make sure that the correct cable is
connected between the TV and the
receiver, and that the antenna is
connected.
input has been selected on your TV.
securely plugged in and that the
signal is adequate.
quad-shielded.
receiver or on the TV.
Select the desired TV volume level
using the TV remote control.
Batteries are flat Change the batteries in the remote
Remote control is not
working
Remote control is outside the
range of operation
For Technical Assistance: Please call our Technical Support Help Line on 1 800 820 030
For General Enquiries: Please email us at techau@strong-technologies.com
Product Return Tracking: If you need to send your receiver to Strong Technologies for repair,
please keep a record of the unit’s serial number (shown on the rear
panel). This will ensure ease of tracking and identification while the
unit is being repaired.
45
control.
Aim the remote control directly at
the receiver.

Specifications
Input Connector Antenna IEC 169-2 Female
Output Connector – RF Loop Out IEC 162-2 Male
Frequency range 174MHz–862MHz
Input impedance 75Ω
Tuner
& Channel Decoder
MPEG Transport
Stream
Video Decoding
Audio Decoding
Main System
Audio & Video
In/Out
Power Supply
Physical
Signal level –77.5 to –20 dBm
Centre IF Frequency 4.571 Mhz
IF bandwidth 7 and 8 MHz (switchable)
Waveform OFDM
Carrier Mode 2k and 8k hierarchical/non hierarchical
Code Rate 1/2, 2/3, 3/4, 5/6, 7/8
Guard Interval 1/4, 1/8, 1/16, 1/32
Standard
Rate Up to 15 Mbps
Profile Level
Input Rate Max 31 Mbps/27 Mbps
Aspect Ratio 4:3, Letter Box, 16:9, Pan & Scan
Video Resolution 1920 x 1080i,1280 x720p, 720 x 576p, 720 x 576i
Standard MPEG Layer 1,2; Dolby AC-3, PCM and DTS
Sampling Rate 32, 44.1, 48KHz
Channels
Main Processor
Memory
Video Component Y / Pb / Pr Component YUV
HDMIS
Video Composite RCA/Cinch, Video Output (CVBS)
S/PDIF Optical Digital Audio Output
Input Voltage AC 90–250V ~ 50/60Hz
Power Consumption
Type SMPS(Switching Mode Power Supply)
Dimensions : W 360mm x D 230mm x H 63mm
Net Weight 2Kg
Operating Temperature 5°C–50°C
Storage Temperature −40°C–65°C
MPEG-2/MPEG-4 Part 10 AVC/H.264 HD
MP@L4.0 1920 × 1080 @ 50MHz
MPEG-2 MP@HL; MPEG-4 Part 10 AVC/H.264 HD
MP@L4.0
Single, Dual Mono, Stereo, Joint Stereo, Dolby
Digital bit-streams
ST40 32-bit Superscaler RISC CPU_400 Dhrystone
2.1 MIPS@266MHz
Flash Memory: 8MB; SDRAM: 128MB
HDMI 1.2 connector ((with HDCP copy
protection)
Maximum 30Watts(Under 2Watts in Standby
Mode)
46

47

STRONG TECHNOLOGIES PTY LTD.
60 WEDGEWOOD ROAD, HALLAM, VICTORIA 3803
PH: +61 3 8795 7990 FAX: +61 3 8795 7991
TECHNICAL SUPPORT: 1 800 820 030
STRONG & CO. (FAR EAST), LTD.
P. O. BOX 85, YOKOHAMA, KANAGAWA-KEN
JAPAN 231-91
www.strong-technologies.com
Email: techau@strong-technologies.com
FAX: +81 45 651-1842
© Strong Technologies Pty Ltd., 2008
 Loading...