

Page 1
LED TV with DVB-T/T2/C/S/S2
SRT 24HX4003
SRT 32HX4003
SRT 43FX4003
SRT 49FX4003
SRT 55FX4003
SRT 65FX4003
User Manual
Bedienungsanleitung
Manuel ulisateur
Manuale utente
Manual del Usuario
Manual do Ulizador
Gebruiksaanwijzing
Instrukcja obsługi
Uživatelská příručka
Používateľská príručka
Korisnički priručnik
Uputsvo za rukovanje
Használa útmutató
Инструкции за употреба
Manual de Ulizare
Руководство пользователя
Посібник користувача
Page 2
Page 3
Page 4

www.strong.tv
Supplied by STRONG & Co, Japan
Represented by STRONG Ges.m.b.H.
Franz-Josefs-Kai 1
1010 Vienna, Austria
Email: support_at@strong.tv
24 May 2016 15:49
Page 5

English
LICENSES
ANY USE OF THIS PRODUCT IN ANY MANNER OTHER THAN PERSONAL USE THAT COMPLIES WITH
THE MPEG-2 STANDARD FOR ENCODING VIDEO INFORMATION FOR PACKAGED MEDIA IS EXPRESSLY
PROHIBITED WITHOUT A LICENSE UNDER APPLICABLE PATENTS IN THE MPEG-2 PATENT PORTFOLIO,
WHICH LICENSE IS AVAILABLE FROM MPEG LA, LLC, 6312 S. Fiddlers Green Circle, Suite 400E,
Greenwood Village, Colorado 80111 U.S.A.
THIS PRODUCT IS LICENSED UNDER THE AVC PATENT PORTFOLIO LICENSE FOR THE PERSONAL AND
NONCOMMERCIAL USE OF A CONSUMER TO (i) ENCODE VIDEO IN COMPLIANCE WITH THE AVC
STANDARD (“AVC VIDEO”) AND/OR (ii) DECODE AVC VIDEO THAT WAS ENCODED BY A CONSUMER
ENGAGED IN A PERSONAL AND NON-COMMERCIAL ACTIVITY AND/OR WAS OBTAINED FROM A
VIDEO PROVIDER LICENSED TO PROVIDE AVC VIDEO. NO LICENSE IS GRANTED OR SHALL BE IMPLIED
FOR ANY OTHER USE. ADDITIONAL INFORMATION MAY BE OBTAINED FROM MPEG LA, L.L.C. SEE
HTTP://WWW.MPEGLA.COM
This product contains one or more programs protected under international and U.S. copyright laws as
unpublished works. They are confidential and proprietary to Dolby Laboratories. Their reproduction
or disclosure, in whole or in part, or the production of derivative works therefrom without the express
permission of Dolby Laboratories is prohibited. Copyright 2003-2009 by Dolby Laboratories. All rights
reserved.
English
Page 6

English
To obtain the best performance and safety, please read this manual carefully. Please keep this manual for
future reference.
TABLE OF CONTENT
1.0 INSTRUCTION 3
1.1 Safety Instructions 3
1.2 WEEE Directive 4
1.3 Storage 4
1.4 Accessories 4
1.5 Equipment set-up 4
2.0 INSTALLATION 5
2.1 Default PIN code: 0000 5
2.2 Front panel 5
2.3 Rear panel 5
2.4 Remote control 6
2.5 Installing the batteries 8
2.6 Using the remote control 8
3.0 FIRST TIME INSTALLATION 8
3.1 DVB-S installation 8
3.2 DVB-T installation 9
3.3 DVB-C installation 9
4.0 PERSONAL VIDEO RECORDING 9
4.1 Instant one-touch recording and playback
10
4.2 Timer recording 10
4.3 Electronic Programme Guide (EPG) 10
5.0 MENU SETTINGS 11
5.1 Menu control (DTV mode) 11
5.2 Picture menu 11
5.3 Sound menu 12
5.4 Channel 12
5.5 Lock 14
6.0 USB 14
6.1 Reminder when using the USB player 14
6.2 USB menu 15
7.0 TROUBLESHOOTING 17
8.0 SPECIFICATIONS 18
9.0 APPENDIX 19
STRONG declares that the equipment complies with the European Directive 2004/108/CE (EMC) and the Low Voltage Directive
2006/95/CE (LVD) in accordance with the following technical standards:
ELECTROMAGNETIC COMPATIBILITY
EN55013:2001 + A1:2003 + A2:2006; EN55020:2002 + A1:2003 + A2:2005; EN61000-3-2:2000 + A2:2005;
EN61000-3-3:1995 + A1:2001 + A2:2005
LOW VOLTAGE
EN60065:2002 + Amd.1:2006
It also complies with the Ministerial Decree no. 548.1 dated Aug. 28th, 1995 concerning the frequencies used in Italy by broadcast
receivers and complies with RoHS Directive 2002/95/EC.
This equipment is manufactured in compliance with the provisions stated in the Ministerial Decree 26/03/92, in particular with Article 1
of the same, and it also complies with the Circular 97/D dated Apr. 29th, 1999.
Subject to alterations. In consequence of continuous research and development technical specifications, design and appearance of
products may change. Manufactured under license from Dolby Laboratories. Dolby and the double-D symbol are trademarks of Dolby
Laboratories. HDMI, the HDMI logo and High-Definition Multimedia Interface are trademarks or registered trademarks of HDMI Licensing
LLC in the United States and other countries. All product names are trademarks or registered trademarks of their respective owners.
25 May 2016 17:42
© STRONG 2016. All rights reserved.
2
Page 7

English
1.0 INSTRUCTION
1.1 Safety Instructions
Read all of the instructions before operating the set. Keep these instructions well for later use.
Only use attachments/accessories specified or provided by the manufacturer (such as the
exclusive supply adapter, battery etc.).
Please refer to the information on the exterior back enclosure for electrical and safety
information before installing or operating the apparatus.
To reduce the risk of fire or electric shock, do not expose this apparatus to rain or moisture.
The ventilation should not be impeded by covering the ventilation openings with items, such
as newspaper, table-cloths, curtains, etc.
The apparatus shall not be exposed to dripping or splashing and no objects filled with liquids,
such as vases, shall be placed on the apparatus.
The mark indicates a risk of electric shock. The external wires must be installed by an
instructed person or ready-made leads or cords must be used.
To prevent injury, this apparatus must be securely attached to the floor/wall in accordance
with the installation instructions.
Danger of explosion if the battery is incorrectly replaced. Replace only with the same or
equivalent types.
The battery (battery or batteries or battery pack) shall not be exposed to excessive heat such
as sunshine, fire or the like.
Excessive sound pressure from earphones and headphones can cause hearing loss.
Listening to music at high volume levels and for extended durations can damage one’s hearing.
In order to reduce the risk of damage to hearing, one should lower the volume to a safe,
comfortable level, and reduce the amount of time listening at high levels.
The mains plug or appliance coupler is used as disconnect device, it shall remain readily
operable. When not in use and during movement, please take care of the power cord set,
e.g. tie up the power cord set with cable tie or something like that. It shall be free from sharp
edges or similar which can cause abrasion of the power cord set. When put into use again,
please make sure the power cord is not damaged. In case of damages, please get the power
cord replaced by a similar one with the same specifications. The absence of a light indication
on the apparatus does not mean that it is fully disconnected from the mains. To disconnect
the apparatus completely, the mains plug must be pulled out.
Attention should be drawn to environmental aspects of battery disposal.
No naked flame sources, such as lighted candles, should be placed on the apparatus.
To prevent the spread of fire, keep candles or other open flames away from this
product at all times.
English
A USB terminal can provide a maximum of 500 mA.
Protective earthing terminal. An apparatus with CLASS I construction shall be
connected to a MAINS socket outlet with a protective earthing connection.
Operating Environment
Do not install this equipment in a confined space such as a bookcase or similar unit.
Do not use the set near damp, and cold areas, protect the set from overheating.
Keep away from direct sunlight.
3
Page 8

English
Do not use the set near dust place.
Do not attach candle to accessible opening area, to avoid flammable foreign material from
entering the TV.
1.2 WEEE Directive
Correct Disposal of this product. This marking indicates that this product should not be disposed
with other household wastes throughout the EU. To prevent possible harm to the environment
or human health from uncontrolled waste disposal, recycle it responsibly to promote the
sustainable reuse of material resources. To return your used device, please use the return and
collection systems or contact the retailer where the product was purchased. They can take this product
for environmental safe recycling.
1.3 Storage
Your device has been carefully checked and packed before shipping. When unpacking it, make sure that
all the parts are included and keep the packaging away from children. We recommend that you keep
the carton during the warranty period, to keep your device perfectly protected in the event of repair or
warranty.
1.4 Accessories
1x Installation instructions
1x stand assembly instruction
1x remote control
2x AAA batteries
1x main power cable (32” – 65”)
1x power adapter 12 V DC 3 A (24”)
1.5 Equipment set-up
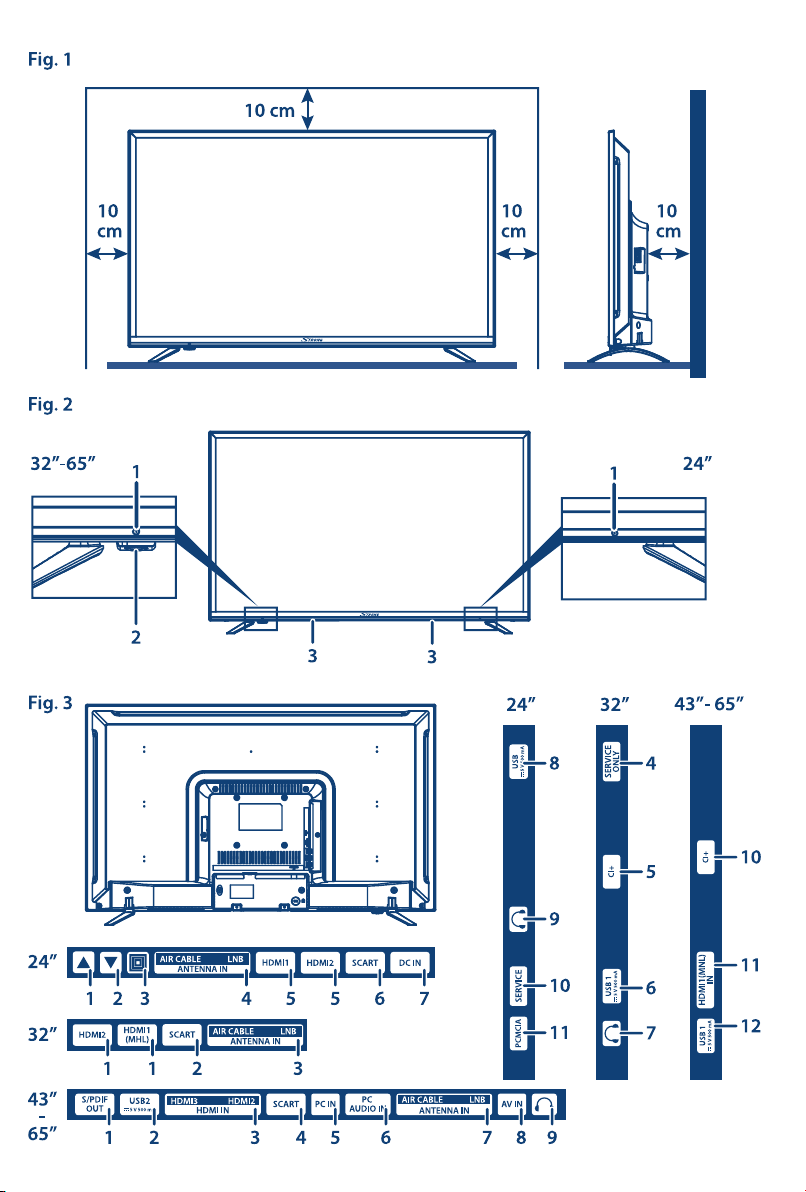
Fig. 1
Install the display on a solid horizontal surface such as a table or desk. For ventilation, leave a space of at
least 10 cm free all around the set. To prevent any fault and unsafe situations, please do not place any
objects on top of the set. This apparatus can be used in tropical and/or moderate climates.
This user manual provides complete instructions for installing and using this TV. The symbols serve as follows.
WARNING: Indicates warning information.
NOTE: Indicates any other additional important or helpful information.
MENU Represents a button on the remote control or the TV.
Move to Represents a menu item within a window.
4
(Bold characters)
(Italic characters)
Page 9
English
2.0 INSTALLATION
2.1 Default PIN code: 0000
2.2 Front panel
NOTE: The graphics are for representation only.
1. Power indicator /remote sensor
2. Standby button*
3. Speakers
* except 24”: see chapter 2.3.1
2.3 Rear panel
NOTE: The graphics are for representation only.
2.3.1 24 inch
1. p Programme up button
2. q Programme down button
3. Opens the main menu. Press short to enter the main menu
4. ANTENNA (AIR/CABLE/LNB) IN: Connect an antenna, cable, satellite dish to the TV for
5. HDMI1/HDMI2: Connect HDMI input signal from a signal source such as
6. SCART: Connect devices like DVD or VCR using SCART cable.
7. DC IN: Connect to the mains plug.
8. USB: USB port.
: Headphone or Earphone audio output, speakers will be
9.
10. SERVICE: Service port.
11. PCMCIA: Connect a Conditional Access Module (CAM).
or press and hold to enter standby mode
searching and receiving programmes.
DVD, Blu-ray player or game console.
muted when earphone is plugged in and headphone
selected.
English
Fig. 2
Fig. 3
2.3.2 32 inch
1. HDMI1 (MHL)/HDMI2: Connect HDMI input signal from a signal source such
as DVD, Blu-ray player or game console. HDMI1 port
supports MHL function.
2. SCART: Connect devices like DVD or VCR using SCART cable.
3. ANTENNA (AIR/CABLE/LNB) IN:
Connect an antenna , cable, satellite dish to the TV for
searching programmes.
5
Page 10

4. SERVICE ONLY: Service port.
5. CI+: Connect a Conditional Access Module (CAM).
6. USB 1: USB port.
: Headphone or Earphone audio output, speakers will be
7.
muted when earphone is plugged in and headphone
selected.
2.3.3 43 inch, 49 inch, 55 inch, 65 inch
1. S/PDIF OUT: Use a RCA cable to connect your TV to a compatible
2. USB 2: USB port.
3. HDMI 3/HDMI 2: Connect HDMI input signal from a signal source such as
4. SCART: Connect devices like DVD or VCR using SCART cable.
5. PC IN: Connect a PC via VGA cable.
6. PC AUDIO IN: Audio input for PC and audio input for HDMI when the
7. ANTENNA (AIR/CABLE/LNB) IN:
8. AV IN: Connect AUDIO and VIDEO input signals from a signal
: Headphone or Earphone audio output, speakers will be
9.
10. CI+ Connect a Conditional Access Module (CAM).
11. HDMI 1 (MHL): Connect HDMI input signal from a signal source such
12. USB 1: USB port
digital amplifier or Home theatre set.
DVD, Blu-ray player or game console.
signal is DVT timing.
Connect an antenna, cable, satellite dish to the TV for
searching and receiving programmes.
source such as DVD.
muted when earphone is plugged in and headphone
selected.
as DVD, Blu-ray player or game console. HDMI1 port
supports MHL function.
English
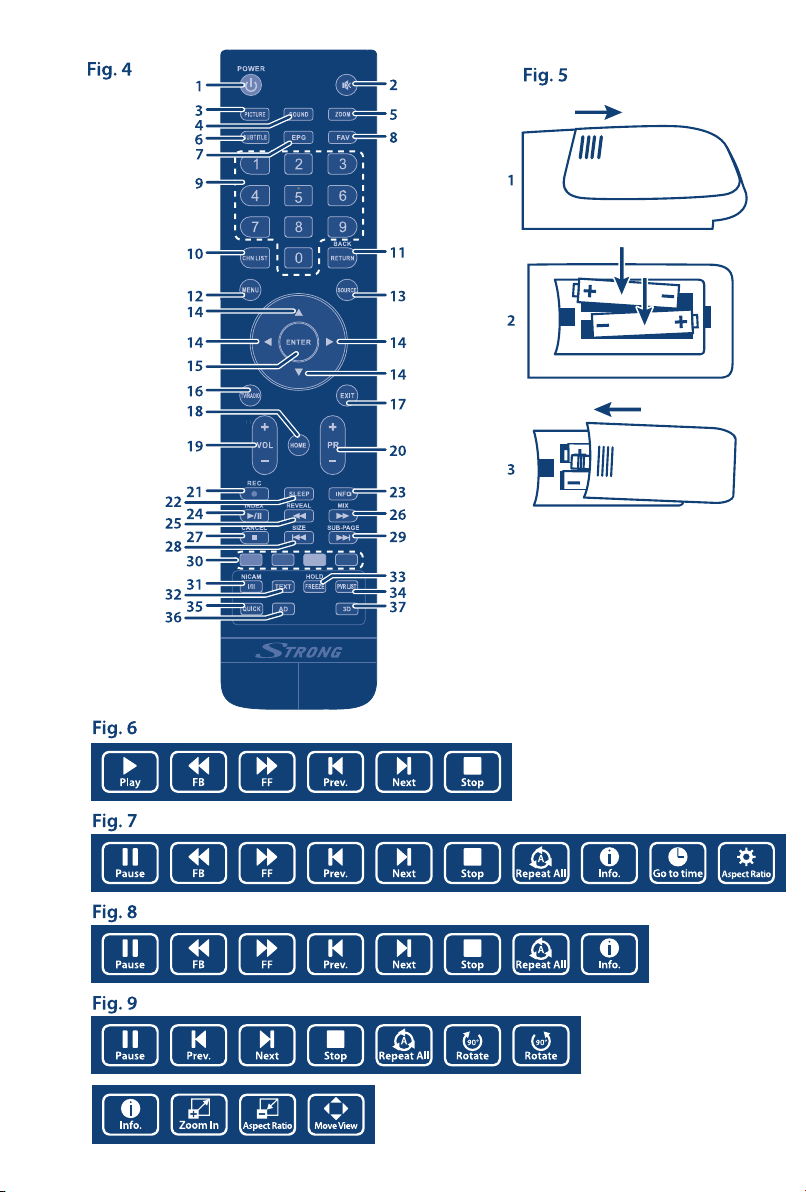
2.4 Remote control
1. q Press to turn the TV on or standby.
Press to mute or restore the volume.
2.
3. PICTURE Change picture mode.
4. SOUND Change sound mode.
5. ZOOM Change aspect ratio.
6. SUBTITLE Enable/disable subtitles in DTV/USB mode.
7. EPG Press to display the current EPG information in DTV mode.
8. FAV Press to view your assigned favourite channels. Press
9. 0~9 Choose channel directly.
10. CHN LIST Press to enter into the channel list.
11. RETURN Press to back to previous viewed channel.
12. MENU Open the menu options.
13. SOURCE Select the input source mode.
14. pqtu Navigate the menu.
15. ENTER Confirm the selection.
6
p q to cycle through your assigned favourite channels,
press ENTER to confirm.
Fig. 4
Page 11

English
16. TV/RADIO Switch between TV and radio.
17. EXIT Exit the current menu.
18. HOME Enter the home desktop. If your TV doesn’t have HOME
function, this button will not work.
19. VOL +/ Adjust the volume up or down.
20. PR +/ Change programmes up or down.
21. 4 Press to record the current programme (only working in
DTV mode).
22. SLEEP Select the sleep time, such as 10 min, 20 min etc.
23. INFO Display information about the current source.
24. 1/2 Press to pause playback, press again to continue playback.
25. 5 Press to fast reverse.
26. 6 Press to fast forward.
27. 3 Press to stop playback.
28. 7 Press to play the previous file.
29. 8 Press to play the next file.
30. COLOUR BUTTONS Press to execute the prompt function in TV or DTV mode.
31. I/II Press to select sound output depending on the
broadcasting channel.
32. TEXT Press to enter or exit the teletext menu.
33. FREEZE Freeze the picture on the screen (not available in USB mode).
34. PVR LIST Display the recording file list.
35. QUICK No function.
36. AD Press to turn on audio description, a narrator will
describe what is happening on the screen for blind or
visually impaired viewers. Press again to turn it off.
(depending on broadcast)
37. 3D No function.
Teletext control buttons
HOLD Press to hold the teletext page on screen without update and
changes. Press again to release the hold state.
SIZE Enlarge the teletext display. Press this button once to enlarge upper
half of the screen. Press this button again to enlarge lower half of the
screen. Press this button again to resume to normal screen size.
REVEAL Press this button to display concealed information, such as solutions
to riddles or puzzles. Press again to remove the information from the
display.
MIX Press this button to superimpose the teletext over the TV
programme. Press again to return to normal teletext mode.
SUBPAGE Press this button to enter or exit subpage mode (if subpage is
available}. Press the RED or GREEN buttons to select a subpage.v
INDEX Press this button to display index page.
CANCEL Press this button to return to TV programme temporarily while
searching for a Teletext page. When the search is done, the page
number will be displayed on the upper left of the screen. Press again
to return to the Teletext page.
English
7
Page 12

2.5 Installing the batteries
Place 2x AAA batteries in the battery compartment of the remote control. Make sure to match the
polarity markings inside the compartment.
NOTE: Pictures are only for reference. Actual items may differ.
1. Slide the cover horizontally.
2. Put 2x AAA batteries in the compartment and make sure the polarity is correct.
3. Slide horizontally to close the cover.
Precautions for using the battery
Improper using of the battery will cause leakage. Carefully follow these instructions.
1. Please note the batteries’ polarity to avoid short circuit.
2. When the battery’s voltage is insufficient which affect the use range, you should replace it with
a new battery. Remove the batteries from the remote control unit if you do not intend to use it
for a long time.
3. Do not use different types of batteries (for example Manganese and Alkaline batteries) together.
4. Do not put the battery into fire, and charge or decompose the battery.
5. Please dispose batteries abide by relevant environmental protection regulation.
2.6 Using the remote control
Use the remote control by pointing it towards the remote sensor. Items between the remote
control and the remote sensor could block normal operation.
Do not cause the remote control to vibrate violently. Also, do not splash liquid on the remote
control, also do not put the remote control in a high humidity place.
Do not place the remote control under direct sunlight which will cause deformation of the
unit by heat.
When the remote sensor is under direct sunlight or strong lighting, the remote control will
not work. If so, please change the lighting or TV’s position, or operate the remote control
closer to the remote sensor.
English
Fig. 5
3.0 FIRST TIME INSTALLATION
After all connections have been made properly, switch on your TV. The language selection will appear
on screen. Use p qt u to select the OSD Language of your preference. Confirm with ENTER on your
remote control.
Then the next screen appears with the tuner selection. Choose the one you like to use.
Scan type Select which input source you want to use: DVB-S to receive satellite
3.1 DVB-S installation
Satellite Setting
Press p q to highlight the satellite your dish is aimed at. The signal quality bar on the bottom of the
screen allows you to fine tune the alignment of your antenna for optimum reception. Adjust your
8
broadcasts (and if you are equipped with a satellite dish), DVB-T to receive
terrestrial broadcasts or DVB-C to receive cable broadcasts.
Page 13

English
antenna for maximum possible signal quality. When the signal cannot be improved anymore, fix the dish
on this position and press the BLUE Scan button to continue.
Channel Search
Press p q t u to highlight the options of choice and press ENTER to start the channel search.
Scan Mode Choose between Fast Scan (recommended), Blind Scan and Network
Crypted Select FTA Channels to search Free-To-Air channels only or All Channels to search FTA
and Encrypted channels
Service Type Select DTV to search DTV channels only, RADIO to search radio channels only or All for a
complete search.
It is recommended to use the default settings.
3.2 DVB-T installation
Terrestrial Setting
First select the Tune Type by pressing t u to select DVB-T, ATV or DVB-T+ATV (DVB-T to search digital
broadcasts and ATV to search analogue broadcasts). Press q to continue. Press p q t u to highlight
the country that you want to install, then press ENTER to start searching.
NOTE: If you have an active antenna, turn it on by following the instructions in
paragraph 5.4.5 and then repeat the scan.
3.3 DVB-C installation
Cable Setting
First select the Tune Type by pressing t u to select DVB-C, ATV or DVB-C+ATV (DVB-C to search digital
broadcasts and ATV to search analogue broadcasts). Press q to continue. Press p q t u to highlight
the country that you want to install, then press ENTER to start searching.
English
4.0 PERSONAL VIDEO RECORDING
Important notes
For any type of recording with this TV, you must have connected an external device to the
USB port at the back of the TV to record onto.
The USB device must be FAT32 format.
When you are using the USB device to record on this TV for the first time, we suggest
formatting the USB device on the TV before you start the recording.
Make sure you are watching a DTV programme.
Use a high-quality mobile device to record HD programmes, otherwise the videos will be
jammed during the playback.
Back up all of the data in the USB storage device in case data was lost due to an unexpected
accident. STRONG assumes no liability for the losses by misuse or malfunction. Data backup is
the responsibility of the consumer.
9
Page 14

English
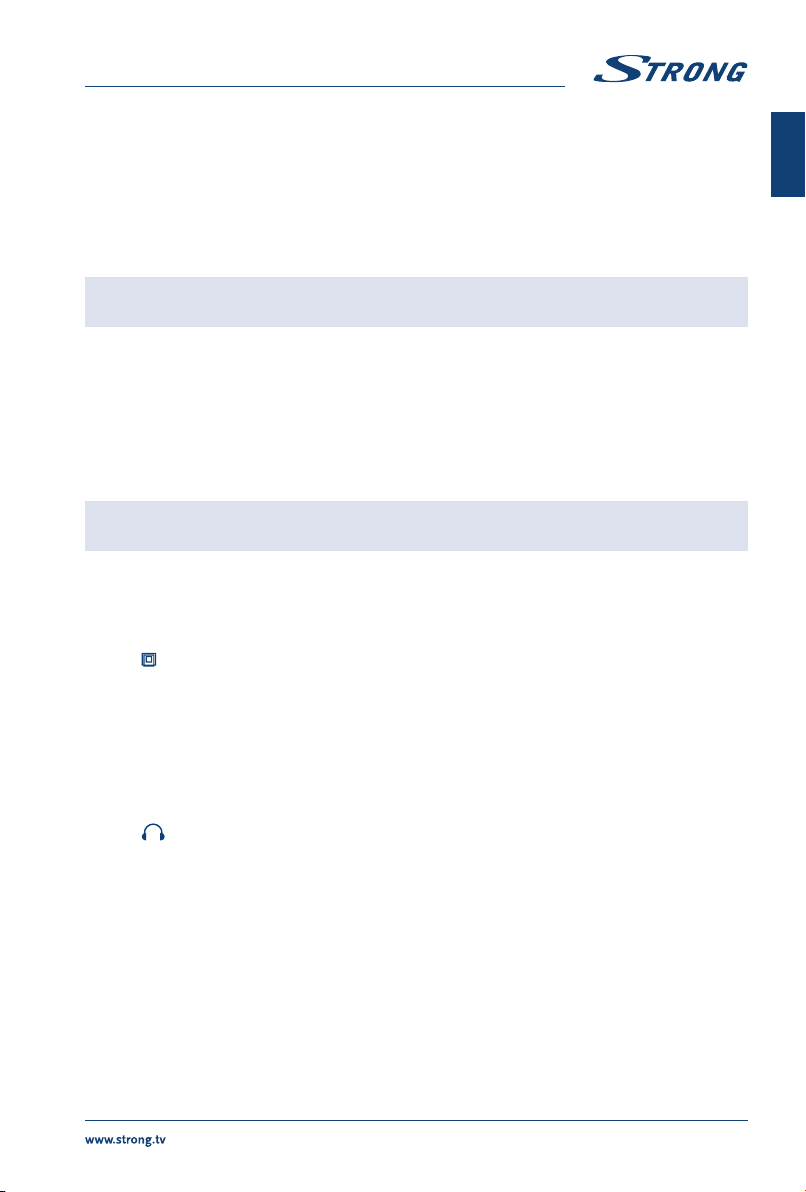
4.1 Instant one-touch recording and playback
Fig. 6
Insert an external high-speed storage device and make sure the device has enough free space. Select the TV
programme you wish to record. Press 4 to enter into PVR mode and start recording. The PVR control bar on
the screen shows as in Fig. 6, you can select the settings of your choice. If the PVR function cannot be realized,
try to format your USB device. If you wish to stop the recording, press 3 and the recording will stop.
NOTE:
During the record mode, you cannot change channels or select another
function.
If the signal is interrupted or removed while in record, the record will stop
until the signal is established. This may cause you to lose programme
content.
Please do not turn the TV OFF during recording. This will make the TV exit
the PVR and turn to standby.
On some encrypted channels (using CI+ module) the recording mode is
blocked by the broadcaster.
4.2 Timer recording
Go to the channel that will broadcast the programme you want to record. Press EPG on your remote
control to bring up the EPG interface. The channel you are watching will be highlighted on the screen
that appears. Press the RED button on the remote control, then enter into the programme details on
the recorder menu by pressing p q to select an item and t u to change the setting. For example, if
the programme starts at 8:30 pm on the same day, enter 30 in the space for MINUTES, 20 in the space
for HOURS (a 24 hour clock applies) and then the relevant date. Use the same method for entering the
finish time. Choose the recording mode: Once, Daily or Weekly. Press ENTER to confirm your selection. A
schedule of all your recordings (the schedule list) will appear. See chapter 4.3.3 for more on the schedule.
The recording will be active also in Standby mode.
NOTE: A recording is possible only if a USB device is connected. If you are browsing
the EPG, follow the steps on the EPG function page.
4.3 Electronic Programme Guide (EPG)
EPG stands for Digital Electronic Programme Guide. It is supplied by the programme providers and offers
information on broadcasted programmes. You can access it in digital mode by pressing EPG on the
remote control.
Press EPG to bring up the EPG interface. The second bar from the top will display the current date and
time. On the list below, the channel you are currently watching will be highlighted. Before you can
view any EPG information, you have to 'activate' every channel for which you want to view programme
information. To do this, use pq to select a channel, then press ENTER to confirm.
To check programmes which will be broadcasted on a future date, scroll up to the date field with p.
Use u to select the date you want to check. Press u/2 to scroll up to the top bar in the display, then
press tu to select the Channel List. The second bar will then display one of your available channels. Go
10
Page 15

English
to the channel for which you want to view information using tu. After a brief moment, the programme
information will appear. Use pq to scroll through the time slots. Press MENU to exit the EPG menu.
4.3.1 Recorder from the EPG
Go to the channel that will broadcast the programme you want to record. Press EPG on your remote
control to bring up the EPG interface. The channel you are watching will be highlighted on the
appearing screen. Press INDEX to reach the top bar in the display and then use tu to display the whole
programme list of that channel. Select with pq the programme you want to record and then press the
RED button to display the recorder menu already set. To confirm the record press ENTER. An updated
schedule list will be shown. See detailed information about the different ways of recording with the
television onto a USB device.
4.3.2 Info
Press the GREEN button to show information about the selected programme.
4.3.3 Schedule
Press the YELLOW button to display the Schedule List. Press p q to select an event, press the RED
button to delete an event.
4.3.4 Remind
Press the BLUE button to display a reminder menu. Press p q to select an item and t u to change the
setting. Press ENTER to add the reminder event to the schedule list.
An updated schedule list will be shown.
English
5.0 MENU SETTINGS
5.1 Menu control (DTV mode)
Press MENU to enter the main menu. Press t u to select an item. Press ENTER to enter the item. Press
p qt u and ENTER to select the submenus. Press MENU to exit the item.
5.2 Picture menu
Picture Mode Select the automatic picture control mode. Available choices are Dynamic,
Colour Temperature Select the overall colour tone of the picture. Available choices are Cool,
Aspect Ratio Select the aspect ratio (display proportions) according to your video signal type or
NOTE: Some options may not be available under some sources.
Noise Reduction Eliminates noise in the picture. Available choices are Off, Low, Middle and High.
MPEG NR Eliminates noise generated while creating digital picture signals. Available
Standard, Mild and User.
Medium, Warm and User.
preference. Available choices are 16:9, 4:3, Just Scan, Zoom1 and Zoom2.
choices are Off, Low, Middle and High.
11
Page 16

English
In the User mode, settings can be changed for Brightness, Contrast, Colour, Tint and Sharpness.
5.3 Sound menu
Sound Mode Select your favourite sound mode for each input. Choices are Standard, Music,
Bass Adjusts the lower frequency of the sound.
Treble Adjusts the higher frequency of the sound.
Balance Control the sound balance between the right and left loudspeaker (earphone).
Auto Volume Adjust the volume corresponding to the input audio level. Options are On and
Surround Sound Turns on the Sound Retrieval System.
AD Switch Turn on the Audio description, you can activate the setting of AD volume.
Movie, Sports and User.
Off.
When turn on the audio description, a narrator will describe what is
happening on the screen for blind or visually impaired viewers. (Only
available In DTV mode.)
5.4 Channel
5.4.1 Auto Tuning (in DVB-T/C mode only)
First select the Tune Type by pressing t u to select DVB-T, ATV or DVB-T+ATV (DVB-T to search digital
broadcasts and ATV to search analogue broadcasts). Press q to continue. Press p qt u to highlight
the country that you want to install, then press ENTER to start searching.
NOTE: If you have an active antenna, turn it on in the Channel menu and then start
the scan.
5.4.2 Advanced Tuning (in DVB-S mode only)
Access the satellite settings essential for searching programmes through DVB-S sources.
Satellite Dish Settings
A set of satellite dish settings must be configured for each wanted satellite before performing a channel
scan.
Satellite Select the satellite for this TV.
LNB Type Make sure the LNB type is corresponding to your dish.
LNB Power: Set the power supply for the LNB (usually 13/18 V).
22KHz Select the 22KHz to set 22K switch to ON/OFF. The Auto mode (recommended) is
DISEqC1.0/1.1 Select the DiSEqC mode for the selected LNB.
Highlight Satellite and press ENTER to access the satellite list and select one. Highlight LNB Type and
press ENTER to select the LNB type. Make sure the 22KHz, DISEqC1.0/1.1 switch is corresponding to the
selected satellite. After the above steps are finished, press the BLUE button to search for channels.
12
used to switch 22KHz on or off depending on the LNB type.
Page 17

English
5.4.3 DTV Manual Tuning (in DVB-T/C mode only)
Search and store programmes manually.
Select the source type DVB-T or DVB-C and search digital programmes manually. In the Channel menu,
select DTV Manual Tuning and press ENTER to access. Press t u to select a Channel No., and then press
ENTER to start the search. The search stops when a programme is found and this programme will be
stored in the current channel position. If you want to stop the search, press MENU.
5.4.4 ATV Manual Tuning (in DVB-T/C mode only)
First select the source type of ATV. Then in the Channel menu, select ATV Manual Tuning and press
ENTER to access. Highlight and press p q to select Storage To 1 (maybe other number), Sound System
and Channel No.. Then select search and press ENTER to start the search. Press u for the unit to search
towards higher frequency. Press t for the unit to search towards lower frequency. The search stops
when a programme is found and this programme will be stored in the current channel position. If you
want to stop the search, press MENU.
Fine-Tune
Use this option to make small adjustments to tuning of an individual channel. Fine-tune is not
necessary under normal conditions. However, in area of inferior broadcast conditions where adjustments
is necessary for a better picture and sound, use fine-tune. Select a channel that you want to fine tune. In
the Channel menu, select ATV Manual Tuning and press q to highlight Fine-Tune. Press t u to fine tune
until the best possible picture and sound are obtained.
5.4.5 Channel settings
Programme Edit Edit the programmes. You can press the COLOUR BUTTONS on the remote
control to skip programmes, rename and delete programmes or move
programmes, and add programmes to the favourite list by pressing FAV.
Signal Information Showing the information of current DTV channel.
Cl information Enables the user to select from the CAM-provided menu. Select the Cl menu
based on the menu PC card.
5 V Antenna Power This option is only available in DVB-T source, select On to supply power for
the TV’s antenna. Select Off to turn off this function.
Software Update (OAD) Select On to allow the TV to update the system software over the air. Select
Off will turn off this function.*
OAD Tuning When software update (OAD) is off, this option is disabled. By selecting OAD
scan you can scan channels to find the OAD update information.*
*Only for some regions.
English
5.4.6 Options
OSD Language Select the OSD language.
Audio Languages/Subtitle Languages
Select as you prefer.
TTX Language Select TTX Ianguage for different regions.
Time Can setup Auto Sync, Clock, Time Zone, Summer Time, Sleep Timer and Auto Sleep.
HDMI CEC Press to enter into submenus.
HDMI CEC: Turn on or off HDMI CEC function.
13
Page 18

English
Auto Standby: Turn the TV to standby automatically.
Device List: When HDMI CEC is ON, you can check the list of
PVR File System Personal Video Record setting. This function only works when receiving a
Factory Reset Restore user setting to the default.
SW Version Displays the current software version and the model name.
Software Update (USB) Connect a USB device with upgrading software to upgrade the TV system.
connected devices.
digital TV programme and when a USB disk is connected.
NOTE:
3 Audio Languages, Subtitle languages and PVR File System only works under
DVB-S/DVB-C/DVB-T mode.
User data on this TV will be completely lost after operating this feature.
Do not power off the TV during the software upgrading process,
otherwise the TV may not work, and STRONG does not assume liability.
5.5 Lock
Lock system Switch the lock system between On and Off.
Set Password Reset the password (the original password is 0000)
Block Programme Set the blocked programmes as you prefer.
Parental Guidance Set it to guide the programmes for children to watch.
6.0 USB
6.1 Reminder when using the USB player
1. Some USB storage devices may not be compatible to operate smoothly with this TV.
2. Back up all of the data in the USB storage device in case data is lost due to an unexpected
accident. STRONG does not assume any liability for the losses by misuse or malfunction. Data
backup is consumer's responsibility.
3. For large file sizes, the loading speed may be slightly longer.
4. The recognition speed of a USB storage device may depend on each device.
5. When connecting or disconnecting the USB storage device, make sure the TV is not in USB
mode otherwise the USB storage device or the files stored in it may be damaged.
6. Please use only a USB storage device which is formatted in FAT16, FAT32, NTFS (playback only)
file system provided with the Windows operating system. In case of a storage device formatted
as a different utility programme which is not supported by Windows, it may not be recognized.
7. When using a USB Hard Disk Drive which is not powered independently, ensure its power does
not exceed 500 mA. Otherwise the TV system will change into standby mode, and you must
pull out the USB Hard Disk and restart the TV system.
8. An "Unsupported File" message will be displayed if the file format is unsupported or the file is
corrupted.
9. FHD big picture needs longer time to process, which is not caused by the TV. Please be patient.
10. This TV may not support some multimedia files changed and upgraded as the change of the
encoding format or other technical aspects advances.
11. Please refer to chapter 9. Appendix for a list of supported file formats for USB playback.
14
Page 19

English
6.2 USB menu
Press SOURCE and select USB. You can view movie, music and photo files from your
USB storage devices. Connect a USB storage device to the USB input terminal and select the types of
media on the home page: Movie, Music and Photo. Press ENTER, the screen will show the connected USB
device, press ENTER again to view the file folders and files. Press p q to select a folder, press ENTER
to open the folder and select the files, then press ENTER to tick them. Highlight the one you want to
play first, press 1/2 to start playing or select a file and press 1/2 to start playing directly. Press 3 to stop
playing and return to upper lever folder. Continuously press RETURN to go back to upper level folder.
Repeat again to select and play another media type.
English
NOTE: By choosing one of the three media types, for example Movie, the folders
inside will display only video files and no other formats.
6.2.1 Play movies
Fig. 7
Press INFO to display/exit from the menu bar (Fig. 7). Press the USB control buttons on the remote
control to do relevant operations.
Play & Pause/Stop/Prev./Next
Fast Reverse/Fast Forward Press and hold 5/6 for seconds to draw the playing progress as your desire,
Play Mode Highlight the corresponding icon and press ENTER to switch to another play
Information Highlight the corresponding icon and press ENTER to view the information of
Go to time Skip to specific point by input time. Highlight the corresponding icon and
Aspect Ratio Highlight the button and press ENTER to select the display mode.
Press 1/2 to play or pause the playback. Press 3 to stop playing. Press
7/8 to play the previous or the next video file. Press INFO and use t u to
highlight the corresponding icon on the control bar, then press ENTER. TV
will response accordingly.
then press 1/2 to start the playing from the new position.
mode.
the playing video.
press ENTER to open the Input search time screen. Press t u to move the
cursor and use the number buttons to insert the time. Press ENTER, the TV
will start playing from the set time.
6.2.2 Play music
Fig. 8
Press INFO to display/exit from the menu bar (Fig. 8). Press the USB control buttons on the remote
control to do relevant operations.
Play & Pause/Stop/Previous/Next
Press 1/2 to play or pause the playback. Press 3 to stop playing. Press
7/8 to play the previous or the next music file. Press t u to highlight the
corresponding icon on the control bar, and then press ENTER. The TV will
response accordingly.
15
Page 20

English
Fast Forward/Fast Reverse Press and hold 5/6 for seconds to draw the playing progress as you wish,
Repeat Highlight the icon and press ENTER. You can select 3 different modes: None
Information Highlight the icon and press ENTER to check the information of the playing
NOTE:
then press 1/2 on the remote control to start playing from the new position.
to disable the function, 1 to repeat one track only and All to repeat the entire
list once it is finished.
music.
3 If one (or more) file(s) of the play list is selected, the buttons 5/6 will play
only selected files.
This menu only shows supported files.
Files with other file extensions are not displayed, even if they are saved
on the same USB storage device.
An over-modulated mp3 file may cause some sound distortion during
playback.
This TV supports lyrics display (in English). The maximum number of
characters per line is 48.
The file name of music and lyrics must be the same in order to display lyrics
while the music is playing.
If you want to show the associated lyrics on the screen with the music,
you must store these in the same folder using the same file name with “.Irc”
file extensions.
6.2.3 Browse photos
Fig. 9
Press INFO or q to display/exit from the menu bar (Fig. 9). Press the USB control buttons on the remote
control to do relevant operations.
Play & Pause/Stop/Previous/Next
Repeat Highlight the icon and press ENTER. You can select 3 different modes: None
Info Highlight the button and press ENTER to check the information of the shown photo.
Rotate Highlight the icon in the menu bar and press ENTER to rotate the picture 90
Zoom In/Zoom Out Highlight the icon on the menu bar and press ENTER to zoom in or zoom out
Move View When the image is magnified, use this function for convenient check.
Press 1/2 to play or pause the playback. Press 3 to stop playing. Press 7/8
to show the previous or the next picture. Press t u to highlight the icon on
the control bar, and then press ENTER. The TV will response accordingly.
to disable the function, 1 to repeat one track only and All to repeat the entire
list once it is finished.
degrees clockwise or counter clockwise.
of the image.
Highlight this icon, press ENTER, then press t up q to move the image.
NOTE: The move function
16
is only available when the image is enlarged.
Page 21

English
7.0 TROUBLESHOOTING
Before calling a service technician, review following information for possible causes and solutions for the
problem you are experiencing. If the TV does not work properly after checking it, please contact your local
service line or STRONG dealer. Alternatively you can send a support mail via our website www.strong.tv.
Problem Possible cause and solution
No picture,no sound 1. Check if the fuse or circuit breaker is working.
2. Plug another electrical device into the outlet to make sure it is working or
turned on.
3. The power plug is in bad contact with the outlet
4. Check the signal source.
No colour 1. Change the colour system.
2. Adjust the saturation.
3. Try another channel. Black-white programme may be received.
The remote control
does not work
No picture, normal
sound
Normal picture, no
sound
Unorderly ripples on
the picture
Snowy dots, blocking
and interference
Ghost Ghosts are caused by the television signal following two paths. One is the direct
Radio frequency
interference
Playback of video (or
Timeshift) is causing
picture freeze/macro
blocks or similar
distortion, especially on
HD content.
1. Change the batteries.
2. The batteries are not installed correctly.
3. Main power is not connected.
1. Adjust the brightness and contrast.
2. Broadcasting failure may happen.
1. Press the volume up button to increase the volume.
2. The volume is set to mute, press
3. Change the sound system.
4. Broadcasting failure may happen.
It is usually caused by local interference, such as cars, daylight lamps and hair
driers. Adjust the antenna to minimize the interference.
If the antenna is located in the fringe area of a television signal where the
signal is weak, the picture may be marred by dots, show blocking or breakups. When the signal is extremely weak, it may be necessary to install a
special antenna to improve the reception.
1. Adjust the position and orientation of the indoor/outdoor antenna.
2. Check the connection of the antenna.
3. Fine tune the channel.
4. Try another channel. Broadcasting failure may happen.
path, the other is reflected from tall buildings, hills, or other objects. Changing the
direction or position of the antenna may improve the reception.
This interference produces moving ripples or diagonal streaks, and in some case,
loss of contrast in the picture. Find out and remove the radio interference source.
Read/write speed of your USB device could be too low. Make sure to use a
USB storage device with sufficient speed and space. Pen drives (USB sticks)
may not support sufficient speed.
to restore the sound.
English
17
Page 22

Problem Possible cause and solution
No signal or weak
signal, intermittent
reception.
Bad picture / blocking
error during heavy rain.
1. Cables might have loosened; moisture might have entered into cables or
connectors, heavy rain at present or heavy storm at present.
Check the cable connections, LNB and other equipment connected between
the LNB and the receiver, or peak the dish.
Wait for rain/storm to subside. Ask a local satellite specialist for advice.
2. The satellite dish is not pointing at the (correct) satellite(s).
Adjust the dish. Ask a local satellite specialist for advice.
3. Satellite dish is too small, trees or buildings in path.
Change to a larger dish or change position of dish.
4. Signal is too strong, dish is oversized.
Connect a signal attenuator to the LNB input. Ask a local satellite specialist
for advice.
Heavy rain will attenuate satellite signals, below a certain level blocking will
occur. Make sure your dish installation is up to standards to minimize rain
effects. When in doubt, ask a local satellite specialist for advice.
English
NOTE: If the problem persists after these solutions, please contact your local
support centre or send a support mail via our website www.strong.tv.
8.0 SPECIFICATIONS
Audio
Audio Output: 6 W + 6 W
Video
Channel coverage: DVB-T/T2:174 MHz - 230 MHz; 470 MHz - 860 MHz
DVB-C: 50 - 858 MHz
DVB-S/S2: 950 MHz - 2150 MHz
System: DTV: DVB-T/T2, DVB-S/S2, DVB-C
ATV: PAL/SECAM (BG/DK/1)
AV: PAL, NTSC
Connectors 24 inch, 32 inch
1 x AIR/CABLE
1 x LNB
2 x HDMI
1 x TV SCART
1 x headphones
1 x USB
1 x CI+ slot
1 x main power cable
Connectors 43 inch, 49 inch, 55 inch, 65 inch
1 x AIR CABLE
1 x LNB
3 x HDMI
1 x TV SCART
1 x S/PDIF (coax.)
2 x USB
1 x Headphones
1 x CI+ slot
1 x PC IN
1 x PC AUDIO IN
1 x AV IN
1 x Main power cable
18
Page 23
English
General Data
Operating voltage: 100 ~ 240 V AC 50/60 Hz
Power consumption: 24”: max. 40 W, typ. 25 W
32”: max. 65 W, typ. 35 W
43”: max. 100 W, typ. 61 W
49”: max. 120 W, typ. 90 W
55”: max. 150 W, typ. 99 W
65”: max. 190 W, typ. 154 W
Power consumption in standby: 24”: <0.5 W
32”: 0.4 W
43”, 49”, 55”, 65”: 0.5 W
Operating temperature: +5 °C ~ +35 °C
Storage temperature: -15 °C ~ +45 °C
Operating humidity: 20% ~ 80% RH, non-condensing
Storage humidity: 10% ~ 90% RH, non-condensing
Dimensions (WxHxD) in mm: 24”: 554 x 131.5 x 371
32”: 735 x 466 x 166
43”: 970 x 601 x212
49”: 1103 x 686 x 264
55”: 1240x264x767
65”: 1468 x 300 x 893.5
Net-weight: 24“: 2.2 kg
32”: 4.5 kg
43”: 9.6 kg
49”: 12.7 kg
55”: 15 kg
65”: 24 kg
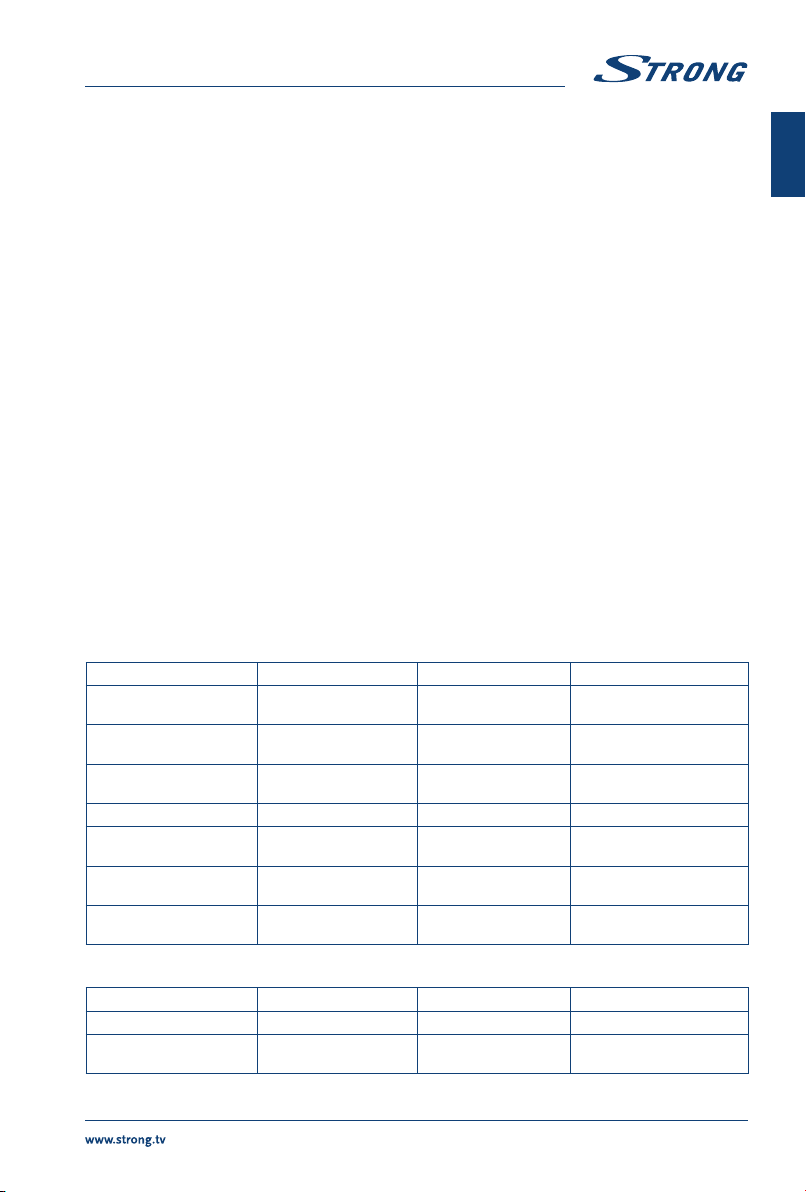
9.0 APPENDIX
USB file playback support.
Video
File Type/(Ext Name) Video Type Audio Type Remark
MP4, MOV/(.mp4, .rnov,
.m4v)
AVI/(.avi) MotionJPEG
ASFI(.wmv3, .xvid) MPEG-4 SPIASP (XviD) MS-ADPCM, Intel-
MKVI(.mkv,.xvid) MPEG-4 SPIASP (XviD) MPEG-AUDIO
TSI(.tsltrp) LPCM
DAT, MPG,MPEG/(.dat,.
mpg,mpeg)
VOB/(.vob) LPCM
Motion JPEG
MPEG-4 SP/ASP (XviD)
MPEG-4 SPIASP (XviD)
LPCM
MPEG-AUDIO
LPCM
MPEG-AUDIO
ADPCM
MPEG-AUDIO
MPEG-AUDIO
MPEG-1 Layer 2
English
Music
File Type/(Ext Name) File Extension Version support Remark
Mpeg-1 Layer 3 Wma, mp3 LPCM WMA 7-9.1 Ia WMA2
MPEG-1/2 Layer 1/2 n/a (included in the
video only)
MPEG1/2
19
Page 24
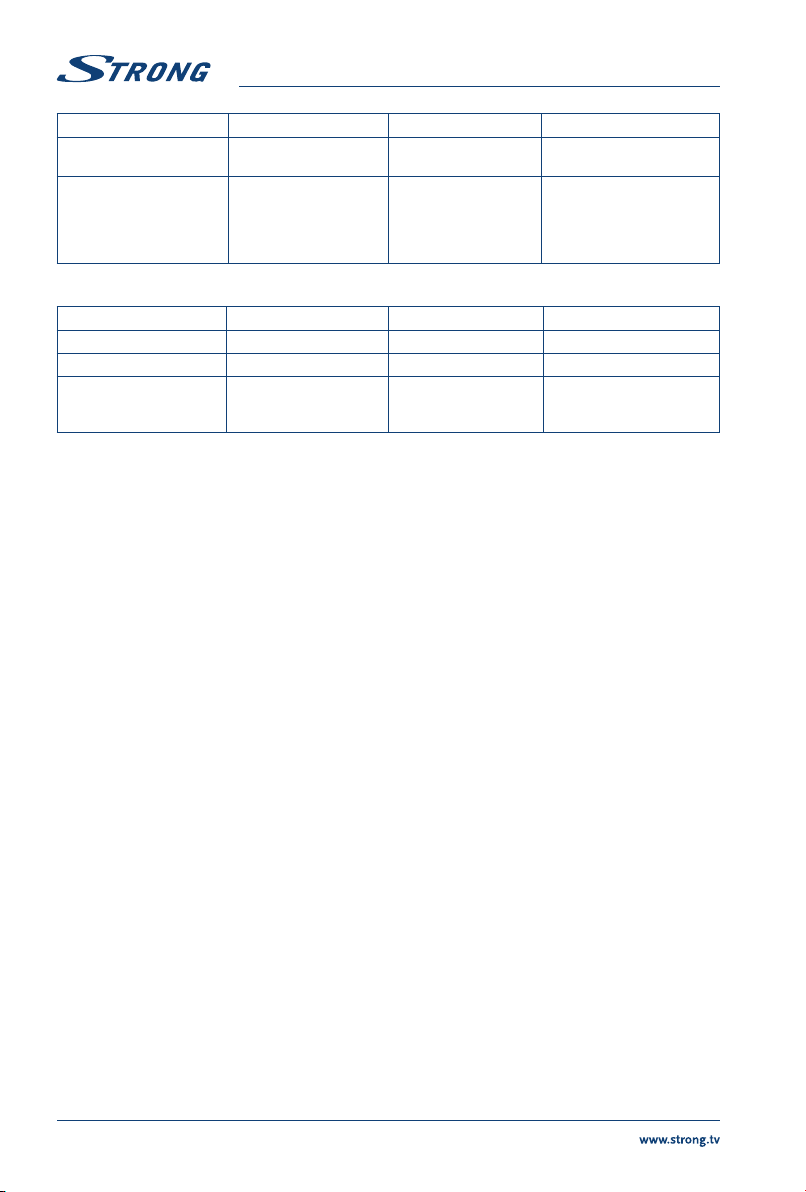
English
File Type/(Ext Name) File Extension Version support Remark
LPCM n/a (included in the
video only)
AAC Aac, mp4, M4A AAC variable bit rate : just
Photo
File Type File Extension Version support Remark
JPEG jpg/jpeg
BMP bmp support all modes
PNG png MPEG1/2 support interlace
forward speed 1.5x-2x
m4a can’t FF/FR
ADIF can’t FF/FR
ADTS can FF/FR
does not support
animation mode
20
 Loading...