

Page 1
LED TV with DVB-T/T2/C/S/S2
SRT 32HY3003
Инструкции за употреба
Uživatelská příručka
Bedienungsanleitung
User Manual
Manual del Usuario
Manuel ulisateur
Εγχειρίδιο Χρήσης
Használa útmutató
Manuale utente
Gebruiksaanwijzing
Instrukcja obsługi
Manual do Ulizador
Руководство пользователя
Používateľská príručka
Navodila za uporabo
Посібник користувача
Korisnički priručnik
Page 2
Page 3
Page 4
www.strong.tv
Supplied by STRONG & Co, Japan
Represented by STRONG Ges.m.b.H.
Franz-Josefs-Kai 1
1010 Vienna, Austria
Email: [email protected]
10 Apr 2018 08:08
Page 5

Licenses
ANY USE OF THIS PRODUCT IN ANY MANNER OTHER THAN PERSONAL USE THAT COMPLIES WITH
THE MPEG-2 STANDARD FOR ENCODING VIDEO INFORMATION FOR PACKAGED MEDIA IS EXPRESSLY
PROHIBITED WITHOUT A LICENSE UNDER APPLICABLE PATENTS IN THE MPEG-2 PATENT PORTFOLIO,
WHICH LICENSE IS AVAILABLE FROM MPEG LA, LLC, 6312 S. Fiddlers Green Circle, Suite 400E, Greenwood
Village, Colorado 80111 U.S.A.
THIS PRODUCT IS LICENSED UNDER THE AVC PATENT PORTFOLIO LICENSE FOR THE PERSONAL AND
NONCOMMERCIAL USE OF A CONSUMER TO (i) ENCODE VIDEO IN COMPLIANCE WITH THE AVC
STANDARD (“AVC VIDEO”) AND/OR (ii) DECODE AVC VIDEO THAT WAS ENCODED BY A CONSUMER
ENGAGED IN A PERSONAL AND NON-COMMERCIAL ACTIVITY AND/OR WAS OBTAINED FROM A
VIDEO PROVIDER LICENSED TO PROVIDE AVC VIDEO. NO LICENSE IS GRANTED OR SHALL BE IMPLIED
FOR ANY OTHER USE. ADDITIONAL INFORMATION MAY BE OBTAINED FROM MPEG LA, L.L.C.
SEE HTTP://WWW.MPEGLA.COM
This product contains one or more programs protected under international and U.S. copyright laws as
unpublished works. They are confidential and proprietary to Dolby Laboratories. Their reproduction
or disclosure, in whole or in part, or the production of derivative works therefrom without the express
permission of Dolby Laboratories is prohibited. Copyright 2003-2009 by Dolby Laboratories. All rights
reserved.
English
1
Page 6

To obtain the best performance and safety, please read this manual carefully. Please keep this manual for
future reference.
TABLE OF CONTENTS
1.0 INSTRUCTION 3
1.1 Safety Instructions 3
1.2 WEEE Directive 4
1.3 Storage 4
1.4 Accessories 4
1.5 Equipment set-up 4
2.0 INSTALLATION 5
2.1 Default PIN code: 0000 5
2.2 Front panel 5
2.3 Rear panel 5
2.4 Remote control 5
2.5 Installing the batteries 6
2.6 Using the remote control 7
3.0 FIRST TIME INSTALLATION 7
3.1 Select Input Source 7
3.2 DVB-S installation 7
3.3 DVB-T installation 8
3.4 DVB-C installation 8
4.0 ELECTRONIC PROGRAMME GUIDE EPG 8
5.0 MENU SETTINGS 8
5.1 Menu control (DTV mode) 8
5.2 Channel menu 9
5.3 Picture menu 10
5.4 Sound menu 11
5.5 Time menu 12
5.6 Lock menu 12
5.7 Setup Menu 13
6.0 USB 13
6.1 Reminder when using the USB player 13
6.2 USB menu 14
7.0 TROUBLESHOOTING 16
8.0 SPECIFICATIONS 18
STRONG declares that the equipment complies with the European Directive 2014/30/EU (EMC) and the Low Voltage Directive 2014/35/
EU (LVD) and the ErP Directive 2009/125/EC and the RoHS Directive 2011/65/EU in accordance with the following technical standards:
ELECTROMAGNETIC COMPATIBILITY
EN 55032:2012; EN 55020:2007+A11; EN55024:2010; EN61000-3-2:2014; EN61000-3-3:2013
LOW VOLTAGE
EN60065:2002+A1+A11+A2+A12
ENERGY RELATED PRODUCTS
COMMISSION REGULATION (EC) No 642/2009; EN 50564:2011; IEC 62087:2012
RoHS
EN 50581:2012
Subject to alterations. In consequence of continuous research and development technical specifications, design and appearance of
products may change. Manufactured under license from Dolby Laboratories. Dolby Audio and the double-D symbol are trademarks of
Dolby Laboratories. HDMI, the HDMI logo and High-Definition Multimedia Interface are trademarks or registered trademarks of HDMI
Licensing LLC in the United States and other countries. All product names are trademarks or registered trademarks of their respective
owners.
© STRONG 2018. All rights reserved.
2
Page 7
1.0 INSTRUCTION
1.1 Safety Instructions
Read all of the instructions before operating the set. Keep these instructions well for later use.
Only use attachments/accessories specified or provided by the manufacturer (such as the
exclusive supply adapter, battery etc.).
Please refer to the information on the exterior back enclosure for electrical and safety
information before installing or operating the apparatus.
To reduce the risk of fire or electric shock, do not expose this apparatus to rain or moisture.
The ventilation should not be impeded by covering the ventilation openings with items, such
as newspaper, table-cloths, curtains, etc.
The apparatus shall not be exposed to dripping or splashing and no objects filled with liquids,
such as vases, shall be placed on the apparatus.
The mark indicates a risk of electric shock. The external wires must be installed by an
instructed person or ready-made leads or cords must be used.
To prevent injury, this apparatus must be securely attached to the floor/wall in accordance with
the installation instructions.
Danger of explosion if the battery is incorrectly replaced. Replace only with the same or
equivalent types.
The battery (battery or batteries or battery pack) shall not be exposed to excessive heat such as
sunshine, fire or the like.
Excessive sound pressure from earphones and headphones can cause hearing loss.
Listening to music at high volume levels and for extended durations can damage one's hearing.
In order to reduce the risk of damage to hearing, one should lower the volume to a safe,
comfortable level, and reduce the amount of time listening at high levels.
The mains plug or appliance coupler is used as disconnect device, it shall remain readily
operable. When not in use and during movement, please take care of the power cord set, e.g.
tie up the power cord set with cable tie or something like that. It shall be free from sharp edges
or similar which can cause abrasion of the power cord set. When put into use again, please
make sure the power cord is not damaged. In case of damages, please get the power cord
replaced by a similar one with the same specifications. The absence of a light indication on
the apparatus does not mean that it is fully disconnected from the mains. To disconnect the
apparatus completely, the mains plug must be pulled out.
Attention should be drawn to environmental aspects of battery disposal.
No naked flame sources, such as lighted candles, should be placed on the apparatus.
English
To prevent the spread of fire, keep candles or other open flames away from this product
at all times.
A USB terminal can provide a maximum of 500 mA.
Equipment with this symbol is a Class II or double insulated electrical appliance. It has
been designed in such a way that it does not require a safety connection to electrical
earth.
Operating Environment
Do not install this equipment in a confined space such as a bookcase or similar unit.
Do not use the set near damp, and cold areas, protect the set from overheating.
Keep away from direct sunlight.
Do not use the set near dust place.
3
Page 8

Do not attach candle to accessible opening area, to avoid flammable foreign material from
entering the TV.
1.2 WEEE Directive
Correct Disposal of this product. This marking indicates that this product should not be disposed
with other household wastes throughout the EU. To prevent possible harm to the environment
or human health from uncontrolled waste disposal, recycle it responsibly to promote the
sustainable reuse of material resources. To return your used device, please use the return and
collection systems or contact the retailer where the product was purchased. They can take this product
for environmental safe recycling.
1.3 Storage
Your device has been carefully checked and packed before shipping. When unpacking it, make sure that
all the parts are included and keep the packaging away from children. We recommend that you keep
the carton during the warranty period, to keep your device perfectly protected in the event of repair or
warranty.
1.4 Accessories
1x Installation instructions
1x remote control
2x AAA batteries
2x bases (feet)
4x M4X15 screws
1.5 Equipment set-up
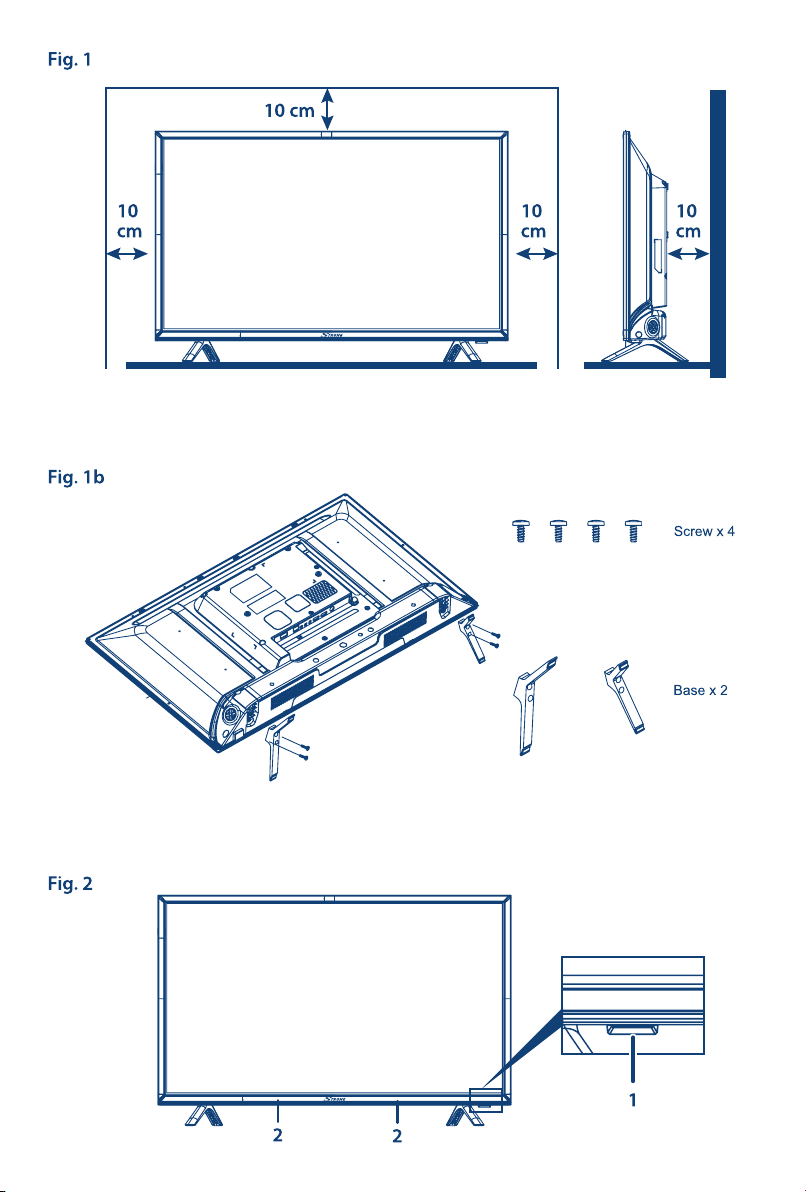
Fig. 1a
Install the display on a solid horizontal surface such as a table or desk. For ventilation, leave a space of
at least 10 cm free all around the set. To prevent any fault and unsafe situations, please do not place any
objects on top of the set. This apparatus can be used in tropical and/or moderate climates.
Stand assembly instruction
Fig. 1b
1. Carefully place the TV with its front side facing down on a cushioned flat surface in order to
protect the TV and the TV screen from damage.
2. Take out the 2x feet and assemble them to the T V.
NOTE: Left foot is marked with “L” and right foot with “R” on the bottom.
3. Fasten the feet to the bottom of the TV using the 4x M4X15 screws.
The symbols serve as follows:
WARNING Indicates warning information.
NOTE Indicates any other additional important or helpful information.
MENU Represents a button on the remote control or the TV.
(Bold characters)
Move to Represents a menu item within a window.
4
(Italic characters)
Page 9
2.0 INSTALLATION
2.1 Default PIN code: 0000
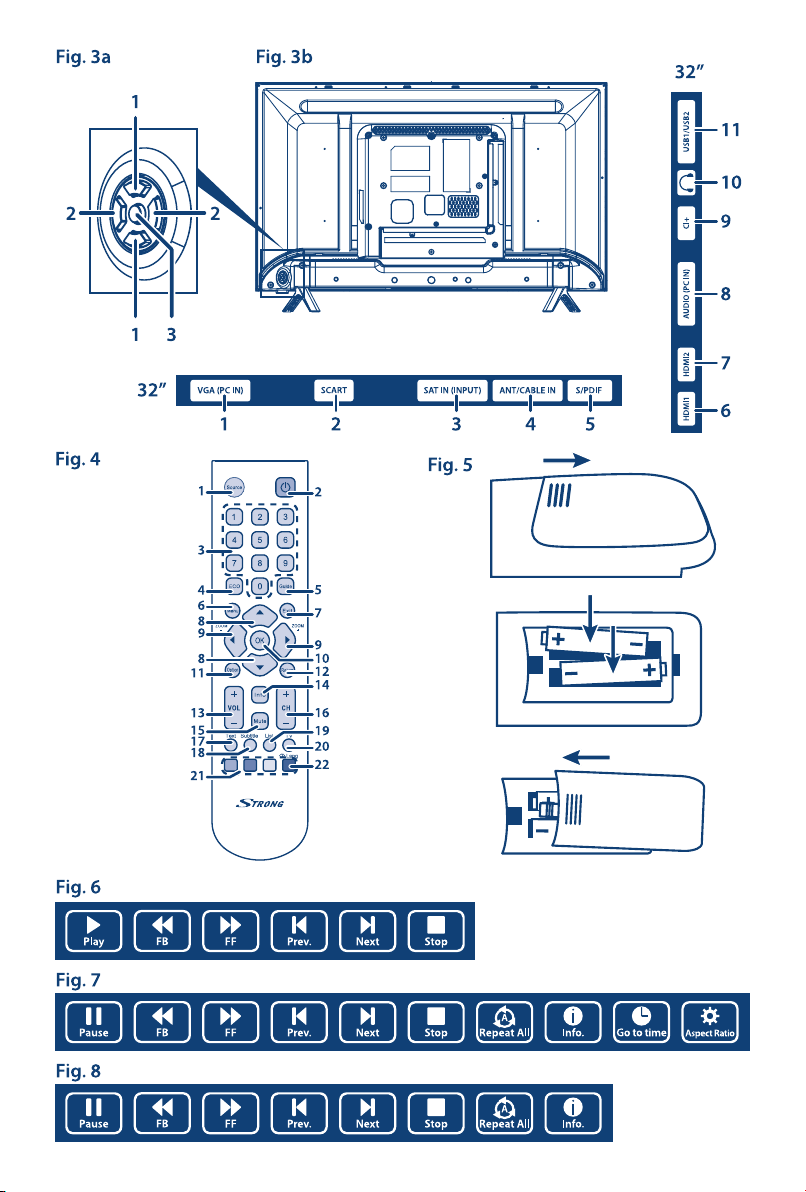
2.2 Front panel
NOTE: The graphics are for representation only.
1. Remote sensor/Power indicator
2. Speakers
2.3 Rear panel
NOTE: The graphics are for representation only.
1. pq Channel up/down button
2. t u Volume up/down button
3. q/Menu Press to turn the TV on or standby/Enter Menu/Source
NOTE: The graphics are for representation only.
1. VGA (PC IN): Video input for PC via VGA cable.
2. SCART: Connect devices like DVD or VCR using SCART cable.
3. SAT IN (INPUT): Connect a coaxial cable to receive signal from the LNB.
4. ANT/CABLE IN: Connect a coaxial cable to receive signal from the antenna.
5. S/PDIF: Use a coaxial cable to connect your TV to a compatible digital amplifier or
6. HDMl1: Connect HDMI input signal from signal source.
7. HDMl2: Connect HDMI input signal from signal source.
8. AUDIO (PC IN): Audio input for PC
9. Cl +: Connect a Conditional Access Module (CAM).
: Headphone or Earphone audio output, speakers will be muted when
10.
11. USB1/USB2: USB port.
Home theatre set.
earphone is plugged in and headphone selected.
English
Fig. 2
Fig. 3a
Fig. 3b
2.4 Remote control
1. Source To select connected devices.
2. q Standby/quit standby.
3. 0-9 To select a channel, page or setting.
4. ECO To select desired power saving mode.
Fig. 4
5
Page 10

5. Guide To toggle the Electronic Programme Guide on or off (only available for digital
6. Menu To access the main menu; to return to the previous menu.
7. Exit To exit the menu structure or Teletext.
8. pq To navigate in the main menu; to select menu options
9. tu To navigate in the main menu and channel list; to set functions and change
channels).
values. u* can also be used to open the corresponding submenu. Select/
change other
* To select the picture format.
NOTE: You are recommended to use the full screen mode. Do not use the display
In USB mode & when HDMI CEC is on, it is unavailable.
10. OK To open the corresponding submenu and activate a setting in menus and to
11. Option Press to change the picture mode
12. Return To return to the previous channel.
13. VOL+/ To control the volume.
14. Info To display programme information, if available.
15. Mute To switch the sound off and back on.
16. CH+/ To change channels.
17. TEXT To toggle Teletext on or off.
18. SUBTITLE To select a subtitle language available for selected digital TV programme.
19. LIST To display channel list.
20. TV To access TV mode.
21. Colour buttons To select tasks or Teletext pages. The RED button can also be used for MHEG
Lang To select a sound type available for selected analogue TV programme; to
22.
mode with black bars on both sides of the picture (such as 4:3) for a long
time, otherwise the TV screen may be damaged permanently.
display channel list.
function.
select an audio language available for selected digital TV programme.
2.5 Installing the batteries
NOTE: Pictures are only for reference. Actual items may differ.
Precautions for using the battery
Improper using of the battery will cause leakage. Carefully follow these instructions.
1. Please note the batteries' polarity to avoid short circuit.
2. When the battery's voltage is insufficient which affect the use range, you should replace it with
a new battery. Remove the batteries from the remote control unit if you do not intend to use it
for a long time.
3. Do not use different types of batteries (for example Manganese and Alkaline batteries) together.
4. Do not put the battery into fire, and charge or decompose the battery.
5. Please dispose batteries abide by relevant environmental protection regulation.
Fig. 5
6
Page 11
2.6 Using the remote control
Use the remote control by pointing it towards the remote sensor. Items between the remote
control and the remote sensor could block normal operation.
Do not cause the remote control to vibrate violently. Also, do not splash liquid on the remote
control, also do not put the remote control in a high humidity place.
Do not place the remote control under direct sunlight which will cause deformation of the unit
by heat.
When the remote sensor is under direct sunlight or strong lighting, the remote control will not
work. If so, please change the lighting or TV's position, or operate the remote control closer to
the remote sensor.
3.0 FIRST TIME INSTALLATION
After all connections, have been properly made, switch on your TV.
English
NOTE: The first time you switch on your TV, the installation procedure will start
with First Time Installation Menu (see chapter 3.1.1).
3.1 Select Input Source
Select which input source you want to use:
Press Source to display the input source list. Press pq to select the input source and confirm by
pressing OK.
3.1.1 First Time installation menu
To access the menu of first installation press Menu and use t u to select Setup. Press pq to select First
Time Installation and confirm with OK.
Language: Press t u to select the language to be used for menus and message.
Country Press pq to highlight the Country menu. Press t u to select your country.
3.1.2 Tuning Setup
Press OK to set the Tuning Setup menu.
Tune Type Select DT V for digital signals, ATV for analogue signals or DTV+ATV for both.
Digital Type Select Satellite DVB-S for signals from a satellite dish (LNB), Terrestrial DVB-T for
(Digital Type only available for DVB-T and DVB-C)
signals from terrestrial antenna or Cable DVB-C for signals from cable.
3.2 DVB-S installation
Satellite Setting
First select the Digital Type by pressing t u to select Satellite (DVB-S) for satellite broadcasts. Then use
pq to select the following settings:
Satellite Press t u to highlight the satellite your dish is aimed at.
Scan Mode Press t u to select Default, Blind Scan or Network
7
Page 12

Channel Type Press t u to select Free to search Free-To-Air channels only, Scrambled
Service Type Press t u to select DTV to search video channels only, Radio to search radio
to search scrambled channels only or Free+Scramble to search FTA and
Encrypted channels.
channels only or All to search both. After setting the options above press OK
to start the scanning.
3.3 DVB-T installation
Terrestrial Setting
First select the Tune Type by pressing t u to select DTV, ATV or DTV+ATV (DTV to search digital
broadcasts and ATV to search analogue broadcasts). Then select Digital Type to select DVB-T (for
terrestrial broadcasts). Press OK to start searching.
3.4 DVB-C installation
Cable Setting
First select the Tune Type by pressing t u to select DTV, ATV or DTV+ATV (DTV to search digital
broadcasts and ATV to search analogue broadcasts). Then select Digital Type to select DVB-C (for cable
broadcasts).
In Scan Type select Full or Blind Scan for a complete scan or select Network Scan if you want to insert a
specific frequency provided by the broadcaster. If provided, insert also the Network ID and Symbol Rate,
otherwise just select Auto.
Press OK to start the searching.
4.0 ELECTRONIC PROGRAMME GUIDE EPG
EPG stands for Digital Electronic Programme Guide. It is supplied by the broadcasters and offers
information on programmes. You can access it in digital mode by pressing Guide on the remote control.
Press Guide to bring up the EPG interface. Use pq t u to select a programme. Then press the
COLOUR BUTTONS for entering the required settings.
GREEN Open the reminder setting. Next to the title of the selected program, a clock symbol
YELLOW Access programme guide of previous day
BLUE Access programme guide of next day
will appear and the reminder will be displayed once. By pressing the GREEN button
two times the letter D (daily) appears, the reminder will be displayed daily. By pressing
the GREEN button 3 times, the letter W (weekly) appears, the reminder will be
displayed weekly. Press it 4 times, the letter A (monthly) will appear. Press it 5 times and
the reminder disappears.
5.0 MENU SETTINGS
5.1 Menu control (DTV mode)
Press Menu to enter the main menu. Press t u to access one of the submenus. Press pq and OK to
select the option of your choice or wish to adjust. Press OK to enter the item. Press OK to save and return
back to the previous menu.
8
Page 13

5.2 Channel menu
Press Menu to display the main menu. The Channel menu is the first that appears. Press pq to select the
option you wish to adjust in the Channel menu.
Press OK to adjust. After finish your adjustment, press OK to save and return to the previous menu.
5.2.1 Auto Tuning
Press pq to select Auto Tuning, then set the Tuning Setup menu according to your needs and proceed
with OK.
5.2.2 Dish Setup (in DVB-S mode only)
If you use Satellite as input source, you should first set the Dish Setup menu. In this menu, you can easily
modify the Satellite and LNB settings. Afterwards you may start the Auto Tuning.
5.2.3 DTV Manual Tuning (in DVB-T mode only)
Search and store programmes manually. Press pq to select DTV Manual Tuning.
Press t u to select a Channel No., and then press OK to start the search. The search stops when a
programme is found and this programme will be stored in the current channel position. If you want to
stop the search, press Menu.
5.2.4 ATV Manual Tuning (in DVB-T/C mode only)
Search and store programmes manually (analog). Press pq to select ATV Manual Tuning. Then press OK
to enter the submenu.
Press pq to select Current CH 1 (maybe other number), Colour System and Sound System. Then select
search and press u to search towards higher frequency or press t to search towards lower frequency.
The search stops when a programme is found and this programme will be stored in the current channel
position. If you want to stop the search, press Exit.
Current CH Set the channel number
Colour System Select the colour system (Available: AUTO, PAL, SECAM)
Sound System Select the Sound system
Fine-Tune Adjust the frequency of the channel
Search Start the channel search
English
5.2.5 CADTV Manual Tuning (in DVB-C mode only)
Search and store programmes manually (digital). Press pq to select CADTV Manual Tuning. Then press
OK to enter the sub-menu.
Here it is possible to insert a specific frequency (usually provided by the broadcaster). In this case, it will
be requested to insert a specific frequency, Symbol Rate and QAM Type. Use pq to select the option to
change, then use the number keys on the remote control to insert the frequency and the Symbol Rate;
use t u to set QAM Type.
By selecting OK the TV will start the search.
9
Page 14

5.2.6 Channel settings
Programme Edit Edit the programmes. You can press the COLOUR BUTTONS on the remote
Schedule List Press pq in the Channel. Select Schedule List, then press OK to enter the sub-
Signal Information Showing the information of current DTV channel. Only available with DTV
Cl information Enables the user to select from the CAM-provided menu. Select the Cl menu
control to skip programmes, rename and delete programmes or move
programmes.
menu. Use the COLOUR BUTTONS to modify your settings.
signal.
based on the menu PC card.
5.3 Picture menu
Picture Mode Press pq to select the Picture mode, then press OK. Available choices are
5.3.1 Contrast/Brightness/Colour/Tint/Sharpness
If Picture Mode is set to Personal you are able to change the following settings:
Press pq to select an option, then press t u to adjust.
Contrast Adjust the highlight intensity of the picture, but the shadow of the picture is
Brightness Adjust the optical fiber output of the entire picture, it will affect the dark
Colour Adjust the saturation of the colour based on your own preference.
Tint Adjusts the balance between the red and green levels.
Dynamic, Standard, Mild and Personal. You can change the value of contrast,
brightness, colour, tint and sharpness when the picture is in Personal mode
only.
invariable.
region of the picture.
NOTE: Tint is available to be adjusted only when the system of the video signal is
Sharpness Adjust the peaking in the detail of the picture.
NTSC.
5.3.2 Colour Temperature
In this menu you can change the overall colour cast of the picture.
Press pq to select Colour Temp, then press OK/u to enter a submenu. Press pq to select the relevant
picture effect (DEFAULT: Normal).
Cold lncrease the blue tone for the white.
Normal Increase the neutral colours for the white.
Warm lncrease the red colour for the white.
5.3.3 Noise Reduction
In this menu you can filter out and reduce the image noise and improve picture quality. Press pq to
select Noise Reduction, then press OK/u to enter a submenu.
10
Page 15
Off Select to turn off video noise detection.
Low Detect and reduce low video noise.
Middle Detect and reduce moderate video noise.
High Detect and reduce enhanced video noise.
Default Set as Default.
5.3.4 HDMI Mode
In this menu, you can select between: Auto, PC and Video
English
NOTE: Only available if the TV is connected to an external device (e.g. receiver, PC,
etc.) via HDMI connection.
5.4 Sound menu
Press Menu to display the main menu. Press t u to select Sound in the main menu. Press pq to
select the option that you want to adjust in the Sound menu. Press OK to adjust. After finishing your
adjustment, press OK to save and return to the previous menu.
Sound Mode Press pq to select Sound Mode, then press OK to enter a submenu. By
Standard Produces a balanced sound in all environments.
Music Preserves the original sound. Good for musical programmes.
Movie Enhances treble and bass for a rich sound experience.
Sports Enhances vocals for sports.
Personal Select to customize sound settings.
NOTE: Treble and Bass are only available in {Personal} mode. You can adjust them
Treble Adjusts the higher frequency of the sound.
Bass Adjusts the lower frequency of the sound.
Balance This item can adjust the speaker’s output. It enables you to listen to the best
Auto Volume Level This item is used for reducing the difference between the volume of channel
SPDIF Mode Press p q to select SPDIF Mode. Press OK/u to select Off PCM Auto.
AD Switch Press OK/u to enter the sub-menu and use t u to turn this function On or
Set this function to On if you want to enable the playback of the Audio
pressing pq choose the preferred setting and confirm with OK.
as you like.
at your position. Press pq to select Balance, press t u to adjust.
and programme automatically. Press pq to select Auto Volume Level, then
press t u or OK to select On or Off.
Off. To adjust the volume press p q and use t u to adjust it.
Description: a narrator will describe what is happening on the screen for blind
or visually impaired viewers
11
Page 16

5.5 Time menu
Press Menu to display the main menu. Press t u to select Time in the main menu. Press p q to do
further adjustments. Press OK to return to the previous menu.
Clock The time is automatically obtained from the channel transmission and
Time Zone Press p q t u to select Time Zone. Press OK to save.
Sleep Timer Press p q to select Sleep Timer. Available Options: Off, 15 min., 30 min., 45
Auto Standby This function allows you to set the automatic shutdown of your TV. Choose
OSD Timer This function allows you to choose how long the info banner is displayed.
doesn’t have to be set manually. Should this function not be provided by the
broadcaster, it is possible to set it by pressing OK and set date and time by
pressing pq t u.
min., 60 min., 90min., 120 min., 240 min..
between 3H, 4H, 5H or Off to disable this function.
Choose between 5s, 15s or 30s.
5.6 Lock menu
Press Menu to display the main menu. Press t u to enter the Lock menu settings. Press p q to select
the options. The following options are available:
System Lock This option allows you to enable or disable the password protection. Press OK
Set Password The default password is 0000, to customize the password press OK and follow
Channel Lock This option allows you to prevent viewing of one or more channels. Press OK
Parental Guidance Press OK to enter submenu, then press pq to select and OK to set the age
Key Lock This function allows you to lock and unlock the buttons on your TV. To access
to set this function On or Off.
the instruction within the menu.
to display the channel list and select with pq the channel you want to be
locked. Press GREEN to lock it. Consider the same procedure to lock other
channels if needed.
for suitable programs for children.
this feature, you must first unlock the System Lock by inserting the password,
then press pq to select this function and press t u or OK to enable or
disable this function.
5.6.1 Hotel Mode
Hotel Mode You can switch the hotel mode to On or Off.
Source Lock Here you have the possibility to lock the input sources: Satellite, DTV (DVB-C/
Default Source The options to modify are Off, Satellite, Media and all other sources selected in
Digital Type Depending on the type of installed DTV channels, you can select DVB-T or
12
DVB-T), ATV, PC, SCART, HDMI 1, 2. The locked input sources will not be
selectable with the Source button. In the case of satellite and DTV (DVB-T or
DVB-C) channels you are not able to lock these sources.
the Source menu.
DVB-C.If DVB-C digital cable channels are not installed, this menu option is
inactive and displays the DVB-T.
Page 17

Default Prog Set the default channel when the TV device is switched On (but only if
Satellite, DVB-T or DVB-C are selected as Default Source).
Default Volume Define the default volume when the TV device is switched on.
Max Volume Define the maximum volume setting.
Import Database Read all settings set in Hotel Mode from USB
Export Database Copy all settings set in Hotel Mode to USB
Clear Lock Return to default settings of the Hotel Mode function.
5.7 Setup Menu
Language Select the Menu language of your choice. The default setting is English. Press
pq to select the menu language.
TT Language Press pq to select TT Language, then press OK to go to the sub-menu.
Audio Languages Press pq t u to select your chosen Audio Language, then press OK.
Subtitle Language Press pq t u to select your chosen Subtitle Language, then press OK
Hearing lmpaired Press pq to select Hearing lmpaired. The available options are On or Off.
Aspect Ratio Highlight Aspect Ratio in the menu and press OK to select the display mode.
Available options: Auto, 4:3, 16:9, Zoom1 and Zoom2.
Blue Screen Press pq to select this function. By pressing t u or OK it is possible to
enable or disable this function.
First Time Installation See chapters 3 – 3.4.
Reset Press pq to select this function, by pressing OK you will reset all the settings
contained in the main menu
Software Update (USB) Press OK and use t u to select Yes if you want to update the software or No
to go back to the main menu. For more information see also chapter 6.2.5.
HDMI CEC See chapter 5.7.1.
Software Version Your current software version is displayed.
English
5.7.1 HDMI CEC
CEC Control Press t u to turn the HDMI CEC On or Off.
Audio Receiver Press t u to turn the Audio Receiver On or Off.
Device Auto Power Off Press t u to turn on this feature. When finished turn off your TV. The
connected device will turn off automatically.
TV Auto Power On Press t u to select this option. When finished, turn on the connected device.
The TV will switch on automatically.
Device List Press OK to open the main menu of device.
Device Menu Access the device menu.
6.0 USB
6.1 Reminder when using the USB player
1. Some USB storage devices may not be compatible to operate smoothly with this TV.
13
Page 18

2. Back up all of the data in the USB storage device in case data is lost due to an unexpected
accident. STRONG does not assume any liability for the losses by misuse or malfunction. Data
backup is consumer's responsibility.
3. For large file sizes, the loading speed may be slightly longer.
4. The recognition speed of a USB storage device may depend on each device.
5. When connecting or disconnecting the USB storage device, make sure the TV is not in USB
mode otherwise the USB storage device or the files stored in it may be damaged.
6. Please use only a USB storage device which is formatted in FAT16, FAT32, NTFS (playback only)
file system provided with the Windows operating system. In case of a storage device formatted
as a different utility programme which is not supported by Windows, it may not be recognized.
7. When using a USB Hard Disk Drive which is not powered independently, ensure its power does
not exceed 500 mA. Otherwise the TV system will change into standby mode, and you must pull
out the USB Hard Disk and restart the TV system.
8. An "Unsupported File" message will be displayed if the file format is unsupported or the file is
corrupted.
9. FHD big picture needs longer time to process, which is not caused by the TV. Please be patient.
10. This TV may not support some multimedia files changed and upgraded as the change of the
encoding format or other technical aspects advances.
11. Please refer to chapter 9. Appendix for a list of supported file formats for USB playback.
6.2 USB menu
Press Source. Press p q to select Media, then press OK. You can view movie, music and photo files from
your USB storage devices. Connect a USB storage device to the USB input terminal and select the types
of media on the home page: Movie, Music and Photo. Press OK, the screen will show the connected USB
device, press OK again to view the file folders and files. Press pq to select a folder, press OK to open the
folder and select the files, then press OK to tick them. Highlight the one you want to play first, press u 2
to start playing or select a file and press u 2 to start playing directly. Press 3 to stop playing and return
to upper lever folder. Continuously press Return to go back to upper level folder. Repeat again to select
and play another media type.
NOTE: By choosing one of the three media types, for example Movie, the folders
inside will display only video files and no other formats.
6.2.1 Play movies
Fig. 6
Press INFO to display/exit from the menu bar (Fig. 6).
Play & Pause/Stop/Prev./Next
Fast Reverse/Fast Forward Press and hold 5 6 for seconds to draw the playing progress as your desire,
Information Highlight the corresponding icon and press OK to view the information of the
Go to time Skip to specific point by input time. Highlight the corresponding icon and
14
Press u 2 to play or pause the playback. Press 3 to stop playing. Press
7 8 to play the previous or the next video file. Press INFO and use t u to
highlight the corresponding icon on the control bar, then press OK. The TV
will response accordingly.
then press u 2 to start the playing from the new position.
playing video.
press OK to open the Input search time screen. Press t u to move the cursor
Page 19

and use the number buttons to insert the time. Press OK, the TV will start
playing from the set time.
Aspect Ratio Highlight the button and press OK to select the display mode.
6.2.2 Play music
Press INFO to display/exit from the menu bar (Fig. 7). Press the USB control buttons on the remote
control to do relevant operations.
Play & Pause/Stop/Previous/Next
Press u 2 to play or pause the playback. Press 3 to stop playing. Press
7 8 to play the previous or the next music file. Press t u to highlight
the corresponding icon on the control bar, and then press OK. The TV will
response accordingly.
Fast Forward/Fast Reverse Press and hold 5 6 for seconds to draw the playing progress as you wish,
then press u 2 on the remote control to start playing from the new position.
Repeat Highlight the icon and press OK. You can select 3 different modes: None to
disable the function, one to repeat one track only and All to repeat the entire
list once it is finished.
Information Highlight the icon and press OK to check the information of the playing
music.
NOTE
This menu only shows supported files.
Files with other file extensions are not displayed, even if they are saved on the same USB
storage device.
An over-modulated mp3 file may cause some sound distortion during playback.
This TV supports lyrics display (in English). The maximum number of characters per line is 48.
The file name of music and lyrics must be the same in order to display lyrics while the music is
playing.
If you want to show the associated lyrics on the screen with the music, you must store these in
the same folder using the same file name with ".Irc" file extensions.
English
Fig. 7
6.2.3 Browse photos
Fig. 8
Press INFO or q to display/exit from the menu bar (Fig.8). Press the USB control buttons on the remote
control to do relevant operations.
Play & Pause/Stop/Previous/Next
Press u 2 to play or pause the playback. Press 3 to stop playing. Press 7 8
to show the previous or the next picture. Press t u to highlight the icon on
the control bar, and then press OK. The TV will response accordingly.
Repeat Highlight the icon and press OK. You can select 3 different modes: None to
disable the function, one to repeat one track only and All to repeat the entire
list once it is finished.
Info Highlight the button and press OK to check the information of the shown
photo.
15
Page 20
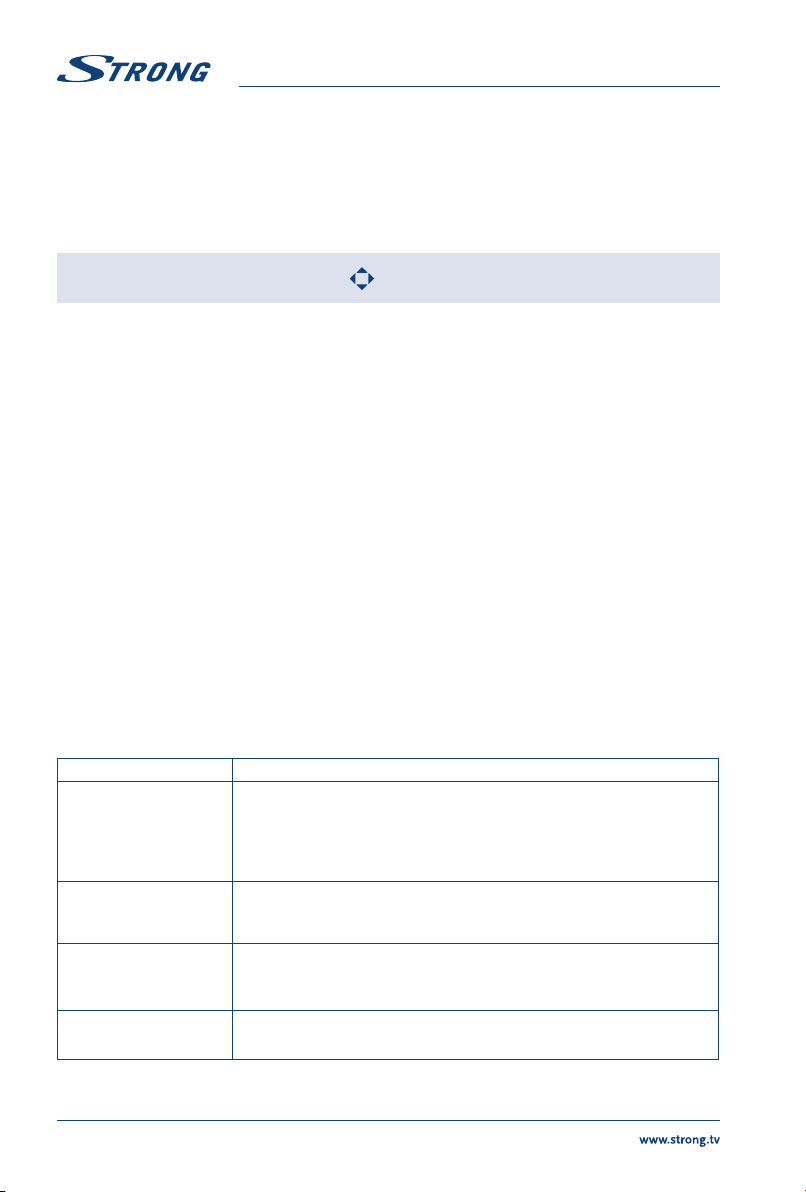
Rotate Highlight the icon in the menu bar and press OK to rotate the picture
Zoom In/Zoom Out Highlight the icon on the menu bar and press OK to zoom in or zoom out of
Move View When the image is magnified, use this function for convenient check.
90 degrees clockwise or counter clockwise.
the image.
Highlight this icon, press OK, then press t upq to move the image.
NOTE: The move function
is only available when the image is enlarged.
6.2.4 Browse text documents
Press t u to select Tex t in the main menu. Then press t u to select the drive disk you choose to watch
and OK to enter. Select the file you want to display by using pq t u and confirm with OK. Quit step by
pressing OK. Press t u to select return and go back to previous menu.
6.2.5 Software update via USB
From time to time you can check if there is an improved software version available. This can be viewed
and downloaded from our website www.strong.tv. Search the model number on our website’s service
support section. If there is an improved software version you can download the file and copy it to the
root of a USB device. Then press pq button to select Software Update (USB) from the SETUP menu
on your TV. Afterwards plug your USB device into the USB slot and press OK to update the respective
software. Confirm with Yes using t u. When the update is completed, remove the USB stick, disconnect
your device from the main power supply and plug in again.
7.0 TROUBLESHOOTING
Before calling a service technician, review following information for possible causes and solutions for
the problem you are experiencing. If the TV does not work properly after checking it, please contact
your local service line or STRONG dealer. Alternatively you can send a support mail via our website
www.strong.tv.
Problem Possible cause and solution
No picture,no sound 1. Check if the fuse or circuit breaker is working.
No colour 1. Change the colour system.
The remote control does
not work
No picture, normal sound 1. Adjust the brightness and contrast.
2. Plug another electrical device into the outlet to make sure it is
working or turned on.
3. The power plug is in bad contact with the outlet
4. Check the signal source.
2. Adjust the saturation.
3. Try another channel. Black-white programme may be received.
1. Change the batteries.
2. The batteries are not installed correctly.
3. Main power is not connected.
2. Broadcasting failure may happen.
16
Page 21
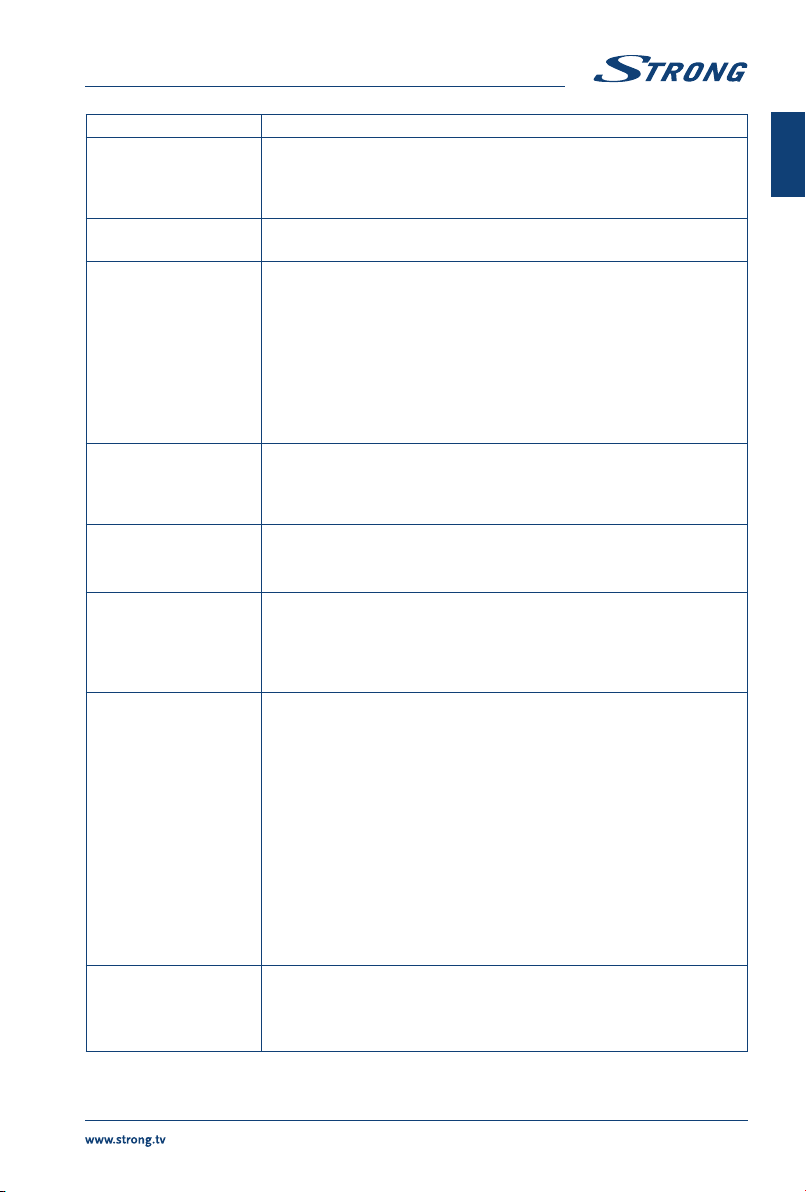
Problem Possible cause and solution
Normal picture, no sound 1. Press the volume up button to increase the volume.
Unorderly ripples on the
picture
Snowy dots, blocking and
interference
Ghost Ghosts are caused by the television signal following two paths. One is the
Radio frequency
interference
Playback of video is
causing picture freeze/
macro blocks or similar
distortion, especially on
HD content.
No signal or weak signal,
intermittent reception.
Bad picture/blocking
error during heavy rain.
2. The volume is set to mute, press ! to restore the sound.
3. Change the sound system.
4. Broadcasting failure may happen.
It is usually caused by local interference, such as cars, daylight lamps and
hair driers. Adjust the antenna to minimize the interference.
If the antenna is located in the fringe area of a television signal where the
signal is weak, the picture may be marred by dots, show blocking or breakups. When the signal is extremely weak, it may be necessary to install a
special antenna to improve the reception.
1. Adjust the position and orientation of the indoor/outdoor
antenna.
2. Check the connection of the antenna.
3. Fine tune the channel.
4. Try another channel. Broadcasting failure may happen.
direct path, the other is reflected from tall buildings, hills, or other objects.
Changing the direction or position of the antenna may improve the
reception.
This interference produces moving ripples or diagonal streaks, and in
some case, loss of contrast in the picture. Find out and remove the radio
interference source.
Read/write speed of your USB device could be too low. Make sure to use a
USB storage device with sufficient speed and space. Pen drives (USB sticks)
may not support sufficient speed.
a) Cables might have loosened; moisture might have entered into
cables or connectors, heavy rain at present or heavy storm at
present.
Check the cable connections, LNB and other equipment
connected between the LNB and the receiver, or peak the dish.
Wait for rain/storm to subside. Ask a local satellite specialist for
advice.
b) The satellite dish is not pointing at the (correct) satellite(s).
Adjust the dish. Ask a local satellite specialist for advice.
c) Satellite dish is too small, trees or buildings in path.
Change to a larger dish or change position of dish.
d) Signal is too strong, dish is oversized.
Connect a signal attenuator to the LNB input. Ask a local satellite
specialist for advice.
Heavy rain will attenuate satellite signals, below a certain level blocking will
occur.
Make sure your dish installation is up to standards to minimize rain effects.
When in doubt, ask a local satellite specialist for advice.
English
17
Page 22

NOTE: If the problem persists after these solutions, please contact your local
support centre or send a support mail via our website www.strong.tv.
8.0 SPECIFICATIONS
Audio
Audio Output: 5 W + 5 W
Video
Channel coverage: DVB-T/T2:174 MHz-230 MHz; 470 MHz-860 MHz
DVB-C: 50-858 MHz
DVB-S/S2: 950 MHz-2150 MHz
System: DTV: DVB-T/T2, DVB-S/S2, DVB-C
ATV: PAL/SECAM (BG/DK/I)
AV: PAL, NTSC
Connectors
1x ANT IN
1x CABLE IN
1x SAT IN
1x CI+
2x HDMI
1x SCART
1x USB
1x PC IN
1x PC AUDIO IN
1x S/PDIF (coax.)
1x Headphones
General Data
Operating voltage: 180-240 V AC 50/60 Hz
Power consumption: max. 55 W,
Power consumption in standby: <0.5 W
Operating temperature: +5 °C ~ +35 °C
Storage temperature: -15 °C ~ +45 °C
Operating humidity: 20% ~ 80% RH, non-condensing
Storage humidity: 10% ~ 90% RH, non-condensing
Dimensions (WxHxD) in mm: 733,3 x 181,2 x 476,9
Net-weight: 4,6 kg
18
Page 23

English
19
 Loading...