

Page 1
Digital HD Cable Receiver
SRT 3002
User Manual
Bedienungsanleitung
Uživatelská příručka
Používateľská príručka
Használa útmutató
Ръководство за употреба
Picture similar
Page 2
Page 3
Page 4
Supplied by STRONG Austria
Represented by
STRONG Ges.m.b.H.
Franz-Josefs-Kai 1
1010 Vienna
Austria
Email: [email protected]
23 Apr 2018 14:56
Page 5

Your receiver is delivered with USB multimedia support. After downloading the optional software for
recording via USB from our webshop at www.strong.tv, the receiver can be upgraded to support the
recording function via USB. This user manual describes the full functionality including the recording
function and may not be applicable if the software for recording via USB has not yet been installed.
Licenses
THIS PRODUCT IS LICENSED UNDER THE AVC PATENT PORTFOLIO LICENSE FOR THE PERSONAL AND
NONCOMMERCIAL USE OF A CONSUMER TO (i) ENCODE VIDEO IN COMPLIANCE WITH THE AVC STANDARD (“AVC
VIDEO”) AND/OR (ii) DECODE AVC VIDEO THAT WAS ENCODED BY A CONSUMER ENGAGED IN A PERSONAL AND
NON-COMMERCIAL ACTIVITY AND/OR WAS OBTAINED FROM A VIDEO PROVIDER LICENSED TO PROVIDE AVC VIDEO.
NO LICENSE IS GRANTED OR SHALL BE IMPLIED FOR ANY OTHER USE. ADDITIONAL INFORMATION MAY BE OBTAINED
FROM MPEG LA, L.L.C. SEE HTTP://WWW.MPEGLA.COM
This product contains one or more programs protected under international and U.S. copyright laws as unpublished
works. They are confidential and proprietary to Dolby Laboratories. Their reproduction or disclosure, in whole or
in part, or the production of derivative works therefrom without the express permission of Dolby Laboratories is
prohibited. Copyright 2003-2009 by Dolby Laboratories. All rights reserved..
English
22 May 2018 22:42
1
Page 6

TABLE OF CONTENTS
1.0 INTRODUCTION 3
1.1 Safety Instructions 3
1.2 Storage 4
1.3 Equipment Set-up 4
1.4 Accessories 4
1.5 Usage of external USB devices 4
2.0 YOUR RECEIVER 5
2.1 DEFAULT PIN: 1234 5
2.2 Front Panel 5
2.3 Rear Panel 5
2.4 Remote Control 5
2.5 Installing the batteries 6
2.6 Using the remote control 6
3.0 CONNECTION 6
3.1 Connecting to cable TV 6
3.2 Connecting to TV with HDMI cable 6
3.3 Connecting to TV with SCART cable 6
3.4 Connecting to a Digital Audio Amplifier with S/PDIF 7
3.5 Connecting to a Digital Audio Amplifier and TV using HDMI 7
3.6 Connecting a USB storage device 7
4.0 STARTING UP FOR THE FIRST TIME 7
4.1 DVB-C Installation 8
5.0 QUICK GUIDE TO USING YOUR RECEIVER 8
6.0 OPERATION 9
6.1 Changing channels 9
6.2 Info Banner 9
6.3 Selection of audio language 9
6.4 Teletext 9
6.5 Subtitles 9
6.6 Timeshift* 10
6.7 EPG (Electronic Programme Guide) 10
6.8 Instant Recording* 10
7.0 MAIN MENU 10
7.1 Edit Channel 10
7.2 Installation 12
7.3 System Setup 13
7.4 Tools 15
7.5 Media Player* 17
8.0 TROUBLESHOOTING 19
9.0 TECHNICAL SPECIFICATIONS 20
STRONG declares that this item complies with the basic requirements and other relevant regulations of directives EMC 2014/30/EU, LVD
2014/35/EU and RoHS 2011/65/EU.
The EU declaration of conformity is available at the following internet address: http://www.strong.tv/en/doc
Subject to alterations. In consequence of continuous research and development technical specifications, design and appearance of products
may change. HDMI, the HDMI logo and High-Definition Multimedia Interface are trademarks or registered trademarks of HDMI Licensing LLC
in the United States and other countries. Manufactured under license from Dolby Laboratories. Dolby Audio, Dolby Digital, Dolby Digital Plus
and the double-D symbol are registered trademarks of Dolby Laboratories. All other product names are trademarks or registered trademarks
of their respective owners.
© STRONG 2018. All rights reserved.
2
Page 7

1.0 INTRODUCTION
1.1 Safety Instructions
Read all of the instructions before operating the device. Keep these instructions well for later use.
Only use attachments/accessories specified or provided by the manufacturer (such as the exclusive supply
adapter, battery etc.).
Please refer to the information on the product enclosure for electrical and safety information before installing or
operating the apparatus.
To reduce the risk of fire or electric shock, do not expose this apparatus to rain or moisture.
The ventilation should not be impeded by covering the ventilation openings with items, such as newspaper,
table-cloths, curtains, etc.
The apparatus shall not be exposed to dripping or splashing and no objects filled with liquids, such as vases, shall
be placed on the apparatus.
This mark indicates a risk of electric shock.
To prevent injury, this apparatus must be securely attached to the floor/wall in accordance with the installation
instructions.
Danger of explosion if the battery is incorrectly replaced. Replace only with the same or equivalent types.
The battery (battery or batteries or battery pack) shall not be exposed to excessive heat such as sunshine, fire or
the like.
Excessive sound pressure from earphones and headphones can cause hearing loss.
Listening to music at high volume levels and for extended durations can damage one's hearing.
In order to reduce the risk of damage to hearing, one should lower the volume to a safe, comfortable level, and
reduce the amount of time listening at high levels.
The mains plug or appliance coupler is used as disconnect device, it shall remain readily operable. When not in
use and during movement, please take care of the power cord set, e.g. tie up the power cord set with cable tie
or something like that. It shall be free from sharp edges or similar which can cause abrasion of the power cord
set. When put into use again, please make sure the power cord is not damaged. The absence of a light indication
on the apparatus does not mean that it is fully disconnected from the mains. To disconnect the apparatus
completely, the mains plug must be pulled out.
Attention should be drawn to environmental aspects of battery disposal.
No naked flame sources, such as lighted candles, should be placed on the apparatus.
To prevent the spread of fire, keep candles or other open flames away from this product
at all times.
Equipment with this symbol is a Class II or double insulated electrical appliance. It has been designed in
such a way that it does not require a safety connection to electrical earth.
Precautions
Never try to open the device. It is dangerous to touch the inside of the device due to high voltages and possible
electrical hazards. Opening the device will void the warranty of the product. Refer all maintenance or servicing to
suitably qualified personnel.
When you are connecting cables, be sure that the device is disconnected from the mains supply voltage. Wait a
few seconds after switching off the device before you move the device or disconnect any equipment.
It is a necessity that you only use an approved extension and compatible wiring that is suitable for the electrical
power consumption of the installed equipment. Please ensure that the electrical power supply corresponds with
the voltage on the electrical identification plate at the back of the device.
Operating Environment
Do not install this equipment in a confined space such as a bookcase or similar unit.
Do not use the set near damp, and cold areas, protect the set from overheating.
Keep away from direct sunlight.
Do not use the set near dust place.
Do not place candles near the opening area, to avoid flammable foreign material from entering the device.
English
3
Page 8

WEEE Directive
Correct Disposal of this product. This marking indicates that this product should not be disposed with other
household wastes throughout the EU. To prevent possible harm to the environment or human health from
uncontrolled waste disposal, recycle it responsibly to promote the sustainable reuse of material resources.
To return your used device, please use the return and collection systems or contact the retailer where the
product was purchased. They can take this product for environmental safe recycling.
1.2 Storage
Your device has been carefully checked and packed before shipping. When unpacking it, make sure that all the
parts are included and keep the packaging away from children. We recommend that you keep the carton during the
warranty period, to keep your device perfectly protected in the event of repair or warranty.
1.3 Equipment Set-up
We recommend you consult a professional installer to set up your equipment. Otherwise, please follow the instructions
below:
Refer to the user manual of your TV.
Make sure that the HDMI cable is in a good condition.
If you use TV SCART connection, use then well shielded SCART cable.
This manual provides complete instructions for installing and using this receiver. The following symbols will serve as
follow.
Warning Indicates warning information.
Tips Indicates any other additional important or helpful information.
MENU Represents a button on the remote control or the receiver. (Bold characters)
Move to Represents a menu item within a window. (Italic characters)
1.4 Accessories
Installation Instructions
Safety instructions/warranty cards
Troubleshooting
1 remote control unit
2x batteries (AAA type)
WARNING The batteries should not be recharged, disassembled, electrically short-circuited, be mixed
or used with other types of batteries. If rechargeable accumulators instead of batteries are
going to be used (e.g. NiMH), we recommend using types with low self-discharge to ensure
long time operation of your remote control.
1.5 Usage of external USB devices
It is recommended to use USB 2.0 storage devices or higher. If your device is not compatible to USB 2.0
specifications, recording, playback and other multimedia functions of the receiver might not work properly. *
To ensure best performance of your USB storage device please format it via your receiver (through the menu
“Media Player”) to FAT32 system. Other file systems are not supported by the receiver. However, it is possible to
use already NTFS formatted disks.
STRONG cannot guarantee compatibility with all types of USB storage devices.
If you are going to use external USB HDDs (Hard Disk Drives), please consider that power specifications may
exceed the supported output of your receiver (max. 5 V/500 mA). If so, please connect your USB HDD to an
according external power adapter.
It is advised not to store important information on USB storage devices used with the receiver. Always make
backups of data on your USB storage device before using it with this receiver. STRONG will not take responsibility
for any loss of information or circumstances caused by loss of information.
4
Page 9

*This user manual describes the full functionality including the recording function and may not be applicable if the software for recording via
USB has not yet been installed.
2.0 YOUR RECEIVER
2.1 DEFAULT PIN: 1234
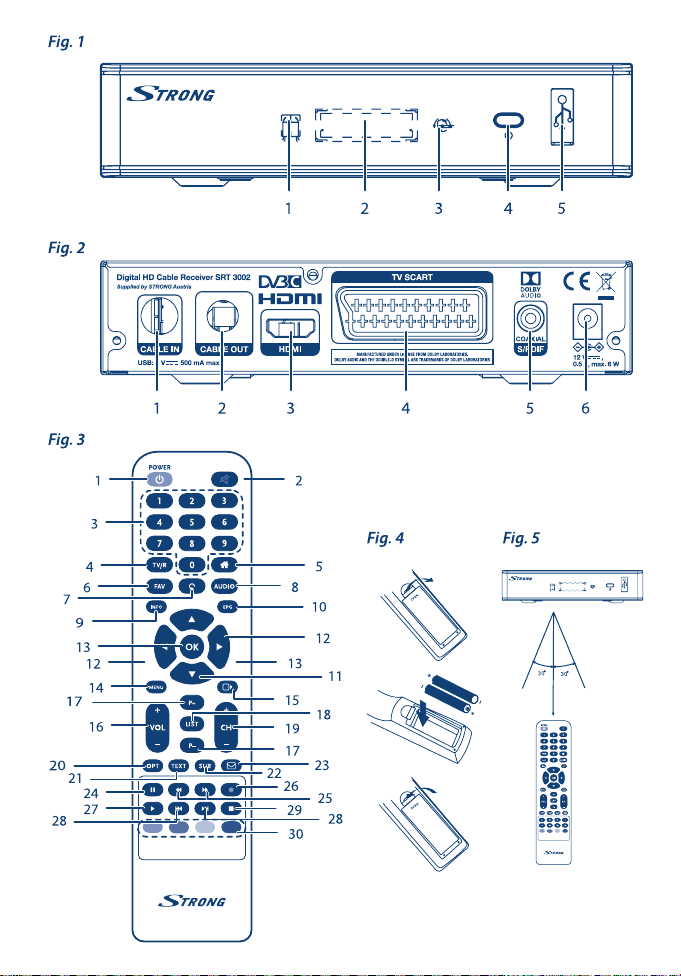
2.2 Front Panel
1. IR Sensor Receives commands from the remote control
2. LED Display Shows channel number and time in standby
3. Mode Indicator LED RED indicates that the receiver is in STANDBY mode.
4. Standby/ON button Switches the receiver ON or into Standby
5. USB To connect your USB storage device.
2.3 Rear Panel
1. CABLE IN Connect your receiver to the wall connector provided by the cable operator
2. CABLE OUT Connect your receiver to another digital receiver or to a TV to keep using its internal
3. HDMI Connect your receiver with your TV set using an HDMI cable.
4. TV SCART Connect your receiver with your TV set using a SCART cable.
5. S/PDIF (coax.) Connect your receiver to a digital home theatre, AV receiver or digital audio
6. Power connector The receiver requires a wall adapter, mains voltage input 100~240 V AC 50~60Hz
(analogue) tuner (loop through function)
amplifier.
12 V, 0.5 A DC output. Please check the local power conditions before connecting
the receiver to the mains supply.
2.4 Remote Control
1. q Switches the receiver On/Standby.
2. ! Mutes all audio outputs of the receiver
3. 0~9 Enter channel number in TV mode or value input in menu
4. TV/R Toggles between TV or RADIO mode.
5. No function
6. FAV Opens the favourite group selection.
7. 9 One step back in menu or back to previous channel.
8. AUDIO Opens the audio language selection*
9. INFO Opens the current channel information; 2x opens the technical information about
10. EPG Opens the EPG (Electronic Programme Guide) in TV mode*
11. p/q Change channel to next/previous. Menu: Moves the cursor up/down.
12. tu Decreases/increases the volume level. Menu: Change settings for specific menus.
13. OK Opens the current channel list in menu: for confirmation
14. MENU Opens the main menu, in a menu you will get one step back.
15. Exits from the menu or sub-menu.
16. VOL+/VOL Increases/decreases the volume level.
17. P+/P Page up/down in all list modes.
18. LIST Call the current channel list.
19. CH+/CH Channel up/down.
20. OPT No function.
21. TEXT Opens the Teletext if available*
22. SUB Shows a list of subtitle languages. *
the current channel.
Fig. 1
Fig. 2
Fig. 3
English
5
Page 10

23. No function
24. 2 Hold play during playback/starting Timeshift mode**
25. 5/6 Fast rewind/fast forward.
26. 4 Starts recording of the currently watched programme**
27. u Opens the multimedia menu
28. 78 Jump function in multimedia playback
29. 3 Stop playback.
30. COLOUR BUTTONS In different menus for specific functions
* Subtitles, Videotext, EPG (Electronic Programme Guide), and Audio languages are depending on availability in the specific broadcast
**This user manual describes the full functionality including the recording function and may not be applicable if the software for recording via
USB has not yet been installed.
2.5 Installing the batteries
Open the cover on the remote control and insert 2x AAA batteries into the compartment. Correct position of the polar
diagram shows the batteries inside the compartment.
1. Open the cover.
2. Insert the batteries.
3. Close the lid.
WARNING The batteries should not be recharged, disassembled, electrically short-circuited, be mixed or
used with other types of batteries.
Fig. 4
2.6 Using the remote control
To use the remote control, point it towards the front of your receiver. The remote control supports a range of up to 5
meters distance to the receiver at an angle of up to approx. 30 degrees.
NOTE Managing the receiver will be limited or not possible if there are obstacles between the
remote control sensor (at the front panel of the receiver) and the remote control. Direct
sunlight or very bright light can reduce or disturb the reception of the remote control signals.
3.0 CONNECTION
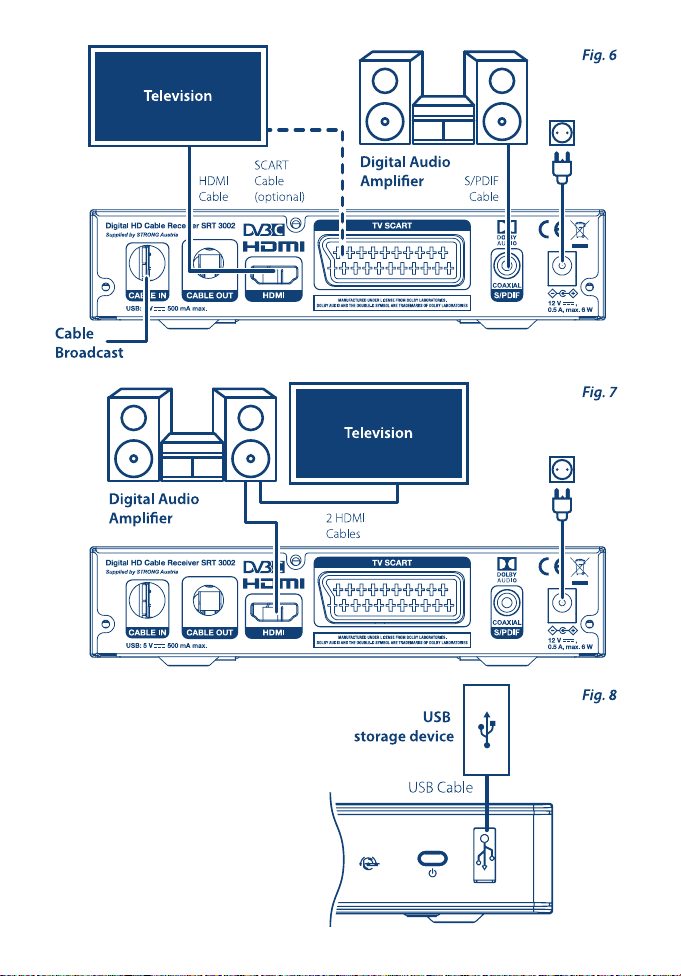
3.1 Connecting to cable TV
Connect your receiver to the wall connector provided by your cable operator, using a high quality coaxial cable (75
Ohms). Normally, wall connections could be either F-type or IEC male type. Use a cable with suitable connectors. This
receiver has an IEC female input.
3.2 Connecting to TV with HDMI cable
The TV set shall be connected with the receiver using a good quality HDMI cable. This connection gives the highest
possible quality.
3.3 Connecting to TV with SCART cable
Your receiver is also equipped with a SCART connector; alternatively, the TV set can be connected to the receiver using
a good quality SCART cable.
6
Fig. 5
Fig. 6
Fig. 6
Fig. 6
Page 11

3.4 Connecting to a Digital Audio Amplier with S/PDIF
By connecting your receiver to a digital amplifier or home theatre system, you can enjoy the best possible sound
quality and multi-channel audio (depending on the broadcast). Connect your Digital Audio Amplifier or home theatre
system with a suitable cinch cable to the S/PDIF connector on the back of the receiver.
3.5 Connecting to a Digital Audio Amplier and TV using HDMI
By connecting your receiver to the latest digital amplifiers or Home Cinema systems you will enjoy the best possible
sound quality and multi-channel audio (depending on the broadcast). Connect the HDMI output of the receiver to an
input of your amplifier, and then connect the HDMI output of the amplifier to your TV set. Select the correct input on
your amplifier to watch and listen to programmes.
3.6 Connecting a USB storage device
Connecting a USB device to the unit allows you to record TV programmes*, playback movies, music and picture files.
See chapter 7.5.1.
NOTE It is recommended to use USB 2.0 storage devices or higher for playback of TV programmes
or HD movies.
Fig. 6
Fig. 7
Fig. 8
English
NOTE Timeshift/recording and playback only works properly when a fast USB storage device such
*This user manual describes the full functionality including the recording function and may not be applicable if the software for recording via
USB has not yet been installed.
4.0 STARTING UP FOR THE FIRST TIME
When you use your receiver for the first time, the Welcome menu appears. Use p/q to move the highlight to the
setting you wish to alter and use tu to change values. Start by selecting your language using tu. Once you have
selected your language, press q to move the highlight to the next item and use tu to change.
Region: Select your region where this receiver is used.
Language Here you can choose your language.
Aspect Mode: Use this option to select the aspect ratio of your TV and the preferred conversion method.
Subtitle Display: Select On to display subtitles per default. Select Hard of Hearing or Normal to show Hard of
Scan mode: Select All to store scrambled and free to air channels or select Free to store only free to air
Provider: Select the Provider on your local cable system. If unknown, select other. From the main menu
When all settings have been made, move the highlight to Search and press OK to continue.
A search will be executed, this may take some time. A message will be show when finished.
as a USB 2.0 HDD is connected to the receiver. Timeshift/recording and playback of HD
content requires a sufficient continuous read/write speed of the used USB storage device. *
The options are: Auto (automatic detection of aspect ratio), 4:3PS (Panscan) (Displays 16:9
widescreen broadcasts full screen on your 4:3 TV), 4:3LB (letterbox) (black bars on top and
under the picture on a 4:3 TV) and 16:9 (use this setting for 16:9 TV sets).
Hearing or Normal subtitles per default. Select Off to hide subtitles per default.
channels. Note: Scrambled channels cannot be viewed with this receiver.
Installation, more options are available to do different scan types.
7
Page 12

NOTE Wrong region or provider selection can lead to missing channels or channels being stored at
wrong positions in the channel list. The search can be stopped anytime by pressing . From
the main menu Installation, more options are available to do different scan types. See chapter
4.1 DVB-C Installation. Press again to show the main menu.
TIP If the Welcome menu does not appear after switching on the receiver the first time, reset the
4.1 DVB-C Installation
Select Installation and press OK to enter the installation menu. Press p/q tu to select Channel Scan or Auto Scan.
Strength and Quality bars are available in each submenu, to provide information about signal presence. Network ID
(NID) and other technical data can usually be found on a provider’s website.
4.1.1 Channel Scan
Select Channel Scan and press OK to enter the Channel Scan menu. Press p/q tu to set Scan mode, Channel No.,
Frequency, Symbol Rate, Scan QAM and Network Search. Highlight Search and press OK to start the channel scan. Obtain
technical data about your cable operator’s base channel from your operator and start a Network search from there to
find all channels belonging to the network.
4.1.2 Auto Scan
Select Auto Scan and press OK to enter the Auto Scan menu. Press p/q tu to set Country and Network and then
highlight Search. Press OK to start the auto search.
Some operators in Germany are pre-installed.
4.1.3 Network ID scan
Select Network ID scan and press OK to enter the Network ID scan menu. Press p/q tu to set Frequency, Symbol Rate,
Scan QAM and Network ID. Obtain technical data about your cable provider’s base channel and Network ID from your
provider and start a Network ID scan from there to find all channels belonging to the network corresponding to the
Network ID. Highlight Search and press OK to start the search.
4.1.4 LCN
If LCN (Logical Channel Numbering) is activated and an LCN signal is provided by the operator, channels will be stored
in an provider defined order. Set LCN to On to activate the provider defined channel numbering or Off to store channels
in the found order. This function only applies when a new channel search is performed and only to Channel Scan and
Auto Scan options.
4.1.5 Free/All channels
If Free/All channels is set to Free, only channels will be stored that are signalled as Free-to-Air. Set to All to store all
channels found. This function only applies when a new channel search is performed and only to Channel Scan and
Auto Scan options. Note: Scrambled channels cannot be viewed with this receiver.
5.0 QUICK GUIDE TO USING YOUR RECEIVER
We at STRONG understand that you can’t wait to enjoy your digital HD cable receiver. The following quick guide will
make you familiar with the basic operation of this device. We do, however, advice you to read the full manual to get the
best performance from your receiver.
To turn your receiver ON or to Standby, use the q button on the remote control.
receiver to factory settings by pressing the MENU button and selecting Load Factory Setting
in the submenu Tools. DEFAULT PIN: 1234.
8
Page 13

Choose a channel with the p/q buttons. Alternatively, you can digit the channel number with the 0~9 buttons on
the remote control or press OK in viewing mode to display the channel list. The volume can be adjusted with the tu
buttons.
6.0 OPERATION
6.1 Changing channels
Following ways are possible for changing channels with your new receiver:
Via direct access using the 0~9 buttons.
Via the channel list using OK and the PG+/PG- buttons.
Via the p/q buttons.
6.1.1 Direct access via 0~9 buttons
To gain direct access to a certain channel, simply input its number with the 0~9 buttons on the remote control. Channel
numbers can be up to four digits long. Entering a number with less than four digits is possible. Just wait a few seconds
and your receiver will switch to the selected channel or press OK immediately after selecting the channel number.
6.1.2 Channel list
Press OK in viewing mode to display the Channel List. Use p/q in the channel list to highlight your channel of choice
and press OK once to select the highlighted channel. Press OK again to leave the channel list mode. Inside the channel
list it is possible to use the PG+/PG- buttons as well in order to scroll page-wise through the list.
TIP Use tu to toggle between the All Channel list and favourite list(s) or press FAV in viewing
6.1.3 Using the p/q buttons
p switches to the next channel.
q switches to the previous channel.
6.2 Info Banner
While watching TV you can press the INFO button at any time to access current information about the channel and
event*. Press INFO twice for technical details about the current channel.
*Event information is displayed when available. Availability depends on the broadcast.
6.3 Selection of audio language
Some channels support a choice of audio formats and/or languages. To select another audio stream, press AUDIO in
viewing mode. A list with available audio streams will now be displayed. Use p/q to select a stream and confirm with
OK. The audio channel as stereo, mono, left and right can be selected with the tu buttons.
6.4 Teletext
Your receiver includes a fully featured Teletext. To access Teletext, press the TEXT button in viewing mode and use the
0~9 buttons to input the number of the page you wish to see. The coloured buttons of the remote control allow you to
jump to selected pages directly, as indicated on the bottom of the Teletext screen. Use the p/q buttons to select one
page up or down, use the tu buttons to select subpages. Press or TEXT to get back to viewing mode.
6.5 Subtitles
Some channels support a choice of subtitle languages. Press SUB in viewing mode to display a list of available subtitle
languages. Select your subtitle of choice with p/q and press OK to confirm. Press to leave without making
changes.*
mode for a list of the available favourite lists.
English
9
Page 14

*Availability of DVB/HoH subtitles depends on the broadcast. If subtitles are not supported, they can be activated via Teletext if available.
6.6 Timeshift*
Timeshift allows you to pause live broadcasts and resume playback later. To activate this function set the Timeshift
mode in the DVR Set menu in HDD Information to Timeshift. For details, see 7.5.3. Press 2 in viewing mode to activate
Timeshift. The progress information banner appears on screen. Live TV keeps playing for moment and will then pause.
Press u to resume Timeshifted playback. Press 3 to return to live TV.
NOTE Timeshift and its playback only work properly when a fast USB storage device such as a
*This user manual describes the full functionality including the recording function and may not be applicable if the software for recording via
USB has not yet been installed.
6.7 EPG (Electronic Programme Guide)
The Electronic Programme Guide is a very useful function that allows you to view event schedules and programme
information and to mark events/movies for recording. To access the EPG, press the EPG button in viewing mode. Use
p/q to select a channel and tu to select an event. Press OK to display detailed information of the selected event.
Use to quit the detailed information screen. Press RED to access further step functions. Use tu to select a step and
OK to execute it. Press to quit the step function. Press GREEN to set a timer for a selected event. Refer to section
7.3.4 for details of the timer function.
NOTE Availability of EPG data depends on the broadcast.
6.8 Instant Recording*
Your new receiver allows you to make an instant recording of the programme you are watching. Simply press 4 to start
the recording. To enter the duration for the recording, press 4 again. Use the 0~9 buttons to enter the recording time
and press OK to confirm.
At the beginning of the recording a recording sign will be shown for a short while on the upper left corner of your TV
screen. To stop the recording, press 3. Select Yes and press OK again to stop the recording. It is possible to make 2
recordings at the same time if they are broadcasted on same frequency.
You can access the Record Manager via the FILE button and select Record by pressing the button 1.
*This user manual describes the full functionality including the recording function and may not be applicable if the software for recording via
USB has not yet been installed.
**Please connect a USB storage device with sufficient free space before you start a recording.
7.0 MAIN MENU
The main menu gives you access to settings, multimedia functions and games. To access the main menu, press MENU
in viewing mode. The main menu consists of the following sub menus: Edit Channel, Installation, System Setup, Tools and
Media Player.
Throughout the main menu, MENU or can be used to get back to the previous screen.
7.1 Edit Channel
Use p/q to select Edit Channel and press OK or u to enter.
Use p/q to highlight the submenu of choice and press OK to select.
Press or t to get back to the main menu.
7.1.1 TV Channel List
In the Edit Channel menu select TV Channel List with p/q and press OK to enter.
USB 2.0 HDD is connected to the receiver. Timeshift and playback of HD content requires
sufficient read/write speed of the used USB storage device.
10
Page 15

Use tu to change the channel group (if you have already set up favourite groups).
Select the channel of choice with p/q. Press OK to view the selected channel in the preview box.
7.1.1.1 Adding channels to favourite lists
Channels from the TV Channel List can be added to up to 8 different favourite groups. Press FAV in TV Channel List
to access this function. The FAV sign on the top of the screen will move up to indicate that the favourite function is
selected. Use p/q to select a channel you wish to add to a favourite group. When the highlight is on the channel of
your choice, press OK. A list with all available favourite lists will now pop up. Use p/q to select the favourite list you
wish to add the channel to and press OK, press to finalize the process. Favourite channels will be marked with a
symbol. When all changes have been made, press twice. A confirmation banner will pop up. Select Yes to save the
changes or No to discard.
7.1.1.2 Locking channels
Locked channels can only be watched after entering the PIN code. DEFAULT PIN: 1234
To lock or unlock a channel, press RED while in TV Channel List. Press p/q to select a channel and press OK to lock
or unlock it. You are asked to input the PIN code. DEFAULT PIN: 1234 Locked channels will be marked with the
symbol. Locking/unlocking multiple channels in one session is possible. When all changes have been made, press
twice. A confirmation banner will pop up. Select Yes to save the changes or No to discard.
7.1.1.3 Skipping channels
Channels marked with Skip will be skipped when zapping channels with the p/q buttons. The channels will still be
available from the channel list.
To mark channels for skipping, press GREEN while in TV Channel List. Use p/q to select a channel and press OK to
mark or unmark it for skipping. Channels set for skipping will be marked with the symbol. When all changes have
been made, press twice. A confirmation banner will pop up. Select Yes to save the changes or No to discard.
7.1.1.4 Moving channels
To enable the Move function, press YELLOW while in TV Channel List. Use p/q to select a channel and press OK to
select it. Now you can move the selected channel up or down inside the channel list by using p/q. When the channel
is on the position of your choice, press OK again. The channel is now fixed on its new position. When all changes have
been made, press twice. A confirmation banner will pop up. Select Yes to save the changes or No to discard.
7.1.1.5 Editing channels
The Edit function allows you to Sort, Rename or Delete channels. To enter the Edit menu, press BLUE while in TV Channel
List. The Edit Channel menu will appear.
If you made changes in the previous menu, but haven’t saved them yet, you will be asked to do so now.
Sort
Press RED to enter the Sort menu.
Use p/q to select sorting method and press OK to confirm.
Possible methods are:
Name (A-Z): Sorting in alphabetical order from A to Z.
Name (Z-A): Sorting in alphabetical order from Z to A.
Free/Scramble: First in the list will be Free-To-Air channels.
Lock: All unlocked channels will placed first in the list.
Default: Sorting by searched Order (from lowest to highest frequency or by LCN numbering).
Rename
Press GREEN in Edit Channel to enable the Rename function. The Rename sign will move up to indicate that Rename
is selected. Use p/q to highlight a channel and press OK to select it. A text field will now pop up at the right of the
screen. Use tu p/q to select characters and enter them with OK. When you have finished editing, press YELLOW to
enter the changes. When all changes have been made, press twice. Select Yes to save the changes or No to discard.
English
11
Page 16

Delete
Press BLUE in Edit Channel to enable the Delete function. The Delete sign will move up to indicate that Delete is selected.
Use p/q to highlight a channel and press OK to mark it for deletion. When you have marked all channels you wish
to delete, press twice. A confirmation banner will be displayed. Select Yes to delete the marked channels or No to
cancel.
7.1.2 Radio Channel List
Basically, the operation of the Radio Channel List is the same as in the TV Channel List. The only difference is that in Radio
Channel List there is no video information, so it will always display the background on the preview screen.
7.1.3 Delete all
Use this menu to delete all stored channels. Select Delete All with p/q and press OK. The receiver asks you to enter the
pin code. (DEFAULT PIN: 1234). Inside the confirmation window select Yes with tu and press OK to delete or select
No to cancel.
Warning! The Delete all function will permanently delete all current channels and all favourite lists from
7.1.4 Rename Favourite list
This menu allows you to personalize the names of the 8 available favourite lists.
Use p/q to select Rename Favourite List from the Edit Channel Menu and press OK to proceed. The names of all groups
are now displayed. Select a favourite group with p/q and press OK to edit its name. A text field will now pop up at the
right of the screen. Use tu p/q to select characters and enter them with OK. When you have finished editing, press
BLUE to save the changes. When all changes have been made, press twice to leave this menu.
your receiver, and you are not able to leave the menu until you search for channels again.
7.2 Installation
7.2.1 Channel Scan
Use p/q to select Installation, press OK or u to advance.
Use p/q to select Channel Scan and press OK to enter.
Use tu to toggle between available scan modes: By Channel and By Frequency.
If By Channel is selected, use p/qtu to select Channel No Symbol Rate and Scan QAM. If Network Search is set to On, all
channel belonging to the network of your operator will be found, according to NIT information provided in the signal
of the operator.
If By Frequency is selected, use p/qtu and 0 ~ 9 to select Frequency, Symbol Rate and select the correct Scan QAM
parameter. Highlight Search and press OK to start scanning. Newly found channels will be added to the channel list.
If Network Search is set to On, all channel belonging to the network of your operator will be found, according to NIT
information provided in the signal of the operator.
NOTE: Obtain technical data about your cable-operator base channel from your operator and start a
network search from there to find all channels belonging to the network.
7.2.2 Auto Scan
Use p/q to select Installation and press OK or u to advance.
Select Auto Scan with p/q and press OK to enter.
Select your country and network.
Use p/q to highlight Search. Now press OK to start auto scan.
The receiver will store all found channels in the channel list.
12
Page 17

NOTE: Obtain technical data about your cable-operator base channel from your operator and start a
7.2.3 Network ID scan
Select Network ID scan and press OK to enter the Network ID scan menu. Press p/q tu to set Frequency, Symbol Rate,
Scan QAM and Network ID. Obtain technical data about your cable provider’s base channel and Network ID from your
provider and start a Network ID scan from there to find all channels belonging to the network corresponding to the
Network ID. Highlight Search and press OK to start the search. Network ID (NID) and other technical data can usually be
found on a provider’s website.
7.2.4 LCN (Logical Channel Numbering)
If LCN (Logical Channel Numbering) is activated and an LCN signal is provided by the provider, channels will be stored
in a provider defined order. Set LCN to On to activate provider defined channel numbering or Off to store channels in
found order. This function only applies when a new channel search is performed.
7.2.5 Free/All channels.
If Free is selected, only channels are stored that are “Free-to-watch”.
If All is selected, coded channels will also be stored.
NOTE: Only Free channels can be watched with this unit.
7.3 System Setup
This menu allows you to manage the system settings of your receiver. It consists of the following sub-menus: Language,
TV System, Local Time Setting, Timer Setting, Parental Lock, OSD Setting, Audio Description Setting and Auto Standby.
Press p/q to highlight the menu of choice and press OK advance to the next screen. Use p/q to move the highlight
to the setting of choice. Values can be changed with tu. Press to leave.
7.3.1 Language
This menu allows you to set up your language preferences.
Language: Use tu to select the language for the On Screen Display.
First Audio: Use tu to select Audio language.
Second Audio: Use tu to select a language that will be played when the language selected at First Audio isn’t
Subtitle Display: Use tu to select the use of subtitle Normal, Hard of Hearing or Off.
Subtitle Language : Use tu to select the preferred subtitle language.
2nd Subtitle Language: Use tu to select the preferred 2nd subtitle language if the 1st preference is not available.
Teletext: Use tu to select the preferred Teletext language (when available).
*Availability of DVB/Hard of Hearing subtitles depends on the broadcast. If subtitles are not supported, they can be activated via Teletext if
available.
7.3.2 TV System
Use this menu to match your receiver to your TV set. The following settings are available:
Video Resolution: Use this option to select the video resolution of your TV screen. The options are: By Source
network search from there to find all channels belonging to the network.
available.
(automatic detection of video resolution offered to the receiver), By Native TV (automatic
detection of maximal resolution of TV screen), and manual selections 480i, 576i up to 1080p.
Please use a setting that matches the specifications of your TV. After a selection is made, you
will be asked to confirm. Selection above 576i is only applicable on HDMI output.
English
13
Page 18

Aspect Mode: Use this option to select the aspect ratio of your TV and the preferred conversion method.
Digital Audio Output: Toggles between PCM and Bitstream output. When PCM is selected, all digital audio will be
NOTE: Dolby® Digital Plus* is only available on the HDMI output.
*Dolby and the double-D symbol are registered trademarks of Dolby Laboratories
7.3.3 Local Time Setting
Here you can set up your region and time zone.
Region: Use tu to select the region you live in.
GMT Usage: Set to By Region for broadcaster defined time, User Define to select manual a GMT zone or to Off
GMT Offset: Allows you to adjust your time zone. This option is only available when GMT Usage is set to User
Summer time: Select On to add one hour for summer time.
Date: Date and Time settings are available only when GMT Usage is set to Off. Use the 0~9 buttons to
Time: Date and Time settings are available only when GMT Usage is set to Off. Use the 0~9 buttons to
7.3.4 Timer Setting
This menu allows you to set up to 8 timed events for recording or waking up the receiver.
Use p/q to select Timer Setting from the System Setup menu and press OK to enter.
The receiver will display a list with 8 timers, followed by their respective status. Select the timer you wish to set or
change with p/q and press OK to proceed.
The timer setup menu will now be displayed.
The following settings are available:
Timer Mode: Choose between Off the timer is inactive, Once, Daily (the timer will be executed every day,
Timer Service: Choose between Channel (the timer will wake up the receiver) or Record (Timer will start
Wakeup Channel: Use tu to select the channel the timer will wake up with.
Wakeup Date: Use the 0~9 buttons to enter the date for the timed event.
On time: Use the 0~9 buttons to enter the starting time.
Duration: Use the 0~9 buttons to enter the duration of the timer.
When all settings have been made, use p/q to move the highlight to Save and press OK to confirm. To quit the timer
without saving your settings, move the highlight to Cancel.
7.3.5 Parental Lock
This menu allows you to protect the installation menu and/or channels with a PIN code. You can also enter a new PIN
code in the Parental Lock menu.
Use p/q to select Parental Lock from the System Setup menu and press OK to proceed. You will be asked to enter your
PIN code. (DEFAULT PIN: 1234)
Menu Lock: Locks the installation menu. You can set Menu Lock to On or Off.
The options are: Auto (automatic detection of aspect ratio), 4:3PS (Panscan) (Displays 16:9
widescreen broadcasts full screen on your 4:3 TV), 4:3LB (letterbox) (black bars on top and
under the picture on a 4:3 TV) and 16:9 (use this setting for 16:9 TV sets).
converted to stereo audio. Bitstream enables you to listen or transfer Dolby® Digital/Dolby®
Digital Plus* audio to the TV via HDMI or to a Home entertainment system (for example)
through coaxial S/PDIF.
to input time and date manually.
Define.The GMT Offset range is "-11:30 ~ +12:00", increasing by half hours progressively. The
cities matching the set GMT Offset are displayed at the bottom of the screen.
enter the date. Press to proceed.
enter the time. Press to proceed.
same time) or Weekly (the timer will be executed every week, same day, same time) and
Monthly (the timer will be executed every month, same day, same time).
recording the scheduled event).
14
Page 19

Parental Rating: Choose between: Off, 10 years and up to 18 years. Channels with a parental rating above the
New Password: Enter your new PIN code (4 digits) here.
Confirm Password: Re-enter your PIN code here to confirm.
7.3.6 OSD Setting
This menu allows you to change settings for: OSD Timeout and OSD Transparency.
OSD Timeout: Sets the duration time of on screen banners and messages remove. The range is 1~10 seconds
OSD Transparency: To set the OSD transparency from Off ~ 40% with 10% steps.
7.3.7 Audio Description
Audio Description is a service by the broadcaster in which the content on screen is being described for the visually
impaired. Select AD Service On and Use AD as default also On to activate the service. With AD Volume Offset the level of
the AD text can be adjusted.
NOTE Availability of Audio Description depends on the broadcast.
7.3.8 Auto Standby
Auto Standby is a new feature that helps you reducing power consumption. When set to 3, 4 or 5 hours, the receiver
will switch to standby if it doesn’t receive any commands during this time. Set Auto Standby to Off to deactivate the
automatic standby function.
Default is 3 hours.
7.4 Tools
Press MENU in viewing mode to enter the Main Menu.
Select the Tools submenu with p/q and press OK or u to enter.
Use p/q to highlight the submenu of choice and press OK proceed.
Press to leave.
7.4.1 Information
This submenu shows receiver specific information such as hardware version and software version. Please have the
Information screen on hand when you call our hotline. The person who answers your call might ask for the information
given in this screen.
7.4.2 Load Factory Settings
This option allows you to reset the receiver to factory settings, which clear all stored channels.
Warning! By resetting your receiver to factory default, all your settings and stored channels will be
Use p/q to select Load Factory Settings in the Tools menu and press OK. You are asked to input your PIN code.
Input the correct PIN code using the 0~9 (DEFAULT PIN: 1234). A confirmation window is displayed.
Select Yes to return to factory settings.
The receiver will return to its initial state and show the Welcome page.
Select No to cancel.
Press to leave.
chosen age will be protected with a PIN code (if rating is available in your local broadcast).
or Always On.
permanently deleted. Please use this option with care.
English
15
Page 20

7.4.3 Upgrade by USB
This feature allows you to upgrade receiver software via the USB port. When new software is available for your receiver,
it can be downloaded from our website www.strong.tv.
Place the software file (unzipped) in the root directory of your USB storage device (HDD, memory stick etc.) and connect
the device to the USB port of the receiver.
Select Upgrade by USB from the Tools menu and press OK to proceed.
The upgrade menu will now be displayed.
Use p/q to select Upgrade Mode and choose option Allcode.
Use p/q to select Upgrade File and choose the file containing the latest and correct software.
When all settings have been made, move the highlight to Start and press OK to start the upgrade process. The receiver
will show a warning message.
Select Yes to finalize the upgrade or No to quit without upgrading.
NOTE: If, after a software upgrade, the receiver should behave in an unexpected way, please
perform a factory reset as well. See chapter 7.4.2.
Warning! Be sure to have the correct software update for your brand and model available. Trying to
Channel Dump and Load function
This feature allows you to load a channels list quickly and use a channel list that previously was created on this (backup)
or another receiver from the same model via the USB port.
This is useful when more receivers have to be installed on the same network, thus omitting a full scan and (optional)
sorting of channels. It is also useful as a backup for your own unit.
Channel Dump function (backup to USB)
Have a storage device connected to the USB port of the receiver. Select Upgrade by USB from the Tools menu and press
OK to proceed. The upgrade menu will now be displayed.
Use pq to select Upgrade Mode and choose the option Dump channel list.
A DataBase file name containing date and time will be presented, format DBMMHHDDMMYYYY
(DatebaseMinuteHourDayMonthYear.udf).
Use pq to select Start and press OK to proceed. The channel list and favourites will be saved.
Update Channel list function (read from USB)
Have the storage device connected to the USB port of the receiver, containing a previously made channel list on this
unit or another of the same model. Select Upgrade by USB from the Tools menu and press OK to proceed. The upgrade
menu will now be displayed.
Use pq to select Upgrade Mode and choose the option Update Channel list.
Use pq to select Upgrade File. Select the correct database file name, format DBMMHHDDMMYYYY
(DatebaseMinuteHourDayMonthYear.udf).
Use pq to select Start and press OK to proceed. Confirm the upgrade with OK to proceed.
WARNING: Old channel list and favourites will be overwritten.
After completion, the unit will reboot and come back with the first channel in the new channel list.
16
update to any other software may damage the unit and will void the warranty. After an
update the receiver restarts automatically. During the upgrade process NEVER disconnect the
receiver from the mains or switch off the power! Doing so might damage your receiver and
will void warranty!
Page 21

7.5 Media Player*
The Media Player menu consists of the following submenus: Media Player, HDD Information and Remove USB device
safely.
Use p/q to highlight the menu of choice and press OK to enter. Press to quit.
7.5.1 Media Player
This function allows playback of different kind of files from the connected USB storage device. In the Media Player
menu, select Media Player and press OK to enter this menu.
When entering the media player, the highlight is on the USB storage device. Press q and OK to open the directory
respectively its folders/subfolders.
First select which files you like to play back. Press 1 to switch between Video/Record/Music or Image. Press p/q to
select a file or folder and then press OK to open the folder/subfolder (if applicable) or start playback of the file. Press the
button to exit.
Use the buttons like described below in order to choose functions during the different playback modes (like described
in the help banner below):
Video:
INFO: Press the INFO button to set repeat mode. The options are repeat folder folder icon/repeat once
1: During the playback of a movie with external subtitles, press 1 to enter the subtitle menu. In
2: Press 2 to open the Sort menu. You can sort by Name/Time or Size.
7: Press 7 to open the Edit menu. This menu allows access of the following functions by entering
: One step back or leave the folder and quit the function.
Record:*
2: Press 2 to enter a new name for the selected recording.
3: Highlight the recording that you want to lock. After pressing 3 you will be asked to input your
4: Press 4 to mark the recording you want to delete. By selecting the same recording and pressing
: One step back or leave the folder and quit the function.
Music:
4: Press 4 to open a previously created play list. With the coloured buttons you can make changes
5: Press 5 to add a file to the playlist. A favourite icon will be shown next to the file. (A single file
6: Press 6 to add all files of this directory/folder to the play list. Press 6 again to delete all files from
7: Press 7 to open the Edit menu. This menu allows access of the following functions by entering
2: Press 2 to open the sort window. You can sort by Name/Time/Size and Favourite.
INFO: Press the INFO button to set repeat mode. The option is Repeat Folder/Random Folder/Repeat
: One step back or leave the folder and quit the function.
Image:
4: Press 4 to open a previously created play list. With the coloured buttons you can make changes
1 or no repetition (no icon shown).
this menu you can select size and colours of your preference.
the number: rename 4, copy 5, delete 6, create folder 7.
PIN code. DEFAULT PIN: "1234". After entering your PIN code, the recording is locked. If you
want to unlock the recording again, press 3 again.
4 again you can remove the delete marker again. Press to delete.
to the list.
will be added to the play list) or 6 (all files of this directory/folder will be added to the play list).
the play list.
the number: rename 4, copy 5, delete 6, create folder 7.
One.
to the list.
English
17
Page 22

5: Press 5 to add a file to the playlist. A favourite icon will be shown next to the file. (a single file
6: Press 6 to add all files of this directory/folder to the play list. Press 6 again to delete all files from
7: Press 7 to open the Edit menu. This menu allows access of the following functions: rename 4,
2: Press 2 to open the sort window. You can sort by Name/Time/Size and Favourite.
INFO: Press INFO to access slideshow settings. You can change the slide time and slideshow
3: Press 3 to show the files in a preview of 3x3 pictures.
: One step back or leave the folder and quit the function.
*This user manual describes the full functionality including the recording function and may not be applicable if the software for recording via
USB has not yet been installed.
7.5.2 HDD Information
This option shows relevant information about the connected USB device. In this menu you can also format your USB
storage device and setup the recording type.
Select HDD Information in the Media Player menu and press OK to enter.
Now you will see all details as Free and the used Recording Sizes and the used file system.
Press the YELLOW button Format to format the connected USB device.
Please, enter your PIN code to access this menu and press OK to start formatting.
Warning! Formatting will permanently delete ALL data stored on the connected device. Please make
NOTE It is possible to use USB storage devices already formatted in NTFS.
Press to leave this menu.
7.5.3 DVR Set and Format*
From the HDD Information menu, you can access the Format and the DVR Set menu.
Format: YELLOW It is only possible to format your USB HDD device with FAT32 FAT. However, an already
DVR Set BLUE This menu allows you to configure settings for Timeshift, recording and playback.
Use p/q to move the highlight and tu to change settings.
DVR Set Select between REC&TMS, Record or Timeshift. When REC&TMS, is selected, both Record and
Press to leave this menu.
*This user manual describes the full functionality including the recording function and may not be applicable if the software for recording via
USB has not yet been installed.
7.5.4 Remove USB device safely
Select Remove USB device safely from the tools menu and press OK. The receiver will display a message indicating that
you can safely remove your storage device from the receiver.
will be added to the play list) or 6 (all files of this directory/folder will be added to the play list).
the play list.
copy 5, delete 6, create folder 7.
repetition.
a backup copy of all data you wish to keep before entering the HDD Format menu. STRONG
cannot be held responsible for loss of data from USB devices used with this receiver.
formatted USB HDD device in a PC with NTFS can also be used in this receiver.
Timeshift is possible. Timeshift it will automatically restart every time after changing a channel.
When the 2 button on the remote control is pressed, the picture will freeze, and it is possible to
return to the point of the last changing of the channel. When set to Timeshift only Timeshift is
possible, when set to Record, only record is possible.
18
Page 23

NOTE After performing this function, the USB device is no longer accessible from your receiver. To
8.0 TROUBLESHOOTING
There may be various reasons for abnormal operation of the receiver. Check the receiver according to the procedures
shown below. If the receiver does not work properly after checking it, please contact your dealer or the local Service
Hotline. Do NOT try to open or disassemble the receiver. It may cause a dangerous situation and warranty will be void.
Problem Possible cause What to do
LED indicator not lit Mains lead unplugged Check mains plug
No signal found Cable input is disconnected Check cable lead
No picture or sound on TV or
amplifier
Scrambled channel
message
No response to remote control Receiver off
Forgotten PIN code
Forgotten channel lock code
Signals are interrupted or
blocking is visible on screen
The receiver switches off
automatically.
Playback of video (or Timeshift)
is causing picture freeze/macro
blocks or similar distortion,
especially on HD content.
gain access to your storage device again, re-insert it or switch the receiver to standby and on
again.
Check with dealer
HDMI or SCART is not selected on
your TV or amplifier or the unit is
set to higher resolution as the TV
supports.
TV/amplifier is not switched on
Channel is scrambled Select alternative channel
Remote not aimed correctly
Front panel obstructed
Remote batteries exhausted
Cable signals are too weak or have
reflections/interference.
Auto Standby function enabled. Disable auto standby. See section
Read/write speed of your USB device
could be too low.
Switch to correct TV/amplifier input
Select lower resolution on receiver
Switch TV/amplifier on.
Check if S/PDIF connection is used.
Plug in and turn on plug
Aim remote at front panel
Check for obstructions
Replace remote batteries
Default PIN is 1234
Contact local Service Hotline or
send email to our Support via www.
strong.tv
Press the INFO button on remote 2x
to call up signal bars and check your
cable connections and leads. Using
(many) splitters in the signal lead
might cause reflections/interference
in the digital signal and distort
reception. When in doubt, check
with your dealer.
7.3.8 for details.
Make sure to use a USB storage
device with sufficient speed and
space. Pen drives (‘USB sticks’) may
not support sufficient speed.
English
19
Page 24

9.0 TECHNICAL SPECIFICATIONS
Tuner
Tuner: NXP8250B
Input Impedance: 75 Ohm
Minimum Input Level: ≤ 40 dBuv (64 QAM)
≤ 44 dBuv (256 QAM)
Receiving Channel Range: 47 MHz ~ 862 MHz
Modulation: 16, 32, 64, 128, 256 QAM
Symbol rate: 3.6 M ~ 6.952 MS/s
Video Decoder
Video resolution: 480i, 480p, 576i, 576p, 720p, 1080p
Decoding & Video Out: PAL
Aspect ratio: 4:3, 16:9
Audio Decoder
Audio decoder: MPEG-1 LAYER 1&2, Dolby Digital, Dolby Digital Plus
Audio support: AC3+/PCM/Dolby® Digital Plus*
*Dolby Digital Plus, Dolby Digital and the double-D symbol are registered trademarks of Dolby Laboratories.
Multimedia
Video playback: MPEG encoded (mpg), VOB, TS, M2T, M2TS, MPEG-4 and MOV*
Audio playback: MP3 and OGG*
Picture view: BMP and JPEG*
*STRONG cannot guarantee the playback of all files although extensions are listed, as it depends on codec used, data bit rate and resolution (all
MPEG codec formats are supported).
System
Transponder: DVB-C
Main Processor: Ali M3711B
Demodulator: NXP8250B
Memory: DDR2 64 MB
FLASH size: 4 MB
Connectors
Cable IN - IEC Female
Cable OUT - IEC Male (Loop through)
HDMI
TV SCART
S/PDIF (coaxial)
USB 2.0 port : DC 5 V, 500 mA (max.) supported
Net adapter (12 V/0.5 A)
General Data
Supply voltage: 100 - 240 V AC (SMPS), 50/60 Hz
Power consumption: 4 W (typ.) 6 W (max.)
Power consumption in standby: max. 1.0 W
Operating temperature: 0 ~ +40 °C
Storage temperature: -10 ~ +70 °C
Operating humidity range: 10 ~ 95%, RH, Non-condensing
Size (WxDxH) in mm: 168 x 97.5 x 39
Weight in kg: 0.28
20
 Loading...