

Page 1
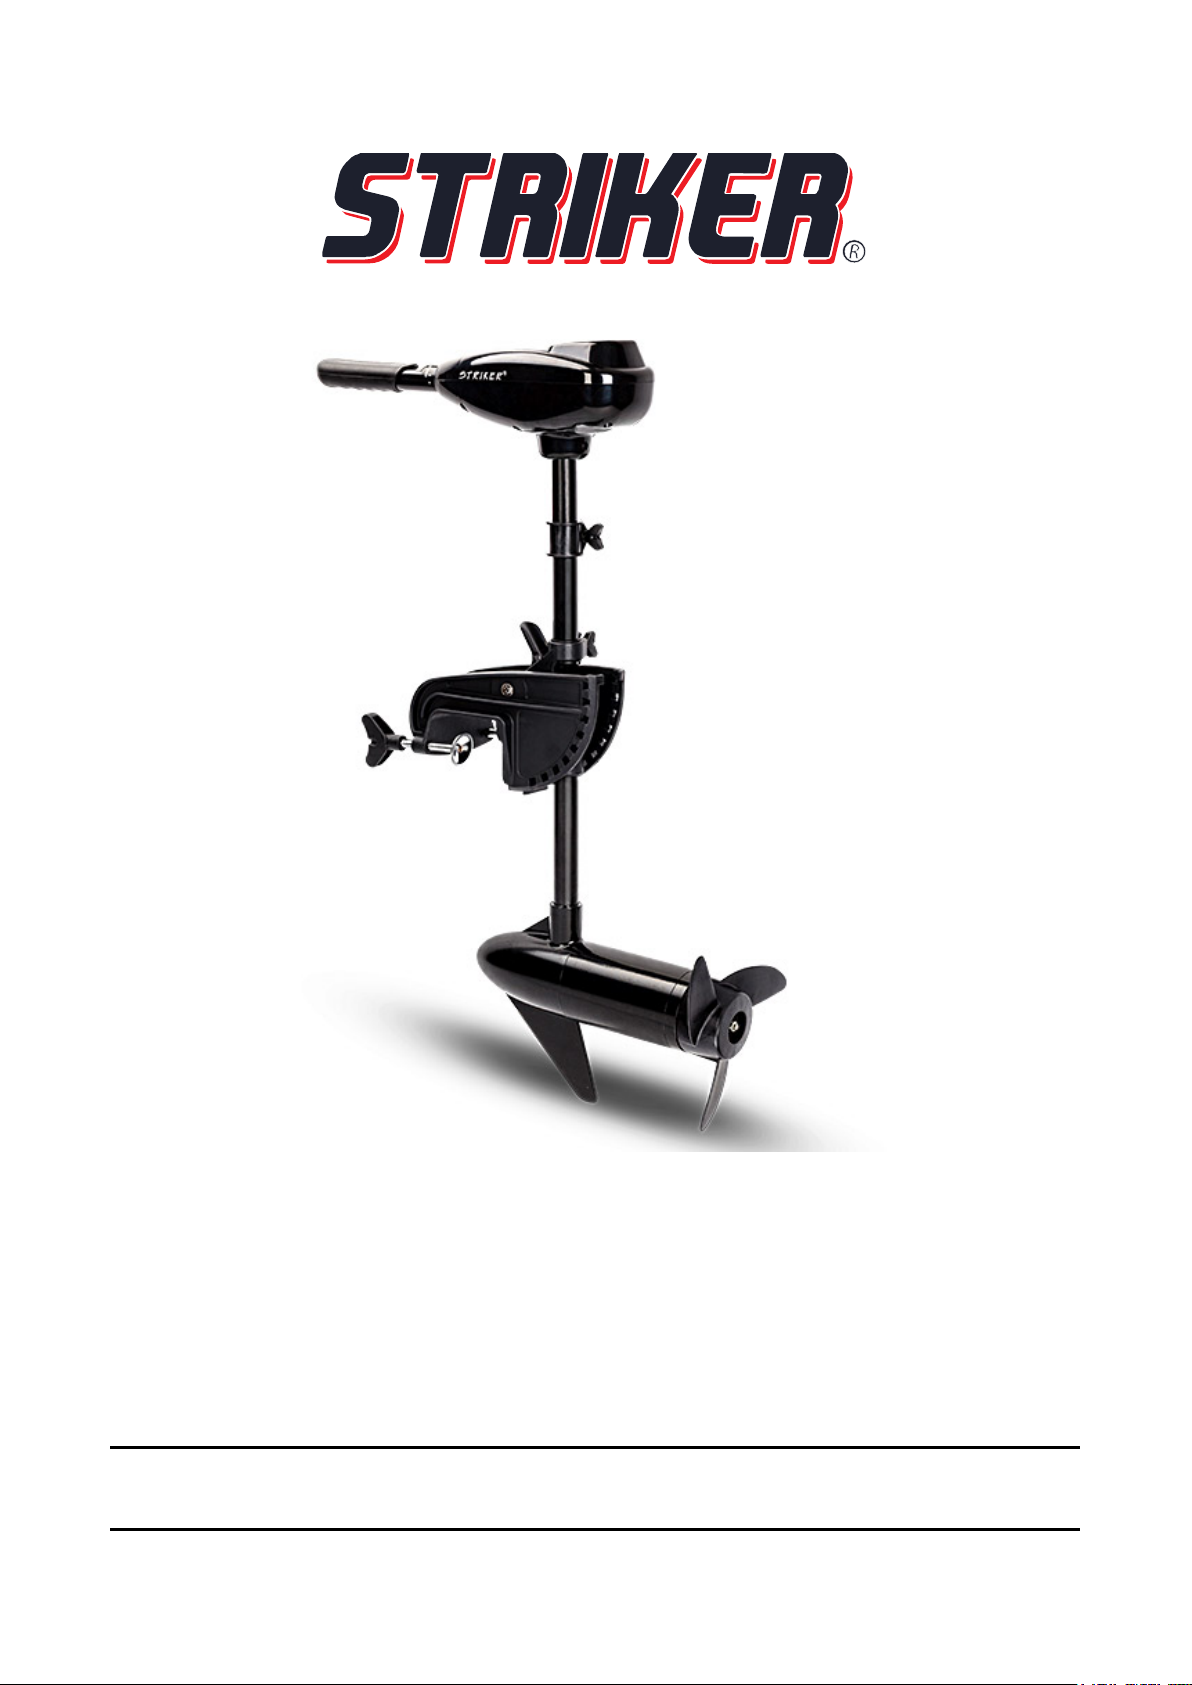
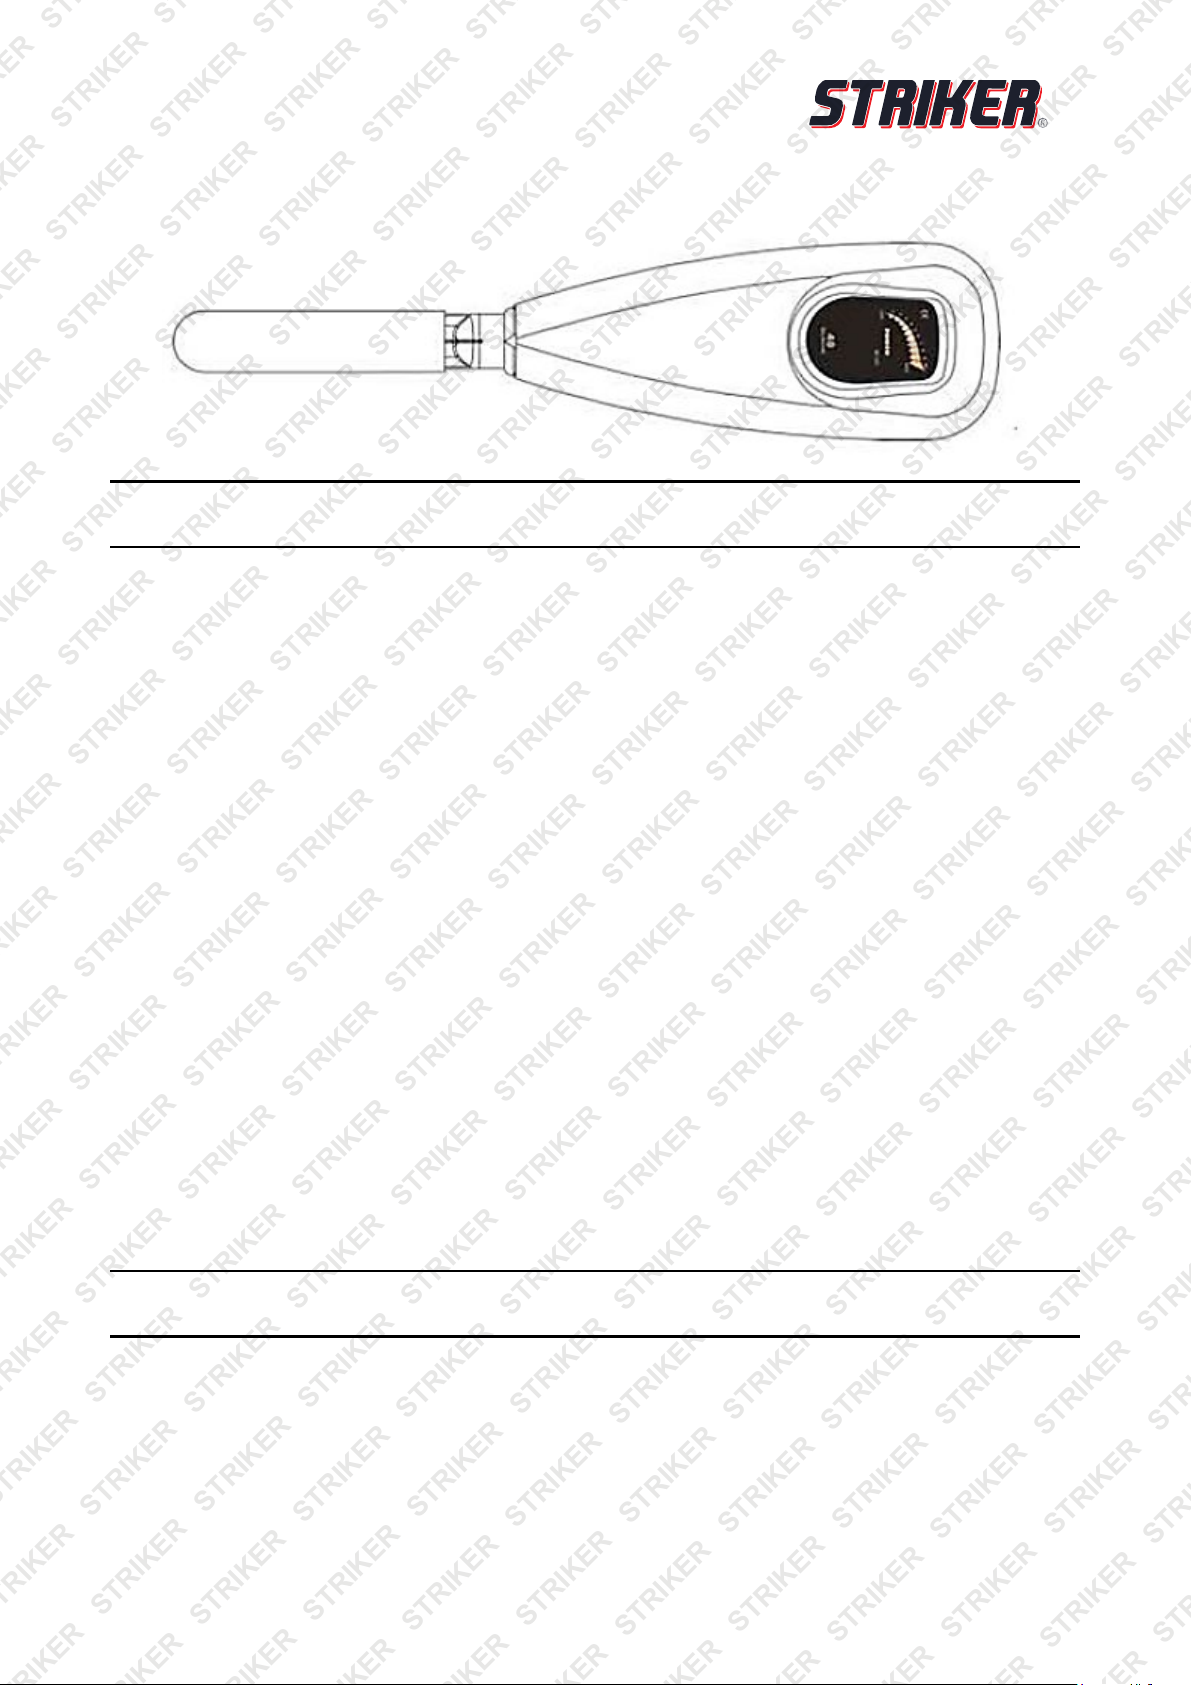
Appearance may vary
Electric Trolling Motor
User Manual
[Revision 1.0 January 2018]
READ THIS MANUAL CAREFULLY BEFORE USE – FAILURE TO DO SO MAY RESULT IN INJURY, PROPERTY
DAMAGE AND MAY VOID WARRANTY. • KEEP THIS MANUAL FOR FUTURE REFERENCE. • Products covered by
this manual may vary in appearance, assembly, inclusions, specifications, description and packaging.
E&OE © 2018 Striker
Page 2
Electric Trolling Motor
It is important that you read and
General Work Area Safety
Use the equipment and accessories etc. in
Safety
Safety messages are designed to alert you to possible dangers or hazards that could cause death, injury or
equipment or property damage if not understood or followed. Safety messages have the following symbols:
You WILL be KILLED or
SERIOUSLY INJURED if you
do not follow instructions.
understand the instruction manual before
use and keep the manual in a safe place
for future reference. Safety information
presented here is generic in nature – some
advice may not be applicable to every
piece of equipment.
All safety precautions must be observed to
reduce the risk of personal injury when
operating the equipment.
The term “equipment" refers to your
product, be it electrical mains, battery or
petrol engine powered.
IMPORTANT – Handle the equipment
safely and carefully.
BEFORE USE - If you are not familiar with
the safe operation/handling of this
equipment, or are in any way unsure of any
aspect of suitability or correct use it for
your application, you should complete
training conducted by a person or
organization qualified in safe use and
operation of this equipment, including
fuel/electrical handling and safety.
WARNINGS
• Read all safety warnings and all
instructions. Failure to follow warnings
and instructions may result in electric
shock, fire and/or serious injury.
• Never run a combustion engine in
confined areas.
• Do not operate the equipment in
flammable or explosive environments,
such as in the presence of flammable
liquids, gases or dust. Engine and
equipment may create sparks or heat
that may ignite vapours, dust etc
• Keep clear of moving parts.
• This equipment may be a potential
source of electric shock if misused.
• Do not operate the equipment if it is
damaged, malfunctioning or is in an
excessively worn state.
• Do not allow others to use the
equipment unless they have read this
manual and are adequately trained.
• When using the equipment, basic
safety precautions detailed here must
always be followed to reduce the risk
of fire, electric shock, personal injury
and material damage.
• When wiring electrically powered
equipment, follow all electrical and
safety code s.
• Ensure all power sources conform to
equipment voltage requirements and
are disconnected before connecting
equipment.
You CAN be KILLED or
SERIOUSLY INJURED if you do
not follow instructions.
Work areas should be clean and well it.
Do not operate the equipment if
bystanders, animals etc are within
operating range of the equipment or the
general work area.
Personal Safety
Keep packaging away from children - risk
of suffocation! Operators must use the
equipment correctly. When using the
equipment, consider conditions and pay
due care to persons and property.
Prevent unintentional starting of the
equipment - ensure equipment and power
source switches are in the OFF position
before connecting or moving the
equipment. Do not carry equipment with
hands/fingers touching any controls.
Remove any tools or other items that are
not a part of the equipment from it before
starting or switc hing on.
Stay alert and use common sense when
operating equipment. Do not overreach.
Keep proper footing and balance at all
times. Do not use equipment when tired or
under the influence of drugs, alcohol or
medication. This equipment is not intended
for use by persons with reduced physical,
sensory or mental capabilities.
You must wear appropriate protective
equipment when operating, servicing, or
when in the operating area of the
equipment to help protect from serious
injury, including eye injury, inhalation of
toxic fumes, burns, and hearing loss.
Always wear eye protection. Protective
equipment such as respirators, non-skid
safety shoes, hard hat, hearing protection
etc should be used for appropriate
conditions. Other people nearby should
also wear appropriate personal protective
equipment. Do not wear loose clothing or
jewellery, which can be caught in moving
parts. Keep hair and clothing away from
the equipment.
If devices are provided for the connection
of dust extraction and collection facilities,
ensure these are connected and properly
used. Use of dust collection can reduce
dust-related hazards.
General Equipment Use and Care
Do not force the equipment. Use the
correct equipment for your application. The
correct equipment will perform better and
be safer within its design parameters. Do
not use the equipment if the ON/OFF
switch malfunctions – any equipment that
cannot be controlled with the ON/OFF
switch is dangerous and must be repaired.
You CAN be INJURED if you do
not follow instructions or
equipment damage may occur.
accordance with these instructions,
considering working conditions and the work
to be performed. Using the equipment for
operations different from those intended
could result in hazardous situations.
Before use, inspect the equipment for
misalignment or binding of moving parts,
loose components, damage or any other
condition that may affect its operation. If
damaged, have the equipment repaired by an
authorized service ce ntre or technician before
use.
Always keep the equipment and accessories
(cutting tools, nozzles, bits etc) properly
maintained. Keep the equipment, controls
and handles dry and free from dirt, oil and
grease.
Store the equipment out of reach of children
or untrained persons. To avoid burns or fire
hazards, let the equipment cool completely
before transporting or storing. Never place
the equipment in places where there are
flammable materials, combustible gases or
combustible liquids etc.
The equipment is not weather proof, and
should not be stored in direct sunlight, at high
ambient temperatures or locations that are
damp or very humid.
Product Use and Care
BATTERY TYPE
• Recommended battery(s): 12-volt Deep
Cycle battery or Marine battery. To
extend running time either a larger
capacity or an additional battery can be
used. See section on battery connection
method. NOTE: 90Ibs1 00lbs model
requires a 24-volt battery.
CIRCUIT PROTECTION
• It is recommended to install a manual
reset circuit breaker in the electric
outboard motor leads within 1.8m (72
Inches) of the battery(ies).
CABLE SIZE
• If extending the standard battery cable
supplied with the product, it is
recommended to use 13mm2 wire (8gauge wire, AWG).
E&OE © 2018 Striker 2
Page 3

Electric Trolling Motor
WARNING
General Service Information
• Batteries contain sulfuric acid, which
can cause severe burns. Avoid
contact with skin, eyes and clothing.
The battery also produces hydrogen
and oxygen gases when being
charged. This potentially explosive
mixture escapes through the fill vent
cell caps and may form an explosive
atmosphere around the battery for
several hours after it has been
charged. Electrical arcing or flames
can ignite the gas and cause an
explosion, which may shatter the
battery and could cause blindness or
other serious injury.
• Be sure all switches are in the OFF
position before connecting to battery
or batteries. Electrical arcing near the
battery could ignite hydrogen gas and
cause the battery to explode.
• Do not allow children to operate the
electric outboard motor.
• Do not modify the unit in any way or
add accessories not intended for this
product.
• Never fully submerse the unit, if unit is
accidentally submersed disconnect
battery and leave to dry.
• To prevent accidental damage of the
glass fibre shaft, do not over tighten
the mounting bracket.
• Only use this product between the
temperatures of -20C to +45C (-4F to
+113F).
• User(s) should always wear approved
Life Jackets.
• Always disconnect power from the
motor when replacing propeller,
removing debris around the prop,
charging batteries, transporting boat
or when the motor is not in use.
• Have the equipment serviced or
repaired at authorized service centres
by qualified personnel only.
• Replacement parts must be original
equipment manufacturer (OEM) to
help ensure that equipment safety is
maintaine d.
• Do not attempt any maintenance or
repair work not described in this
instruction manual.
• After use, the equipment and
components may still be hot – allow
the equipment to cool and disconnect
spark plugs and/or electrical power
sources and/or batteries from it before
making adjustments, changing
accessories or performing repair or
maintenance.
• Do not make adj ustments while the
equipment is running.
• Perform all service related activities
under suitable conditions, such as a
workshop etc.
• Replace any worn, damaged or
missing warning labels immediately.
• Do not clean equipment with solvents,
flammable liquids or harsh abrasives.
E&OE © 2018 Striker 3
Page 4

Electric Trolling Motor
Table of Contents
Safety ................................................................................................................................................... 2
Assembly ............................................................................................................................................ 5
First Use Set-Up ........................................................................................................................................ 5
Transom Mount Installation ........................................................................................................................ 5
Operation ............................................................................................................................................ 6
Motor Usage .............................................................................................................................................. 6
Battery Connection Method (12V only) ...................................................................................................... 6
Connection with One Battery (12V DC) ............................................................................................... 6
Connection with Two Batteries in Parallel (12V DC) ............................................................................ 6
Controlling the Motor .................................................................................................................................. 7
On/Off Speed Control................................................................................................................................. 7
Battery Level Indicator ............................................................................................................................... 7
Adjusting the Motor Depth .......................................................................................................................... 7
Raising the Motor ....................................................................................................................................... 7
Lowering the Motor .................................................................................................................................... 7
Replacing the Propeller .............................................................................................................................. 8
About the Circuit Breaker (50amp) ............................................................................................................. 8
Circuit Breaker Function ...................................................................................................................... 8
Maintenance ....................................................................................................................................... 9
Troubleshooting ............................................................................................................................... 10
Specifications ................................................................................................................................... 11
TR100 ...................................................................................................................................................... 11
TR60 ........................................................................................................................................................ 11
TR80 ........................................................................................................................................................ 11
E&OE © 2018 Striker 4
Page 5
Electric Trolling Motor
Assembly
First Use Set-Up
1. Place Electric Trolling Motor onto the back of the vessel in the Stow away position.
2. Tighten the Transom Mounting Screws till they grip the Transom Mount.
3. Press the Tilt Lever and slowly let the motor enter the water.
4. Use the Depth Adjuster Collar to adjust the height of the motor (Recommended running depth between
150mm and 300mm below the waterline).
5. When you are satisfied that the motor is at a safe depth and isn't too close or in danger of hitting the
bottom of a lake, river or other water way, you may proceed to tighten the Transom Mounting Screws.
6. Once this is done, it should be safe to connect the battery to the motor. Ensure that the twist grip is in the
neutral position and that the nuts are tight on the terminals to prevent a poor connection.
7. Select the desired speed and direction using the twist grip on the tiller arm.
8. Do not go from full forward speed to full reverse speed without letting the propeller stop rotating first,
otherwise motor damage may occur.
Transom Mount Installation
CAUTION! Before the installation, make sure that the area between the column and bracket is clear.
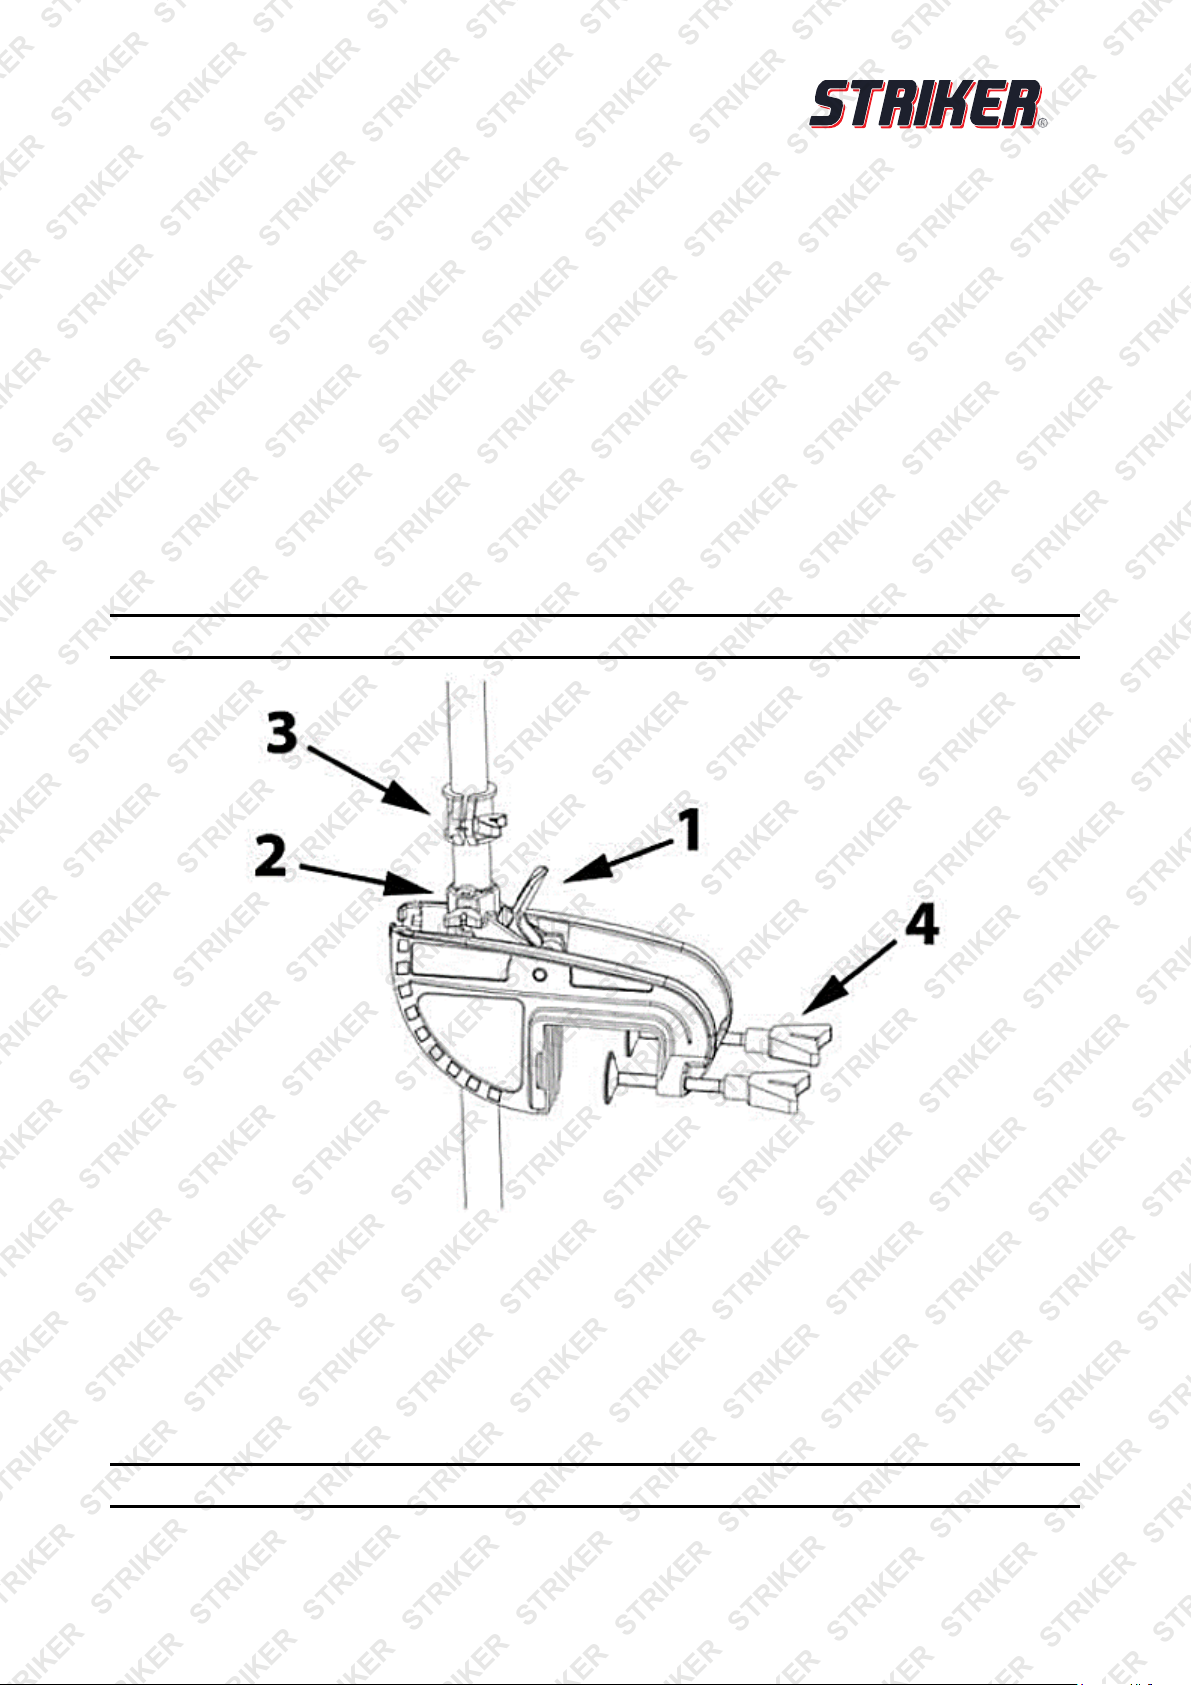
1. Tilt Position Lever - This lever allows the user to adjust the tilt (angle) of the motor. Push tilt position
lever, adjust tilt of motor, the release the lever.
2. Steering Tension Adjustment -To adjust the steering resistance, simply tighten or loosen the tension
knob located on front of the mount.
3. Depth Adjustment Collar -The depth of the motor can be adjusted up and down by loosening the depth
collar tension knob located on the column directly above the mount. The column can be adjusted and the
motor can be positioned at the desired depth by re-tightening the tension knob.
4. Transom Screws -The transom clamp screws allow for easy motor removal and installation. Mount your
motor on the transom, then tighten the transom clamp screws securely.
CAUTION! The motor can only be used in water deeper than 0.7m.
E&OE © 2018 Striker 5
Page 6
Electric Trolling Motor
Operation
Motor Usage
The motors’ packaging does not include batteries; please choose a battery with 12V (24V for 90LBS and
100LBS motor) output to fit this motor. The recommended type of battery is a deep-cycle battery or a marine
battery, as they will last much longer and are designed for this type of application.
Battery Connection Method (12V only)
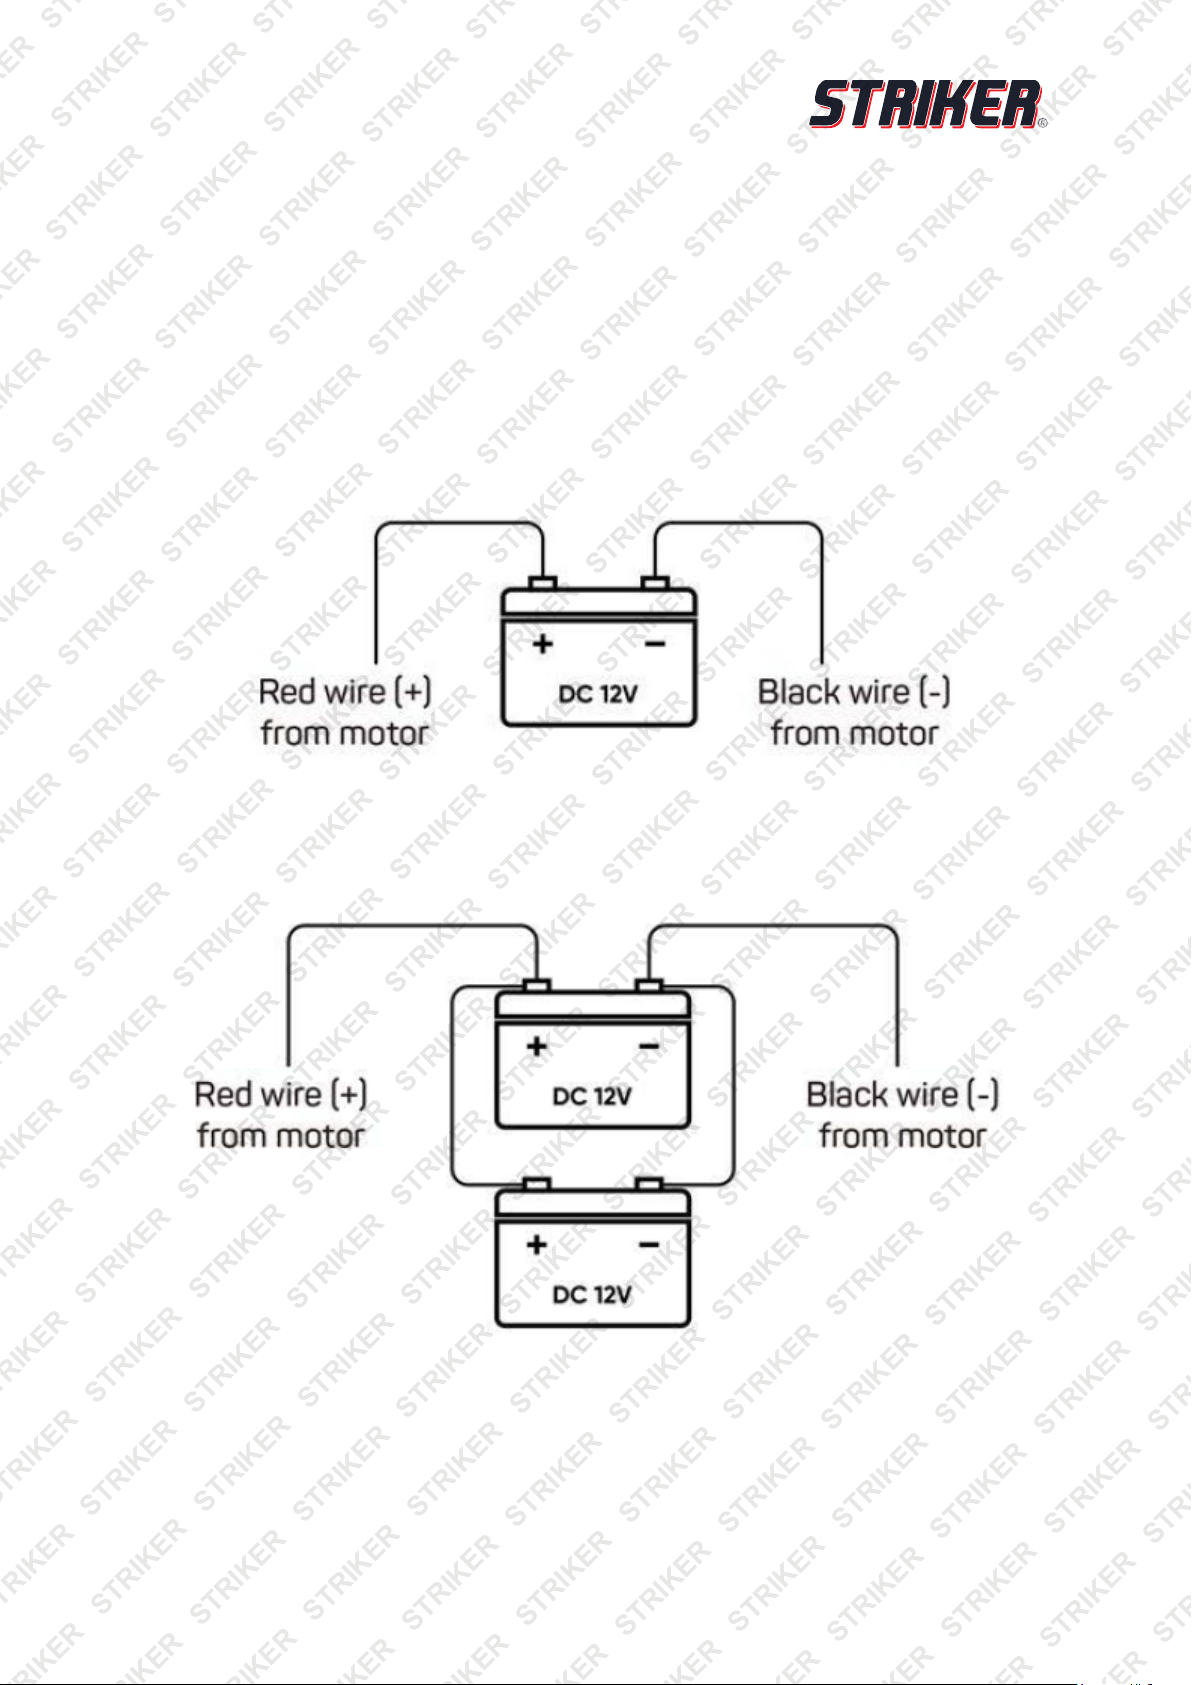
Connection with One Battery (12V DC)
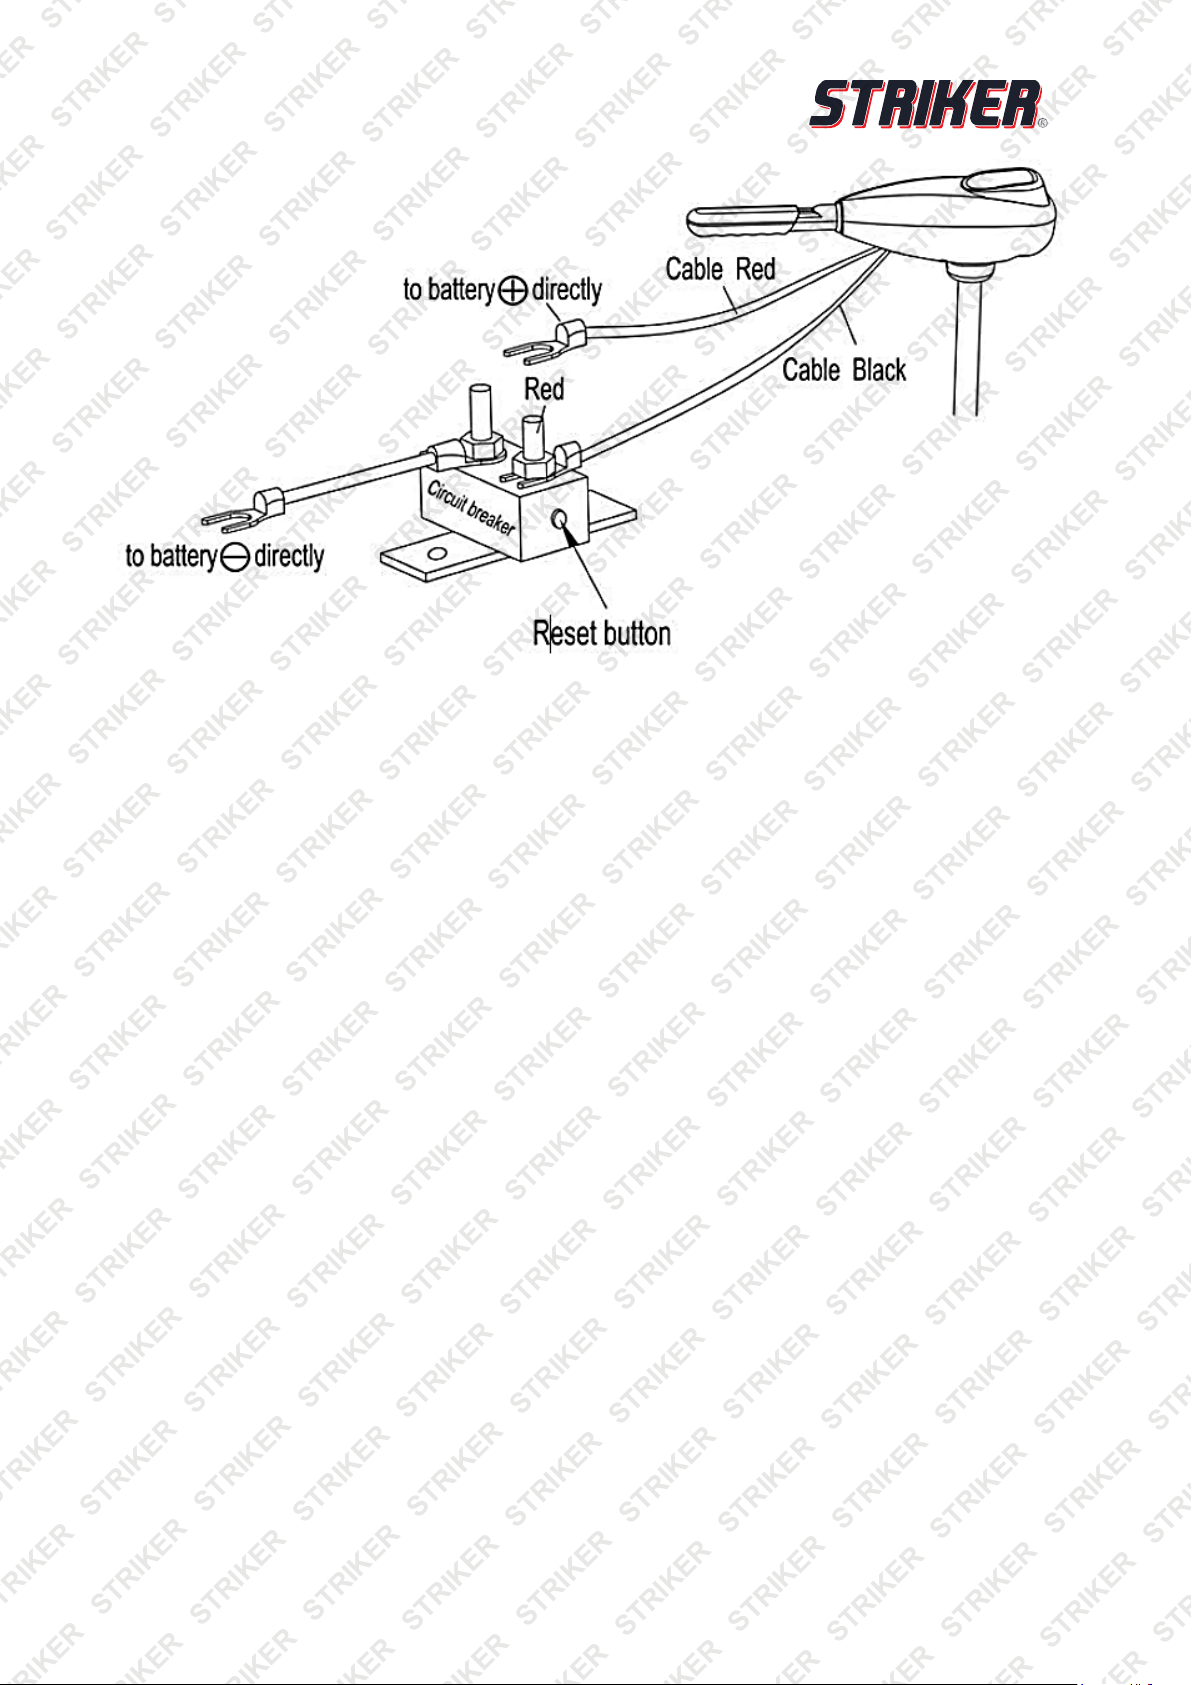
The red wire should connect to the positive node while the black wire should connect to the negative node.
(It is recommended to install in-line with the positive node.)
Connection with Two Batteries in Parallel (12V DC)
The red wire should connect to the positive node while the black wire should connect to the negative node.
(It is recommended to install the circuit breaker in-line with the positive node.)
E&OE © 2018 Striker 6
Page 7
Electric Trolling Motor
Controlling the Motor
Rotate the handle to make the motor work.
WARNING! Remember to always disconnect the motor from the battery(ies) once the motor leaves the
water, as a rotating propeller can cause serious injuries.
On/Off Speed Control
Rotate the handle clockwise to obtain any of the 5 forward speeds. Rotate the handle counter-clockwise for
any of the 3 reverse speeds. To stop the motor from running, position the handle following the arrow marker
and position on level 0.
Battery Level Indicator
There are 10 LED lights on the top cover, when four green LED's are out, the meter is indicating that the
input voltage is less than 9.5V (normal voltage should be 12V). It is advisable to disconnect the motor from
the battery to prevent damage to the battery and then recharge it.
Adjusting the Motor Depth
Position the depth adjustment collar so the propeller blades are submerged 150 – 300mm (6 – 12inches)
below the water’s surface.
Raising the Motor
It is recommended to disconnect the battery first before carrying out this procedure to prevent accidental
running of the motor. To raise the motor out of the water, push and hold the tilt lever and with the other hand
push down on the end of the handle to bring the motor up and out of the water. Then release the tilt lever to
lock in place.
Lowering the Motor
It is recommended to disconnect the battery first before carrying out this procedure to prevent accidental
running of the motor. Press the tilt lever and with the other hand, hold onto the end of the handle to steady
the motor into the water. Once lowered, release the tilt lever to lock into position.
CAUTION! Remember to wash the motor by using fresh water after being used in salt water as it can greatly
reduce the possibility of corrosion.
E&OE © 2018 Striker 7
Page 8
Electric Trolling Motor
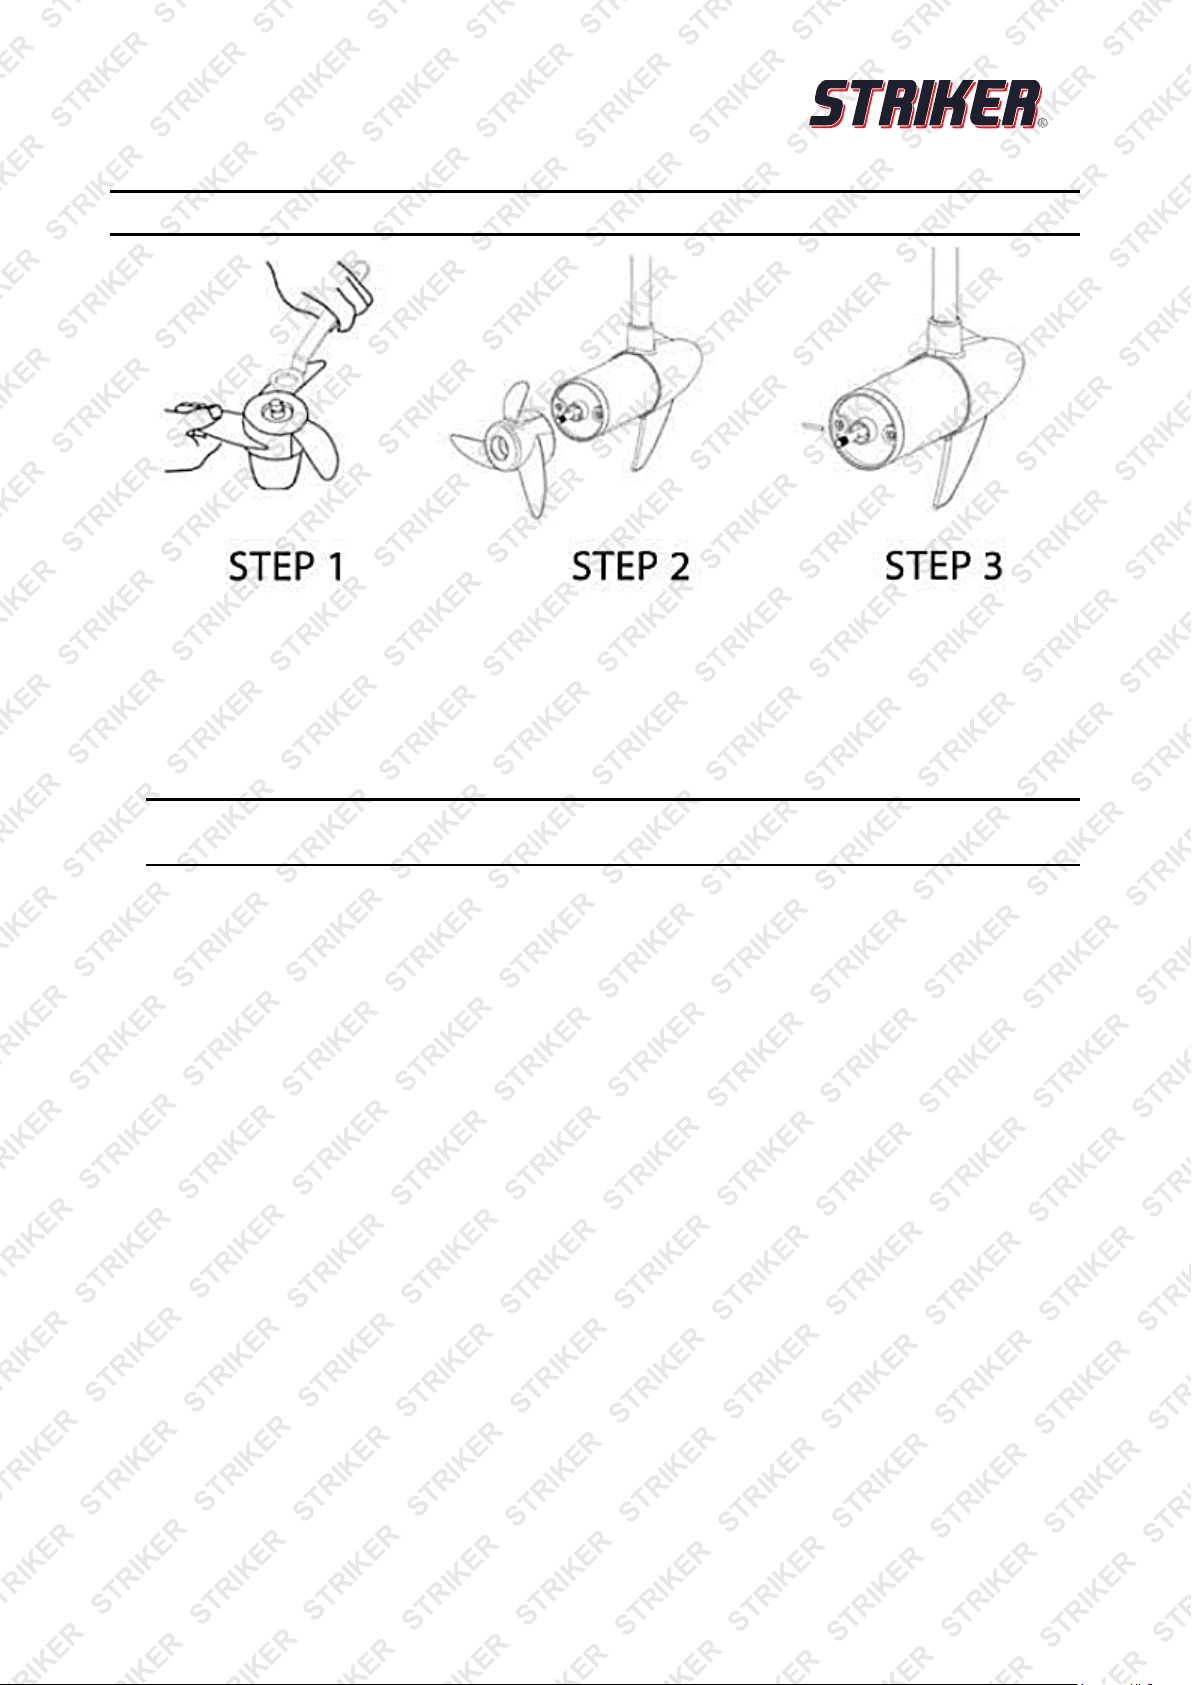
Replacing the Propeller
CAUTION! Make sure that the motor has been disconnected from batteries.
1. Hold the propeller blade and loosen the propeller nut, using the prop spanner supplied or a set of needle
nose pliers. Remove the propeller nut.
2. Pull the propeller straight off. If prop is stuck, grasp one blade with one hand and tap on the backside of
the opposite blade lightly with a rubber mallet, until the propeller comes off. If the propeller pin is bent,
replace it.
3. Align the new propeller with the propeller pin. Re-install the propeller nut and tighten firmly by hand,
tighten with spanner another ¼ turn.
CAUTION! Do not strike a bent prop pin with hammer to remove the pin. Damage to motor armature
may occur and will not be covered by warranty.
About the Circuit Breaker (50amp)
During the usage of the electric trolling motor, the propeller can sometimes get stuck by weeds, fishing lines,
or fishing webs. Sometimes, due to the variance of the water depth, the propeller can become covered by
silt. If those situations occur, quickly disconnect the battery and clean up the propeller. (Please DO NOT skip
steps and increase the thrust of electric outboard motor to solve the problem, or it may cause permanent
damages to the electric trolling motor.)
The characteristics between the electric outboard motor and gasoline outboard motor are different. If the
propeller of the motor gets stuck, the gasoline outboard motor will shut down to not cause any permanent
damage to the motor itself. However, the electric outboard will draw extremely large currents due to the
motor stall and can generate large amounts of heat that can damage important components in the motor
such as the switch, rotor and other connecting parts or can even cause dangerous battery explosions.
In some muddy water areas, it can be hard for the user to recognize that the motor is stalled. To prevent
these situations from occurring, it is strongly recommended to use the circuit breaker to protect the electric
trolling motor. If the current draw of the electric trolling motor exceeds the limit of normal usage, the circuit
breaker will cut off the power automatically to prevent any possible damage to the electric trolling motor. The
circuit breaker has a reset button and is therefore reusable.
To prevent the rotor coil from damage because of exceeding the current, it is highly recommended to use a
circuit breaker to protect the electric trolling motor.
Circuit Breaker Function
When the electric trolling motor is being used, when the propeller is stuck by the weeds, small stones, fishing
lines, etc., the circuit breaker will cut off the power automatically to prevent damage to the motor's electrical
parts.
If the circuit breaker cuts off the power, please disconnect the battery first, then check and clear any
obstacles. Then, press the reset button on the circuit breaker and reconnect the battery, the electric outboard
motor will now be able to continue functioning properly.
E&OE © 2018 Striker 8
Page 9
Electric Trolling Motor
Maintenance
•
Check behind the propeller after each day for weeds, fishing lines or other debris that may get wrapped
up behind the propeller.
•
Lubricate all the pivot points with a non-aerosol lubricant. Never use an aerosol lubricant as many types
contain harmful propellants that can cause damage to various parts of your electric motor.
•
Check the tightness of the battery lead connections.
•
Visually check the condition of the main battery cables.
•
Inspect for loose or corroded wiring connections.
•
Always thoroughly rinse your electric trolling motor with fresh water after every use in salt water. Only
rinse the areas that have been in contact with salt water; avoid getting the top cover wet as this may
damage the circuitry inside.
•
Inspect for tightness of all nuts, bolts and screws.
•
Recharge batteries after each use. Follow the battery manufacturer's recommendations for battery
maintenance.
•
During freezing temperatures, when your electric motor is not being used, it should be stored in an area
where it will not freeze over.
•
Never connect the wires to wrong battery terminals. Always disconnect the battery during maintenance.
E&OE © 2018 Striker 9
Page 10
Electric Trolling Motor
Troubleshooting
The following information may assist in identifying a problem and rectifying it.
Loss of Power
Possible Fault Action
Propeller may have debris on it or
damaged.
Battery connections may be corroded. Replace battery connections
Battery has low voltage. Recharge the battery
Battery may be faulty. Recharge and check the battery.
Insufficient cable size from battery to
motor wiring.
Bad or faulty connection in boat
wiring or electric motor wiring
Permanent magnet cracked or
chipped. Motor will whine or grind.
Remove propeller, then clean and/or replace it.
13mm2 thickness / 6-gauge wire (AWG) is recommended.
Fix and/or replace faulty connection.
Replace.
Motor Makes Excessive Noise Or Vibration
Possible Fault Action
Propeller may have debris on it or
damaged.
Remove propeller, then clean and/or replace it.
Propeller may be unbalanced. Secure the propeller properly.
Bent armature. Remove the propeller, set at medium speed, turn unit on and check for armature wobble.
Bearing bushes may be worn out. Replace.
Turn propeller by hand. It should turn freely with a slight magnetic drag.
Motor Fails To Run
Possible Fault Action
Check fuse circuit breaker on boat for electric motor.
Check for loose or corroded connections.
Check plug for loose or bad connection.
Test main rotary switch.
Turn prop by hand. It should turn freely with a slight magnetic drag.
E&OE © 2018 Striker 10
Page 11
Electric Trolling Motor
Total battery failure. Recharge and check voltage. Replace, if needed.
Propeller may have debris on it or
damaged.
Remove propeller, then clean and/or replace it.
Motor Loses One or More Speed
Possible Fault Action
Lose wire on rotary switch. Check wiring diagram.
Lose connection in top housing. Check the connection.
Rotary switch damaged. Repair or replace the rotary switch.
Speed coils in lower unit may be
burned.
Repair or replace the speed coils.
Specifications
TR100
Input Power
1152W
Battery Required (Input)
Thrust Force
Maximum Speed
TR60
Input Power
Battery Required (Input)
Thrust Force
Maximum Speed
TR80
Input Power
Battery Required (Input)
Thrust Force
Maximum Speed
24V 48A
40.8kg / 90lbs
24km/h
408W
12V 34A
20.4kg / 45lbs
8km/h
684W
12V 52A
27.2kg / 60lbs
15km/h
E&OE © 2018 Striker 11
Page 12
Electric Trolling Motor
Some experts believe that the incorrect or prolonged use of almost any
product may cause serious injury or death. To help reduce your risk of
serious injury or death, refer to the information below. For more information,
see www.datastreamserver.com/safety
Consult all documentation, packaging
and product labelling before use. Note
that some products feature
documentation available online. It is
recommended to print and retain the
documentation.
Before each use, check the product for
loose/broken/damaged/missing parts,
wear or leaks (if applicable). Never use a
product with
loose/broken/damaged/missing parts,
wear or leaks.
Products must be inspected and serviced
(if applicable) by a qualified technician
every 6 months. This is based on
average residential use by persons of
average size and strength, and on a
property of average metropolitan size.
Use beyond these recommendations may
require more frequent
inspections/servicing.
Ensure that all users of the product have
completed a suitable industry recognised
training course before being allowed
access to the product.
The product has been supplied by a general merchandise
retailer that may not be familiar with your specific
application or description of application. Be sure to attain
third-party approval from a qualified specialist for your
application before use, regardless of any assurances from
the retailer or its representatives.
This product is not intended for use where fail-safe
operation is required. As with any product (for example,
automobile, computer, toaster), there is the possibility of
technical issues that may require the repair or
replacement of parts, or the product itself. If the possibility
of such failure and the associated time it may take to
rectify could in any way inconvenience the user, business
or employee, or financially affect the user, business or
employee, then the product is not suitable for your
requirements. This product is not intended for use where
incorrect operation or a failure of any kind, including but
not limited to, a condition requiring product return,
replacement, parts replacement or service by a technician
may cause financial loss, loss of employee time or an
inconvenience requiring compensation.
If this product has been purchased in error when
considering the information presented here, contact the
retailer directly for details of their returns policy, if
required.
©2018 Striker. All rights reserved. No part of this document, including descriptive content, concepts, ideas,
diagrams or images may be reproduced or transmitted in any form or by any means, electronic or
mechanical, including photocopying, scanning or recording, or any information storage and retrieval system,
without express permission or consent from the publisher.
E&OE © 2018 Striker 12
 Loading...