


US SECTION ............................................................... |
3 |
|
INTERNATIONAL SECTION |
|
|
|
English / English ....................................................... |
16 |
|
Spanish / Español..................................................... |
24 |
|
Italian / Italiano.......................................................... |
32 |
|
French / Français ...................................................... |
40 |
|
German / Deutsch .................................................... |
48 |
|
Russian / Pусский ................................................... |
56 |
|
Greek / Ελληνικ ..................................................... |
64 |
|
Portuguese / Português ............................................ |
72 |
|
Finnish / Suomi ......................................................... |
80 |
|
Swedish / Svensk ..................................................... |
88 |
|
Turkish / Türkçe ........................................................ |
96 |
ILLUSTRATIONS ....................................................... |
104 |
|


OWNER’S MANUAL
IMPORTANT: US customers have to refer to the “USA Section” of this Owner’s Manual
3

READ ALL INSTRUCTIONS AND WARNINGS IN THIS MANUAL BEFORE USING THIS AIRGUN.
Congratulations and thank you for purchasing your new STOEGER pellet airgun.
WARNING
THIS AIRGUN IS NOT A TOY. THIS AIRGUN IS TO BE USED BY ADULTS ONLY.
PLEASE READ THIS OWNER’S MANUAL COMPLETELY. ALWAYS TREAT YOUR AIRGUN AS YOU WOULD A REAL FIREARM.
WARNING
FOLLOW THIS OWNER’S MANUAL SAFETY INSTRUCTIONS CAREFULLY AND KEEP THIS MANUAL SAFELY FOR FUTURE USE. DO NOT SELL YOUR AIRGUN WITHOUT THIS OWNER MANUAL.
OWNER AND USER MUST KNOW AND OBEY ALL LOCAL LAWS ABOUT THE OWNERSHIP AND THE USE OF THIS AIRGUN.
4 USA

CONTENTS |
USA |
|
1 |
Airgun parts ...................................................................................... |
9 |
2 |
Safety handling ................................................................................. |
10 |
3 |
Adjusting the trigger ....................................................................... |
10 |
4 |
Cocking .............................................................................................. |
10 |
5 |
Loading .............................................................................................. |
11 |
6 |
Shooting: aiming and firing .......................................................... |
11 |
7 |
Airgun maintenance ........................................................................ |
11 |
8 |
Service and Repairs........................................................................ |
12 |
Manual subject to modification without prior notice.
USA 5

AIRGUN SAFETY
1.NEVER POINT AN AIRGUN AT SOMETHING THAT IS NOT SAFE TO SHOOT.
Never let the muzzle of an airgun point at any part of your body or at another person. This is especially important when loading or unloading the airgun.
When you are shooting at a target, know what is behind it.
If you miss your target or if the pellet penetrates the target, it is your responsibility to ensure that the shot does not cause unintended injury or damage.
2.AN AIRGUN CAN CAUSE PERMANENT INJURY OR DEATH. ALWAYS TREAT AN AIRGUN AS A REAL FIREARM AND AS IF IT WAS LOADED.
Never assume that an airgun is unloaded. The only certain way to ensure that an airgun is not loaded is to open  the chamber and
visually examine the
inside to see if a pellet is present. Airguns can be checked by
opening the chamber so that a visual inspection of the chamber for
any remaining pellet can be made.
3.STORE YOUR AIRGUN SO THAT CHILDREN CANNOT GAIN ACCESS TO IT.
It is your responsibility to ensure that children under the lawful age of possession of an airgun or other unauthorized persons do not gain unsupervised access to your airgun.
To reduce the risk of accidents involving children, unload your airgun, lock it and store the pellets in a separate locked location.
Please note that devices intended to prevent accidents - for example, cable locks, chamber plugs, etc, - may not prevent use or misuse of your airgun by a determined person. Steel gun safes may be more appropriate to reduce the likelihood of intentional misuse of an airgun by an unauthorized child or person.
r e g e o t S
6 USA

4.NEVER SHOOT AT WATER OR AT A HARD SURFACE.
Shooting at the surface of water or at a rock or other hard surface increases the chance of ricochets or fragmentation of the pellet, which can result in the projectile striking an unintended or peripheral target.
5.KNOW THE SAFETY FEATURES OF THE AIRGUN YOU ARE USING, BUT REMEMBER: SAFETY DEVICES ARE NOT A SUBSTITUTE FOR SAFE HANDLING PROCEDURES.
Keep your airgun on “safe” until ready to fire, but never rely solely on a safety device to prevent an accident. It is imperative that you know and use the safety features of the particular airgun you are handling, but accidents can best be prevented by following the safe handling procedures described in these safety rules and elsewhere in the product manual.
To further familiarize yourself with the proper use of airguns, take an airgun Safety Course taught by an expert in airgun use and safety procedures.
6. PROPERLY MAINTAIN YOUR AIRGUN.
Store and carry your airgun so that dirt or lint does not accumu-
late in the working parts. Clean and oil
your airgun, following the instructions provided your user’s manual, after each use to
prevent corrosion, damage to the barrel or accumulation of impurities.
Always check the barrel prior to loading to ensure that it is clean and free from obstructions. Firing against an obstruction can cause a dangerous build up of pressure and might injure yourself or others nearby. If you hear an unusual noise when shooting, stop firing immediately, engage the manual safety and unload the airgun. Make sure the chamber and barrel are free from any obstruction.
7. USE PROPER PELLETS. |
USA |
|
Be certain that each pellet you use is in the proper caliber for the airgun. The caliber of the airgun is clearly marked on the barrel of the airgun. The use of low quality pellets may affect the accuracy or obstruct the barrel by accumulation of pellets inside the barrel.
USA 7

8.ALWAYS WEAR PROTECTIVE GLASSES WHEN SHOOTING.
A pellet or pellet fragments can blow back or ricochet and cause serious injury including the possible loss of eyesight. The shooter and bystanders must always wear impact resistant
shooting glasses when firing any airgun.
9.NEVER CLIMB A TREE, FENCE OR OBSTRUCTION WITH A LOADED AIRGUN.
Open barrel before climbing or descending a tree or before climbing a fence or jumping over a ditch or obstruction. Never pull or push a loaded airgun toward yourself or another person.
10.AVOID ALCOHOLIC BEVERAGES AND JUDGMENT OR REFLEX IMPAIRING MEDICATION WHEN SHOOTING.
Do not drink and shoot. If you take medication that can impair motor reactions or judgment, do not handle an airgun while you are under the influence of the medication.
11.NEVER TRANSPORT A LOADED AIRGUN.
Unload an airgun before putting it in a vehicle. Hunters and target shooters should load their airgun only at their destination.
12.NEVER FIRE YOUR AIRGUNS WITHOUT PELLETS IN THE CHAMBER.
This may permanently damage your rifle.
8 USA

SAFE FIRE
C
A B
O
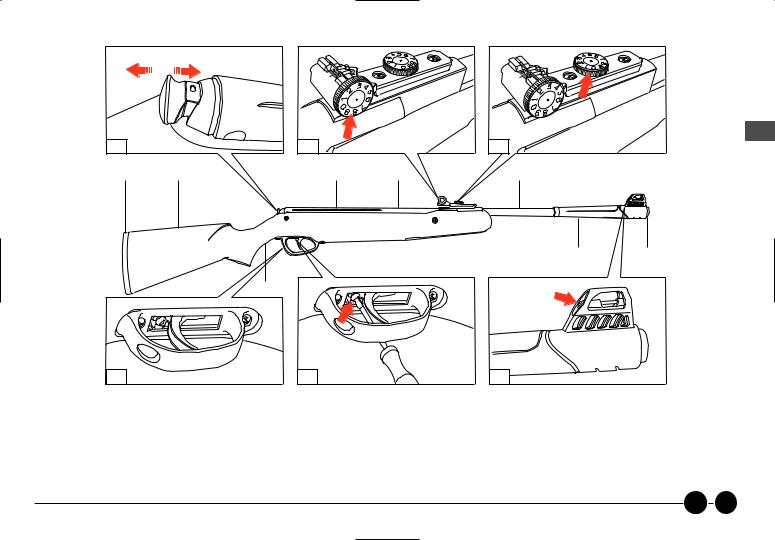
1 AIRGUN PARTS
AButt pad
BStock
CSafety
DRail for scope mount
F
D E
 Stoeger
P
N
ECompression cylinder
FWindage adjustment screw
GElevation adjustment screw
HBarrel
IMuzzle
USA
G
H
M I
L
LFront sight with fiber optic
MGrip
NTrigger adjustment screw
OTrigger guard
PPistol grip
USA 9
2 SAFETY HANDLING
Your airgun has an automatic locking safety which engages automatically when you cock your gun. The safety slide is situated at the end of the compression tube (fig. C):
●Back = safe
Safety button fully rearward - white dot visible - the safety is in the “ON” or “Safe” position
●Forward = fire
Push the safety button fully forward - white dot not visible - to put the safety in the “OFF” or “Fire” position.
SAFE
FIRE
C
3 ADJUSTING THE TRIGGER
Trigger pull is adjusted in the factory, and does not need adjustment for most shooters. This two stage trigger has an adjusting screw for second stage length adjustment
(fig. N).
This feature is for experienced shooters on models X10, X20 and X50.
●To reduce second stage length, turn screw clockwise.
●To increase second stage length, turn screw counter clockwise.
N
4 COCKING
Point the airgun in safe direction while keeping your finger off the trigger (fig. Q).
eger |
Sto |
Q |
With one hand grasp stock at the pistol grip. Holding the rifle firmly, tap barrel behind front sight in order to break locked position (fig. R).
Stoeger
R
Grasp barrel behind the front sight and pull downward until it stops. You will hear an audible click of the trigger mechanism lock when the pressure is released. You must control, and not release, the barrel under strong resistance until the audible click is heard.
Be careful not to pinch your hand or fingers in the hinge area (fig. S).
Stoeger |
S |
10 USA

5 LOADING
Check pellet to ensure it matches the caliber of the airgun. Insert pellet into the breech until skirt is flush with breech face
(fig. T).
T |
Move barrel back to its original locked position.
Again, be careful not to pinch your hand or fingers in the hinge area (fig. U).
ger |
Stoe |
U |
6 SHOOTING: AIMING AND FIRING
Keep finger outside trigger guard until on target, push safety button fully forward, squeeze trigger. Safety can be put back to “On” or “Safe” positions at any time by pulling fully rewarded (white dot visible).
A) Wrong (fig. V)
V |
|
B) |
Right (fig. Z) |
|
1 |
|
2 |
Z |
|
Your airgun is equipped with an adjustable USA rear sight for both elevation (1) (up-down)
and windage (left-right) (2).
Elevation settings are marked on the elevation knob and controlled by turning elevation screw 1.
●Turn clockwise to make the airgun shoot lower
●Turn counter clockwise to make the airgun shoot higher
Left or Right windage settings are marked on the sliding scale and controlled by turning windage screw 2.
●Turn clockwise to make the pellet hit to the right
●Turn counter clockwise to make the pellet hit to the left
The scale and numbers are for reference only, and do not represent a specific distance at the target.
7 AIRGUN MAINTENANCE
Airgun care requires very little cleaning and maintenance.
Mechanicals parts:
Barrel should be cleaned before storage or at least after 500 shots with a cleaning rod (avoid brass brushes for rifling preservation), or cleaning pellets to be fired as a real pellet. You can apply a drop of gun oil into the breach.
USA 11

Every 1000 shots, apply a drop of gun lubricant into the compression chamber
(fig. W).
W |
Blued parts as barrel and compression cylinder should be protected from rusting. Maintain protection by wiping these parts with a lightly oiled pad.
All visible mechanicals parts, breach, trigger, safety may be lightly oiled as needed to maintain a proper function.
Stock care:
Synthetic stocks require no maintenance except wiping clean and drying with a soft cloth or towel. Wooden stocks should only be stored at room temperature because excessive heat can crack them. A wooden stock can be polished with oil and a soft cloth.
Storage:
● Do not leave the rifle in the cocked position, as this weakens the mainspring.
● Decock your airgun by firing in a safe direction and always strictly respect all safety rules.
● Do not leave the rifle in humid environment.
|
● |
Do not attempt to disassemble |
|
|
your airgun. Take or send it to |
|
|
an authorized service station. |
|
● Do not modify your airgun, |
|
|
|
handling it in a different manner |
WARNING |
|
as described in this manual, as |
|
this could make your gun unsafe |
|
|
|
|
|
|
and you will void the warranty. |
|
● |
Any modification may make the |
|
|
gun unsafe to use, and cause |
|
|
serious injury or death. |
|
● |
Do not fire the airgun without |
|
|
pellet in the chamber (dry fire) |
|
|
as this may damage you airgun |
|
|
permanently. |
8 SERVICE AND REPAIRS
Call STOEGER INDUSTRIES (301) 283 6300 and ask for the Service Department. It is possible that our Service personnel and gunsmiths will be able to help you over the phone.
In the event this is not possible, authorized service and repairs will be issued a RA (Return Authorization) Number. Write this number boldly on the box. Include a note in the box stating the defect or problem along with your name, address and phone number. Return prepaid to:
STOEGER INDUSTRIES Airgun division
801 Broad Street Pocomoke, MD 21851
Warranty Claims
All Stoeger Airguns carry a limited 2 year warranty.
Stoeger Industries to You - This new Stoeger Airgun is warranted only to the original retail purchaser, for two years from the date of purchase. This warranty applies only if the product was purchased from an authorized Stoeger reseller in United States.
Stoeger will at its option, repair or replace without charge any product fails due to a defect in workmanship or materials. Parts and labor are included. Repairs are warranted for the duration of the original warranty. If Stoeger replaces an airgun under its original warranty, you will receive a new two year warranty. Stoeger will return replacement airgun to you freight prepaid.
12 USA

To Obtain Warranty Service - You must send your airgun freight prepaid to Stoeger Industries at the address listed above. No C.O.D. shipments will be accepted. Only the Stoeger reap facility in Maryland is authorized to make warranty repairs. DO NOT PACK OR SHIP LOADED AIRGUNS.
Return the complete unloaded airgun with a detailed description of the problem. You must provide Stoeger satisfactory proof of the date of original purchase if the warranty registration is not on file. Only a sales receipt or properly completed warranty registration card for a new Stoeger airgun will establish eligibility for warranty repairs when a product is returned. You must provide proof of the date you purchased a new Stoeger product at the time you send a product for warranty repair.
What is Not Covered - The warranty does not cover defects or damage caused by:
1)Misuse or accident
2)Failure to provide proper care and maintenance
3)Failure to comply with instructions in the owner’s manual
4)Normal wear and tear
5)Rust or corrosion
6)Obstruction in the barrel.
All wooden parts are excluded from warranty repairs. This warranty does not cover claims made by the subsequent owner of any Stoeger product.
ANY UNAUTHORIZED ALTERATION OR MODIFICATION OF THE AIRGUN WILL VOID THE WARRANTY.
STOEGER SHALL NOT BE RESPONSIBLE FOR ANY CLAIMS INVOLVING AIRGUN THAT RESULT FROM THE USE OF NON STANDARD OR REUSED PELLETS.
IN NO EVENT SHALL STOEGER INDUSTRIES BE LIABLE FOR CONSEQUENTIAL DAMAGES. Some states do not allow the exclusion or limitation of incidental or consequential damages, so the above limitation or exclusion may not apply to you. The warranty gives specific legal rights, and so you may also have other rights which vary from state to state.
Stoeger Industries authorizes no dealer or USA any other person to vary the terms of this warranty or make any other express warranties.
Where to get Further Help - If you have any questions concerning this warranty, please contact:
-Stoeger Industries (301) 283-6300 or
-Stoeger Industries
17603 Indian Head Highway, Accockeek, MD 20607-2501.
USA 13


OWNERS’ MANUAL
USO Y MANTENIMIENTO
USO E MANUTENZIONE
MODE D’EMPLOI ET D’ENTRETIEN
VERWENDUNG UND WARTUNG
ЭКСПЛУАТАЦИЯ И ТЕХОБСЛУЖИВАНИЕ
ΡΗΣΗ ΚΑΙ ΣΥΝΤΗΡΗΣΗ
USO E MANUTENÇÃO
KÄYTTÖJA HUOLTO-OHJEET
ANVÄNDNING OCH UNDERHÅLL
KULLANIM VE BAKIM
GB
E
I
F
D
RUS
GR
P
FIN
S
TR
15

READ ALL INSTRUCTIONS AND WARNINGS IN THIS MANUAL BEFORE USING THIS AIRGUN.
Congratulations and thank you for purchasing your new STOEGER pellet airgun.
WARNING
THIS AIRGUN IS NOT A TOY. THIS AIRGUN IS TO BE USED BY ADULTS ONLY.
PLEASE READ THIS OWNER’S MANUAL COMPLETELY. ALWAYS TREAT YOUR AIRGUN AS YOU WOULD A REAL FIREARM.
WARNING
FOLLOW THIS OWNER’S MANUAL SAFETY INSTRUCTIONS CAREFULLY AND KEEP THIS MANUAL SAFELY FOR FUTURE USE. DO NOT SELL YOUR AIRGUN WITHOUT THIS OWNER MANUAL.
OWNER AND USER MUST KNOW AND OBEY ALL LOCAL LAWS ABOUT THE OWNERSHIP AND THE USE OF THIS AIRGUN.
16 GB

CONTENTS
1 |
Airgun parts ...................................................................................... |
21 |
|
2 |
.................................................................................Safety handling |
22 |
GB |
3 |
.......................................................................Adjusting the trigger |
22 |
|
4 |
Cocking .............................................................................................. |
22 |
|
5 |
Loading .............................................................................................. |
22 |
|
6 |
Shooting: aiming and firing .......................................................... |
22 |
|
7 |
Airgun maintenance ........................................................................ |
23 |
|
8 |
Service and Repairs........................................................................ |
23 |
|
Manual subject to modification without prior notice.
GB 17

AIRGUN SAFETY
1.NEVER POINT AN AIRGUN AT SOMETHING THAT IS NOT SAFE TO SHOOT.
Never let the muzzle of an airgun point at any part of your body or at another person. This is especially important when loading or unloading the airgun.
When you are shooting at a target, know what is behind it.
If you miss your target or if the pellet penetrates the target, it is your responsibility to ensure that the shot does not cause unintended injury or damage.
2.AN AIRGUN CAN CAUSE PERMANENT INJURY OR DEATH. ALWAYS TREAT AN AIRGUN AS A REAL FIREARM AND AS IF IT WAS LOADED.
Never assume that an airgun is unloaded. The only certain way to ensure that an airgun is not loaded is to open  the chamber and
visually examine the
inside to see if a pellet is present. Airguns can be checked by
opening the chamber so that a visual inspection of the chamber for
any remaining pellet can be made.
3.STORE YOUR AIRGUN SO THAT CHILDREN CANNOT GAIN ACCESS TO IT.
It is your responsibility to ensure that children under the lawful age of possession of an airgun or other unauthorized persons do not gain unsupervised access to your airgun.
To reduce the risk of accidents involving children, unload your airgun, lock it and store the pellets in a separate locked location.
Please note that devices intended to prevent accidents - for example, cable locks, chamber plugs, etc, - may not prevent use or misuse of your airgun by a determined person. Steel gun safes may be more appropriate to reduce the likelihood of intentional misuse of an airgun by an unauthorized child or person.
r e g e o t S
18 GB

4.NEVER SHOOT AT WATER OR AT A HARD SURFACE.
Shooting at the surface of water or at a rock or other hard surface increases the chance of ricochets or fragmentation of the pellet, which can result in the projectile striking an unintended or peripheral target.
5.KNOW THE SAFETY FEATURES OF THE AIRGUN YOU ARE USING, BUT REMEMBER: SAFETY DEVICES ARE NOT A SUBSTITUTE FOR SAFE HANDLING PROCEDURES.
Keep your airgun on “safe” until ready to fire, but never rely solely on a safety device to prevent an accident. It is imperative that you know and use the safety features of the particular airgun you are handling, but accidents can best be prevented by following the safe handling procedures described in these safety rules and elsewhere in the product manual.
To further familiarize yourself with the proper use of airguns, take an airgun Safety Course taught by an expert in airgun use and safety procedures.
6. PROPERLY MAINTAIN YOUR AIRGUN.
Store and carry your airgun so that dirt or lint does not accumu-
late in the working parts. Clean and oil
your airgun, following the instructions provided your user’s manual, after each use to
prevent corrosion, damage to the barrel or accumulation of impurities.
Always check the barrel prior to loading to ensure that it is clean and free from obstructions. Firing against an obstruction can cause a dangerous build up of pressure and might injure yourself or others nearby. If you hear an unusual noise when shooting, stop firing immediately, engage the manual safety and unload the airgun. Make sure the chamber and barrel are free from any obstruction.
7. USE PROPER PELLETS.
Be certain that each pellet you use is in the proper caliber for the airgun. The caliber of
the airgun is clearly marked on the barrel of GB the airgun. The use of low quality pellets may affect the accuracy or obstruct the barrel by accumulation of pellets inside the barrel.
GB 19
8.ALWAYS WEAR PROTECTIVE GLASSES WHEN SHOOTING.
A pellet or pellet fragments can blow back or ricochet and cause serious injury including the possible loss of eyesight. The shooter and bystanders must always wear impact resistant
shooting glasses when firing any airgun.
9.NEVER CLIMB A TREE, FENCE OR OBSTRUCTION WITH A LOADED AIRGUN.
Open barrel before climbing or descending a tree or before climbing a fence or jumping over a ditch or obstruction. Never pull or push a loaded airgun toward yourself or another person.
10.AVOID ALCOHOLIC BEVERAGES AND JUDGMENT OR REFLEX IMPAIRING MEDICATION WHEN SHOOTING.
Do not drink and shoot. If you take medication that can impair motor reactions or judgment, do not handle an airgun while you are under the influence of the medication.
11.NEVER TRANSPORT A LOADED AIRGUN.
Unload an airgun before putting it in a vehicle. Hunters and target shooters should load their airgun only at their destination.
12.NEVER FIRE YOUR AIRGUNS WITHOUT PELLETS IN THE CHAMBER.
This may permanently damage your rifle.
20 GB

SAFE FIRE
C
A B
O
1 AIRGUN PARTS
AButt pad
BStock
CSafety
DRail for scope mount
F
D E
 Stoeger
P
N
ECompression cylinder
FWindage adjustment screw
GElevation adjustment screw
HBarrel
IMuzzle
GB
G
H
M I
L
LFront sight with fiber optic
MGrip
NTrigger adjustment screw
OTrigger guard
PPistol grip
GB 21

2 SAFETY HANDLING
Your airgun has an automatic locking safety which engages automatically when you cock your gun. The safety slide is situated at the end of the compression tube (fig. C):
●Back = safe
Safety button fully rearward - white dot visible - the safety is in the “ON” or “Safe” position
●Forward = fire
Push the safety button fully forward - white dot not visible - to put the safety in the “OFF” or “Fire” position.
4 COCKING
Point the airgun in safe direction while keeping your finger off the trigger (fig. Q).
With one hand grasp stock at the pistol grip. Holding the rifle firmly, tap barrel behind front sight in order to break locked position (fig. R).
Grasp barrel behind the front sight and pull downward until it stops. You will hear an audible click of the trigger mechanism lock when the pressure is released. You must control, and not release, the barrel under strong resistance until the audible click is heard.
Be careful not to pinch your hand or fingers in the hinge area (fig. S).
3 ADJUSTING THE TRIGGER
Trigger pull is adjusted in the factory, and does not need adjustment for most shooters. This two stage trigger has an adjusting screw for second stage length adjustment
(fig. N).
This feature is for experienced shooters on models X10, X20 and X50.
●To reduce second stage length, turn screw clockwise.
●To increase second stage length, turn screw counter clockwise.
5 LOADING
Check pellet to ensure it matches the caliber of the airgun. Insert pellet into the breech until skirt is flush with breech face
(fig. T).
Move barrel back to its original locked position.
Again, be careful not to pinch your hand or fingers in the hinge area (fig. U).
6 SHOOTING:FIRING AIMING AND
Keep finger outside trigger guard until on target, push safety button fully forward, squeeze trigger. Safety can be put back to “On” or “Safe” positions at any time by pulling fully rewarded (white dot visible).
A)Wrong (fig. V)
B)Right (fig. Z)
Your airgun is equipped with an adjustable rear sight for both elevation (1) (up-down) and windage (left-right) (2).
Elevation settings are marked on the elevation knob and controlled by turning elevation screw 1.
●Turn clockwise to make the airgun shoot lower
●Turn counter clockwise to make the airgun shoot higher
Left or Right windage settings are marked on the sliding scale and controlled by turning windage screw 2.
●Turn clockwise to make the pellet hit to the right
●Turn counter clockwise to make the pellet hit to the left
The scale and numbers are for reference only, and do not represent a specific distance at the target.
22 GB

7 AIRGUN MAINTENANCE
Airgun care requires very little cleaning and maintenance.
Mechanicals parts:
Barrel should be cleaned before storage or at least after 500 shots with a cleaning rod (avoid brass brushes for rifling preservation), or cleaning pellets to be fired as a real pellet. You can apply a drop of gun oil into the breach.
Every 1000 shots, apply a drop of gun lubricant into the compression chamber
(fig. W).
Blued parts as barrel and compression cylinder should be protected from rusting. Maintain protection by wiping these parts with a lightly oiled pad.
All visible mechanicals parts, breach, trigger, safety may be lightly oiled as needed to maintain a proper function.
Stock care:
Synthetic stocks require no maintenance except wiping clean and drying with a soft cloth or towel. Wooden stocks should only be stored at room temperature because excessive heat can crack them. A wooden stock can be polished with oil and a soft cloth.
Storage:
● Do not leave the rifle in the cocked position, as this weakens the mainspring.
● Decock your airgun by firing in a safe direction and always strictly respect all safety rules.
● Do not leave the rifle in humid environment.
|
● |
Do not attempt to disassemble |
|
|
your airgun. Take or send it to |
|
|
an authorized service station. |
|
● Do not modify your airgun, |
|
|
|
handling it in a different manner |
WARNING |
|
as described in this manual, as |
|
this could make your gun unsafe |
|
|
|
|
|
|
and you will void the warranty. |
|
● |
Any modification may make the |
|
|
gun unsafe to use, and cause |
|
|
serious injury or death. |
|
● |
Do not fire the airgun without |
|
|
pellet in the chamber (dry fire) |
|
|
as this may damage you airgun |
|
|
permanently. |
8 SERVICE AND REPAIRS
Contact your dealer for first assistance or the |
|
|
GB |
||
official distributor in your country. |
||
The list of Official Distributors of the Stoe- |
|
|
ger Airguns products are available on: |
|
|
“stoegerairguns.com”. |
|
WARRANTY
All Stoeger Airguns are covered by a 2 years warranty valid from the purchase date.
Incidental damages, consequential damages to non-manual advices respect and nonauthorized disassembling are excluding the airgun from the warranty.
What is not covered:
●Misuse or accident
●Failure to provide care and maintenance
●Failure to comply with instructions in the owner’s manual
●Normal wear and tear
●Rust or corrosion
●Obstruction in the barrel
Wooden parts are excluded from warranty repairs. This warranty does not cover claims made by the subsequent owner of any Stoeger product.
GB 23

LEA ATENTAMENTE TODOS LOS APARTADOS DE ESTE MANUAL ANTES DE UTILIZAR SU ESCOPETA DE AIRE COMPRIMIDO.
Enhorabuena y gracias por haber comprado su nueva escopeta de aire comprimido de balines STOEGER.
ATENCIÓN
ESTA ESCOPETA DE AIRE COMPRIMIDO NO ES UN JUGUETE. ESTA ESCOPETA DE AIRE COMPRIMIDO DEBE SER UTILIZADA SÓLO POR ADULTOS.
LEA ATENTAMENTE ESTE MANUAL DE INSTRUCCIONES POR COMPLETO. TRATE SIEMPRE SU ESCOPETA DE AIRE COMPRIMIDO COMO SI FUERA UN ARMA DE FUEGO REAL.
ATENCIÓN
SIGA ATENTAMENTE LAS INSTRUCCIONES PARA SU SEGURIDAD CONTENIDAS EN ESTE MANUAL DE INSTRUCCIONES Y GUARDE ESTE MANUAL EN UN LUGAR SEGURO PARA USOS FUTUROS. NO VENDA ESTA ESCOPETA DE AIRE COMPRIMIDO SIN ESTE MANUAL DE INSTRUCCIONES.
EL PROPIETARIO Y LOS USUARIOS TIENEN QUE RESPETAR RIGUROSAMENTE TODAS LAS LEYES LOCALES ACERCA DE LA PROPIEDAD Y DEL USO DE ESTA ESCOPETA DE AIRE COMPRIMIDO.
24 E

ÍNDICE
1 |
Partes de la escopeta de aire comprimido ............................. |
29 |
|
|
2 |
Manejo seguro .................................................................................. |
30 |
|
|
3 |
Ajuste del gatillo .............................................................................. |
30 |
|
|
4 |
Montaje |
30 |
|
|
E |
||||
5 |
Carga ................................................................................................. |
30 |
||
|
||||
6 |
Disparo: apuntar y disparar ........................................................ |
30 |
|
|
7 |
Mantenimiento de la escopeta de aire comprimido ............. |
31 |
|
|
8 |
Asistencia y reparaciones ............................................................. |
31 |
|
Manual sujeto a modificaciones sin previo aviso.
E 25

NORMAS RELATIVAS A LA SEGURIDAD DE LA ESCOPETA DE AIRE COMPRIMIDO
1.NO APUNTE NUNCA LA ESCOPETA DE AIRE COMPRIMIDO CONTRA ALGO A LO QUE PUEDA SER PELIGROSO DISPARAR.
No apunte nunca un arma hacia ninguna parte de su cuerpo o contra otra persona. Esto es importante sobre todo cuando se carga o descarga la escopeta de aire comprimido.
Cuando se dispara a un blanco hay que controlar lo que hay detrás.
En el caso de que el objetivo no sea alcanzado o se sobrepase es su responsabilidad asegurarse de que el proyectil no cause lesiones o daños involuntarios a personas o cosas.
2.UNA ESCOPETA DE AIRE COMPRIMIDO PUEDE CAUSAR DAÑOS PERMANENTES O INCLUSO LA MUERTE.TRATE SIEMPRE LA ESCOPETA DE AIRE COMPRIMIDO COMO SI FUERA UN ARMA REALY ESTUVIERA CARGADA.
No presuma nunca de que la escopeta de aire comprimido está descargada. La única manera de asegurarse de que una escopeta de
aire comprimido está
 descargada es examinar la recámara y verificar que no quede dentro ningún balín. Las
escopetas de aire comprimido pueden controlarse abriendo la recámara para poder inspeccionar visiblemente la recámara y verificar si queda algún balín en ella.
3.MANTENGA LA ESCOPETA DE AIRE COMPRIMIDO FUERA DEL ALCANCE DE LOS NIÑOS.
Es responsabilidad del propietario de la escopeta de aire comprimido que los niños, menores de 18 años, o personas no autorizadas, no tengan acceso a ella si no están bajo la supervisión de personas autorizadas.
Para reducir el riesgo de incidentes en los que puedan verse envueltos los niños, descargue la escopeta de aire comprimido, guárdela bajo llave y coloque los balines en lugar separado, cerrado incluso con llave.
Conviene tener presente que los sistemas empleados para prevenir incidentes, como por ejemplo asegurarla con candado o taponar la recámara de cartuchos, pueden a veces no impedir el uso o abuso intencionado de la escopeta de aire comprimido por parte de una persona determinada. Para evitar el mal uso intencionado de la escopeta de aire comprimido por parte de niños o personas no autorizadas se recomienda utilizar armarios blindados de seguridad.
r e g e o t S
26 E

4.NO DISPARE NUNCA CONTRA EL AGUA O SUPERFICIES DURAS.
Disparar contra el agua o contra una roca u otra superficie dura aumenta la posibilidad de rebote o fragmentación de la bala o de los balines que podrían alcanzar un objetivo no intencionado o periférico.
5.ASEGÚRESE DE CONOCER LOS DISPOSITIVOS DE SEGURIDAD DEL ARMA QUE ESTA USANDO: PERO RECUERDE QUE DICHOS DISPOSITIVOS NO SUSTITUYEN A LAS NORMAS DE SEGURIDAD Y DE USO.
Mantenga su escopeta con el “seguro puesto” hasta que esté listo para disparar, sin embargo, no confíe sólo en los dispositivos de seguridad para prevenir los accidentes. Es imprescindible conocer y utilizar los dispositivos de seguridad específicos de la escopeta de aire comprimido que está manejando, aunque el mejor modo de prevenir dichos incidentes es seguir el procedimiento de uso de seguridad descrito en estas normas y que se encuentra en el interior del libro de instrucciones.
Para familiarizarse con el uso de ésta u otras escopetas de aire comprimido se aconseja seguir un curso de seguridad con las escopetas de aire comprimido impartido por expertos en esta materia.
6.REALICE UN MANTENIMIENTO ADECUADO DE LA ESCOPETA DE AIRE COMPRIMIDO.
Guarde y transporte la escopeta de aire comprimido de modo que
no se acumule suciedad o pólvora en los
mecanismos de funcionamiento. Limpie y lubrique la escopeta de aire comprimido,
siguiendo las indicaciones de este manual, después de cada uso para prevenir: corrosión, daños en el cañón o acumulación de suciedad.
Compruebe siempre el cañón antes de cargar el arma para asegurarse que está limpio y libre de obstrucciones. Disparar con obstrucciones en el cañón puede provocar un aumento de presión y causarle lesiones a usted mismo y a personas cercanas a usted,
Si al disparar se produce algún sonido extraño deje automáticamente de disparar, ponga la escopeta de aire comprimido en posición segura y descárguela.Verifique que la recámara y el cañón estén libres de obstrucciones.
E
7. USE LOS BALINES ADECUADOS.
Asegúrese de que cada balín que usa sea del calibre que su escopeta de aire comprimido requiere. El calibre de la escopeta de aire comprimido está estampado claramente en el cañón de la escopeta. El uso de balines de baja calidad podría afectar la precisión u obstruir el cañón con la acumulación de balines en su interior.
E 27

8.USE SIEMPRE GAFAS PROTECTORAS DURANTE EL TIRO.
Una bola o fragmentos de metal pueden salir disparados hacia atrás o rebotar provocando lesiones graves, incluida la pérdida de la vista. Cuando se dispara un arma el tirador y las personas
presentes deben llevar siempre gafas protectoras y de una resistencia adecuada.
10.EVITE BEBIDAS ALCOHÓLICAS O MEDICAMENTOS QUE PUEDAN REDUCIR LA CAPACIDAD DE JUICIO Y SUS REFLEJOS DURANTE EL TIRO.
Evite beber alcohol antes de disparar. Si está tomando medicamentos que puedan disminuir su capacidad de juicio o sus reflejos, no use el arma mientras esté bajo el efecto de dichos medicamentos.
12.NUNCA DISPARE SU ESCOPETA DE AIRE COMPRIMIDO SIN BALINES EN LA RECÁMARA.
Esto podría dañar su escopeta de manera permanente.
9.NO SUBA A LOS ÁRBOLES NI SALTE CERCAS O ZANJAS CON UNA ESCOPETA DE AIRE COMPRIMIDO CARGADA.
Antes de subir o bajar de un árbol, saltar una cerca o una zanja o cualquier otro obstáculo, abra el cañón. Nunca tire o empuje una escopeta de aire comprimido cargada hacia usted mismo o hacia otra persona.
11.NO TRANSPORTE NUNCA UNA ESCOPETA DE AIRE COMPRIMIDO CARGADA.
Descargue la escopeta de aire comprimido antes de meterla en el vehículo. Los cazadores y tiradores deben cargar la escopeta de aire comprimido una vez hayan llegado a destino.
CARGADA |
28 E
SEGURO DISPARO
E
C |
|
F |
|
G |
A |
B |
D |
E |
H |
|
|
Stoeger |
|
|
O
1 PARTES DE LA ESCOPETA
ACantonera
BCulata
CSeguro
DRail para montar la óptica
M I
P
N |
L |
ECilindro de compresión
FGuía de regulación
GGuía de regulación elevación
HCañón
IBoca del cañón
LMira delantera con fibra óptica
MEmpuñadura
NTornillo de regulación del gatillo
OGuardamonte
PEmpuñadura tipo pistola
E 29
 Loading...