

Page 1
UM2180
User manual
Getting started with the ST BLE Mesh Android application
Introduction
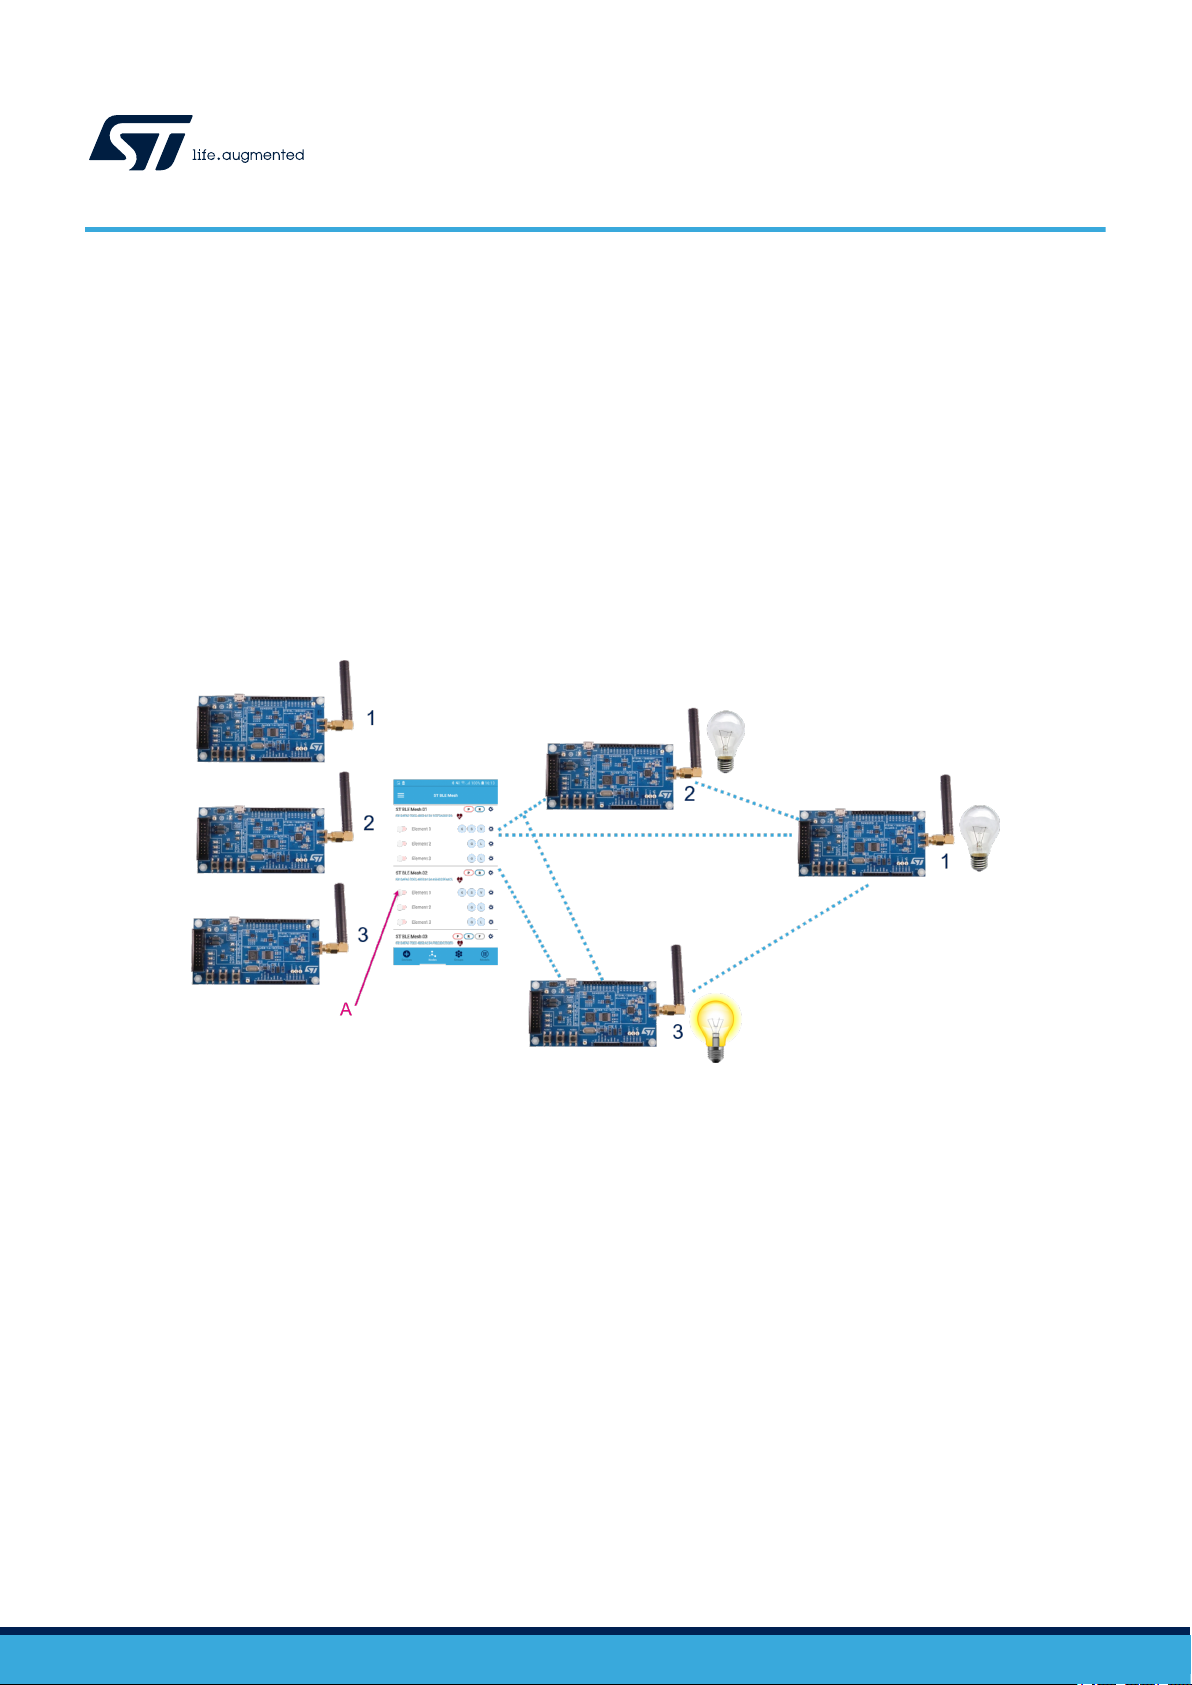
The ST BLE Mesh Android App is designed to help you evaluate the ST Bluetooth low energy mesh solution.
The application works with ST BLE devices running the embedded mesh over Bluetooth low energy (MoBLE) library. You can
use it to evaluate provisioning, un-provisioning and controlling MoBLE embedded nodes in a mesh network over the Bluetooth
low energy protocol to create distributed control system such as smart lighting and home automation.
Communication between the Android App and the mesh network is secured by encryption and authentication. The underlying
standards of secured communication are compliant with the BLE Mesh technology standards.
Figure 1. ST BLE Mesh scenario
A. Button to turn the light ON or OFF
UM2180 - Rev 3 - September 2020
For further information contact your local STMicroelectronics sales office.
www.st.com
Page 2

1 ST BLE Mesh Android App overview
The ST BLE Mesh App allows performing the following tasks in a BLE mesh network:
• Add new devices to the network via the provisioning process
• View and configure nodes in a BLE mesh network
• Control the nodes (Vendor, Generic, Lighting and Sensor model commands)
• Remove nodes from the network using the un-provisioning procedure
• Create and manage groups of nodes
• Set subscription and publication addresses on nodes
• Upgrade firmware of compatible nodes
1. The App includes a subset of model commands for demonstration purposes. More commands are available in the customer
application using the ST BLE Mesh SDK.
Bluetooth® Mesh Profile can be used for home, office and industrial applications.
UM2180
ST BLE Mesh Android App overview
(1)
UM2180 - Rev 3
page 2/43
Page 3
2 Getting started with the App
2.1 Hardware and software requirements
The App is tested on various Android phones (for details, refer to STSW-BNRG-Mesh software package release
notes in the Android folder) and works with the following boards running the BLE mesh firmware:
• NUCLEO-L152RE STM32 Nucleo-64 development board with the X-NUCLEO-IDB05A1 Bluetooth® low
energy expansion board based on the SPBTLE-RF module
• STEVAL-IDB007V1 evaluation platform based on the BlueNRG-1 low power BLE single-mode system-on-
chip
• STEVAL-IDB008V2 evaluation platform based on the BlueNRG-2 Bluetooth® low energy wireless system-
on-chip
Refer to the STSW-BNRG-Mesh firmware SDK for the default evaluation board support. The SDK can also be
ported on any board based on BlueNRG-MS, BlueNRG-1, BlueNRG-2 and STM32WB devices.
2.2 Installing and running the App
Follow the instructions below to install the ST BLE Mesh Android App on a compatible Android (6 or later
versions) device.
Step 1. Download and install the application in one of the following ways:
– Follow the link to Google Play® store to install the app directly to your Android device
or
– Copy the APK file provided in the STSW-BNRG-Mesh\Android\apk folder to your smartphone via
USB cable
UM2180
Getting started with the App
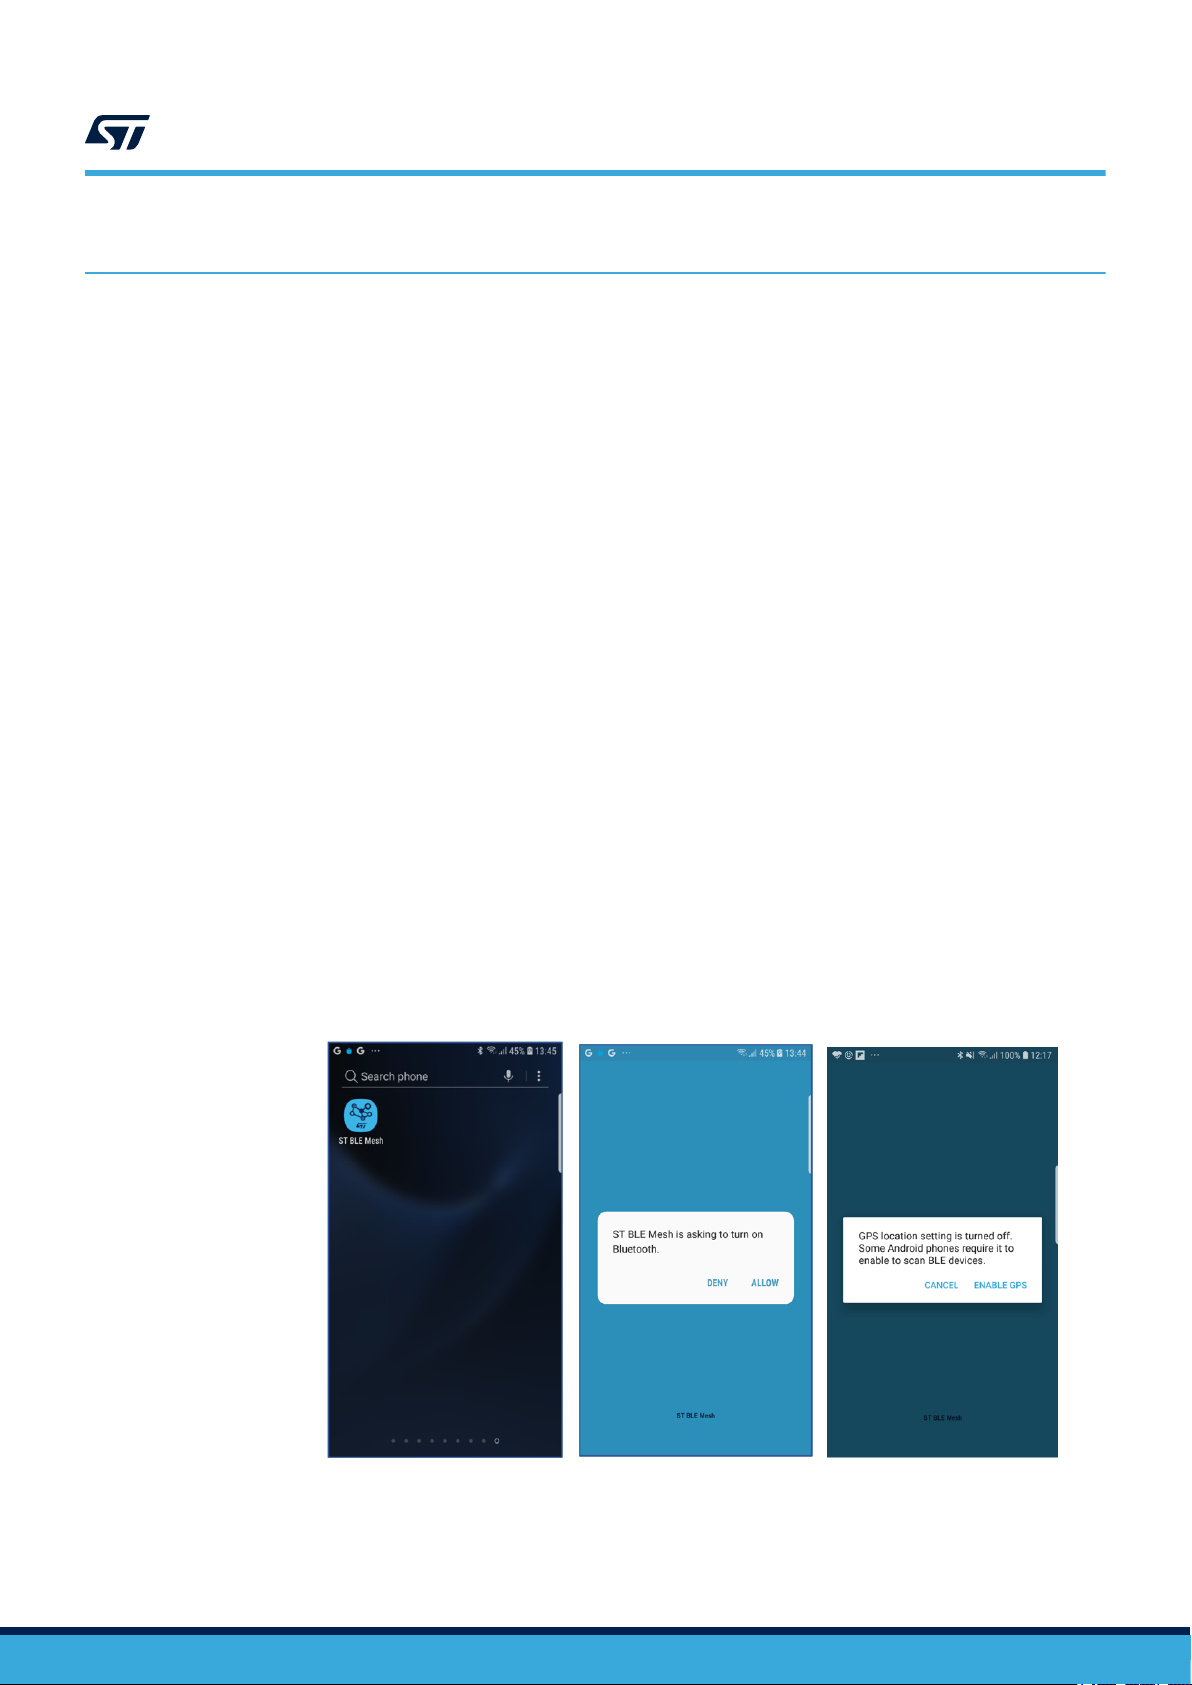
Step 2. Click on the ST BLE Mesh icon to launch the App and accept the request prompt to allow Bluetooth
radio and location turn on.
Note: From Android 6.0 onwards, you must allow the location services (GPS) to work with BLE.
Therefore, it is recommended to keep the GPS location on.
Figure 2. Turning the Bluetooth radio and location on
UM2180 - Rev 3
page 3/43
Page 4
2.3 Introduction to the App controls
The app has following tabs:
1. Devices: opens the Provisioning View which allows adding new provisioned mesh capable devices into the
mesh network
2. Nodes: is the app home page and allows opening the Network View to show the list of all the nodes and
their elements in the current mesh network
3. Groups: opens the Groups View which shows the list of all the groups in the network
4. Models: opens the Model View which shows the list of nodes supporting the selected model. It allows
sending specific messages to the nodes
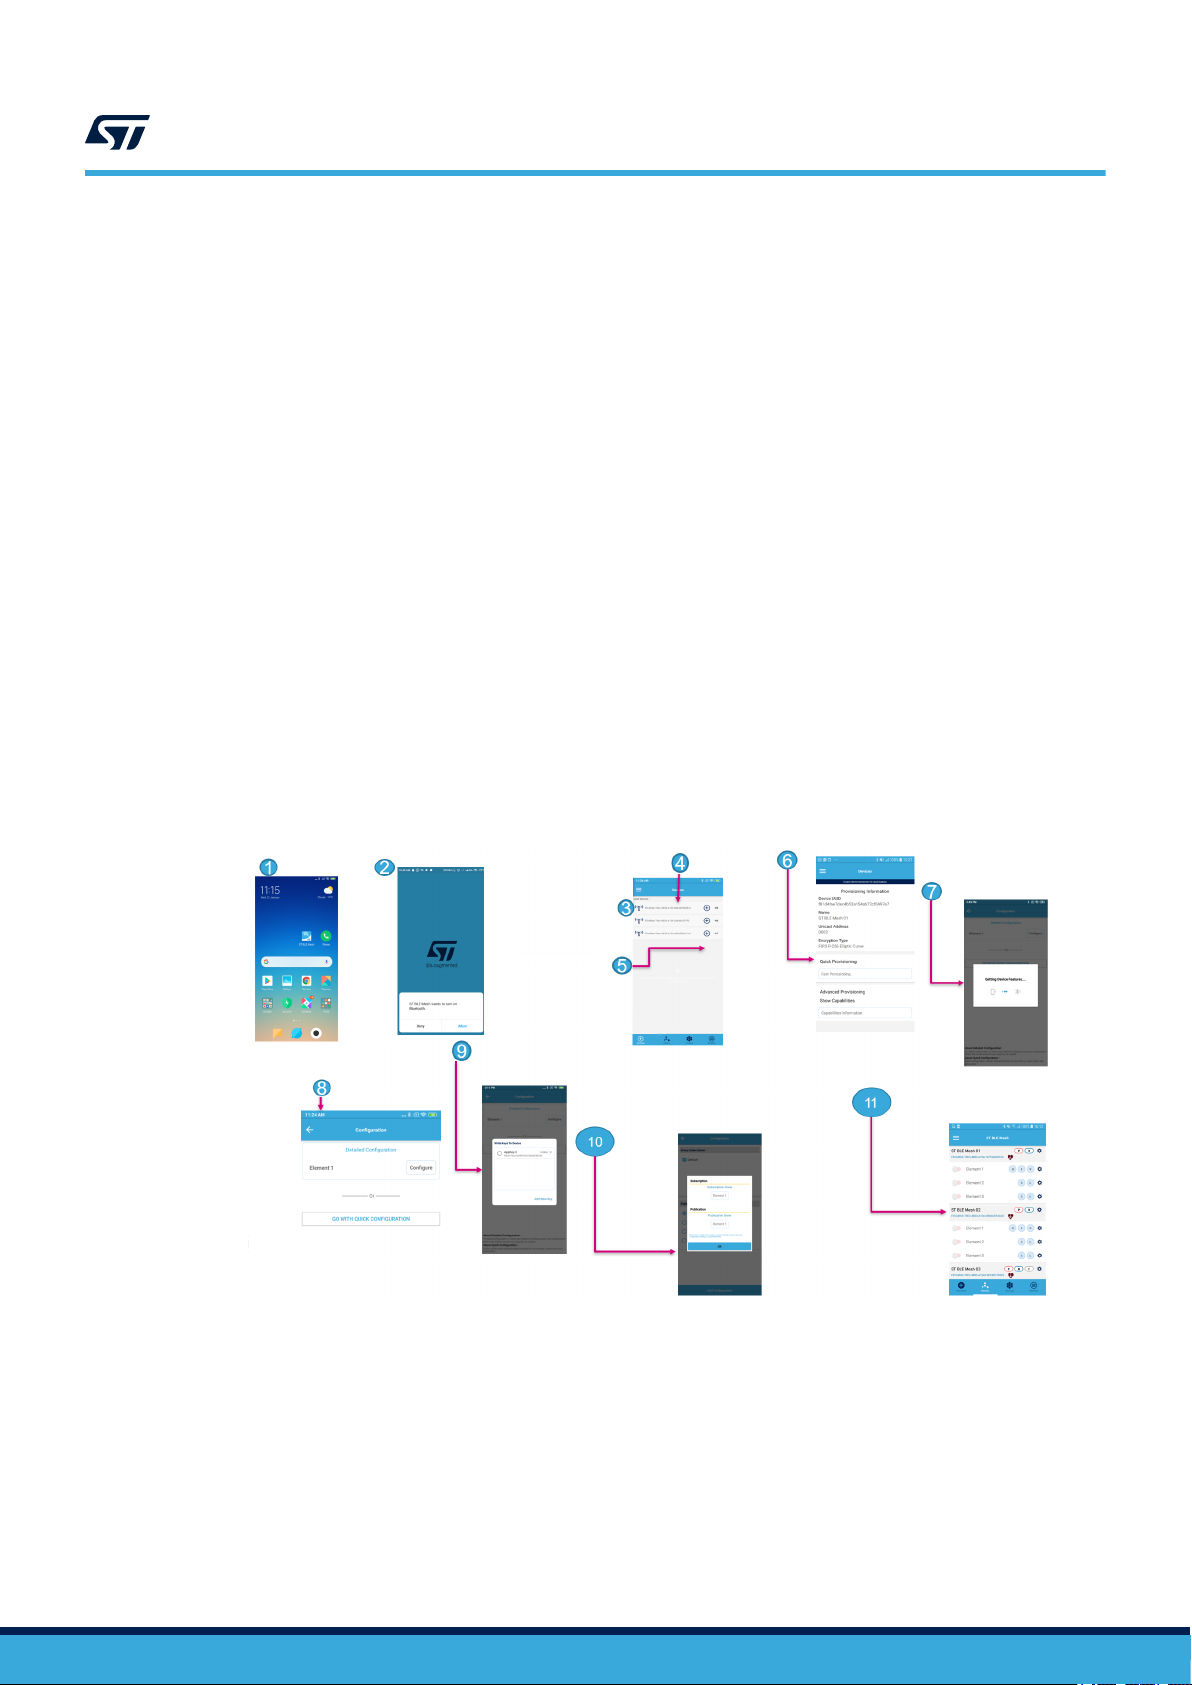
The figure below shows the overview of the app control panels and the flow from the app launching to the device
connected into a mesh network.
Figure 3. ST BLE Mesh app flow
1. ST BLE Mesh app launching
2. Prompt message to turn the Bluetooth on
3. Un-provisioned node identification
4. Device UUID for node identification
5. Adding a device
6. Quick provisioning
7. Loading device features: getting all the information and models supported by the device
8. Quick configuration to configure your device in less time and directly control it
9. Adding default key and starting configuration
10. The device is ready to be used by pressing OK
11. Provisioned devices: you can control the device and change settings
UM2180
Introduction to the App controls
UM2180 - Rev 3
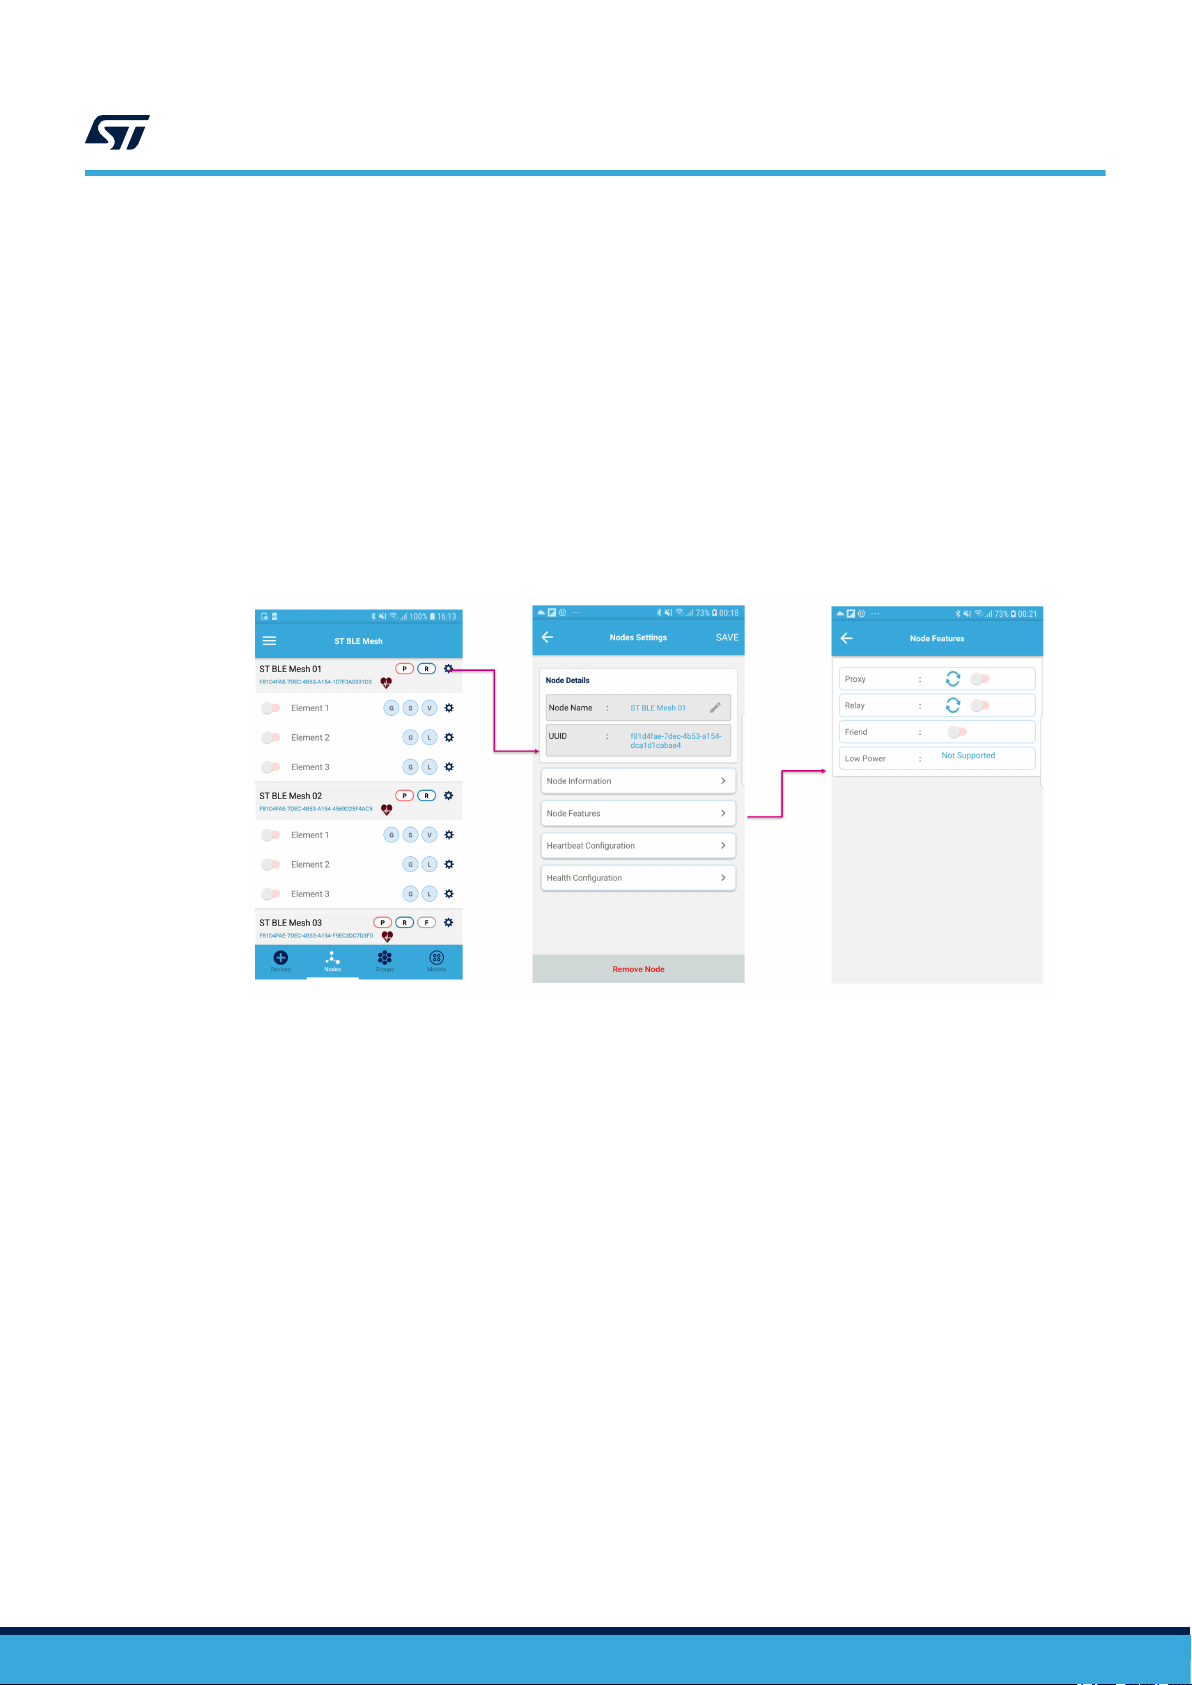
Node features are the network features supported by the node and displayed close to each node name in the
app. If a feature is supported, it is possible to enable or disable it from node settings.
page 4/43
Page 5
UM2180
Introduction to the App controls
The network features defined in Mesh specifications are:
1. Relay: a node that supports this feature can relay the messages destined for other nodes in the network. If
there are few relay nodes, a message may not reach its destination; on the contrary, too many relay nodes
may cause network congestion.
2. Proxy: the current generation of smartphones do not fully support sending and receiving mesh packets over
advertising bearer. So, a proxy node is necessary to communicate with the smartphone over Bluetooth ® low
energy using the GATT protocol. The proxy node forwards the messages received on GATT to the mesh
network and vice versa.
3. Low Power: low power nodes are battery-operated nodes which wake up occasionally to send packets and
to check any incoming packet.
4. Friend: as low power nodes are sleeping most of the time, a friend node is necessary to receive messages
on their behalf. When low power nodes wake up, they can retrieve the pending messages from the mailbox
maintained by their friend node.
Figure 4. ST BLE Mesh node features
You can also enable/disable any network feature supported by the node:
• by tapping on the refresh icon to read the current status
• by tapping on the switch icon to enable/disable the feature
Note: If you disable the proxy feature in the supporting nodes, your smartphone can communicate with the node only
through another proxy node in the network. If you have only one node in the network and you disable the proxy
feature, the smartphone cannot communicate with that node at all. In this case, the only solution is to reset the
node manually.
Tapping the gear icon next to any element, the Element settings page is displayed.
When enabling/disabling a network feature, the information is not stored in the non-volatile memory (NVM) and
reverts to default when powering the node.
UM2180 - Rev 3
page 5/43
Page 6
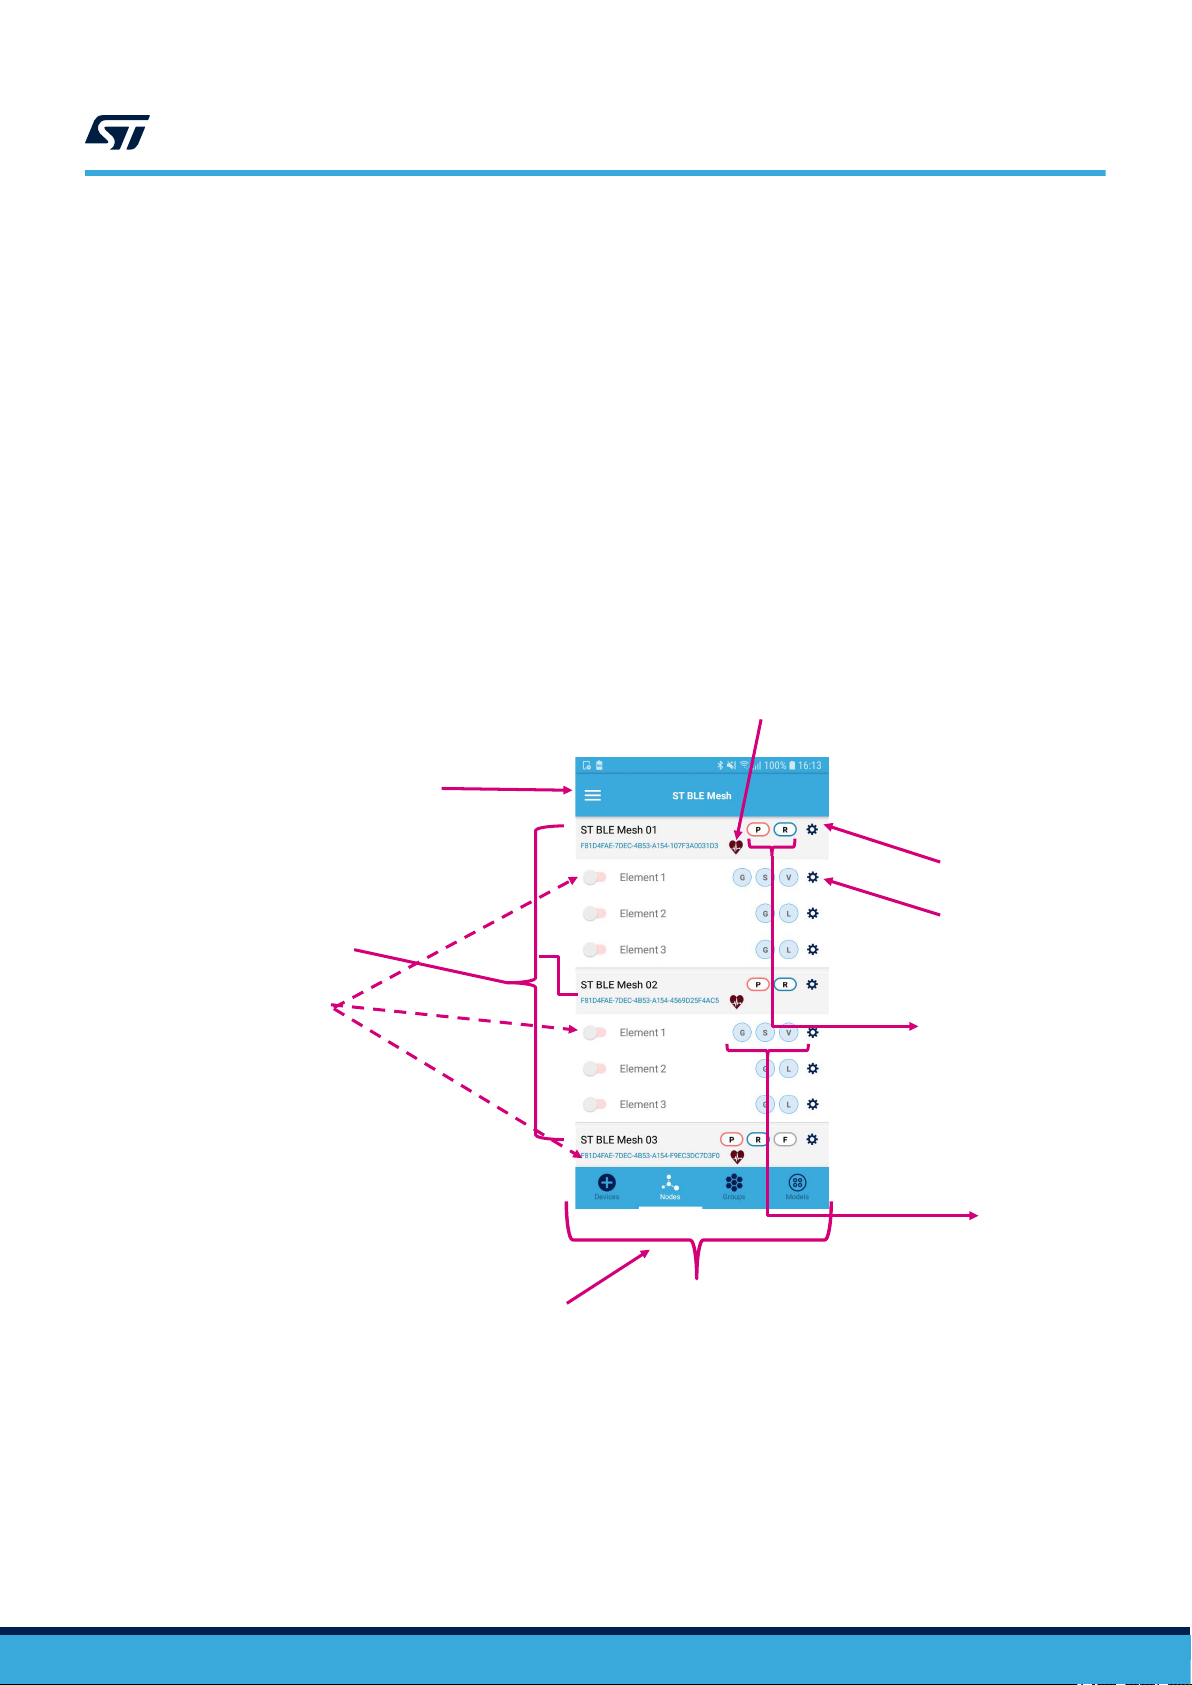
Figure 5. ST BLE Mesh app controls
1
2
9
8
7
6
5
4
3
1.
Navigation bar
Heartbeat
2.
3. Provisioned nodes
4. Node elements
5. Devices, Nodes, Groups and Models tabs
6. Models:
– G - generic
– L - lighting
– S - sensor
– V - vendor
7. Node features:
– P - Proxy
– R - Relay
– LP - Low Power
– F - Friend
8. Element settings
9. Node settings
UM2180
Introduction to the App controls
UM2180 - Rev 3
When you open the Provisioning View, the app scans for un-provisioned mesh capable devices in the proximity.
The devices are listed with RSSI values and identified by their UUIDs (or MAC address in Android only) and
advertised names. The provisioning process starts by clicking on the (+) icon next to each device name.
page 6/43
Page 7
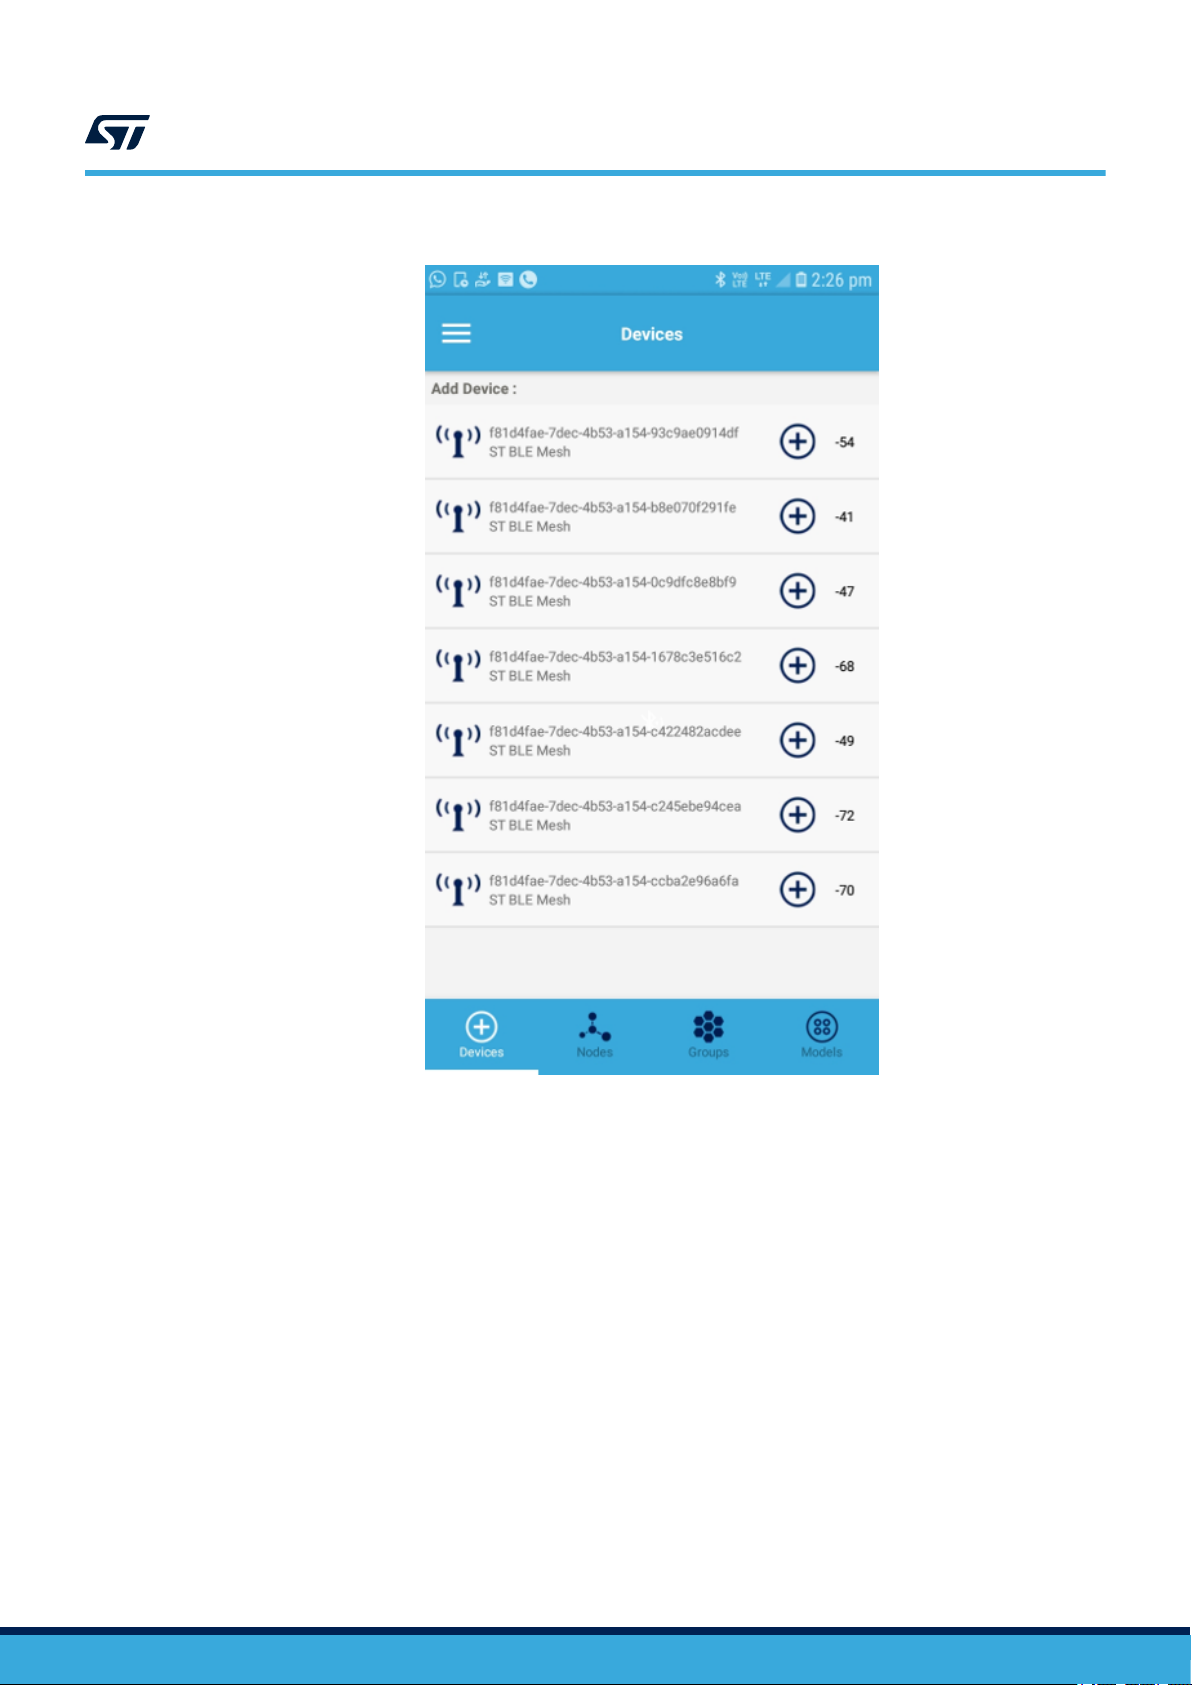
Figure 6. ST BLE Mesh - Provisioning View
UM2180
Group, node and element settings
2.4
UM2180 - Rev 3
After the provisioning process, it is necessary to disconnect from the provisioning service and connect to the
proxy service of any node in the network. By default, this option is enabled to ensure the phone connects to the
proxy service of the just provisioned node and not to any other node. The post provisioning configuration process
involves transfer of a relatively high number of large messages. It is more reliable and efficient to transfer this
data over GATT connection instead of mesh network. If the “Node Identity Proxy” options are disabled, the
configuration is performed over the mesh network, which would be slow. In some cases, where the node does not
support proxy service nor node identity option, the option must be disabled.
Group, node and element settings
In the Groups View, each group is identified by group address and you can:
• toggle a group on and off with the switch button close to the group name
• add a new group with the plus button
• open the Group Settings menu
This view displays the list all the configured groups and allows sending messages to a group of nodes.
The gear icon close to each group is used to access its publication and subscription settings.
page 7/43
Page 8
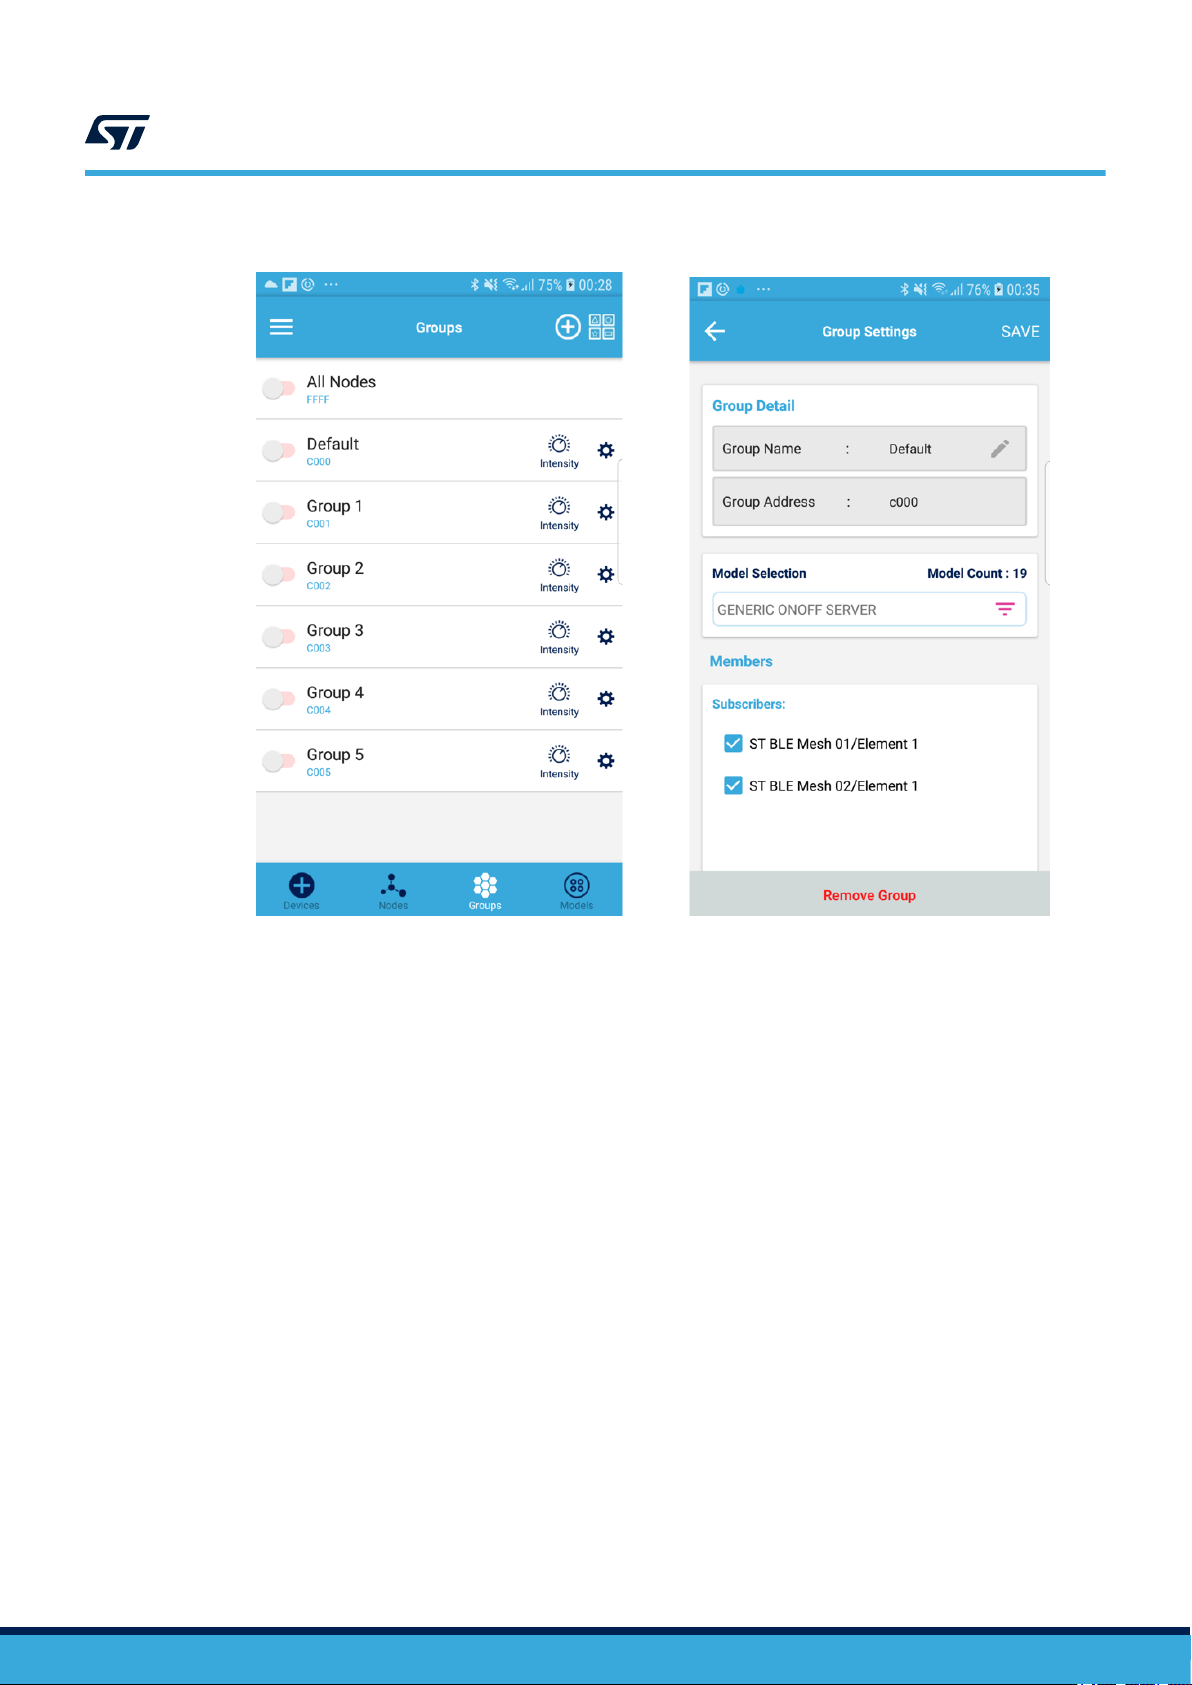
Figure 7. ST BLE Mesh - Group View
UM2180
Group, node and element settings
The (+) icon on the top is used to create a new group. It creates the group starting from address C001 and the
default name Group 1. You can change the name from Group Settings.
UM2180 - Rev 3
page 8/43
Page 9
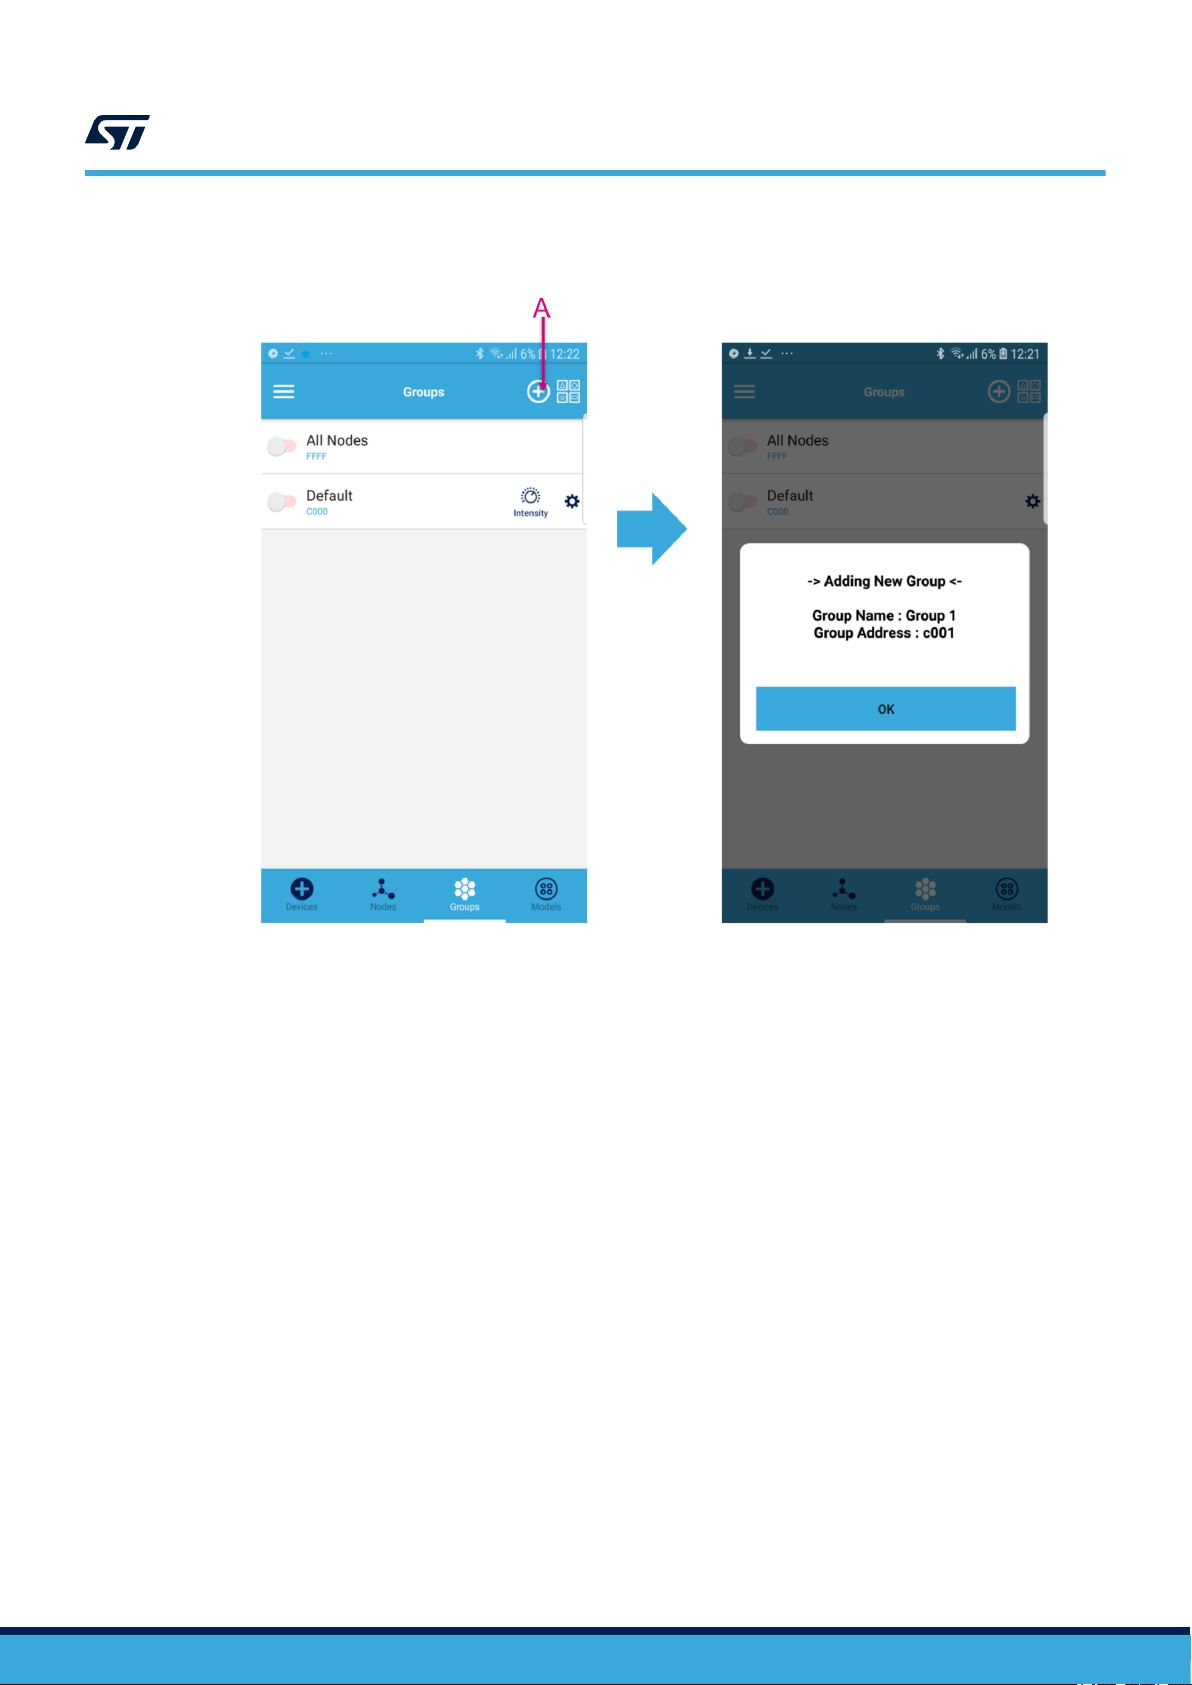
Figure 8. ST BLE Mesh - adding a new group
• A - Click the plus button to add a new group
UM2180
Group, node and element settings
From the Group Settings view, you can:
• edit group names
• set the subscription address for a given model (in the drop down list) by enabling the check box next to the
group address
• remove the subscription address for a given model (in the drop down list) by disabling the check box next to
the group address
• remove groups
UM2180 - Rev 3
page 9/43
Page 10
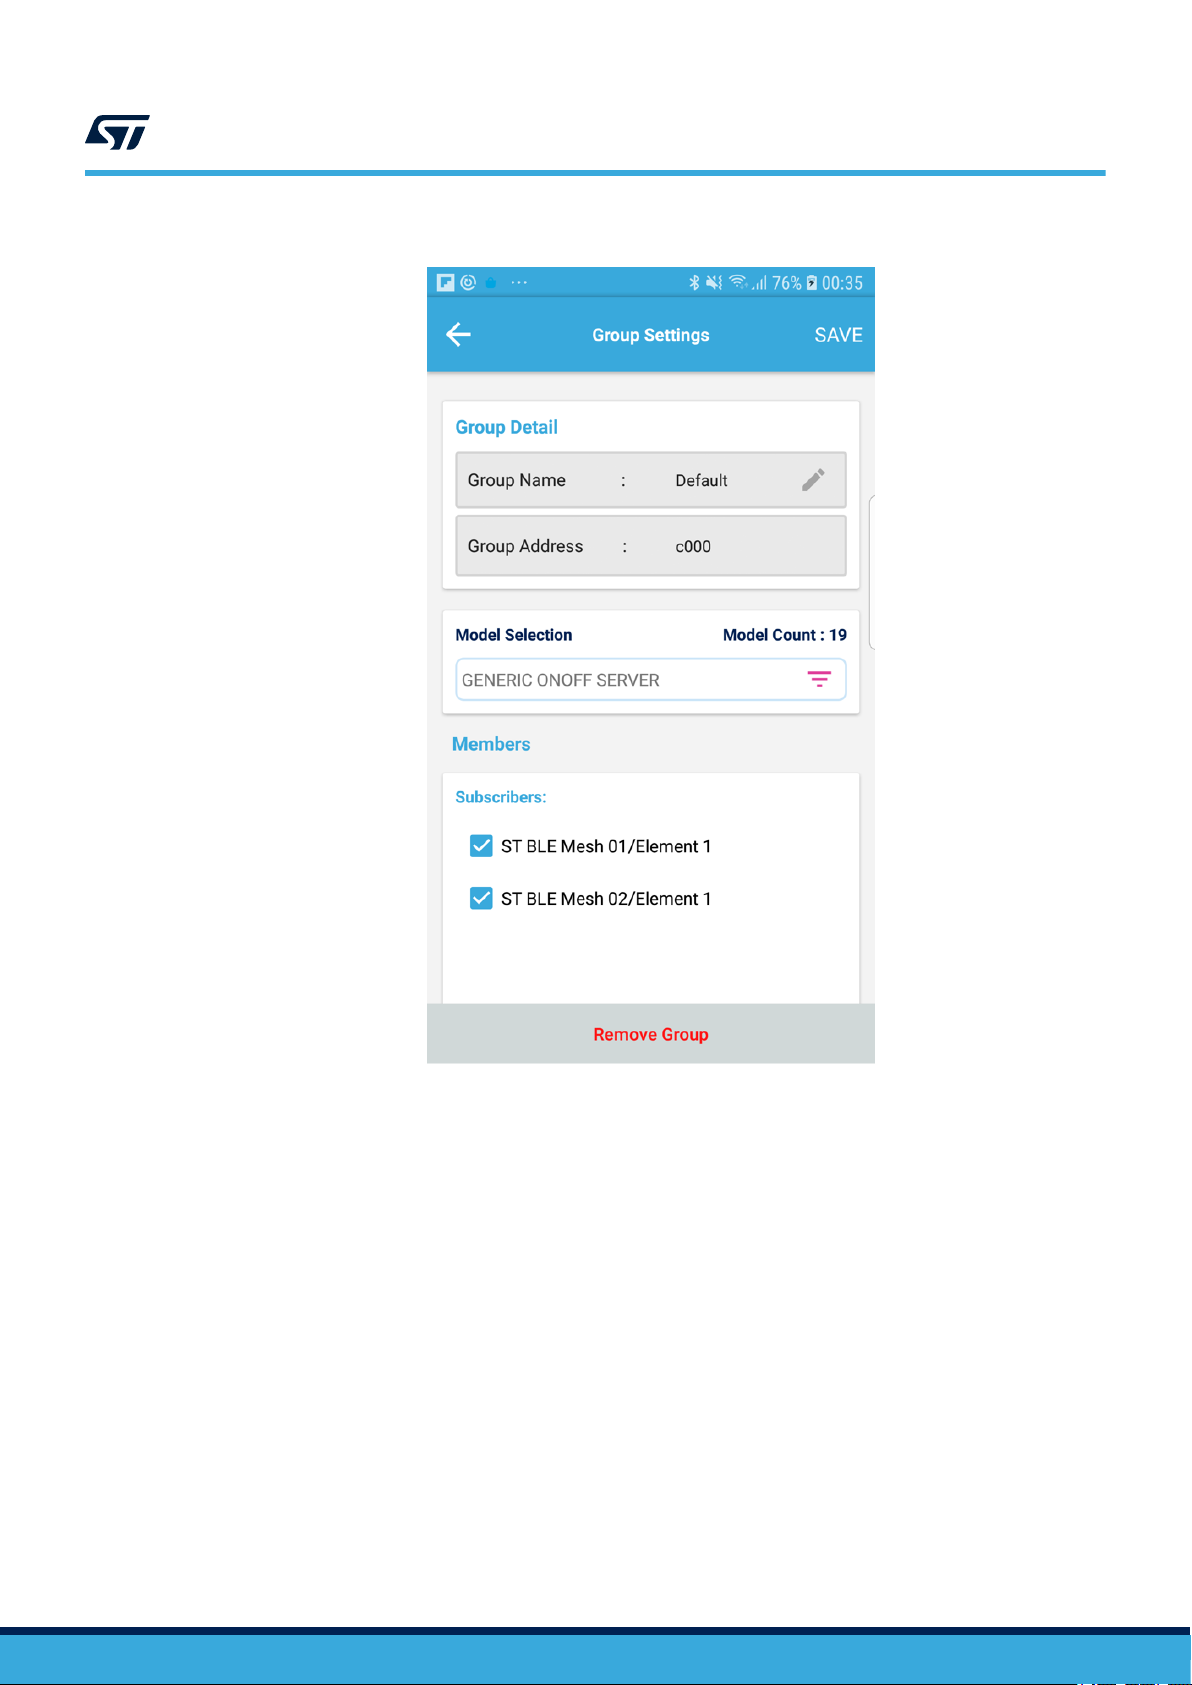
Figure 9. ST BLE Mesh - Group Settings
UM2180
Group, node and element settings
UM2180 - Rev 3
The network view lists all the nodes (and elements) in the mesh network and allows configuration of various
parameters as shown below.
The switch on each element can be used to send on/off commands to the element.
page 10/43
Page 11
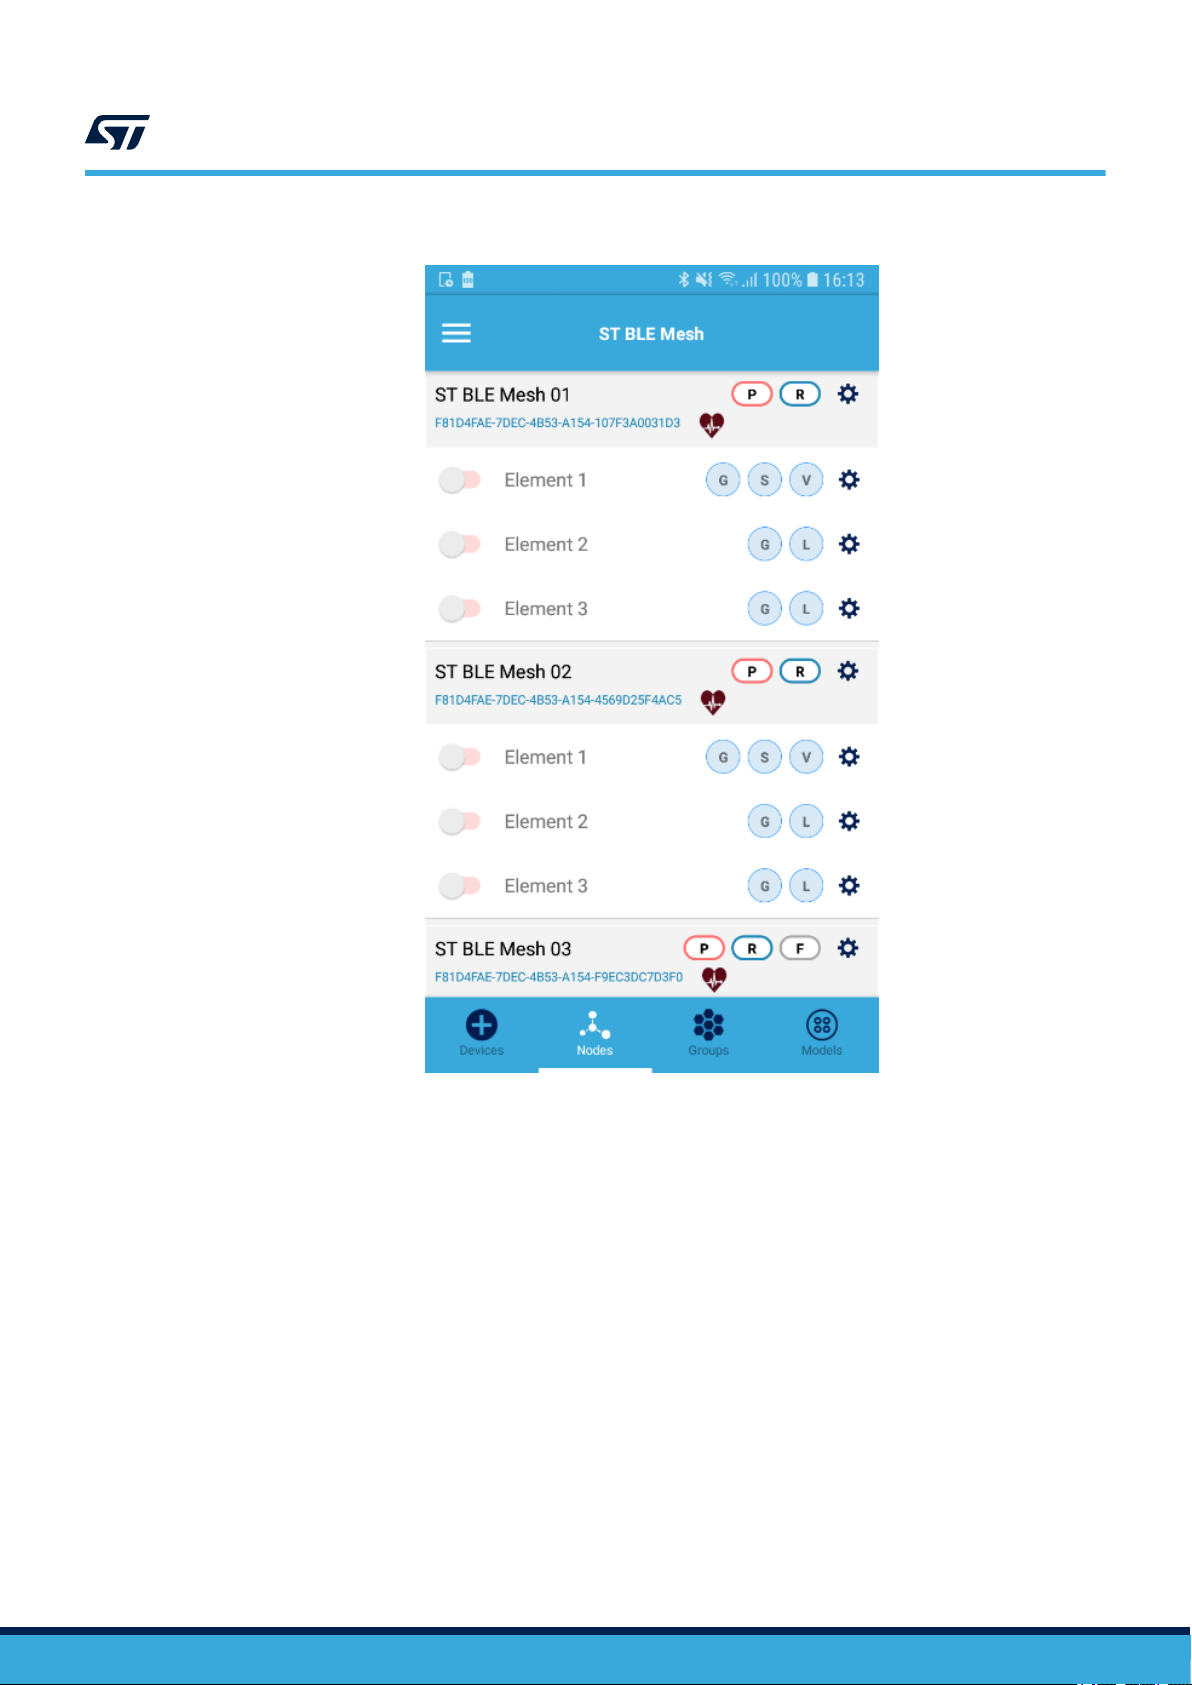
Figure 10. ST BLE Mesh - Nodes
UM2180
Group, node and element settings
UM2180 - Rev 3
Tapping the gear icon close to any node, the Node Settings page is displayed.
This view allows updating the node display name, subscription and publication settings.
page 11/43
Page 12
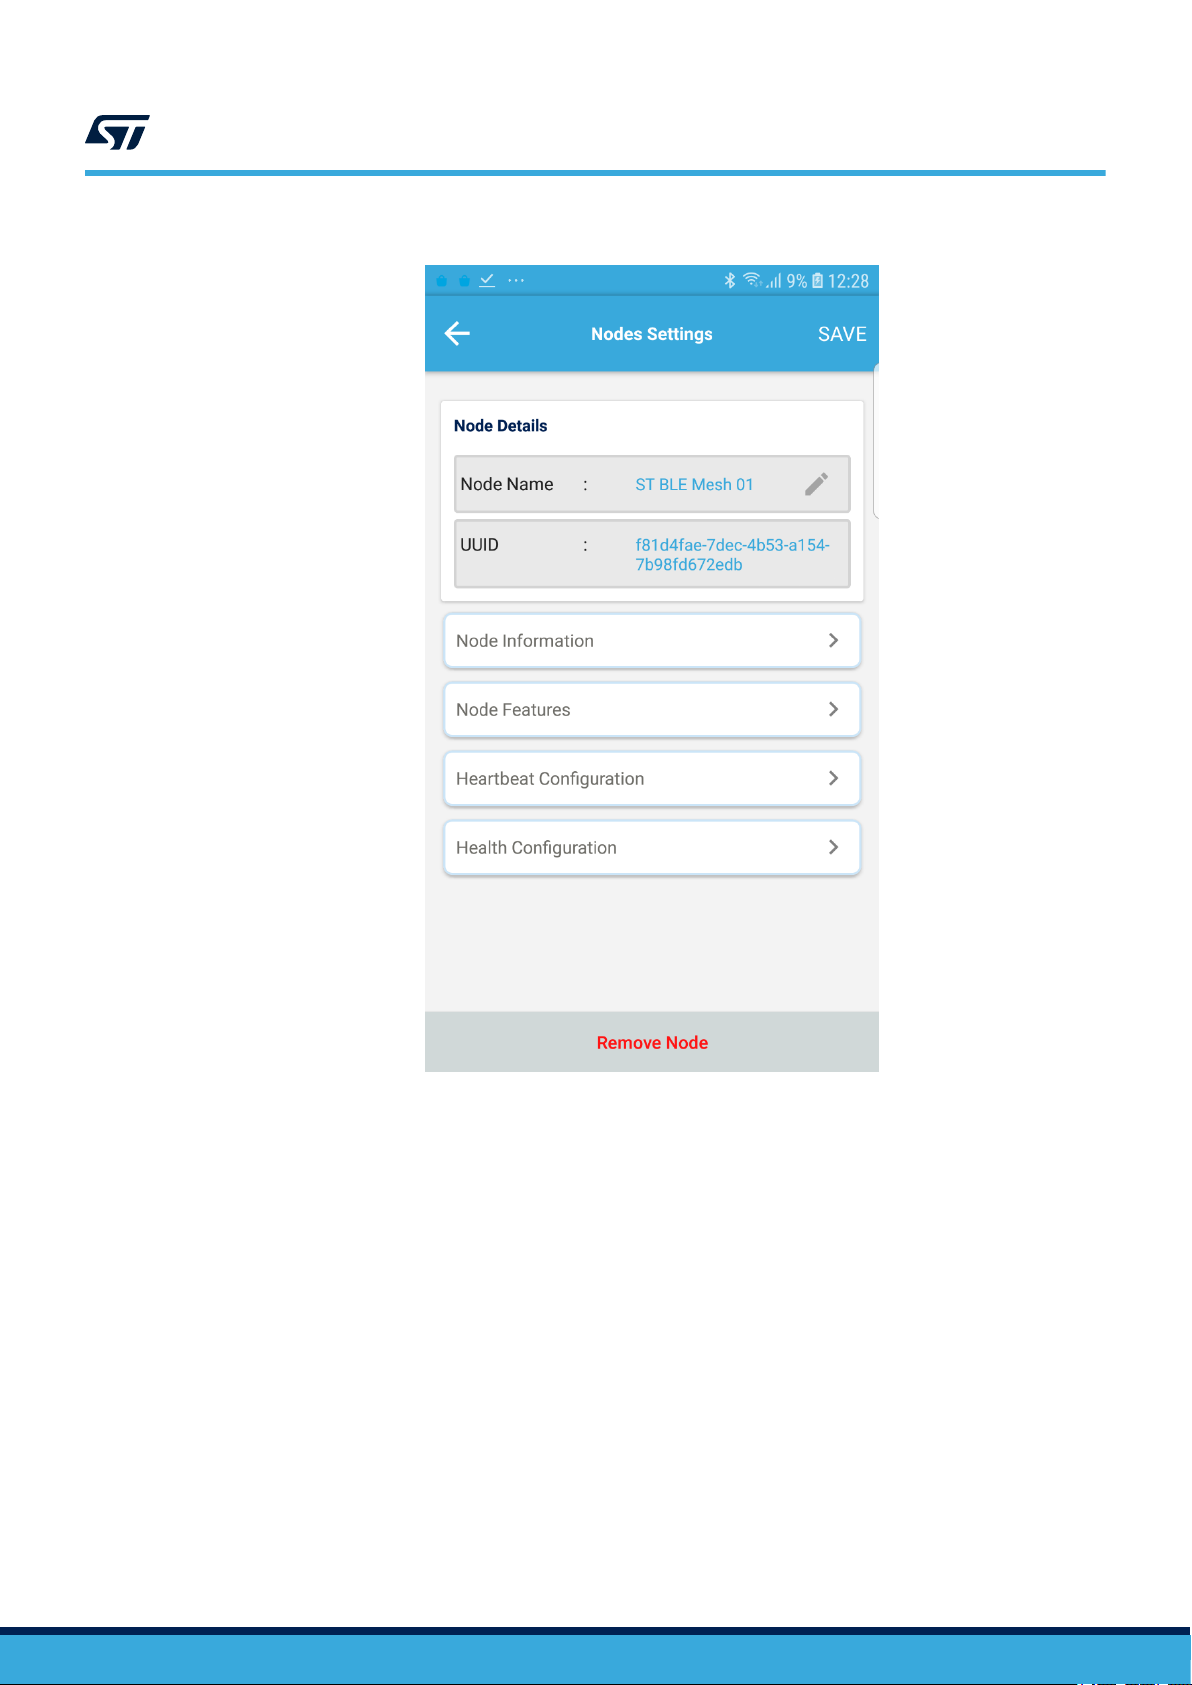
Figure 11. ST BLE Mesh - Node Settings
UM2180
Group, node and element settings
UM2180 - Rev 3
From the Element Settings view, you can :
• edit the element name
• bind more app keys and select the key set for a given model (in the drop down list) by enabling the check
box next to the group address
• remove the subscription address for a given model (in the drop down list) by disabling the check box next to
the group address
• set the publication address for a given model (in the drop down list) by enabling the check box next to the
group address
page 12/43
Page 13
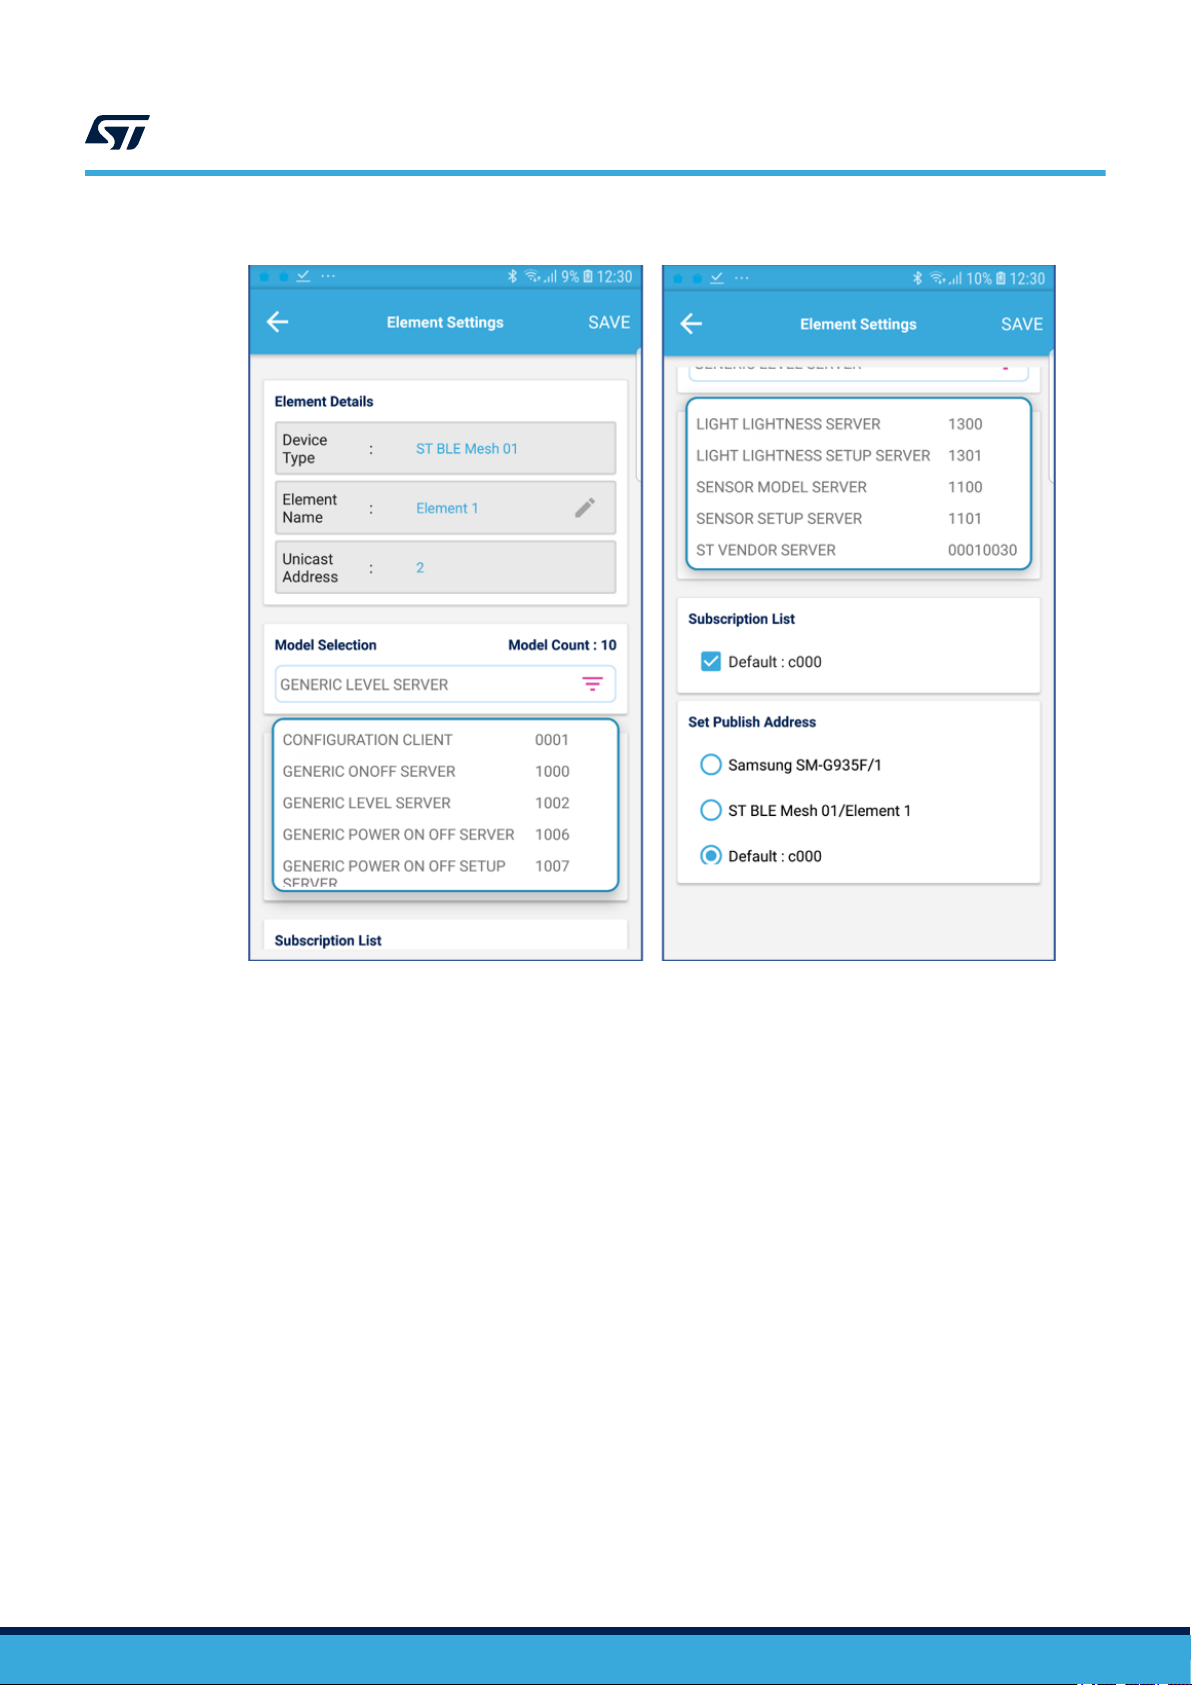
Figure 12. ST BLE Mesh - Element Settings
UM2180
Group, node and element settings
UM2180 - Rev 3
page 13/43
Page 14
Group, node and element settings
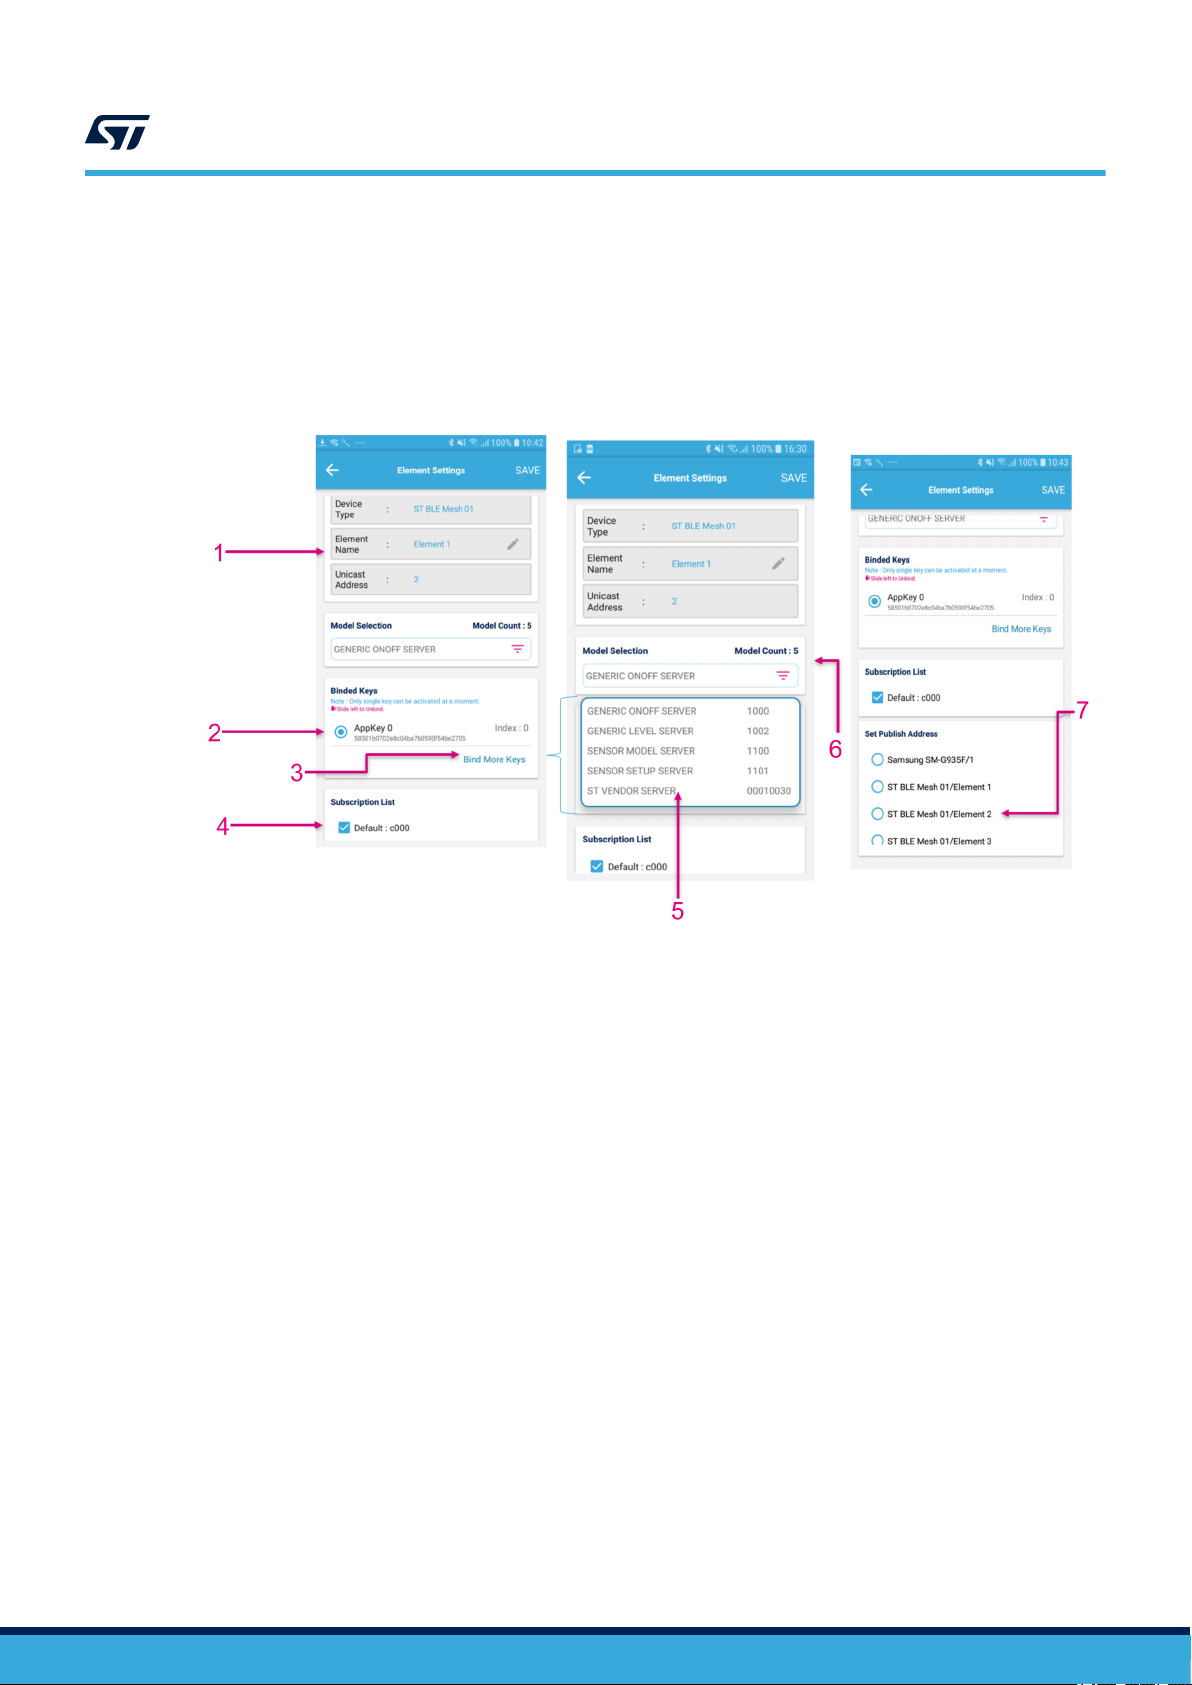
Figure 13. ST BLE Mesh - Element Settings (commands)
1. Edit Element Name
2. Select Binded Keys
3. Bind more app keys
4. Select the subscription address
5. Drop down list to select model
6. Select model
7. Select the element which will be given the publish address (multiple elements can be selected)
UM2180
UM2180 - Rev 3
page 14/43
Page 15

2
3
ST BlueNRG-Mesh Android App functionality
3 ST BlueNRG-Mesh Android App functionality
3.1 Provisioning the node
Provisioning is a process of authenticating the un-provisioned devices and bringing them into the BLE Mesh
network.
Step 1. Launch the app.
Figure 14. Un-provisioned device view
1. Un-provisioned devices
2. RSSI value
3. Click button to provision the device
UM2180
UM2180 - Rev 3
Step 2. Ensure the device you want to add to your mesh network is powered and in signal range.
Step 3. Go to the provisioning page.
The page lists un-provisioned devices in the signal range and their UUID.
The RSSI number on the right of each device indicates your approximate distance from it.
Step 4. Click the add (+) button to begin provisioning.
Once the provisioning starts, you will see a window showing the provisioning status.
During this process, the device identity is verified by its public key and/or OOB data. After verification, a
secure channel is created using ECDH algorithm over BLE GATT connection. Using this secure
channel, the provisioner distributes encryption keys and allocates a unique unicast address to the
device which becomes a mesh network node. The node can now send and receive encrypted and
authenticated packets on the mesh network.
Step 5. Keep the device near your Android smartphone during provisioning procedure.
The provisioning takes 10 to 12 seconds depending on the smartphone.
The provisioned node is listed with a default node name as New Node YY along with the UUID and
setting icon for individual node.
page 15/43
Page 16

UM2180
Provisioning the node
Step 6. Toggle the switch near the Element right to left to turn the LED on (or left to right to turn it off). The
proxy node is indicated in bold. The provisioned node is listed with a default New Node NN and all the
Elements within the node as Element ZZ (New Node 01 and Element 01 in this example).
Figure 15. Provisioning process
Figure 16. Configuration process
Step 7. Configure the element group subscription settings.
Each element can subscribe to a group to receive the messages addressed to it. The elements appear
in that group subscription list and each of them can be part of multiple groups.
UM2180 - Rev 3
page 16/43
Page 17

Step 8. Configure the element group publication settings.
An element can publish to a group address or element address. By default, all messages generated by
an element target its publish address. All the elements publishing to a group appear in that group
publisher list. For example, when you toggle a switch on a Bluetooth® Mesh enabled board, the switch
publish address determines the appliances or group of appliances to be controlled. Publish and
subscription addresses are reconfigurable allowing very flexible control scenarios.
Figure 17. Publication and subscription scenario
UM2180
Provisioning the node
Once the node is provisioned, it appears in the Nodes tab which shows the information on the models
and features supported by the nodes. It also shows the toggle control next to each node to send
generic on/off and vendor commands.
UM2180 - Rev 3
page 17/43
Page 18

Figure 18. Provisioned node view
UM2180
Un-provisioning the node
3.2 Un-provisioning the node
Un-provisioning the node involves removing the node from the BLE Mesh network.
UM2180 - Rev 3
page 18/43
Page 19

Step 1. To un-provision the nodes, go to the node settings and click the “Remove Node” button.
Figure 19. Node un-provisioning
UM2180
Configuration
3.3 Configuration
To configure a node, you have to add an app key, bind the node to a given model and assign subscription and
publication address to the node. During the provisioning, the node is configured as per the default configuration.
UM2180 - Rev 3
page 19/43
Page 20

UM2180
Configuration
There are the following types of configuration:
• quick configuration: every element of a node is provided with a default app key (random), subscription and
publication address (C000)
Figure 20. Quick configuration
• detailed configuration: each element of a node can be selectively provided with an app key, subscription and
publication address
Figure 21. Detailed configuration
UM2180 - Rev 3
page 20/43
Page 21

3.4 Subscription
Subscription is a process of providing a Node, a Subscription or Group Address, so that it becomes part of that
group. Multiple nodes can be subscribed to the same group address and can be controlled by sending messages
to that group address (C000 is the default group address).
3.4.1 Adding or deleting subscription
You can assign subscription (or group) address to any node. A node can have multiple subscription addresses
and a group can have any number of nodes (ST BLE Mesh supports 10 nodes per group).
A node can be removed from a group by deleting the subscription. For each subscription address you have to
select a given model which has at least one key bound.
In the default configuration a default key is applied to all the supported models.
You can add or delete a node from a group through the element or group setting pages.
Figure 22. Adding/deleting a node from the Element Settings page
1. Element selection
2. Model selection
3. Check/uncheck to add/delete the element from the group
4. Successful subscription
UM2180
Subscription
UM2180 - Rev 3
page 21/43
Page 22

Figure 23. Adding/deleting a node from the Group Settings page
1. Group selection
2. Model selection
3. Check/uncheck to add/delete the element from the group
4. Successful subscription
5. Group name (editable after clicking on the SAVE button)
UM2180
Publication
3.5 Publication
Publication is a process of providing a publication address to a node. By default, the node broadcasts the
message to its publication address. The publication address can be set for a node from the Element Settings and
the Group Settings pages. If a node is given a publication address for a given model, the node can publish the
message of that model to that address.
For example, a hallway has two light bulbs and their addresses are given as a publication address to a given
switch as shown in Figure 17. Publication and subscription scenario. By pressing the switch messages of the light
bulb, the publication address messages will be published to all the lights in the hallway (two light bulbs).
A publication address (group or unicast address) can be assigned to any node acting as a switch. Once the
publication address has been assigned, it cannot be deleted unlike the subscription (with delete subscription) but
it can be changed to a different publication address.
For each publication address, you have to select a model which must have at least one key bound. In the default
configuration, a default key is applied to all the supported models.
UM2180 - Rev 3
page 22/43
Page 23
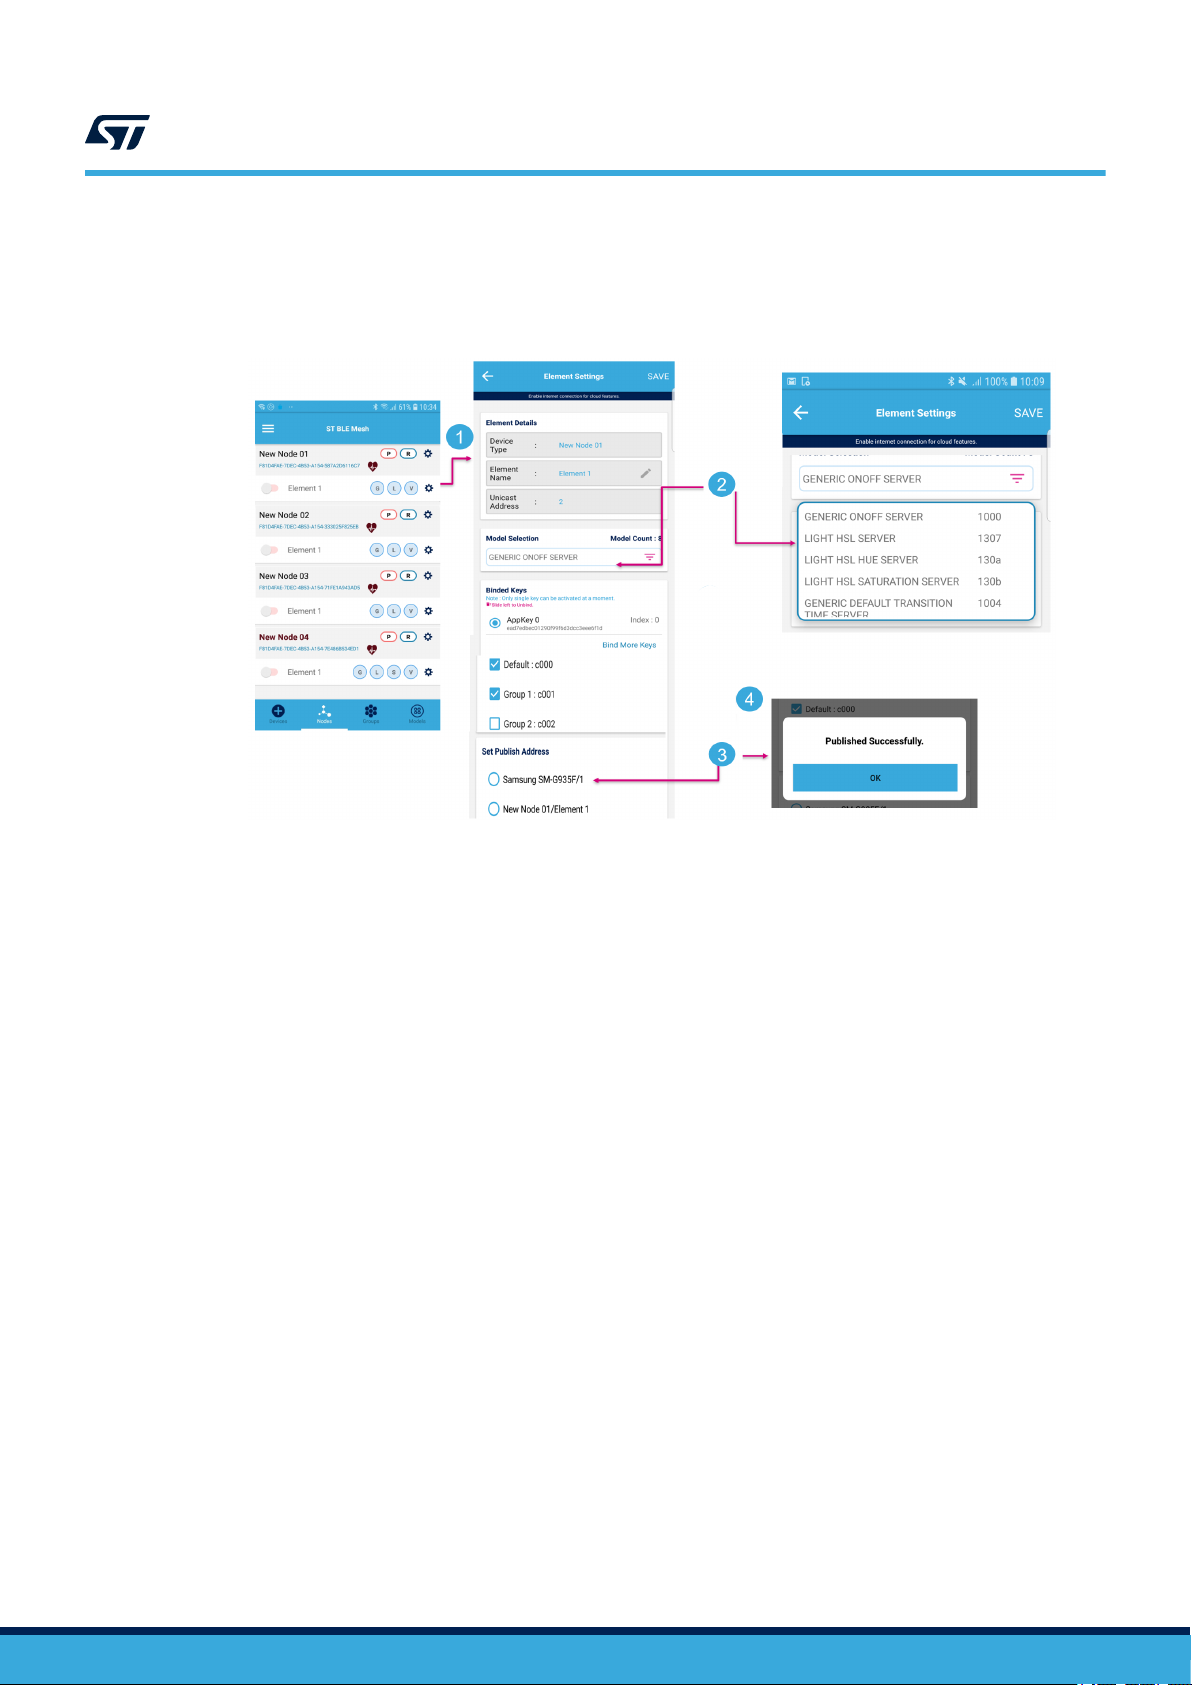
Figure 24. Publication process
1. Node selection
2. Model selection
3. Check/uncheck to set the publication address to the address indicated here (in this case, provisioner address)
4. Successful publication
UM2180
Publication
UM2180 - Rev 3
page 23/43
Page 24

4 Models
Models and their required states and messages are defined by the Bluetooth Mesh Profile specification to perform
basic functions on the nodes in a mesh network.
In the STSW-BNRG-Mesh model view allows accessing a model specific functionality. Mesh models define a
node basic functionality in a mesh network relevant to a specific application category (for example, lighting model
defines basic functionality covering common lighting use cases). Supported models support publication and
subscription.
STSW-BNRG-Mesh provides the information of the supported models in an element by clicking on the circles next
to its name.
UM2180
Models
Figure 25. Model information
4.1 Generic ON/OFF model
Generic ON/OFF model is used to send the ON and OFF commands.
UM2180 - Rev 3
page 24/43
Page 25

Figure 26. Generic ON/OFF model control
1. Model selection
2. Generic model
3. Switch to slide for sending generic ON/OFF commands
UM2180
Generic level model
4.2 Generic level model
Generic Level is a base model for sending the level or intensity messages in percentage (0-100).
1. Model selection
2. Generic model
3. Level intensity
4. Slide over the slider to send the generic level values
4.3
Light HSL model
Figure 27. Generic level model control
UM2180 - Rev 3
Light HSL model is used to change the color of the RGB lights. It sends the RGB color values in HSL (hue,
saturation and lightness) format. You can hover over the color wheel to get the RGB values to be sent to the node
(RGB capable device).
page 25/43
Page 26

Figure 28. Light HSL model control
1. Model selection
2. Lighting model
3. Level intensity
4. Hover on the color circle to send the HSL values
UM2180
Light CTL model
4.4 Light CTL model
Light CTL model is used to control the color temperature of a tunable white light along with the delta UV value.
The color temperature corresponds to a curve on the color temperature chart and is equivalent to black body
radiation at different temperatures (expressed in Kelvin).
1. Model selection
2. Lighting model
3. Color temperature control
4. Slide over the slider to send the CTL delta values
5. Slide over the slider to send the CTL temperature values
Figure 29. Light CTL model control (delta and temperature)
4.5 Light Lightness model
Light Lightness model is used to send the lighting level values.
UM2180 - Rev 3
page 26/43
Page 27
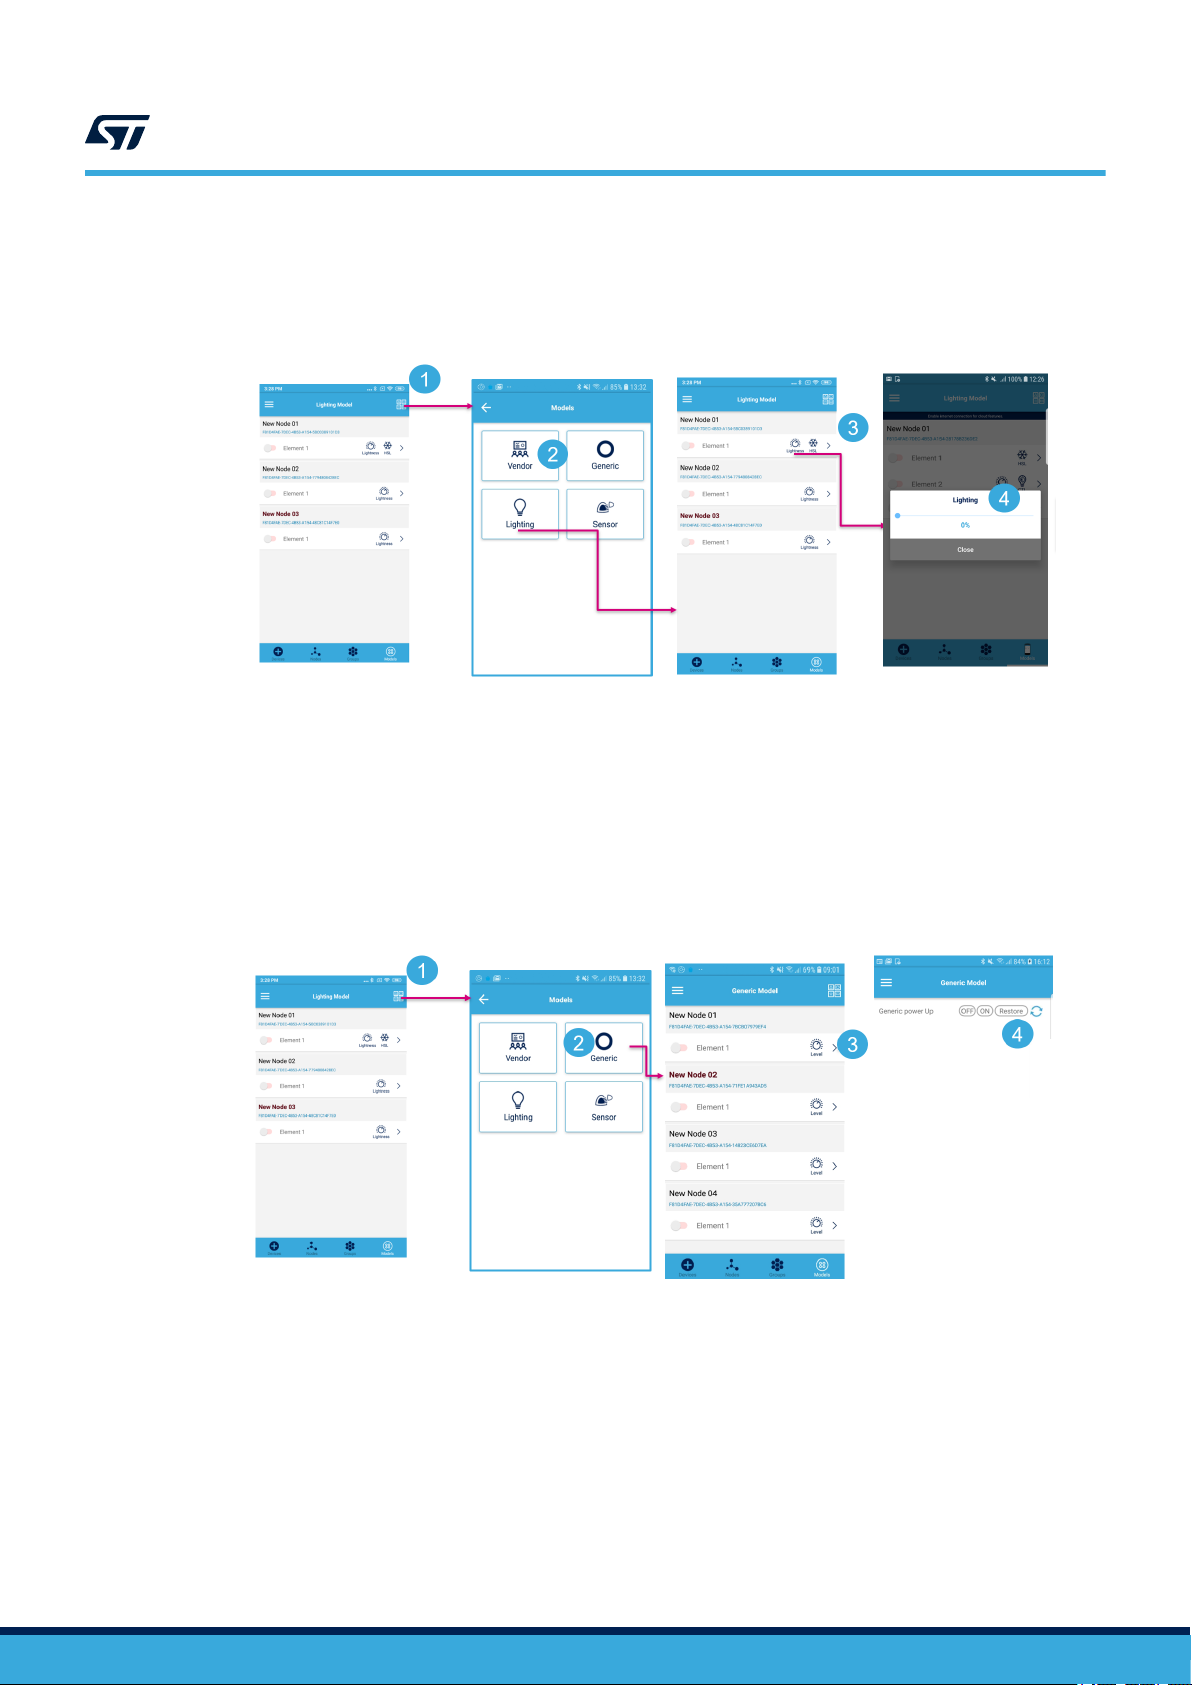
Figure 30. Light Lightness model control
1. Model selection
2. Lighting model
3. Lightness control
4. Slide over the slider to send the lighting values
UM2180
Generic power ON/OFF model
4.6 Generic power ON/OFF model
Generic power ON/OFF model is based on generic ON/OFF model and is used to send the generic power
ON/OFF model messages.
Figure 31. Generic power ON/OFF model control
1. Model selection
2. Generic model
3. Click on the > symbol to open the generic model power up page
4. Press on/off to send the message and refresh icon to get the state
4.7 Sensor model
Sensor model is used to retrieve the values from the sensors (environmental, inertial, etc.) supported by the node.
UM2180 - Rev 3
page 27/43
Page 28

Figure 32. Sensor model control
1. Model selection
2. Sensor model
3. Click on the refresh icon
4. Or click on the > symbol
5. The Sensor page opens
6. Click on an icon to get data from that sensor
7. Refresh to get data from all available sensors
UM2180
Vendor model
4.8
Vendor model
Vendor model is a custom model with Custom Opcode and Vendor ID.
Figure 33. Vendor model control
1. Model selection
2. Vendor model
3. Click this button to send a toggle command to the vendor
4. Slide over the slider to send the lighting values
5. Node library version
UM2180 - Rev 3
page 28/43
Page 29

5 Database exchange configuration
ST BLE Mesh app provides multiple options to share the network configuration with other smartphones and allow
you to use and manage the mesh network created by other users and vice versa.
During the provisioning process, “Network Key” and “Unicast Address” are transferred to the newly provisioned
node over a secure channel created using ECDH algorithm over BLE GATT connection. A “Device Key” is
independently computed. The device becomes a mesh network node after provisioning.
During the configuration phase, other configuration items (such as “Application Key”) are created.
To operate and manage nodes in the network, a smartphone must have the configuration shown below.
Figure 34. Network configuration sharing
UM2180
Database exchange configuration
UM2180 - Rev 3
The network configuration information can be shared via:
1. e-mail: suitable only for simple one-time sharing scenarios
2. cloud app: synchronization is automatic after the first sharing. Other users can be invited through an
invitation code. The cloud app also validates the information shared by other users and protects the
configuration file integrity.
page 29/43
Page 30

Figure 35. Mesh configuration exchange
1. Mesh configuration exchange
2. To import JSON configuration from the download folder (containing the JSON previously downloaded)
3. To import JSON files via cloud
UM2180
Sharing via e-mail
5.1 Sharing via e-mail
E-mails are used for sharing only in simple one-time sharing scenarios.
1. Exchange mesh configuration
2. Open the e-mail application and export the JSON configuration
3. E-mail client selection
Figure 36. Configuration database sharing setting - export
5.2
UM2180 - Rev 3
Sharing via cloud
A cloud app allows you to share your network configuration with other users. This feature permits automatic
synchronization after the first sharing and inviting other users through an invitation code.
page 30/43
Page 31

UM2180
Sharing via cloud
The cloud app also validates the information shared by other users and protects configuration file integrity.
You have to create an account to enable sharing via cloud and provide one or more security questions with the
corresponding answers to help recover the account in case the password is lost.
Figure 37. Sharing via cloud
UM2180 - Rev 3
Once registration is complete, you can log into the account.
page 31/43
Page 32

In cloud-based network sharing, you can:
• register a new network and invite other users to join it
Figure 38. Registering a network
UM2180
Sharing via cloud
UM2180 - Rev 3
page 32/43
Page 33

• join an existing network using an invitation code shared by the network creator
Figure 39. Joining a network
UM2180
Sharing via cloud
UM2180 - Rev 3
page 33/43
Page 34

UM2180
Sharing via cloud
• re-join a previously created network. It is used as a backup option, useful when you reinstall the app or
change smartphone
Figure 40. Re-joining a previously created network
UM2180 - Rev 3
page 34/43
Page 35

6 Firmware over the air (FOTA) update
ST BLE Mesh app updates ST BLE mesh firmware using the BlueST-SDK DFU protocol for firmware over the air
(FOTA) update. You have to copy the BlueNRG2_OTA_X.bin into the smartphone file system via USB cable and
browse it as shown below.
Figure 41. FOTA over GATT
1. Go to service manager to flash the new binary
2. OTA service manager
3. Browse the bin file
4. Upload in progress
5. After successful uploading, the device is visible in the app
UM2180
Firmware over the air (FOTA) update
UM2180 - Rev 3
page 35/43
Page 36

7 Voice control over mesh
Voice control feature is enabled in the mesh solution. The mesh messages are invoked using voice commands.
The lights, with a specific group address, can be controlled by saying “Lights On” or “Lights Off”.
Figure 42. Voice control over mesh
1. Select About
2. Go to control groups via voice assist
3. Write the broadcast address to which the voice message is going to be sent
4. Tap on the microphone icon and speak
UM2180
Voice control over mesh
UM2180 - Rev 3
page 36/43
Page 37

8 Miscellaneous app settings
The cloud app has many other settings (Reliable/Unreliable message sending, Vendor/Generic On/Off Model
selection) that can be changed as shown in the figures below.
Figure 43. Miscellaneous app settings (1 of 2)
1. Mesh network name
2. Mesh provisioner's name
3. Toggle to send Vendor or Generic ON/OFF model messages from the Node tab
4. Toggle to send reliable/unreliable messages
5. Toggle to use node identity for proxy connection
6. Mesh control by voice
7. Check the box to generate debug logs
UM2180
Miscellaneous app settings
UM2180 - Rev 3
page 37/43
Page 38

Figure 44. Miscellaneous app settings (2 of 2)
UM2180
Miscellaneous app settings
UM2180 - Rev 3
page 38/43
Page 39

Revision history
Date Version Changes
01-Feb-2018 1 Initial release.
13-Sep-2018 2
15-Sep-2020 3 Updated all document to reflect GUI new release.
UM2180
Table 1. Document revision history
Updated Figure 1. ST BlueNRG-Mesh scenario, Section 1.1 Installing and running the App, Section
1.2 Introduction to the App controls, Section 2.1 Provisioning the node and Section 2.2 Unprovisioning the node.
Added Section 2.3 Publication address, Section 2.4 Model selection and Section 2.5 Provisioner
database sharing.
UM2180 - Rev 3
page 39/43
Page 40

UM2180
Contents
Contents
1 ST BLE Mesh Android App overview ...............................................2
2 Getting started with the App .......................................................3
2.1 Hardware and software requirements..............................................3
2.2 Installing and running the App....................................................3
2.3 Introduction to the App controls...................................................4
2.4 Group, node and element settings ................................................7
3 ST BlueNRG-Mesh Android App functionality .....................................15
3.1 Provisioning the node ..........................................................15
3.2 Un-provisioning the node .......................................................18
3.3 Configuration .................................................................19
3.4 Subscription..................................................................21
3.4.1 Adding or deleting subscription .............................................21
3.5 Publication ...................................................................22
4 Models ...........................................................................24
4.1 Generic ON/OFF model ........................................................24
4.2 Generic level model ...........................................................25
4.3 Light HSL model ..............................................................25
4.4 Light CTL model ..............................................................26
4.5 Light Lightness model..........................................................26
4.6 Generic power ON/OFF model ..................................................27
4.7 Sensor model.................................................................27
4.8 Vendor model.................................................................28
5 Database exchange configuration.................................................29
5.1 Sharing via e-mail .............................................................30
5.2 Sharing via cloud..............................................................30
6 Firmware over the air (FOTA) update ..............................................35
7 Voice control over mesh ..........................................................36
8 Miscellaneous app settings .......................................................37
Revision history .......................................................................39
UM2180 - Rev 3
page 40/43
Page 41

UM2180
List of figures
List of figures
Figure 1. ST BLE Mesh scenario ..............................................................1
Figure 2. Turning the Bluetooth radio and location on ................................................3
Figure 3. ST BLE Mesh app flow .............................................................. 4
Figure 4. ST BLE Mesh node features...........................................................5
Figure 5. ST BLE Mesh app controls ............................................................6
Figure 6. ST BLE Mesh - Provisioning View .......................................................7
Figure 7. ST BLE Mesh - Group View ...........................................................8
Figure 8. ST BLE Mesh - adding a new group ..................................................... 9
Figure 9. ST BLE Mesh - Group Settings ........................................................ 10
Figure 10. ST BLE Mesh - Nodes .............................................................. 11
Figure 11. ST BLE Mesh - Node Settings ........................................................ 12
Figure 12. ST BLE Mesh - Element Settings ......................................................13
Figure 13. ST BLE Mesh - Element Settings (commands) ............................................. 14
Figure 14. Un-provisioned device view .......................................................... 15
Figure 15. Provisioning process ...............................................................16
Figure 16. Configuration process ..............................................................16
Figure 17. Publication and subscription scenario ...................................................17
Figure 18. Provisioned node view.............................................................. 18
Figure 19. Node un-provisioning .............................................................. 19
Figure 20. Quick configuration ................................................................ 20
Figure 21. Detailed configuration .............................................................. 20
Figure 22. Adding/deleting a node from the Element Settings page....................................... 21
Figure 23. Adding/deleting a node from the Group Settings page ........................................ 22
Figure 24. Publication process ................................................................ 23
Figure 25. Model information .................................................................24
Figure 26. Generic ON/OFF model control........................................................ 25
Figure 27. Generic level model control .......................................................... 25
Figure 28. Light HSL model control............................................................. 26
Figure 29. Light CTL model control (delta and temperature)............................................26
Figure 30. Light Lightness model control .........................................................27
Figure 31. Generic power ON/OFF model control ................................................... 27
Figure 32. Sensor model control .............................................................. 28
Figure 33. Vendor model control .............................................................. 28
Figure 34. Network configuration sharing ........................................................ 29
Figure 35. Mesh configuration exchange ......................................................... 30
Figure 36. Configuration database sharing setting - export ............................................ 30
Figure 37. Sharing via cloud ................................................................. 31
Figure 38. Registering a network .............................................................. 32
Figure 39. Joining a network ................................................................. 33
Figure 40. Re-joining a previously created network .................................................. 34
Figure 41. FOTA over GATT ................................................................. 35
Figure 42. Voice control over mesh............................................................. 36
Figure 43. Miscellaneous app settings (1 of 2) ..................................................... 37
Figure 44. Miscellaneous app settings (2 of 2) ..................................................... 38
UM2180 - Rev 3
page 41/43
Page 42

UM2180
List of tables
List of tables
Table 1. Document revision history .............................................................39
UM2180 - Rev 3
page 42/43
Page 43

UM2180
IMPORTANT NOTICE – PLEASE READ CAREFULLY
STMicroelectronics NV and its subsidiaries (“ST”) reserve the right to make changes, corrections, enhancements, modifications, and improvements to ST
products and/or to this document at any time without notice. Purchasers should obtain the latest relevant information on ST products before placing orders. ST
products are sold pursuant to ST’s terms and conditions of sale in place at the time of order acknowledgement.
Purchasers are solely responsible for the choice, selection, and use of ST products and ST assumes no liability for application assistance or the design of
Purchasers’ products.
No license, express or implied, to any intellectual property right is granted by ST herein.
Resale of ST products with provisions different from the information set forth herein shall void any warranty granted by ST for such product.
ST and the ST logo are trademarks of ST. For additional information about ST trademarks, please refer to www.st.com/trademarks. All other product or service
names are the property of their respective owners.
Information in this document supersedes and replaces information previously supplied in any prior versions of this document.
© 2020 STMicroelectronics – All rights reserved
UM2180 - Rev 3
page 43/43
 Loading...