

Page 1
UM2425
User manual
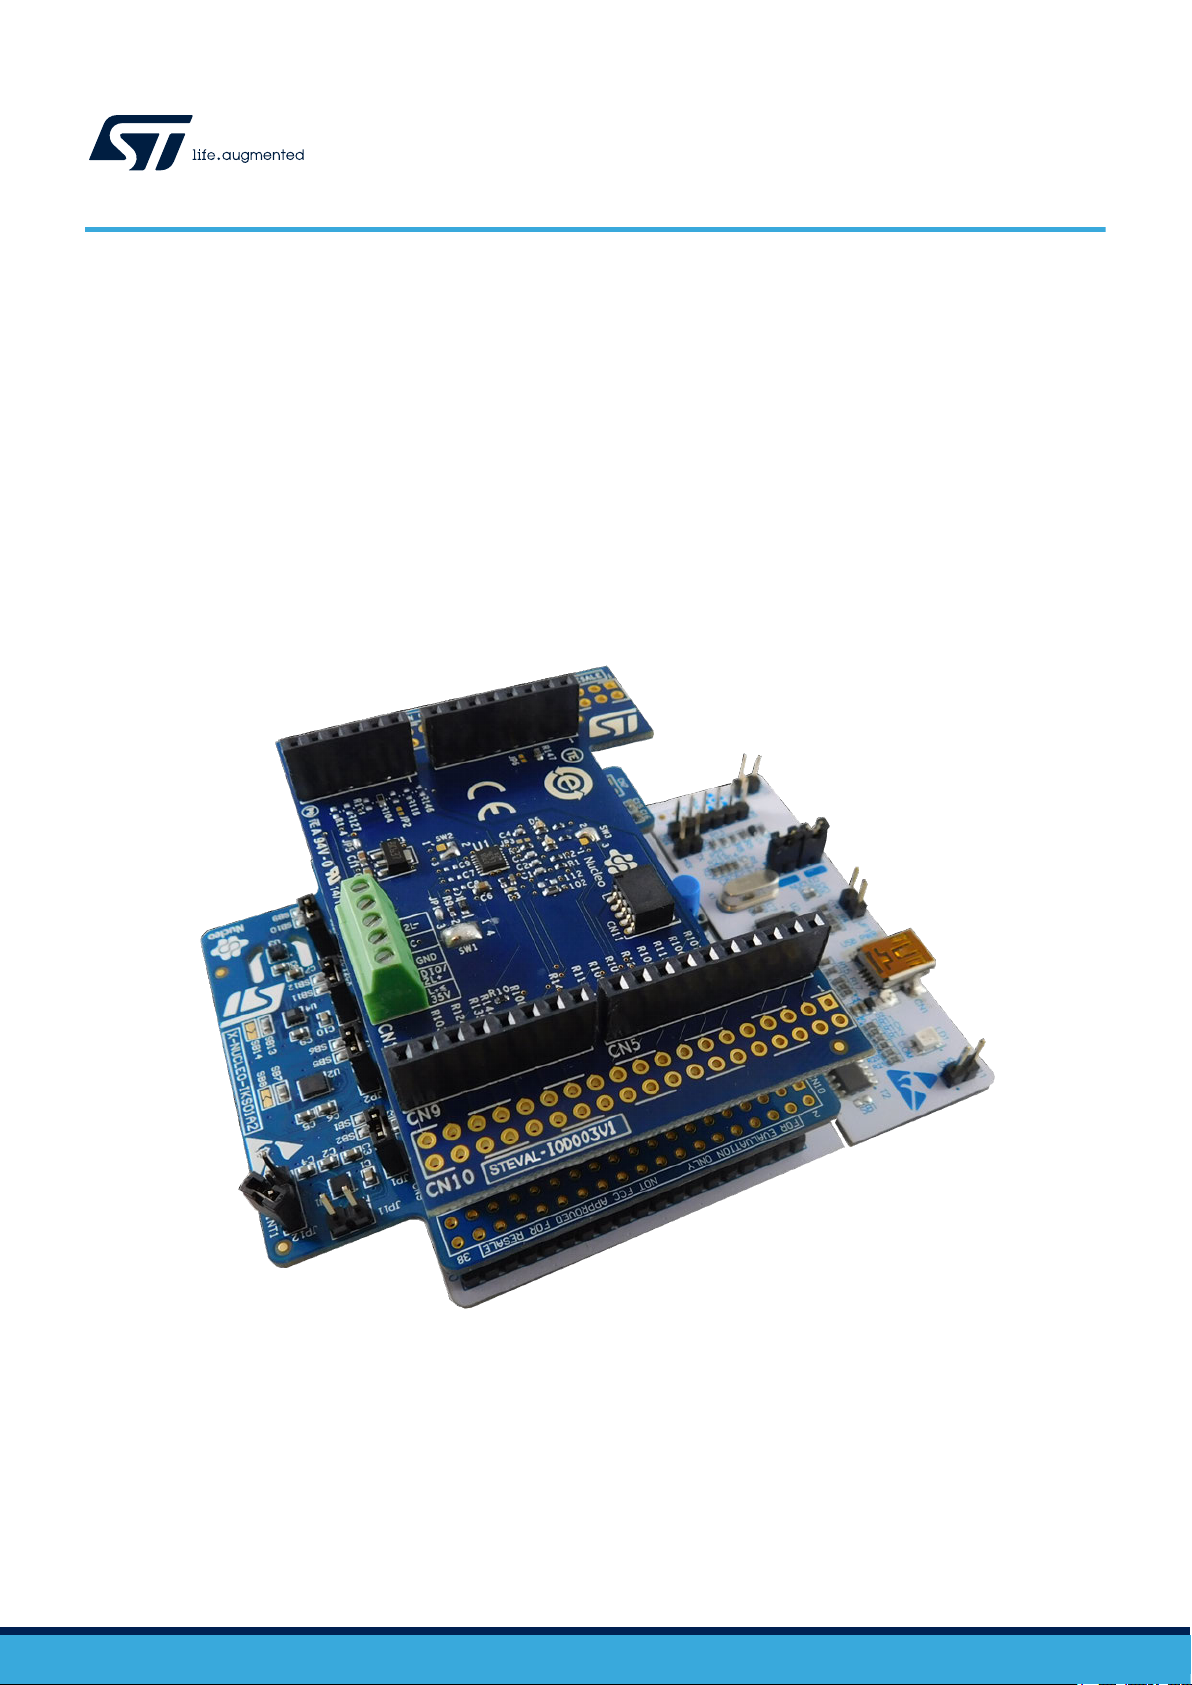
Getting started with P-NUCLEO-IOD01A1 IO-Link (v1.1.3) multi-sensor node
Introduction
The P-NUCLEO-IOD01A1 is an STM32 Nucleo pack composed of the NUCLEO-L073RZ
IOD003V1 evaluation board and the X-NUCLEO-IKS01A2 expansion board.
The STEVAL-IOD003V1 offers an IO-Link device PHY layer (L6362A) while the NUCLEO-L073RZ runs the IO-Link stack v1.1.3
included in the STSW-IOD01 (developed by and property of TEConcept Gmbh) and the firmware controlling the X-NUCLEO-
IKS01A2 sensors.
The STM32 Nucleo pack provides an affordable and easy-to-use solution for the development of IO-Link and SIO applications,
L6362A communication features and robustness, together with the STM32L073RZT6 computation performance.
Figure 1. P-NUCLEO-IOD01A1 STM32 Nucleo evaluation pack
development board, the STEVAL-
UM2425 - Rev 3 - June 2020
For further information contact your local STMicroelectronics sales of
fice.
www.st.com
Page 2
1 Architecture overview
A generic IO-Link system is composed of an IO-Link master and an IO-Link device connected by an unshielded
cable. Normally
system.
The IO-Link master is installed in the control cabinet or, as a remote I/O, directly in the field. It can have several
IO-Link ports (channels): an IO-Link device can be connected to each port, hence, it is a point-to-point
communication and not a fieldbus.
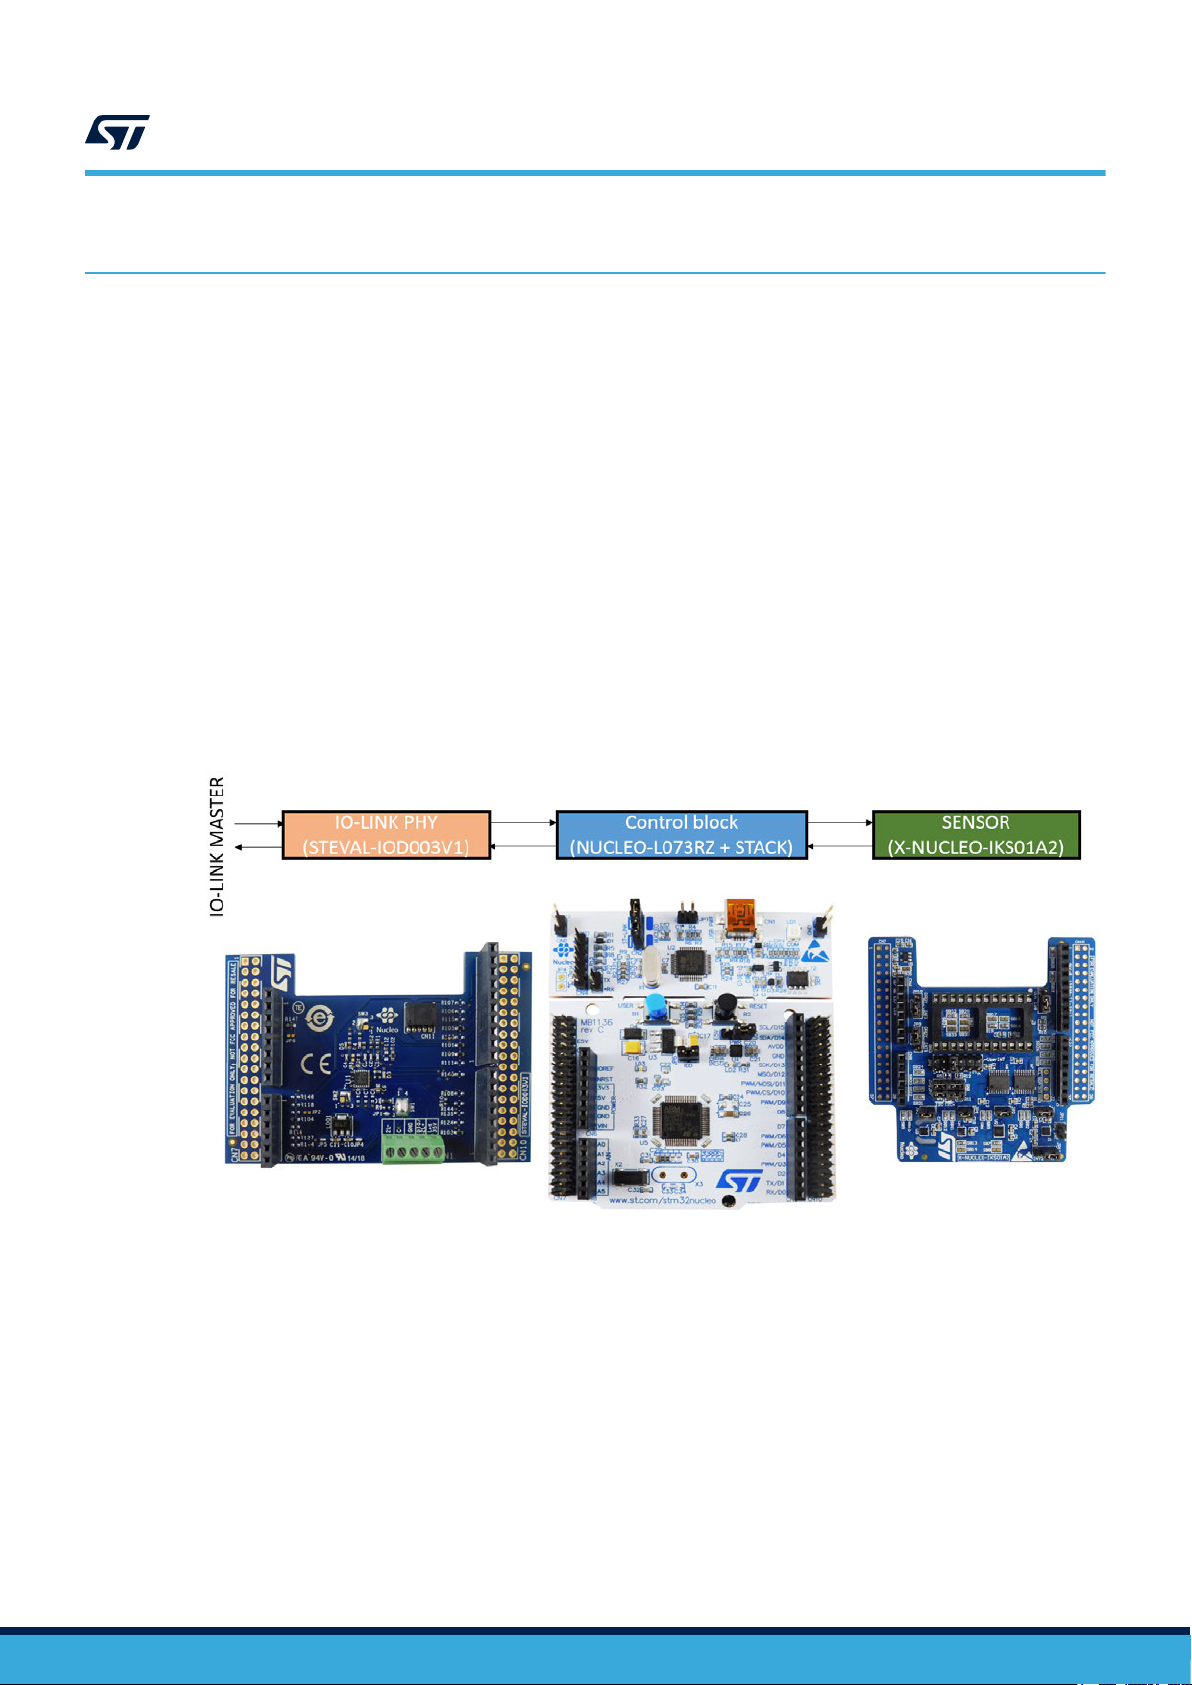
An IO-Link device, as the P-NUCLEO-IOD01A1, can be basically schematized as the arrangement of three main
blocks (see Figure 2. P-NUCLEO-IOD01A1 block details):
• Control sub-system: the NUCLEO-L073RZ board runs the control software, the IO-Link stack and sensors
firmware, accepting the commands and configuration parameters from the IO-Link master. It also provides
all digital signals to perform the proper control of the whole IO-Link device system.
• IO-Link physical: the STEVAL-IOD003V1 mounts the ST transceiver L6362A, which interfaces with the
micro-controller by digital interfaces UART for IO-Link data transfer, GPIO and interrupts) and the IO-Link
master by the IO-Link interface (connector CN1).
• Sensor: the X-NUCLEO-IKS01A2 multi-sensor shield, with on-board temperature and humidity sensor
(HTS221), MEMS 3D accelerometer and 3D gyroscope (LSM6DSL), MEMS 3D accelerometer and
magnetometer (LSM303AGR), MEMS pressures sensor (LPS22HB).
, the IO-Link master is the connection point between the IO-Link device and the automation
UM2425
Architecture overview
Figure 2. P-NUCLEO-IOD01A1 block details
UM2425 - Rev 3
page 2/11
Page 3

2 Getting started
2.1 Hardware requirements
To evaluate the system, the hardware requirements are:
a P-NUCLEO-IOD01A1 (STEVAL-IOD003V1 plus NUCLEO-L073RZ plus X-NUCLEO-IKS01A2)
•
• an IO-Link master (e.g. P-NUCLEO-IOM01M1) together with a power supply (18-32.5 V for the P-NUCLEO-
IOM01M1)
• a USB cable (type A to mini-B)
• connection cable/wires between IO-Link master and IO-Link device
• a laptop/PC
The P-NUCLEO-IOD01A1 is a complete IO-Link multi-sensor composed of three application boards (STEVAL-
IOD003V1, NUCLEO-L073RZ and X-NUCLEO-IKS01A2) connected via the Arduino connectors (CN5, CN6, CN8
and CN9).
A supply rail (up to 35 V) is necessary to supply the STEVAL-IOD003V1 via CN1 connector, while the NUCLEO-
L073RZ can be supplied in two different ways:
1. by enabling the LDO1 mounted on the STEVAL-IOD003V1 (open JP3; close JP4 and JP5) and setting JP5
on the STM32 Nucleo development board to position “E5V”;
2. by connecting the mini-USB port of the STM32 Nucleo development board to your laptop/PC through a USB
type A to mini-B USB cable. In this case, the STM32 Nucleo development board JP5 must be closed in the
position “U5V” and the STEVAL-IOD003V1 jumpers JP3, JP4 and JP5 must be open.
UM2425
Getting started
2.2 Software requirements
To complete the system, you need a PC/laptop with:
•
Windows®(version 7 or above)
• STSW-LINK009 driver installed
For system evaluation only:
• the IO-Link master control tool provided with your IO-Link master hardware. If you are using the P-NUCLEO-
IOM01M1 as IO-Link master, then the control tool is the IO-Link Control Tool©, property of TEConcept GmbH
• the P-NUCLEO-IOD01A1 IODD file (included in the STSW-IOD01 and available on www.st.com)
For application development:
• a software development environment (STM32CubeIDE 1.3.0, EWARM v8.32.3 or MDK-ARM v5.29.0)
• the STSW-IOD01 software package (including source code and IO-Link stack library, available on
www.st.com)
• the IODD file of your application
The P-NUCLEO-IOD01A1 is provided with the IO-Link stack included in the STSW-IOD01 software.
The software also includes an IO-Link library that developers can use to compile and link their sensor code.
The stack library contains a 30-minute runtime limited version of the TEConcept IO-Link stack.
The library is intended for evaluation purposes and its limitations are:
• data storage and block parametrization are not supported
• vendor ID, product ID, product name and device ID cannot be changed
• 30-minute execution time
After 30 minutes, a notification event that indicates “FW test phase expired” is shown and the IO-Link stack stops
working. A power-on reset is required to restore the operation.
2.2.1 IODD file
The IODD file (IO device description) is the electronic device description file necessary for each IO-Link device.
The file stores a variety of information for the system integration:
•
communication properties
UM2425 - Rev 3
page 3/11
Page 4

UM2425
Software requirements
• device parameters with value range and default value
•
identification, process and diagnostics data
• device data
• text description
• device illustration
• manufacturer logo
To ensure the same handling of all IO-Link devices, independently of the manufacturer, the IODD file structure is
always the same for all manufacturer devices and it is always represented in the same way by the IO-Link
configuration tools of the master manufacturers.
The STSW-IOD01 software package includes an IODD file for P-NUCLEO-IOD01A1 complete evaluation.
UM2425 - Rev 3
page 4/11
Page 5
3 How to build and run the IO-Link device
3.1 System evaluation setup
P-NUCLEO-IOD01A1 can be used as IO-Link device evaluation system, following the hardware configuration
.
below
Step 1. For the STEVAL-IOD003V1 setup:
– enable VIN supply by LDO1 (close JP4 and JP5, open JP3)
– configure the L6362A output as IO-Link by closing JP1 and all positions of SW1 to its pin 4
– verify that SW2 and SW3 pins 2 and 3 are closed and JP2 and JP6 are open
Step 2. For the NUCLEO-L073RZ setup, enable the external supply from STEVAL-IOD003V1 by setting JP5 to
position “E5V”.
Step 3. For the X-NUCLEO-IKS01A2 setup:
– enable all sensors by closing JP1, JP2, JP3, JP4
– close JP5 between pins 1-2
– leave JP6 open
– close J7 and J8 pins 1-2 and 3-4
– leave J9, J10, J11 and J12 open
UM2425
How to build and run the IO-Link device
Step 4. Connect the STEVAL-IOD003V1 evaluation board to the X-NUCLEO-IKS01A2 expansion board and
the NUCLEO-L073RZ development board through the Arduino connectors.
Note: Connect the boards as shown in Figure 1. P-NUCLEO-IOD01A1 STM32 Nucleo evaluation pack, leaving the two
user buttons (the blue and the black ones) out.
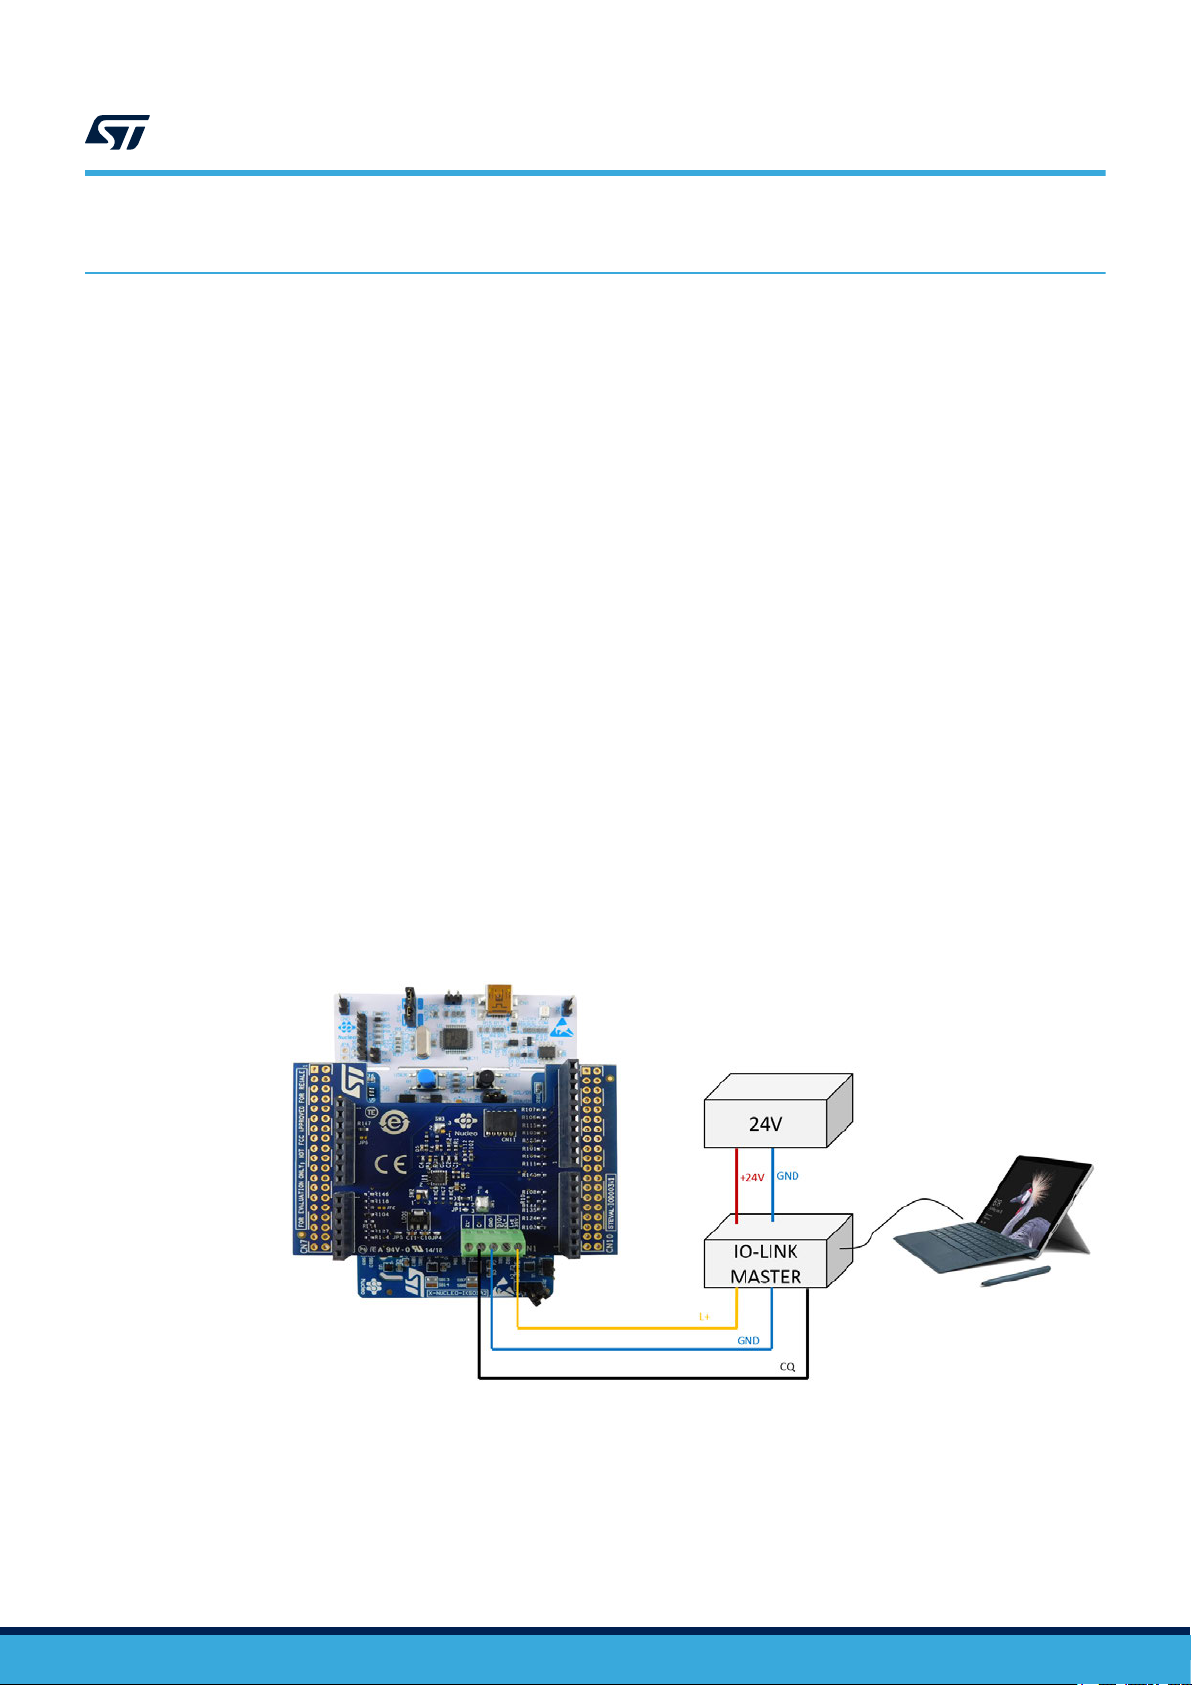
Step 5. Connect the STEVAL-IOD003V1 to the IO-Link master by screwing cables on the CN1 connector,
taking care of the pin/signal correspondence.
Figure 3. P-NUCLEO-IOD01A1 connections to the IO-Link master
UM2425 - Rev 3
Step 6. Install the P-NUCLEO-IOD01A1 IODD file (included in the STSW
control tool of your master is running. Depending on the control system of your master, it could be
required that you launch the control tool first and then load the IODD file.
The system is ready to operate: the IO-Link master control tool allows the user to supply, configure and
activate the data transfer (in SIO or IO-Link mode) with the IO-Link device. If the master is the P-
NUCLEO-IOM01M1, refer to its user manual (UM2421 on www.st.com) for the detailed procedure to
use the related control tool.
-IOD01) in the laptop/PC where the
page 5/11
Page 6
UM2425
System development setup with the X-NUCLEO-IKS01A2 expansion board
3.2 System development setup with the X-NUCLEO-IKS01A2 expansion board
You can use the P-NUCLEO-IOD01A1 evaluation pack as a development platform for an IO-Link device sensor
node, but with a dif
You can use just a subset of the sensors mounted on the X-NUCLEO-IKS01A2 or manage them differently from
the proposed available source code (refer to the X-NUCLEO-IKS01A2 documentation on www.st.com to properly
set up the jumpers for the hardware activation/deactivation of each sensor as the software has to be modified
accordingly, otherwise the system may be stuck, for example, as in the I²C polling sequence).
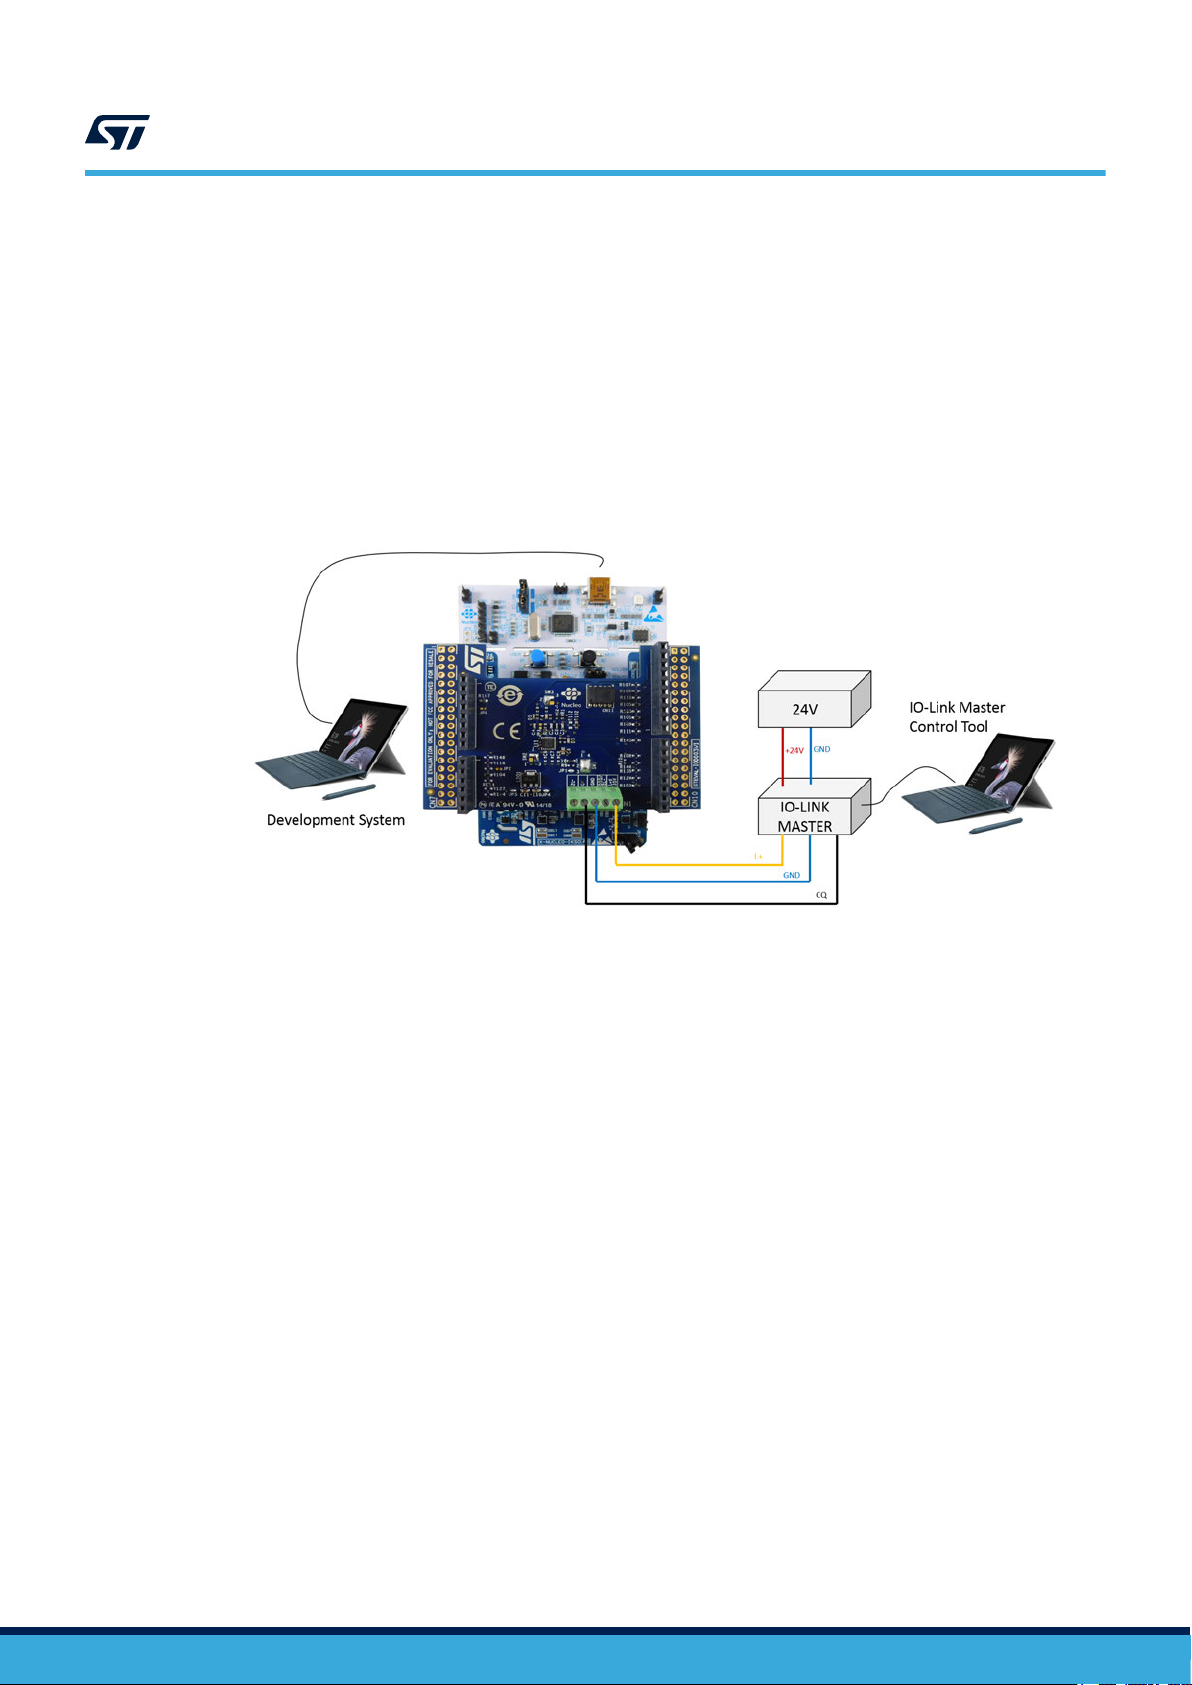
In this setup, you have to connect the NUCLEO-L073RZ to the development tool via the USB cable. The supply
architecture described in Section 2.1 Hardware requirements, in the first option, can be used anyway (refer to
UM1724 on www.st.com for further details).
ferent firmware managing the sensors.
Figure 4. P-NUCLEO-IOD01A1 connections to the development system
You can develop your application considering the IO-Link Device Stack v1.1 API User Guide published by
TEConcept (document ID API_TEC_012_001) and available on request contacting info@teconcept.de.
3.3 System development setup with other sensors
You can develop application cases also for sensors not mounted on the X-NUCLEO-IKS01A2 expansion board.
ou can easily connect an alternative I²C sensor to the P-NUCLEO-IOD01A1 by:
Y
• mounting it on the STEVAL-IOD003V1 CN11 connector (in this case the X-NUCLEO-IKS01A2 can be
removed)
• connecting it to J1, the 24 DIL connector available on the X-NUCLEO-IKS01A2 (refer to UM2121 on
www.st.com for the proper jumper setup).
Refer to Section 3.2 System development setup with the X-NUCLEO-IKS01A2 expansion board for firmware
development (interface and API to access the demo stack) and system setup (connection to the development
system).
UM2425 - Rev 3
page 6/11
Page 7

Appendix A References
UM2425
References
The following resources are freely available on www
1. L6362A datasheet
2. P-NUCLEO-IOD01A1 data brief
3. STEVAL-IOD003V1 data brief
4. STEVAL-IOD003V1 user manual
5. P-NUCLEO-IOM01M1 data brief
6. P-NUCLEO-IOM01M1 user manual
7. X-NUCLEO-IKS01A2 data brief and user manual
8. STSW-IOD01 data brief
Freely available on teconcept.de
1. IO-Link Device Stack v1.1 API User Guide
.st.com.
UM2425 - Rev 3
page 7/11
Page 8

Revision history
Date Revision Changes
11-Jun-2018 1 Initial release.
04-Jul-2018 2 Removed schematic diagrams and bill of materials.
10-Jun-2020 3 Added references to STSW-IOD01 IO-Link v1.1.3 sensor software.
able 1. Document revision history
T
UM2425
UM2425 - Rev 3
page 8/11
Page 9

UM2425
Contents
Contents
1 Architecture overview .............................................................2
2 Getting started ....................................................................3
2.1 Hardware requirements .........................................................3
2.2 Software requirements ..........................................................3
2.2.1 IODD file ...............................................................3
3 How to build and run the IO-Link device............................................5
3.1 System evaluation setup ........................................................5
3.2 System development setup with the X-NUCLEO-IKS01A2 expansion board .............6
3.3 System development setup with other sensors ......................................6
Appendix A References ...............................................................7
Revision history ........................................................................8
UM2425 - Rev 3
page 9/11
Page 10

UM2425
List of figures
List of figures
Figure 1. P-NUCLEO-IOD01A1 STM32 Nucleo evaluation pack .........................................1
Figure 2. P-NUCLEO-IOD01A1 block details ......................................................2
Figure 3. P-NUCLEO-IOD01A1 connections to the IO-Link master .......................................5
Figure 4. P-NUCLEO-IOD01A1 connections to the development system ...................................6
UM2425 - Rev 3
page 10/11
Page 11

UM2425
IMPORTANT NOTICE – PLEASE READ CAREFULLY
STMicroelectronics NV and its subsidiaries (“ST”) reserve the right to make changes, corrections, enhancements, modifications, and improvements to ST
products and/or to this document at any time without notice. Purchasers should obtain the latest relevant information on ST products before placing orders. ST
products are sold pursuant to ST’
Purchasers are solely responsible for the choice, selection, and use of ST products and ST assumes no liability for application assistance or the design of
Purchasers’ products.
No license, express or implied, to any intellectual property right is granted by ST herein.
Resale of ST products with provisions different from the information set forth herein shall void any warranty granted by ST for such product.
ST and the ST logo are trademarks of ST. For additional information about ST trademarks, please refer to www
names are the property of their respective owners.
Information in this document supersedes and replaces information previously supplied in any prior versions of this document.
s terms and conditions of sale in place at the time of order acknowledgement.
.st.com/trademarks. All other product or service
© 2020 STMicroelectronics – All rights reserved
UM2425 - Rev 3
page 11/11
 Loading...