

Page 1
INSTRUCTION MANUAL
After Sales Support
Telephone: 1300 886 649
Email: [email protected]
Model Number U009R
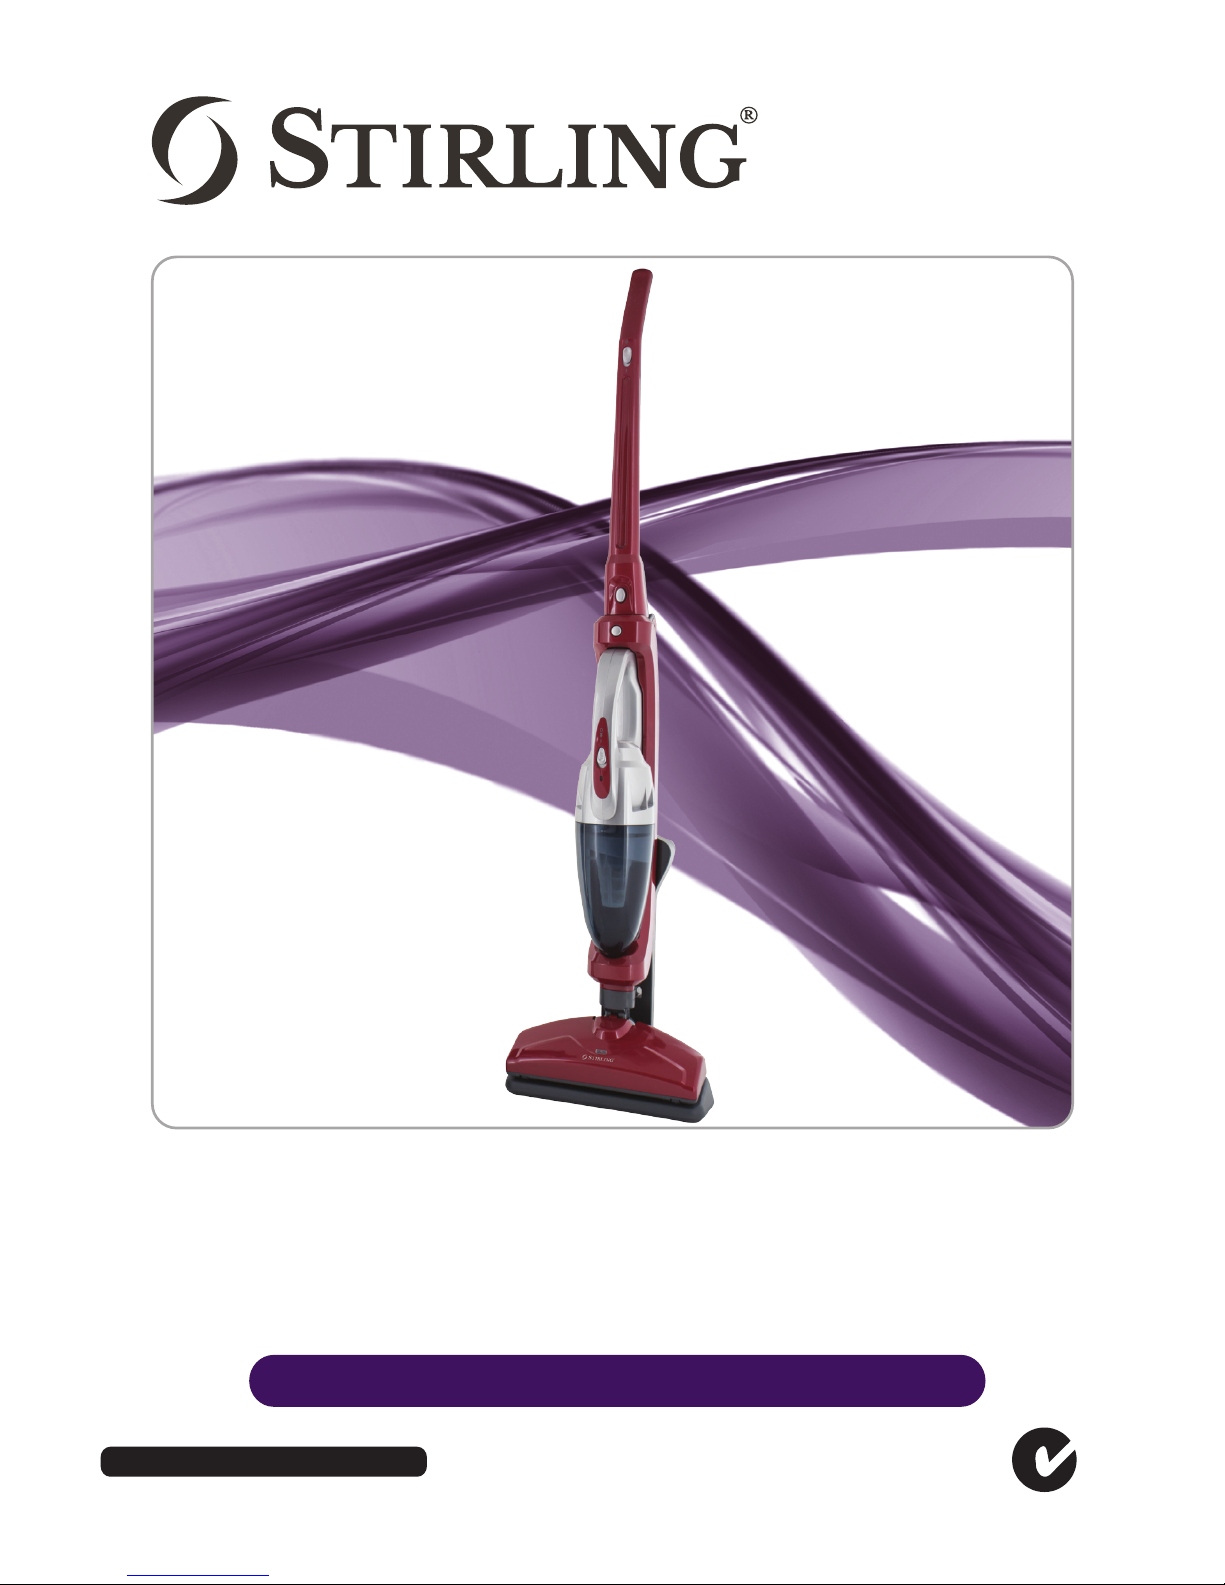
2 in 1 Cordless Vacuum Cleaner
N13275
Page 2

After Sales Support
Telephone: 1300 886 649
Email: [email protected]
Contents
03 Warranty Details
04 Welcome
05 General Safety Instructions
07 Product Overview
08 Getting Started
10 Instructions
12 Other Useful Information
Page 3

After Sales Support
Telephone: 1300 886 649
Email: [email protected]
3
2 in 1 Cordless Vacuum Cleaner
Warranty Details
The product is guaranteed to be free from defects in workmanship and parts
for a period of 36 months from the date of purchase. Defects that occur
within this warranty period, under normal use and care, will be repaired,
replaced or refunded at our discretion, solely at our option with no charge for
parts and labour. The benefits conferred by this warranty are in addition
to all rights and remedies in respect of the product that the consumer
has under the Competition and Consumer Act 2010 and similar state and
territory laws.
Our goods come with guarantees that cannot be excluded under the
Australian Consumer Law. You are entitled to a replacement or refund for
a major failure and to compensation for any other reasonably foreseeable
loss or damage. You are also entitled to have the goods repaired or
replaced if the goods fail to be of acceptable quality and the failure does
not amount to a major failure.
Page 4

After Sales Support
Telephone: 1300 886 649
Email: [email protected]
4
Welcome
Congratulations on choosing to buy a Stirling® product.
All products brought to you by Stirling® are manufactured to the highest
standards of performance and safety and, as part of our philosophy of customer
service and satisfaction, are backed by our comprehensive 3 Year Warranty. We
hope you will enjoy using your purchase for many years to come.
Page 5

After Sales Support
Telephone: 1300 886 649
Email: [email protected]
5
General Safety Instructions
Read this manual thoroughly before first use, even if you are familiar with this
type of product. The safety precautions enclosed herein reduce the risk of fire,
electric shock and injury when correctly adhered to. Keep the manual in a safe
place for future reference, along with the completed warranty card, purchase
receipt and carton. If applicable, pass these instructions on to the next owner of
the appliance.
Always follow basic safety precautions and accident prevention measures when
using an electrical appliance, including the following:
Usage conditions and restrictions
• Domestic use only: This appliance is intended for indoor household use
only. It is not suitable for commercial or industrial use. Do not use it outdoors
or on wet surfaces. Do not use it for anything other than its intended
purpose, and only use it as described in this manual.
• Accessories: Only use the device with the accessories supplied. Improper
installation and use of accessories that are not recommended in this manual
may result in the risk of fire, electric shock and/or injury to persons. We
assume no liability for any eventual damages caused by improper use or
faulty handling.
• Damage: Check the appliance and connections regularly for visible damage.
Do not use it if the housing or any other part is damaged. A damaged
cord must be replaced by the manufacturer, an authorised service centre
or similarly qualified personnel in order to avoid any hazards. In case of
damage, contact our after sales support line to arrange return or repair
of the damaged product.
• Usage restriction: This appliance is not intended for use by persons (including children) with reduced physical, sensory or mental capabilities, or lack of
experience and knowledge unless they have been given supervision or instructions concerning use of the appliance by a person responsible for their safety.
• Children: This vacuum cleaner is not a toy. Supervise young children to
ensure they do not play with the appliance. Close supervision is necessary
when any appliance is used by or near children.
• Prevent injury: Keep hair, loose clothing, fingers and all parts of the body
away from openings and moving parts. Do not point the vacuum cleaner at
people or animals when in use. Take extra care when vacuuming on stairs.
• Prevent blockage: Do not put any objects into openings. Keep all openings
free of dust, lint, hair or anything that may reduce the airow. Do not use the
product with any openings blocked or restricted airow.
Page 6

After Sales Support
Telephone: 1300 886 649
Email: [email protected]
6
General Safety Instructions (Cont.)
• Do not use the vacuum cleaner to pick up:
• Flammable or combustible uids (such as fuel or solvent), burning
substances (such ash, cigarettes or hot coals) or use it in the presence of
explosive liquids or fumes
• Hard or sharp objects such as shards of glass, nails, coins
• Harmful or toxic materials (such as chlorine bleach, ammonia, drain cleaner)
• Any liquids, or vacuum in areas where liquids may be present
• Service and repair: The appliance has no user-serviceable parts contained
within. Do not attempt to open, disassemble or repair the device or the
battery charger yourself, or to replace the power cord. Only have it repaired
by an authorised technician, or contact the after sales support line for advice.
Electrical safety (charging)
• Battery charger: Use only the original battery charger supplied with this
appliance. Insert the plug rmly into a properly earthed mains socket.
• Voltage: Before connecting the battery charger to the charging station and
the power supply, ensure that the electrical voltage and circuit frequency
correspond to those indicated on the charger rating label.
• Charging: When charging the appliance, place the charger base:
• On a at surface to avoid overturning,
• Close to a power point so no one trips over the cord,
• Away from heated surfaces, such as a stove or heater surface.
• Protect the power cord. Do not kink or damage the battery charger's power
supply cord. If it is damaged, contact our after sales support line for advice.
• Protect from moisture: To protect against electric shock, do not immerse
the cord, plug or charger in water. Ensure your hands are dry before use.
• Disconnect after use: Unplug the battery charger from the outlet when you
have finished charging the appliance. Grip the plug, do not pull the cord.
• Unattended: Do not leave the appliance unsupervised while it is charging.
• Cleaning and storage: Before cleaning, servicing or moving the vacuum
cleaner, make sure it is disconnected from the charging station and the
charging station is disconnected from the power socket.
• Storage: Store the appliance in a cool, dry indoor area, out of children's reach.
• RCD: The installation of a residual current device (safety switch) is
recommended to provide additional safety protection when using electrical
appliances. It is advisable that a safety switch with a rated residual operating
current not exceeding 30mA be installed in the electrical circuit supplying the
appliance. See your electrician for professional advice.
Page 7
After Sales Support
Telephone: 1300 886 649
Email: [email protected]
7
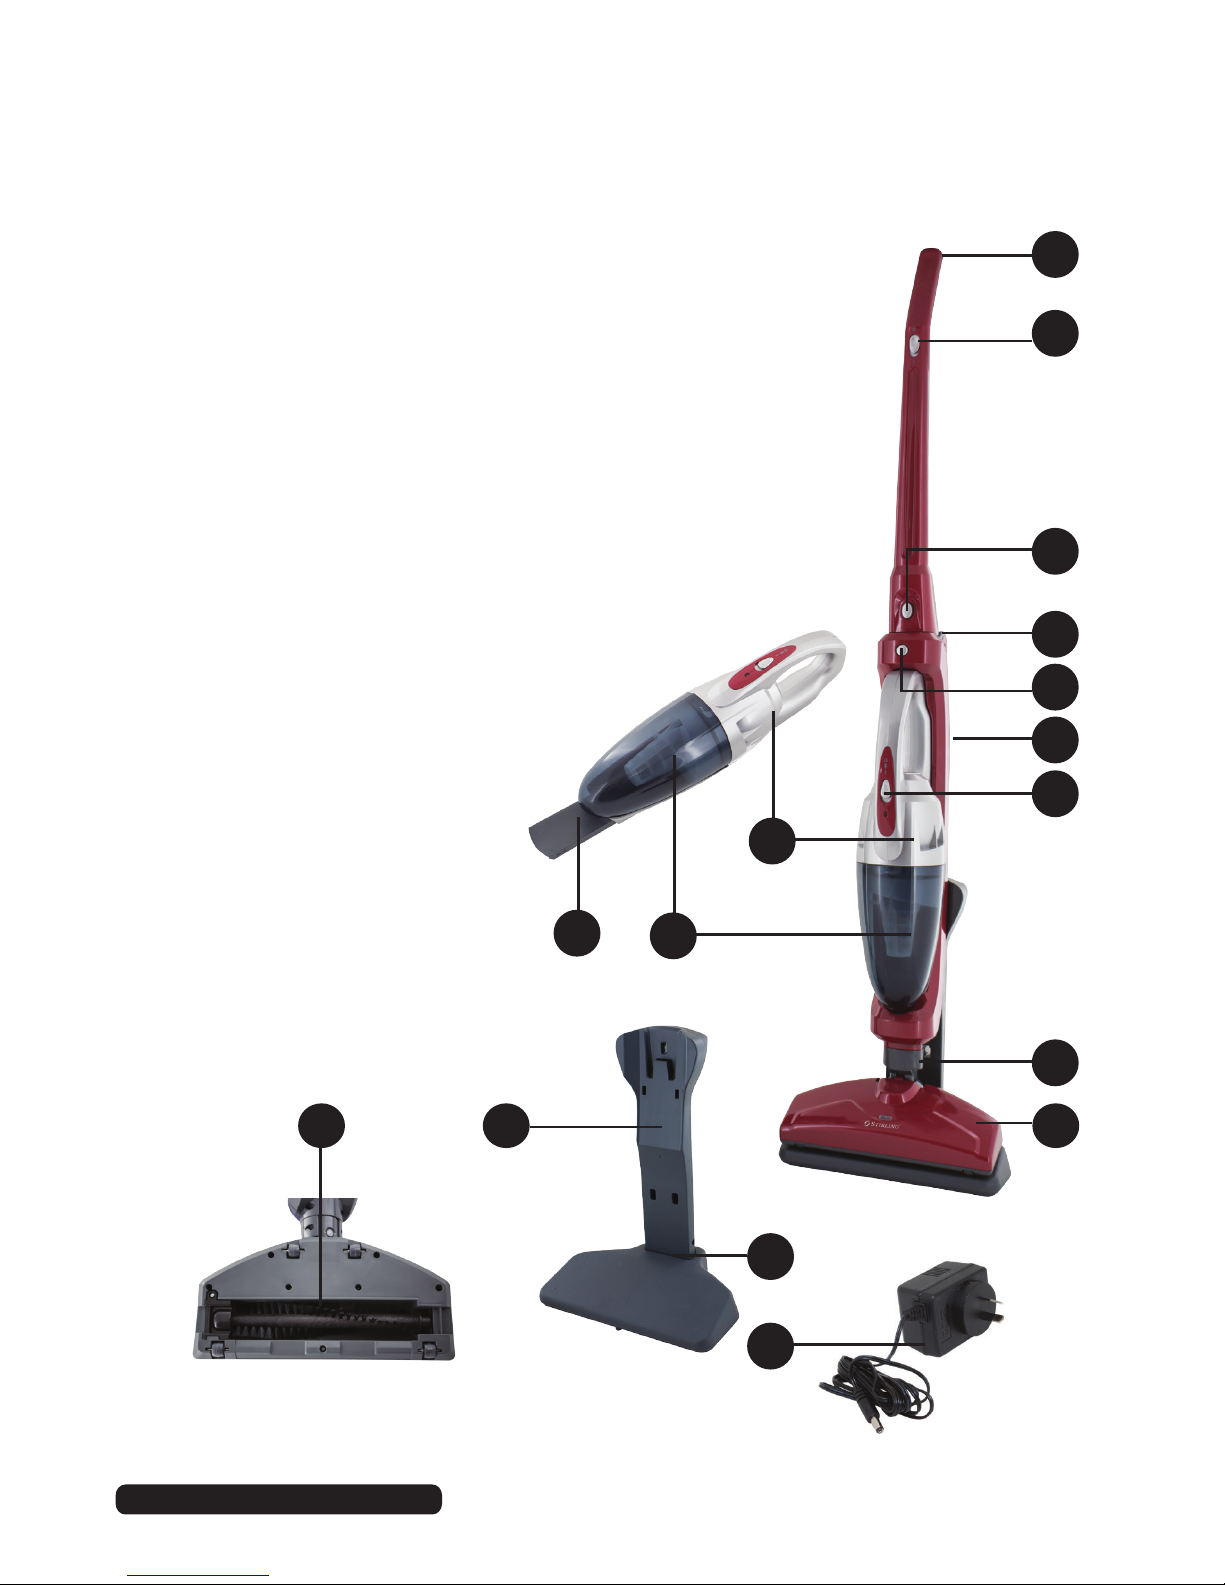
Product Overview
2
7
3
4
5
1
6
8
11
10
15
1 Upper handle
2 On/Off switch (on the upper handle)
3 Release button (for the handle)
4 Foldable handle axis
5 Release button (for the handheld unit)
6 Main body frame
7 On/Off switch (on the handheld unit)
8 Handheld vacuum cleaner
9 Filter assembly (inside the handheld unit)
10 Crevice nozzle
11 Swivel connector
12 Turbo brush
13 Rotating brush assembly
14 Charging station
15 Charger socket
16 Battery charger
1213
14
9
16
Page 8
After Sales Support
Telephone: 1300 886 649
Email: [email protected]
8
Before first use
• Unpack the appliance but keep all packaging materials until you have made
sure your new Rechargeable Vacuum Cleaner is undamaged and in good
working order. Plastic wrapping can be a suffocation hazard for babies and
young children, so ensure all packaging materials are out of their reach.
• Unwind the cord of the battery charger to its full length and inspect it for
damage. Do not use the charger if the cord is damaged. In case of damage,
contact our after sales support line for advice on examination, repair or
return of the damaged product.
• Read this manual to familiarise yourself with all the parts and operating
principles of the vacuum cleaner. Pay particular attention to the safety
instructions on the previous pages.
• Make sure all parts listed on page 7 are inside the box. If anything is missing,
contact our after sales support line.
Assembly
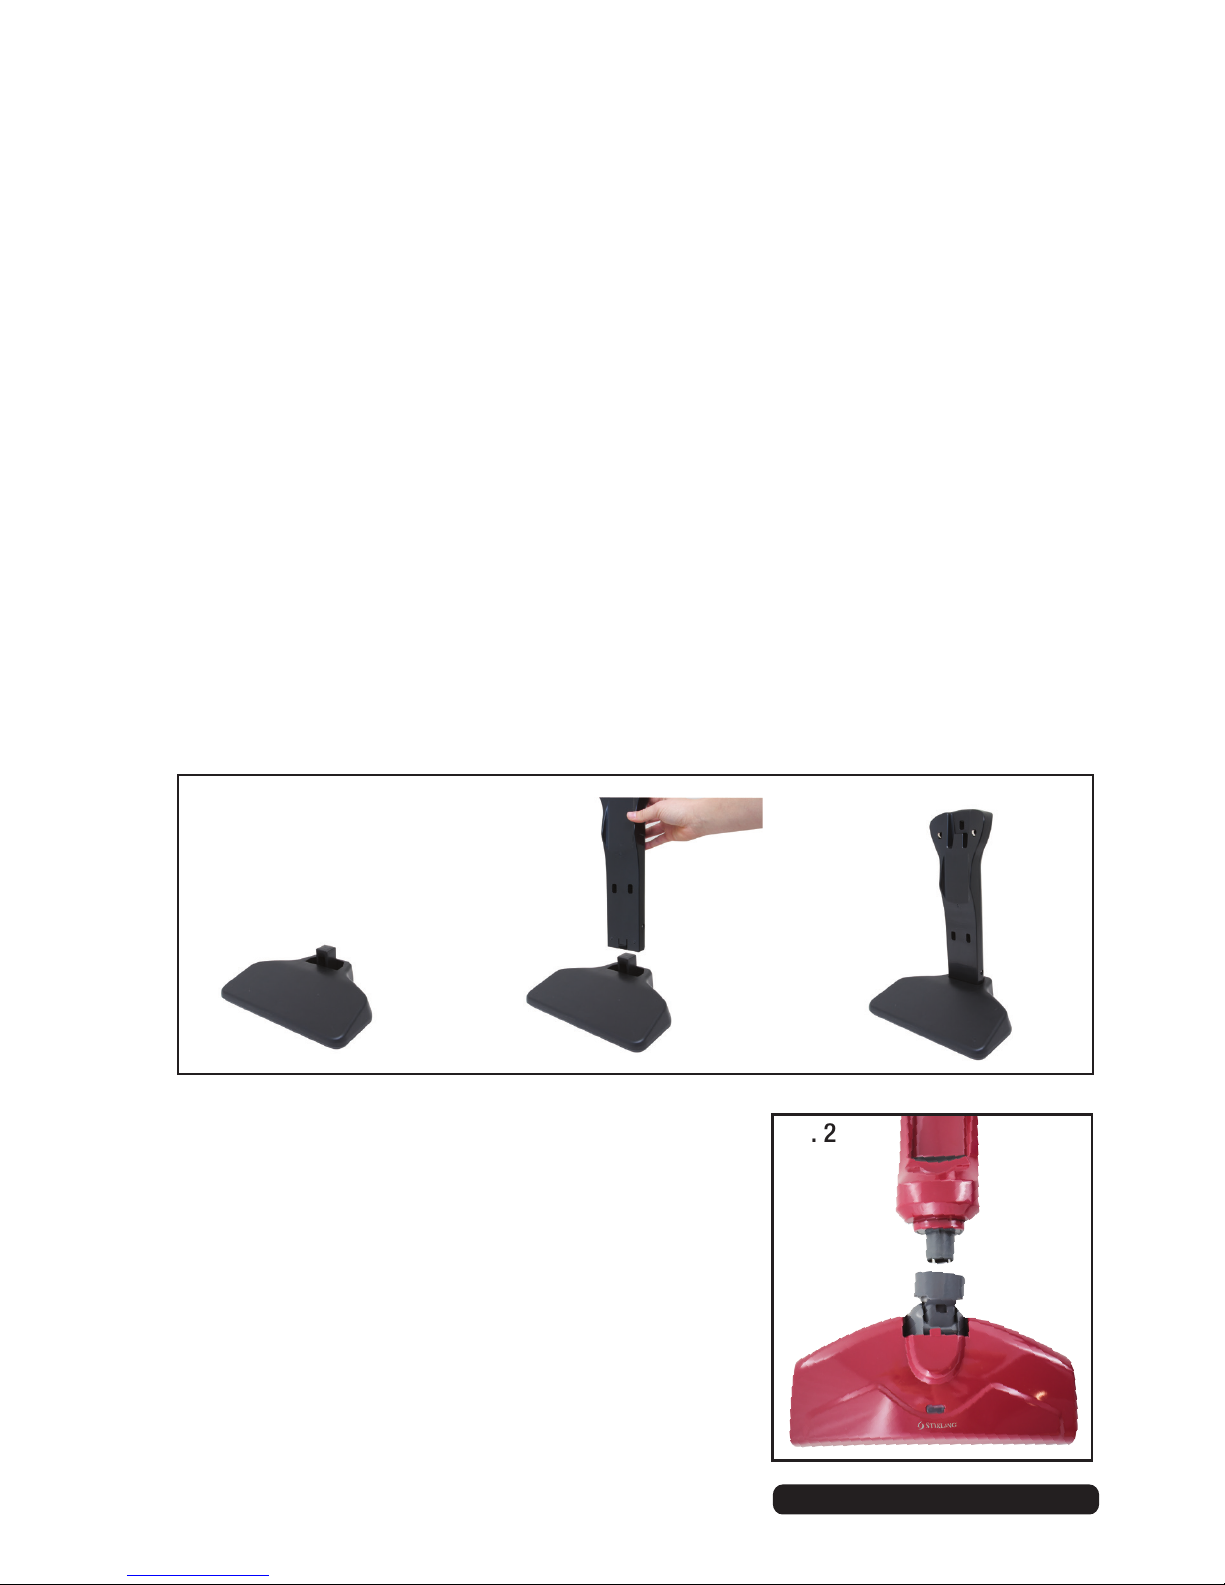
• To assemble the charging station, follow the illustration below (Fig. 1):
Getting Started
→
→
Fig. 1
• Insert the turbo brush carefully into the swivel
connector at the bottom of the main body, as
illustrated (Fig. 2).
Fig. 2
→
Page 9

After Sales Support
Telephone: 1300 886 649
Email: [email protected]
9
Getting Started (Cont.)
Charging
• Position the charging station close to a mains socket, well away from heat
sources and excessive moisture.
• Insert the battery charger jack into the charger socket and connect the
battery charger to the mains power supply.
• Make sure the vacuum cleaner is switched off before placing it on the
charging station. The charging light will ash while charging and glow
steadily once charged.
Charging time
• It takes more than 16 hours to fully charge the batteries before the rst use.
• When the device is completely empty, approximately 14-16 hours charging is
required for the battery to regain full capacity.
• In order to ensure that it is always ready for use, we recommend you leave
the appliance on the charger when not in use. The charger may become
warm during charging, this is normal.
Page 10
After Sales Support
Telephone: 1300 886 649
Email: [email protected]
10
Instructions
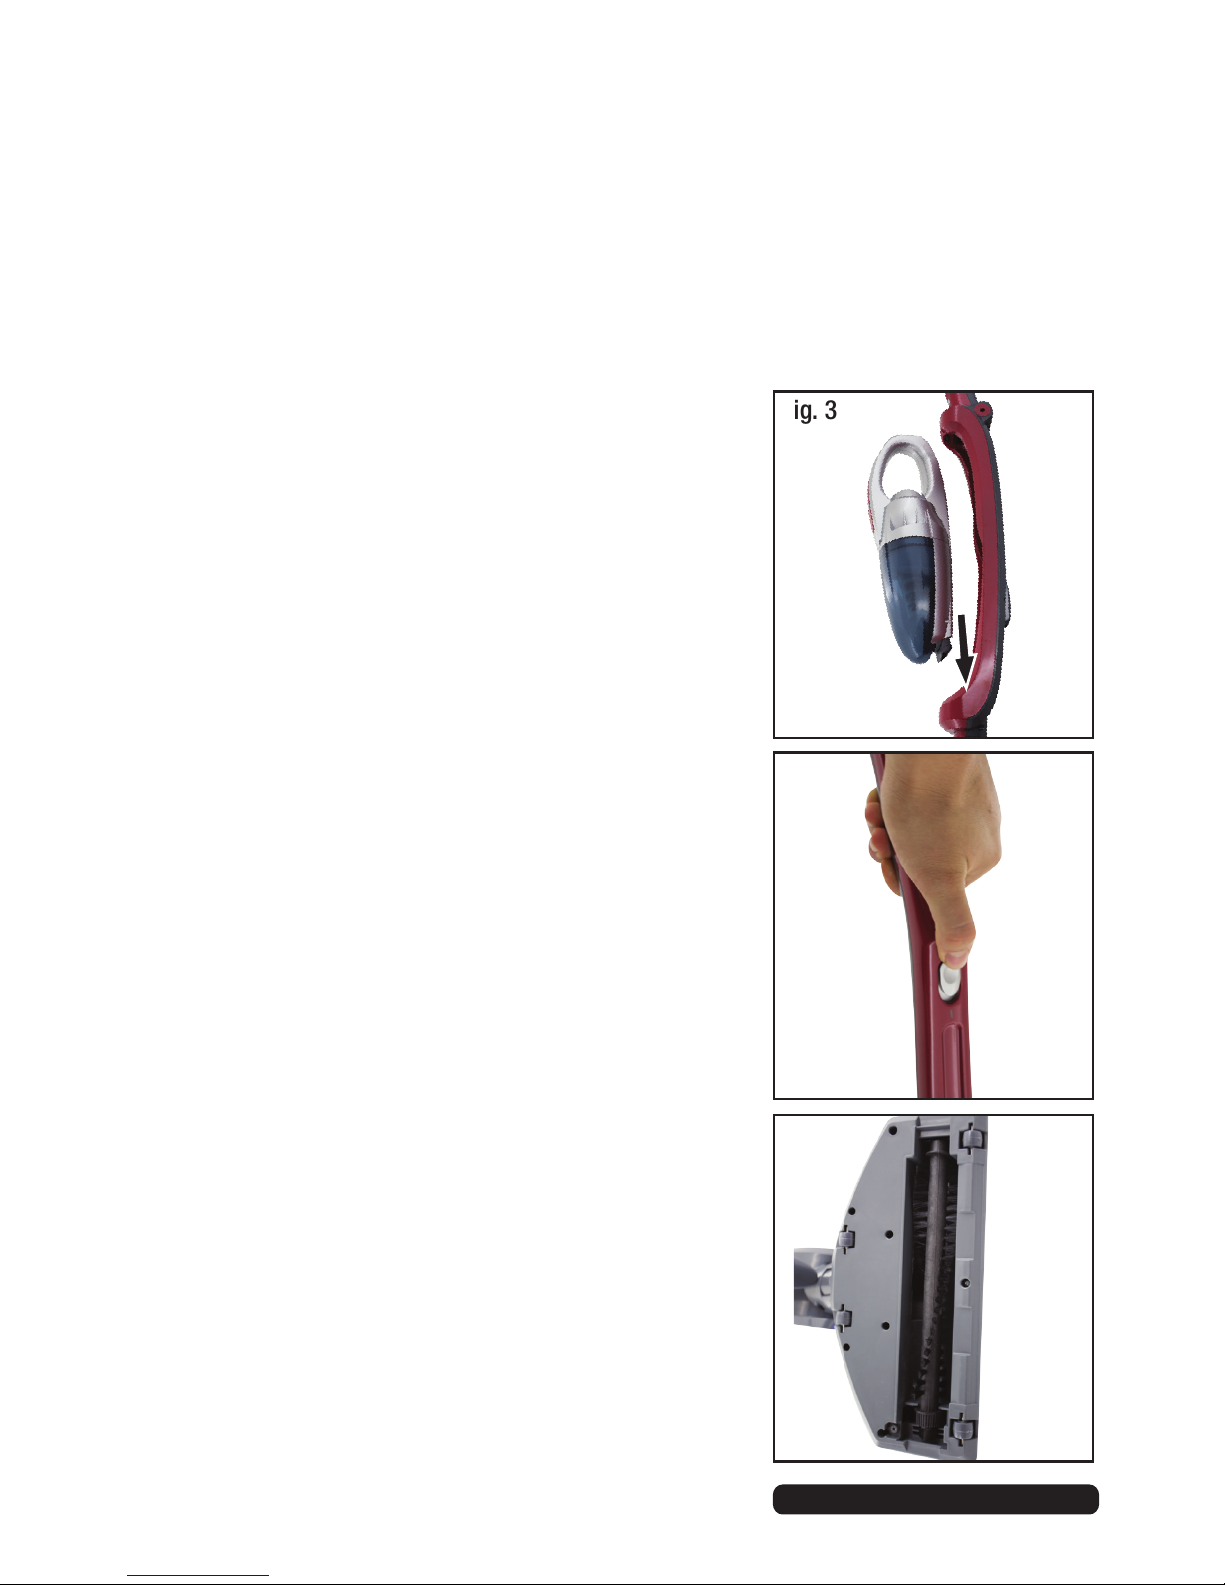
Fig. 3
Fig. 4
Upright vacuuming
The handheld vacuum cleaner ts securely into the main body of the vacuum
cleaner. Before you use the vacuum cleaner in an upright position to vacuum
carpets or oors, make sure the handheld unit is properly tted into the frame
and the unit is sufciently charged (see page 9).
• Insert the handheld vacuum cleaner securely
into the main body until it clicks into place, as
illustrated (Fig. 3).
• Start the vacuum cleaner by pushing the On/
Off switch on the upper handle to the On
position, as illustrated (Fig. 4).
• When vacuuming hard oors with the vacuum
cleaner in upright position, check regularly
that the brush assembly and rollers are clean
in order to avoid scratching sensitive oors
(Fig. 5).
Fig. 5
Page 11
After Sales Support
Telephone: 1300 886 649
Email: [email protected]
11
Instructions (Cont.)
Handheld vacuuming
The handheld unit is designed for convenient vacuuming of furniture, stairs, the
car interior or any areas that are more difcult to access with an upright vacuum
cleaner. Before you use the handheld vacuum cleaner, make sure the unit is
sufciently charged (see page 9).
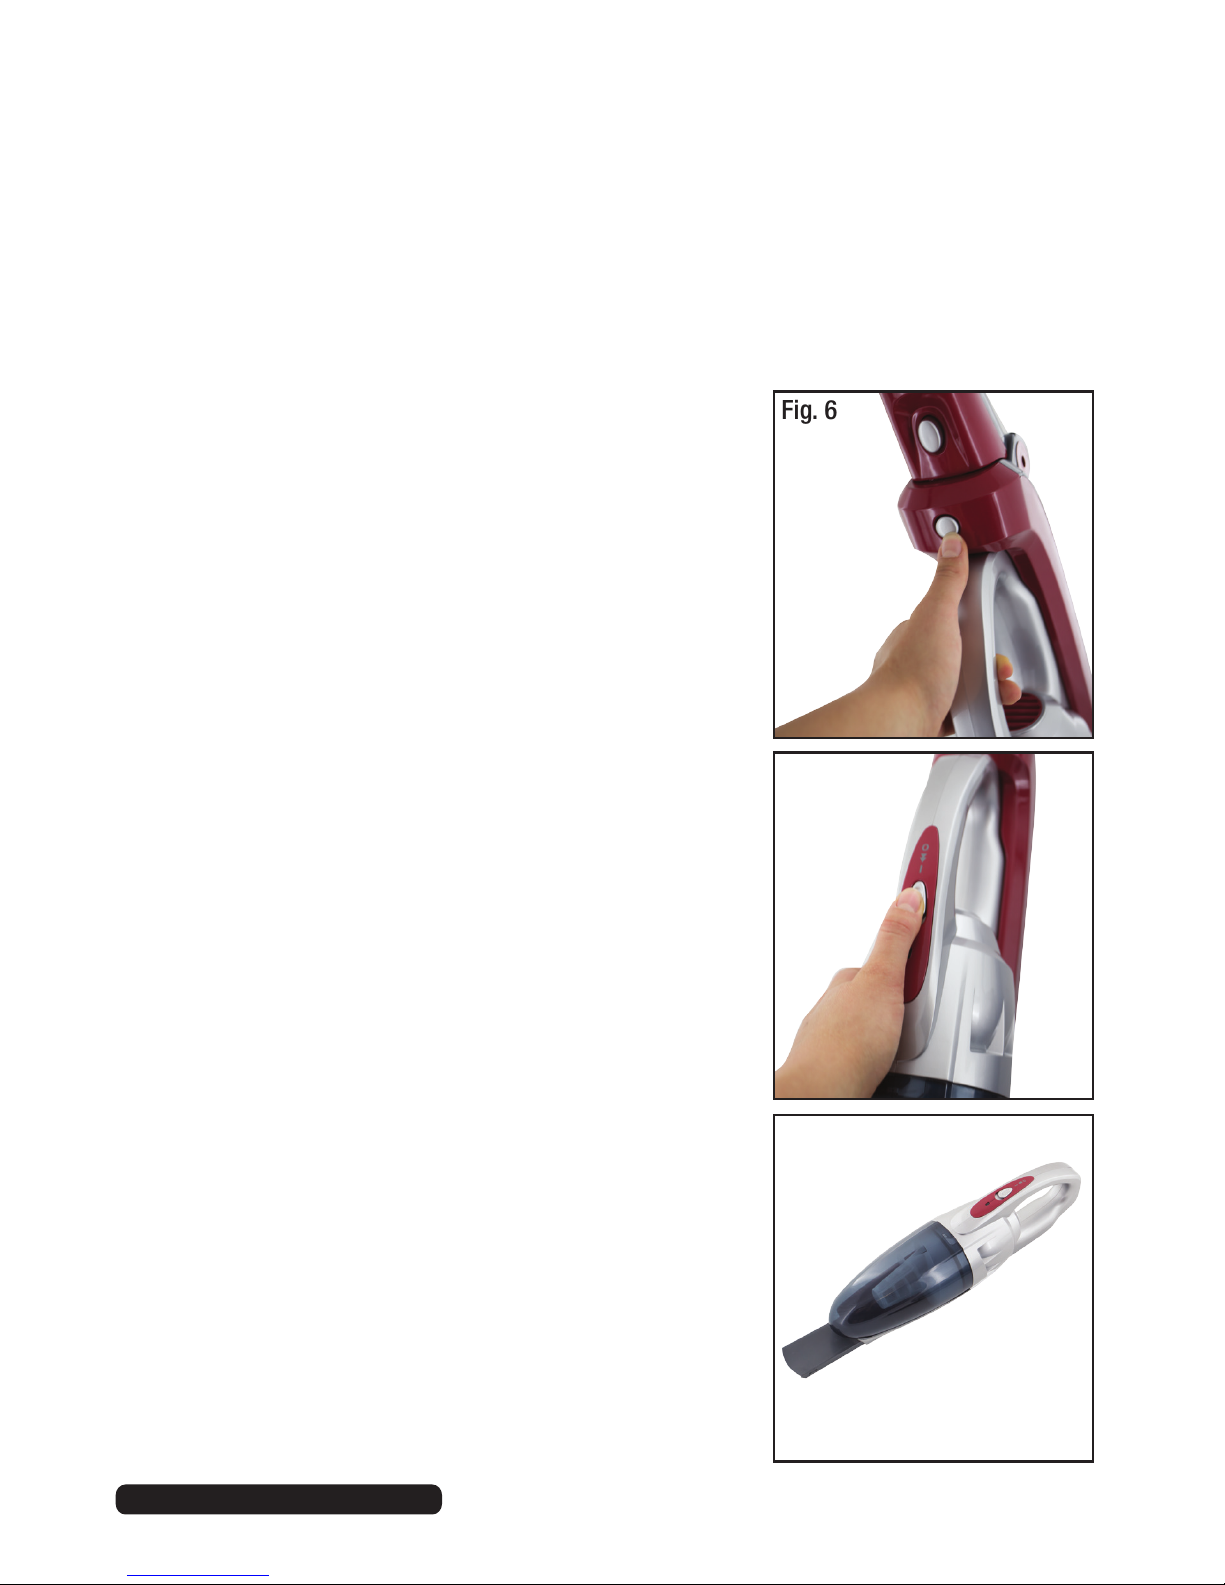
• Remove the handheld vacuum cleaner from
the main body by pressing the round release
button and lifting the handheld unit out of the
main body frame, as illustrated (Fig. 6).
• Start the vacuum cleaner by pushing the
On/Off switch on top of the unit to the On
position, as illustrated (Fig. 7).
• You may t the crevice nozzle to the front of
the unit to reach into less accessible places,
as illustrated (Fig. 8).
Fig. 6
Fig. 7
Fig. 8
Page 12

Emptying and cleaning the dust canister
After using the vacuum cleaner, take off the dust canister, empty it and clean the
lters so the unit is ready for your next use.
• To remove the dust canister, push the release button at the back of the unit
forward and twist the dust canister off the motor unit, as illustrated (Fig. 9).
• Pull out the lters as illustrated (Fig. 10). Empty the contents of the dust
canister into a waste bin or bag. You can shake out the lters until they are
clean or wash and rinse them in warm water, if necessary.
Reassembling the components
• Make sure all parts are completely dry before reassembly.
• Reassemble the unit as illustrated (Fig. 11). Put the cloth lter inside the
plastic frame with the mesh lter, then push the lter assembly back into the
dust canister. Twist the dust canister back onto the motor unit until it clicks
into place.
After Sales Support
Telephone: 1300 886 649
Email: [email protected]
12
Other Useful Information
→
→
→ → →
Fig. 10
Fig. 11
Fig. 9
→
Page 13
After Sales Support
Telephone: 1300 886 649
Email: [email protected]
13
Other Useful Information (Cont.)
Cleaning the rotating brush assembly
If the rotating brush assembly (part 13 on page 7) becomes blocked or jammed
for any reason, the effective power will be lowered and the rotating brush may
need to be cleaned.
Fig. 13
Fig. 15Fig. 14
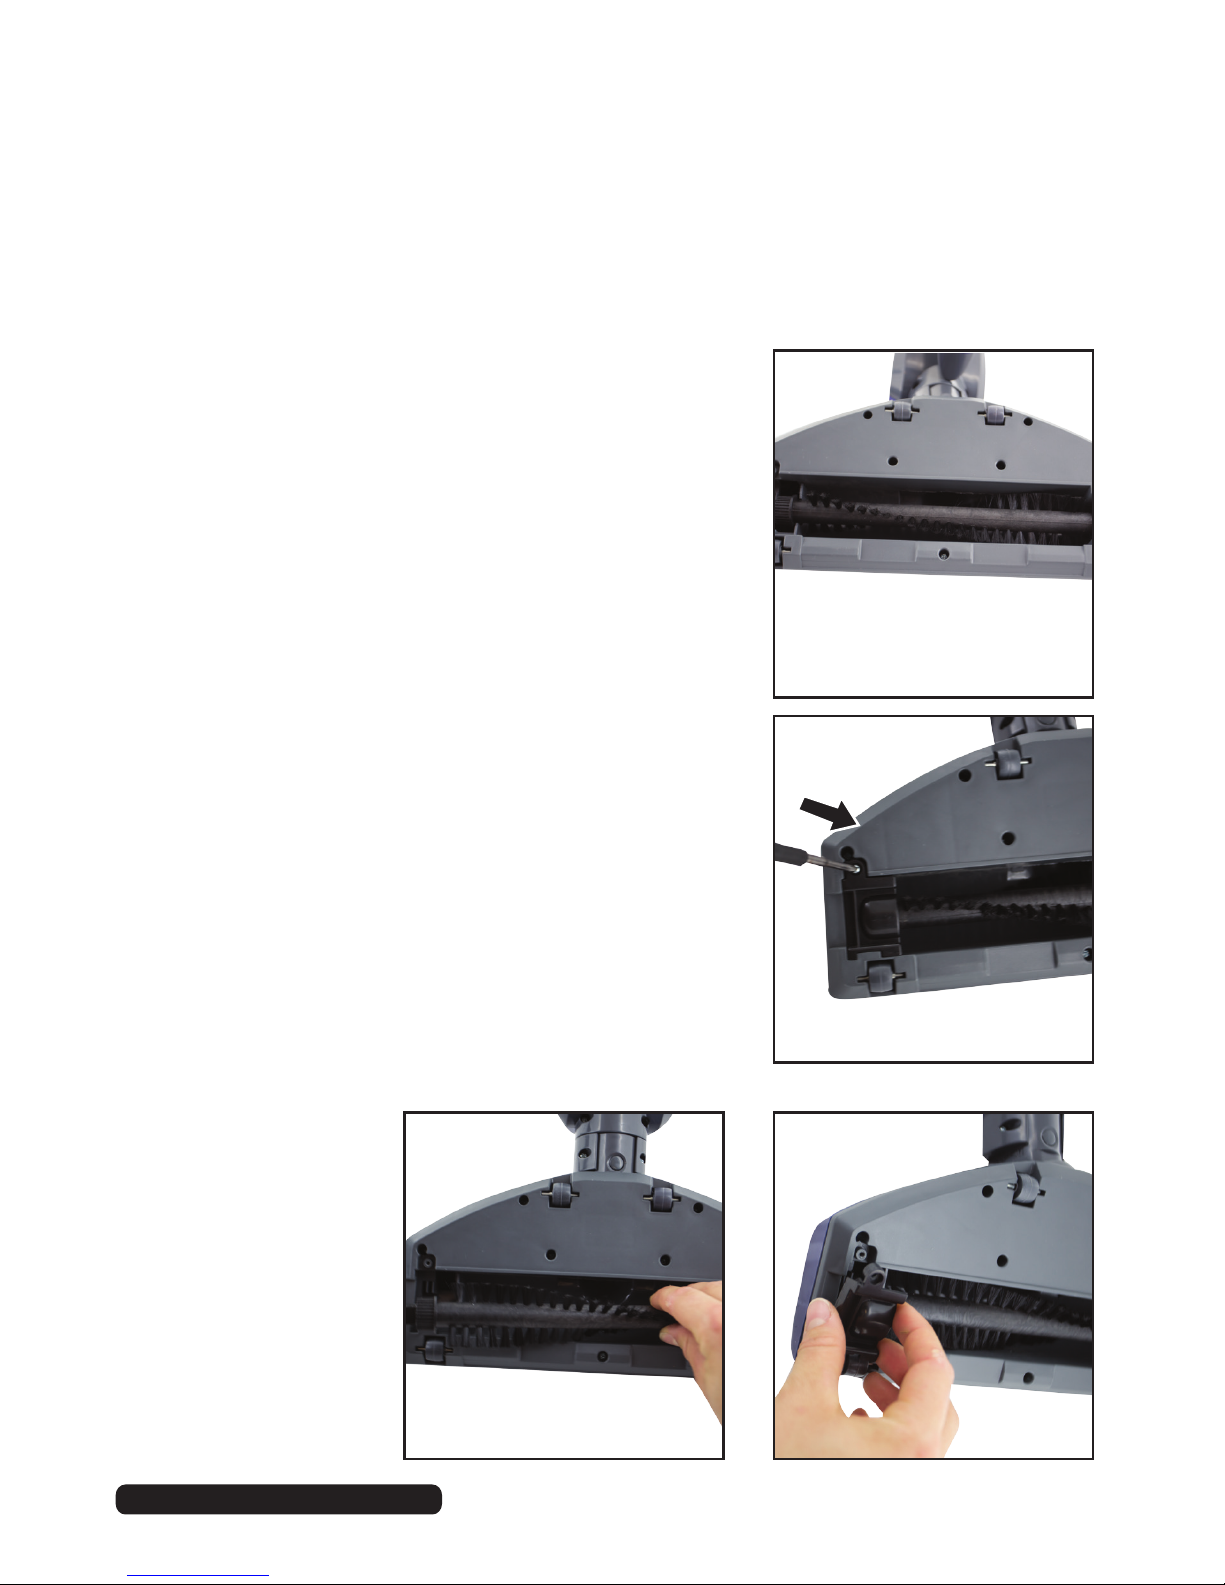
• Turn off the device and carefully remove any
items such as threads that may have become
entangled (Fig. 12).
• If the rotating brush needs to be lifted out,
unscrew the hatch cover with a Phillips head
screwdriver and take the hatch off (Fig. 13).
• Gently lift the rotating brush off the belt and
out of the housing (Fig. 14).
• Clean the rotating brush.
• Reinstall the rotating brush, making sure it
ts into its guiding tracks, with the belt around
the corrugated end so it can spin freely.
• Put the hatch cover back into place (Fig. 15)
and tighten the screw to secure it.
Fig. 12
Page 14
After Sales Support
Telephone: 1300 886 649
Email: [email protected]
14
Fig. 16
Fig. 17
Cleaning the wheel axles
If a wheel is jammed by threads or dirt that you cannot remove without removing
the wheel:
Other Useful Information (Cont.)
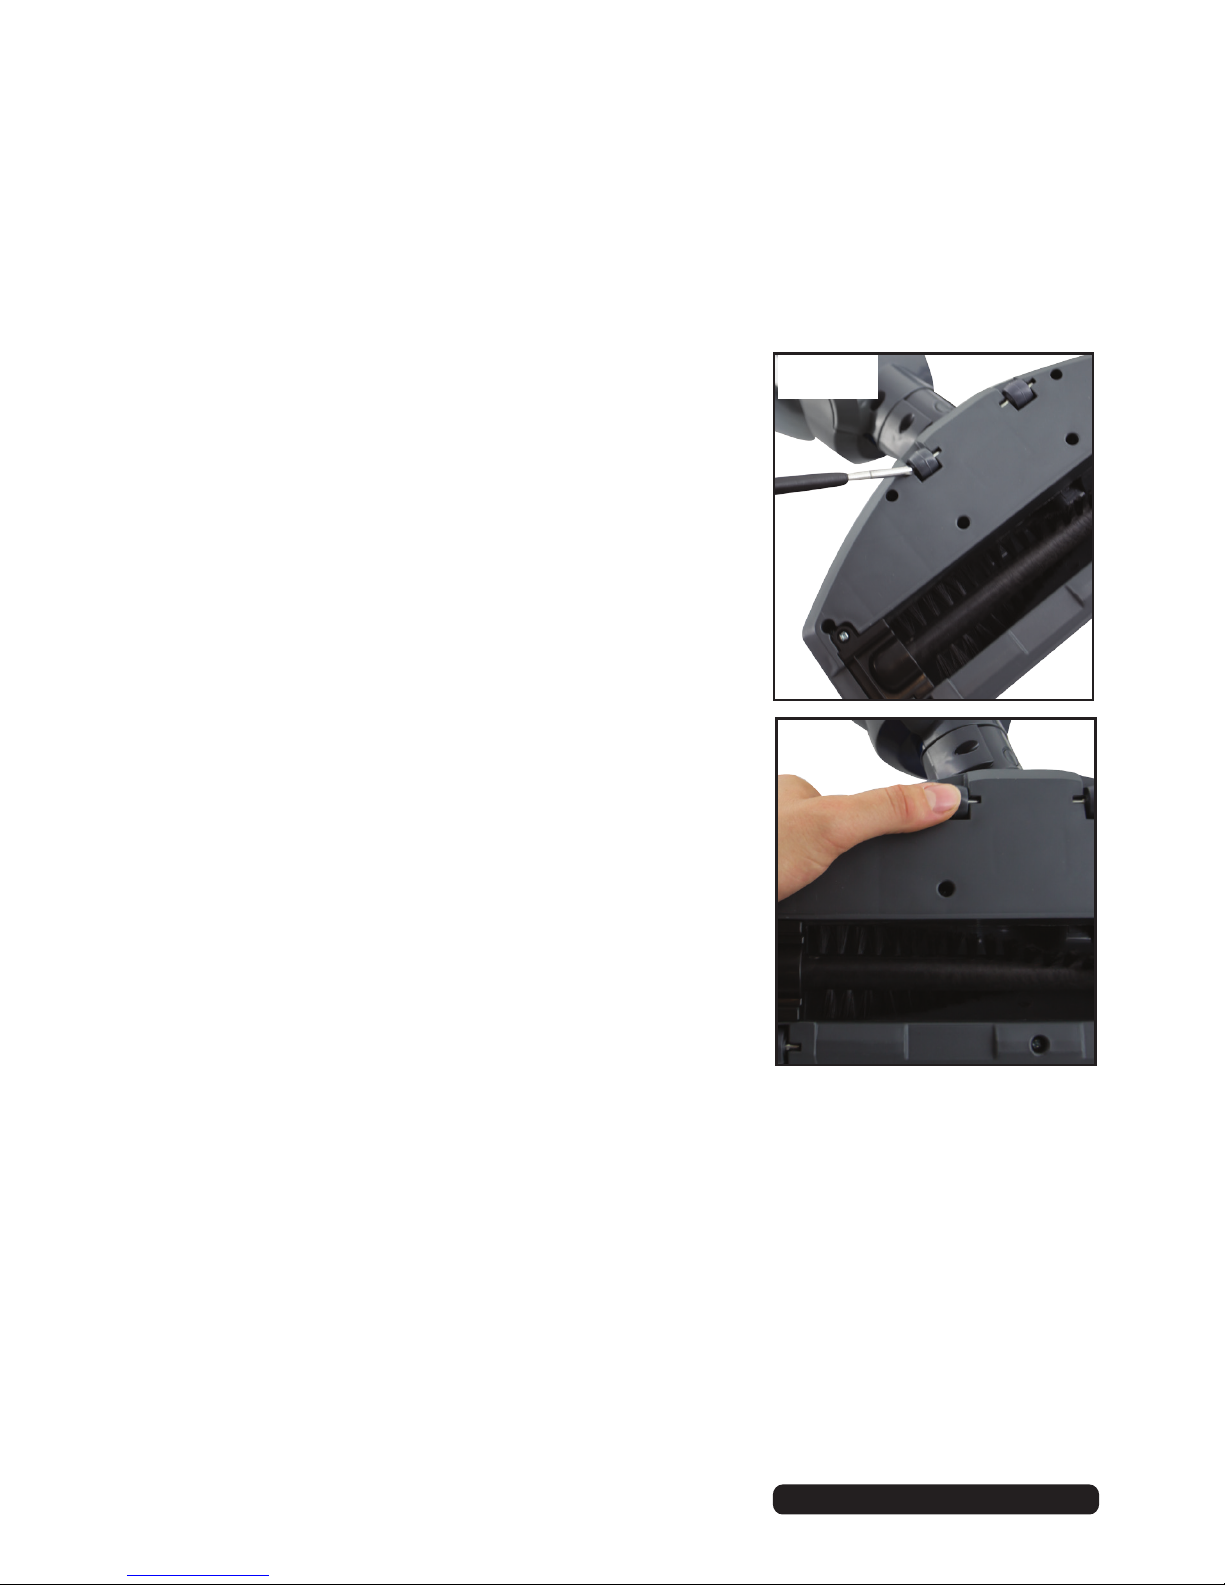
• Carefully prise the wheels loose with a
screwdriver inserted into the cavity (Fig. 16).
• Remove threads or any other objects that may
have become jammed in the wheel axles.
• Reassemble the wheels by pressing them
tightly together back into their position
(Fig. 17).
Page 15

After Sales Support
Telephone: 1300 886 649
Email: [email protected]
15
Responsible disposal
At the end of its working life, do not throw this appliance out with your household
rubbish. Electrical and electronic products contain substances that can have
a detrimental effect on the environment and human health if disposed of
inappropriately. Observe any local regulations regarding the disposal of electrical
consumer goods and dispose of it appropriately for recycling. Contact your local
authorities for advice on recycling facilities in your area.
Other Useful Information (Cont.)
Page 16

After Sales Support
Telephone: 1300 886 649
Email: [email protected]
Repair and Refurbished
Goods or Parts Notice
Unfortunately, from time to time, faulty products are manufactured which need to
be returned to the supplier for repair.
Please be aware that if your product is capable of retaining user-generated data
(such as files stored on a computer hard drive, telephone numbers stored on
a mobile telephone, songs stored on a portable media player, games saved on
a games console or files stored on a USB memory stick) during the process of
repair, some or all of your stored data may be lost. We recommend you save this
data elsewhere prior to sending the product for repair.
You should also be aware that rather than repairing goods, we may replace them with
refurbished goods of the same type or use refurbished parts in the repair process.
Please be assured though, refurbished parts or replacements are only used
where they meet ALDI’s stringent quality specifications.
If at any time you feel your repair is being handled unsatisfactorily, you may
escalate your complaint. Please telephone us on 1300 886 649 or write to us at:
Tempo (Aust) Pty Ltd ABN 70 106 100 252
PO BOX 6056 Frenchs Forest, Sydney, Australia NSW 2086
Telephone: 1300 886 649 (Aust) - Fax: (02) 9975 2688
Tempo Help Desk: 1300 886 649 (Aust)
(Operating Hours: Mon-Fri 08:30am to 06:00pm EST)
Email: [email protected]
2 in 1 Cordless Vacuum Cleaner
 Loading...