


STIHL MS 210, 230, 250
STIH)
Instruction Manual
Notice d’emploi

Contents
English
Guide to Using this Manual .............. 2
ErgoStart ........................................... 3
Safety Precautions and
Working Techniques ......................... 3
Mounting the Bar and Chain
(Side chain tensioner) .................... 26
Mounting the Bar and Chain
BA_SE_090_010_01_06.fmPrinted on chlorine-free paper.
(Front chain tensioner) ................... 27
Mounting the Bar and Chain
(Quick Chain Tensioner) ................. 28
Tensioning the Saw Chain
(Side chain tensioner) .................... 31
Tensioning the Saw Chain
(Front chain tensioner) ................... 32
Tensioning the Saw Chain
(Quick chain tensioner) .................. 32
Checking Chain Tension ................. 32
Fuel ................................................ 33
Fueling ............................................ 34
Chain Lubricant .............................. 35
Filling Chain Oil Tank ...................... 36
Checking Chain Lubrication ........... 36
Chain Brake .................................... 36
Winter Operation ........................... 38
Information Before You Start .......... 38
Starting / Stopping the Engine ........ 39
Printing inks contain vegetable oils; paper can be recycled.
Operating Instructions .................... 43
Taking Care of Guide Bar ............... 44
Air Filter System ............................. 45
Cleaning the Air Filter ..................... 45
Motor Management ........................ 46
Adjusting the Carburetor ................ 46
Checking the Spark Plug ................ 48
Replacing Starter Rope
and Rewind Spring ......................... 49
Storing the Machine ....................... 53
Checking and Replacing
Chain Sprocket ............................... 53
Maintaining and Sharpening
Saw Chain ...................................... 55
Maintenance Chart ......................... 59
Main Parts of the Saw .................... 61
Specifications ................................. 64
Special Accessories ....................... 66
Ordering Spare Parts ..................... 66
Maintenance and Repairs .............. 66
Important Safety Precautions ......... 67
Key to Symbols .............................. 68
STIHL Limited Emission Control
Warranty Statement ........................ 69
CSA-Standard Z62.3-04 ................. 71
Allow only persons who understand this
Manual to operate your chainsaw.
To receive maximum performance and
satisfaction from your STIHL chainsaw,
it is important that you read and
understand
precautions,
using your chainsaw.
Contact your STIHL dealer or the STIHL
distributor for your area if you do not
understand any of the instructions in this
Manual.
the maintenance and safety
starting on page 3, before
!Warning!
Because a chainsaw is a high-speed
wood-cutting tool, some special safety
precautions must be observed as with
any other power saw to reduce the risk
of personal injury.
Careless or improper use may cause
serious or even fatal injury.
STIHL's philosophy is to continually
improve all of its products. As a result,
engineering changes and improvements
are made from time-to-time. If the
operating characteristics or the
appearance of your chainsaw differs
from those described in this Manual,
please contact your STIHL dealer for
information and assistance.
STIHl
© ANDREAS STIHL AG & Co. KG, 2006
0458 208 8221 A. M1,5. G6. CP. Printed in USA
1MS 210, MS 210 C, MS 230, MS 230 C, MS 250, MS 250 C

English
Guide to Using this Manual
Pictograms
All the pictograms attached to the
machine are shown and explained in
this manual.
The operating and handling instructions
are supported by illustrations.
Symbols in text
The individual steps or procedures
described in the manual may be marked
in different ways:
: A bullet marks a step or procedure
without direct reference to an
illustration.
A description of a step or procedure that
refers directly to an illustration may
contain item numbers that appear in the
illustration.
Example:
Loosen the screw (1)
Lever (2) ...
In addition to the operating instructions,
this manual may contain paragraphs
that require your special attention. Such
paragraphs are marked with the
symbols described below:
Warning where there is a risk of an
accident or personal injury or
serious damage to property.
Caution where there is a risk of
damaging the machine or its
individual components.
Note or hint which is not essential
for using the machine, but may
improve the operator’s understanding of the situation and result
in better use of the machine.
Note or hint on correct procedure in
order to avoid damage to the
environment.
Equipment and features
This instruction manual may refer to
several models with different
features. Components that are not
installed on all models and related
applications are marked with an
asterisk (*). Such components may
be available as special accessories
from your STIHL dealer.
Engineering improvements
STIHL’s philosophy is to continually
improve all of its products. As a result,
engineering changes and improvements
are made from time to time. If the
operating characteristics or the
appearance of your machine differ from
those described in this manual, please
contact your STIHL dealer for
assistance.
Therefore some changes, modifications
and improvements may not be covered
in this manual.
2
MS 210, MS 210 C, MS 230, MS 230 C, MS 250, MS 250 C

ErgoStart Safety Precautions and
Working Techniques
English
Chainsaws equipped with ErgoStart*
can be started with less effort at a lower
cranking speed.
ErgoStart stores the energy
required to start the chainsaw. For
this reason there may be a delay of
a few seconds between cranking
the engine and it actually starting.
: Keep children well away from the
machine – even small children could
start the saw.
: Hold the saw firmly by the front
handle during the entire starting
procedure – allow for time delay
between cranking the engine and it
starting.
: To help prevent the engine starting
unintentionally when the saw is not
in use, always move the Master
Control to the stop position and
engage the chain brake.
Protect the machine from
unauthorized use (e.g. children).
See also chapter on "Starting / Stopping
the Engine".
Because a chainsaw is a
high-speed, fast-cutting
power tool, special safety
precautions must be
observed to reduce the
risk of personal injury.
It is important that you
read, fully understand and
observe the following
safety precautions and
warnings. Read the
instruction manual and
the safety instructions periodically.
Careless or improper use may cause
serious or fatal injury.
!Warning!
Reactive forces, including kickback, can
be dangerous. Pay special attention to
the section on reactive forces.
Have your STIHL dealer show you how
to operate your power tool. All safety
precautions that are generally observed
when working with an axe or a hand saw
also apply to the operation of chainsaws.
Observe all applicable federal, state and
local safety regulations, standards and
ordinances.
!Warning!
Do not lend or rent your power tool
without the instruction manual. Be sure
that anyone using it understands the
information contained in this manual.
!Warning!
The use of this machine may be
hazardous.The saw chain has many
sharp cutters. If the cutters contact your
flesh, they will cut you, even if the chain
is not moving. At full throttle, the chain
speed can reach 30 m/s.
Use your chainsaw only for cutting
wooden objects. It must not be used for
any other purposes, since such misuse
may result in an accident or damage to
the machine.
!Warning!
Minors should never be allowed to use
this power tool. Bystanders, especially
children, and animals should not be
allowed in the area where it is in use.
!Warning!
To reduce the risk of injury to bystanders
and damage to property, never let your
power tool run unattended. When it is
not in use (e.g. during a work break),
shut it off and make sure that
unauthorized persons do not use it.
* Special option
3MS 210, MS 210 C, MS 230, MS 230 C, MS 250, MS 250 C

English
Most of these safety precautions and
warnings apply to the use of all STIHL
chainsaws. Different models may have
different parts and controls. See the
appropriate section of your instruction
manual for a description of the controls
and the function of the parts of your
model.
Safe use of a chainsaw involves
1. the operator
2. the saw
3. the use of the saw.
THE OPERATOR
Physical Condition
You must be in good physical condition
and mental health and not under the
influence of any substance (drugs,
alcohol, etc.) which might impair vision,
dexterity or judgment. Do not operate
this machine when you are fatigued.
!Warning!
Be alert – if you get tired, take a break.
Tiredness may result in loss of control.
Working with any power tool can be
strenuous. If you have any condition that
might be aggravated by strenuous work,
check with your doctor before operating
this machine.
!Warning!
Prolonged use of a power tool (or other
machines) exposing the operator to
vibrations may produce whitefinger
disease (Raynaud's phenomenon) or
carpal tunnel syndrome.
These conditions reduce the hand's
ability to feel and regulate temperature,
produce numbness and burning
sensations and may cause nerve and
circulation damage and tissue necrosis.
All factors which contribute to whitefinger disease are not known, but cold
weather, smoking and diseases or
physical conditions that affect blood
vessels and blood transport, as well as
high vibration levels and long periods of
exposure to vibration are mentioned as
factors in the development of whitefinger
disease. In order to reduce the risk of
whitefinger disease and carpal tunnel
syndrome, please note the following:
– Most STIHL power tools are
available with an anti-vibration
(“AV”) system designed to reduce
the transmission of vibrations
created by the machine to the
operator's hands. An AV system is
recommended for those persons
using power tools on a regular or
sustained basis.
– Wear gloves and keep your hands
warm. Heated handles, which are
available on some STIHL powerheads, are recommended for cold
weather use.
– Keep the AV system well
maintained. A power tool with loose
components or with damaged or
worn AV buffers will tend to have
higher vibration levels.
Keep the saw chain sharp. A dull
chain will increase cutting time, and
pressing a dull chain through wood
will increase the vibrations
transmitted to your hands.
– Maintain a firm grip at all times, but
do not squeeze the handles with
constant, excessive pressure. Take
frequent breaks.
All the above-mentioned precautions do
not guarantee that you will not sustain
whitefinger disease or carpal tunnel
syndrome. Therefore, continual and
regular users should closely monitor the
condition of their hands and fingers. If
any of the above symptoms appear,
seek medical advice immediately.
!Warning!
The ignition system of the STIHL unit
produces an electromagnetic field of a
very low intensity. This field may
interfere with some pacemakers. To
reduce the risk of serious or fatal injury,
persons with a pacemaker should
consult their physician and the
pacemaker manufacturer before
operating this tool.
4
MS 210, MS 210 C, MS 230, MS 230 C, MS 250, MS 250 C
English
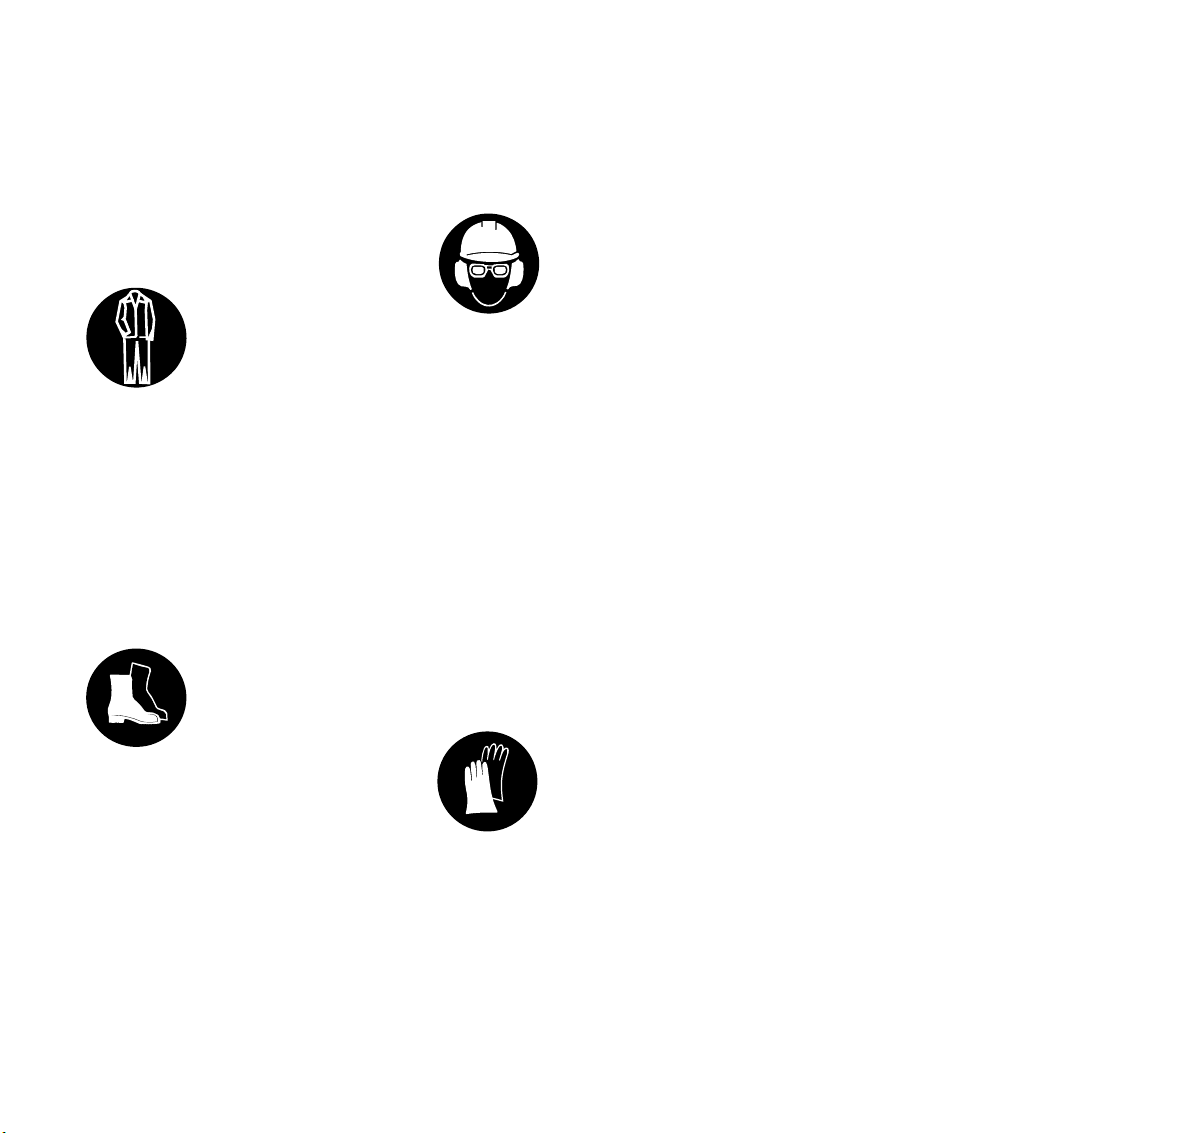
Proper Clothing
!Warning!
To reduce the risk of injury, the operator
should wear proper protective apparel.
Clothing must be sturdy
and snug-fitting, but allow
complete freedom of
movement. Wear long
pants made of heavy
material to help protect
your legs from contact with branches or
brush. To reduce the risk of cut injuries,
wear pants or chaps that contain pads of
cut retardant material.
Avoid loose-fitting jackets, scarfs,
neckties, jewelry, flared or cuffed pants,
unconfined long hair or anything that
could become caught on branches,
brush or the moving parts of the unit.
Secure hair so it is above shoulder level.
Good footing is very
important. Wear sturdy
boots with nonslip soles.
Steel-toed safety boots
are recommended.
!Warning!
Wear an approved safety
hard hat to reduce the risk
of injury to your head.
Chainsaw noise may
damage your hearing.
Wear sound barriers (ear
plugs or ear mufflers) to help protect
your hearing. Continual and regular
users should have their hearing checked
regularly.
Be particularly alert and cautious when
wearing hearing protection because
your ability to hear warnings (shouts,
alarms, etc.) is restricted.
Never operate your power tool unless
wearing goggles or properly fitted
protective glasses with adequate top
and side protection complying with your
applicable national standard. To reduce
the risk of injury to your face STIHL
recommends that you also wear a face
shield or face screen over your goggles
or protective glasses.
Always wear gloves when
handling the machine and
the cutting tool. Heavy-
duty, nonslip gloves
improve your grip and
help to protect your
hands.
STIHL offers a wide range of protective
clothing and equipment.
THE POWER TOOL
For illustrations and definitions of the
power tool parts see the chapter on
“Main Parts and Controls.”
!Warning!
Never modify this power tool in any way.
Only attachments supplied by STIHL or
expressly approved by STIHL for use
with the specific STIHL model are
authorized. Although certain
unauthorized attachments are useable
with STIHL power tools, their use may, in
fact, be extremely dangerous.
If this tool is subjected to unusually high
loads for which it was not designed (e.g.
heavy impact or a fall), always check
that it is in good condition before
continuing work. Check in particular that
the fuel system is tight (no leaks) and
that the controls and safety devices are
working properly. Do not continue
operating this machine if it is damaged.
In case of doubt, have it checked by your
STIHL servicing dealer.
5MS 210, MS 210 C, MS 230, MS 230 C, MS 250, MS 250 C
English
THE USE OF THE POWER TOOL
Transporting the Power Tool
!Warning!
To reduce the risk of injury from saw
chain contact, never carry or transport
your power tool with the saw chain
moving. Always engage the chain brake
when taking more than a few steps.
!Warning!
Always switch off the engine, and fit the
chain guard (scabbard) over the chain
and guide bar before transporting the
power tool over longer distances. When
transporting it in a vehicle, properly
secure it to prevent turnover, fuel
spillage and damage to the unit.
It may be carried only in a horizontal
position. Grip the front handle in a
manner that the machine is balanced
horizontally. Keep the hot muffler away
from your body and the cutting
attachment behind you.
Fuel
Your STIHL power tool uses an oilgasoline mixture for fuel (see the chapter on “Fuel” of your instruction manual).
!Warning!
Gasoline is an extremely
flammable fuel. If spilled
and ignited by a spark or
other ignition source, it
can cause fire and serious
burn injury or property
damage. Use extreme caution when
handling gasoline or fuel mix.
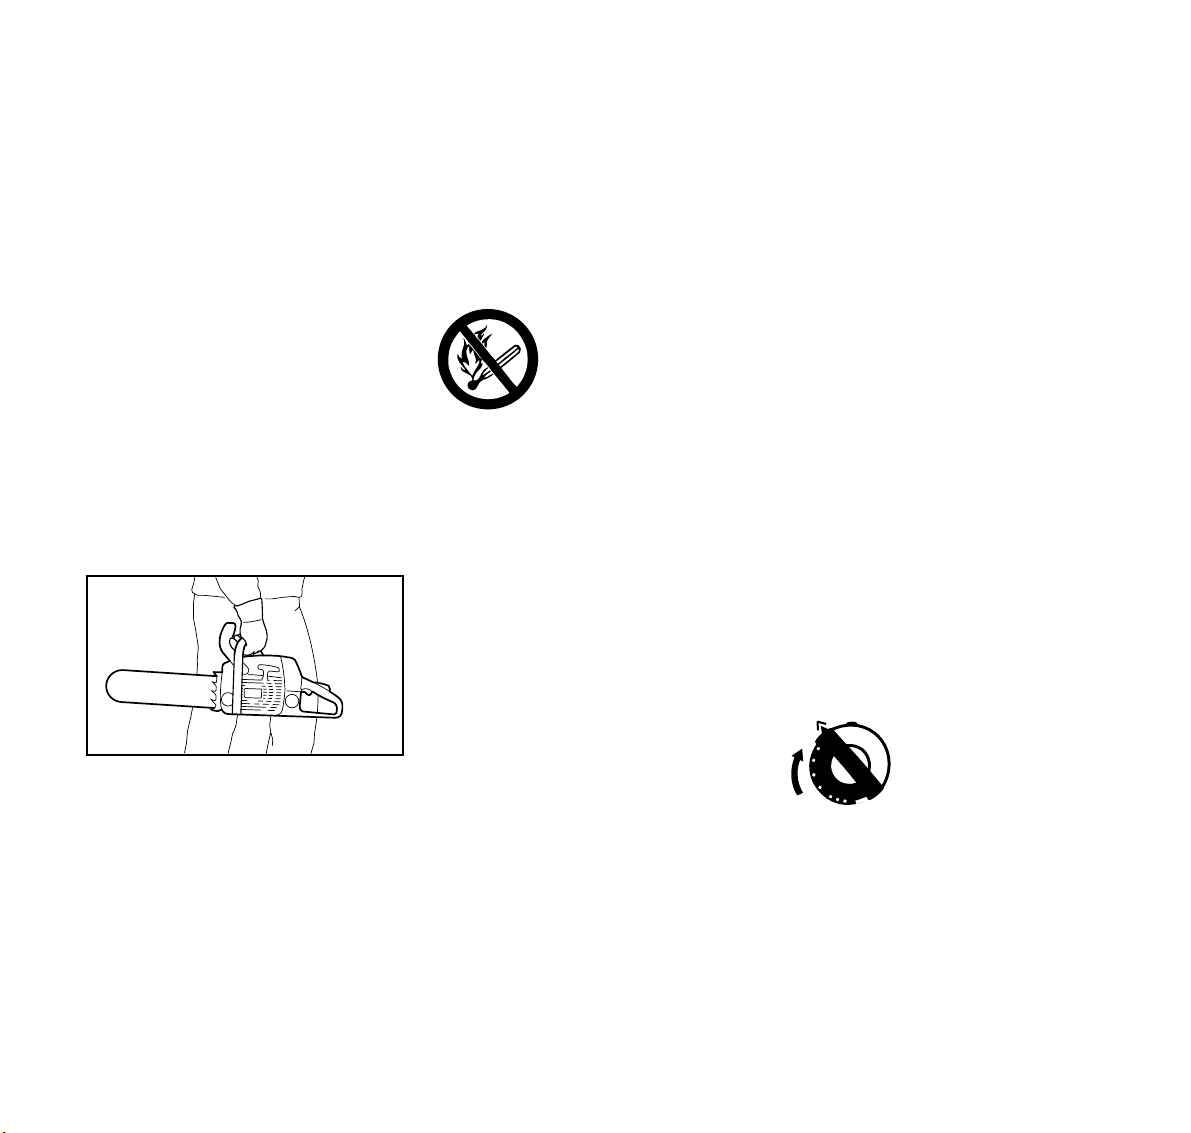
Do not smoke or bring any fire or flame
near the fuel or the power tool. Note that
combustible fuel vapor may escape from
the fuel system.
Fueling Instructions
!Warning!
Fuel your power tool in well-ventilated
areas, outdoors. Always shut off the
001BA115 KN
engine and allow it to cool before
refueling. Gasoline vapor pressure may
build up inside the fuel tank depending
on the fuel used, the weather conditions
and the tank venting system.
In order to reduce the risk of burns and
other personal injury from escaping gas
vapor and fumes, remove the fuel filler
cap on your power tool carefully so as to
allow any pressure build-up in the tank
to release slowly. Never remove the fuel
filler cap while the engine is running.
Select bare ground for fueling and move
at least 10 feet (3 m) from the fueling
spot before starting the engine. Wipe off
any spilled fuel before starting your
machine.
!Warning!
Check for fuel leakage while refueling
and during operation. If fuel leakage is
found, do not start or run the engine until
the leak is fixed and any spilled fuel has
been wiped away. Take care not to get
fuel on your clothing. If this happens,
change your clothing immediately.
Different models may be equipped with
different fuel caps.
Cap with grip
!Warning!
In order to reduce the risk of fuel spillage
and fire from an improperly tightened
fuel cap, correctly position and tighten
the fuel cap in the fuel tank opening.
To do this with this STIHL
cap, raise the grip on the
top of the cap until it is
upright at a 90° angle.
Insert the cap in the fuel
tank opening with the
triangular marks on the grip of the cap
and on the fuel tank opening lining up.
Using the grip, turn the cap firmly
clockwise as far as it will go (approx. a
quarter turn).
6
MS 210, MS 210 C, MS 230, MS 230 C, MS 250, MS 250 C
English
Fold the grip flush with the
top of the cap. If the grip
does not lie completely
flush with the cap and the
detent on the grip does
not fit in the
corresponding recess in the filler
opening, the cap is not properly seated
and tightened and you must repeat the
above steps.
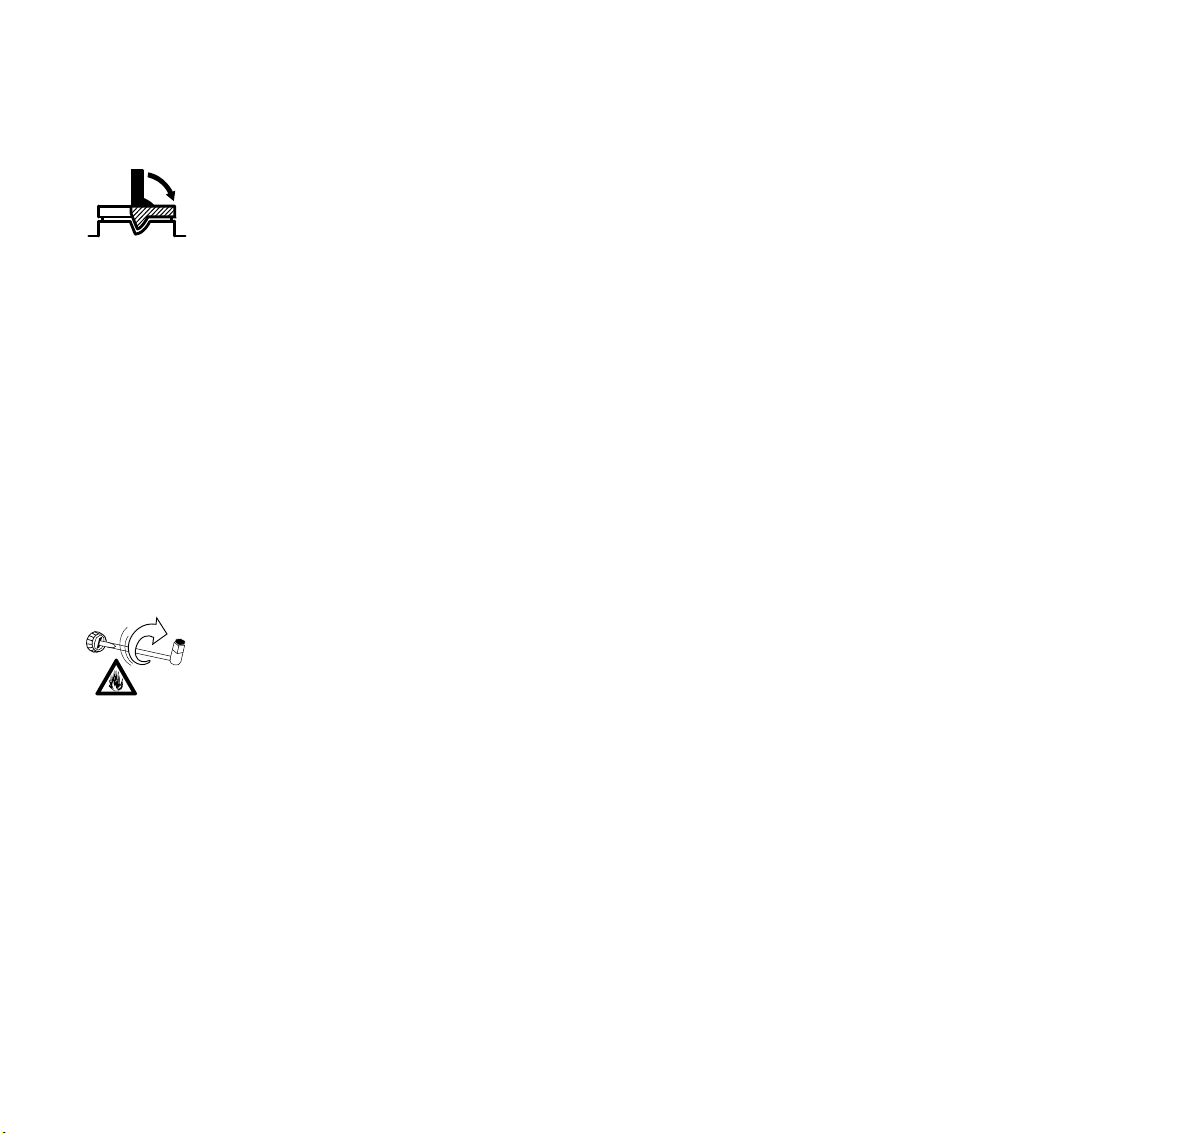
Screw cap
!Warning!
Unit vibrations can cause an improperly
tightened fuel filler cap to loosen or
come off and spill quantities of fuel. In
order to reduce the risk of fuel spillage
and fire, tighten the fuel filler cap by
hand as securely as possible.
The screwdriver end of
the STIHL combination
wrench or other similar
tool can be used as an aid
in tightening slotted fuel
filler caps.
See "Fueling" chapter in your instruction
manual.
Before Starting
Take off the chain guard (scabbard) and
inspect the saw for proper condition and
operation. (See the maintenance chart
near the end of the instruction manual.)
!Warning!
Always check your power tool for proper
condition and operation before starting,
particularly the throttle trigger, throttle
trigger interlock, stop switch and cutting
tool. The throttle trigger must move
freely and always spring back to the idle
position. Never attempt to modify the
controls or safety devices.
!Warning!
Never operate your power tool if it is
damaged, improperly adjusted or
maintained, or not completely or
securely assembled.
!Warning!
Check that the spark plug boot is secure
– a loose boot may cause arcing that
could ignite combustible fumes and
cause a fire.
For proper assembly of the bar and
chain follow the procedure described in
the chapter "Mounting the Bar and
Chain" of your instruction manual.
STIHL Oilomatic chain, guide bar and
sprocket must match each other in
gauge and pitch. Before replacing any
bar and chain, see the sections on
"Specifications," and "Kickback".
!Warning!
Proper tension of the chain is extremely
important. In order to avoid improper
setting, the tensioning procedure must
be followed as described in your
manual. Always make sure the
hexagonal nut(s) for the sprocket cover
is (are) tightened securely after
tensioning the chain in order to secure
the bar. Never start the saw with the
sprocket cover loose. Check chain
tension once more after having
tightened the nut(s) and thereafter at
regular intervals (whenever the saw is
shut off). If the chain becomes loose
while cutting, shut off the engine and
then tighten. Never try to adjust the
chain while the engine is running!
Keep the handles clean and dry at all
times; it is particularly important to keep
them free of moisture, pitch, oil, fuel mix,
grease or resin in order for you to
maintain a firm grip and properly control
your power tool.
7MS 210, MS 210 C, MS 230, MS 230 C, MS 250, MS 250 C

English
Starting
Warning!
To reduce the risk of fire and burn
injuries, start the engine at least 10 feet
(3 meters) from the fueling spot,
outdoors only.
Start and operate your saw without
assistance. For specific starting
instructions, see the appropriate section
of the instruction manual. Proper starting
methods reduce the risk of injury.
!Warning
To reduce the risk of injury from chain
contact and/or reactive forces, the chain
brake must be engaged when starting
the saw.
!Warning!
Do not drop start. This method is very
dangerous because you may lose
control of the saw.
There are two recommended methods
for starting your chainsaw.
With the first recommended method,
the chainsaw is started on the ground.
Make sure the chain brake is engaged
(see "Chain Brake" chapter in your
instruction manual) and place the
chainsaw on firm ground or other solid
surface in an open area. Maintain good
balance and secure footing.
Grip the front handlebar of the saw firmly
with your left hand and press down. For
saws with a rear handle level with the
ground, put the toe of your right foot into
the rear handle and press down. With
your right hand pull out the starter grip
slowly until you feel a definite resistance
and then give it a brisk, strong pull.
001BA113 KN
The second recommended method for
starting your chainsaw allows you to
start the saw without placing it on the
ground. Make sure the chain brake is
engaged, grip the front handle of the
chainsaw firmly with your left hand.
Keep your arm on the front handle in a
locked (straight) position. Hold the rear
handle of the saw tightly between your
legs just above the knees. Maintain
good balance and secure footing. Pull
the starting grip slowly with your right
hand until you feel a definite resistance
and then give it a brisk, strong pull.
001BA114 KN
8
MS 210, MS 210 C, MS 230, MS 230 C, MS 250, MS 250 C

English
!Warning!
Be sure that the guide bar and chain are
clear of you and all other obstructions
and objects, including the ground. When
the engine is started, the engine speed
with the starting throttle lock engaged
will be fast enough for the clutch to
engage the sprocket and, if the chain
brake is not activated, turn the chain. If
the upper quadrant of the tip of the bar
touches any object, it may cause kickback to occur (see section on reactive
forces). To reduce this risk, always
engage the chain brake before starting.
Never attempt to start the chainsaw
when the guide bar is in a cut or kerf.
As soon as the engine is running,
immediately blip the throttle trigger,
which will disengage the starting throttle
lock and allow the engine to settle down
to idle.
!Warning!
When you pull the starter grip, do not
wrap the starter rope around your hand.
Do not let the grip snap back, but guide
the starter rope to rewind it properly.
Failure to follow this procedure may
result in injury to your hand or fingers
and may damage the starter
mechanism.
Important Adjustments
!Warning!
To reduce the risk of personal injury from
loss of control or contact with the
running cutting tool, do not use your unit
with incorrect idle adjustment. At correct
idle speed, the cutting tool should not
move. For directions on how to adjust
idle speed, see the appropriate section
of your instruction manual.
If you cannot set the correct idle speed,
have your STIHL dealer check your
power tool and make proper
adjustments and repairs.
During Operation
Holding and controlling the power
tool
Always hold the unit firmly with both
hands on the handles while you are
working. Wrap your fingers and thumbs
around the handles.
Your right hand should grip the rear
handle. This also applies to left-handers.
With your hands in this position, you can
best oppose and absorb the push, pull
and kickback forces of your saw without
losing control (see section on reactive
forces).
!Warning!
To reduce the risk
of serious or fatal
injury to the
operator or
bystanders from
loss of control, never use the saw with
one hand. It is more difficult for you to
control reactive forces and to prevent
the bar and chain from skating or
bouncing along the limb or log. Even for
those compact saws designed for use in
confined spaces, one-handed operation
is dangerous because the operator may
lose control.
!Warning!
To reduce the risk of cut injuries, keep
hands and feet away from the cutting
tool. Never touch a moving cutting tool
with your hand or any other part of your
body.
001BA087 LÄ
9MS 210, MS 210 C, MS 230, MS 230 C, MS 250, MS 250 C

English
!Warning!
Keep proper footing and balance at all
times. Special care must be taken in
slippery conditions (wet ground, snow)
and in difficult, overgrown terrain. Watch
for hidden obstacles such as tree
stumps, roots, rocks, holes and ditches
to avoid stumbling. There is increased
danger of slipping on freshly debarked
logs. For better footing, clear away fallen
branches, scrub and cuttings. Be
extremely cautious when working on
slopes or uneven ground.
!Warning!
Take extreme care in wet and freezing
weather (rain, snow, ice). Put off the
work when the weather is windy, stormy
or rainfall is heavy.
!Warnin!g
To reduce the risk of injury from loss of
control, never work on a ladder or any
other insecure support. Never hold the
machine above shoulder height. Do not
overreach.
!Warning!
Never work in a tree unless you have
received specific, professional training
for such work, are properly secured
(such as tackle and harness system or a
lift bucket), have both hands free for
operating the chainsaw in a cramped
environment and have taken proper
precautions to avoid injury from falling
limbs or branches.
Position the chainsaw in such a way that
your body is clear of the cutting
attachment whenever the engine is
running. Stand to the left of cut while
bucking.
Never put pressure on the saw when
reaching the end of a cut. The pressure
may cause the bar and rotating chain to
001BA031 KN
pop out of the cut or kerf, go out of
control and strike the operator or some
other object. If the rotating chain strikes
some other object, a reactive force may
cause the moving chain to strike the
operator.
Working conditions
Operate and start your power tool only
outdoors in a well ventilated area.
Operate it under good visibility and
daylight conditions only. Work carefully.
!Warning!
Your chainsaw is a one-person machine.
Do not allow other persons in the
general work area, even when starting.
Stop the engine immediately if you are
approached.
001BA082 KN
10
MS 210, MS 210 C, MS 230, MS 230 C, MS 250, MS 250 C

English
!Warning!
Even though bystanders should be kept
away from the running saw, never work
alone. Keep within calling distance of
others in case help is needed.
!Warning!
As soon as the engine is
running, this product
generates toxic exhaust
fumes containing
chemicals, such as
unburned hydrocarbons
(including benzene) and carbon
monoxide, that are known to cause
respiratory problems, cancer, birth
defects, or other reproductive harm.
Some of the gases (e.g. carbon
monoxide) may be colorless and
odorless. To reduce the risk of serious or
fatal injury/illness from inhaling toxic
fumes, never run the machine indoors or
in poorly ventilated locations. If exhaust
fumes become concentrated due to
insufficient ventilation, clear
obstructions from work area to permit
proper ventilation before proceeding
and/or take frequent breaks to allow
fumes to dissipate before they become
concentrated.
!Warning!
Inhalation of certain dusts, especially
organic dusts such as mold or pollen,
can cause susceptible persons to have
an allergic or asthmatic reaction.
Substantial or repeated inhalation of
dust and other airborne contaminants, in
particular those with a smaller particle
size, may cause respiratory or other
illnesses. This includes wood dust,
especially from hardwoods, but also
from some softwoods such as Western
Red Cedar. Control dust at the source
where possible. Use good work
practices, such as always cutting with a
properly sharpened chain (which
produces wood chips rather than fine
dust) and operating the unit so that the
wind or operating process directs any
dust raised by the power tool away from
the operator. Follow the
recommendations of occupational and
trade associations with respect to dust
(“particulate matter”). When the
inhalation of dust cannot be substantially
controlled, i.e., kept at or near the
ambient (background) level, the
operator and any bystanders should
wear a respirator complying with your
applicable national standard.
!Warning!
Breathing asbestos dust is dangerous
and can cause severe or fatal injury,
respiratory illness or cancer. The use
and disposal of asbestos-containing
products have been strictly regulated by
the Environmental Protection Agency.
Operating instructions
!Warning!
Do not operate your power tool using the
starting throttle lock, as you do not have
control of the engine speed.
In the event of an emergency, switch off
the engine immediately – move the slide
control / stop switch to 0 or STOP.
!Warning!
Always stop the engine before putting a
chainsaw down.
11MS 210, MS 210 C, MS 230, MS 230 C, MS 250, MS 250 C

English
!Warning!
The saw chain continues to move for a
short period after the throttle trigger is
released (flywheel effect).
Accelerating the engine while the saw
chain is blocked increases the load and
will cause the clutch to slip continuously.
This may occur if the throttle is
depressed for more than a few seconds
when the chain is pinched in the cut or
the chain brake is engaged. It can result
in overheating and damage to important
components (e.g. clutch, polymer
housing components) – which can then
increase the risk of injury, e.g., from the
saw chain moving while the engine is
idling.
! Warning!
Your chainsaw is equipped with a chain
catcher. It is designed to reduce the risk
of personal injury in the event of a
thrown or broken chain. From time to
time, the catcher may be damaged or
removed. To reduce the risk of personal
injury, do not operate a chainsaw with a
damaged or missing chain catcher.
! Warning!
Inspect buffers periodically. Replace
damaged, broken or excessively worn
buffers immediately, since they may
result in loss of control of the saw. A
"sponginess" in the feel of the saw,
increased vibration or increased
"bottoming" during normal operation
may indicate damage, breakage or
excessive wear. Buffers should always
be replaced in sets. If you have any
questions as to whether the buffers
should be replaced, consult your STIHL
servicing dealer.
!Warning!
Your saw is not designed for prying or
shoveling away limbs, roots or other
objects. Such use could damage the
cutting attachment or AV system.
!Warning!
When sawing, make sure that the saw
chain does not touch any foreign
materials such as rocks, fences, nails
and the like. Such objects may be flung
off, damage the saw chain or cause the
saw to kickback.
!Warning!
The muffler and other parts of the engine
(e.g. fins of the cylinder, spark plug)
become hot during operation and remain
hot for a while after stopping the engine.
To reduce risk of burns do not touch the
muffler and other parts while they are
hot.
!Warning!
To reduce the risk of fire and burn injury,
keep the area around the muffler clean.
Remove excess lubricant and all debris
such as pine needles, branches or
leaves. Let the engine cool down sitting
on concrete, metal, bare ground or solid
wood (e.g. the trunk of a felled tree)
away from any combustible substances.
!Warning!
Never modify your muffler. A modified or
damaged muffler could cause an
increase in heat radiation or sparks,
thereby increasing the risk of fire and
burn injury. You may also permanently
damage the engine. Have your muffler
serviced and repaired by your STIHL
servicing dealer only.
Catalytic converter
!Warning!
Some STIHL power tools
are equipped with a
catalytic converter, which
is designed to reduce the
exhaust emissions of the
engine by a chemical
process in the muffler. Due to this
process, the muffler does not cool down
as rapidly as conventional mufflers when
the engine returns to idle or is shut off.
To reduce the risk of fire and burn
injuries, the following specific safety
precautions must be observed.
12
MS 210, MS 210 C, MS 230, MS 230 C, MS 250, MS 250 C

English
!Warning!
Since a muffler with a catalytic converter
cools down less rapidly than conventional mufflers, always set your power
tool down in the upright position and
never locate it where the muffler is near
dry brush, grass, wood chips or other
combustible materials while it is still hot.
!Warning!
An improperly mounted or damaged
shroud or a damaged/deformed muffler
shell may interfere with the cooling
process of the catalytic converter. To
reduce the risk of fire or burn injury, do
not continue work with a damaged or
improperly mounted cylinder shroud or a
damaged/deformed muffler shell.
Your catalytic converter is furnished with
screens designed to reduce the risk of
fire from the emission of hot particles.
Due to the heat from the catalytic
reaction, these screens will normally
stay clean and need no service or
maintenance. If you experience loss of
performance and you suspect a clogged
screen, have your muffler maintained by
a STIHL servicing dealer.
Reactive forces including kickback
!Warning!
Reactive forces may occur any time the
chain is rotating. Reactive forces can
cause serious personal injury.
The powerful force used to cut wood can
be reversed and work against the
operator. If the rotating chain is suddenly
stopped by contact with any solid object
such as a log or branch or is pinched, the
reactive forces may occur instantly.
These reactive forces may result in loss
of control, which, in turn, may cause
serious or fatal injury. An understanding
of the causes of these reactive forces
may help you avoid the element of
surprise and loss of control. Sudden
surprise contributes to accidents.
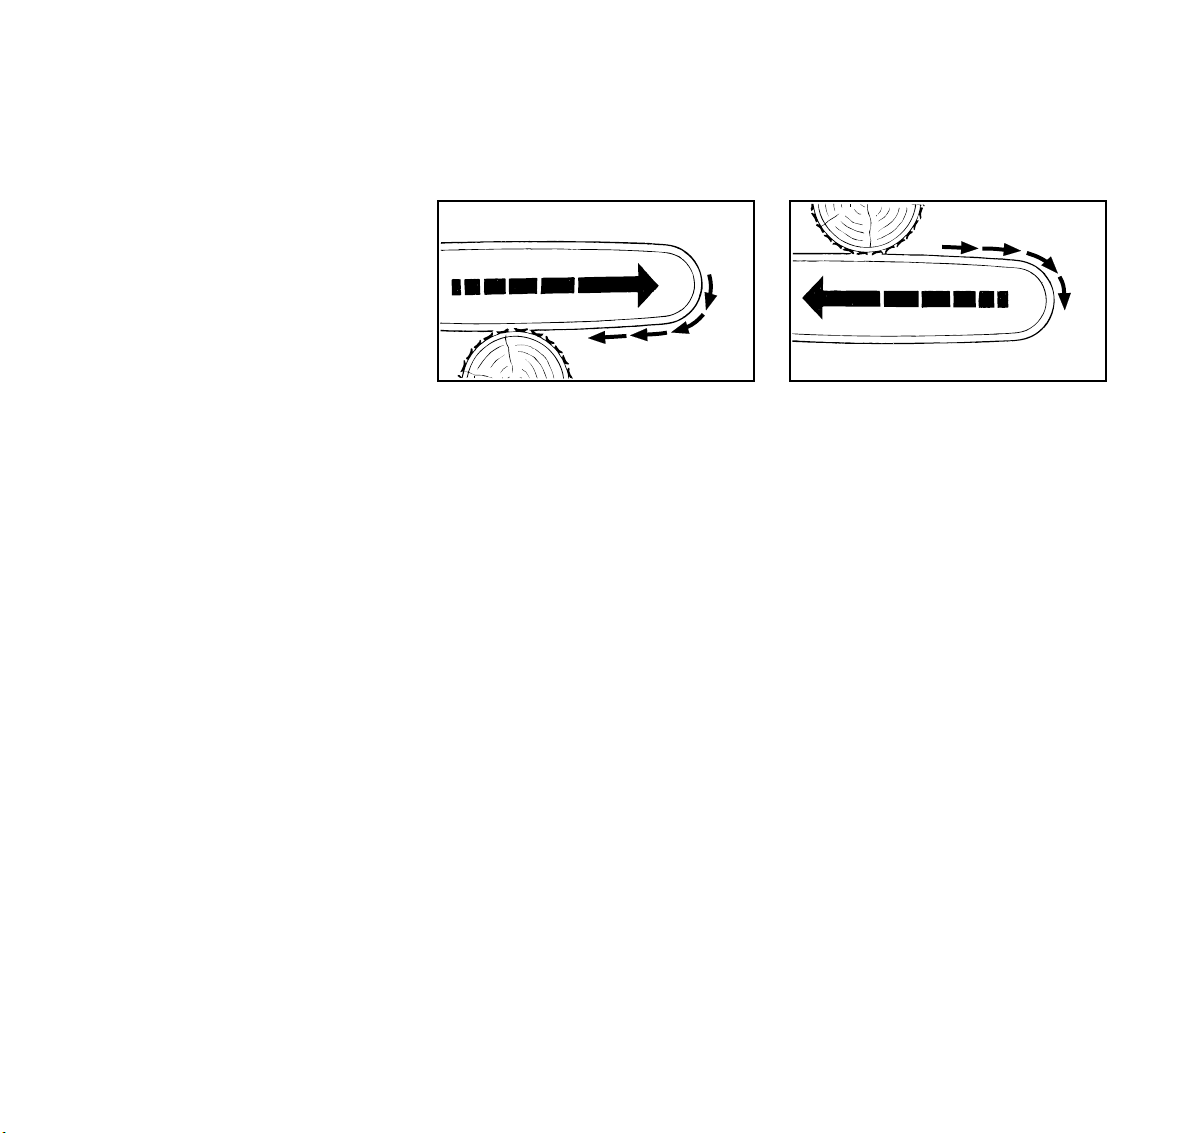
The most common reactive forces are:
– kickback,
– pushback,
– pull-in.
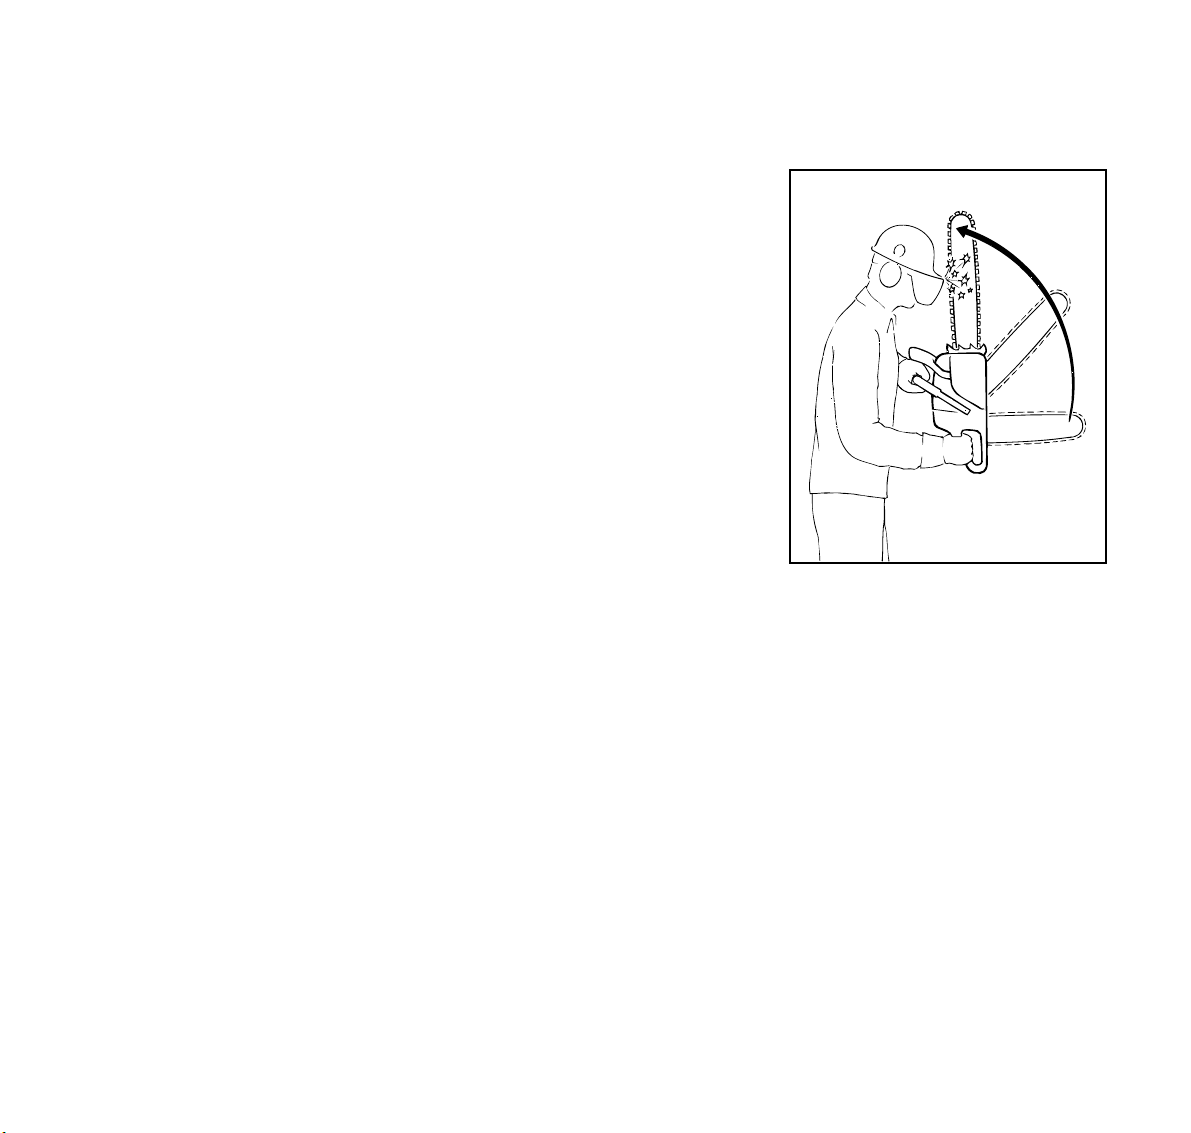
Kickback:
Kickback may occur when
the moving saw chain
near the upper quadrant
of the bar nose contacts a
solid object or is pinched.
001BA093 LÄ
001BA035 KN
The reaction of the cutting force of the
chain causes a rotational force on the
chainsaw in the direction opposite to the
chain movement. This may fling the bar
up and back in a ligtening fast reaction in
an uncontrolled arc mainly in the plane
of the bar. Under some cutting
circumstances the bar moves towards
the operator, who may suffer severe or
fatal injury.
13MS 210, MS 210 C, MS 230, MS 230 C, MS 250, MS 250 C
English
Kickback may occur, for example,
when the chain near the upper quadrant
of the bar nose contacts the wood or is
pinched during limbing or when it is
incorrectly used to begin a plunge or
boring cut.
The greater the force of the kickback
reaction, the more difficult it becomes for
the operator to control the saw. Many
factors influence the occurrence and
force of the kickback reaction. These
include chain speed, the speed at which
the bar and chain contact the object, the
angle of contact, the condition of the
chain and other factors.
The type of bar and saw chain you use
is an important factor in the occurrence
and force of the kickback reaction. Some
STIHL bar and chain types are designed
to reduce kickback forces. STIHL
recommends the use of reduced
kickback bars and low kickback chains.
Devices for reducing the risk of
kickback injury
STIHL recommends the use of the
STIHL Quickstop chain brake on your
powerhead with green labeled reduced
kickback bars and low kickback chains.
!Warning!
To reduce the risk of injury, never use a
saw if the chain brake does not function
properly. Take the saw to your local
STIHL servicing dealer. Do not use the
saw until the problem has been rectified.
STIHL Quickstop chain brake
STIHL has developed a chain stopping
system designed to reduce the risk of
injury in certain kickback situations. It is
called a Quickstop chain brake. The
Quickstop chain brake is standard
equipment on your STIHL chainsaw.
001BA174 KN
When a kickback occurs, the guide bar
may rotate around the front handle. If the
cutting position is such that the
operator's left hand is gripping the front
handle behind the hand guard, and if the
left hand rotates around the front handle
and makes a sufficiently forceful contact
with the front hand guard, which is the
Quickstop activating lever, this contact
will activate a properly maintained
Quickstop chain brake. The chain brake
on newer STIHL chainsaws can also be
activated by inertia. If the kickback
forces are sufficiently high, the hand
guard is accelerated towards the bar
nose even without hand contact. See the
chapter entitled "Chain Brake" of your
instruction manual.
14
MS 210, MS 210 C, MS 230, MS 230 C, MS 250, MS 250 C

English
!Warning!
Never operate your chainsaw without a
front hand guard. In a kickback situation
this guard helps protect your left hand
and other parts of your body. In addition,
removal of the hand guard on a saw
equipped with a Quickstop chain brake
will deactivate the chain brake.
!Warning!
No Quickstop or other chain brake
device prevents kickback. These
devices are designed to reduce the risk
of kickback injury, if activated, in certain
kickback situations. In order for the
Quickstop to reduce the risk of kickback
injury, it must be properly maintained
and in good working order. See the
chapter of your instruction manual
entitled "Chain Brake" and the section
"Maintenance, Repair and Storing" at
the end of these Safety Precautions. In
addition, there must be enough distance
between the bar and the operator to
ensure that the Quickstop has sufficient
time to activate and stop the chain
before potential contact with the
operator.
!Warning!
An improperly maintained chain brake
may increase the time needed to stop
the chain after activation, or may not
activate at all.
!Warning!
Never run the chainsaw above idle
speed for more than 3 seconds when the
chain brake is engaged or when the
chain is pinched or otherwise caught in
the cut. Clutch slippage can cause
excessive heat, leading to severe
damage of the motor housing, clutch
and oiler component and may interfere
with the operation of the chain brake. If
clutch slippage in excess of 3 seconds
has occurred, allow the motor housing to
cool before proceeding and check the
operation of your chain brake as
described in the chapter entitled "Chain
Brake" of your instruction manual. Also
make sure that the chain is not turning at
idle speed (see above at "Important
Adjustments").
Low kickback saw chain and reduced
kickback bars
STIHL offers a variety of bars and
chains. STIHL reduced kickback bars
and low kickback chains are designed to
reduce the risk of kickback injury. Other
chains are designed to obtain higher
cutting efficiency or sharpening ease but
may result in higher kickback tendency.
STIHL recommends the use of its
reduced kickback bars, low kickback
chains and a STIHL Quickstop chain
brake for both experienced and
inexperienced chainsaw users.
Please ask your STIHL dealer to
properly match your powerhead with the
appropriate bar/chain combination to
reduce the risk of kickback injury. Green
labeled bars and chains are
recommended for all powerheads.
Warning!
Use of other, non-listed bar/chain
combinations may increase kickback
forces and the risk of kickback injury.
New bar/chain combinations may be
developed after publication of this
literature, which comply with
§ 4.1.3 of CSA Standard Z 62.3-04
Chain Saw Kickback. Check with your
STIHL dealer for such combinations.
15MS 210, MS 210 C, MS 230, MS 230 C, MS 250, MS 250 C

English
!Warning!
Reduced kickback bars and low
kickback chains do not prevent
kickback, but they are designed to
reduce the risk of kickback injury. They
are available from your STIHL dealer.
!Warning!
Even if your saw is equipped with a
Quickstop, a reduced kickback bar and/
or low kickback chain, this does not
eliminate the risk of injury by kickback.
Therefore, always observe all safety
precautions to avoid kickback situations.
Low kickback chain
Some types of saw chain have specially
designed components to reduce the
force of nose contact kickback. STIHL
has developed low kickback chain for
your powerhead.
"Low kickback saw chain" is a chain
which has met the kickback
performance requirements of § 4.1.3.2
of CSA Standard Z 62.3-04 Chain Saw
Kickback when tested in its original
condition on a selected representative
sample of chainsaws.
!Warning!
There are potential powerhead and bar
combinations with which low kickback
saw chains can be used which have not
been specifically certified to comply with
the 60 ° / 45 ° computer derived kickback
angle of § 4.1.3 of CSA Standard Z 62.304 Chain Saw Kickback. Some low
kickback chains have not been tested
with all powerhead and bar
combinations.
!Warning!
A dull or improperly sharpened chain
may reduce or negate the effects of the
design features intended to reduce
kickback energy. Improper lowering or
sharpening of the depth gauges or
shaping of the cutters may increase the
chance and the potential energy of a
kickback. Always cut with a properly
sharpened chain.
Reduced kickback bars
STIHL green labeled reduced kickback
bars are designed to reduce the risk of
kickback injury when used with STIHL
green labeled low kickback chains.
!Warning!
When used with other, more aggressive
chains, these bars may be less effective
in reducing kickback.
Bow Guides
!Warning!
Do not mount a bow guide on any STIHL
chainsaw. Any chainsaw equipped with
a bow guide is potentially very
dangerous. The risk of kickback is
increased with a bow guide because of
the increased kickback contact area.
Low kickback chain will not significantly
reduce the risk of kickback injury when
used on a bow guide.
16
MS 210, MS 210 C, MS 230, MS 230 C, MS 250, MS 250 C
English
To avoid kickback
The best protection from personal injury
that may result from kickback is to avoid
kickback situations:
1. Hold the chainsaw firmly with both
hands and maintain a secure grip.
Don’t let go.
2. Be aware of the location of the guide
bar nose at all times.
3. Never let the nose of the guide bar
contact any object. Do not cut limbs
with the nose of the guide bar. Be
especially careful near wire fences
and when cutting small, tough
limbs, small size brush and saplings
which may easily catch the chain.
4 Don't overreach.
5. Don't cut above shoulder height.
6. Begin cutting and continue at full
throttle.
7. Cut only one log at a time.
8. Use extreme caution when
reentering a previous cut.
9. Do not attempt to plunge cut if you
are not experienced with these
cutting techniques.
10. Be alert for shifting of the log or
other forces that may cause the cut
to close and pinch the chain.
11. Maintain saw chain properly. Cut
with a correctly sharpened, properly
tensioned chain at all times.
12. Stand to the side of the cutting path
of the chainsaw.
A = Pull-in
A
Pull-in occurs when the chain on the
bottom of the bar is suddenly stopped
when it is pinched, caught or encounters
a foreign object in the wood. The
reaction of the chain pulls the saw
forward and may cause the operator to
lose control.
Pull-in frequently occurs when the
bumper spike of the saw is not held
securely against the tree or limb and
when the chain is not rotating at full
speed before it contacts the wood.
!Warning!
Use extreme caution when cutting small
size brush and saplings which may
easily catch the chain, be whipped
towards you or pull you off balance.
To avoid pull-in
1. Always start a cut with the chain
rotating at full speed and the
bumper spike in contact with the
wood.
2. The risk of pull-in may also be
reduced by using wedges to open
the kerf or cut.
B = Pushback
001BA037 KN
Pushback occurs when the chain on the
top of the bar is suddenly stopped when
it is pinched, caught or encounters a
foreign object in the wood. The reaction
of the chain may drive the saw rapidely
straight back toward the operator and
may cause loss of saw control.
Pushback frequently occurs when the
top of the bar is used for cutting.
To avoid pushback
1. Be alert to forces or situations that
may cause material to pinch the top
of the chain.
2. Do not cut more than one log at a
time.
3. Do not twist the saw when
withdrawing the bar from a plunge
cut or underbuck cut because the
chain can pinch.
B
001BA038 KN
17MS 210, MS 210 C, MS 230, MS 230 C, MS 250, MS 250 C
English
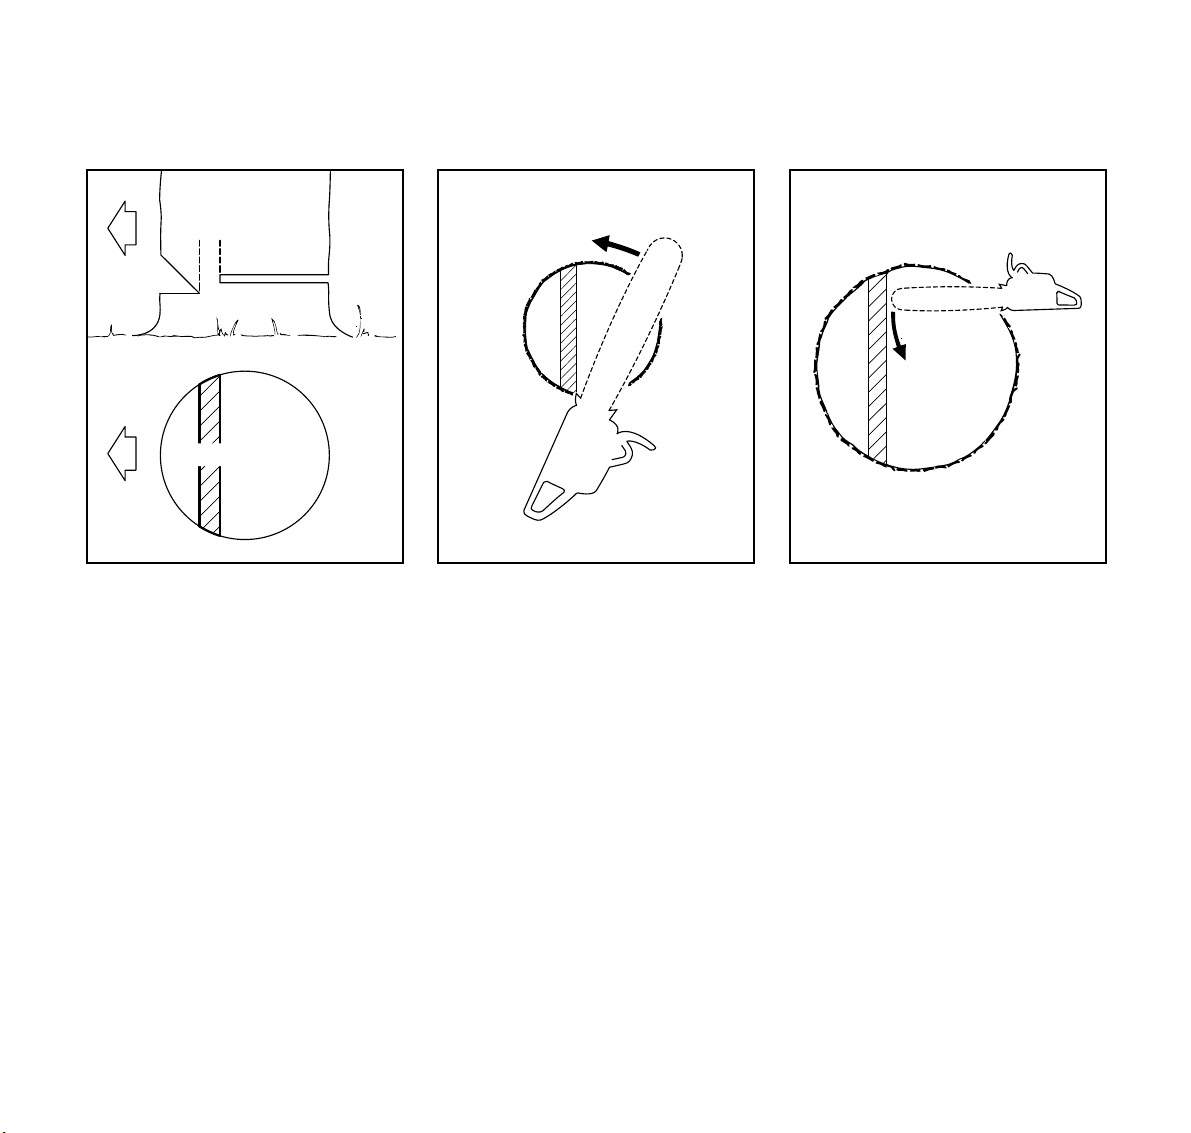
Cutting Techniques
Felling
Felling is cutting down a tree.
Before felling a tree, consider carefully
all conditions which may affect the
direction of fall.
!Warning!
There are a number of factors that may
affect and change the intended direction
of fall, e.g. wind direction and speed,
lean of tree, surrounding trees and
obstacles, sloping ground, one-sided
limb structure, wood structure, decay,
snow load, etc. To reduce the risk of
severe or fatal injury to yourself or
others, look for these conditions prior to
beginning the cut, and be alert for a
change in direction while the tree is
falling.
!Warning!
Always observe the general condition of
the tree. Inexperienced users should
never attempt to cut trees which are
decayed or rotted inside or which are
leaning or otherwise under tension.
There is an increased risk that such
trees could snap or split while being cut
and cause serious or fatal injury to the
operator or bystanders. Also look for
broken or dead branches which could
vibrate loose and fall on the operator.
When felling on a slope, the operator
should stand on the uphill side if
possible.
Felling Instructions:
1
1 1
When felling, maintain a distance of at
least 2 1/2 tree lengths from the nearest
person.
When felling in the vicinity of roads,
railways and power lines, etc., take extra
precautions. Inform the police, utility
company or railway authority before
beginning to cut.
/
2
1
/
2
2
!Warning!
The noise of your engine may drown any
warning call.
001BA088 LÄ
Escape path
First clear the tree base and work area
from interfering limbs and brush and
clean its lower portion with an ax.
Then, establish two paths of escape (B)
and remove all obstacles. These paths
should be generally opposite to the
planned direction of the fall of the tree
(A) and about at a 45° angle. Place all
tools and equipment a safe distance
away from the tree, but not on the
escape paths.
A
B
45°
45°
B
001BA040 KN
18
MS 210, MS 210 C, MS 230, MS 230 C, MS 250, MS 250 C
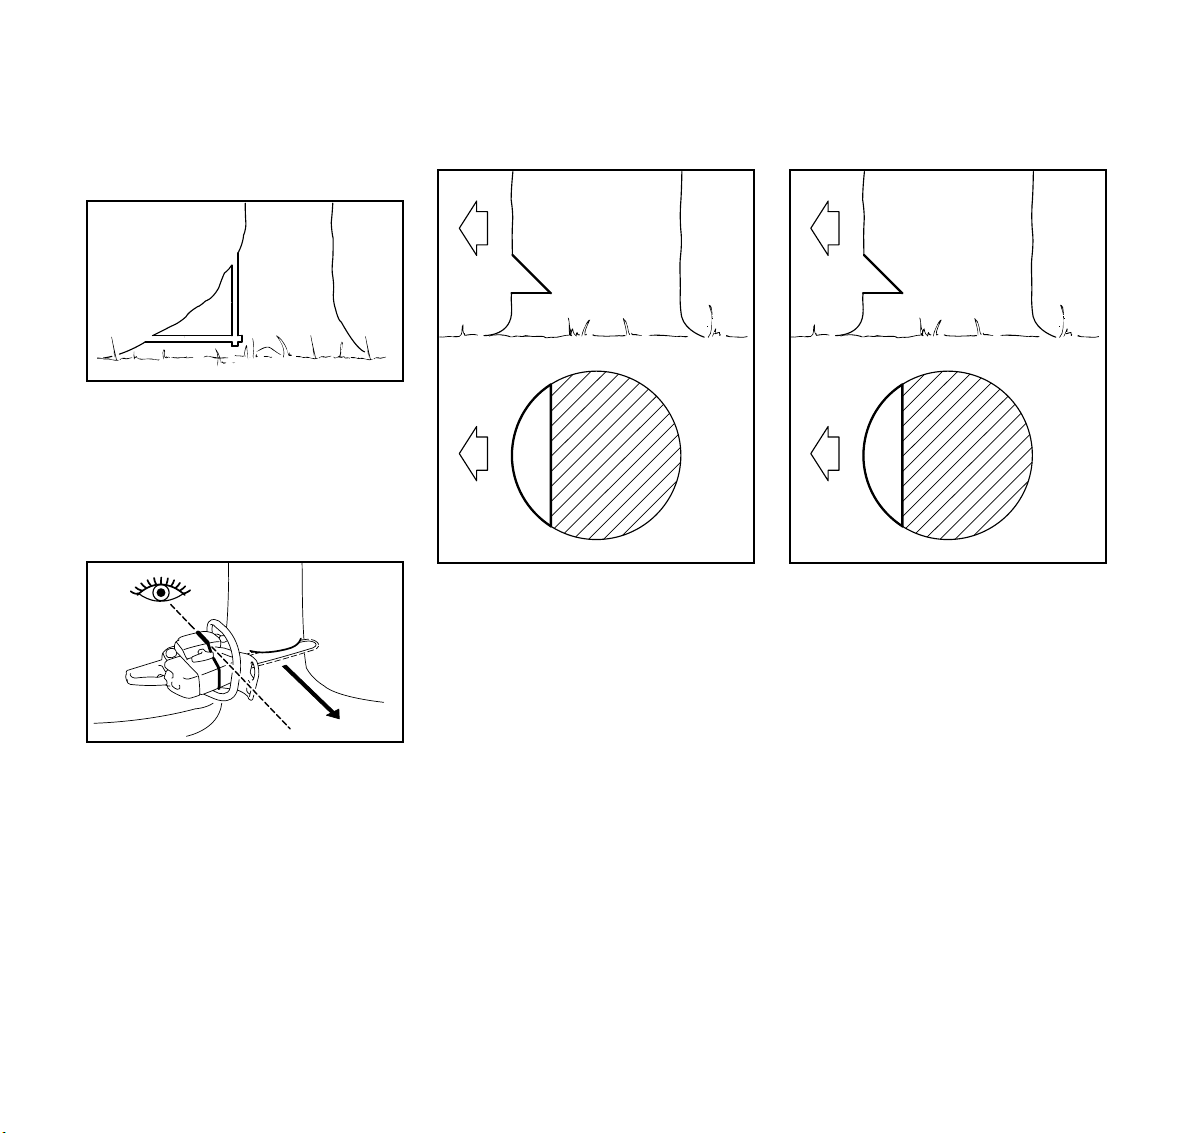
Buttress roots
English
If the tree has large buttress roots, cut
into the largest buttress vertically first
(horizontally next) and remove the
resulting piece.
Gunning sight
When making the felling notch, use the
gunning sight on the shroud and housing
to check the desired direction of fall:
Position the saw so that the gunning
sight points exactly in the direction you
want the tree to fall.
C
001BA146 KN
C
Conventional cut
C = felling notch - determines the
direction of the fall
For a conventional cut:
: Properly place felling notch
001BA153 KN
perpendicular to the line of fall,
close to the ground.
: Cut down at app. 45-degree angle
to a depth of about 1/5 to 1/4 of the
trunk diameter.
: Make second cut horizontal.
: Remove resulting 45-degree piece.
C
C
001BA143 KN
Open-face technique
C = felling notch - determines the
direction of the fall
For an open-face cut:
: Properly place felling notch
perpendicular to the line of fall,
close to the ground.
: Cut down at app. 50-degree angle
to a depth of app.1/5 to 1/4 of the
trunk diameter.
: Make second cut from below at app.
40 degree angle.
: Remove resulting 90-degree piece.
001BA143 KN
19MS 210, MS 210 C, MS 230, MS 230 C, MS 250, MS 250 C
English
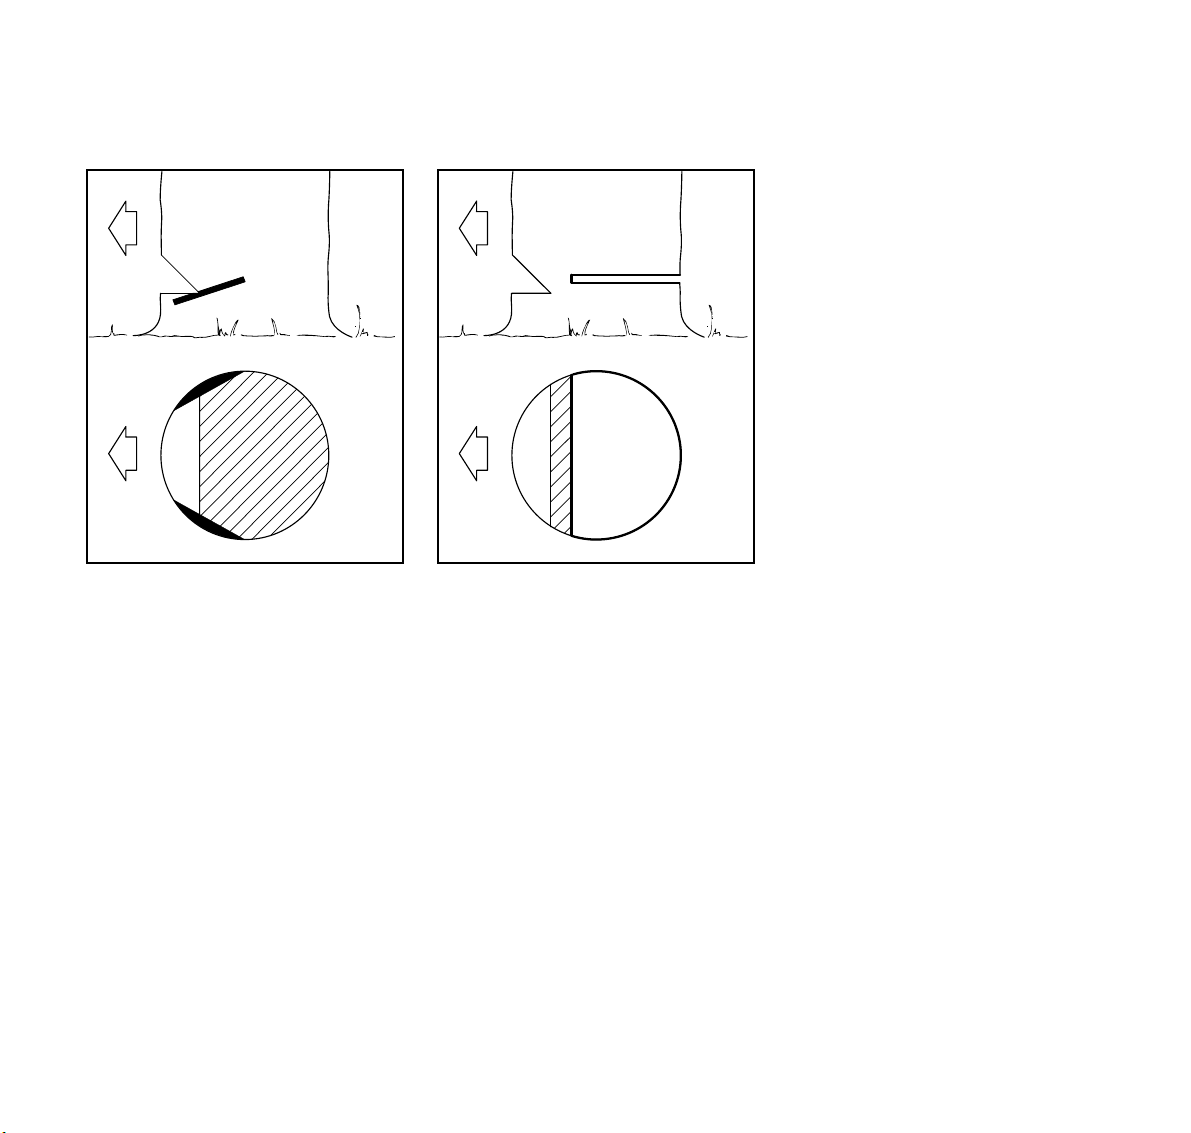
D
D
Drive wedges into the felling cut where
necessary to control the fall.
!Warning!
If the tip of the bar contacts a wedge, it
may cause kickback. Wedges should be
of wood or plastic - never steel, which
can damage the chain.
Making sapwood cuts
: For medium sized or larger trees
make cuts at both sides of the trunk,
at same height as subsequent
felling cut.
: Cut to no more than width of guide
bar.
This is especially important in softwood
in summer - it helps prevent sapwood
splintering when the tree falls.
20
001BA150 KN
D = Felling cut
Conventional and open-face technique:
: Begin 1 to 2 inches (2,5 to 5 cm)
higher than center of felling notch.
: Cut horizontally towards the felling
notch.
: Leave approx.1/10 of diameter
uncut. This is the hinge.
: Do not cut through the hinge - you
could lose control of the direction of
the fall.
MS 210, MS 210 C, MS 230, MS 230 C, MS 250, MS 250 C
001BA144 KN
E
E
English
1
E = Hinge
: Helps control the falling tree.
: Do not cut through the hinge – you
could lose control of the direction of
the fall.
001BA145 KN
Felling cut for small diameter trees:
simple fan cut
Engage the bumper spikes of the
chainsaw directly behind the location of
the intended hinge and pivot the saw
around this point only as far as the
hinge. The bumper spike rolls against
the trunk.
001BA147 KN
Felling cut for large diameter trees:
!Warning!
Felling a tree that has a diameter greater
than the length of the guide bar requires
use of either the sectioning felling cut or
plunge-cut method. These methods are
extremely dangerous because they
involve the use of the nose of the guide
bar and can result in kickback. Only
properly trained professionals should
attempt these techniques.
Sectioning method
For the sectioning method make the first
part of the felling cut with the guide bar
fanning in toward the hinge. Then, using
the bumper spike as a pivot, reposition
the saw for the next cut.
001BA148 KN
21MS 210, MS 210 C, MS 230, MS 230 C, MS 250, MS 250 C

English
2
4
Avoid repositioning the saw more than
necessary. When repositioning for the
next cut, keep the guide bar fully
engaged in the kerf to keep the felling
cut straight. If the saw begins to pinch,
insert a wedge to open the cut. On the
last cut, do not cut the hinge.
Plunge-cut method
Timber having a diameter more than
twice the length of the guide bar requires
the use of the plunge-cut method before
making the felling cut.
First, cut a large, wide felling notch.
Make a plunge cut in the center of the
notch.
The plunge cut is made with the guide
bar nose. Begin the plunge cut by
applying the lower portion of the guide
bar nose to the tree at an angle. Cut until
the depth of the kerf is about the same
as the width of the guide bar. Next, align
the saw in the direction in which the
recess is to be cut.
With the saw at full throttle, insert the
guide bar in the trunk.
Enlarge the plunge cut as shown in the
illustration.
!Warning!
There is an extreme danger of kickback
at this point. Extra caution must be taken
to maintain control of the saw. To make
the felling cut, follow the sectioning
method described previously.
If you are inexperienced with a
chainsaw, plunge-cutting should not be
attempted. Seek the help of a
professional.
22
MS 210, MS 210 C, MS 230, MS 230 C, MS 250, MS 250 C
English
!Warning!
In order to reduce the risk of personal
injury, never stand directly behind the
tree when it is about to fall, since part of
the trunk may split and come back
towards the operator (barber-chairing),
or the tree may jump backwards off the
stump. Always keep to the side of the
falling tree. When the tree starts to fall,
withdraw the bar, shut off the engine and
walk away on the preplanned escape
path. Watch out for falling limbs.
!Warning!
Be extremely careful with partially fallen
trees which are poorly supported. When
the tree hangs or for some other reason
does not fall completely, set the saw
aside and pull the tree down with a cable
winch, block and tackle or tractor. If you
try to cut it down with your saw, you may
be injured.
Limbing
Limbing is removing the branches from a
fallen tree.
!Warning!
There is an extreme danger of kickback
during the limbing operation. Do not
work with the nose of the bar. Be
extremely cautious and avoid contacting
the log or other limbs with the nose of the
guide bar.
Do not stand on a log while limbing it you may slip or the log may roll.
Start limbing by leaving the lower limbs
to support the log off the ground. When
underbucking freely hanging limbs, a
pinch may result or the limb may fall,
causing loss of control. If a pinch occurs,
stop the engine and remove the saw by
lifting the limb.
!Warning!
Be extremely cautious when cutting
limbs or logs under tension (spring
poles). The limbs or logs could spring
back toward the operator and cause loss
of control of the saw and severe or fatal
injury to the operator.
001BA033 KN
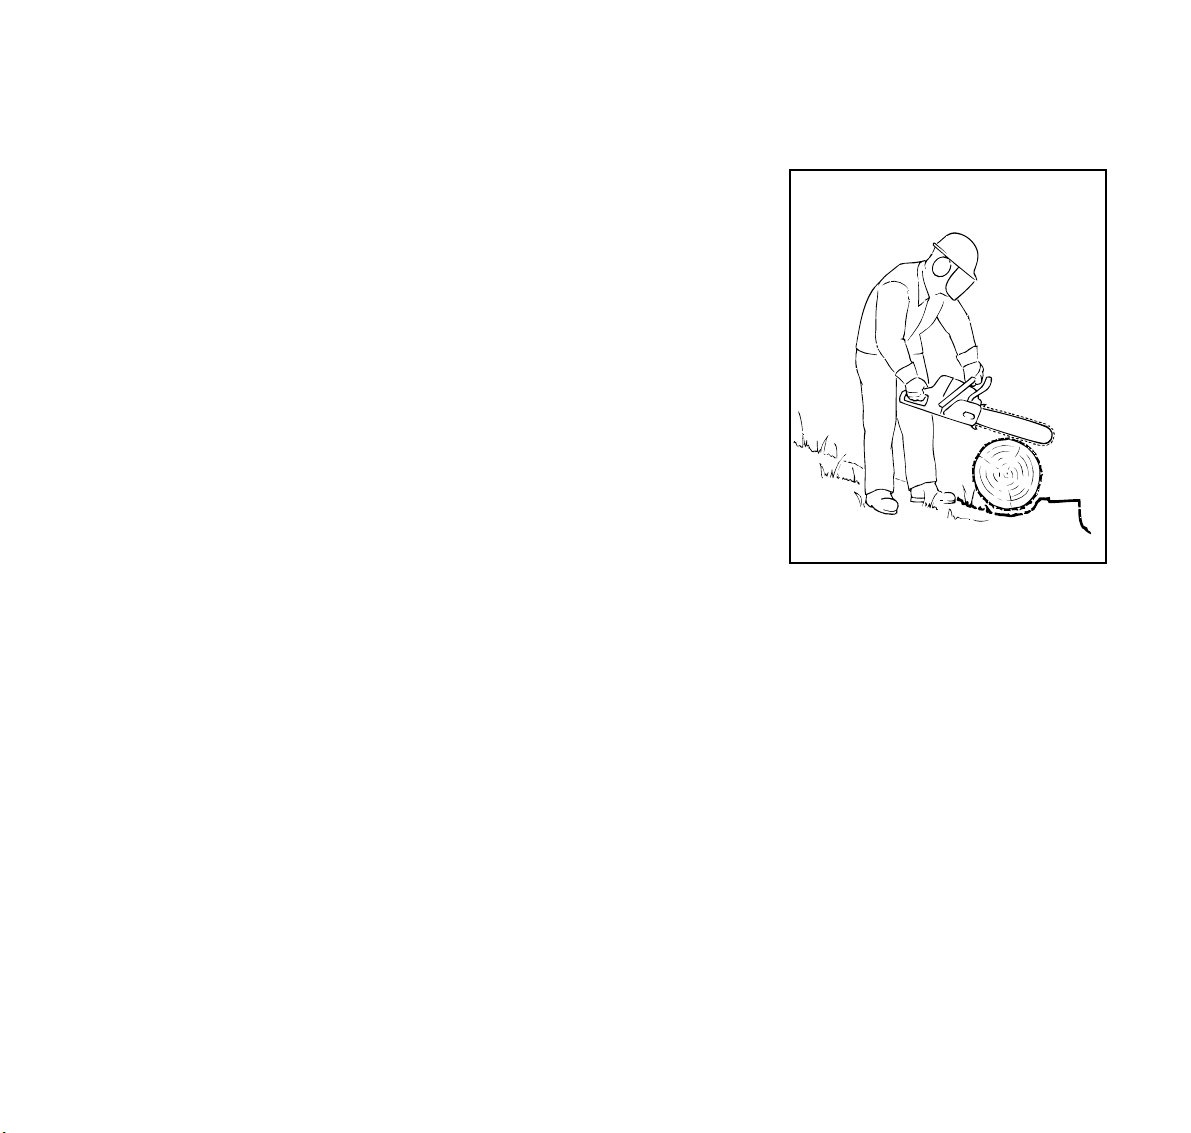
Bucking
Bucking is cutting a log into sections.
!Warning!
When bucking, do not stand on the log.
Make sure the log will not roll downhill. If
on a slope, stand on the uphill side of the
log. Watch out for rolling logs.
Cut only one log at a time.
Shattered wood should be cut very
carefully. Sharp slivers of wood may be
caught and flung in the direction of the
operator of the saw.
23MS 210, MS 210 C, MS 230, MS 230 C, MS 250, MS 250 C

English
0
When cutting small logs, place log
through "V" - shaped supports on top of
a sawhorse. Never permit another
person to hold the log. Never hold the
log with your leg or foot.
1
2
2
1
01BA051 LÄ
Logs under strain:
Risk of pinching! Always start relieving
cut (1) at compression side.Then make
bucking cut (2) at tension side.
If the saw pinches, stop the engine and
remove it from the log.
Only properly trained professionals
should work in an area where the logs,
limbs and roots are tangled. Working in
“blow down“ areas is extremely
hazardous.
Drag the logs into a clear area before
cutting. Pull out exposed and cleared
logs first.
MAINTENANCE, REPAIR AND
STORING
Maintenance, replacement, or repair
of the emission control devices and
systems may be performed by any
nonroad engine repair establishment
or individual. However, if you make a
warranty claim for a component
001BA151 KN
which has not been serviced or
maintained properly or if
nonapproved replacement parts were
used, STIHL may deny coverage.
!Warning!
Use only identical STIHL replacement
parts for maintenance and repair. Use of
non-STIHL parts may cause serious or
fatal injury.
001BA152 KN
Strictly follow the maintenance and
repair instructions in the maintenance
chart near the end of the instruction
manual.
!Warning!
Always stop the engine and make sure
that the chain is stopped before doing
any maintenance or repair work or
cleaning the power tool.
24
MS 210, MS 210 C, MS 230, MS 230 C, MS 250, MS 250 C

English
!Warning!
Do not attempt any maintenance or
repair work not described in your
instruction manual. Have such work
performed by your STIHL servicing
dealer only. For example, if improper
tools are used to remove the flywheel or
if an improper tool is used to hold the
flywheel in order to remove the clutch,
structural damage to the flywheel could
occur and could subsequently cause the
flywheel to burst.
Wear gloves when handling or
performing maintenance on saw chains.
!Warning!
Use the specified spark plug and make
sure it and the ignition lead are always
clean and in good condition. Always
press spark plug boot snugly onto spark
plug terminal of the proper size. (Note: If
terminal has detachable SAE adapter
nut, it must be securely attached.) A
loose connection between spark plug
terminal and the ignition wire connector
in the boot may create arcing that could
ignite combustible fumes and cause a
fire.
!Warning!
Never test the ignition system with the
spark plug boot removed from the spark
plug or with a removed spark plug, since
uncontained sparking may cause a fire.
!Warning!
Do not operate your chainsaw if the
muffler is damaged, missing or modified.
An improperly maintained muffler will
increase the risk of fire and hearing loss.
If your muffler was equipped with a
spark-arresting screen to reduce the risk
of fire, never operate your saw if the
screen is missing or damaged.
Remember that the risk of forest fires is
greater in hot or dry weather.
Keep the chain, bar and sprocket clean;
replace worn sprockets or chains. Keep
the chain sharp. You can spot a dull
chain when easy-to-cut wood becomes
hard to cut and burn marks appear on
the wood. Keep the chain at proper
tension.
Tighten all nuts, bolts and screws except
the carburetor adjustment screws after
each use.
!Warning!
In order for the chain brake on your
STIHL chainsaw to properly perform its
function of reducing the risk of kickback
and other injuries, it must be properly
maintained. Like an automobile brake, a
chainsaw chain brake incurs wear each
time it is engaged.
The amount of wear will vary depending
upon usage, conditions under which the
saw is used and other factors. Excessive
wear will reduce the effectiveness of the
chain brake and can render it
inoperable.
For the proper and effective operation of
the chain brake, the brake band and
clutch drum must be kept free of dirt,
grease and other foreign matter which
may reduce friction of the band on the
drum.
For these reasons, each STIHL
chainsaw should be returned to trained
personnel such as your STIHL servicing
dealer for periodic inspection and
servicing of the brake system according
to the following schedule:
Heavy usage - every three months,
Moderate usage - twice a year,
Occasional usage - annually.
The chainsaw should also be returned
immediately for maintenance whenever
the brake system cannot be thoroughly
cleaned or there is a change in its
operating characteristics.
For any maintenance of the emission
control system please refer to the
maintenance chart and to the limited
warranty statement near the end of the
instruction manual.
Store chainsaw in a dry place and away
from children. Before storing for longer
than a few days, always empty the fuel
tank (see chapter "Storing the Machine"
in the instruction manual).
25MS 210, MS 210 C, MS 230, MS 230 C, MS 250, MS 250 C
English
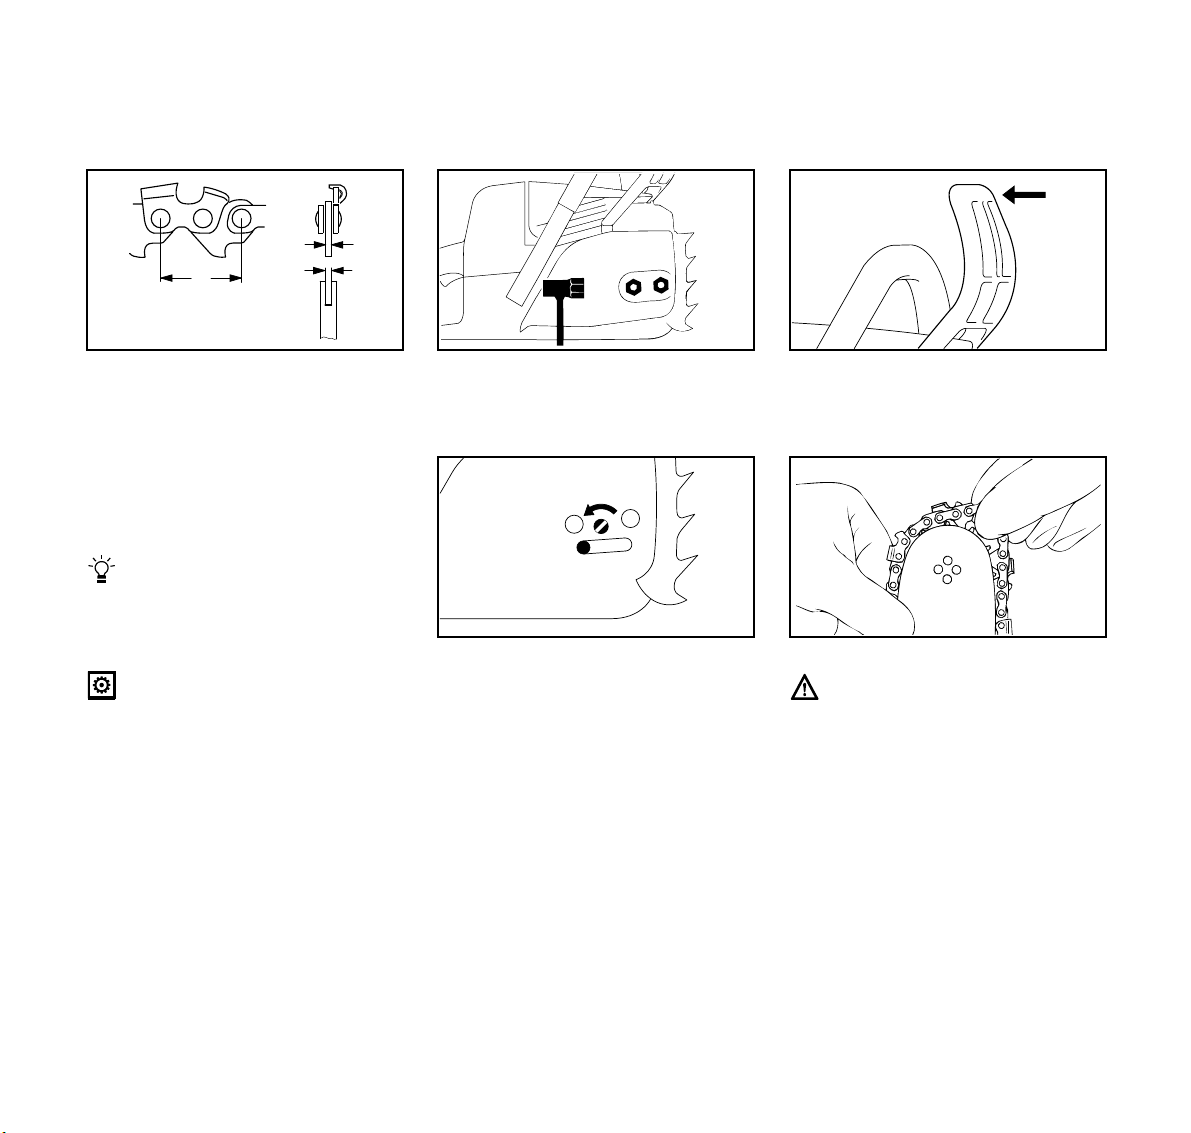
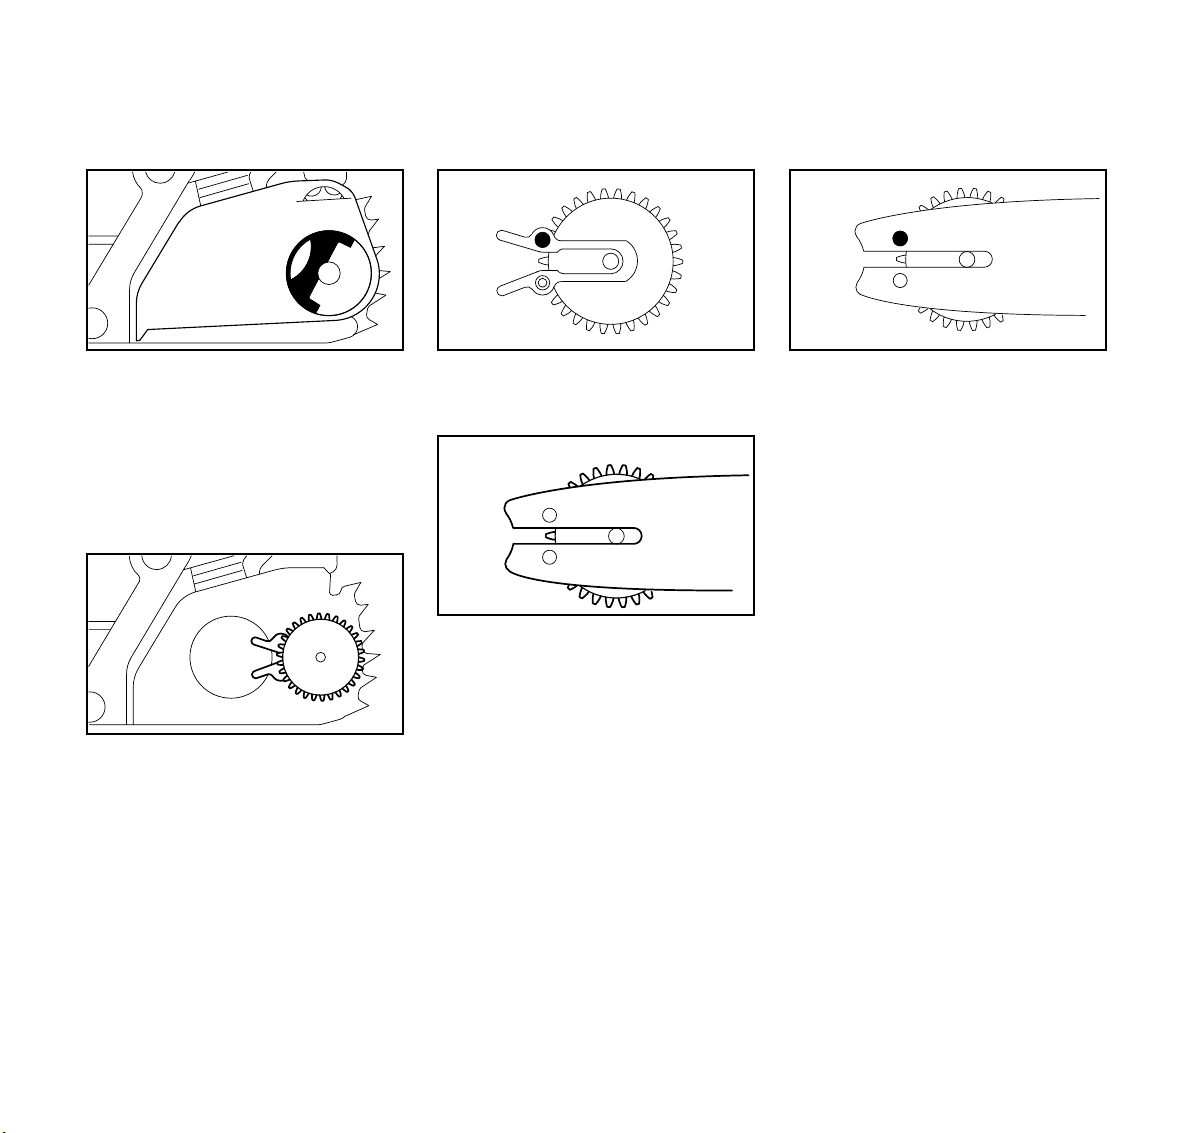
Mounting the Bar and Chain
(Side chain tensioner)
1
a
t = a : 2
You can run chains of different pitches
on this chainsaw – depending on the
chain sprocket (see “Specifications”):
The chain pitch (1) must match the pitch
of the sprocket and the guide bar (for
Rollomatic). The drive link gauge (2)
must match the bar groove width (3).
The pitch is marked on the chain
sprocket and guide bar in inches
(e.g. 3/8 or .325). The groove width
is marked on the guide bar in
millimeters (e.g. 1.6).
If non-matching components of the
wrong pitch or drive link gauge are
run together on the same machine
they may be damaged beyond
repair after a short period of
operation.
2
3
001BA105 KN
: Unscrew the nuts and take off the
chain sprocket cover.
4
5
: Turn screw (4) counterclockwise
until the tensioner slide (5) butts
against left end of housing slot.
143BA034 KN
: Disengage the chain brake: Pull
hand guard (6) toward front handle.
001BA107 KN
Wear work gloves to protect your
hands from the sharp cutters.
: Fit the chain – start at the bar nose.
6
001BA108 KN
143BA003 KN
26
MS 210, MS 210 C, MS 230, MS 230 C, MS 250, MS 250 C

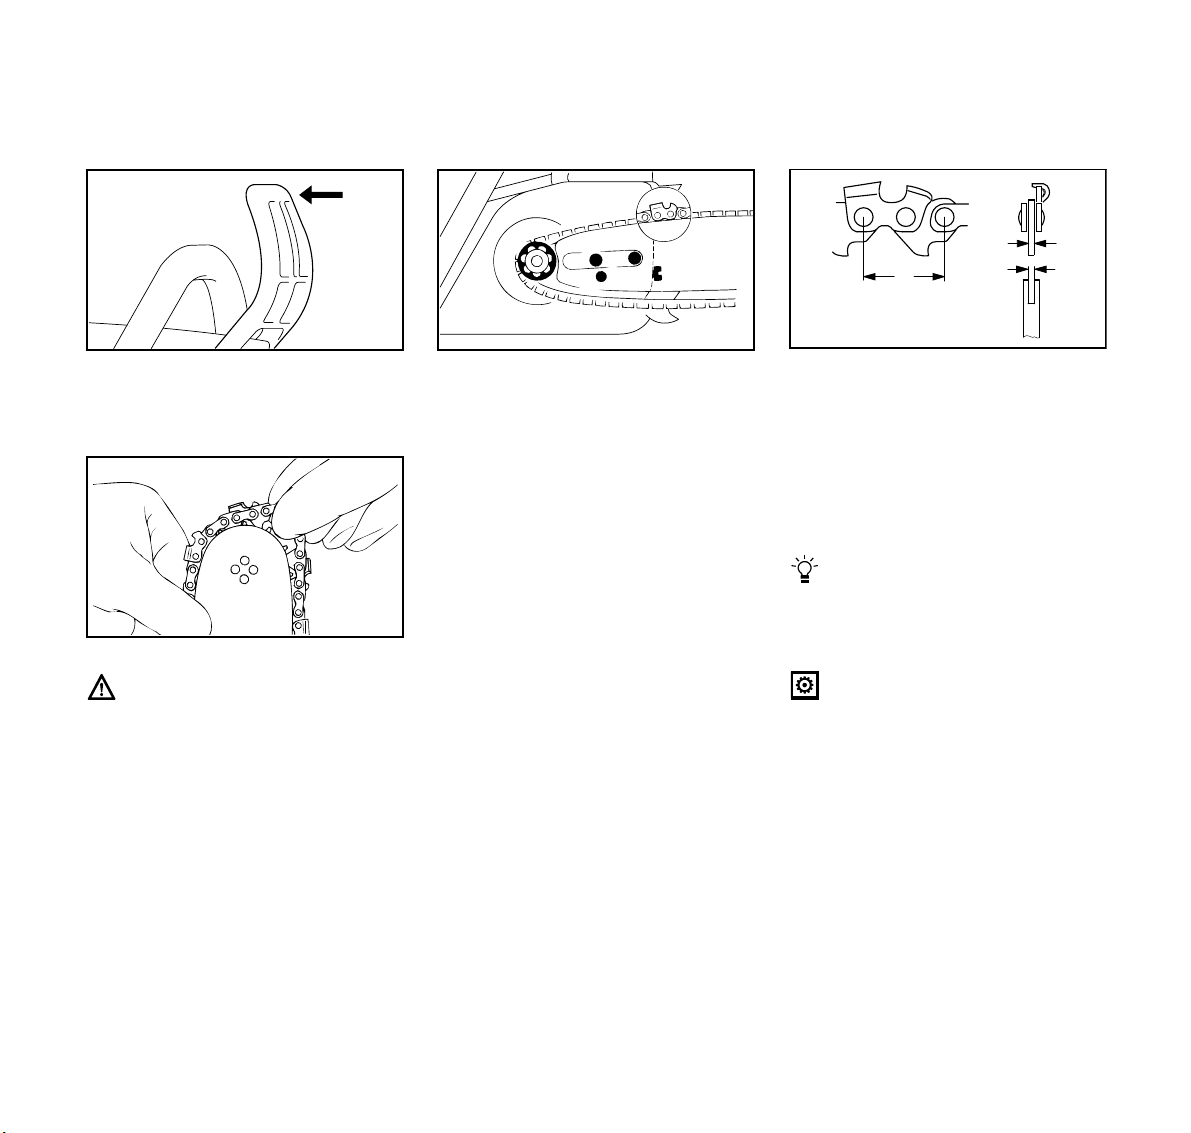
Mounting the Bar and Chain
(Front chain tensioner)
English
9
: Fit the guide bar over the studs (7) –
cutting edges on top of bar must
point to right – and engage the
peg of the tensioner slide in locating
hole (8) –- place the chain over
sprocket (9) at the same time.
: Now turn tensioning screw (10)
clockwise until there is very little
chain sag on the underside of the
bar –- and the drive link tangs are
located in the bar groove.
: Refit the sprocket cover –
and screw on the nuts only fingertight.
: Go to “Tensioning the Saw Chain”.
7
7
10
8
1
a
t = a : 2
001BA109 KN
You can run chains of different pitches
on this chainsaw – depending on the
chain sprocket (see “Specifications”):
The chain pitch (1) must match the pitch
of the sprocket and the guide bar (for
Rollomatic). The drive link gauge (2)
must match the bar groove width (3).
The pitch is marked on the chain
sprocket and guide bar in inches
(e.g. 3/8 or .325). The groove width
is marked on the guide bar in
millimeters (e.g. 1.6).
If non-matching components of the
wrong pitch or drive link gauge are
run together on the same machine
they may be damaged beyond
repair after a short period of
operation.
2
3
001BA105 KN
: Unscrew the nuts and take off the
chain sprocket cover.
5
: Turn screw (4) counterclockwise
until the tensioner nut (5) butts
against left end of housing slot.
143BA034 KN
4
001BA0110 KN
27MS 210, MS 210 C, MS 230, MS 230 C, MS 250, MS 250 C
English
Mounting the Bar and Chain
(Quick Chain Tensioner)
6
: Disengage the chain brake: Pull
hand guard (6) toward front handle.
Wear work gloves to protect your
hands from the sharp cutters.
: Fit the chain – start at the bar nose.
9
7
7
8
001BA108 KN
: Fit the guide bar over the studs (7) –
cutting edges on top of bar must
point to right – and engage the
peg of the tensioner slide in locating
hole (8) –- place the chain over
sprocket (9) at the same time.
: Now turn tensioning screw (10)
clockwise until there is very little
chain sag on the underside of the
bar –- and the drive link tangs are
143BA003 KN
located in the bar groove.
: Refit the sprocket cover –
and screw on the nuts only fingertight.
: Go to “Tensioning the Saw Chain”.
10
1
a
t = a : 2
001BA111 KN
You can run chains of different pitches
on this chainsaw – depending on the
chain sprocket (see “Specifications”):
The chain pitch (1) must match the pitch
of the sprocket and the guide bar (for
Rollomatic). The drive link gauge (2)
must match the bar groove width (3).
The pitch is marked on the chain
sprocket and guide bar in inches
(e.g. 3/8 or .325). The groove width
is marked on the guide bar in
millimeters (e.g. 1.6).
If non-matching components of the
wrong pitch or drive link gauge are
run together on the same machine
they may be damaged beyond
repair after a short period of
operation.
2
3
001BA105 KN
28
MS 210, MS 210 C, MS 230, MS 230 C, MS 250, MS 250 C
English
8
4
8
6
5
: Pull out the hinged handle (4) so
that it snaps into position.
: Turn the wingnut (5) counterclock-
wise until it hangs loose in the
sprocket cover (6).
: Remove the sprocket cover.
7
: Remove the tensioning gear (7)
and turn it over.
140BA000 KN
: Take out the screw (8).
7
: Position the tensioning gear (7)
against the guide bar (9).
140BA001 KN
140BA002 KN
: Fit and tighten down the screw (8).
135BA007 KN
9
140BA003 KN
29MS 210, MS 210 C, MS 230, MS 230 C, MS 250, MS 250 C

English
1
9
140BA005 KN
: Disengage the chain brake: Pull
hand guard (9) back towards the
front handle.
: Turn the guide bar so that the
tensioning gear is facing you.
7
Wear work gloves to protect your
hands from the sharp cutters!
: Fit the chain – start at the bar nose.
Pay attention to the position of the
tensioning gear and the cutting
edges.
: Turn the tensioning gear (7)
clockwise as far as stop.
30
40BA004 KN
11
10
: Fit the chain over the sprocket (10).
: Fit the guide bar over the collar
screw (11), the head of the rear
collar screw must locate in the slot.
MS 210, MS 210 C, MS 230, MS 230 C, MS 250, MS 250 C
135BA011 KN
: Make sure the drive link tangs
engage the bar groove (see arrow)
and then rotate tensioning gear
counterclockwise as far as stop.
140BA006 KN

13
English
Tensioning the Saw Chain
(Side chain tensioner)
12
1
: Place the chain sprocket cover in
position and engage guide lugs in
recesses in engine housing at the
same time.
135BA012 KN
: When fitting the chain sprocket
cover, check that the teeth of the
tensioning gear and adjusting wheel
mesh properly. If necessary, turn the
adjusting wheel (12) slightly until the
sprocket cover can be pushed flush
against the engine housing.
: Pull out the hinged handle (13) so
that it snaps into position.
: Engage wingnut and tighten it down
moderately.
Go to "Tensioning the Saw Chain".
140BA007 KN
Retensioning during cutting work:
: Shut off the engine first –
and then loosen the nuts.
: Hold the bar nose up and use
screwdriver to turn tensioning screw
(1) clockwise until chain fits snugly
against the underside of the bar.
: While still holding the bar nose up,
tighten down the nuts firmly.
: Go to “Tensioning the Saw Chain”
A new chain has to be retensioned more
often than one that has been in use for
some time.
: Check chain tension frequently –
see "During Operation".
133BA024 KN
31MS 210, MS 210 C, MS 230, MS 230 C, MS 250, MS 250 C

English
Tensioning the Saw Chain
(Front chain tensioner)
1
Retensioning during cutting work:
: Shut off the engine first –
and then loosen the nuts.
: Hold the bar nose up and use
screwdriver to turn tensioning screw
(1) clockwise until chain fits snugly
against the underside of the bar.
: While still holding the bar nose up,
tighten down the nuts firmly.
: Go to “Tensioning the Saw Chain”.
A new chain has to be retensioned more
often than one that has been in use for
some time.
: Check chain tension frequently –
see "Operating Instructions".
Tensioning the Saw Chain
(Quick chain tensioner)
1
2
143BA045 KN
Retensioning during cutting work:
: Shut off the engine.
: Pull out the hinged clip and loosen
the wingnut.
: Turn the adjusting wheel (1)
clockwise as far as stop.
: Tighten down the wingnut (2) firmly
by hand.
: Fold down the hinged clip.
: Follow instructions in "Checking
Chain Tension".
A new chain has to be retensioned more
often than one that has been in use for
some time.
: Check chain tension frequently –
see "Operating Instructions".
Checking Chain Tension
001BA112 KN
: Shut off the engine.
: Wear work gloves.
: Chain must fit snugly against the
underside of the bar – and, with the
chain brake disengaged, it must still
be possible to pull the chain along
the bar by hand.
: If necessary, retension the chain.
A new chain has to be retensioned more
often than one that has been in use for
some time.
Check chain tension frequently – see
"Operating Instructions".
143BA007 KN
32
MS 210, MS 210 C, MS 230, MS 230 C, MS 250, MS 250 C

Fuel
English
This engine is certified to operate on
unleaded gasoline and with the mix ratio
50:1.
Your engine requires a mixture of highquality premium gasoline and highquality two-stroke air-cooled engine oil.
Use premium branded unleaded
gasoline with a minimum octane rating
of 89 RON.
Note: Models equipped with a catalytic
converter require unleaded gasoline. A
few tankfuls of leaded gasoline can
reduce the efficiency of the catalytic
converter by more than 50%.
Fuel with a lower octane rating may
result in preignition (causing "pinging")
which is accompanied by an increase in
engine temperature. This, in turn,
increases the risk of the piston seizure
and damage to the engine.
The chemical composition of the fuel is
also important. Some fuel additives not
only detrimentally affect elastomers
(carburetor diaphragms, oil seals, fuel
lines etc.), but magnesium castings as
well. This could cause running problems
or even damage the engine. For this
reason it is essential that you use only
high-quality fuels!
Fuels with different percentages of
ethanol are being offered. Ethanol can
affect the running behaviour of the
engine and increase the risk of lean
seizure.
Use only STIHL two-stroke engine oil or
equivalent high-quality two-stroke aircooled engine oils for mixing.
We recommend STIHL 50:1 two-stroke
engine oil since it is specially formulated
for use in STIHL engines.
Do not use BIA or TCW (two-stroke
water cooled) mix oils!
Use only STIHL 50:1 heavy-duty
engine oil or an equivalent quality twostroke engine oil for the fuel mix in
models equipped with a catalytic
converter.
Take care when handling gasoline.
Avoid direct contact with the skin and
avoid inhaling fuel vapour.
The canister should be kept tightly
closed in order to avoid any moisture
getting into the mixture.
The fuel tank and the canister in which
fuel mix is stored should be cleaned
from time to time.
Fuel mix ratio
Only mix sufficient fuel for a few days
work, not to exceed 3 months of storage.
Store in approved safety fuel-canisters
only. When mixing, pour oil into the
canister first, and then add gasoline.
Examples
Gasoline Oil (STIHL 50:1 or
equivalent high-quality
oils)
liters liters (ml)
1 0.02 (20)
5 0.10 (100)
10 0.20 (200)
15 0.30 (300)
20 0.40 (400)
25 0.50 (500)
Dispose of empty mixing-oil canisters
only at authorized disposal locations.
33MS 210, MS 210 C, MS 230, MS 230 C, MS 250, MS 250 C

English
Fueling
Before fueling, clean the filler cap and
the area around it to ensure that no dirt
falls into the tank.
Always position the machine so that the
filler cap points upwards.
Always thoroughly shake the mixture in
the canister before fueling your
machine.
In order to reduce the risk of burns
or other personal injury from
escaping gas vapor and fumes,
remove the fuel filler cap carefully
so as to allow any pressure build-up
in the tank to release slowly.
Opening the cap
001BA159 KN
: Raise the grip until it is upright.
: Turn the cap counterclockwise
(approx. a quarter turn).
: Remove the filler cap.
Closing the cap
001BA160 KN
: Fit the cap - grip upright -marks
must line up.
: Turn the cap clockwise as far as
stop (approx. a quarter turn).
001BA161 KN
: Fold the grip flush with the top of the
cap.
001BA162 KN001BA163 KN
34
If the grip does not lie completely flush
with the cap and the detent on the grip
does not engage the recess in the filler
neck, the cap is not properly seated and
tightened and you must repeat the
above steps.
MS 210, MS 210 C, MS 230, MS 230 C, MS 250, MS 250 C

Chain Lubricant
English
Change the fuel pickup body
once every year
: Drain the fuel tank.
: Use a hook to pull the fuel pickup
body out of the tank and take it off
the hose.
: Push the new pickup body into the
hose.
: Place the pickup body in the tank.
For automatic and reliable
lubrication of the chain and guide
bar – use only an environmentally
compatible quality chain and bar
lubricant with non-fling additive
or the rapidly biodegradable
STIHL BioPlus is recommended.
Biological chain oil must be resistant
to aging (e.g. STIHL BioPlus) since
it will otherwise quickly turn to resin.
This results in hard deposits that are
difficult to remove, especially in the
area of the chain drive, clutch and
chain. It may even cause the oil
pump to seize.
The service life of the chain and guide
bar depends on the quality of the
165BA003 KN
lubricant. It is therefore essential to use
only a specially formulated chain
lubricant.
If special chain lubricant is not available,
you may – in an emergency – use an HD
single grade or multigrade engine oil
with a viscosity that suits the prevailing
outside temperature.
Do not use waste oil!
Medical studies have shown that
renewed contact with waste oil can
cause skin cancer. Moreover, waste
is environmentally harmful!
Waste oil does not have the
necessary lubricating properties
and is unsuitable for chain
lubrication.
35MS 210, MS 210 C, MS 230, MS 230 C, MS 250, MS 250 C

English
Filling Chain
Oil Tank
: Thoroughly clean the oil filler cap
and the area round it to ensure that
no dirt falls into the tank.
: Remove the filler cap.
: Refill the chain oil tank every time
you refuel.
: Close the filler cap.
There must still be a small amount of oil
in the oil tank when the fuel tank is
empty.
If the oil level in the tank does not go
down, the reason may be a problem in
the oil supply system: Check chain
lubrication, clean the oilways, contact
your servicing dealer for assistance if
necessary. STIHL recommends that you
have maintenance and repair work
performed only by a STIHL servicing
dealer.
Checking Chain Lubrication
001BA158 KN
The saw chain must always throw off a
small amount of oil.
Never operate your saw without
chain lubrication. If the chain runs
dry, the whole cutting attachment
will be irretrievably damaged within
a very short time.
Always check chain lubrication and
oil level in tank before starting work.
Every new chain has to be broken in for
about 2 to 3 minutes.
After breaking in chain, check chain
tension and adjust if necessary – see
“Checking Chain Tension”.
Chain Brake
143BA024 KN
Locking chain with chain brake
– in an emergency
– when starting
– at idling speed
The chain is stopped and locked when
the hand guard is pushed toward the bar
nose by the left hand –
or when brake is activated by inertia in
certain kickback situations.
143BA011 KN
36
MS 210, MS 210 C, MS 230, MS 230 C, MS 250, MS 250 C

English
Releasing the chain brake
: Pull the hand guard back toward the
front handle.
Always disengage chain brake
before accelerating engine and
before starting cutting work. The
only exception to this rule is when
you check operation of the chain
brake.
High revs with the chain brake
engaged (chain locked) will quickly
damage the powerhead and chain
drive (clutch, chain brake).
The chain brake is also activated by
the inertia of the front hand guard
if the kickback force of the saw is high
enough:
The hand guard is accelerated toward
the bar nose – even if your left hand is
not behind the hand guard, e.g. during
felling cut.
The chain brake will operate only if the
hand guard has not been modified in any
way.
Check operation of chain brake
Before starting work:
Run engine at idle speed, engage the
chain brake (push hand guard toward
143BA012 KN
bar nose). Accelerate up to full throttle
for no more than 3 seconds – the chain
must not rotate. The hand guard must be
free from dirt and move freely.
Chain brake maintenance
The chain brake is subject to normal
wear. It is necessary to have it serviced
and maintained regularly by trained
personnel. STIHL recommends that you
have the maintenance and repair work
performed by a STIHL servicing dealer
at the following intervals:
Full-time professional
users: every 3
months
Semi-professional
users (in agriculture
and construction): every 6
months
Hobby and
occasional users: every 12
months
37MS 210, MS 210 C, MS 230, MS 230 C, MS 250, MS 250 C

English
Winter Operation
At temperatures below +10°C/
50°F:
: Press down the throttle trigger
interlock and move the Master
Control lever to l (cold start).
: Turn the twist lock above the rear
handle 90° to the left.
: Lift off the carburetor box cover
vertically.
208BA005 KN
: Lift out the shutter (in front of spark
plug) vertically.
: Turn the shutter 180°.
: Refit the shutter.
: Refit the carburetor box cover and
secure it the twist lock.
Heated air is now drawn in from around
the cylinder and mixed with cold air –
this helps prevent carburetror icing.
At temperatures above +20°C/70°F,
always close the shutter again. This
is important to avoid engine running
problems, i.e. overheating.
Information
Before You Start
STOP
0
135BA029 LÄ
The four positions of the
Master Control lever
$ = Engine off –
ignition is switched off.
# = Normal run position –
engine runs or can fire.
To move the Master Control lever from #
to
n or l, press down the throttle
trigger interlock and squeeze throttle
trigger at the same time.
n=Warm start – this position is used to
start a warm engine. The Master
Control lever moves to the normal
run position as soon as the throttle
trigger is squeezed.
l=Cold start – this position is used to
start a cold engine.
001BA140 KN
38
MS 210, MS 210 C, MS 230, MS 230 C, MS 250, MS 250 C

Starting / Stopping
the Engine
English
0
1
2
3
Models with Easy Start
System
: Prime the fuel system by pressing
the fuel pump bulb about five times.
Press a few times more if you are
starting for the first time after refilling a
dry tank.
135BA027 KN
: Press in the button to open the
decompression valve.
The decompression valve closes as
soon as the engine fires.
: For this reason you must press in
the button before each starting
attempt.
135BA015 KN
All Models
: Observe safety precautions.
: Push hand guard (1) forward:
The chain is now locked.
: Press down trigger interlock (2) and
squeeze throttle trigger (3) at the
same time.
Set Master Control lever to:
for cold start l
for warm start n
(even if engine has been running
but is still cold).
208BA000 KN
39MS 210, MS 210 C, MS 230, MS 230 C, MS 250, MS 250 C

English
: Place your saw on the ground.
Make sure you have a firm footing –
check that chain is not touching any
object or the ground.
Bystanders must be well clear of the
general work area of the saw.
: Hold the saw firmly on the ground
with your left hand on the front
handle – your thumb should be
under the handle.
: Put your right foot into the rear
handle and press down.
40
143BA018 KN
Alternative method of starting:
: Hold the rear handle tightly between
your legs, just above the knees.
: Hold the front handle firmly with
your left hand – your thumb should
be under the handle.
MS 210, MS 210 C, MS 230, MS 230 C, MS 250, MS 250 C
143BA019 KN
If the engine is new, pull the starter
several times to prime the fuel system.
Machines with standard starter grip:
: Pull the starter grip slowly with your
right hand until you feel it engage –
then give the grip a brisk strong pull
and push down the front handle at
the same time.
: Do not pull out the starter rope to its
full length – it might otherwise
break.
: Do not let the starter grip snap back
– guide it slowly and vertically into
the housing so that the starter rope
can rewind properly.
143BA020 KN

Machines with ErgoStart:
ErgoStart stores the energy required to
start the chainsaw. For this reason there
may be a delay of a few seconds
between cranking the engine and it
actually starting.
There are two ways of starting with the
ErgoStart:
: Hold the starter grip with your right
hand and pull it out slowly and
steadily
or:
Hold the starter grip with your right
hand and give it several short pulls,
using only a short length of rope for
each pull.
: Push down the front handle down
while cranking. Do not pull out the
starter rope to its full length – it
might otherwise break.
: Do not let the starter grip snap back
– guide it slowly and vertically into
the housing so that the starter rope
can rewind properly.
0
5
3
4
When engine begins to fire:
: Move Master Control lever (3) to n
and continue cranking – as soon
as engine runs, immediately blip
the throttle trigger (4) –
the Master Control lever (3) will
move to the “run” position # (5) and
the engine settles down to idling
speed.
.
As the chain brake is still engaged,
the engine must be returned to
idling speed immediately – or the
engine and chain brake might
otherwise be damaged.
208BA001 KN
: Pull the hand guard back toward
the front handle: =
The chain brake is now disengaged
– your saw is ready for operation.
Always disengage chain brake
before accelerating engine. High
revs with the chain brake engaged
(chain locked) will quickly damage
the engine and chain drive (clutch,
chain brake).
: Observe safety precautions.
: Always check operation of chain
lubrication before starting work.
English
143BA012 KN
41MS 210, MS 210 C, MS 230, MS 230 C, MS 250, MS 250 C

English
To shut down the engine:
: Move Master Control lever to $
At very low outside temperatures:
Allow the engine to warm up
As soon as the engine runs:
: Blip the throttle trigger to disengage
it from the starting throttle position.
The Master Control lever will move
to the operating position – engine
settles down to idling speed.
: Disengage the chain brake:
Pull hand guard back toward front
handle as shown in illustration.
: Open throttle partly – warm up
engine for short period.
4
3
If the engine doesn’t start:
If you did not move the Master Control
lever to warm start position n quickly
enough after the engine began to fire,
the combustion chamber is flooded.
: Press down the interlock lever and
move the Master Control lever to l
(cold start).
: Turn the twist lock 90° to the left.
: Lift off the carburetor box cover
vertically.
: Place fingers behind the air filter (3),
press thumbs against the housing
and swing filter in direction of rear
handle.
: Take out the shutter (4).
208BA005 KN
: Pull off the spark plug boot.
: Unscrew and dry off the spark plug.
: Set the Master Control lever to stop
position $.
: Crank the engine several times with
the starter to clear the combustion
chamber.
135BA001 KN
: Refit the spark plug. Connect the
spark plug boot and reassemble all
other parts.
: Set Master Control lever to n
– even if engine is cold.
: Now start the engine.
135BA038 KN
42
MS 210, MS 210 C, MS 230, MS 230 C, MS 250, MS 250 C

Operating Instructions
English
If fuel tank has been run until dry and
then refueled:
Machines without easy start system:
: Pull starter rope several times until
fuel system is primed.
Machines with easy start system:
: Press fuel pump bulb (in handle
housing) several times.
During break-in period
A factory new machine should not be run
at high revs (full throttle off load) for the
first three tank fillings. This avoids
unnecessary high loads during the
break-in period. As all moving parts
have to bed in during the break-in
period, the frictional resistances in the
engine are greater during this period.
The engine develops its maximum
power after about 5 to 15 tank fillings.
Do not make the mixture leaner to
achieve an apparent increase in
power – this could damage the
engine – see “Adjusting
Carburetor”.
Always disengage the chain brake
before opening the throttle. Running
the engine at higher revs with the
chain brake engaged (saw chain at
a standstill) will quickly damage the
engine and chain drive (clutch,
chain brake).
During operation
Check chain tension frequently
A new chain has to be retensioned more
often than one that has been in use for
some time.
Chain cold:
Tension is correct when chain fits snugly
against the underside of the bar and can
still be pulled along the bar by hand.
Retension if necessary – see
“Tensioning the Saw Chain”.
Chain at operating temperature:
The chain stretches and begins to sag.
The drive links must not come out of the
bar groove – the chain may otherwise
jump off the bar.
Retension the chain – see “Tensioning
the Saw Chain”!
Always slacken off the chain after
finishing work. The chain contracts
as it cools down. If it is not
slackened off, it can damage the
crankshaft and bearings.
43MS 210, MS 210 C, MS 230, MS 230 C, MS 250, MS 250 C

English
Taking Care of Guide Bar
After long period of full-throttle
operation
Allow engine to run for a short while at
idle speed so that engine heat can be
dissipated by flow of cooling air. This
protects engine-mounted components
(ignition, carburetor) from thermal
overload.
After finishing work
: Slacken off the chain if you have
retensioned it at operating
temperature during cutting work.
The chain contracts as it cools
down. If it is not slackened off, it
could damage the crankshaft and
bearings.
Storing your saw for a short period:
Wait for engine to cool down. To avoid
condensation, fill the fuel tank and keep
the machine in a dry place, well away
from sources of ignition, until you need it
again.
Storing for a long period:
See “Storing the Unit”!
2
1
: Turn the bar over –
every time you sharpen the chain
and every time you replace the
chain – this helps avoid one-sided
wear, especially at the nose and
underside of the bar.
: Regularly clean
the oil inlet hole (1),
the oilway (2) and
the bar groove (3).
: Measure groove depth –
with scale on filing gauge* – in area
used most for cutting.
3
3
Chain
type
Picco 3/8" P 5.0 mm
Rapid 1/4" 4.0 mm
Rapid 3/8"; 0.325" 6.0 mm
Rapid 0.404" 7.0 mm
If groove depth is less than specified:
: Replace the guide bar.
The drive link tangs will otherwise
scrape along the bottom of the groove –
the cutters and tie straps will not ride on
the bar rails.
001BA119 KN
Pitch Minimum
groove
depth
44
* see “Guide to Using this Manual”
MS 210, MS 210 C, MS 230, MS 230 C, MS 250, MS 250 C

English
Air Filter System
The air filter system can be adapted to
suit different operating conditions by
simply installing a choice of filters.
Fabric filter*
For normal operating conditions and
winter operation.
Fleece filter* (non-woven)
For dry and very dusty work areas.
Cleaning the Air Filter
Dirty air filters reduce engine power,
increase fuel consumption and make
starting more difficult.
If there is a noticeable loss of
engine power
: Press down the throttle trigger
interlock and move the Master
Control lever to l (cold start).
: Turn the twist lock 90° to the left.
: Lift off off the carburetor box cover
208BA001 KN
vertically.
: Always replace damaged filter
elements.
: Clean away loose dirt from around
the filter.
1
208BA005 KN
: Place fingers behind the air filter (1),
press thumbs against the housing
and swing filter in direction of rear
handle.
To avoid damaging the air filter,
remove and install it without tools.
: Blow out the filter with compressed
air from the clean air side.
If the filter fabric is caked with dirt or no
compressed air is available:
: Wash the filter in a clean, non-
flammable solution (e.g. warm
soapy water) and then dry.
: Reinstall the filter.
135BA035 KN
* see "Guide to Using this Manual"
45MS 210, MS 210 C, MS 230, MS 230 C, MS 250, MS 250 C

English
Motor Management Adjusting the Carburetor
Exhaust emissions are controlled by the
design of the fundamental engine
parameters and components (e.g.
carburation, ignition, timing and valve or
port timing) without the addition of any
major hardware.
General Information
The carburetor comes from the factory
with a standard setting.
This setting provides an optimum fuel-air
mixture under most operating
conditions.
With this carburetor it is only possible to
correct the setting of the high speed
screw within fine limits.
Standard Setting
H
H
3
: Shut off the engine.
: Check the air filter and clean or
replace if necessary.
: Turn high speed screw (H) counter-
clockwise (max.
stop.
: Carefully screw the low speed
screw (L) down onto its seat
(clockwise), then turn it one full
turn counterclockwise from that
position.
L
/
4
1
3
/4 turn) as far as
L
208BA006 KN
46
MS 210, MS 210 C, MS 230, MS 230 C, MS 250, MS 250 C

English
Adjusting Idle Speed
H
H
3
L
/
4
1
L
LA
Engine stops while idling
: Carefully screw the low speed
screw (L) down onto its seat
(clockwise), then turn it one full
turn counterclockwise from that
position.
: Turn the idle speed screw (LA)
slowly clockwise until the chain
begins to run – then turn the screw
back one quarter of a turn from
that position.
Chain runs while engine is idling
: Carefully screw the low speed
screw (L) down onto its seat
(clockwise), then turn it one full
turn counterclockwise from that
position.
: Turn the idle speed screw (LA)
slowly counterclockwise until the
chain stops running – then turn the
screw another quarter of a turn in
the same direction.
Erratic idling behavior, poor
acceleration
(even though L screw is open 1 full turn)
Idle setting is too lean:
: Turn low speed screw (L)
208BA007 KN
counterclockwise until the engine
runs and accelerates smoothly.
It is usually necessary to change the
setting of the idle speed screw (LA)
after every correction to the low speed
screw (L).
Fine Tuning for Operation at High
Altitude
A slight correction of the setting may be
necessary if engine power is not
satisfactory when operating at high
altitude:
: Check the standard setting.
: Warm up the engine.
: Turn high speed screw (H) slightly
clockwise (leaner) no further than
stop.
47MS 210, MS 210 C, MS 230, MS 230 C, MS 250, MS 250 C

English
0
Checking the Spark Plug
Wrong fuel mix (too much engine oil in
the gasoline), a dirty air filter and
unfavorable running conditions (mostly
at part throttle etc.) affect the condition of
the spark plug. These factors cause
deposits to form on the insulator nose
which may result in trouble in operation.
If engine is down on power, difficult to
start or runs poorly at idling speed, first
check the spark plug.
: Remove spark plug – see "Starting /
Stopping the Engine".
: Clean dirty spark plug.
: Check electrode gap (A) and
readjust if necessary – see
"Specifications".
: Use only resistor type spark plugs
of the approved range.
Rectify problems which have caused
fouling of spark plug:
: Too much oil in fuel mix.
: Dirty air filter.
: Unfavorable running conditions,
000BA002 KN
e.g. operating at part load.
Fit a new spark plug after approx.
100 operating hours
or earlier if the electrodes are badly
eroded.
1
00BA036 TR
To reduce the risk of fire and burn
injury, use only spark plugs
authorized by STIHL. Always press
spark plug boot (2) snugly onto
spark plug terminal (1) of the proper
size. (Note: If terminal has
detachable SAE adapter nut, it must
be attached.)
A loose connection between spark
plug boot and ignition wire
connector in the boot may create
arcing that could ignite combustible
fumes and cause a fire.
48
MS 210, MS 210 C, MS 230, MS 230 C, MS 250, MS 250 C

Replacing Starter Rope
and Rewind Spring
English
1
1
1
: Remove the screws (1).
: Push the hand guard upward.
: Pull the underside of the fan
housing away from the crankcase
and remove it downward.
1
Machines with ErgoStart
133BA014 KN
6
: Use circlip pliers to carefully remove
circlip (2).
: Remove the washer (3), driver (4),
spring housing (5) and washer (6).
1)
5
Standard rewind starter
7
8
9
208BA013 KN
Machines with ErgoStart
4
3
7
8
2
208BA012 KN
: Remove the spring clip (7).
: Carefully remove the rope rotor
with washer (8) and pawl (9).
9
9
208BA017 KN
If no suitable circlip pliers are available,
have the starter rope or rewind spring
replaced by your servicing dealer.
1) Special option
The rewind spring may pop out and
uncoil – take care to avoid injury.
49MS 210, MS 210 C, MS 230, MS 230 C, MS 250, MS 250 C

English
2
Replacing the Starter Rope
Machines with ElastoStart
1)
10
: Ease the cap (10) out of the starter
grip.
: Remove the remaining rope from
the rotor and grip.
a
: Thread the new rope through the
starter grip and tie a simple
overhand knot. Dimension "a"
should be 4 – 7 mm.
: Pull the knot back into the grip.
: Refit the cap in the grip.
208BA014 KN
11
: Thread the rope through the top of
the guide bush (11), pull it through
the rotor (12) and secure it with a
simple overhand knot.
: Go to "Installing the Rope Rotor".
135BA036 KN
Machines without ElastoStart or
machines with ErgoStart
1
108BA015 KN
135BA032 LÄ
: Remove remaining rope from the
rotor and starter grip.
: Thread the new starter rope through
the rotor and secure it with a simple
overhand knot.
: Thread the other end of the rope
through the rope guide bushing
(from inside) and the underside of
the starter grip and secure it with
one of the special knots shown – do
not wind the rope onto the rotor.
1) Special option
50
MS 210, MS 210 C, MS 230, MS 230 C, MS 250, MS 250 C

English
Installing the Rope Rotor
Standard rewind starter
7
8
9
Machines with ErgoStart
7
8
9
: Coat rope rotor bearing bore with
resin-free oil.
: Slip rotor over the starter post – turn
it back and forth to engage anchor
loop of the rewind spring.
: Fit the pawl or pawls (9) in the rope
rotor.
9
: Fit the washer (8) on the starter
post.
: Use a screwdriver or suitable pliers
to install the spring clip (7) on the
starter post and engage it on the
pawl’s peg – the spring clip must
point clockwise as shown in the
illustration.
208BA013 KN
208BA017 KN
Tensioning the Rewind Spring
108BA014 KN
: Make a loop in the starter rope and
use it to turn the rope rotor six full
revolutions in the direction of the
arrow.
: Hold the rotor steady – pull out and
straighten the twisted rope.
: Release the rope rotor.
: Let go of rope slowly so that it winds
onto the rotor.
51MS 210, MS 210 C, MS 230, MS 230 C, MS 250, MS 250 C

English
The starter grip must locate firmly in the
rope guide bush. If the grip droops to
one side: Increase spring tension by
adding one more turn.
When the starter rope is fully extended it
must still be possible to rotate the rotor
another half turn. If this is not the case,
the spring is overtensioned and could
break.
: Take one turn of rope off the rotor in
such a case.
Machines with ErgoStart:
: Fit the spring housing, driver and
washer on the starter post.
: Use circlip pliers to carefully install
the circlip in the starter post groove.
All versions:
: Fit the fan housing on the
crankcase.
Replacing a Broken Rewind
Spring
: Remove the rope rotor.
The bits of spring might still be
under tension and could fly apart
when you take them out of the fan
housing. To reduce risk of injury,
wear eye and face protection and
work gloves.
: Carefully remove the parts of the
spring.
: Lubricate the new spring with a few
drops of resin-free oil.
: Place the replacement spring with
frame in the fan housing – the spring
loop must engage the lug in the fan
housing.
: Apply a suitable tool (screwdriver,
punch or similar) to the recesses
and push the spring into its seat in
the fan housing – the spring slips
out of the frame in this process.
: Take the frame out of the fan
housing.
: Reinstall the rope rotor, tension the
rewind spring, fit the fan cover and
secure in position with the screws.
001BA126 KN
52
MS 210, MS 210 C, MS 230, MS 230 C, MS 250, MS 250 C

Storing the Machine Checking and Replacing
Chain Sprocket
English
For periods of about 3 months or longer:
: Drain and clean the fuel tank in a
well ventilated area.
: Dispose of remaining fuel and
cleaning solution properly in
accordance with local
environmental requirements.
: Run engine until carburetor is dry,
this helps prevent the carburetor
diaphragms sticking together.
: Remove the saw chain and guide
bar, clean them and spray with
corrosion inhibiting oil.
: Thoroughly clean the unit,
pay special attention to the cylinder
fins and air filter.
: If you use a biological chain and bar
lubricant, e.g. STIHL BioPlus,
completely fill the chain oil tank.
: Store the unit in a dry and high or
locked location, out of the reach of
children and other unauthorized
persons.
: Remove the chain sprocket cover,
chain and guide bar.
: Disengage the chain brake:
Pull hand guard toward the front
handle.
Replace the chain sprocket:
– after using two Oilomatic chains
– or sooner if the wear marks (arrows)
on the sprocket are deeper than
approx. 0.5 mm since this would
reduce the life of the chain.
You can use a gauge (special
accessory) to check the depth of the
wear marks on sprockets.
It is best to use two saw chains in
rotation with one sprocket.
STIHL recommends the use of original
STIHL sprockets to ensure correct
operation of the chain brake.
5
6
2
1
4
3
6
001BA121 KN
: Use a screwdriver to remove
the E-clip (1).
: Take off the washer (2) and rim
sprocket (3).
: Examine splines on clutch drum (4)
– if wear marks are severe, fit a new
clutch drum.
: Pull clutch drum or spur sprocket
(5) and needle cage (6) off the
crankshaft.
2
1
001BA122 KN
53MS 210, MS 210 C, MS 230, MS 230 C, MS 250, MS 250 C

English
Installing spur sprocket /
rim sprocket
: Clean the crankshaft stub and
needle cage, and lubricate with
STlHL grease (special accessory).
: Push needle cage on to crankshaft.
: After fitting clutch drum or spur
sprocket, rotate it about one turn to
engage oil pump drive.
: Fit rim sprocket with cavities facing
outward.
: Refit washer and E-clip on the
crankshaft.
54
MS 210, MS 210 C, MS 230, MS 230 C, MS 250, MS 250 C

Maintaining and Sharpening
Saw Chain
Correctly sharpened chain
A properly sharpened chain slices
through wood effortlessly and requires
very little feed pressure.
Do not work with a dull or damaged
chain as it will increase the physical
effort required, cause high vibrations,
produce unsatisfactory cutting results
and a higher rate of wear.
: Clean the chain.
:
Check the chain
links and damaged rivets.
: Replace any damaged or worn parts
of the chain and match the new
parts to the shape and size of the
original parts.
It is absolutely essential to comply
with the angles and dimensions
specified below. If the saw chain is
incorrectly sharpened – and in
particular if the depth gauge is set
too low – there is a risk of increased
kickback of the chainsaw, with
resulting risk of injury.
for cracks in the
3/8
The chain pitch (e.g.
the depth gauge end of each cutter.
Use only special saw chain
sharpening files. Other files have the
wrong shape and cut.
Select file diameter according to chain
pitch – see table “Sharpening Tools”.
You must observe certain angles when
resharpening the chain cutter.
3
/8") is marked on
A
B
689BA020 KN
A = Filing angle
B = Side plate angle
Chain type Angle (°)
Rapid-Micro (RM) 30 85
Rapid-Super (RS) 30 60
Picco-Micro (PM/PMN) 30 85
Cutter shapes:
Micro = Semi-chisel
Super = Full chisel
The specified angles A and B are
obtained automatically if the
recommended files or sharpening tools
and correct settings are used.
English
689BA021 KN
AB
55MS 210, MS 210 C, MS 230, MS 230 C, MS 250, MS 250 C

English
Furthermore, the angles must be the
same on all cutters. If angles are
uneven: Chain will run roughly, not in a
straight line, wear quickly and finally
break.
As these requirements can be met only
after sufficient and constant practice:
: Use a file holder
A file holder (special accessory) must be
used for manual resharpening (see table
"Sharpening Tools"). The correct filing
angles are marked on the file holder.
For checking angles
90°
85°70°
80°
60°
35°
30°
0°
10°
Use a STlHL filing gauge (special
accessory – see table "Sharpening
689BA025 KN
Tools"). This is a universal tool for
checking the filing and side plate angles,
depth gauge setting and cutter length. It
also cleans the guide bar groove and oil
inlet holes.
File correctly
: Select sharpening tools according
to chain pitch.
: Clamp the bar in a vise if necessary.
: Lock the chain – push hand guard
forward.
: To rotate the chain, pull the hand
guard against the front handle to
disengage the chain brake. On
models with QuickStop Super, also
press down the throttle trigger
interlock lever.
: Sharpen chain frequently, take
away as little metal as possible –
two or three strokes of the file are
usually enough.
689BA022 KN
: Hold the file horizontally (at right
angle to side of guide bar) and file
according to the angles marked on
the file holder. Rest the file holder on
the top plate and depth gauge.
90°
689BA018 KN
689BA043 KN
56
MS 210, MS 210 C, MS 230, MS 230 C, MS 250, MS 250 C

English
: Always file from the inside to the
outside of the cutter.
: The file only sharpens on the
forward stroke –
lift the file off the cutter on the
backstroke.
: Avoid touching the tie straps and
drive links with the file.
: Rotate the file at regular intervals
while filing to avoid one-sided wear.
: Use a piece of hardwood to remove
burrs from cutting edge.
: Check angles with the filing gauge.
All cutters must be the same length.
If the cutters are not the same length,
they will have different heights. This
makes the chain run roughly and can
cause it to break.
: Find the shortest cutter and then file
all other cutters back to the same
length. This can be very time
consuming – it is best to have it
done in the workshop on an electric
grinder.
Depth gauge setting
a
The depth gauge determines the height
at which the cutter enters the wood and
thus the thickness of the chip removed.
Specified distance or setting between
depth gauge and cutting edge = a:
This setting may be increased by 0.2mm
(0.008") for cutting softwood in mild
weather season – no frost.
Chain pitch Depth gauge
setting “a“
Inch (mm) mm (inch)
1
/
4
3
/8 PMN (9.32) 0.45 (0.018)
3
/8 PM (9.32) 0.65 (0.026)
0.325 (8.25) 0.65 (0.026)
3
/
8
0.404 (10.26) 0.80 (0.031)
(6.35) 0.65 (0.026)
(9.32) 0.65 (0.026)
Lowering depth gauges
The depth gauge setting is reduced
when the chain is sharpened.
: Use a filing gauge to check the
setting every time you sharpen the
chain.
689BA023 KN
1
689BA047 KN
: Place a filing gauge (1) that
matches the chain pitch on the
chain – if the depth gauge projects
from the filing gauge, the depth
gauge has to be lowered.
: File down the depth gauge until it is
level with the filing gauge.
57MS 210, MS 210 C, MS 230, MS 230 C, MS 250, MS 250 C
689BA051 KN

English
: File the top of the depth gauge
parallel to the stamped service
marking (see arrow) – but do not
lower the highest point of the depth
gauge in this process.
The kickback tendency of the
chainsaw is increased if the depth
gauges are too low.
689BA044 KN
: Place filing gauge on the chain –
highest point of depth gauge must
be level with the filing gauge.
PM 1, RM2:
Rear hump of tie strap (with service
marking) is lowered along with the depth
gauge.
RSC3, RMC3, PMC3:
The upper part of the humped drive link
(with service marking) is lowered along
with the depth gauge.
The other parts of the triple-humped
tie strap and humped drive link must
not be filed since this may increase
689BA052 KN
the kickback tendency of the
chainsaw.
: After sharpening, clean the chain
thoroughly, remove filings or
grinding dust – lubricate the chain
thoroughly.
: Before long out-of-service period,
clean the chain and store it in a
well-oiled condition.
Sharpening Tools (special accessories)
Chain pitch Round file Ø Round file File holder Filing gauge Flat file
1)
Sharpening kit
inch (mm) mm (inch) Part No. Part No. Part No. Part No. Part No.
1
/
4
3
/8 PMN (9.32) 4.0 (5/32) 5605 772 4006 5605 750 4327 0000 893 4000 0814 252 3356 5605 007 1026
3
/8 P (9.32) 4.0 (5/32) 5605 772 4006 5605 750 4327 1110 893 4000 0814 252 3356 5605 007 1027
0.325 (8.25) 4.8 (
3
/
8
0.404 (10.26) 5.5 (
(6.35) 4.0 (5/32) 5605 772 4006 5605 750 4327 1110 893 4000 0814 252 3356 5605 007 1027
3
/16) 5605 772 4806 5605 750 4328 1110 893 4000 0814 252 3356 5605 007 1028
(9.32) 5.2 (13/64) 5605 772 5206 5605 750 4329 1110 893 4000 0814 252 3356 5605 007 1029
7
/32) 5605 772 5506 5605 750 4330 1106 893 4000 0814 252 3356 5605 007 1030
1) Use triangular file 0811 421 8971 for PM1 and RM2
2) consisting of file holder with round file, flat file and filing gauge
58
MS 210, MS 210 C, MS 230, MS 230 C, MS 250, MS 250 C
2)

Maintenance Chart
Please note that the following maintenance intervals apply for normal
operating conditions only. If your daily working time is longer than normal or
cutting conditions are difficult (very dusty work area, resin-rich wood,
tropical wood etc.), shorten the specified intervals accordingly. If you only
use the saw occasionally, extend the intervals accordingly.
Complete machine
Throttle trigger, trigger interlock, Master
Control
Chain brake
Pickup body/filter in fuel tank
Fuel tank Clean
Chain oil tank Clean
Chain lubrication Check
Saw chain
Guide bar
Chain sprocket Check
Air filter
AV elements (rubber buffers, springs)
Cooling inlets Clean
Cylinder fins Clean
1) STIHL recommends that this work
be done by a STIHL servicing dealer
2) see "Chain brake"
Visual inspection (condition, leaks)
Clean
Check operation XX
Check operation
Have checked by servicing dealer
Check
Clean, replace filter element
Replace pickup body
Inspect, also check sharpness
Check chain tension
Sharpen
Check (wear, damage)
Clean and turn over
Deburr
Replace
Clean
Replace
Inspect
Have replaced by servicing dealer
1)2)
1)
English
before
starting work
after finishing
work or daily
after each
refueling stop
weekly
monthly
every 12 months
if problem
if damaged
as required
XX
X
XX
X
X
XX
XXX
X
X
X
XX
XX
X
X
X
X
XX
X
XX
X
XX
X
X
XX
59MS 210, MS 210 C, MS 230, MS 230 C, MS 250, MS 250 C

English
Please note that the following maintenance intervals apply for normal
operating conditions only. If your daily working time is longer than normal or
cutting conditions are difficult (very dusty work area, resin-rich wood,
tropical wood etc.), shorten the specified intervals accordingly. If you only
use the saw occasionally, extend the intervals accordingly.
Carburetor
Spark plug
All accessible screws and nuts
(not adjusting screws)
Spark arresting screen* in muffler
Chain catcher
Safety label Replace
2)
Check idle adjustment – chain must not rotate
Readjust idle
Readjust electrode gap
Replace after about 100 operating hours
Retighten
Inspect
Clean or replace
Check
Replace
1) STIHL recommends that this work
be done by a STIHL servicing dealer
2) Firmly tighten cylinder base screws
of professional saws (3.4 kW or
more) after 10 to 20 hours of
operation
before
starting work
after finishing
work or daily
after each
refueling stop
weekly
XX
X
monthly
every 12 months
if problem
X
X
if damaged
as required
X
X
X
X
X
* see “Guide to Using this Manual“
60
MS 210, MS 210 C, MS 230, MS 230 C, MS 250, MS 250 C

Main Parts of the Saw
14
8
15
9
English
1 Twist lock
2 Carburetor adjusting screws
3 Fuel pump (easy start*)
4 Decompression valve*
5 Chain brake
3
4
1
6
2
5
7
10
8
12
11
13
9
6 Muffler
7 Chain sprocket
8 Chain sprocket cover
9 Chain catcher
10 Chain tensioner (side)
11 Chain tensioner (front)
12 Guide bar
13 Oilomatic saw chain
14 Adjusting wheel of quick
208BA003 KN
tensioner*
15 Handle of wingnut*
(quick chain tensioner)
* see "Guide to Using this Manual"
61MS 210, MS 210 C, MS 230, MS 230 C, MS 250, MS 250 C

English
16 Oil filler cap
17 Bumper spike
18
19
21
20
17
25
22
16
#
23
24
27
26
18 Front hand guard
19 Front handle (handelbar)
20 Starter grip
21 Spark plug boot
22 Master Control lever
23 Fuel filler cap
24 Throttle trigger
25 Throttle trigger interlock
26 Rear handle
27 Rear hand guard
# Serial number
208BA004 KN
62
MS 210, MS 210 C, MS 230, MS 230 C, MS 250, MS 250 C

English
Definitions
1 Twist Lock
Lock for carburetor box cover.
2 Carburetor Adjusting Screws
For fine tuning the carburetor.
3Fuel Pump
Fills carburetor with fuel to simplify
starting.
4 Decompression Valve
Releases compression pressure to
make starting easier.
5 Chain Brake
A device to stop the rotation of the
chain if activated in a kickback
situation by the operator's hand or
by inertia.
6 Muffler
Reduces engine exhaust noise and
directs the exhaust gases.
7 Chain Sprocket
The toothed wheel that drives the
saw chain.
8 Chain Sprocket Cover
Covers the clutch and the sprocket.
9 Chain Catcher
Helps to reduce the risk of operator
contact by a chain if it breaks or
comes off the bar.
10 Chain Tensioner
Permits precise adjustment of chain
tension.
11 Chain Tensioner
Permits precise adjustment of chain
tension.
12 Guide Bar
Supports and guides the saw chain.
13 Oilomatic Saw Chain
A loop consisting of cutters, tie
straps and drive links.
14 Adjusting Wheel
Permits precise adjustment of chain
tension.
15 Handle of Wingnut
Must be released to allow chain to
be tensioned with adjusting wheel.
16 Oil Filler Cap
For closing the oil tank.
17 Bumper Spike
Toothed stop for holding saw steady
against wood.
18 Front Hand Guard
Provides protection against
projecting branches and helps
prevent left hand from touching the
chain if it slips off the handlebar. It
also serves as the lever for chain
brake activation.
19 Front Handle (Handlebar)
Handlebar for the left hand at the
front of the saw.
20 Starter Grip
The grip of the starter, for starting
the engine.
21 Spark Plug Boot
Connects the spark plug with the
ignition wire.
22 Master Control Lever
Lever for choke control, starting
throttle, run and stop positions.
23 Fuel Filler Cap
For closing the fuel tank.
24 Throttle Trigger
Controls the speed of the engine.
25 Throttle Trigger Interlock
Must be depressed before the
throttle trigger can be activated.
63MS 210, MS 210 C, MS 230, MS 230 C, MS 250, MS 250 C

English
Specifications
26 Rear Handle
The support handle for the right
hand, located at the rear of the saw.
27 Rear Hand Guard
Gives added protection to
operator's right hand.
Guide Bar Nose
The exposed end of the guide bar.
(not illustrated, see chapter
"Tensioning the Saw Chain")
Clutch
Couples engine to chain sprocket
when engine is accelerated beyond
idle speed (not illustrated).
Anti-Vibration System
The anti-vibration system includes a
number of buffers designed to
reduce the transmission of
vibrations created by the engine
and cutting attachment to the
operator's hands (not illustrated).
EPA / CEPA:
The Emission Compliance Period
referred to on the Emissions
Compliance Label indicates the number
of operating hours for which the engine
has been shown to meet Federal
emission requirements.
Category
A = 300 hours
B = 125 hours
C = 50 hours
CARB:
The Emission Compliance Period used
on the CARB Air Index Label indicates
the terms:
Extended = 300 hours
Intermediate = 125 hours
Moderate = 50 hours
Engine
STIHL single cylinder two-stroke engine
MS 210
Displacement 35.2 cm
Bore 40 mm
Stroke 28 mm
Engine power 1.5 kW
Idle speed 2800 rpm
3
MS 230
Displacement 40.2 cm
3
Bore 40 mm
Stroke 32 mm
Engine power 1.9 kW
Idle speed 2800 rpm
MS 250
Displacement 45.4 cm
3
Bore 42 mm
Stroke 32 mm
Engine power 2.2 kW
Idle speed 2800 rpm
Magneto Ignition System
Electronic (breakerless)
Spark plug (resistor type)
Bosch WSR 6 F, NGK BPMR 7 A
Electrode gap
0.5 mm
This ignition system conforms to all
requirements of the Canadian
Interference-Causing Equipment
Regulations ICES-002.
64
MS 210, MS 210 C, MS 230, MS 230 C, MS 250, MS 250 C

English
Carburetor
All position diaphragm carburetor with
integral fuel pump
Fuel tank capacity
0.47 l (470 cm3)
Chain lubrication
Fully automatic speed-controlled rotary
piston oil pump. Additional manual oil
flow control.
Oil tank capacity
0.20 l (200 cm3)
Weight
Dry, without bar and chain
MS 210 4.4 kg
MS 210 C 4.5 kg
MS 230, MS 250 4.6 kg
MS 230 C, MS 250 C 4.7 kg
MS 250 C ErgoStart 4.9 kg
Cutting Attachment
STIHL cutting attachments complying
with CSA Standard CAN 3-Z 62.3:
MS 210:
Chain sprocket:
6- or 7-tooth for 3/8" P pitch
Guide bar:
for 3/8" P (9.32 mm) pitch
Rollomatic with sprocket nose
12, 14 or 16 in (30, 35 or 40 cm)
Oilomatic chain:
3/8" (9.32 mm) Picco-Micro
(63 PM, 63 PM1, 63 PMC3)
MS 230, MS 250:
Chain sprocket:
7- or 8-tooth for 0.325" pitch
Guide bar:
Rollomatic with sprocket nose
for 0.325" (8.25 mm) pitch
14, 16 or 18 in (35, 40 or 45 cm)
Oilomatic chain:
0.325" (8.25 mm) Rapid-Micro
(23 RS, 23 RM, 23 RMC, 23 RMC3)
Other cutting attachments complying
with CSA Standard CAN 3-Z 62.3 are
available (see section CSA Standard
Z 62.3 and "Chain Leaflet" inside chain
box or contact your local STIHL dealer).
Please ask your STIHL dealer to
properly match your powerhead with the
appropriate bar/chain combinations to
reduce the risk of kickback injury.
65MS 210, MS 210 C, MS 230, MS 230 C, MS 250, MS 250 C

English
Special Accessories Ordering Spare Parts Maintenance and Repairs
File holder with round file
Filing gauge
Reference gauges
STIHL lubricating grease
STIHL filler nozzle for STIHL
canisters
helps avoid spills and overfilling during
refueling.
Contact your STIHL dealer for more
information on these and other special
accessories.
Please enter your saw model, serial
number as well as the part numbers of
the guide bar and saw chain in the
spaces provided. This will make reordering simpler.
The guide bar and saw chain are subject
to normal wear and tear.
When purchasing these parts, always
quote the saw model, the part numbers
and names of the parts.
Model
Serial number
Guide bar part number
Chain part number
Users of this unit should carry out only
the maintenance operations described
in this manual. Other repair work may be
performed only by authorized STIHL
service shops.
Warranty claims following repairs can be
accepted only if the repair has been
performed by an authorized STIHL
servicing dealer using original STIHL
replacement parts.
Original STlHL parts can be identified by
the STlHL part number, the
logo and, in some cases, by the STlHL
parts symbol (. This symbol may
appear alone on small parts.
STIHl
66
MS 210, MS 210 C, MS 230, MS 230 C, MS 250, MS 250 C

Important Safety
Precautions
English
1. Fatigue causes carelessness. Be
more cautious before rest periods
and before the end of your shift.
2. Safety clothing required by your
safety organizations, government
regulations, or your employer
should be used; otherwise, snug
fitting clothing, safety foot-wear, and
hand and hear protection should be
worn.
3. Before fuelling, servicing, or trans-
porting your chainsaw, switch off the
engine. To help prevent fire, restart
your chainsaw at least 3 m from the
fuelling area.
4. When using a chainsaw, a fire
extinguisher should be available.
5. When felling, keep at least 2 1/2 tree
lengths between yourself and your
fellow workers.
6. Plan your work, assure yourself of
an obstacle-free work area and, in
the case of felling, of an escape
path from the falling tree.
7. Follow instructions in your
operator's manual for starting the
chainsaw and control the chainsaw
with a firm grip on both handles
when it is in operation. Keep
handles dry, clean and free of oil. A
chainsaw should never be carried
with the engine running.
8. When transporting your chainsaw,
use the appropriate transportation
covers that should be available for
the guide bar and saw chain.
9. Never operate a chainsaw that is
damaged or improperly adjusted or
that is not completely and securely
assembled. Be sure that the saw
chain stops moving when the
throttle control trigger is released.
Never adjust the guide bar or saw
chain when the engine is operating.
10. Beware of carbon monoxide
poisoning. Operate the chainsaw in
well ventilated areas only.
11. Do not attempt a pruning or limbing
operation in a standing tree unless
specifically trained to do so.
12. Guard against kickback. Kickback is
the upward motion of the guide bar
that occurs when the saw chain, at
the nose of the guide bar, contacts
an object. Kickback can lead to
dangerous loss of control of the
chainsaw.
13. Allow your chainsaw to cool before
fuelling, and do not smoke.
14. Don't allow other persons or
animals close to a running chainsaw
or close to where a tree is being
felled.
15. Use extreme caution when cutting
small size brush and saplings
because slender material may catch
the saw chain and be whipped
toward you.
16. When cutting a limb that is under
tension be alert for spring-back.
17. This gas powered saw is classified
according CSA-Standard
CAN 3-Z62.1 as a class 1A saw.
67MS 210, MS 210 C, MS 230, MS 230 C, MS 250, MS 250 C

English
Key to Symbols
STIHl
XX cm
© Andreas Stihl XXXX
XX cm
Model: XXX Class: XX
XXXX
XXXXX
Guide bar length
Chain Type
Kickback angle, without chain brake
Kickback angle, with chain brake
Contact of the guide bar tip with any object should be avoided
XX°/XX°
XX°/XX°
CAN 3-Z 62.1
CAN 3-Z 62.3
68
Always use two hands when operating the chainsaw
MS 210, MS 210 C, MS 230, MS 230 C, MS 250, MS 250 C

STIHL Limited Emission Control Warranty Statement
This statement is given voluntarily, based on the MOU (Memorandum of
Understanding) as agreed in April 1999 between Environmental Canada and STIHL Limited
English
Your Warranty Rights
and Obligations
STIHL Limited is pleased to explain the
Emission Control System Warranty on
your equipment type engine. In Canada
new 1999 and later model year small offroad equipment engines must be
designed, built and equipped, at the time
of sale, to meet the U.S. EPA regulations
for small non road engines. The
equipment engine must be free from
defects in materials and workmanship
which cause it to fail to conform with
U.S. EPA standards for the first two
years of engine use from the date of sale
to the ultimate purchaser.
STIHL Limited must warrant the
emission control system on your small
off-road engine for the period of time
listed below provided there has been no
abuse, neglect or improper maintenance
of your small off-road equipment engine.
Your emission control system includes
parts such as the carburetor and the
ignition system. Also included may be
hoses, and connectors and other
emission related assemblies.
Where a warrantable condition exists,
STIHL Limited will repair your small offroad equipment engine at no cost to you,
including diagnosis (if the diagnostic
work is performed at an authorized
dealer), parts, and labor.
Manufacturer's Warranty
Coverage:
In Canada 1999 and later model year
small off-road equipment engines are
warranted for two years. If any emissionrelated part on your engine is defective,
the part will be repaired or replaced by
STIHL Limited free of charge.
Owner's Warranty
Responsibilities:
As the small off-road equipment engine
owner, you are responsible for the performance of the required maintenance
listed in your owner's manual. STIHL
Limited recommends that you retain all
receipts covering maintenance on your
small off-road equipment engine, but
STIHL Limited cannot deny warranty
solely for the lack of receipts or for your
failure to ensure the performance of all
scheduled maintenance.
Any replacement part or service that is
equivalent in performance and durability
may be used in non-warranty maintenance or repairs, and shall not reduce the
warranty obligations of the engine
manufacturer.
As the small off-road equipment engine
owner, you should be aware, however,
that STIHL Limited may deny you
warranty coverage if your small off-road
equipment engine or a part has failed
due to abuse, neglect, improper
maintenance or unapproved
modifications.
You are responsible for presenting your
small off-road equipment engine to a
STIHL service center as soon as a
problem exists. The warranty repairs will
be completed in a reasonable amount of
time, not to exceed 30 days.
If you have any questions regarding your
warranty rights and responsibilities,
please contact a STIHL customer
service representative at
www.stihl.ca
or you can write to :
STIHL Ltd.,
1515 Sise Road
Box 5666
CA-LONDON ONTARIO; N6A 4L6
Coverage by STIHL Limited
STIHL Limited warrants to the ultimate
purchaser and each subsequent purchaser that your small off-road
equipment engine will be designed, built
and equipped, at the time of sale, to
meet all applicable regulations. STIHL
Limited also warrants to the initial
purchaser and each subsequent
purchaser that your engine is free from
defects in materials and workmanship
which cause the engine to fail to conform
with applicable regulations for a period
of two years.
Warranty Period
The warranty period will begin on the
date the utility equipment engine is
purchased by the initial purchaser and
69MS 210, MS 210 C, MS 230, MS 230 C, MS 250, MS 250 C

English
you have signed and sent back the warranty card to STIHL Ltd. If any emission
related part on your engine is defective,
the part will be replaced by STIHL
Limited at no cost to the owner.
Any warranted part which is not
scheduled for replacement as required
maintenance, or which is scheduled only
for regular inspection to the effect of
"repair or replace as necessary" will be
warranted for the warranty period. Any
warranted part which is scheduled for
replacement as required maintenance
will be warranted for the period of time
up to the first scheduled replacement
point for that part.
Diagnosis
You, as the owner, shall not be charged
for diagnostic labor which leads to the
determination that a warranted part is
defective. However, if you claim
warranty for a component and the
machine is tested as non-defective,
STIHL Limited will charge you for the
cost of the emission test.
Mechanical diagnostic work will be performed at an authorized STIHL servicing
dealer. Emission test may be performed
either at STIHL Incorporated,
536 Viking Drive, P.O. Box 2015, Virginia
Beach, VA 23452 or at any independent
test laboratory.
Warranty Work
STIHL Limited shall remedy warranty
defects at any authorized STIHL
servicing dealer or warranty station. Any
such work shall be free of charge to the
owner if it is determined that a warranted
part is defective. Any manufacturerapproved or equivalent replacement part
may be used for any warranty
maintenance or repairs on emissionrelated parts and must be provided
without charge to the owner. STIHL
Limited is liable for damages to other
engine components caused by the
failure of a warranted part still under
warranty.
The following list specifically defines the
emission-related warranted parts:
Carburetor
Choke (Cold start enrichment system)
Intake manifold
Air filter
Spark plug
Magneto or electronic ignition system
(ignition module)
Catalytic converter (if applicable)
Fasteners
Where to make a claim for
Warranty Service
Bring the product to any authorized
STIHL servicing dealer and present the
signed warranty card.
Maintenance Requirements
The maintenance instructions in this
manual are based on the application of
the recommended 2-stroke fuel-oil
mixture (see also instruction "Fuel").
Deviations from this recommendation
regarding quality and mixing ratio of fuel
and oil may require shorter maintenance
intervals.
Limitations
This Emission Control Systems Warranty shall not cover any of the following:
: repair or replacement required
because of misuse, neglect or lack
of required maintenance,
: repairs improperly performed or re-
placements not conforming to
STIHL Limited specifications that
adversely affect performance and/
or durability, and alterations or
modifications not recommended or
approved in writing by STIHL
Limited,
and
: replacement of parts and other
services and adjustments
necessary for required maintenance
at and after the first scheduled
replacement point.
70
MS 210, MS 210 C, MS 230, MS 230 C, MS 250, MS 250 C

CSA-Standard Z62.3-04
English
CSA-Standard Z62.3-04 sets certain
performance and design criteria related
to chain saw kickback.
To comply with CSA Z62.3-04:
a. saws of class 1A and 2A shall, in
their original condition, not exceed
60° bar stop angle
b. saws of class 1B, 1C and 2C shall
not exceed 45° bar stop angle
In both cases the chain brake will be
activated when the kickback is
measured.
These kickback requirements do not
apply to chainsaws fitted with bow bars.
Bow bar equipped saws are only for use
by thoroughly instructed and
experienced operators. Use of bow bar
guides may result in serious or fatal
injury.
The computed kickback angles are
measured by applying a computerprogram to test results from a kickback
test machine.
Warning!
In order to comply with the computed
kickback angle requirements of
CSA Z62.3-04, use only the following
cutting attachments:
: a bar and chain combination as
listed in this leaflet on the following
page as complying
: other replacement saw chains for
use on specific powerheads or
: type A reduced kickback saw chain
or type C low kickback saw chain
There are potential powerhead and bar
combinations with which reduced
kickback saw chains or low-kickback
saw chains can be used and which have
not been specifically tested for
compliance with the computer derived
kickback angle.
STIHL offers a variety of bars and
chains. STIHL reduced kickback bars
and low kickback chains are designed to
reduce the risk of kickback injury. Other
chains are designed to obtain higher
productivity or sharpening ease but may
result in a higher kickback tendency.
Please ask your STIHL dealer to
properly match your powerhead with the
appropriate bar/chain combinations to
reduce the risk of kickback injury. Low
kickback saw chains are recommended
for all powerheads. See the charts of this
STIHL Bar and Chain Information for
details.
Warning!
Use of other, non listed bar/chain
combinations may increase kickback
forces and increase the risk of kickback
injury. New bar/chain combinations may
be developed after publication of this
literature, which will, in combination with
certain powerheads, comply with
CSA Z62.3-04. Check with your STIHL
dealer for such new combination
updates.
Definition of the chainsaw
classes
Class 1A
A professional chainsaw with internal
combustion engine, intended for use in
forest operations by trained forestry
workers where the operator is expected
to use the chainsaw for extended
periods of time on a daily basis
Class 1B
A professional chainsaw with internal
combustion engine, limited to a
maximum engine displacement of
40 cm3 and intended for use by trained
tree service workers
Class 1C
A consumer chainsaw with internal
combustion engine, intended for general
use by home owners, cottagers,
campers, etc., and for such general
applications as clearing, pruning, cutting
firewood, etc.
Class 2A
An electric, professional chainsaw,
intended for use in forest operations by
trained forestry workers where the
operator is expected to use the chain
saw for extended periods of time on a
daily basis
Class 2C
An electric consumer chainsaw,
intended for general use by home
owners, cottagers, campers, etc., and
for such general applications as
clearing, pruning, cutting, firewood, etc.
71MS 210, MS 210 C, MS 230, MS 230 C, MS 250, MS 250 C

English
Definition of replacement saw
chain types:
Typ e A
Reduced-kickback saw chain which
meets a computed kickback angle of 60°
for any saw without activated chainbrake
Typ e C
Low-kickback saw chain is a chain which
meets a computed kickback angle for
45° for any saw without activated chain
brake
72
MS 210, MS 210 C, MS 230, MS 230 C, MS 250, MS 250 C

Table des matières
français
Indications concernant
la présente Notice d’emploi ............ 74
ErgoStart ......................................... 75
Prescriptions de sécurité
et techniques de travail .................. 75
Montage du guide-chaîne
et de la chaîne
BA_SE_090_010_02_06.fmImprimé sur papier blanchi sans chlore.
(Tendeur de chaîne latéral) ............ 98
Montage du guide-chaîne
et de la chaîne
(Tendeur de chaîne frontal) ............ 99
Montage du guide-chaîne
et de la chaîne
(Tendeur de chaîne rapide) .......... 100
Tension de la chaîne
(Tendeur de chaîne latéral) .......... 103
Tension de la chaîne
(Tendeur de chaîne frontal) .......... 104
Tension de la chaîne
(Tendeur de chaîne rapide) .......... 104
Contrôle de la tension
de la chaîne .................................. 104
Carburant ..................................... 105
Faire le plein de carburant ............ 106
Huile de graissage
de chaîne ...................................... 107
L’encre d’imprimerie contient des huiles végétales, le papier est recyclable.
Faire le plein d’huile
de graissage de chaîne ................ 108
Contrôle du graissage
de la chaîne .................................. 108
Frein de chaîne ............................ 108
Utilisation en hiver ........................ 110
Avant la mise en route –
pour information ............................ 110
Mise en route / arrêt du moteur ..... 111
Instructions de service .................. 115
Entretien du guide-chaîne ............. 116
Système de filtre à air ................... 117
Nettoyage du filtre à air ................. 117
Réglage du moteur ........................ 118
Réglage du carburateur ................ 118
Contrôle de la bougie ................... 120
Remplacement du câble de
lancement et du
ressort de rappel .......................... 121
Rangement de la machine ........... 125
Contrôle et remplacement
du pignon ..................................... 125
Entretien et affûtage
de la chaîne .................................. 127
Instructions pour la
maintenance et l’entretien ............ 131
Principales pièces ........................ 133
Caractéristiques techniques ......... 136
Accessoires optionnels ................ 138
Approvisionnement en
pièces détachées ......................... 138
Instructions pour la réparation ...... 138
Règles de sécurité importantes .... 139
Explication des symboles ............. 140
Garantie de la Société
STIHL Limited relative au
système antipollution .................... 141
Norme CSA Z62.3-04 ................... 143
Ne confiez votre tronçonneuse qu’à des
personnes qui comprennent parfaitement la présente Notice d’emploi.
Pour obtenir les meilleures performances et être satisfait de votre tronçonneuse, il est très important que vous
lisiez et compreniez les instructions de
maintenance et les prescriptions de
sécurité (à partir de la page 75) avant
d’utiliser votre tronçonneuse.
Si vous ne comprenez pas parfaitement
certaines instructions de cette Notice
d’emploi, veuillez consulter votre concessionnaire ou distributeur STIHL.
!Attention !
Cette tronçonneuse à bois étant un outil
à haute vitesse, il faut impérativement
prendre des précautions de sécurité particulières - comme avec toute autre scie
à moteur - pour éviter les risques de
blessure.
Une utilisation imprudente ou inadéquate peut causer des blessures graves,
voire mortelles.
La philosophie de STIHL consiste à
poursuivre le développement continu de
tous ses produits. Ceux-ci sont donc
susceptibles d’être l’objet de modifications et de perfectionnements techniques. Si par conséquent les caractéristiques ou l’aspect de votre tronçonneuse
diffèrent des descriptions de la présente
Notice d’emploi, veuillez consulter votre
concessionnaire STIHL qui pourra vous
donner des informations complémentaires ou vous conseiller.
STIHl
© ANDREAS STIHL AG & Co. KG, 2006
0458 208 8221 A. M1,5. G6. CP. Printed in USA
73MS 210, MS 210 C, MS 230, MS 230 C, MS 250, MS 250 C

français
Indications concernant la
présente Notice d’emploi
Pictogrammes
Tous les pictogrammes appliqués sur
le dispositif sont expliqués dans la présente Notice d’emploi.
Pour faciliter la compréhension, des
illustrations viennent compléter les
descriptions concernant l’utilisation du
dispositif.
Repérage des différents types de
textes
Les textes qui décrivent l’utilisation du
dispositif peuvent être mis en évidence
de différentes manières :
: Description ou instruction qui ne se
réfère pas directement à l’illustration.
Description ou instruction qui se réfère
directement à l’illustration placée audessus ou à côté du texte, avec renvoi
au numéro de repérage d’une pièce sur
cette illustration.
Exemple :
Desserrer la
1 = vis ;
démonter le
2 = levier ...
Outre la description concernant l’utilisation, la présente Notice d’emploi peut
renfermer des textes complémentaires
importants. Ces passages sont repérés
par l’un des pictogrammes suivants :
Avertissement contre un risque
d’accident et de blessure ainsi que
de graves dommages matériels.
Avertissement contre un risque de
détérioration du dispositif ou de certains composants.
Indication pas forcément indispensable pour la manipulation du dispositif, mais pouvant être utile pour
une meilleure compréhension et
une utilisation optimale.
Indication à suivre pour ménager
l’environnement avec une utilisation
éco-compatible.
Volume de fourniture /
équipement
La présente Notice d’emploi est
valable pour des modèles qui ne
sont pas tous dotés des mêmes
équipements. Les composants qui
ne sont pas compris sur tous les
modèles et les utilisations qui s’y
rapportent sont repérés par un asté-
*. Les composants qui ne
risque
font pas partie du volume de fourniture standard et qui sont par conséquent repérés par un astérisque
peuvent être fournis par le revendeur STIHL à titre d’accessoires
optionnels.
*
Développement technique
La philosophie de STIHL consiste à
poursuivre le développement continu de
toutes ses machines et de tous ses
dispositifs ; c’est pourquoi nous devons
nous réserver tout droit de modification
du volume de fourniture, en ce qui
concerne la forme, la technique et les
équipements.
On ne pourra donc en aucun cas se prévaloir des indications et illustrations de
la présente Notice d’emploi à l’appui de
revendications quelconques.
74
MS 210, MS 210 C, MS 230, MS 230 C, MS 250, MS 250 C

ErgoStart Prescriptions de sécurité et
techniques de travail
français
Les tronçonneuses avec ErgoStart*
peuvent être mises en route avec une
vitesse de lancement réduite et un
moindre effort.
Le système ErgoStart accumule
l’énergie de lancement pour la mise
en route de la tronçonneuse. C’est
pourquoi quelques secondes peuvent s’écouler entre le lancement et
le démarrage du moteur.
: Conserver la tronçonneuse hors de
portée des enfants – même des
enfants très jeunes sont capables
de la faire démarrer.
: Durant toute la procédure de mise
en route, tenir fermement la poignée tubulaire – tenir compte de
l’intervalle de temps nécessaire
entre le lancement et le démarrage
du moteur.
: Lorsque la tronçonneuse n’est pas
utilisée – toujours placer le levier
universel en position d’arrêt et
enclencher le frein de chaîne –
afin d’écarter le risque de mise en
route inopinée.
Veiller à ce que la machine ne
puisse pas être utilisée sans autorisation (p. ex. par des enfants).
Voir aussi « Mise en route / arrêt du
moteur ».
* Version optionnelle
Une tronçonneuse est un
outil de sciage à haute
vitesse de coupe et c'est
pourquoi il faut respecter
des prescriptions de
sécurité particulières afin
de réduire le risque de
blessure.
Il est donc important de
lire, de comprendre parfaitement et d'observer
les prescriptions de sécurité et les avertissements
ci-après. Il convient de
relire périodiquement la Notice d'emploi
et les prescriptions de sécurité. Une utilisation imprudente ou inadéquate peut
entraîner des blessures graves, voire
même mortelles.
!Attention !
Les forces de réaction, y compris le
rebond (kick-back) peuvent être dangereuses. Attacher une attention toute particulière au chapitre consacré aux forces
de réaction.
L'utilisateur doit donc demander au
revendeur STIHL de lui montrer comment utiliser sa machine. En travaillant
avec une tronçonneuse, il convient de
suivre aussi toutes les règles de sécurité
généralement valables pour le travail
avec une hache ou une scie à main.
Respecter toutes les règles de sécurité,
normes et prescriptions applicables de
l'État fédéral, de la province ou des
administrations locales.
!Attention !
Ne pas prêter ou louer la machine sans
y joindre la Notice d'emploi. S'assurer
que toute personne utilisant cette
machine comprend parfaitement les instructions de cette Notice d'emploi.
!Attention !
L'utilisation de cette machine peut être
dangereuse. La chaîne de la tronçonneuse possède de nombreuses dents
acérées. Tout contact des dents de
coupe avec une partie du corps de l'utilisateur risque de causer des coupures,
même si la chaîne n'est pas en mouvement. À pleins gaz, la vitesse de la
chaîne peut atteindre 30 m/s.
Utiliser la tronçonneuse uniquement
pour couper des objets en bois. Ne pas
l'utiliser pour d'autres travaux, car un tel
usage pourrait provoquer un accident ou
bien endommager la machine.
!Attention !
Les jeunes encore mineurs ne sont pas
autorisés à manier cette machine.
Veillez à ce que des personnes, en particulier des enfants, ou des animaux ne
se trouvent pas sur l'aire d'utilisation de
la machine.
!Attention !
Afin de réduire le risque de blessure de
personnes qui pourraient se trouver à
proximité, et d'endommagement de leur
propriété, ne jamais laisser la machine
en marche sans surveillance.
75MS 210, MS 210 C, MS 230, MS 230 C, MS 250, MS 250 C

français
Lorsqu'elle n’est pas employée (p. ex.
au cours d'une pause), il faut arrêter le
moteur et prendre les précautions
nécessaires pour que la machine ne
puisse pas être utilisée par des personnes non autorisées.
La plupart de ces prescriptions de sécurité et avertissements sont valables pour
toutes les tronçonneuses STIHL. Divers
modèles peuvent toutefois avoir des
composants ou des commandes différents. Pour la description des commandes et du fonctionnement des
composants du modèle considéré,
consulter le chapitre correspondant de
la Notice d'emploi.
Les prescriptions à suivre pour utiliser
une tronçonneuse en toute sécurité
s'appliquent :
1. à l'utilisateur ;
2. à la tronçonneuse ;
3. à l'utilisation de la tronçonneuse.
L'UTILISATEUR
Condition physique
L'utilisateur doit être en bonne condition
physique et mentale et il ne doit pas être
sous l'influence de substances quelconques (drogues, alcool, etc.) risquant
d'entraver sa vue, sa dextérité ou sa
capacité de jugement. Ne jamais travailler avec cette machine en étant fatigué.
!Attention !
Il faut toujours rester vigilant – si l'on se
sent fatigué, faire une pause. La fatigue
peut entraîner une perte de contrôle. Le
travail avec un dispositif à moteur peut
être fatigant. Si son état de santé risque
d'être aggravé par un travail fatigant,
l'utilisateur devrait consulter un médecin
avant d'entreprendre des travaux avec
cette machine.
!Attention !
L'utilisation prolongée d'un dispositif à
moteur (ou de toute autre machine)
exposant l'utilisateur aux vibrations peut
provoquer la maladie des « doigts
blancs » (phénomène de Raynaud) ou
le syndrome du tunnel carpien.
Ces phénomènes réduisent l'aptitude
des mains à percevoir et à régler la température, entraînant une insensibilité
des doigts et une sensation brûlante.
Cela peut causer des troubles nerveux
et circulatoires ainsi qu'une nécrose.
Tous les facteurs qui contribuent à la
maladie des doigts blancs ne sont pas
connus, mais on sait que le temps froid,
le fait de fumer et des maladies ou des
conditions physiques affectant les
artères et la circulation sanguine, ainsi
qu'un niveau de vibrations élevé et de
longues périodes d'exposition aux vibrations comptent parmi les facteurs qui
favorisent le développement de la maladie des doigts blancs. Afin de réduire le
risque de la maladie des doigts blancs et
du syndrome du tunnel carpien, veuillez
tenir compte des indications suivantes :
– La plupart des dispositifs à moteur
STIHL sont livrables avec un système antivibratoire (« AV ») conçu
pour réduire la transmission, aux
mains de l'utilisateur, des vibrations
engendrées par la machine. Un système AV est recommandé pour les
personnes qui utilisent des dispositifs à moteur régulièrement ou pendant d'assez longues périodes.
– Porter des gants et prendre soin
d'avoir toujours les mains au chaud.
Des poignées chauffantes, livrables
sur de nombreuses tronçonneuses
STIHL, sont recommandées pour
l'utilisation par temps froid.
– Veiller à ce que le système AV soit
bien entretenu. Sur un dispositif à
moteur avec des composants desserrés ou avec des butoirs AV
endommagés ou usés, le taux de
vibrations est plus élevé.
Veiller à ce que la chaîne soit bien
affûtée. Une chaîne émoussée fait
augmenter le temps de coupe et la
pression nécessaire pour faire
avancer la chaîne émoussée dans
le bois augmente le taux des vibrations transmises aux mains de l'utilisateur.
– Toujours saisir fermement les poi-
gnées, mais ne pas les serrer constamment avec une pression excessive. Faire des pauses fréquentes.
Toutes les précautions énoncées ciavant ne peuvent pas exclure le risque
de la maladie des doigts blancs ou d'un
syndrome du tunnel carpien. C'est
pourquoi les personnes qui utilisent
76
MS 210, MS 210 C, MS 230, MS 230 C, MS 250, MS 250 C

français
continuellement ou régulièrement un tel
dispositif à moteur doivent attentivement
surveiller l'état de leurs mains et de leurs
doigts. Si l'un des symptômes ci-dessus
se manifeste, consulter immédiatement
un médecin.
!Attention !
Le système d'allumage du moteur
STIHL génère un champ électromagnétique de très faible intensité. Ce champ
peut produire des interférences avec
certains stimulateurs cardiaques. Afin
de prévenir le risque de conséquences
graves, voire même mortelles, les personnes portant un stimulateur cardiaque
devraient consulter leur médecin et le
fabricant de leur stimulateur cardiaque
avant de travailler avec cette machine.
Vêtements appropriés
!Attention !
Pour réduire le risque de blessure, l'utilisateur devrait porter un équipement de
protection approprié.
Les vêtements doivent
être résistants et bien
ajustés, tout en laissant
une liberté de mouvement
totale. Porter des panta-
lons longs en tissu
robuste, pour se protéger les jambes
contre le contact avec les branches ou
les buissons. Afin de réduire le risque de
coupures, porter des pantalons ou des
jambières avec protection anticoupure
intégrée.
Éviter de porter une veste ample, une
écharpe, une cravate, des bijoux, un
pantalon large ou à revers, de longs cheveux flottants et tout ce qui risquerait de
se prendre dans les branches, les buissons ou les pièces en mouvement de la
machine. Les personnes aux cheveux
longs doivent les nouer ou les assurer
au-dessus des épaules.
Une bonne prise au sol
est très importante. Porter
des chaussures robustes
à semelle antidérapante.
Il est recommandé de porter des chaussures de
sécurité avec coquille en
acier.
!Attention !
Afin de réduire le risque
de blessure à la tête, porter un casque de protection homologué. Le bruit
d'une tronçonneuse peut
porter atteinte à l'ouïe.
Porter des protège-oreilles (tampons ou
capsules insonorisantes) pour se protéger l'ouïe. Les personnes qui travaillent
régulièrement et longuement avec cette
machine devraient faire vérifier leur ouïe
périodiquement.
En travaillant avec des protège-oreilles,
il faut faire tout particulièrement attention, parce que des bruits signalant un
danger (cris, signaux sonores etc.) sont
moins bien perceptibles.
Ne jamais travailler avec cette machine
sans porter des lunettes de protection
ou des lunettes de sécurité avec éléments de protection supérieurs et latéraux, conformément à la norme nationale applicable. Afin de réduire le risque
de blessure au visage, STIHL recommande de porter, en plus des lunettes de
protection ou de sécurité – une visière
protégeant le visage.
En travaillant avec la
machine et pour manipuler la chaîne, toujours porter des gants. Des gants
robustes et antidérapants
assurent une bonne prise
et protègent les mains.
STIHL propose une vaste gamme de
vêtements et équipements de protection.
LA TRONÇONNEUSE
Pour les illustrations et les définitions
des composants de la machine, voir le
chapitre « Principales pièces ».
!Attention !
Ne jamais apporter de modifications
quelconques sur la machine. Utiliser
exclusivement les équipements livrés
par STIHL ou expressément autorisés
par STIHL pour ce modèle STIHL bien
déterminé. Même si certains équipements non autorisés pouvaient être rapportés sur la machine STIHL, leur usage
serait extrêmement dangereux.
77MS 210, MS 210 C, MS 230, MS 230 C, MS 250, MS 250 C

français
Si la machine a été soumise à des sollicitations sortant du cadre de l'utilisation
normale (p. ex. si elle a été soumise à
des efforts violents, en cas de choc ou
de chute), avant de poursuivre le travail,
il faut impérativement s'assurer qu'elle
se trouve en parfait état de fonctionnement. Contrôler tout particulièrement
l'étanchéité du système de carburant
(absence de fuites) et la fiabilité des
commandes et des dispositifs de sécurité. Il ne faut en aucun cas continuer
d'utiliser cette machine si elle est
endommagée. En cas de doute, la faire
contrôler par le revendeur STIHL.
L'UTILISATION DE LA TRONÇONNEUSE
Transport de la machine
!Attention !
Afin de réduire le risque de blessure par
suite d'un contact avec la chaîne, ne
jamais porter ou transporter la machine
avec la chaîne en mouvement. Pour tout
déplacement sur une distance dépassant quelques pas, toujours engager le
frein de chaîne.
!Attention !
Avant de transporter la machine sur de
longues distances, toujours arrêter le
moteur et mettre en place le protègechaîne sur la chaîne et le guide-chaîne.
Pour le transport dans un véhicule,
l'assurer afin qu'elle ne risque pas de se
renverser, ce qui pourrait l'endommager
et entraîner une fuite de carburant.
Toujours porter la machine à l'horizontale. Saisir la poignée avant de telle
sorte que la machine soit bien équilibrée, à l'horizontale. La porter avec le
silencieux chaud placé du côté opposé
au corps et avec le dispositif de coupe
en arrière.
Carburant
La machine STIHL fonctionne avec un
mélange d'essence et d'huile (voir chapitre « Carburant » de la Notice
d'emploi).
!Attention !
L'essence est un carbu-
rant extrêmement inflam-
mable. Le carburant ren-
versé et enflammé par
une étincelle ou par toute
autre source d'allumage
peut entraîner un incendie, ainsi que de
graves brûlures et des dégâts matériels
importants. Il faut donc être très prudent
lors de la manipulation de l'essence ou
du mélange. Ne pas fumer, manipuler le
carburant à proximité d'un feu ou
s'approcher avec une flamme. À noter
que des vapeurs de carburant peuvent
s'échapper du système d'alimentation.
Instructions pour faire le plein
!Attention !
Faire le plein de la machine à un endroit
bien aéré, seulement en plein air. Toujours arrêter le moteur et attendre qu'il
soit refroidi avant de refaire le plein. Suivant le carburant utilisé, les conditions
001BA115 KN
climatiques et le système d'aération du
réservoir de carburant, les vapeurs
d'essence emprisonnées dans le réservoir de carburant peuvent se trouver
sous pression.
Afin de réduire le risque de brûlures ou
d'autres blessures, à l'échappement de
vapeurs et de gaz d'essence, enlever
prudemment le bouchon du réservoir de
carburant de la machine, de telle sorte
qu'une surpression interne puisse
s'échapper lentement. Ne jamais enlever le bouchon du réservoir de carburant
lorsque le moteur est en marche.
Pour faire le plein, choisir un endroit bien
dégagé et, avant de lancer le moteur,
aller au moins à 10 pieds (3 m) du lieu où
l'on a fait le plein. Avant de lancer le
moteur, essuyer le carburant qui aurait
pu déborder.
!Attention !
En faisant le plein, et à l'utilisation de la
machine, s'assurer qu'elle ne présente
pas de fuites. Si l'on constate une fuite,
ne pas laisser le moteur en marche ou le
redémarrer avant d'avoir éliminé la fuite
et essuyé le carburant qui s'est
échappé. Ne pas se renverser de
l'essence sur les vêtements. Le cas
échéant, se changer immédiatement.
78
MS 210, MS 210 C, MS 230, MS 230 C, MS 250, MS 250 C

français
Divers modèles peuvent être munis de
différents bouchons de réservoir de carburant.
Bouchon à ailette rabattable
!Attention !
Afin de réduire le risque de fuite de carburant et d'incendie par suite du desserrage du bouchon du réservoir de carburant, le bouchon du réservoir doit être
correctement positionné et fermement
serré dans l'orifice de remplissage du
réservoir de carburant.
À cet effet, sur ce bouchon de réservoir STIHL,
relever l'ailette rabattable
située au-dessus du bouchon de telle sorte qu'elle
se trouve à angle droit par
rapport au bouchon. Présenter le bouchon de telle sorte que les repères triangulaires situés sur l'ailette rabattable et
sur l'orifice du réservoir de carburant
coïncident. En agissant sur l'ailette, faire
tourner le bouchon dans le sens des
aiguilles d'une montre, le plus fermement possible (environ 1/4 de tour).
Rabattre l'ailette de telle
sorte qu'elle affleure avec
le dessus du bouchon. Si
l'ailette rabattable
n'affleure pas avec le bou-
chon du réservoir et que
le talon de l'ailette rabattable ne se
prend pas dans le logement prévu dans
le goulot de remplissage du réservoir,
cela signale que le bouchon n'est pas
correctement positionné et serré. Il faut
alors recommencer toute la procédure
décrite ci-avant.
Bouchon à visser
!Attention !
S'il n'est pas fermement serré, le bouchon de réservoir peut se desserrer
sous l'effet des vibrations. Une grande
quantité de carburant peut alors
s'échapper. Pour écarter le risque de
perte de carburant et d'incendie, serrer
le bouchon le plus fermement possible,
à la main.
Pour serrer fermement le
bouchon de réservoir
muni d'une fente, on peut
insérer l'embout du tournevis de la clé multiple
STIHL ou un outil similaire
dans la fente du bouchon.
Voir le chapitre « Faire le plein de
carburant » de la Notice d'emploi.
Avant la mise en route
Enlever le protège-chaîne et vérifier si la
tronçonneuse se trouve en bon état de
fonctionnement. (Voir le tableau de
maintenance, vers la fin de la Notice
d'emploi.)
!Attention !
Avant la mise en route, toujours s'assurer que la machine se trouve en bon état
de fonctionnement, en particulier la
gâchette d'accélérateur, le blocage de
gâchette d'accélérateur, le commutateur
d'arrêt et la chaîne. La gâchette d'accélérateur doit pouvoir être actionnée facilement et elle doit toujours revenir d'ellemême en position de ralenti. Ne jamais
essayer de modifier les éléments de
commande ou les équipements de sécurité.
!Attention !
Ne jamais travailler avec la machine si
elle est endommagée, pas correctement
ajustée ou entretenue, pas complètement assemblée ou bien pas assemblée
de façon fiable.
!Attention !
S'assurer que le contact de câble d'allumage est parfaitement fixé sur la bougie
– un contact d'allumage desserré peut
produire un arc électrique qui risque
d'enflammer des vapeurs de carburant
et de causer un incendie.
Pour l'assemblage correct du guidechaîne et de la chaîne, respecter la procédure décrite au chapitre « Montage du
guide-chaîne et de la chaîne » de la
Notice d'emploi. La chaîne STIHL Oilomatic, le guide-chaîne et le pignon doivent être parfaitement appariés, en ce
qui concerne l'épaisseur des maillons
d'entraînement et le pas. Avant de remplacer un guide-chaîne ou une chaîne,
voir les chapitres « Spécifications » et
« Rebond (kick-back) ».
79MS 210, MS 210 C, MS 230, MS 230 C, MS 250, MS 250 C

français
!Attention !
Une tension correcte de la chaîne est
extrêmement importante. Pour éviter un
réglage incorrect, il faut tendre la chaîne
en respectant la procédure décrite dans
la Notice d'emploi. Toujours s'assurer
que l'écrou (les écrous) à six pans du
couvercle de pignon est (sont) bien
serré(s) après le réglage de la tension
de la chaîne, pour assurer la bonne fixation du guide-chaîne. Ne jamais démarrer la tronçonneuse si le couvercle de
pignon n'est pas serré. Vérifier une nouvelle fois la tension de la chaîne après le
serrage de l'écrou (des écrous) puis à
intervalles réguliers (après chaque arrêt
de la tronçonneuse). Si la chaîne se
détend au cours de la coupe, arrêter le
moteur et rectifier ensuite la tension de
la chaîne. Ne jamais essayer d'ajuster la
chaîne lorsque le moteur tourne !
Les poignées doivent être toujours
propres et sèches : veiller tout particulièrement à ce qu'elles ne soient pas
mouillées ou poisseuses, enduites
d'huile, de carburant, de graisse ou de
résine – pour que l'on puisse parfaitement les tenir et contrôler la machine.
Mise en route du moteur
!Attention !
Afin de réduire le risque d'incendie et de
brûlure, avant de lancer le moteur, aller
au moins à 10 pieds (3 mètres) du lieu
où l'on a fait le plein. Démarrer le moteur
seulement en plein air.
Pour le démarrage et l'utilisation de la
tronçonneuse, ne pas se faire aider par
une autre personne. Pour les instructions spécifiques concernant le lancement du moteur, voir le chapitre correspondant de la Notice d'emploi. Des
méthodes de mise en route adéquates
réduisent le risque de blessure.
!Attention !
Afin de réduire le risque de blessure par
suite d'un contact avec la chaîne et/ou
de forces de réaction, à la mise en route
de la tronçonneuse, le frein de chaîne
doit être engagé.
!Attention !
Ne pas démarrer la tronçonneuse à
bout de bras. Une telle méthode est
dangereuse, car on risque de perdre le
contrôle de la tronçonneuse.
Deux méthodes sont recommandées
pour le démarrage de la tronçonneuse.
001BA113 KN
Avec la première méthode recommandée, on démarre la tronçonneuse au sol.
S'assurer que le frein de chaîne est
engagé (voir le chapitre « Frein de
chaîne » dans la Notice d'emploi) et placer la tronçonneuse sur un sol ferme ou
sur une autre surface solide, dans une
zone dégagée. Prendre une position
stable et sûre.
Saisir fermement la poignée avant de la
tronçonneuse avec la main gauche et
exercer une pression vers le bas. Pour
les tronçonneuses dont la poignée
arrière se trouve au niveau du sol,
mettre la pointe du pied droit dans la poignée arrière et exercer une pression
vers le bas. Avec la main droite, tirer lentement la poignée du lanceur jusqu'à ce
qu'une certaine résistance devienne
perceptible, puis tirer vigoureusement
d'un coup sec.
80
MS 210, MS 210 C, MS 230, MS 230 C, MS 250, MS 250 C

français
Avec la seconde méthode recommandée, vous pouvez démarrer la tronçonneuse sans la mettre par terre. S'assurer
que le frein de chaîne est engagé et saisir fermement la poignée avant de la
tronçonneuse avec la main gauche. Raidir le bras qui tient la poignée avant (le
tenir bien tendu). Maintenir fermement la
poignée arrière de la tronçonneuse
entre les jambes, juste au-dessus des
genoux. Prendre une position stable et
sûre. Avec la main droite, tirer lentement
la poignée du lanceur jusqu'à ce qu'une
certaine résistance devienne perceptible, puis tirer vigoureusement d'un
coup sec.
!Attention !
S'assurer que le guide-chaîne et la
chaîne ne risquent pas de vous toucher
ou bien d'entrer en contact avec le sol,
des obstacles ou des objets quelconques. Au lancement du moteur, le
régime atteint avec commande d'accélérateur encliquetée en position de démarrage est suffisamment élevé pour que
l'embrayage entraîne le pignon et mette
la chaîne en mouvement, si le frein de
chaîne n'est pas engagé. Si le quart
supérieur de la tête du guide-chaîne
entre en contact avec un objet quelconque, cela peut provoquer un effet de
rebond ou de kick-back (voir « Forces
de réaction ». Afin de réduire ce risque,
il faut toujours enclencher le frein de
chaîne avant de lancer le moteur. Ne
jamais essayer de lancer le moteur tant
que le guide-chaîne se trouve dans une
001BA114 KN
coupe ou une entaille.
Dès que le moteur démarre, donner
immédiatement une impulsion sur la
gâchette d'accélérateur, pour défaire
l'encliquetage en position de démarrage
et permettre au moteur de retomber au
régime de ralenti.
!Attention !
En tirant la poignée du lanceur, ne pas
s'enrouler le câble de lancement autour
de la main. Ne pas lâcher la poignée du
lanceur et la laisser revenir brusquement en arrière, mais la guider au retour
afin que le câble de lancement s'enroule
correctement. Si l'on ne respecte pas
ces recommandations, on risque de se
blesser la main ou les doigts ou
d'endommager le lanceur.
Ajustages importants
!Attention !
Afin de réduire le risque de blessure, par
suite d'une perte de contrôle ou d'un
contact avec la chaîne en mouvement,
ne jamais utiliser la machine si le ralenti
n'est pas correctement réglé. Lorsque le
régime de ralenti est correctement réglé,
la chaîne doit être arrêtée au ralenti.
En ce qui concerne les instructions à
suivre pour le réglage du régime de
ralenti, voir le chapitre correspondant de
la Notice d'emploi.
Si vous ne pouvez pas régler correctement le régime de ralenti, demandez au
revendeur STIHL de contrôler la
machine et de la régler correctement ou
de la réparer si nécessaire.
Au cours du travail
Prise en mains et guidage de la
machine
Au cours du travail, toujours tenir fermement la machine à deux mains, par les
poignées. Empoigner les poignées en
les entourant avec les pouces.
001BA087 LÄ
Prendre la poignée arrière de la main
droite. Cela est également valable pour
les gauchers.
Avec les mains dans cette position,
on peut mieux contrôler et absorber les
à-coups et les forces de traction et de
rebond, sans risquer de perdre le
contrôle de la tronçonneuse (voir chapitre « Forces de réaction »).
81MS 210, MS 210 C, MS 230, MS 230 C, MS 250, MS 250 C

français
!Attention !
Afin de réduire le
risque de perte de
contrôle et de
blessure grave,
voire même
mortelle, de l'utilisateur ou de personnes
qui pourraient se trouver à proximité, ne
jamais utiliser la tronçonneuse d'une
seule main. Il vous serait alors plus difficile de contrôler les forces de réaction et
de prévenir un glissement ou un rebond
du guide-chaîne et de la chaîne le long
du tronc ou du morceau de bois à scier.
Même avec les tronçonneuses compactes spécialement conçues pour l'utilisation dans des espaces restreints, le
travail d'une seule main est dangereux,
car l'utilisateur risque de perdre le
contrôle de la machine.
!Attention !
Pour éviter de graves coupures, tenir les
mains et les pieds à l'écart du dispositif
de coupe. Ne jamais toucher à une
chaîne en mouvement, avec la main ou
toute autre partie du corps.
!Attention !
Toujours se tenir dans une position
stable et bien d'aplomb. Faire très attention dans des conditions présentant un
risque de dérapage (sol mouillé, neige)
et sur un terrain difficile recouvert d'une
végétation dense. Faire attention aux
obstacles cachés, tels que des souches
d'arbre, racines, pierres, trous ou fossés, pour ne pas risquer de trébucher.
Les troncs écorcés présentent un grand
risque de dérapage. Pour dégager le
passage, enlever les branches, buissons et autres morceaux coupés. Il faut
être extrêmement prudent en travaillant
à flanc de coteau ou sur un sol inégal.
!Attention !
Faire extrêmement attention par temps
mouillé ou en cas de gel (pluie, neige,
verglas). Arrêter le travail en cas de
vent, de tempête ou de forte pluie.
!Attention !
Afin de réduire le risque de blessure par
suite d'une perte de contrôle, ne jamais
travailler sur une échelle ou sur tout
autre support instable. Ne jamais tenir la
machine à bras levés, c'est-à-dire à une
hauteur supérieure à celle des épaules.
Ne pas trop se pencher en avant.
!Attention !
Ne jamais travailler dans un arbre sans
avoir reçu la formation professionnelle
spécifique requise pour un tel travail et
sans être parfaitement assuré (par
exemple avec un système composé
d'un moufle et d'un harnais ou sur une
nacelle élévatrice). Il faut toujours avoir
les deux mains libres pour manipuler la
tronçonneuse dans un espace restreint
et il faut prendre toutes les précautions
utiles pour éviter d'être blessé par les
branches qui tombent.
Lorsque le moteur est en marche, toujours tenir la tronçonneuse de telle sorte
qu'aucune partie du corps de l'utilisateur
ne se trouve dans le rayon d'action du
001BA031 KN
dispositif de coupe. Au tronçonnage, se
tenir du côté gauche par rapport au plan
de coupe.
Ne jamais exercer de pression sur la
tronçonneuse en arrivant à la fin de la
coupe. Sous l'effet de la pression, le
guide-chaîne et la chaîne en rotation
pourraient s'échapper de la coupe et de
001BA082 KN
82
MS 210, MS 210 C, MS 230, MS 230 C, MS 250, MS 250 C

français
l'entaille, décrire un mouvement incontrôlé et toucher l'utilisateur ou un objet
quelconque. Si la chaîne en rotation
touche un objet, elle peut rebondir et
blesser l'utilisateur.
Conditions de travail
Démarrer et utiliser la machine exclusivement à l'extérieur, dans un espace
bien aéré. Travailler seulement dans de
bonnes conditions de visibilité, à la
lumière du jour. Travailler prudemment.
!Attention !
La tronçonneuse est conçue pour être
maniée par une seule personne. Ne
tolérer aucune autre personne dans la
zone de travail, pas même au moment
de la mise en route du moteur. Arrêter
immédiatement le moteur si quelqu'un
s'approche.
!Attention !
Même si toute personne doit rester
assez loin de la tronçonneuse en
marche, il ne faut pas travailler tout seul.
Rester à portée de voix d'autres personnes qui pourraient venir en aide si
nécessaire.
!Attention !
Dès que le moteur tourne,
il dégage des gaz
d'échappement toxiques
contenant des substances chimiques, p. ex.
des hydrocarbures imbrûlés (y compris du benzène) et de l'oxyde
de carbone, susceptibles de provoquer
des maladies du système respiratoire,
un cancer, des malformations de naissance ou d'autres défauts génétiques.
Certains de ces gaz (p. ex. l'oxyde de
carbone) sont incolores et inodores. Afin
de réduire le risque d'intoxication grave,
voire mortelle, par suite de l'inhalation
de gaz toxiques, ne jamais faire fonctionner la machine dans des locaux ou
dans des espaces mal aérés. En cas de
concentration de fumées due à une ventilation insuffisante, éliminer de l'aire de
travail tout ce qui pourrait gêner la circulation de l'air, pour permettre une bonne
ventilation avant d'entreprendre le travail et/ou faire des pauses fréquentes
pour que les fumées puissent se dissiper avant d'atteindre une concentration
élevée.
!Attention !
L'inhalation de certaines poussières,
en particulier de poussières organiques
telles que de la moisissure ou du pollen,
peut déclencher chez les personnes
sensibles une réaction allergique ou
asthmatique. L'inhalation intense ou
répétée de poussière ou d'autres polluants entraînés dans l'air, en particulier
dans le cas de particules très fines, peut
causer des maladies respiratoires ou
autres. Ceci concerne également la
poussière de bois, tout spécialement
celle du bois dur, mais aussi celle de
nombreux bois tendres tels que le Western Red Cedar. Dans la mesure du possible, éviter la poussière à la source.
Appliquer de bonnes procédures de travail, par exemple en sciant toujours avec
une chaîne parfaitement affûtée (qui
produit des copeaux de bois, plutôt que
de la poussière fine) et manier la
machine de telle sorte que le vent ou le
processus de travail dirige la poussière
produite par la machine dans le sens
opposé à l'utilisateur. Suivre les recommandations des organismes professionnels et commerciaux relatives à la poussière et aux « particules ». Si l'inhalation
de poussière ne peut pas être efficacement évitée, par exemple lorsqu'on travaille au niveau du sol ou à proximité du
sol, l'utilisateur et toutes les personnes
qui pourraient se trouver à proximité doivent porter un masque respiratoire conforme à la norme nationale applicable.
!Attention !
L'inhalation de poussière d'amiante est
dangereuse et peut causer des maladies graves, voire même mortelles, du
système respiratoire ou un cancer des
poumons. L'utilisation et l'élimination de
produits renfermant de l'amiante sont
soumises à la sévère réglementation de
l'EPA (Environmental Protection
Agency).
Instructions de travail
!Attention !
Ne pas travailler avec commande
d'accélérateur encliquetée en position
de démarrage, car il serait alors impossible de contrôler le régime du moteur.
En cas d'urgence, arrêter immédiatement le moteur – placer le curseur combiné / le commutateur d'arrêt en position
0 ou STOP.
83MS 210, MS 210 C, MS 230, MS 230 C, MS 250, MS 250 C

français
!Attention !
Toujours arrêter le moteur avant de
poser la tronçonneuse sur le sol.
!Attention !
Après le relâchement de la gâchette
d'accélérateur, la chaîne de la tronçonneuse reste en mouvement pendant un
court instant (par inertie).
Si la chaîne de la tronçonneuse se
coince et que l'on accélère en même
temps, la machine est soumise à de
fortes sollicitations et l'embrayage
patine continuellement. Cela peut arriver
si l'on enfonce la gâchette d'accélérateur pendant plus de quelques secondes alors que la chaîne est coincée dans
la coupe ou que le frein de chaîne est
bloqué. Cela peut produire une surchauffe qui endommage des éléments
fonctionnels importants (p. ex.
embrayage, pièces du carter en matière
synthétique) – les défauts subséquents,
notamment le fait que la chaîne soit
entraînée au ralenti, présentent un
risque de blessure accru.
! Attention !
La tronçonneuse est munie d'un arrêt de
chaîne. Il a pour fonction de réduire le
risque de blessure si la chaîne saute ou
casse. Il arrive parfois que l'arrêt de
chaîne soit endommagé ou arraché. Afin
de réduire le risque de blessure, il ne
faut pas travailler avec la tronçonneuse
si l'arrêt de chaîne est endommagé ou
manque.
! Attention !
Contrôler régulièrement les butoirs antivibratoires. Remplacer immédiatement
les butoirs endommagés, cassés ou fortement usés, car de tels butoirs risqueraient de causer une perte de contrôle
de la tronçonneuse. Si l'on constate un
certain « mou » au guidage de la tronçonneuse, un accroissement du taux de
vibrations ou des « talonnages » plus
fréquents à l'utilisation normale, il faut en
conclure que les butoirs sont endommagés, cassés ou fortement usés. Les
butoirs doivent toujours être remplacés
par jeu complet. En cas de doute, pour
savoir si les butoirs doivent être remplacés, consulter le revendeur STIHL.
!Attention !
La tronçonneuse n'est pas conçue pour
écarter ou soulever les branches,
racines ou autres objets. Un tel usage
pourrait endommager le dispositif de
coupe ou le système AV.
!Attention !
À la coupe, veiller à ce que la chaîne ne
touche pas des corps étrangers tels que
des pierres, fils de clôture, clous etc. De
tels objets peuvent être projetés et risquent d'endommager la chaîne ou de
causer un effet de rebond.
!Attention !
Le silencieux et d'autres pièces du
moteur (p. ex. les ailettes de refroidissement du cylindre, la bougie) chauffent au
cours de l'utilisation et restent chauds
pendant un certain temps après l'arrêt
du moteur. Afin de réduire le risque de
brûlures, ne pas toucher au silencieux
ou à d'autres pièces tant qu'ils sont
chauds.
!Attention !
Afin de réduire le risque d'incendie et de
brûlures, veiller à ce que le voisinage du
silencieux soit propre. Enlever les
dépôts excessifs de lubrifiant et tous les
débris tels que les aiguilles de sapin, les
brindilles ou les feuilles. Laisser le
moteur refroidir en le posant sur une surface en béton ou en métal, sur le sol nu
ou sur un gros morceau de bois (p. ex.
sur le tronc d'un arbre abattu), loin de
toute substance inflammable.
!Attention !
Ne jamais modifier le silencieux. Une
modification ou un endommagement du
silencieux peut augmenter le dégagement de chaleur ou d'étincelles, avec un
plus grand risque d'incendie et de brûlures. De plus, le moteur pourrait alors
subir des dommages irréparables. Faire
entretenir et réparer le silencieux exclusivement par le revendeur STIHL.
Pot catalytique (catalyseur)
!Attention !
Certains dispositifs à
moteur STIHL sont équipés d'un catalyseur qui
réduit les émissions de
nuisances du moteur en
assurant des réactions
chimiques à l'intérieur du silencieux.
84
MS 210, MS 210 C, MS 230, MS 230 C, MS 250, MS 250 C

français
En raison de ces réactions chimiques,
au ralenti ou lorsqu'on arrête le moteur,
le silencieux refroidit plus lentement
qu'un silencieux sans catalyseur. Afin de
réduire le risque d'incendie et de brûlures, il faut donc respecter les prescriptions de sécurité particulières précisées
ci-après.
!Attention !
Étant donné qu'un silencieux à catalyseur refroidit plus lentement qu'un silencieux ordinaire, le dispositif à moteur
doit toujours être rangé debout tant que
le silencieux est très chaud. Ne jamais le
ranger de telle sorte que le silencieux
encore très chaud se trouve à proximité
de buissons, d'herbe, de copeaux de
bois ou d'autres matières inflammables.
!Attention !
Un montage incorrect ou un endommagement du capot ou bien l'endommagement ou une déformation du silencieux
gêne le refroidissement du catalyseur.
Pour réduire le risque d'incendie ou de
brûlures, ne pas poursuivre le travail si
le capot du cylindre est endommagé ou
mal monté ou bien si le silencieux est
endommagé ou déformé.
Le catalyseur est fourni avec des grilles
réduisant le risque d'incendie par suite
d'un jaillissement de particules très
chaudes. Étant donné la forte chaleur
dégagée par la réaction catalytique, ces
grilles restent généralement propres et
ne nécessitent normalement pas
d’entretien. En cas de perte de puissance, si l'on suppose qu'elle provient
de l'encrassement d'une grille, demander au revendeur STIHL de procéder à
la maintenance du silencieux.
Forces de réaction, y compris rebond
!Attention !
Lorsque la chaîne tourne, des forces de
réaction peuvent se produire à tout
moment. Les forces de réaction peuvent
entraîner des blessures graves.
Les forces considérables développées
pour scier le bois peuvent être inversées
et agir contre l'utilisateur. Si la chaîne en
rotation est brusquement arrêtée en touchant un objet solide tel qu'un tronc ou
une branche ou si elle se coince, les
forces de réaction se manifestent instantanément. Ces forces de réaction peuvent provoquer une perte de contrôle, ce
qui, en retour, risque de causer des blessures graves, voire même mortelles. La
connaissance des causes de ces forces
de réaction peut toutefois aider à éviter
une surprise et une perte de contrôle.
L'effet de surprise augmente le risque
d'accident.
Les forces de réaction les plus courantes sont :
– le rebond (kick-back),
– le contrecoup,
– les forces de traction.
Rebond (kick-back) :
Un effet de rebond se produit lorsque le quart supérieur de la tête du guidechaîne touche un objet
dur ou se coince.
001BA093 LÄ
001BA035 KN
La réaction de la puissance de coupe de
la chaîne soumet alors la tronçonneuse
à une force de rotation dans la direction
opposée au mouvement de la chaîne.
85MS 210, MS 210 C, MS 230, MS 230 C, MS 250, MS 250 C

français
Le guide-chaîne peut être alors rapidement projeté en décrivant un arc de
cercle incontrôlé vers le haut et vers
l'arrière, généralement dans le plan du
guide-chaîne. Dans certaines circonstances, le guide-chaîne décrit un mouvement en direction de l'utilisateur qui
peut subir des blessures graves, voire
même mortelles.
Un rebond peut se produire p. ex.
lorsque la partie de la chaîne qui passe
sur le quart supérieur de la tête du
guide-chaîne entre en contact avec le
bois ou se coince à l'ébranchage ou bien
si la tronçonneuse n'est pas maniée correctement au début d'une coupe à cœur
ou d'un mortaisage.
Plus les forces de rebond sont importantes, plus l'utilisateur a du mal à rester
maître de la tronçonneuse. De nombreux facteurs influent sur le déclenchement et sur la force de l'effet de rebond.
Parmi d'autres facteurs, il convient de
citer la vitesse de la chaîne, la vitesse
d'impact du guide-chaîne et de la chaîne
contre l'objet, l'angle de contact, l'état de
la chaîne.
Le type du guide-chaîne et de la chaîne
utilisés joue aussi un rôle important en
ce qui concerne les risques de rebond et
les forces engendrées. Certains types
de guide-chaînes et de chaînes STIHL
sont construits de telle sorte que les
forces de rebond se trouvent réduites.
STIHL recommande l'utilisation de
guide-chaînes et de chaînes à tendance
au rebond réduite.
Équipements pour la réduction du
risque de blessure en cas de rebond
STIHL recommande d'utiliser sur la tronçonneuse le frein de chaîne STIHL
Quickstop avec les guide-chaînes et les
chaînes à tendance au rebond réduite,
repérés par une étiquette verte.
!Attention !
Afin de réduire le risque de blessure, ne
jamais utiliser une tronçonneuse dont le
frein de chaîne ne fonctionne pas correctement. Confier alors la tronçonneuse au revendeur STIHL local. Ne pas
utiliser la tronçonneuse tant que le
défaut n'a pas été éliminé.
Frein de chaîne STIHL Quickstop
STIHL a mis au point un système de
frein de chaîne dont le rôle est de
réduire le risque de blessure dans certaines situations de rebond. Il est appelé
frein de chaîne Quickstop. Ce frein de
chaîne Quickstop fait partie de l'équipement standard de votre tronçonneuse
STIHL.
001BA174 KN
En cas de rebond, le guide-chaîne peut
pivoter autour de la poignée avant.
Lorsque l'utilisateur de la tronçonneuse
se trouve en position de sciage – c'està-dire que sa main gauche tient fermement la poignée située derrière le
protège-main – et que cette main
gauche tournant autour de la poignée
avant touche le protège-main avant (qui
constitue le levier d'actionnement du
frein de chaîne Quickstop) en exerçant
un effort suffisant, ce contact avec la
main actionne le frein de chaîne Quickstop, à condition toutefois qu'il ait fait
l'objet d'une maintenance adéquate. Sur
les tronçonneuses STIHL de fabrication
assez récente, le frein de chaîne peut
être également actionné par la force
d'inertie. Si les forces de rebond sont
suffisamment élevées, le protège-main
86
MS 210, MS 210 C, MS 230, MS 230 C, MS 250, MS 250 C

français
est soumis à une accélération en direction du nez du guide-chaîne, même sans
contact avec la main de l'utilisateur. Voir
chapitre « Frein de chaîne » de la Notice
d'emploi.
!Attention !
Ne jamais utiliser la tronçonneuse sans
protège-main avant. En cas de rebond,
ce protège-main contribue à la protection de la main gauche ou d'autres parties du corps. De plus, le fait d'enlever le
protège-main de la tronçonneuse munie
d'un frein de chaîne Quickstop mettrait
le frein de chaîne hors de service.
!Attention !
Ni le frein de chaîne Quickstop, ni tout
autre dispositif de freinage de la chaîne
ne peut empêcher l'effet de rebond. Ces
dispositifs sont construits de telle sorte
qu'ils réduisent les risques de blessure
lorsqu'ils sont déclenchés dans certaines situations provoquant l'effet de
rebond. Afin que le frein de chaîne
Quickstop puisse réduire le risque de
blessure en cas de rebond, il doit être
correctement entretenu et se trouver en
bon état de fonctionnement. Voir le chapitre « Frein de chaîne » de la Notice
d'emploi et le paragraphe
« Maintenance, réparation et
rangement » à la fin des présentes prescriptions de sécurité. De plus, l'utilisateur doit rester à une distance suffisante
du guide-chaîne pour être sûr que le
système Quickstop ait le temps de se
déclencher et d'arrêter la chaîne, avant
que la chaîne vienne le toucher.
!Attention !
Une maintenance incorrecte du frein de
chaîne peut accroître le temps de freinage ou empêcher le déclenchement du
frein de chaîne.
!Attention !
Ne jamais faire tourner la tronçonneuse
pendant plus de 3 secondes à une
vitesse supérieure au régime de ralenti
lorsque de frein de chaîne est actionné
ou si, pour une raison quelconque, la
chaîne est coincée dans la coupe. Le
patinage de l'embrayage peut produire
une surchauffe entraînant de graves
détériorations du carter du moteur, de
l'embrayage et des composants du système de graissage, ce qui exerce aussi
une influence négative sur le fonctionnement du frein de chaîne. Si l'embrayage
a patiné pendant plus de 3 secondes,
laisser le carter du moteur refroidir avant
de reprendre le travail et contrôler le
fonctionnement du frein de chaîne
comme décrit au chapitre « Frein de
chaîne » de la Notice d'emploi. S'assurer aussi que la chaîne n'est pas entraînée au régime de ralenti (voir
« Ajustages importants », ci-avant).
Chaîne à faible tendance au rebond et
guide-chaînes à tendance au rebond
réduite
STIHL propose différentes versions de
guide-chaînes et de chaînes. Les guidechaînes STIHL à tendance au rebond
réduite et les chaînes à faible tendance
au rebond sont conçus pour réduire le
risque de blessure pouvant découler de
l'effet de rebond. D'autres chaînes sont
conçues pour un plus haut rendement
de coupe ou pour un affûtage facile,
mais cela peut entraîner une plus forte
tendance au rebond.
Aussi bien aux utilisateurs dotés
d'une longue expérience qu'aux utilisateurs manquant d'expérience,
STIHL recommande l'utilisation de
guide-chaînes à tendance au rebond
réduite, de chaînes à faible tendance
au rebond et d'un frein de chaîne
Quickstop.
Demander au revendeur STIHL d'équiper votre tronçonneuse avec la combinaison de guide-chaîne/chaîne qui convient pour réduire le risque de blessure
du à l'effet de rebond. Des guidechaînes et chaînes portant une étiquette
verte sont recommandés pour toutes les
tronçonneuses.
Attention !
L'utilisation d'autres combinaisons de
guide-chaîne/chaîne qui ne figurent pas
sur la liste peut accroître les forces de
rebond et le risque de blessure par suite
d'un rebond. De nouvelles combinaisons de guide-chaîne/chaîne conformes
au § 4.1.3 de la norme CSA Z 62.3-04
Rebond de tronçonneuses peuvent
avoir été mises au point après la publication de la présente documentation.
Veuillez rechercher de telles combinaisons adéquates avec votre revendeur
STIHL.
87MS 210, MS 210 C, MS 230, MS 230 C, MS 250, MS 250 C

français
!Attention !
Les guide-chaînes à tendance au
rebond réduite et les chaînes à faible
tendance au rebond ne peuvent pas éviter le rebond, mais ils sont conçus de
telle sorte qu'ils réduisent le risque de
blessure découlant de l'effet de rebond.
Ils peuvent être fournis par le revendeur
STIHL.
!Attention !
Même si la tronçonneuse est équipée du
Quickstop, d'un guide-chaîne à tendance au rebond réduite et/ou d'une
chaîne à faible tendance au rebond, cela
ne supprime pas le risque de blessure
en cas de rebond. C'est pourquoi il faut
toujours respecter toutes les prescriptions de sécurité pour éviter les situations dans lesquelles un effet de rebond
peut se produire.
Chaîne à faible tendance au rebond
Certains types de chaînes de tronçonneuses possèdent des composants spécialement conçus pour réduire la force
d'un effet de rebond provoqué par un
contact du nez du guide-chaîne. STIHL
a mis au point une chaîne à faible tendance au rebond pour votre tronçonneuse.
La « chaîne de tronçonneuse à faible
tendance au rebond » est une chaîne
dont les caractéristiques de rebond, testées avec une chaîne à l'état d'origine,
sur un nombre représentatif de tronçonneuses sélectionnées, a satisfait aux
exigences du § 4.1.3.2 de la norme CSA
Z 62.3-04 Rebond de tronçonneuses.
!Attention !
Il existe des combinaisons de tronçonneuse et de guide-chaîne avec lesquelles on peut utiliser des chaînes à
faible tendance au rebond, mais pour
lesquelles il n'a pas été spécialement
certifié qu'elles satisfont au test d’angle
de rebond de 60° / 45° déterminé par
ordinateur, conformément au § 4.1.3 de
la norme CSA Z 62.3-04 Rebond de
tronçonneuses. Certaines chaînes à
faible tendance au rebond n'ont pas été
testées avec toutes les combinaisons de
tronçonneuse et guide-chaîne.
!Attention !
Une chaîne émoussée ou pas correctement affûtée peut réduire ou annuler
l'effet des éléments spécialement conçus pour réduire l'énergie d'un effet de
rebond. Une réduction ou un meulage
incorrect des limiteurs de profondeur ou
une forme incorrecte des dents de
coupe peut accroître le risque et l'énergie potentielle d'un effet de rebond.
C'est pourquoi il faut toujours scier avec
une chaîne parfaitement affûtée.
Guide-chaîne à tendance au rebond
réduite
Les guide-chaînes STIHL à tendance au
rebond réduite, portant une étiquette
verte, sont conçus pour réduire le risque
de blessure par suite d'un effet de
rebond, lorsqu'ils sont employés avec
des chaînes STIHL à faible tendance au
rebond portant une étiquette verte.
!Attention !
Lorsqu'ils sont utilisés avec d'autres
chaînes plus agressives, ces guidechaînes peuvent perdre leur avantage
en ce qui concerne la réduction de l'effet
de rebond.
Guide-chaînes en arc
!Attention !
Ne jamais monter un guide-chaîne en
arc sur une tronçonneuse STIHL. Toute
tronçonneuse équipée d'un guidechaîne en arc présente un très grand
danger. Un guide-chaîne en arc présente un plus grand risque de rebond,
étant donné que la surface qui pourrait
produire un effet de rebond est bien plus
grande. Le fait d'utiliser une chaîne à
tendance au rebond réduite sur un
guide-chaîne en arc ne réduit pas sensiblement le risque de blessure en cas de
rebond.
Conseils pour éviter un rebond
La meilleure protection contre le risque
de blessure pouvant découler d'un effet
de rebond est d'éviter les situations qui
présentent un risque de rebond :
1. Prendre la tronçonneuse à deux
mains et la tenir fermement. Ne pas
la lâcher.
88
MS 210, MS 210 C, MS 230, MS 230 C, MS 250, MS 250 C

français
2. Toujours surveiller la position de la
tête du guide-chaîne.
3. Faire attention à ce que la tête du
guide-chaîne ne touche jamais un
objet quelconque. Ne pas couper
des branches avec la tête du guidechaîne. Faire tout spécialement
attention à proximité de fils de fer et
à la coupe de petites branches
dures, de buissons et de rejets,
dans lesquels la chaîne peut facilement rester accrochée.
4 Ne pas trop se pencher vers l'avant.
5. Ne pas scier à bras levés.
6. Attaquer et poursuivre la coupe à
pleins gaz.
7. Ne couper qu'un seul morceau de
bois à la fois.
8. Être extrêmement prudent en introduisant la tronçonneuse dans une
coupe déjà commencée.
9. Ne pas essayer d'effectuer un mortaisage sans être familiarisé avec
cette technique de travail.
10. Ne jamais oublier que le morceau
de bois à scier peut changer de
position et que des forces diverses
peuvent refermer la fente de coupe
et coincer la chaîne.
11. Maintenir la chaîne en bon état. Travailler seulement avec une chaîne
correctement affûtée et bien tendue.
12. Se tenir de côté par rapport au plan
de coupe de la tronçonneuse.
A = Forces de traction
A
Des forces de traction peuvent se produire lorsque la section de chaîne située
sur la partie inférieure du guide-chaîne
est brusquement arrêtée, lorsqu'elle se
coince, reste accrochée ou touche un
corps étranger noyé dans le bois. La
réaction de la chaîne attire la tronçonneuse vers l'avant et l'utilisateur ne peut
plus la maîtriser. Des forces de traction
se produisent souvent lorsque la griffe
de la tronçonneuse n'est pas fermement
plaquée contre l'arbre ou la branche et
lorsque la chaîne ne tourne pas à pleine
vitesse avant d'attaquer le bois.
!Attention !
Faire très attention en coupant des taillis
et des rejets dans lesquels la chaîne
peut facilement s'accrocher, ce qui
risque de faire perdre l'équilibre.
Pour éviter les forces de traction
1. Toujours attaquer la coupe avec la
chaîne tournant à pleine vitesse, la
griffe étant plaquée contre le bois.
2. On peut aussi éviter les forces de
traction en ouvrant l'entaille ou la
fente de coupe avec des coins.
B = Contrecoup
001BA037 KN
Un contrecoup peut se produire lorsque
la section de chaîne située sur la partie
supérieure du guide-chaîne est brusquement arrêtée parce qu'elle se
coince, reste accrochée ou touche un
corps étranger noyé dans le bois. La
réaction de la chaîne repousse la tronçonneuse vers l'utilisateur qui risque de
perdre le contrôle de la machine. Un
contrecoup se produit souvent lorsqu'on
coupe avec la partie supérieure du
guide-chaîne.
Pour éviter un contrecoup
1. Faire attention aux forces ou situations qui risquent de provoquer un
coincement de la partie supérieure
de la chaîne dans le bois à scier.
2. Ne jamais couper plus d'un seul
morceau de bois à la fois.
3. Ne pas gauchir la tronçonneuse en
retirant le guide-chaîne d'un mortaisage ou d'une coupe effectuée de
bas en haut, car la chaîne risquerait
de se coincer.
B
001BA038 KN
89MS 210, MS 210 C, MS 230, MS 230 C, MS 250, MS 250 C

français
Techniques de coupe
Abattage
Par abattage, on entend la coupe d'un
arbre pour le faire tomber.
Avant d'abattre un arbre, prendre en
considération toutes les conditions risquant d'affecter la direction de la chute.
!Attention !
De nombreux facteurs peuvent avoir
une influence sur la direction de la
chute, de telle sorte que l'arbre ne tombe
pas dans la direction prévue, p. ex. la
direction et la vitesse du vent, l'inclinaison naturelle de l'arbre, les arbres et
obstacles avoisinants, la déclivité du
terrain, une structure unilatérale des
branches, la structure du bois, la pourriture du cœur de l'arbre, une charge de
neige etc. Afin de réduire le risque de
blessures graves, voire même mortelles, pour l'utilisateur et d'autres personnes qui pourraient se trouver à proximité, toujours analyser la situation et
tenir compte de ces conditions avant
d'entreprendre la coupe et faire attention
au fait que l'arbre peut changer de direction en tombant.
!Attention !
Toujours tenir compte de l'état général
de l'arbre. Des personnes manquant
d'expérience ne devraient jamais
essayer d'abattre des arbres dont le
cœur est pourri ou décomposé ou bien
des arbres inclinés et soumis à des
contraintes quelconques. En effet, à
l'abattage, de tels arbres risquent de
casser ou d'éclater, avec les risques
de blessures graves, voire même mortelles, que cela présente pour l'utilisateur et les personnes qui pourraient se
trouver à proximité. Faire également
attention aux branches cassées ou
mortes qui pourraient se détacher sous
l'effet des vibrations et tomber sur l'utilisateur. À l'abattage d'un arbre à flanc de
coteau, l'utilisateur devrait si possible se
tenir en amont par rapport à l'arbre.
Instructions pour l'abattage :
1
1 1
À l'abattage, respecter une distance au
moins égale à deux fois et demi la longueur de l'arbre, par rapport à la personne la plus proche.
Avant d'entreprendre des travaux
d'abattage près des routes, voies de
chemin de fer, lignes électriques etc., il
faut prendre des précautions supplémentaires. Informer la police, la société
d'électricité ou l'administration des chemins de fer avant d'entreprendre les travaux.
/
2
1
/
2
2
!Attention !
Ne jamais oublier que des appels ou
avertissements sonores peuvent être
étouffés par le bruit du moteur.
A
Chemin de repli
001BA088 LÄ
Dégager tout d'abord la base du tronc
et la zone de travail en enlevant les
branches et les broussailles gênantes et
nettoyer le pied du tronc à la hache.
Prévoir ensuite deux chemins de repli
(B) et enlever les obstacles. Ces chemins de repli doivent généralement se
trouver du côté opposé à la direction de
chute prévue pour l'arbre considéré (A)
et ce, sous un angle d'env. 45°. Déposer
tous les outils et équipements à une distance de sécurité par rapport à l'arbre,
mais pas sur les chemins de repli.
B
45°
45°
B
001BA040 KN
90
MS 210, MS 210 C, MS 230, MS 230 C, MS 250, MS 250 C

Racines d'appui
français
Si l'arbre possède de grosses racines,
couper tout d'abord la plus grosse racine
puis exécuter une coupe horizontale
pour enlever le coin ainsi obtenu.
Contrôle de la direction de chute à
l'aide de la nervure de visée
La nervure de visée prévue sur le capot
et sur le carter de la tronçonneuse aide
à contrôler la direction de chute lors du
sciage de l'entaille d'abattage :
Positionner la tronçonneuse de telle
sorte que la ligne de visée soit exactement orientée dans la direction dans
laquelle l'arbre devra tomber.
C
001BA146 KN
C
Coupe conventionnelle
C = Entaille d'abattage - déterminant la
direction de chute
Pour une coupe conventionnelle :
: Exécuter l'entaille d'abattage bien
001BA153 KN
perpendiculairement à la ligne de
chute et le plus près possible du sol.
: Exécuter une coupe de haut en bas,
sous un angle d'env. 45 degrés,
jusqu'à une profondeur égale
à 1/5 ou 1/4 du diamètre du tronc.
: Exécuter la deuxième coupe à
l'horizontale.
: Enlever le coin à 45 degrés ainsi
obtenu.
C
C
001BA143 KN
Technique à grand angle d'entaille
C = Entaille d'abattage - déterminant la
direction de chute
Pour la coupe à grand angle d'entaille :
: Exécuter l'entaille d'abattage bien
perpendiculairement à la ligne de
chute et le plus près possible du sol.
: Exécuter une coupe de haut en bas,
sous un angle d'env. 50 degrés,
jusqu'à une profondeur égale
à 1/5 ou 1/4 du diamètre du tronc.
: Exécuter la deuxième coupe par
le bas, sous un angle d'env.
40 degrés.
: Enlever le coin à 90 degrés ainsi
obtenu.
001BA143 KN
91MS 210, MS 210 C, MS 230, MS 230 C, MS 250, MS 250 C

français
D
D
Introduire des coins dans la coupe
d'abattage, si cela est nécessaire pour
contrôler la direction de chute.
!Attention !
Si la tête du guide-chaîne entre en contact avec un coin, cela peut provoquer
un effet de rebond. Les coins devraient
être en bois ou en matière plastique –
mais jamais en acier – pour ne pas
endommager la chaîne.
Entailles dans l'aubier
: En cas d'arbres moyens ou de gros
gabarits, entailler les deux côtés du
tronc, à la même hauteur que la
coupe d'abattage à exécuter
ensuite.
: Ne pas entailler le tronc à une pro-
fondeur dépassant la largeur du
guide-chaîne.
Cette méthode est particulièrement
recommandée pour l'abattage du bois
tendre en été – elle empêche l'éclatement de l'aubier au moment de la chute
de l'arbre.
92
001BA150 KN
D = Coupe d'abattage
Méthode conventionnelle et méthode à
grand angle d'entaille :
: Commencer la coupe d'abattage
à 1 – 2 pouces plus haut que le
centre de l'entaille d'abattage.
: Couper alors à l'horizontale en
direction de l'entaille d'abattage.
: Laisser env. 1/10 du diamètre du
tronc non coupé. Cette partie restante agit comme une charnière.
: Ne pas entamer la charnière, sinon
il ne serait plus possible de contrôler
la direction de chute.
MS 210, MS 210 C, MS 230, MS 230 C, MS 250, MS 250 C
001BA144 KN

E
E
français
1
E = Charnière
: Elle aide à contrôler la direction de
chute de l'arbre.
: Ne pas entamer la charnière, sinon
il ne serait plus possible de contrôler
la direction de chute.
001BA145 KN
Abattage d'arbres de faible section :
coupe en éventail simple
Appliquer la griffe de la tronçonneuse
directement derrière la charnière et faire
pivoter la tronçonneuse autour de ce
point d'articulation, jusqu'à la charnière.
La griffe « roule » alors sur le tronc.
001BA147 KN
Abattage d'arbres de grande section :
!Attention !
Pour abattre un arbre d'une section
supérieure à la longueur du guidechaîne, il faut appliquer soit la méthode
à secteurs multiples, soit la méthode de
mortaisage. Ces méthodes sont extrêmement dangereuses, car elles exigent
une incision avec la tête du guidechaîne, ce qui risque de causer un effet
de rebond. Seuls les bûcherons de
métier dotés de la formation requise
devraient pratiquer ces techniques.
001BA148 KN
93MS 210, MS 210 C, MS 230, MS 230 C, MS 250, MS 250 C

français
Coupe à secteurs multiples
Dans le cas de la coupe à secteurs multiples, effectuer la première coupe en
guidant le guide-chaîne vers la charnière, en décrivant un mouvement en
éventail. Après cela, en utilisant la griffe
comme point d'appui, repositionner la
tronçonneuse pour la coupe suivante.
2
4
Éviter de repositionner la tronçonneuse
plus souvent que nécessaire. En passant à la coupe suivante, le guidechaîne doit toujours rester entièrement
dans l'entaille de coupe, pour garantir
que la coupe d'abattage soit bien droite.
Si la tronçonneuse commence à se coincer, introduire un coin pour ouvrir
l'entaille de coupe. À la dernière coupe,
veiller à ne pas attaquer la charnière.
Méthode de mortaisage
Les troncs dont le diamètre fait plus que
le double de la longueur du guidechaîne exigent l'application de la
méthode de mortaisage, avant l'exécution de la coupe d'abattage.
Couper tout d'abord une grande et large
entaille d'abattage. Exécuter un mortaisage au centre de l'entaille.
Le mortaisage se fait avec la tête du
guide-chaîne. Commencer le mortaisage en appliquant la partie inférieure
de la tête du guide-chaîne obliquement
contre le tronc. Couper jusqu'à ce que la
profondeur de l'entaille atteigne à peu
près la largeur du guide-chaîne. Ensuite,
aligner la tronçonneuse dans la direction
dans laquelle le renfoncement doit être
coupé.
Introduire le guide-chaîne dans le tronc
à pleins gaz.
Élargir le mortaisage comme indiqué sur
l'illustration.
!Attention !
Cette phase du travail présente un
risque de rebond extrême. Il faut
prendre des précautions particulières
pour rester maître de la tronçonneuse.
Pour effectuer la coupe d'abattage,
suivre les instructions données ci-avant
pour la méthode de coupe à secteurs
multiples.
Ne pas essayer de pratiquer un mortaisage si l'on ne possède pas une expérience suffisante à l'utilisation d'une tronçonneuse. Dans ce cas, il faut
demander l'aide d'un professionnel.
94
MS 210, MS 210 C, MS 230, MS 230 C, MS 250, MS 250 C

français
!Attention !
Afin de réduire les risques de blessure,
ne jamais rester directement derrière le
tronc au moment où il commence à tomber, car une partie du tronc peut éclater
et être projetée vers l'arrière, vers l'utilisateur. Il peut aussi arriver que le tronc
saute en arrière. Il faut donc toujours se
tenir de côté par rapport à l'arbre qui
tombe. Dès que l'arbre commence à
tomber, retirer le guide-chaîne, arrêter le
moteur et s'écarter sur le chemin de repli
aménagé auparavant. Faire attention
aux branches qui tombent.
!Attention !
Il faut être extrêmement prudent avec
les arbres qui ne sont que partiellement
tombés et sont restés suspendus. Si
l'arbre est resté accroché ou ne tombe
pas complètement pour une raison quelconque, il faut mettre la tronçonneuse
de côté et tirer l'arbre avec un treuil à
câble, un grappin et un tracteur. En
essayant de l'abattre à la tronçonneuse,
on risquerait de se blesser.
Ébranchage
Par ébranchage, on entend la coupe des
branches d'un arbre abattu.
!Attention !
L'ébranchage présente un très grand
risque de rebond. Il ne faut donc pas
couper avec la tête du guide-chaîne.
Une grande prudence s'impose, pour
éviter de toucher le tronc ou d'autres
branches avec la tête du guide-chaîne.
Ne pas procéder à ébranchage en se
tenant debout sur le tronc, pour ne pas
risquer de déraper, p. ex. si le tronc se
met à rouler.
Commencer l'ébranchage à laissant les
branches inférieures pour supporter le
tronc à une certaine distance du sol. Ne
pas couper par le bas les branches qui
pendent, car le guide-chaîne risquerait
d'être coincé ou la branche pourrait
tomber, ce qui causerait une perte de
contrôle. Si la tronçonneuse se coince,
arrêter le moteur et retirer la tronçonneuse en soulevant la branche.
!Attention !
Il faut être extrêmement prudent en
coupant des branches ou troncs sous
contrainte. Les branches ou les troncs
peuvent se détendre brusquement vers
l'utilisateur qui risque de perdre le
contrôle de sa tronçonneuse et de subir
des blessures graves, voire même
mortelles.
001BA033 KN
Tronçonnage
Par tronçonnage, on entend la coupe
d'un arbre en tronçons.
!Attention !
Ne pas tronçonner en se tenant debout
sur le tronc. S'assurer que le tronc ne
risque pas de rouler. En travaillant à
flanc de coteau, toujours se tenir en
amont du tronc. Faire attention aux
troncs d'arbre qui se mettent à rouler.
Ne couper qu'un seul morceau de bois à
la fois.
Le bois éclaté doit être coupé très prudemment, car des éclats de bois pointus
risquent d'être entraînés et projetés en
direction de l'utilisateur de la tronçonneuse.
95MS 210, MS 210 C, MS 230, MS 230 C, MS 250, MS 250 C

français
0
MAINTENANCE, RÉPARATION ET
RANGEMENT
1
2
2
La maintenance, le remplacement ou
la réparation de pièces du système
antipollution peuvent être exécutés
par une entreprise ou une personne
compétente pour la réparation de
moteurs d'engins mobiles non rou-
001BA151 KN
tiers. STIHL peut rejeter toute
demande de garantie pour un composant dont l'entretien ou la maintenance n'a pas été effectué correctement ou si l'on a utilisé des pièces de
rechange non autorisées.
Pour couper du bois de faible section,
utiliser un chevalet. Ne jamais permettre
à une autre personne de tenir le morceau de bois. Ne jamais maintenir le
morceau de bois avec la jambe ou le
pied.
96
1
01BA051 LÄ
Bois sous contrainte :
Risque de coincement ! Toujours effectuer la coupe de dégagement (1) du côté
de compression et ensuite la coupe de
séparation (2) du côté de tension.
Si la tronçonneuse se coince, arrêter le
moteur et la sortir du bois.
Seuls les professionnels dotés d'une
formation spéciale sont autorisés à travailler dans les zones où les troncs,
branches et racines sont entremêlés.
Le travail dans les zones ravagées par
la tempête (chablis) est extrêmement
dangereux.
Tirer les troncs sur une aire dégagée,
avant de les couper. Sortir d'abord les
troncs déjà dégagés et nettoyés.
MS 210, MS 210 C, MS 230, MS 230 C, MS 250, MS 250 C
!Attention !
Pour la maintenance et les réparations,
utiliser exclusivement des pièces de
001BA152 KN
rechange d'origine STIHL. L'utilisation
de pièces non d'origine STIHL peut causer des blessures graves, voire même
mortelles.
Suivre strictement les instructions pour
la maintenance et la réparation qui figurent dans le tableau de maintenance,
vers la fin de la présente Notice
d'emploi.
!Attention !
Toujours arrêter le moteur et s'assurer
que la chaîne est arrêtée avant d'entreprendre une opération de maintenance
ou une réparation quelconque, ou le nettoyage de la machine.
!Attention !
Ne pas essayer d'effectuer une opération de maintenance ou une réparation
non décrite dans la Notice d'emploi.

français
Faire exécuter de telles opérations
exclusivement par le revendeur STIHL.
Si l'on utilise par exemple des outils inadéquats pour le démontage du rotor ou
un outil inadéquat pour le blocage du
rotor, afin de démonter l'embrayage, la
structure du rotor peut être endommagée et, par conséquent, le rotor risque
d'éclater.
Porter des gants pour manipuler les
chaînes de tronçonneuses ou pour procéder à leur maintenance.
!Attention !
Utiliser la bougie spécifiée et s'assurer
que la bougie et le câble d'allumage sont
toujours propres et en bon état. Toujours
fermement presser le contact du câble
d'allumage sur la bougie munie d'un raccord de dimensions correctes. (Nota : Si
le raccord est constitué d'un écrou SAE
amovible, cet écrou doit être fermement
serré.) Une connexion mal serrée entre
le raccord de la bougie et le contact de
câble d'allumage peut engendrer un arc
électrique risquant d'enflammer les
vapeurs de carburant et de causer un
incendie.
!Attention !
Ne jamais contrôler le système d'allumage avec le contact de câble d'allumage débranché de la bougie ou avec la
bougie dévissée, car un jaillissement
d'étincelles risque de provoquer un
incendie.
!Attention !
Ne pas travailler avec la tronçonneuse si
le silencieux manque, est endommagé
ou a été modifié. Un silencieux mal
entretenu accroît le risque d'incendie et
de troubles auditifs.
Si le silencieux est muni d'une grille
pare-étincelles, afin de réduire le risque
d'incendie, ne jamais utiliser la tronçonneuse si la grille pare-étincelles manque
ou est endommagée. À noter que l'utilisation par temps très chaud ou sec présente de plus grands risques d'incendie
de forêt.
Veiller à ce que la chaîne, le guidechaîne et le pignon soient propres et
remplacer les pignons et chaînes usés.
La chaîne doit être toujours bien affûtée.
Une chaîne émoussée est aisément
reconnaissable au fait qu'il devient plus
difficile de scier le bois normalement
facile à couper et que des traces de brûlure apparaissent sur le bois. Veiller à ce
que la chaîne soit toujours correctement
tendue.
Resserrer tous les écrous, boulons et
vis, sauf les vis de réglage du carburateur, après chaque utilisation.
!Attention !
Afin que le frein de chaîne de la tronçonneuse STIHL puisse fonctionner correctement et réduire ainsi le risque de blessure en cas de rebond ou dans d'autres
situations, il doit faire l'objet d'une maintenance correcte. Comme le frein d'une
automobile, à chaque intervention, le
frein de chaîne d'une tronçonneuse est
soumis à l'usure. Le degré d'usure diffère suivant l'usage du frein de chaîne,
les conditions d'utilisation de la tronçonneuse et d'autres facteurs. Une usure
excessive réduit l'efficacité du frein de
chaîne et peut même le rendre totalement inefficace.
Pour garantir un fonctionnement impeccable et fiable du frein de chaîne, il faut
que le collier de frein et le tambour de
frein ne soient jamais encrassés par
des saletés, de la graisse ou d'autres
matières étrangères qui pourraient
réduire le coefficient de friction du collier
de frein sur le tambour.
Il faut donc confier périodiquement toute
tronçonneuse STIHL au personnel doté
de la formation requise pour l'inspection
et la remise en état du système du frein
de chaîne, p. ex. au service STIHL, en
se basant sur le planning suivant :
usage intensif – tous les trois mois,
usage modéré – deux fois par an,
usage occasionnel – une fois par an.
Confier aussi immédiatement la tronçonneuse au personnel de maintenance
si le système du frein de chaîne ne peut
pas être soigneusement nettoyé ou si
l'on constate un changement des caractéristiques de fonctionnement du frein.
Pour toute opération de maintenance
sur le système antipollution, consulter le
tableau de maintenance et les indications concernant la garantie limitée, vers
la fin de la présente Notice d'emploi.
Conserver la tronçonneuse au sec et
hors de portée des enfants. Avant de la
ranger pour une période dépassant
quelques jours, il faut toujours vider le
réservoir de carburant (voir le chapitre
« Rangement de la machine », dans la
Notice d'emploi).
97MS 210, MS 210 C, MS 230, MS 230 C, MS 250, MS 250 C

français
Montage du guide-chaîne
et de la chaîne
(Tendeur de chaîne latéral)
1
a
t = a : 2
Sur cette tronçonneuse, on peut utiliser
des chaînes avec différents pas –
suivant le pignon monté (voir «Caractéristiques techniques») :
Le
1 = pas de la chaîne doit coïncider avec
le pas du pignon et du guide-chaîne
(dans le cas d’un guide-chaîne
Rollomatic) et
2 = l’épaisseur des maillons d’entraîne-
ment doit correspondre avec la
3 = largeur de la rainure du guide-
chaîne.
Sur le pignon et sur le guide-chaîne,
le pas en pouces est frappé sous
forme d’expression fractionnaire
(p. ex. 3/8 ou .325) ; sur le guidechaîne, la largeur de la rainure est
indiquée en plus en millimètres
(p. ex. 1,6).
L’appariement de composants avec
des pas ou épaisseurs de maillons
d’entraînement incompatibles a
pour effet que ces pièces subissent
des dommages irréparables déjà au
bout d’une courte période de service.
2
3
001BA105 KN
: Dévisser les écrous et enlever le
couvercle de pignon ;
4
5
tourner la
4 = vis vers la gauche, jusqu’à ce que le
5 = coulisseau de tension bute contre la
découpure du carter, à gauche ;
143BA034 KN
débloquer le frein de chaîne :
repousser le
6 = protège-main en direction de la
poignée tubulaire.
001BA107 KN
Mettre des gants de sécurité –
risque de blessure sur les dents de
coupe acérées !
: Poser la chaîne –
en commençant par le nez du
guide-chaîne.
6
001BA108 KN
143BA003 KN
98
MS 210, MS 210 C, MS 230, MS 230 C, MS 250, MS 250 C

Montage du guide-chaîne
et de la chaîne
(Tendeur de chaîne frontal)
français
9
Poser le guide-chaîne par-dessus
les
7= vis – les tranchants des dents de la
chaîne doivent être orientés vers la
droite – et passer le
8= trou de calage par-dessus le tou-
rillon du coulisseau de tension –
poser simultanément la chaîne sur
le
9= pignon ;
tourner
10= la vis vers la droite jusqu’à ce que la
chaîne ne pende plus que légèrement sur la partie inférieure du
guide-chaîne – et que les talons des
maillons d’entraînement soient bien
introduits dans la rainure du guidechaîne ;
: remettre le couvercle de pignon –
et serrer seulement légèrement les
écrous à la main ;
: pour continuer comme voir «Ten-
sion de la chaîne».
7
7
10
8
1
a
t = a : 2
001BA109 KN
Sur cette tronçonneuse, on peut utiliser
des chaînes avec différents pas –
suivant le pignon monté (voir chapitre
« Caractéristiques techniques ») :
Le
1 = pas de la chaîne doit coïncider avec
le pas du pignon et du guide-chaîne
(dans le cas d’un guide-chaîne
Rollomatic) et
2 = l’épaisseur des maillons d’entraîne-
ment doit correspondre avec la
3 = largeur de la rainure du guide-
chaîne.
Sur le pignon et sur le guide-chaîne,
le pas en pouces est frappé sous
forme d’expression fractionnaire
(p. ex. 3/8 ou .325) ; sur le guidechaîne, la largeur de la rainure est
indiquée en plus en millimètres
(p. ex. 1,6).
L’appariement de composants avec
des pas ou épaisseurs de maillons
d’entraînement incompatibles a
pour effet que ces pièces subissent
des dommages irréparables déjà au
bout d’une courte période de service.
2
3
001BA105 KN
: Dévisser les écrous et enlever le
couvercle de pignon.
5
faire tourner la
4 = vis vers la gauche jusqu’à ce que
5 = l’écrou de tension vienne en butée
du côté gauche de la découpure du
carter.
143BA034 KN
4
001BA0110 KN
99MS 210, MS 210 C, MS 230, MS 230 C, MS 250, MS 250 C
 Loading...